Railway Pillow - Hobbii
14
Railway Pillow No. 1001-203-6571 Materials: Baby Snuggle color 24 Deluxe mounting pillow 40x50 1 wooden button 60 mm Crochet hook sizes 4 and 5 Yarn usage 450 g (5 skeins) Buy the yarn and supplies here: http://shop.hobbii.com/railway-pillow Measurements: Approx. 33x43 cm - it will stretch 7-10 cm Gauge Approx. 15 sts. x 8 rows = 10 x 10 cm Abbreviations: Ch: Chain St(s): Stitch(es) Sc: Single crochet Hdc: Half double crochet Dc: Double crochet FPdc: Front post double crochet BPdc: Back post double crochet Railway - Hobbii Design, Tine Sommer Hansen - Copyright © 2020 Page 1
Transcript of Railway Pillow - Hobbii

Railway Pillow No. 1001-203-6571
Materials: Baby Snuggle color 24 Deluxe mounting pillow 40x50 1 wooden button 60 mm Crochet hook sizes 4 and 5 Yarn usage 450 g (5 skeins) Buy the yarn and supplies here: http://shop.hobbii.com/railway-pillow
Measurements: Approx. 33x43 cm - it will stretch 7-10 cm Gauge Approx. 15 sts. x 8 rows = 10 x 10 cm Abbreviations: Ch: Chain St(s): Stitch(es) Sc: Single crochet Hdc: Half double crochet Dc: Double crochet FPdc: Front post double crochet BPdc: Back post double crochet
Railway - Hobbii Design, Tine Sommer Hansen - Copyright © 2020 Page 1

Pattern
Note: From row 2 and onward, ch 2 to turn the work. The ch 2 counts as 1 hdc and the first st of each row. The last st of each row is worked into the top chain of the turning chain.
Use hook size 5 for the front and back pieces. Use hook size 4 for assembling of the pillow. If you don’t want the button closing on the backside, you can make 2 ”front pieces”, place them wrong side against wrong side and crochet them together as described in Assembling later on.
Front piece
Row 1. Chain 51. Work 1 dc in the 4th ch from the hook. Work dc in every stitch to the end of the row. (49)
Row 2. Ch 2 and turn. Work 1 FPdc around the next 2 sts. “Work 1 BPdc around the next 3 sts, 1 FPdc around the following 2 sts”. Repeat “to” to the end of the row. Work 1 hdc in the last st.
Row 3. Ch 2 and turn. Work 1 BPdc around the next 2 sts. “Work 1 FPdc around the next 3 sts, 1 BPdc around the following 2 sts”. Repeat “to” to the end of the row. Work 1 hdc in the last st.
Repeat rows 2 and 3 until you have a total of 34 rows. Cut the yarn and weave in ends.
Right side
Wrong side
Railway - Hobbii Design, Tine Sommer Hansen - Copyright © 2020 Page 2

Pattern tutorial The tutorial depicts fewer stitches, but the procedure is the same.
Row 1
1. Chain 51.
2. Work 1 dc in the 4th ch from the hook.
3. Like this.
4. Work dc in every stitch to the end of the row. (49)
Railway - Hobbii Design, Tine Sommer Hansen - Copyright © 2020 Page 3

Row 2
5. Ch 2 and turn.
6. Work 1 FPdc around the next st. A FPdc is a raised double crochet which is worked from the front around the dc post of the previous row. The needle shows the post that you will be working your FPdc around.
7. Like this. You have now made 1 FPdc.
8. Work 1 FPdc around the next st.
9. Work 1 BPdc around the next st. A BPdc is a raised double crochet which is worked from the back around the post of the dc of the previous row.
10. Like this. You have now made 1 BPdc.
Railway - Hobbii Design, Tine Sommer Hansen - Copyright © 2020 Page 4

11. Work 1 BPdc around the next 2 sts to have 3 BPdc in total.
12. Work 2 FPdc around the next 2 sts.
13. “Work 1 BPdc around the next 3 sts, 1 FPdc around the following 2 sts”.
14. Repeat “to” to the end of the row.
15. Work 1 hdc in the last st.
16. Like this.
Railway - Hobbii Design, Tine Sommer Hansen - Copyright © 2020 Page 5
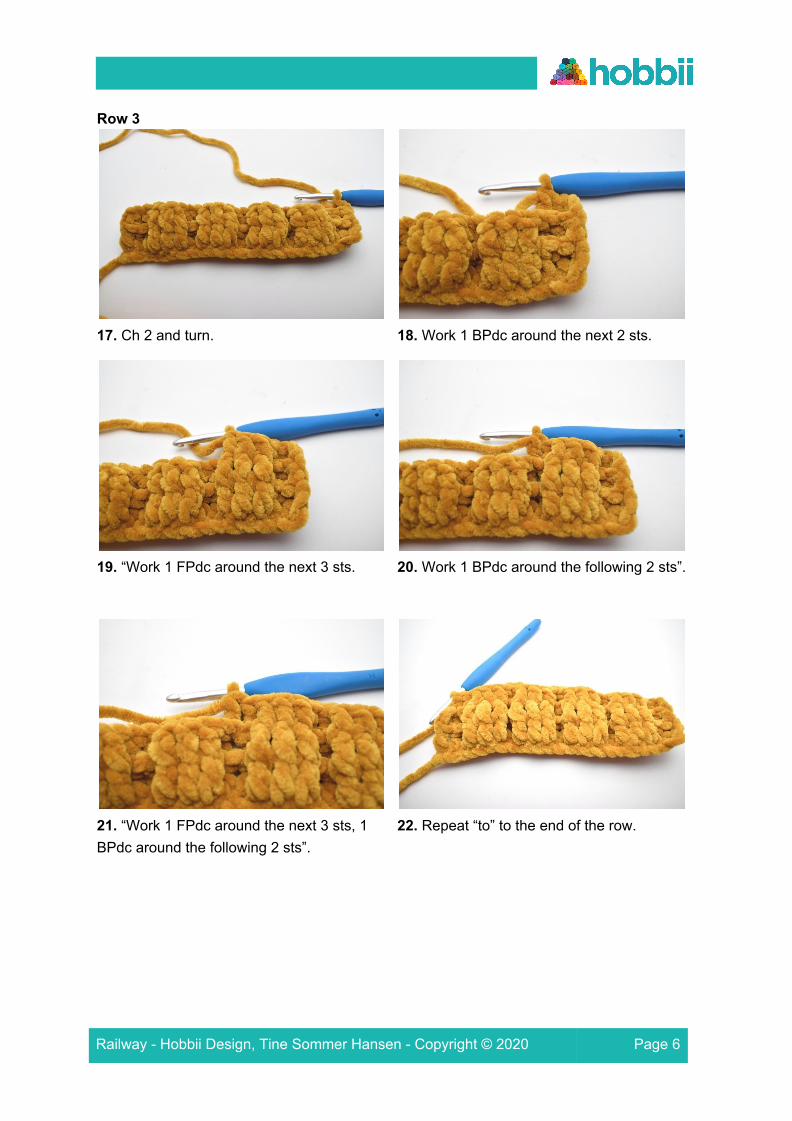
Row 3
17. Ch 2 and turn.
18. Work 1 BPdc around the next 2 sts.
19. “Work 1 FPdc around the next 3 sts.
20. Work 1 BPdc around the following 2 sts”.
21. “Work 1 FPdc around the next 3 sts, 1 BPdc around the following 2 sts”.
22. Repeat “to” to the end of the row.
Railway - Hobbii Design, Tine Sommer Hansen - Copyright © 2020 Page 6

Back piece A
Row 1. Chain 51. Work 1 dc in the 4th ch from the hook. Work dc in every stitch to the end of the row. (49)
Row 2. Ch 2 and turn. Work 1 FPdc around the next 2 sts. “Work 1 BPdc around the next 3 sts, 1 FPdc around the following 2 sts”. Repeat “to” to the end of the row. Work 1 hdc in the last st.
Row 3. Ch 2 and turn. Work 1 BPdc around the next 2 sts. “Work 1 FPdc around the next 3 sts, 1 BPdc around the following 2 sts”. Repeat “to” to the end of the row. Work 1 hdc in the last st.
Repeat rows 2 and 3 until you have a total of 21 rows. Cut the yarn and weave in ends.
23. Work 1 hdc in the last st.
24. Like this.
Row 4 and onward
25. Repeat rows 2 and 3 alternating as explained in the pattern instructions.
Railway - Hobbii Design, Tine Sommer Hansen - Copyright © 2020 Page 7
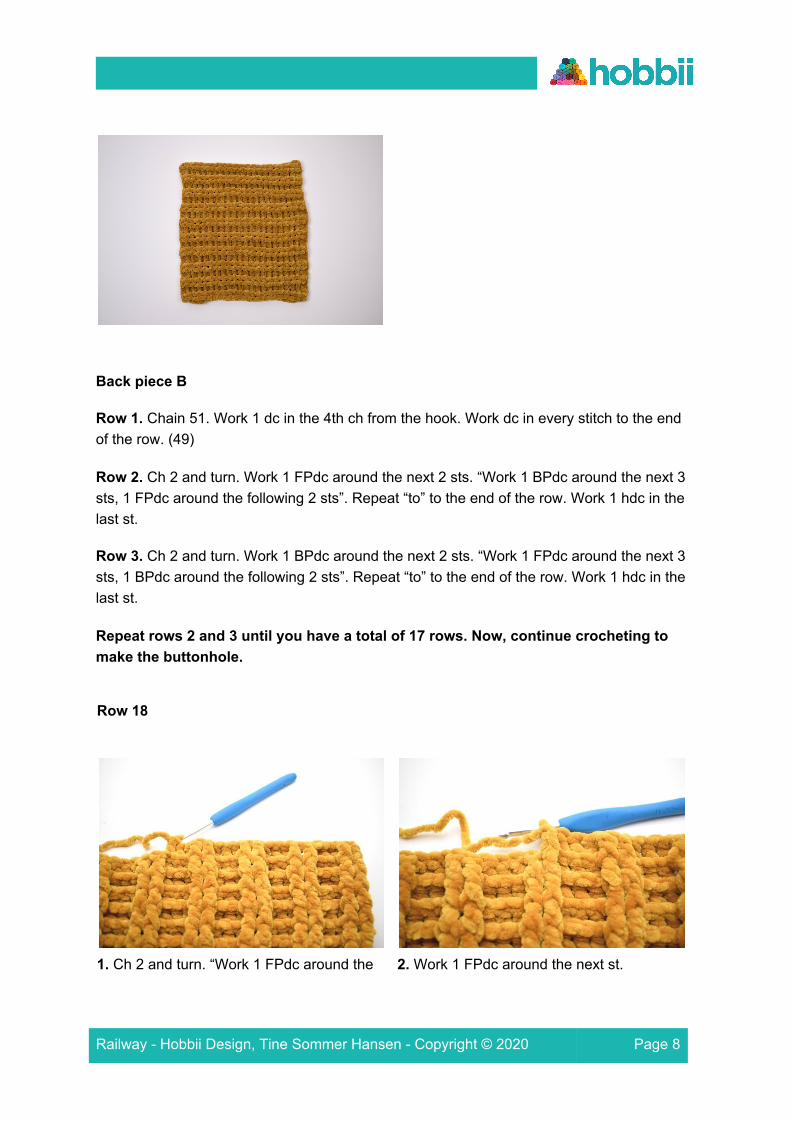
Back piece B
Row 1. Chain 51. Work 1 dc in the 4th ch from the hook. Work dc in every stitch to the end of the row. (49)
Row 2. Ch 2 and turn. Work 1 FPdc around the next 2 sts. “Work 1 BPdc around the next 3 sts, 1 FPdc around the following 2 sts”. Repeat “to” to the end of the row. Work 1 hdc in the last st.
Row 3. Ch 2 and turn. Work 1 BPdc around the next 2 sts. “Work 1 FPdc around the next 3 sts, 1 BPdc around the following 2 sts”. Repeat “to” to the end of the row. Work 1 hdc in the last st.
Repeat rows 2 and 3 until you have a total of 17 rows. Now, continue crocheting to make the buttonhole.
Row 18
1. Ch 2 and turn. “Work 1 FPdc around the
2. Work 1 FPdc around the next st.
Railway - Hobbii Design, Tine Sommer Hansen - Copyright © 2020 Page 8

next 2 sts. Work 1 BPdc around the next 3 sts”. Repeat from “to“ 4 times in total.
3. Ch 5.
4. Skip 5 sts. Work 1 FPdc around the next st.
6. Like this.
7. “Work 1 BPdc around the next 3 sts, 1 FPdc around the following 2 sts”. Repeat from “to“ 4 times in total. Work 1 hdc in the last st.
Row 19
8. Ch 2 and turn. “Work 1 BPdc around the
9. Work 1 BPdc around the next st.
Railway - Hobbii Design, Tine Sommer Hansen - Copyright © 2020 Page 9

Row 20. Ch 2 and turn. Work 1 FPdc around the next 2 sts. “Work 1 BPdc around the next 3 sts, 1 FPdc around the following 2 sts”. Repeat “to” to the end of the row. Work 1 hdc in the last st.
next 2 sts. Work 1 FPdc around the next 3 sts”. Repeat from “to“ 4 times in total.
10. Work 1 dc in the next 5 ch.
11. Work 1 BPdc around the next st.
12. “Work 1 FPdc around the next 3 sts, 1 BPdc around the following 2 sts”. Repeat from “to“ 4 times in total. Work 1 hdc in the last st.
Railway - Hobbii Design, Tine Sommer Hansen - Copyright © 2020 Page 10

Row 21. Ch 2 and turn. Work 1 BPdc around the next 2 sts. “Work 1 FPdc around the next 3 sts, 1 BPdc around the following 2 sts”. Repeat “to” to the end of the row. Work 1 hdc in the last st.
Cut the yarn and weave in ends.
Railway - Hobbii Design, Tine Sommer Hansen - Copyright © 2020 Page 11

Assembling
1. Place the front piece with the wrong side facing upwards.
2. Place back piece A with the right side facing upwards, as shown in the picture.
3. Place back piece B with the right side facing upwards and overlapping back piece A, as shown in the picture.
4. You may want to use stitch markers to hold the pieces together.
5. Flip everything over to have the front piece facing upwards.
6. Attach the yarn and sc the pieces together using hook size 4.
Railway - Hobbii Design, Tine Sommer Hansen - Copyright © 2020 Page 12

7. Work 2 sc in the corners.
8. Work sc all the way around and end with 1 sl st.
9. Cut the yarn and weave in ends.
10. Flip the pillow over.
11. Sew the button onto back side A matching the buttonhole on back piece B.
12. Like this.
Railway - Hobbii Design, Tine Sommer Hansen - Copyright © 2020 Page 13

Enjoy!
13. Insert the mounting pillow and your pillow is now ready to use.
Railway - Hobbii Design, Tine Sommer Hansen - Copyright © 2020 Page 14