Veritas CommandCentral™ Enterprise Reporter Installation Guide · · 2011-06-17Chapter 2...
84
Veritas CommandCentral™ Enterprise Reporter Installation Guide for Microsoft Windows and Solaris 5.1
Transcript of Veritas CommandCentral™ Enterprise Reporter Installation Guide · · 2011-06-17Chapter 2...

Veritas CommandCentral™Enterprise ReporterInstallation Guide
for Microsoft Windows and Solaris
5.1

CommandCentral Enterprise Reporter InstallationGuide
The software described in this book is furnished under a license agreement andmay be usedonly in accordance with the terms of the agreement.
Documentation version 5.1.0
Legal NoticeCopyright © 2009 Symantec Corporation. All rights reserved.
Symantec, the Symantec logo, Veritas, CommandCentral, NetBackup, SANPoint, SANPointControl, and Storage Foundation are trademarks or registered trademarks of SymantecCorporation or its affiliates in theU.S. and other countries. Other namesmaybe trademarksof their respective owners.
This Symantec product may contain third party software for which Symantec is requiredto provide attribution to the third party (“Third Party Programs”). Some of the Third PartyPrograms are available under open source or free software licenses. The LicenseAgreementaccompanying the Software does not alter any rights or obligations you may have underthose open source or free software licenses. Please see the Third Party Legal Noticedocumentation accompanying this Symantec product for more information on the ThirdParty Programs.
■ AIX is a registered trademark of IBM Corporation.
■ HP-UX is a registered trademark of Hewlett-Packard Development Company, L.P.
■ Linux is a registered trademark of Linus Torvalds.
■ Solaris is a trademark of Sun Microsystems, Inc.
The product described in this document is distributed under licenses restricting its use,copying, distribution, and decompilation/reverse engineering. No part of this documentmay be reproduced in any form by any means without prior written authorization ofSymantec Corporation and its licensors, if any.
THEDOCUMENTATIONISPROVIDED"ASIS"ANDALLEXPRESSORIMPLIEDCONDITIONS,REPRESENTATIONS AND WARRANTIES, INCLUDING ANY IMPLIED WARRANTY OFMERCHANTABILITY, FITNESS FOR A PARTICULAR PURPOSE OR NON-INFRINGEMENT,ARE DISCLAIMED, EXCEPT TO THE EXTENT THAT SUCH DISCLAIMERS ARE HELD TOBELEGALLYINVALID.SYMANTECCORPORATIONSHALLNOTBELIABLEFORINCIDENTALOR CONSEQUENTIAL DAMAGES IN CONNECTION WITH THE FURNISHING,PERFORMANCE, OR USE OF THIS DOCUMENTATION. THE INFORMATION CONTAINEDIN THIS DOCUMENTATION IS SUBJECT TO CHANGE WITHOUT NOTICE.
The Licensed Software andDocumentation are deemed to be commercial computer softwareas defined in FAR12.212 and subject to restricted rights as defined in FARSection 52.227-19"Commercial Computer Software - Restricted Rights" and DFARS 227.7202, "Rights in

Commercial Computer Software or Commercial Computer Software Documentation", asapplicable, and any successor regulations.
Symantec Corporation350 Ellis StreetMountain View, CA 94043
http://www.symantec.com

Technical SupportSymantec Technical Support maintains support centers globally. TechnicalSupport’s primary role is to respond to specific queries about product featuresand functionality. TheTechnical Support group also creates content for our onlineKnowledge Base. The Technical Support group works collaboratively with theother functional areas within Symantec to answer your questions in a timelyfashion. For example, theTechnical Support groupworkswithProductEngineeringand Symantec Security Response to provide alerting services and virus definitionupdates.
Symantec’s maintenance offerings include the following:
■ A range of support options that give you the flexibility to select the rightamount of service for any size organization
■ Telephone and Web-based support that provides rapid response andup-to-the-minute information
■ Upgrade assurance that delivers automatic software upgrade protection
■ Global support that is available 24 hours a day, 7 days a week
■ Advanced features, including Account Management Services
For information about Symantec’sMaintenance Programs, you can visit ourWebsite at the following URL:
www.symantec.com/techsupp/
Contacting Technical SupportCustomerswith a currentmaintenance agreementmay access Technical Supportinformation at the following URL:
www.symantec.com/techsupp/
Before contacting Technical Support, make sure you have satisfied the systemrequirements that are listed in your product documentation. Also, you should beat the computer onwhich theproblemoccurred, in case it is necessary to replicatethe problem.
When you contact Technical Support, please have the following informationavailable:
■ Product release level
■ Hardware information
■ Available memory, disk space, and NIC information
■ Operating system
■ Version and patch level
■ Network topology
■ Router, gateway, and IP address information
■ Problem description:
■ Error messages and log files
■ Troubleshooting that was performed before contacting Symantec
■ Recent software configuration changes and network changes
Licensing and registrationIf yourSymantecproduct requires registrationor a licensekey, access our technicalsupport Web page at the following URL:
www.symantec.com/techsupp/
Customer serviceCustomer service information is available at the following URL:
www.symantec.com/techsupp/
Customer Service is available to assist with the following types of issues:
■ Questions regarding product licensing or serialization
■ Product registration updates, such as address or name changes
■ General product information (features, language availability, local dealers)
■ Latest information about product updates and upgrades
■ Information about upgrade assurance and maintenance contracts
■ Information about the Symantec Buying Programs
■ Advice about Symantec's technical support options
■ Nontechnical presales questions
■ Issues that are related to CD-ROMs or manuals

Maintenance agreement resourcesIf you want to contact Symantec regarding an existing maintenance agreement,please contact the maintenance agreement administration team for your regionas follows:
[email protected] and Japan
[email protected], Middle-East, and Africa
[email protected] America and Latin America
Additional enterprise servicesSymantec offers a comprehensive set of services that allow you tomaximize yourinvestment in Symantec products and to develop your knowledge, expertise, andglobal insight, which enable you to manage your business risks proactively.
Enterprise services that are available include the following:
These solutions provide early warning of cyber attacks, comprehensive threatanalysis, and countermeasures to prevent attacks before they occur.
SymantecEarlyWarningSolutions
These services remove the burdenofmanaging andmonitoring security devicesand events, ensuring rapid response to real threats.
Managed Security Services
Symantec Consulting Services provide on-site technical expertise fromSymantec and its trustedpartners. SymantecConsultingServices offer a varietyof prepackaged and customizable options that include assessment, design,implementation,monitoring, andmanagement capabilities. Each is focused onestablishing andmaintaining the integrity and availability of your IT resources.
Consulting Services
Educational Services provide a full array of technical training, securityeducation, security certification, and awareness communication programs.
Educational Services
To access more information about Enterprise services, please visit our Web siteat the following URL:
www.symantec.com
Select your country or language from the site index.

Technical Support . . . . . . . . . . . . . . . . . . . . . . . . . . . . . . . . . . . . . . . . . . . . . . . . . . . . . . . . . . . . . . . . . . . . . . . . . . . . . . . . . . . . . . . . . . . . . . . 4
Chapter 1 Introducing CommandCentral Enterprise Reporter5.1 . . . . . . . . . . . . . . . . . . . . . . . . . . . . . . . . . . . . . . . . . . . . . . . . . . . . . . . . . . . . . . . . . . . . . . . . . . . . . . . . . . . . 11
About Veritas CommandCentral Enterprise Reporter ... . . . . . . . . . . . . . . . . . . . . . . . 11About CommandCentral Enterprise Reporter components ... . . . . . . . . . . . . . . . . 13About CommandCentral Enterprise Reporter documentation .... . . . . . . . . . . . 14
Chapter 2 Planning your deployment of CommandCentralEnterprise Reporter 5.1 . . . . . . . . . . . . . . . . . . . . . . . . . . . . . . . . . . . . . . . . . . . . . . . 17
Host requirements for Enterprise Reporter ... . . . . . . . . . . . . . . . . . . . . . . . . . . . . . . . . . . . . 17Operating system requirements ... . . . . . . . . . . . . . . . . . . . . . . . . . . . . . . . . . . . . . . . . . . . . . . . . . . . 18Network and firewall requirements ... . . . . . . . . . . . . . . . . . . . . . . . . . . . . . . . . . . . . . . . . . . . . . . 19Oracle database version requirements ... . . . . . . . . . . . . . . . . . . . . . . . . . . . . . . . . . . . . . . . . . . 20Oracle database client requirements ... . . . . . . . . . . . . . . . . . . . . . . . . . . . . . . . . . . . . . . . . . . . . . 21Deploying the Symantec Product Authentication Service on the
Enterprise Reporter Management Server ... . . . . . . . . . . . . . . . . . . . . . . . . . . . . . . . . . 21About the install only and install and configure options .... . . . . . . . . . . . . . . . . . . 23Planning for downtime of other Symantec products ... . . . . . . . . . . . . . . . . . . . . . . . . 23About the Java Runtime Environment version that installs with
Enterprise Reporter on Windows .... . . . . . . . . . . . . . . . . . . . . . . . . . . . . . . . . . . . . . . . . . . 24
Chapter 3 Setting up the Oracle database instance . . . . . . . . . . . . . . . . . . . . . . . 25
Requirements for the Oracle database instance .... . . . . . . . . . . . . . . . . . . . . . . . . . . . . . . 25Setting up the Oracle database instance on Solaris ... . . . . . . . . . . . . . . . . . . . . . . . . . . 26
Preparing to install the Oracle database software on Solaris ... . . . . . . . . 27Setting up the Oracle database instance on Windows .... . . . . . . . . . . . . . . . . . . . . . . 28Creating tablespaces and schema for the Oracle database
instance .... . . . . . . . . . . . . . . . . . . . . . . . . . . . . . . . . . . . . . . . . . . . . . . . . . . . . . . . . . . . . . . . . . . . . . . . . . . . 29Verifying that the Oracle TNS listener is running .... . . . . . . . . . . . . . . . . . . . . . . . . . . . 32Example of the tnsnames.ora file ... . . . . . . . . . . . . . . . . . . . . . . . . . . . . . . . . . . . . . . . . . . . . . . . . . 33Example of the listener.ora file ... . . . . . . . . . . . . . . . . . . . . . . . . . . . . . . . . . . . . . . . . . . . . . . . . . . . . 33Ensuring that your Oracle database is properly configured .... . . . . . . . . . . . . . . 34
Contents

Chapter 4 Installing and configuring CommandCentralEnterprise Reporter 5.1 . . . . . . . . . . . . . . . . . . . . . . . . . . . . . . . . . . . . . . . . . . . . . . . 37
Installation and configuration prerequisites for EnterpriseReporter ... . . . . . . . . . . . . . . . . . . . . . . . . . . . . . . . . . . . . . . . . . . . . . . . . . . . . . . . . . . . . . . . . . . . . . . . . . . . . 37
Installing Enterprise Reporter on a Solaris host ... . . . . . . . . . . . . . . . . . . . . . . . . . . . . . . 38Installing Enterprise Reporter on a Windows host ... . . . . . . . . . . . . . . . . . . . . . . . . . . . 42Configuring Enterprise Reporter on a Solaris host ... . . . . . . . . . . . . . . . . . . . . . . . . . . . 46Configuring Enterprise Reporter on a Windows host ... . . . . . . . . . . . . . . . . . . . . . . . 48Performing post-installation setup .... . . . . . . . . . . . . . . . . . . . . . . . . . . . . . . . . . . . . . . . . . . . . . . 51
Logging in to CommandCentral Enterprise Reporter ... . . . . . . . . . . . . . . . . . . 51
Chapter 5 Upgrading to CommandCentral Enterprise Reporter5.1 . . . . . . . . . . . . . . . . . . . . . . . . . . . . . . . . . . . . . . . . . . . . . . . . . . . . . . . . . . . . . . . . . . . . . . . . . . . . . . . . . . . . 53
Upgrade prerequisites for Enterprise Reporter ... . . . . . . . . . . . . . . . . . . . . . . . . . . . . . . . 53Upgrading Oracle database schema .... . . . . . . . . . . . . . . . . . . . . . . . . . . . . . . . . . . . . . . . . . . . . . 54Upgrading Enterprise Reporter to 5.1 on a Solaris host ... . . . . . . . . . . . . . . . . . . . . 56Performing post-upgrade setup .... . . . . . . . . . . . . . . . . . . . . . . . . . . . . . . . . . . . . . . . . . . . . . . . . . . 58
Chapter 6 Reconfiguring CommandCentral EnterpriseReporter 5.1 . . . . . . . . . . . . . . . . . . . . . . . . . . . . . . . . . . . . . . . . . . . . . . . . . . . . . . . . . . . . . . . . . . . 59
Reconfiguring Enterprise Reporter 5.1 ... . . . . . . . . . . . . . . . . . . . . . . . . . . . . . . . . . . . . . . . . . . 59Reconfiguring Enterprise Reporter after a domain name change .... . . . . . . . 64
Chapter 7 Uninstalling CommandCentral Enterprise Reporter5.1 . . . . . . . . . . . . . . . . . . . . . . . . . . . . . . . . . . . . . . . . . . . . . . . . . . . . . . . . . . . . . . . . . . . . . . . . . . . . . . . . . . . . 71
Uninstalling Enterprise Reporter 5.1 from a Solaris host ... . . . . . . . . . . . . . . . . . . 71Uninstalling Enterprise Reporter 5.1 from a Windows host ... . . . . . . . . . . . . . . . 72Removing all packages and shared components from Windows
hosts ... . . . . . . . . . . . . . . . . . . . . . . . . . . . . . . . . . . . . . . . . . . . . . . . . . . . . . . . . . . . . . . . . . . . . . . . . . . . . . . . . 73Removing Enterprise Reporter tablespaces and schema from the
Oracle database ... . . . . . . . . . . . . . . . . . . . . . . . . . . . . . . . . . . . . . . . . . . . . . . . . . . . . . . . . . . . . . . . . . . 73
Appendix A Supplemental information . . . . . . . . . . . . . . . . . . . . . . . . . . . . . . . . . . . . . . . . . . . . . . . . 77
Troubleshooting your Enterprise Reporter installation .... . . . . . . . . . . . . . . . . . . . 77Enterprise Reporter installation log files ... . . . . . . . . . . . . . . . . . . . . . . . . . . . . . . . . . . . . . . . 78Mounting the CommandCentral Enterprise Reporter 5.1 product disc
on Solaris ... . . . . . . . . . . . . . . . . . . . . . . . . . . . . . . . . . . . . . . . . . . . . . . . . . . . . . . . . . . . . . . . . . . . . . . . . . . 80Unmounting the product disc from a Solaris host ... . . . . . . . . . . . . . . . . . . . . . . . . . . . . 81Enterprise Reporter component packages ... . . . . . . . . . . . . . . . . . . . . . . . . . . . . . . . . . . . . . . 82
Contents8

Index . . . . . . . . . . . . . . . . . . . . . . . . . . . . . . . . . . . . . . . . . . . . . . . . . . . . . . . . . . . . . . . . . . . . . . . . . . . . . . . . . . . . . . . . . . . . . . . . . . . . . . . . . . . . . . . . . . . . 83
9Contents

Contents10

IntroducingCommandCentralEnterprise Reporter 5.1
This chapter includes the following topics:
■ About Veritas CommandCentral Enterprise Reporter
■ About CommandCentral Enterprise Reporter components
■ About CommandCentral Enterprise Reporter documentation
About Veritas CommandCentral Enterprise ReporterVeritasCommandCentral EnterpriseReporter bySymantec (EnterpriseReporter)improves storage service management by aligning IT to business objectives.Enterprise Reporter offers business information executives and storageadministrators the following:
■ Global views of storage assets mapped to your organization
■ Business insights into inventory utilization
■ On-demand customized reporting
■ Personalized dashboards for multiple users
Enterprise Reporter includes a central reporting interface for your storageinfrastructure that unifies information frommultiple data centers and organizesit along the lines of your business. If you are a business information executive,you canuseEnterpriseReporter to viewyour storage environment at the enterpriselevel. You can then drill down into your organization's hierarchy, which could beorganized by location, departments, or any other logical business unit. This
1Chapter

summarized informationenables you toassess trends inyour storage environment,which you can then analyze to assign responsibility.
If you are a storage administrator, you can use Enterprise Reporter to identifycapacity trends, review storage inventory, and determine your storage costs perbusiness unit.With this information, you canpromote storage accountability anddecrease costs.
Figure 1-1 Report types and scopes
Use Enterprise Reporter to answer questions like the following:
■ Which applications are growing out of control?
■ What will my tier 1 storage growth look like next year?
■ How is capacity trending in North America versus Europe?
■ How is storage allocated in the finance department?
■ Which department uses the highest percentage of tier 1 storage in theTorontodata center?
Storage administrators and business users operate Enterprise Reporter withCommandCentral Storage. While CommandCentral Storage provides storagereporting for a single data center and is used at an operational level, EnterpriseReporter lets you aggregate storage information from multiple data centers andview storage assets by a variety of business dimensions. For example, if you area business information executive, you could use Enterprise Reporter to identifythe trend of unclaimed tier 1 storage in your New York and Zurich data centers.You could then ask the storage administrators at each site to useCommandCentralStorage to drill down to the details of which arrays or LUNs are unclaimed.
Introducing CommandCentral Enterprise Reporter 5.1About Veritas CommandCentral Enterprise Reporter
12

About CommandCentral Enterprise Reportercomponents
Enterprise Reporter consists of the following components:
■ Data sources: One or more CommandCentral Storage Management Servers.
■ Kettle: A software tool that aggregates storage network information from oneor more data centers by extracting, transforming, and loading the data fromCommandCentral Storage databases into the Enterprise Reporter Oracledatabase. Enterprise Reporter uses Kettle in the data rollup process.
■ Oracle database: A repository for storage data that derives fromCommandCentral Storage. The Oracle database can be on the EnterpriseReporter Management Server host or another host.
■ Cognos: A reporting engine that lets you create customized reports based ondata that is rolledup frommultiple data sources. Cognos also lets you customizeyour own product dashboards.Cognos includes many options, including the following:
■ Cognos Connection: Lets you manage reports that are created in QueryStudio or Report Studio
■ Query Studio: Lets you create ad hoc reports quickly
■ Report Studio: Lets you create advanced reports
■ Enterprise Reporter Console: A browser-based console that lets you do thefollowing:
■ Access Cognos Connection.
■ Create ad hoc reports.
■ Create advanced reports.
■ Set configuration options.
■ Display reports.
The following illustrationprovides ahigh-level overviewof theEnterpriseReporterarchitecture.
13Introducing CommandCentral Enterprise Reporter 5.1About CommandCentral Enterprise Reporter components

Figure 1-2 Enterprise Reporter high level architecture
Cognos
Kettle
AuthenticationService (VRTSat)
Data Center 2 withCommandCentral
Storage
Data Center 3 withCommandCentral
Storage
Data Center 1 withCommandCentral
Storage
Web browser(Console)(VRTSweb)
CCER Oracledatabase
Data Sources
Enterprise Reporter Management Server
About CommandCentral Enterprise Reporterdocumentation
The following guides provide information about Enterprise Reporter:
Provides information about managing your data,including rollingupdata fromCommandCentral Storageandmanaging storage tiers, business views, and customattributes. The guide also includes information aboutmanaging licenses and user accounts.
CommandCentral EnterpriseReporter Administrator’s Guide
Provides a high level overview of how you can useEnterprise Reporter.
CommandCentralGettingStartedGuide
Instructs you how to install Enterprise Reporter.CommandCentral EnterpriseReporter Installation Guide
Introducing CommandCentral Enterprise Reporter 5.1About CommandCentral Enterprise Reporter documentation
14

Provides information about supported operatingsystems, host resource requirements, softwarelimitations, and known issues.
CommandCentral EnterpriseReporter Release Notes
Describeshowyou canuseEnterpriseReporter to createand manage reports.
CommandCentral EnterpriseReporter User's Guide
Provides information about third-party software thatis used in Enterprise Reporter.
CommandCentral EnterpriseReporter Third-Party LicenseAgreements
Product documentation is available on the Symantec Technical Support web site:
www.symantec.com/enterprise/support/documentation.jsp?pid=54971
15Introducing CommandCentral Enterprise Reporter 5.1About CommandCentral Enterprise Reporter documentation

Introducing CommandCentral Enterprise Reporter 5.1About CommandCentral Enterprise Reporter documentation
16

Planning your deploymentof CommandCentralEnterprise Reporter 5.1
This chapter includes the following topics:
■ Host requirements for Enterprise Reporter
■ Operating system requirements
■ Network and firewall requirements
■ Oracle database version requirements
■ Oracle database client requirements
■ Deploying the Symantec Product Authentication Service on the EnterpriseReporter Management Server
■ About the install only and install and configure options
■ Planning for downtime of other Symantec products
■ About the Java Runtime Environment version that installs with EnterpriseReporter on Windows
Host requirements for Enterprise ReporterTo identify the kind of host that you need to run Enterprise Reporter, ensure thefollowing:
■ The host runs a supported operating system.See “Operating system requirements” on page 18.
2Chapter

■ The host meets or exceeds the system requirements.For more information about system requirements, see the CommandCentralEnterprise Reporter Release Notes.
■ The host runs the required Oracle database or has a connection to a remotehost that runs the Oracle database.See “Oracle database version requirements” on page 20.
■ The host runs the required Oracle database client software (only required ifyou run the Oracle database on a remote host).See “Oracle database client requirements” on page 21.
■ The host has a connection to one ormore hosts that run the CommandCentralStorage Management Server.
■ Thehost does not runSymantec products that cannot co-existwithEnterpriseReporter.For more information about co-existence with other Symantec products, seethe CommandCentral Enterprise Reporter Release Notes
Operating system requirementsTable 2-1 provides operating system requirements for Enterprise Reporter.
Table 2-1 Enterprise Reporter operating system requirements
Required patches and componentsOperating systems supported
■ Windows Installer version 1.1 or higher
■ WindowsManagement Instrumentation
WindowsServer 2003SP2 (32-bit and64-bit)and Windows Server 2008 SP1 (32-bit) forthe following editions:
■ Standard
■ Datacenter
■ Enterprise
■ Web
You can install Enterprise Reporter onvirtualmachines that runsupportedversionsof the Windows Server operating system.
Planning your deployment of CommandCentral Enterprise Reporter 5.1Operating system requirements
18

Table 2-1 Enterprise Reporter operating system requirements (continued)
Required patches and componentsOperating systems supported
■ Sun Enterprise AuthenticationMechanism (SEAM)
■ Required patches for Solaris 9:
■ 111711-14
■ 111712-14
■ 111722-04
■ 112233-12
■ 112874-37
■ 112963-23
■ 113225-07
■ 117560-03
■ Required patches for Solaris 10:
■ 117461-06
■ 118833-36
■ 119254-34
■ 122032-03
■ 125418-01
Solaris 9 and10 (SPARConly)with EndUseras the minimum requirement for thesoftware group
We do not support installation of Enterprise Reporter on non-English operatingsystems.
Network and firewall requirementsTable 2-2 displays the default ports that Enterprise Reporter uses to transferinformation.
Table 2-2 CommandCentral Enterprise Reporter default port assignments
Effect ifblocked
PurposeBidirectional(Yes/No)
Initiator -recipient
ProtocolPort
Data rollupsfail
EnterpriseReporter rolls updata fromCommandCentralStorage using thisport
NoEnterpriseReporter toCommandCentralStorage 5.xdatabase
TCP(JDBC)
2994
19Planning your deployment of CommandCentral Enterprise Reporter 5.1Network and firewall requirements

Table 2-2 CommandCentral Enterprise Reporter default port assignments(continued)
Effect ifblocked
PurposeBidirectional(Yes/No)
Initiator -recipient
ProtocolPort
You cannotaccess theEnterpriseReporterConsole
View reports andmanageEnterpriseReporter
YesWeb browser toEnterpriseReporterManagementServer
HTTPover TCP
8181
You cannotaccess theEnterpriseReporterConsole
View reports andmanageEnterpriseReporter
YesWeb browser toEnterpriseReporterManagementServer
HTTPover TCP
8443
Reports do notappear in theEnterpriseReporterConsole
Viewing Cognosreports andmanagingCognos
YesEnterpriseReporterManagementServer toCognos orWeb browser toCognos
TCP9400
Oracle database version requirementsTable 2-3 lists the supported Oracle database versions by operating system.
Table 2-3 Oracle database version requirements
Supported Oracle editionsSupported Oracleversions
Supported operatingsystems
■ Standard
■ Enterprise
■ 10.2.0.3 (requirespatch 5169247)
■ 10.2.0.4
Solaris
■ Standard
■ Enterprise
10.2.0.4Windows
You can install the Oracle database on the same host as Enterprise Reporter oron a remote host. If you install the database on a remote host, you need to installthe Oracle client on the Enterprise Reporter host.
See “Oracle database client requirements” on page 21.
Planning your deployment of CommandCentral Enterprise Reporter 5.1Oracle database version requirements
20

Table 2-4 lists the supported deployment scenarios for installing the Oracledatabase on a host separate from Enterprise Reporter.
Table 2-4 Supported deployment scenarios for remote Oracle databases
Oracle databaseoperatingsystem
Oracle client bitrequirement
Enterprise Reporteroperating system
Windows2003or200832-bit32-bitWindows2003or200832-bit
Windows 2003 64-bit64-bitWindows 2003 64-bit
Solaris 9 or 1064-bitSolaris 9 or 10
Oracle database client requirementsIf you install the Oracle database on a host separate from Enterprise Reporter,you need to install the Oracle client on the Enterprise Reporter host. The clientinstallation must include the following:
■ SQL*Plus
■ SQL*Loader
■ tnsnames.ora and listener.ora files containing the proper entriesThese files reside in the following location:
■ Solaris: Oracle_HOME/network/admin
■ Windows: Oracle_HOME\network\admin
See “Example of the tnsnames.ora file” on page 33.See “Example of the listener.ora file” on page 33.
Deploying the Symantec Product AuthenticationService on the Enterprise Reporter ManagementServer
TheSymantec ProductAuthentication Service is a commonSymantec componentthat validates identities based on network operating system domains (like NISandNT) or private domains. TheAuthentication Service protects communicationchannels between Symantec application clients and services through messageintegrity and confidentiality services.
TheAuthenticationService includes aRootBroker (RB) andAuthenticationBrokers(AB). The Root Broker resides at the top level of the authentication hierarchy and
21Planning your deployment of CommandCentral Enterprise Reporter 5.1Oracle database client requirements

implements a registration authority to validate Authentication Brokers. In atypical network that includes several Symantec products, youdeploy aRootBrokerand several Authentication Brokers.
The Authentication Service is required on the host on which you install theManagement Server. Because you may have multiple Symantec products in yourenvironment that use theAuthentication Service, youneed to determine themodein which to run the Authentication Service on the Management Server.
When you deploy the Authentication Service on the Management Server, youtypically want to configure the Authentication Service in RB + AB mode or ABonly mode.
The following table identifies the possible scenarios for deploying theAuthentication Service on the Management Server.
Table 2-5 Scenarios for deploying the Authentication Service on theManagement Server
ActionScenario
Install the Management Server. By default, the AuthenticationService installs inRB+ABmodewhenyou install theManagementServer. This is the optimal configuration if you do not have aRootBroker currently installed in your network.
You have notestablished a RootBroker in yournetwork.
Before you install the Management Server, we recommend thatyou install the Authentication Service in Authentication BrokerOnly mode. This ensures the optimal configuration of only oneRoot Broker in the network.
See “To install the Authentication Service in AuthenticationBroker Only mode” on page 22.
Youhave established aRoot Broker in yournetwork.
To install the Authentication Service in Authentication Broker Only mode
1 Open the Symantec Product Authentication Service Installation Guide. Youcan access the guide here:
exftpp.symantec.com/pub/support/products/Foundation_Suite/287316.pdf
2 In the Basic Installation Instructions chapter, navigate to the section titledInstalling and Configuring an Authentication Broker.
3 Perform steps 1 and 2.
4 When you get to step 3, to install and configure the Authentication Service,do the following:
Planning your deployment of CommandCentral Enterprise Reporter 5.1Deploying the Symantec Product Authentication Service on the Enterprise Reporter Management Server
22

From theinstaller_location/sol_sparc/authentication
directory, run the command ./installat
Solaris
From the installer_location\win\authenticationdirectory, run VxSSVRTSatSetup.exe
Windows
where installer_location is one of the following:
■ The location in which you extracted or unzipped the installation files
■ The location of your DVD drive
About the install only and install and configureoptions
When you install Enterprise Reporter, you can choose from the followinginstallation options:
Installs Enterprise Reporter without configuration. With this option,the installer does not configure the Oracle database for use withEnterpriseReporter. For example, youmightwant to install EnterpriseReporter packages during an available window and then configureEnterprise Reporter at another time.
Install Only
Installs and configures Enterprise Reporter.With this option, you canuse Enterprise Reporter after installation completes.
Install andConfigure
Planning for downtime of other Symantec productsWhenyou install EnterpriseReporter, the installer installs, upgrades, or configuresshared components. Other Symantec productsmay rely on these components. Toinstall or upgrade the shared components, the Enterprise Reporter installer needsto stop the following services:
■ Symantec Product Authentication Service
■ Symantec Web Server
■ Storage Management Web Console by Symantec
After the install or upgrade of the shared components completes, the installerrestarts these services.
23Planning your deployment of CommandCentral Enterprise Reporter 5.1About the install only and install and configure options

Before the installer stops these services, you need to shut down any Symantecproducts that depend on these services. When installation completes, you canrestart the products that you shut down.
Because of this requirement, you need to plan for downtime of other Symantecproducts.
The installer prompts you when you need to shut down the products.
Note: You do not need to stop CommandCentral Storage or CommandCentralStorage Change Manager. The installer stops and then restarts them.
About the Java Runtime Environment version thatinstalls with Enterprise Reporter on Windows
Whenyou install EnterpriseReporter 5.1 onWindows, JavaRuntimeEnvironment(JRE) version 1.5.0_11 installs. This version installs even if the host currently runsa later version of JRE. For example, if the host runs JRE version 1.6.0_12, theEnterprise Reporter installer downgrades the version to 1.5.0_11.
Please be aware that other applications may have a dependency on a specificversion of JRE.
Planning your deployment of CommandCentral Enterprise Reporter 5.1About the Java Runtime Environment version that installs with Enterprise Reporter on Windows
24

Setting up the Oracledatabase instance
This chapter includes the following topics:
■ Requirements for the Oracle database instance
■ Setting up the Oracle database instance on Solaris
■ Setting up the Oracle database instance on Windows
■ Creating tablespaces and schema for the Oracle database instance
■ Verifying that the Oracle TNS listener is running
■ Example of the tnsnames.ora file
■ Example of the listener.ora file
■ Ensuring that your Oracle database is properly configured
Requirements for the Oracle database instanceYouneed to create anOracle database instance specifically for EnterpriseReporteruse. We recommend that you name the instance ccer. This instance requires thefollowing:
■ 300 processes
■ AL32UTF8 or UTF8 for database character set
■ AL16UTF16 or UTF8 for national character set
■ Dedicated mode
■ 500 M or larger SGA
3Chapter

■ At least 10 GB of storage spaceFor information about disk space recommendations, see theCommandCentralEnterprise Reporter Release Notes.
Setting up the Oracle database instance on SolarisBefore you install Enterprise Reporter, you need to set up an Oracle databaseinstance that Enterprise Reporter can use for data storage.
Table 3-1 outlines the process to set up the database instance on Solaris.
Table 3-1 Setting up the database instance on Solaris
DescriptionStep
If you have not yet installed the Oracle database software, do the following:
■ Perform the recommended preinstallation tasks.
See “Preparing to install the Oracle database software on Solaris”on page 27.
■ Install Oracle Database 10g Release 2 (10.2.0.1.0).
We recommend that you do not create the Enterprise Reporter databaseinstance when you install Oracle. Doing so increases the amount of timethat it takes to upgrade.
■ Upgrade to one of the following versions:
■ 10.2.0.3
■ 10.2.0.4
■ If you upgrade to 10.2.0.3, install patch 5169247.
1
Create the database instance with Oracle’s Database Configuration Assistant(DBCA). When you use the DBCA, we recommend that you use the GeneralPurpose template.
See “Requirements for the Oracle database instance” on page 25.
2
Ensure that the tnsnames.ora and listener.ora files include the properentries. The files reside in the following locations:
■ Solaris: Oracle_HOME/network/admin
■ Windows: Oracle_HOME\network\admin
See “Example of the tnsnames.ora file” on page 33.
See “Example of the listener.ora file” on page 33.
3
Verify that the Oracle TNS listener service is running. If it is not running,start the listener service.
See “Verifying that the Oracle TNS listener is running” on page 32.
4
Setting up the Oracle database instanceSetting up the Oracle database instance on Solaris
26

Table 3-1 Setting up the database instance on Solaris (continued)
DescriptionStep
(Optional) Manually create the required schema and tablespaces.
See “Creating tablespaces and schema for the Oracle database instance”on page 29.
This step is not required because the Enterprise Reporter installer creates therequired schema and tablespaces. We recommend that you let the installercreate the schema and tablespaces.
5
Verify that the database instance is properly configured.
See “Ensuring that your Oracle database is properly configured” on page 34.
6
Preparing to install the Oracle database software on SolarisBefore you install the Oracle database software on Solaris, we recommend thatyou do the following:
■ Modify the system settings.
■ Create the Oracle base directory.
■ Create a group that is called dba.
■ Add the user oracle to the dba group.
■ Grant the oracle user permissions to the Oracle installation home directory.
To prepare to install the Oracle database software on Solaris
1 Open an operating system console and log in as root.
2 To modify the system settings, type the following commands:
vi /etc/system
set shmsys:shminfo_shmmni=500
set shmsys:shminfo_shmmin=1
set shmsys:shminfo_shmseg=50
set semsys:seminfo_semmns=14000
set semsys:seminfo_semmni=1024
set semsys:seminfo_semmsl=1024
set shmsys:shminfo_shmmax=4294967295
set noexec_user_stack=1
set semsys:seminfo_semvmx=32767
27Setting up the Oracle database instanceSetting up the Oracle database instance on Solaris
3 To create the Oracle base directory, type the following command:
mkdir /oracle/
4 To create the group dba, type the following command:
groupadd dba
5 To add the user oracle to the dba group, type the following command:
useradd -d /oracle -u 105 -g dba oracle
6 Togrant the oracle user permissions to theOracle installationhomedirectory,type the following commands:
chown oracle:dba /oracle
chmod 775 /oracle/
7 Reboot the host.
You can now install the Oracle database software.
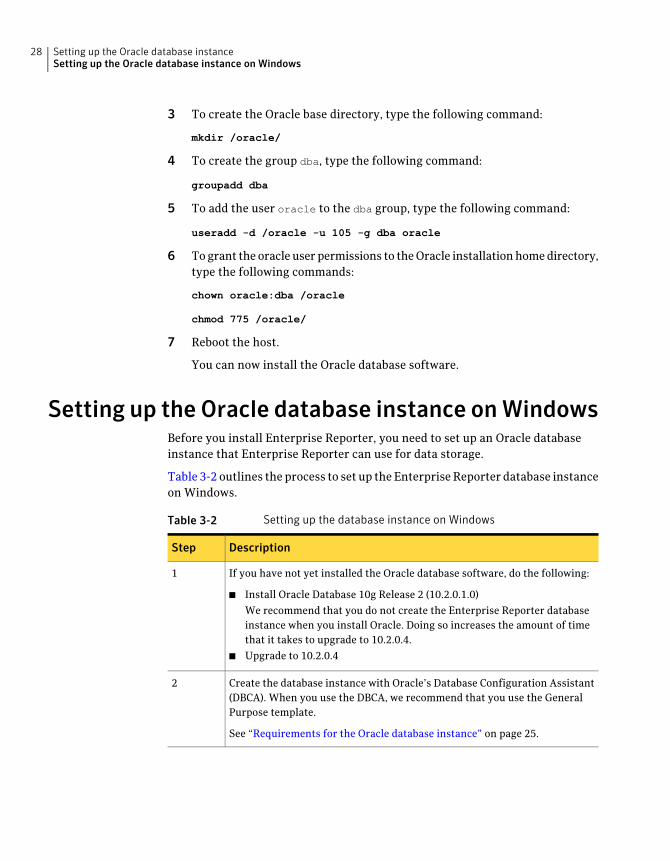
Setting up the Oracle database instance onWindowsBefore you install Enterprise Reporter, you need to set up an Oracle databaseinstance that Enterprise Reporter can use for data storage.
Table 3-2 outlines the process to set up the EnterpriseReporter database instanceon Windows.
Table 3-2 Setting up the database instance on Windows
DescriptionStep
If you have not yet installed the Oracle database software, do the following:
■ Install Oracle Database 10g Release 2 (10.2.0.1.0)
We recommend that you do not create the Enterprise Reporter databaseinstance when you install Oracle. Doing so increases the amount of timethat it takes to upgrade to 10.2.0.4.
■ Upgrade to 10.2.0.4
1
Create the database instance with Oracle’s Database Configuration Assistant(DBCA). When you use the DBCA, we recommend that you use the GeneralPurpose template.
See “Requirements for the Oracle database instance” on page 25.
2
Setting up the Oracle database instanceSetting up the Oracle database instance on Windows
28

Table 3-2 Setting up the database instance on Windows (continued)
DescriptionStep
Ensure that the tnsnames.ora and listener.ora files include the properentries. The files reside in the following locations:
■ Solaris: Oracle_HOME/network/admin
■ Windows: Oracle_HOME\network\admin
See “Example of the tnsnames.ora file” on page 33.
See “Example of the listener.ora file” on page 33.
3
Verify that the Oracle TNS listener service is running. If it is not running,start the listener service.
See “Verifying that the Oracle TNS listener is running” on page 32.
4
(Optional) Manually create the required schema and tablespaces.
See “Creating tablespaces and schema for the Oracle database instance”on page 29.
This step is not required because the Enterprise Reporter installer creates therequired schema and tablespaces. We recommend that you let the installercreate the schema and tablespaces.
5
Verify that the database instance is properly configured.
See “Ensuring that your Oracle database is properly configured” on page 34.
6
Creating tablespaces and schema for the Oracledatabase instance
Enterprise Reporter requires tablespaces and schema in the Oracle databaseinstance.Whenyou install EnterpriseReporter, the installer automatically createsthese tablespaces and schema.Optionally, you canmanually create the tablespacesand schema yourself.
To create tablespaces and schema for the Enterprise Reporter database instance
1 Log on to the host where the Oracle database resides.
2 Copy the contents of the following directory to a writeable temp directory:
installer_location/sol_sparc/command_central_enterprise_reporter/
scripts/db
Solaris
29Setting up the Oracle database instanceCreating tablespaces and schema for the Oracle database instance

installer_location\win\command_central_enterprise_reporter\
scripts\db
Windows
where installer_location is one of the following:
■ The directory in which you extracted the installation files
■ The location of your DVD-ROM drive
Setting up the Oracle database instanceCreating tablespaces and schema for the Oracle database instance
30

3 To run the tablespace creation script, type the following command:
sqlplus sys/password@ccer as sysdba@path_to_files/saharaTablespaces.sqldirectory_location
Solaris
sqlplus sys/password@ccer as sysdba@path_to_files\saharaTablespaces.sqldirectory_location
Windows
where:
are the database credentials.sys and password
is the instance name.ccer
is the location where the Enterprise Reporter database schemascripts reside. These are the scripts that you copied in step 2.
path_to_files
is the fully qualified path to the directory that should containthe database files. This directory must already exist and it musthave write permission for the Oracle user who runs the Oracledatabase.
directory_location
4 To run the schemacreationSQL, type the following command fromawriteablelocation:
sqlplus sys/password@ccer as sysdba@path_to_files/sahara.sql
Solaris
sqlplus sys/password@ccer as sysdba@path_to_files\sahara.sql
Windows
where:
are the database credentials.sys and password
is the instance name.ccer
is the location where the Enterprise Reporter database schemascripts reside. These are the scripts that you copied in step 2.
path_to_files
31Setting up the Oracle database instanceCreating tablespaces and schema for the Oracle database instance

Verifying that the Oracle TNS listener is runningBefore you install Enterprise Reporter, ensure that the Oracle TNS listener isrunning.
To verify that the Oracle TNS listener is running
1 Log on to the Enterprise Reporter Management Server.
2 In an operating system console, change to the following directory:
Oracle_HOME/binSolaris
Oracle_HOME\binWindows
3 To verify if the TNS listener is running, type the following command:
tnsping service_name
where service_name is the servicenameof thedatabase instance—for example,ccer
4 After the command runs, do the following based on themessage that returnedafter you ran tnsping:
The tnsping utility cannot resolve the service name.
Do the following:
■ On the Management Server, verify that the service nameentries are correct in the SQLNET.ora and TNSNAMES.orafiles. These files reside in the following location:
■ Solaris: Oracle_HOME/network/admin
■ Windows: Oracle_HOME\network\admin
■ Repeat step 3.
TNS-03505:
Failed to
resolve name
Indicates that the TNS listener service is not running.
Do the following:
■ Log on to the host where the Oracle database resides.
■ Change to the following directory:
■ Solaris: Oracle_HOME/bin
■ Windows: Oracle_HOME\bin
■ To start the listener service, type the following command:
■ Solaris: lsnrctl START
■ Windows: LSNRCTL.EXE start
■ Repeat step 3 to verify that the TNS listener is running.
TNS-12541:
TNS: no
listener
Setting up the Oracle database instanceVerifying that the Oracle TNS listener is running
32

Indicates that the TNS listener service is running. No furthersteps are required.
OK (# msec)
Example of the tnsnames.ora fileThe tnsnames.ora file is a configuration file that defines connection parametersfor yourOracle database instance. The following is anexample of thetnsnames.orafile:
CCER =
(DESCRIPTION =
(ADDRESS = (PROTOCOL = TCP) (HOST = host.symantecexample.com)
(PORT = 1521)
(CONNECT_DATA =
(SERVER = DEDICATED)
(SERVICE_NAME = CCER)
)
)
Example of the listener.ora fileThe listener.ora file is a configuration file that defines the Oracle services towhichother systems can connect. The following is an example of thelistener.orafile:
LISTENER =
(ADDRESS_LIST =
(ADDRESS =
(PROTOCOL = TCP)
(Host = 127.0.0.1)
(Port = 1521)
)
)
STARTUP_WAIT_TIME_LISTENER = 0
CONNECT_TIMEOUT_LISTENER = 10
TRACE_LEVEL_LISTENER = ADMIN
SID_LIST_LISTENER =
(SID_LIST =
(SID_DESC =
(SID_NAME = ccer)
33Setting up the Oracle database instanceExample of the tnsnames.ora file

)
)
LISTENER =
(DESCRIPTION_LIST =
(DESCRIPTION =
(ADDRESS = (PROTOCOL = TCP)(HOST = host.symantecexample.com)
(PORT = 1521))
)
)
Ensuring that your Oracle database is properlyconfigured
Before you install Enterprise Reporter, you need to ensure that your Oracledatabase is properly configured for use with Enterprise Reporter. To ensure thatthe database is properly configured, you can run a script that shipswithEnterpriseReporter.
To ensure that your Oracle database is properly configured
1 Log on to the host on which you want to install and configure EnterpriseReporter.
2 Open the following directory:
installer_location/sol_sparc/command_central_enterprise_reporter/
scripts/Support/OracleInstanceCheck/
Solaris
installer_location\win\command_central_enterprise_reporter\
Support\OracleInstanceCheck\
Windows
where installer_location is one of the following:
■ The directory in which you unzipped or extracted the .zip or tar file
■ The location of your DVD-ROM drive
3 If the Oracle database runs on a remote host, copy the following file to theOracle host:
oracleinstancecheck.plSolaris
oracleinstancecheck.vbsWindows
Setting up the Oracle database instanceEnsuring that your Oracle database is properly configured
34

4 Open an operating system console.
5 In the directory where the script resides, type the following command:
perl oracleinstancecheck.pl --tns TNS_name --username username --password password --oracle_homeOracle_Home
Solaris
CScript "oracleinstancecheck.vbs" TNS_name usernamepassword "Oracle_Home"
Windows
where:
is the TNS name for the Oracle database instanceTNS_name
is the user name to use for connecting with the Oracle databaseinstance
username
is the password for the provided user namepassword
is the Oracle Home directoryOracle_Home
The script’s output lists any settings that do not meet requirements. Correctany issues before you proceed with installation.
35Setting up the Oracle database instanceEnsuring that your Oracle database is properly configured

Setting up the Oracle database instanceEnsuring that your Oracle database is properly configured
36

Installing and configuringCommandCentralEnterprise Reporter 5.1
This chapter includes the following topics:
■ Installation and configuration prerequisites for Enterprise Reporter
■ Installing Enterprise Reporter on a Solaris host
■ Installing Enterprise Reporter on a Windows host
■ Configuring Enterprise Reporter on a Solaris host
■ Configuring Enterprise Reporter on a Windows host
■ Performing post-installation setup
Installation and configuration prerequisites forEnterprise Reporter
Before you install Enterprise Reporter, review the following prerequisites:
■ Ensure that the host on which you want to install Enterprise Reporter meetsall requirements.See “Host requirements for Enterprise Reporter” on page 17.
■ You can install Enterprise Reporter on a local host only.
Before you configure Enterprise Reporter, review the following prerequisites:
■ Ensure that the Oracle database instance is running.
4Chapter

■ If the Oracle database instance runs on a remote host, ensure that the Oracleclient software is running on the Enterprise Reporter host.See “Oracle database client requirements” on page 21.
■ On the host where the Oracle database instance resides, run the scriptoracleinstancecheck to ensure that database instance is properly configuredfor use with Enterprise Reporter.See “Ensuring that your Oracle database is properly configured” on page 34.
■ Have the following information available:
■ The directory in which you want Enterprise Reporter configuration filesto reside. The size of the configuration directory increases with time andusage.
■ The directory in which you want tablespace files to reside. The tablespacefiles consume approximately 700 MB of space.
■ The user name and password for the Oracle sysdba user or an Oracle userwith sysdba privileges.
■ The absolute path to the Oracle home directory.
■ The Oracle SID for the database instance.
■ The Oracle service name for the database instance.
■ The port number of the Oracle TNS listener for the database instance.
■ The fully qualified host name or IP address for the Oracle database server.
You can find this information in the tnsnames.ora file. This file resides onthe host where you installed the Oracle database.See “Example of the tnsnames.ora file” on page 33.
Installing Enterprise Reporter on a Solaris hostUse the Enterprise Reporter installer to install Enterprise Reporter on a Solarishost.
Do not install Enterprise Reporter from a mounted file system.
To install Enterprise Reporter on a Solaris host
1 Log on to the host on which you want to install Enterprise Reporter.
2 Do one of the following:
Installing and configuring CommandCentral Enterprise Reporter 5.1Installing Enterprise Reporter on a Solaris host
38

Mount the DVD.
See “Mounting the CommandCentral Enterprise Reporter 5.1product disc on Solaris” on page 80.
If you have theEnterpriseReporter 5.1product disc
Do the following:
■ Go to fileconnect.symantec.com and download the installer.
■ Extract the install files to your local machine.
If you have not yetobtained theEnterpriseReporter 5.1installer
3 Open an operating system console and change to the following directory:
installer_location/sol_sparc/command_central_enterprise_reporter/
where installer_location is one of the following:
■ The directory in which you extracted the tar file
■ The location in which the DVD is mounted
4 Type one of the following commands:
./installccerTo install and configure EnterpriseReporter
./installccer -installonlyTo install Enterprise Reporter withoutconfiguration
See “About the install only and install and configure options” on page 23.
5 At the welcome screen, press Enter to start installation.
6 At the installation directory screen, read the information about the packagesthat install with Enterprise Reporter. Then, press Enter.
7 Respond to the question about specifying an alternate directory in which toinstall the packages.
8 If the shared components screen appears, do the following:
■ Review the list of shared components that Enterprise Reporter requires.
■ Respond to the question about continuing with installation.
See “Planning for downtime of other Symantec products” on page 23.
39Installing and configuring CommandCentral Enterprise Reporter 5.1Installing Enterprise Reporter on a Solaris host

9 Do one of the following:
Proceed to step 10.If you chose toinstall andconfigureEnterpriseReporter
Proceed to step 18.If you chose toinstall EnterpriseReporter withoutconfiguration
10 At the configuration and log files screen, do one of the following:
Press Enter.To accept thedefault location(/var)
Type the location and then press Enter.To specify analternate location
11 At the fully qualified host name screen, do one of the following.
Press Enter.To accept the hostname that wasobtained by theinstaller
Type the fully qualified host name and then press Enter.To specify analternate hostname
12 At the installation prerequisites screen, read the information and then pressEnter.
Installing and configuring CommandCentral Enterprise Reporter 5.1Installing Enterprise Reporter on a Solaris host
40

13 At the screen that informs you to run the oracleinstancecheck script, readthe information about running the script. Then, do one of the following:
To exit the installation, type n and press Enter. Then, run thescript.
See “Ensuring that your Oracle database is properly configured”on page 34.
If you have not yetrun the script
To continue the installation, type y and press Enter.If youhave run thescript
14 Respond to the prompts that ask for the following information about yourOracle database:
■ TheOracle home directorywhere the Oracle client or the Oracle databaseis installed on the local system.
■ The Oracle database instance name.
■ The port number for the Oracle TNS listener.
■ The fully qualified name or IP address of the host where the Oracledatabase resides.
■ The service name for the Oracle database instance.
15 At the configuration information screen, review the information about yourOracle instance and then respond to the question about whether theinformation is correct.
16 At the configure SMTP notification screen, respond to the question aboutconfiguring SMTP notification.
SMTP notification lets you email reports in Enterprise Reporter.
41Installing and configuring CommandCentral Enterprise Reporter 5.1Installing Enterprise Reporter on a Solaris host

17 If the installer verifies that the required tablespaces and schema are notpresent, do one of the following:
Type 1 and press Enter. Then, follow the prompts so that theinstaller can create the tablespaces and schema.
To proceed and letthe installer createthe requiredtablespaces andschema
Type 2 and press Enter. Then, manually create the requiredtablespaces and schema.
See “Creating tablespaces and schema for the Oracle databaseinstance” on page 29.
To create therequiredtablespaces andschema yourself
18 After installation completes, do one of the following:
Perform post-installation setup.
See “Configuring Enterprise Reporter on a Solaris host”on page 46.
If you chose toinstall andconfigureEnterpriseReporter
Configure Enterprise Reporter.
See “Configuring Enterprise Reporter on a Solaris host”on page 46.
If you chose toinstall EnterpriseReporter withoutconfiguration
Installing Enterprise Reporter on a Windows hostUse the Enterprise Reporter 5.1 installer to install Enterprise Reporter on aWindows host.
To install Enterprise Reporter on a Windows host
1 Log on to the host on which you want to install Enterprise Reporter.
2 Do one of the following:
Insert the disc into your DVD-ROM drive.
If autorun is enabled, proceed to step 4.
If you have theEnterpriseReporter 5.1product disc
Installing and configuring CommandCentral Enterprise Reporter 5.1Installing Enterprise Reporter on a Windows host
42

Do the following:
■ Go to fileconnect.symantec.com and download the installer.
■ Unzip the install files to your local machine.
If you have not yetobtained theEnterpriseReporter 5.1installer
3 Open the following directory and run Setup.exe:
installer_location\win\command_central_enterprise_reporter\
where installer_location is one of the following:
■ The directory in which you unzipped the .zip file
■ The location of your DVD-ROM drive
4 In the Welcome panel, read the instructions. Then, click Next.
5 In the License Agreement panel, read the license agreement. If you agree,click I accept the terms of the license agreement. Then, click Next.
6 At the message box, read the information about licensing. Then, click OK.
7 In the Actions panel, select one of the following:
Installs Enterprise Reporter without configuration.With this option, the installer does not configure theOracle database for use with Enterprise Reporter. Forexample, youmightwant to install EnterpriseReporterpackages during an available window and thenconfigure Enterprise Reporter at another time.
Install Only
Installs and configures Enterprise Reporter.With thisoption, you can use Enterprise Reporter afterinstallation completes.
Install and Configure
8 If a message box appears, read the information about physical memoryrequirements. Then, do one of the following:
Click Yes.If your host meets therequirements
Click No.If your host does not meetthe requirements
43Installing and configuring CommandCentral Enterprise Reporter 5.1Installing Enterprise Reporter on a Windows host

9 If you chose the Install and Configure option, read the information aboutrunning the oracleinstancecheck script. Then, do one of the following:
To exit the installation, clickYes. Then, run the script.
See “Ensuring that your Oracle database is properlyconfigured” on page 34.
If you have not yet run thescript
To continue the installation, click No.If you have run the script
10 In the Destination Folders panel, do one of the following:
Click Next.To keep the default locationfor the program files anddata files
ClickChange and select a new folder. Then, clickNext.
Do not select a directory that includes Unicodecharacters.
To change the destinationfolder for the program filesand data files
11 In the Symantec Shared Components panel, review the list of sharedcomponents that Enterprise Reporter requires. To confirm the installationor upgrade of the shared components, click Next.
12 If amessage box appears, follow the instructions about installing, upgrading,or configuring the shared components.
See “Planning for downtime of other Symantec products” on page 23.
13 Do one of the following:
Proceed to step 14.If you chose the Install andConfigure option
Proceed to step 16.If you chose the Install Onlyoption
14 In the Configuration Inputs panel, enter information about your Oracledatabase as follows and click Next:
Enter the locationwhere youwant theEnterpriseReporter configuration files to reside.
ER Configuration directory
Enter the Oracle home directory where theOracle client or the Oracle database is installedon the local system.
Oracle Home (ORACLE_HOME)directory
Installing and configuring CommandCentral Enterprise Reporter 5.1Installing Enterprise Reporter on a Windows host
44

Enter the SID for the Oracle database.Oracle SID
Enter the port number for the TNS listener.TNS listener port number
Enter the fully qualified host name of the hostwhere the Oracle database resides.
Oracle database server host
Enter the Oracle database service name.Oracle database service name
Enter the user name for the Oracle database’sSYSDBA user.
Oracle database SYSDBA user
Enter the password for the SYSDBA user.Password for the above user
Enter an SMTP server so that you can emailreports in Enterprise Reporter.
SMTPserverhostname (optional)
Enter a directory on the host where the Oracledatabase resides.
Note the following requirements:
■ The directory must already exist.
■ The drive must have sufficient space(approximately 700MB).
■ Oracle must have write permissions to thedirectory.
This option is not available until EnterpriseReporter determines that the required files arenot present in the database instance.
OracledatabaseserverTablespacedirectory
15 If the Oracle database’s tablespaces and schema are not present, a messagebox appears. Do one of the following:
Do the following:
■ Click Yes.■ In the Oracle database server Tablespace directory field,
enter the location where you want the installer to create thefiles.
■ Click Next.
To proceed and letthe installer createthe requiredtablespaces andschema
45Installing and configuring CommandCentral Enterprise Reporter 5.1Installing Enterprise Reporter on a Windows host

Do the following:
■ Click No.■ Create the required tablespaces and schema.
See “Creating tablespaces and schema for theOracle databaseinstance” on page 29.
■ Click Next.
To stop thecurrent step andcreate the requiredtablespaces andschema yourself
16 In the Start Copying Files panel, review the installation settings and do oneof the following:
To start the installation, click Next.If the settings arecorrect
To return to the previous panels and make changes, click Back.If the settings arenot correct
17 If you chose the Install and Configure option, in the Configuration panel, dothe following:
■ Read the information about configuration.
■ If errors occurred, review the installation logs.See “ Enterprise Reporter installation log files” on page 78.
■ Click Next.
18 In the Installation Complete panel, read the information about theinstallation. Then, click Finish.
19 Do one of the following:
Configure Enterprise Reporter.
See “Configuring Enterprise Reporter on a Windows host”on page 48.
If you chose theinstall only option
Perform post-installation setup.
See “Performing post-installation setup” on page 51.
If you chose theinstall andconfigure option
Configuring Enterprise Reporter on a Solaris hostIf you chose the install only option during installation of Enterprise Reporter,you need to configure Enterprise Reporter so that you can use the product.
Installing and configuring CommandCentral Enterprise Reporter 5.1Configuring Enterprise Reporter on a Solaris host
46

To configure Enterprise Reporter on a Solaris host
1 On the host on which you want to configure Enterprise Reporter, open anoperating system console and log in as root.
2 Change to the following directory:
/opt/VRTS/install
3 Type the following command:
./installccer -configure
4 At the configuration and log files screen, do one of the following:
Press Enter.To accept thedefault location(/var)
Type the location and then press Enter.To specify analternate location
5 At the fully qualified host name screen, do one of the following:
Press Enter.To accept the hostname that wasobtained by theinstaller
Type the fully qualified host name and then press Enter.To specify analternate hostname
6 At the installationprerequisites screen, read the information andpressEnter.
7 At the screen that informs you to run the oracleinstancecheck script, readthe information about running the script. Then, do one of the following:
To exit the installation, type n and press Enter. Then, run thescript.
See “Ensuring that your Oracle database is properly configured”on page 34.
If you have not yetrun the script
To continue the installation, type y and press Enter.If youhave run thescript
47Installing and configuring CommandCentral Enterprise Reporter 5.1Configuring Enterprise Reporter on a Solaris host

8 Respond to the prompts that ask for the following information about yourOracle database:
■ TheOracle home directorywhere the Oracle client or the Oracle databaseis installed on the local system.
■ The Oracle database instance name.
■ The port number for the Oracle TNS listener.
■ The fully qualified name or IP address of the host where the Oracledatabase resides.
■ The service name for the Oracle database instance.
9 At the configuration information screen, review the information about yourOracle instance and then respond to the question about whether theinformation is correct.
10 At the configure SMTP notification screen, respond to the question aboutconfiguring SMTP notification.
SMTP notification lets you email reports in Enterprise Reporter.
11 If the installer verifies that the required tablespaces and schema are notpresent, do one of the following:
Type 1 and press Enter. Then, follow the prompts so that theinstaller can create the tablespaces and schema.
To proceed and letthe installer createthe requiredtablespaces andschema
Type 2 and press Enter. Then, manually create the requiredtablespaces and schema.
See “Creating tablespaces and schema for the Oracle databaseinstance” on page 29.
To create therequiredtablespaces andschema yourself
12 After installation completes, perform post-installation setup.
See “Performing post-installation setup” on page 51.
Configuring Enterprise Reporter on a Windows hostIf you chose the install only option during installation of Enterprise Reporter,you need to configure Enterprise Reporter so that you can use the product.
Installing and configuring CommandCentral Enterprise Reporter 5.1Configuring Enterprise Reporter on a Windows host
48
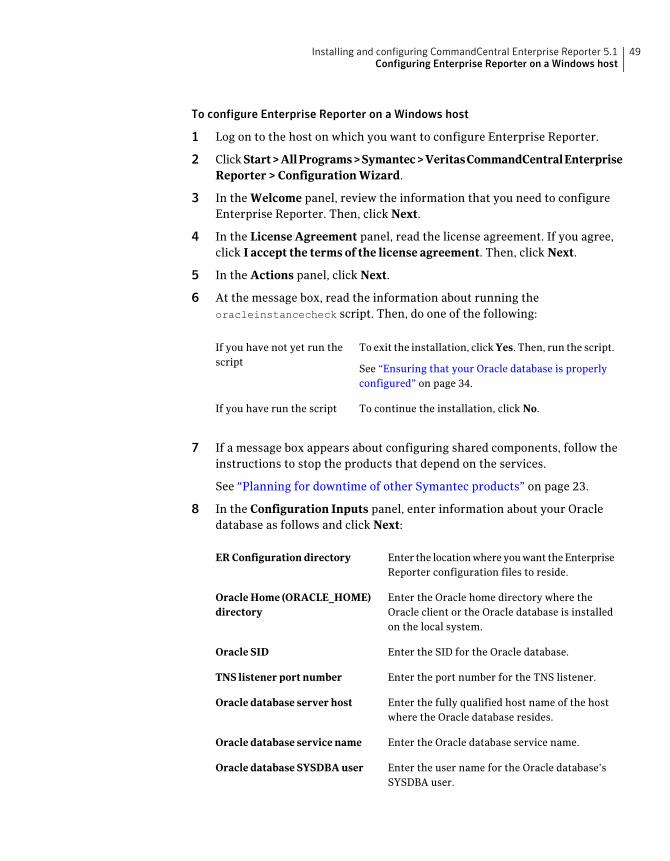
To configure Enterprise Reporter on a Windows host
1 Log on to the host on which you want to configure Enterprise Reporter.
2 ClickStart>AllPrograms>Symantec>VeritasCommandCentralEnterpriseReporter > Configuration Wizard.
3 In the Welcome panel, review the information that you need to configureEnterprise Reporter. Then, click Next.
4 In the License Agreement panel, read the license agreement. If you agree,click I accept the terms of the license agreement. Then, click Next.
5 In the Actions panel, click Next.
6 At the message box, read the information about running theoracleinstancecheck script. Then, do one of the following:
To exit the installation, clickYes. Then, run the script.
See “Ensuring that your Oracle database is properlyconfigured” on page 34.
If you have not yet run thescript
To continue the installation, click No.If you have run the script
7 If a message box appears about configuring shared components, follow theinstructions to stop the products that depend on the services.
See “Planning for downtime of other Symantec products” on page 23.
8 In the Configuration Inputs panel, enter information about your Oracledatabase as follows and click Next:
Enter the locationwhere youwant theEnterpriseReporter configuration files to reside.
ER Configuration directory
Enter the Oracle home directory where theOracle client or the Oracle database is installedon the local system.
Oracle Home (ORACLE_HOME)directory
Enter the SID for the Oracle database.Oracle SID
Enter the port number for the TNS listener.TNS listener port number
Enter the fully qualified host name of the hostwhere the Oracle database resides.
Oracle database server host
Enter the Oracle database service name.Oracle database service name
Enter the user name for the Oracle database’sSYSDBA user.
Oracle database SYSDBA user
49Installing and configuring CommandCentral Enterprise Reporter 5.1Configuring Enterprise Reporter on a Windows host

Enter the password for the SYSDBA user.Password for the above user
Enter an SMTP server so that you can emailreports in Enterprise Reporter.
SMTPserverhostname (optional)
Enter a directory on the host where the Oracledatabase resides.
Note the following requirements:
■ The directory must already exist.
■ The drive must have sufficient space(approximately 700MB).
■ Oracle must have write permissions to thedirectory.
This option is not available until EnterpriseReporter determines that the required files arenot present in the database instance.
OracledatabaseserverTablespacedirectory
9 If the Oracle database’s tablespaces and schema are not present, a messagebox appears. Do one of the following:
Do the following:
■ Click Yes.■ In the Oracle database server Tablespace directory field,
enter the location where you want the installer to create thefiles.
■ Click Next.
To proceed and letthe installer createthe requiredtablespaces andschema
Do the following:
■ Click No.■ Create the required tablespaces and schema.
See “Creating tablespaces and schema for theOracle databaseinstance” on page 29.
■ Click Next.
To stop thecurrent step andcreate the requiredtablespaces andschema yourself
10 In the Start Copying Files panel, review the installation settings and do oneof the following:
To start the installation, click Next.If the settings arecorrect
To return to the previous panels and make changes, click Back.If the settings arenot correct
Installing and configuring CommandCentral Enterprise Reporter 5.1Configuring Enterprise Reporter on a Windows host
50

11 In the Configuration panel, do the following:
■ Read the information about configuration.
■ If errors occurred, review the configuration logs.See “ Enterprise Reporter installation log files” on page 78.
■ Click Next.
12 In the Installation Complete panel, read the information about theinstallation. Then, click Finish.
13 Perform post-installation setup.
See “Performing post-installation setup” on page 51.
Performing post-installation setupAfter you install and configure Enterprise Reporter, we recommend that you dothe following:
■ Log in to the Enterprise Reporter Console.Enterprise Reporter ships with one default user account. The user name isadmin and the password is password.
See “Logging in to CommandCentral Enterprise Reporter” on page 51.
■ Install a permanent license.When you install CommandCentral Enterprise Reporter 5.1, an evaluationlicense installs. The evaluation license is valid for 60 days.With the evaluationlicense, you cannot add more than two data sources to Enterprise Reporter.To add more data sources, you need to obtain a permanent license. Forinformationabout obtaining apermanent license, go to theSymantec LicensingPortal:www.symantec.com/business/products/licensing/activationFor information about installing licenses, see theCommandCentralEnterpriseReporter Administrator’s Guide.
■ Change the password for the default admin user account.
After you change the password for the admin user account, you need to runthe er_password.pl script.
For informationabout changingpasswords, see theCommandCentralEnterpriseReporter Administrator’s Guide.
Logging in to CommandCentral Enterprise ReporterAfter you install Enterprise Reporter, you can log in to the Console.
51Installing and configuring CommandCentral Enterprise Reporter 5.1Performing post-installation setup

See Web browser requirements in the CommandCentral Enterprise ReporterRelease Notes.
To log in to the Enterprise Reporter Console
1 On a client system that has a network connection to the Enterprise Reporterhost, open a Web browser.
2 In the browser’s address field, type the following URL and press Enter:
https://hostname:8443/
wherehostname is the fully-qualifiedhostnameonwhichEnterpriseReporteris installed.
3 In the Login page, type your user name and password in the respective fields.
User names are case-sensitive.
4 Click Login.
The Enterprise Reporter Console displays.
Installing and configuring CommandCentral Enterprise Reporter 5.1Performing post-installation setup
52

Upgrading toCommandCentralEnterprise Reporter 5.1
This chapter includes the following topics:
■ Upgrade prerequisites for Enterprise Reporter
■ Upgrading Oracle database schema
■ Upgrading Enterprise Reporter to 5.1 on a Solaris host
■ Performing post-upgrade setup
Upgrade prerequisites for Enterprise ReporterBefore you upgrade Enterprise Reporter to 5.1, you need to do the following:
■ Verify that all data rollup processes are in the Successful state.
■ Disable data rollup for all data sources.For more information about disabling data rollup, see the CommandCentralEnterprise Reporter Administrator’s Guide.
■ If you are upgrading from Enterprise Reporter 5.0 to 5.1, export any reportsthat you created.When you upgrade from Enterprise Reporter 5.0 to 5.1, any reports that youcreated will be lost. If you want to retain the reports that you created, exportthe reports before youupgrade to 5.1. This does not happenwhen youupgradefrom Enterprise Reporter 5.0 MP1 to 5.1.For more information about exporting reports, see the CommandCentralEnterprise Reporter User's Guide.
5Chapter

Upgrading Oracle database schemaWhen you upgrade Enterprise Reporter to 5.1, you can either let the installerupgrade the database schema or you can upgrade the database schema yourself.Use the following procedure to upgrade the database schema yourself.
To upgrade Oracle database schema
1 Do one of the following:
Do the following:
■ Open a UNIX console and log in as root on theEnterprise Reporter Management Server.
■ Change the OS user to the user running the databaseserver. For example:
su - oracle
If the EnterpriseReporter ManagementServer and the Oracledatabase are on the samehost
Do the following:
■ Open a UNIX console and log in as root on the hostwhere the Oracle database instance resides.
■ Provide access from the Enterprise Reporter databasehost to the following directory on the ManagementServer:
installer_location/sol_sparc/
command_central_enterprise_reporter/scripts/db
Where installer_location is one of the following:
■ The directory in which you extracted the tar file
■ The location in which the DVD is mounted
You can either create a network share, or copy thedirectory contents to the database host.
■ Change the OS user to the user running the databaseserver. For example:
su - oracle
If the EnterpriseReporter ManagementServer and the Oracledatabase are ondifferenthosts
2 Change to awritable directory. For example, the following commandchangesto the writable directory tmp:
cd /tmp
The current directory should bewritable as the SQL scripts create temporaryfiles.
3 If thewriteable directory includes the file saharaScriptConfig2.tmp, deletethe file. If you do not delete the file, database upgrade fails.
Upgrading to CommandCentral Enterprise Reporter 5.1Upgrading Oracle database schema
54
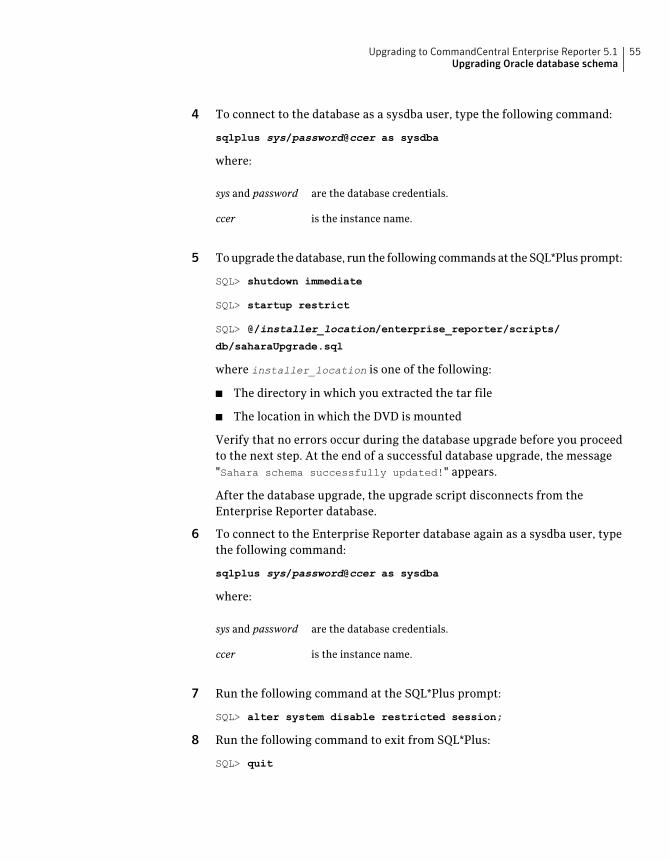
4 To connect to the database as a sysdba user, type the following command:
sqlplus sys/password@ccer as sysdba
where:
are the database credentials.sys and password
is the instance name.ccer
5 Toupgrade thedatabase, run the followingcommandsat theSQL*Plusprompt:
SQL> shutdown immediate
SQL> startup restrict
SQL> @/installer_location/enterprise_reporter/scripts/
db/saharaUpgrade.sql
where installer_location is one of the following:
■ The directory in which you extracted the tar file
■ The location in which the DVD is mounted
Verify that no errors occur during the database upgrade before you proceedto the next step. At the end of a successful database upgrade, the message"Sahara schema successfully updated!" appears.
After the database upgrade, the upgrade script disconnects from theEnterprise Reporter database.
6 To connect to the Enterprise Reporter database again as a sysdba user, typethe following command:
sqlplus sys/password@ccer as sysdba
where:
are the database credentials.sys and password
is the instance name.ccer
7 Run the following command at the SQL*Plus prompt:
SQL> alter system disable restricted session;
8 Run the following command to exit from SQL*Plus:
SQL> quit
55Upgrading to CommandCentral Enterprise Reporter 5.1Upgrading Oracle database schema

Upgrading Enterprise Reporter to 5.1 on a Solarishost
You can upgrade Enterprise Reporter from 5.0, 5.0 MP1, or 5.0 MP1-RP1 to 5.1.
To upgrade Enterprise Reporter to 5.1 on a Solaris host
1 Log on to the host on which you want to upgrade Enterprise Reporter.
2 Do one of the following:
Mount the DVD.
See “Mounting the CommandCentral Enterprise Reporter 5.1product disc on Solaris” on page 80.
If you have theEnterpriseReporter 5.1product disc
Do the following:
■ Go to fileconnect.symantec.com and download the installer.
■ Extract the install files to your local machine.
If you have not yetobtained theEnterpriseReporter 5.1installer
3 Open an operating system console and change to the following directory:
installer_location/sol_sparc/command_central_enterprise_reporter/
where installer_location is one of the following:
■ The directory in which you extracted the tar file
■ The location in which the DVD is mounted
4 Type the following command:
./installccer
5 At the welcome screen, press Enter to start the upgrade.
6 If the shared components screen appears, do the following:
■ Review the list of shared components that Enterprise Reporter requires.
■ Respond to the question about continuing with installation.
See “Planning for downtime of other Symantec products” on page 23.
Upgrading to CommandCentral Enterprise Reporter 5.1Upgrading Enterprise Reporter to 5.1 on a Solaris host
56

7 At the configuration and log files screen, do one of the following:
Press Enter.To accept thedefault location(/var)
Type the location and then press Enter.To specify analternate location
8 At the local host fully qualified host name screen, do one of the following:
Press Enter.To accept the hostname that wasobtained by theinstaller
Type the fully qualified host name and then press Enter.To specify analternate hostname
9 At the configuration information screen, review the information about yourOracle instance and then respond to the question about whether theinformation is correct.
10 At the configure SMTP notification screen, respond to the question aboutconfiguring SMTP notification.
SMTP notification lets you email reports in Enterprise Reporter.
11 At the database schema upgrade screen, do one of the following:
Type 1 and press Enter. Then, follow the prompts so that theinstaller can update the schema.
To update theschema throughthe installer
Type 2 and press Enter. Then, manually update the schema.
See “Upgrading Oracle database schema” on page 54.
To update theschema yourself
12 After the schema updates, to start the Enterprise Reporter upgrade, type yand then press Enter.
13 After the upgrade is complete, perform post-upgrade setup.
See “Performing post-upgrade setup” on page 58.
57Upgrading to CommandCentral Enterprise Reporter 5.1Upgrading Enterprise Reporter to 5.1 on a Solaris host
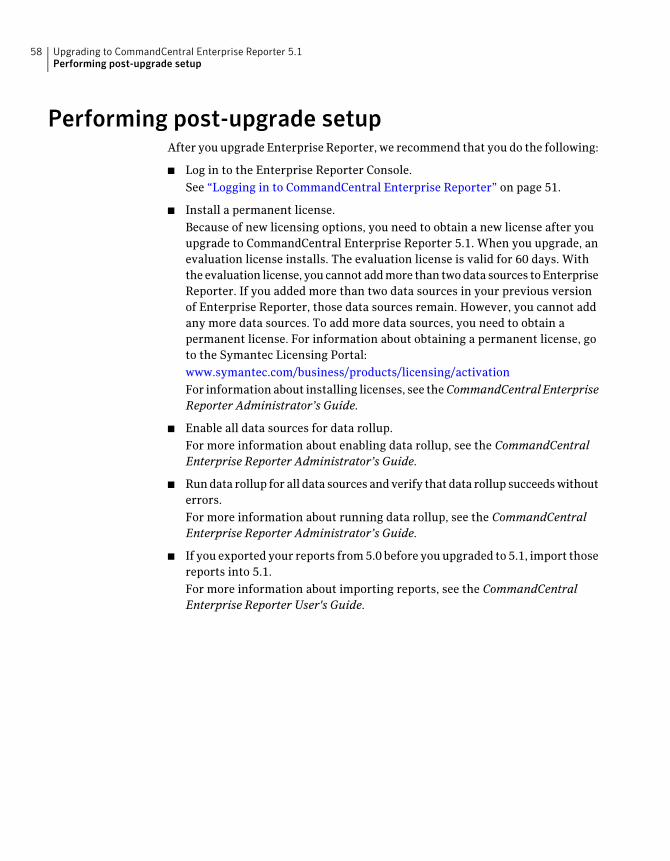
Performing post-upgrade setupAfter you upgrade Enterprise Reporter, we recommend that you do the following:
■ Log in to the Enterprise Reporter Console.See “Logging in to CommandCentral Enterprise Reporter” on page 51.
■ Install a permanent license.Because of new licensing options, you need to obtain a new license after youupgrade to CommandCentral Enterprise Reporter 5.1. When you upgrade, anevaluation license installs. The evaluation license is valid for 60 days. Withthe evaluation license, you cannot addmore than twodata sources toEnterpriseReporter. If you added more than two data sources in your previous versionof Enterprise Reporter, those data sources remain. However, you cannot addany more data sources. To add more data sources, you need to obtain apermanent license. For information about obtaining a permanent license, goto the Symantec Licensing Portal:www.symantec.com/business/products/licensing/activationFor information about installing licenses, see theCommandCentralEnterpriseReporter Administrator’s Guide.
■ Enable all data sources for data rollup.For more information about enabling data rollup, see the CommandCentralEnterprise Reporter Administrator’s Guide.
■ Rundata rollup for all data sources andverify that data rollup succeedswithouterrors.For more information about running data rollup, see the CommandCentralEnterprise Reporter Administrator’s Guide.
■ If you exported your reports from5.0 before you upgraded to 5.1, import thosereports into 5.1.For more information about importing reports, see the CommandCentralEnterprise Reporter User's Guide.
Upgrading to CommandCentral Enterprise Reporter 5.1Performing post-upgrade setup
58

ReconfiguringCommandCentralEnterprise Reporter 5.1
This chapter includes the following topics:
■ Reconfiguring Enterprise Reporter 5.1
■ Reconfiguring Enterprise Reporter after a domain name change
Reconfiguring Enterprise Reporter 5.1Youcan reconfigureEnterpriseReporter. Youmightneed to reconfigureEnterpriseReporter for any of the following reasons:
■ A system name or domain name has changed.See “Reconfiguring Enterprise Reporter after a domain name change”on page 64.
■ You want to configure Enterprise Reporter to use a new database instance.
■ You want to choose a new location for logs. You might do this because thecurrent location does not have sufficient space for the temp files that generateduring data rollup.
■ Configuration files are corrupt.
Whenyou reconfigure EnterpriseReporter, your current data remains unless youconfigure Enterprise Reporter to use a new database.
6Chapter
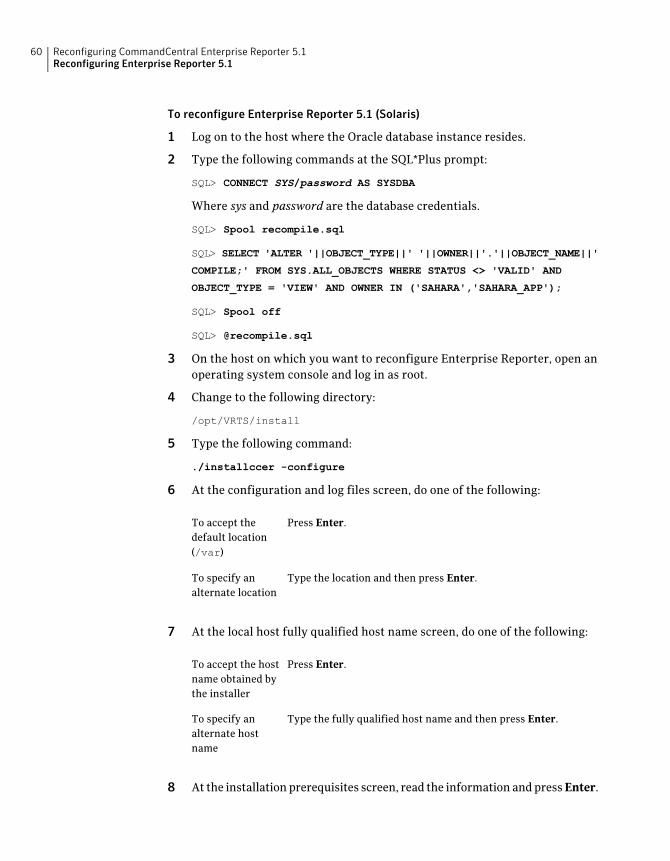
To reconfigure Enterprise Reporter 5.1 (Solaris)
1 Log on to the host where the Oracle database instance resides.
2 Type the following commands at the SQL*Plus prompt:
SQL> CONNECT SYS/password AS SYSDBA
Where sys and password are the database credentials.
SQL> Spool recompile.sql
SQL> SELECT 'ALTER '||OBJECT_TYPE||' '||OWNER||'.'||OBJECT_NAME||'
COMPILE;' FROM SYS.ALL_OBJECTS WHERE STATUS <> 'VALID' AND
OBJECT_TYPE = 'VIEW' AND OWNER IN ('SAHARA','SAHARA_APP');
SQL> Spool off
SQL> @recompile.sql
3 On the host on which you want to reconfigure Enterprise Reporter, open anoperating system console and log in as root.
4 Change to the following directory:
/opt/VRTS/install
5 Type the following command:
./installccer -configure
6 At the configuration and log files screen, do one of the following:
Press Enter.To accept thedefault location(/var)
Type the location and then press Enter.To specify analternate location
7 At the local host fully qualified host name screen, do one of the following:
Press Enter.To accept the hostname obtained bythe installer
Type the fully qualified host name and then press Enter.To specify analternate hostname
8 At the installationprerequisites screen, read the information andpressEnter.
Reconfiguring CommandCentral Enterprise Reporter 5.1Reconfiguring Enterprise Reporter 5.1
60

9 At the screen that informs you to run the oracleinstancecheck script, readthe information about running the script. Then, do one of the following:
To exit the installation, type n and press Enter. Then, run thescript.
See “Ensuring that your Oracle database is properly configured”on page 34.
If you have not yetrun the script
To continue the installation, type y and press Enter.If youhave run thescript
10 At the configuration information screen, review the information about yourOracle instance and then respond to the question about whether theinformation is correct.
11 At the configure SMTP notification screen, respond to the question aboutconfiguring SMTP notification.
SMTP notification lets you email reports in Enterprise Reporter.
12 If the installer verifies that the required tablespaces and schema are notpresent, do one of the following:
Type 1 and press Enter. Then, follow the prompts so that theinstaller can create the tablespaces and schema.
To proceed and letthe installer createthe requiredtablespaces andschema
Type 2 and press Enter. Then, manually create the requiredtablespaces and schema.
See “Creating tablespaces and schema for the Oracle databaseinstance” on page 29.
To create therequiredtablespaces andschema yourself
The installer reconfigures Enterprise Reporter.
61Reconfiguring CommandCentral Enterprise Reporter 5.1Reconfiguring Enterprise Reporter 5.1

To reconfigure Enterprise Reporter 5.1 (Windows)
1 Log on to the host where the Oracle database instance resides.
2 Type the following commands at the SQL*Plus prompt:
SQL> CONNECT SYS/password AS SYSDBA
Where sys and password are the database credentials.
SQL> Spool recompile.sql
SQL> SELECT 'ALTER '||OBJECT_TYPE||' '||OWNER||'.'||OBJECT_NAME||'
COMPILE;' FROM SYS.ALL_OBJECTS WHERE STATUS <> 'VALID' AND
OBJECT_TYPE = 'VIEW' AND OWNER IN ('SAHARA','SAHARA_APP');
SQL> Spool off
SQL> @recompile.sql
3 Log on to the host on which you want to reconfigure Enterprise Reporter.
4 ClickStart>AllPrograms>Symantec>VeritasCommandCentralEnterpriseReporter > Configuration Wizard.
5 In the Welcome panel, review the information that you need to reconfigureEnterprise Reporter. Then, click Next.
6 In the License Agreement panel, read the license agreement. If you agree,click I accept the terms of the license agreement. Then, click Next.
7 In the Actions panel, click Next.
8 At the message box, read the information about running theoracleinstancecheck script. Then, do one of the following:
To exit the installation, clickYes. Then, run the script.
See “Ensuring that your Oracle database is properlyconfigured” on page 34.
If you have not yet run thescript
To continue the installation, click No.If you have run the script
9 If a message box appears about configuring shared components, follow theinstructions to stop the products that depend on the services.
See “Planning for downtime of other Symantec products” on page 23.
10 In the Configuration Inputs panel, enter information about your Oracledatabase as follows and click Next:
Reconfiguring CommandCentral Enterprise Reporter 5.1Reconfiguring Enterprise Reporter 5.1
62

Enter the locationwhere youwant theEnterpriseReporter configuration files to reside.
ER Configuration directory
Enter the Oracle home directory where theOracle client or the Oracle database is installedon the local system.
Oracle Home (ORACLE_HOME)directory
Enter the SID for the Oracle database.Oracle SID
Enter the port number for the TNS listener.TNS listener port number
Enter the fully qualified host name of the hostwhere the Oracle database resides.
Oracle database server host
Enter the Oracle database service name.Oracle database service name
Enter the user name for the Oracle database’sSYSDBA user.
Oracle database SYSDBA user
Enter the password for the SYSDBA user.Password for the above user
Enter an SMTP server so that you can emailreports in Enterprise Reporter.
SMTPserverhostname (optional)
Enter a directory on the host where the Oracledatabase resides.
Note the following requirements:
■ The directory must already exist.
■ The drive must have sufficient space(approximately 700MB).
■ Oracle must have write permissions to thedirectory.
This option is not available until EnterpriseReporter determines that the required files arenot present in the database instance.
OracledatabaseserverTablespacedirectory
11 If the Oracle database’s tablespaces and schema are not present, a messagebox appears. Do one of the following:
Do the following:
■ Click Yes.■ In the Oracle database server Tablespace directory field,
enter the location where you want the installer to create thefiles.
■ Click Next.
To proceed and letthe installer createthe requiredtablespaces andschema
63Reconfiguring CommandCentral Enterprise Reporter 5.1Reconfiguring Enterprise Reporter 5.1

Do the following:
■ Click No.■ Create the required tablespaces and schema.
See “Creating tablespaces and schema for theOracle databaseinstance” on page 29.
■ Click Next.
To stop thecurrent step andcreate the requiredtablespaces andschema yourself
12 In the Start Copying Files panel, review the installation settings and do oneof the following:
To start the installation, click Next.If the settings arecorrect
To return to the previous panels and make changes, click Back.If the settings arenot correct
13 In the Configuration panel, do the following:
■ Read the information about configuration.
■ If errors occurred, review the configuration logs.See “ Enterprise Reporter installation log files” on page 78.
■ Click Next.
14 In the Installation Complete panel, read the information about theinstallation. Then, click Finish.
Reconfiguring Enterprise Reporter after a domainname change
If you change the domain name of the domain onwhich Enterprise Reporter runs,you need to reconfigure Enterprise Reporter so it runs properly.
Table 6-1 outlines the process to reconfigure Enterprise Reporter after a domainname change.
Table 6-1 Process to reconfigure Enterprise Reporter after a domain namechange
DescriptionStep
Back up your reports. If you do not back up the reports, they will be lost.
See “To back up your reports” on page 65.
1
Reconfiguring CommandCentral Enterprise Reporter 5.1Reconfiguring Enterprise Reporter after a domain name change
64

Table 6-1 Process to reconfigure Enterprise Reporter after a domain namechange (continued)
DescriptionStep
Delete the UserManagement.xml file.
See “To delete UserManagement.xml” on page 66.
2
Edit the ERUsers.ini file.
See “To edit ERUsers.ini” on page 66.
3
Recreate the cognos database user.
See “To recreate the cognos database user” on page 66.
4
Edit the ABAuthSource and RBAuthSource files.
See “To edit the ABAuthSource and RBAuthSource files” on page 67.
5
If the Oracle database instance is on the same host as Enterprise Reporter, doone of the following:
■ Modify the ccer_conf file (Solaris).
See “To modify the ccer_conf file (Solaris)” on page 67.
■ Update the ER_HOST_FQHN registry entry (Windows).
See “To update the ER_HOST_FQHN registry entry (Windows)” on page 68.
6
Reconfigure Enterprise Reporter.
See “Reconfiguring Enterprise Reporter 5.1” on page 59.
7
If you use business views, add them to Enterprise Reporter’s metamodel.
See “To add business views to Enterprise Reporter’s metamodel” on page 68.
8
If you use custom attributes, add them to Enterprise Reporter’s metamodel.
See “Toadd customattributes toEnterpriseReporter’smetamodel”onpage68.
9
Import the reports that you backed up in step 1.
See “To import reports” on page 68.
10
To back up your reports
◆ In the Enterprise Reporter Console, do the following for each report that youwant to save:
■ Open the report in Report Studio.
■ Click Tools > Copy Report to clipboard.
■ Copy the report from the clipboard to a text file.
65Reconfiguring CommandCentral Enterprise Reporter 5.1Reconfiguring Enterprise Reporter after a domain name change

■ Save the text file.
To delete UserManagement.xml
1 On the Enterprise Reporter host, navigate to the following directory:
/opt/VRTSsmweb/webgui/sm/configSolaris
install_location\VRTSsmweb\webgui\sm\configWindows
where install_location is the directory in which you installed EnterpriseReporter. The default directory for Windows is C:\Program Files\VERITAS
2 Delete the file UserManagement.xml
To edit ERUsers.ini
1 On the Enterprise Reporter host, navigate to the following directory:
configuration_directory/VRTSccer/confSolaris
configuration_directory\VRTSccer\confWindows
where configuration_directory is the directory in which you chose to storeEnterprise Reporter configuration files. The default directories are /var forSolaris and C:\Program Files\VERITAS for Windows.
2 Open the file ERUsers.ini in a text editor.
3 In the file, under the section [function cognos_updates] change the domainname to the new domain name.
To recreate the cognos database user
1 On the Enterprise Reporter host, stop Cognos as follows:
■ Go to /opt/VRTSccer/bin
■ To set your environment variable, type the followingcommand:
. setenv.sh
■ To stop Cognos, type the following command:
./ccercog stop
Solaris
Reconfiguring CommandCentral Enterprise Reporter 5.1Reconfiguring Enterprise Reporter after a domain name change
66

Use Windows’ Service Control Manager to stop the serviceCognos8.
Windows
2 On the host where the Oracle database instance resides, run the followingcommands at the SQL*Plus prompt:
SQL> CONNECT SYS/password AS SYSDBA
where sys and password are the database credentials.
SQL> drop user SAHARA_COGNOS cascade;
SQL> create user SAHARA_COGNOS identified by sahara default
tablespace SAHARA_CGNS_01 quota unlimited on SAHARA_CGNS_01;
SQL> grant create procedure,create sequence,create session,create
table,create trigger,create view,SAHARA_READ to SAHARA_COGNOS;
SQL> COMMIT;
SQL> QUIT;
To edit the ABAuthSource and RBAuthSource files
1 On the Enterprise Reporter host, navigate to the following directory:
configuration_directory/VRTSatSolaris
configuration_directory\Security\Authentication\
systemprofile
Windows
where configuration_directory is the directory in which you chose to storeEnterprise Reporter configuration files. The default directories are /var forSolaris and C:\Program Files\VERITAS for Windows.
2 Open the files ABAuthSource and RBAuthSource in a text editor.
3 In the files, change the domain name to the new domain name.
To modify the ccer_conf file (Solaris)
1 On the Enterprise Reporter host, navigate to /etc/vx/ccer/
2 Open the file ccer_conf in a text editor.
3 Change the entry for CCER_ORAHOST to the new domain name.
67Reconfiguring CommandCentral Enterprise Reporter 5.1Reconfiguring Enterprise Reporter after a domain name change

To update the ER_HOST_FQHN registry entry (Windows)
◆ In Windows’ registry editor, underHKEY_LOCAL_MACHINE\SOFTWARE\VERITAS\VRTSccer\config, modify theregistry entry ER_HOST_FQHN to the new domain name.
To add business views to Enterprise Reporter’s metamodel
1 OntheEnterpriseReporterhost, openanoperating systemconsole andchangeto the following directory:
install_location/VRTSccer/binSolaris
install_location\VRTSccer\binWindows
where install_location is the directory in which you installed EnterpriseReporter. The default directories are /opt for Solaris and C:\Program
Files\VERITAS for Windows.
2 Type the following command:
update_metamodel.shSolaris
update_metamodel.batWindows
To add custom attributes to Enterprise Reporter’s metamodel
1 OntheEnterpriseReporterhost, openanoperating systemconsole andchangeto the following directory:
install_location/VRTSccer/binSolaris
install_location\VRTSccer\binWindows
where install_location is the directory in which you installed EnterpriseReporter. The default directories are /opt for Solaris and C:\Program
Files\VERITAS for Windows.
2 Type the following command:
update_attributes.shSolaris
update_attributes.batWindows
To import reports
◆ Do the following for each report that you backed up:
Reconfiguring CommandCentral Enterprise Reporter 5.1Reconfiguring Enterprise Reporter after a domain name change
68

■ Open the saved text file.
■ Copy the contents of the file.
■ In the Enterprise Reporter Console, open Report Studio.
■ Click Tools > Open Report from clipboard.
■ Save the report.
69Reconfiguring CommandCentral Enterprise Reporter 5.1Reconfiguring Enterprise Reporter after a domain name change

Reconfiguring CommandCentral Enterprise Reporter 5.1Reconfiguring Enterprise Reporter after a domain name change
70

UninstallingCommandCentralEnterprise Reporter 5.1
This chapter includes the following topics:
■ Uninstalling Enterprise Reporter 5.1 from a Solaris host
■ Uninstalling Enterprise Reporter 5.1 from a Windows host
■ Removing all packages and shared components from Windows hosts
■ Removing Enterprise Reporter tablespaces and schema from the Oracledatabase
Uninstalling Enterprise Reporter 5.1 from a Solarishost
Use Enterprise Reporter’s uninstall script to uninstall Enterprise Reporter froma Solaris host.
Optionally, you can choose to remove all shared components when you uninstallEnterprise Reporter.
Warning: Other Symantec products may depend on these shared components.Only remove the shared components if you are certain that no other Symantecproducts depend on the components.
7Chapter

To uninstall Enterprise Reporter from a Solaris host
1 On the Enterprise Reporter Management Server, open an operating systemconsole and log in as root.
2 (Optional) If youwant to remove sharedcomponentswhenEnterpriseReporteruninstalls, set the following environment variable:
`export CCER_TOTAL_CLEANUP=1`
3 Change to the following directory:
/opt/VRTS/install
4 Type the following command:
./uninstallccer
5 To uninstall Enterprise Reporter, type y and then press Enter.
Uninstalling Enterprise Reporter 5.1 fromaWindowshost
Use Windows’ Add/Remove Programs utility to uninstall Enterprise Reporterfrom a Windows host.
Whenyouuninstall EnterpriseReporter, packages and shared components remainon the host.
See “Removing all packages and shared components from Windows hosts”on page 73.
To uninstall Enterprise Reporter from a Windows host
1 Log on to the Enterprise Reporter Management Server as a user withadministrator-level privileges.
2 From the Windows Control Panel, click Add/Remove Programs.
3 Select Veritas CommandCentral™ Enterprise Reporter from Symantec.
4 Click Remove.
5 In the Uninstallation wizard, read the panels and click Next.
6 In the Uninstallation Complete panel, click Finish.
Uninstalling CommandCentral Enterprise Reporter 5.1Uninstalling Enterprise Reporter 5.1 from a Windows host
72

Removing all packages and shared components fromWindows hosts
After you uninstall Enterprise Reporter, some packages, directories, registryentries, and shared components remain. You can remove these, if desired.
Warning: Other Symantec products may depend on these shared components.Only remove the shared components if you are certain that no other Symantecproducts depend on the components.
To remove all packages and shared components from Windows hosts
1 Log on to the host on which you want to remove all shared components as auser with administrator-level privileges.
2 Open the following directory:
installer_location\win\command_central_enterprise_reporter\
Support\CleanUp\
where installer_location is one of the following:
■ The directory in which you unzipped the installer .zip file
■ The location of your DVD-ROM drive
3 Run the following file:
ERCleanup.bat
Removing Enterprise Reporter tablespaces andschema from the Oracle database
You can remove Enterprise Reporter tablespaces and schema from the Oracledatabase instance. You should remove the tablespaces and schema only ifEnterprise Reporter is not configured to use the Oracle database instance.
To remove Enterprise Reporter tablespaces and schema from the Oracle database
1 Copy the contents of the following directory to a writeable temp directory:
installer_location/sol_sparc/command_central_enterprise_reporter/
scripts/db
Solaris
installer_location\win\command_central_enterprise_reporter\
scripts\db
Windows
73Uninstalling CommandCentral Enterprise Reporter 5.1Removing all packages and shared components from Windows hosts

where installer_location is one of the following:
■ The directory in which you extracted the installation files
■ The location of your DVD-ROM drive
2 Type the following commands at the SQL*Plus prompt:
SQL> SHUTDOWN IMMEDIATE
SQL> STARTUP
SQL> CONNECT SYS/password AS SYSDBA
SQL> @path_to_files/saharaDropUsers.sql
SQL> drop user SAHARA_COGNOS cascade;
SQL> @path_to_files/@saharaDropTablespaces.sql;
Solaris
SQL> SHUTDOWN IMMEDIATE
SQL> STARTUP
SQL> CONNECT SYS/password AS SYSDBA
SQL> @path_to_files\saharaDropUsers.sql
SQL> drop user SAHARA_COGNOS cascade;
SQL> @path_to_files\@saharaDropTablespaces.sql;
Windows
where:
are the database credentials.sys and password
is the location where the Enterprise Reporter database scriptsreside. These are the scripts that you copied in step 1.
path_to_files
3 Delete the following tablespaces from the directory in which you created thetablespace files:
■ sacgns01.dbf
■ sadimd01.dbf
■ safctd01.dbf
■ saindx01.dbf
■ sadata01.dbf
■ sadimi01.dbf
■ safcti01.dbf
Uninstalling CommandCentral Enterprise Reporter 5.1Removing Enterprise Reporter tablespaces and schema from the Oracle database
74

■ sastge01.dbf
75Uninstalling CommandCentral Enterprise Reporter 5.1Removing Enterprise Reporter tablespaces and schema from the Oracle database

Uninstalling CommandCentral Enterprise Reporter 5.1Removing Enterprise Reporter tablespaces and schema from the Oracle database
76

Supplemental information
This appendix includes the following topics:
■ Troubleshooting your Enterprise Reporter installation
■ Enterprise Reporter installation log files
■ Mounting theCommandCentral EnterpriseReporter 5.1 product disc onSolaris
■ Unmounting the product disc from a Solaris host
■ Enterprise Reporter component packages
Troubleshooting your EnterpriseReporter installationIf the Cognos server does not start, you may have to troubleshoot your Oracledatabase. To troubleshoot the database, do the following:
■ Verify that the database is up and running.
■ For Solaris hosts, source the Enterprise Reporter env script from/opt/VRTSccer/bin/setenv.sh to set all parameters.
■ If the sahara.sql script fails midway, you must drop existing users beforere-running the script.
To drop users and the Enterprise Reporter schema and recreate the schema
1 Copy the contents of the following directory to a writeable temp directory:
installer_location/sol_sparc/command_central_enterprise_reporter/
scripts/db
Solaris
installer_location\win\command_central_enterprise_reporter\
scripts\db
Windows
AAppendix

where installer_location is one of the following:
■ The directory in which you extracted the installation files
■ The location of your DVD-ROM drive
2 Type the following command to drop users and the Enterprise Reporterschema:
sqlplus sys/password@ccer as sysdba@path_to_files/saharaDropUsers.sql
Solaris
sqlplus sys/password@ccer as sysdba@path_to_files\saharaDropUsers.sql
Windows
where:
are the database credentials.sys and password
is the instance name.ccer
is the location where the Enterprise Reporter database schemascripts reside. These are the scripts that you copied in step 1.
path_to_files
3 Type the following command to recreate the schema:
sqlplus sys/password@ccer as sysdba@path_to_files/sahara.sql
Solaris
sqlplus sys/password@ccer as sysdba@path_to_files\sahara.sql
Windows
where:
are the database credentials.sys and password
is the instance name.ccer
is the location where the Enterprise Reporter database schemascripts reside. These are the scripts that you copied in step 1.
path_to_files
Enterprise Reporter installation log filesYou can access Enterprise Reporter installation log files from the followingdirectories:
Supplemental informationEnterprise Reporter installation log files
78

/opt/VRTS/install/logs/installccer-unique_identifier/
where unique_identifier is a series of six alphanumeric characters
Solaris
C:\Documents and Settings\All Users\Application
Data\VERITAS\VCC\51
Windows
Table A-1 describes the installation log files available on Solaris.
Table A-1 Installation log files for Solaris
DescriptionFile name
Configuration log for Cognos.ccer_cognos.log
Lists the packages that install withEnterprise Reporter.
installccer-unique_identifier.install.
host_name
Install log of the VRTSsmweb patch.installccer-unique_identifier.install.
patch.128056.host_name
Lists the patches that install withEnterprise Reporter.
installccer-unique_identifier.install.
patch.host_name
Install log for the VRTSccer package.installccer-unique_identifier.install.
VRTSccer.host_name
Install log for the VRTSjre15 package.installccer-unique_identifier.install.
VRTSjre15.host_name
Install log for the VRTSPerl package.installccer-unique_identifier.install.
VRTSperl.host_name
Install log for the VRTSsmweb package.installccer-unique_identifier.install.
VRTSsmweb.host_name
Install log for the VRTSweb package.installccer-unique_identifier.install.
VRTSweb.host_name
Lists the summary of operations that theinstaller performs.
installccer-unique_identifier.
summary
Install log for Enterprise Reporter.installccer-unique_identifier.log
Table A-2 describes the installation log files available on Windows.
79Supplemental informationEnterprise Reporter installation log files
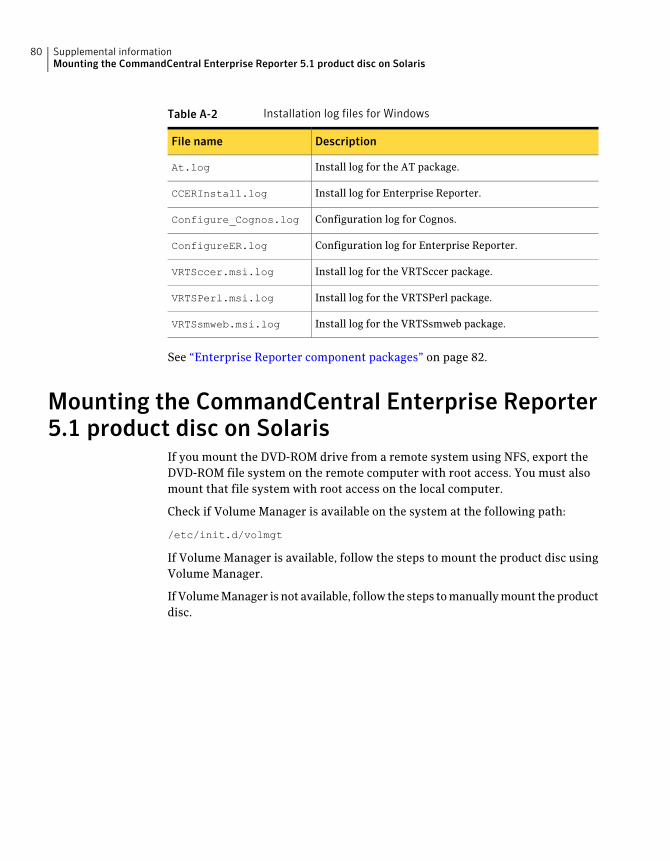
Table A-2 Installation log files for Windows
DescriptionFile name
Install log for the AT package.At.log
Install log for Enterprise Reporter.CCERInstall.log
Configuration log for Cognos.Configure_Cognos.log
Configuration log for Enterprise Reporter.ConfigureER.log
Install log for the VRTSccer package.VRTSccer.msi.log
Install log for the VRTSPerl package.VRTSPerl.msi.log
Install log for the VRTSsmweb package.VRTSsmweb.msi.log
See “Enterprise Reporter component packages” on page 82.
Mounting the CommandCentral Enterprise Reporter5.1 product disc on Solaris
If you mount the DVD-ROM drive from a remote system using NFS, export theDVD-ROM file system on the remote computer with root access. You must alsomount that file system with root access on the local computer.
Check if Volume Manager is available on the system at the following path:
/etc/init.d/volmgt
If Volume Manager is available, follow the steps to mount the product disc usingVolume Manager.
IfVolumeManager is not available, follow the steps tomanuallymount theproductdisc.
Supplemental informationMounting the CommandCentral Enterprise Reporter 5.1 product disc on Solaris
80

To mount the CommandCentral Enterprise Reporter 5.1 product disc on Solarisusing Volume Manager
1 Insert the CommandCentral Enterprise Reporter 5.1 product disc into theDVD-ROM drive, open a Solaris console, and login as root.
If the Volume Manager (vold) is currently running, the DVD-ROMautomatically mounts as /cdrom/cd_label if the disc has a label or/cdrom/unnamed_cdrom if it is unlabeled.
2 If the Volume Manager is not currently running, then start it by typing thefollowing command:
/etc/init.d/volmgt start
The DVD-ROM is now mounted.
To manually mount the CommandCentral Enterprise Reporter 5.1 product disc onSolaris
1 Insert the CommandCentral Enterprise Reporter 5.1 product disc into theDVD-ROM drive, open a Solaris console, and login as root.
2 Determine the name of the device by entering the following command:
ls -al /dev/sr*
3 The command in step2 returns thenameof theDVD-ROMdevice. An examplewould be lrwxrwxrwx 1 root root 12 Apr 3 2007 /dev/sr0 ->
dsk/c2t0d0s2
4 Enter the following commands to mount the DVD-ROM:
mkdir -p /dvd_mount
mount -F hsfs -o ro /dev/sr0 /dvd_mount
where/dev/sr0 represents thenameof thedevice fromstep2and/dvd_mountrepresents the DVD-ROM mount directory.
5 Your DVD-ROM file system is now mounted. To view the contents of theDVD-ROM,place thedisk in thedrive andenter thecd /dvd_mount commandwhere /dvd_mount is the DVD mount point directory.
Unmounting the product disc from a Solaris hostAfter you use the product disc, you can unmount it.
81Supplemental informationUnmounting the product disc from a Solaris host

To unmount the product disc from a Solaris host
1 Use the mount command to list the mounted partitions or discs.
The output looks similar to the following:
/ on /dev/vg00/lvol3 defaults on Tue Jun 25 13:44:03 2004
...
/CDROM on /dev/dsk/c3t2d0 ro on Tue Jun 25 13:44:34 2004
2 To unmount the product disc use the following command:
unmount /CDROM
3 If Volume Manager (vold) is running on the system, to unmount the productdisc, type the following command:
/etc/init.d/volmgt stop
Enterprise Reporter component packagesTable A-3 lists the packages that install on Solaris and Windows hosts.
Table A-3 Packages that install on Solaris and Windows hosts
DescriptionPackage
Symantec Product Authentication ServiceVRTSat
Veritas CommandCentral Enterprise ReporterVRTSccer
Symantec Java Runtime Environment RedistributionVRTSjre
Veritas Perl RedistributionVRTSperl
Storage Management Web Console by SymantecVRTSsmweb
Veritas License UtilitiesVRTSvlic (Solaris only)
Symantec Web ServerVRTSweb
Supplemental informationEnterprise Reporter component packages
82

AAuthentication Service
deploying 21overview 21
CCommandCentral Enterprise Reporter
componentsCognos 13Console 13Kettle 13Management Server 13Oracle database 13
documentation 14install packages 82logging in 51overview 11
component packages 82configuring
Solaris 46Windows 48
Ddocumentation 14DVD
mounting 80unmounting 81
Ffirewall requirements 19
Iinstall and configure 23install only 23installation
mounting the DVD 80options 23packages 82post-install setup 51prerequisites 37
installation (continued)shared components 23Solaris 38troubleshooting 77unmounting the DVD 81Windows 42
Llistener.ora 33log files 78logging in 51
Nnetwork requirements 19
Ooperating system requirements 18Oracle database
instancecreating tablespaces and schema 29removing tablespaces and schema 73requirements 25setting up on Solaris 26setting up on Windows 28upgrading schema 54verifying configuration 34
listener.ora 33requirements
client 21instance 25version 20
TNS listener 32tnsnames.ora 33
oracleinstancecheck script 34
Ppackages
removing 73
Index

Rrequirements
host 17network and firewall 19operating system 18Oracle database client 21Oracle database instance 25Oracle database version 20
Sschema
creating 29removing 73upgrading 54
shared components 23removing 73
Ttablespaces
creating 29removing 73
TNS listenerstarting 32status 32
tnsnames.ora 33troubleshooting 77
Uuninstalling
packages and shared components 73Solaris 71Windows 72
upgrademounting the DVD 80Oracle database schema 54prerequisites 53shared components 23unmounting the DVD 81
upgradingpost-upgrade setup 58Solaris 56
Index84