
V1L1 Bandits Nest - Print Friendly
16
-
Upload
stevenschur -
Category
Documents
-
view
156 -
download
3
description
Print friendly version of a module for DND 5th edition.
Transcript of V1L1 Bandits Nest - Print Friendly
2
Ban
dit’s
Nes
tD
unge
ons O
n D
eman
d
© 2015 Dan Coleman. Dungeons on Demand is not associated with Wizards of the Coast LLC. Player’s Handbook, Dungeon Master’s Guide, and Monster Manual are wholly owned trademarks of Wizards of the Coast LLC in the USA and other countries. All rights reserved.
Bandit’sNest
Tips for the Game Master
• This is your dungeon adventure. If you don’t like how some-thing works, change it. If you think an item or NPC from your campaign world works better than an item or NPC presented here, make the switch. If a puzzle is too hard or an encounter is too easy, drop some hints or add some monsters - do whatever is best for your game. You’re the master of your gaming world, this packet is just a guide to help you. It will present hints and opportunities for you to customize, but ultimately everything is up to you. You don’t need permission to break the mold.
• The encounters listed within this packet were designed by the book - but by the book isn’t always the most practical for every party of adventurers. You may need to give a monster fewer hit points, fudge some dice rolls, or just plain ignore some of the rules if you think an encounter is a risk of killing the entire party.
• This adventure will work best when you take the time to read through the packet first, so you’re familiar with everything that’s going on. Sometimes the monsters that lie in wait to ambush the party, traps that are hidden from sight, or the clues to a puzzle may be glossed over if you’re not prepared.
• The goal of each adventure is to give the party enough experience points to advance one level. This depends on a lot of things however - the party needs to complete most of the encounters and be of the appropriate size and level for that to work out. Ultimately, you might want to go without experience points altogether, and simply allow the players to advance to the next level once they’re finished the dungeon. This means a lot less record-keeping on you part!
• The ultimate goal is to have fun! If you’re having fun while playing, then you’re playing correctly.

3
Introduction ....................................................................................................................................................... 4Dungeon Overview Map .................................................................................................................................. 5Adventure Hooks ............................................................................................................................................... 6Encounters .......................................................................................................................................................... 7Wrapping Up ...................................................................................................................................................... 15Appendix A: New Monsters & NPCs .............................................................................................................. 16
Contents
4
Ban
dit’s
Nes
tD
unge
ons O
n D
eman
d
Introduction
Dungeons On Demand are designed with Game Masters in mind, created to be instant adventure sites a GM can wholly custom-ize to fit his or her campaign. Unlike lengthy, full scale published adventures, Dungeons On Demand can often be played in a single gaming session, requires little planning beforehand aside from reading the packet, and gives plenty of options to make the dun-geon fit seamlessly within the owner’s campaign. Each dungeon has enough encounters and challenges to advance the party play-ing through it by one level.
Bandit’s Nest is designed for a party of 1st-level adventurers, as-suming 4 or 5 players in the party. If your game has more or less players, you can adjust the amount of monsters present in each encounter to fit the proper difficulty.
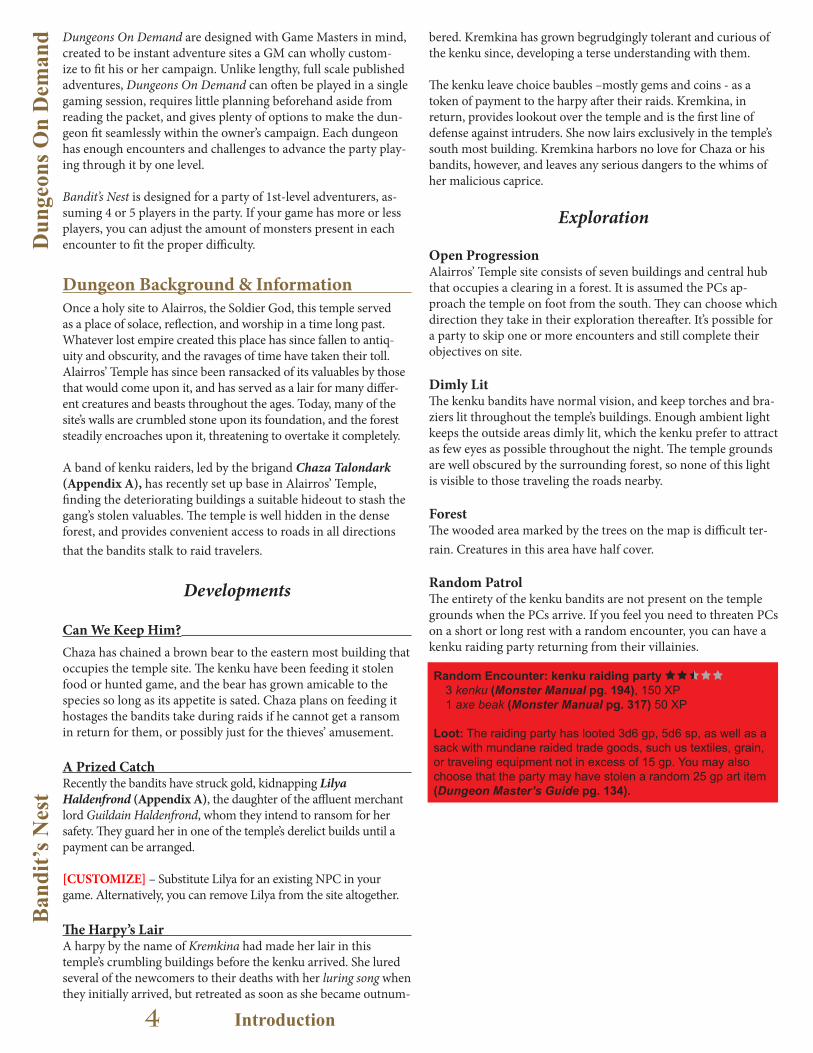
Dungeon Background & Information Once a holy site to Alairros, the Soldier God, this temple served as a place of solace, reflection, and worship in a time long past. Whatever lost empire created this place has since fallen to antiq-uity and obscurity, and the ravages of time have taken their toll. Alairros’ Temple has since been ransacked of its valuables by those that would come upon it, and has served as a lair for many differ-ent creatures and beasts throughout the ages. Today, many of the site’s walls are crumbled stone upon its foundation, and the forest steadily encroaches upon it, threatening to overtake it completely.
A band of kenku raiders, led by the brigand Chaza Talondark (Appendix A), has recently set up base in Alairros’ Temple, finding the deteriorating buildings a suitable hideout to stash the gang’s stolen valuables. The temple is well hidden in the dense forest, and provides convenient access to roads in all directions that the bandits stalk to raid travelers.
Developments
Can We Keep Him?
Chaza has chained a brown bear to the eastern most building that occupies the temple site. The kenku have been feeding it stolen food or hunted game, and the bear has grown amicable to the species so long as its appetite is sated. Chaza plans on feeding it hostages the bandits take during raids if he cannot get a ransom in return for them, or possibly just for the thieves’ amusement.
A Prized Catch Recently the bandits have struck gold, kidnapping Lilya Haldenfrond (Appendix A), the daughter of the affluent merchant lord Guildain Haldenfrond, whom they intend to ransom for her safety. They guard her in one of the temple’s derelict builds until a payment can be arranged.
[CUSTOMIZE] – Substitute Lilya for an existing NPC in your game. Alternatively, you can remove Lilya from the site altogether.
The Harpy’s Lair A harpy by the name of Kremkina had made her lair in this temple’s crumbling buildings before the kenku arrived. She lured several of the newcomers to their deaths with her luring song when they initially arrived, but retreated as soon as she became outnum-
bered. Kremkina has grown begrudgingly tolerant and curious of the kenku since, developing a terse understanding with them.
The kenku leave choice baubles –mostly gems and coins - as a token of payment to the harpy after their raids. Kremkina, in return, provides lookout over the temple and is the first line of defense against intruders. She now lairs exclusively in the temple’s south most building. Kremkina harbors no love for Chaza or his bandits, however, and leaves any serious dangers to the whims of her malicious caprice.
Exploration
Open ProgressionAlairros’ Temple site consists of seven buildings and central hub that occupies a clearing in a forest. It is assumed the PCs ap-proach the temple on foot from the south. They can choose which direction they take in their exploration thereafter. It’s possible for a party to skip one or more encounters and still complete their objectives on site.
Dimly LitThe kenku bandits have normal vision, and keep torches and bra-ziers lit throughout the temple’s buildings. Enough ambient light keeps the outside areas dimly lit, which the kenku prefer to attract as few eyes as possible throughout the night. The temple grounds are well obscured by the surrounding forest, so none of this light is visible to those traveling the roads nearby.
ForestThe wooded area marked by the trees on the map is difficult ter-rain. Creatures in this area have half cover.
Random PatrolThe entirety of the kenku bandits are not present on the temple grounds when the PCs arrive. If you feel you need to threaten PCs on a short or long rest with a random encounter, you can have a kenku raiding party returning from their villainies.
Random Encounter: kenku raiding party 3 kenku (Monster Manual pg. 194), 150 XP1 axe beak (Monster Manual pg. 317) 50 XP
Loot: The raiding party has looted 3d6 gp, 5d6 sp, as well as a sack with mundane raided trade goods, such us textiles, grain, or traveling equipment not in excess of 15 gp. You may also choose that the party may have stolen a random 25 gp art item (Dungeon Master’s Guide pg. 134).
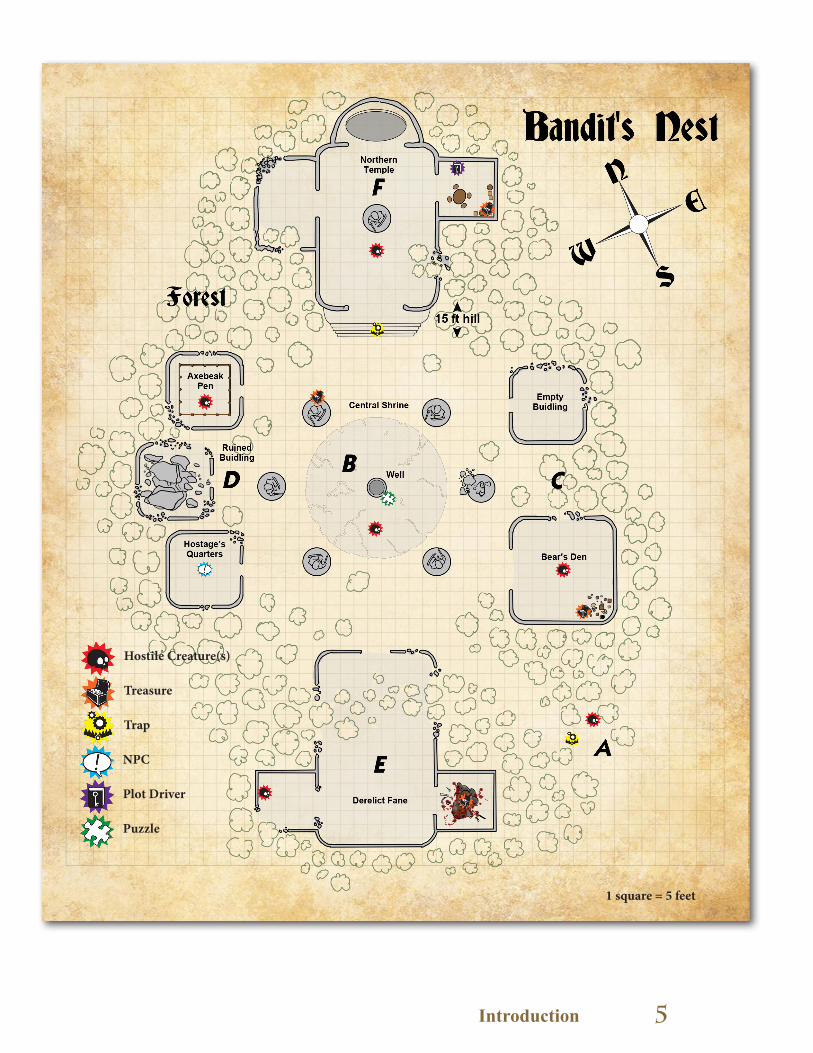
5Introduction
1 square = 5 feet
Hostile Creature(s)
Treasure
Trap
NPC
Plot Driver
Puzzle
6
Ban
dit’s
Nes
tD
unge
ons O
n D
eman
d
Introduction
Adding Bandit’s Nest to Your Campaign Bandit’s Nest is designed to be played by a party of 1st-level play-ers. You can increase the difficulty of the encounters by adding more monsters for higher level players. If you’re unable to come up with a reason as to why the party would be at the adventure site, consider using one or more of these hooks:
Hook 1: The Stolen MacGuffinDuring their raids, the bandits have absconded with an item important to your campaign’s plot. The exact nature of the item (referred to as a MacGuffin) are up to you to decide- it could be a lost family heirloom, an expensive piece of jewelry, a one of a kind history book, an ancestral weapon, or any item of importance to an NPC in your game. The PCs are hired by the NPC to retrieve the item at any cost. In return they will pay the party a total of 50 gp. Hook 2: Lost LilyaLilya Haldenfrond (or the NPC you choose to replace her with) has been captured by Chaza and his miscreants in hopes to ransom her for her father’s gold. Guildain Haldenfrond (or an appropriate NPC) has commissioned the party to rescue her, offering a 50 gp reward for her safe return. If you use this hook, you may want to consider incorporating Hook 1 as well, using Lilya herself as the NPC in need. When the party rescues Lilya, she explains the thieves have stolen a MacGuffin from her during the raid she was abducted in, and she refuses to leave the dungeon unless the party secures it.
Hook 3: Raided!The party is traveling a nearby road when they hear the distinct sound of a baby crying echoing from the forest. When they stop to investigate, the party is surrounded on all sides by a kenku raiding party (described above). The thieves fight until it’s clear they’re out matched, at which point they retreat into the woods and the PCs can pursue them. If the PCs manage to kill the entire party before they attempt to retreat, insinuate a path the players otherwise would have missed becomes visible in the aftermath of the combat.
�� Role-playing Kenku ��Kenku understand Common and Auran, but cannot speak either language. Fortunately, kenku are incredible mimics, able to reproduce the sounds of things they’ve heard before in near perfect duplication. Refer to the Mimicry feature listed under kenku in the Monster Manual for information regarding this trait, as well as the DC associated with it.
The kenku that occupy Alairros’ Temple have collected a menag-erie of phrases of that they may use to converse with the PCs or others. Remember that they use these sayings in the same voices and inflection they’ve heard them in, sometimes creating a con-fusing or nonsensical conversation. Use these phrases or sounds if the PCs attempt to communicate with the kenku bandits.
A deep, stern voice of a guardsman• Halt! Who goes there?! • What’s this? To arms! To arms!
The voice of a curious child• Look behind you mama, the birdie has papa’s cloak!• Heehee! He’s got a shiny stone! Can I has one mister birdie?• Where’s papa?
A terrified voice with a dwarven accent• Ye gods’ run! Its got a knife!
A frightened elderly woman• I think.. I think it wants our money – Charles, please, just, just give it our coins. Maybe... maybe it will let us go-SLASH-ooaAAHhhhhhhh!
A commander giving orders• Strike them down men, I’ll have no thieves on my watch!• They’ve ran that way, after them!
A scared, rushed voice of a male• I’m warning you! Stay where you are!
A wizened voice with an elven accent• Curious, creatures you are.• I don’t think you know what you’re up against.
An angry female youth• Unhand me you beasts! Do you know who my father is?• Put that back! That doesn’t belong to you.• Well I never! You’ll rue this day, you brigands!
• A baby/children crying
• A horse neighing and the sound of hoofbeats
• A bear’s roar
7Encounters
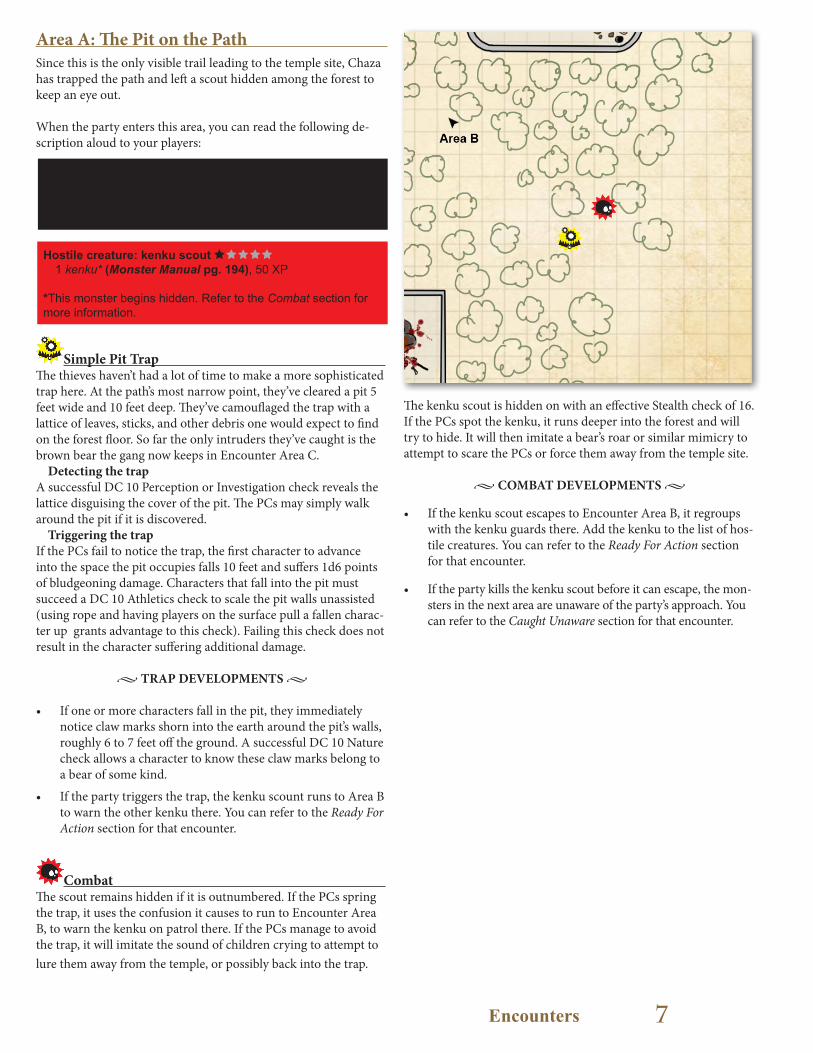
Area A: The Pit on the Path Since this is the only visible trail leading to the temple site, Chaza has trapped the path and left a scout hidden among the forest to keep an eye out.
When the party enters this area, you can read the following de-scription aloud to your players:
The path you’re following splits away to reveal a hint of light piercing the dark forest and night sky. You can vaguely make out shadows dancing off firelight, and the shapes of stone statues and old stone walls in a clearing just ahead.
Hostile creature: kenku scout 1 kenku* (Monster Manual pg. 194), 50 XP
*This monster begins hidden. Refer to the Combat section for more information.
Simple Pit Trap The thieves haven’t had a lot of time to make a more sophisticated trap here. At the path’s most narrow point, they’ve cleared a pit 5 feet wide and 10 feet deep. They’ve camouflaged the trap with a lattice of leaves, sticks, and other debris one would expect to find on the forest floor. So far the only intruders they’ve caught is the brown bear the gang now keeps in Encounter Area C.
Detecting the trapA successful DC 10 Perception or Investigation check reveals the lattice disguising the cover of the pit. The PCs may simply walk around the pit if it is discovered.
Triggering the trapIf the PCs fail to notice the trap, the first character to advance into the space the pit occupies falls 10 feet and suffers 1d6 points of bludgeoning damage. Characters that fall into the pit must succeed a DC 10 Athletics check to scale the pit walls unassisted (using rope and having players on the surface pull a fallen charac-ter up grants advantage to this check). Failing this check does not result in the character suffering additional damage.
• TRAP DEVELOPMENTS •
• If one or more characters fall in the pit, they immediately notice claw marks shorn into the earth around the pit’s walls, roughly 6 to 7 feet off the ground. A successful DC 10 Nature check allows a character to know these claw marks belong to a bear of some kind.
• If the party triggers the trap, the kenku scount runs to Area B to warn the other kenku there. You can refer to the Ready For Action section for that encounter.
Combat The scout remains hidden if it is outnumbered. If the PCs spring the trap, it uses the confusion it causes to run to Encounter Area B, to warn the kenku on patrol there. If the PCs manage to avoid the trap, it will imitate the sound of children crying to attempt to lure them away from the temple, or possibly back into the trap.
The kenku scout is hidden on with an effective Stealth check of 16. If the PCs spot the kenku, it runs deeper into the forest and will try to hide. It will then imitate a bear’s roar or similar mimicry to attempt to scare the PCs or force them away from the temple site.
• COMBAT DEVELOPMENTS •
• If the kenku scout escapes to Encounter Area B, it regroups with the kenku guards there. Add the kenku to the list of hos-tile creatures. You can refer to the Ready For Action section for that encounter.
• If the party kills the kenku scout before it can escape, the mon-sters in the next area are unaware of the party’s approach. You can refer to the Caught Unaware section for that encounter.
8
Ban
dit’s
Nes
tD
unge
ons O
n D
eman
d
Encounters
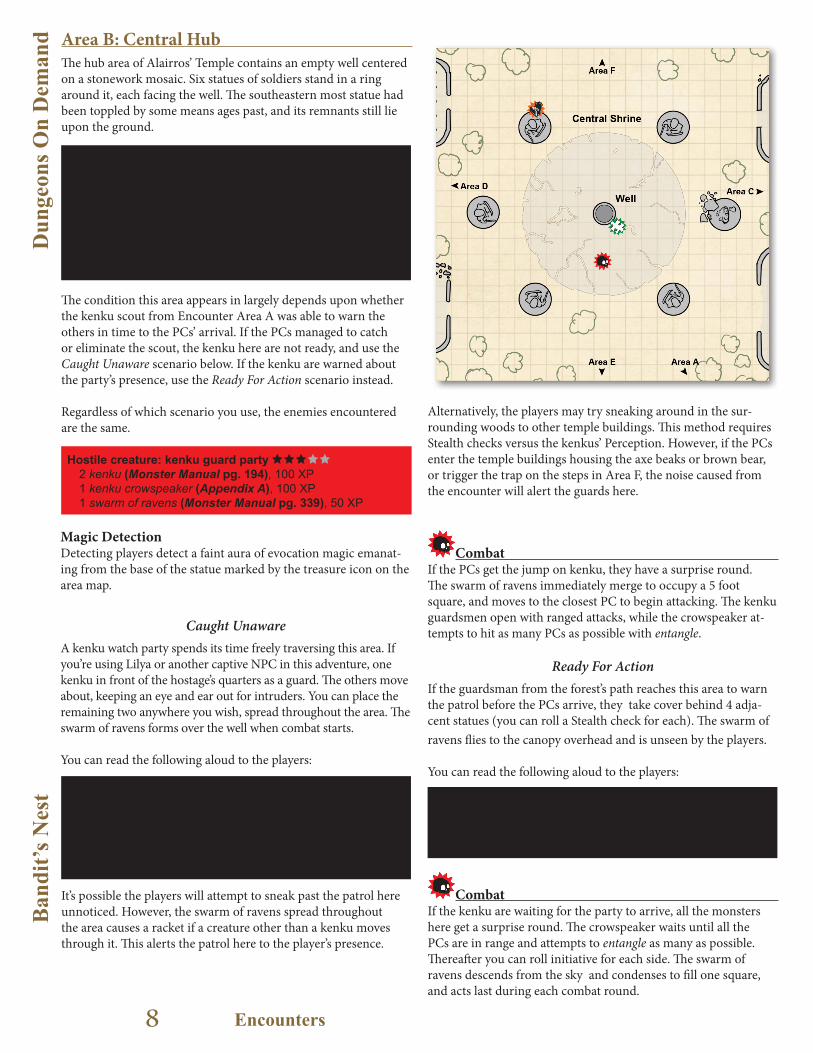
Area B: Central Hub The hub area of Alairros’ Temple contains an empty well centered on a stonework mosaic. Six statues of soldiers stand in a ring around it, each facing the well. The southeastern most statue had been toppled by some means ages past, and its remnants still lie upon the ground.
The condition this area appears in largely depends upon whether the kenku scout from Encounter Area A was able to warn the others in time to the PCs’ arrival. If the PCs managed to catch or eliminate the scout, the kenku here are not ready, and use the Caught Unaware scenario below. If the kenku are warned about the party’s presence, use the Ready For Action scenario instead.
Regardless of which scenario you use, the enemies encountered are the same.
The woods open into a large clearing, revealing the dimly lit remains of some long lost ruin. To the north east you see a large hill, with a deteriorating temple nestled atop it. To the south west you see the entrance to a similar building that has been com-pletely overrun by nature, the forest itself has broken through its foundation and trees line its interior. Smaller buildings form an enclave between them. In the middle of everything is a stone well, set atop a cobbled mosaic, ringed by statues of warriors.
Walking freely about the area are raven-like humanoids, oc-cassionally rattling off caws to one another. They’re seemingly unaware of your presence, walking to and fro, and occasionally stopping to peer into nearby buildings. Engulfing the entire area is a murder of crows, breaking the forest’s pervasive silence with the steady rhythm of beak pecks against stone and fluttering wings.
There’s an unpleasant stillness in this area. You can hear some muffled noises coming from the closest southern building that occupies the site. All over the ground, amid the forest floor and stone, you see dark raven feathers scattered about.
Hostile creature: kenku guard party 2 kenku (Monster Manual pg. 194), 100 XP1 kenku crowspeaker (Appendix A), 100 XP1 swarm of ravens (Monster Manual pg. 339), 50 XP
Magic DetectionDetecting players detect a faint aura of evocation magic emanat-ing from the base of the statue marked by the treasure icon on the area map.
Caught UnawareA kenku watch party spends its time freely traversing this area. If you’re using Lilya or another captive NPC in this adventure, one kenku in front of the hostage’s quarters as a guard. The others move about, keeping an eye and ear out for intruders. You can place the remaining two anywhere you wish, spread throughout the area. The swarm of ravens forms over the well when combat starts.
You can read the following aloud to the players:
It’s possible the players will attempt to sneak past the patrol here unnoticed. However, the swarm of ravens spread throughout the area causes a racket if a creature other than a kenku moves through it. This alerts the patrol here to the player’s presence.
Alternatively, the players may try sneaking around in the sur-rounding woods to other temple buildings. This method requires Stealth checks versus the kenkus’ Perception. However, if the PCs enter the temple buildings housing the axe beaks or brown bear, or trigger the trap on the steps in Area F, the noise caused from the encounter will alert the guards here.
Combat If the PCs get the jump on kenku, they have a surprise round. The swarm of ravens immediately merge to occupy a 5 foot square, and moves to the closest PC to begin attacking. The kenku guardsmen open with ranged attacks, while the crowspeaker at-tempts to hit as many PCs as possible with entangle.
Ready For ActionIf the guardsman from the forest’s path reaches this area to warn the patrol before the PCs arrive, they take cover behind 4 adja-cent statues (you can roll a Stealth check for each). The swarm of ravens flies to the canopy overhead and is unseen by the players.
You can read the following aloud to the players:
Combat If the kenku are waiting for the party to arrive, all the monsters here get a surprise round. The crowspeaker waits until all the PCs are in range and attempts to entangle as many as possible. Thereafter you can roll initiative for each side. The swarm of ravens descends from the sky and condenses to fill one square, and acts last during each combat round.
9Encounters
• COMBAT DEVELOPMENTS •
• The crowspeaker fights to the death. If the crowspeaker is slain, the swarm of ravens disperses immediately.
• The kenku guardsmen here are brave, but certainly are not willing to give their lives for Chaza’s sake. If things go poorly in combat, they will attempt to flee or beg for mercy.
• If the kenku overpower the PCs, they rob them of their weap-ons and valuables, bind their hands and wrists, and throw them into the same building as their captive NPC in Area D. PCs that were reduced to 0 or less hit points in the encounter recover at 1 hit point an hour or so later, finding themselves in this predicament. The kenku can be seen outside the build-ing rooting through the players’ equipment, quipping phrases from the battle in excellent imitations of the PCs voice, mock-ing them gleefully.
• In the unlikely event the players get captured, it will be up to you to decide what happens. Ultimately, the kenku will either try to ransom them, sell them as slaves, or feed them to the brown bear they have.
Secret of the Well A player can attempt a Religion check to discern the nature of this temple site. If you’re using the site to belong to a well-known deity, you may choose to forgo this roll. Otherwise, you can use a DC of 10, 15, or 20 depending upon how obscure the lost culture is.
On a success, you should inform the player the temple site prob-ably belongs to Alairros, the Soldier God (or a deity appropriate for your campaign). In addition to being a protector of the masses, you should also insinuate that Alairros idealized knowledge and reason.
This area is actually a puzzle, used to safeguard the site’s valuables from brigands. Engraved around the surface of the well’s perim-eter is a compass marking the four cardinal directions. Players may attempt a DC 11 Insight check upon examination to realize the compass’ north mark is actually pointing due south.
Players can attempt an Investigation check DC 12 if they choose to interact with the well. Upon a success, it is revealed that the well’s top panel with the compass marks can freely rotate around the well’s perimeter, grooved so that it can rest in any of four directions. However, the stone mechanism is quite heavy, and requires a DC 15 Strength check to move. If more than one player attempts to assist in moving the compass portion of the well’s top, reduce the DC by 1 for each contributing player.
Upon moving the well’s top panel to point due north, an access is revealed upon the base of the statue marked by the treasure icon on the area map.
Soldier God’s Fortune The treasure stowed here is only accessible if the party solves the puzzle in this area. If they do, you can read the following aloud:
The access is roughly 6 inches square, and inside of it contains a molded wooden box that almost crumbles upon touch. Inside is a pouch of 33 silver coins, a potion of healing, and a silver holy symbol of Alairros (a shield set with a tower and star crest). The holy symbol is worth 10 gp.
When you set the rim of the well into place, you hear a soft clicking noise. A panel slides open at the base of the statue to the north, coughing up dust and cobwebs.
10
Ban
dit’s
Nes
tD
unge
ons O
n D
eman
d
Encounters
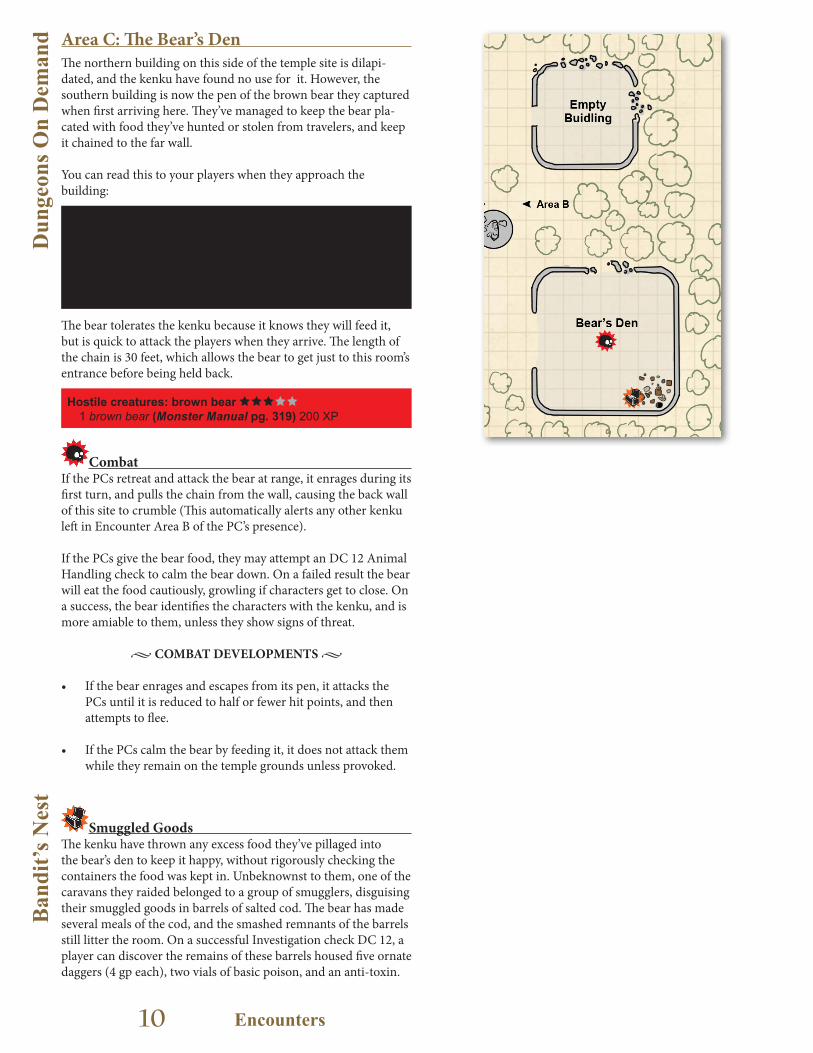
Area C: The Bear’s Den The northern building on this side of the temple site is dilapi-dated, and the kenku have found no use for it. However, the southern building is now the pen of the brown bear they captured when first arriving here. They’ve managed to keep the bear pla-cated with food they’ve hunted or stolen from travelers, and keep it chained to the far wall.
You can read this to your players when they approach the building:
The bear tolerates the kenku because it knows they will feed it, but is quick to attack the players when they arrive. The length of the chain is 30 feet, which allows the bear to get just to this room’s entrance before being held back.
Combat If the PCs retreat and attack the bear at range, it enrages during its first turn, and pulls the chain from the wall, causing the back wall of this site to crumble (This automatically alerts any other kenku left in Encounter Area B of the PC’s presence).
If the PCs give the bear food, they may attempt an DC 12 Animal Handling check to calm the bear down. On a failed result the bear will eat the food cautiously, growling if characters get to close. On a success, the bear identifies the characters with the kenku, and is more amiable to them, unless they show signs of threat.
• COMBAT DEVELOPMENTS •
• If the bear enrages and escapes from its pen, it attacks the PCs until it is reduced to half or fewer hit points, and then attempts to flee.
• If the PCs calm the bear by feeding it, it does not attack them while they remain on the temple grounds unless provoked.
Smuggled Goods The kenku have thrown any excess food they’ve pillaged into the bear’s den to keep it happy, without rigorously checking the containers the food was kept in. Unbeknownst to them, one of the caravans they raided belonged to a group of smugglers, disguising their smuggled goods in barrels of salted cod. The bear has made several meals of the cod, and the smashed remnants of the barrels still litter the room. On a successful Investigation check DC 12, a player can discover the remains of these barrels housed five ornate daggers (4 gp each), two vials of basic poison, and an anti-toxin.
This temple site reeks of waste and rotting fish. The back wall is lined with a mishmash of small animal bones and refuse from what you assume are stolen goods – smashed crates and barrels, torn linens, and debris. In the middle of it all is an enormous brown bear, rising as you approach. It wears a heavy iron collar and appears to be chained to the back corner of this room.
Hostile creatures: brown bear 1 brown bear (Monster Manual pg. 319) 200 XP
11Encounters
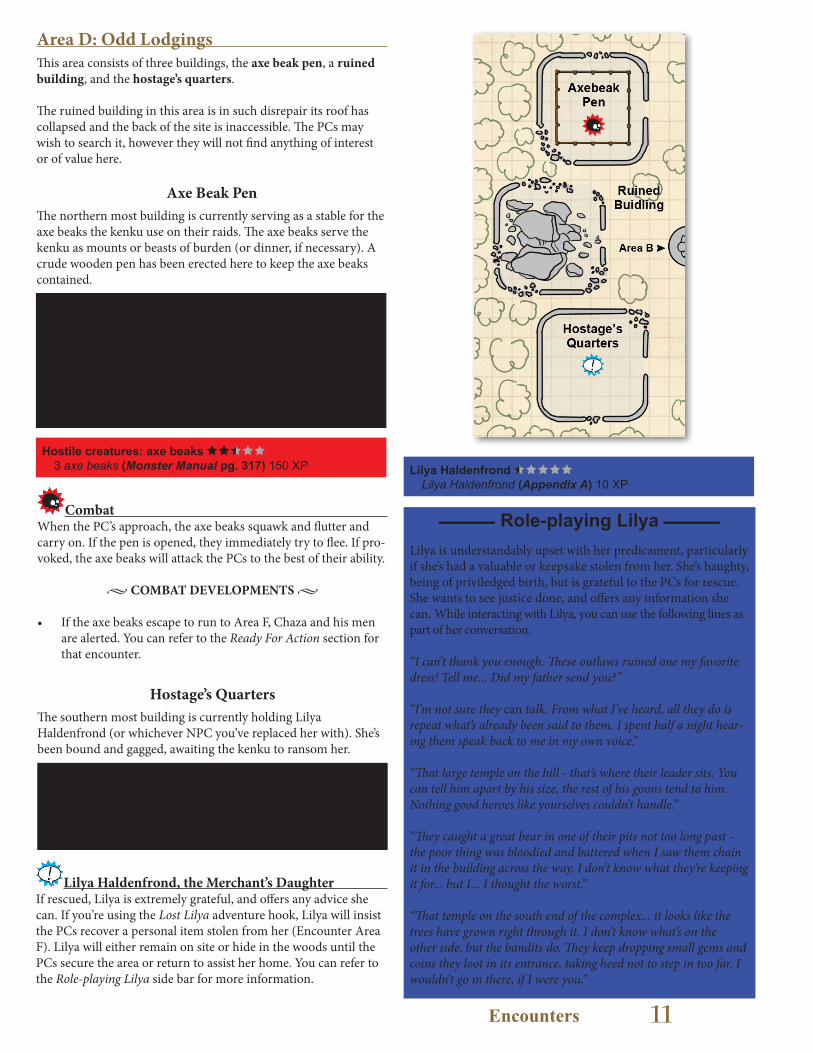
Area D: Odd Lodgings This area consists of three buildings, the axe beak pen, a ruined building, and the hostage’s quarters.
The ruined building in this area is in such disrepair its roof has collapsed and the back of the site is inaccessible. The PCs may wish to search it, however they will not find anything of interest or of value here.
Axe Beak PenThe northern most building is currently serving as a stable for the axe beaks the kenku use on their raids. The axe beaks serve the kenku as mounts or beasts of burden (or dinner, if necessary). A crude wooden pen has been erected here to keep the axe beaks contained.
Combat When the PC’s approach, the axe beaks squawk and flutter and carry on. If the pen is opened, they immediately try to flee. If pro-voked, the axe beaks will attack the PCs to the best of their ability.
• COMBAT DEVELOPMENTS •
• If the axe beaks escape to run to Area F, Chaza and his men are alerted. You can refer to the Ready For Action section for that encounter.
Hostage’s QuartersThe southern most building is currently holding Lilya Haldenfrond (or whichever NPC you’ve replaced her with). She’s been bound and gagged, awaiting the kenku to ransom her.
Inside this room is a wooden pen that’s clearly been constructed haphazardly over the past couple days. Inside the pen are three birds that stand as tall as horses. You imagine their tiny wings are incapable of letting them fly, but their enormous, wedge-shaped beaks look as if they could split boulders. Around their necks and backs are rope harnesses that dangle to the stone floor. The birds take a long, curious look at you from behind the pen as you approach, then immediately start squawking loudly.
Laying against the far wall of this room is a young human woman. Her ankles and wrists have been tied together, and she has a torn swatch of cloth gagging her. He clothing is dirty, torn, and blood-stained, but you can plainly see it is not of commoner’s ilk – more in line with the finer garments of wealthier citizens.
Hostile creatures: axe beaks 3 axe beaks (Monster Manual pg. 317) 150 XP Lilya Haldenfrond
Lilya Haldenfrond (Appendix A) 10 XP
Lilya Haldenfrond, the Merchant’s Daughter If rescued, Lilya is extremely grateful, and offers any advice she can. If you’re using the Lost Lilya adventure hook, Lilya will insist the PCs recover a personal item stolen from her (Encounter Area F). Lilya will either remain on site or hide in the woods until the PCs secure the area or return to assist her home. You can refer to the Role-playing Lilya side bar for more information.
�� Role-playing Lilya ��Lilya is understandably upset with her predicament, particularly if she’s had a valuable or keepsake stolen from her. She’s haughty, being of priviledged birth, but is grateful to the PCs for rescue. She wants to see justice done, and offers any information she can. While interacting with Lilya, you can use the following lines as part of her conversation.
“I can’t thank you enough. These outlaws ruined one my favorite dress! Tell me... Did my father send you?”
“I’m not sure they can talk. From what I’ve heard, all they do is repeat what’s already been said to them. I spent half a night hear-ing them speak back to me in my own voice.”
“That large temple on the hill - that’s where their leader sits. You can tell him apart by his size, the rest of his goons tend to him. Nothing good heroes like yourselves couldn’t handle.”
“They caught a great bear in one of their pits not too long past - the poor thing was bloodied and battered when I saw them chain it in the building across the way. I don’t know what they’re keeping it for... but I... I thought the worst.”
“That temple on the south end of the complex... it looks like the trees have grown right through it. I don’t know what’s on the other side, but the bandits do. They keep dropping small gems and coins they loot in its entrance, taking heed not to step in too far. I wouldn’t go in there, if I were you.”
12
Ban
dit’s
Nes
tD
unge
ons O
n D
eman
d
Encounters
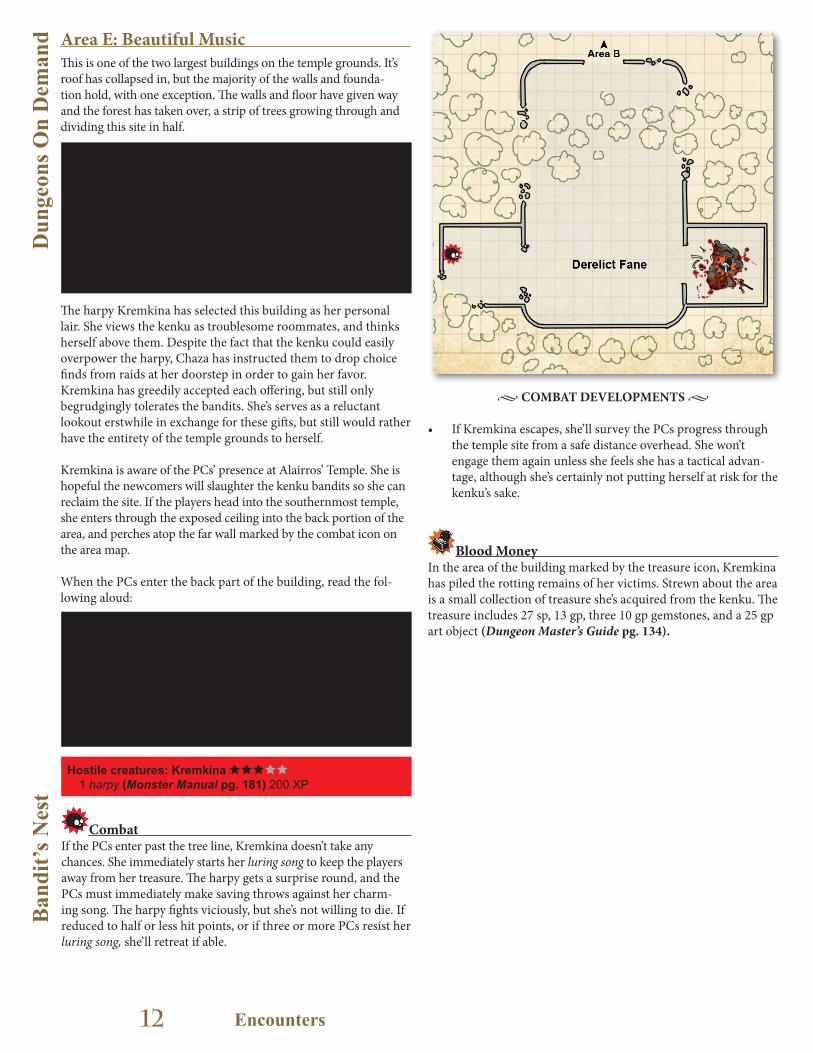
Area E: Beautiful Music This is one of the two largest buildings on the temple grounds. It’s roof has collapsed in, but the majority of the walls and founda-tion hold, with one exception. The walls and floor have given way and the forest has taken over, a strip of trees growing through and dividing this site in half.
The harpy Kremkina has selected this building as her personal lair. She views the kenku as troublesome roommates, and thinks herself above them. Despite the fact that the kenku could easily overpower the harpy, Chaza has instructed them to drop choice finds from raids at her doorstep in order to gain her favor. Kremkina has greedily accepted each offering, but still only begrudgingly tolerates the bandits. She’s serves as a reluctant lookout erstwhile in exchange for these gifts, but still would rather have the entirety of the temple grounds to herself.
Kremkina is aware of the PCs’ presence at Alairros’ Temple. She is hopeful the newcomers will slaughter the kenku bandits so she can reclaim the site. If the players head into the southernmost temple, she enters through the exposed ceiling into the back portion of the area, and perches atop the far wall marked by the combat icon on the area map.
When the PCs enter the back part of the building, read the fol-lowing aloud:
This large building stands prominently on the southern side of the temple grounds. Where other buildings in the area show evidence of losing the fight against time and nature, this building has already lost. What was once the roof now lay in stone ruins among the ground. The forest has overrun this place, driving a line of trees right through the sides of the building some 15 feet or so from the entrance, erupting out from the floor and heaving its foundation into disarray. The trees shoot through this building’s absent ceiling, enveloping it in their canopy.
As you emerge from the tree line, the back half of this stone building comes into view in the dim light. The pervasive stink of offal and decay assaults you. The floor is littered with the remnants of the collapsed ceiling, molded and torn linens, long brown feathers, and bones. As you take in the sights, you hear a sonorous voice singing a melody from an access up and to your right. You can’t see the singer from here, but hers is the most beautiful voice you’ve ever heard.
Combat If the PCs enter past the tree line, Kremkina doesn’t take any chances. She immediately starts her luring song to keep the players away from her treasure. The harpy gets a surprise round, and the PCs must immediately make saving throws against her charm-ing song. The harpy fights viciously, but she’s not willing to die. If reduced to half or less hit points, or if three or more PCs resist her luring song, she’ll retreat if able.
Hostile creatures: Kremkina 1 harpy (Monster Manual pg. 181) 200 XP
• COMBAT DEVELOPMENTS •
• If Kremkina escapes, she’ll survey the PCs progress through the temple site from a safe distance overhead. She won’t engage them again unless she feels she has a tactical advan-tage, although she’s certainly not putting herself at risk for the kenku’s sake.
Blood Money In the area of the building marked by the treasure icon, Kremkina has piled the rotting remains of her victims. Strewn about the area is a small collection of treasure she’s acquired from the kenku. The treasure includes 27 sp, 13 gp, three 10 gp gemstones, and a 25 gp art object (Dungeon Master’s Guide pg. 134).
13Encounters
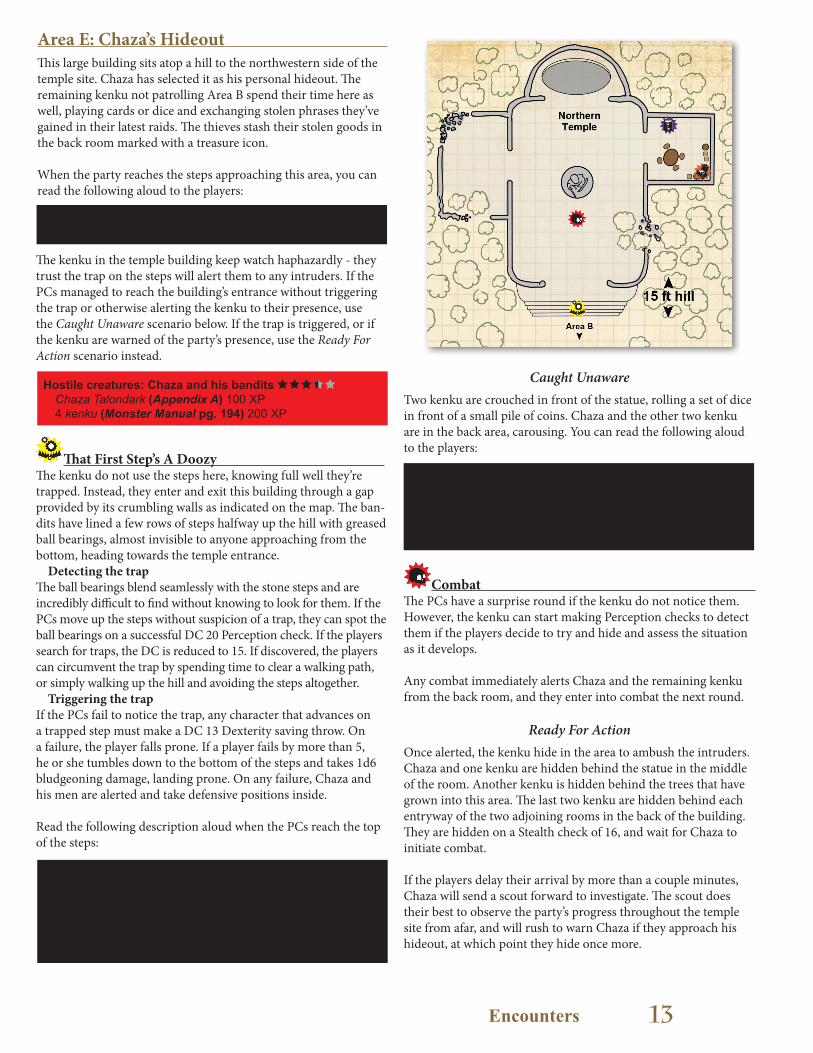
Area E: Chaza’s Hideout This large building sits atop a hill to the northwestern side of the temple site. Chaza has selected it as his personal hideout. The remaining kenku not patrolling Area B spend their time here as well, playing cards or dice and exchanging stolen phrases they’ve gained in their latest raids. The thieves stash their stolen goods in the back room marked with a treasure icon.
When the party reaches the steps approaching this area, you can read the following aloud to the players:
The largest building on site looms atop a hill some 15 feet high. A deteriorating set of stone steps winds down from its open access.
Inside this building, standing in the middle of a large, mostly vacant room, is a large statue of a warrior. A couple trees from the surrounding forest have burst through the ground and wall to your right. Sconces secure flaming torches to the walls, and the floor looks relatively clean and well kept compared to other buildings on the site.
Two bandits are crouched, with their backs to you, in front of the statue. You hear the clatter of something strike the stone floor, followed by a few excited caws. One of the bandits grabs something off the floor, points, and you hear the clatter and caws once more.
Hostile creatures: Chaza and his bandits Chaza Talondark (Appendix A) 100 XP4 kenku (Monster Manual pg. 194) 200 XP
The kenku in the temple building keep watch haphazardly - they trust the trap on the steps will alert them to any intruders. If the PCs managed to reach the building’s entrance without triggering the trap or otherwise alerting the kenku to their presence, use the Caught Unaware scenario below. If the trap is triggered, or if the kenku are warned of the party’s presence, use the Ready For Action scenario instead.
That First Step’s A Doozy The kenku do not use the steps here, knowing full well they’re trapped. Instead, they enter and exit this building through a gap provided by its crumbling walls as indicated on the map. The ban-dits have lined a few rows of steps halfway up the hill with greased ball bearings, almost invisible to anyone approaching from the bottom, heading towards the temple entrance.
Detecting the trapThe ball bearings blend seamlessly with the stone steps and are incredibly difficult to find without knowing to look for them. If the PCs move up the steps without suspicion of a trap, they can spot the ball bearings on a successful DC 20 Perception check. If the players search for traps, the DC is reduced to 15. If discovered, the players can circumvent the trap by spending time to clear a walking path, or simply walking up the hill and avoiding the steps altogether.
Triggering the trapIf the PCs fail to notice the trap, any character that advances on a trapped step must make a DC 13 Dexterity saving throw. On a failure, the player falls prone. If a player fails by more than 5, he or she tumbles down to the bottom of the steps and takes 1d6 bludgeoning damage, landing prone. On any failure, Chaza and his men are alerted and take defensive positions inside.
Read the following description aloud when the PCs reach the top of the steps:
Caught UnawareTwo kenku are crouched in front of the statue, rolling a set of dice in front of a small pile of coins. Chaza and the other two kenku are in the back area, carousing. You can read the following aloud to the players:
Combat The PCs have a surprise round if the kenku do not notice them. However, the kenku can start making Perception checks to detect them if the players decide to try and hide and assess the situation as it develops.
Any combat immediately alerts Chaza and the remaining kenku from the back room, and they enter into combat the next round.
Ready For ActionOnce alerted, the kenku hide in the area to ambush the intruders. Chaza and one kenku are hidden behind the statue in the middle of the room. Another kenku is hidden behind the trees that have grown into this area. The last two kenku are hidden behind each entryway of the two adjoining rooms in the back of the building. They are hidden on a Stealth check of 16, and wait for Chaza to initiate combat.
If the players delay their arrival by more than a couple minutes, Chaza will send a scout forward to investigate. The scout does their best to observe the party’s progress throughout the temple site from afar, and will rush to warn Chaza if they approach his hideout, at which point they hide once more.

14
Ban
dit’s
Nes
tD
unge
ons O
n D
eman
d
Encounters
Combat The kenku wait for the players to approach, and then surprise them with ranged attacks. Each kenku targets a different party member if possible.
• COMBAT DEVELOPMENTS •
• Chaza and the kenku have no desire to die, and will gladly sur-render or flee if it means the difference between life and death.
• If the Chaza and other kenku flee, they do not return until they’ve had a chance to regroup, which takes at least 12 hours. If Chaza is slain, fleeing kenku do not return.
• If Chaza and his men overpower the PCs, they take them prisoner. You can follow the guidelines given in Encounter Area B regarding this scenario.
The Stolen Goods The kenku have piled their ill-gotten gains in the back room. Most of their stolen goods are trade wares - boxes and barrels of wheat, cloth, flour, salt, various spices, craft metals, and artisan tools. The thieves have also stashed 6d6 gp, five 10 gp gemstones, and two 25 gp art objects (Dungeon Master’s Guide pg. 134).
Plot Driver (Optional) At your option, you may want to include something in the ban-dits’ treasure horde to wrap up an adventure hook.
NOTE: If you’re using the Lost Lilya or The Stolen MacGuffin adventure hook, this is where the important item is kept.
Alternatively, you might place something here the PCs did not expect to find that drives the plot towards a new story.
For instance, you might include a scroll stapled to the table with a dagger, or discarded among the rest of the goods. The scroll might contain a map of the forest or the temple itself, or possibly is a letter from a mysterious benefactor encouraging the kenku to continue their banditry.
This is the end of the narrative arc for Bandit’s Nest, but the play-ers are still welcome to explore any areas they may have missed.
15Wrapping Up
Wrapping Up the Dungeon As things are drawing to an end, refer to this information for anything left to wrap up in the dungeon:
Adventure Hooks• By defeating Chaza and reclaiming the cache of stolen goods,
the players should be able to complete whichever adventure hook brought them to Alairros’ Temple.
• Lilya, or whichever NPC you’ve replaced her with, rejoins the players’ party for safe return to the nearest town or city.
• If a reward was offered for the return of the captured NPC or stolen item, it can be given to the players at this time, or role-played as part of another adventure.
Remaining Monsters• Once Chaza is defeated, the remaining kenku disband and
flee if they have not already been slain. You might want to have a returning raiding party come later after the players have rested if you have time for another encounter.
• If Kremkina is still alive, she waits patiently for the party to leave so that she can reclaim the entire temple site as her lair. Otherwise, she attacks the party shortly after if they have not saved from her luring song yet (she waits 24 hours otherwise).
• The brown bear and axe beaks can be challenged in combat if they are still alive, but simply flee if released.
Experience Points• You can reward each player 100 XP for successfully clearing
the dungeon and completing whichever purpose brought them here.
• You can reward each player 15 XP for each trap the party suc-cessfully detects and disarms or avoids.
• You can reward each player 25 XP if the party deduces and solves the puzzle in Encounter Area B.
16
Ban
dit’s
Nes
tD
unge
ons O
n D
eman
d
Appendix A: New Monsters & NPCs
Appendix A: New Monsters & NPCs
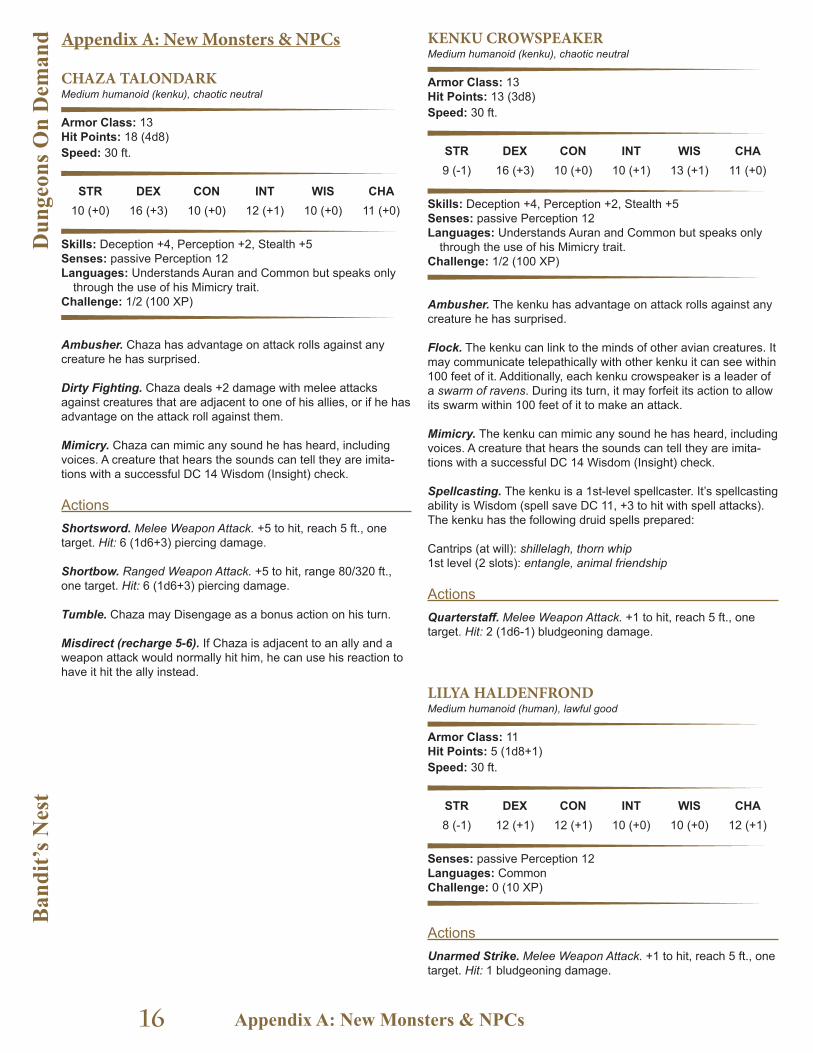
CHAZA TALONDARKMedium humanoid (kenku), chaotic neutral
Armor Class: 13Hit Points: 18 (4d8)Speed: 30 ft.
STR DEX CON INT WIS CHA10 (+0) 16 (+3) 10 (+0) 12 (+1) 10 (+0) 11 (+0)
Skills: Deception +4, Perception +2, Stealth +5Senses: passive Perception 12Languages: Understands Auran and Common but speaks only
through the use of his Mimicry trait.Challenge: 1/2 (100 XP)
Ambusher. Chaza has advantage on attack rolls against any creature he has surprised.
Dirty Fighting. Chaza deals +2 damage with melee attacks against creatures that are adjacent to one of his allies, or if he has advantage on the attack roll against them.
Mimicry. Chaza can mimic any sound he has heard, including voices. A creature that hears the sounds can tell they are imita-tions with a successful DC 14 Wisdom (Insight) check.
Actions Shortsword. Melee Weapon Attack. +5 to hit, reach 5 ft., one target. Hit: 6 (1d6+3) piercing damage.
Shortbow. Ranged Weapon Attack. +5 to hit, range 80/320 ft., one target. Hit: 6 (1d6+3) piercing damage.
Tumble. Chaza may Disengage as a bonus action on his turn.
Misdirect (recharge 5-6). If Chaza is adjacent to an ally and a weapon attack would normally hit him, he can use his reaction to have it hit the ally instead.
KENKU CROWSPEAKERMedium humanoid (kenku), chaotic neutral
Armor Class: 13Hit Points: 13 (3d8)Speed: 30 ft.
STR DEX CON INT WIS CHA9 (-1) 16 (+3) 10 (+0) 10 (+1) 13 (+1) 11 (+0)
Skills: Deception +4, Perception +2, Stealth +5Senses: passive Perception 12Languages: Understands Auran and Common but speaks only
through the use of his Mimicry trait.Challenge: 1/2 (100 XP)
Ambusher. The kenku has advantage on attack rolls against any creature he has surprised.
Flock. The kenku can link to the minds of other avian creatures. It may communicate telepathically with other kenku it can see within 100 feet of it. Additionally, each kenku crowspeaker is a leader of a swarm of ravens. During its turn, it may forfeit its action to allow its swarm within 100 feet of it to make an attack.
Mimicry. The kenku can mimic any sound he has heard, including voices. A creature that hears the sounds can tell they are imita-tions with a successful DC 14 Wisdom (Insight) check.
Spellcasting. The kenku is a 1st-level spellcaster. It’s spellcasting ability is Wisdom (spell save DC 11, +3 to hit with spell attacks). The kenku has the following druid spells prepared:
Cantrips (at will): shillelagh, thorn whip1st level (2 slots): entangle, animal friendship
Actions Quarterstaff. Melee Weapon Attack. +1 to hit, reach 5 ft., one target. Hit: 2 (1d6-1) bludgeoning damage.
LILYA HALDENFRONDMedium humanoid (human), lawful good
Armor Class: 11Hit Points: 5 (1d8+1)Speed: 30 ft.
STR DEX CON INT WIS CHA8 (-1) 12 (+1) 12 (+1) 10 (+0) 10 (+0) 12 (+1)
Senses: passive Perception 12Languages: CommonChallenge: 0 (10 XP)
Actions Unarmed Strike. Melee Weapon Attack. +1 to hit, reach 5 ft., one target. Hit: 1 bludgeoning damage.