
Using the Workday Adapter with Oracle Autonomous ... · • Getting the data from an existing...
31
Oracle® Cloud Using the Workday Adapter with Oracle Autonomous Integration Cloud E90890-03 June 2018
Transcript of Using the Workday Adapter with Oracle Autonomous ... · • Getting the data from an existing...
Oracle® CloudUsing the Workday Adapter with OracleAutonomous Integration Cloud
E90890-03June 2018

Oracle Cloud Using the Workday Adapter with Oracle Autonomous Integration Cloud,
E90890-03
Copyright © 2017, 2018, Oracle and/or its affiliates. All rights reserved.
Primary Author: Oracle Corporation
This software and related documentation are provided under a license agreement containing restrictions onuse and disclosure and are protected by intellectual property laws. Except as expressly permitted in yourlicense agreement or allowed by law, you may not use, copy, reproduce, translate, broadcast, modify,license, transmit, distribute, exhibit, perform, publish, or display any part, in any form, or by any means.Reverse engineering, disassembly, or decompilation of this software, unless required by law forinteroperability, is prohibited.
The information contained herein is subject to change without notice and is not warranted to be error-free. Ifyou find any errors, please report them to us in writing.
If this is software or related documentation that is delivered to the U.S. Government or anyone licensing it onbehalf of the U.S. Government, then the following notice is applicable:
U.S. GOVERNMENT END USERS: Oracle programs, including any operating system, integrated software,any programs installed on the hardware, and/or documentation, delivered to U.S. Government end users are"commercial computer software" pursuant to the applicable Federal Acquisition Regulation and agency-specific supplemental regulations. As such, use, duplication, disclosure, modification, and adaptation of theprograms, including any operating system, integrated software, any programs installed on the hardware,and/or documentation, shall be subject to license terms and license restrictions applicable to the programs.No other rights are granted to the U.S. Government.
This software or hardware is developed for general use in a variety of information management applications.It is not developed or intended for use in any inherently dangerous applications, including applications thatmay create a risk of personal injury. If you use this software or hardware in dangerous applications, then youshall be responsible to take all appropriate fail-safe, backup, redundancy, and other measures to ensure itssafe use. Oracle Corporation and its affiliates disclaim any liability for any damages caused by use of thissoftware or hardware in dangerous applications.
Oracle and Java are registered trademarks of Oracle and/or its affiliates. Other names may be trademarks oftheir respective owners.
Intel and Intel Xeon are trademarks or registered trademarks of Intel Corporation. All SPARC trademarks areused under license and are trademarks or registered trademarks of SPARC International, Inc. AMD, Opteron,the AMD logo, and the AMD Opteron logo are trademarks or registered trademarks of Advanced MicroDevices. UNIX is a registered trademark of The Open Group.
This software or hardware and documentation may provide access to or information about content, products,and services from third parties. Oracle Corporation and its affiliates are not responsible for and expresslydisclaim all warranties of any kind with respect to third-party content, products, and services unless otherwiseset forth in an applicable agreement between you and Oracle. Oracle Corporation and its affiliates will not beresponsible for any loss, costs, or damages incurred due to your access to or use of third-party content,products, or services, except as set forth in an applicable agreement between you and Oracle.

Contents
Preface
Audience v
Documentation Accessibility v
Related Resources v
Conventions v
1 Getting Started with the Workday Adapter
Workday Adapter Capabilities 1-1
What Application Version Is Supported? 1-2
About Oracle Autonomous Integration Cloud 1-2
About Oracle Autonomous Integration Cloud Connections 1-3
About Oracle Autonomous Integration Cloud Integrations 1-3
About Workday Adapter Use Cases 1-3
Workflow to Create and Add a Connection to an Integration 1-7
2 Creating a Workday Adapter Connection
Prerequisites for Creating a Connection 2-1
Uploading an SSL Certificate 2-4
Creating a Connection 2-5
Adding a Contact Email 2-6
Configuring Connection Properties 2-6
Configuring Connection Security 2-7
Testing the Connection 2-7
Editing a Connection 2-7
Cloning a Connection 2-8
Deleting a Connection 2-9
3 Creating an Integration
iii

4 Adding the Connection to an Integration
Configuring Basic Information Properties 4-1
Configuring Workday Adapter Actions Properties 4-1
Configuring Workday Adapter Service Selection Properties 4-2
Configuring Workday Adapter Operations Properties 4-2
Configuring Workday Adapter RaaS Services Properties 4-3
Reviewing Configuration Values on the Summary Page 4-4
5 Creating Mappings and Lookups in Integrations
6 Administering Integrations
7 Troubleshooting the Workday Adapter
Identifying the Correct CSV Fields to Use in Stage File Actions in Workday EIBIntegrations 7-1
iv
Preface
Using the Workday Adapter describes how to configure the Workday Adapter as aconnection in an integration in Oracle Autonomous Integration Cloud.
Topics
• Audience
• Documentation Accessibility
• Related Resources
• Conventions
AudienceUsing the Workday Adapter is intended for developers who want to use the WorkdayAdapter in integrations in Oracle Autonomous Integration Cloud.
Documentation AccessibilityFor information about Oracle's commitment to accessibility, visit the OracleAccessibility Program website at http://www.oracle.com/pls/topic/lookup?ctx=acc&id=docacc.
Access to Oracle Support
Oracle customers that have purchased support have access to electronic supportthrough My Oracle Support. For information, visit http://www.oracle.com/pls/topic/lookup?ctx=acc&id=info or visit http://www.oracle.com/pls/topic/lookup?ctx=acc&id=trsif you are hearing impaired.
Related ResourcesSee these Oracle resources:
• Oracle Cloud
http://cloud.oracle.com
• Using Integrations in Oracle Autonomous Integration Cloud
• Using the Oracle Mapper with Oracle Autonomous Integration Cloud
ConventionsThe following text conventions are used in this document:
v

Convention Meaning
boldface Boldface type indicates graphical user interface elements associatedwith an action, or terms defined in text or the glossary.
italic Italic type indicates book titles, emphasis, or placeholder variables forwhich you supply particular values.
monospace Monospace type indicates commands within a paragraph, URLs, codein examples, text that appears on the screen, or text that you enter.
Preface
vi

1Getting Started with the Workday Adapter
Review the following conceptual topics to learn about the Workday Adapter and how touse it as a connection in integrations in Oracle Autonomous Integration Cloud. Atypical workflow of adapter and integration tasks is also provided.
Topics
• Workday Adapter Capabilities
• What Application Version Is Supported?
• About Oracle Autonomous Integration Cloud
• About Oracle Autonomous Integration Cloud Connections
• About Oracle Autonomous Integration Cloud Integrations
• About Workday Adapter Use Cases
• Workflow to Create and Add a Connection to an Integration
Workday Adapter CapabilitiesThe Workday Adapter enables you to create an integration with Workday in OracleAutonomous Integration Cloud.
Workday is a SAAS-based human capital management system that also supportsfinancial management systems for organizations.
Workday can be the one system for all your organizational activities such as recruiting,payroll, finance, inventory, and so on. The Workday Public API, Reporting API, andWorkday Integration platform play the major roles in integrating the Workday Adapterwith third-party applications. The Workday Adapter supports all these services at asingle gateway. The Workday Adapter handles complexities such as understandingdifferent SOAP web services, presenting all modules, services, and operations, andexecuting reports about different Workday modules.
The Workday Adapter enables nontechnical developers to build integration solutionsfrom Workday to other applications without dealing with complexities such as differentAPIs.
The Workday Adapter provides the following capabilities:
• Connecting your on-premises financial system with Workday Human CapitalManagement (HCM) cloud.
• Browsing different Workday modules with little effort.
• Getting the right operation with a detailed description in the user interface to assistyou in building integrations rapidly.
• Checking the reports accessible to you and selecting them and exporting the datafrom Workday.
1-1

• Getting the data from an existing Enterprise Interface Builder (EIB) integration toyour financial system.
• Exporting the bulk data from Workday through the Workday Adapter is easy andenables you to synchronize the same data with different SaaS and on-premisesapplications within the same business flow.
• Provisioning from Workday to other resources of your organization.
• Supporting the latest API version to ensure that you always use the latestWorkday functionality.
The Workday Adapter is one of many predefined adapters included with OracleAutonomous Integration Cloud. You can configure the Workday Adapter as a targetconnection in an integration in Oracle Autonomous Integration Cloud. For informationabout Oracle Autonomous Integration Cloud, connections, and integrations, see thefollowing sections:
• About Oracle Autonomous Integration Cloud
• About Oracle Autonomous Integration Cloud Connections
• About Oracle Autonomous Integration Cloud Integrations
What Application Version Is Supported?For information about which application version is supported by this adapter, see theOracle Integration Adapters Certification Matrix under section Oracle IntegrationAdapters Certification at the top of the page:
Oracle Integration Adapters Certification Matrix
About Oracle Autonomous Integration CloudOracle Autonomous Integration Cloud is a complete, secure, but lightweight integrationsolution that enables you to connect your applications in the cloud. It simplifiesconnectivity between your applications and connects both your applications that live inthe cloud and your applications that still live on premises. Oracle AutonomousIntegration Cloud provides secure, enterprise-grade connectivity regardless of theapplications you are connecting or where they reside.
Oracle Autonomous Integration Cloud provides native connectivity to Oracle Softwareas a Service (SaaS) applications, such as Oracle Sales Cloud, Oracle RightNowCloud, and so on. Oracle Autonomous Integration Cloud adapters simplify connectivityby handling the underlying complexities of connecting to applications using industry-wide best practices. You only need to create a connection that provides minimalconnectivity information for each system. Oracle Autonomous Integration Cloudlookups map the different codes or terms used by the applications you are integratingto describe similar items (such as country or gender codes). Finally, the visual datamapper enables you to quickly create direct mappings between the trigger and invokedata structures. From the mapper, you can also access lookup tables and usestandard XPath functions to map data between your applications.
Once you integrate your applications and activate the integrations to the runtimeenvironment, the dashboard displays information about the running integrations so youcan monitor the status and processing statistics for each integration. The dashboardmeasures and tracks the performance of your transactions by capturing and reportingkey information, such as throughput, the number of messages processed successfully,
Chapter 1What Application Version Is Supported?
1-2

and the number of messages that failed processing. You can also manage businessidentifiers that track fields in messages and manage errors by integrations,connections, or specific integration instances.
About Oracle Autonomous Integration Cloud ConnectionsConnections define information about the instances of each configuration you areintegrating. Oracle Autonomous Integration Cloud includes a set of predefinedadapters, which are the types of applications on which you can base your connections,such as Oracle Sales Cloud, Oracle Eloqua Cloud, Oracle RightNow Cloud, andothers. A connection is based on an adapter. For example, to create a connection to aspecific RightNow Cloud application instance, you must select the Oracle RightNowadapter and then specify the WSDL URL, security policy, and security credentials toconnect to it.
Note:
When provisioning Oracle Autonomous Integration Cloud, you allocateconnections to an instance. Once allocated, you can add more, but cannotreduce the number of connections allocated to an instance. This is shown onthe My Services dashboard. Within an instance, it shows you how manyconnections are being used, but not the number of connections allocated.
Video
About Oracle Autonomous Integration Cloud IntegrationsIntegrations are the main ingredient of Oracle Autonomous Integration Cloud. Anintegration includes at the least a trigger (source) connection (for requests sent toOracle Autonomous Integration Cloud) and invoke (target) connection (for requestssent from Oracle Autonomous Integration Cloud to the target) and the field mappingbetween those two connections.
When you create your integrations, you build on the connections you already createdby defining how to process the data for the trigger (source) and invoke (target)connections. This can include defining the type of operations to perform on the data,the business objects and fields against which to perform those operations, requiredschemas, and so on. To make this easier, the most complex configuration tasks arehandled by Oracle Autonomous Integration Cloud. Once your trigger (source) andinvoke (target) connections are configured, the mappers between the two are enabledso you can define how the information is transferred between the trigger (source) andinvoke (target) data structures for both the request and response messages.
Video
About Workday Adapter Use CasesThe Workday Adapter can be used in scenarios such as the following.
• Maintaining the Records of a New Employee
• Process RaaS Reports that Support the Delivery of Data in CSV Format
Chapter 1About Oracle Autonomous Integration Cloud Connections
1-3

Maintaining the Records of a New Employee
When a new employee is recruited and enters the organization, data and records forthat employee must be maintained. For example, their qualifications:
• Work experience
• Personal details
To configure the Workday Adapter to use Workday web services:
1. Add the Workday Adapter as an invoke connection in an integration.
This starts the Adapter Endpoint Configuration Wizard.
2. On the Basic Info page, specify a name and an optional description, then clickNext.
3. Or the Workday Actions page, select Query Information, then click Next.
4. On the Service Selection page, select Human Capital Management from theSelect a Workday Product list.
5. On the Operations page, select Get Workers from the Operations list, and clickNext.
6. In the mapper, perform the required mappings, save, and close the integration.
7. Activate the integration and test the endpoint generated. The URL is displayed in abanner at the top of the Integrations page.
All worker data is displayed.
To configure the Workday Adapter to use a synchronous Report as a Service (RaaS):
1. Add the Workday Adapter as an invoke connection in an integration. This startsthe Adapter Endpoint Configuration Wizard.
2. On the Basic Info page, specify a name and optional description, then click Next.
3. On the Workday Actions page, select Extract Bulk Data From Workday, thenclick Next.
4. On the RaaS Services page, select Reports as a Service (Custom Reports) asthe report name, then click Next.
5. In the mapper, perform the required mappings, save, and close the integration.
6. Activate the integration and test the endpoint generated. The URL is displayed in abanner at the top of the Integrations page.
A file having data of the selected report is downloaded.
Process RaaS Reports that Support the Delivery of Data in CSV Format
This section provides an overview of creating an integration that uses the EnterpriseInterface Builder (EIB-based Reports) Workday API and its operations to retrievereports in CSV format, monitor execution, and download the CSV file.
1. Create an orchestrated integration to be triggered by a schedule.
2. Drag a Workday Adapter connection into the integration canvas.
3. Specify the following details in the Adapter Endpoint Configuration Wizard.
• On the Basic Info page, name the adapter (for this example, Launch_EIB).
Chapter 1About Workday Adapter Use Cases
1-4
• On the Action page, select Extract Bulk data from Workday.
• On the RaaS Services page, select Enterprise Interface Builder (EIB-basedReports) as the type of Workday report.
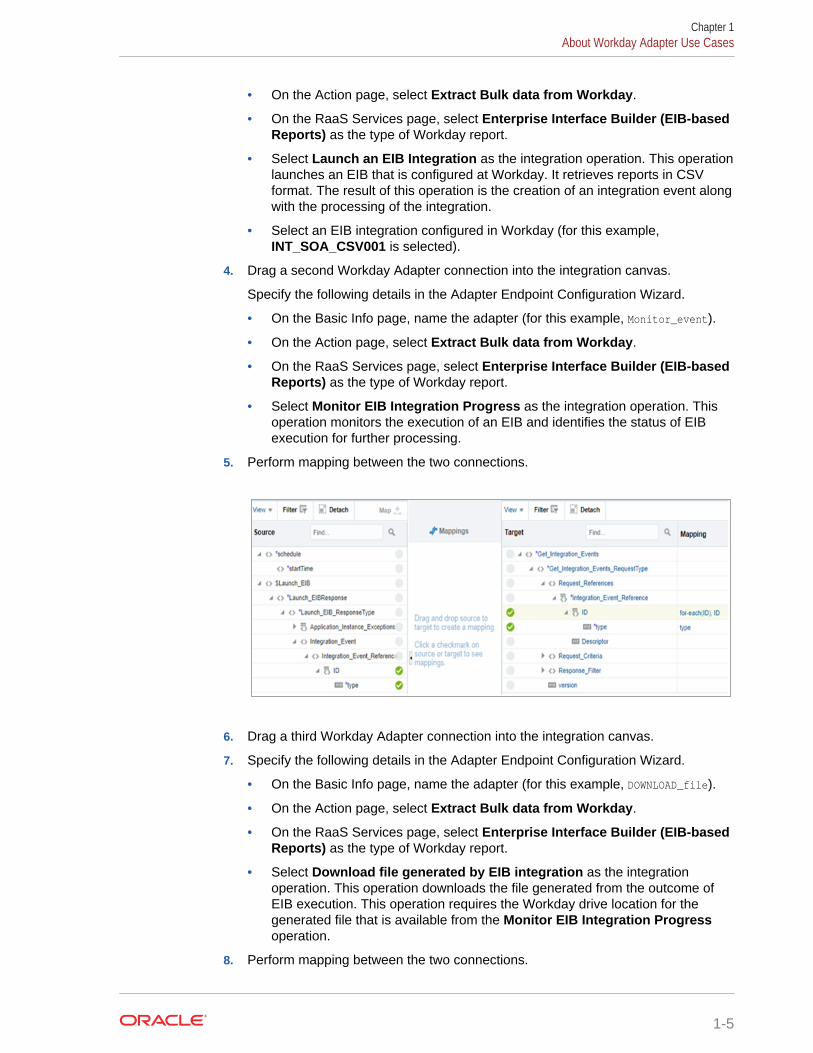
• Select Launch an EIB Integration as the integration operation. This operationlaunches an EIB that is configured at Workday. It retrieves reports in CSVformat. The result of this operation is the creation of an integration event alongwith the processing of the integration.
• Select an EIB integration configured in Workday (for this example,INT_SOA_CSV001 is selected).
4. Drag a second Workday Adapter connection into the integration canvas.
Specify the following details in the Adapter Endpoint Configuration Wizard.
• On the Basic Info page, name the adapter (for this example, Monitor_event).
• On the Action page, select Extract Bulk data from Workday.
• On the RaaS Services page, select Enterprise Interface Builder (EIB-basedReports) as the type of Workday report.
• Select Monitor EIB Integration Progress as the integration operation. Thisoperation monitors the execution of an EIB and identifies the status of EIBexecution for further processing.
5. Perform mapping between the two connections.
6. Drag a third Workday Adapter connection into the integration canvas.
7. Specify the following details in the Adapter Endpoint Configuration Wizard.
• On the Basic Info page, name the adapter (for this example, DOWNLOAD_file).
• On the Action page, select Extract Bulk data from Workday.
• On the RaaS Services page, select Enterprise Interface Builder (EIB-basedReports) as the type of Workday report.
• Select Download file generated by EIB integration as the integrationoperation. This operation downloads the file generated from the outcome ofEIB execution. This operation requires the Workday drive location for thegenerated file that is available from the Monitor EIB Integration Progressoperation.
8. Perform mapping between the two connections.
Chapter 1About Workday Adapter Use Cases
1-5

9. Drag a wait action below the first Workday Adapter (Launch_EIB).
The wait action ensures that the process waits for the specified time beforemonitoring the progress of reports (EIB).
10. Drag a stage file action below the third Workday Adapter (DOWNLOAD_file). Thestage file action reads the CSV format data from Oracle Autonomous IntegrationCloud at the downloaded location.
• Name the action.
• Specify the delimited data file name (for this example, INT_SOA_Test_CSV.csv)and directory name.
11. Drag an FTP Adapter below the stage file action to write the file to a target FTPserver.
12. Specify the following details in the Adapter Endpoint Configuration Wizard.
• Name the adapter (for this example, FTP_Write).
• Select Write File from the Select Operation list. This operation writes the fileto the target FTP server.
• Select to create a new schema from a CSV file (for this example, namedINT_SOA_Test_CSV.csv).
• Specify an output directory and file name pattern.
13. Perform mapping between the stage file action and the FTP Adapter.
Chapter 1About Workday Adapter Use Cases
1-6

The completed integration looks as follows:
Workflow to Create and Add a Connection to an IntegrationFollow a workflow to create a connection with an adapter and include the connection inan integration in Oracle Autonomous Integration Cloud.
Chapter 1Workflow to Create and Add a Connection to an Integration
1-7
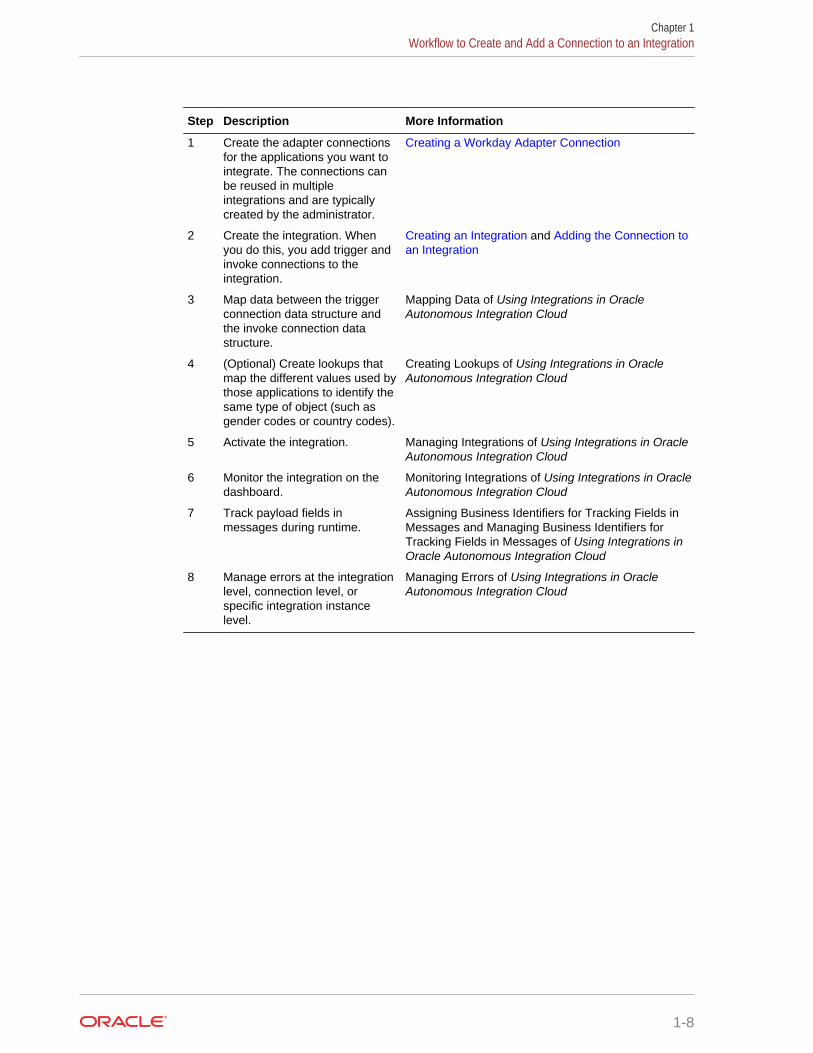
Step Description More Information
1 Create the adapter connectionsfor the applications you want tointegrate. The connections canbe reused in multipleintegrations and are typicallycreated by the administrator.
Creating a Workday Adapter Connection
2 Create the integration. Whenyou do this, you add trigger andinvoke connections to theintegration.
Creating an Integration and Adding the Connection toan Integration
3 Map data between the triggerconnection data structure andthe invoke connection datastructure.
Mapping Data of Using Integrations in OracleAutonomous Integration Cloud
4 (Optional) Create lookups thatmap the different values used bythose applications to identify thesame type of object (such asgender codes or country codes).
Creating Lookups of Using Integrations in OracleAutonomous Integration Cloud
5 Activate the integration. Managing Integrations of Using Integrations in OracleAutonomous Integration Cloud
6 Monitor the integration on thedashboard.
Monitoring Integrations of Using Integrations in OracleAutonomous Integration Cloud
7 Track payload fields inmessages during runtime.
Assigning Business Identifiers for Tracking Fields inMessages and Managing Business Identifiers forTracking Fields in Messages of Using Integrations inOracle Autonomous Integration Cloud
8 Manage errors at the integrationlevel, connection level, orspecific integration instancelevel.
Managing Errors of Using Integrations in OracleAutonomous Integration Cloud
Chapter 1Workflow to Create and Add a Connection to an Integration
1-8
2Creating a Workday Adapter Connection
A connection is based on an adapter. You define connections to the specific cloudapplications that you want to integrate. The following topics describe how to defineconnections.
Topics
• Prerequisites for Creating a Connection
• Uploading an SSL Certificate
• Creating a Connection
• Editing a Connection
• Cloning a Connection
• Deleting a Connection
Prerequisites for Creating a ConnectionYou must satisfy the following prerequisites to create a connection with the WorkdayAdapter.
Creating a Workday User Account
You must have an existing Workday integration system user account. A user accountis required to provide the credentials necessary to create the connection andintegration. Create the Workday integration system user with the Integration Systemsecurity group (Unconstrained) group, and provide the following authorizations.
Note:
See the "User Security Group" sheet in the authorization XLSX file youdownload in the following instructions for a list of all security groups that youcan assign to the integration user.
• Report Administrator: The standard Workday security group that exists inWorkday. This group contains permissions for executing, viewing, creating, andediting all custom reports.
• Custom Security Group: Create a custom security group for the integration user.This group should include authorization based on the functional area such asintegration, system, staffing, and so on. The integration functional area must beassigned all entries provided in the "Test_001_Group Permissions" sheet of theXLSX file. Those are highlighted with an asterisk (*) in the sheet. Ensure that thesecurity group "Test_001_Group" is assigned to the user as per the "User SecurityGroup" sheet in the downloaded XLSX file.
1. Log in to the Workday application.
2-1
2. Search for the task Create Integration System User.
3. Set the username and password.
4. Search for the task Create Security Group.
5. Select the type as Integration System security group (Unconstrained).
6. Set the group name and press Enter.
7. Select the integration system username from the dropdown list to assign the userto that group.
Obtaining the Workday Hostname, Tenant Name, and WD Drive Hostname fromthe Sandbox User Interface
When you create your Workday Adapter connection on the Connections page, youmust specify the following details:
• Workday hostname
• Tenant name
• WD drive hostname
The following steps describe how to obtain this information. The tenant name and WDdrive hostname can be obtained in multiple ways. Each way is described below.
To obtain the Workday hostname:
1. Log in to the Workday sandbox or production instance.
2. Search for Public Web Service in the search box.
3. Select Public Web Service from the search results.
4. Under Actions, click the Web Services list and select View WSDL.
The WSDL file is opened for viewing.
5. Scroll down to the end to find the hostname value assigned to the locationelement.
6. Copy and save the Workday hostname portion of the value. For example:
location="https://wd5-impl-services9.workday.com/...."
To obtain the tenant name and WD drive hostname from the user profile:
Note:
You can also obtain the WD drive hostname from the Workday communityand the tenant name from the sandbox (steps below these steps).
1. Log in to Workday and click the User icon in the upper right corner.
The option named W:Drive is displayed.
2. Click W:Drive.
3. Right-click any of the files in the list and select Copy URL.
Chapter 2Prerequisites for Creating a Connection
2-2
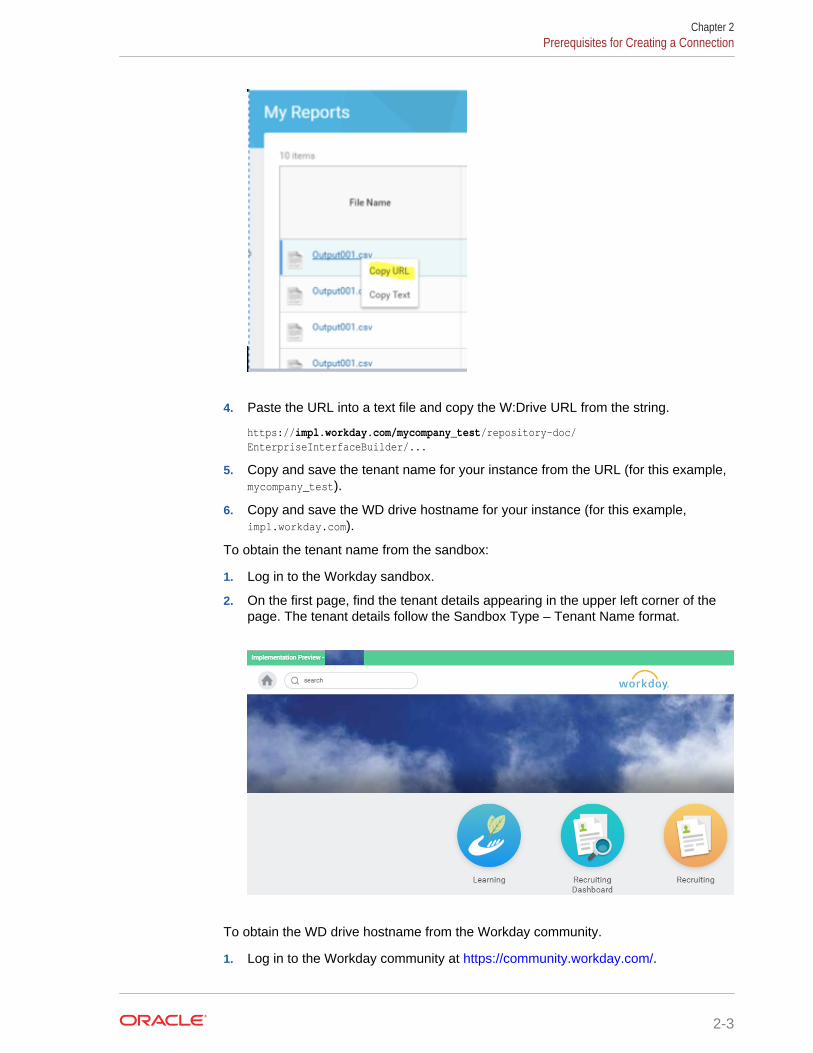
4. Paste the URL into a text file and copy the W:Drive URL from the string.
https://impl.workday.com/mycompany_test/repository-doc/EnterpriseInterfaceBuilder/...
5. Copy and save the tenant name for your instance from the URL (for this example,mycompany_test).
6. Copy and save the WD drive hostname for your instance (for this example,impl.workday.com).
To obtain the tenant name from the sandbox:
1. Log in to the Workday sandbox.
2. On the first page, find the tenant details appearing in the upper left corner of thepage. The tenant details follow the Sandbox Type – Tenant Name format.
To obtain the WD drive hostname from the Workday community.
1. Log in to the Workday community at https://community.workday.com/.
Chapter 2Prerequisites for Creating a Connection
2-3
2. In the upper-right corner, click the user name, then select My Profile.
3. Click your company name.
The organizational profile page appears. The Organizational Profile page showsthe data center of your different Workday sandboxes.
4. On the open page, click your company name as provided below your name.
A page is displayed showing your organizational profile, which contains the datacenter of your different workday sandboxes.
5. Select the data center of the Workday instance to which to connect and get theURL information for the sandbox.
6. Open https://community.workday.com/articles/29946 in the Workday community.
7. Select the link for your production data center on the right hand side on the page.For example, if your sandbox is Ashburn, click the Ashburn data center link.
8. Download the data center information XLSX file attached to this page. You canfind URLs in the "DNS and IP Address details" sheet of the XLSX file.
The file lists the URL of your web services and WD drive hostname. Use thisinformation to create a connection on the Connections page.
9. Based on the tenant type, you can get URLs from the "DNS name" column bycomparing the URL type description in the "Description" column.
Uploading an SSL CertificateCertificates are used to validate outbound SSL connections. If you make an SSLconnection in which the root certificate does not exist in Oracle AutonomousIntegration Cloud, an exception is thrown. In that case, you must upload theappropriate certificate. A certificate enables Oracle Autonomous Integration Cloud toconnect with external services. If the external endpoint requires a specific certificate,request the certificate and then upload it into Oracle Autonomous Integration Cloud.
To upload an SSL certificate:
1. In the navigation pane, click Integrations, then click the < arrow next toDESIGNER.
2. Click Settings > Certificates.
All certificates currently uploaded to the trust store are displayed in the Certificatesdialog. The Filter By > Type list displays the following details:
• Preinstalled: Displays the certificates automatically installed in OracleAutonomous Integration Cloud. These certificates cannot be deleted.
• Uploaded: Displays the certificates uploaded by individual users. Thesecertificates can be deleted and updated.
You can also search for certificates in the Search field. The search results arelimited to a maximum of ten records sorted by name for performance and usabilityreasons. To ensure that your search results are more granular, enter as much ofthe certificate name as possible.
3. Click Upload at the top of the page.
4. In the Upload Certificate dialog box, select the certificate type. Each certificatetype enables Oracle Autonomous Integration Cloud to connect with externalservices.
Chapter 2Uploading an SSL Certificate
2-4

• Trust Certificate: Use this option to upload a trust certificate.
a. Enter a unique alias for the certificate.
b. Click Browse, then select the trust file (for example, .cer or .crt) toupload.
• Message Protection Certificate: Use this option to upload a keystorecertificate with SAML token support. Create, read, update, and delete (CRUD)operations are supported on this type of certificate.
a. Enter a unique alias for the certificate.
b. Click Browse, then select the certificate file (.cer or .crt) to upload.
• Identity Certificate: Use this option to upload a certificate for two-way SSLcommunication.
a. Click Browse, then select the keystore file (.jks) to upload.
b. Enter the password of the keystore being imported.
c. Enter the comma-separated list of aliases from the keystore beingimported.
d. Enter the comma-separated list of passwords corresponding to keyaliases.
e. If you want to display the passwords in clear text, select Show KeyPassword(s). This enables you to ensure that you are correctly entering alist of keystore passwords.
5. Click Upload.
6. Click the certificate name to view details such as the subject of the certificate, theissuer of the certificate, the date the certificate was issued, and the date thecertificate expires.
Creating a ConnectionThe first step in creating an integration is to create the connections to the applicationswith which you want to share data.
1. In the navigation pane, click Integrations, then click Connections.
2. Click Create.
The Create Connection — Select Adapter dialog is displayed.
3. Select an adapter from the dialog. You can also search for the type of adapter touse by entering a partial or full name in the Search field, and clicking Search.
The Create New Connection dialog is displayed.
4. Enter the information to describe the connection.
• Enter a meaningful name to help others find your connection when they beginto create their own integrations. The name you enter is automatically added incapital letters to the Identifier field. If you modify the identifier name, do notinclude a blank space (for example, Sales Opportunity).
• Select the role (direction) in which to use this connection (trigger, invoke, orboth). Only the roles supported by this adapter are displayed for selection.When you select a role, only the connection properties and security policiesappropriate to that role are displayed on the Connections page. If you select
Chapter 2Creating a Connection
2-5

an adapter that supports both invoke and trigger, but select only one of thoseroles, then try to drag the adapter into the section you did not select, youreceive an error (for example, configure an Oracle RightNow Cloud Adapter asonly an invoke, but drag the adapter to the trigger section).
• Enter an optional description of the connection.
5. Click Create.
Your connection is created and you are now ready to configure connection details,such as email contact, connection properties, security policies, connection logincredentials, and (for certain connections) agent group.
Adding a Contact EmailFrom the Connection Administrator section of the connection, you can add a contactemail address for notifications.
1. In the Email Address field, enter an email address to receive email notificationswhen problems occur.
2. In the upper right corner, click Save.
Configuring Connection PropertiesEnter connection information so your application can process requests.
1. Click Configure Connectivity.
The Connection Properties dialog is displayed. The information to specify wasobtained when you completed the Workday Adapter prerequisites. See Prerequisites for Creating a Connection.
2. In the Hostname field, enter the host name of the Workday server.
Chapter 2Creating a Connection
2-6
3. In the Tenant Name field, provide the tenant name.
4. In the WD Drive Hostname field, provide the Workday drive host name (forexample, impl-cc.workday.com).
5. Click OK.
6. Configure connection security. See Configuring Connection Security.
Configuring Connection SecurityConfigure security for your Workday Adapter connection.
1. Click Configure Security.
The Security Policy field is displayed. Only the Workday Username TokenPolicy is supported. It cannot be deselected.
2. Enter a username authorized to access the Workday account and the password.Section “Creating a Workday User Account” of Prerequisites for Creating aConnection describes the integration user and roles. You can also assign theadmin role named Security Admin to the user.
3. Reenter the password a second time.
4. Click OK.
5. Test your connection. See Testing the Connection.
Testing the ConnectionTest your connection to ensure that it is successfully configured.
1. In the upper right corner of the page, click Test.
2. Select the type of connection testing to perform:
• Validate and Test: Performs a full validation of the WSDL, includingprocessing of the imported schemas and WSDLs. Complete validation cantake several minutes depending on the number of imported schemas andWSDLs. No requests are sent to the operations exposed in the WSDL.
• Test: Connects to the WSDL URL and performs a syntax check on the WSDL.No requests are sent to the operations exposed in the WSDL.
If successful, the following message is displayed and the progress indicator shows100%.Connection connection_name was tested successfully.
3. If your connection was unsuccessful, an error message is displayed with details.Verify that the configuration details you entered are correct.
4. When complete, click Save, then click Close.
Editing a ConnectionYou can edit connection settings after creating a new connection.
1. In the navigation pane, click Integrations, then click Connections.
2. On the Connections page, search for the connection name.
Chapter 2Editing a Connection
2-7
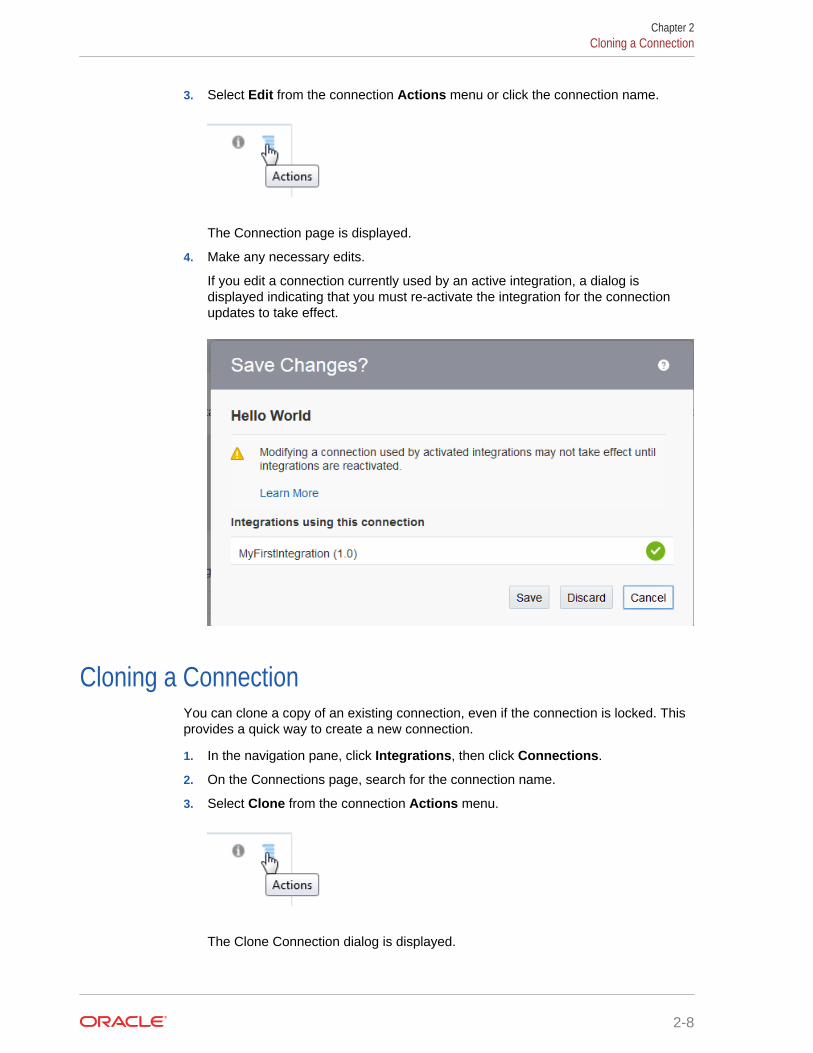
3. Select Edit from the connection Actions menu or click the connection name.
The Connection page is displayed.
4. Make any necessary edits.
If you edit a connection currently used by an active integration, a dialog isdisplayed indicating that you must re-activate the integration for the connectionupdates to take effect.
Cloning a ConnectionYou can clone a copy of an existing connection, even if the connection is locked. Thisprovides a quick way to create a new connection.
1. In the navigation pane, click Integrations, then click Connections.
2. On the Connections page, search for the connection name.
3. Select Clone from the connection Actions menu.
The Clone Connection dialog is displayed.
Chapter 2Cloning a Connection
2-8

4. Enter the connection information.
5. Click Clone.
6. Click Edit to configure the credentials of your cloned connection. Cloning aconnection does not copy the credentials.
See Editing a Connection for instructions.
Deleting a ConnectionYou can delete a connection from the connection menu.
1. In the navigation pane, click Integrations, then click Connections.
2. On the Connections page, search for the connection name.
3. Click Delete from the connection Actions menu.
The Delete Connection dialog is displayed if the connection is not used in anintegration.
4. Click Yes to confirm deletion.
Chapter 2Deleting a Connection
2-9

3Creating an Integration
Integrations use the adapter connections you created to your applications, and definehow information is shared between those applications. You can create, import, modify,or delete integrations; create integrations to publish or subscribe to messages; addand remove request and response enrichment triggers; and create routing paths fordifferent invoke endpoints in integrations. Click the following topic for more information:
Topic
• Creating Integrations (in Using Integrations in Oracle Autonomous IntegrationCloud)
3-1

4Adding the Connection to an Integration
When you drag the Workday Adapter into the invoke area of an integration, theAdapter Endpoint Configuration Wizard appears. This wizard guides you throughconfiguration of endpoint properties.
The following sections describe the wizard pages that guide you through configurationof the Workday Adapter as an invoke connection in an integration. The WorkdayAdapter cannot be used as a trigger connection in an integration.
Topics
• Configuring Basic Information Properties
• Configuring Workday Adapter Actions Properties
• Configuring Workday Adapter Service Selection Properties
• Configuring Workday Adapter Operations Properties
• Configuring Workday Adapter RaaS Services Properties
• Reviewing Configuration Values on the Summary Page
Configuring Basic Information PropertiesYou can enter a name and description on the Basic Info page of each adapter in yourintegration.
Element Description
What do you want to call your endpoint? Provide a meaningful name so that others canunderstand the responsibilities of thisconnection. You can include Englishalphabetic characters, numbers, underscores,and dashes in the name. You cannot includethe following:• Blank spaces (for example, My Inbound
Connection)• Special characters (for example, #;83& or
righ(t)now4)• Multibyte characters
What does this endpoint do? Enter an optional description of theconnection’s responsibilities. For example:This connection receives an inboundrequest to synchronize accountinformation with the cloud application.
Configuring Workday Adapter Actions PropertiesSpecify the action to execute in the Workday application.
4-1
Element Description
Query Information Select to request business objects such as employee records,benefits, and others through use of the get and find operations.
Create, Update or DeleteInformation
Select to perform operations such as employee onboarding,data synchronization, and others.
Import Bulk Data intoWorkday
Select to perform operations such as importing multiple recordsfor payroll, time sheets, and others using the import operation.
Extract Bulk Data FromWorkday
Select to import bulk data from Workday such as payrollrecords, time sheets, and others using the import operation.
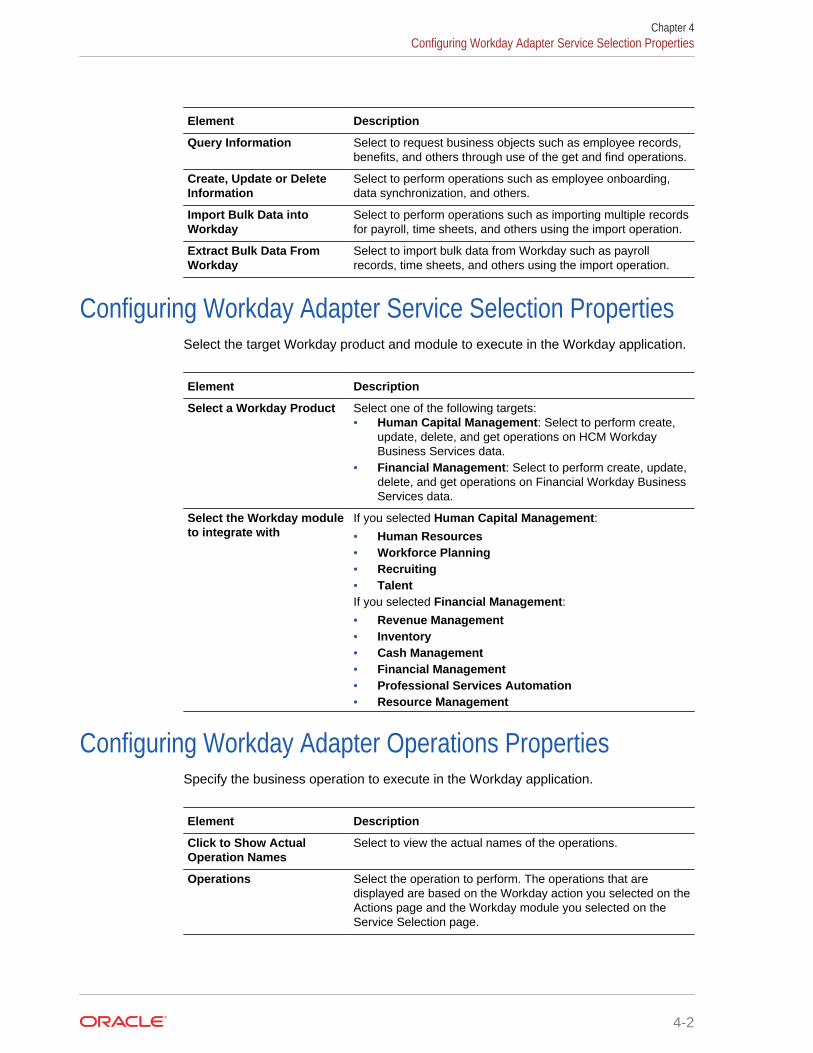
Configuring Workday Adapter Service Selection PropertiesSelect the target Workday product and module to execute in the Workday application.
Element Description
Select a Workday Product Select one of the following targets:• Human Capital Management: Select to perform create,
update, delete, and get operations on HCM WorkdayBusiness Services data.
• Financial Management: Select to perform create, update,delete, and get operations on Financial Workday BusinessServices data.
Select the Workday moduleto integrate with
If you selected Human Capital Management:• Human Resources• Workforce Planning• Recruiting• TalentIf you selected Financial Management:• Revenue Management• Inventory• Cash Management• Financial Management• Professional Services Automation• Resource Management
Configuring Workday Adapter Operations PropertiesSpecify the business operation to execute in the Workday application.
Element Description
Click to Show ActualOperation Names
Select to view the actual names of the operations.
Operations Select the operation to perform. The operations that aredisplayed are based on the Workday action you selected on theActions page and the Workday module you selected on theService Selection page.
Chapter 4Configuring Workday Adapter Service Selection Properties
4-2
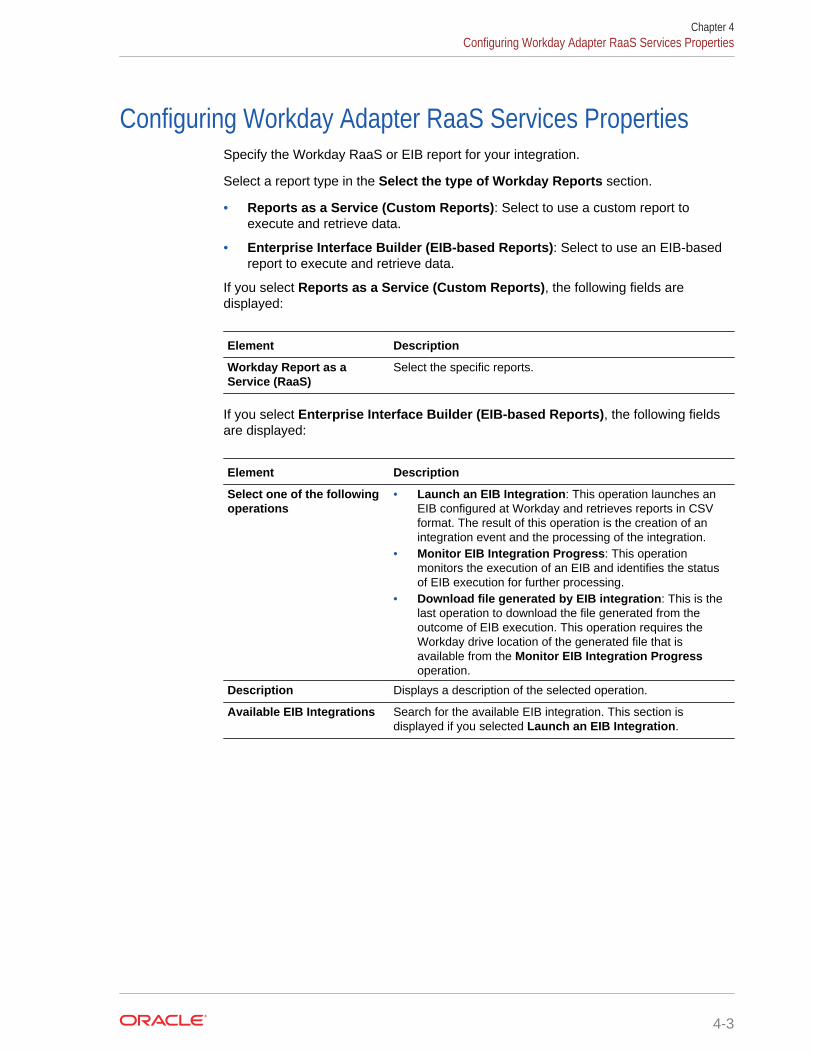
Configuring Workday Adapter RaaS Services PropertiesSpecify the Workday RaaS or EIB report for your integration.
Select a report type in the Select the type of Workday Reports section.
• Reports as a Service (Custom Reports): Select to use a custom report toexecute and retrieve data.
• Enterprise Interface Builder (EIB-based Reports): Select to use an EIB-basedreport to execute and retrieve data.
If you select Reports as a Service (Custom Reports), the following fields aredisplayed:
Element Description
Workday Report as aService (RaaS)
Select the specific reports.
If you select Enterprise Interface Builder (EIB-based Reports), the following fieldsare displayed:
Element Description
Select one of the followingoperations
• Launch an EIB Integration: This operation launches anEIB configured at Workday and retrieves reports in CSVformat. The result of this operation is the creation of anintegration event and the processing of the integration.
• Monitor EIB Integration Progress: This operationmonitors the execution of an EIB and identifies the statusof EIB execution for further processing.
• Download file generated by EIB integration: This is thelast operation to download the file generated from theoutcome of EIB execution. This operation requires theWorkday drive location of the generated file that isavailable from the Monitor EIB Integration Progressoperation.
Description Displays a description of the selected operation.
Available EIB Integrations Search for the available EIB integration. This section isdisplayed if you selected Launch an EIB Integration.
Chapter 4Configuring Workday Adapter RaaS Services Properties
4-3
Reviewing Configuration Values on the Summary PageYou can review the specified adapter configuration values on the Summary page.
Element Description
Summary Displays a summary of the configurationvalues you defined on previous pages of thewizard.
The information that is displayed can vary byadapter. For some adapters, the selectedbusiness objects and operation name aredisplayed. For adapters for which a generatedXSD file is provided, click the XSD link to viewa read-only version of the file.
To return to a previous page to update anyvalues, click the appropriate tab in the leftpanel or click Back. Click Cancel to cancelyour configuration details.
Chapter 4Reviewing Configuration Values on the Summary Page
4-4

5Creating Mappings and Lookups inIntegrations
You must map data between trigger (source) connections and invoke (target)connections in integrations. You can also optionally create lookups in integrations.
Topics
• Mapping Data (in Using Integrations in Oracle Autonomous Integration Cloud)
• Creating Lookups (in Using Integrations in Oracle Autonomous Integration Cloud)
5-1
6Administering Integrations
Oracle Autonomous Integration Cloud provides you with the information and toolsrequired to activate, monitor, and manage your integrations in the runtimeenvironment.
Topic
• Administering Oracle Autonomous Integration Cloud (in Using Integrations inOracle Autonomous Integration Cloud)
6-1
7Troubleshooting the Workday Adapter
Review the following topic to learn about troubleshooting issues with the WorkdayAdapter.
Topic
• Identifying the Correct CSV Fields to Use in Stage File Actions in Workday EIBIntegrations
Identifying the Correct CSV Fields to Use in Stage FileActions in Workday EIB Integrations
You can create an integration that uses the Enterprise Interface Builder (EIB/Asynchronous RaaS) Workday API and its operations to retrieve reports in CSVformat, monitor execution, and download the CSV file. This type of integration uses thestage file action to read data from Oracle Autonomous Integration Cloud.
To identify the correct CSV fields:
1. Log in to Workday and search for View Custom Report.
2. Click the custom report in the search results list.
3. Enter the report name you are using in the EIB integration as a data source andpress Enter.
4. In the column tab of the report view, use the names in the highlighted columnheading Overriding XML Alias as the CSV fields.
7-1