Using Quicken for Farm/Ranch Financial Records · 2 . Introduce Manual Text Conventions, Keyboard...
68
Quicken For Farm/Ranch Financial Records Quicken Deluxe 2011
Transcript of Using Quicken for Farm/Ranch Financial Records · 2 . Introduce Manual Text Conventions, Keyboard...
Quicken
For Farm/Ranch Financial Records
Quicken Deluxe 2011

i

ii
QUICKEN COMPUTER WORKSHOP EVALUATION
Please evaluate this workshop by filling in the appropriate space for each pair of phrases. What is your overall evaluation of this workshop? (Fill in appropriate space.)
Excellent Poor
CONTENT: In general, how do you rate the content of this workshop?
What I expected Different than expected
Good style and delivery Poor style and delivery
Organized Unorganized
Too complex Too simple
Informative Uninformative
MATERIALS: In general, how do you rate the materials handed out?
Very effective Ineffective
Well prepared Useless
HOW DID THIS WORKSHOP CHANGE:
Your knowledge? Improved No change
Your interest in topic? Increased Decreased
Your confidence in using skills? Increased Decreased
Comments helpful to instructors and conference planners: Would you be interested in participating in an advanced Quicken workshop? Potential topics of interest (fill in all that apply):
Developing budgets
Livestock inventory options
More on reports and graphs
Financial calculator features (refinancing, college savings, retirement planning) Investment Accounts
Online Banking
Other_______________________________________________________

iii

iv
Table of Contents
Using Quicken® for Farm/Ranch Financial Records ........................................................................1
Introduce Manual Text Conventions, Keyboard Shortcuts and desktop setup ......................2
Set up a Data File and Add a Checking Account ...................................................................5
Add Savings and Cash Accounts ...........................................................................................9
Modify the Category List .......................................................................................................9
Import a Farm Category List ..........................................................................................10
Add Categories ...............................................................................................................12
Delete Categories ............................................................................................................14
Add Subcategories ..........................................................................................................14
Set Up Tags ............................................................................................................................16
Add Loan Accounts ...............................................................................................................17
Enter Transaction Data Using Categories, Subcategories, and Tags .....................................21
Record Loan Payments ..........................................................................................................26
Create Reports to Summarize Data Entered ..........................................................................28
View a Graph of Income and Expenses .................................................................................35
Back Up Data .........................................................................................................................37
Category Lists ....................................................................................................................................40
Standard Category ..........................................................................................................40
Business Categories ........................................................................................................42
Investment Categories ....................................................................................................43
Rents and Royalties ........................................................................................................44
Farm Categories ..............................................................................................................45
Transactions .......................................................................................................................................47
Reports ...............................................................................................................................................50
Cash Flow .......................................................................................................................50
London Monthly Cash Flow – Q4 2010 .........................................................................52
London Cash Flow by Enterprise - 2010 ........................................................................54
Deere Transactions .........................................................................................................56
Tax Schedule – 2010 (sample report, pages 1-4) ...........................................................57
Tax Schedule Totals .......................................................................................................61
London Monthly Budget, Jan-Feb 2011 .........................................................................62
1
Using Quicken® for Farm/Ranch Financial Records1
(Quicken® Deluxe 2011)
December 2010
This tutorial demonstrates a “hands-on” session to develop a simple set of financial records and reports for a case farm with a cow/calf herd and wheat for grain and pasture. Although our case farm is a simple one, you will be able to practice many of the steps that you might use in adapting Quicken Deluxe2
to keep records on your farm or ranch. This tutorial is intended to be a step-by-step reference that can be used when working on computerized personal records at home or to supplement instructions in a workshop setting.
An overview of what we do in an introductory workshop follows: 1. Introduce text conventions in the manual, keyboard shortcuts and desktop setup. 2. Create a data file and add checking, savings and cash accounts. 3. Work with category lists.
a. Import Farm Categories to match tax Schedule F. b. Add categories. c. Delete categories. d. Add subcategories.
5. Set up tags. 6. Add loan accounts to be used in the file. 7. Enter transaction data using the categories, subcategories and tags specified. 8. Record loan payments. 9. Create reports to summarize the data entered.
10. View a graph of income and expenses. 11. Back up data.
Specific instructions for accomplishing each of these steps are included in this tutorial. Additional instructions for common or farm-related procedures follow the basic instructions. A glossary of financial and Quicken terms are at the end of the tutorial. If you are using this tutorial at home, the “new user setup” in Quicken will prompt you to set up a file and your accounts as described in the first three sections of this tutorial.
Additional farm management information and Quicken tips for usage can be viewed online
at www.agecon.okstate.edu/quicken. The Quick Tips newsletter is a helpful companion to this tutorial.
1 Damona Doye, Extension Economist, and Lori J. Shipman, Extension Paraprofessional. Please visit our website, http://www.agecon.okstate.edu/quicken/ to access additional topics and instructions, including the Quick Tips newsletter 2 Quicken Deluxe 2011 is a registered trademark and will be written as Quicken or Quicken 2011 throughout the rest of the tutorial.

2
Introduce Manual Text Conventions, Keyboard Shortcuts and desktop setup Text Conventions
Throughout this tutorial, you will notice some information is printed differently than the surrounding text. This enhanced text requires special attention as it generally signifies an action to be performed. If, for instance, we want you to type the words “My programs”, you will see this:
Type My programs. Buttons that you need to click, selections that you need to make, or text that is referenced in
a document on screen appear in bold text:
Click the Customize button.
Select Expense. File and folder names are referenced in italics and use the case conventions for the operating
system in which you are working. For example, a computer file name might appear like this:
Document1 Keyboard and keyboard combinations that you may need to apply appear like this:
Press [ENTER].
Press [CTRL+A]. A keyboard/mouse combination such as [CTRL+A] means to press and hold down the first
key (Control) while pressing the second key (A), then release. Text that appears within parentheses refers to steps that may be necessary depending on
your computer’s settings or steps in an alternate approach to the same task. Parenthetical steps appear like this:
(Click the Close button.) Titles of screens, programs, etc. will be underlined such as the name of the following
Quicken screen: Create Quicken File Notes and helpful hints are in italics and sometimes enclosed in parentheses, for example:
Note: The note may appear this way.
(The note may appear this way.)
3
Keyboard Shortcuts and Desktop Setup
You may select an item from Quicken in one of four ways: a. Using the mouse, left-click (click using the left button of your mouse) on specialized
“buttons” in the toolbar.
b. Using the mouse, move the cursor to the appropriate line in a drop-down menu and left-click.
c. Use a shortcut key by simultaneously pressing [Ctrl] or [Ctrl+Shift] and the designated letter. For example, [Ctrl + S] takes you to the split transaction screen.
d. In the check register, simultaneously press [Alt] and the letter key underlined in the word or phrase.
For example to open the menu line File, select [Alt+F].
In our instructions we typically use mouse clicks and the menu bar for selections. We occasionally mention the shortcut keys.
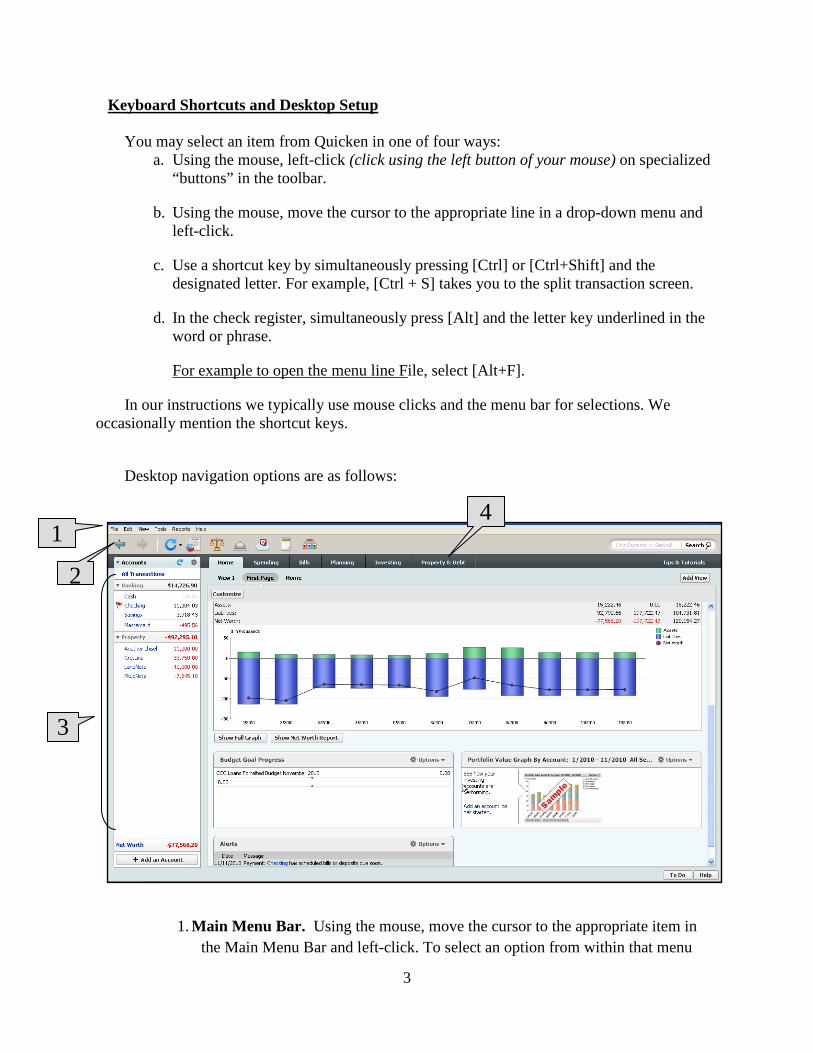
Desktop navigation options are as follows:
1. Main Menu Bar. Using the mouse, move the cursor to the appropriate item in the Main Menu Bar and left-click. To select an option from within that menu
2
3
4 1
4
heading, move the cursor to select it. For example, to create a new file within Quicken, select File from the main menu and move the cursor to New.
2. Toolbar. Toolbar buttons provide quick access to options such as returning to the previous screen (Back button), accessing the Internet for stock quotes and news (One Step Update button) or the Quicken website (Quicken.com button). If the toolbar isn’t available, click on View, Show Tool Bar.
3. Account Bar. The Account Bar allows easy access to accounts by center. The “centers” display account summary information in one easy-to-read place. You can customize what appears on each of the centers by deleting, rearranging, or adding new components. You can also create different views of the center. When an account is selected, the account register appears.
4. Shortcut Tabs. When you become more familiar with Quicken, you may want to try using the shortcut features. They take you to the different centers within Quicken and have an overview screen that appears for each tab. We will typically use the Main Menu Bar for navigation.
To move around in the register or menu screens, press [Tab] to move forward to the next field (area for input). Press [Shift+Tab] to move backwards one field. The step-by-step instructions that follow will not note every [Tab] needed to move through screens. Assume that if the cursor doesn’t move to the next field, you should [Tab] to navigate to enter the next piece of information.
Later in this tutorial, we will use the sample files provided on the Quicken Sample Files
compact disc (CD) to review some of Quicken’s features. For these files to run efficiently, follow these instructions to copy them to the hard drive of your computer.
Place the CD labeled Quicken Sample Files into the appropriate computer drive (for our
example, we will use CD drive, D:). Open the Windows Explorer program [ Windows Key + E] or right-click on Start, Explore
or click Start All Programs (You may need to click Accessories.) Windows Explorer From the options on the left, double-click My Computer (D:) 11 Quicken Sample Files File names Asset Acct, Farm Categories, and LOND11 should be displayed on the right. From the taskbar at the top of Windows Explorer, click

5
Edit Select All (The shortcut for Edit, Select All is to press [Ctrl+A]). Then, click Edit Copy
Now, click Local Disk (C:) (from the menu on the left) From the Drop-Down Menu Bar, click File New Folder To name the folder, type Workshop Files and press [Enter]. Open the Workshop Files folder by double-clicking it. Then click Edit Paste (The shortcut for Edit, Paste is to press [Ctrl+V]).
Click X in the top right corner to close Windows Explorer. You have completed the task of copying the Quicken Sample Files to your computer. Later
in the tutorial, you will be using these files. Now we will create a new file for your practice.
Set up a Data File and Add a Checking Account
Just as a file cabinet can contain family and farm financial information, one Quicken computer file can contain both farm and family financial information. Income and expenses are recorded in one or more accounts (checking, credit card, etc.). Reports can be developed to summarize information across all accounts, by individual account, or by tag if you specify tags when you enter transactions. We will use tags to represent the different enterprises of our farm (for example, Wheat, Stockers, Overhead, and Family Living). This tutorial touches on the basic features of Quicken,
Previous Quicken Users: Quicken 2011 will automatically uninstall previous versions of
Quicken. Make a backup of all current data files before installing 2011! Follow the installation instructions as prompted after inserting your program CD or downloading Quicken from the Intuit website. You will be asked if you are a new or previous user. Then, you will be asked if you want to open the data file most recently used, use a different data file or start over and create a new file. If you choose “start over”, you can create a file name that you choose and select the directory in which you want to save it.
6
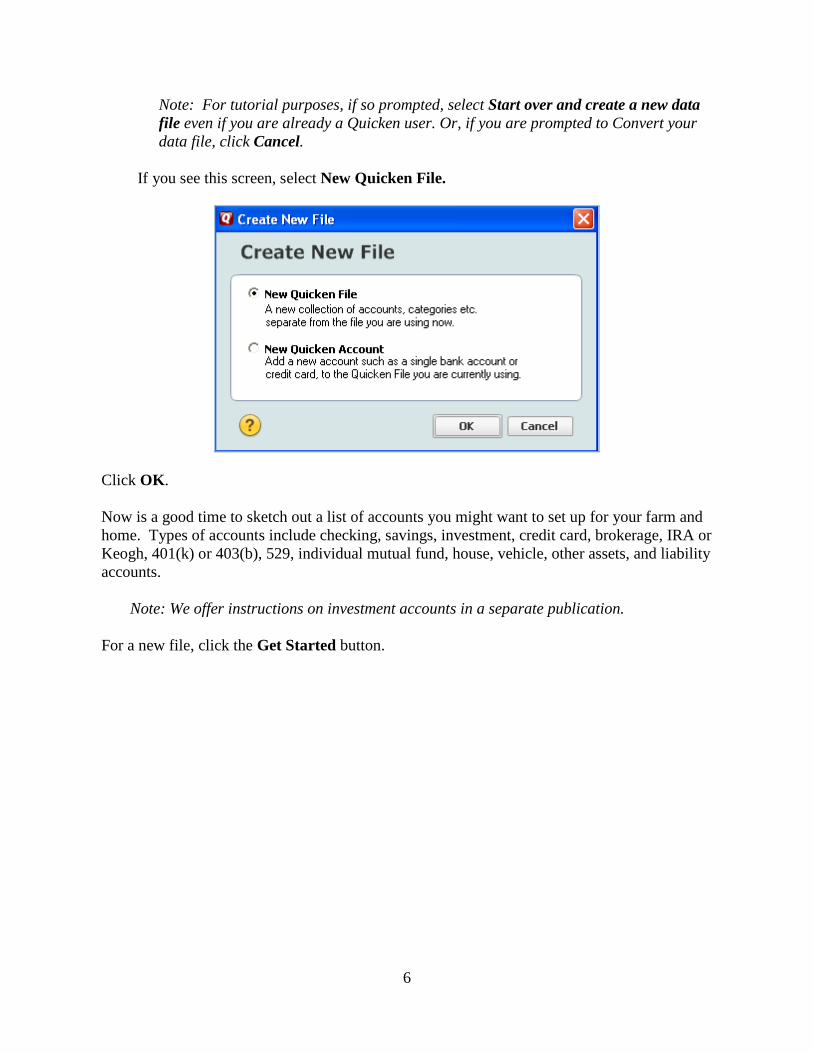
Note: For tutorial purposes, if so prompted, select Start over and create a new data file even if you are already a Quicken user. Or, if you are prompted to Convert your data file, click Cancel.
If you see this screen, select New Quicken File.
Click OK. Now is a good time to sketch out a list of accounts you might want to set up for your farm and home. Types of accounts include checking, savings, investment, credit card, brokerage, IRA or Keogh, 401(k) or 403(b), 529, individual mutual fund, house, vehicle, other assets, and liability accounts.
Note: We offer instructions on investment accounts in a separate publication.
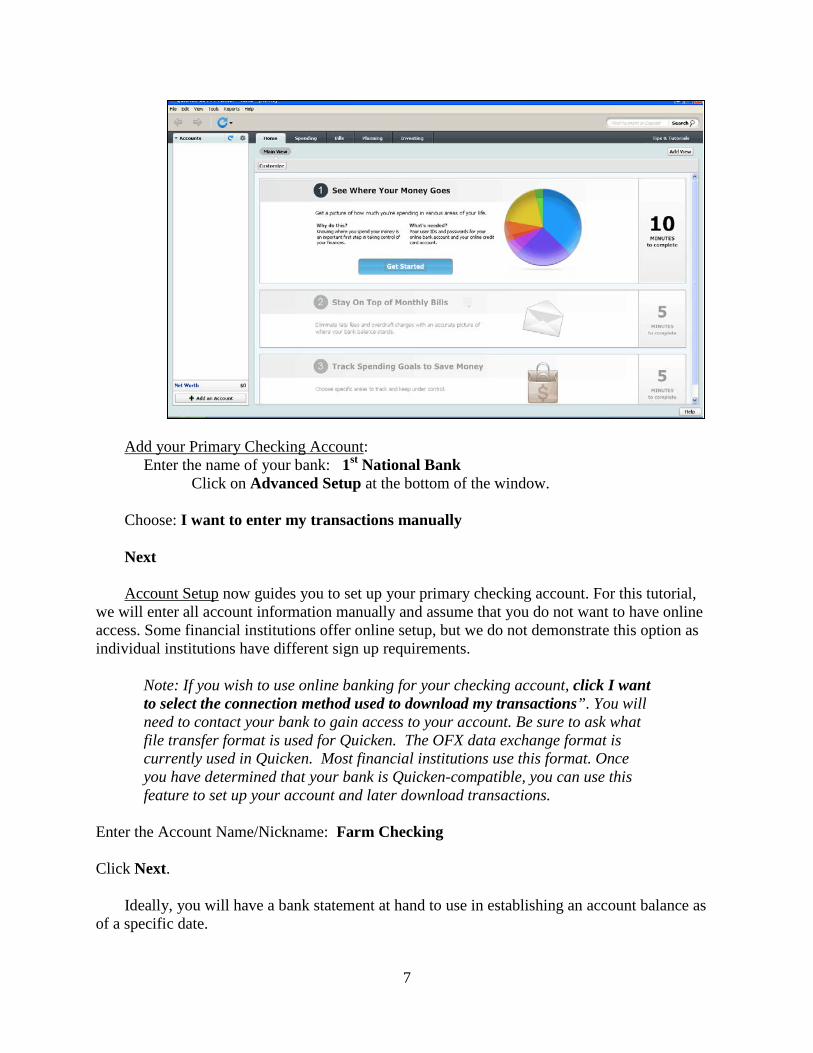
For a new file, click the Get Started button.
7
Add your Primary Checking Account:
Enter the name of your bank: 1st National Bank Click on Advanced Setup at the bottom of the window. Choose: I want to enter my transactions manually Next Account Setup now guides you to set up your primary checking account. For this tutorial,
we will enter all account information manually and assume that you do not want to have online access. Some financial institutions offer online setup, but we do not demonstrate this option as individual institutions have different sign up requirements.
Note: If you wish to use online banking for your checking account, click I want to select the connection method used to download my transactions”. You will need to contact your bank to gain access to your account. Be sure to ask what file transfer format is used for Quicken. The OFX data exchange format is currently used in Quicken. Most financial institutions use this format. Once you have determined that your bank is Quicken-compatible, you can use this feature to set up your account and later download transactions.
Enter the Account Name/Nickname: Farm Checking
Click Next. Ideally, you will have a bank statement at hand to use in establishing an account balance as
of a specific date.
8
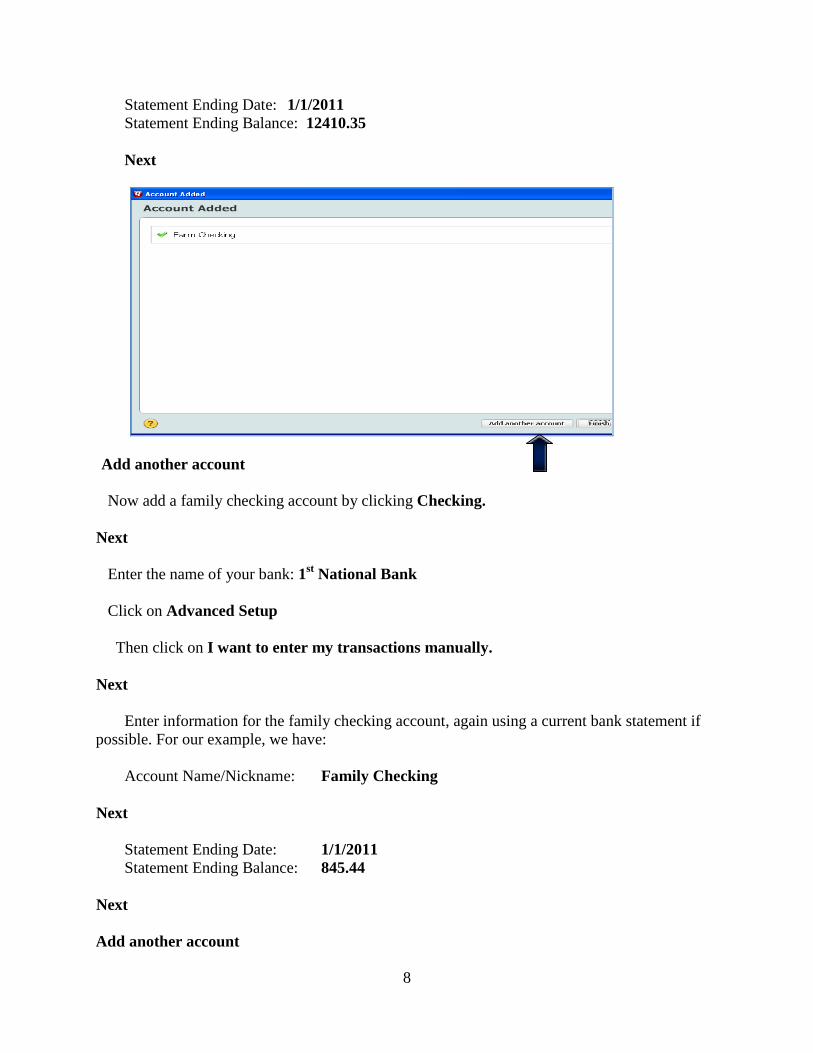
Statement Ending Date: 1/1/2011 Statement Ending Balance: 12410.35 Next
Add another account Now add a family checking account by clicking Checking.
Next
Enter the name of your bank: 1st National Bank Click on Advanced Setup Then click on I want to enter my transactions manually.
Next
Enter information for the family checking account, again using a current bank statement if possible. For our example, we have:
Account Name/Nickname: Family Checking
Next
Statement Ending Date: 1/1/2011 Statement Ending Balance: 845.44
Next
Add another account
9
Add Savings and Cash Accounts
Now we will add the savings and cash accounts.
Click on
Add Account
Savings Next Enter the name of your bank: 1st National Bank Click on Advanced Setup Next
Then click on I want to enter my transactions manually
Next Enter information for the savings account, again using a current statement if possible. For our example, we have: Account name/nickname: Savings
Statement Ending Date: 1/5/2011 Statement Ending Balance: 5218.43
Next Click on Add another account button.
Using this account will help you keep track of where you spend cash and can point out some
budget breakers or costly habits. Don’t kid yourself—using cash for transactions and failing to tally them periodically can hide some problems.
Account name/nickname: Cash Date to start tracking: 1/1/2011 Amount of cash you have: 200.00
Click Next, then Finish.
We are going to postpone adding other accounts to establish the category list.
Modify the Category List

10
Spend some time thinking about the kinds of income and expenses that you need to track. In the beginning, you may want to start with categories for tax reports or match an existing chart of accounts or record system. Start simple and add new levels of detail as needed for management purposes. The category list is shared (accessible) across all accounts within your Quicken file. Access the current category list to view it by clicking
Tools
Category List Note: To show a description of each category click on the Options button and click on Show Description.
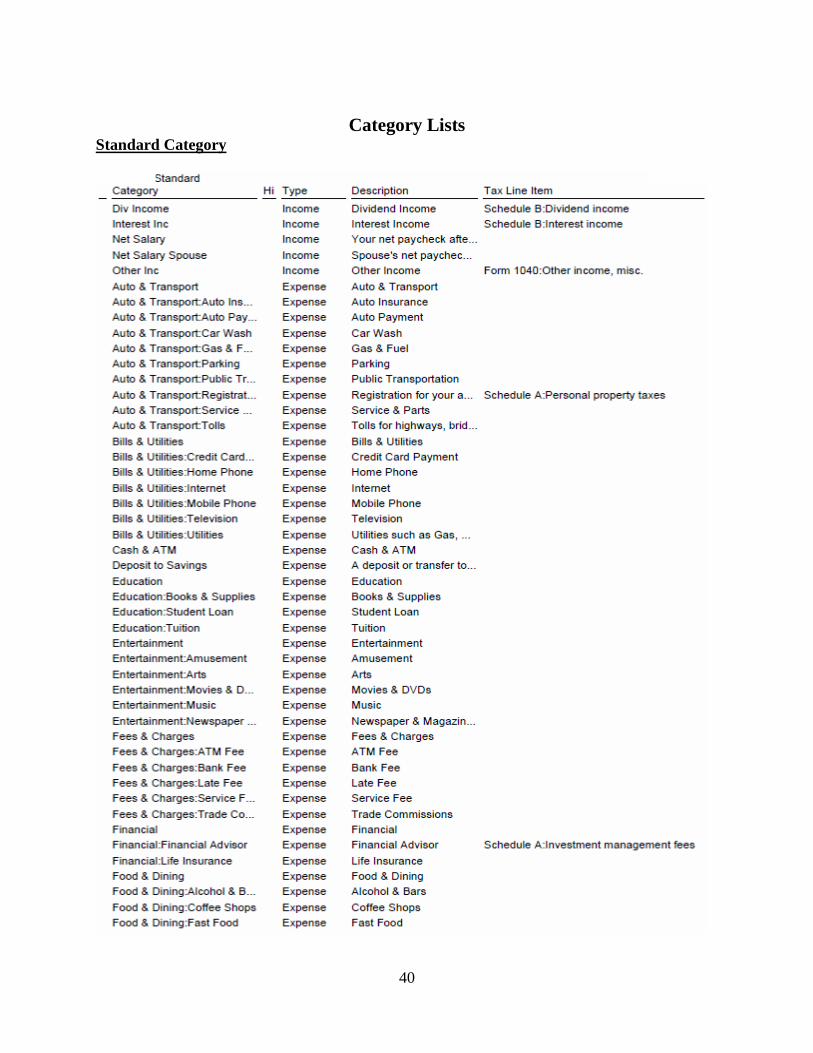
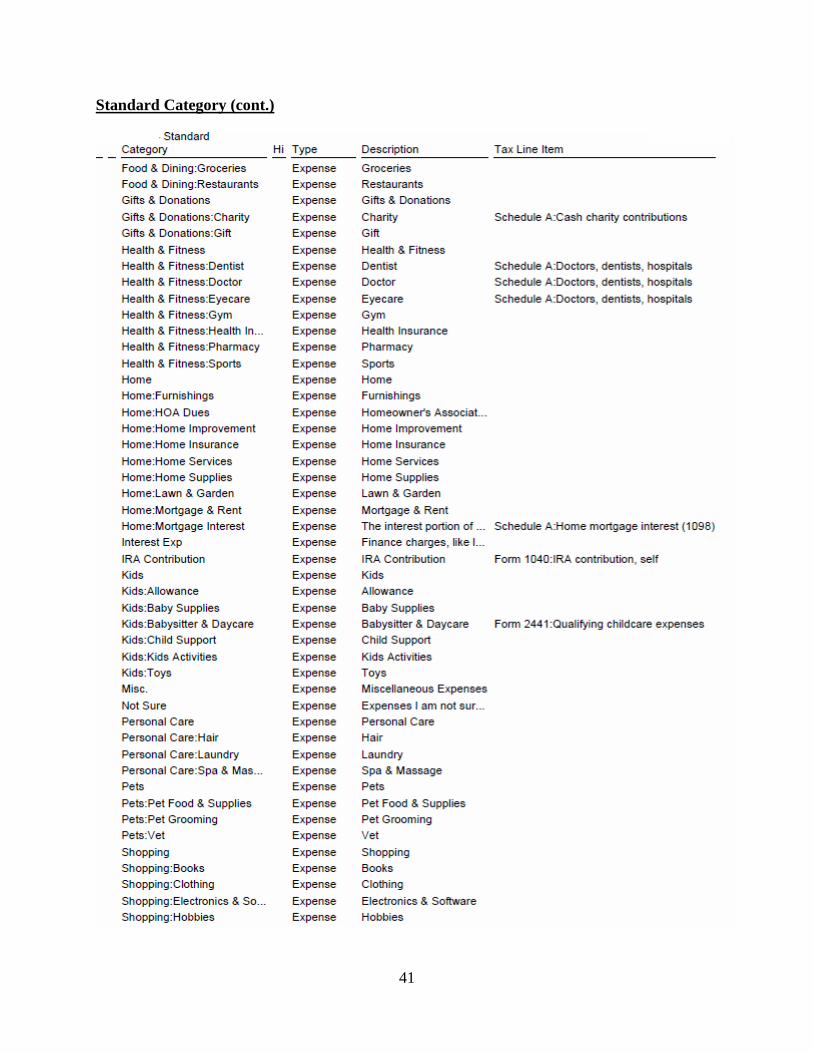
Scroll through the list to see the default categories. Tables showing the built-in Category
lists that come with Quicken are included in this manual. Click on the X in the upper right corner to close the Category List window. Import a Farm Category List
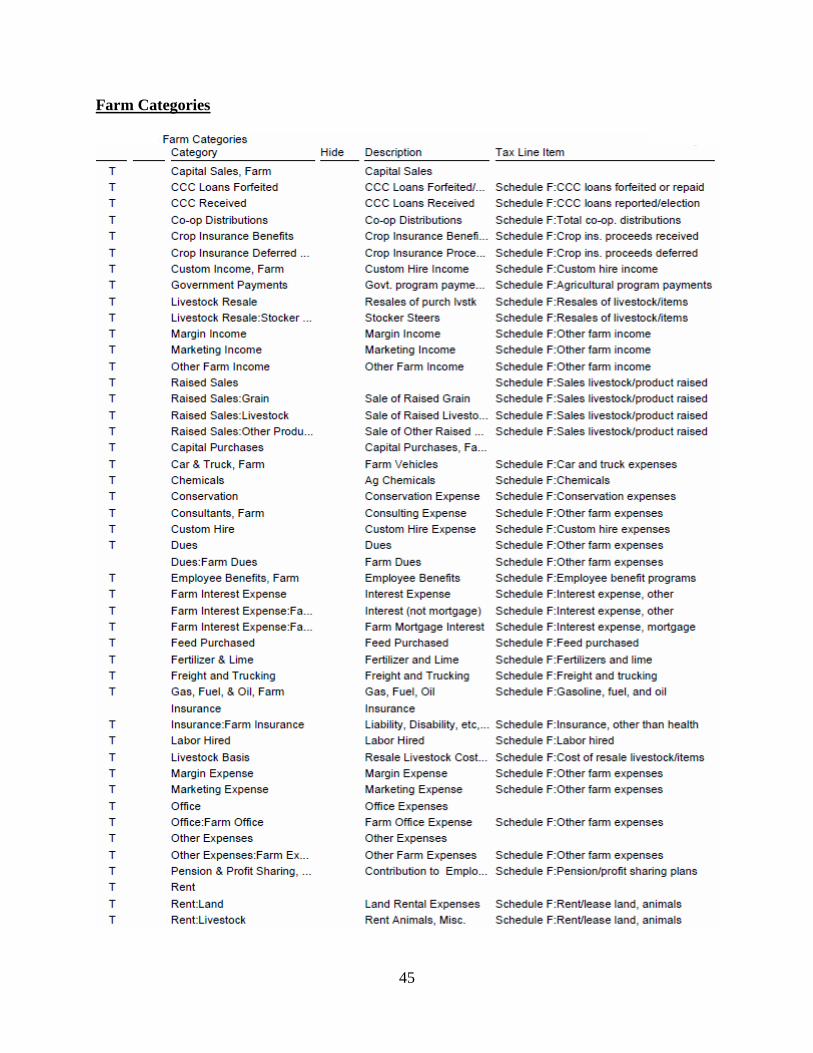
A printed list of farm categories built to match farm income tax Schedule F is included in this manual (Farm Categories). This list can be imported into Quicken from a file named Farm Categories on the CD with purchased copies of the tutorial. This file is also available on the website from which you downloaded the instructions (agecon.okstate.edu/quicken, download sample files). The farm income and expense category list provided is by no means sacred. It is

11
intended to serve as a beginning point for your own personalized list. You may add, delete, or modify items in the list to make it useful for your operation.
We will now import the farm income and expense categories to our current file to facilitate
farm financial record keeping and tax reporting. If you copied sample files to your computer using the earlier instructions, the Farm Categories file is located in the C:\Workshop Files folder. From the main menu, click
File File Import QIF File
Click Browse to locate the Farm Categories file in the C:\Workshop Files folder. Click OK.
Use the mouse or space bar to select Category List (and deselect the other items if necessary).
Click Import
Click Done. Click Tools in the main menu line at the top of the Quicken window and select Category
List to verify that your category list now contains Capital Sales, Farm, plus CCC Loans Forfeited, CCC Received, Co-op Distributions, and other farm categories in addition to the original default list (you may need to click on All Categories on the left to see these). Scroll through the list to become familiar with the names and descriptions of the categories. Income items are listed first in alphabetical order, followed by Expense items, again in alphabetic order.
Note: Quicken includes the Farm Categories as Personal Income and Personal Expenses to preserve Business Expenses for its internal Schedule C items. Don’t

12
let this stress you as the categories are appropriately linked with Schedule F and will show up in Tax Schedule reports correctly. The view of the category list may be altered by clicking on the Options button in the lower left side. We do not use the Type and Group part of the category list.
When creating new categories designate tax-related items as such and select the correct tax
form and line (check with your accountant or tax preparer if you need guidance—you can make corrections later if necessary). Even if you select the tax line item for a category, it will not be recognized in the preset tax reports unless the tax-related box is checked.
Add Categories If you need to add additional categories that are already in one of the Quicken preset “life event” lists, you can do so by clicking on the Options button in the lower left corner of the category list and choose Manage Categories.
From here, select from the Available Categories (Standard, Business, Investment, etc.) in the
drop-down list. The associated categories in that grouping are listed in the box below it. You can Mark All or individually check the categories needed.
Note: You will only be able to add from Category groups not already included in your category list. If Add cannot be clicked on because it is in gray scale, those categories are already included.
Once the categories are selected, click Add (middle of the window)

13
OK To add categories that are not on any of the built-in lists, click on the New button Let’s assume that we want to create a new category that is a legitimate farm expense, that is, something we will want to link to a Schedule F tax line item. For schedule F categories, it is best to complete this screen in the following order:
1. Enter the Name, Crop advisory service. 2. Select Expense.
Click on the Tax Reporting tab.
1. Select the Tax-related box. This box must be marked to allow transactions associated with this category to appear in tax schedule and tax summary reports.
2. Select Extended line item list. Schedule F line items will now be made available in the Tax Line Item box. You have to scroll down through a long list to select the appropriate line.
3. In this case, select Schedule F: Other farm expenses from the Tax line item
: drop-down menu.

14
OK
The category has now been added as you can see if you scroll down to the expense section in the category list on your screen. Delete Categories You can easily remove categories that aren’t needed. Let’s delete the Auto and Transport: Public Transportation category by selecting the category:subcategory and then click the Delete button to the right of the category name.
Note: If you delete a category, the linked subcategories will be deleted simultaneously.
Click OK
Add Subcategories
Setting up subcategories adds a second level of detail for reports and summaries. Fertilizer purchase records, for example, can track lime and 18-46-0 separately rather than as one item

15
under the Fertilizer & Lime category. At the same time, they will be subtotaled in the Fertilizer & Lime main category.
Note: Start with a simple category list and don’t get carried away adding subcategories. Subcategories should only be used for detailed information that is needed for financial reporting or management decisions. Otherwise, use the memo field or notes for recording data needed as a note or reminder.
In the category list window, click New (lower left).
Note: If a subcategory has different tax attributes from the category, select the correct tax line item. For example, if Office is the category, subcategories for farm office and business office would be attached to different tax schedules, Schedule F and Schedule C, respectively.
Click OK
Repeat the procedure above to add another subcategory for 18-46-0.
Close the category list by clicking on Done (bottom right) or the X in the upper right corner of the Category List window.
Don't stress about making mistakes in setting up categories—you may rename or edit categories as needed. To make corrections, go to the Category List and highlight the category name and click Edit (on the right side). Changes made to an existing category are immediately reflected in previously recorded transactions.
16
Set Up Tags
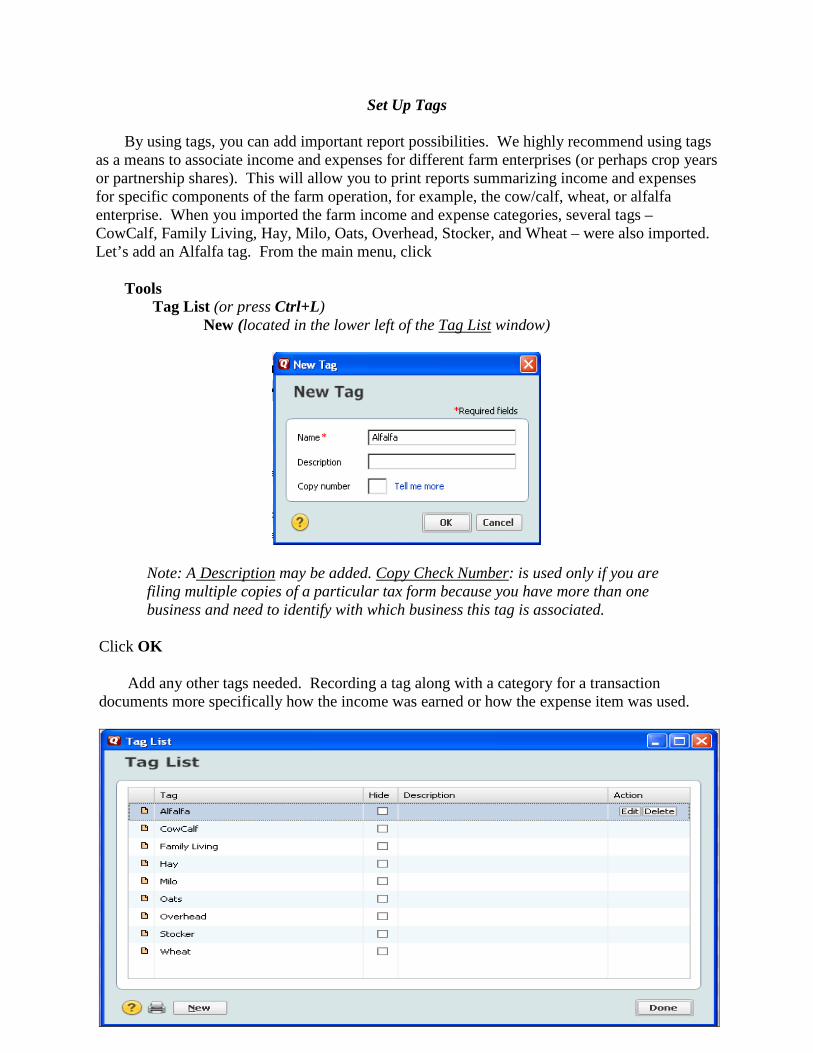
By using tags, you can add important report possibilities. We highly recommend using tags as a means to associate income and expenses for different farm enterprises (or perhaps crop years or partnership shares). This will allow you to print reports summarizing income and expenses for specific components of the farm operation, for example, the cow/calf, wheat, or alfalfa enterprise. When you imported the farm income and expense categories, several tags – CowCalf, Family Living, Hay, Milo, Oats, Overhead, Stocker, and Wheat – were also imported. Let’s add an Alfalfa tag. From the main menu, click
Tools Tag List (or press Ctrl+L) New (located in the lower left of the Tag List window)
Note: A Description may be added. Copy Check Number: is used only if you are filing multiple copies of a particular tax form because you have more than one business and need to identify with which business this tag is associated.
Click OK
Add any other tags needed. Recording a tag along with a category for a transaction documents more specifically how the income was earned or how the expense item was used.
17
To edit a tag, highlight the appropriate tag name by clicking on it, and then click on the Edit button at the right.
Note: If the selected tag name has been used in transactions and you change it, all previously recorded transactions will automatically change.
To delete a tag, highlight the tag line and click on the Delete button to the right.
Note: We recommend that you run a report sorted by Tag before deleting one to make sure there are no transactions which use it. For tags that will not be used in the future, we suggest clicking on the Hide field next to the tag. This will not remove it from previously recorded transactions, but will remove it from the tag list in normal view. Deleting a tag that has been used will cause those transactions to have a blank tag field.
We have decided we don’t need the Oats tag since we do not raise oats. Click on the Oats tag. Delete Close the Tag List by clicking on the X in the upper right corner or clicking the Done button in the lower right corner.
Add Loan Accounts
Even if you do not use Quicken for maintaining a balance sheet, you may still want to amortize and/or record loans using the liability account features.
Note: Line of credit notes are best handled as credit card accounts in Quicken. See the line of credit account instructions under Various Topics for more details. Note: Users may want to evaluate Quicken features for tracking net worth. However, the balance sheet features in Quicken are not designed to maintain cost and market value information nor can you calculate and record depreciation from within Quicken. If you use Quicken to maintain a balance sheet, use the appropriate asset/debt accounts and be sure to update asset values periodically. If tracking assets at cost basis, use purchase price minus adjustments for depreciation as the beginning balance. See Balance Sheet instructions for more information.
We have a land loan with a remaining balance of $73,126.04. The land note at origination was for $94,936 to be repaid over 15 years at 8.5% interest with annual payments (9 years of payments remain).

18
Add liability accounts Tools
Add Account Loan
Next Add information as in the following screens.
Next
Next
19
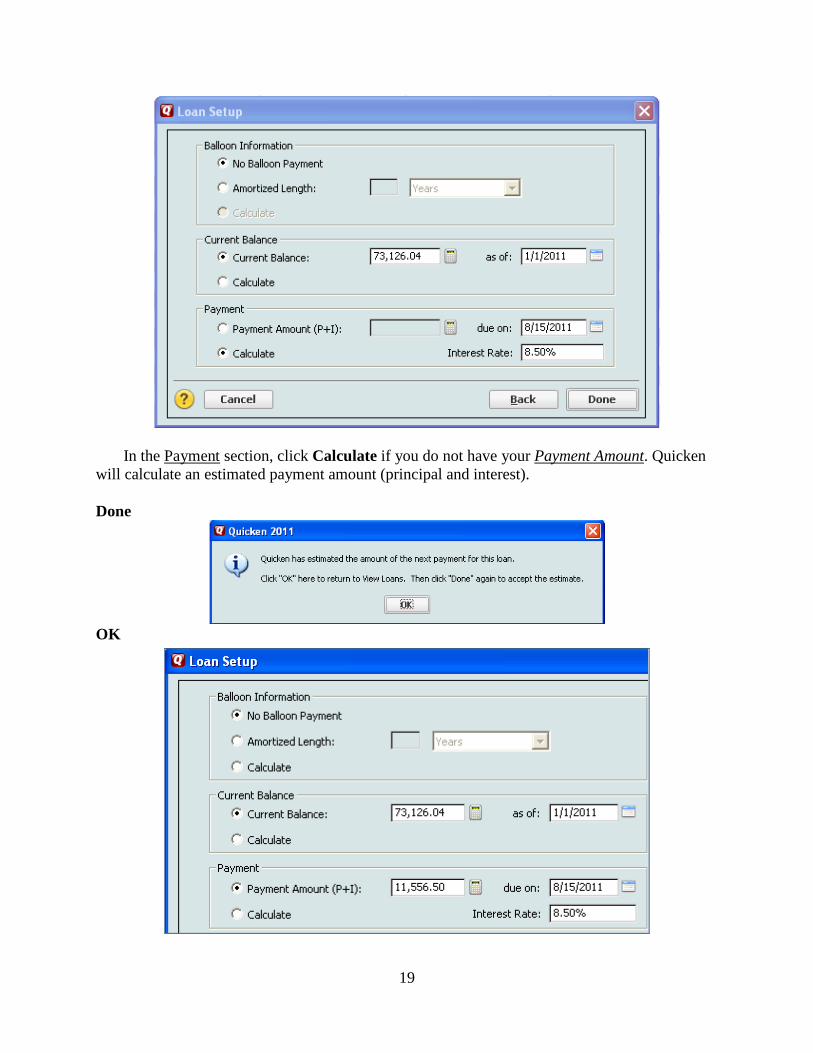
In the Payment section, click Calculate if you do not have your Payment Amount. Quicken will calculate an estimated payment amount (principal and interest). Done
OK
20
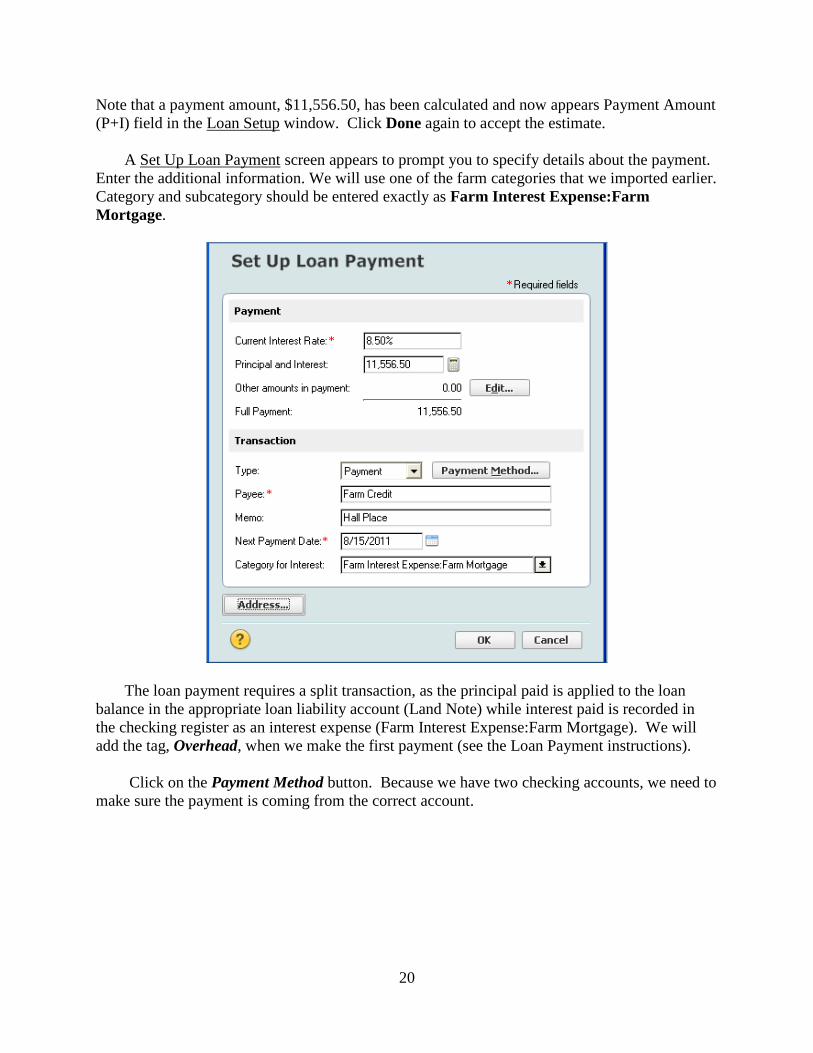
Note that a payment amount, $11,556.50, has been calculated and now appears Payment Amount (P+I) field in the Loan Setup window. Click Done again to accept the estimate.
A Set Up Loan Payment screen appears to prompt you to specify details about the payment. Enter the additional information. We will use one of the farm categories that we imported earlier. Category and subcategory should be entered exactly as Farm Interest Expense:Farm Mortgage.
The loan payment requires a split transaction, as the principal paid is applied to the loan balance in the appropriate loan liability account (Land Note) while interest paid is recorded in the checking register as an interest expense (Farm Interest Expense:Farm Mortgage). We will add the tag, Overhead, when we make the first payment (see the Loan Payment instructions).
Click on the Payment Method button. Because we have two checking accounts, we need to
make sure the payment is coming from the correct account.
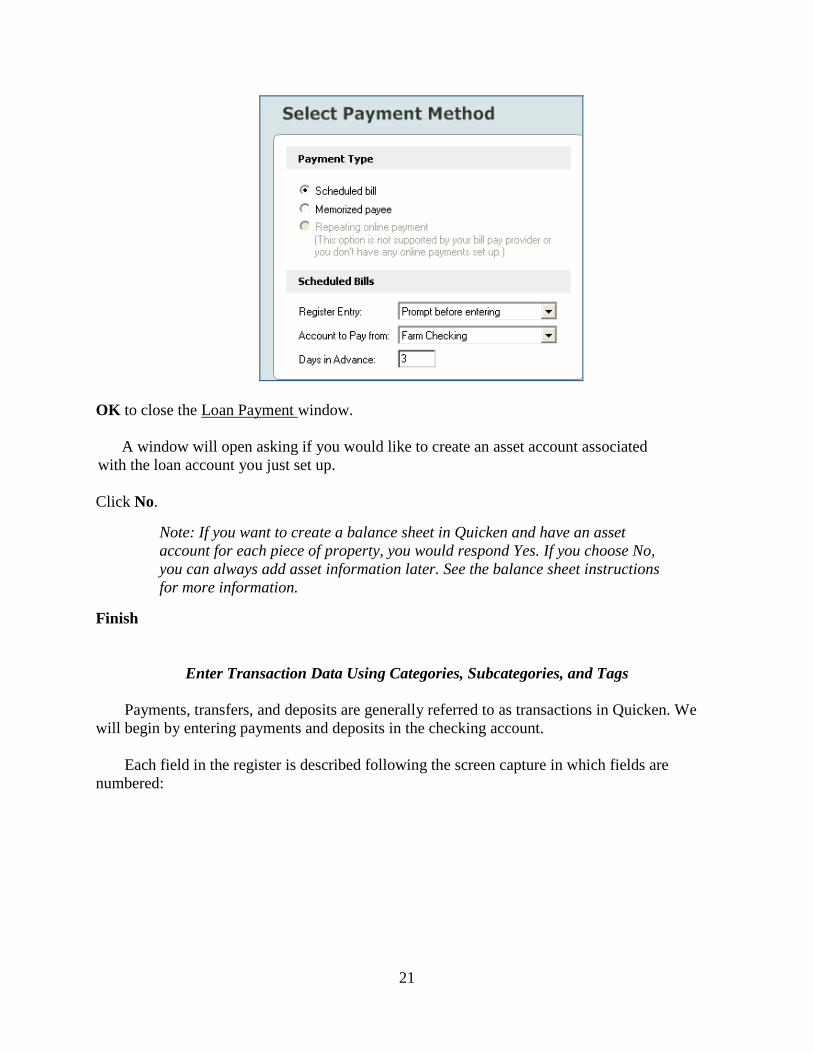
21
OK to close the Loan Payment window. A window will open asking if you would like to create an asset account associated
with the loan account you just set up.
Click No.
Note: If you want to create a balance sheet in Quicken and have an asset account for each piece of property, you would respond Yes. If you choose No, you can always add asset information later. See the balance sheet instructions for more information.
Finish
Enter Transaction Data Using Categories, Subcategories, and Tags Payments, transfers, and deposits are generally referred to as transactions in Quicken. We
will begin by entering payments and deposits in the checking account. Each field in the register is described following the screen capture in which fields are
numbered:
5

22
1. The name of the account register that is currently open is displayed here. In this case, we are viewing the Checking
2. The Flag button allows you to add flags or notes to mark a transaction. account register.
3. Click on the Attach button to insert attachments such as check images, bills, or other graphics.
4. The Date appears in the first column of the register. The Quicken default is the current date. Simply type the date (01/01/2011), or click on the calendar icon and highlight the correct date, or press the [+] or [-] keys to select the correct date.
5. The Check Number (if applicable) may be typed in the second column. If the checks are in consecutive order, you may simply press the [+] or [-] key on your keyboard to increase or decrease the check number by one, respectively. Entering DEP for a deposit automatically moves the cursor to the Deposit column when entering the amount. Other choices include EFT (Electronic Funds Transfer), ATM (Automatic Teller Machine) transaction, or TXFR (Transfer) to another account.
6. The name of the Payee (for payments) and the Paid by (for receipts/deposits). 7. To add further details about the transaction, for example, pounds used or application
rate, enter information in the Memo field. Memos are useful for recording quantities, signaling the potential need for a 1099, and for noting more detail about the transaction that might be beneficial for filtering reports.
8. The name of the category and subcategory goes in the next column. To be able to create reports summarizing income and expenses by category, you must specify a category for each transaction. The format for labeling a transaction is
2
3
4 5
6 7 8 9 10
11
12 13
1
23
Category:Subcategory. The “: " after the category name signals that a subcategory will follow. Thus, at the Category prompt for a transaction involving the purchase of lime for the wheat enterprise, you could type Fertilizer & Lime:Lime where Fertilizer & Lime is the category and Lime is a subcategory.
9. Here the Tag is used to denote an enterprise for which cost and return information is of interest. In the example described in Check Numbered 6, we would use Wheat as the tag as the lime was used for the wheat enterprise.
10. The Split button allows you to divide payments and deposits among more than one category and/or tag. An example is demonstrated later in the instructions.
11. A payment made to someone is recorded in the Payment column. If a payee name has been used previously, Quicken will recall the previous transaction amount (Quickfill). To enter the correct amount, highlight and type in the Check Number. Credits or deposits to the account are recorded in the Deposit column.
12. The Clr column shows each transaction as uncleared when blank, cleared with a “c” or an “R” when the transaction has been reconciled (see reconciliation section).
13. The Save button is what you will click once the transaction information is recorded. This saves the information to the file automatically.
Press the F11 button on your keyboard to expand the register to full screen. Go to the checking register by clicking on Farm Checking under Banking (on the left
sidebar). Practice a sample entry using the information below. Remember to use the [Tab] key to
move from one field to another.
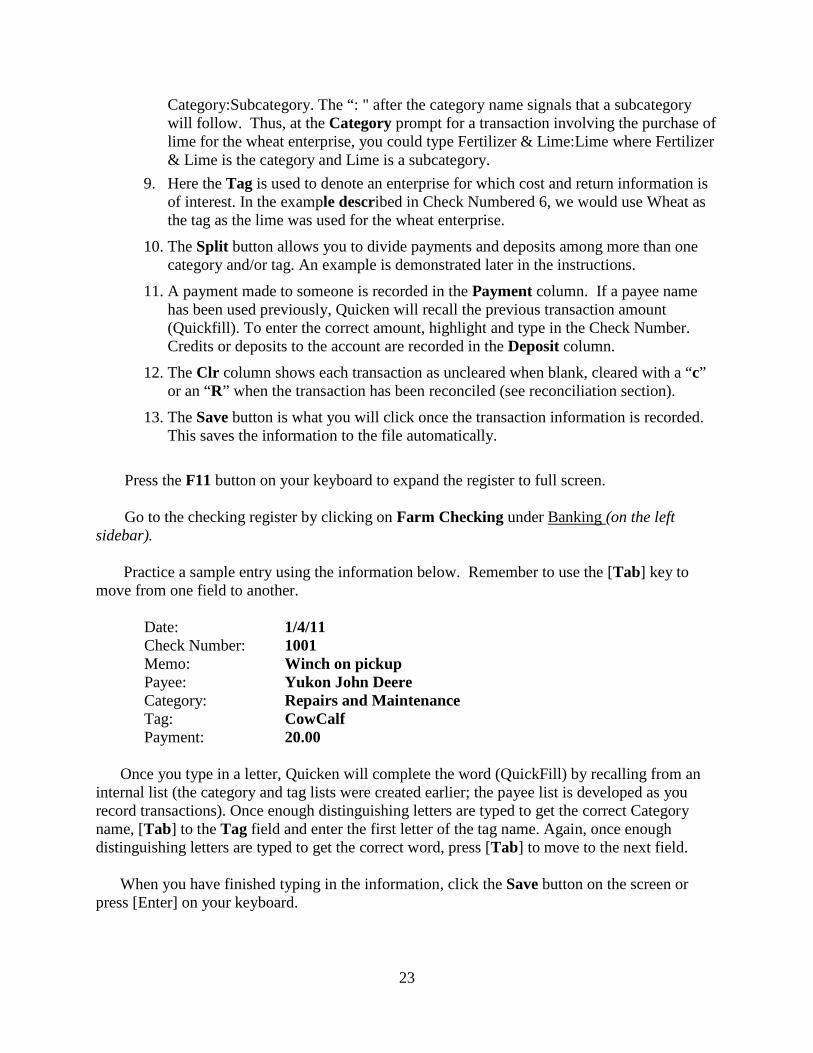
Date: 1/4/11 Check Number: 1001 Memo: Winch on pickup Payee: Yukon John Deere Category: Repairs and Maintenance Tag: CowCalf Payment: 20.00
Once you type in a letter, Quicken will complete the word (QuickFill) by recalling from an
internal list (the category and tag lists were created earlier; the payee list is developed as you record transactions). Once enough distinguishing letters are typed to get the correct Category name, [Tab] to the Tag field and enter the first letter of the tag name. Again, once enough distinguishing letters are typed to get the correct word, press [Tab] to move to the next field.
When you have finished typing in the information, click the Save button on the screen or
press [Enter] on your keyboard.

24
Note: [Tab] is the default used to move between fields. If you see a pop-up window asking if you want to use the [Enter] key, you can decide which is most comfortable. If you choose to use [Enter], you will have to use [Ctrl + Enter] or use your mouse to click the [Save] button on the screen to record the transaction. Note: If you want to record and display the Memo after the Category, choose Edit, Preferences, Register and remove the check mark on Show Memo before Category. To have the payment amount precede the Category and Tag, click on Account Actions, Register Views and Preferences and check Two-line Display.
Often a transaction with a particular company or payee will include items that should be allocated to different categories and tags. In this case, you will split the transaction as needed. For instance, the co-op bill might include Feed purchased for the CowCalf enterprise as well as Gas, Fuel & Oil used in the Wheat enterprise. First, enter the total amount of the check:
Date: 1/4/11 Check Number: 1002 Payee: Klondike Co-op Payment: 421
Now, click on Split (or click on the Split icon on the right of the line, or press [Ctrl+S]).
Type in the following responses:
Note: Make sure the Split Total and Transaction Total match (bottom right of the screen). Otherwise, you will need to recalculate the splits or Adjust the Transaction Total that appears in the register.
Click OK after entering split information, then press [Enter] to record the transaction.

25
The screen appears
Click OK If you are writing a check to a business or individual for whom an earlier check was a split
transaction, Quicken assumes that you want to use the same format as before. Let’s say that you now want to enter a check to the Klondike Co-op which is for lime only. Let’s practice this:
Date: 1/5/11 Check Number: 1003 Payee: Klondike Co-op
Click the red X (clear split lines) near the middle of the screen:
Click Yes to clear the split lines. Enter in the category field, Fertilizer & Lime:Lime, and the tag, Wheat. Payment: 355 Press [Enter]. (You may need to press [Enter] a second time.) Review all split transactions, particularly those where the amount allocated to different
categories varies each time. Deposits, as well as checks written to discount stores or the co-op,

26
are good candidates for mistakes. If you don’t clear all previous amounts and categories when you enter a new transaction, you can end up with unintended amounts in categories.
Now, to record a deposit.... Let’s say that our farmer had some alfalfa hay in storage and
recently sold some to a neighbor, Paul Bunyan. Go to a blank line and enter
Date: 1/11/11 Check Number: DEP (This will help ensure that your entry is made in the deposit
column after you enter the Paid by name and [Tab]) Payee: Paul Bunyan Memo: 8 tons hay Category: Raised Sales:OtherProducts Tag: Alfalfa Deposit: 800 (If you didn’t enter DEP in the Check Number column, be sure to
[Tab] over so the cursor is in the Deposit column!)
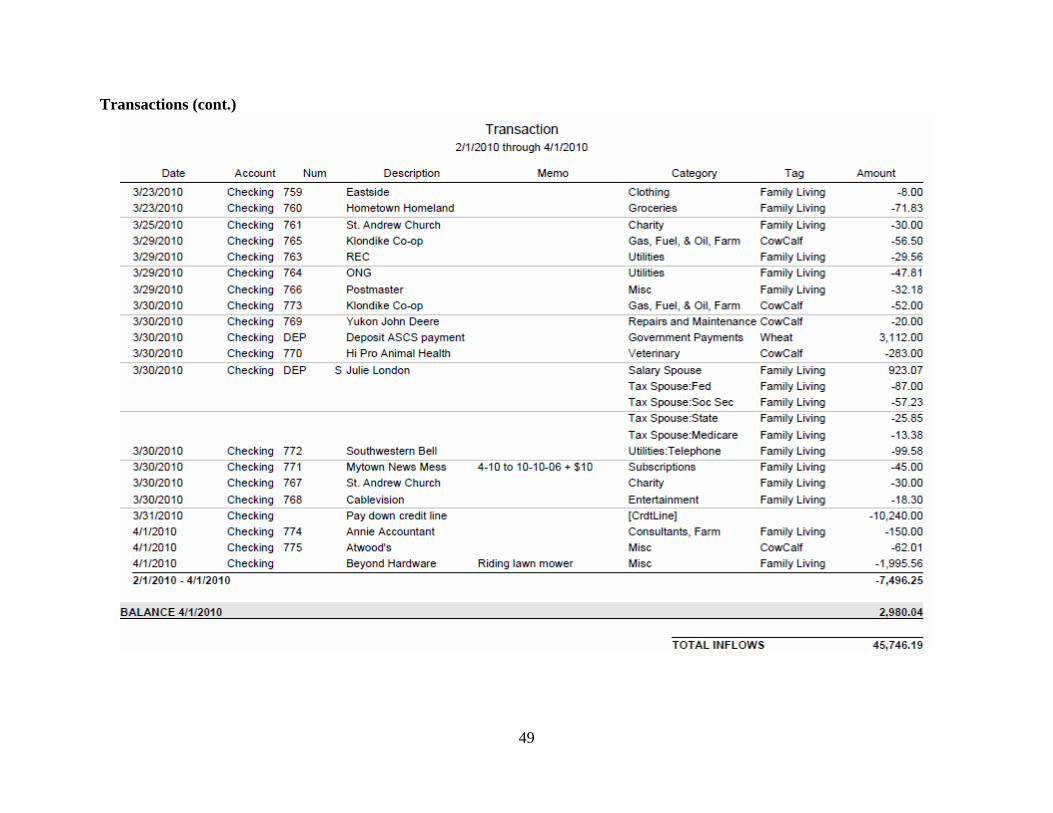
Save. Now begin entering the transactions for our farmer using the printed transaction register (in
the Reports following these instructions) from the checking account. Begin at the top of the sheet and practice recording transactions until you feel comfortable with the process.
Record Loan Payments Let's assume it is now August 2011 and time to record a payment on the amortized land
loan. Click Tools (from the drop-down menu) Loan Details If the Land Note is not the loan in view, click Choose Loan and select it. Click the Make Payment button. You are asked if this is a regular scheduled loan payment or extra payment. Click Regularly scheduled loan payment. Make Regular Payment screen is opened. First, click on the Split button in the middle. We
need to make sure the tag to label interest as an Overhead expense is inserted.

27
OK Make sure the rest of the payment screen is correct and add the Check Number.
OK
You can view how the amounts applied to principal and interest are handled by viewing the land note payment line in the Farm Checking register and looking at the splits. Highlight the Farm Credit transaction by clicking anywhere within the transaction. Click Split (or press [Ctrl+S]) to open the Split Transaction window, or you may simply hover the cursor over - -Split- -, which will show a pop up window with the split information. You will see that Quicken has recorded the appropriate amounts to principal ($5,208.70 to the Land Note) and interest ($6,347.80 to Farm Interest Expense:Farm Mortgage).
If you opened the Split Transaction window, click OK to leave the split.
Done
If you are in the Farm Checking account you can also view the principal payment applied to
the outstanding loan balance by selecting the Farm Credit transaction, right-click (click the right button of your mouse) and select Go To matching transfer. You will see a Balance Adjustment entry was made for earlier principal payments. The principal portion of the current payment from the checking account has been applied to the loan balance. (If you get a message that the transaction is not a transfer, you didn't click Enter to record the payment information and it was not posted.)

28
Right-click the Farm Credit transaction and select Go To matching transfer to return to
the Farm Checking account. Click OK if the Split Transaction window appears.
Create Reports to Summarize Data Entered Let’s look at some sample reports that you might want to use in monitoring your financial
performance: • Cash flow summaries, including one by tag/enterprise (which also gives the overall total) • A summary of payments made to a payee • A tax schedule report Because you may have entered only a few transactions in this file, we will close the file with
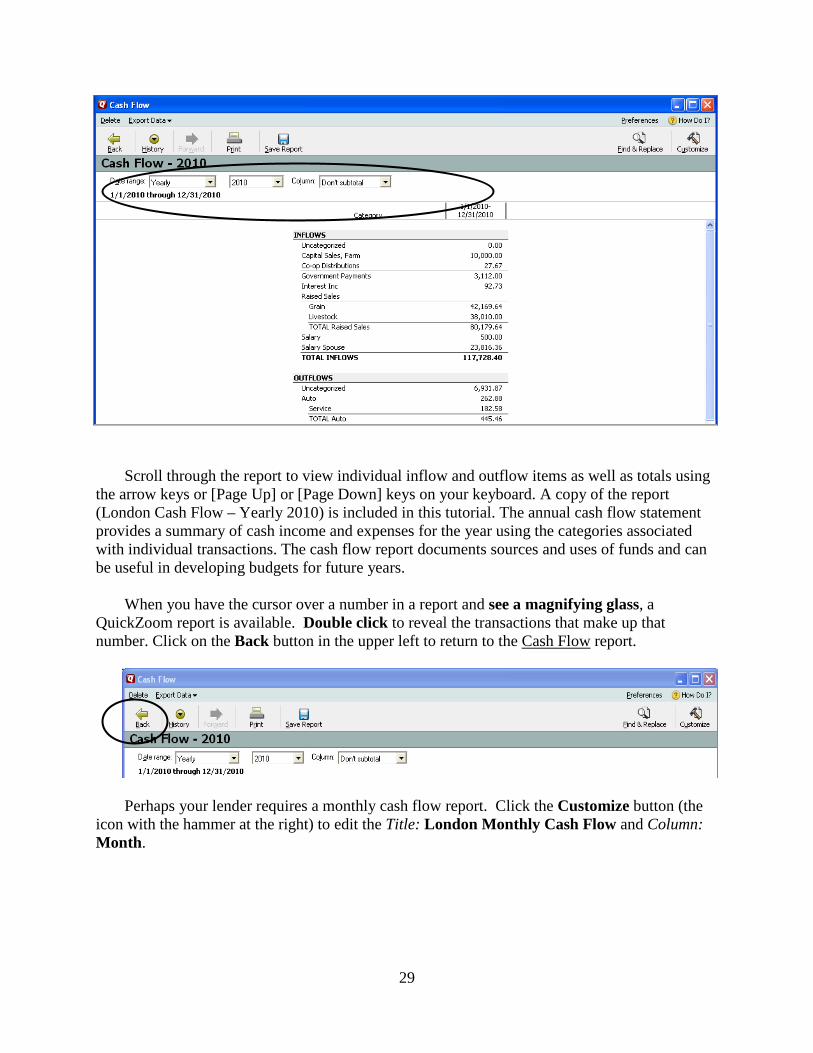
your name and open the sample file, LOND11. Click File Open Quicken File Click the small arrow next to the Look in: box to reveal the drop-down list. Click Local Disk (C:). Double click Workshop Files. Click LOND11. Click OK. Click Reports (from the menu bar) Banking Cash Flow Note: You may receive a message that data is not available. Click Yes to change the date range.
Select Yearly and 2010 as the date range. Click Don’t Subtotal in the column
field. (The fields are circled in the screen below).
29
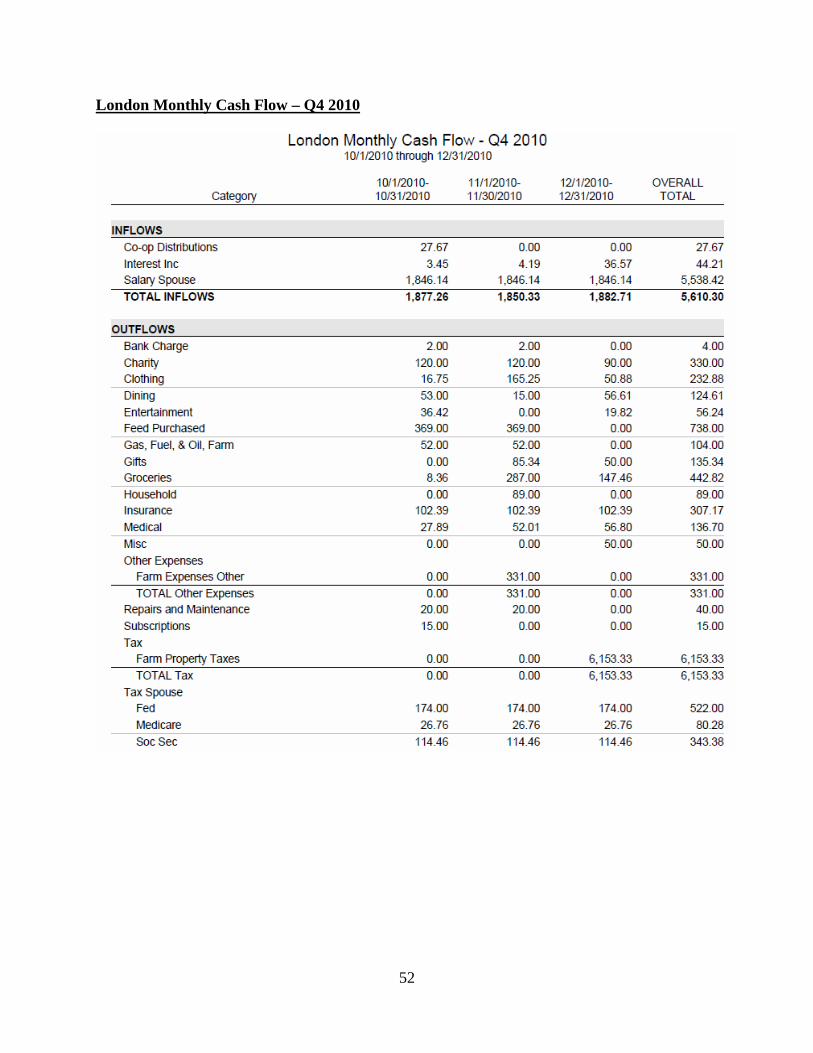
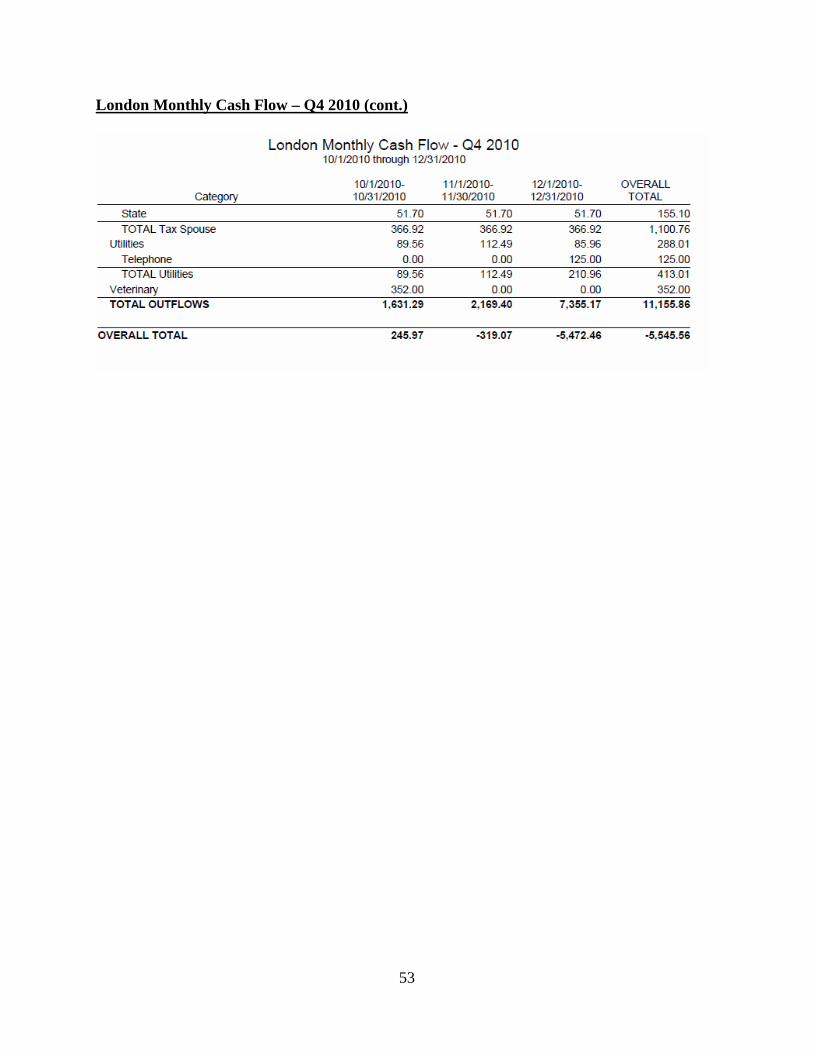
Scroll through the report to view individual inflow and outflow items as well as totals using the arrow keys or [Page Up] or [Page Down] keys on your keyboard. A copy of the report (London Cash Flow – Yearly 2010) is included in this tutorial. The annual cash flow statement provides a summary of cash income and expenses for the year using the categories associated with individual transactions. The cash flow report documents sources and uses of funds and can be useful in developing budgets for future years.
When you have the cursor over a number in a report and see a magnifying glass, a
QuickZoom report is available. Double click to reveal the transactions that make up that number. Click on the Back button in the upper left to return to the Cash Flow report.
Perhaps your lender requires a monthly cash flow report. Click the Customize button (the
icon with the hammer at the right) to edit the Title: London Monthly Cash Flow and Column: Month.

30
OK If you think you might want to use this report again, you can memorize its features by clicking Save Report (a disk icon in the taskbar). Report Name: Monthly Cash Flow Description: (optional) Save in: use drop-down arrow to select create new report folder Name: Lender Reports

31
OK
Note: If you select Save report history, you can track each step in developing this report.
Click OK.
Now, let's develop a cash flow report by tag (farm enterprise). You may want to change the title of the report. Click Customize at right.
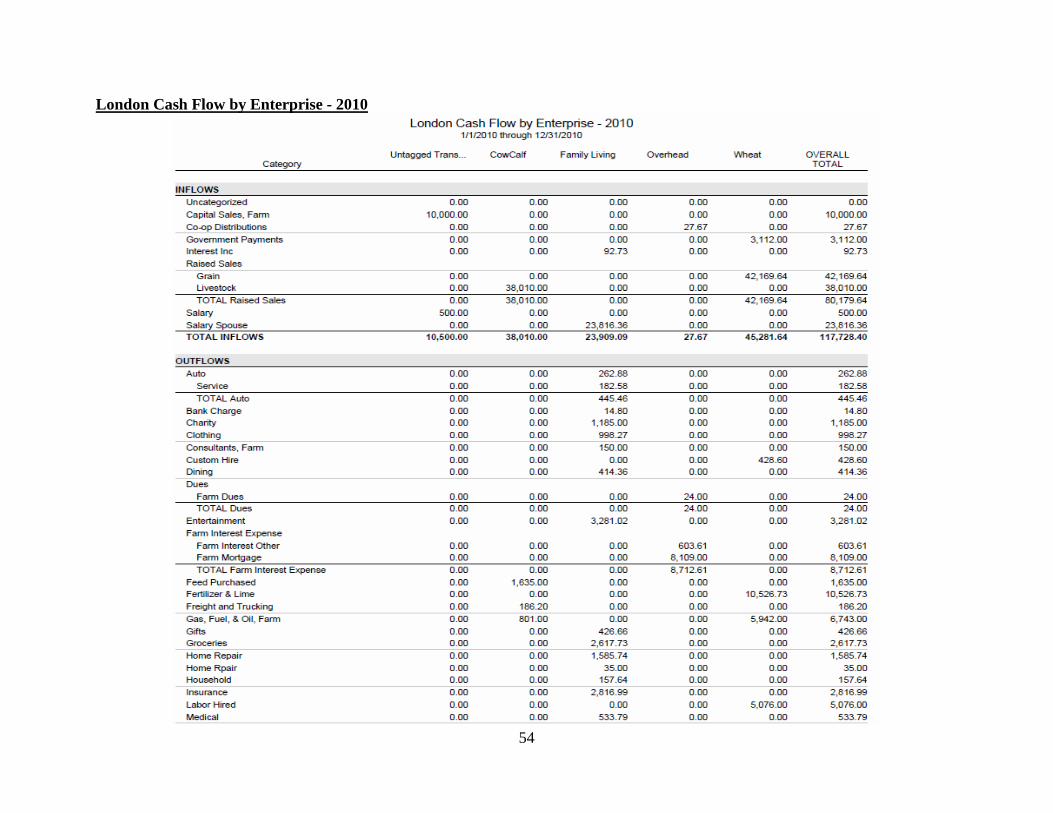
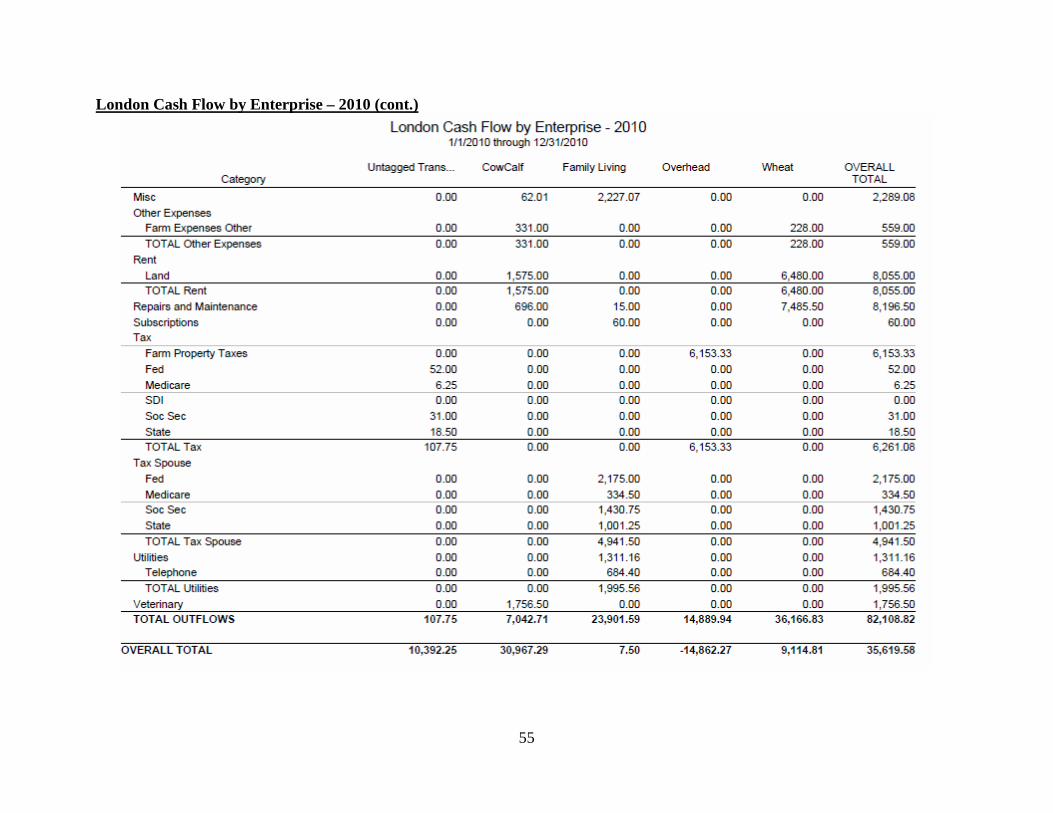
Type the Title, London Cash Flow by Enterprise and for the Column select Tag, as shown below.

32
Click OK. A report showing a summary of cash inflows and outflows by tag (farm enterprise) for
last year appears. Review it to see the cash generated and used by the CowCalf enterprise relative to the Wheat enterprise and to note totals by category for Family Living expenses (a printed copy is in the Reports section). You may memorize this report for future use by clicking the Save Report button. Create a new folder for Financial Reports.
33
Check Save report history Click OK
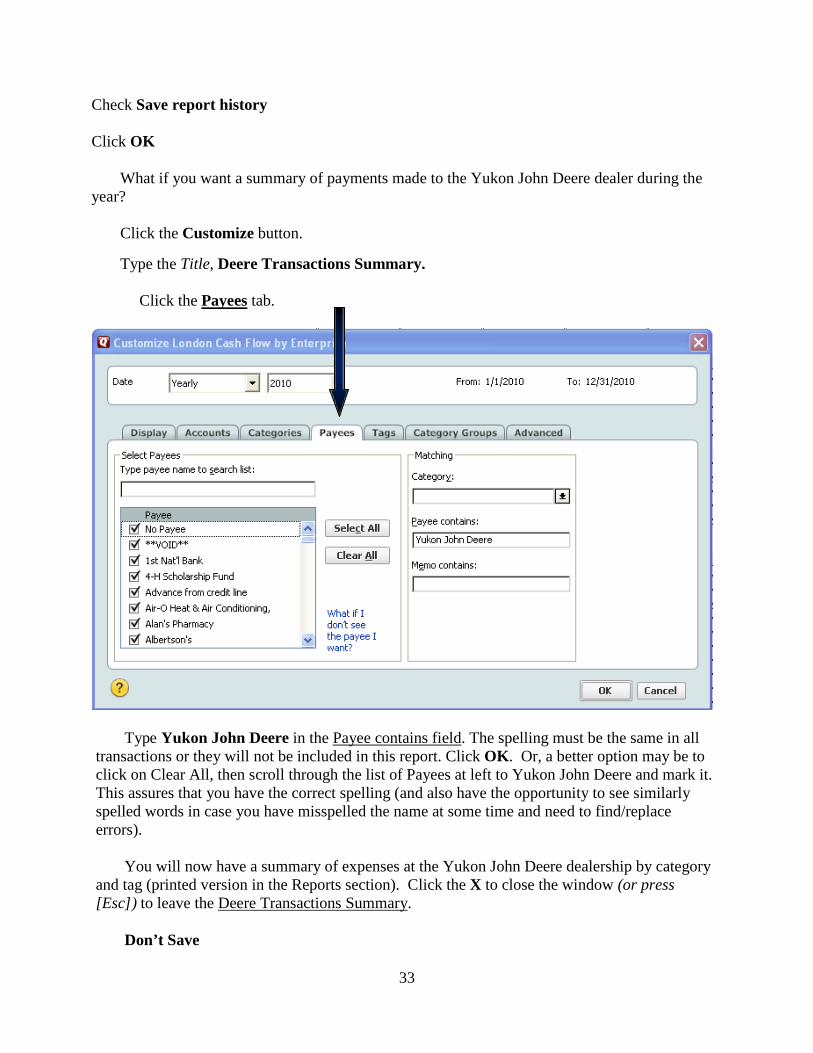
What if you want a summary of payments made to the Yukon John Deere dealer during the
year? Click the Customize button. Type the Title, Deere Transactions Summary.
Click the Payees tab.
Type Yukon John Deere in the Payee contains field. The spelling must be the same in all
transactions or they will not be included in this report. Click OK. Or, a better option may be to click on Clear All, then scroll through the list of Payees at left to Yukon John Deere and mark it. This assures that you have the correct spelling (and also have the opportunity to see similarly spelled words in case you have misspelled the name at some time and need to find/replace errors).
You will now have a summary of expenses at the Yukon John Deere dealership by category
and tag (printed version in the Reports section). Click the X to close the window (or press [Esc]) to leave the Deere Transactions Summary.
Don’t Save

34
All of the previous reports have been examples of cash flow reports. We will now switch to
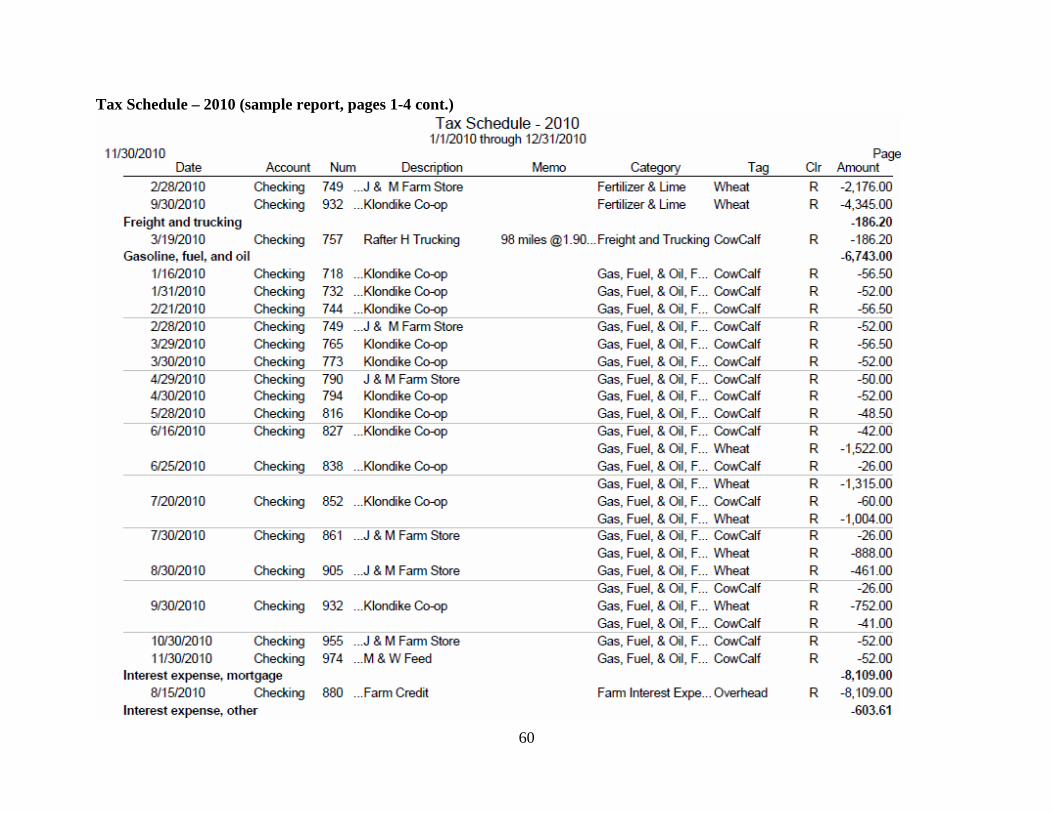
a different kind of report, the tax schedule report. When you begin gathering information to take to the tax preparer, consider the differences between the tax schedule and tax summary reports. Tax schedule reports list all transactions (or splits of a transaction) assigned to a category that is attached to a specific tax form or schedule. Tax summary reports include transactions with categories that have been noted as tax-related, whether or not a specific tax schedule has been assigned. For example, capital sales items are noted as tax-related as they are needed for use in calculating capital gains but are not transferred directly to a tax schedule.
Click Reports
Tax Tax Schedule Select Yearly and 2010 as the date range This report lists every transaction assigned to a category attached to a tax schedule. To
prepare a report showing totals only (not individual transactions), click Customize.
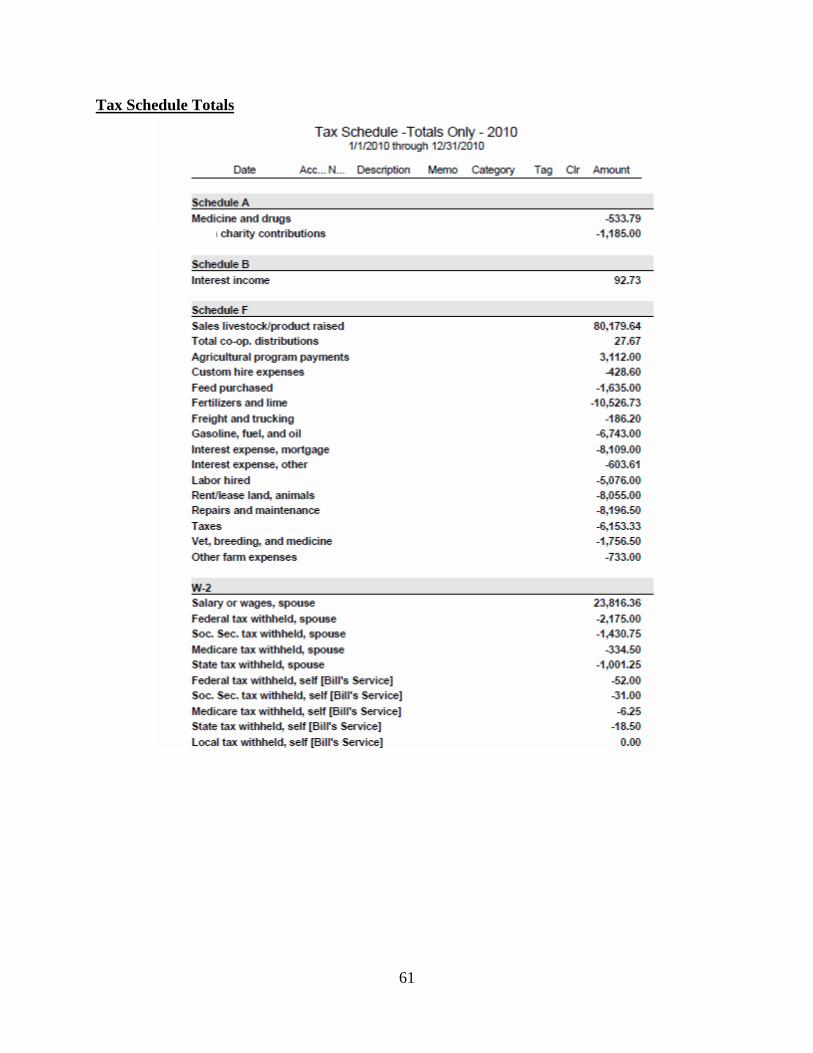
Modify the Title: Tax Schedule – Totals Only. In the Show section (as circled in the center
of the Customize Tax Schedule screen below), select Totals only. We have also removed the fields for Num, Description, and Memo since they are not needed for this report.

35
Click OK. You now have a summary of the information needed for tax reporting purposes by schedule. In our example, the report begins with Schedule A (deductions including charitable contributions), Schedule B (interest income), and continues to Schedule F (farm income and expense items) and ends with a W-2 (wages and salary) summary.
Exit the Reports window by clicking on the X in the upper right corner. You can choose whether to save the report or not.
View a Graph of Income and Expenses It's said that a picture is worth a thousand words. Quicken makes it easy for you to get a quick picture of income relative to expenses, as well as income and expense composition. Click Reports Graphs Income and Expense by Category Select the date range, Yearly and 2010 and Month for the interval.

36
You will see a bar chart showing monthly income and expenses. By double clicking on an individual bar, you can see the categories, amounts, and percentage of the total for that month.
Click X to close the Income Comparison window. As with the reports, you may memorize useful graphs. Click the Save Report button.
Report Name: Monthly Income/Expense Chart Save in: use the drop down arrow and select (create new report folder), Name: Farm Reports.
OK To view a chart showing how money has been spent throughout the year, close the open Report window and click Reports Spending Spending by Category
Select the Date range: Yearly and 2010 with the Column: None. To focus on farm expenditures, click on
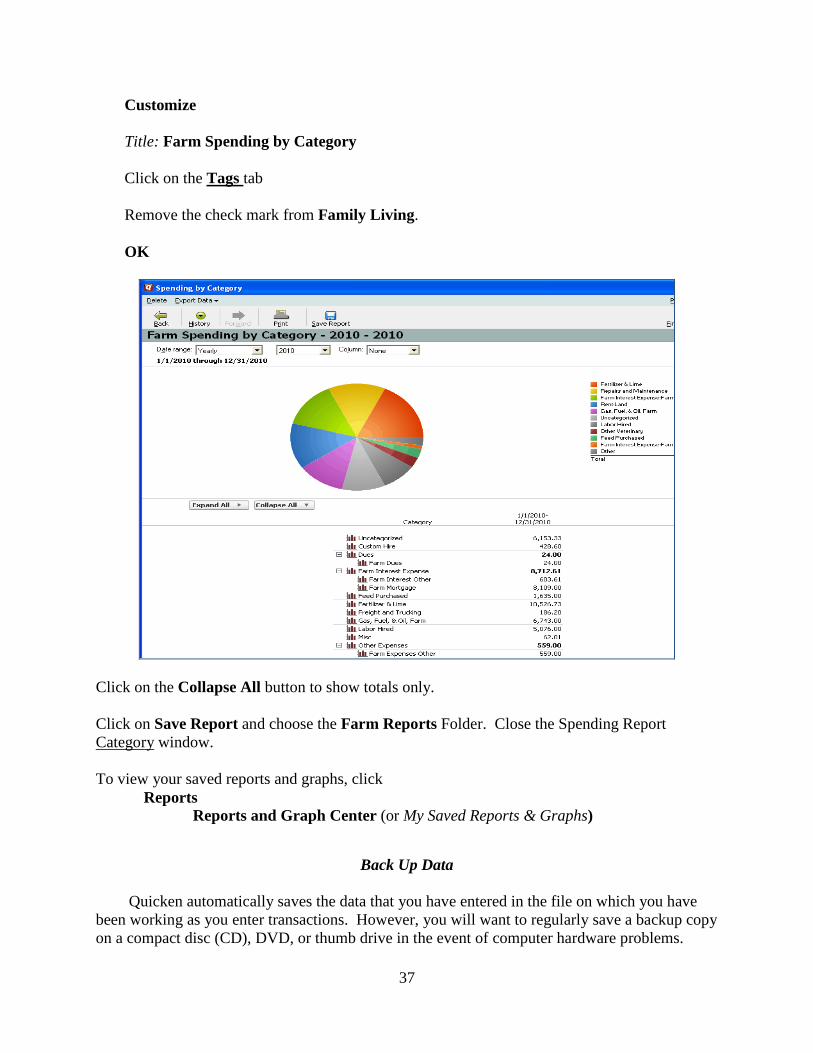
37
Customize Title: Farm Spending by Category Click on the Tags tab Remove the check mark from Family Living. OK
Click on the Collapse All button to show totals only.
Click on Save Report and choose the Farm Reports Folder. Close the Spending Report Category window.
To view your saved reports and graphs, click
Reports Reports and Graph Center (or My Saved Reports & Graphs)
Back Up Data Quicken automatically saves the data that you have entered in the file on which you have been working as you enter transactions. However, you will want to regularly save a backup copy on a compact disc (CD), DVD, or thumb drive in the event of computer hardware problems.
38
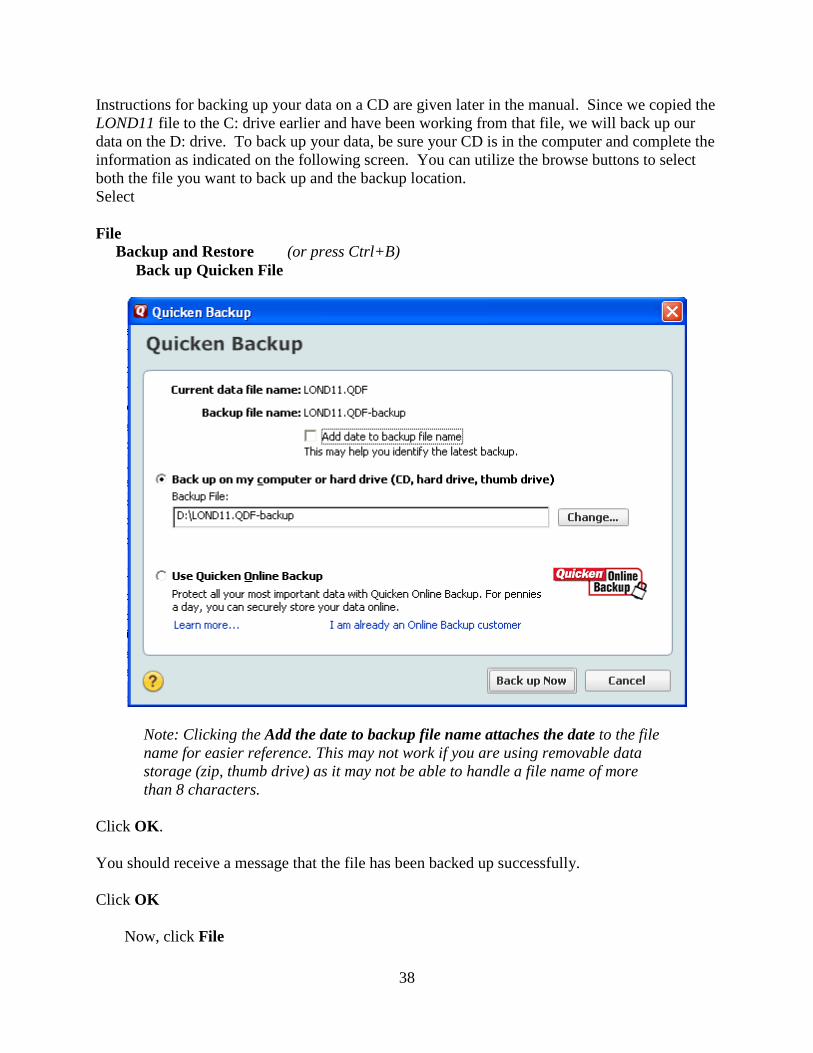
Instructions for backing up your data on a CD are given later in the manual. Since we copied the LOND11 file to the C: drive earlier and have been working from that file, we will back up our data on the D: drive. To back up your data, be sure your CD is in the computer and complete the information as indicated on the following screen. You can utilize the browse buttons to select both the file you want to back up and the backup location. Select File Backup and Restore (or press Ctrl+B) Back up Quicken File
Note: Clicking the Add the date to backup file name attaches the date to the file name for easier reference. This may not work if you are using removable data storage (zip, thumb drive) as it may not be able to handle a file name of more than 8 characters.
Click OK.
You should receive a message that the file has been backed up successfully.
Click OK
Now, click File
39
Exit (This closes the Quicken program.)
Note: It would be wise to back up your information on multiple CDs and back up often. Alternate the disks that you use so that you minimize the potential loss of information due to faulty disks
CONGRATULATIONS! You have now completed the basic Quicken workshop for farm
financial records! Hopefully, you will want to apply your newly learned skills to your own farming operation. Refer to this tutorial and the Quicken manual for assistance in setting up your own record keeping system.
40
Category Lists
Standard Category
41
Standard Category (cont.)

42
Standard Categories (cont,)
Business Categories
43
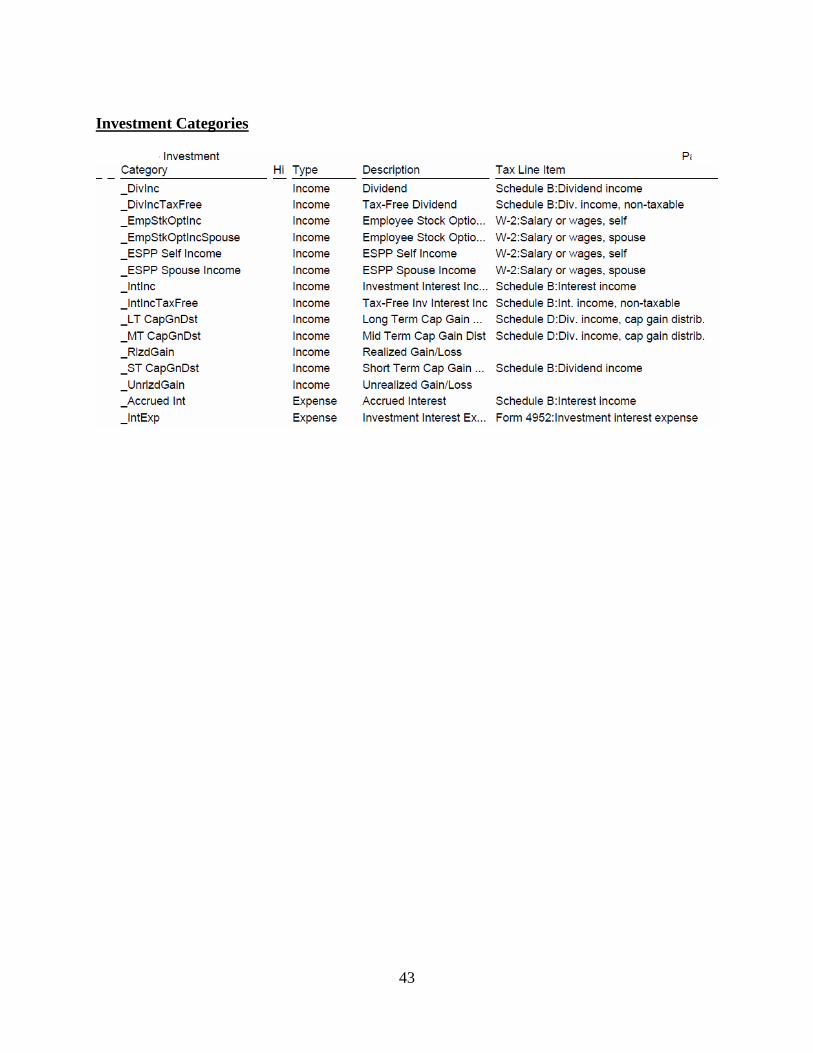
Investment Categories

44
Rents and Royalties
45
Farm Categories

46
Farm Categories (cont.)

47
Transactions

48
Transactions (cont.)
49
Transactions (cont.)

50
Reports Cash Flow

51
Cash Flow (cont.)
52
London Monthly Cash Flow – Q4 2010
53
London Monthly Cash Flow – Q4 2010 (cont.)
54
London Cash Flow by Enterprise - 2010
55
London Cash Flow by Enterprise – 2010 (cont.)

56
Deere Transactions

57
Tax Schedule – 2010 (sample report, pages 1-4)

58
Tax Schedule – 2010 (sample report, pages 1-4 cont.)

59
Tax Schedule – 2010 (sample report, pages 1-4 cont.)
60
Tax Schedule – 2010 (sample report, pages 1-4 cont.)
61
Tax Schedule Totals

62
London Monthly Budget, Jan-Feb 2011

63
Monthly Budget (cont.)