Using Outlook 2010 for Email - University of · PDF fileUsing Outlook 2010 for Email 1 1....
16
Using Outlook 2010 for Email Workbook Edition 1 June 2013 Document Reference: 3774
Transcript of Using Outlook 2010 for Email - University of · PDF fileUsing Outlook 2010 for Email 1 1....

Using Outlook 2010 for Email
Workbook
Edition 1 June 2013 Document Reference: 3774

Using Outlook 2010 for Email
Introduction
Contents
1. Introduction Microsoft Outlook ..................................................................................................... 1 Outlook Basics ......................................................................................................... 1
2. The Ribbon Mail, Contacts – same tabs, different content ........................................................... 1 Automatically self-resizing ribbon ............................................................................. 2
3. Class setup 4. The Quick access toolbar
Arranging the Layout ................................................................................................ 3 5. Outlook panes 6. Views
Useful pre-set views (Mail) .......................................................................................... 5 Customising the view and saving customised views .................................................... 5 Conversation view ....................................................................................................... 6
Switch conversations on or off ................................................................................. 6 View messages in a conversation ............................................................................ 6
7. Quick steps
8. Sorting mail into folders using rules Creating Mail Rules: Method 1– Quick ......................................................................... 8
Suggestions for mail rules .................................................................................... 8 Creating Mail Rules: Method 2 – Detailed (Optional Exercise) ..................................... 9
9. Searching Create a search folder to dynamically display messages you flagged .................... 10
10. Contact Groups 11. Optional Section
Customising the Ribbon ............................................................................................. 12 12. Categories 13. File, Options
Composing Messages ............................................................................................... 13 Message Arrival Settings ........................................................................................... 14 Reply and Forward Settings ...................................................................................... 14 Saving Messages ...................................................................................................... 14

Using Outlook 2010 for Email 1
1. Introduction
1. Introduction This course covers working with email on an existing Outlook 2010 Exchange account. Outlook test accounts have been created for you to use during the course.
Microsoft Outlook
Outlook is a personal information manager that helps you manage your email, calendar, contacts, and tasks. It can be used for time management as well as communications, and personalised to suit your requirements.
Useful features include:
Rules which you can use to:
Filter messages into appropriate folders and reduce the need to manually file messages. e.g. Keep important messages in your Inbox and filter other messages to a ‘Useful Information’ folder.
Delay delivery of messages sent from your Outbox by a time period of your choice
Search to:
Find messages according to subject, sender, size, flag status, unread, with attachments etc.
Quick Steps:
Carry out repetitive multi-action tasks with one click.
Outlook Basics
Outlook 2010 has the same interface as other Office applications, including the Ribbon and the Quick Access Toolbar.
Outlook 2010 is generally easier to use than previous versions, and has several new features.
Note: When you send emails to training accounts you may receive a delivery failure message as the machine tries to email a non-existent staffmail account. Please ignore this message.
2. The Ribbon Outlook 2010 uses a Ribbon interface. Commands are available via tabs and buttons. You can still display commands via context sensitive menus by right clicking a message etc.
Mail, Contacts – same tabs, different content
The default tab is the Home tab. The buttons on the ribbon change according to the context e.g. mail, calendar, or contacts. Mail and calendar each have their own, context sensitive Home, View, and Folder tabs. Send/Receive remains constant.
Tabs and Groups: Each tab is split into logical Groups e.g. The Respond group on the Home tab contains buttons for replying, forwarding or turning the email into a meeting.

2 Using Outlook 2010 for Email
The Ribbon
Automatically self-resizing ribbon
Outlook will display small or large buttons depending on the size of the application window. E.g. a normal size Outlook window, will show the Mail / Home tab buttons maximised:
The same window resized to a smaller size, shows only the main groups. Buttons appear as pull-down menus. E.g. Respond provides commands for the Respond group.
The File tab
The File tab contains Outlook management commands e.g. Print, Out of Office, Account management and Mailbox clean-up
Try this...- Change the Outlook colour scheme
1. Click the File tab and click Options on the left side. 2. Under General pick a Colour scheme which suits you and click OK. 3. Close the Options window.
The Home tab
This tab contains the most frequently used commands as well as new features such as Quick Steps and filtering options.
The Send/Receive tab
The Send/Receive functions and the Work Offline feature can be found under this tab.
The Folder tab
The Folder tab contains mail and calendar folder commands (the purge command is only available for Staffmail users, Outlook 2010 sends deleted email to the trash folder).
The View tab
The way in which Outlook displays the calendar, mail and contacts windows and panes can be changed under this tab.
Tabs inside Messages and Contacts
When creating a new message, or contact card, notice that the window has its own set of tabs.
The File tab is independent of context but the Home tab is context sensitive and changes according to whether you are editing a message, calendar item, or contact. Email messages have an extra Options tab where you can set a BCC or Direct Replies-To.
Tip: It is advisable not to use BCC to let third parties know about sensitive messages. Forward the message after sending instead. Recipients may not realise they have been bcc’d and might use Reply All – thereby revealing they received a BCC message.
Note: The email options tab may offer features not currently supported within the University. Currently, Message permissions, Voting buttons and Delayed Delivery require signup to external services. Note that data saved in Windows Live Services (e.g. Instant Messenger and Office Live) is stored on servers outside the EU not subject to Data Protection law. We strongly advise not storing any critical data using these services.

Using Outlook 2010 for Email 3
3. Class setup
3. Class setup Outlook accounts have been allocated to each training machine. The account name reflects the room and machine numbers and is of the format IS TRAINING 1.1Y-X (Y is the room number and X the machine number). Before carrying out the rest of the exercises:
1. Go to Start, All Programs, scroll to Microsoft Office then open Microsoft Outlook 2. Right click on your Mailbox ([email protected]) and choose New Folder 3. Name the folder 1. Reference (may already exist) 4. Repeat the above steps and name the second folder 2. Personal (may already exist) 5. Each machine has a training name associated with it e.g. tr10-001 is Training Smith.
Click the Window button at the bottom left of the screen to see your machine’s training name.
6. Send an email to your training account and your neighbour's training account to populate the mailboxes and ensure the accounts are active.
7. Reply to the email from your neighbour. (These emails will be used in later exercises).
4. The Quick access toolbar This toolbar, displayed on top of the Outlook window, offers access to frequent functions through miniature buttons.
Try this...Task: Customise Quick access toolbar (QAT)
1. Click the tiny down arrow on the right side of the Quick Access toolbar to switch three or four commands on.
2. Move the QAT below the ribbon by clicking the arrow again and choose Show below the Ribbon. Move the QAT back above the ribbon if you prefer it this way.
3. Ensure the Home (Mail) tab is active.
4. Right click the Address Book button and choose Add to Quick Access toolbar.
5. Click on a previously opened email message, then right click the Reply button on the Ribbon and choose Add to Quick Access toolbar.
6. Try this for other commands you use frequently.
To remove items on the Quick Access toolbar, right-click the button and select Remove from Quick Access Toolbar.
Arranging the Layout
Setting up the layout in a way that suits you will optimize how you use Outlook 2010. In the following example:
The Navigation Pane is open on the left.
Messages are in Conversation view
Messages sent directly to the mailbox owner are automatically formatted in a large blue font.
Calendar is on the right
Tasks list is at the bottom right

4 Using Outlook 2010 for Email
Outlook panes
5. Outlook panes You can use Outlook panes on the View tab to personalise the display and layout in Outlook.
Try this...Task – working with Mail panes 1. Open the Outlook Mail view.
2. Click the View tab at the top of the Ribbon.
3. In the Layout Pane click through each of the buttons Navigation Pane, Reading Pane, To Do Bar and People Pane. Observe that each menu lets you control several options.
4. Use the buttons in each pane to switch panes on or off. Change the location, size and what each item displays. Some of the panes also have their own Options, have a look at these options to see what they do.
5. Use the buttons to arrange your mail view to best suit your working style.
6. For example Click on the To Do Bar button, and switch the various settings on to see what they reveal. Click on the To Do Bar options and turn the options on and off.
7. Click the Navigation Pane button, choose Options, click the Font button and set a different font for the Navigation pane. Click OK to close options.
The Layout, People Pane and Window Groups

Using Outlook 2010 for Email 5
6. Views
The View, Conversations and Arrangement Groups
6. Views
Useful pre-set views (Mail)
1. Go to the View tab in Mail and observe the Current View group on the left side of the ribbon. Views can be customised and reset via these buttons.
2. Click the Change View button and move between the different pre-set views available.
Note View settings differ between STAFFMAIL and EXCHANGE mail accounts.
Staffmail users can choose from: Exchange Users can choose from
IMAP Messages shows all messages Hide Messages hides marked for deletion, Group hides and groups messages marked for deletion
Compact Single Preview for the view settings
Customising the view and saving customised views
In the following task we will customise the email list so that emails directly addressed to the mailbox owner appear in blue. We will then save it as a new view.
(Replaces the Organise Pane in Outlook 2003).
1. Ensure you are in Mail. Under the View tab click the View Settings button.
2. Click Conditional Formatting
3. In the Conditional Formatting Window click Add.
3. Type a name such as Directly to me only
4. Click Font and under Colour, select blue.
5. Increase the font size by 2pt and click OK
6. Click Condition
7. Add a tick next to Where I am: and click the pull-down menu next to it to select the only person in the To line.

6 Using Outlook 2010 for Email
Views
8. Finally click OK.
9. Click OK in the other two windows and you are back in the mail window. Messages directly to you should now be highlighted in blue text
10. From the Change View button select Save Current View as a
new view.
(The options available differ between STAFFMAIL and EXCHANGE).
11. Give it a sensible name. In this window you could also restrict the view to specific folders. Choose All Mail and Post folders (Staffmail: All IMAP folders.)
12. Click the Change View button again and move between the different views.
Conversation view
Switching on Conversations view groups multiple items together. Outlook looks at the subject and detects whether the message is part of a linked email exchange. It then shows the whole exchange as a single entry. Conversation headers can be clicked to expand the conversation, and show it in the Reading Pane.
Switch conversations on or off
1. Open the email view
2. Go to the View tab 3. In the Conversations group, select or clear the Show as
Conversations box.
4. Click All Folders or This folder
View messages in a conversation
When conversation view is turned on several little envelopes will appear to the left of the message header that contains the conversation.
To expand or open the Conversation, click the small arrow to the left of the message header.
In some cases the conversation has “split” and you need to click the small arrow again to expand to all items.
Conversations include messages from multiple folders. E.g. by default, messages from the Sent Items folder will appear in the Conversation. Settings can be toggled on or off using the Conversation Settings button.
To see more on conversations go to: http://tinyurl.com/83tbe5u

Using Outlook 2010 for Email 7
7. Quick steps
7. Quick steps Quick steps help you process your messages faster. Repetitive multi-action tasks can be carried out with a click.
Try this...Creating a new Quick Step from scratch
Quick steps already includes a Create New button. Now we will set up the Defer step.
1. In the Quick Steps group click Create New.
2. For Name type Defer but do today.
3. Click the Choose an Action menu.
4. For the first action, select Move to folder. For your folder, select 1 – Reference.
5. Click Add Action again.
6. For the second action choose Flag Message and Today.
7. Add the shortcut keys Ctrl, Shift and 1 to the Quick Step.
8. Click Finish and your Quick Step is set-up.
9. The name is slightly too long – to rename it right-click the quick step and select Edit (name) from the menu.
10. Type a shorter name, e.g. Defer + Flag:
11. Click Save.
12. To edit or delete a Quick Step click the Quick Step dialogue box launcher, highlight the step and choose Edit or Delete.
You can create further Quick Steps by clicking the New button near the bottom left corner of the dialogue box.
Try creating a quick step relevant to your work style and situation.
Use the quick reference list for ideas of possible steps. See below for examples:

8 Using Outlook 2010 for Email
Sorting mail into folders using rules
8. Sorting mail into folders using rules Using rules to automatically filter emails can be useful when you have a high volume of email.
You can filter unimportant mail and keep it for reference by using rules. Organizing email reduces the amount of unnecessary ‘noise’ in your Inbox and enables the most important items to bubble to the top. Rules based on your criteria which move mail into folders can help this process.
(From: http://tinyurl.com/7elqg3d)
Creating Mail Rules: Method 1– Quick
Outlook 2010 offers a simplified way to create a rule to move messages:
1. Right click a message in your Inbox and select Rules.
2. Choose Always Move Messages From: or To:
3. When prompted choose a folder and click OK.
4. Outlook immediately creates and runs the rule on existing messages in your inbox. It also switches the rule on.
5. If you need to delete, fine-tune, or change the rule, go to the Home tab, Rules and click Manage Rules & Alerts.
Suggestions for mail rules
Here are some suggestions for creating rules from the Outlook product team:
File away messages sent to distribution lists which you don’t need to read – except those containing your choice of keywords.
If the message was directly sent to you, stop processing all other rules and allow message to remain in Inbox.
Put all meeting requests into the Inbox even if they were sent to a distribution list.
Defer sent items – delay messages in the Outbox for one minute before sending.
(Further Information: http://tinyurl.com/7elqg3d)
Note: Rules and Alerts can be found under the Home tab, Move group, Rules

Using Outlook 2010 for Email 9
8. Sorting mail into folders using rules
Creating Mail Rules: Method 2 – Detailed (Optional Exercise)
You can also set up a rule via File, Manage Rules & Alerts. We will set up a “Defer Sent Items” rule as an example.
1. Go to the File tab.
2. Click Manage Rules & Alerts.
3. In the Rules and Alerts dialog box, click New Rule.
4. In the Rules Wizard, under Start from a Blank Rule, select Apply rule on messages I send, and click Next.
5. Click Next again (with the condition left blank, the rule will apply to every message you send).
6. Click Yes
7. At Step 1:Select Actions select Defer delivery by a number of minutes
8. At Step 2: Edit the rule description (click an underlined value), click a number of
9. The minutes box displays a default of 1. Click OK in the Deferred Delivery dialog box. Click Next.
10. Select the following exception in Step 1: Select exception(s) (if necessary) except if marked as ‘importance’
11. In Step 2: Edit the rule description (click an underlined value), click importance and then select High importance.
12. Click Next and name this rule Defer Sent Items. Click Finish.
13. Test out the rule by sending yourself an email. The email should now wait in your Outbox for one minute.
We will now practice the scenario where you realise a serious mistake has been made in the email:
14. Send another email to yourself, and before the minute is up, click in the Outbox and do one of the following:
Double-click the email in the Outbox (it will open again for editing as shown. The email will not send until you hit Send and Send & Receive.
Grab the email and drag it into your Drafts folder.
(Don’t panic) Delete the email.
Important: Ensure your messages have left the Outbox before shutting down your computer. This is a client-only rule. It will only work when Outlook 2010 is running.
Note: If you use Staffmail, and therefore have two accounts in Outlook you may wish to tick Create this rule on all accounts. If you tick this the rule will also apply to any departmental mailbox you look after.

10 Using Outlook 2010 for Email
Searching
9. Searching In the Navigation Pane (column on left) click the folder that you want to search 1. In the Instant Search box, type your search text. Items that contain the text that you
typed appear with the search text highlighted.
2. To narrow your search, type more characters
3. To widen your search to include all folders, at the end of the search results, click Try searching again in All Mail Items.
Notes
To return the insertion point to the
Instant Search box, press CTRL+E.
When finished with the search, you can clear the search by clicking Close
Search next to the Instant Search
box.
Attachments are searched, but search results from attachments are not highlighted.
Add more search criteria: You can narrow your search by adding criteria. When you click or type in the Instant Search box, the Search Tools tab is created. In the Refine group, a
number of criteria options help to make the search more specific.
NOTE Added search fields are specific to the context within Outlook, e.g. Mail, Calendar or
Contacts. The search fields are also specific to the profile that you are using. The search fields
persist after you exit and restart Outlook. The search query does not persist.
Try this...Advanced search
1. Click into the Search box in the mail view. A new tab, Search Tools appears.
2. Widen your search by clicking All Subfolders, All Mail items, or even All Outlook items (includes calendar items).
3. Now narrow your search, by clicking From / Subject / Has attachments. (Find an email message from IS TRAINING containing the subject Group).
4. Observe the buttons on the Search tab including This week, Sent to, and More and Recent searches You can also use Advanced Find under Search, Search Tools.
Create a search folder to dynamically display messages you flagged 1. Use the follow up button to mark a couple of messages For Follow Up
2. Go to the Folder tab.
3. Click New Search folder. Select Mail flagged for follow up. Click OK
4. Look in your list of folders and observe that a new folder For Follow Up has been created and added below Search Folders.
5. Open the folder For Follow Up and check for follow up messages

Using Outlook 2010 for Email 11
10. Contact Groups
10. Contact Groups Contact Groups were called Distribution Lists in Outlook 2003.
Try this...This is how you create a group:
1. Go to the Outlook Contacts view.
2. On the Home tab, Click New Contact Group.
3. Click Add Members and select From Address Book.
4. In the Search box type IS Training. This will display the IS training accounts. We will add all of them at the same time:
5. Scroll down to the first entry for the training room. (Example IS.TRAINING 1.12-01)
6. Highlight the entry, hold down the shift key and scroll down and click so that at least ten accounts are highlighted (IS.TRAINING 1.12-01-10).
7. Click the Members button to add the accounts to the box. Click OK.
8. The accounts have now been added to the Contact Group. Type a name and Save & Close.
The new group can now be used from any To: field in Outlook, to send an email or create a meeting.
(Note: If you have more than 50 University external recipients we recommend using a mailing list service such as the University’s own SYMPA service instead.) SYMPA groups can be shared and forwarded with other email systems.
Try this...Create an email to the new Contact Group.
1. Whilst still in Contacts, click new Items and E-mail message.
2. Click the To: field and type your own name.
3. Now click the Options tab at the top and click BCC.
4. Click the BCC field. Type the name of the new group (let Outlook auto-complete it).
5. Click the + sign next to the name in order to expand the address list – you will see the warning message ‘Expand List If you expand the list, Outlook will replace the list with its members. You will not be able to collapse it again’. Click OK.
6. Send the message.
Note: Important: When sending emails to Contact Groups, every recipient will see all other recipient’s addresses. (i.e. it only looks like a group to you, when you send a message all addresses get filled in). To avoid this, put the group name into BCC and add yourself to the To: field.

12 Using Outlook 2010 for Email
Optional Section
To create a meeting with the newly set-up Contact Group, from the Contacts view:
1. Whilst still in Contacts, highlight your new IS training account group and click Meeting.
2. You will find the To: field has been filled in with the group title.
3. Click the + sign next to the name in order to expand the address list.
11. Optional Section This section includes further tips and information that you may find useful.
Customising the Ribbon
Many people find it useful to customise the ribbon to suit their needs. In the following exercise we will customise the ribbon by adding a command which searches for Flagged messages.
1. Right click any tab on the ribbon, and then left click Customize the Ribbon.
2. On the right side of the screen, highlight Home (Mail). This lets Outlook know where to put the command.
3. To add a new group to the Home (Mail) tab: Click the New Group button which appears below the Main Tabs box.
4. Right click New Group (Custom) which appears at the bottom of the Home (Mail) menu.
5. Select Rename and type "Flagged". Click OK.
6. On the left side of the screen below Choose commands from: select All Commands from the drop down menu.
7. In the extremely long list (this is why we blame nobody for struggling with Outlook), scroll down to Flagged. Highlight it. Click Add >>. It will then appear in your custom group.
8. Click OK. You now have a Flagged button. Click this button and a custom search will automatically show you just flagged messages. Click Close search to return to normal.
Useful commands to have on a Favourites ribbon:
New email, Reply, Reply All, Forward, Delete, Save As, Save all attachments
New Meeting, new Appointment, Today, Day, Next 7 days
Advanced Find
Print, Quick Print, Print Options
Outlook Options, Empty Deleted Items Folder, Exit
Find out more by clicking the Help symbol and searching for Customize Ribbon.- Download a customized ribbon from: http://tinyurl.com/7cajsm2
Note: Please do not log in with your own account on the training machines. The Outlook pst files can get corrupted and you may not be able to send emails from Outlook when you get back to your own desk.
Using Outlook 2010 for Email 13
12. Categories
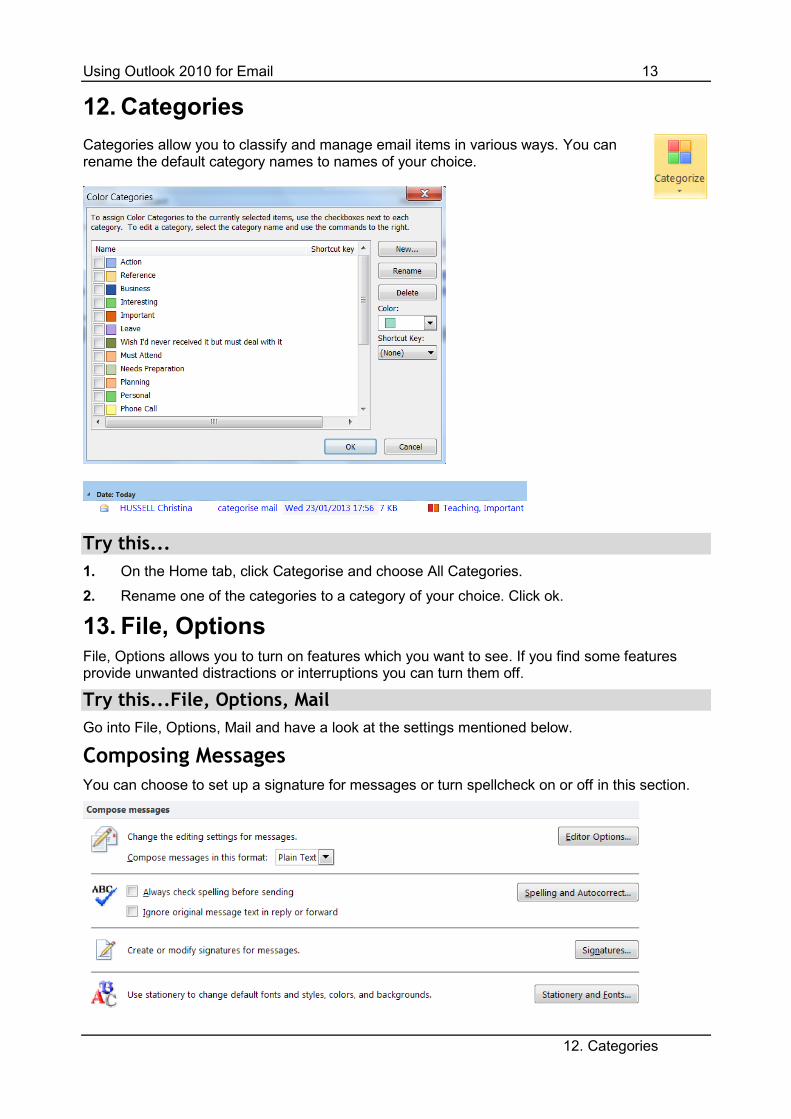
12. Categories
Categories allow you to classify and manage email items in various ways. You can rename the default category names to names of your choice.
Try this...
1. On the Home tab, click Categorise and choose All Categories.
2. Rename one of the categories to a category of your choice. Click ok.
13. File, Options File, Options allows you to turn on features which you want to see. If you find some features provide unwanted distractions or interruptions you can turn them off.
Try this...File, Options, Mail
Go into File, Options, Mail and have a look at the settings mentioned below.
Composing Messages
You can choose to set up a signature for messages or turn spellcheck on or off in this section.
14 Using Outlook 2010 for Email
File, Options
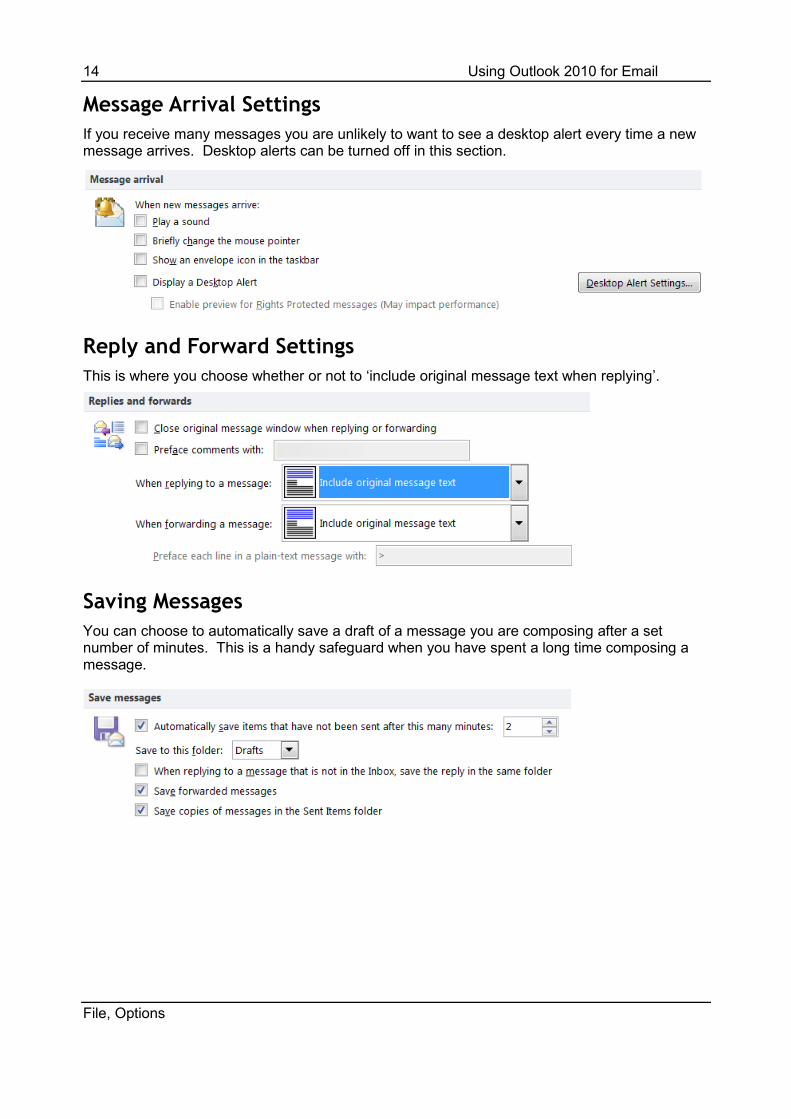
Message Arrival Settings
If you receive many messages you are unlikely to want to see a desktop alert every time a new message arrives. Desktop alerts can be turned off in this section.
Reply and Forward Settings
This is where you choose whether or not to ‘include original message text when replying’.
Saving Messages
You can choose to automatically save a draft of a message you are composing after a set number of minutes. This is a handy safeguard when you have spent a long time composing a message.