Using GCC/GDB With CC2538 (Rev. A) - TI.com · Using GCC/GDB With CC2538 ... to set up an open...
25
Application Report SWRA443A – February 2014 – Revised February 2015 Using GCC/GDB With CC2538 Bjorn Selvig ABSTRACT This document describes how to set up an open source software-based development environment for the Texas Instruments CC2538 using Eclipse as IDE. Project collateral and source code discussed in this application report can be downloaded from the following URL: http://www.ti.com/lit/zip/swra443. Contents 1 Introduction ................................................................................................................... 2 2 Prerequisites.................................................................................................................. 2 3 Hardware Setup .............................................................................................................. 3 4 Software Installation Instructions .......................................................................................... 3 5 Software Example and Eclipse Configuration .......................................................................... 11 6 References .................................................................................................................. 23 List of Figures 1 Eclipse IDE (Windows) ...................................................................................................... 4 2 Installing CDT ................................................................................................................ 5 3 Installation Details ........................................................................................................... 6 4 Eclipse IDE (Linux) .......................................................................................................... 7 5 Installing CDT (Linux) ....................................................................................................... 7 6 GNU Toolchain (Windows) ................................................................................................. 8 7 Schedule of Pending Actions............................................................................................... 9 8 Support for Wireless Connectivity Devices ............................................................................. 10 9 Spectrum Digital Emulator Support ..................................................................................... 10 10 Import Example Project Into Eclipse IDE Workspace ................................................................. 11 11 New GDB Hardware Debugging Window ............................................................................... 12 12 Using Legacy GDB Hardware Debugger Launcher ................................................................... 13 13 Settings for Startup Tab ................................................................................................... 14 14 Connected Devices ........................................................................................................ 15 15 ID of the Detected EB Board ............................................................................................. 16 16 Configuring the Flash Programmer Tool (Linux) ....................................................................... 17 17 Launching the GDB Server (Windows) .................................................................................. 18 18 Launch the GDB Server (Linux) .......................................................................................... 19 19 Clean Project................................................................................................................ 20 20 Build Command............................................................................................................. 21 21 Load the Image to Target (Windows) .................................................................................... 21 22 Load the Image to Target (Linux) ........................................................................................ 22 SmartRF, Code Composer Studio are trademarks of Texas Instruments. Linux Mint is a trademark of Linux Mark Institute. Linux is a registered trademark of Linux Torvalds in the U.S. and other countries. Windows is a registered trademark of Microsoft Corporation in the United States and/or other countries, or both. All other trademarks are the property of their respective owners. 1 SWRA443A – February 2014 – Revised February 2015 Using GCC/GDB With CC2538 Submit Documentation Feedback Copyright © 2014–2015, Texas Instruments Incorporated
Transcript of Using GCC/GDB With CC2538 (Rev. A) - TI.com · Using GCC/GDB With CC2538 ... to set up an open...

Application ReportSWRA443A–February 2014–Revised February 2015
Using GCC/GDB With CC2538
BjornSelvig
ABSTRACTThis document describes how to set up an open source software-based development environment for theTexas Instruments CC2538 using Eclipse as IDE.
Project collateral and source code discussed in this application report can be downloaded from thefollowing URL: http://www.ti.com/lit/zip/swra443.
Contents1 Introduction ................................................................................................................... 22 Prerequisites.................................................................................................................. 23 Hardware Setup.............................................................................................................. 34 Software Installation Instructions .......................................................................................... 35 Software Example and Eclipse Configuration .......................................................................... 116 References .................................................................................................................. 23
List of Figures
1 Eclipse IDE (Windows)...................................................................................................... 42 Installing CDT ................................................................................................................ 53 Installation Details ........................................................................................................... 64 Eclipse IDE (Linux) .......................................................................................................... 75 Installing CDT (Linux) ....................................................................................................... 76 GNU Toolchain (Windows) ................................................................................................. 87 Schedule of Pending Actions............................................................................................... 98 Support for Wireless Connectivity Devices ............................................................................. 109 Spectrum Digital Emulator Support ..................................................................................... 1010 Import Example Project Into Eclipse IDE Workspace ................................................................. 1111 New GDB Hardware Debugging Window ............................................................................... 1212 Using Legacy GDB Hardware Debugger Launcher ................................................................... 1313 Settings for Startup Tab ................................................................................................... 1414 Connected Devices ........................................................................................................ 1515 ID of the Detected EB Board ............................................................................................. 1616 Configuring the Flash Programmer Tool (Linux) ....................................................................... 1717 Launching the GDB Server (Windows).................................................................................. 1818 Launch the GDB Server (Linux) .......................................................................................... 1919 Clean Project................................................................................................................ 2020 Build Command............................................................................................................. 2121 Load the Image to Target (Windows).................................................................................... 2122 Load the Image to Target (Linux) ........................................................................................ 22
SmartRF, Code Composer Studio are trademarks of Texas Instruments.Linux Mint is a trademark of Linux Mark Institute.Linux is a registered trademark of Linux Torvalds in the U.S. and other countries.Windows is a registered trademark of Microsoft Corporation in the United States and/or other countries, or both.All other trademarks are the property of their respective owners.
1SWRA443A–February 2014–Revised February 2015 Using GCC/GDB With CC2538Submit Documentation Feedback
Copyright © 2014–2015, Texas Instruments Incorporated

Introduction www.ti.com
23 Running the Software Example From Debugger....................................................................... 23
1 IntroductionThe CC2538 is a low-power radio device with an integrated ARM Cortex-M3 MCU. For more informationabout CC2538, see [1] and [2].
This document describes which software packages are necessary, and provides installation andconfiguration instructions for each. It also describes how to use this tool chain setup to debug a softwareexample for the CC2538.
Section 2 and Section 3 list the software packages and hardware required for this tool chain setup.
Installation procedures for the software packages are provided in Section 4.
Section 5 describes how to use the tool chain setup to build, program, and debug a software example forCC2538.
This setup has been tested on a Windows® 7 and on a Linux Mint™ machine.
Table 1. Acronyms
CDT C/C++ Development ToolingDK Development KitEB Evaluation BoardEM Evaluation Module
GCC The GNU Compiler CollectionGDB The GNU Project DebuggerIDE Integrated Development EnvironmentJRE Java Runtime Environment
2 Prerequisites
2.1 PlatformsThis tools setup has been tested on Windows 7 and on Linux Mint 12. Most of the setup instructions willbe identical for these platforms. In those cases where the instructions differ on Linux®, this is noted in thetext.
2.2 HardwareThe following hardware pieces are required:• SmartRF06EB• CC2538EM• USB cable
These two boards are part of the CC2538DK. The SmartRF06EB has an integrated XDS100v3 emulator.For more information about the hardware, see [3] and [4].
2 Using GCC/GDB With CC2538 SWRA443A–February 2014–Revised February 2015Submit Documentation Feedback
Copyright © 2014–2015, Texas Instruments Incorporated
www.ti.com Prerequisites
2.3 SoftwareThis section describes the software packages that are required with this application report. Toolscomponents, other than the packages below, might be used as well, for example, newer versions of thetools that have become available after this document was written. The following packages and versionswere tested together during the writing of this document.• An IDE. For example Eclipse and the following belonging components:
– Java Runtime Environment – JRE:http://java.com/en/download/index.jsp
– Eclipse Luna 4.4.1http://archive.eclipse.org/eclipse/downloads/drops4/R-4.4.1-201409250400/
– CDT (C/C++ Development Tooling) version 8.5.0 for Eclipse Lunahttp://www.eclipse.org/cdt/downloads.php
• A GCC Compiler. For example:– GNU Tools for ARM Embedded Processors 4.8
https://launchpad.net/gcc-arm-embedded• Build tools for Windows. For example:
– MinGWhttp://www.mingw.org/
• A GDB agent and a Flash programmer tool. For example:– For Windows: XDS100v3 EMUpack + GDB agent
http://processors.wiki.ti.com/index.php/XDS_Emulation_Software_Package– For Windows: SmartRF™ Flash Programmer 2
http://www.ti.com/tool/flash-programmer– For Linux: Code Composer Studio™ Uniflash Standalone Flash Tool
http://www.ti.com/tool/uniflash• Blink LED software example for GCC (packaged with this document)
Download and installation instructions for each software package are provided in Section 4.
3 Hardware SetupFor instructions on how to configure the hardware, see [4].
4 Software Installation Instructions
4.1 Eclipse IDE (Windows)Follow these instructions to install Eclipse and CDT on a Windows platform. Note that the Eclipse IDE isdependent on Java Runtime Environment being installed on the machine. Make sure JRE is installed, andthat the installation path is added to your environment variables, before the installation of Eclipse. Notethat both JRE and Eclipse must be downloaded for the same platform (the 64-bit version of Eclipserequires the 64-bit version of JRE).1. Download Eclipse from the following location: http://eclipse.org/downloads/index.php.2. Unzip the downloaded package.
3SWRA443A–February 2014–Revised February 2015 Using GCC/GDB With CC2538Submit Documentation Feedback
Copyright © 2014–2015, Texas Instruments Incorporated

Software Installation Instructions www.ti.com
3. The Eclipse IDE can now be started by running the eclipse.exe file. Eclipse will ask for a folder to usefor workspace location when it is started. If Eclipse reports that it cannot find the Java RuntimeEnvironment, make sure that the installation path is added to your environment variables. This is doneby going to Control Panel → System and Security → System → Advanced system settings. Appendthe path of the bin folder in the JRE installation to the PATH variable.
4. Verify the installed versions of the package under Help → About Eclipse SDK.
The following instructions describe how to install the CDT plugins:1. Download the CDT for your version of Eclipse from: http://www.eclipse.org/cdt/downloads.php.2. Start the Eclipse IDE. If on Windows 7, make sure that Eclipse is run as administrator to allow for the
new installations. If the Welcome screen is shown, click on the Workbench icon to open theworkbench. Then, click Window → Open Perspective → Other… and select the C/C++ perspective.Navigate to Help → Install New Software (see Figure 1).
Figure 1. Eclipse IDE (Windows)
3. Press the ‘Add..’ button and the Add Repository popup window is shown. Fill in ‘CDT’ as the name.Press the ‘Archive’ button and browse to the downloaded CDT *.zip file. Press OK.
4 Using GCC/GDB With CC2538 SWRA443A–February 2014–Revised February 2015Submit Documentation Feedback
Copyright © 2014–2015, Texas Instruments Incorporated
www.ti.com Software Installation Instructions
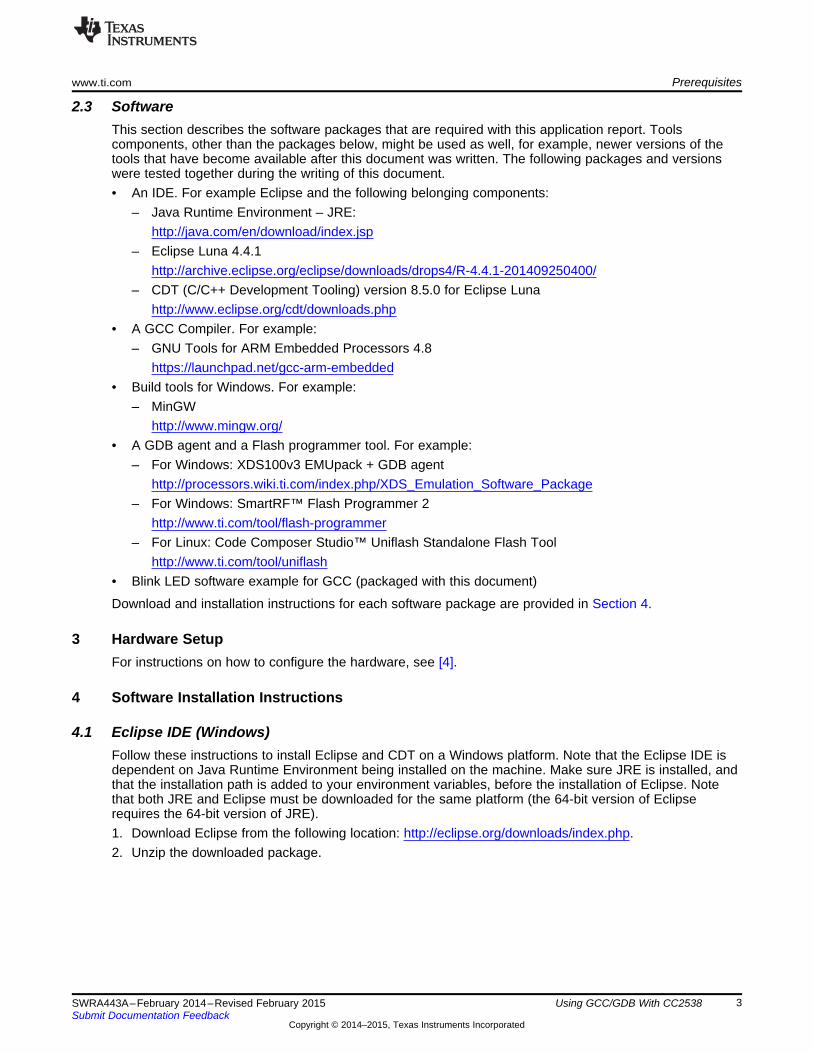
4. Select both ‘CDT Main Features’ and ‘CDT Optional Features’ to install (see Figure 2).
Figure 2. Installing CDT
5. Click ‘Next’ twice and accept the licence agreements. Click ‘Finish’ to install the CDT package.6. When finished, click Yes to restart Eclipse.
5SWRA443A–February 2014–Revised February 2015 Using GCC/GDB With CC2538Submit Documentation Feedback
Copyright © 2014–2015, Texas Instruments Incorporated
Software Installation Instructions www.ti.com
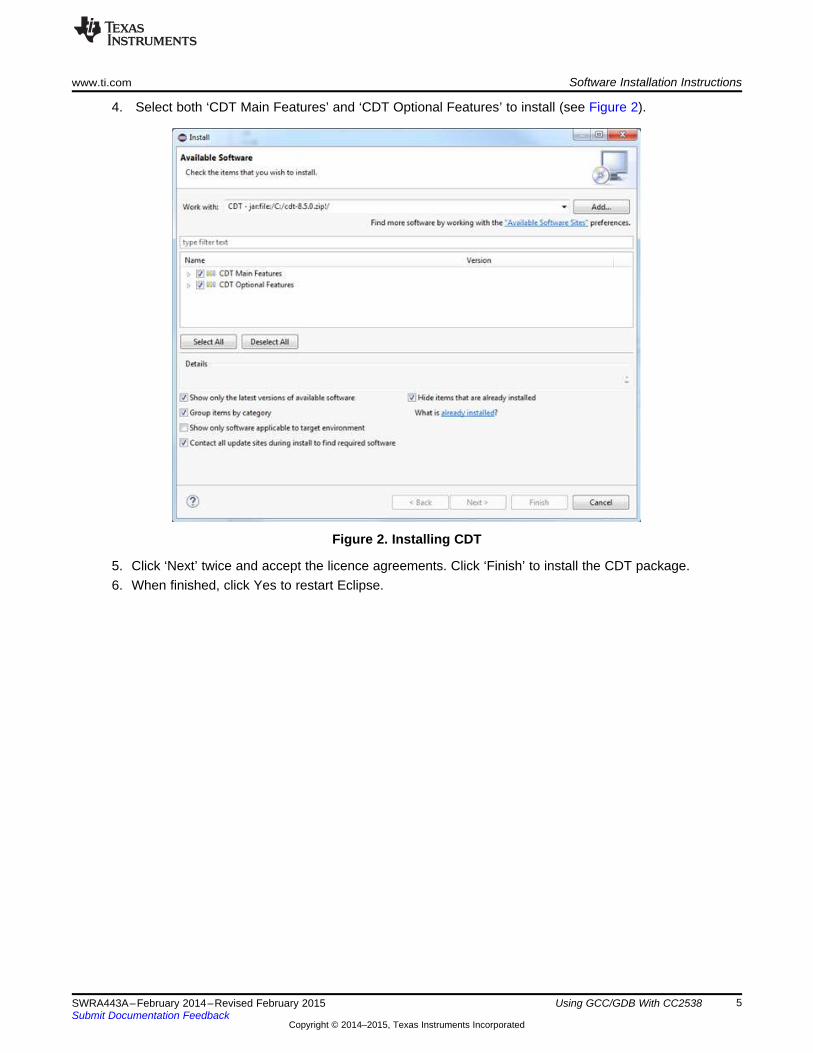
7. Verify that the CDT components are correctly installed. Navigate to Help → About Eclipse SDK andclick ‘Installation Details’. Make sure that the C/C++ Development Platform and the C/C++ GDBHardware Debugging are both installed (see Figure 3).
Figure 3. Installation Details
4.2 Eclipse IDE (Linux)Follow these instructions to install Eclipse and CDT on a Linux platform. Note that the Eclipse IDE isdependent on Java Runtime Environment being installed on the machine. Make sure JRE is installedbefore installation of Eclipse IDE.1. Download Eclipse from the following location: http://eclipse.org/downloads/index.php. Choose the
installer for your Linux platform.2. Extract the downloaded package.3. The Eclipse IDE can now be started by running the binary file eclipse. Eclipse will ask for a folder to
use for workspace location when it is started. If Eclipse reports that it cannot find the Java RuntimeEnvironment, open the eclipse.ini file and add the following command direct under the ‘openFile’statement:-vm<path to your JRE installation>/bin/java
4. Verify the installed versions of the package under Help → About Eclipse SDK.
6 Using GCC/GDB With CC2538 SWRA443A–February 2014–Revised February 2015Submit Documentation Feedback
Copyright © 2014–2015, Texas Instruments Incorporated

www.ti.com Software Installation Instructions
The following instructions describe how to install the CDT plugins:1. Download the CDT for your version of Eclipse from: http://www.eclipse.org/cdt/downloads.php.2. Start the Eclipse IDE. Make sure that Eclipse is run with administrator privileges to allow for the new
installations (see Figure 4). If the Welcome screen is shown, click on the Workbench icon to open theworkbench. Then, click Window → Open Perspective → Other… and select the C/C++ perspective.Navigate to Help → Install New Software.
Figure 4. Eclipse IDE (Linux)
3. Select Add → Archive… and browse to your downloaded archive file. Name it CDT and click OK (seeFigure 5).
Figure 5. Installing CDT (Linux)
4. Follow step 4 in Section 4.1. These final steps for Windows and Linux are equal.
7SWRA443A–February 2014–Revised February 2015 Using GCC/GDB With CC2538Submit Documentation Feedback
Copyright © 2014–2015, Texas Instruments Incorporated

Software Installation Instructions www.ti.com
4.3 GNU Toolchain (Windows)GNU Tools for ARM Embedded Processors is a free package that includes the GNU compiler and linkertools as well as the GNU debugger. Perform the following steps for Windows installation:1. Download GNU Tools for ARM Embedded Processors. The package can be found on this site:
https://launchpad.net/gcc-arm-embedded.2. Run the installer and follow the instructions. In the last step, make sure to select the checkbox 'Add
path to environment variable'.3. Verify from the command prompt that the package is installed is updated correctly.
This can be done by clicking Start → Run… . Type in cmd and click OK. In the command window,write:arm-none-eabi-gcc --version
The expected output is shown in Figure 6. If the arm-none-eabi-gcc program is not found, check thatthe PATH variable is correctly set.
Figure 6. GNU Toolchain (Windows)
More information about this package can be found in [5].
4.4 GNU Toolchain (Linux)Perform the following steps for the Linux installation of GNU Tools for ARM Embedded Processors:1. Download GNU Tools for ARM Embedded Processors. The package can be found on this site:
https://launchpad.net/gcc-arm-embedded.2. Unpack the tarball to the install directory with the following command:
$ cd <install_dir> && tar xjf gcc-arm-none-eabi-*-yyyymmdd-linux.tar.bz2
3. Add the installation path to the PATH variable with the following command:$ export PATH=$PATH:<install_dir>/gcc-arm-none-eabi-*/bin
4. Check that the correct version is installed with the command:$ arm-none-eabi-gcc –v
More information about this package can be found in [5].
4.5 Build Tools for WindowsIf your development platform is Windows, an additional command line program, ‘make’, is required by theEclipse external builder. One choice is to download the MinGW tool. Perform the following steps forinstallation:1. Download the MinGW setup tool from http://www.mingw.org/.2. Run the Setup. Choose default installation directory. Click Continue when the setup is finished, to open
the installation manager.3. In the Installation Manager, select ‘all Packages’. Choose the packages mingw32-make and mingw32-
gcc by clicking on the names and selecting ‘mark for installation’. Then, select Installation → ApplyChanges and click the ‘Apply’ button (see Figure 7).
8 Using GCC/GDB With CC2538 SWRA443A–February 2014–Revised February 2015Submit Documentation Feedback
Copyright © 2014–2015, Texas Instruments Incorporated

www.ti.com Software Installation Instructions
Figure 7. Schedule of Pending Actions
4. Add the installation path (default: C:\MinGW\bin) to your environment variables.
4.6 TI Emupack and GDB Server (Windows)The following two steps are necessary only for Windows:1. Download the XDS Emulation Software Package from the following location:
http://processors.wiki.ti.com/index.php/XDS_Emulation_Software_Package.This includes drivers for the XDS emulators and the GDB server.
2. Run the installer. Select the typical installation and default installation directory.
4.7 Flash Programmer (Windows)The following two steps describe the installation of the Flash programmer tool for Windows:1. Download SmartRF Flash Programmer 2 from the following location:
http://www.ti.com/tool/flashprogrammer.2. Unzip the downloaded file and run the installer.
9SWRA443A–February 2014–Revised February 2015 Using GCC/GDB With CC2538Submit Documentation Feedback
Copyright © 2014–2015, Texas Instruments Incorporated

Software Installation Instructions www.ti.com
4.8 Flash Programmer (Linux)The following three steps describe the installation of flash programmer tool for Linux:1. Download CCS Uniflash Flash programmer for Linux from the following location:
http://www.ti.com/tool/uniflash.CCS Uniflash includes the TI Emupack and GDB Server.
2. Run the installer (uniflash_setup_x.x.x.xxxxx.bin). Select custom installation and make sure thatsupport for Wireless Connectivity devices is installed (see Figure 8).
Figure 8. Support for Wireless Connectivity Devices
3. Make sure TI emulators, XDS100 class and Spectrum Digital emulator support is installed (seeFigure 9).
4. If the installed version of TI EmuPack is older than ti_emupack_5.1.402.0, open UniFlash, click Help →Check for Updates, and install the latest version. In the older version, there was a problem using theGDB agent on Linux.
Figure 9. Spectrum Digital Emulator Support
10 Using GCC/GDB With CC2538 SWRA443A–February 2014–Revised February 2015Submit Documentation Feedback
Copyright © 2014–2015, Texas Instruments Incorporated
www.ti.com Software Example and Eclipse Configuration
5 Software Example and Eclipse ConfigurationThis section describes how to open the example project in Eclipse and configure the installed tool chain.
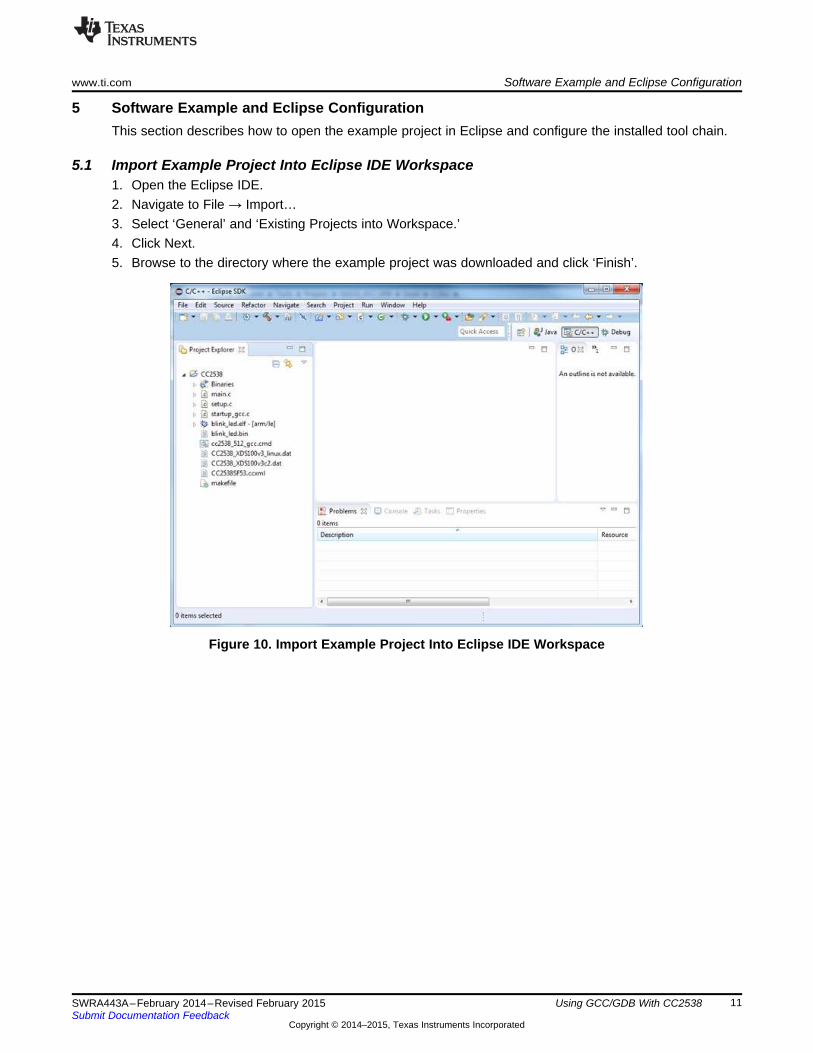
5.1 Import Example Project Into Eclipse IDE Workspace1. Open the Eclipse IDE.2. Navigate to File → Import…3. Select ‘General’ and ‘Existing Projects into Workspace.’4. Click Next.5. Browse to the directory where the example project was downloaded and click ‘Finish’.
Figure 10. Import Example Project Into Eclipse IDE Workspace
11SWRA443A–February 2014–Revised February 2015 Using GCC/GDB With CC2538Submit Documentation Feedback
Copyright © 2014–2015, Texas Instruments Incorporated

Software Example and Eclipse Configuration www.ti.com
5.2 Configure Eclipse DebuggerThis section describes how to configure the Eclipse debugger.1. Right click on the Project and select Debug As → Debug Configurations. The Debug Configurations
window will now be shown.2. Right click GDB Hardware Debugging and select ‘New’.3. Make sure that the settings in the Main tab are configured as in Figure 11.
Figure 11. New GDB Hardware Debugging Window
4. Select the ‘Debugger’ tab. Make sure the "Use remote target" box is unchecked. In the GDB commandfield type in:(a) Windows: arm-none-eabi-gdb.exe(b) Linux: arm-none-eabi-gdb
5. At the bottom of the window where the following text is shown’ Using GDB (DSF) Hardware DebuggingLauncher’, press ‘Select other’. Mark the checkbox 'Use configuration specific settings' and selectLegacy GDB Hardware Debugging Launcher'.
12 Using GCC/GDB With CC2538 SWRA443A–February 2014–Revised February 2015Submit Documentation Feedback
Copyright © 2014–2015, Texas Instruments Incorporated

www.ti.com Software Example and Eclipse Configuration
6. Select the ‘Debugger’ tab again. The settings should now be as seen in Figure 12.
NOTE: For Linux: In some cases an absolute path to gdb must be used for Eclipse to be able to findit. Use the full path to arm-none-eabi-gdb. This program is found in the bin folder whereCodeSourcery is installed.
Figure 12. Using Legacy GDB Hardware Debugger Launcher
13SWRA443A–February 2014–Revised February 2015 Using GCC/GDB With CC2538Submit Documentation Feedback
Copyright © 2014–2015, Texas Instruments Incorporated

Software Example and Eclipse Configuration www.ti.com
7. Select the ‘Startup’ tab and configure the same setting as shown in Figure 13. Make sure that ‘Loadimage’ is unchecked, and that the same commands in the ‘Initialization Commands’ window areadded. Then click ‘Apply’ and close the Debug Configurations window.
Figure 13. Settings for Startup Tab
14 Using GCC/GDB With CC2538 SWRA443A–February 2014–Revised February 2015Submit Documentation Feedback
Copyright © 2014–2015, Texas Instruments Incorporated

www.ti.com Software Example and Eclipse Configuration
5.3 Configure Flash Programmer Tool (Windows)This section describes how to configure the SmartRF Flash Programmer tool for the Eclipse environmenton Windows. The Flash programmer tool is used to load a generated binary image to the target beforedebugging.1. Start SmartRF Flash Programmer 2 GUI application (installation is described in Section 4.7).2. Start the command line by clicking the tools symbol in the top right corner of the GUI3. Make sure the hardware is connected on the USB and type ‘srfprog –ls all’ in the command line to
detect the connected hardware. If there is one SmartRF EB board connected on USB, the output willbe similar to the output shown in Figure 14.
Figure 14. Connected Devices
4. Note down the ID of the detected EB board (in the above example it is XDS-06EB121004B7A).5. In Eclipse, open the External Tools Configurations panel: Run → External Tools → External Tools
Configurations.6. Select ‘Program’ in the left side panel and press the new button to create a new Tools configuration
under ‘Program’.7. Fill in the fields ‘Name’, ‘Location’ and ‘Arguments’ as shown in Figure 15. ‘Location’ should be set to
the directory where the SmartRF Flash programmer was installed. The location below is correct whenthe default installation directory is used.
8. Under ‘Arguments’ make sure to use the same XDS ID number as noted in step 4 (replace XDS-06EB121004B7A as shown in Figure 15 with the ID number noted).
9. Note that the serial number (starting with 'XDS') is unique for each SmartRF06EB board. The stepsfrom 3 - 8 must be repeated if the board is changed.
15SWRA443A–February 2014–Revised February 2015 Using GCC/GDB With CC2538Submit Documentation Feedback
Copyright © 2014–2015, Texas Instruments Incorporated

Software Example and Eclipse Configuration www.ti.com
Figure 15. ID of the Detected EB Board
10. Press Apply.
16 Using GCC/GDB With CC2538 SWRA443A–February 2014–Revised February 2015Submit Documentation Feedback
Copyright © 2014–2015, Texas Instruments Incorporated

www.ti.com Software Example and Eclipse Configuration
5.4 Configure Flash Programmer Tool (Linux)This section describes how to configure the CCS Uniflash Flash programmer tool in the Eclipseenvironment for Linux.1. Open the External Tools Configurations panel; Run → External Tools → External Tools Configurations.2. Select ‘Program’ in the left side panel and press the new button to create a new Tools configuration
under ‘Program’.3. Fill in name, location and arguments as shown in Figure 16.
Figure 16. Configuring the Flash Programmer Tool (Linux)
17SWRA443A–February 2014–Revised February 2015 Using GCC/GDB With CC2538Submit Documentation Feedback
Copyright © 2014–2015, Texas Instruments Incorporated

Software Example and Eclipse Configuration www.ti.com
5.5 Launch the GDB Server (Windows)Perform the following steps to launch and configure the GDB Server for the XDS100v3 emulator onWindows:1. The GDB Server agent is found in the folder where emupack is installed. If emupack is installed in the
default directory, it can be found in the folder ‘C:\ti\ccs_base\common\uscif’. Launch the GDB Serveragent: ‘gdb_agent_gui.exe’.
2. Press the ‘Configure’ button and select the board configuration *.dat file for your target. The *dat file forthis target is found together with the CC2538 software example. For Windows, use the file‘CC2538_XDS100v3c2.dat’.
3. Press the ‘Start’ button (see Figure 17). The GDB server agent is now started.
Figure 17. Launching the GDB Server (Windows)
18 Using GCC/GDB With CC2538 SWRA443A–February 2014–Revised February 2015Submit Documentation Feedback
Copyright © 2014–2015, Texas Instruments Incorporated

www.ti.com Software Example and Eclipse Configuration
5.6 Launch the GDB Server (Linux)Perform the following steps to launch and configure the GDB Server for the XDS100v3 emulator on Linux:1. The GDB server agent is found in the following folder where Uniflash was installed:
‘ccs_base\common\uscif’. Launch the GDB Server agent with the following command:gdb_agent_console <board-data-file>
The board-data-file is the *.dat file found in the software example package:CC2538_XDS100v3c2_linux.dat.
2. If launched successfully, the output shown in Figure 18 can be seen in the console.
Figure 18. Launch the GDB Server (Linux)
19SWRA443A–February 2014–Revised February 2015 Using GCC/GDB With CC2538Submit Documentation Feedback
Copyright © 2014–2015, Texas Instruments Incorporated

Software Example and Eclipse Configuration www.ti.com
5.7 Build the Software Example1. Open the Eclipse IDE and select the imported software example. On Windows, specify the make tool
you are using. Navigate to Project → Properties → C/C++ build. Under the tab 'Builder Settings',uncheck 'Use default build command' and type in the build command you are using. If you are usingthe MinGW tools, the command will be mingw32-make.
2. Right click on the project name in the Project Explorer window, and select ‘Clean Project’ to clean theproject.On Windows, the console output from the clean command should be as shown in Figure 19.
Figure 19. Clean Project
3. Right click the project again and select ‘Build Project’. This will create the binary files blink_led.bin andblink_led.elf.
NOTE: On Linux, if the build fails and arm-none-eabi-gcc is not found, edit the makefile by addingthe full path to arm-none-eabi-gcc and to arm-none-eabi-objcopy. These tools are both foundin the bin folder where GNU Tools for ARM Embedded Processors was installed.
20 Using GCC/GDB With CC2538 SWRA443A–February 2014–Revised February 2015Submit Documentation Feedback
Copyright © 2014–2015, Texas Instruments Incorporated
www.ti.com Software Example and Eclipse Configuration
On Windows, the console output from the build command should be as shown in Figure 20.
Figure 20. Build Command
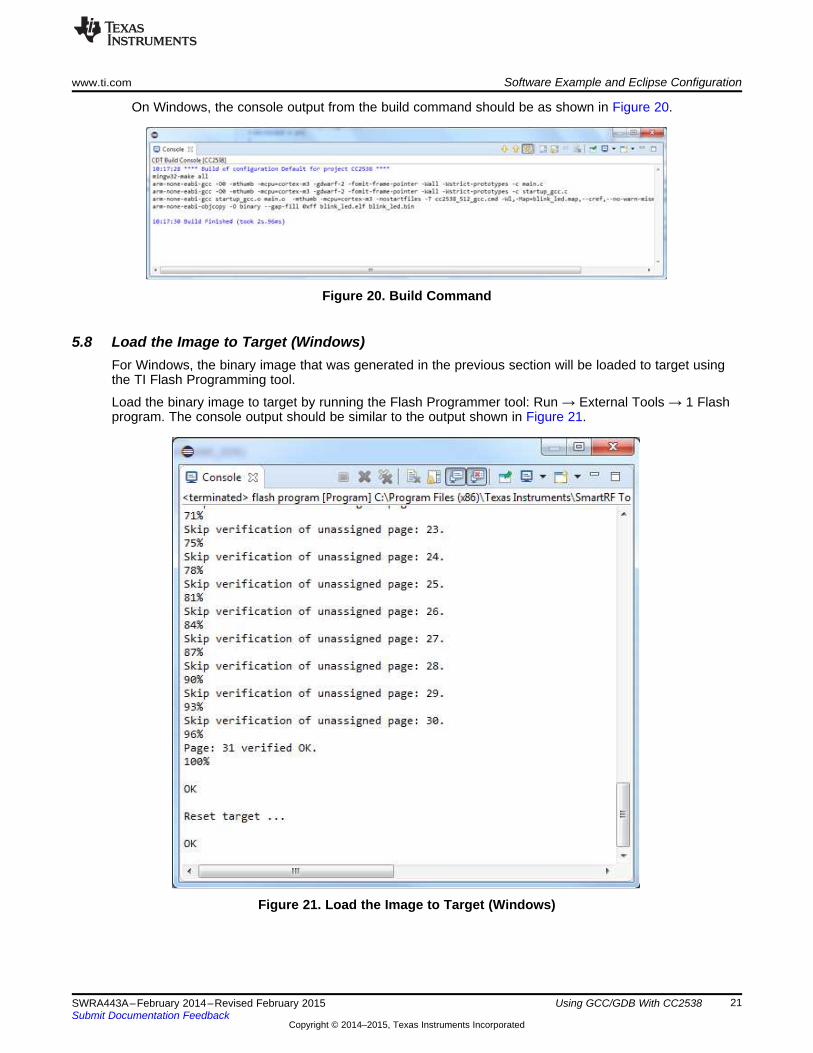
5.8 Load the Image to Target (Windows)For Windows, the binary image that was generated in the previous section will be loaded to target usingthe TI Flash Programming tool.
Load the binary image to target by running the Flash Programmer tool: Run → External Tools → 1 Flashprogram. The console output should be similar to the output shown in Figure 21.
Figure 21. Load the Image to Target (Windows)
21SWRA443A–February 2014–Revised February 2015 Using GCC/GDB With CC2538Submit Documentation Feedback
Copyright © 2014–2015, Texas Instruments Incorporated

Software Example and Eclipse Configuration www.ti.com
5.9 Load the Image to Target (Linux)For Linux, the *.elf file that was generated in the previous section will be loaded to target using theUniflash Flash programming.
Load the binary image to target by running the Flash Programmer tool: Run → External Tools → 1 Flashprogram. The console output should be similar to the output shown in Figure 22.
Figure 22. Load the Image to Target (Linux)
22 Using GCC/GDB With CC2538 SWRA443A–February 2014–Revised February 2015Submit Documentation Feedback
Copyright © 2014–2015, Texas Instruments Incorporated

www.ti.com Software Example and Eclipse Configuration
5.10 Running the Software Example From DebuggerAfter the image is downloaded to target, the debugger can be launched.1. Select Run → Debug Configurations, and the Debug Configurations panel will be opened (see
Figure 23).2. Make sure that the GDB server agent is started (as described in Section 5.5 for Windows and
Section 5.6 for Linux)3. Select the ‘blink_led’ configuration under ‘GDB Hardware Debugging’ and press the ‘Debug’ button.4. The debugger connects to target through the GDB server. The debugger prompts you to ‘Confirm
Perspective Switch’. Click ‘Yes’ to switch to the Debug perspective. The execution of the applicationcan now be controlled from the debugger in Eclipse (press F8 (or the Resume button) to start runningthe application).
Figure 23. Running the Software Example From Debugger
6 References1. CC2538 product page: http://www.ti.com/product/cc25382. CC2538 System-on-Chip Solution for 2.4-GHz IEEE 802.15.4 and ZigBee®/ZigBee IP® Applications
User's Guide (SWRU319)3. SmartRF06 Evaluation Board User's Guide (SWRU321)4. CC2538 Development Kit Quick Start Guide (SWRU347)5. GNU Tools for ARM Embedded Processors home page (https://launchpad.net/gcc-arm-embedded)
23SWRA443A–February 2014–Revised February 2015 Using GCC/GDB With CC2538Submit Documentation Feedback
Copyright © 2014–2015, Texas Instruments Incorporated

Revision History www.ti.com
Revision History
Changes from Original (February 2014) to A Revision .................................................................................................. Page
• Information was updated in Section 2.3. ............................................................................................... 3• Information was updated in Section 4.1. ............................................................................................... 3• Information was updated in Section 4.2. ............................................................................................... 6• Information was updated in Section 4.3................................................................................................ 8• Information was updated in Section 4.4................................................................................................ 8• Added new Section 4.5. .................................................................................................................. 8• Information was updated in Section 4.7. ............................................................................................... 9• Information was updated in Section 4.8............................................................................................... 10• Information was updated in Section 5.1............................................................................................... 11• Information was updated in Section 5.1............................................................................................... 11• Information was updated in Section 5.2............................................................................................... 12• Information was updated in Section 5.3............................................................................................... 15• Information was updated in Section 5.4............................................................................................... 17• Information was updated in Section 5.5............................................................................................... 18• Information was updated in Section 5.6............................................................................................... 19• Information was updated in Section 5.7............................................................................................... 20• Information was updated in Section 6................................................................................................. 23
NOTE: Page numbers for previous revisions may differ from page numbers in the current version.
24 Revision History SWRA443A–February 2014–Revised February 2015Submit Documentation Feedback
Copyright © 2014–2015, Texas Instruments Incorporated

IMPORTANT NOTICE
Texas Instruments Incorporated and its subsidiaries (TI) reserve the right to make corrections, enhancements, improvements and otherchanges to its semiconductor products and services per JESD46, latest issue, and to discontinue any product or service per JESD48, latestissue. Buyers should obtain the latest relevant information before placing orders and should verify that such information is current andcomplete. All semiconductor products (also referred to herein as “components”) are sold subject to TI’s terms and conditions of salesupplied at the time of order acknowledgment.TI warrants performance of its components to the specifications applicable at the time of sale, in accordance with the warranty in TI’s termsand conditions of sale of semiconductor products. Testing and other quality control techniques are used to the extent TI deems necessaryto support this warranty. Except where mandated by applicable law, testing of all parameters of each component is not necessarilyperformed.TI assumes no liability for applications assistance or the design of Buyers’ products. Buyers are responsible for their products andapplications using TI components. To minimize the risks associated with Buyers’ products and applications, Buyers should provideadequate design and operating safeguards.TI does not warrant or represent that any license, either express or implied, is granted under any patent right, copyright, mask work right, orother intellectual property right relating to any combination, machine, or process in which TI components or services are used. Informationpublished by TI regarding third-party products or services does not constitute a license to use such products or services or a warranty orendorsement thereof. Use of such information may require a license from a third party under the patents or other intellectual property of thethird party, or a license from TI under the patents or other intellectual property of TI.Reproduction of significant portions of TI information in TI data books or data sheets is permissible only if reproduction is without alterationand is accompanied by all associated warranties, conditions, limitations, and notices. TI is not responsible or liable for such altereddocumentation. Information of third parties may be subject to additional restrictions.Resale of TI components or services with statements different from or beyond the parameters stated by TI for that component or servicevoids all express and any implied warranties for the associated TI component or service and is an unfair and deceptive business practice.TI is not responsible or liable for any such statements.Buyer acknowledges and agrees that it is solely responsible for compliance with all legal, regulatory and safety-related requirementsconcerning its products, and any use of TI components in its applications, notwithstanding any applications-related information or supportthat may be provided by TI. Buyer represents and agrees that it has all the necessary expertise to create and implement safeguards whichanticipate dangerous consequences of failures, monitor failures and their consequences, lessen the likelihood of failures that might causeharm and take appropriate remedial actions. Buyer will fully indemnify TI and its representatives against any damages arising out of the useof any TI components in safety-critical applications.In some cases, TI components may be promoted specifically to facilitate safety-related applications. With such components, TI’s goal is tohelp enable customers to design and create their own end-product solutions that meet applicable functional safety standards andrequirements. Nonetheless, such components are subject to these terms.No TI components are authorized for use in FDA Class III (or similar life-critical medical equipment) unless authorized officers of the partieshave executed a special agreement specifically governing such use.Only those TI components which TI has specifically designated as military grade or “enhanced plastic” are designed and intended for use inmilitary/aerospace applications or environments. Buyer acknowledges and agrees that any military or aerospace use of TI componentswhich have not been so designated is solely at the Buyer's risk, and that Buyer is solely responsible for compliance with all legal andregulatory requirements in connection with such use.TI has specifically designated certain components as meeting ISO/TS16949 requirements, mainly for automotive use. In any case of use ofnon-designated products, TI will not be responsible for any failure to meet ISO/TS16949.
Products ApplicationsAudio www.ti.com/audio Automotive and Transportation www.ti.com/automotiveAmplifiers amplifier.ti.com Communications and Telecom www.ti.com/communicationsData Converters dataconverter.ti.com Computers and Peripherals www.ti.com/computersDLP® Products www.dlp.com Consumer Electronics www.ti.com/consumer-appsDSP dsp.ti.com Energy and Lighting www.ti.com/energyClocks and Timers www.ti.com/clocks Industrial www.ti.com/industrialInterface interface.ti.com Medical www.ti.com/medicalLogic logic.ti.com Security www.ti.com/securityPower Mgmt power.ti.com Space, Avionics and Defense www.ti.com/space-avionics-defenseMicrocontrollers microcontroller.ti.com Video and Imaging www.ti.com/videoRFID www.ti-rfid.comOMAP Applications Processors www.ti.com/omap TI E2E Community e2e.ti.comWireless Connectivity www.ti.com/wirelessconnectivity
Mailing Address: Texas Instruments, Post Office Box 655303, Dallas, Texas 75265Copyright © 2015, Texas Instruments Incorporated


![MIT OpenCourseWare 6.189 Multicore …...Running Processes Under GDB ppu-gdb ./hello-world (gdb) run [args] … (gdb) quit export SPU_INFO=1 for extra information about threads Phil](https://static.fdocuments.us/doc/165x107/5f19ba63a6b0b957e67c7a59/mit-opencourseware-6189-multicore-running-processes-under-gdb-ppu-gdb-hello-world.jpg)