USG - J-Trader 9.0.0 26FEB2010 V1 · J-Trader is a trading platform for futures, options and...
82
J-Trader 9.0 User Guide
Transcript of USG - J-Trader 9.0.0 26FEB2010 V1 · J-Trader is a trading platform for futures, options and...

J-Trader 9.0
User Guide

This document was created on 26 February 2010.
© Patsystems (UK) Ltd. Registered in England and Wales under company number 3086310
This material is copyrighted. Apart from uses permitted under the Copyright Act 1968, no part may be reproduced by any process without prior written permission from Patsystems (UK) Ltd.
This material is for reference only, and Patsystems (UK) Ltd does not accept any liability arising out of the use of the information or products described herein. Furthermore, Patsystems (UK) Ltd reserves the right to alter specifications or procedures without notice.
This material may contain or refer to information and products protected by copyright or patents, and does not convey any license under the patent rights of Patsystems (UK) Ltd or the rights of others. All product names mentioned are trademarks of their respective owners.
Produced by:
Patsystems (UK) Ltd Riverside House 2a Southwark Bridge Road London SE1 9HA
Tel: +44 (020) 7940 0490 Fax: +44 (020) 7803 1619
www.patsystems.com

© Patsystems Ltd 26/02/2010 14:49 i
Contents
1 About this Guide................................. ................................................................. 1
2 Introducing J-Trader ............................. .............................................................. 2 What is J-Trader? .............................................................................................................................. 2
What’s New in J-Trader 9.0 ........................................................................................................... 2 Installation and System Requirements .............................................................................................. 2
J-Trader’s System Requirements .................................................................................................. 2 Installing J-Trader .......................................................................................................................... 2 Running the Japanese Version of J-Trader................................................................................... 3 Running J-Trader from the Command Line................................................................................... 3
Logging In to J-Trader ....................................................................................................................... 4 Changing Your Network Settings .................................................................................................. 5
Logging Out of J-Trader..................................................................................................................... 5 Overview of J-Trader Screens........................................................................................................... 6
J-Trader Main Screen.................................................................................................................... 7 Managing Trading Windows & Desktops ...................................................................................... 8 Connectivity Status Screen ........................................................................................................... 8 Messages Screen .......................................................................................................................... 9
3 Configuring J-Trader............................. ............................................................ 10 Using the Settings Screen ............................................................................................................... 10
Display Tab.................................................................................................................................. 11 General Tab................................................................................................................................. 12 Trading Tab ................................................................................................................................. 14 Sounds Tab ................................................................................................................................. 16 Contract Tab ................................................................................................................................ 17 MEL Template Tab ...................................................................................................................... 18 Reflector Tab ............................................................................................................................... 18
Configuring the Hot Quotes Screen................................................................................................. 19 Hot Quotes Columns ................................................................................................................... 20
Setting Default Accounts ................................................................................................................. 20
4 Trading With J-Trader ............................ ........................................................... 22 Overview of Trading in J-Trader ...................................................................................................... 22
Sorting & Filtering Lists................................................................................................................ 22 Adjusting Columns....................................................................................................................... 23 Order Types................................................................................................................................. 23
Trading with the Hot Quotes Screen ............................................................................................... 26 Using DOM Screens ........................................................................................................................ 27 Trading with Patsystems Reflector .................................................................................................. 29
PIG (Price Injector Gun) .............................................................................................................. 32 Protection Orders......................................................................................................................... 34
Using a Trade Ticket........................................................................................................................ 35 Trading Synthetic and Timed Orders........................................................................................... 38 Trading on the London Metal Exchange ..................................................................................... 38 Trading FX ................................................................................................................................... 39 Trading Eurodollar Contracts....................................................................................................... 41
Trading Calendar Spreads............................................................................................................... 42 Trading Options ............................................................................................................................... 44
Options Columns ......................................................................................................................... 46 Trading Strategies ........................................................................................................................... 47
Strategies Screen Columns......................................................................................................... 48
ii © Patsystems Ltd 26/02/2010 14:49
Using Strategies (MELs).................................................................................................................. 49 Creating a MEL............................................................................................................................ 49 Trading a MEL ............................................................................................................................. 51
Viewing and Updating Orders.......................................................................................................... 51 Status Screen Columns............................................................................................................... 54
Viewing Positions............................................................................................................................. 55 Position Columns......................................................................................................................... 56 Fill Columns ................................................................................................................................. 57
5 J-Trader Tools................................... ................................................................. 59 Overview of the Tools Menu............................................................................................................ 59 Using the Scroll Ticker..................................................................................................................... 59 Creating Exchange Strategies......................................................................................................... 60
Options Strategies ....................................................................................................................... 62 Futures Strategies ....................................................................................................................... 63
Using the List Ticker ........................................................................................................................ 63 Submitting Bulk Orders.................................................................................................................... 64
Format of the Input File ............................................................................................................... 65 Submitting the Orders from J-Trader........................................................................................... 66
Viewing Fills ..................................................................................................................................... 69
6 Glossary ......................................... .................................................................... 71
7 Index ............................................ ....................................................................... 75
© Patsystems Ltd 26/02/2010 14:49 1
This guide explains how to use version 9.0 of J-Trader. It assumes that J-Trader has already been installed on your system and that you have been given a user login identification (ID) and password, that you are familiar with Microsoft OS platforms and derivatives trading, and that you understand any data retrieved using J-Trader.
There is a glossary to help you with unfamiliar terms, and a comprehensive index after the glossary. If you still have any problems using J-Trader after reading this guide, please contact your local system administrator or Patsystems Support.
Since each company’s installation of J-Trader can differ, this guide may describe functions that are not available to you. If you require any extra functions, please contact your Patsystems Account Manager.
C H A P T E R 1
About this Guide

© Patsystems Ltd 26/02/2010 14:49 2
This chapter explains what J-Trader is, shows you how to install, run and log on to J-Trader, and gives you an overview of the screens.
What is J-Trader? J-Trader is a trading platform for futures, options and strategies – including spreads between contracts traded on different exchanges. Prices and the statuses of working orders are updated in real-time. J-Trader can connect to exchanges over WANS (wide-area networks), LANs (local-area networks), leased lines, or the Internet.
What’s New in J-Trader 9.0 J-Trader 9.0 has been released with a new Trading API. This brings several advantages:
• Quicker login and download time.
• Efficient handling of orders and prices.
• Easier installation as it comes packaged inside J-Trader jar file.
There are no new features added in this version.
Installation and System Requirements The following sections explain J-Trader’s hardware and software requirements, and how to install J-Trader.
J-Trader’s System Requirements The following are the minimum system requirements for J-Trader:
• Processor: 1.5GHz or equivalent. Pentium 3 or equivalent.
• Hard disk: 50Mb of free HDD space
• RAM: 1GB
• Operating system: Windows XP, NT4 or 2000.
Note: The recommended OS is Windows XP, but Vista is supported as well.
• Browser: Internet Explorer 5.5 or 6.0
• SUN JVM: 1.6.0_1 or later
Installing J-Trader There are two ways to install J-Trader:
• Standalone application: Using a CD or zip file, you install J-Trader on your computer. You can then open it like any other Windows application: either from the Start menu or by double-clicking the J-Trader desktop icon.
Now, either follow the additional steps in Running the Japanese Version of J-Trader (page 3), or log in to J-Trader.
C H A P T E R 2
Introducing J-Trader

Introducing J-Trader
© Patsystems Ltd 26/02/2010 14:49 3
• Hosted web-based application: You click on a web link, and the latest version of J-Trader is downloaded onto your machine as a Java Applet.
When you exit from J-Trader, the application is no longer physically on your machine. To access J-Trader the next time, you simply click on the web link again. The advantage over a standalone installation is that you always get the latest version.
To install J-Trader as a hosted web-based application:
1 Ensure that your browser is Internet Explorer 5.5 or greater (Patsystems does not support other browsers).
2 Enable Java applets:
i. Open Internet Explorer.
ii. Select Tools/Internet Options...
iii. Select the Security tab of the Internet Options dialog box.
iv. Click on:
... then click on Custom Level...
v. Ensure that you have the following setting (scroll to the bottom of the list to find it):
3 If you get a warning asking for your permission to install and run J-Trader, click Yes. You can bypass this message in the future by ticking Always trust content from Patsystems (UK) Limited.
4 You can add the website from where you launch J-Trader to Internet Explorer’s list of trusted sites: in Internet Explorer, select Tools > Options, Security tab, Trusted Sites icon, click Sites and add the website’s URL.
5 Now:
� If you are installing the Japanese version of J-Trader, follow the additional steps in Running the Japanese Version of J-Trader (page 3).
� Otherwise, log in to J-Trader.
Running the Japanese Version of J-Trader This section describes steps specific to starting the Japanese version of J-Trader. You can also launch the Japanese version of J-Trader from the command line (page 3).
Running J-Trader from the Command Line You can launch J-Trader from the command line, eg if you are launching it as part of a batch file during start- up, or running it in a Citrix farm.
The J-Trader components must already be installed on the machine from which you want to launch J-Trader.
Follow these steps:
1 From the Windows Start menu, click Run.
Introducing J-Trader
4 © Patsystems Ltd 26/02/2010 14:49
2 Type cmd and click OK to display the command line.
3 Make sure you are in the directory where J-Trader runs from.
4 At the command prompt, type in the following:
java -Xms256m –Xmx1024m -cp pats.jar patsystems.ui.PATSClient
5 If you are launching the Japanese version of J-Trader, you need to add -Duser.language=ja:
java -Xms256m –Xmx1024m -Duser.language=ja -cp pats.jar patsystems.ui.PATSClient
6 Press Return.
7 You can now log in to J-Trader.
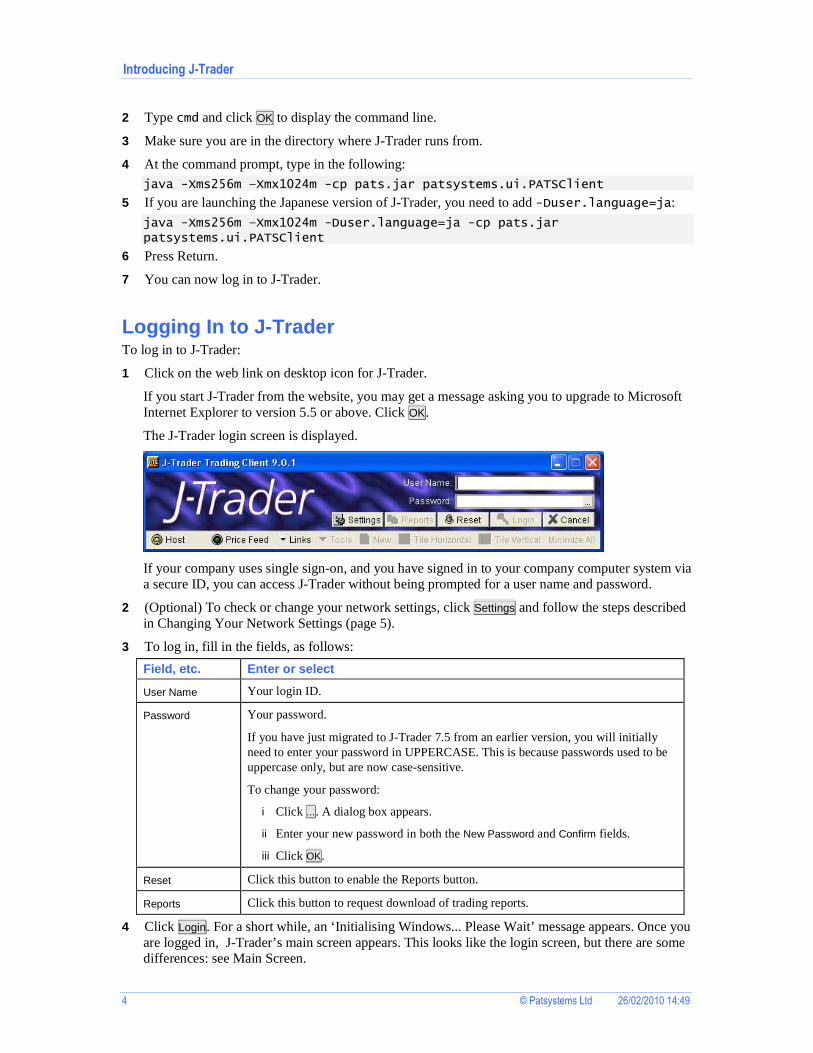
Logging In to J-Trader To log in to J-Trader:
1 Click on the web link on desktop icon for J-Trader.
If you start J-Trader from the website, you may get a message asking you to upgrade to Microsoft Internet Explorer to version 5.5 or above. Click OK.
The J-Trader login screen is displayed.
If your company uses single sign-on, and you have signed in to your company computer system via a secure ID, you can access J-Trader without being prompted for a user name and password.
2 (Optional) To check or change your network settings, click Settings and follow the steps described in Changing Your Network Settings (page 5).
3 To log in, fill in the fields, as follows:
Field, etc. Enter or select
User Name Your login ID.
Password Your password.
If you have just migrated to J-Trader 7.5 from an earlier version, you will initially need to enter your password in UPPERCASE. This is because passwords used to be uppercase only, but are now case-sensitive.
To change your password:
i Click .... A dialog box appears.
ii Enter your new password in both the New Password and Confirm fields.
iii Click OK.
Reset Click this button to enable the Reports button.
Reports Click this button to request download of trading reports.
4 Click Login. For a short while, an ‘Initialising Windows... Please Wait’ message appears. Once you are logged in, J-Trader’s main screen appears. This looks like the login screen, but there are some differences: see Main Screen.
Introducing J-Trader
© Patsystems Ltd 26/02/2010 14:49 5
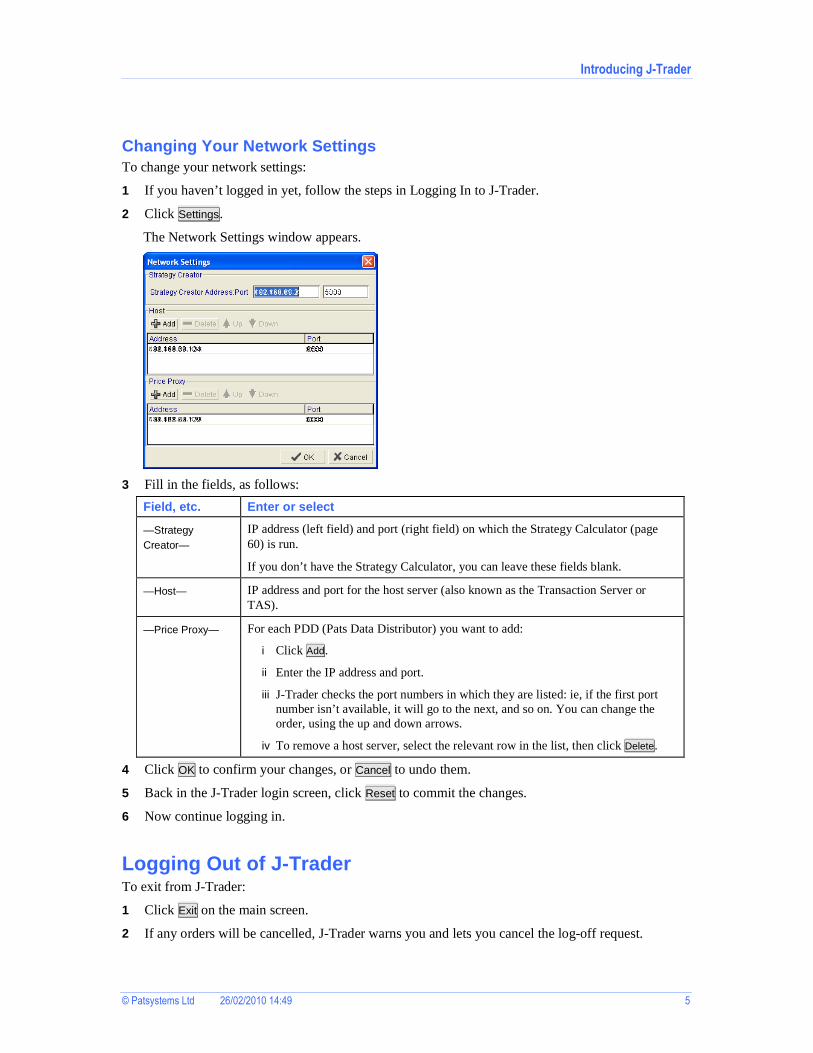
Changing Your Network Settings To change your network settings:
1 If you haven’t logged in yet, follow the steps in Logging In to J-Trader.
2 Click Settings.
The Network Settings window appears.
3 Fill in the fields, as follows:
Field, etc. Enter or select
—Strategy Creator—
IP address (left field) and port (right field) on which the Strategy Calculator (page 60) is run.
If you don’t have the Strategy Calculator, you can leave these fields blank.
—Host— IP address and port for the host server (also known as the Transaction Server or TAS).
—Price Proxy— For each PDD (Pats Data Distributor) you want to add:
i Click Add.
ii Enter the IP address and port.
iii J-Trader checks the port numbers in which they are listed: ie, if the first port number isn’t available, it will go to the next, and so on. You can change the order, using the up and down arrows.
iv To remove a host server, select the relevant row in the list, then click Delete.
4 Click OK to confirm your changes, or Cancel to undo them.
5 Back in the J-Trader login screen, click Reset to commit the changes.
6 Now continue logging in.
Logging Out of J-Trader To exit from J-Trader:
1 Click Exit on the main screen.
2 If any orders will be cancelled, J-Trader warns you and lets you cancel the log-off request.

Introducing J-Trader
6 © Patsystems Ltd 26/02/2010 14:49
Overview of J-Trader Screens When you have successfully logged on to J-Trader and opened a trading window, as explained in Logging In to J-Trader, you have four different screens:
• Main screen:
The main screen of J-Trader, from where you can select windows (see next row of this table), configure J-Trader’s appearance and behaviour, log off, and more.
• Trading screen:
Screen for selecting all of the trading and reporting functions.
See Managing Desktops & Windows (page 8) and Overview of Trading in J-Trader (page 22).
• Connectivity screen:
Screen for checking your server connections.
See Connectivity Status Screen.
• Messages screen:
Screen for connection messages, alerts, and requests for quotes (RFQs)
See Messages Screen (page 9).
You can minimise and maximise all J-Trader screens in one go, by clicking on the J-Trader icon located on the Windows taskbar:
Introducing J-Trader
© Patsystems Ltd 26/02/2010 14:49 7
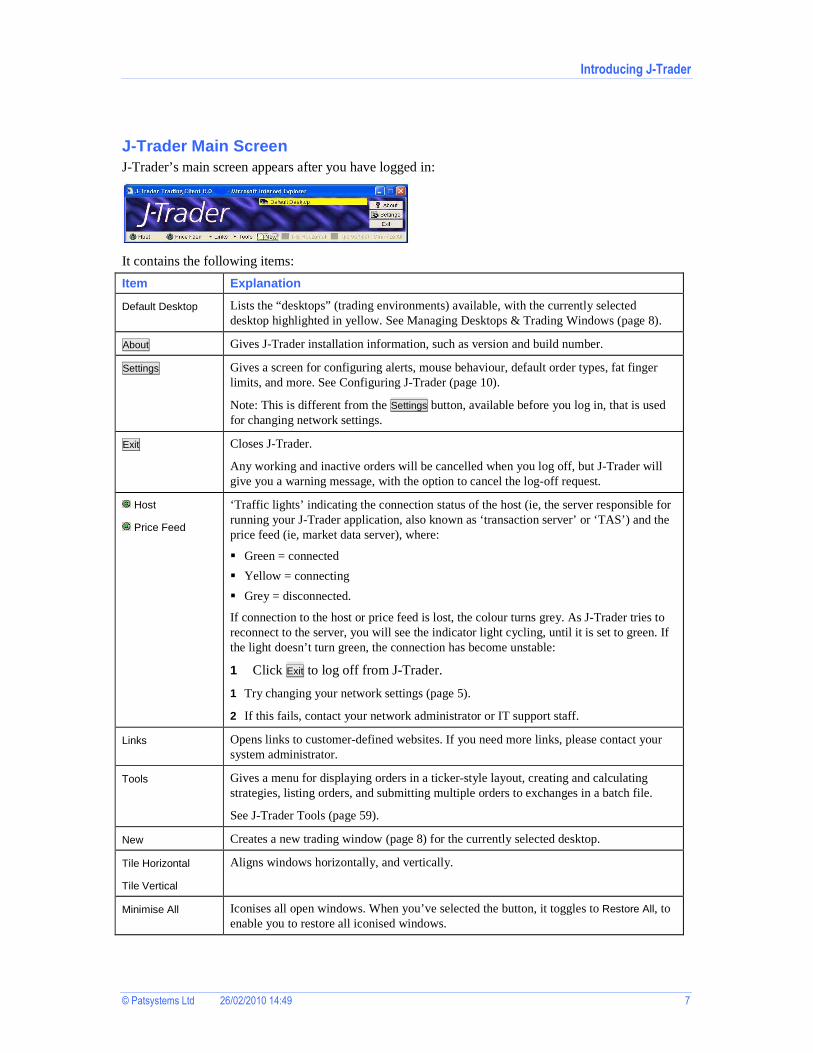
J-Trader Main Screen J-Trader’s main screen appears after you have logged in:
It contains the following items:
Item Explanation
Default Desktop Lists the “desktops” (trading environments) available, with the currently selected desktop highlighted in yellow. See Managing Desktops & Trading Windows (page 8).
About Gives J-Trader installation information, such as version and build number.
Settings Gives a screen for configuring alerts, mouse behaviour, default order types, fat finger limits, and more. See Configuring J-Trader (page 10).
Note: This is different from the Settings button, available before you log in, that is used for changing network settings.
Exit Closes J-Trader.
Any working and inactive orders will be cancelled when you log off, but J-Trader will give you a warning message, with the option to cancel the log-off request.
Host
Price Feed
‘Traffic lights’ indicating the connection status of the host (ie, the server responsible for running your J-Trader application, also known as ‘transaction server’ or ‘TAS’) and the price feed (ie, market data server), where:
� Green = connected
� Yellow = connecting
� Grey = disconnected.
If connection to the host or price feed is lost, the colour turns grey. As J-Trader tries to reconnect to the server, you will see the indicator light cycling, until it is set to green. If the light doesn’t turn green, the connection has become unstable:
1 Click Exit to log off from J-Trader.
1 Try changing your network settings (page 5).
2 If this fails, contact your network administrator or IT support staff.
Links Opens links to customer-defined websites. If you need more links, please contact your system administrator.
Tools Gives a menu for displaying orders in a ticker-style layout, creating and calculating strategies, listing orders, and submitting multiple orders to exchanges in a batch file.
See J-Trader Tools (page 59).
New Creates a new trading window (page 8) for the currently selected desktop.
Tile Horizontal
Tile Vertical
Aligns windows horizontally, and vertically.
Minimise All Iconises all open windows. When you’ve selected the button, it toggles to Restore All, to enable you to restore all iconised windows.
Introducing J-Trader
8 © Patsystems Ltd 26/02/2010 14:49
Managing Trading Windows & Desktops You can create, rename and copy trading windows and “desktops”.
“Desktops” are saved selections of screens and instruments. By using multiple desktops, you can switch rapidly between different trading environments. For example, if you trade bonds and STIRs, you could have a desktop for each. When you next log in, J-Trader will automatically show the last desktop you were using.
Follow these steps:
1 In J-Trader’s main screen, click the desktop or trading window you want to edit. It is then highlighted in yellow.
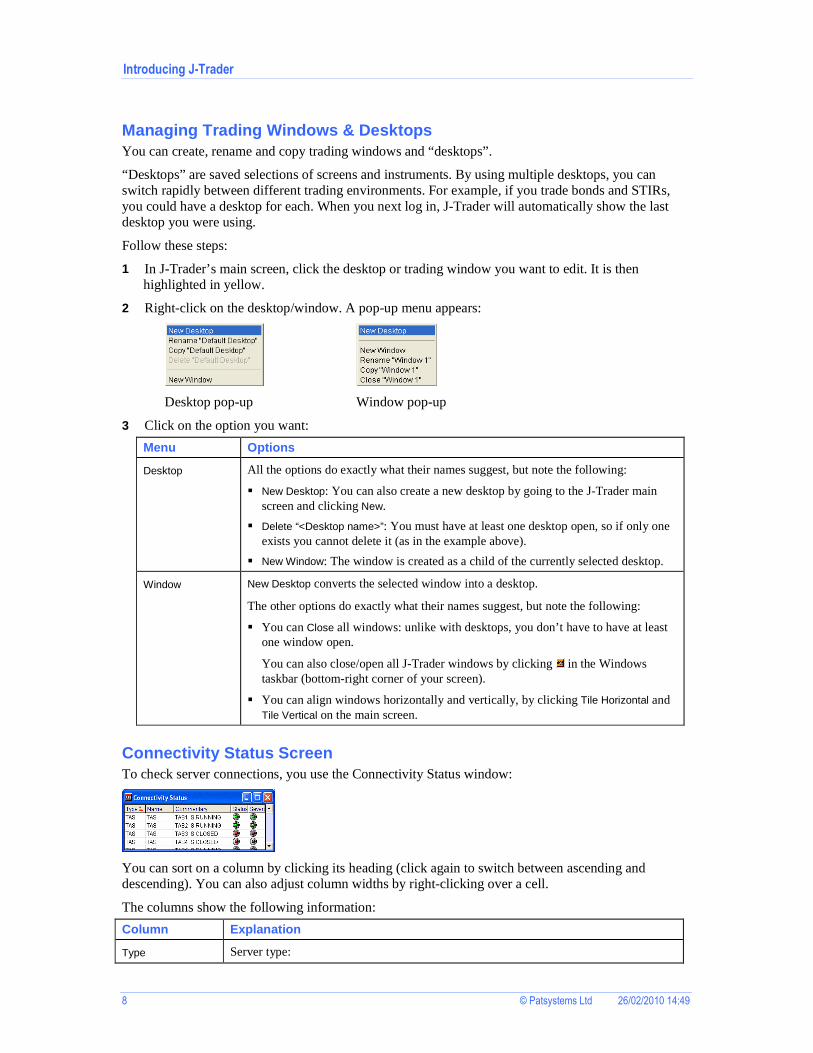
2 Right-click on the desktop/window. A pop-up menu appears:
Desktop pop-up
Window pop-up
3 Click on the option you want:
Menu Options
Desktop All the options do exactly what their names suggest, but note the following:
� New Desktop: You can also create a new desktop by going to the J-Trader main screen and clicking New.
� Delete “<Desktop name>”: You must have at least one desktop open, so if only one exists you cannot delete it (as in the example above).
� New Window: The window is created as a child of the currently selected desktop.
Window New Desktop converts the selected window into a desktop.
The other options do exactly what their names suggest, but note the following:
� You can Close all windows: unlike with desktops, you don’t have to have at least one window open.
You can also close/open all J-Trader windows by clicking in the Windows taskbar (bottom-right corner of your screen).
� You can align windows horizontally and vertically, by clicking Tile Horizontal and Tile Vertical on the main screen.
Connectivity Status Screen To check server connections, you use the Connectivity Status window:
You can sort on a column by clicking its heading (click again to switch between ascending and descending). You can also adjust column widths by right-clicking over a cell.
The columns show the following information:
Column Explanation
Type Server type:

Introducing J-Trader
© Patsystems Ltd 26/02/2010 14:49 9
Column Explanation
� STAS: Server that runs your J-Trader installation. Also known as the host server, application server, super transaction server, or STAS.
� PDD: Pats Data Distributor. Also known as the price feed.
� ESA: Exchange Specific Adaptor, namely what connects J-Trader to an exchange.
Name Server name.
Commentary A message saying whether the server is running. This information comes from the Order Routing Engine (ORE).
Status ‘Traffic lights’ indicating the server’s status: green (OK); amber (requiring attention); red (failure).
Severity ‘Traffic lights’ indicating the problem severity of the connection: green (OK); amber (requiring attention); red (failure).
Messages Screen To view messages about connectivity, and order activity (fills, part-fills, cancellations, RFQs, etc.):
1 Open the Messages screen.
2 The columns are:
� Sequence: Message number.
� Type: Category of message, where Normal is trade status, Alert is the reason a trade failed, and RFQ is request-for-quote information.
You can filter the messages by type, using the checkboxes at the top of the screen.
� Time: When the message arrived, in PC’s local time.
� Message: The message itself (50 characters maximum)
3 To sort by a column, click its heading (and re-click to switch between ascending and descending).

© Patsystems Ltd 26/02/2010 14:49 10
This chapter explains the ways in which you can change the appearance and behaviour of J-Trader.
Using the Settings Screen Most of the functions for configuring J-Trader are available from the ‘Settings’ screen, available by clicking Settings on J-Trader’s main screen. The tabs in the screen are as follows:
Tab (see page) Contains settings for...
Display tab (page 11) � Colours used for different kinds of price, and indicating price changes
� The display of fractions/decimals
� Miscellaneous display settings
� The default font to be used for all screens
� Which screens you want to appear in front of others.
General tab (page 12) � Properties of alerts (pop-up messages or sounds, informing or warning you that something has happened)
� Settings affecting the tick bar
� A checkbox for forcing messages to appear in front of other screens and dialog boxes
� Checkboxes for controlling which kinds of log you want created
� Shortcut keys, namely keys on your keyboard you assign to commonly performed tasks: eg, pressing F3 for the Instrument tree.
Trading tab (page 14) Trades and how you enter them.
Contract tab (page 17) Properties (such as default contract type) for exchanges, instruments and quoted instruments.
MEL Template tab (page 18)
Creating multi-legged strategies that are not supported by exchanges.
Reflector tab (page 18) Patsystems Reflector™ screens.
When you’ve made your changes, remember to click Apply (save and keep window open), OK (save and close window) or Cancel (quit without saving changes).
C H A P T E R 3
Configuring J-Trader

Configuring J-Trader
© Patsystems Ltd 26/02/2010 14:49 11
Display Tab The Display tab of the Settings dialog looks like this:
You use the tab as follows:
Frame Explanation
—Colours— 1 Highlight the row whose colour you want to change: � next to a row indicates that the current colour is the default.
3 Select the new colour, using either the colour palette or the colour-selection fields.
Each colour-selection field can have a number between 0-255 inclusive, giving 16,777,216 possible tints and shades. You can both select the numbers (using the up and down arrows) and type them in. If all three fields are set to zero, the colour is black; if all are set to 255, it is white.
To restore the default colour scheme, click Reset colours to default. Notice how the rows now all have checkboxes next to them.
4 Some colours change to indicate an information update:
▫ Use price change colour for (seconds): Number of seconds (0-60) that a price change (Bid or Offer) is to be displayed in the colour for Rising or Falling, before returning to the Normal colour.
▫ Show on-Market Background: Tick to show trades working at the current best bid/offer in the colours set using ‘On-Market Background’ (cell colour) or ‘On-Market Foreground’ (text colour).
▫ For All Orders In TAG: Tick to make Show On-market Background apply to all trades in your trader account group, rather than just your own trades.
—Prices— Fractional Prices: Switches price displays between fractional and decimal:
Lowest Common Denominator: Displays fractions in their lowest common denominator (eg, 2/8 becomes ¼).
Show Settlement Prices On Closing Column: Shows settlement prices instead of closing prices in Hot Quotes’ Closing column.
—General— � Increase space between pull and action buttons: Increases the space between the rows of buttons at the bottom of the various trading screens, to reduce the risk of clicking the wrong button:
� Display Reflector Button: Displays the Reflector button in all your trading screens.
Configuring J-Trader
12 © Patsystems Ltd 26/02/2010 14:49
Frame Explanation
� Floating Reflector: Gives you one Patsystems Reflector™ screen, containing the last-selected contract, as opposed to a separate Reflector™ for each selected contract.
� Disable DOM: Prevents trading in the DOM, although you can still view prices.
� Action On Mouse Down: Actions are performed the moment you click the mouse button, rather than only after you have released it.
� Display Account Field: Displays the Account field on trading windows, not just the Status and Position screens (where it always appears).
� Always Blank Lots: Clears any previously entered lots each time you submit an order. This avoids the possibility of resubmitting a previous Lots amount by mistake.
� Order Sub State: Displays the sub-state of an order on the Status screen’s Status column. See Status Screen Columns (page 54).
—Fonts— Setting the default font to be used throughout J-Trader.
You need both a Min Size (4-36pt) and Max Size (4-36pt) because, in some places, the font size adjusts to fill the available space when you resize the window. Max Size must be bigger than Min Size.
Note: Several screens have an A button, which opens a window for overriding (or reapplying) the default font for that screen only.
—Always On Top— Tick the checkboxes for those screens you want always to appear in front of others:
� Trade Frame: Trade ticket (page 35).
� DOM: DOM Screen (page 27).
� Subscriber Depth: (SGX exchange only) Screen that breaks market depth into individual order volumes.
� Fill Alert: The alerts you get for fills.
� Reflector: Patsystems Reflector™.
� At Best: (Sydney Futures Exchange only) Screen giving ‘at best’ information, namely for the best price, where your order is in the queue, and the volumes (actual and implied) for other queued orders.
Note: If more than one checkbox is on, the most recently selected window is on top.
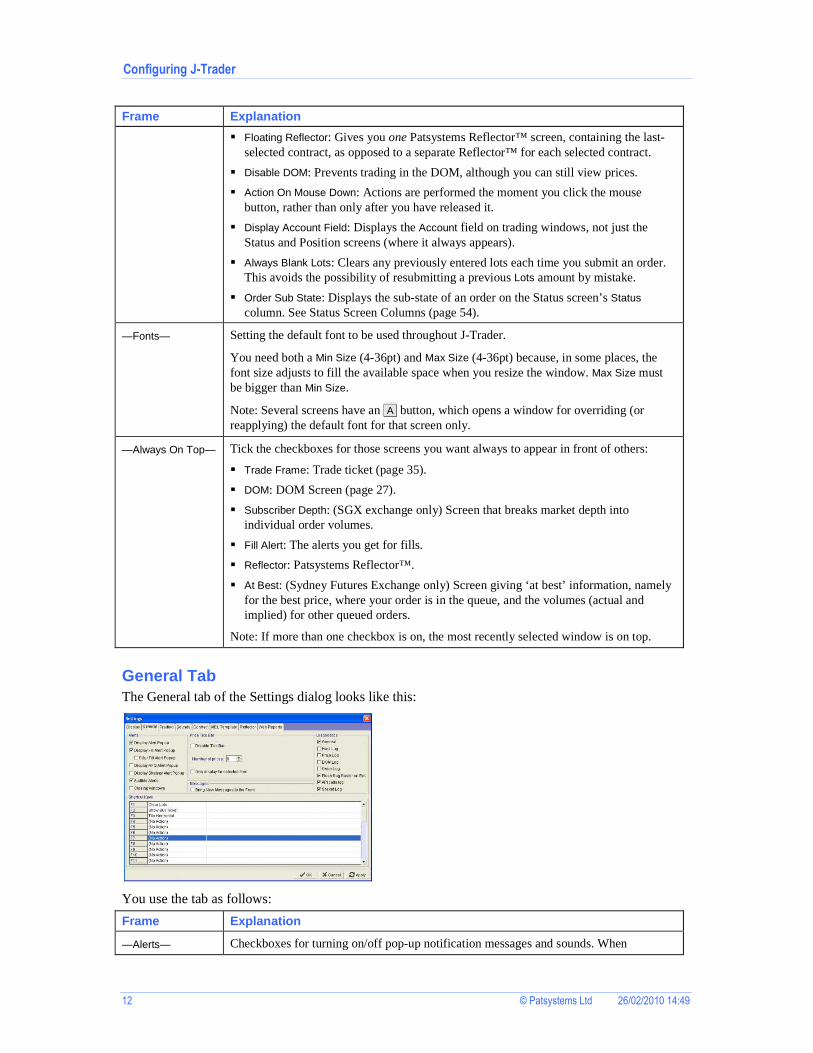
General Tab The General tab of the Settings dialog looks like this:
You use the tab as follows:
Frame Explanation
—Alerts— Checkboxes for turning on/off pop-up notification messages and sounds. When
Configuring J-Trader
© Patsystems Ltd 26/02/2010 14:49 13
Frame Explanation messages and alerts are switched off here, you can still see them in the Messages window.
� Display Alert Popup: Displays a pop-up message for every alert.
� Display Fill Alert Popup: Alert for when an order in your trader account group is filled: either by you, or any trader in the group (see following checkbox).
� Filter Fill Alert Popup: Filters fill alerts (see above) by your User ID, ie, fill alerts will appear only for your own orders, but not those for other traders using the same trader account.
� Display RFQ Alert Popup: Alert for when you receive a request-for-quote message from an exchange.
A Close All button is provided in each alert window (Fill, RFQ, Message) to clear all alerts, rather than clicking through them one at a time.
� Audible Alerts: Activates all the sounds you set in the Sounds tab (page 16). Note that pop-ups and sounds can be allocated to alerts independently: ie, an alert can be associated with a pop-up, or a sound, or with both simultaneously.
� Closing windows: Displays a Confirm/Cancel dialog whenever you close a window.
—Price Tick Bar— Sets the properties for tick bars. These appear when you place your cursor over a bid or offer price, and are for selecting prices other than those displayed.
� Disable Tick Bar: Switches off the tick bar in all screens.
� Number of prices [ ]: Sets how many prices the tick bar displays at any one time.
� Only display for selected item: Makes tick bars appear for the currently selected contract only. Otherwise, the tick bar appears when you place your cursor over any price.
—Messages— Bring New Messages to the Front: Forces pop-up alert messages to appear in front of all other windows.
—Diagnostics— Tick the checkboxes matching the log entries you want created.
Once created, the log files appear in C:\Program Files\PATS JTrader Client
—Shortcut Keys— To assign keyboard shortcuts (F1-F10, Shift+F1...Shift+F10, etc.):
1 Select the row containing the shortcut key to which you want to assign a function.
5 In the dropdown list, select the function you want.
Notice Show Trade Frame. This function calls up a trade ticket with your selection of values already filled in. You can assign more than one shortcut key to Show Trade Frame: eg, one for a default buy ticket, and another for a default sell ticket. See Creating Trade Ticket Templates (page 13).
Creating Trade Ticket Templates
You can use keyboard shortcuts to open a trade ticket with your selection of values already filled in. You can assign more than one shortcut key, eg a default buy ticket and default sell ticket, or even different tickets for your most commonly traded contracts:
1 FromJ-Trader’s main screen, click Settings.
Configuring J-Trader
14 © Patsystems Ltd 26/02/2010 14:49
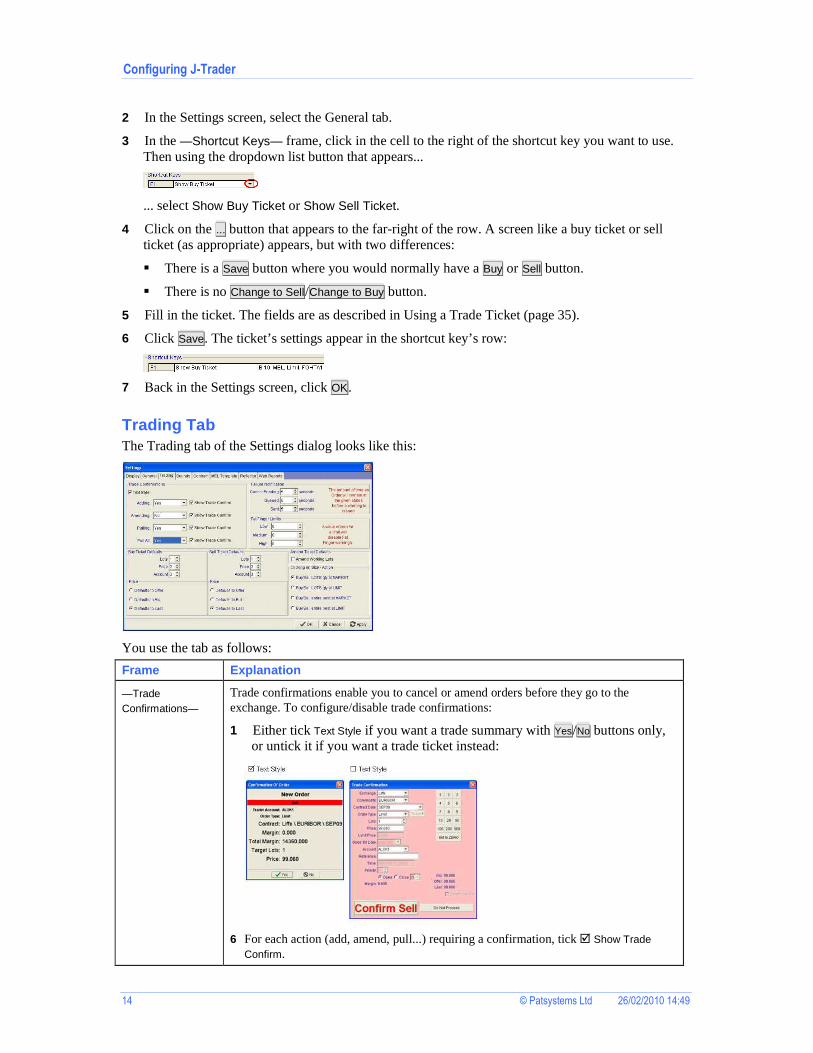
2 In the Settings screen, select the General tab.
3 In the —Shortcut Keys— frame, click in the cell to the right of the shortcut key you want to use. Then using the dropdown list button that appears...
... select Show Buy Ticket or Show Sell Ticket.
4 Click on the ... button that appears to the far-right of the row. A screen like a buy ticket or sell ticket (as appropriate) appears, but with two differences:
� There is a Save button where you would normally have a Buy or Sell button.
� There is no Change to Sell/Change to Buy button.
5 Fill in the ticket. The fields are as described in Using a Trade Ticket (page 35).
6 Click Save. The ticket’s settings appear in the shortcut key’s row:
7 Back in the Settings screen, click OK.
Trading Tab The Trading tab of the Settings dialog looks like this:
You use the tab as follows:
Frame Explanation
—Trade Confirmations—
Trade confirmations enable you to cancel or amend orders before they go to the exchange. To configure/disable trade confirmations:
1 Either tick Text Style if you want a trade summary with Yes/No buttons only, or untick it if you want a trade ticket instead:
6 For each action (add, amend, pull...) requiring a confirmation, tick � Show Trade Confirm.
Configuring J-Trader
© Patsystems Ltd 26/02/2010 14:49 15
Frame Explanation
7 For each ticked row, specify where you want the cursor to be when the confirmation dialog box opens:
▫ If Text Style is ticked, you can choose from Yes (over the Yes button); No (over the No button); Middle (between ‘Yes’ and ‘No’); or None (the cursor remains in its previous position).
▫ If Text Style is unticked, you can choose from Buy/Sell (over the ‘Buy’ or ‘Sell’ button) and Do Not Proceed (over the ‘Do Not Proceed’ button).
Note: If your trade has no lots, J-Trader automatically selects the Lots field in the ticket.
—Failure Notification—
Seconds to wait before issuing a failure notification, when an order’s status is Cancel Pending, Queued, and Sent.
—Fat Finger Limits—
Maximum number of lots (or enter ‘0’ for no limit), for:
� Low: Your normal limit. For example, if Low = 50, J-Trader warns you for 51 lots or more (you can still make the trade).
� Medium: Exceptional circumstances, such as making a 100-lot trade to reverse a 50-lot position. For example, if Medium = 100, trading 101 lots or more first triggers the Low then the Medium warning.
� High: Maximum lot size. J-Trader will prevent you from ever exceeding this number.
These limits are especially important if you aren’t using trade tickets and confirmations. Using the settings in the Sounds tab (page 16), you can set warning sounds for when the Low and High limits are breached. If you want to use sounds, tick Audible Alerts in the General tab (page 12).
Note: These are local limits only; they do not override the limits imposed on your trader account by your system administrator.
—Buy Tickets Defaults—
Tabbing order for the Lots, Price and Account fields in buy tickets, where 1 = first field, 2 = second field, etc.
Notice that Shift+tab will tab you backwards through whatever tabbing you set here. Also notice that if all three fields share the same number, tabbing is not possible.
In the —Price— frame, select the default price type for buy tickets.
—Sell Tickets Defaults—
The same as the —Buy Tickets Defaults— frame, but for sell tickets instead.
—Clicking on Size - Action—
Which action you want performed when you click on the size (ie, volume) of a bid or an offer, in the Hot Quotes and Matrix screens:
� Buy/Sell LOTS qty at MARKET: Take the volume displayed in the Lots field, and buy/sell at the price displayed (see Note below).
� Buy/Sell LOTS qty at LIMIT: Take the volume displayed in the Lots field, and use the current bid/offer as the limit price (see Note below).
� Buy/Sell entire best at MARKET: Take the full volume displayed in the grid (rather than the volume set in the Lots field), and buy/sell at the price displayed.
� Buy/Sell entire best at LIMIT: Take the full volume displayed in the grid (rather than the volume set in the Lots field), and use the current bid/offer as the limit price.
Note: If you select a contract with a default volume, the contract value takes priority. See Contract tab (page 17), Traded Lots.
—Amend Ticket Tick Amend Working Lots if you want to be able to amend partially filled orders using a

Configuring J-Trader
16 © Patsystems Ltd 26/02/2010 14:49
Frame Explanation
Defaults— trade ticket.
If you amend partially filled orders, J-Trader warns you of the risk of overfilling.
Sounds Tab The Sounds tab of the Settings dialog looks like this:
You use this tab for setting sounds to accompany messages and warnings. You put the cursor in the relevant field; a ... button appears, for selecting the sound (.wav file) you want.
To get any sounds at all, you must tick General tab (page 12) Audible Alerts. You can have both sounds and pop-ups, if General tab (page 12) Display Alert Popup is ticked.
The fields are for supplying sounds for the following events:
Field/event Explanation
Account Limit Breached
A limit on your currently selected account has been breached; either you are trading too many instruments, or exceeding your allowed exposure (ie, “buying power”). The account limits themselves are set in SARA, a separate application that only your system administrator can use.
TAG Fill Received A fill for one of your trader account group’s orders has been received from the exchange.
User Fill Received A fill for one of your own orders has been received from the exchange.
Amend/Cancel Received
One of your previously submitted orders has been amended or cancelled.
Amend/Cancel Rejected
The exchange has rejected an order amendment or cancellation, eg if you used an invalid price, an account limit was breached, or the original order has already been filled.
Fat Finger Lower Limit Warning
The —Fat Finger Limits— Low limit, set in the Trading tab (page 14), has been exceeded.
Fat Finger Upper Limit Error
The —Fat Finger Limits— High limit, set in the Trading tab (page 14), has been exceeded.
Price Alert A low price or high price has been triggered.
Market State Change
(Tokyo Grain Exchange only)
The market state has changed.

Configuring J-Trader
© Patsystems Ltd 26/02/2010 14:49 17
Contract Tab The Contract tab of the Settings dialog looks like this:
The tab is for assigning properties to the contracts you can trade. For each tab within the Contract tab (Commission, Traded Lots, Price Alerts, etc.):
1 Select the relevant tab.
2 In the tree hierarchy, highlight the item to which you want to assign the property. That property will then apply to the selected item and everything underneath it. The hierarchy comprises All (ie, everything at all exchanges) � exchanges � instruments � individual maturities. A property set at a lower level overrides one at a higher level.
3 Specify the properties, as explained in the table below.
4 Remember to save your changes with OK or Apply.
The tabs are as follows:
Tab Enter
Commission Commission fees payable to the clearer for each lot traded.
Price Alerts Enter the low price and high price at which message pop-ups are triggered.
Price alerts can be specified only at the maturity level in the tree hierarchy, and appear only if General tab (page 12) Display Alert Popup is ticked.
Price Check How many ticks a trade can be away from the last-traded price: eg, entering 6 will give you a warning if you enter a price 3 ticks either side of the last traded price.
If you try entering a trade outside this tolerance, J-Trader warns you, but still lets you do the trade if you OK the warning pop-up.
These alerts appear whether or not General tab (page 12) Display Alert Popup is ticked.
Order Type Default order type for a trade ticket.
For a description of supported order types, see Order Types (page 23).
Tick Size How many ticks are displayed in the Hot Quotes tick bar: eg, Globex Eurodollar front-months trade in quarter-ticks, whereas back-months trade in halves. Using this feature, you can set different tick-fractions per contract.
The actual tick size for a contract is defined in SARA, a separate application that only your system administrator can use.
Lots Buttons Values for the lots number pad, which appears in trade entry screens.
� Set Default resets the values to those hardcoded for J-Trader.
Configuring J-Trader
18 © Patsystems Ltd 26/02/2010 14:49
Tab Enter
� Set Parent resets the values to those set for the item one step up in the tree hierarchy: eg, resets a contract date’s number pad to that used for the contract, or a contract’s number pad to that set for the exchange.
Colours Colours for grid cells (Background) and cell text (Foreground).
How you select colours is the same as in the Display tab (page 11).
Broadcast Message
(Exchange level only)
Allows broadcast messages from the selected exchange.
Traded Lots Default volume. You can overwrite this value in trading screens.
Reflector Number of price digits for columns on the Reflector™ screen:
� Hold Price Ticks: Price column.
� Hold Order Ticks: Order column.
MEL Template Tab You use the MEL Template tab of the Settings dialog for creating multi-legged strategies that are not supported by exchanges: see Using Strategies (MELs) on page 49.
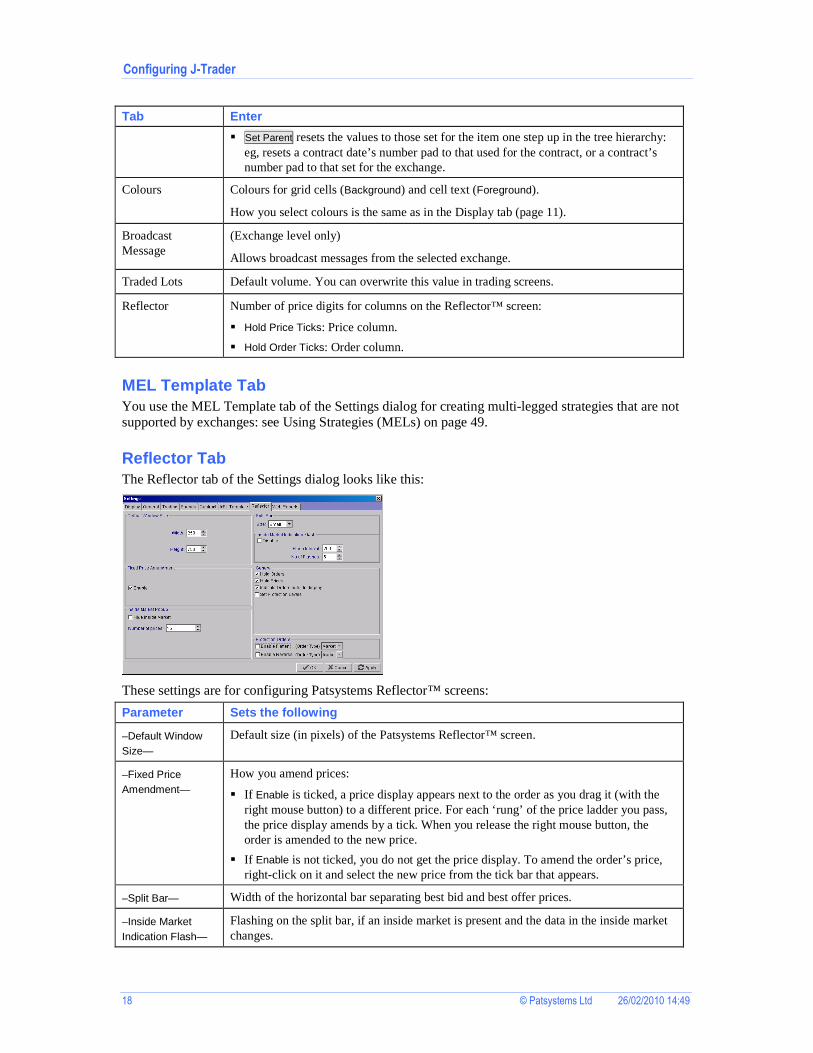
Reflector Tab The Reflector tab of the Settings dialog looks like this:
These settings are for configuring Patsystems Reflector™ screens:
Parameter Sets the following
–Default Window Size—
Default size (in pixels) of the Patsystems Reflector™ screen.
–Fixed Price Amendment—
How you amend prices:
� If Enable is ticked, a price display appears next to the order as you drag it (with the right mouse button) to a different price. For each ‘rung’ of the price ladder you pass, the price display amends by a tick. When you release the right mouse button, the order is amended to the new price.
� If Enable is not ticked, you do not get the price display. To amend the order’s price, right-click on it and select the new price from the tick bar that appears.
–Split Bar— Width of the horizontal bar separating best bid and best offer prices.
–Inside Market Indication Flash—
Flashing on the split bar, if an inside market is present and the data in the inside market changes.
Configuring J-Trader
© Patsystems Ltd 26/02/2010 14:49 19
Parameter Sets the following
You can set the colours of the split bar using Display tab (page 11) –Colours—.
–Inside Market Popup—
Number of inside market prices to display in the Inside Market pop-up (maximum 15), or tick Hide Inside Market to hide this information.
–General— Tick the features you want:
� Hold Orders: Holds an order on the current rung on the price ladder when you place your cursor over it. Holding the order means you don’t have to chase it up and down the ladder with your mouse as prices move.
� Hold Prices: As above, but for prices instead of orders.
� Indicate Orders outside display: Price-ladder scroll button changes colour if there is an order beyond the rungs on display.
� Set Protection Levels: Enable protection-order fields.
You can see (and change) these default settings from within each Reflector screen, by clicking in the bottom-right corner.
–Protection Orders—
Tick the protection-order features you want:
� Enable Flatten (Order Type): Enables Pull & Flatten, a button for pulling all working orders and placing an order to flatten the current position.
� Enable Reverse (Order Type): Enables Reverse, a button for pulling all working orders and placing an order to reverse the current position.
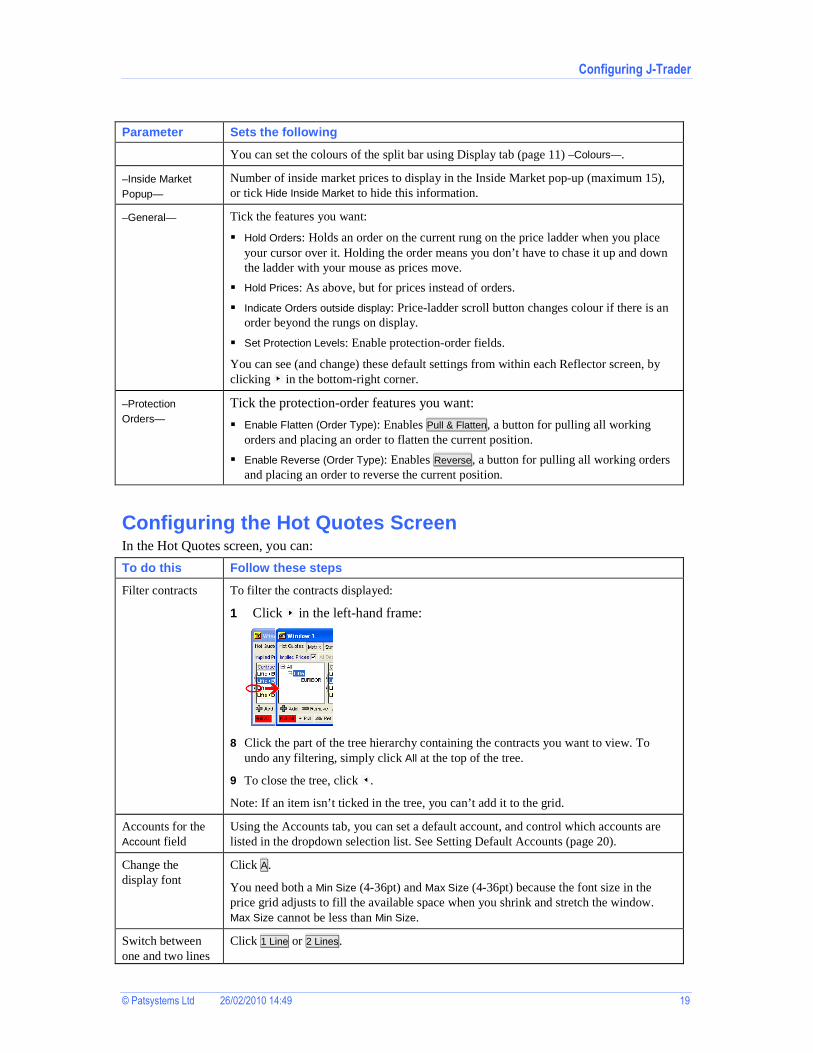
Configuring the Hot Quotes Screen In the Hot Quotes screen, you can:
To do this Follow these steps
Filter contracts To filter the contracts displayed:
1 Click in the left-hand frame:
8 Click the part of the tree hierarchy containing the contracts you want to view. To undo any filtering, simply click All at the top of the tree.
9 To close the tree, click .
Note: If an item isn’t ticked in the tree, you can’t add it to the grid.
Accounts for the Account field
Using the Accounts tab, you can set a default account, and control which accounts are listed in the dropdown selection list. See Setting Default Accounts (page 20).
Change the display font
Click A.
You need both a Min Size (4-36pt) and Max Size (4-36pt) because the font size in the price grid adjusts to fill the available space when you shrink and stretch the window. Max Size cannot be less than Min Size.
Switch between one and two lines
Click 1 Line or 2 Lines.

Configuring J-Trader
20 © Patsystems Ltd 26/02/2010 14:49
To do this Follow these steps per contract
Adjust columns (order, width and selection)
You can move a column to a new position, adjust its width, and change the selection of columns: see Adjusting Columns (page 23).
For an explanation of the columns available, see Hot Quotes Columns.
Other changes There are several other changes you can make (like changing the colour scheme) that are not specific to the Live Quotes screen: see Configuring J-Trader (page 10).
Pay particular attention to the settings in the Settings screen, Trading tab (page 14).
Hot Quotes Columns Right-click in the grid of the Hot Quotes screen and click on Select Columns to choose from the following columns:
Column Explanation
Bid Price
Bid Volume
Offer Price
Offer Volume
Last Traded Price
Last Traded Volume
The ‘Price’ columns are:
� Bid Price: Best bid in the market.
� Offer Price: Best offer in the market.
� Last Traded Price: Price of the last (ie, most recent) trade for this contract.
The ‘Volume’ columns are the aggregated volumes for the Bid Price, Offer Price, and Last Traded Price, respectively.
Low Price
High Price
Lowest/highest prices for this instrument during the current trading day, or trading session.
Opening Price Initial price of this instrument at the start of the current trading day, or trading session.
Closing Price Final price of this instrument at the end of the previous trading day, or trading session.
Total Traded Volume
Aggregated volumes of all trades of this instrument during the current trading day, or trading session.
Change (Last -Closing)
Difference between the previous day’s Closing Price, and the Last Traded Price.
Contract Status Status of the exchange (which affects the status of contracts at that exchange). This can include any of the following: Normal; Ex-Dividend, Auction, Suspended, Closed, Pre-Open, Pre-Close, Fast-Market.
Position How long or short the position is, in a particular contract month.
Settlement Yesterday’s daily settlement price.
Setting Default Accounts All the tabs in a trading window (except Reports and Accounts) have a field called Account, for selecting the trader account you want to use. This is assuming that the Settings screen, Display tab (page 11), Display Account Field checkbox is ticked: otherwise, the Account field appears only on the Status and Position screens.
Configuring J-Trader
© Patsystems Ltd 26/02/2010 14:49 21
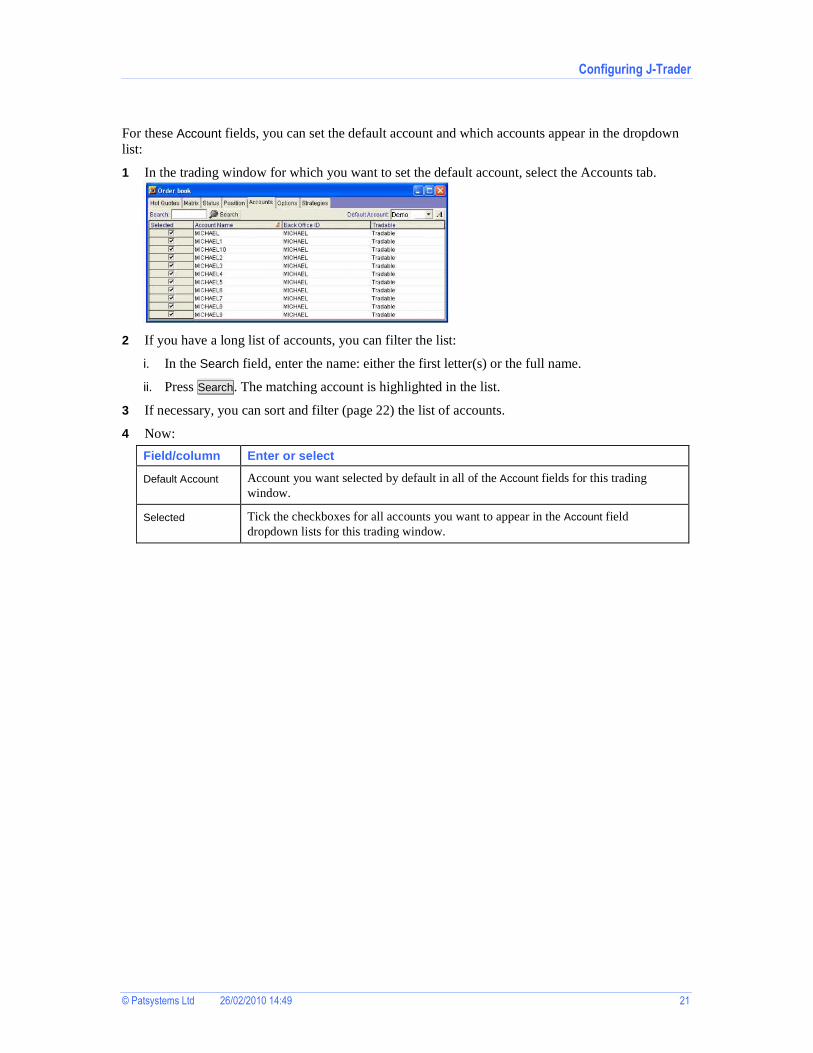
For these Account fields, you can set the default account and which accounts appear in the dropdown list:
1 In the trading window for which you want to set the default account, select the Accounts tab.
2 If you have a long list of accounts, you can filter the list:
i. In the Search field, enter the name: either the first letter(s) or the full name.
ii. Press Search. The matching account is highlighted in the list.
3 If necessary, you can sort and filter (page 22) the list of accounts.
4 Now:
Field/column Enter or select
Default Account Account you want selected by default in all of the Account fields for this trading window.
Selected Tick the checkboxes for all accounts you want to appear in the Account field dropdown lists for this trading window.
© Patsystems Ltd 26/02/2010 14:49 22
This chapter explains the various ways in which you can trade with J-Trader.
Overview of Trading in J-Trader Before you start trading, please read the chapter Configuring J-Trader (page 10): especially Trading tab (page 14), as these settings affect the orders you create.
1 Open a trading window or, if none exists, create one by clicking New on J-Trader’s main menu.
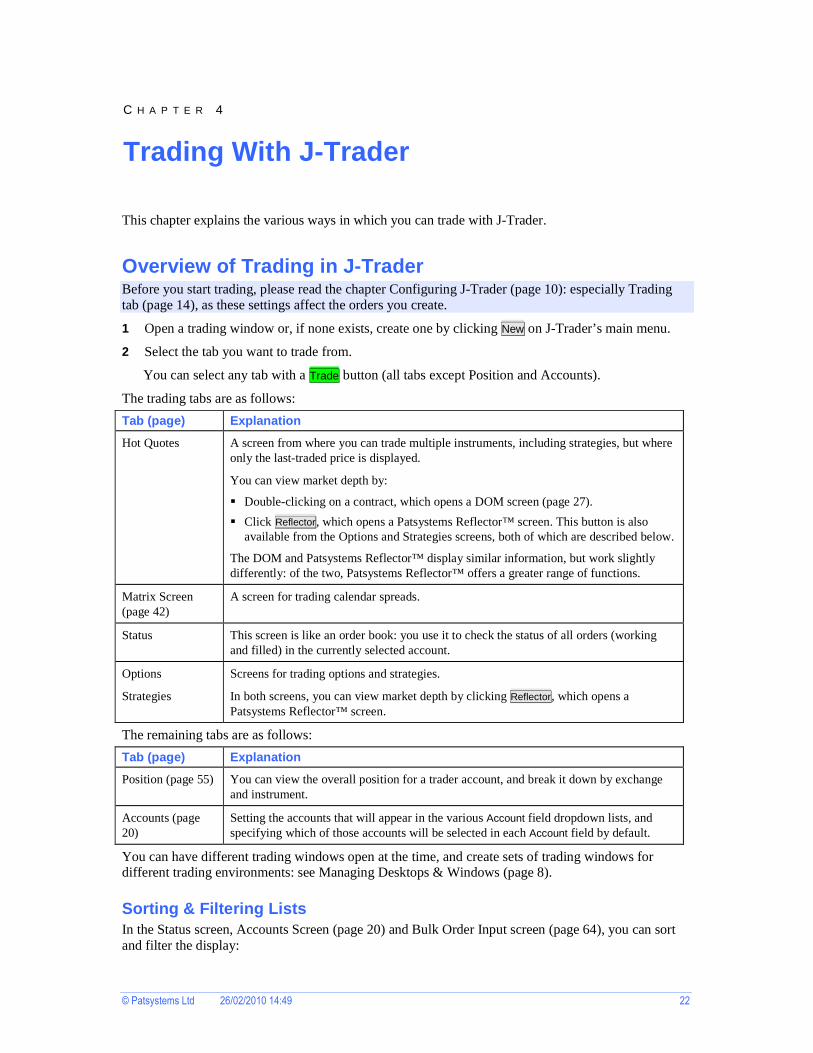
2 Select the tab you want to trade from.
You can select any tab with a Trade button (all tabs except Position and Accounts).
The trading tabs are as follows:
Tab (page) Explanation
Hot Quotes A screen from where you can trade multiple instruments, including strategies, but where only the last-traded price is displayed.
You can view market depth by:
� Double-clicking on a contract, which opens a DOM screen (page 27).
� Click Reflector, which opens a Patsystems Reflector™ screen. This button is also available from the Options and Strategies screens, both of which are described below.
The DOM and Patsystems Reflector™ display similar information, but work slightly differently: of the two, Patsystems Reflector™ offers a greater range of functions.
Matrix Screen (page 42)
A screen for trading calendar spreads.
Status This screen is like an order book: you use it to check the status of all orders (working and filled) in the currently selected account.
Options
Strategies
Screens for trading options and strategies.
In both screens, you can view market depth by clicking Reflector, which opens a Patsystems Reflector™ screen.
The remaining tabs are as follows:
Tab (page) Explanation
Position (page 55) You can view the overall position for a trader account, and break it down by exchange and instrument.
Accounts (page 20)
Setting the accounts that will appear in the various Account field dropdown lists, and specifying which of those accounts will be selected in each Account field by default.
You can have different trading windows open at the time, and create sets of trading windows for different trading environments: see Managing Desktops & Windows (page 8).
Sorting & Filtering Lists In the Status screen, Accounts Screen (page 20) and Bulk Order Input screen (page 64), you can sort and filter the display:
C H A P T E R 4
Trading With J-Trader

Trading With J-Trader
© Patsystems Ltd 26/02/2010 14:49 23
• Sort: Left-click on the relevant column heading, eg Exchange to sort by exchange. Click again and the order is switched between ascending/descending. Notice the icon indicating the column and direction of sorting:
• Filter: Right-click on a column heading and select an item. For example, for orders from one exchange only, right-click the Exchange column and select the relevant exchange. For some columns, you have an editable field, for inputting ranges and wildcards: eg, E* for all items starting with the letter ‘E’.
The heading of a filtered column changes colour.
To restore a filtered list, right-click on any grid cell (not the column heading) and select Remove All Filters or Remove <column name> Filter. The other options in the pop-up menu are explained in Adjusting Columns (page 23). Notice also that you can reorder columns by dragging them by their headings to a new position.
Adjusting Columns In screens with columns, you can right-click the column heading and drag the column to a new position. By right-clicking in a cell, you get a pop-up menu with some or all of the following options:
Option Explanation
Select Columns... Gives you checkboxes for determining which columns you want displayed in the selected tab.
Size Columns to Fit Screen
Size All Columns to Contents
Size Column to Contents
These options are all for resizing columns:
� Size Columns to Fit Screen: Resizes columns to fit the current width of the screen.
� Size All Columns to Contents: Resizes all columns (including headings) to fit the width of the data they contain.
� Size Column to Contents: Resizes the currently selected column (including its heading) to fit the width of the data it contains.
Rename Columns (Hot Quotes screen only)
Gives a dialog box for changing column names.
Remove <column name> Filter
Remove All Filters
Removes any order list filtering you applied, as explained in Sorting & Filtering Lists (page 22).
Order Types This section shows the order types available in Pro-Mark and J-Trader. Note the following:
• Which order types are available depends on the exchange.
• You can trade orders of type Limit, Market, Stop and GTC Limit from Live Quotes and the other standard trading screens, using trade initiators to set the default order type. For other trade types you will need to use a ticket:
� For AA, basis, block, buy-and-sell, and cross trades, use a custom ticket.
� For all other trade types, use a standard ticket.
• An exclamation mark ( ! ) indicates a synthetic order type, namely one worked via Patsystems’ SYOMS (Synthetic Order Management System) because the exchange doesn’t support that order type. A hash sign ( # ) indicates an synthetic order that is held in the front end rather than SyOMS.

Trading With J-Trader
24 © Patsystems Ltd 26/02/2010 14:49
• The order types shown in shaded cells are available in Pro-Mark only, and those shown in bold are available only if you have purchased SyOMS Pro.
Order Type Definition
AA (Against Actuals)
Trade that enables physical market participants to exchange futures contracts outside of the central order-book, in order to price directly related physical contracts. Also known as exchange-for-physicals (EFPs).
Basis Contract that enables a trader to enter into a conditional transaction involving both a futures contract and a corresponding cash instrument. As such, they can include bond and swap futures, equity index futures and Short Term Interest Rate (STIR) futures contracts. Many different cash instruments are available to form the cash leg of basis trades.
BI Limit Order request sent by a client to a broker, for the broker to work.
Note: Broker Intervention only.
Block Trade involving many securities at once. Usually, only institutional investors undertake such large trades, and block trading is restricted to certain Pro-Mark user roles. Block-trade orders must include a buy side, a sell side, a trade price and a volume.
Bracket# A two-leg order (stop vs.limit) where the profit target is set with a limit order, while a stop order provides protection from losses.
Cross Simultaneous submission to the exchange of a buy order and a sell order, at the same price and volume as each other. Cross trades can be between a trader and a market maker, or between two traders.
Ghost! Synthetic limit order that is working within Patsystems but not at the exchange, making it invisible to the market. If the best bid/offer matches your price, the order is triggered.
If the ghost order is not filled immediately, any unfilled lots are balance-cancelled and placed back as a ghost order.
GTC [order type] (Good Till Cancel)
Same as its non-GTC equivalent, except that any orders still working are not cancelled at the close of the trading day.
Note: You can trade GTC Limit orders from standard trading screens such as Live Quotes, but to trade any other kind of GTC order you will need to use a standard ticket.
GTD [order type] (Good Till Date)
Same as its non-GTC equivalent, except that any orders still working are not cancelled until the ‘good till’ date is passed.
Iceberg! Large-volume order submitted to the market as a series of smaller orders (‘clips’) to hide from the market the full size of the order.
Limit Order used to enter a new position, or to exit an open position at a specific price or better.
A limit order is removed from the exchange if:
� You fill it or cancel it
� It is still working at the close of the trading day.
[order type] FAK (Limit Fill And Fill, aka balance cancelled)
Order that is executed against any existing orders at the stated price or better, up to the volume of the order. Any residual volume from this order is then immediately cancelled

Trading With J-Trader
© Patsystems Ltd 26/02/2010 14:49 25
Order Type Definition (killed).
[order type] FOK (Limit Fill Or Kill)
Order that is either completely filled at a specified price (or better), or cancelled (killed) by the exchange.
Market Order that is executed immediately, at the best price obtainable when the order reaches the exchange.
MIT! (Market If Touched)
Similar to a limit order in that a specific price is placed on the order. However, a synthetic MIT order becomes a market order once the limit price is reached (‘touched’). A buy MIT is placed below the market price and a sell MIT is placed above the market price.
MktTLmt Market order with a limit (specified as a maximum number of ticks the price can move), for those exchanges that do not allow market orders.
MOO (Market On Open)
Market order that is automatically submitted when the market opens and filled at the market price.
OCOLmtStp! (One Cancels Other / Order Cancels Order)
A two-leg order (stop vs.limit) where the profit target is set with a limit order, while a stop order provides protection from losses.
Protect! Like a Bracket# order, except that you can set up to three levels for your profit target (but only before the trade is initiated).
RFQ (Request for Quote)
A request, sent to market makers, for a quote for an contract that currently has no price.
For Chicago Mercantile Exchange Eurodollar contracts (CME_E$) only, you have instead:
� RFQI: RFQ, indicative price
� RFQT: RFQ, tradable price
Rsvd Qty Like an iceberg order (see above), except that you can’t use random clip sizes.
Stop! Order used to:
� Minimise a loss on a long or short position.
� Protect a profit on an existing long or short position.
� Start a new long or short position.
A buy stop order is placed above the market and a sell stop order is placed below the market.
StopLimit Order that lists two prices, one a stop price and the other a limit price, to gain more control over the price at which the order is filled. Once the stop is triggered, the order is not filled beyond the limit price.
Timed [order type]
Same as its non-timed equivalent, except that it is sent at a preset date-time.
TimeSlice! Execution of a large order in smaller clips over a specified period of time, requiring selection of either the clip size or time interval.
Trading With J-Trader
26 © Patsystems Ltd 26/02/2010 14:49
Order Type Definition
TrStop! (Trailing stop)
Stop order that follows (trails) market price movements.
WithATick! Also known as ‘finessing’, a trade allowing you to exploit falling volume at a less-favourable price level as an indicator of an imminent price move, by moving your own order price to meet the change.
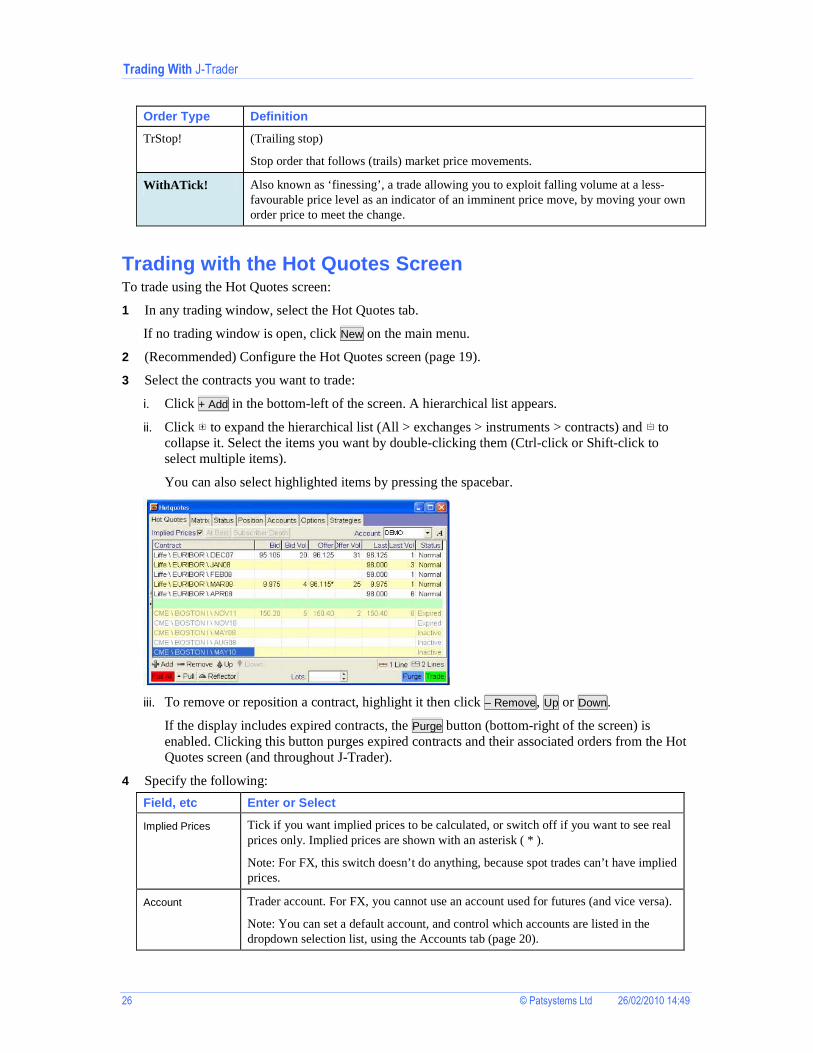
Trading with the Hot Quotes Screen To trade using the Hot Quotes screen:
1 In any trading window, select the Hot Quotes tab.
If no trading window is open, click New on the main menu.
2 (Recommended) Configure the Hot Quotes screen (page 19).
3 Select the contracts you want to trade:
i. Click + Add in the bottom-left of the screen. A hierarchical list appears.
ii. Click to expand the hierarchical list (All > exchanges > instruments > contracts) and to collapse it. Select the items you want by double-clicking them (Ctrl-click or Shift-click to select multiple items).
You can also select highlighted items by pressing the spacebar.
iii. To remove or reposition a contract, highlight it then click – Remove, Up or Down.
If the display includes expired contracts, the Purge button (bottom-right of the screen) is enabled. Clicking this button purges expired contracts and their associated orders from the Hot Quotes screen (and throughout J-Trader).
4 Specify the following:
Field, etc Enter or Select
Implied Prices Tick if you want implied prices to be calculated, or switch off if you want to see real prices only. Implied prices are shown with an asterisk ( * ).
Note: For FX, this switch doesn’t do anything, because spot trades can’t have implied prices.
Account Trader account. For FX, you cannot use an account used for futures (and vice versa).
Note: You can set a default account, and control which accounts are listed in the dropdown selection list, using the Accounts tab (page 20).

Trading With J-Trader
© Patsystems Ltd 26/02/2010 14:49 27
Field, etc Enter or Select
Lots Select or type the number of lots to trade.
You can set a default number of lots per exchange, instrument and contract, using the Settings screen, Contract tab (page 17).
5 To trade, click any of the following:
Clicking here Does this
Contract Double-clicking on the Contract column calls up the DOM screen (page 27), from where you can view the current depth of market, and enter orders. The screen displays all bids and offers in the market in real time, with the best ones at the top of each list.
Tip: The DOM screen is a quick and convenient way to view depth of market. For trading, however, the Patsystems Reflector screen™, accessed by clicking Reflector, offers more features.
Bid
Offer
Creates limit orders.
If General tab (page 12) Disable Tick Bar is unticked, you get a tick bar for selecting different bids/offers.
Bid Vol
Offer Vol
Creates an order whose type (market or limit) and volume (in the grid, or in the Lots field) depend on which of the –Clicking on Size - Action— radio buttons you selected in the Trading tab (page 14).
Last (Information only)
Shows you the 20 most recently traded prices, where Last + O is the last-traded price, Last + 1 the last-but-one traded price, etc.
For MELs only, clicking in the Last cell gives a screen for calculating the price.
Reflector Calls up a Patsystems Reflector screen™, from where you can view depth of market, join bids and offers, and take offers and hit bids.
Trade Opens a trade ticket. From the Ticket > button on the trade ticket you can select: Basis, Block, Against Actual, OCO and Cross trade types.
Block, Basis and AA are available only if the selected contract supports these trade types.
Note the following two buttons:
� Subscriber Depth opens a screen that breaks market depth into individual order volumes.
� At Best (Sydney Futures Exchange only) opens a screen showing, for the best price, where volumes are in the queue. Implied prices are shown with an asterisk.
6 To pull orders (ie, withdraw them from the exchange), you can use the following buttons:
� ^ Pull pulls bids only, offers only, or all the bids and offers for the selected contract.
� Pull All pulls all bids and offers for contracts in this trader account (Account field).
In the Status screen, pulled orders move from the ‘working’ part of the screen to the ‘completed’ part.
Using DOM Screens DOM screens display, in real time, all current bids and offers in the market, with the best ones at the top of each list. You can see up to 20 bids and 20 offers, and trade any of them.
Trading With J-Trader
28 © Patsystems Ltd 26/02/2010 14:49
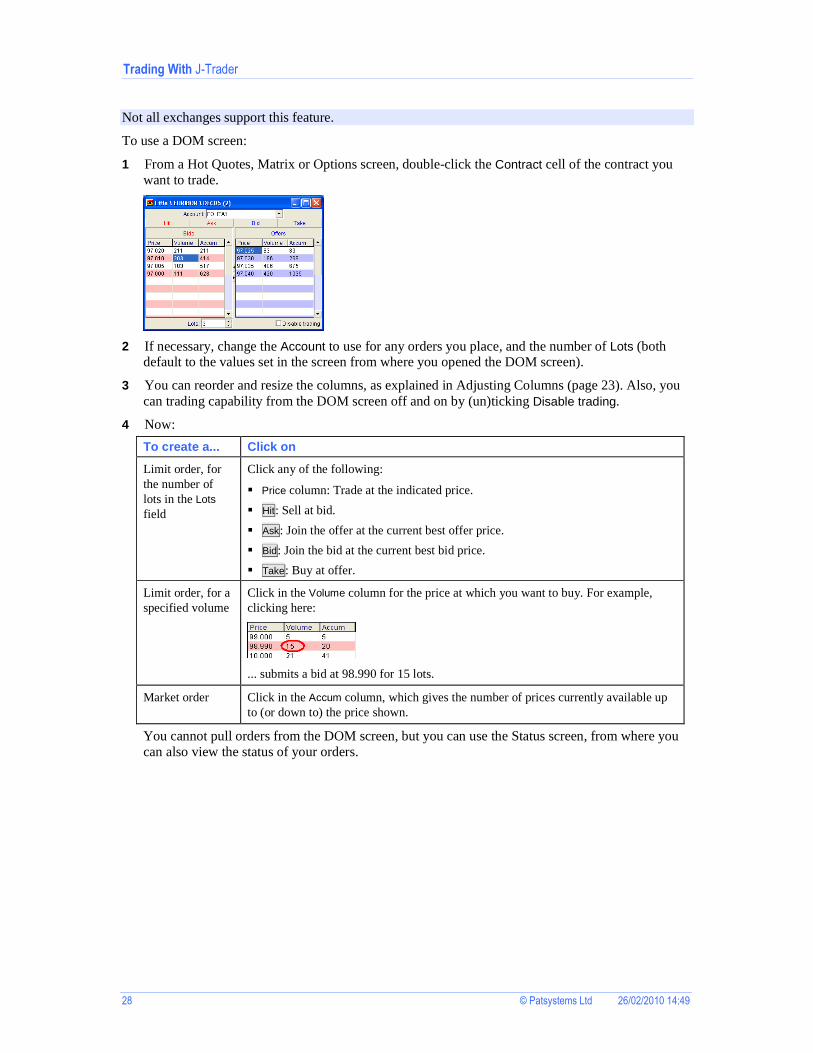
Not all exchanges support this feature.
To use a DOM screen:
1 From a Hot Quotes, Matrix or Options screen, double-click the Contract cell of the contract you want to trade.
2 If necessary, change the Account to use for any orders you place, and the number of Lots (both default to the values set in the screen from where you opened the DOM screen).
3 You can reorder and resize the columns, as explained in Adjusting Columns (page 23). Also, you can trading capability from the DOM screen off and on by (un)ticking Disable trading.
4 Now:
To create a... Click on
Limit order, for the number of lots in the Lots field
Click any of the following:
� Price column: Trade at the indicated price.
� Hit: Sell at bid.
� Ask: Join the offer at the current best offer price.
� Bid: Join the bid at the current best bid price.
� Take: Buy at offer.
Limit order, for a specified volume
Click in the Volume column for the price at which you want to buy. For example, clicking here:
... submits a bid at 98.990 for 15 lots.
Market order Click in the Accum column, which gives the number of prices currently available up to (or down to) the price shown.
You cannot pull orders from the DOM screen, but you can use the Status screen, from where you can also view the status of your orders.
© Patsystems Ltd 26/02/2010 14:49 29
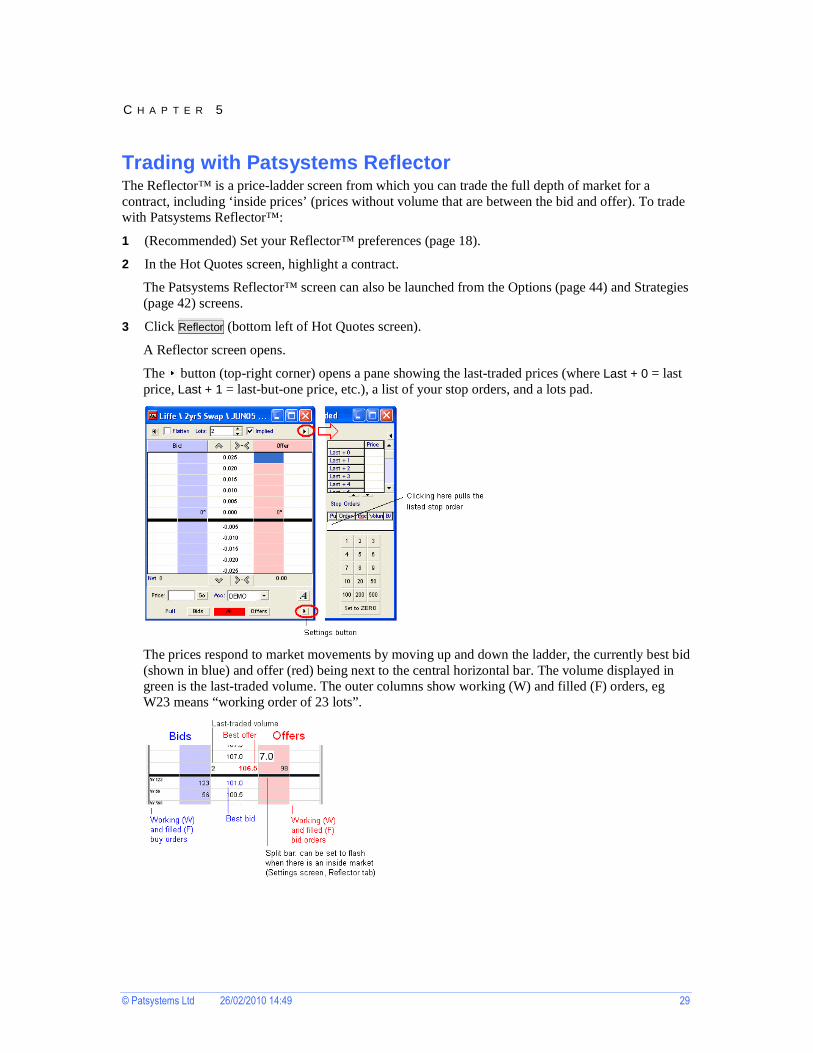
Trading with Patsystems Reflector The Reflector™ is a price-ladder screen from which you can trade the full depth of market for a contract, including ‘inside prices’ (prices without volume that are between the bid and offer). To trade with Patsystems Reflector™:
1 (Recommended) Set your Reflector™ preferences (page 18).
2 In the Hot Quotes screen, highlight a contract.
The Patsystems Reflector™ screen can also be launched from the Options (page 44) and Strategies (page 42) screens.
3 Click Reflector (bottom left of Hot Quotes screen).
A Reflector screen opens.
The button (top-right corner) opens a pane showing the last-traded prices (where Last + 0 = last price, Last + 1 = last-but-one price, etc.), a list of your stop orders, and a lots pad.
The prices respond to market movements by moving up and down the ladder, the currently best bid (shown in blue) and offer (red) being next to the central horizontal bar. The volume displayed in green is the last-traded volume. The outer columns show working (W) and filled (F) orders, eg W23 means “working order of 23 lots”.
C H A P T E R 5
Trading With J-Trader
30 © Patsystems Ltd 26/02/2010 14:49
Your net position and global P&L are shown at the bottom of the Reflector™:
4 Now:
To do this Follow these steps
Select a volume By default, the volume displayed in the Lots field is the same as in the screen from which you selected the Reflector™.
� Either change the volume in the Lots field itself.
� Or use the lots pad, available in the right-hand pane:
Enter a limit order
To enter a limit order:
1 Check/amend the volume in the Lots field.
10 Left-click on a volume/price, eg if you click here...
... you enter the bid at 97.415, a price at which there are 263 lots available.
J-Trader takes the volume at the best price; if your order is still not filled, it will take lots from the next-best-price... and so on, stopping at the price on the row you selected.
If the horizontal bar is yellow, there are ‘inside market’ prices, namely prices between the best bid and best offer. To enter a limit order at an inside price:
1 Ensure that Settings, Reflector tab, Hide Inside Market is not ticked.
11 Put the cursor over the best bid or best offer cell. The inside prices are shown in a tick bar with a yellow border:
12 Click on the price you want.
You can hide the inside-price tick bar either by moving the cursor off the previously selected cell, or by pressing the Ctrl key.
Enter a stop order
To enter a stop order:
1 Check/amend the volume in the Lots field.
13 Right-click on a volume/price.
14 If the stop would automatically go live, you get an error message.
You can display (and pull) current stop orders from the Stop Orders area in the right-
Trading With J-Trader
© Patsystems Ltd 26/02/2010 14:49 31
To do this Follow these steps hand panel of the screen:
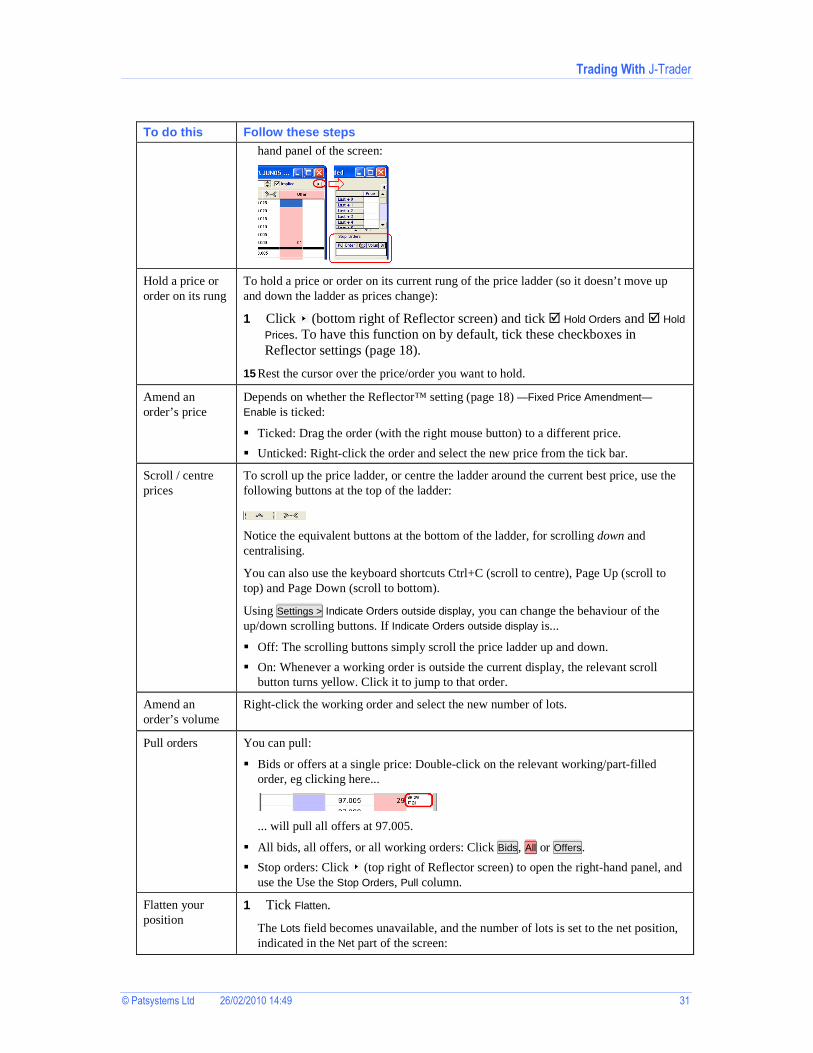
Hold a price or order on its rung
To hold a price or order on its current rung of the price ladder (so it doesn’t move up and down the ladder as prices change):
1 Click (bottom right of Reflector screen) and tick � Hold Orders and � Hold
Prices. To have this function on by default, tick these checkboxes in Reflector settings (page 18).
15 Rest the cursor over the price/order you want to hold.
Amend an order’s price
Depends on whether the Reflector™ setting (page 18) —Fixed Price Amendment— Enable is ticked:
� Ticked: Drag the order (with the right mouse button) to a different price.
� Unticked: Right-click the order and select the new price from the tick bar.
Scroll / centre prices
To scroll up the price ladder, or centre the ladder around the current best price, use the following buttons at the top of the ladder:
Notice the equivalent buttons at the bottom of the ladder, for scrolling down and centralising.
You can also use the keyboard shortcuts Ctrl+C (scroll to centre), Page Up (scroll to top) and Page Down (scroll to bottom).
Using Settings > Indicate Orders outside display, you can change the behaviour of the up/down scrolling buttons. If Indicate Orders outside display is...
� Off: The scrolling buttons simply scroll the price ladder up and down.
� On: Whenever a working order is outside the current display, the relevant scroll button turns yellow. Click it to jump to that order.
Amend an order’s volume
Right-click the working order and select the new number of lots.
Pull orders You can pull:
� Bids or offers at a single price: Double-click on the relevant working/part-filled order, eg clicking here...
... will pull all offers at 97.005.
� All bids, all offers, or all working orders: Click Bids, All or Offers.
� Stop orders: Click (top right of Reflector screen) to open the right-hand panel, and use the Use the Stop Orders, Pull column.
Flatten your position
1 Tick Flatten.
The Lots field becomes unavailable, and the number of lots is set to the net position, indicated in the Net part of the screen:

Trading With J-Trader
32 © Patsystems Ltd 26/02/2010 14:49
To do this Follow these steps
16 Enter a trade to flatten your position.
Use implied prices
Switch on if you want implied prices to be calculated, or switch off if you want to see real prices only. Implied prices are shown with an asterisk ( * ). Implied prices don’t apply to FX trades.
PIG (Price Injector Gun) This function is available only if your organisation has the required permission level. Please contact your Patsystems Account Manager for more information.
If you click in the top-left corner of a Patsystems Reflector screen™, you will see the PIG (Price Injector Gun). Using the PIG, you can join or dime a bid/offer at specified lots sizes. ‘Diming’ means entering a bid one tick higher, or entering an offer one tick lower. You can do this either manually (page 32) or automatically (page 33).
Joining or Diming Manually
In a Patsystems Reflector™ screen, you can join or dime a bid/offer at specified lots sizes, with one click. To ‘dime’ means to create the new best bid or offer: ie, submit an order one tick higher than the current best bid, or one tick lower than the current best offer.
1 Open a Patsystems Reflector screen™.
2 Expand the left panel, so that the PIG panel is displayed. The fields to use are the ones in the Manual part of the screen:
Net Position is the same as Net in the main part of the Patsystems Reflector™ screen: it shows the net position of the selected trader account (Account field) for the specified contract, taking into account all orders submitted by any method of trade entry.
3 Select the number of lots in the field relating to the action you want to perform, then click on the relevant button, where:
Button Enters this kind of order
Join Bid A bid at the currently best bid price.
Join Offer An offer at the currently best offer price.
Join Both Two orders simultaneously: a bid at the currently best bid price, and an offer at the currently best offer price.
Dime Bid A bid at one tick higher than the current best bid.
Dime Offer An offer one tick lower than the current best offer.
4 To pull orders, use either the matching button, or the red button to pull all orders.
If Settings screen, Trading tab, Pull All � Show Trade Confirm is ticked, you’ll get a confirmation dialog asking you whether you want to pull the orders; otherwise, the orders are pulled immediately. In the Status screen, pulled orders move from the ‘working’ part of the screen to the ‘completed’ part.

Trading With J-Trader
© Patsystems Ltd 26/02/2010 14:49 33
Joining or Diming Automatically
In a Patsystems Reflector™ screen, you can automatically join or dime a bid/offer continuously, at predefined time intervals, until the volume you specify has been filled:
1 Open a Patsystems Reflector screen™.
2 Expand the left panel, so that the PIG panel is displayed. The fields to use are the ones in the Automatic part of the screen:
Net Position is the same as Net in the main part of the Patsystems Reflector™ screen: it shows the net position of the selected trader account (Account field) for the specified contract, taking into account all orders submitted by any method of trade entry.
3 Fill in the fields, as follows:
Field, etc. Enter or select
Time Out Interval (1-60 seconds) between the bid/offer being filled and the next order being submitted.
—Bid Below Market—
The parameters of the bid to be submitted:
� Step: Number of ticks below the bid, or 0 for joining at the current bid price.
� Lots: Volume of the clips in which the orders are to be submitted. If this field is set to zero, no orders will be submitted, even if the on/off button is showing as On.
� Max: Total volume of bids to be filled.
—Offer Above Market—
Same principle as the —Bid Below Market— fields above, except that Step is the number of ticks above the bid.
Note that you can submit bids and offers at the same time.
1 Click Off to start the automatic price injection. The button changes to On.
Total Orders Submitted shows the total number of orders currently submitted to the market by the PIG. Furthermore, the numbers in parentheses in the —Bid Below Market— and —Offer Above Market— frames shows the number of lots fills for bids and offers individually.
2 You can stop the automatic price injection, either with or without pulling any orders already submitted:
� Without pulling submitted orders: Set the Lots field to 0.
� Click On. The button changes to Off, to indicate that the process has been stopped.
If Settings screen, Trading tab, Pull All � Show Trade Confirm is ticked, you’ll get a confirmation dialog asking you whether you want to pull the orders; otherwise, the orders are pulled immediately. In the Status screen, pulled orders move from the ‘working’ part of the screen to the ‘completed’ part.

Trading With J-Trader
34 © Patsystems Ltd 26/02/2010 14:49
Protection Orders You can enter protection orders, but only in the Patsystems Reflector™ screen. A protection order consists of:
• A limit order that sets the target profit level. You can set up to three profit targets.
• A stop order that limits the loss or secures the profit for the trade. This can also be a ‘trailing stop’, namely a stop order that follows price movements. The stop order is activated once the profit target order starts to fill.
To enter a protection order:
1 From any trading screen, highlight the contract you want to trade and click Reflector. The Reflector screen opens, with the prices for the contract you selected.
2 Click (bottom-right corner of the Patsystems Reflector™ screen) and select Set Protection Levels.
Protection-specific fields appear at the bottom of the screen.
3 Fill in the protection-specific fields, as follows:
Field Enter or select
Protection Enabled
Enables protection orders to be submitted.
If the checkbox is unticked, the default order type for Reflector (limit or stop order) is sent instead.
Stop
Tr. Stop
Choose between:
� Stop: Standard synthetic stop order.
� Tr. Stop: Follows (trails) market price movements. A buy trailing stop tracks the offer price as the market moves down; a sell trailing stop tracks the bid price as the market moves up.
Orders are activated once the profit target order starts to fill, with a volume that equals the first fill of the protected order. As the volume of the profit target order is filled, the volume of the stop order is amended down equally. These stop order volumes are displayed in Reflector™ in brackets e.g. (W 27).
Steps (Ticks) Number of ticks from the filled price at which the (trailing) stop order will stop.
Frequency (Tr. Stop only)
How many ticks the filled price must change before the trailing stop is modified. For example, a frequency of 2 means that the filed price must move by 2 ticks before the trailing stop is modified by 1 tick/step.
+1 Profit For each level of protection you want:

Trading With J-Trader
© Patsystems Ltd 26/02/2010 14:49 35
Field Enter or select
+2 Profit
+3 Profit
i Tick the checkbox.
ii In Steps (Ticks), enter the number of ticks away from the filled price at which the limit order will be placed.
iii In Quantity, enter the maximum number of lots to be entered for this protection order.
Once the +1 Profit target is met, any subsequent profit targets are activated.
Pull & Flatten Pull all working orders, and place an order to flatten the current position. The flatten order will be for the current total position. When flattened, the position = zero, eg bought 70 sold 70. The flatten order submitted is a market order by default but can be a limit order type.
To enable this button, tick the Reflector setting (page 18) Enable Flatten (Order Type).
Pull all working orders and place an order to reverse the current position. For example, if the position in a contract is ‘bought 23, sold 18’ (ie, long 5 lots), J-Trader pulls all working orders for the contract and places an order to sell 10 lots to produce the reverse position of short 5 (bought 23, sold 28).
To enable this button, tick the Reflector settings (page 18) Enable Reverse (Order Type).
Widen
Tighten
Move all protection orders (stop, trailing stop, +1 profit, +2 profit, and +3 profit) one tick:
� further from the filled price
� closer to the filled price.
1 To activate the orders, tick Protection Enabled.
The protection order volumes are displayed in Reflector™ in brackets e.g. (W 12).
As the target profit levels are filled, the stop order quantity is amended down equally (as in One Cancels Other, OCO).
2 The working order group moves from the Working to the Completed section of the Status screen once all of the protection orders are filled, cancelled or balance cancelled.
Use the Status screen to amend/cancel the orders:
Order type What you can amend/cancel
Parent order � Volume and price cannot be amended.
� Pulling the parent order cancels all related protection orders.
Protection � Price can be amended.
Limit orders � Limit order volumes can be amended.
� Pulling a protection limit order cancels that order only.
Protection stop order
� Price can be amended. All additional volume is added to the stop order at the new price.
� The volume cannot be amended.
� (Trailing) stop component of the bracket order cannot be cancelled.
Using a Trade Ticket Using trade tickets, you can enter and amend orders. For options, the trade ticket gives the premium to pay and the margin requirement (premium multiplied by lots).

Trading With J-Trader
36 © Patsystems Ltd 26/02/2010 14:49
Follow these steps:
1 In any screen containing a Trade button, highlight a contract and click Trade. Or, if you have set up a shortcut key for opening a trade ticket (page 13), you can press that instead.
A trade ticket is displayed.
The trade ticket is blue for a buy, or red for a sell. By default the trade ticket is a buy ticket for a limit order, at the last-traded price, using your default lot size.
2 Fill in the ticket, as follows:
Field, etc. Enter or select
Exchange
Commodity
Contract Date
Exchange, commodity and contract date that apply to this order.
Your choice of exchange filters the list of commodities, which in turn filters the list of contract dates.
Order Type Order type.
The order types available vary according to the exchange selected. Orders with an exclamation mark are those for synthetic/timed orders. See Trading Synthetic and Timed Orders.
3 Click Ticket if you want to enter the following order types (page 23). Notice how the ticket gets extra fields applicable to the order type you select:
Trade type Explanation / extra fields
OCO If you want the total quantity of the order split in two as both orders are working at the exchange, tick Split Volumes Across Orders.
As one order is executed, the remaining quantities are split equally between both orders.
Cross SEND RFQ (which you will use in step 5 below).
Warning: Most derivatives exchanges have specific rules for cross trades, including the need to post an RFQ first (eg 30 seconds for Liffe). Before submitting a cross trade, check the exchange’s regulations.
Block If you select a multi-leg contract type, you will get a price field per leg. The prices for each leg are initially set to the mid point between the buy and sell side of each leg: check and amend each leg price, as required.
Basis � ISIN Code: ISIN reference code for the cash leg of the trade.
� Cash Price: Price of the deal.
� Methodology: Character identifier that represents the hedge ratio methodology code of the cash leg.
� ReferenceNo: Free-form text used to assist with any auditing by the exchange.
Trading With J-Trader
© Patsystems Ltd 26/02/2010 14:49 37
Trade type Explanation / extra fields
Against Actual � Bid User: Freeform text for identifying the bid counterparty.
� Offer User: Freeform text for identifying the offer counterparty.
1 Fill in the remaining fields:
Field, etc. Enter or select
Lots Number of lots (default = number selected in the Hot Quotes Lots field).
You can also use the number pad to select the volume. The lots buttons are configurable: see Contract tab (page 17).
Price Price at which the order is to be submitted. To enter the price, you can:
� Type in the price.
� Select the price from the tick-bar that appears when you place the cursor over the field.
� Click the Bid, Offer or Last price in the bottom-right of the trade ticket.
Limit Price (Only available when Order Type = StopLimit)
Price beyond which buying or selling will stop.
Good Till Date (Only if Order Type = GTD Limit)
Date up to which the order is executable, unless cancelled or filled. This is an inclusive date (up to and including the date specified).
Account Account on which the order is placed (defaults to the account selected for the Account field in the Hot Quotes screen).
Reference (20 characters maximum) Any message about the order you want, eg a reference number or a message for the back office.
The message lasts throughout the lifetime of the order, is visible to other traders in the same group, and appears in the Status screen from where you can edit it.
Time
Priority
Date and time that a triggered order is to be triggered (Time) and the priority with which it is to be submitted (Priority). See Trading Synthetic and Timed Orders (page 38).
Requirement (Options only)
Margin requirement for the option, ie the amount of money required from the account to execute the trade. It is calculated as Option Premium multiplied by the number of lots being traded.
Option Premium (Options only)
Cost of the option.
Open
Close
Whether this trade is opening or closing a position: the regulations of some exchanges require you to specify this.
For example, if you are entering a trade to shorten an existing position, you select Close so that the exchange doesn’t consider this a separate short position in the same contract (which would incur additional charges).
Bid
Offer
Last
Current bid price, current offer price, and last-traded price, for this contract. You can select any of these prices by clicking on them: the price then appears in the Price field.
Note: Bid and Offer are snapshots of the prices as they were when you opened the

Trading With J-Trader
38 © Patsystems Ltd 26/02/2010 14:49
Field, etc. Enter or select ticket; they will not be updated if the prices in the market change.
Create Inactive Tick this checkbox to stop the transaction from being submitted to the market, eg if you want to have a trade ready for an announcement that could affect the market.
In the Status screen, inactive transactions are indicated by an ‘I’ in the ‘St’ column and are greyed out: you can activate them by clicking Activate in the Status screen.
Close After Trade Tick this checkbox to close the trade ticket after the order has been sent.
1 Click the big button (which is labelled according to the type of trade, eg Buy Basis). The button is available only if all required fields have been filled in.
Warning: Clicking Change to Sell or Change to Buy does not automatically change a bid price to an offer price, and vice versa. You will need to reselect a price.
For cross trades, you need to click SEND RFQ, wait the amount of time required by the exchange, and only then click Send Cross.
2 If you get the warning message, “Order cannot be entered without a volume”, click OK to clear the message, then specify a number of lots.
Trading Synthetic and Timed Orders If your J-Trader installation has the SyOMS (Synthetic Order Management System) module, you can trade ‘synthetic orders’, namely orders that mimic order types not supported by a particular exchange. Examples include synthetic versions of stops, GTCs and GTDs. You can also trade time-triggered orders.
These order types are held by SyOMS and released to the exchange when all trigger conditions are met. SyOMS allows orders to be added, amended and cancelled until the orders have been triggered. Either price or time, or a combination of both price and time, can trigger an order.
To enter synthetic or time-triggered orders, you use a trade ticket, as described in Using a Trade Ticket (page 35).
The fields that apply specifically to synthetic and timed orders are as follows:
Field Enter or select
Order Type The relevant order type: the order types for synthetic/timed orders are those with an exclamation mark.
Time (Timed orders only)
Date and time at which the order is to be triggered.
The default time is 16:00:00. This default time is used only if the TIMED_ORDER_EXECUTION_TIME property is not set in JTrader.properties or popup.html.
Priority Priority of the order (1-9 inclusive). If the orders are at the same time, price and quantity, then execute priority 9 before priority 8, etc.
Trading on the London Metal Exchange When you open a trade ticket and Exchange = LME, the ticket is slightly different. Follow these steps:
1 Fill in a trade ticket (page 35), where Exchange = LME.
2 Select the Type of trade:
� Outright: Single contract date with a fixed delivery date.
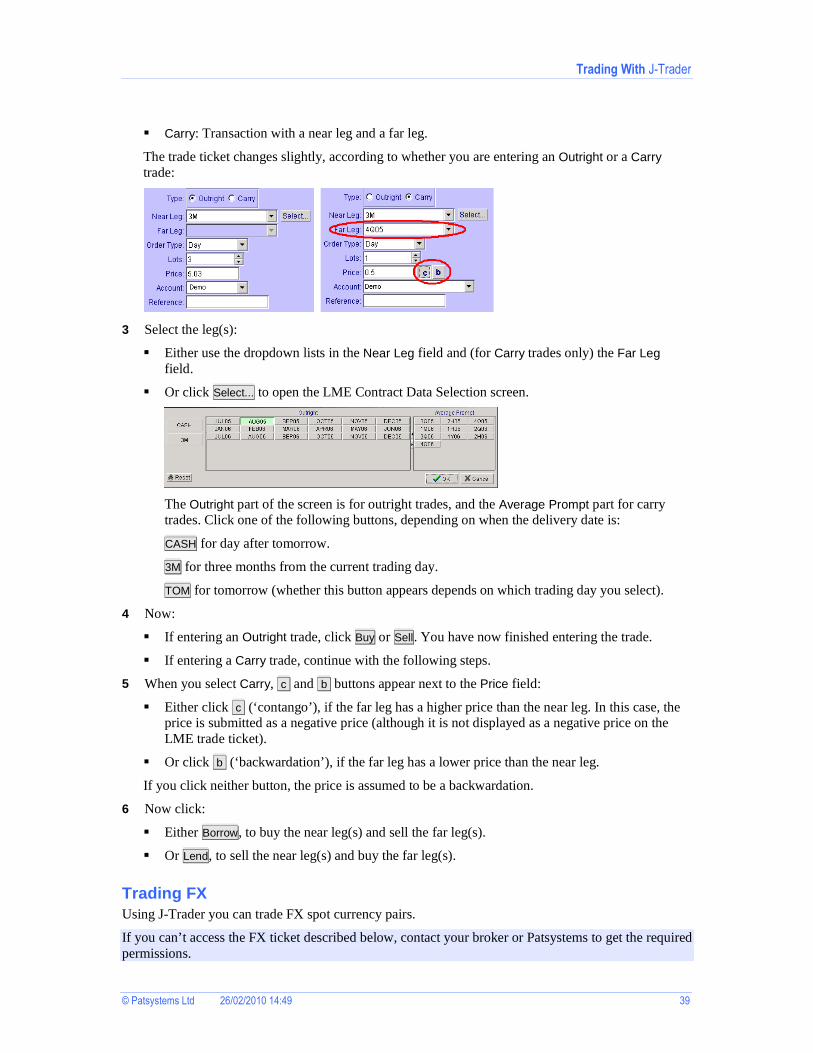
Trading With J-Trader
© Patsystems Ltd 26/02/2010 14:49 39
� Carry: Transaction with a near leg and a far leg.
The trade ticket changes slightly, according to whether you are entering an Outright or a Carry trade:
3 Select the leg(s):
� Either use the dropdown lists in the Near Leg field and (for Carry trades only) the Far Leg field.
� Or click Select... to open the LME Contract Data Selection screen.
The Outright part of the screen is for outright trades, and the Average Prompt part for carry trades. Click one of the following buttons, depending on when the delivery date is:
CASH for day after tomorrow.
3M for three months from the current trading day.
TOM for tomorrow (whether this button appears depends on which trading day you select).
4 Now:
� If entering an Outright trade, click Buy or Sell. You have now finished entering the trade.
� If entering a Carry trade, continue with the following steps.
5 When you select Carry, c and b buttons appear next to the Price field:
� Either click c (‘contango’), if the far leg has a higher price than the near leg. In this case, the price is submitted as a negative price (although it is not displayed as a negative price on the LME trade ticket).
� Or click b (‘backwardation’), if the far leg has a lower price than the near leg.
If you click neither button, the price is assumed to be a backwardation.
6 Now click:
� Either Borrow, to buy the near leg(s) and sell the far leg(s).
� Or Lend, to sell the near leg(s) and buy the far leg(s).
Trading FX Using J-Trader you can trade FX spot currency pairs.
If you can’t access the FX ticket described below, contact your broker or Patsystems to get the required permissions.
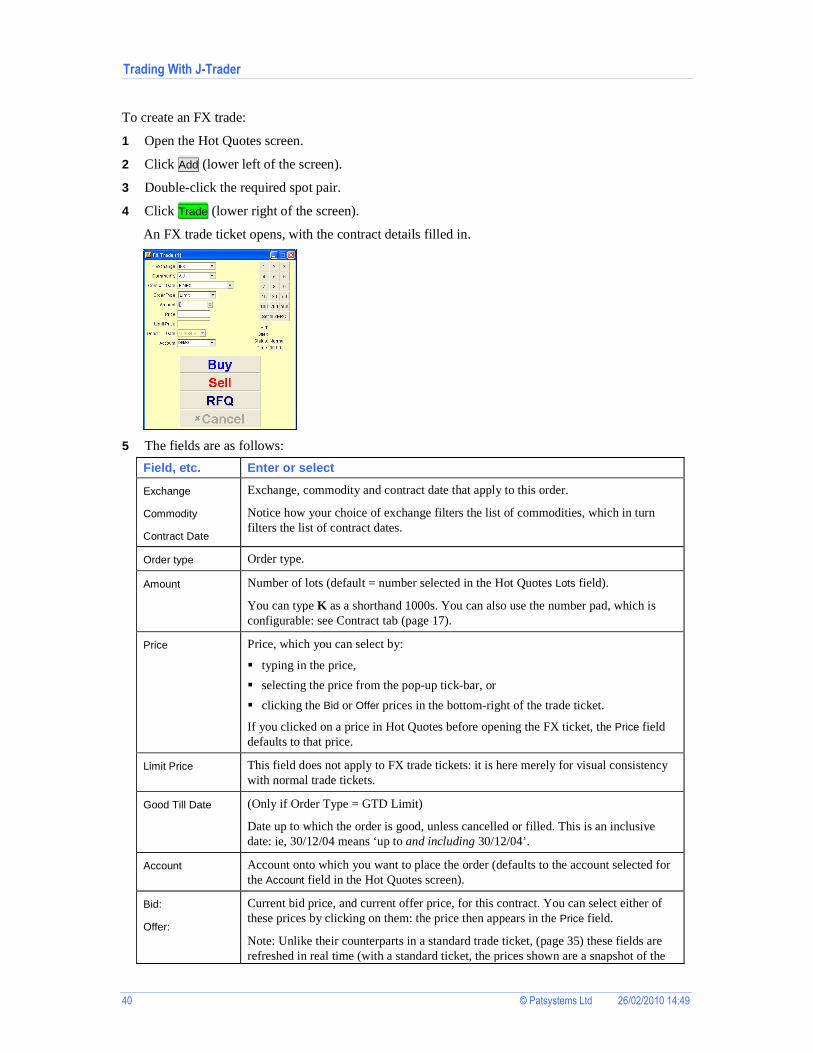
Trading With J-Trader
40 © Patsystems Ltd 26/02/2010 14:49
To create an FX trade:
1 Open the Hot Quotes screen.
2 Click Add (lower left of the screen).
3 Double-click the required spot pair.
4 Click Trade (lower right of the screen).
An FX trade ticket opens, with the contract details filled in.
5 The fields are as follows:
Field, etc. Enter or select
Exchange
Commodity
Contract Date
Exchange, commodity and contract date that apply to this order.
Notice how your choice of exchange filters the list of commodities, which in turn filters the list of contract dates.
Order type Order type.
Amount Number of lots (default = number selected in the Hot Quotes Lots field).
You can type K as a shorthand 1000s. You can also use the number pad, which is configurable: see Contract tab (page 17).
Price Price, which you can select by:
� typing in the price,
� selecting the price from the pop-up tick-bar, or
� clicking the Bid or Offer prices in the bottom-right of the trade ticket.
If you clicked on a price in Hot Quotes before opening the FX ticket, the Price field defaults to that price.
Limit Price This field does not apply to FX trade tickets: it is here merely for visual consistency with normal trade tickets.
Good Till Date (Only if Order Type = GTD Limit)
Date up to which the order is good, unless cancelled or filled. This is an inclusive date: ie, 30/12/04 means ‘up to and including 30/12/04’.
Account Account onto which you want to place the order (defaults to the account selected for the Account field in the Hot Quotes screen).
Bid:
Offer:
Current bid price, and current offer price, for this contract. You can select either of these prices by clicking on them: the price then appears in the Price field.
Note: Unlike their counterparts in a standard trade ticket, (page 35) these fields are refreshed in real time (with a standard ticket, the prices shown are a snapshot of the

Trading With J-Trader
© Patsystems Ltd 26/02/2010 14:49 41
Field, etc. Enter or select price when you opened the ticket).
Status: Whether the exchange considers the market to be Normal or Fast (see next step).
You can also see the status in the Hot Quotes screen, if the Contract Status column has been selected. To select a column, right-click in the grid area and pick Select Columns... from the pop-up menu.
Time: (Only when Status = Fast)
A ‘stopwatch’ showing how long J-Trader has had the price. See the next step for more information.
6 Do you want to place a buy order, place a sell order, or request a quote?
To do this Follow these steps
Buy If the button with blue text is labelled Buy, click the button. Your order is immediately submitted. It is labelled Request Offer, the exchange considers the market to be ‘fast’ (Status = Fast). This means that the prices are changing so fast that you have to request a price to guarantee getting it:
1 Click Request Offer to receive a dealing price.
17 If the exchange responds to the request, the Time: field becomes a ‘stopwatch’ showing how long J-Trader has had the price.
18 Hit the price displayed in the Bid: or Offer: fields within 5-10 seconds. Any longer and you will need to re-request a price.
Sell Same as buy (see previous row), except you use the red button labelled either Sell or Request Bid.
Request a quote 1 Click RFQ.
If this button is greyed out, the exchange doesn’t support RFQs for FX trades.
19 Prices appear in the Bid: and Offer: fields. You have 5-10 seconds (indicated in the Time: field) to select them. Any longer and you will have to send another RFQ.
Trading Eurodollar Contracts To trade Eurodollar contracts:
1 In Hot Quotes, click Add (lower-left corner of the screen), then double-click the required Eurodollar contracts.
2 Click to highlight the Eurodollar contract to trade.
3 Click Trade (lower-right corner of the Hot Quotes screen).
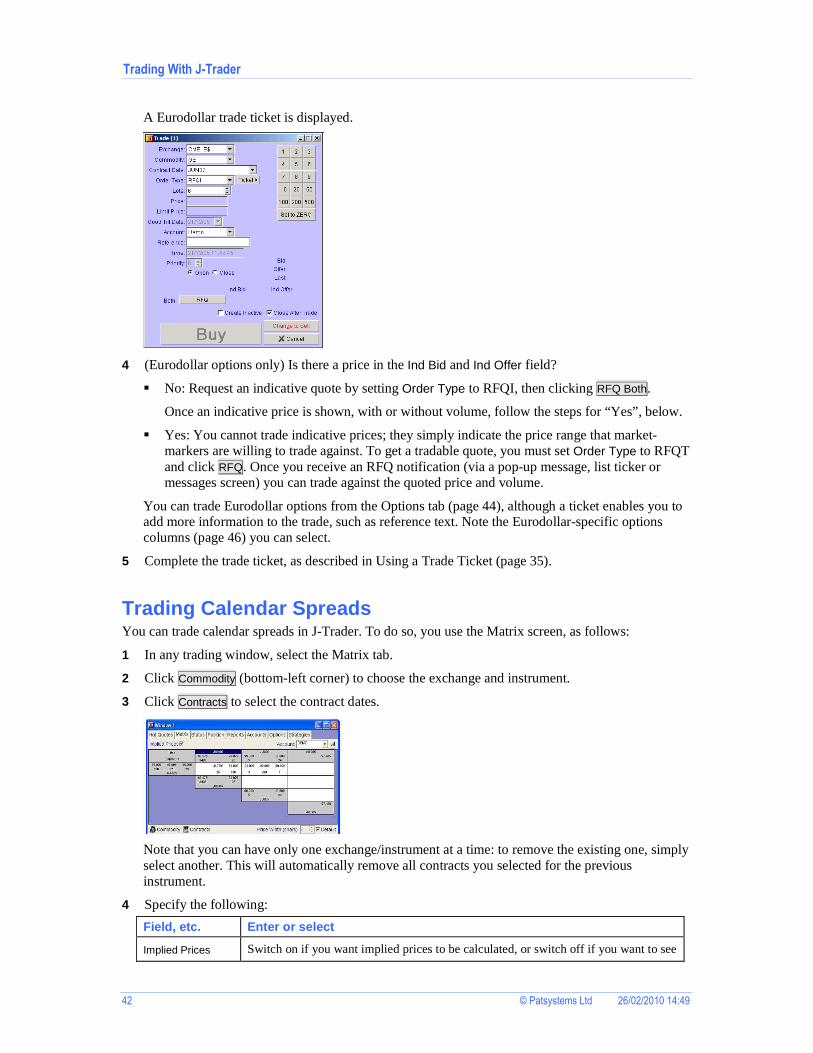
Trading With J-Trader
42 © Patsystems Ltd 26/02/2010 14:49
A Eurodollar trade ticket is displayed.
4 (Eurodollar options only) Is there a price in the Ind Bid and Ind Offer field?
� No: Request an indicative quote by setting Order Type to RFQI, then clicking RFQ Both.
Once an indicative price is shown, with or without volume, follow the steps for “Yes”, below.
� Yes: You cannot trade indicative prices; they simply indicate the price range that market-markers are willing to trade against. To get a tradable quote, you must set Order Type to RFQT and click RFQ. Once you receive an RFQ notification (via a pop-up message, list ticker or messages screen) you can trade against the quoted price and volume.
You can trade Eurodollar options from the Options tab (page 44), although a ticket enables you to add more information to the trade, such as reference text. Note the Eurodollar-specific options columns (page 46) you can select.
5 Complete the trade ticket, as described in Using a Trade Ticket (page 35).
Trading Calendar Spreads You can trade calendar spreads in J-Trader. To do so, you use the Matrix screen, as follows:
1 In any trading window, select the Matrix tab.
2 Click Commodity (bottom-left corner) to choose the exchange and instrument.
3 Click Contracts to select the contract dates.
Note that you can have only one exchange/instrument at a time: to remove the existing one, simply select another. This will automatically remove all contracts you selected for the previous instrument.
4 Specify the following:
Field, etc. Enter or select
Implied Prices Switch on if you want implied prices to be calculated, or switch off if you want to see
Trading With J-Trader
© Patsystems Ltd 26/02/2010 14:49 43
Field, etc. Enter or select real prices only. Implied prices are shown with an asterisk ( * ).
The LIFFE CONNECT™ Trading Host calculates:
� Implied IN prices, which are strategy prices based on current explicit orders in the market.
� Implied OUT prices, which are the implied individual futures leg prices from explicit strategy orders. These prices are distributed only if they equal or improve upon orders currently in the market.
For FX, this switch doesn’t do anything, because it’s physically impossible to have implied prices for spot trades.
Account Trader account you want to use (assuming that you have more than one account to choose from). For FX, you cannot use an account used for futures (and vice versa).
Tip: Using the Accounts tab, you can set a default account, and control which accounts are listed in the dropdown selection list. See Setting Default Accounts (page 20).
Lots Select or type the number of lots to trade.
Tip: You can set a default number of lots per exchange, instrument and contract, using the Settings screen, Contract tab, Default Quantity sub-tab.
Price Width (chars) Width of the cells in the display. To change this value, ensure that Default (see below) is unticked.
Default Tick to reset Price Width (chars) to the default.
5 Once you have set the number of Lots, you can trade the outright in the grey squares (left) and trade the spread in the white squares at the heart of the matrix. The prices and volumes are arranged as follows, with implied prices shown with an asterisk ( * ):
Bid price Offer price Last-traded price
Bid volume Offer volume Last-traded volume
Contract month
For example:
You enter limit and market orders as on the Hot Quotes screen, namely:
Method Explanation
Tick bar Enter limit orders by hovering the mouse pointer over the bid (or offer) price, and selecting a price from the tick bar.
Click on a volume
Enter market orders by clicking a bid (or offer) volume.
DOM Clicking the last-traded volume, or the contract month, calls up a DOM Screen (page 27).
Trade Enter a trade using a trade ticket (page 35) or create an FX trade (page 39).
You can also see the price history (last 20 trades) for this contract, by clicking the last-traded price. The price history is automatically updated as new trades are entered.
Trading With J-Trader
44 © Patsystems Ltd 26/02/2010 14:49
6 To pull all bids and offers, click Pull All. (It is not possible, as it is on other screens, to pull only orders, or only bids.)
7 To purge inactive and expired contracts from the Matrix (and the rest of J-Trader), click Purge (bottom-right corner).
Trading Options To trade an option:
1 From any trading window, select the Options tab.
2 (Recommended) Right-click on a column header, click Columns in the pop-up and select the options columns (page 46) you want.
3 Select the first option you want to trade (you can add several options, but only one at a time):
i. Click + Add in the bottom-left of the screen.
ii. The tree hierarchy shows exchanges > underlyings > options. Display the option you want, clicking on to expand a branch, and to collapse it. Notice how the option names end with C for calls, or P for puts.
iii. Double-click the option. It is then added to the grid.
iv. For any other options you want to add, repeat the steps above. The options you select appear in separate panes within the screen.
4 You can remove and replace options already displayed:
To do this Click here
Remove option Click on X in the top-right of the relevant pane:
Replace option Put the mouse cursor on the option’s contract-date label (notice how it changes to a button)...
... then click on the button, and pick the new option from the selection tree.
5 In the outer frame of the tab, specify the following:
Field, etc. Enter or select
Account Trader account you want to use (assuming that you have more than one account to choose from). For FX, you cannot use an account used for futures (and vice versa).
Tip: Using the Accounts tab, you can set a default account, and control which
Trading With J-Trader
© Patsystems Ltd 26/02/2010 14:49 45
Field, etc. Enter or select accounts are listed in the dropdown selection list. See Setting Default Accounts (page 20).
Lots Select or type the number of lots to trade.
Tip: You can set a default number of lots per exchange, instrument and contract, using the Settings screen, Contract tab, Default Quantity sub-tab.
6 Within the pane for the option you want to trade, set the following:
Field, etc. Explanation
Lock: When ticked, fixes the display of the at-the-money strike at the centre of the screen, with two ‘Hi’ and two ‘Lo’ strikes above and below.
When the checkbox is off, all prices are displayed.
Add and subtract high/low strikes:
i Hi = high strikes, and Lo = low strikes. Click Hi to switch to Lo (and vice versa).
ii Click + to add a strike, or – to remove one. Notice how the number of rows increases or decreases accordingly.
C Bid Size
...
P Offer Size
The various combinations of volumes/prices, bids/calls, and puts/offers, at the indicated strike prices.
7 If you want to view and trade implied prices (displayed with an asterisk), tick Implied Prices.
8 To trade, you can use the Reflector and Trade buttons, which are the same as their Hot Quotes counterparts. You can also click on any cell, except Last Traded:
Notice the colour scheme for cells: white = volume, blue = bids, and pink = offers.
Clicking here Does this
Bid
Offer
Creates an order for the underlying:
� Bid (left field): The left field gives you a price, so clicking here gives you a limit order, at the displayed bid price.
� Bid (right field): This field gives you a volume, so clicking here gives you a market order, at the displayed bid volume.
� Offer (left field) and Offer (right field): Same as their Bid counterparts, except that they are for offers instead.
Note: These fields are not affected by the —Clicking on Size - Action— radio buttons in the Settings screen, Trading tab.
C Bid Size
P Offer Size
The various columns give all combinations of volumes/prices, bids/calls, and puts/offers, at the indicated strike prices:
• Clicking a volume creates a market order.
• Clicking a price creates a limit order, at the relevant price.
If you hover the cursor over a price cell, you get a tick bar. Using the arrow icons (down for offers, up for bids) on the tick bar, you can select a price beyond the range first displayed.
Double-clicking a strike price (green cell) calls up two DOM screens: one for the put,
Trading With J-Trader
46 © Patsystems Ltd 26/02/2010 14:49
Clicking here Does this and one for the call. See Using DOM Screens (page 27).
Reflector Opens a Patsystems Reflector™ screen for the underlying, put or call.
Trade Opens a trade ticket for the underlying put or call.
Purge Removes expired options from the Options screen and from J-Trader.
Pull All Pulls all working orders.
^ Pull Gives a selection list for pulling all bids/offers/orders for the selected call or put.
Options Columns By right-clicking in the Options screen (page 44) and clicking on Select Columns, you can choose from the following columns.
Note how on the left of the selection dialog you have call versions of these columns, and on the right their put equivalents.
Call / Put Explanation
Bid Size
Bid Price
Offer Size
Offer Price
(Always selected)
Bid volume and price, and offer volume and price.
Indicative Bid Price
Indicative Bid Size
Indicative Offer Price
Indicative Offer Size
(Eurodollar contracts only)
Indicative bid price and volume, and indicative offer price and volume.
For help with requesting indicative and tradable prices for Eurodollar contracts, see Requesting a Quote.
Last Price
Last Size
Last-traded price and last-traded volume.
Total Size Total traded volume.
High Price
Low Price
Highest and lowest price traded this session.
Open Opening price.
Settlement Price Today’s settlement price.
YDSP (Pro-Mark only)
Yesterday’s settlement price.
Net Position Your net position in this option.
RFQI Bid Volume
RFQI Offer Volume
RFQI 2 Sides Volume
Click to request an indicative quote for a bid/offer/bid-and-offer for the displayed volume.

Trading With J-Trader
© Patsystems Ltd 26/02/2010 14:49 47
Call / Put Explanation
RFQT Bid Volume
RFQT Offer Volume
RFQT 2 Sides Volume
Same as the RFQI columns above, except for requesting tradeable quotes.
RFQT Cross Volume Click to request a tradable price at which you can cross your orders.
Trading Strategies Using the Strategies tab of a trading window, you can trade strategies (for both options and futures). The screen is similar to the Hot Quotes screen, from where you can also trade strategies. The difference is that the Strategies screen shows only strategies, and is dynamically updated with any new strategies that are created in the market.
If you have the Strategy Calculator (page 60), you can create exchange-supported strategies.
You can view and trade option and future strategies. Follow these steps:
1 In any trading window, select the Strategies tab.
2 Click + Add. and select the strategies you want to monitor. The hierarchical list (exchanges > instruments > contracts) looks and works the same as in the Hot Quotes Screen (page 19).
3 Click to display the selection tree in the left-hand pane:
Tick the strategies you want to monitor. Unticking an item will stop the Strategies screen from scanning for its details, and will remove it from the grid display. Notice how (un)ticking an item causes all its children to be (un)ticked as well, although you can (un)tick children separately.
4 The Strategies screen displays expired strategies as greyed out. To remove expired strategies from the strategies screen, click Purge (bottom-left corner).
5 If you want implied prices, tick Implied Prices.
Note: If an implied price is worse than the best bid or offer, the real price will be displayed instead.

Trading With J-Trader
48 © Patsystems Ltd 26/02/2010 14:49
6 If necessary, adjust the columns (page 23): ie, change the selection of columns, reorder columns, and auto-adjust their widths. For an explanation of the columns you can choose from, see Strategies Screen Columns (page 48).
7 Apart from the choice of columns, the screen is just a simplified version of the Hot Quotes screen. For help using this screen, then, please see the following sections:
� Configuring the Hot Quotes Screen (page 19)
� Trading With the Hot Quotes Screen (page 26).
Strategies Screen Columns By right-clicking in the grid of the Strategies screen and clicking on Select Columns, you can choose from the following columns:
Column Explanation
Outright Bid Price Price of the strategy, determined by the prices of the legs and the requirements of the structure of the strategy.
For example, suppose you have the following best bids and offers, for a butterfly (buy one lot of leg 1, sell two lots of leg 2 and buy one lot of leg 3):
Leg 1: Bid = 97.53, Offer = 97.55
Leg 2: Bid = 97.545, Offer = 97.555
Leg 3: Bid = 97.855, Offer = 97.86
The best bid is 97.53 - (2 * 97.555) + 97.855 = 0.275.
Outright Bid Volume
Volume of the strategy available, determined by the volumes of the legs and the requirements of the structure of the strategy.
For example, you have the following volumes and you want to buy a butterfly:
Leg 1: Bid = 24 lots, Offer = 10 lots
Leg 2: Bid = 6 lots, Offer = 2 lots
Leg 3: Bid = 8 lots, Offer = 7 lots
Since you’re required to sell two lots per butterfly, and you have only two lots anyway, you’re restricted to trading one lot of the butterfly.
Outright Offer Price Same as Outright Bid Price, except for generating an offer instead of a bid.
For example, suppose you’re selling the butterfly described above for Outright Bid Price:
Leg 1: Bid = 97.53, Offer = 97.55
Leg 2: Bid = 97.545, Offer = 97.555
Leg 3: Bid = 97.855 , Offer = 97.86
... then the best offer is 97.55 - (2 * 97.545) + 97.86 = 0.32.
Outright Offer Volume
Same as Outright Bid Volume, except for generating an offer instead of a bid.
Suppose, for example, you’re selling the butterfly given above as an example for Outright Bid Volume:
Leg 1: Bid = 24 lots, Offer = 10 lots
Leg 2: Bid = 6 lots, Offer = 2 lots
Leg 3: Bid = 8 lots, Offer = 7 lots
Here, the limiting factor is the six lots. Since you’ re required to buy two lots per

Trading With J-Trader
© Patsystems Ltd 26/02/2010 14:49 49
Column Explanation butterfly, you’re restricted to trading three lots of the butterfly.
Total Traded Volume
Total traded volume for the strategy.
For example, if you were buying a butterfly, you’d be buying one lot of leg 1, selling two lots of leg 2, and buying one lot of leg 3: that’s four legs, but only one butterfly: so the total traded volume is 1.
High Price
Low Price
Highest, and lowest, price at which the strategy has traded during the current trading day.
Closing Price Closing price. This is generated from the settlement prices for the individual legs.
Last Traded Price Price at which the strategy last traded.
Using Strategies (MELs) You can create and trade “multi-exchange leggers” (MELs): strategies that are not supported by exchanges.
You can use MELs to trade both inter-market (eg, trading the DAX against the FTSE) and intra-market (eg, LIFFE Short Sterling against Gilts). Other uses include buying/selling an index against futures for the constituent securities, or using the automatic-execution capabilities of MELs to simulate icebergs.
MELs are executed automatically once the price criteria are met. There is a small legging risk to trading unsupported strategies like this, namely the risk that one leg executes while the other fails; to reduce your exposure on larger trades, you can specify a clip size, eg send 100 lots in clips of 10.
J-Trader will calculate a ‘MEL Price’ for your strategy, using the parameters defining the relationship between the legs. This is a synthetic price, existing only locally on J-Trader and not at the exchange. Once a leg is executed, it exists as an entirely normal order at an exchange, unrelated to any other orders anywhere (except on your screen).
If you have the Strategy Calculator (page 60), you can create exchange-supported strategies.
Creating a MEL To create a MEL:
1 On J-Trader’s main screen, click Settings. The Settings screen appears.
2 Click the MEL Template tab.
� The –Templates— frame (top half of the screen) is for defining the attributes of the MEL.
� The –Legs— frame (bottom half) is for defining the legs it contains.
Notice between the frames, which you can use for maximising one frame (or returning to two frames).

Trading With J-Trader
50 © Patsystems Ltd 26/02/2010 14:49
3 In the –Templates— frame, click Add and fill in the row, as follows:
Column Enter or select
Description Name of the MEL strategy: eg, DAX FTSE SPREAD.
Legs (Information only)
Number of legs currently included in the strategy.
Pricing How you want the displayed price to be calculated:
� Weighted: The MEL price is calculated allowing for the ratios between the legs, the ratios themselves being specified in the —Legs— frame, Ratio column. For example, (4 x FDAX price) against (3 x FTSE price)
� Linear: Each leg is priced at a ratio of one, irrespective of the ratio at which it is executed: (1 x FDAX price) against (1 x FTSE price).
Note: This does not affect transactions. The legs of the strategy are always executed in the ratios specified.
Settlement Tick this checkbox to include the settlement price at the previous close: eg, (4 x (FDAX price - settlement price)) against (3 x (FTSE price - settlement price)).
Ticks Tick-size increment in which you want the MEL’s price to be displayed.
The base (base 32, base 64, and base 128) or decimal used depends on the contracts you select in the —Legs— frame. If different legs use different bases,J-Trader defaults to the largest tick.
Clips Clip size.
For example, you could simulate an iceberg by trading 100 lots of the MEL in clips of 10.
4 Add the legs. Each leg represents a separate buy or sell operation, to be executed the number of times shown in the Ratio column, and in the order they are shown in the list.
For each leg you add:
i. Click Add.
ii. Fill in the row, as follows:
Column Enter or select
B/S Buy or Sell.
Ratio Quantity or weighting of this leg.
Exchange
Commodity
Contract
Exchange, commodity and contract for the leg.
Coefficient Factor by which the leg price is multiplied, to manage tick size differentials (and/or account for FX exposure).
For example, suppose you had a DAX leg (priced at €25 per tick with an exchange value of £17) and the FTSE (priced at £10 per tick): you’d give the FTSE a coefficient of 1.7.
Type Whether the leg is to be traded as a Market or Limit order.
5 Click OK to save and close the Settings dialog.
Trading With J-Trader
© Patsystems Ltd 26/02/2010 14:49 51
Trading a MEL To trade a MEL:
1 In the Hot Quotes screen, click + Add.
2 Double-click the MELs you want to trade.
Note: The MELs branch appears at the top of the contracts selection tree, but only if at least one MEL has been created. See Creating a MEL (page 49).
3 Trade the MELs, as explained in Trading With the Hot Quotes Screen (page 26). To view/trade the legs, click + to the left of the MEL’s name.
4 Note, however, that you can enter the MEL only as a limit order, not as a market order.
Once you have entered a MEL, the following happens:
1 Until the price criteria for all legs have been met, or improved upon, the MEL order is held locally in J-Trader, with an HO (Held Order) status. This is to:
� reduce legging risk (the risk that legs are traded separately, and end up trading outside the price of the strategy),
� minimise transaction throughput, and
� improve the chances of filling the order.
The legs of the MEL will be submitted in the sequence configured in the MEL template (page 49), beginning with the first on the list.
You can view orders with an HO (or any other) status in the Status screen.
2 Once the price criteria have been met, all legs of the MEL are submitted to the exchange(s) as limit orders, at the best price at which they can be filled. The only volumes that the MEL will submit (up to the clip size) are those at which fills can be guaranteed for that specified MEL price.
3 If an order triggered by a MEL fails to fill (ie, it remains in a working state), the MEL remains as a working order in the Status screen. No further orders will be submitted from that MEL strategy until the unexecuted legs are either filled or cancelled.
4 The MEL will remain as a working order until the order price is reached (or you amend the order price so that it is reached), or until you cancel the unexecuted legs. You can amend the price of these legs in the Status screen.
Viewing and Updating Orders You can check the status of all working, filled and completed orders in a trader account group, including why an order was rejected. You can also pull, amend and resubmit orders, and reactivate inactive orders.
Follow these steps:

Trading With J-Trader
52 © Patsystems Ltd 26/02/2010 14:49
1 In a trading window, select the Status tab.
2 In the Account field, select the account to monitor.
3 If contracts are in the Working (upper) pane but greyed out, the exchange is closed. Expired multi-day orders and day orders appear in the Completed (lower) pane. To purge expired orders from both the Status screen and the rest of J-Trader, click Purge (bottom-left of screen).
4 You can adjust the display as follows:
To do this Follow these steps
(De)select and resize columns
Right-click over any cell. The columns you can choose from are described in Status Screen Columns (page 54).
Sort orders Left-click the column heading you want to sort by. Click again and the sort order is reversed. An icon appears to indicate both the column and the sort direction.
Filter orders You have two choices:
� Right-click a column heading and select an item from the list. For example, to list orders from one exchange only, right-click the Exchange column and select the relevant exchange. For some columns, you have an editable field, for inputting ranges and wildcards: e.g., E* for all items starting with the letter ‘E’.
The headers of filtered columns change colour to show what filtering applies.
� Click (in either the Working or Completed pane) and select the filter parameters you want.
To turn off filtering:
� Either click , namely the button to the right of .
� Or right-click on any cell and select Remove Filter.
5 The buttons in the Working Orders (upper) pane are as follows:
Button Explanation
Pull orders Pulls the selected orders. You can only pull orders that are working, inactive or part-filled (any filled lots remain in your position.
You can pull an individual order by highlighting it and clicking (by default, the last column), and you can pull all orders by clicking Pull All.
Activate Submits an inactive order (Status = I) to the exchange.
Deactivate Inactivates an order (Status = I): the order stays in the order book, but is removed from the market until you click Activate.
Near Orders Sorts orders by their nearness to the last traded price (nearest at the top).

Trading With J-Trader
© Patsystems Ltd 26/02/2010 14:49 53
Button Explanation
Last Entered Sorts orders by when they were entered (latest at the top).
The rest of the buttons are as follows:
Button Explanation
Amend Opens a trade ticket, from which you can amend the selected order. See Using a Trade Ticket (page 35).
Detail Gives a history of the order (same information you get by double-clicking an order).
Recap (Completed and Working orders)
Displays a summary of all highlighted orders, ignoring cancelled or rejected orders. This summary can be printed, copied and exported (to .csv or .txt).
Print Prints the selected orders. Tick the printing requirements you want:
� Print Fills: Print fills only.
� Print History: Print the whole history of the order, for a full audit trail.
� Use Filters: Use the filters (page 22) applied to the Status Screen display.
� Landscape: Print the report in landscape format rather than portrait.
Export Exports all of the selected orders as a .txt file, to your choice of folder and filename.
CSV Export Exports all the selected orders as a .csv file, to your choice of folder and filename. Choose from:
� Export BOI Order Details: Exports in a format that can be fed back into J-Trader as a bulk-order-input sheet in Excel.
� Export Full Order Details: Exports all orders in the Working pane.
Resubmit Resubmits cancelled orders (statuses ‘C’ and ‘BC’). Orders can be cancelled when, for example, an exchange goes down.
Highlight the orders you want to resubmit, and click Resubmit. The button is greyed out unless at least one of the selected orders has the status ‘C’ or ‘BC’. In the pop-up that appears, select the type of order you want submitted:
� Resubmit Balance: The number of lots equals the unfilled balance of the original order. Any orders with no lots as yet filled will be resubmitted with the same number of lots as the original order.
� Resubmit Total: The resubmitted order contains the same number of lots as the original order, irrespective of how many lots from the original have already been filled. Be careful, especially when resubmitting batches of orders, that the total number of lots is not significantly larger than intended.
� Resubmit Balance as Inactive: Same as Resubmit Balance, except that the order is submitted as Inactive: ie, it is held in the Working Orders pane until you highlight it and click Activate.
� Resubmit Total as Inactive: Same as Resubmit Total, except that the order is submitted as Inactive: ie, it is held in the Working Orders portion of the screen until you highlight it and click Activate.
Any new order created following a resubmission is allocated a new Patsystems order number.
Purge Click to remove expired contracts from both the Status screen and the whole of J-Trader.
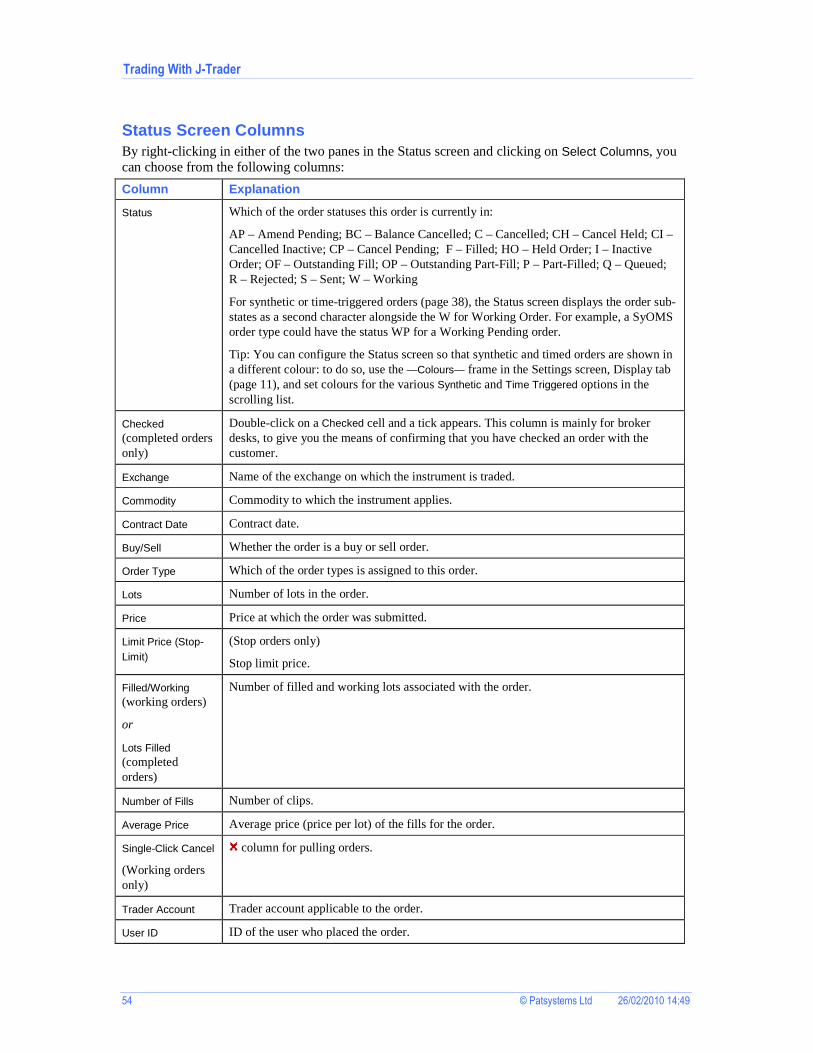
Trading With J-Trader
54 © Patsystems Ltd 26/02/2010 14:49
Status Screen Columns By right-clicking in either of the two panes in the Status screen and clicking on Select Columns, you can choose from the following columns:
Column Explanation
Status Which of the order statuses this order is currently in:
AP – Amend Pending; BC – Balance Cancelled; C – Cancelled; CH – Cancel Held; CI – Cancelled Inactive; CP – Cancel Pending; F – Filled; HO – Held Order; I – Inactive Order; OF – Outstanding Fill; OP – Outstanding Part-Fill; P – Part-Filled; Q – Queued; R – Rejected; S – Sent; W – Working
For synthetic or time-triggered orders (page 38), the Status screen displays the order sub-states as a second character alongside the W for Working Order. For example, a SyOMS order type could have the status WP for a Working Pending order.
Tip: You can configure the Status screen so that synthetic and timed orders are shown in a different colour: to do so, use the —Colours— frame in the Settings screen, Display tab (page 11), and set colours for the various Synthetic and Time Triggered options in the scrolling list.
Checked (completed orders only)
Double-click on a Checked cell and a tick appears. This column is mainly for broker desks, to give you the means of confirming that you have checked an order with the customer.
Exchange Name of the exchange on which the instrument is traded.
Commodity Commodity to which the instrument applies.
Contract Date Contract date.
Buy/Sell Whether the order is a buy or sell order.
Order Type Which of the order types is assigned to this order.
Lots Number of lots in the order.
Price Price at which the order was submitted.
Limit Price (Stop-Limit)
(Stop orders only)
Stop limit price.
Filled/Working (working orders)
or
Lots Filled (completed orders)
Number of filled and working lots associated with the order.
Number of Fills Number of clips.
Average Price Average price (price per lot) of the fills for the order.
Single-Click Cancel
(Working orders only)
column for pulling orders.
Trader Account Trader account applicable to the order.
User ID ID of the user who placed the order.

Trading With J-Trader
© Patsystems Ltd 26/02/2010 14:49 55
Column Explanation
Good Till Date Date (if applicable) up to which the order can remain on the system, unless cancelled or filled in the intervening period.
Reference Free-text field that gets passed to the back office.
Reason
(Completed orders only)
Reason that an order was rejected.
Tip: To see the message in full, right-click on any grid cell and select Size All Columns to Contents.
Amount (IFX only)
Monetary value of the trade, expressed in millions in the base currency: eg, 0.005m for 5,000.
Entry Time Applies to all order types - time that the order was entered.
Trigger Time Applies to SyOMS order types. Time that a SyOMS order is to be triggered. See Trading Synthetic and Timed Orders.
Priority (Synthetic and timed orders only)
Priority (1-9) assigned to the order. The priority determines the order in which orders at the same time, price and quantity are executed, priority 9 being executed before priority 8, etc.
ESA Reference Free text column for entering ESA-related information.
Execution ID You can ignore this column; it is not used.
Open/Close Whether this trade is an opening or closing position.
APIM Code To identify how an order was submitted and its origin, select the Automatic Price Injection Model column named APIM Code. The code meanings are as follows:
A = Automatic. M = Manual. G = Generated by the API. T = order originates from a conformed 3rd party. U = undefined, to be used for exchanges where APIM functionality is not used.
Filled Time (Completed orders pane only)
Time that the order was filled.
Viewing Positions You can view the overall position for a trader account, and break it down by exchange and instrument.
You can view total buys, sells, and trading costs (commission per exchange charges); P&L on open and closed positions; and average position price. Furthermore, by clicking on a contract, you can see the fills making up the position in that contract. Positions and their P&Ls are automatically updated after every trade.

Trading With J-Trader
56 © Patsystems Ltd 26/02/2010 14:49
Follow these steps:
1 In any trading window, select the Positions tab.
In the upper pane, you have the positions in each contract, in the contract currency. In the orange-coloured TOTAL: row, you have the totals, expressed in the system currency.
Note: You can display totals in your local currency as well as the system currency, if your J-Trader Properties file has the setting LOCAL_CURRENCY = TRUE.
2 In the position tree in the left-hand pane, select the position you want to view. If the left-hand pane is closed, click here:
3 Select the relevant Account.
Notice the following information:
where:
� Position gives the real-time state of the trading account: either Open or Flat.
� Profit & Loss gives the total gross P&L, in the system currency.
4 To see the fills for a contract, highlight it in the upper pane of the window, and the fills are displayed in the bottom pane.
5 To change the columns, right-click in the grid area of the Positions (upper) or Fill (lower) pane. For explanations of the columns available, see Position Columns (page 56) and Fill Columns (page 57).
Position Columns By right-clicking in the Positions pane of the Position screen (page 55) and clicking on Select Columns, you can choose from:
Column Explanation
Net Position Net position for the contract: eg, +20 for ‘20 lots long’ and -10 for ‘10 lots short’.
Buys Number of lots bought.
Sells Number of lots sold.

Trading With J-Trader
© Patsystems Ltd 26/02/2010 14:49 57
Column Explanation
Average Price
Buys Average Price
Sells Average Price
Average price for:
� position
� position’s buys only
� position’s sells only.
At the start of day, the average price reflects yesterday’s settlement price.
Last Traded Price Last price at which the contract traded.
Open Profit & Loss Current position, namely the average price of the net position against the last-traded price.
If there is no last-traded price, the net position is against today’s settlement price (or, failing that, yesterday’s).
Cumulative Profit & Loss
Net closed position, calculated against the last-traded price.
Total Profit & Loss Complete position, namely Cumulative Profit & Loss + Open Profit & Loss.
This may or may not include any open position from the previous day. Typically, accounts used by those who don’t want to build positions (eg, brokers and fund managers) will not include the previous day’s trading, whereas other accounts will.
Commission Total commission paid for trades in this contract, namely commission per lot multiplied by the number of lots.
Currency Currency of the contract.
Margin per Lot Margin required per lot, for this contract and trader account.
% P/L Burn Rate Ratio of P&L to SODNLV.
% Open Position Exposure
Ratio of required position margin to (SODNLV + P&L).
Buying Power Remaining
Cash Buying Power Remaining
(SODNLV +/- P&L) less position margin required, expressed as:
� a percentage
� an actual amount
Compare with Equity, below.
Suppress P & L Value
Suppress the display of P&L values.
Margin Paid Total margin that has been paid on this contract and trader account.
Equity SODNLV +/- P&L.
In other words, like Cash Buying Power Remaining but without allowing for the margin required.
* SODNLV is ‘start-of-day net liquidity value’, namely the funds available for you to trade with today.
Fill Columns By right-clicking in the Fills pane of the Position screen (page 55) and clicking on Select Columns, you can choose from:

Trading With J-Trader
58 © Patsystems Ltd 26/02/2010 14:49
Column Explanation
Order ID Unique ID for this order (automatically generated).
Lots Fill volume, S 50 for ‘sold 50’, or B 20 for ‘bought 20’.
Price Price at which the trade was filled.
Date/Time Filled Date and time that the trade was filled.
Date/Time Received
Date and time that the trade confirmation was received.
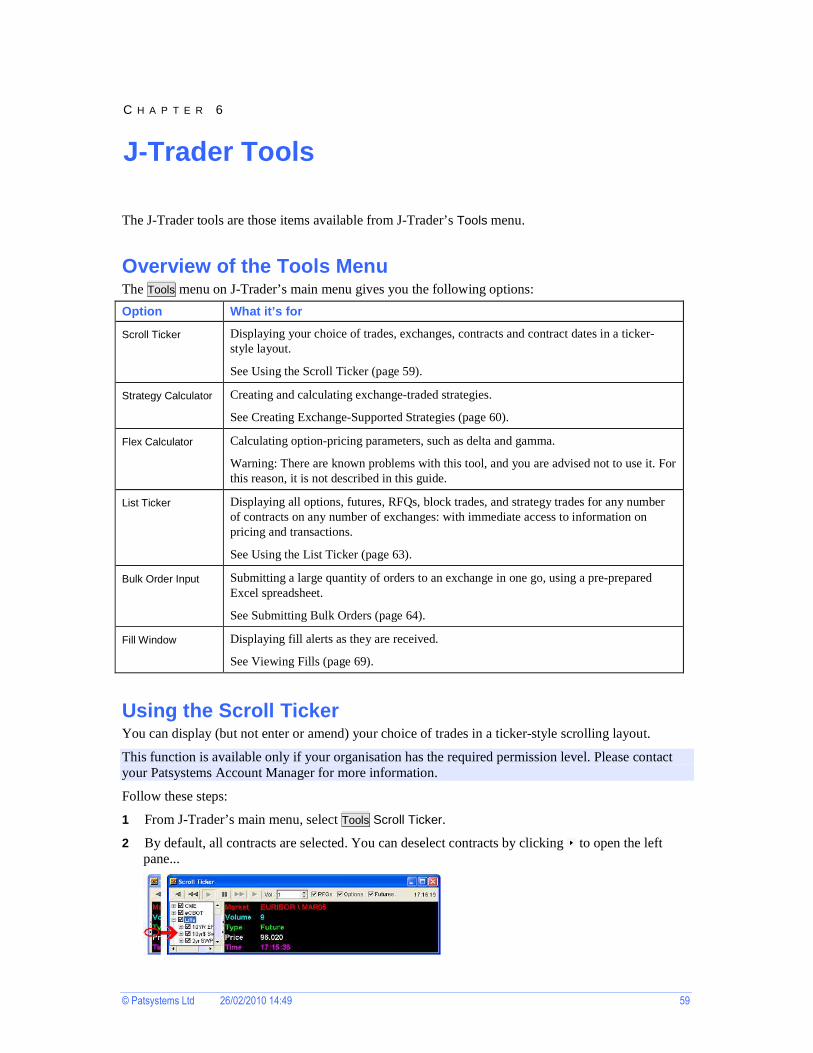
© Patsystems Ltd 26/02/2010 14:49 59
The J-Trader tools are those items available from J-Trader’s Tools menu.
Overview of the Tools Menu The Tools menu on J-Trader’s main menu gives you the following options:
Option What it’s for
Scroll Ticker Displaying your choice of trades, exchanges, contracts and contract dates in a ticker-style layout.
See Using the Scroll Ticker (page 59).
Strategy Calculator Creating and calculating exchange-traded strategies.
See Creating Exchange-Supported Strategies (page 60).
Flex Calculator Calculating option-pricing parameters, such as delta and gamma.
Warning: There are known problems with this tool, and you are advised not to use it. For this reason, it is not described in this guide.
List Ticker Displaying all options, futures, RFQs, block trades, and strategy trades for any number of contracts on any number of exchanges: with immediate access to information on pricing and transactions.
See Using the List Ticker (page 63).
Bulk Order Input Submitting a large quantity of orders to an exchange in one go, using a pre-prepared Excel spreadsheet.
See Submitting Bulk Orders (page 64).
Fill Window Displaying fill alerts as they are received.
See Viewing Fills (page 69).
Using the Scroll Ticker You can display (but not enter or amend) your choice of trades in a ticker-style scrolling layout.
This function is available only if your organisation has the required permission level. Please contact your Patsystems Account Manager for more information.
Follow these steps:
1 From J-Trader’s main menu, select Tools Scroll Ticker.
2 By default, all contracts are selected. You can deselect contracts by clicking to open the left pane...
C H A P T E R 6
J-Trader Tools

J-Trader Tools
60 © Patsystems Ltd 26/02/2010 14:49
... and unticking the items you don’t want. Notice how unticking a parent unticks all its children, although you can subsequently tick the children individually.
3 Control the ticker display using the buttons:
Go to first item
Rewind through prices
Play (advance prices at normal speed)
Pause
Fast-forward through prices
Go to last item
The rest of the items on the control panel are as follows:
Item Explanation
Vol. Select the minimum volume you want displayed.
RFQs
Options
Futures
Tick the categories of contract you want to view.
17:16:19 Shows the current time (hours:minutes:seconds).
Creating Exchange Strategies You can build your own exchange-supported strategies and send a ‘create strategy’ request to the exchange. Once the exchange has created the strategy, you can trade it.
Notice also that you can create strategies not supported by an exchange, using J-Trader’s MEL functionality: see Using Strategies (MELs) on page 49. You can also trade calendar spreads using the Matrix screen (page 42).
Before you can use the Strategy Calculator, your system administrator will need to set up the Strategy Creator administrative module, and you may need to specify an IP address and port number in the Network Settings dialog box (page 5).
Follow these steps:
1 From J-Trader’s main menu, select Tools Strategy Calculator. Notice how you can close the right-hand panel by clicking (top-right corner).
2 Select the Options or Futures tab, depending on whether you are creating an options or futures strategy.
3 (Options tab only) If you want a delta-neutral strategy (one where the risk of the option is offset against the current value of the underlying), tick As Volatility Trade. Notice how the selection of available strategy types changes.
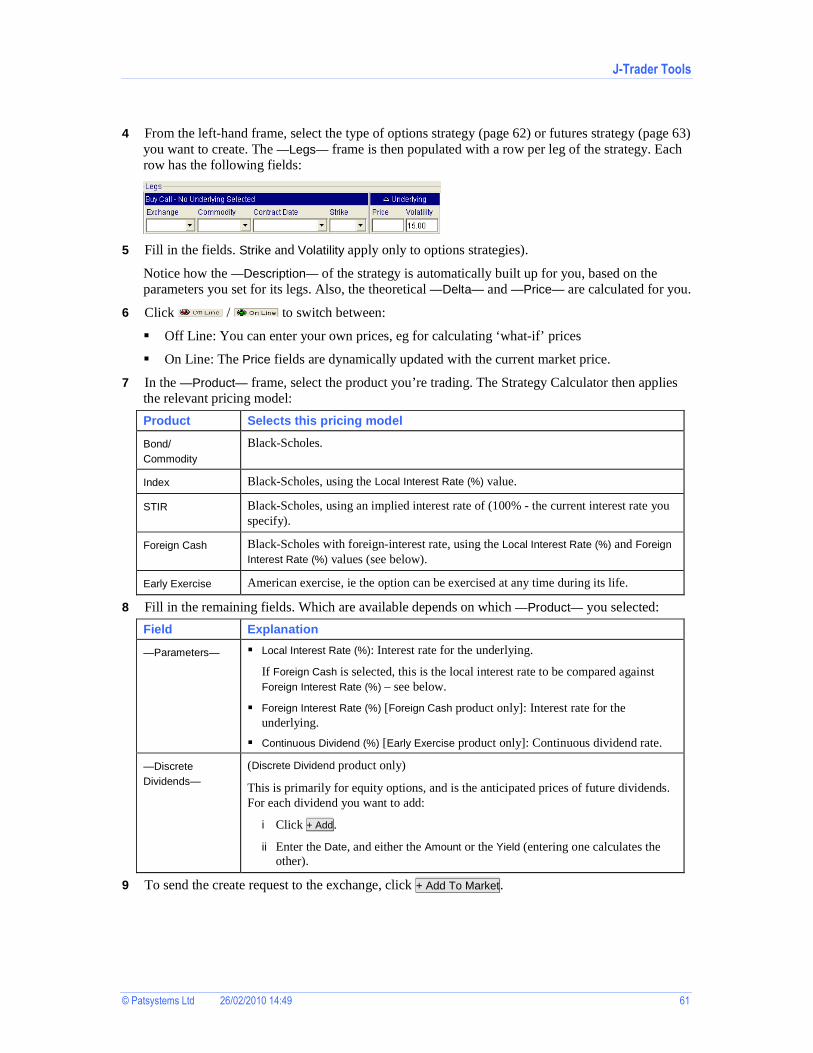
J-Trader Tools
© Patsystems Ltd 26/02/2010 14:49 61
4 From the left-hand frame, select the type of options strategy (page 62) or futures strategy (page 63) you want to create. The —Legs— frame is then populated with a row per leg of the strategy. Each row has the following fields:
5 Fill in the fields. Strike and Volatility apply only to options strategies).
Notice how the —Description— of the strategy is automatically built up for you, based on the parameters you set for its legs. Also, the theoretical —Delta— and —Price— are calculated for you.
6 Click / to switch between:
� Off Line: You can enter your own prices, eg for calculating ‘what-if’ prices
� On Line: The Price fields are dynamically updated with the current market price.
7 In the —Product— frame, select the product you’re trading. The Strategy Calculator then applies the relevant pricing model:
Product Selects this pricing model
Bond/ Commodity
Black-Scholes.
Index Black-Scholes, using the Local Interest Rate (%) value.
STIR Black-Scholes, using an implied interest rate of (100% - the current interest rate you specify).
Foreign Cash Black-Scholes with foreign-interest rate, using the Local Interest Rate (%) and Foreign Interest Rate (%) values (see below).
Early Exercise American exercise, ie the option can be exercised at any time during its life.
8 Fill in the remaining fields. Which are available depends on which —Product— you selected:
Field Explanation
—Parameters— � Local Interest Rate (%): Interest rate for the underlying.
If Foreign Cash is selected, this is the local interest rate to be compared against Foreign Interest Rate (%) – see below.
� Foreign Interest Rate (%) [Foreign Cash product only]: Interest rate for the underlying.
� Continuous Dividend (%) [Early Exercise product only]: Continuous dividend rate.
—Discrete Dividends—
(Discrete Dividend product only)
This is primarily for equity options, and is the anticipated prices of future dividends. For each dividend you want to add:
i Click + Add.
ii Enter the Date, and either the Amount or the Yield (entering one calculates the other).
9 To send the create request to the exchange, click + Add To Market.

J-Trader Tools
62 © Patsystems Ltd 26/02/2010 14:49
Options Strategies The types of option strategy you can choose from on the Strategy Calculator (page 60) are described in the following table. Notice how the selection of available strategies changes according to whether As Volatility Trade is ticked.
The options strategy types are as follows:
Options strategy type
Explanation
Call Standard call.
Put Standard put.
Straddle Buy put, buy call at same strike.
Strangle Buy put, buy call at higher strike.
Call Spread Buy call, sell and call (same month) at higher strike.
Put Spread Buy put, sell any put (same month) at lower strike.
2x1 Call Spread Sell call, buy two calls at higher strike.
2x1 Put Spread Sell put, buy two puts at lower strike.
Call Spread vs Put Buy a call spread versus selling a put: buy a call, sell a call at a higher strike, sell a put at any strike.
Put Spread vs Call Buy a put spread versus selling a call: buy a put, sell a put at a lower strike, sell a call at any strike.
Call Butterfly
Buy call, sell two calls at higher strikes, buy call at a higher strike. (The strikes do not have to be consecutive and the gaps between them do not have to be equal.)
Put Butterfly Buy put, sell two puts at higher strikes, buy put at a higher strike. (The strikes do not have to be consecutive and the gaps between them do not have to be equal.)
Combo Sell call, buy put at lower strike.
Iron Butterfly Buy the straddle, sell the strangle. This must be entered in the following sequence: sell put, buy put and call at higher strike, sell call at a higher strike. (The strikes do not have to be consecutive and the gaps between them do not have to be equal.)
Call Condor
Put Condor
Buy near month, sell later month, sell yet later month and buy later month still. (The delivery months do not have to be consecutive and the gaps between them do not have to be equal.)

J-Trader Tools
© Patsystems Ltd 26/02/2010 14:49 63
Options strategy type
Explanation
Calendar Call Spread Sell near month call, buy far month call (same strikes across the two months).
Calendar Put Spread Sell near month put, buy far month put (same strikes across the two months).
Straddle vs Call Buy a straddle versus selling a call: buy the straddle (ie, buy a put and call at the same strike), as well as selling a call at any strike.
Straddle vs Put Buy a straddle versus selling a put: buy the straddle (ie, buy a put and call at the same strike), as well as selling a put at any strike.
Reversal (Conversion)
Reversal: Buy call, set put at same strike, sell underlying.
Conversion: Same sequence as Reversal, but submitted to the market as a sell/offer order.
Synthetic Conversion/ Reversal
Same as Reversal (Conversion), except that you aren’t trading the underlying leg.
Straddle Calendar Spread
Sell Straddle in near month, buy straddle in far month at same strike. (Sell near month put, sell near month call, buy far put, buy far call.)
Diagonal Straddle Calendar Spread
Sell straddle in near month, buy straddle in far month at different strike: sell near month put, sell near month call, buy far month put, buy far month call.
Diagonal Calendar Call Spread
Sell near month call, buy any far month call at a different strike.
Diagonal Calendar Put Spread
Sell near month put, buy any far month put at a different strike.
Futures Strategies The types of future strategy you can choose on the Strategy Calculator (page 60) are as follows:
Futures strategy type Explanation
Calendar Spread Buy near month, sell far month.
Butterfly Buy near contract month, sell two contracts in far month, buy one contract in yet farther month. (The delivery months and the gaps between them do not have to be equal.)
Condor Buy near month, sell later moth, sell yet later month and buy later month still. (The delivery months do not have to be consecutive and the gaps between them do not have to be equal.)
ICS Spread (eCBOT exchange only)
Buy future contract, sell future contract. Two different commodities can be selected and the ratio set for the first and second legs.
Using the List Ticker The List Ticker (available from Tools/List Ticker) displays all options, futures, RFQs, block trades, and strategy trades for any number of contracts on any number of exchanges. It provides immediate access to information on pricing and transactions. Note that you can only display trades from here, not enter or amend them.
Follow these steps:

J-Trader Tools
64 © Patsystems Ltd 26/02/2010 14:49
1 From J-Trader’s main menu, select Tools List Ticker.
2 By default, everything is selected. You can deselect items by clicking , and unticking the items you don’t want. Notice how (un)ticking an item causes all its children to be (un)ticked as well, although you can subsequently (un)tick those children independently of each other.
3 You can adjust the columns (page 23), namely change the selection of columns, reorder columns, and auto-adjust their widths.
4 The rest of the screen is as follows:
Item Explanation
Vol. Select the minimum volume you want displayed.
RFQs
Options
Futures
Tick the categories of contract you want to view.
Trade ticket column
Click in the second-last column to open a trade ticket (page 35) for trading the contract on that row.
In the trade ticket, the Lots field defaults to the Vol. selected here on the List Ticker, and the Price field defaults to the last-traded price.
Options screen column
(Options only)
Click in the last column to open the Options screen for trading the option on that row. The Options screen opens with the selected price in the middle, and extra prices above and below.
Submitting Bulk Orders You can submit, in one batch, a large quantity of orders for any number of exchanges. You will probably want to submit the orders in the pre-open period, but you can specify any time – even different times per order within the batch.
To submit bulk orders, you use a .csv (comma-delimited) file. Typically you would import the data into Excel, which saves you from manually entering each order, which can be time-consuming and error-prone. If you are a broker, you could have a spreadsheet per customer, exported from your customers’ databases.
The following two sections explain the format of the input file, and how to submit the orders from J-Trader.
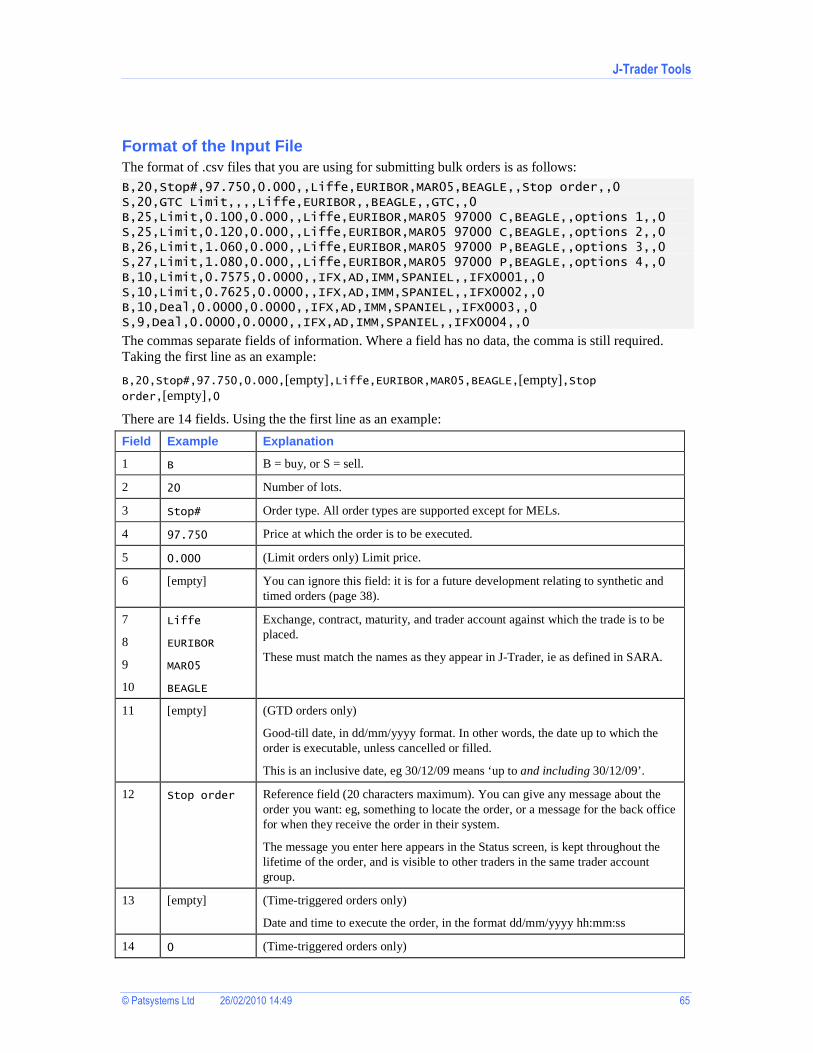
J-Trader Tools
© Patsystems Ltd 26/02/2010 14:49 65
Format of the Input File The format of .csv files that you are using for submitting bulk orders is as follows:
B,20,Stop#,97.750,0.000,,Liffe,EURIBOR,MAR05,BEAGLE,,Stop order,,0 S,20,GTC Limit,,,,Liffe,EURIBOR,,BEAGLE,,GTC,,0 B,25,Limit,0.100,0.000,,Liffe,EURIBOR,MAR05 97000 C,BEAGLE,,options 1,,0 S,25,Limit,0.120,0.000,,Liffe,EURIBOR,MAR05 97000 C,BEAGLE,,options 2,,0 B,26,Limit,1.060,0.000,,Liffe,EURIBOR,MAR05 97000 P,BEAGLE,,options 3,,0 S,27,Limit,1.080,0.000,,Liffe,EURIBOR,MAR05 97000 P,BEAGLE,,options 4,,0 B,10,Limit,0.7575,0.0000,,IFX,AD,IMM,SPANIEL,,IFX0001,,0 S,10,Limit,0.7625,0.0000,,IFX,AD,IMM,SPANIEL,,IFX0002,,0 B,10,Deal,0.0000,0.0000,,IFX,AD,IMM,SPANIEL,,IFX0003,,0 S,9,Deal,0.0000,0.0000,,IFX,AD,IMM,SPANIEL,,IFX0004,,0
The commas separate fields of information. Where a field has no data, the comma is still required. Taking the first line as an example:
B,20,Stop#,97.750,0.000,[empty],Liffe,EURIBOR,MAR05,BEAGLE,[empty],Stop order,[empty],0
There are 14 fields. Using the the first line as an example:
Field Example Explanation
1 B B = buy, or S = sell.
2 20 Number of lots.
3 Stop# Order type. All order types are supported except for MELs.
4 97.750 Price at which the order is to be executed.
5 0.000 (Limit orders only) Limit price.
6 [empty] You can ignore this field: it is for a future development relating to synthetic and timed orders (page 38).
7
8
9
10
Liffe
EURIBOR
MAR05
BEAGLE
Exchange, contract, maturity, and trader account against which the trade is to be placed.
These must match the names as they appear in J-Trader, ie as defined in SARA.
11 [empty] (GTD orders only)
Good-till date, in dd/mm/yyyy format. In other words, the date up to which the order is executable, unless cancelled or filled.
This is an inclusive date, eg 30/12/09 means ‘up to and including 30/12/09’.
12 Stop order Reference field (20 characters maximum). You can give any message about the order you want: eg, something to locate the order, or a message for the back office for when they receive the order in their system.
The message you enter here appears in the Status screen, is kept throughout the lifetime of the order, and is visible to other traders in the same trader account group.
13 [empty] (Time-triggered orders only)
Date and time to execute the order, in the format dd/mm/yyyy hh:mm:ss
14 0 (Time-triggered orders only)
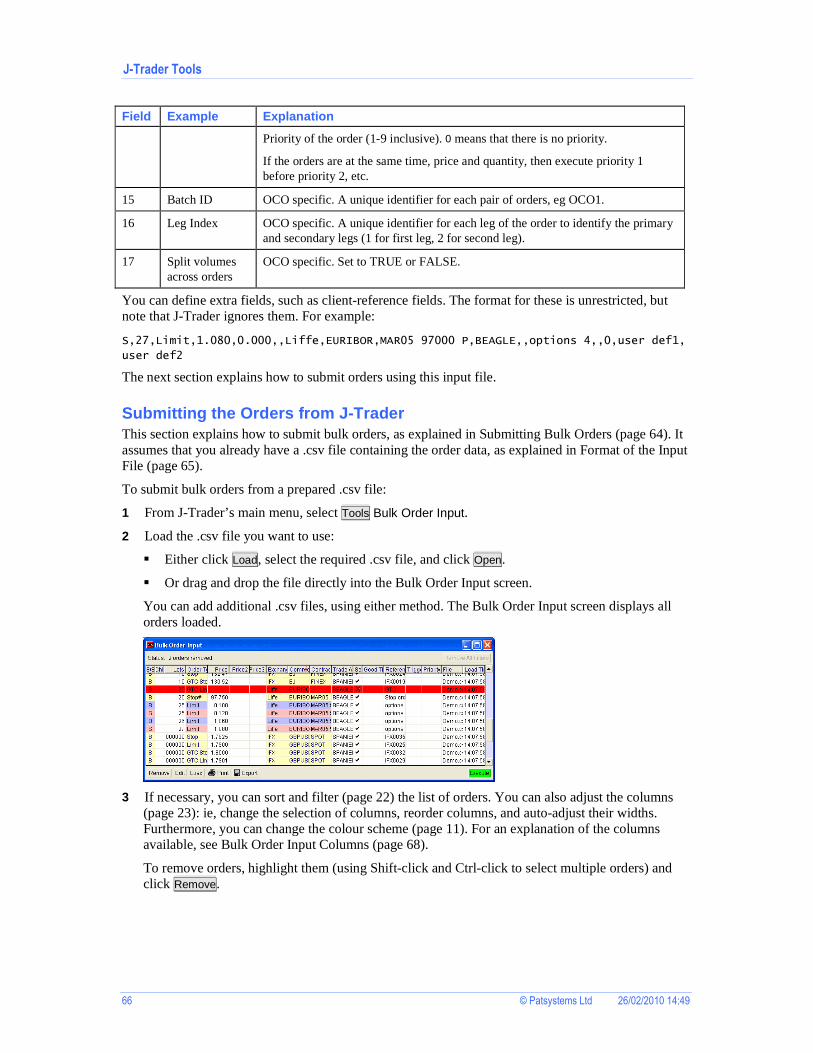
J-Trader Tools
66 © Patsystems Ltd 26/02/2010 14:49
Field Example Explanation
Priority of the order (1-9 inclusive). 0 means that there is no priority.
If the orders are at the same time, price and quantity, then execute priority 1 before priority 2, etc.
15 Batch ID OCO specific. A unique identifier for each pair of orders, eg OCO1.
16 Leg Index OCO specific. A unique identifier for each leg of the order to identify the primary and secondary legs (1 for first leg, 2 for second leg).
17 Split volumes across orders
OCO specific. Set to TRUE or FALSE.
You can define extra fields, such as client-reference fields. The format for these is unrestricted, but note that J-Trader ignores them. For example:
S,27,Limit,1.080,0.000,,Liffe,EURIBOR,MAR05 97000 P,BEAGLE,,options 4,,0,user def1,
user def2
The next section explains how to submit orders using this input file.
Submitting the Orders from J-Trader This section explains how to submit bulk orders, as explained in Submitting Bulk Orders (page 64). It assumes that you already have a .csv file containing the order data, as explained in Format of the Input File (page 65).
To submit bulk orders from a prepared .csv file:
1 From J-Trader’s main menu, select Tools Bulk Order Input.
2 Load the .csv file you want to use:
� Either click Load, select the required .csv file, and click Open.
� Or drag and drop the file directly into the Bulk Order Input screen.
You can add additional .csv files, using either method. The Bulk Order Input screen displays all orders loaded.
3 If necessary, you can sort and filter (page 22) the list of orders. You can also adjust the columns (page 23): ie, change the selection of columns, reorder columns, and auto-adjust their widths. Furthermore, you can change the colour scheme (page 11). For an explanation of the columns available, see Bulk Order Input Columns (page 68).
To remove orders, highlight them (using Shift-click and Ctrl-click to select multiple orders) and click Remove.
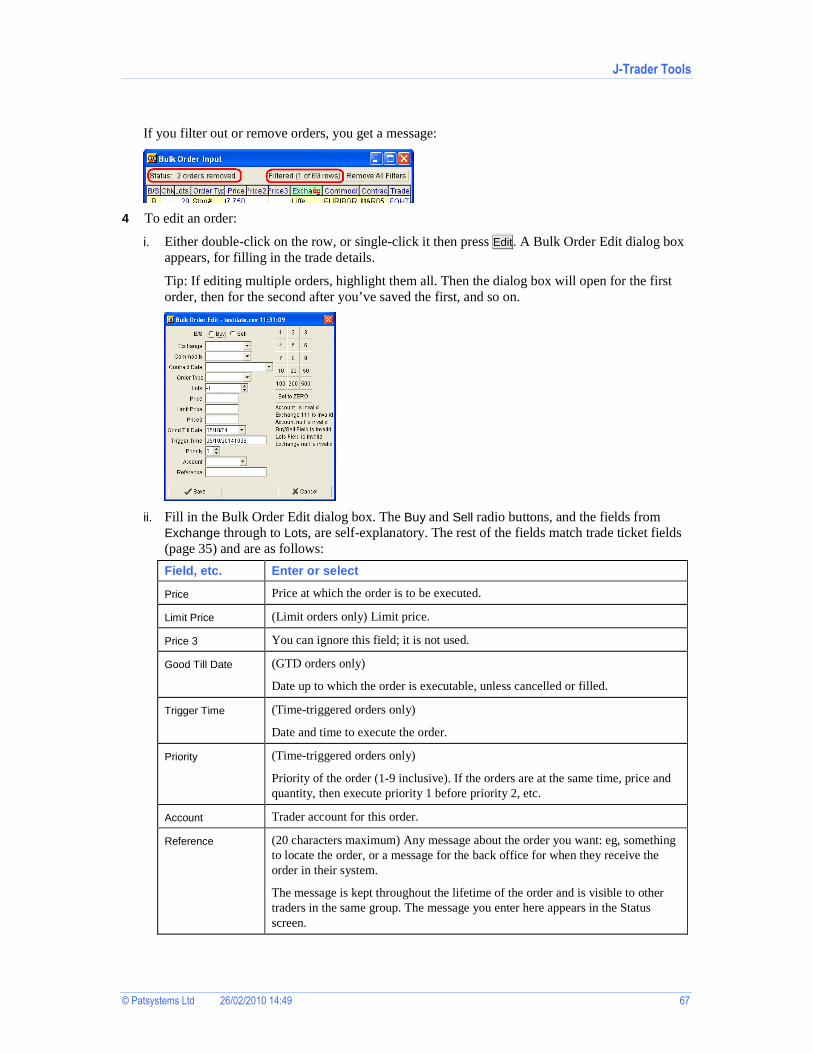
J-Trader Tools
© Patsystems Ltd 26/02/2010 14:49 67
If you filter out or remove orders, you get a message:
4 To edit an order:
i. Either double-click on the row, or single-click it then press Edit. A Bulk Order Edit dialog box appears, for filling in the trade details.
Tip: If editing multiple orders, highlight them all. Then the dialog box will open for the first order, then for the second after you’ve saved the first, and so on.
ii. Fill in the Bulk Order Edit dialog box. The Buy and Sell radio buttons, and the fields from Exchange through to Lots, are self-explanatory. The rest of the fields match trade ticket fields (page 35) and are as follows:
Field, etc. Enter or select
Price Price at which the order is to be executed.
Limit Price (Limit orders only) Limit price.
Price 3 You can ignore this field; it is not used.
Good Till Date (GTD orders only)
Date up to which the order is executable, unless cancelled or filled.
Trigger Time (Time-triggered orders only)
Date and time to execute the order.
Priority (Time-triggered orders only)
Priority of the order (1-9 inclusive). If the orders are at the same time, price and quantity, then execute priority 1 before priority 2, etc.
Account Trader account for this order.
Reference (20 characters maximum) Any message about the order you want: eg, something to locate the order, or a message for the back office for when they receive the order in their system.
The message is kept throughout the lifetime of the order and is visible to other traders in the same group. The message you enter here appears in the Status screen.
J-Trader Tools
68 © Patsystems Ltd 26/02/2010 14:49
iii. Click Save. The red background for the order turns white, to show that all required details have been supplied.
5 (Optional) Print or export the data:
To do this Follow these steps
Print i Click Print.
ii In the dialog box, select one of the following:
All Orders (all imported orders)
All Filtered Orders (imported orders after any filtering)
Selected Orders (only those orders you have highlighted)
iii Click OK.
Note: Any user-defined fields you have are not printed.
Export To export the data to a new .csv file, highlight the rows to export then click Export.
6 Ensure that the Send column has ticks for all orders you want to execute in this batch. By default, all loaded orders are ticked, unless they contain errors.
7 Click Execute.
A confirmation box shows the total number of orders selected.
As orders are executed, they are removed from the Bulk Order Input screen and placed in a log file, located in your J-Trader home directory (the folder where your user property files are stored) and named executelog-ddmm.csv.
Unexecuted orders remain in the Bulk Order Input screen until you remove them.
Bulk Order Input Columns
By right-clicking in the grid of the Bulk Order Input screen (page 66) and clicking on Select Columns, you can choose from the following columns:
Column Explanation
B/S Buy/Sell indicator.
Chk Double-click to add a tick, showing that this order has been checked.
This column is mainly for brokers needing to confirm whether an order has been checked with the customer.
Lots Number of lots.
Order Type Type of order (Stop, Limit, etc.).
Price Price at which the order is to be executed.
Price2 (Limit orders only) Limit price.
Price3 You can ignore this column; it is not used.
Exchange
Commodity
Contract Date
Exchange, commodity and contract date.
Trade Account Trader account for this order.
Send Column for ticking the orders you want to execute in this batch.

J-Trader Tools
© Patsystems Ltd 26/02/2010 14:49 69
Column Explanation
By default, all orders are ticked when you load them, unless they contain errors.
GT Date (GTD orders only)
Date up to which the order is executable, unless cancelled or filled.
Reference Freeform description of the order.
Trigger Time (Time-triggered orders only)
Date and time the order is to be executed.
Priority (Time-triggered orders only)
Priority of the order (1-9 inclusive). If the orders are at the same time, price and quantity, then execute priority 1 before priority 2, etc.
File Name of the .csv file from which you loaded the order.
Load Time Time at which you loaded this order into the Bulk Order Input screen.
Viewing Fills If General tab (page 12) Display Alert Popup is ticked, you get a pop-up message whenever an order receives a fill.
Using the Fill window, you can see the same information in grid format (one row per fill):
1 From J-Trader’s main menu, select Tools Fill Window.
As fills are received, they are inserted into the top row and highlighted in red.
2 To acknowledge fill notifications (which moves them to the lower pane):
� Either select a single order, then click Acknowledge Selected.
� Or select multiple orders (Shift-click), then click Acknowledge All.
3 To sort orders in the lower pane, click the header of the column to sort by.
4 If a row is greyed out, it means that the fill is inactive or expired. To clear expired fills from the Fill Window (and the rest of J-Trader), click Purge (bottom-left corner).


© Patsystems Ltd 26/02/2010 14:49 71
Screen from which you can check the status and progress of working, filled and completed orders.
against actuals trade Trade that enables physical market participants to exchange futures contracts outside of the central order-book, in order to price directly related physical contracts. Also known as exchange-for-physicals (EFPs). See Entering ‘Against Actuals’ Trades.
alert Collective name for pop-up messages and sounds, alerting you that something has happened. In the Settings screen, you can turn alerts on and off using the General tab (page 12), and set sounds for alerts using the Sounds tab (page 16).
AlgoServer Old name for SyOMS Pro.
basis trade Contract that enables a trader to enter into a conditional transaction involving both a futures contract and a corresponding cash instrument. As such, they can include bond and swap futures, equity index futures and Short Term Interest Rate (STIR) futures contracts. Many different cash instruments are available to form the cash leg of basis trades. See Entering Basis Trades.
block trade Trade involving many securities at once. Usually, only institutional investors undertake such large trades, and block trading is restricted to certain Pro-Mark user roles. Block-trade orders must include a buy side, a sell side, a trade price and a volume.See Entering Block Trades.
cross trade Simultaneous submission to the exchange of a buy order and a sell order, at the same price and volume as each other. Cross trades can be between a trader and a market maker, or between two traders.
desktop ‘Desktops’ are sets of windows and instrument selections that you can switch between and configure independently of each other. For example, you could have different desktops for trading bonds and trading STIRs.
dime Create the new best bid or offer, namely submit an order one tick higher than the current best bid, or one tick lower than the current best offer.
EFP (Exchange For Physical) Another name for an against actuals trade.
Glossary
Glossary
72 © Patsystems Ltd 26/02/2010 14:49
expired contract A contract whose expiry date has passed. Compare with inactive contract.
fat-finger limits A set of limits (low, medium and high severity) that you can set against the numbers of lots you trade. Depending on the severity of the limit you breach, you will either get a warning or be prevented from entering the trade.
inactive contract Contract that is not currently usable although it still exists, eg a quoted instrument when its exchange is closed. Compare with expired contract.
inside price Price with no volume that is between the current best bid and offer. Viewable in Patsystems Reflector™ screens.
instrument (Sometimes referred to as a ‘contract’) T-Bond, etc. Compare with quoted instrument.
lots pad Panel for increasing the number of lots by preset amounts, and for resetting the number of lots to zero. Lots pads appear on trade tickets, FX trade tickets, and the Patsystems Reflector™ screen. You can set a default number of lots per exchange, instrument and contract, using the Settings screen, Contract tab (page 17), Default Quantity sub-tab.
main screen Screen from which you select all menu items and from where you open trading windows. See Main Screen.
MEL (Multi-Exchange Legger) A strategy not supported by an exchange. You can define and trade MELs, which can be either intra-market (a strategy involving instruments from the same exchange) or inter-market (instruments from different exchanges). See Using Strategies (MELs) on page 49.
OCO (one cancels the other) trade An OCO (‘One Cancels the Other’) order comprises two separate orders, one of which is cancelled the moment the other is filled. The two orders can be either limit-limit, or limit-stop: eg, a buy limit order below the current market price, paired with a buy stop above the current market price.
one-click trading Synonym for single-click trading.
Patsystems Reflector The Reflector™ is a price-ladder screen from which you can trade the full depth of market for a contract, including ‘inside prices’ (prices without volume that are between the bid and offer).
quoted instrument (Also known as contract) Specific issue of an instrument, eg Dec 04 T-Bond.
Glossary
© Patsystems Ltd 26/02/2010 14:49 73
SARA System And Risk Administration: an administration tool for monitoring trading activity on J-Trader, and maintaining data required by J-Trader.
single-click trading (Also known as one-click trading) Trading where the moment you activate an order, the order is sent straight to the exchange without any confirmation message or trade ticket.
If you want single-click trading, you untick the Show Trade Confirm checkboxes in the Settings screen, Trading tab (page 14). Be very careful, though: this means you can’t amend a trade it before it is sent to the exchange.
SODNLV Start-Of-Day Net Liquidity Value, namely the trading funds available to an account.
split bar The horizontal bar, in the middle of a Patsystems Reflector™ screen, that separates the best bid and best offer prices.
synthetic order Order, processed by SyOMS, for mimicking order types not supported by a particular exchange. Examples include synthetic versions of stops, GTCs and GTDs, and time-triggered orders. See Trading Synthetic and Timed Orders.
SyOMS Synthetic Order Management System, a module from Patsystems for managing the flow and execution of time-triggered orders and synthetic orders.
SyOMS Pro A version of SyOMS that includes extra order types. See Order Types (page 23).
tick bar A pop-up list of alternative prices that opens when you place the cursor on the currently displayed best bid or offer. The background colour indicates whether the prices are bids (red) or offers (blue).
timed order Order that is activated at a specified date and time. See Trading Synthetic and Timed Orders (page 38).
trade ticket Screen from which you enter or amend the details of a trade. See Using a Trade Ticket (page 35).
trading window Screen from which you select all of the trading and reporting functions. See Overview of Trading in J-Trader (page 22).

© Patsystems Ltd 26/02/2010 14:49 75
A
AA (against actual) orders definition of • 23
Account field display on trading windows • 11 setting defaults for • 20
Accounts screen • 20 activating orders • 51 against actuals, definition of • 71 alerts
definition of • 71 turning on and off • 12
Always On Top function • 11 amending orders • 51 APIM code • 54 auto-clear Lots field • 11
B
backwardation • 38 basis orders
definition of • 23 basis trades, definition of • 71 best bid/offer
entering automatically • 33 entering manually • 32
block orders definition of • 23
block trades, definition of • 71 bracket orders
definition of • 23 Bulk Order Input (Tools menu) • 64
columns for • 68 bulk orders, submitting • 66 buttons, increasing space between • 11 buy ticket
default with shortcut key • 13 setting tabbing order for • 14
C
calendar spreads, trading • 42 Clicking on Size Action function • 14 colours, defining • 11 columns
bulk order input • 68 Hot Quotes screen • 20 Positions screen • 56 selecting, sizing and renaming • 23 Status screen • 54 Strategies screen • 48
Columns
Fills • 57 command line, running J-Trader from • 4 configuring J-Trader • 10 confirmations (for trades), configuring • 14 connectivity, checking • 8 contact details for Patsystems • 2 context-sensitive help • 1 Contract tab (Settings screen) • 17 contracts, setting attributes for • 17 cross orders
definition of • 23 cross trades
definition of • 71 entering • 35
D
deactivating orders • 51 decimal and fractional, switching between • 11 default accounts, setting • 20 default lot increment • 17 default trade tickets, with shortcut keys • 13 desktops
definition of • 71 managing • 8
diagnostics, selecting which to create • 12 diming
automatically • 33 definition of • 71 manually • 32
display font, changing • 11 Display tab (Settings screen) • 11 DOM screen • 27
preventing trading in • 11
E
Eurodollar contracts, trading • 41 Excel spreadsheet, submitting orders using • 64 exchanges, setting attributes for • 17 exchange-supported strategies, creating • 60 execution time - timed order • 17 expired or inactive fill • 69 expired strategies • 47 exporting orders • 51
F
failure notification • 14 FAK (fill and kill) orders
definition of • 23 fat-finger limits
definition of • 72 setting • 14
Index
Index
76 © Patsystems Ltd 26/02/2010 14:49
Fill columns • 57 Fill Window • 69 filtering and sorting lists • 22 FOK (fill or kill) orders
definition of • 23 font for displays, changing • 11 fractional and decimal, switching between • 11 futures strategies
creating • 60 types you can create • 63
FX trades • 39
G
General tab (Settings screen) • 12 ghost orders
definition of • 23 global trading, overview of • 2 GTC orders
definition of • 23 GTD orders
definition of • 23
H
help, context-sensitive • 1 hosted web-based J-Trader, launching • 3 Hot Quotes
columns • 20 configuring • 19 trading with • 26
I iceberg orders
definition of • 23 icebergs, simulating using MELs • 49 inactive or expired fill • 69 indicative bid/offer • 41 input file for bulk orders • 65 inside prices, definition of • 72 installing J-Trader • 3 inter-commodity spread • 60 introduction to J-Trader • 2 IP addresses and ports, specifying • 5
J
Japanese version, starting • 3 joining a bid/offer
automatically • 33 manually • 32
L
launching J-Trader • 3 List Ticker (Tools menu) • 63 LME, trade tickets for • 38 log entries, selecting which to create • 12 logging in to J-Trader • 4 logging out of J-Trader • 6 London Metal Exchange, trade tickets for • 38 lots
limiting number per order • 14 setting default numbers • 17
Lots field, auto-clear • 11 lots pad
configuring • 17 definition of • 72
M
main screen definition of • 72 overview of • 7
Matrix screen • 42 MEL Template tab (Settings screen) • 18 MELs
creating • 49 definition of • 72 overview of • 49 trading • 51 using to simulate icebergs • 49
Messages screen • 9 MIT (market if touched) orders
definition of • 23 MOO (market on open) orders
definition of • 23 mouse clicks, speeding up • 11 Multi-Exchange Legger, definition of • 72
N
Network Settings screen • 5
O
OCO definition of • 72 entering • 35
OCO (one cancels other) orders definition of • 23
one-click trading configuring • 14 definition of • 72
online help • 1 Options screen • 44 options strategies
creating • 60 types you can create • 62
Order Book, definition of • 71 order sub states
in Status screen • 54 switching on/off • 11
order types definitions for • 23
orders displaying in the Scroll Ticker • 59 limiting number of lots for • 14 messages about • 9 setting default number of lots • 17
P
password, changing • 4

Index
© Patsystems Ltd 26/02/2010 14:49 77
Patsystems contact details • 2 Patsystems Reflector, definition of • 72 PIG (Price Injector Gun) • 32 pop-up messages, turning on and off • 12 ports and IP addresses, specifying • 5 Position columns • 56 Positions screen
using • 55 positions, viewing • 55 price tick bar, setting properties for • 12 protection orders • 34
definition of • 23 purge expired contracts • 26
Q
quoted instrument, definition of • 72
R
Reflector configuring • 18 definition of • 72 trading with • 29
Reflector tab (Settings screen) • 18 renaming columns • 23 reserved-quantity orders
definition of • 23 resizing columns • 23 resubmitting orders • 51 RFQi RFQt • 41 running J-Trader • 3
S
SARA, definition of • 73 Scroll Ticker (Tools menu) • 59 selecting columns • 23 sell ticket
default with shortcut key • 13 setting tabbing order for • 14
servers, IP addresses and ports for • 5 Settings screen
Contract tab • 17 Display tab • 11 General tab • 12 MEL Template tab • 18 Reflector tab • 18 Sounds tab • 16 Trading tab • 14 using • 10
shortcut keys, defining • 12 single-click trading • 14
configuring • 14 definition of • 73
sizing columns • 23 sort and filter orders (Status screen) • 51 sorting and filtering lists • 22 sounds
assigning • 16
turning on and off • 12 Sounds tab (Settings screen) • 16 space between buttons, increasing • 11 split bar
definition of • 73 setting thickness of • 18
standalone J-Trader, installing • 3 starting J-Trader • 3 Status screen
columns • 54 using • 51
Strategies screen columns for • 48 columns in • 48 trading with • 47
strategies, creating • 60 Strategy Calculator (Tools menu) • 60 sub states
in Status screen • 54 switching on/off • 11
synthetic orders definition of • 73 trading • 38
synthetic strategies (MELs) • 49 SyOMS Pro, definition of • 73 SyOMS, definition of • 73 system requirements for J-Trader • 2
T
tabbing order for trade tickets, setting • 14 tick bar
definition of • 73 setting properties for • 12
timed orders definition of • 23
timed orders, entering • 38 timeslice orders
definition of • 23 time-triggered orders
definition of • 73 Tools menu
Bulk Order Input • 66 List Ticker • 63 overview of • 59 Scroll Ticker • 59 Strategy Calculator • 60
trade confirmations • 14 trade recap • 51 trade tickets
defining shortcut keys for • 13 definition of • 73 for cross trades • 35 for FX trades • 39 for LME (London Metal Exchange) • 38 for OCOs • 35 for synthetic orders • 38 setting tabbing order for • 14 using • 35
Index
78 © Patsystems Ltd 26/02/2010 14:49
Trading tab (Settings screen) • 14 trading windows
definition of • 73 display Account field • 11 managing • 8
trading with J-Trader, overview • 22
U
updating and viewing orders • 51
V
viewing and updating orders • 51 viewing positions • 55
W
web-based J-Trader, launching • 3 website and contact details for Patsystems • 2 windows, bring selected to foreground • 11 with-a-tick orders
definition of • 23