User's Manual AVIC-S1 - Pioneer Electronics USAs manual AVIC-S1 - 10 - The basic principle of...
111
User's manual AVIC-S1 as of may 2006
Transcript of User's Manual AVIC-S1 - Pioneer Electronics USAs manual AVIC-S1 - 10 - The basic principle of...

User's manual
AVIC-S1
as of may 2006

Copyright
The information contained herein may be changed at any time without prior notification. This manual nor any parts thereof may not be reproduced for any purpose whatsoever without the written consent of Pioneer, nor transmitted in any form either electronically or mechanically, including photocopying and recording.
© Copyright 2006, PIONEER Corporation All rights reserved.

User's manual AVIC-S1
User's manual Table of contents i
Table of contents 1 Introduction................................................................5
1.1 About this manual............................................................ 6 1.1.1 Arrangement ........................................................ 6 1.1.2 Conventions ......................................................... 6 1.1.3 Symbols in the Manual........................................... 6 1.1.4 Terminology......................................................... 7
1.2 Legal notice .................................................................... 8 1.2.1 Liability ............................................................... 8 1.2.2 Trademarks.......................................................... 8
1.3 Support.......................................................................... 9 1.4 The basic principle of navigation ...................................... 10
2 Using the AVIC-S1 for the First Time ........................11 2.1 Power supply and charging the battery ............................. 12
2.1.1 At home ............................................................ 12 2.1.2 In the car .......................................................... 12 2.1.3 End of recharging................................................ 12
2.2 Switching on the AVIC-S1 ............................................... 13 2.3 Basic settings................................................................ 13
3 Operating the navigation software............................19 3.1 Hardware keys .............................................................. 20 3.2 Software keyboard......................................................... 21
3.2.1 Enter characters with the touch screen keyboard ..... 21 3.3 Command buttons ......................................................... 23
4 Navigation ................................................................25 4.1 General information on navigation.................................... 26 4.2 Starting AVIC-S1 ........................................................... 27 4.3 Entering a destination .................................................... 28
4.3.1 Opening the DESTINATION window........................... 28 4.3.2 Specifying destination state (province)................... 29 4.3.3 Entering a destination address .............................. 30 4.3.4 Specifying points of interest ................................. 37 4.3.5 Destination history .............................................. 44 4.3.6 Address book ..................................................... 45 4.3.7 Navigating home................................................. 46 4.3.8 Selecting destinations on the map ......................... 47
4.4 Administering destinations .............................................. 49 4.4.1 Opening the ADDRESS BOOK ................................... 49 4.4.2 Saving............................................................... 50 4.4.3 Editing .............................................................. 51 4.4.4 Deleting............................................................. 54
4.5 Itinerary (with waypoints)............................................... 55 4.5.1 Opening the ITINERARY window............................... 55 4.5.2 Indicating waypoints ........................................... 56 4.5.3 Scrolling through the list of waypoints.................... 57 4.5.4 Editing the list of waypoints.................................. 57

User's manual AVIC-S1
ii Table of contents User's manual
4.5.5 Managing itineraries ............................................ 58 4.5.6 Calculating the route ........................................... 60 4.5.7 Displaying information regarding the route ............. 61 4.5.8 Simulating a route .............................................. 62 4.5.9 Starting navigation.............................................. 62
5 Working with the map...............................................65 5.1 Status displays .............................................................. 66 5.2 Zoom........................................................................... 68 5.3 Map views .................................................................... 69
5.3.1 Standard map view ............................................. 69 5.3.2 Search for destination view .................................. 71 5.3.3 View destination - map view................................. 72
5.4 Showing the map during navigation.................................. 73
6 Useful functions for navigation .................................77 6.1 Waypoints .................................................................... 78 6.2 Skip next waypoint ........................................................ 78 6.3 Blocking a route section.................................................. 79 6.4 Change route preferences ............................................... 81 6.5 Simulation .................................................................... 82
7 Configuring AVIC-S1 .................................................83 7.1 Opening the SETTINGS window .......................................... 84 7.2 Orientation ................................................................... 85 7.3 Map Type ..................................................................... 85 7.4 Day / Night Display ........................................................ 85 7.5 Route Preferences.......................................................... 86 7.6 Overlay POI .................................................................. 87 7.7 Displayed Information .................................................... 89
7.7.1 Current Time...................................................... 89 7.7.2 Current Street Name ........................................... 90 7.7.3 Compass ........................................................... 90 7.7.4 Current Speed .................................................... 90 7.7.5 Destination Info.................................................. 91 7.7.6 Waypoint Info..................................................... 91 7.7.7 Displayed Time................................................... 91 7.7.8 Street names on map (2D)................................... 92 7.7.9 GPS / current position ......................................... 92 7.7.10 Battery Status .................................................... 92
7.8 Background .................................................................. 93 7.9 Autozoom..................................................................... 93 7.10 Home Address............................................................... 94 7.11 Phone Menu .................................................................. 94 7.12 Hardware ..................................................................... 95
7.12.1 Demo Mode........................................................ 95 7.12.2 Click sound ........................................................ 96 7.12.3 Brightness ......................................................... 96 7.12.4 Battery Status .................................................... 97 7.12.5 GPS Status ........................................................ 97

User's manual AVIC-S1
User's manual Table of contents iii
7.13 Regional Settings........................................................... 98 7.13.1 Language........................................................... 99 7.13.2 Time Zone ......................................................... 99 7.13.3 Time Format .....................................................100 7.13.4 Distance ...........................................................100
7.14 Product Information ......................................................100 7.15 Restore Factory Settings ................................................100
8 Appendix.................................................................101 8.1 Appendix A: Restoring the Software and Map....................102
8.1.1 Restoring the software........................................102 8.1.2 Restoring the map..............................................103
9 Glossary..................................................................105
10 Index ......................................................................107


User's manual AVIC-S1
Introduction - 5 -
1 Introduction
Topics covered in this chapter:
1.1 About this manual page 6
Arrangement Conventions Symbols in the Manual Terminology
1.2 Legal notice page 8
Liability Trademarks
1.3 Support page 9
1.4 The basic principle of navigation page 10

User's manual AVIC-S1
- 6 - About this manual
1.1 About this manual
1.1.1 Arrangement
Find information quickly
If you are looking for specific information or the explanation for a specific term, you can refer to the following sections in the manual:
In the list Terminology on page 7 you'll find an explanation of terms used in this manual.
In the Glossary on page 105 you'll find an explanation of the specialist terms and abbreviations.
In the Index on page 107 you'll find page references.
1.1.2 Conventions
Conventions For better legibility and clarification the following styles are used in this manual:
Style Use
bold Buttons, icons, names of entry fields, and elements of the software’s user interface. Also used for highlighting warnings and notices.
bold italic Registered names and trademarks.
SMALL CAPITALS Window and dialog box titles.
1.1.3 Symbols in the Manual
Symbols The following symbols refer to specific content of text:
Symbol Use
Information and tips that facilitate working with AVIC-S1
More detailed information and explanations
Warnings

User's manual AVIC-S1
Introduction - 7 -
1.1.4 Terminology
Terms Used Specific terminology is used in this manual to designate elements of the product and user actions.
Term Use
Display The physical display of the navigation device.
Window A functional software operating unit that occupies the entire display.
Tab The navigation software is mainly operated by means of two tabs, the DESTINATION tab and the SETTINGS tab. Tap the appropriate tab in order to open the respective window.
Dialogue window A dialog window is a popup message, which includes questions or information text, and usually has a OK or Cancel button that need to be pressed to continue operation.
Button Elements of the user interface that can be touched to trigger a software action. Buttons can be labelled and /or provided with a graphic.
Symbol Small graphics on the user interface. These represent information. An example of this is the symbol for GPS reception. No operation associated with a symbol.
Input field A field in which data can be input. Input fields are generally labelled with text situated either above the input field or at the start of the input field.
Highlight Item which is currently selected from a list of options. You can change your selection by using the scroll wheel.
Scrolling wheel The scrolling wheel is located under the display, in the center. You can move Up and Down using the scrolling wheel, and also select an entry by pressing down on the scrolling wheel.
Hard Key Brings up MENU and MAP window. Activate Touch the screen on check box to activate
certain entries. Select Use the scrolling wheel to highlight entry of
choice.

User's manual AVIC-S1
- 8 - Legal notice
1.2 Legal notice
1.2.1 Liability
Limitation of liability The software and the manual are subject to change without notice. Pioneer may not be liable for the correctness of the information contained in this manual nor for damages resulting from the use of this manual.
To improve the quality of our products and our services, we appreciate all suggestions for improvement and all error notices.
1.2.2 Trademarks
Registered trademarks
All brands and trademarks mentioned in this document are possibly registered by third party and subject to the current legislation and to the rights of their respective owners without reservation. All mentioned names of products, societies, or brands may be registered trademarks of their respective owners. Every right that is not explicitly accorded is reserved.
The absence of an explicit labeling of registered trademarks does not allow the conclusion that this brand was not subject to the rights of third party.
Windows and ActiveSync are registered trademarks of the Microsoft Corporation.
User's manual AVIC-S1
Introduction - 9 -
1.3 Support
Failure to Operate
Should this Navigation System fail to operate properly, contact your dealer or the nearest authorized Pioneer service facility.
To locate your nearest authorized Pioneer service facility, please visit the Pioneer Electronics website
http://www.pioneerelectronics.com for USA or
http://www.pioneerelectronics.ca for Canada,
or call the Pioneer customer service telephone numbers listed below.
After-sales Service for Pioneer Products
Please contact the dealer or distributor from where you purchased the product for after- sales service (including warranty conditions) or any other information. In case the necessary information is not available, please contact Pioneer as specified below:
(Do not ship your product to the companies at the addresses listed below for repair without making advance contact.)
U.S.A. Pioneer Electronics (USA) Inc.
CUSTOMER SUPPORT DIVISION
P.O. Box 1760
Long Beach, CA 90801-1760
1-800-421-1404
Canada Pioneer Electronics of Canada, Inc.
CUSTOMER SATISFACTION DEPARTMENT
300 Allstate Parkway
Markham, Ontario L3R OP2
1-877-283-5901

User's manual AVIC-S1
- 10 - The basic principle of navigation
1.4 The basic principle of navigation
AVIC-S1 The stylish, small, and slim AVIC-S1 offers smart navigation features like address and points of interest search. In addition, built-in Bluetooth(TM) technology lets you wirelessly synchronize your compatible cell phone to the AVIC-S1 for handsfree calling. Pioneer's AVIC-S1 makes getting there simple.
GPS-based navigation
The Global Positioning System (GPS) was originally developed in the 1970's, as a weapon guidance system for the Government of the United States of America.
GPS is based on 24 satellites, which are in orbit round the earth and are permanently emitting signals. The GPS receiver receives these signals and calculates, based on the runtime of the signals, their distance from the respective satellites. This information allows for GPS devices to calculate your current geographic location.
The signals of at least four satellites are needed to determine the longitude and the latitude. GPS accuracy is estimated to be within 3 yards.
Navigation with GPS The imbedded maps contain the geographic coordinates of the points of interest, streets and cities in the database. Thus the navigation system can calculate a route from a given start point to a given destination point.
When your navigation system receives the signals of at least four satellites, it can determine your current position on the map. This will start as your starting point for navigating.
Current position calculation occurs about once a second, so your current location moves along the map right away, as you move also.

User's manual AVIC-S1
Using the AVIC-S1 for the First Time - 11 -
2 Using the AVIC-S1 for the First Time
Topics covered in this chapter:
2.1 Power supply and charging the battery page 12
At home page 12 In the car page 12 End of recharging page 12
2.2 Switching on the AVIC-S1 page 13
2.3 Basic settings page 13
User's manual AVIC-S1
- 12 - Power supply and charging the battery
2.1 Power supply and charging the battery
The unit is shipped with the battery uncharged. You must connect the device to an external power source (through the supplied 12V or AC adapter) and recharge the battery.
Once the device is connected to an external power source, it can be used, even if the battery is not recharged.
2.1.1 At home
1. Connect the mini USB end of the AC adapter to the mini USB opening on the bottom of the navigation device.
2. Insert the adapter into an outlet.
The diode indicating the charging status of the battery is to the left of the screen and lights up orange while recharging.
2.1.2 In the car
1. Install the suction mount.
2. Place the AVIC-S1 in the cradle.
The diode indicating the charging status of the battery is to the left of the screen and lights up orange while recharging.
2.1.3 End of recharging
As soon as the diode lights up green, the battery is completely recharged.
Caution: Recharge the unit fully when using it for the first time. Not doing so could cause permanent damage to the rechargeable battery.

User's manual AVIC-S1
Using the AVIC-S1 for the First Time - 13 -
2.2 Switching on the AVIC-S1
As soon as you have connected the navigation system to a power supply, you can start to use the unit.
1. Slide the main switch on the back of the device to ON.
If the main switch is already switched to ON, then press the On/Off button on the top of the device.
The PIONEER start screen appears briefly during start-up.
At the first start the following message appears:
2. Read the message, and touch OK if you agree with the written warning.
2.3 Basic settings
Basic Settings When you start AVIC-S1 for the first time, you will be asked
to specify the language in which you would like to operate the unit,
for the time zone of your current location, for calculating accurate estimated time of arrival.
to specify the desired format for displaying time (12hr/24hr) and distance (km/mi).

User's manual AVIC-S1
- 14 - Basic settings
Language 1. Switch on the navigation device.
The LANGUAGE window opens.
2. Touch the language in which you would like to operate the unit.
3. If your language is not displayed, touch the More/Más/Plus button to view more languages.
As soon as you select a language a window opens. This window informs you that you must restart the unit.
4. Touch OK.
The system switches off and then back on again. Operation continues in the chosen language.

User's manual AVIC-S1
Using the AVIC-S1 for the First Time - 15 -
Time Zone The TIME ZONE window opens.
5. Touch the time zone that applies to your location. You can scroll through the list with the Up and Down buttons. The cities displayed in the respective time zone are an aid for choosing the correct time zone.
Summer Time The SUMMER TIME window opens.
5. Specify whether the changeover to summertime or wintertime should take place automatically.
Time Format The TIME FORMAT window opens.

User's manual AVIC-S1
- 16 - Basic settings
7. Specify whether times should be displayed in 12-hour format (12hr) or in 24-hour format (24hr).
Distance Unit The DISTANCE UNIT window opens.
8. Specify whether distances should be displayed in kilometers (km) or miles (mi).
Introduction The INTRODUCTION window opens.
9. Specify whether you would like to see a brief introduction to operating the navigation software (Yes) or (No).

User's manual AVIC-S1
Using the AVIC-S1 for the First Time - 17 -
The DESTINATION window opens, after the introduction if applicable.


User's manual AVIC-S1
Operating the navigation software - 19 -
3 Operating the navigation software
Topics covered in this chapter:
3.1 Hardware keys page 20
3.2 Software keyboard page 21
Enter characters with the touch screen keyboard
3.3 Command buttons page 23

User's manual AVIC-S1
- 20 - Hardware keys
3.1 Hardware keys
Hardware Keys The following hardware keys are located on the front of the unit. Use these for quick access to important functions:
Left Key
Position on map
Opens the map in standard view and displays your current location.
Toggles between 2D and 3D view when your current position is being displayed (i.e. when GPS-signals are being received).
Centre
Scrolling wheel
Your device has a wheel that can be turned up and down and also pressed.
In a list:
Turn the wheel upwards / downwards and the previous / following entry in the list is selected.
Press the center of the wheel to choose the selected entry.
In map view:
Turn the wheel upwards to increase the volume of route guidance.
Turn the wheel downwards to reduce the volume of route guidance.
Press the center of the wheel to open the ADDRESS BOOK.
Right Key
Press briefly when you are on the map screen: Opens the DESTINATION window.
Press briefly when you are on the map screen: Opens the map at the same point at which it was closed.
Long push: Brings up the Bluetooth handsfree application.
Briefly press in the telephone application: Switches back to the navigation software.
Switch device on / off
The button to switch the device on and off is located on the top of the device.
Switch on / off button
Long push: Switches the device on / off.

User's manual AVIC-S1
Operating the navigation software - 21 -
3.2 Software keyboard
Overview If text entries are necessary, a touch screen keyboard appears in the lower area of the screen.
3.2.1 Enter characters with the touch screen keyboard
You can enter all entries with the touch screen keyboard. But you
may enter capital letters only.
You need not enter small letters or special characters when entering a destination's town or street name. AVIC-S1 replaces these characters automatically. When you are looking for, e.g., a Canadian city called "Verchères", simply type "VERCHERES".
Smart keyboard The system has a database and therefore knows which cities or streets begin with the character combination you have entered.
As soon as you have entered a character, the system deactivates all characters that do not exist in combination with the ones already entered.
The city or street names that begin with the previously entered character combination will be listed above the keyboard.

User's manual AVIC-S1
- 22 - Software keyboard
If a street name or name of a point of interest consists of several words, you can type in the start of each of these words. For example, to search for "John F. Kennedy Ave." you can enter "JOH…" or also "KEN…".
However, in the case of city names that consist of several words, you can enter only the first letters of the first word .
Use the Up and Down buttons to scroll through a list.
When the searched location or street name appears on the list, just touch to select it.
Note: In order to scroll through a list you may also use the Scrolling Wheel on the device. When the searched location or street name is highlighted, simply press the Scrolling Wheel to select it.
Entering a space, deleting a character…
Tap the icon to enter a space between two words.
Tap the icon to delete the character to the left of the cursor.
Switching between character and number entry…
Tap the icon to enter numbers, e.g. for a Zip code search.
Tap the icon to return to character entry mode.

User's manual AVIC-S1
Operating the navigation software - 23 -
Special characters Tap the icon to enter a special character.
The special characters keyboard appears.
Tap the icon to return to character entry mode.
You need not enter special characters when entering a destination's city or street name but they may be helpful for entering names for saved destinations and itineraries.
3.3 Command buttons
Command buttons Most of the AVIC-S1 screens have the following buttons:
Back
To a map: displays the map in standard view.
To a different window: opens the last window you were at.
To the left / right
Move into other menu options.
Show on map
In a list: touch this button to the right of entry to show location on the map.


User's manual AVIC-S1
Navigation - 25 -
4 Navigation
Topics covered in this chapter:
4.1 General information on navigation page 26
4.2 Starting AVIC-S1 page 27
4.3 Entering a destination page 28
Opening the DESTINATION window Specifying destination state (province Entering a destination address Specifying points of interest Destination history Address book Navigating home Selecting destinations on the map
4.4 Administering destinations page 49
Saving Opening the ADDRESS BOOK Saving Editing Opening the ADRESS Book RECORD window Deleting 4.5 Itinerary (with waypoints) page 55 Opening the ITINERARY window Indicating waypoints Scrolling through the list of waypoints Editing the list of Managing itineraries Calculating the route Displaying information regarding the route Simulating a route Starting navigation

User's manual AVIC-S1
- 26 - General information on navigation
4.1 General information on navigation
Use of AVIC-S1 is executed at your our risk.
Caution: Before you use this navigation system, please make sure that you have thoroughly read and understood the "Important Information for the User" which is to be found on the Software DVD.
Caution: The availability of navigation data depends on the ability of the antenna to receive a GPS satellite signal. A minimum of 4 GPS satellite signals is needed to determine current GPS position. The signal may be unavailable if obstructed by such things as overhead roofs, tall buildings, tunnels, bridges, and in some cases bad weather. Depending upon where you are, it may take a short time for the Navigation System to re-establish your position after a GPS satellite signal is re-acquired.
Caution: Other wireless devices in the vehicle may interfere with the reception of GPS satellite signals, and cause the reception to be unstable.
Caution: In order to prevent theft and/or sun/heat damage, remove this Navigation System from its mount when it is not being used.
Caution: The windshield on some vehicles contains a special metallic coating that could block GPS satellite signals from this Navigation System. In such cases, it may be necessary to use an external antenna outside the vehicle.
Arriving at your destination
When you have reached your destination the system pronounces the message "You have reached your destination".
The map is no longer presented in navigation mode. A small green arrow indicates your current position.

User's manual AVIC-S1
Navigation - 27 -
4.2 Starting AVIC-S1
How to start the AVIC-S1
1. Switch on your device.
A window with the following message appears:
2. Read the message, and touch OK if you agree to the written warning.
The DESTINATION window opens.
DESTINATION window In the DESTINATION window you may enter a destination,
process routes or view the map.
Note: Unless you turn off the main power on the back of the unit, you will return to the last screen you were on before turning off the power button at the top of the unit.

User's manual AVIC-S1
- 28 - Entering a destination
4.3 Entering a destination
Basis of navigation This section describes the various ways of entering, selecting and managing a destination on the AVIC-S1.
Map views during navigation are described in chapter "Map views" On page 69.
Note: The settings that are specified in the settings window ROUTE PREFERENCES are taken into consideration when calculating the route for the entered destination.
For further information, please refer to chapter "Configuring AVIC-S1" on page 83.
4.3.1 Opening the DESTINATION window
Opening the DESTINATION window
Specifying a destination or planning a route always starts in the DESTINATION window.
You can open the DESTINATION window as follows:
If you can see the map:
1. Press the MENU key to the right at the bottom of the display.
If a different window is opened:
1. Press the MAP key.
The map opens.
2. Press the MENU key.
The DESTINATION window now opens.

User's manual AVIC-S1
Navigation - 29 -
4.3.2 Specifying destination state (province)
It is possible to search for cities and some points of interest only within a specific region.
The region is displayed on the Region button in the lower right-hand corner of the display.
1. If the city or point of interest is situated in a different state (province) to the one that is shown, then tap on the Region button.
The REGION window opens.
2. Use the Up and Down buttons (or the scrolling wheel) to scroll through the list of states (provinces).
3. Touch the region in which the destination is located.

User's manual AVIC-S1
- 30 - Entering a destination
4.3.3 Entering a destination address
There are various methods for entering addresses. Choose
Address (city, street, house number), if you know the complete address of your destination,
City center (only city name), to be guided to the center of a specific city or if there are no roads around your destination,
Zip code (zip code, street, house number), if you would prefer to enter the zip code of your destination,
Intersection (city, street, intersecting road), if the destination road is very long and you do not know the house number, but you do know the name of an intersecting road.
Address (city, street, house number)
1. Open the DESTINATION window. (refer to page 28)
2. In the DESTINATION window, tap on the Address Search button.
The keyboard appears with the City entry field.
Note: If the Region button in the right lower corner of the display does not show the state (province) in which your destination is located, then touch to specify the state (province). (refer to Specifying destination state (province, page 29)
3. Enter the destination city.
Note: The last 8 cities from the displayed state (province) that you have entered as destination city are listed chronologically. If you want to enter one of these cities, then touch the selection.
4. As soon as the destination city appears in the list above the keyboard, touch to select.

User's manual AVIC-S1
Navigation - 31 -
The keyboard appears with the Street entry field.
5. Enter the destination street.
Note: The last 8 streets from the destination city that you have entered as destination street are listed chronologically. If you want to enter one of these cities, then touch the entry to select.
6. As soon as the destination street appears in the list above the keyboard, touch to select.
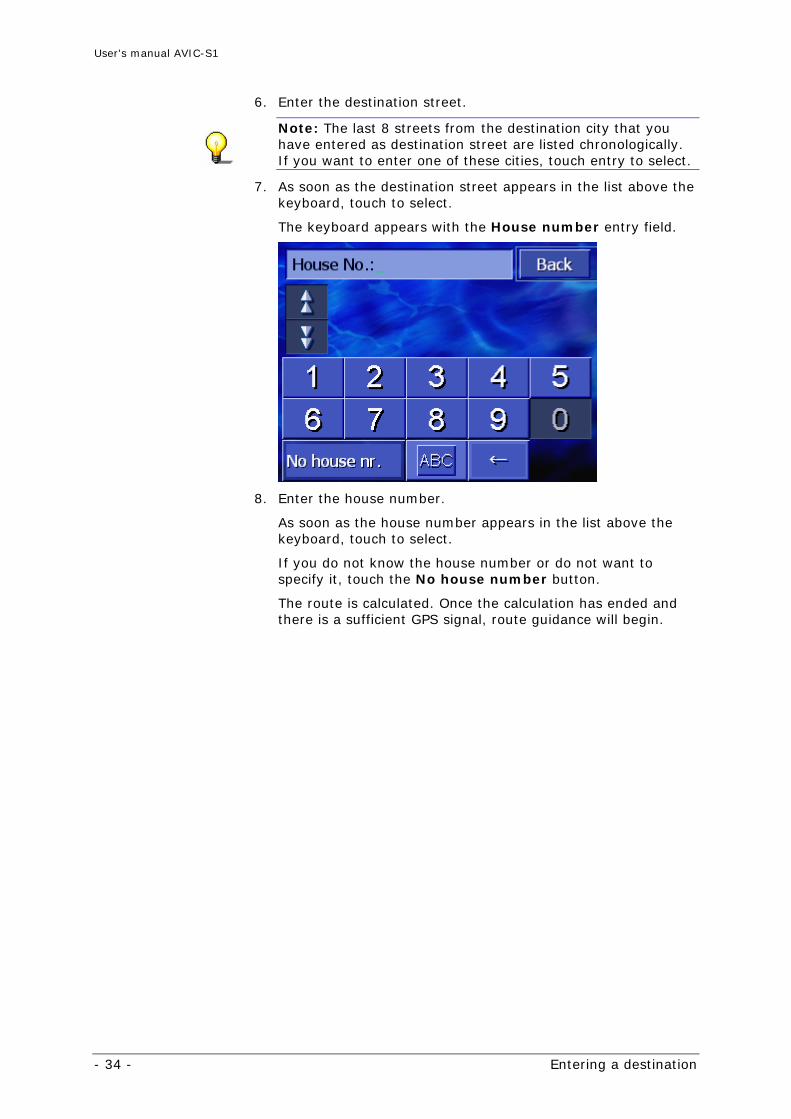
The keyboard appears with the House number entry field.
7. Enter the house number.
As soon as the house number appears in the list above the keyboard, touch to select.
If you do not know the house number or do not want to specify it, touch the No number button.
The route is calculated. Once the calculation has ended and there is a sufficient GPS signal, the map will be displayed and route guidance will begin.

User's manual AVIC-S1
- 32 - Entering a destination
City center (only city name)
1. Open the DESTINATION window. (refer to page 28)
2. In the DESTINATION window, tap on the To the right button.
3. Touch the City center button.
The keyboard appears with the City entry field.
Note: If the Region button in the right lower corner of the display does not show the state (province) in which your destination is located, then touch to specify the state (province). (refer to Specifying destination state (province, page 29)
4. Enter the destination city.
Note: The last 8 cities from the displayed state (province) that you have entered as destination city are listed chronologically. If you want to enter one of these cities, just tap on its entry.
5. As soon as the destination city appears in the list above the keyboard, touch to select.
The route is calculated. Once the calculation has ended and there is a sufficient GPS signal, the map will be displayed and route guidance will begin.

User's manual AVIC-S1
Navigation - 33 -
Zip code (zip code, street, house number)
1. Open the DESTINATION window. (Refer to page 28)
2. In the DESTINATION window, touch the To the right button.
3. Tap on the Zip Code Search button.
The keyboard appears with the Zip code entry field.
Note: If the Region button in the right lower corner of the display does not show the state (province) in which your destination is located, then touch to specify the state (province). (refer to Specifying destination state (province, page 29)
4. Enter the zip code for the destination.
Note: The last 8 cities from the displayed state (province) that you have entered as destination city are listed chronologically. If you want to enter one of these cities, touch entry to select.
5. As soon as the zip code appears in the list above the keyboard, touch to select.
The keyboard appears with the Street entry field.
User's manual AVIC-S1
- 34 - Entering a destination
6. Enter the destination street.
Note: The last 8 streets from the destination city that you have entered as destination street are listed chronologically. If you want to enter one of these cities, touch entry to select.
7. As soon as the destination street appears in the list above the keyboard, touch to select.
The keyboard appears with the House number entry field.
8. Enter the house number.
As soon as the house number appears in the list above the keyboard, touch to select.
If you do not know the house number or do not want to specify it, touch the No house number button.
The route is calculated. Once the calculation has ended and there is a sufficient GPS signal, route guidance will begin.

User's manual AVIC-S1
Navigation - 35 -
Intersection (city, street, intersecting road)
1. Open the DESTINATION window. (Refer to page 28)
2. In the DESTINATION window, touch the To the right button.
3. Touch the Crossing button.
The keyboard appears with the City entry field.
Note: If the Region button in the right lower corner of the display does not show the state (province) in which your destination is located, then touch to specify the state (province). (refer to Specifying destination state (province, page 29)
4. Enter the destination city.
Note: The last 8 cities from the displayed state (province) that you have entered as destination city are listed chronologically. If you want to enter one of these cities, touch entry to select.
5. As soon as the destination city appears in the list above the keyboard, touch to select.
The keyboard appears with the Street entry field.

User's manual AVIC-S1
- 36 - Entering a destination
6. Enter the destination street.
Note: The last 8 streets from the destination city that you have entered as destination street are listed chronologically. If you want to enter one of these cities, touch entry to select.
7. As soon as the destination street appears in the list above the keyboard, touch to select.
The keyboard appears with the Street entry field for the intersecting street.
8. Enter the intersecting street.
As soon as the street appears in the list above the keyboard, touch to select.
The route is calculated. Once the calculation has ended and there is a sufficient GPS signal, route guidance will begin.

User's manual AVIC-S1
Navigation - 37 -
4.3.4 Specifying points of interest
Points of Interest Points of interest, also known as POI are included in the navigation system's database.
Included as points of interest are airports and harbors, restaurants, hotels, gas stations, public facilities, doctors, hospitals, shopping centers and others.
Points of interest can be displayed using a symbol on the map. Refer to Chapter "Overlay POI" on page 87 for more information.
Points of interest can also be entered as navigation destinations.
Different processes are defined for specifying points of interest. Choose
Point of interest nearby, if, for example, you are looking for the next gas station or a restaurant in the vicinity.
Point of interest in a specific city, if, for example, you are looking for a specific theater or a restaurant in a specific city.
Point of interest of regional significance, if, for example, you are looking for the next airport or train station.
Point of interest nearby
Note: Points of interest from the current surroundings can only be specified if the GPS reception is sufficient for positioning.
1. Open the DESTINATION window. (Refer to page 28)
2. In the DESTINATION window, touch the POI Search button.
3. Touch the Nearby button.
The CATEGORY window opens.
4. Use the Up and Down buttons or the scrolling wheel to scroll through the list of categories.

User's manual AVIC-S1
- 38 - Entering a destination
5. Touch the category from which you wish to find a point of interest.
The SUBCATEGORY window opens. The category that you have just chosen is specified at the top.
6. Use the Up and Down buttons or the scrolling wheel to scroll through the list of subcategories.
7. Touch the subcategory in which you want to find a point of interest. If you do not wish to specify a subcategory, tap on All categories (topmost entry).
The POINTS OF INTEREST NEARBY window opens. The subcategory that you have just chosen is displayed at the top.
It lists all the destinations of the specified category / subcategory that can be found in a specific radius around your current location.
8. Use the Up and Down buttons or the scrolling wheel to scroll through the list of points of interest.
9. Touch to select the point of interest you wish to drive to.
The route is calculated. When the calculation is completed, route guidance will begin.

User's manual AVIC-S1
Navigation - 39 -
No point of interest found?
If no point of interest with the specified category is found in the vicinity of your location, a dialog window appears with the following message:
1a Touch Wider Area, in order to search within a greater radius.
- OR -
1b Touch OK, in order to return to the SUBCATEGORY window.
Search within a greater radius
If the list of points of interest found is very short, you can proceed as follows:
1. Touch the Wider Area button.
The list now shows the points of interest within a greater radius.
You can repeat this process several times.

User's manual AVIC-S1
- 40 - Entering a destination
Point of interest in a specific city
1. Open the DESTINATION window. (Refer to page 28)
2. In the DESTINATION window, touch the POI Search button.
3. Touch the In a City button.
The keyboard appears with the City input field.
Note: If the Region button in the right lower corner of the display does not show the state (province) in which your destination is located, then touch to specify the state (province). (refer to Specifying destination state (province, page 29)
4. Enter the city in which you are looking for a point of interest.
Note: The last 8 cities from the displayed state (province) that you have entered as destination city are listed chronologically. If you want to enter one of these cities, touch entry to select.
5. As soon as the city appears in the list above the keyboard, touch to select.
The CATEGORY window opens.
User's manual AVIC-S1
Navigation - 41 -
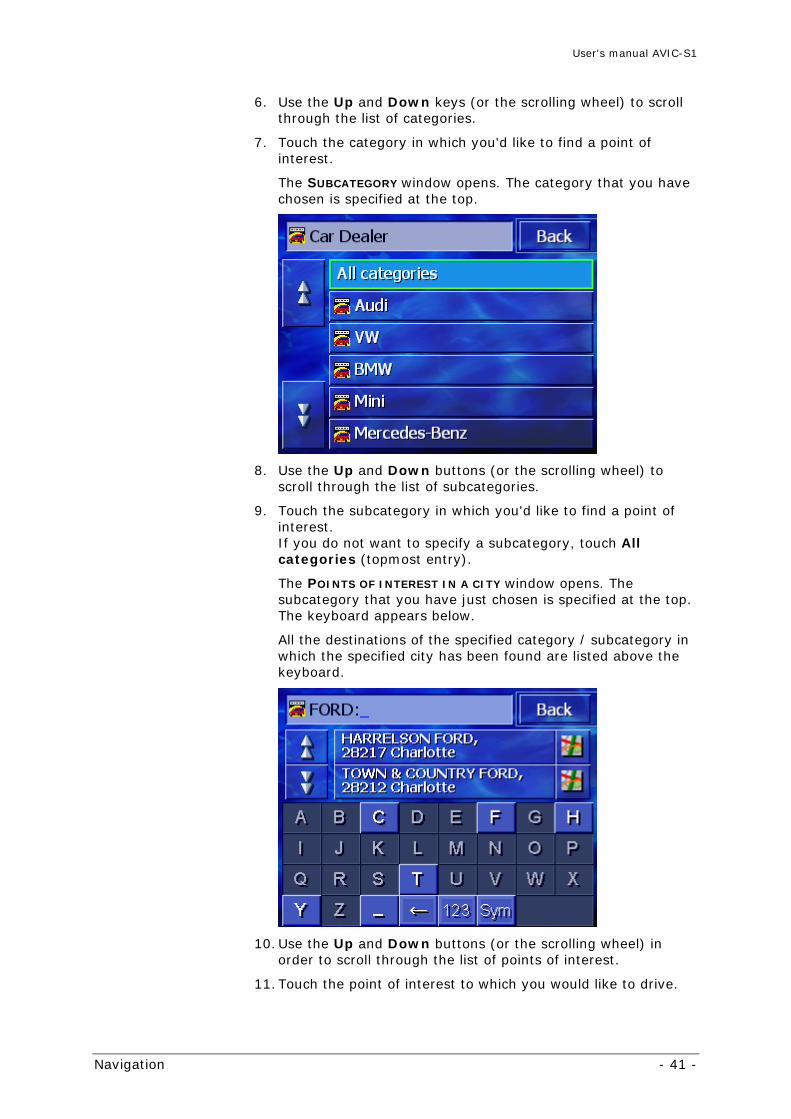
6. Use the Up and Down keys (or the scrolling wheel) to scroll through the list of categories.
7. Touch the category in which you'd like to find a point of interest.
The SUBCATEGORY window opens. The category that you have chosen is specified at the top.
8. Use the Up and Down buttons (or the scrolling wheel) to scroll through the list of subcategories.
9. Touch the subcategory in which you'd like to find a point of interest. If you do not want to specify a subcategory, touch All categories (topmost entry).
The POINTS OF INTEREST IN A CITY window opens. The subcategory that you have just chosen is specified at the top. The keyboard appears below.
All the destinations of the specified category / subcategory in which the specified city has been found are listed above the keyboard.
10. Use the Up and Down buttons (or the scrolling wheel) in order to scroll through the list of points of interest.
11. Touch the point of interest to which you would like to drive.

User's manual AVIC-S1
- 42 - Entering a destination
The route is calculated. When the calculation is completed, route guidance will begin.
No Point of Interest found?
If no point of interest with the specified categories is found in the specified city, then a dialog window appears with the following message:
1. Touch OK in order to return to the SUBCATEGORY window.
Point of interest of regional significance
1. Open the DESTINATION window. (Refer to page 28)
2. In the DESTINATION window, touch the POI Search button.
3. Touch the Nationwide button.
The CATEGORY window opens.
Note: If the Region button in the right lower corner of the display does not show the state (province) in which your destination is located, then touch to specify the state (province). (refer to Specifying destination state (province, page 29)
4. Use the Up and Down buttons (or the scrolling wheel) in order to scroll through the list of categories.

User's manual AVIC-S1
Navigation - 43 -
5. Touch the category in which you wish to find a point of interest. If you do not want to specify a category, touch All categories (topmost entry).
The POINTS OF INTEREST NATIONWIDE window opens. The category that you have chosen is specified at the top.
The keyboard appears with the entry field for the chosen category.
6. Enter the name of the point of interest either in whole or in part.
All the destinations of the specified category, the names of which begin with the characters entered or include the characters entered are listed above the keyboard.
7. Use the Up and Down buttons (or the scrolling wheel) to scroll through the list of points of interest.
8. Touch the point of interest you would like to drive to.
The route is calculated. When route calculation is completed, route guidance will begin.
No Point of Interest found?
If no point of interest with the specified category and the name entered is found, then a dialog window appears with the following message:
1. Touch OK in order to return to the CATEGORY window.

User's manual AVIC-S1
- 44 - Entering a destination
4.3.5 Destination history
Overview AVIC-S1 saves destinations that you have navigated to before in the list DESTINATION HISTORY. You can quickly select these destinations without having to repeat the information that has already been entered once before.
1. Open the DESTINATION window. (Refer to page 28)
2. In the DESTINATION window, touch the Destination History button.
The DESTINATION HISTORY window opens.
3. Use the Up and Down buttons (or the scrolling wheel) to scroll through the list.
4. Touch the destination to which you would like to drive.
The route is calculated. When route calculation is completed, route guidance will begin.

User's manual AVIC-S1
Navigation - 45 -
4.3.6 Address book
Overview Destinations which you drive to repeatedly can be stored in the ADDRESS BOOK. You can quickly select them without entering the address again.
For details on how to save and edit a destination, refer to chapter "Administering destinations", page 49.
1. Open the DESTINATION window. (Refer to page 28)
2. In the DESTINATION window, touch the Address Book button.
The ADDRESS BOOK opens.
3. Use the Up and Down buttons (or the scrolling wheel), to scroll through the list.
4. Touch the destination to which you wish to drive.
The route is calculated. When route calculation is completed, route guidance will begin.
Changing the Sorting Order
You can sort the entries in the address book alphabetically or by the categories assigned to them.
Sorting the address book alphabetically.
Sorting the address book according to category.
The button for the current sorting order is inactive.

User's manual AVIC-S1
- 46 - Entering a destination
4.3.7 Navigating home
Overview You can save one address as a home address on the AVIC-S1. Navigation to the home address can be started by touching this button.
Refer to chapter "Home Address" on page 94 for information on entering your home address.
1. Open the DESTINATION window. (Refer to page 28)
2. In the DESTINATION window, touch the Return home button.
The route is calculated. When route calculation is completed, route guidance will begin.
Haven't Yet Entered a Home Address?
If you haven't yet entered the home address, a dialog window appears.
1a Touch Yes, to enter the home address now.
- OR -
1b Touch No, to return to the DESTINATION window.

User's manual AVIC-S1
Navigation - 47 -
4.3.8 Selecting destinations on the map
With this function you can select a destination directly on the map.
There are two possibilities of starting a destination search on the
map:
Via the standard map view
Via the Select on map button
The standard map view option is the easier option.
Via the standard map view
1. If the standard map view isn't opened, then press the MAP key beneath the display.
The map opens.
1a Touch any point in the map.
Select via the Select on map button
1. Open the DESTINATION window. (Refer to page 28)
1a In the DESTINATION window, touch the To the right button.
1b Touch the Select on map button.

User's manual AVIC-S1
- 48 - Entering a destination
The map opens in SEARCH FOR DESTINATION mode. The uniqueness of this mode is that the address field appears in the lower half of the display.
Your current location is marked by a red triangle. Above the triangle you can see a crosshair.
2. Change the map section that is being displayed in such a way
that the point to which you want to navigate is visible on the map.
You will find information about working with the map in chapter "Working with the map" on page 65.
3. Touch briefly on the destination point.
The crosshair appears at the position you have touched. The name of the street in which your destination is located then appears in the address field. If you have touched on a point of interest, the name of the point of interest appears.

User's manual AVIC-S1
Navigation - 49 -
You have the following possibilities:
Start navigating to the point under the crosshair.
Look for a point of interest in the vicinity of the crosshair. Proceed as described in chapter "Point of interest in the vicinity", page 37, as of section 4.
If you have specified a destination for the address book, instead of the Navigate button, the OK button appears.
Touch to accept the point under the crosshair in the address book.
If you have specified a waypoint, the Add button appears instead of the Navigate button
Touch to accept the point under the crosshair as the waypoint.
4.4 Administering destinations
Overview
You can save destinations to which you drive frequently in the ADDRESS BOOK. They are named here and can be assigned to a group.
Address book entries can be renamed, deleted and assigned to other groups. You can also assign the entry to a different address.
You can view the assigned address on the map.
All the actions start from the ADDRESS BOOK window.
4.4.1 Opening the ADDRESS BOOK
Opening the ADDRESS
BOOK The administration of the entries in the address book always starts in the ADDRESS BOOK window.
You can open the ADDRESS BOOK in the following way:
If the map is visible:
1. Press directly on the center of the scrolling wheel below the display.
If the DESTINATION window is open:
1. Touch the Address Book button.
If a different window is open:
1. Press the MAP key.
The map opens.
2. Press directly on the centre of the scrolling wheel below the display.
The ADDRESS BOOK is now open.

User's manual AVIC-S1
- 50 - Administering destinations
4.4.2 Saving
1. Open the ADDRESS BOOK. (Refer to page 49)
2. Touch the Add button.
3. Enter a destination (refer to chapter "Entering a destination", page 28).
As soon as you have entered a destination, the SET NAME
window appears.
4. Specify a name for the new entry.
5. Touch the OK button.

User's manual AVIC-S1
Navigation - 51 -
The ADDRESS BOOK window opens.
4.4.3 Editing
Overview Address book entries can be renamed and assigned to a different group. You can also assign the entry to a different address.
Opening the ADRESS BOOK RECORD window
1. Open the ADDRESS BOOK. (refer to page 49)
2. Use the Up and Down buttons (or the scrolling wheel), in order to scroll through the list.

User's manual AVIC-S1
- 52 - Administering destinations
3. Touch the Editing button alongside the entry that you wish to
edit.
The ADDRESS BOOK RECORD window opens.
Renaming
1. Open the ADDRESS BOOK RECORD window for the entry you wish to rename (refer to page 51).
2. Touch the Name button.
The SET NAME window opens.
3. Tap repeatedly on the Delete character button in order to
delete the old name.
4. Enter the new name.
5. Touch the OK button.
The ADDRESS BOOK RECORD window opens again.
Close the ADDRESS BOOK RECORD window and return to the ADDRESS BOOK. The new entry appears in the list.

User's manual AVIC-S1
Navigation - 53 -
Assigning a group
Overview The entries of more extensive address books can be assigned to groups. These groups are labelled with icons.
The address book can be sorted alphabetically or even according to groups.
1. Open the ADDRESS BOOK RECORD window for the entry you wish to rename (refer to page 51).
2. Touch the Icon button.
The SELECT ICON window opens.
3. Touch the icon of the group to which you wish to assign the entry. If you do not wish to assign the entry to a group, then touch the No Icon button.
4. Touch the OK button.
The ADDRESS BOOK RECORD window opens again.
Close the ADDRESS BOOK RECORD window and return to the ADDRESS BOOK. The new entry appears in the list.

User's manual AVIC-S1
- 54 - Administering destinations
Changing an address
Overview You can change the addresses that are assigned to an address book, e.g. if one of your friends moves.
1. Open the EDITING window for the entry the assigned address
of which you wish to change (refer to page 51).
2. Touch the Location button.
3. Enter the new destination (refer to chapter "Entering a destination", page 28).
The ADDRESS BOOK RECORD window opens again.
Close the EDITING window and return to the ADDRESS BOOK. The new entry appears in the list.
4.4.4 Deleting
1. Open the ADDRESS BOOK RECORD window for the entry you wish to delete (refer to page 51).
2. Touch the Delete Record button.
The CONFIRMATION window appears.
3. Tap on Yes, in order to delete the destination.
The entry is deleted from the address book.

User's manual AVIC-S1
Navigation - 55 -
4.5 Itinerary (with waypoints)
Itinerary planning You may plan itineraries without receiving GPS signals. Planned itineraries can be stored.
4.5.1 Opening the ITINERARY window
Opening the ITINERARY window
To plan and edit a route you always start in the ITINERARY
window.
You can open the ITINERARY window as follows:
1. Open the DESTINATION window. (refer to page 28)
2. In the DESTINATION window, touch the To the right button.
3. Touch once again the To the right button.
4. Then touch the Itinerary button.
The ITINERARY window now opens.
Enter the starting point, point of destination and as many waypoints as you wish. (refer to chapter "Indicating waypoints", page 56)
Calculate the route and view the route on the map. (refer to chapter "Calculating the route", page 60)
Download a previously saved route. (refer to chapter "Load route", page 59)
Save a planned route in order to download it again at any point in the future. (refer to chapter "Save route", page 59)

User's manual AVIC-S1
- 56 - Itinerary (with waypoints)
4.5.2 Indicating waypoints
This is how you plan your route…
1. Open the ITINERARY window. (refer to page 55).
2. Touch the Add button in order to specify the first waypoint.
The ITINERARY window opens.
3. Enter the first waypoint (refer to chapter "Entering a destination", page 28)
The ITINERARY window opens again. The specified destination is listed as waypoint 1.
4. Repeat the steps 2 and 3 for any extra waypoints that should be added to the route.

User's manual AVIC-S1
Navigation - 57 -
4.5.3 Scrolling through the list of waypoints
You can view a maximum of 3 waypoints on the display. If the list includes more waypoints, to the left alongside the list the two buttons Up and Down will be activated, and you can use these to scroll.
Up
Touch this button to view the 3 previous waypoints.
Down
Touch this button to view the three following waypoints.
The end of the list may display just one or two waypoints.
4.5.4 Editing the list of waypoints
Overview
You can add additional waypoints to the list of waypoints at any time; you can change the order of waypoints, delete waypoints or view the specified waypoints on the map.
Opening the EDIT LIST OF WAYPOINTS menu
1. In the list of waypoints, touch the waypoint that you wish to edit.
The menu EDIT LIST OF WAYPOINTS opens to the right.
This menu offers the following buttons:

User's manual AVIC-S1
- 58 - Itinerary (with waypoints)
Change the order
Move waypoint to top
Touch this button to navigate to the selected waypoint earlier (example: waypoint 3 becomes waypoint 2).
Move waypoint to bottom
Touch this button to navigate to the respective waypoint later (example: waypoint 2 becomes waypoint 3).
Deleting waypoints
Delete waypoint
Touch this button to delete the selected waypoint from the list.
Close menu
Close menu
Tap on this button to close the menu without changing the list of waypoints.
4.5.5 Managing itineraries
Overview
You may plan multiple itineraries. You may save them and use them later for navigation purposes.
The ITINERARY window offers the following buttons for this function:

User's manual AVIC-S1
Navigation - 59 -
Save route
1. Open the ITINERARY window. (refer to page 55).
2. Touch the Save button in order to save a new route.
The ENTER ITINERARY NAME window opens.
3. Enter a name for the route.
4. Touch OK.
Note: Only waypoints will be saved. When you download a saved route, it will have to be recalculated.
Load route
1. Open the ITINERARY window. (refer to page 55).
2. Touch the Load button in order to download a saved route that you wish to either edit or navigate to.
The LOAD ITINERARY screen opens:
3. Use the Up and Down buttons (or the scrolling wheel) to scroll through the list.
4. Touch the route that you wish to download.
The ITINERARY window opens again. The saved waypoints are entered in the list of waypoints.

User's manual AVIC-S1
- 60 - Itinerary (with waypoints)
4.5.6 Calculating the route
A planned routed can also be calculated without GPS reception so that you can get an overview of the route.
In doing so, the first specified waypoint is assumed as the starting point of the route.
Note: During navigation the current position is the starting point. The first stage is then the drive to the first specified waypoint.
1. Touch the Done button in order to calculate the entire route
as well as the foreseeable duration of journey.
Note: For the route calculation to the entered destination the settings will be taken into consideration that have been entered in the settings window of the ROUTE PREFERENCES window.
To do this, refer to chapter "Route Preferences", page 86.
The route is calculated. A window informs you of the progress of the calculation.
As soon as the route is calculated, the map opens and the route is displayed on the map.
The route is highlighted in green.
The specified waypoints are labelled with little flags.

User's manual AVIC-S1
Navigation - 61 -
You have the following options:
Launch the navigation to the first waypoint. (refer to chapter "Starting navigation" , page 62)
Open the ROUTE DETAILS window in order to see detailed information regarding the route. (refer to chapter "Displaying information regarding the route", page 61 )
Simulate a route guidance. (refer to chapter "Simulating a route", page 62)
Return to the ITINERARY window.
4.5.7 Displaying information regarding the route
Overview You can view detailed information about the route, for example driving time and overall route.
Conditions You have planned or downloaded a route, as described in "Indicating waypoints" on page 53 and "Download routes" on page 56.
The route is calculated as described in "Calculating the route" on page 57 and is displayed on the map.
1. Touch the Details button.
The ROUTE INFO window opens.
The list shows for each waypoint the distance from the previous waypoint and the estimated driving time for this section of the trip.
In addition, the lower edge of the screen displays the total distance of the route from the first to the last waypoint and the estimated duration of journey for this route.

User's manual AVIC-S1
- 62 - Itinerary (with waypoints)
4.5.8 Simulating a route
Simulation You can also simulate a navigation.
Note: You do not need GPS reception in order to simulate a route.
Only routes of max. 60 miles in length can be simulated.
Condition You have planned or downloaded a route as described in "Indicating waypoints" on page 56 and "Load route" on page 59.
The route is calculated as described in "Calculating the route" on page 60 and is shown on the map.
1. Touch the Simulation button.
The route is recalculated for the simulation.
After the calculation the simulation starts.
Stop simulation The simulation can be ended at any time.
1. Press the MENU key beneath the display.
2. In the DESTINATION window, tap on the To the right button.
3. Touch the Cancel Route button.
4.5.9 Starting navigation
Overview When the GPS signal is sufficient for navigation purposes, you can start route guidance.
Note: During navigation the current position is the starting point. The first stage is then the drive to the first specified waypoint.
Note: The route calculation uses the settings that were established in the ROUTE PREFERENCES settings window. You can change the standard settings via the SETTINGS – ROUTE
PREFERENCES window. You will find detailed information on this in chapter "Route Preferences" on page 86.
Condition You have planned or downloaded a route as is described in "Indicating waypoints" on page 56 and "Download route” on page 59.
The route is calculated as described in "Calculating the route" on page 60 and is shown on the map.

User's manual AVIC-S1
Navigation - 63 -
1. Touch the Navigate button.
The route is calculated to the first waypoint. A window informs you of the progress of the calculation.
The map is shown. Your current position is shown by a red triangle. The route is highlighted in green.
As soon as you arrive at the first waypoint, the message "You have reached your destination" can be heard. The system then automatically calculates the route to the next waypoint and you can continue your journey without interruption.

User's manual AVIC-S1
- 64 - Itinerary (with waypoints)
No GPS Reception?
If there is no GPS signal, the following message appears:
You have the following options:
Wait to get into an area where there is GPS reception. Once you enter this area, route guidance will begin.
Touch Cancel. The window you came from reappears. Repeat your last entry later to restart navigation.
Touch OK. The system calculates the route. Therefore it assumes the last known position to be the starting point.
The calculation terminated, the route is shown on the map, with the last known position as starting point. This is useful if the last known position is not far from your current position.
As soon as GPS-reception is sufficient for navigation purposes, the system recalculates the route and displays it on the map. Now navigation may begin.

User's manual AVIC-S1
Working with the map - 65 -
5 Working with the map
Topics covered in this chapter:
5.1 Status displays page 66
5.2 Zoom page 68
5.3 Map views page 69
Standard map view Search for destination view View destination - map view
5.4 Showing the map during navigation page 73

User's manual AVIC-S1
- 66 - Status displays
Overview The map can be displayed in different views.
Each of these views represents differing functions, but you can zoom and view the status in all of the views.
AVIC-S1 offers you the possibility to display in great detail which information, points of interest and status displays you would like to show on the map.
For more information refer to chapter "Displayed Information" as of page 89.
5.1 Status displays
GPS GPS
The GPS symbol is displayed at the right margin of the map window. The number on the GPS symbol indicates how many GPS satellites are being received. The different symbols have the following meaning:
Symbol Significance
No Signal
An insufficient number of satellites with adequate signal strength are being received. It is not possible to navigate or perform positioning. This is the case, e.g. if you are located in an indoor parking structure.
GPS ready
Sufficient satellites with adequate signal strength are being received. Navigation can start.
GPS status Detailed information regarding the current GPS status can be
displayed any time in the GPS STATUS window. It includes, among others, information about your current location and your current speed.
For a detailed description on how to display the GPS status window refer to chapter "GPS Status" as of page 97.

User's manual AVIC-S1
Working with the map - 67 -
Energy
The Energy symbol is placed at the right margin of the map window. The different symbols have the following significance:
Symbol Significance
The device is connected to an external power supply. The battery is charged. The LED on the device shines green.
The device is connected to an external power supply. The battery is being charged. The LED on the device shines red.
The device is being supplied by its internal battery. The charge state of the battery is sufficient. The number of blue segments on the battery indicates its charge state (2 or 3 segments).
The device is being supplied by its internal battery. The charge state of the battery is weak. The number of blue segments on the battery indicates its charge state (0 or 1 segment). A message box informs you when the charge state of the battery becomes insufficient.
Time
Time
The current time is displayed.
User's manual AVIC-S1
- 68 - Zoom
5.2 Zoom
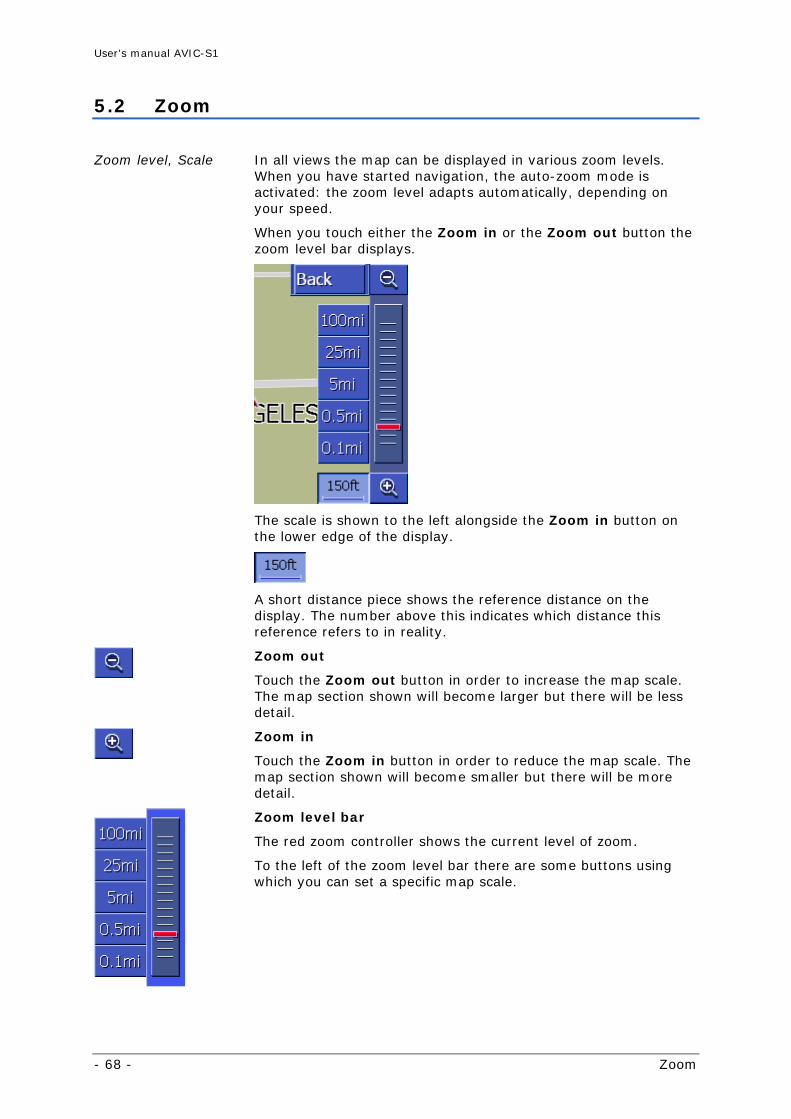
Zoom level, Scale In all views the map can be displayed in various zoom levels. When you have started navigation, the auto-zoom mode is activated: the zoom level adapts automatically, depending on your speed.
When you touch either the Zoom in or the Zoom out button the zoom level bar displays.
The scale is shown to the left alongside the Zoom in button on the lower edge of the display.
A short distance piece shows the reference distance on the display. The number above this indicates which distance this reference refers to in reality.
Zoom out
Touch the Zoom out button in order to increase the map scale. The map section shown will become larger but there will be less detail.
Zoom in
Touch the Zoom in button in order to reduce the map scale. The map section shown will become smaller but there will be more detail.
Zoom level bar
The red zoom controller shows the current level of zoom.
To the left of the zoom level bar there are some buttons using which you can set a specific map scale.

User's manual AVIC-S1
Working with the map - 69 -
Note: In all views, zooming is only possible when the map is being displayed in 2D mode.
Note: Once the zoom level has been changed manually, the auto-zoom mode is deactivated.
5.3 Map views
Overview
The map can be shown in three different views:
In the Standard map view
In the Search for destination view
In the View destination view
Each of these views makes available different functions that are explained in the pages to come.
5.3.1 Standard map view
The STANDARD map view opens when you start navigating. It also opens when you press the MAP key.
The following properties are typical for this view:
The current position is shown by a red triangle in the centre of the lower third. When you move, the triangle doesn't change its position on the screen. Instead of this, the map section follows your direction of movement.
The scale of the map changes depending on your speed.

User's manual AVIC-S1
- 70 - Map views
In the STANDARD map view, the following buttons are available:
Alignment of the map
Red point shows up (north): the map is aligned so that north is always at the top. Touch the button to align the map in accordance with the driving direction.
Red point is not pointing upwards: the map is aligned so that the driving direction is always at the top. Touch the button to align the map to the north.
Alignment to the driving direction is recommended for the navigation because the directions right and left on the map are then shown exactly as they are in reality.
Note: North alignment is only possible when the map is being displayed in 2D mode. In 3D mode, north alignment is not possible.
Back
The Back button is only visible if the zoom level bar is shown.
Touch this button to hide the zoom level bar and maintain the altered map scale.
Autozoom
The Autozoom button is only visible if the zoom level bar is showing and the map scale has been changed.
Touch this button so that the map scale is automatically changed according to your speed: if you drive slowly, the map scale becomes smaller, if you drive quickly, the map scale becomes greater.
Show entire route
The button is only visible if a route has been calculated. Touch this button to view the entire route in the map.
Note: By touching the map you can quickly change the map view to Search for destination. Refer to the next chapter for more information ("Search for destination view" on page 71).

User's manual AVIC-S1
Working with the map - 71 -
5.3.2 Search for destination view
In the SEARCH FOR DESTINATION view you can select a destination directly on the map or gain an overview of a specific area.
For further information on how to select a destination on the map, refer to chapter "Selecting destinations on the map", page 47.
The following properties are typical for this view:
An address field is shown in the lower third of the display.
Your current location is shown by a red triangle. You will see a crosshair above the triangle.
Map is showing north.
The map is fixed and does not follow your position. If you change this view whilst driving, then the triangle that shows your position moves from the screen.
You can move the map in order to view a different map section.
Opening map view SEARCH FOR
DESTINATION
You can open the SEARCH FOR DESTINATION map view by
Touching the map if in STANDARD map view. (refer to "Standard map view" on page 69)
Touching the Select from map button in the DESTINATION
window. (refer to "Selecting destinations on the map", page 47)
Back
Touch this button to return to the window that was active prior to opening the SEARCH FOR DESTINATION view.

User's manual AVIC-S1
- 72 - Map views
Autozoom
The Autozoom button is only visible if the zoom level bar is showing and the map scale has been changed.
Touch this button so that the map scale automatically changes according to your speed: if you drive slowly, the map scale becomes smaller, if you drive quickly, the map scale becomes greater.
Moving the map You can also move the map in the Search for destination view.
To do this, touch the map, keep the pen or finger pressed down and move the map area to the desired direction.
5.3.3 View destination - map view
Open VIEW
DESTINATION view If, in a list, you press on the
Show on map button to the right alongside a list entry, the map will open in the VIEW DESTINATION map view. You can view cities, streets, house numbers, points of interest and recent destinations on the map.
The following properties are typical for this view:
The map is aligned north.
A destination is shown centered on the map. A destination road or a point of interest is marked in orange. House numbers are shown with a black dot.
You can move the map in order to view a different map section.

User's manual AVIC-S1
Working with the map - 73 -
Touch the Back button in order to close the map and return to the previously opened list.
Moving the map You can also move the map in the View destination view. To do
this, touch the map, keep the pen or finger pressed down and move the map area to the desired direction.
5.4 Showing the map during navigation
During navigation the map opens in the STANDARD view. For the parameters Map type, Autozoom and Orientation you apply the settings that you have specified.
For more information, refer to chapter "Configuring AVIC-S1" on page 83.
Navigation aids Whilst navigating you will be shown different information that will
be of use for the journey.

User's manual AVIC-S1
- 74 - Showing the map during navigation
Area Information
1 The distance field shows you at what distance the driving manoeuvre shown below should be carried out. If you are supposed to follow a course of the road for several miles, the distance field indicates how far. An arrow beneath this points straight up.
2 In the large arrow field the next driving manoeuvre that is to be performed is shown schematically. If you are supposed to follow a course in the road for several miles, the arrow will be pointing straight up.
3 In the case of driving manoeuvres that are to be carried out quickly in succession, the small arrow field shows the next but one driving manoeuvre.
4 When you are approaching the location where the next manoeuvre is to be carried out, a bar is shown beneath the arrow field.
The closer you come to the crossroads, the less of the bar is shown. You will be prompted to turn approximately when there are no longer any bars.
5 The red triangle shows your position on the map.
6 The "waypoint information" area is only visible when you are navigating on a planned route with at least 2 waypoints. It shows the distance until you reach the next waypoint and, depending on the settings, the foreseeable arrival time or the remaining driving time. You can hide this field. When you are approaching the location for the next driving action, the waypoint information is overlapped
by the bar (4).
7 The "destination information" area shows the distance until reaching the driving destination and, depending on the settings, the foreseeable arrival time or the remaining driving time. You can hide this field.
8 Your current speed is shown in the speed field as it is calculated from the GPS position data. The speed is shown in the unit you have set for the AVIC-S1. The speed shown here may slightly differ from your real speed and must therefore not be used as a reference! You can hide this field.
9 The name of the road into which you should turn next is shown in the top road field. If you are supposed to follow specific signs, then these will be shown here.

User's manual AVIC-S1
Working with the map - 75 -
10 The name of the road in which you are located at the moment is shown in the lower road field. You can hide this field.
For detailed information regarding the settings mentioned above, refer to chapter "Displayed Information" on page 89.


User's manual AVIC-S1
Useful functions for navigation - 77 -
6 Useful functions for navigation
Topics covered in this chapter:
6.1 Waypoints page 78
6.2 Skip next waypoint page 78
6.3 Blocking a route section page 79
6.4 Change route preferences page 81
6.5 Simulation page 82

User's manual AVIC-S1
- 78 - Waypoints
Survey The following functions are available during navigation or after calculating a planned route:
6.1 Waypoints
Waypoints during navigation
During navigation you can enter a new waypoint at any time. The route is then recalculated so that the next destination will be this waypoint. After reaching the waypoint the guidance to the remaining locations will continue.
This is how you enter a waypoint...
Condition: The map is displayed in STANDARD map view.
1. Press the MENU key.
The DESTINATION window opens.
2. In the DESTINATION window, touch the To the right button.
3. Touch once again the To the right button.
4. Then touch the Way Point button.
5. Enter the waypoint (refer to chapter "Entering a destination", page 28)
The route is then recalculated and the entered waypoint is approached as the next destination.
6.2 Skip next waypoint
Skip Next Waypoint
Skip Next Waypoint
This function is only available when you are navigating a route with at least two indicated waypoints.
Use this function if you want to skip the next waypoint.
Example: You have planned an itinerary from your office to "Company A" and then to "Company B" and you are already on your way. Before you arrive at "Company A", a mobile phone call informs you that you need not visit "Company A".
Condition: The map is displayed in STANDARD map view.
1. Press the MENU key.
The DESTINATION window opens.
2. In the DESTINATION window, touch the To the right button.
3. Touch once again the To the right button.
4. Touch the Skip Next Waypoint button to navigate to the waypoint after the next (here: "Company B").
The system recalculates the route. "Company B" will be your next destination.

User's manual AVIC-S1
Useful functions for navigation - 79 -
6.3 Blocking a route section
Blocking a route section manually
You may block a route section manually in order to evade it. Manual blocking forces a recalculation of the route.
Presume that you are driving on a freeway and a radio message announces a traffic jam 4 miles ahead of your current position. With the "Block route sections" function you may instruct the navigation system to evade the announced traffic jam.
A manual blocking is only valid for the current navigation process. The respective route section will be unblocked for the next navigation or when you restart the software.
This is how you block route sections……
This function is only available during navigation.
Condition: The map is displayed in STANDARD map view.
1. Press the MENU key.
The DESTINATION window opens.
2. In the DESTINATION window, touch the To the right button.
3. Touch once again the To the right button..
4. Touch the Set Blocked Road button.
The SET BLOCKED ROAD window opens.
5. By touching the respective button, enter how long the blocked section of road should be.

User's manual AVIC-S1
- 80 - Blocking a route section
The route is recalculated.
The Set Blocked Road button is now replaced by the Unblock button.
6. Press the MAP key to reopen the map.
The blocked section of road is shown in violet. The new calculated route is shown in green.

User's manual AVIC-S1
Useful functions for navigation - 81 -
Cancel block 1. Press the MENU key.
The DESTINATION window opens.
2. In the DESTINATION window, touch the To the right button.
3. Touch once again the To the right button.
4. Touch the Unblock button.
The block is then cancelled and AVIC-S1 continues to route the originally calculated route.
6.4 Change route preferences
Overview During navigation you can change the route preferences, perhaps because you now no longer wish to use the freeway.
This is how you change the route preferences…
This function is only available during route guidance.
Condition: The map is displayed in STANDARD map view.
1. Press the MENU key.
The DESTINATION window opens.
2. In the DESTINATION window, tap on the SETTINGS tab.
The SETTINGS window opens.
3. Touch the Route Preferences button.

User's manual AVIC-S1
- 82 - Simulation
The ROUTE PREFERENCES window opens.
4. Carry out the desired changes to the routing options.
Detailed information regarding establishing the routing options can be found in chapter "Configuring AVIC-S1" on page 83.
5. Tap on the Recalculate button.
The route is then recalculated. Navigation then continues while taking into account the new route preferences.
6.5 Simulation
Overview Once you have planned and calculated a route you can start a simulated route guidance. For more information, refer to chapter "Simulating a route" on page 62.
Note: You do not need GPS reception in order to simulate a route.
Only routes of max. 60 miles in length can be simulated.

User's manual AVIC-S1
Configuring AVIC-S1 - 83 -
7 Configuring AVIC-S1
Topics covered in this chapter:
7.1 Opening the SETTINGS window page 84
7.2 Orientation page 85
7.3 Map Type page 85
7.4 Day / Night Display page 85
7.5 Route Preferences page 86
7.6 Overlay POI page 87
7.7 Displayed Information page 89
Current Time Current Street Name Compass Current Speed Destination Info Waypoint Info Displayed Time Street names on map (2D) GPS / current position Battery Status
7.8 Background page 93
7.9 Autozoom page 93
7.10 Home Address page 94
7.11 Phone Menu page 94
7.12 Hardware page 95
Demo Mode Click sound Brightness Battery Status GPS Status
7.13 Regional Settings page 98
Language Time Zone Time Format Distance
7.14 Product Information page 100
7.15 Restore Factory Settings page 100

User's manual AVIC-S1
- 84 - Opening the Settings window
7.1 Opening the SETTINGS window
Opening the SETTINGS window
Avic-S1 offers a number of setting possibilities with which you can adapt the software to your individual requirements.
To display and change the current settings you always start at the SETTINGS window.
You can open the SETTINGS window as follows:
If you can see the map:
1. Press the MENU key on the lower right of the display.
The DESTINATION tab opens.
2. Tap on the Settings tab.
If a different window is opened:
1. Press the MAP key.
The map opens.
2. Press the MENU key.
The DESTINATION window opens.
3. Tap on the Settings tab.
The SETTINGS window is now opened.
Touch the To the right and To the left buttons to view more setting possibilities.

User's manual AVIC-S1
Configuring AVIC-S1 - 85 -
7.2 Orientation
Orientation Use this setting to establish whether the map should be orientated so that north is always at the top (set to north) or in such a way that the driving direction is always at the top (driving direction).
The current setting is displayed on the button. Touch the button to change the setting.
Setting Meaning
Heading up The orientation in driving direction is recommended for navigation because the directions are shown on the map to the right and left just as they are in reality.
North up The north alignment corresponds to the map orientation on a printed map, but this is impractical for navigation purposes.
7.3 Map Type
Map Type 2D/3D Use these settings to establish whether the map should be displayed as standard in 3D or 2D.
This setting only affects the map when it is in Standard map view. With the views Search for destination and View destination the map is always shown in 2D (refer to chapter Map views, page 69.)
The current setting is displayed on the button. Touch the button in order to change the setting.
Setting Meaning
3D Three-dimensional map view
2D Two-dimensional map view
7.4 Day / Night Display
Day / Night Display With this setting you can establish whether the map should be displayed in day or night view. This setting also effects the brightness of the screen.
The current setting is shown on the button. Touch the button to change the setting.
Setting Meaning
Day Mode Shows the map in the Day view and switches the device´s screen to day mode.
Night Mode Shows the map in Night view and switches the device´s screen to night mode.
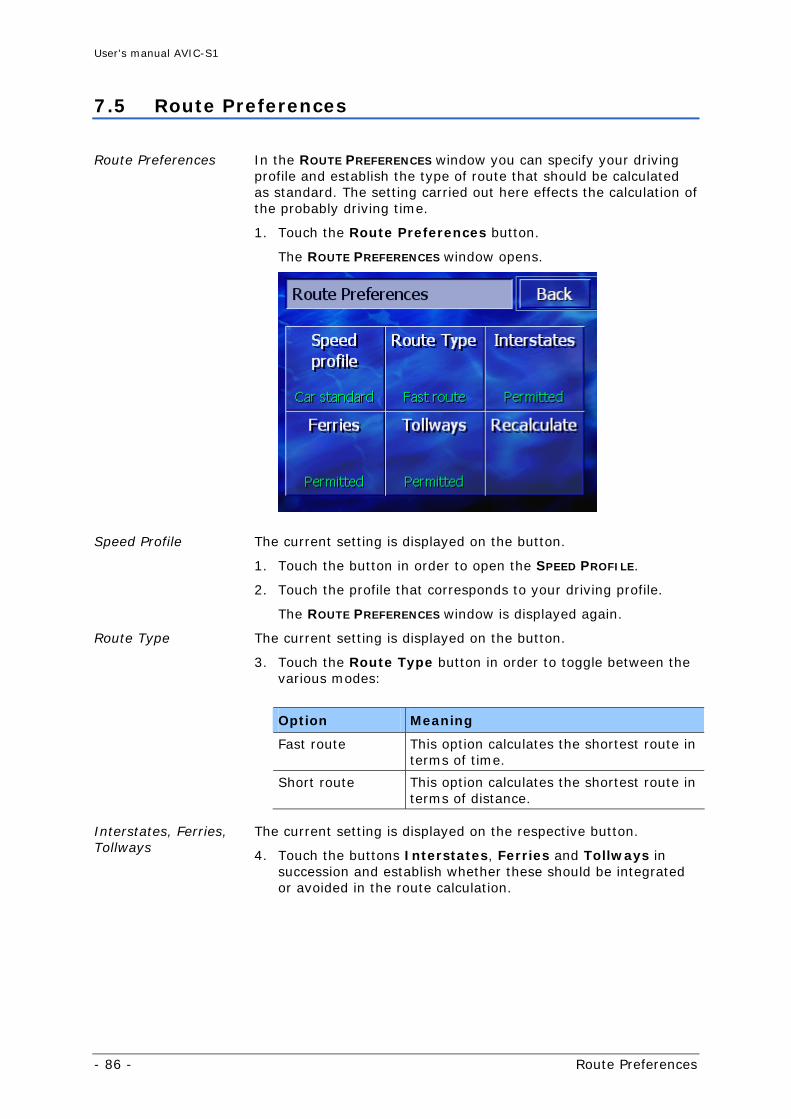
User's manual AVIC-S1
- 86 - Route Preferences
7.5 Route Preferences
Route Preferences In the ROUTE PREFERENCES window you can specify your driving profile and establish the type of route that should be calculated as standard. The setting carried out here effects the calculation of the probably driving time.
1. Touch the Route Preferences button.
The ROUTE PREFERENCES window opens.
Speed Profile The current setting is displayed on the button.
1. Touch the button in order to open the SPEED PROFILE.
2. Touch the profile that corresponds to your driving profile.
The ROUTE PREFERENCES window is displayed again.
Route Type The current setting is displayed on the button.
3. Touch the Route Type button in order to toggle between the various modes:
Option Meaning
Fast route This option calculates the shortest route in terms of time.
Short route This option calculates the shortest route in terms of distance.
Interstates, Ferries, Tollways
The current setting is displayed on the respective button.
4. Touch the buttons Interstates, Ferries and Tollways in succession and establish whether these should be integrated or avoided in the route calculation.

User's manual AVIC-S1
Configuring AVIC-S1 - 87 -
Option Meaning
Permitted With this option the respective road type will be incorporated in the calculation of the route.
Avoid With this option, the respective road type will be avoided if possible.
Forbidden With this option, the respective road type will not be incorporated in the calculation of the route.
Recalculate This button is only available during navigation and after a route
calculation during route planning if the settings are changed.
5. Touch the Recalculate button in order to recalculate the route based on the changed settings.
Please refer to chapter "Change route preferences" on page 81.
7.6 Overlay POI
Overlay POI In OVERLAY POI, you can establish which point of interest categories should be displayed on the map. If a category also has subcategories you can also select individual subcategories.
1. Touch Overlay POI.
The OVERLOI POI window opens.
The current setting is shown in the box to the right alongside the
respective point of interest:
: This category will be shown on the map.
: This category will not be shown on the map.
: This category includes subcategories of which one or more will not be shown on the map.

User's manual AVIC-S1
- 88 - Overlay POI
Show all categories Touch the All button in order to show all the points of interest on the map.
Show no categories Touch the None button in order to show no points of interest on the map.
Show / hide specific categories / subcategories
Categories without subcategories:
Touch the box for the respective category in order to activate (box with checkmark) or deactivate (empty box) the display.
Categories with subcategories:
1. Touch the box for the respective category.
A window opens with all the subcategories of the chosen category.
Touch the All button in order to show the category in the map.
- or -
Touch the None button in order not to show the category in the map.
- or -
Touch the button for the respective subcategory in order to
activate (box with checkmark ) or deactivate (empty box ) its display.
Then touch the Back button.

User's manual AVIC-S1
Configuring AVIC-S1 - 89 -
7.7 Displayed Information
Displayed Information
In DISPLAYED INFORMATION you can establish which information will be displayed on the map. The majority of this information is only relevant for the navigation and is only available in the map view whilst navigating.
Refer also to chapter "Showing the map during navigation" on page 73.
1. Touch Displayed Information.
The DISPLAYED INFORMATION window opens.
Touch the To the right and To the left buttons in order to view additional setting possibilities.
You can carry out the following settings in the DISPLAYED
INFORMATION window:
7.7.1 Current Time
Current time With this setting you can establish whether the map should show the current time.
The current setting is shown on the button. Touch the button to change the setting.
Setting Meaning
Show The current time is shown.
Hide The current time is not shown.

User's manual AVIC-S1
- 90 - Displayed Information
7.7.2 Current Street Name
Current street name With this setting you can establish whether the name of the street on which you are currently driving should be displayed.
The current setting is shown on the button. Touch the button to change the setting.
Setting Meaning
Show The street name of the street on which you are currently driving is shown.
Hide The street name of the street on which you are currently driving is not shown.
7.7.3 Compass
Compass With this setting you can establish whether a compass should be shown on the map.
It is practical to show the compass during navigation if the map is driving direction.
If the map is shown in 2D during navigation, by tapping on the compass you can switch between North alignment and Drivin direction.
The current setting is shown on the button. Touch the button to change the setting.
Setting Meaning
Show The compass is shown.
Hide The compass is not shown.
7.7.4 Current Speed
Current Speed With this setting you establish whether the map should show your current speed as is calculated from the GPS positioning data. The speed is shown in the unit you have specified for the AVIC-S1. (refer to "Distance", page 100)
The current setting is shown on the button. Touch the button in order to change the setting.
Setting Meaning
Show Your current speed will be shown.
Hide Your current speed will not be shown.

User's manual AVIC-S1
Configuring AVIC-S1 - 91 -
7.7.5 Destination Info
Destination Info With this setting you can establish whether the distance left until you reach the destination and, depending on setting, the probable arrival time or the remaining driving time should be shown. (Refer to "Displayed Time", page 91)
The current setting is shown on the button. Touch the button in order to change the setting.
Setting Meaning
Show The destination information will be shown.
Hide The destination information will not be shown.
7.7.6 Waypoint Info
Waypoint Info This information is only visible if you are navigating a route that has at least two indicated waypoints.
With this setting you establish whether the distance left until you reach the next waypoint and, depending on setting, the estimated time of arrival or the remaining driving time should be shown. (Refer to "Displayed Time", page 91)
The current setting is shown on the button. Touch the button in order to to change the setting.
Setting Meaning
Show The waypoint information is shown.
Hide The waypoint information is not shown.
7.7.7 Displayed Time
Displayed Time If you have set the display of destination information and waypoint information you can use this setting to establish which information should be shown in addition to the distance. (See Destination Info, page 91 and Waypoint Info, page 91)
The current setting is shown on the button. Touch the button to change the setting.
Setting Meaning
Arrival The probable time of arrival is shown above the distance display.
Duration The remaining driving time is shown above the distance display.

User's manual AVIC-S1
- 92 - Displayed Information
7.7.8 Street names on map (2D)
Street names on map
With this setting you establish whether the street names should be shown on the map. This display can be useful if you are looking for a specific street as a destination.
The current setting is shown on the button. Touch the button to change the setting.
Setting Meaning
Show The street names will be shown.
Hide The street names will not be shown.
7.7.9 GPS / current position
GPS / current position
With this setting you establish whether the GPS symbol should be shown on the map. The GPS symbol offers information regarding whether the received signal is sufficient and strong enough for navigating or positioning.
For more information on the GPS symbol, refer to the chapter "Status displays" on page 66.
The current setting is shown on the button. Touch the button to change the setting.
Setting Meaning
Show The GPS symbol will be shown.
Hide The GPS symbol will not be shown.
You can view detailed information regarding the GPS status at any time in the GPS STATUS window. To do this read chapter "GPS Status" on page 97.
7.7.10 Battery Status
Battery Status With this setting you can establish whether the battery symbol should be shown on the map. The battery symbol gives you information as the charge status of the battery.
For more information on the battery symbol, refer to chapter "Status displays" on page 66.
The current setting is shown on the button. Touch the button in order to change the setting.

User's manual AVIC-S1
Configuring AVIC-S1 - 93 -
Setting Meaning
Show The battery symbol will be shown.
Hide The battery symbol will not be shown.
You can also obtain detailed information about the current battery status in the BATTERY STATUS window. To do this refer to chapter "Battery Status" on page 97.
7.8 Background
Background In the BACKGROUND settings window you can select a different graphic that you can use as a background graphic for your software.
The current setting is shown on the button.
1. Touch the button in order to open the BACKGROUND window.
2. Touch the graphic (skin) that you would like to use as a background.
The BACKGROUND window closes. The new background graphic can now be used.
Repeat the process if you are not happy with your choice and wish to try out a different graphic.
7.9 Autozoom
Autozoom This setting only affects the map when it is in the Standard map view, and if the map is shown in 2D. With this setting you can establish whether during a navigation with 2D display should have a high autozoom, standard autozoom or low autozoom. Autozoom means that the zoom intensity changes depending on your speed: if you drive slowly, the scale reduces. Drive quicker and the scale increases. The more intense the autozoom, the smaller the map´s scale.
The current setting is shown on the button. Touch the button to change the setting.
Setting Meaning
Standard Standard autozoom
High High autozoom
Low Low autozoom

User's manual AVIC-S1
- 94 - Home Address
7.10 Home Address
Home Address In the HOME ADDRESS settings window you can specify your home address and therefore you can also quickly navigate from any location to your home.
1. Touch the Home address button.
The HOME ADDRESS window opens.
2. Touch the Change button and enter your home address. (Refer to chapter "Entering a destination", page 28)
The address is now shown in the HOME ADDRESS window.
7.11 Phone Menu
Phone Menu A telephone application is installed on your device. With this aid of this you can connect your mobile telephone to the device via Bluetooth. Once a connection is created, in the case of incoming calls the telephone application is automatically displayed on top of the navigation. This way, whilst navigating you can use the device as a hands free unit and accept incoming calls. Using the telephone application you can also make calls and view incoming, made or missed calls.
1. Touch the Phone Menu button in order to open the telephone application and generate a Bluetooth connection with your mobile telephone.
Refer to the "User manual part 2 (Hardware and Bluetooth" on the DVD for detailed information on how to use the telephone application.

User's manual AVIC-S1
Configuring AVIC-S1 - 95 -
7.12 Hardware
Hardware In the HARDWARE settings window you can carry out some hardware-specific settings and view detailed information regarding the current GPS and battery status.
1. Touch the Hardware button.
The HARDWARE window opens.
You can carry out the following settings in the HARDWARE window:
7.12.1 Demo Mode
Demo Mode With this setting you can establish whether the demo mode should be launched if you do not operate the device for more than 5 minutes and you are not currently navigating.
Demo mode plays a brief overview of the AVIC-S1 range of options. You can cancel this by tapping anywhere on the touchscreen.
The current setting is shown on the button. Touch the button to change the setting.
Setting Meaning
On Demo mode is switched on.
Off Demo mode is switched off.

User's manual AVIC-S1
- 96 - Hardware
7.12.2 Click sound
Click sound With this setting you can establish whether there should be a click sound when tapping on the device's touch screen or not.
The current setting is shown on the button. Touch the button to change the setting.
Setting Meaning
On Click sound is switched on.
Off Click sound is switched off.
7.12.3 Brightness
Brightness In the BRIGHTNESS settings window you can establish the brightness for the daylight and nighttime display.
1. Touch the Brightness button.
The BRIGHTNESS window opens.
Brightness day The current degree of brightness is displayed between the two
buttons "-" and "+".
Touch the "+" button to increase the value.
Touch the "-" button to reduce the value.
Brightness night The current degree of brightness is displayed between the two buttons "-" and "+".
Touch the "+" button to increase the value.
Touch the "-" button to reduce the value.
Touch Back in order to close the BRIGHTNESS window.

User's manual AVIC-S1
Configuring AVIC-S1 - 97 -
7.12.4 Battery Status
Battery Status The BATTERY STATUS window includes information regarding the current charge status of the battery.
1. Touch the Battery Status button.
The BATTERY STATUS window opens.
The battery symbol shows the current charge status. The meaning of the symbol is displayed as text beneath it.
The battery symbol is the same one that is shown in the map when its display is set, refer to "Battery Status", page 92).
Touch the Back button to close the BATTERY STATUS window.
7.12.5 GPS Status
GPS Status The GPS STATUS window includes information regarding your current location and your present speed.
1. Touch the GPS Status button.
The GPS STATUS window opens.
.

User's manual AVIC-S1
- 98 - Regional Settings
Information Meaning
GMT Greenwich Mean Time London time without summertime.
Lon/Lat Current position. Specifies the East longitudinal and north latitudinal degrees.
Satellites Number of receiving satellites. For navigation, the signals require at least three satellites.
HDOP Horizontal Dilution of Precision Indicates the quality of the positioning. Theoretically, values from 0 to 50 are possible, whereby it follows: the smaller the value, the more precise the positioning (value 0= no deviation from the actual position). Values up to 8 are acceptable for navigation purposes.
Speed Shows the current speed of the vehicle.
Location Shows the current location. Tap on the Back button to close the GPS STATUS window.
7.13 Regional Settings
Regional Settings In the REGIONAL SETTINGS settings window you can change the basic settings, e.g. language and time zone, that you specified when you first started the navigation system (refer to "Basic settings", page 13).
1. Touch the Regional Settings button.
The REGIONAL SETTINGS window opens.
In the REGIONAL SETTINGS window you can carry out the following settings:

User's manual AVIC-S1
Configuring AVIC-S1 - 99 -
7.13.1 Language
Language With this setting you specify the language the user interface of the software and the spoken driving directions should be.
The current setting is shown on the button.
1. Touch the button to open the LANGUAGE window.
2. Touch the language in which you wish to operate the system. You can scroll through the list using the Up and Down keys.
If your language is not displayed, touch the More/Más/Plus button to view more languages.
As soon as you select the language an information window opens that informs you that need to restart the machine.
3. Touch the OK button.
The system switches off and then back on again. The chosen language is used for the user interface and the speech instructions.
7.13.2 Time Zone
Time Zone With this setting you can establish valid time zones for your location. This setting is important for the correct calculation of probable arrival times.
Touch the button to open the TIME ZONE window.
Time Zone The current setting is shown on the button.
1. Touch the button to open the TIME ZONE window.
2. Touch the time zone that applies to your location. Use Up and Down to scroll through the list. The display of the major cities of the respective time zone should help you to choose the correct one.
The TIME ZONE window is shown again.
Daylight Saving Time The current setting is shown on the button.
3. Touch the Daylight saving time button to change the setting:
Setting Meaning
On Daylight saving time is switched on
Off Daylight saving time is switched off

User's manual AVIC-S1
- 100 - Product Information
7.13.3 Time Format
Time Format With this setting you establish which units of measurement should be used for times.
The current setting is shown on the button. Touch the button to change the setting.
Setting Meaning
24h Displays the time in 12-hour format.
12h Displays the time in 24-hour format.
7.13.4 Distance
Distance With this setting you establish which units of measurement should be used for the distances.
The current setting is shown on the button. Touch the button to change the setting.
Setting Meaning
Kilometres Displays the distances in kilometres.
Miles Displays the distances in miles.
7.14 Product Information
Product Information The name and version of the software is displayed in the PRODUCT INFORMATION settings window.
Touch the button to open the PRODUCT INFORMATION window.
Guided Tour Touch the Guided Tour button to have the most important functions of the software explained.
7.15 Restore Factory Settings
Restore Factory Settings
Use this setting to restore to factory settings.
Touch the button to restore the factory settings.

User's manual AVIC-S1
Appendix - 101 -
8 Appendix
Topics covered in this chapter:
8.1 Appendix A: Restoring the Software and Map page 102
Restoring the software Restoring the map

User's manual AVIC-S1
- 102 - Appendix A: Restoring the Software and Map
8.1 Appendix A: Restoring the Software and Map
Overview If the software and / or map are damaged, perhaps because the navigation device has been subject to strong electromagnetic radiation, you can reinstall both of them.
On the supplied DVD you’ll find an Installer Tool, which guides you through the software and map installation.
Note: The files can be copied either via a card reading device or via an ActiveSync connection. Copying via a card reading device takes considerably less time.
If you want to copy files via an ActiveSync connection, please first ensure that you have installed the Pioneer Sync Manager, which you can find on the supplied DVD.
8.1.1 Restoring the software
Via USB 1. Connect the navigation device to your PC via the USB cable.
2. Insert the AVIC-S1 DVD in your DVD ROM drive.
The Installer Tool starts automatically.
3. Select your language.
4. Click on Upgrade / Restore Application.
5. Click on MS ActiveSync®.
6. Follow the on-screen instructions.
Note: If the Installer Tool does not start automatically, open Windows Explorer. Select the directory for your DVD drive and double-click on the "Setup.exe" file.
Via card reader 1. Insert a memory card with at least 70 MB free memory in
your card reader.
2. Insert the supplied DVD in your DVD ROM drive.
The Installer Tool starts automatically.
3. Select your language.
4. Click on Upgrade / Restore Application.
5. Click on SD card.
6. Follow the on-screen instructions.
Once the installation files have been copied to the memory card you will be basked to insert the memory card in the navigation device.
7. Insert the memory card in your device.
8. Switch on your navigation device.
9. The software installation starts automatically.
Note: If the Installer Tool does not start automatically, open Windows Explorer. Select the directory for your DVD drive and
User's manual AVIC-S1
Appendix - 103 -
double-click on the "Setup.exe" file.
8.1.2 Restoring the map
Via ActiveSync 1. Connect your navigation device to your PC via ActiveSync.
2. Insert the AVIC-S1 DVD in your DVD ROM drive.
The Installer Tool starts automatically.
3. Select your language.
4. Click on Upgrade / Restore Map.
5. Click on MS ActiveSync®.
6. Follow the on-screen instructions.
Note: If the Installer Tool does not start automatically, open Windows Explorer. Select the directory for your DVD drive and double-click on the "Setup.exe" file.
Via card reader 1. Insert a memory card with sufficient free memory into your
card reader.
2. Insert the AVIC-S1 DVD in your DVD ROM drive.
The Installer Tool starts automatically.
3. Select your language.
4. Click on Upgrade / Restore Map.
5. Click on SD card.
6. Follow the on-screen instructions.
7. After copying the map to the memory card, insert the memory card in your navigation device.
Note: You don't need to copy the map from the memory card to the device; you can also download the map directly from your memory card. To do this, tap on No when after inserting the memory card in your navigation device you are asked if you would like to copy the map to the device.


User's manual AVIC-S1
Glossary - 105 -
9 Glossary
GMT GMT (Greenwich Mean Time) is the mean solar time at the Royal Greenwich Observatory in Greenwich near London, England, which by convention is at 0 degrees geographic longitude. Theoretically, noon Greenwich Mean Time is the moment when the Sun crosses the Greenwich meridian (and reaches its highest point in the sky in Greenwich). Up to 1972, GMT was the global time standard. Because of the Earth's uneven speed in its elliptic orbit, GMT has been replaced by UTC (Universal Time Coordinated) which is an ultra stable time standard based on atomic clocks.
GPS The GPS (Global Positioning System) is based on 24 satellites
that are in orbit round the earth. They are permanently emitting the time and their current position. The GPS receiver receives this information and calculates the longitude and the latitude of its own current position.
The signals of at least three satellites are needed to determine the longitude and the latitude. With the signals of at least four satellites the elevation may be calculated, too. The determination has an accuracy of about 3 yards.
HDOP The Horizontal Dilution of Precision (HDOP) indicates the quality
of position determination. Theoretically any value from 0 to 50 is possible. The smaller the value is, the more accurate is the position determination (value 0 = no deviation from the actual position). Values up to 8 are convenient for street navigation.
POI Point of Interest (POI). See Point of Interest.
Point of Interest Points of Interest are covered by the map and may be displayed
on it. Harbors, airports, restaurants, hotels, gas stations, public buildings, and others belong to the special destinations. You may determine special destinations as itinerary points for navigation purposes.


User's manual AVIC-S1
Index - 107 -
10 Index
2
2D/3D ........................................... 85
A
Activate ........................................... 7 Arrangement of the Manual ................ 6 Autozoom ...................................... 93 AVIC-S1
Start........................................... 27
B
Background.................................... 93 Basic Settings................................. 13 Battery .......................................... 92
Charge........................................ 12 Charging Status ........................... 12 Status......................................... 67
Battery Status ................................ 97 Blocking......................................... 79 Brightness...................................... 96 Button ............................................. 7
C
Click sound .................................... 96 Compass........................................ 90 Conventions in the Manual.................. 6 Current..................................... 89, 90 Current Speed ................................ 90 Current Time .................................. 67
D
Day / Night Display ......................... 85 Demo Mode.................................... 95 Destination
Address book ............................... 45 Destination History ....................... 44 Home Address.............................. 46 Points of interest .......................... 37
In a City................................... 40 Nationwide ............................... 42 Nearby..................................... 37
Recent destinations ...................... 44 Select on map.............................. 47
Destination Info .............................. 91 Destinations
Administer ................................... 49 Details ........................................... 61 Dialog Window ..................................7 Display ............................................7 Displayed Information...................... 89 Displayed Time ............................... 91 Distance....................................... 100 Distance Unit .................................. 16
E
Energy........................................... 67
G
GMT .............................................. 98 GPS..........................................10, 92
GPS symbol ................................. 66 Signals........................................ 10
GPS Status ..................................... 97 Guided Tour.................................. 100
H
Hardware ....................................... 95 HDOP ............................................ 98 Highlight ..........................................7 Home Address ...........................46, 94
I
Input Field........................................7 Introduction.................................... 16 Itinerary ........................................ 55
K
Key .................................................7 Keyboard ....................................... 21
L
Language ..................................14, 99 List of waypoints ............................. 57
M
Manual Arrangement..................................6

User's manual AVIC-S1
- 108 - Index
Conventions................................... 6 Symbols........................................ 6
Map 2D/3D......................................... 85 Autozoom............................... 70, 72 Buttons....................................... 70 Day / Night Display....................... 85 Displayed Information ................... 89 Map............................................ 85 Moving................................... 72, 73 Orientation .................................. 85 Overlay POI ................................. 87 Route information......................... 73 Search for destination ................... 71 Show Entire Route ........................ 70 Standard view.............................. 69 Using.......................................... 69 View destination on map................ 72 Zoom in ...................................... 68 Zoom level bar............................. 68 Zoom out .................................... 68
N
Navigation Change route preferences.............. 81 No GPS Reception......................... 64
Navigation aids ............................... 73 Navigation System
Switching On ............................... 13 Next destination.............................. 78
O
Orientation..................................... 85 Overlay POI.................................... 87
P
Phone Menu ................................... 94 POI ............................................... 37 Points of interest............................. 37
In a City...................................... 40 Nationwide .................................. 42 Nearby........................................ 37
Power supply .................................. 12 Product Information........................100
R
Regional Settings ............................ 98 Restore Factory Settings .................100 Route
Calculate ..................................... 60 Details ........................................ 61
Download .................................... 59 Save........................................... 59 Simulate.................................62, 82
Route information............................ 73 Route planning................................ 55 Route Preferences ........................... 86 Route section
Block .......................................... 79 Unblock....................................... 81
Routes Editing the list of waypoints ........... 57 Manage ....................................... 58
S
Scrolling Wheel .................................7 Select ..............................................7 Settings
2D/3D......................................... 85 Autozoom.................................... 93 Background ................................. 93 Battery Status.........................92, 97 Brightness ................................... 96 Click sound .................................. 96 Compass ..................................... 90 Current Speed.............................. 90 Current street name...................... 90 Current time ................................ 89 Day / Night Display....................... 85 Demo Mode ................................. 95 Destination Info............................ 91 Displayed Information ................... 89
Battery Status ........................... 92 Compass .................................. 90 Current Speed ........................... 90 Current street name................... 90 Current time ............................. 89 Destination Info......................... 91 Displayed Time.......................... 91 GPS / current position ................ 92 Street names on map ................. 92 Waypoint Info ........................... 91
Displayed time ............................. 91 Distance.................................... 100 Distance Unit ............................... 16 GPS / current position ................... 92 GPS Status .................................. 97 Hardware .................................... 95
Battery Status ........................... 97 Brightness ................................ 96 Click sound ............................... 96 Demo Mode............................... 95 GPS Status ............................... 97
Home Address.............................. 94 Introduction................................. 16 Language .................................... 99 Map Type .................................... 85

User's manual AVIC-S1
Index - 109 -
Orientation .................................. 85 Overlay POI ................................. 87 Phone Menu................................. 94 Product Information .....................100
Guided Tour.............................100 Regional Settings ......................... 98
Distance..................................100 Language ................................. 99 Time Zone ......................... 99, 100
Restore Factory Settings...............100 Route Preferences ........................ 86
Route Type ............................... 86 Speed Profile............................. 86
Skins .......................................... 93 Street names on map.................... 92 Summer Time .............................. 15 Time Format ......................... 15, 100 Time Zone................................... 99 Waypoint Info .............................. 91
Simulation................................. 62, 82 Stop ........................................... 62
Skins............................................. 93 Software Keyboard .......................... 21 Speed profile .................................. 86 Street names on map ...................... 92 Summer Time................................. 15 Switching on................................... 13 Symbol ............................................ 7 Symbols in the Manual ....................... 6
T
Tab ................................................. 7
Terminology .....................................7 Activate.........................................7 Button ..........................................7 Dialog Window ...............................7 Display..........................................7 Hard Key .......................................7 Highlight .......................................7 Input Field .....................................7 Scrolling Wheel ..............................7 Select ...........................................7 Symbol .........................................7 Tab...............................................7 Window.........................................7
Terms..............................................7 Terms Used ......................................7 Time.............................................. 67 Time Format ............................ 15, 100 Time Zone.................................15, 99
U
Unblocking ..................................... 81
W
Waypoint Next destination ........................... 78 Skip next waypoint ....................... 78
Waypoint Info ................................. 91 Waypoints ...................................... 78 Window............................................7