User’s Guide to Deploying vApps and Virtual Appliances · For onsite pilot programs and...
24
User’s Guide to Deploying vApps and Virtual Appliances VMware Studio 2.0 EN-000208-00
-
Upload
truongtuong -
Category
Documents
-
view
214 -
download
1
Transcript of User’s Guide to Deploying vApps and Virtual Appliances · For onsite pilot programs and...

User’s Guide to Deploying vApps andVirtual Appliances
VMware Studio 2.0
EN-000208-00

VMware, Inc.3401 Hillview Ave.Palo Alto, CA 94304www.vmware.com
2 VMware, Inc.
User’s Guide to Deploying vApps and Virtual Appliances
You can find the most up-to-date technical documentation on the VMware Web site at:
http://www.vmware.com/support/
The VMware Web site also provides the latest product updates.
If you have comments about this documentation, submit your feedback to:
© 2008-2009 VMware, Inc. All rights reserved. This product is protected by U.S. and international copyright and intellectual property laws. VMware products are covered by one or more patents listed at http://www.vmware.com/go/patents.
VMware, the VMware “boxes” logo and design, Virtual SMP, and VMotion are registered trademarks or trademarks of VMware, Inc. in the United States and/or other jurisdictions. All other marks and names mentioned herein may be trademarks of their respective companies.

VMware, Inc. 3
Contents
About This Book 5
1 Overview of Appliances Created With VMware Studio 7About vApps and Virtual Appliances 7
Components of Virtual Appliances Created With VMware Studio 8
2 Deploying Your Virtual Appliance 9Distribution Formats 9
Supported VMware Platform Products 9
Supported Web Browsers 9
Deploying a Virtual Appliance in VMware vSphere 10
Deploying a Virtual Appliance in VMware Server, Workstation, or Player 10
First Start of the Virtual Appliance 11
Configuring Static IP Addresses 11
Configuring DHCP 12
Setting the Time Zone 12
3 Managing Your Virtual Appliance 13Exploring your Virtual Appliance 13
Using the Command Line 13
Exploring vApps in the vSphere Client 14
Shutting Down or Rebooting the Virtual Appliance 14
Setting the Time Zone 14
Choosing Between DHCP and Static Network Addresses 15
Network Configuration 15
Firewall Security 15
VAMI Configuration Utilities 16
4 Updating Your Virtual Appliance 17Types of Updates 17
Update Tab 17
Checking Status and Applying Updates 17
Using the Command Line 18
Setting Update Policies 18
Setting Update Location 18

User’s Guide to Deploying vApps and Virtual Appliances
4 VMware, Inc.
5 Managing Your Virtual Appliance with VMware vCenter 19Requirements 19
Viewing Virtual Appliance Information 19
Scanning Your Virtual Appliance 20
Doing a Manual Scan 20
Scheduling a Scan 20
Viewing Scan Results 20
Reviewing Scan Results for Virtual Appliances Contained in a vSphere Object 21
Reviewing Scan Results for an Individual Virtual Appliance 21
Remediating Virtual Appliances 21
Virtual Appliance Recognition 22
Product Platforms for OVF and OVA 23VMware Product Platforms 23
Compatibility for a Virtual Appliance or vApp 23

VMware, Inc. 5
This book, the User’s Guide to Deploying vApps and Virtual Appliances, provides information about deploying
and managing virtual appliances with VMware Studio 2.0. This guide is intended for VMware users who are
installing, running, administering, and updating vApps and virtual appliances created by VMware Studio.
Revision HistoryThis book is revised with each release of the product or when necessary. A revised version can contain minor
or major changes, Table 1 summarizes the significant changes in each version of this book.
VMware provides several SDK products, each of which targets different developer communities and product
platforms. To view documentation for the various SDK products, and the current version of this guide, go to
http://www.vmware.com/support/pubs/sdk_pubs.html.
VMware Studio ForumIf you have questions about VMware Studio or want to interact with other users and developers, go to
http://communities.vmware.com/community/beta/studiobeta.
Intended AudienceThis book is intended for anyone who wants to deploy, manage, and update vApps and virtual appliances
with the help of VMware Studio. One chapter discusses how to manage vApps and virtual appliances on
VMware vSphere. For information about creating vApps and virtual appliances with VMware Studio 2.0, see
the companion manual, Developer’s Guide to Building vApps and Virtual Appliances.
Document FeedbackVMware welcomes your suggestions for improving our documentation. Send your feedback to
Technical Support and Education ResourcesThe following sections describe the technical support resources available to you. To access the current versions
of other VMware books, go to http://www.vmware.com/support/pubs.
About This Book
Table 1. Revision History
Revision Description
20090828 Release version, the User’s Guide to Deploying vApps and Virtual Appliances for VMware Studio 2.0.
20090629 Version of the User’s Guide to Deploying vApps and Virtual Appliances for VMware Studio 2.0 Beta.
20081216 Similar version with corrections, but no new material.
20080905 First version, the Guide to Deploying Virtual Appliances for VMware Studio 1.0.

User’s Guide to Deploying vApps and Virtual Appliances
6 VMware, Inc.
Online and Telephone Support
To use online support to submit technical support requests, view your product and contract information, and
register your products, go to http://www.vmware.com/support.
Support Offerings
To find out how VMware support offerings can help meet your business needs, go to
http://www.vmware.com/support/services.
VMware Professional Services
VMware Education Services courses offer extensive hands‐on labs, case study examples, and course materials
designed to be used as on‐the‐job reference tools. Courses are available onsite, in the classroom, and live
online. For onsite pilot programs and implementation best practices, VMware Consulting Services provides
offerings to help you assess, plan, build, and manage your virtual environment. To access information about
education classes, certification programs, and consulting services, go to http://www.vmware.com/services.

VMware, Inc. 7
1
This chapter provides an overview of virtual appliances, and includes the following topics:
“About vApps and Virtual Appliances” on page 7
“Components of Virtual Appliances Created With VMware Studio” on page 8
VMware Studio is an integrated development tool that takes existing software applications and transforms
them into vApps and virtual appliances that are ready to run on VMware product platforms. With VMware
Studio, software developers and IT professionals can quickly begin packaging applications that are optimized
for virtual environments. When developers are finished, users can easily deploy these virtual appliance
packages, and datacenter administrators can manage them within vSphere.
About vApps and Virtual AppliancesA virtual appliance is a prebuilt software solution that contains virtual machines and software applications
that are packaged, managed, updated, and maintained together. Unlike traditional hardware appliances,
virtual appliances are easy for users to acquire and deploy as preintegrated solution stacks. Virtual appliances
reduce time‐to‐market and simplify the development and distribution of software applications.
VMware recently introduced the vApp, a software solution optimized for the cloud OS. The vApp is a logical
entity that contains one or more virtual machines, which can be managed as a unit. The vApp uses the industry
standard Open Virtualization Format (OVF) 1.0 to specify and encapsulate the components of a multitier
application, as well as the operational policies and service levels associated with it. The vApp gives application
owners a standard way to describe operational policies for an application that the cloud OS can consistently
interpret and run.
VMware Studio enables the building and maintenance of production‐ready vApps and virtual appliances for
applications that are not tied to a particular hardware form factor. Virtual appliances built with VMware
Studio carry an in‐guest management component, Virtual Appliance Management Infrastructure (VAMI).
VAMI provides users with a Web console and command‐line interface that can:
Configure network settings
Check for updates and install them over the network or from CD‐ROM, immediately or on a schedule
Review basic system information for the virtual appliance
Stop or restart the virtual appliance
An independent software vendor (ISV) can customize and rebrand the VAMI Web console so it provides an
immediate link to the applicationʹs Web interface. VAMI ensures that the first boot and subsequent reboots run
as specified by the developer or system integrator. To aid central management of virtual appliances, VAMI
integrates seamlessly with VMware vCenter Server (formerly VirtualCenter) and VMware Update Manager.
This document focuses on Linux‐based virtual appliances. VMware Studio can also build Windows‐based
virtual appliances, but they do not contain the VAMI agent. Likewise, virtual appliances build by methods
other than VMware Studio do not contain the VAMI agent.
Overview of Appliances Created With VMware Studio 1

User’s Guide to Deploying vApps and Virtual Appliances
8 VMware, Inc.
VMware Studio can produce virtual appliances in either Open Virtualization Format (OVF) or ZIP format. In
this release, OVF files conform to either the OVF 0.9 draft specification or the OVF 1.0 standard. OVF 1.0 is
required for vApps. For information about OVF, see http://www.vmware.com/appliances/learn/ovf.html.
VMware Studio builds virtual appliances that are portable across VMware product platforms, and which can
be updated or patched remotely, if the appliance developer enabled the update repository. This update facility
does not require use of VMware Update Manager.
Components of Virtual Appliances Created With VMware StudioFigure 1‐1 shows the components of a virtual appliance created with VMware Studio.
Figure 1-1. Virtual Appliance Created by VMware Studio
Virtual appliances created with VMware Studio have the following components:
JeOS – Just enough Operating System. Virtual appliances built with VMware Studio uses the minimal
required packages, ensuring that virtual appliances have a small footprint and are relatively secure.
VMware Tools – VMware Studio installs VMware Tools during the build of virtual appliances to enhance
communication between VMware virtualization platforms and the virtual appliance.
VAMI – The in‐guest management component provides a Web console to manage the virtual appliance.
VAMI allows you to change network settings, update the virtual appliance, and control the state of the
system by shutdown and reboot, in addition to other management services that an ISV adds. All the
default management services provided by VAMI are implemented as Common Information Model (CIM)
Providers using Small Footprint CIM Broker (SFCB) as a CIM Manager. CIM is a standard from
Distributed Management Task Force (DMTF). For more information on CIM and other DMTF standards,
see http://www.dmtf.org.
Application – The ISV or hardware appliance vendor (HAV) creates the application. The application
performs the intended task for which the appliance is created.
The virtual appliance can be managed by one or more of the following methods:
Virtual Appliance Web console – This connection provides a Web console for configuration and
maintenance tasks. A command‐line interface is also available for these tasks.
VMware vCenter Server – This connection allows vApps and virtual appliances to be integrated with and
managed by VMware Update Manager, an optional module for vCenter Server (formerly VirtualCenter).
Third‐party management software – This connection allows any third party management software to
manage the virtual appliance.

VMware, Inc. 9
2
This chapter provides information about how to deploy a virtual appliance, and includes the following topics:
“Distribution Formats” on page 9
“Supported VMware Platform Products” on page 9
“Supported Web Browsers” on page 9
“Deploying a Virtual Appliance in VMware vSphere” on page 10
“Deploying a Virtual Appliance in VMware Server, Workstation, or Player” on page 10
“First Start of the Virtual Appliance” on page 11
Distribution FormatsYour virtual appliance might be distributed in one or more of the following formats:
A ZIP archive containing a VMX virtual machine file and one or more VMDK files
An OVF 0.9 file and one or more VMDK files (OVF 0.9 package)
An OVF 1.0 file and one or more VMDK files (OVF 1.0 package)
An OVA archive (an OVF 1.0 package in TAR format)
The virtual appliance deployment method depends on the distribution format
Supported VMware Platform ProductsVirtual appliances created with VMware Studio are officially supported on the following VMware platform
products:
VMware ESX/ESXi 4
VMware ESX/ESXi 3.5 U3
VMware Workstation 6.5.1
VMware Server 2.0
VMware Server 1.0.x
VMware Player 2.0.4 and 2.5
Supported Web BrowsersVirtual appliances created with VMware Studio support the following browsers:
Internet Explorer 6 and 7
Firefox 2 and 3
Deploying Your Virtual Appliance 2

User’s Guide to Deploying vApps and Virtual Appliances
10 VMware, Inc.
Deploying a Virtual Appliance in VMware vSphereIf you receive a virtual appliance in OVF 0.9 format, you can deploy it on VMware Infrastructure 3 or later. If
you receive a vApp or virtual appliance in OVF 1.0 format, it must be deployed on VMware vSphere 4.
To deploy a virtual appliance or vApp from OVF or OVA
1 You can deploy an OVF or OVA either from a URL, or by downloading the OVF and VMDK files (or the
OVA archive) to local disk.
2 In the VMware Infrastructure Client, select menu File > Virtual Appliance > Import.
In the VMware vSphere Client, select File > Deploy OVF Template.
3 Choose either Deploy from URL or Deploy from file, based on where the OVF or OVA is located.
4 Answer questions in the Import Virtual Appliance Wizard to install the appliance, and accept the End
User License Agreement (EULA).
When you deploy an OVF 1.0 produced by VMware Studio on vSphere 4, you are prompted for OVF
networking properties, which are used to configure networking for the vApp. For OVF networking
properties to work, you must configure an IP Pool on this vCenter Server, which must be complete before
power‐on of the virtual appliance. You are also prompted for other OVF properties that the ISV may have
defined to configure the application.
On other product platforms, by default most appliances try to acquire an IP address from a DHCP server.
If you prefer a static IP address, see “Configuring Static IP Addresses” on page 11.
5 Power on the virtual machine.
In the case of a vApp, you can power on the entire vApp.
6 Continue with “First Start of the Virtual Appliance” on page 11.
If you receive your virtual appliance in a ZIP file containing a VMX file and one or more VMDK files, then you
must convert the virtual appliance. The VMware vCenter Converter 4 Standalone tool converts and imports
the virtual appliance directly into the VMware vSphere inventory so that you can run it immediately. This
converter is free and available from the VMware Web site at http://vmware.com/products/converter/.
Deploying a Virtual Appliance in VMware Server, Workstation, or PlayerA ZIP distribution file contains a VMX file and one or more VMDK files. If you receive a distribution in ZIP
format, you must unzip the file and open the VMX file with the appropriate virtualization engine (either
VMware Server, VMware Workstation, or VMware Player).
To deploy a virtual appliance from ZIP
1 On the VMware product platform where it will run, extract the appliance ZIP file into a folder. The folder
might be /var/lib/vmware/VirtualMachines on a Linux host or C:\MyVirtualMachines on a Windows host.
2 In VMware Workstation or the VMware Server Console application, select File > Open from the menu.
3 Click Browse, navigate to the folder where you extracted the virtual appliance software, select
<applianceName>.vmx and click Open. The appliance appears as an entry in the Inventory.
4 Click Start in the Commands section.
5 Continue with “First Start of the Virtual Appliance” on page 11.
If you receive your virtual appliance as an OVF file, you can convert the virtual appliance with the ovftool. Workstation 6.5.1 uses ovftool internally to convert the OVF and VMDK files into VMX and VMDK files that
are compatible with VMware hosted products. The tool is free and available on the VMware Web site at
http://vmware.com/appliances/learn/ovf.html.

VMware, Inc. 11
Chapter 2 Deploying Your Virtual Appliance
First Start of the Virtual ApplianceTo run the virtual appliance, follow this procedure:
1 On a VMware platform product, start the virtual appliance with the virtual machine Power On command.
As the appliance starts (in products other than VMware vCenter Server 4) it might display the EULA. If
it does, press the space bar to continue displaying more pages. At the end, type yes and press Enter to accept the EULA. If it asks you to give other information, provide it.
2 The IP address of the appliance might display on the welcome screen, and in the Summary tab of the
vSphere Client. The IP address could come from OVF networking properties. The welcome screen also
might display the URL to access the appliance management Web console. The virtual appliance welcome
screen displays the following menu selections at the bottom of the page:
LoginConfigure NetworkSet Timezone (Current:UTC)
3 By default, the virtual appliance tries to acquire an IP address from a DHCP server. If the virtual appliance
requires a static IP address or a proxy, see “Configuring Static IP Addresses” on page 11.
4 You can change the time zone, if the default UTC is unacceptable. See “Setting the Time Zone” on page 12.
5 If the URL of the management Web console appeared in the welcome screen, point your Web browser to
this URL.
6 Login to the management Web console using the same credentials that you would use for login to your
virtual appliance. You might be asked to configure a trust relationship for the self‐signed HTTP certificate.
Configuring Static IP Addresses
You can configure static IP address from the welcome screen as described here, or from the virtual appliance
Web console as described in “Choosing Between DHCP and Static Network Addresses” on page 15.
If you are deploying OVF 1.0 using an IP Pool, you can configure static IP during deployment, or later when
the virtual appliance is powered off.
To configure a static network address for the virtual appliance
1 From the virtual appliance welcome screen, select Configure Network and press Enter.
2 Enter no to the “Use a DHCP server instead of a static IP address” prompt.
3 Type the addresses for the following and press Enter after each entry:
IP Address
Netmask
Gateway
DNS Server 1
DNS Server 2
Host name
4 Enter yes or no at the “Is a proxy server necessary to reach the Internet?” prompt. For information about
the proxy, or to set proxy login and password, see “Network Configuration” on page 15.
If you answered no, press Enter.
If you answered yes, press Enter. Type the IP address and port number of the proxy server. Press Enter.
A review of your entries appears.
5 Enter yes and press Enter if the values are correct.
User’s Guide to Deploying vApps and Virtual Appliances
12 VMware, Inc.
If the values are incorrect, enter no and repeat the procedure.
If OVF properties for IP networking are present, they are used for network configuration.
Configuring DHCP
If you configured the virtual appliance to use static IP addresses, but you want to change the configuration to
retrieve IP addresses from a DHCP server, take the following steps.
To configure a DHCP for the virtual appliance
1 From the virtual appliance welcome screen, select Configure Network and press Enter.
2 Enter yes to the “Use a DHCP server instead of a static IP address” prompt.
3 Enter yes or no to the “Is a proxy server necessary to reach the Internet?” prompt.
If you answered no, press Enter.
If you answered yes, enter the IP address and the port number for the proxy server. Press Enter.
A review of the network settings appears.
4 Enter yes and press Enter if the values on the review screen are correct.
If the values are incorrect, enter no, press Enter and repeat the procedure.
Setting the Time Zone
You can set time zone from the welcome screen as described here, or from the virtual appliance Web console
as described in “Setting the Time Zone” on page 14. The virtual hardware clock is always maintained in UTC,
which the virtual appliance converts to local time. Correct local time is important for the update repository
and VMware Update Manager.
If the vami.timezone OVF property is present and correctly set, it is used to change the time zone.
To change the time zone for your virtual appliance, return to the VMware platform in “First Start of the Virtual
Appliance” on page 11 (step 1) and take the following steps.
To set the time zone from the welcome screen
1 From the virtual appliance welcome screen, select Set Timezone and press Enter.
2 In the Geographic area screen, select your continent or region and press Enter.
3 In the Time zone screen, select a city or area in your time zone and press Enter.
4 The time zone is set and the welcome screen appears.
(These steps may vary.) The time zone is set and the welcome screen appears again.

VMware, Inc. 13
3
This chapter describes software discovery and network settings for your vApp or virtual appliance, including
the following topics:
“Exploring your Virtual Appliance” on page 13
“Shutting Down or Rebooting the Virtual Appliance” on page 14
“Setting the Time Zone” on page 14
“Choosing Between DHCP and Static Network Addresses” on page 15
“Network Configuration” on page 15
You can perform management operations from the Web console by using a browser to reach the IP address or
host name of the vApp or virtual appliance at its designated port number, https://vapp.example.com:5480 for
example. To log in, type the user name and password you set, or documented by your appliance provider.
Exploring your Virtual ApplianceThe System tab provides the following information:
Vendor – The name of the company that created your virtual appliance.
Appliance Name – The name of your appliance.
Appliance Version – The version number of your appliance.
Hostname – The fully qualified host name of your appliance. If a static IP is configured for the VM, then
you can specify a host name. If the OVF vami.hostname property is present, the host name is set
according. Otherwise DNS service maps the IP address into a host name (PTR record).
OS Name – The name of the operating system on which your appliance runs.
OS Version – The version number of the operating system.
OVF Environment – If deployed in vSphere, shows the OVF properties defined and configured for this
virtual machine or vApp.
Using the Command Line
To access the command line, select Login at the VMware platform product console, supply the login name and
password that the vendor provided with your appliance. Type the vamicli command at the system prompt
for a usage summary.
The following command shows the version information for the virtual appliance:
vamicli version --appliance
The following command shows the version of VMware Studio used to build the virtual appliance:
vamicli version --studio
Managing Your Virtual Appliance 3

User’s Guide to Deploying vApps and Virtual Appliances
14 VMware, Inc.
Exploring vApps in the vSphere Client
You can also find information about virtual appliances and vApps by examining them with the vSphere Client.
Figure 3‐1 shows several vApps. A vApp looks similar to a folder containing virtual machines, except that the
vApp icon shows four small blue squares instead of a yellow folder. A vApp behaves like a virtual machine,
with power operations, network settings, datastores, and configurable resource use.
Figure 3-1. Three vApps in a Datacenter
The Summary tab of vSphere Client shows the product name of the vApp or virtual appliance, its version
number, and the software vendor. Storage and resource use appear on the right. You can see the resources
consumed by a constituent virtual machine by selecting it instead of the vApp.
The remainder of this chapter describes maintenance operations and network settings.
Shutting Down or Rebooting the Virtual ApplianceClick the System tab in the virtual appliance Web console and click the Information page button.
On the System Information page you see the virtual appliance vendor, appliance name, and appliance version.
The computer host name, operating system, and operating system version are also shown.
Reboot and Shutdown buttons are under the Actions heading on the right side of the window.
To restart the virtual appliance, click the Reboot button.
To shut down the virtual appliance, click the Shutdown button.
Setting the Time ZoneClick the System tab in the virtual appliance Web console and click the Time Zone page button.
On the Time Zone Settings page is a drop‐down menu from which you can select from time zones of the world.
Click the Save Settings button to make a change.
The virtual hardware clock is always maintained in UTC, which the virtual appliance converts to local time.
Correct local time is important for the update repository and VMware Update Manager.

VMware, Inc. 15
Chapter 3 Managing Your Virtual Appliance
Choosing Between DHCP and Static Network AddressesDynamic Host Configuration Protocol (DHCP) is a method of dynamically allocating IP addresses (and other
attributes) to computers on a local area network.
When started, your virtual appliance attempts to find a DHCP server. If it does, it asks the DHCP server to
assign a temporary network address. This allows you to run the virtual appliance without setup, but this
temporary address might be different each time the virtual appliance starts. Most server appliances should be
configured to a static network address that remains constant whenever the virtual appliance is restarted. This
allows other users of the virtual appliance to be aware of the network address (or associated network computer
name) and connect to it.
Network ConfigurationYour virtual appliance might be configured to check an external site for updates to its software. If your IT
department has configured your network to disallow access outside of your local area network, you might
need to specify a proxy server. This is a server through which all external network traffic flows, controlling
which types of network traffic are allowed. Your IT department can provide you with a proxy server name and
a port number for proxy communications.
The Network tab contains subtabs for the following operations:
Status – Displays network status information, such as the interface name, whether DHCP was used, the
IP address, netmask, gateway IP address, and DNS servers. You can click the Refresh button under the
Actions heading (on the right side) to obtain the current information.
Address – Allows you to specify static IP information or to retrieve the IP settings from a DHCP server.
Click Save Settings to accept changes that you made to the IP settings. Click Cancel Changes to discard
changes. If you set a static IP address you must enter values in all the following fields:
IP Address – IP address of virtual appliance.
Netmask – Network mask for the virtual appliance.
Gateway – IP address of the gateway (network router).
Preferred DNS Server – IP address of the primary DNS server.
Alternate DNS Server – IP address of the secondary DNS server.
Hostname – Host name of the virtual appliance
Proxy – Allows you to specify a proxy server and port for accessing external networks (for example, the
wide‐area Internet). Click Save Settings to accept changes that you make to the proxy settings. Click
Cancel Changes to discard changes. Select the check box next to Use a Proxy Server, to enter values in the
following fields:
Proxy Server – Host name or IP address for the proxy server.
Proxy Port – Proxy server communications port.
Proxy User name – A valid user name, if the proxy server requires authentication.
Proxy Password – The valid password, if the proxy server requires authentication.
Firewall Security
The following ports on your vApp or virtual appliance should be exempted from the firewall:
5480/TCP incoming – For Web browser access to the VAMI agent. Developers can change this port in the
build profile, so your vApp or virtual appliance may differ.
5488/TCP incoming and 5489/TCP incoming – For communication between lighttpd and SFCB in VAMI,
and for VMware Update Manager. SFCB ports for VAMI services are relocated to 5488/TCP and 5489/TCP
so the default ports (5988/TCP and 5989/TCP) remain available for use by independent software vendors
and hardware appliance vendors.
User’s Guide to Deploying vApps and Virtual Appliances
16 VMware, Inc.
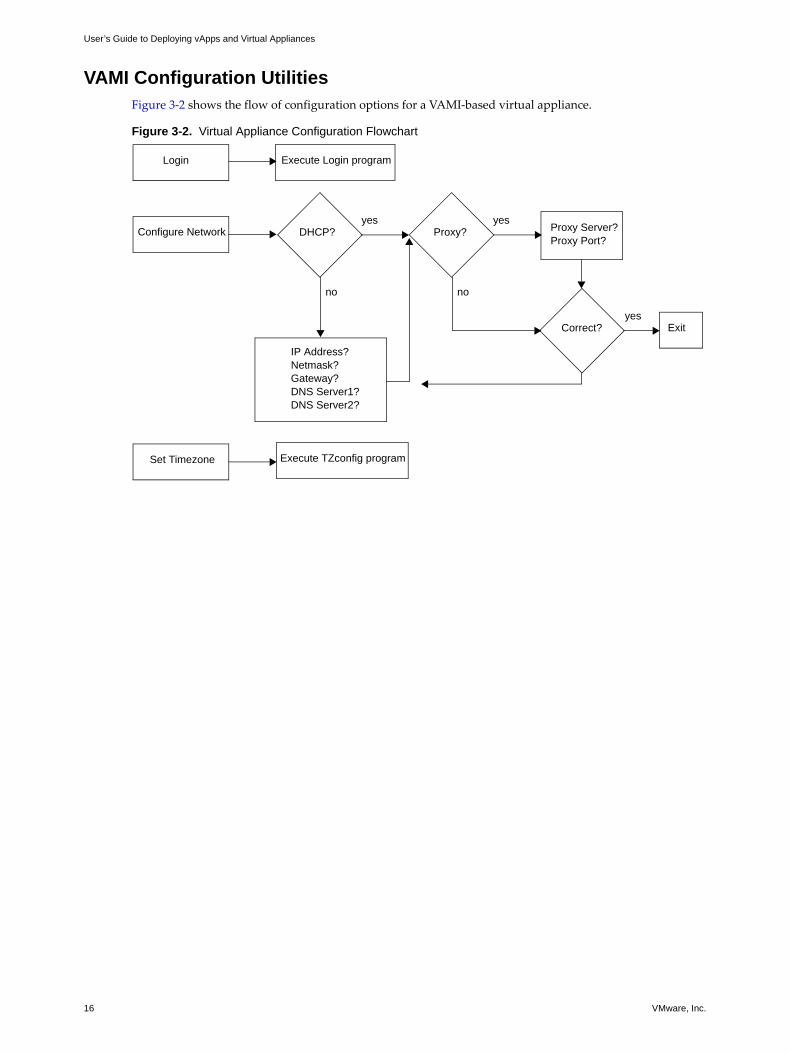
VAMI Configuration UtilitiesFigure 3‐2 shows the flow of configuration options for a VAMI‐based virtual appliance.
Figure 3-2. Virtual Appliance Configuration Flowchart
Execute Login programLogin
Execute TZconfig programSet Timezone
Configure Network DHCP?
IP Address?Netmask?Gateway?DNS Server1?DNS Server2?
no
Proxy?yes
Proxy Server?Proxy Port?
yes
Exit
no
Correct?yes

VMware, Inc. 17
4
This chapter provides information about updating a virtual appliance, and includes the following topics:
“Types of Updates” on page 17
“Update Tab” on page 17
“Checking Status and Applying Updates” on page 17
“Setting Update Policies” on page 18
Types of UpdatesAfter deployment, virtual appliances can be updated with packages published by ISVs. Updates can be done
over the external Web, on your local area network, or from CD‐ROM, and applied to:
Operating system
Applications
VMware Appliance Management Infrastructure (VAMI)
VMware Tools
Update TabThe Update tab appears (in the Web console) if an update repository was specified during the virtual appliance
build process. If the Update tab is missing, contact your ISV for updates or patches to your virtual appliance.
You can access update status and settings for the virtual appliance on the Update tab, which has two subtabs:
Status – Provides information about the virtual appliance vendor, name, and version.
Settings – Shows the setting of policies for periodically checking and installing updates.
Checking Status and Applying UpdatesThe Status tab allows you to view information about your virtual appliance, such as vendor and version. You
can also check for updates and install available updates. If you decide to check for and install updates, you can
do so using the Web console, with the command line, or with vCenter Server, as described in Chapter 5,
“Managing Your Virtual Appliance with VMware vCenter,” on page 19.
To view information about your virtual appliance or check for and install updates, click the Status tab on the
Update tab. The following information about your virtual appliance is shown:
Vendor – The name of the company that created your virtual appliance.
Appliance Name – The name of the virtual appliance.
Appliance Version – The version information of the virtual appliance.
Updating Your Virtual Appliance 4
User’s Guide to Deploying vApps and Virtual Appliances
18 VMware, Inc.
Available Updates – If an update is available, gives the name and version of the product.
Last Check – If a check for update was performed, the date and time when the virtual appliance was
checked, in UTC (GMT) with local time offset.
Last Install – If an update was installed, the date and time when the virtual appliance was updated.
To check for updates, click Check Updates under Actions. The virtual appliance connects to the update
repository and checks for available updates, which are displayed in the Available Updates pane.
To install the available update, click Install Updates.
Using the Command Line
Use the following command to check for updates for your virtual appliance:
vamicli update --check
Use the following command to download and install the latest updates for your virtual appliance:
vamicli update --install latest
Setting Update PoliciesTo set update policies for your virtual appliance from the management Web console, click Update > Settings.
You can select one of the following policies for updating your virtual appliance:
No automatic updates – The virtual appliance does not check for and install updates. This is probably the
default, unless the appliance vendor made internal changes.
Automatic check for updates – The virtual appliance checks for updates at the scheduled time. If an
update is available, it appears on the Update Status page.
Automatic check and install updates – The virtual appliance checks for updates at the scheduled time,
and if one is available, installs it.
If you select either Automatic check for updates or Automatic check and install updates, you can configure
the scheduling. With either policy, the check occurs by default daily at 3:00 am local time, as determined by
your time zone setting.
To change the frequency or time of update checking
1 Click one of the Automatic check buttons.
2 Select either every day or day of the week, and select the hour at which to check.
3 To save your changes, click Save Settings.
Setting Update Location
You can choose to update from CD‐ROM, or change the URL of the update repository to something other than
the default location. These options are useful for updates inside a restricted local area network.
To change the update repository location
1 Click either Use CD‐ROM Updates or Use Specified Repository.
If you select Use CD‐ROM Updates, insert the update CD‐ROM into a drive that the virtual
appliance can read. The update agent scans the CD drives to find the first update CD‐ROM.
If you select Use Specified Repository, type the URL of the update repository that your appliance
should check. If the URL requires authentication, provide a valid user name and password.
2 To save your changes, click Save Settings.
If you leave Use Default Repository selected (the default), the update agent checks the URL that the ISV
configured into your virtual appliance, which is usually a public URL on the Internet.

VMware, Inc. 19
5
This chapter provides information about managing your virtual appliance with VMware vCenter Server. It is
not necessary to manage virtual appliances with VMware vCenter and VMware Update Manager, but doing
so provides centralized management of multiple virtual appliances. For information about baselines and
compliance checks, see the VMware vCenter Update Manager Administration Guide on the VMware Web site.
This chapter contains the following topics:
“Requirements” on page 19
“Viewing Virtual Appliance Information” on page 19
“Scanning Your Virtual Appliance” on page 20
“Remediating Virtual Appliances” on page 21
RequirementsIf you deployed the virtual appliance on a VMware ESX/ESXi host managed by vCenter Server 4, you can use
the VMware Update Manager plug‐in for vSphere Client to update multiple appliances simultaneously. If you
deployed the virtual appliance on a VMware ESX/ESXi 3.5 host managed by VirtualCenter 2.5, you can use the
VMware Update Manager plug‐in for the VMware Infrastructure Client to this.
The following conditions apply to updating virtual appliances with VMware Update Manager:
The vCenter Server into which you import your virtual appliance must have Update Manager installed.
All virtual appliances are required to have an Internet connection (direct or proxied) for discovery, scan,
and remediation operations.
If the virtual appliance must access the Internet through a proxy, the proxy server settings must be
configured using the appliance’s own Web console.
Offline and suspended virtual appliances cannot be scanned or remediated.
After you import a VMware Studio‐based virtual appliance using the vSphere Client and power it on for the
first time, it is discovered as a virtual appliance. For discrete management, VMware recommends that you
import virtual appliances into a separate folder under Virtual Machines and Templates in vCenter Server.
Viewing Virtual Appliance InformationTo view information about your virtual appliance:
1 Connect the vSphere Client to the vCenter Server where you imported your virtual appliance.
2 Click Inventory and click Virtual Machines and Templates.
3 Select the folder where you imported your virtual appliance.
4 Select your virtual appliance and click the Update Manager tab to view information about it.
Managing Your Virtual Appliance with VMware vCenter 5

User’s Guide to Deploying vApps and Virtual Appliances
20 VMware, Inc.
Scanning Your Virtual ApplianceYou can enable Update Manager to scan virtual appliances as a preestablished (scheduled) task, or you can
manually begin a scan.
Doing a Manual Scan
To manually scan a virtual appliance:
1 Connect the vSphere Client to the vCenter Server where you imported your virtual appliance.
2 Click Inventory and then click Virtual Machines and Templates.
3 Click the folder where you imported your virtual appliance.
4 In the left pane, right‐click your virtual appliance and then click Scan for Updates.
Scheduling a Scan
To schedule scans for your virtual appliance:
1 Connect the vSphere Client to the vCenter server where you imported your virtual appliance.
2 Click Scheduled Tasks.
3 Click New in the toolbar to open the Select a Task to Schedule dialog box.
4 From the drop‐down menu, select Scan for Updates and click OK.
5 Select the type of scan to schedule, and click Next.
6 Select the virtual appliance to be scanned, and click Next.
7 Enter the task name and the task description, schedule a time to run the task, and click Next.
8 Review the summary information for the task to be completed, and click Finish.
Viewing Scan Results
Update Manager provides a means to quickly check how virtual appliances comply with baselines. You can
review compliance either by examining the results for a single virtual appliance or by reviewing the results for
a grouping of virtual appliances. Compliance information is available on the Update Manager tab in the
vSphere Client. For virtual appliances, you can view compliance in the Virtual Machines and Templates view.
Supported groupings include VMware vSphere container objects such as folders, clusters, and data centers.
Baselines interact with virtual appliances in the following ways:
If a user lacks permissions to view a virtual appliance, the results of those scans are not displayed.
Compliance with baselines is assessed at the time of viewing. To ensure that all information is current, a
brief pause might occur while information is gathered about a virtual appliance’s compliance.
Only information about compliance with relevant baselines is provided. For example, if a baseline is not
attached to the container in question, compliance is not assessed.
Compliance status is displayed based on permissions. Users with permission to view a container, but not
all of the container’s contents, can see the aggregate compliance of all entities under that container.
However, the individual counts for compliant, noncompliant, and unknown entities appear only as user
permissions allow. To view the compliance status, users also must have permissions to view the baseline
or software update compliance status for an object in the inventory.
IMPORTANT Although you can attach baselines and baseline groups to individual objects, it is more efficient
to attach them to container objects, such as folders, hosts, clusters, and datacenters. Attaching a baseline to a
container object transitively attaches the baseline to all objects in the container.

VMware, Inc. 21
Chapter 5 Managing Your Virtual Appliance with VMware vCenter
Reviewing Scan Results for Virtual Appliances Contained in a vSphere Object
When scans are completed on all machines contained within a VMware vSphere object, the results are
displayed in a summary. Information that is displayed explains the degree of conformance with baselines,
rather than the details. The following information is included:
When the last scan was completed at this level.
The total number of compliant and noncompliant updates.
For each baseline, the number of virtual appliances that are compliant or noncompliant.
For each baseline, the number of patches that are not applicable to a particular virtual appliance.
To view scan results for virtual appliances:
1 Connect the vSphere Client to the vCenter Server where you imported your virtual appliance.
2 Click Inventory and click Virtual Machines and Templates.
3 Click the object whose scan results you want to view.
4 Click the Update Manager tab.
The results for scans completed on virtual appliances in that container appear on the right.
To receive more information about the results of the scans of particular baselines, click the hyperlink
indicating how many virtual machines are in a particular state of compliance. The Baseline Details
window appears.
To receive more information about a specific virtual machine’s compliance with the updates contained in
a baseline, click the hyperlink indicating the number of updates that are or are not in compliance. The
Virtual Machine Baseline Details window appears.
Reviewing Scan Results for an Individual Virtual Appliance
When scans of a virtual appliance complete, detailed results appear. Displayed information explains the
degree of conformance with baselines, rather than the details of conformance, including:
When the last scan was completed at this level.
The total number of baselines and updates that are compliant or noncompliant.
To view the results for an individual virtual appliance:
1 Connect the vSphere Client to the vCenter server where you imported your virtual appliance.
2 Click Inventory and click Virtual Machines and Templates.
3 Select an individual virtual machine or select a VMware vSphere object, such as a folder, to see the status
for all virtual machines in that object.
4 Click the Update Manager tab.
Remediating Virtual AppliancesUpdates for a virtual appliance are downloaded by automatic updates (“Setting Update Policies” on page 18),
or by the virtual appliance during the remediation process. VMware Update Manager controls only when and
what to download. The download URL is set by the ISV providing the virtual appliance.
To download the updates for virtual appliances, Update Manager uses the following approach:
1 Update Manager scans the virtual appliances to return product and vendor information, information
about the current version, and missing updates.
2 Update Manager directs the virtual appliances to download the missing updates. Update Manager
controls the remediation process of when and how to remediate, but the virtual appliance downloads and
installs the updates itself.

User’s Guide to Deploying vApps and Virtual Appliances
22 VMware, Inc.
After remediation, reboot your virtual appliance if the update package says that it requires a reboot.
Virtual appliances have their own Web UI for self‐managed update mode. If the auto install updates option is
turned on in a virtual appliance, Update Manager runs reporting mode against it. This means that Update
Manager scans the virtual appliance, but skips remediation and the remediation operation fails with an event
indicating the reason. (See the “Troubleshooting” chapter of the VMware Update Manager manual.)
You can either remediate virtual appliances manually, or schedule a remediation process.
To manually remediate a virtual appliance:
1 Connect the vSphere Client to the vCenter server where you imported your virtual appliance.
2 Click Inventory and click Virtual Machines and Templates.
3 Click the Update Manager tab.
4 Right‐click the virtual appliance to be remediated, and click Remediate.
5 Select the baselines to apply and click Next.
6 All updates are included by default. To exclude individual updates from the remediation process, deselect
their check boxes and click Next.
7 (Optional) Review the excluded updates and click Next.
8 In the Schedule page, select the time to begin the remediation actions, and click Next.
9 Specify whether you would like to enable rollback before performing the update. If you enable rollback,
a snapshot of the virtual appliance is created.
Select the snapshot options including a name and description for the snapshot, and click Next.
10 Review the summary information for the task to be initiated, and click Finish.
To schedule virtual appliance remediation:
1 Connect the vSphere Client to the vCenter server where you imported your virtual appliance.
2 Click the Scheduled Tasks button.
3 Right‐click the Scheduled Tasks pane and click New Scheduled Task.
4 Select Remediate and click OK.
5 Select Virtual Machines / Guest Operating Systems and click Next.
6 Select the virtual appliances to which this remediation applies, and click Next.
7 In the Baselines page, select the baselines to apply and click Next.
8 To exclude individual updates from the remediation process, deselect their check boxes in the Updates
page and click Next.
9 (Optional) Review the list of excluded updates and click Next.
10 In the Schedule page, select the time to complete the remediation actions, and click Next.
11 Specify whether you would like to enable rollback before performing the update. If you enable rollback,
a snapshot of the virtual appliance is created.
Select the snapshot options including a name and description for the snapshot and click Next.
12 Review the summary information for the task to be completed and click Finish.
Virtual Appliance Recognition
When a correctly installed or remediated virtual appliance is first powered on, vCenter should discover it
(recognize it) as a virtual appliance. Your remediated virtual appliance is ready to use.

VMware, Inc. 23
This appendix contains the following sections:
“VMware Product Platforms” on page 23
“Compatibility for a Virtual Appliance or vApp” on page 23.
VMware Product PlatformsThe following short codes represent various VMware product platforms in tables Table A‐1 and Table A‐2.
vSphere 4 Managed – VMware vSphere 4 deployed as a vCenter Server 4 “managed” environment with
ESX/ESXi 4.0 (and possibly ESX/ESXi 3.5) hosts.
vSphere 4 Standalone – VMware vSphere 4 deployed as a standalone ESX/ESXi 4.0 host.
VI 3.5 Managed – VMware Infrastructure 3.5 deployed as a VirtualCenter 2.5 “managed” environment
with ESX/ESXi 3.5 hosts.
VI 3.5 Standalone – VMware Infrastructure 3.5 deployed as a standalone ESX/ESXi 3.5 host.
VI 3 – Any permutation of VMware Infrastructure 3.0.
Workstation 6.5.1+ – VMware Workstation 6.5.1 and later (which adds some OVF support).
VHP – VMware hosted‐class platform products (Workstation, Player, Server, ACE, and Fusion).
Compatibility for a Virtual Appliance or vAppTable A‐1 shows product platform compatibility for virtual appliances with one virtual machine.
YES – No added conversion steps are necessary; imports using the product alone.
YES* – Similar to YES, but conversion may discard certain OVF metadata post‐import.
Conv. – Not directly, but the end‐consumer can convert with added steps and sacrifice of certain metadata.
Product Platforms for OVF and OVA
Table A-1. Compatibility of a Single-VM Virtual Appliance
Target ZIP OVF 0.9 Draft OVF 1.0 OVF 1.0 OVA
vSphere 4 Managed Conv. YES YES YES
vSphere 4 Standalone Conv. YES* YES* YES*
VI 3.5 Managed Conv. YES* Conv. Conv.
VI 3.5 Standalone Conv. YES* Conv. Conv.
VI 3 Conv. Conv. Conv. Conv.
Workstation 6.5.1+ YES YES* Conv. Conv.
VHP YES Conv. Conv. Conv.

User’s Guide to Deploying vApps and Virtual Appliances
24 VMware, Inc.
Table A‐2 shows product platform compatibility for a vApp containing one or more virtual machines.
YES – No added conversion steps are necessary; imports using the product alone.
YES* – Similar to YES, but conversion may discard certain OVF metadata post‐import.
Conv. – Not directly, but the end‐consumer can convert with added steps and sacrifice of certain metadata.
N/A – This deliverable type is not compatible with the desired construct (single‐VM versus vApp).
NO – Not possible, or required metadata constructs cannot be converted.
Table A-2. Compatibility of a Single-VM or Multiple-VM vApp
Target ZIP OVF 0.9 Draft OVF 1.0 OVF 1.0 OVA
vSphere 4 Managed N/A N/A YES YES
vSphere 4 Standalone N/A N/A NO NO
VI 3.5 Managed N/A N/A NO NO
VI 3/5 Standalone N/A N/A NO NO
VI 3 N/A N/A NO NO
Workstation 6.5.1+ N/A N/A NO NO
VHP N/A N/A NO NO