User Manual XLR14-SS K0835 XLR14-CS K0836… · Pihsiang Machinery Mfg. Co., LTD. ... • DO NOT...
32
| User Manual XLR14-SS K0835 XLR14-CS K0836
Transcript of User Manual XLR14-SS K0835 XLR14-CS K0836… · Pihsiang Machinery Mfg. Co., LTD. ... • DO NOT...

| User ManualXLR14-SS K0835XLR14-CS K0836
2
DisclaimerThis Powerchair is not intended to be used by individuals with physical limitations that could prevent the user from operating the Powerchair safely. Shoprider ® disclaims all responsibility for any personal injury or property damage, which may occur as a result of improper or unsafe use of its products.
Warranty is only valid when genuine Shoprider ® parts are used. All modifications on the Powerchair, unless approved and authorized by Shoprider ®, will automatically invalidate the warranties. Standard warranty does not extend to consumable items and parties other than the original user.
The preceding guidance is intended to assist you in the safe operation of this Powerchair. If you should have any questions about the correct operation of your Powerchair, please contact your authorized Shoprider ® provider.
Make: XLR 14 Pihsiang Machinery Mfg. Co., LTD. Model # P424LESerial No.:
Provider Stamp
Doc #300904-154

3
Introduction ................................................................................... 4
Emi Warning ................................................................................... 7
Electromagnetic Interference From Radio Waves .......................... 8
Feature Guide ................................................................................ 9
The Joystick Controller (VR2) ......................................................... 10
Locking / Unlocking The Joystick Controller .................................. 12
Drive / Freewheel Mechanism ........................................................ 13
Main Circuit Breaker ...................................................................... 13
Driving Your Powerchair ................................................................. 14
Tilt System Function ....................................................................... 18
Maintenance Chart ........................................................................ 19
General Maintenance, Storage, Cleaning, And Lubrication ............ 20
Batteries And Battery Charging ..................................................... 22
Troubleshooting ............................................................................. 24
Specifications ................................................................................ 26
Warranty ........................................................................................ 28
Notes ............................................................................................. 31
Contents

4
IntroductionThis power wheelchair is designed for comfort, safety, stability, and maneuverability with smooth control for today’s active lifestyle. The XLR 14 helps you regain your mobility and independence. The following innovations are included in the XLR Mobility Series:• Mid-wheel drive for maximum maneuverability • 6-wheel design for ultimate stability• Full featured suspension system• Programmable joystick controller• Deluxe reclining captain seat (some units)• Adjustable footplate and arm assemblies• Flat-free tires• 8A off-board battery charger• Power tilt seating• High ground clearance with 14” drive wheel• Extra long range battery options
This manual contains important information to allow optimal use of the XLR 14 and to ensure the safety of the user. Please read this manual carefully and thoroughly before using your power wheelchair and make sure you understand all the instructions. If you have any questions, please contact your provider or Shoprider ® Mobility, see below:
21184 S. Figueroa St.Carson, CA. 90745
(310) 328 8866
Intended UseThe intended use of the Shoprider® XLR 14 powered wheelchair by Pihsiang Machinery Mfg. Co., LTD is to provide mobility solutions to individuals who are limited to a seated position.
Prescription StatementCAUTION Federal law restricts this device to sale by or on the order of a practitioner licensed by the law of the state in which he/she practices.
The final decision on the type of power wheelchair to be used is the responsibility of the user and his or her healthcare professional (physician, physical therapist, etc.). Shoprider ® Mobility is not responsible for the inappropriate selection of a power wheelchair model, its features, or improper fitting of the wheelchair.
Power Wheelchair SafetyRead carefully ALL safety tips to help ensure your safety while using the power wheelchair. Being

5
safe in a wheelchair requires anticipating potential problems, using common sense, maintenance of equipment, and communicating with assistants.
SymbolsSymbols & key words are used in this manual and apply to hazards or unsafe practices that could result in personal injury or property damage.
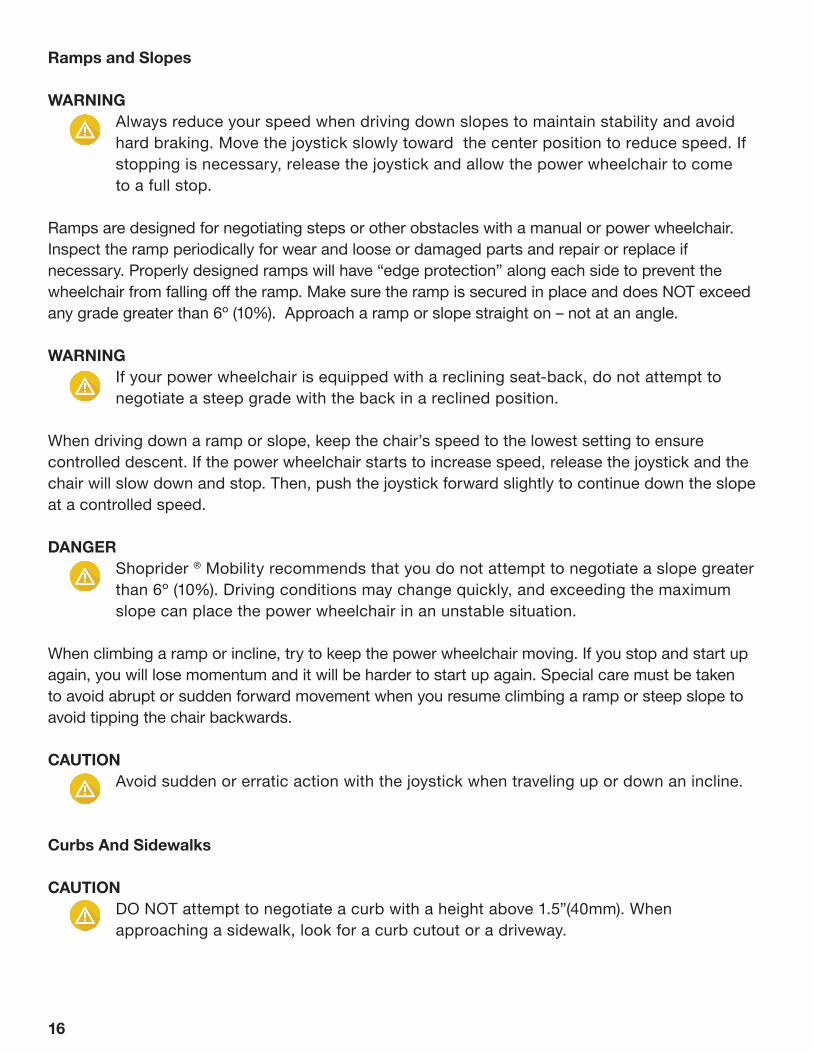
DANGER Danger indicates an imminently hazardous situation which, if not avoided, will result in death or serious injury.
WARNING Warning indicates a potentially hazardous situation which, if not avoided, could result in death or serious injury.
CAUTION Caution indicates a potentially hazardous situation which, if not avoided, may result in property damage, minor injury, or both.
Setup and Adjustments for SafetyFor maximum safety, a qualified technician must perform the initial setup and all adjustments of this wheelchair. Incorrect settings could cause injury to the driver, wheelchair, bystanders, or surrounding property. After the wheelchair has been set-up/adjusted, check to make sure that the wheelchair performs to the specifications entered during the set-up procedure. If the wheelchair does not perform to specifications, re-enter set-up specifications. Repeat this procedure until the wheelchair performs to specifications.
Operator Safety There are many inherent dangers while operating a power wheelchair. Read carefully and observe all of the precautions below.
DANGER Cell phones are a vital necessity for your safety, and should be used in case of an emergency to call for help and to notify loved ones. However, warnings about driving while talking on cell phones also apply to power wheelchair operation. In addition to the distraction safety issue, you also have possible electromagnetic interference (EMI) that can disrupt the control system (see the EMI section for more information). Do not use a cell phone, walkie/talkie, laptop, or other radio transmitter while operating your wheelchair.
Lap belts are very important in a wheelchair. Never operate your wheelchair without first fastening the lap belt.

6
DO NOT sit on the power wheelchair when riding in a vehicle: instead, transfer to a vehicle seat.
DO NOT transfer onto or from the wheelchair unless the brakes are engaged and the controls are powered off. DO NOT ride on streets, roads, or highways except for crossing walkways.
DO NOT attempt to move an occupied power wheelchair between floors using a stairway or escalator. Use an Elevator to move an occupied power wheelchair between floors.
WARNING:DO NOT let children play on or operate your power wheelchair.DO NOT operate the power wheelchair if the unit is in freewheel mode. DO NOT use the joystick in an erratic manner when traveling up or down an incline. DO NOT carry passengers or exceed the maximum weight limit. DO NOT perform weight bearing exercises while in your powered wheelchair. Your powered wheelchair has NOT been designed or tested as a seat for any kind of weight training. Attempting to perform weight bearing exercises may exceed the weight limit of the powered wheelchair will void the warranty, and may cause serious injury. DO NOT turn off the joystick controller when the power wheelchair is in motion. This will activate the electromagnetic brakes and could cause damage to the joystick controller.DO NOT drive over uneven and soft terrain (soft dirt, loose gravel, deep grass). DO NOT attempt to mount a curb height greater than 1.5”(40mm). DO NOT exceed any grade over 6º (10%)ALWAYS stop fully before changing forward or reverse direction.ALWAYS brake in an emergency by releasing the joystick.ALWAYS use slow speed when going down gradients (move the joystick slowly toward center position to reduce the speed).ALWAYS reduce your speed before turning sharply.ALWAYS try to use a “dropped curb” or “curb cutout” whenever possible.ALWAYS approach and climb over curbs at slow speed.ALWAYS approach curbs and gradients at 90 degrees.ALWAYS keep both feet on the footplate while driving.ALWAYS make sure the batteries are fully charged before operating the power wheelchair.ALWAYS charge the power wheelchair in a well-ventilated area.ALWAYS power off the power wheelchair before performing non-weight bearing exercises. Failure to do so could result in injury.
7
ALWAYS check that the drive wheels are engaged and not in freewheel mode.ALWAYS keep your power wheelchair maintained properly. ALWAYS place the seatback in an upright position whenever negotiating an incline.
CAUTION: NEVER try to use your power wheelchair beyond its limitations as described in this manual.
NEVER operate the power wheelchair in the rain: the electronics are not waterproof and you could lose traction on slippery surfaces. Tips• Power wheelchairs can be very quiet--make sure others are aware of your presence.
• Announce yourself at closed doors or blind corners to prevent a collision.
• Avoid tipping - DO NOT place heavy loads on the back of your power wheelchair. • Avoid reaching out from the power wheelchair to pick up low objects.
• DO NOT lift the power wheelchair by its armrests.
• Keep loose items or lap covers away from the wheels.
• Wear brightly colored clothes when you are outdoors.
• Use optional headlights, reflector tape, and/or flashing taillights at night.
Transportation SafetyBefore transporting the power wheelchair, switch off the joystick controller and lock the brake. A power wheelchair must be tightly secured to the floor of a transportation vehicle before departing. Use the securement points (if available) at the front and at the back of the wheelchair as well as the anchoring points in the transportation vehicle. A trained and experienced driver must be present to perform the lifting and anchoring of the wheelchair and ensure owner and wheelchair safety.
DANGER There are dangers present while using public or private transportation vehicles. Securement points are provided for unoccupied transport only, if available.
Electromagnetic Interference (EMI) CAUTION It is very important that you thoroughly read this information regarding the possible effects of EMI on your power wheelchair.

8
Tests by the Food and Drug Administration (FDA) have determined that EMI can, under certain conditions, cause power wheelchairs and scooters to move unintentionally and/or erratically, or cause unintended release of the brakes. Stronger EMI sources can also permanently damage the power wheelchair’s control system. The intensity of the interfering EM energy can be measured in volts per meter (V/m). Each powered wheelchair can resist EMI up to a certain intensity, or “immunity level.” The higher the immunity level is, the greater the protection against EMI. At this time, current technology is capable of achieving at least a 20V/m immunity level, which would provide useful protection from the more common sources of radiated EMI.
WARNING Although your power wheelchair has been tested to the current standard of 20V/m, care should be taken to avoid electromagnetic sources.
The sources of radiated EMI can be broadly classified into three types:Hand-held portable transceivers (transmitters-receivers) with the antenna mounted directly on the transmitting unit. Examples include: citizens band (CB) radios; “walkie talkies;” security, fire, and police transceivers; cellular telephones; and other personal communication devices.
CAUTION Some cellular telephones and similar devices transmit signals while they are ON, even when not being used.
Medium-range mobile transceivers, such as those used in police cars, fire trucks, ambulances, and taxis. These usually have the antenna mounted on the outside of the vehicle.Long-range transmitters and transceivers, such as commercial broadcast transmitters (radio and TV broadcast antenna towers) and amateur (HAM) radios.
Note: Other types of hand-held devices, such as cordless phones, mobile devices, laptop computers, AM/FM radios, TV sets, CD players, cassette players, and small appliances, such as electric shavers and hair dryers, are currently unlikely to cause problems to your power wheelchair.
EMI radiations from hand-held radio sources (transceivers) are of special concern because they can be brought close to the power wheelchair’s control system. As the transceiver nears the control system, EMI energy rapidly becomes more intense. This can be unintentional if someone is not aware of the hazard. Please observe the warnings listed below to prevent possible interference with the control system of the power wheelchair.
Note: Adding accessories and components or modifying the unit may change the susceptibility to EMI.
WARNING DO NOT operate hand-held transceivers (transmitters and receivers), such as CB radios, or turn ON personal communication devices, such as cellular phones, while the power wheelchair is turned ON.
Report all incidents of unintended movement or braking on your power wheelchair to a Shoprider ® provider, and note whether there were sources of EMI nearby.

9
Feature Guide01. Flip-Back, Height & Width Adjustable Armrest02. Captain’s Seat 03. Headrest04. Battery Deck Lid (Not Shown)05. Interchangeable Color Fenders06. Freewheel Release 07. Castor Fork (Rear) 08. Rear Stabilizing Castor Wheel 09. Castor Fork (Front)10. Front Castor Wheel 11. Center Mount Foot Platform12. Joystick13. Recline Lever
Labels And WarningsFig. 01. EMI-RFI: notes that the unit has passed FDA testing for 20-V/m performance.Fig. 02. Read your user manual and familiarize yourself with additional EMI information and warnings.Fig. 03. Battery Connection Diagram: Illustrates battery orientation and information on circuit protection devices.Fig. 04. Freewheel: drive mode = Lever inward; freewheel/push mode = Lever outward.Fig. 05. Non-Spillable Battery Type.Fig. 06. XLR Data Plate.
01
13
0506
0809
10
11
12
07
02
03
Model: P424LE (XLR 14)Manufacturer: Pihsiang Machinery Mfg Co.Country of Origin: TaiwanImporter: Shoprider Mobility, Carson CA
Max Speed: 4.1 mph / 6.6 km/hMax User Weight: 300 lb / 136 kgUnit Weight (Unloaded): 217 lb / 98 kgWebsite: WWW.SHOPRIDER.COM
Max Slope: 6˚Max recommended Slope: 6˚
N36-45
Figure 01 Figure 02
Figure 03 Figure 04
Figure 05 Figure 06
10
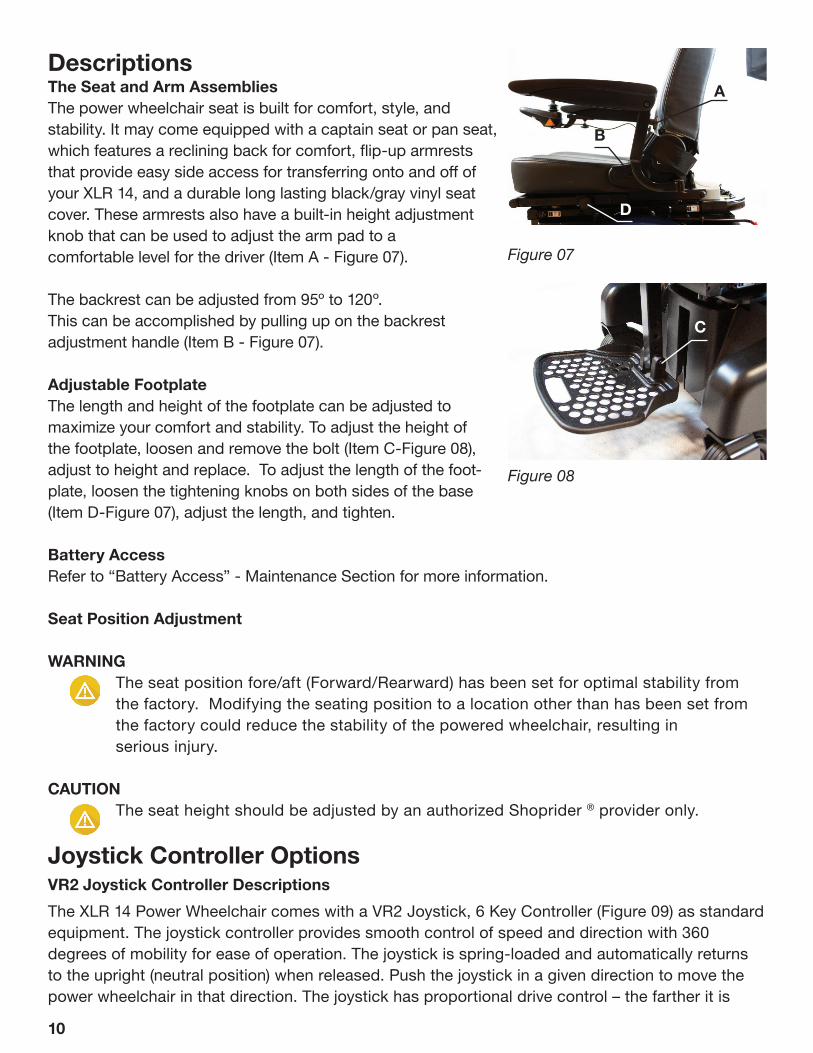
DescriptionsThe Seat and Arm AssembliesThe power wheelchair seat is built for comfort, style, and stability. It may come equipped with a captain seat or pan seat, which features a reclining back for comfort, flip-up armrests that provide easy side access for transferring onto and off of your XLR 14, and a durable long lasting black/gray vinyl seat cover. These armrests also have a built-in height adjustment knob that can be used to adjust the arm pad to a comfortable level for the driver (Item A - Figure 07).
The backrest can be adjusted from 95º to 120º. This can be accomplished by pulling up on the backrest adjustment handle (Item B - Figure 07).
Adjustable Footplate The length and height of the footplate can be adjusted to maximize your comfort and stability. To adjust the height of the footplate, loosen and remove the bolt (Item C-Figure 08), adjust to height and replace. To adjust the length of the foot-plate, loosen the tightening knobs on both sides of the base (Item D-Figure 07), adjust the length, and tighten.
Battery AccessRefer to “Battery Access” - Maintenance Section for more information. Seat Position Adjustment
WARNING The seat position fore/aft (Forward/Rearward) has been set for optimal stability from the factory. Modifying the seating position to a location other than has been set from the factory could reduce the stability of the powered wheelchair, resulting in serious injury.
CAUTION The seat height should be adjusted by an authorized Shoprider ® provider only.
Joystick Controller OptionsVR2 Joystick Controller Descriptions The XLR 14 Power Wheelchair comes with a VR2 Joystick, 6 Key Controller (Figure 09) as standard equipment. The joystick controller provides smooth control of speed and direction with 360 degrees of mobility for ease of operation. The joystick is spring-loaded and automatically returns to the upright (neutral position) when released. Push the joystick in a given direction to move the power wheelchair in that direction. The joystick has proportional drive control – the farther it is
Figure 08
Figure 07
C
D
B
A

11
pushed from the neutral position, the faster the wheelchair moves. Maximum speed is limited by the speed adjustment buttons (increase and decrease). To slow the wheelchair to a STOP, simply release the joystick.
CAUTION When learning to drive, select a slow speed and try to drive the wheelchair as slowly as possible by pushing the joystick forward slightly.
Wheelchair Controller FunctionsThe following is a quick review of the major functionsTurn the controller power button on. Forward – push the joystick forward. Reverse – pull the joystick back.Turn right – push the joystick to the right. Turn left – push the joystick to the left. Stop – release the joystick.
VR2 Joystick ControllerOn-Off Button: Use this buttonto turn the joystick controller (hereinafter referred to as VR2) on and off. Do not use this button to stop the power wheelchair, except in an emergency. (Item A-Figure 09)
Battery Gauge: This is a 10-segment display, located on the face of the VR2. It indicates if the VR2 is switched on and provides the state of charge of the battery. It also indicates any faults in the power wheelchair electrical system. Refer to Table 1 for more details. (Item B-Figure 09)
Horn Button: Press this button to sound the warning horn (Item C-Figure 09).
Maximum Speed Indicator: This is a 5-segment display that indicates the maximum speed setting selected (Item D-Figure 09).
Speed Decrease Button: Press this button to decrease the maximum speed (Item
Figure 09
AC
ED
FH
B
G

12
E-Figure 09). Speed Increase Button: Press this button to increase the maximum speed (Item F-Figure 09).
Joystick: The joystick (Item G-Figure 09) controls the speed and direction of the power wheelchair. Push the joystick in the direction you want to go. The farther you push the joystick from the neutral position, the faster the power wheelchair will travel. Releasing the joystick will automatically engage the brakes and stop the power wheelchair.
Note: The controller can be fitted to suit either right-or left-handed users. Please contact your provider for further assistance.
Actuator Control (Item H-Figure 09)If your XLR 14 Power Wheelchair is equipped with optional power actuators, there will be two additional keys on the VR2 controller for actuator adjustment. The functions of these keys will differ depending on the number of actuators installed on the power wheelchair.
One Actuator is Installed on the Power Wheelchair:1. With the VR2 powered on, press either actuator button to activate actuator adjustment mode. 2. The LED above each actuator button will light up.3. Push the joystick forward or backward to adjust the actuator to the desired position.4. Release the joystick to stop actuator adjustment.5. Press either actuator button to return to drive mode.6. The LED above each actuator button will go out.
Charging Port VR2Use this port to charge the power wheelchair battery. This is the primary charging port for the XLR 14 and should only be used with a qualified XLR 14 charger certified by the original manufacturer of the power wheelchair. Do not use this port as a power supply for any other electrical devices other than the optional USB charger available from Shoprider ®. Failure to follow these instructions will void the warranty of the power wheelchair.
Attention! The power wheelchair controller may be programmed with a lock mode function to prevent unauthorized use. The locking method is achieved one of two ways, depending on the controller and programming.
To lock Powerchair controller1. While the controller is switched on, depress and hold the on/off button.2. After 1 second the controller will bleep. Now release the on/off button.3. Push the joystick forward until the controller bleeps.4. Push the joystick in reverse until the controller bleeps.5. Release the joystick, there will be a long bleep.6. The Powerchair controller is now locked.
13
To unlock the Powerchair controller1. Use the on/off button to switch the controller on. 2. The maximum speed/profile indicator will be rippling up and down.3. Push the joystick forward until the controller bleeps.4. Push the joystick in reverse until the controller bleeps.5. Release the joystick, there will be a long bleep.6. The Powerchair is now unlocked.
Sleep ModeIf the controller is left on and not used for more than ten minutes, the controller will automatically “go to sleep”. This is recognized by a slow intermittent flash of the battery indicator lights. Simply turn the controller off and back on to reset.
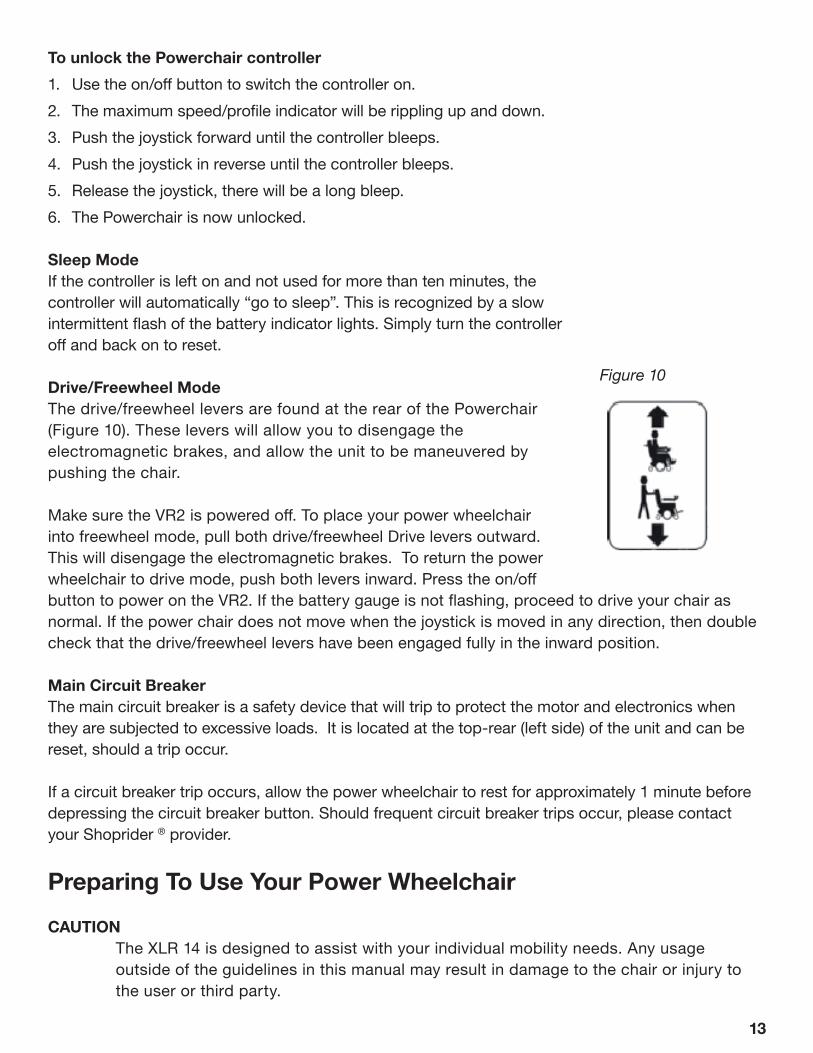
Drive/Freewheel ModeThe drive/freewheel levers are found at the rear of the Powerchair (Figure 10). These levers will allow you to disengage the electromagnetic brakes, and allow the unit to be maneuvered by pushing the chair.
Make sure the VR2 is powered off. To place your power wheelchair into freewheel mode, pull both drive/freewheel Drive levers outward. This will disengage the electromagnetic brakes. To return the power wheelchair to drive mode, push both levers inward. Press the on/off button to power on the VR2. If the battery gauge is not flashing, proceed to drive your chair as normal. If the power chair does not move when the joystick is moved in any direction, then double check that the drive/freewheel levers have been engaged fully in the inward position.
Main Circuit Breaker The main circuit breaker is a safety device that will trip to protect the motor and electronics when they are subjected to excessive loads. It is located at the top-rear (left side) of the unit and can be reset, should a trip occur.
If a circuit breaker trip occurs, allow the power wheelchair to rest for approximately 1 minute before depressing the circuit breaker button. Should frequent circuit breaker trips occur, please contact your Shoprider ® provider.
Preparing To Use Your Power Wheelchair CAUTION The XLR 14 is designed to assist with your individual mobility needs. Any usage outside of the guidelines in this manual may result in damage to the chair or injury to the user or third party.
Figure 10

14
First Time UseBefore using your XLR 14 power wheelchair for the first time, you must charge the batteries fully (refer to Battery Charging Instructions). It is recommended to charge your batteries for 12 hours. Charging the batteries completely prior to first time use will increase battery efficiency and battery life.
Before you operate your power wheelchair, check all systems
WARNING Proper training on safety, operation, and maintenance are essential and can potentially decrease the frequency of power wheelchair breakdowns and accidents.
Tips• Inspect the XLR 14, making sure it is clean and ready for use.
• Keep loose items or lap covers away from the wheels.
• Turn off the joystick controller when you have finished using the power wheelchair and immediately charge the battery.
XLR 14 Power Wheelchair OperationTo safely handle the XLR 14, pay close attention to your surroundings. Scan ahead and look for the best path to take. Are there obstacles in the path or is it smooth and level? If there are obstacles, how will you avoid them? Now is the time to put into use all that you have learned from your provider training and this XLR 14 User Manual. It is important to practice these safety techniques until you are comfortable in maneuvering around frequently encountered obstacles.
Recommended Driving SurfacesThe XLR 14 is intended to be operated on dry, level surfaces composed of concrete, asphalt, or blacktop. Care should be taken on soft gravel, or dirt, and wet grass, please refer to additional warnings under “Wet/Slippery Surfaces”
CAUTION Before you begin to venture outside or away from your home, practice and master the safety procedures and techniques involved in safe operation of your power wheelchair. Have an experienced assistant help you before attempting to operate the power wheelchair alone.
CAUTION Keep your arms on or inside the armrests and feet on the footplate at all times during operation. The handling and maneuverability characteristics of mid-wheel drive power wheelchairs are inherently different from rear- or front-wheel drive power wheelchairs. If you have used other types of wheelchairs, handling and

15
maneuverability differences will be most noticeable when traveling over rough terrain or when negotiating ramps and slopes. To determine and establish your particular safety limits, practice use of this product on various sloping surfaces in the presence of a qualified attendant before attempting active use of this power wheelchair.
WARNING Do not use a cell phone, walkie/talkie, laptop, or other radio transmitter while operating your wheelchair.
Using the Joystick Controller
Note: For more information, see the descriptions in the Joystick Controller Options section.
CAUTION When learning to drive, select a slow speed and try to drive the wheelchair as slowly as possible by pushing the joystick forward only slightly.
Weight LimitationsYour power wheelchair is rated for a maximum weight capacity. Please refer to the specifications table for this limit. Keep in mind that the maximum weight capacity includes the combined weight of the user and any accessories mounted to the power wheelchair.
WARNING Do not carry passengers on your power wheelchair. Carrying passengers may affect the center of gravity, resulting in a tip over or fall.
Transferring Onto or Off the Power Wheelchair
WARNING Always fasten the lap belt when operating your power wheelchair; the lap belt is there for safety and protection.
Before you transfer onto or off the power wheelchair, engage the drive/freewheel levers in drive mode and power the joystick controller off. It can be dangerous if you bump into the joystick when the power is on. When you are sitting or traveling in your wheelchair, always maintain your center of gravity. Use a positioning belt if there is one available. For maximum safety, practice your transfer onto and off of the wheelchair. All practice moves should be under the supervision of a trained assistant. Do not stand on the footplate. Ensure armrests and footplate have been moved out of the way before transferring onto or off the wheelchair.
16
Ramps and Slopes
WARNING Always reduce your speed when driving down slopes to maintain stability and avoid hard braking. Move the joystick slowly toward the center position to reduce speed. If stopping is necessary, release the joystick and allow the power wheelchair to come to a full stop.
Ramps are designed for negotiating steps or other obstacles with a manual or power wheelchair. Inspect the ramp periodically for wear and loose or damaged parts and repair or replace if necessary. Properly designed ramps will have “edge protection” along each side to prevent the wheelchair from falling off the ramp. Make sure the ramp is secured in place and does NOT exceed any grade greater than 6º (10%). Approach a ramp or slope straight on – not at an angle.
WARNING If your power wheelchair is equipped with a reclining seat-back, do not attempt to negotiate a steep grade with the back in a reclined position.
When driving down a ramp or slope, keep the chair’s speed to the lowest setting to ensure controlled descent. If the power wheelchair starts to increase speed, release the joystick and the chair will slow down and stop. Then, push the joystick forward slightly to continue down the slope at a controlled speed.
DANGER Shoprider ® Mobility recommends that you do not attempt to negotiate a slope greater than 6º (10%). Driving conditions may change quickly, and exceeding the maximum slope can place the power wheelchair in an unstable situation.
When climbing a ramp or incline, try to keep the power wheelchair moving. If you stop and start up again, you will lose momentum and it will be harder to start up again. Special care must be taken to avoid abrupt or sudden forward movement when you resume climbing a ramp or steep slope to avoid tipping the chair backwards.
CAUTION Avoid sudden or erratic action with the joystick when traveling up or down an incline.
Curbs And Sidewalks
CAUTION DO NOT attempt to negotiate a curb with a height above 1.5”(40mm). When approaching a sidewalk, look for a curb cutout or a driveway.
17
Wet/Slippery Surfaces
WARNING NEVER operate the power wheelchair in the rain. It is NOT safe. Drive wheels lose traction on wet ground or grass. The joystick controller and other power wheelchair electronics are NOT waterproof.
Lawns are often watered and they can be very slick. Also, the water runoff from sprinklers can make sidewalks, driveways and streets wet and slippery.
Public Streets, Roadways & Crosswalks
DANGER A public street or roadway is a very dangerous place for a power wheelchair. Use special caution when crossing a busy street. Obey streetlights and proceed cautiously. Make sure traffic has stopped and that it is safe to proceed across the street.
Cornering InformationEven with front and rear caster wheels, excessive speed when cornering can cause the power wheelchair to lose control and tip over. Reduce your speed and steering angle to lessen the sharpness of the turn.
Stairs and Escalators
DANGER Never use your power wheelchair to negotiate stairs or escalators.
Do not try to use escalators, because they pose a serious danger to a power wheelchair. If an elevator is available, you may safely enter and use it to reach upper or lower floors.
Power Wheelchair StabilityDo not operate the power wheelchair in any direction while leaning forward in the chair. If an object is to be picked up from the floor, the caster wheels must be positioned to support the chair. Drive past the object, and then reverse so that the front casters are in the forward position. This position will provide the power wheelchair with the greatest stability for this operation. Do not lean out of the chair, because this will cause instability. Keep your arms on or inside the armrests and your feet on the footplate at all times.
Note: Proper use, handling, and maintenance of your power wheelchair are critical to your protection and to avoiding injury. Turn off the VR2 after you have finished using your power wheelchair and charge the battery.
18
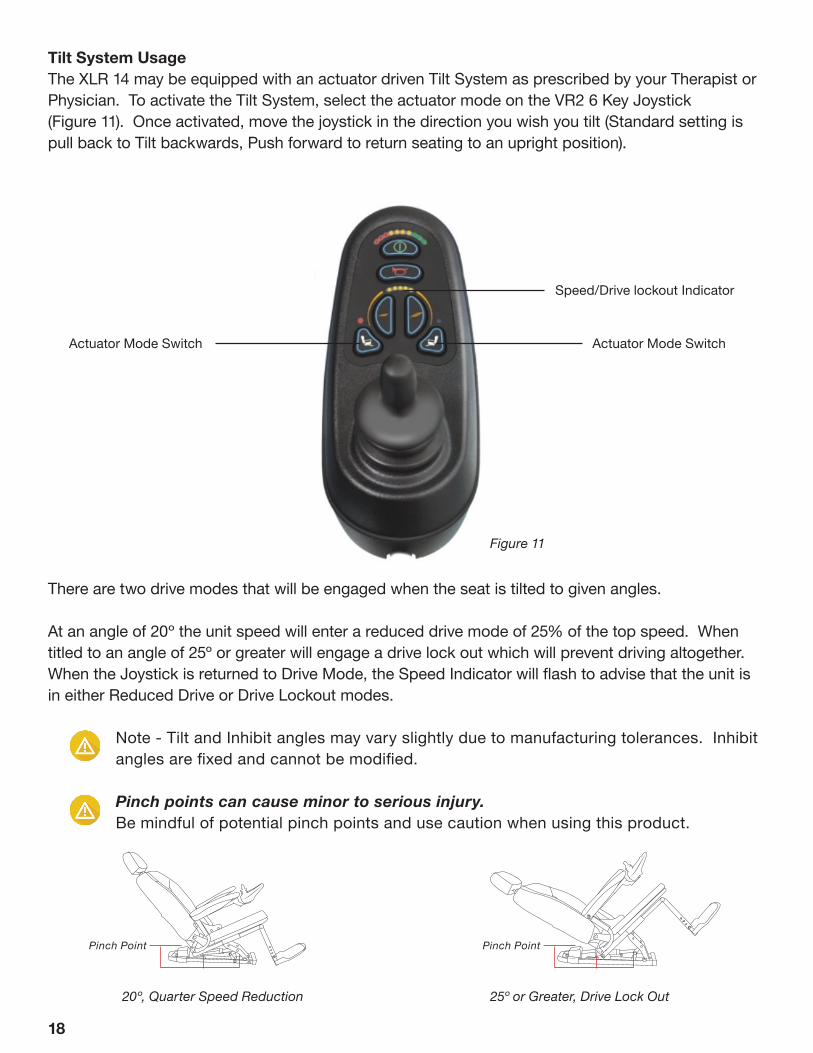
Tilt System UsageThe XLR 14 may be equipped with an actuator driven Tilt System as prescribed by your Therapist or Physician. To activate the Tilt System, select the actuator mode on the VR2 6 Key Joystick (Figure 11). Once activated, move the joystick in the direction you wish you tilt (Standard setting is pull back to Tilt backwards, Push forward to return seating to an upright position).
There are two drive modes that will be engaged when the seat is tilted to given angles.
At an angle of 20º the unit speed will enter a reduced drive mode of 25% of the top speed. When titled to an angle of 25º or greater will engage a drive lock out which will prevent driving altogether. When the Joystick is returned to Drive Mode, the Speed Indicator will flash to advise that the unit is in either Reduced Drive or Drive Lockout modes.
Note - Tilt and Inhibit angles may vary slightly due to manufacturing tolerances. Inhibit angles are fixed and cannot be modified. Pinch points can cause minor to serious injury. Be mindful of potential pinch points and use caution when using this product.
Actuator Mode Switch
Figure 11
25º or Greater, Drive Lock Out20º, Quarter Speed Reduction
Actuator Mode Switch
Speed/Drive lockout Indicator
Pinch Point Pinch Point

19
Maintenance Caring for the XLR 14 Power WheelchairThere are some maintenance procedures that can be performed by the user, if he/she is able. These procedures include equipment inspection, cleaning, and servicing of the power wheelchair. All other maintenance and repair must be performed by a provider with a trained and certified technician.
CAUTION Please follow the procedures and precautions in this manual carefully. Failure to adhere to these instructions can result in equipment damage or personal injury.
CAUTION During all work on the power wheelchair and electrical system, make sure the circuit breaker is disconnected (disconnect at least one battery connector).
Inspection Inspect the power wheelchair on a regular basis, see the Maintenance Chart for periodic inspection criteria. Regular inspection can spot problems before they can cause breakdown or other dangerous issues.
CAUTION Use only parts and accessories authorized by Shoprider ® Mobility. Unapproved tires, batteries, and other equipment could make your wheelchair unstable or dangerous. Such use may also void the warranty on the wheelchair.
Seat and Frame Inspect the seat, armrests, cushions, lap belt, and footplate. Inspect the lap belt carefully - it is there for your safety. Make sure it is not fraying or damaged and that it is attached securely to the power wheelchair frame. Inspect the buckle and make sure it locks secure.
Inspect the seat cushions for wear and replace them if necessary. Make sure that the seat is fastened securely to the frame. Look for missing fasteners or sharp edges on any seat hardware.
Check the footplate assembly and make sure there are no broken or missing parts. Make sure that your footplate is adjusted properly according to your requirements.
Wheels and TiresThe wheels and tires should be checked periodically for cracks and wear and replaced if necessary. The condition of the tires depends on how you drive and use your power wheelchair. Because your tires are flat-free tires, there is no need to worry about tire air pressure. Make sure the wheels have no “sideplay,” wobbling, or flutter when turning. Tighten loose wheel bolts and caster nuts on a regular basis.
Inspect caster assemblies for wear and proper tightness by spinning the wheel and observing for free movement or wobble of the wheel. Beware of caster flutter, side-to-side motion, which may

20
occur at high speeds. If the casters flutter, replace them immediately.
It is recommended that the driving axles (inside the drive wheel assembly) and caster assemblies be checked and cleaned occasionally for debris buildup, which will hinder the performance of the unit.
Maintenance Chart Use the following chart for periodic recommended inspection and adjustments of hardware and electrical parts and systems:
Inspection Criteria Initially Inspect/Adjust Monthly
Inspect/Adjust Bi-Annually
Electrical ConnectionsMake sure all electrical connections are secure √ √
Check limit switch position √ √
Drive LockoutMake sure Drive Lockout operate properly √ √
Tilt MechanismMake sure Tilt operates properly* √ √
Manual Recline MechanismMake sure the Recline operates smoothly and properly*
√ √
Clothing GuardsEnsure all fasteners are secure (If available) √ √
ArmsSecure but easy to release; make sure adjustment levers engage properly
√ √
Ensure height adjustment on arms operates and locks securely
√ √
ArmrestsInspect for rips in upholstery √ √
Make sure armrest pad sits flush against arm tube √ √
Seat And Back CushionInspect for rips √ √
CleaningClean cushions and armrests (see cleaning instructions on Pg. 21)
√ √

21
CleaningPlastic Shroud CoverClean the plastic shroud with mild, soapy water monthly or whenever dust or dirt accumulates on the shroud.
MotorsClean around the motor area weekly with a slightly damp (not wet) cloth. Wipe off or blow away any dust or dirt on or around the motors. Note: You do not need to grease or oil the power wheelchair mechanisms. UpholsteryHand wash seat upholstery and armrests as needed with a soft, damp cloth and mild detergent. Never use an abrasive cleanser or solvent-based cleaners, such as turpentine. Air dry only. Heat from a dryer may damage fabric.
Note: Washing the fabric may decrease the fire retardant properties.
Storage TipsIf you do not plan on using your power wheelchair for an extended period, it is recommended that you fully charge the batteries and then disconnect the battery harness before storage.
Store your power wheelchair in a clean, dry area to prevent corrosion. Before using your power wheelchair, make sure it is in proper working order. Inspect and service all items in the “Maintenance Chart.”
If you store the power wheelchair for more than 3 months, have it inspected by an authorized Shoprider ® provider before use.
CAUTION Never attempt to charge a frozen battery! A cold or frozen battery should be warmed for several days prior to charging.
LubricationMost lubricated components on this power wheelchair are designed to be maintenance free and are sealed. Therefore, lubrication IS NOT required for these components.
Batteries and Charging Before using your power wheelchair for the first-time, you must charge the batteries fully (refer to Battery Charging Instructions). Charging may take up to 12 hours. Charging the batteries completely prior to first time use will enhance battery efficiency and battery life.
Battery TypeThe XLR 14 power wheelchair is designed to operate on two 12v60Ah or two 12V73.6Ah gel-cell, maintenance-free, batteries. The two 12-volt batteries are wired in series to create a 24-volt

22
system. It is like having one large battery. Gel-cell batteries have many advantages over the wet-cell (automotive type) in that you never need to add water. They are sealed to avoid spills and corrosion problems. Using a sealed gel-type battery should allow you to travel on an airplane and other transportation without having to remove the batteries. Gell-cell deep-cycle batteries are designed to be discharged and recharged regularly.
Tips
CAUTION Always replace the batteries with two identical batteries of the same chemistry, amp- hours, and capacity as a set and at the same time. The XLR 14 is designed to accept 12v60Ah or 12v73.6Ah batteries.
Only sealed non-spillable batteries that meet DOT CFR173.159 (d), IATA Packing Instructions 806, and IATA Provision A67 shall be installed in this wheelchair.
Battery Charging
WARNING Use only the charger that came with your XLR 14. Never use a battery charger made for car batteries.
Note: The XLR 14 comes with an 8A charger only.
The average XLR 14 user will need to charge the batteries after using approximately 30% of the battery capacity. For extended battery life, it is highly recommended that these guidelines be followed. Keeping the batteries charged extends the life of the batteries.
Note: You cannot overcharge the batteries.
Battery accessTo access the batteries on the XLR 14, start by removing the center mounted foot platform. Locate and remove the two 13mm bolts on the top back plate of the tilt mechanism. Fold the seat back down and extend the headrest to its max position. The entire seating from will lift forward towards the front of the unit. Remove the battery cover, then disconnect the wiring harness on each battery and undo the velcro straps holding the batteries in place.
Charger Safety
CAUTION Never attempt to charge a frozen battery! A cold or frozen battery should be warmed for several days prior to charging.
Familiarize yourself with the safety information below before using the battery charger

23
• Read the battery charger instructions in this manual and in the manual supplied with the charger prior to charging the batteries.
• Do not remove the grounding prong from the battery charger plug. Removal of the grounding prong could result in an electrical hazard.
• Plug the charger into a 3-pronged electrical outlet only, or an approved 3-pronged adapter for use with a 2-pronged electrical outlet.
• Make sure that the electrical outlet being used is not controlled by a wall switch that can be turned off easily.
• Do not use an extension cord to plug in the charger.
• Disconnect the charger from the power wheelchair when not charging the batteries.
• Use only the off-board charger supplied with this unit. Never use an automotive-type battery charger. Contact your supplier if a replacement off-board charger is needed.
• Inspect the battery charger, wiring, and connections for damage before each use.
• Do not open the battery charger case.
• The battery charger is supplied with cooling slots. Do not insert objects through the slots.
• Make sure that the charger is not in contact with flammable materials at any time.
• The off-board charger is for indoor use only.
• Explosive gases may be generated while charging the batteries. Keep the power wheelchair and battery charger away from sources of ignition, such as flames or sparks, and provide adequate ventilation when charging the batteries.
• Do not allow children to play near the power wheelchair while the batteries are charging.
• Do Not charge the batteries while the power wheelchair is occupied.
Battery Charging Instructions 1. Verify the charger is the 24Vdc 8A charger supplied with the XLR 14. 2. Plug the charger into the electrical outlet; LEDs indicate when the charger is powered on. 3. Connect the charger to the charging port at the front of the VR2 joystick controller. 4. Observe the LEDs on the front of the charger for the following indications.

24
• Charger Indicator Lights• Blinking Green: Power on; charger in stand-by mode • Steady Orange: Battery charging• Steady Green: Charging completePlease refer to the LED indicator descriptions for the charging status on the charger. Batteries that go below a minimum voltage, as a result of not being charged, will not be able to recharge.
Battery/Charging TroubleshootingCharger DiagnosticsIf the charger indicator light goes to green within a few minutes after being plugged in and does not charge the batteries, then the batteries may be over-discharged and may require additional service or replacement. Contact your service provider for assistance.
If the charger indicator light goes immediately to green when plugged in to charge, the problem is likely a blown fuse, popped circuit breaker (push reset button), or similar malfunction. Contact your provider for assistance. If the charger does not come on at all when plugged in, check the charger fuse if applicable, then call your provider.
Controller DiagnosticsIn the unlikely event that the XLR 14 power wheelchair begins to malfunction, the VR2 will display one of several error codes to help diagnose the problem. Please see Table 1 (Pg. 23) for more information. Note: If performing the applicable procedure from Table 1 does not clear the corresponding fault, DO NOT continue use of the power wheelchair. Turn off the power to the joystick controller and consult your service provider immediately.
This Portion Left Intentionally
Blank
25
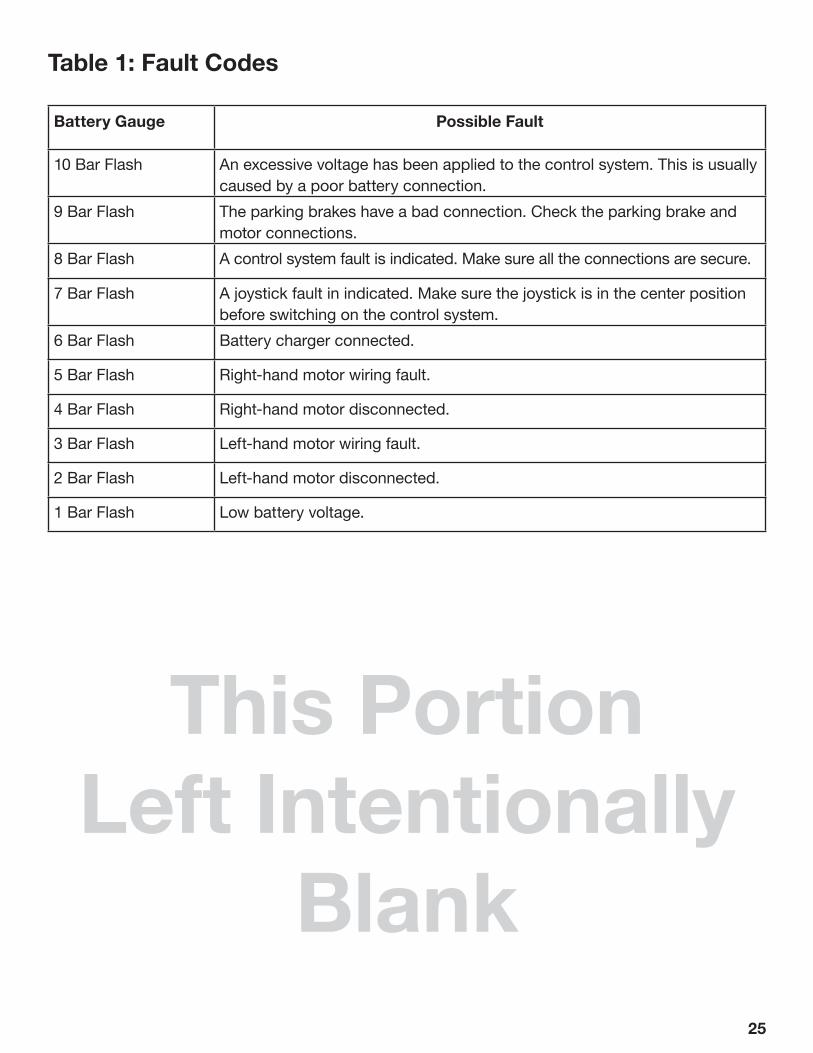
Table 1: Fault Codes
Battery Gauge Possible Fault
10 Bar Flash An excessive voltage has been applied to the control system. This is usually caused by a poor battery connection.
9 Bar Flash The parking brakes have a bad connection. Check the parking brake and motor connections.
8 Bar Flash A control system fault is indicated. Make sure all the connections are secure.
7 Bar Flash A joystick fault in indicated. Make sure the joystick is in the center position before switching on the control system.
6 Bar Flash Battery charger connected.
5 Bar Flash Right-hand motor wiring fault.
4 Bar Flash Right-hand motor disconnected.
3 Bar Flash Left-hand motor wiring fault.
2 Bar Flash Left-hand motor disconnected.
1 Bar Flash Low battery voltage.
This Portion Left Intentionally
Blank
26
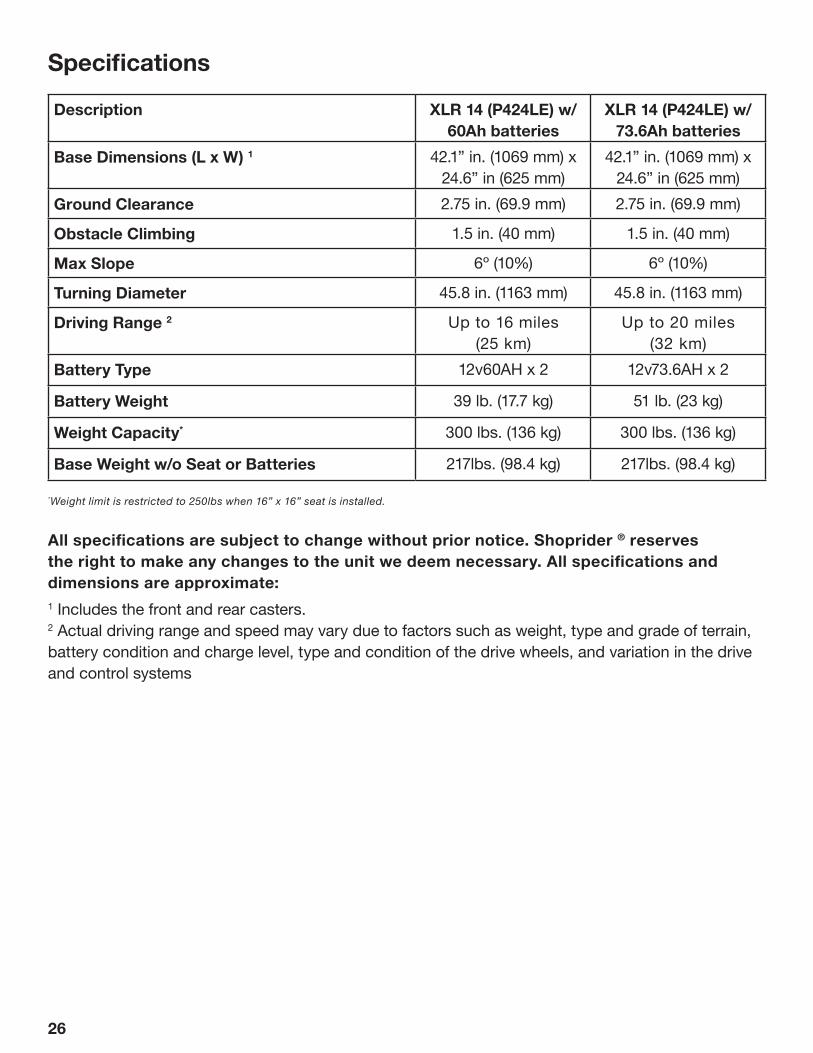
Specifications
All specifications are subject to change without prior notice. Shoprider ® reserves the right to make any changes to the unit we deem necessary. All specifications and dimensions are approximate:1 Includes the front and rear casters.2 Actual driving range and speed may vary due to factors such as weight, type and grade of terrain, battery condition and charge level, type and condition of the drive wheels, and variation in the drive and control systems
Description XLR 14 (P424LE) w/ 60Ah batteries
XLR 14 (P424LE) w/ 73.6Ah batteries
Base Dimensions (L x W) 1 42.1” in. (1069 mm) x 24.6” in (625 mm)
42.1” in. (1069 mm) x 24.6” in (625 mm)
Ground Clearance 2.75 in. (69.9 mm) 2.75 in. (69.9 mm)
Obstacle Climbing 1.5 in. (40 mm) 1.5 in. (40 mm)
Max Slope 6º (10%) 6º (10%)
Turning Diameter 45.8 in. (1163 mm) 45.8 in. (1163 mm)
Driving Range 2 Up to 16 miles (25 km)
Up to 20 miles (32 km)
Battery Type 12v60AH x 2 12v73.6AH x 2
Battery Weight 39 lb. (17.7 kg) 51 lb. (23 kg)
Weight Capacity* 300 lbs. (136 kg) 300 lbs. (136 kg)
Base Weight w/o Seat or Batteries 217lbs. (98.4 kg) 217lbs. (98.4 kg)
*Weight limit is restricted to 250lbs when 16” x 16” seat is installed.

27
Unit Dimensions
24.6”
42.1”
45.8”

28
WarrantyFrame: 5 Years / Electronics: 1 Year / Drivetrain: 1 YearRecord Serial number here for future use: Shoprider ® Mobility (“Distributor”) warrants its power wheelchairs (“products”) against certain defects in materials and workmanship from the date of purchase, subject to certain conditions and exclusions, as defined below. Please take the time to read the following terms and conditions under which the Distributor agrees to provide repair services. 1.) Structural frame components including platform, fork, caster arms, and frame welds are warranted for five (5) years, to the original owner.
2.) To present a claim, Customer shall deliver the defective part for exchange to an authorized Shoprider ® provider from whom the product was purchased.
3.) This warranty is for the replacement or repair, at the option of Shoprider ®, of defective parts only and does not cover any labor charges including, but not limited to, charges incurred for shipping, handling, or the installation of replacement parts or additional fees, which may be imposed by the provider or service agent.
4.) All warranty replacement parts are under warranty from the date of purchase of the original “product” and not from the date of part replacement.
5.) The warranty covers the drivetrain (including the gearbox, motor, and brake). 6.) This warranty is valid and enforceable only on “products” purchased in the United States and from an authorized Shoprider ® provider.
7.) This warranty is applicable only to the customer as an original purchaser of the “product” from an authorized Shoprider ® provider and shall not apply to any subsequent purchaser, assignee, or other recipient of the powered wheelchair from customer.
8.) No provider or other similar person has any authority to make any warranties or representations concerning Shoprider ® Mobility products, or to extend this warranty beyond the express terms contained within. Distributor assumes no responsibility for any warranties beyond the express terms contained in the warranty. Customer releases and holds distributor harmless from any claims stemming from any unauthorized representations.

29
9.) This warranty shall be void if the Customer modifies the “product” in any respect, including, but not limited to, the use of parts other than genuine Shoprider ® parts.
10.) This warranty does not apply unless the Registration Card is signed, completed, and returned within thirty days (30) from the date of purchase. Distributor reserves the right to dispose of the Registration Card once it is received.
11.) Warranty exceptions:A. Gearbox: In cases where there is an increase in the operational noise level, the warranty will not apply.B. Motor: If damage occurs to commutator of motor as a result of not replacing motor brushes after heavy wear to brushes. Motor brushes are wear items, and will be warranted for one year.C. Brake: Brake pads are wear items and will be warranted for one year.D. Maintenance: Annual maintenance schedule must be followed as outlined in the User Manual Section marked “Maintenance.”
12.) This warranty does not cover batteries or damage caused by battery leakage. The battery warranty is covered by the battery manufacturer. As part of the electronics, the battery charger is only covered for a period of one year from date of purchase of unit.
13.) This warranty does not cover plastic shrouding or covers, seat upholstery, or arm pads as these components are considered wear items.
14.) This warranty does not apply to any injury, loss, defect or malfunction of the “product,” or failure to function resulting from any failure to operate or maintain “product” in accordance with the directions contained in the user manual provided by Shoprider ®; or any injury, loss, damage, defect or malfunction, or failure to function resulting from any accident, acts of God, alterations in the “product” by anyone other than the distributor, or misuse, unreasonable use, tampering, abuse, acts, omissions, failure, or negligence by anyone other than manufacturer.
15.) Any implied warranty imposed by state consumer law is limited.
16.) Customer represents and agrees that any claims, which it may assert against Distributor, shall be limited to those, which may be asserted under the foregoing warranty.

30
17.) Distributor makes no warranty, either express or implied, including, but not limited to, any implied warranties of merchantability and fitness for a particular purpose. Distributor expressly disclaims all warranties.
18.) Your exclusive remedy and Distributor’s entire, collective liability in contract, tort or otherwise, under this Agreement is the repair of the defective system or components in accordance with this Agreement. If Distributor is unable to make such repair, your exclusive remedy and Distributor’s entire liability will be the payment of actual damages not to exceed the charge paid by you. Under no circumstances will the Distributor be liable to you or any other person for any damages, including, without limitation, any indirect, incidental, special, or consequential damages. This agreement gives you specific legal rights and you may have other rights that vary from state to state. Some states do not allow the exclusion or limitation of (i) incidental or consequential damages or (ii) implied warranties, so the above exclusions may not apply.
19.) No provider of Distributor and no person other than an officer of Distributor may extend this warranty, nor may they modify it in any respect. No modification or extension is effective unless it is in writing and signed by the President or Vice-President of the Distributor.
Replacement DocumentsThe most current version of this owner’s manual is available for download at www.Shoprider.com. Should you ever lose or misplace your owner’s manual or any other supplemental information provided with your power wheelchair, please visit the website or contact Shoprider ® for a replacement.

31
Notes:

XLR 14 Serial Numbers
Shoprider Mobility21184 S. Figueroa St. Carson, CA. 90745Phone: 1.800.743.0772Website: www.shoprider.com
SR_XLR14USERMANUALr3v1_073117