User Manual TV/DVDTV/DVD - Philips Manual 20DV6942/37 TV/DVDTV/DVD Thank you for choosing Philips....
36
User Manual 20DV6942/37 TV/DVD TV/DVD Thank you for choosing Philips. Need help fast? Read your User Manual first for quick tips that make using your Philips product more enjoyable. If you have read your instructions and still need assistance you may access our online help at www.p4c.philips.com or call 1-800-531-0039 while with your product. 8670 000 20966 Model No.: Serial No.:
Transcript of User Manual TV/DVDTV/DVD - Philips Manual 20DV6942/37 TV/DVDTV/DVD Thank you for choosing Philips....

User Manual
20DV6942/37
TV/DVDTV/DVD
Thank you for choosing Philips.
Need help fast?Read your User Manual first for quick tipsthat make using your Philips product more
enjoyable. If you have read your instructionsand still need assistance you may access our
online help at www.p4c.philips.com orcall 1-800-531-0039 while with your product.
8670 000 20966
Model No.:Serial No.:

PANEL INDEX
PanelSequence
andPanel Index
COVER SAFETYINFO
MODELREGISTRATIONINFORMATION
PANEL
1PANEL
2
PANEL
3PANEL
4PANEL
5PANEL
6PANEL
7PANEL
8
PANEL
9PANEL
10PANEL
11PANEL
12PANEL
13PANEL
14
PANEL
19PANEL
20
PANEL
21PANEL
22PANEL
23PANEL
24PANEL
25PANEL
26
PANEL
27PANEL
28PANEL
29PANEL
30PANEL
31PANEL
32
PANEL
15PANEL
16PANEL
17PANEL
18
Subject Panel No.Basic Antenna/Cable TV Connections . . .1Connecting Other Equipment to theTV/DVD . . . . . . . . . . . . . . . . . . . . . . . . .2Connecting the TV/DVDto Other Systems . . . . . . . . . . . . . . . . . .3Remote Control . . . . . . . . . . . . . . . . . .4-5 Basic Features . . . . . . . . . . . . . . . . . . . . .6Programming TV Channels . . . . . . . . . . . .7Skipping Channels, Favorite Channels . . .8Language, Clock . . . . . . . . . . . . . . . . . . . .9On Time, Off Time . . . . . . . . . . . . . . . . .10Picture, SmartTimer . . . . . . . . . . . . . . . .11Sound, MTS . . . . . . . . . . . . . . . . . . . . . .12Closed Captions, SleepTimer . . . . . . . . .13Picture, Sound Effects . . . . . . . . . . . . . .14AutoLockTM Secret Code . . . . . . . . . . . .15
Subject Panel No.CH Lock . . . . . . . . . . . . . . . . . . . . . . . .16Master Enable, MPAA Ratings . . . . . . . .17TV Parental Guidelines . . . . . . . . . . . . .18Canadian English or French Ratings . . . .19General Disc Information . . . . . . . . . . .20DVD Features . . . . . . . . . . . . . . . . . .21-23MP3/JPEG Playback . . . . . . . . . . . . . . . .24Search Mode . . . . . . . . . . . . . . . . . . . . .25DVD General Setup . . . . . . . . . . . . . . . .26DVD Analog Audio Setup,DVD Video Setup . . . . . . . . . . . . . . . . .27Digital Setup . . . . . . . . . . . . . . . . . . . . .28DVD Preferences . . . . . . . . . . . . . . . . . .29DVD Parental Control . . . . . . . . . . . . . .30Troubleshooting . . . . . . . . . . . . . . . . . . .31Philips Limited Warranty . . . . . . . . . . . .32
Side 1
Side 2
PANEL LAYOUT
AutoLock is a trademark of Philips Consumer Electronics.Copyright 2004 Philips Consumer Electronics.

Return your Product Registration Card todayto get the very most from your purchase.
Congratulations on your purchase, and welcome to the “family!”
Dear PHILIPS product owner:Thank you for your confidence in PHILIPS.You’ve selected one of the best-built, best-backed products available today.We’ll do everything in our power to keep you happy withyour purchase for many years to come.As a member of the PHILIPS “family,” you’re entitled to protection by one of the mostcomprehensive warranties and outstanding service networks in the industry.What’s more,your purchase guarantees you’ll receive all the information and special offers for whichyou qualify, plus easy access to accessories from our convenient home shopping network.Most importantly, you can count on our uncompromising commitment to your total satis-faction.All of this is our way of saying welcome - and thanks for investing in a PHILIPSproduct.
P.S. To get the most from your PHILIPS purchase, be sure to complete andreturn your Product Registration Card at once.Registering your model with PHILIPS makes you eligible for all of the valuable benefits listed below, sodon't miss out. Complete and return your Product Registration Card at once to ensure:
Know these
safetysymbols
This “bolt of lightning” indicates uninsulated material within your unit maycause an electrical shock. For the safety of everyone in your household, pleasedo not remove product covering.The “exclamation point” calls attention to features for which you should readthe enclosed literature closely to prevent operating and maintenance problems.
WARNING: To reduce the risk of fire or electric shock, this apparatus should notbe exposed to rain or moisture, and objects fillled with liquids, such as vases, shouldnot be placed on this apparatus.CAUTION: To prevent electric shock, match wide blade of plug to wide slot, fullyinsert.
*Proof of Purchase Returning the enclosed cardguarantees that your date ofpurchase will be on file, sono additional paperwork willbe required from you toobtain warranty service.
*Product Safety Notification By registering your product,you'll receive notification -directly from the manufac-turer - in the rare case of aproduct recall or safetydefect.
*Additional Benefitsof ProductOwnershipRegistering your productguarantees that you'll receiveall of the privileges to whichyou're entitled, including spe-cial money-saving offers.
t
s
Visit our World Wide Web Site at http://www.philips.com

IMPORTANT SAFETY INSTRUCTIONSRead before operating equipment
Note to the CATV system installer: Thisreminder is provided to call the CATV systeminstaller's attention to Article 820-40 of the NECthat provides guidelines for proper grounding and, inparticular, specifies that the cable ground shall beconnected to the grounding system of the building, asclose to the point of cable entry as practical.
1. Read these instructions.2. Keep these instructions.3. Heed all warnings.4. Follow all instructions.5. Do not use this apparatus near water.6. Clean only with a dry cloth.7. Do not block any of the ventilation openings. Install
in accordance with the manufacturer’s instructions.8. Do not install near any heat sources such as radia-
tors, heat registers, stoves, or other apparatus(including amplifiers) that produce heat.
9. Do not defeat the safety purpose of the polarizedor grounding-type plug.A polarized plug has twoblades with one wider than the other.A groundingtype plug has two blades and a third groundingprong.The wide blade or third prong are providedfor your safety.When the provided plug does not fitinto your outlet, consult an electrician for replace-ment of the obsolete outlet.
10. Protect the power cord from being walked on orpinched particularly at plugs, convenience recepta-cles, and the point where they exit from the appara-tus.
11. Only use attachments/accessories specified by themanufacturer.
12. Use only with a cart, stand, tripod, bracket, or tablespecified by the manufacturer, or sold withthe apparatus. When a cart is used, usecaution when moving the cart/apparatus
combination to avoid injury from tip-over.13. Unplug this apparatus during lightning storms or
when unused for long periods of time.14. Refer all servicing to qualified service personnel.
Servicing is required when the apparatus has beendamaged in any way, such as power-supply cord orplug is damaged, liquid has been spilled or objectshave fallen into apparatus, the apparatus has beenexposed to rain or moisture, does not operate nor-mally, or has been dropped.
15. This product may contain lead and mercury.Disposal of these materials may be regulated due toenvironmental considerations. For disposal or recy-cling information, please contact your local authori-ties or the Electronic Industries Alliance:www.eiae.org
16. Damage Requiring Service - The applianceshould be serviced by qualified service personnelwhen:
A. The power supply cord or the plug has been dam-aged; or
B. Objects have fallen, or liquid has been spilled intothe appliance; or
C. The appliance has been exposed to rain; orD. The appliance does not appear to operate normally
or exhibits a marked change in performance; orE. The appliance has been dropped, or the enclosure
damaged.17. Tilt/Stability - All televisions must comply with
recommended international global safety standardsfor tilt and stability properties of its cabinet design.• Do not compromise these design standards byapplying excessive pull force to the front, or top, ofthe cabinet which could ultimately overturn theproduct.• Also, do not endanger yourself, or children, by plac-ing electronic equipment/toys on the top of the cab-inet. Such items could unsuspectingly fall from thetop of the set and cause product damage and/orpersonal injury.
18. Wall or Ceiling Mounting - The appliance shouldbe mounted to a wall or ceiling only as recommend-ed by the manufacturer.
19. Power Lines - An outdoor antenna should belocated away from power lines.
20. Outdoor Antenna Grounding - If an outsideantenna is connected to the receiver, be sure theantenna system is grounded so as to provide someprotection against voltage surges and built up staticcharges.Section 810 of the National Electric Code,ANSI/NFPA No. 70-1984, provides information withrespect to proper grounding of the mast and sup-porting structure, grounding of the lead-in wire toan antenna discharge unit, size of grounding connec-tors, location of antenna-discharge unit, connectionto grounding electrodes, and requirements for thegrounding electrode. See Figure below.
21. Object and Liquid Entry - Care should be takenso that objects do not fall and liquids are not spilledinto the enclosure through openings.
22. Battery Usage CAUTION - To prevent batteryleakage that may result in bodily injury, propertydamage, or damage to the unit:• Install all batteries correctly, with + and - aligned asmarked on the unit.• Do not mix batteries (old and new or carbon andalkaline, etc.).• Remove batteries when the unit is not used for along time.
ANTENNA LEAD IN WIRE
ANTENNA DISCHARGE UNIT (NEC SECTION 810-20)
GROUNDING CONDUCTORS (NEC SECTION 810-21)
GROUND CLAMPS
POWER SERVICE GROUNDING ELECTRODE SYSTEM (NEC ART 250, PART H)
GROUND CLAMP
ELECTRIC SERVICE EQUIPMENT

BASIC ANTENNA/CABLE TV CONNECTIONS
Your Cable Box/Satellite Receiver mayhave Audio/Video Out jacks instead of asingle Antenna Out jack (RF coaxial or75 ohm) as shown here. Use audio/videocables to connect those jacks to theTV/DVD’s AV INPUTS.Press TV/AV/DVD on the remote to selectVIDEO mode. Select TV channels at theCable Box/Satellite Receiver as usual,leaving the TV/DVD on VIDEO.
HELPFUL HINT
75 OHMANTENNA
INPUT
CABLE TV OR SATELLITE
SIGNAL
75 OHMANTENNA
INPUT VIDEO AUDIO-R
AV INPUT
L(MONO)
AV OUTPUT
COAXIAL
DVD DIGITALOUTPUT
L
1To receive television programming, con-
nect your TV/DVD using one of theconnections shown.The TV channels willbe available after you use Auto Search toselect channels.
1 Using Cable TV service or anIndoor or Outdoor AntennaConnect a Cable TV signal or anantenna to the 75 OHMANTENNA INPUT on the rearof the TV/DVD.
Using a Cable Box or Satellite Receiver
1. Connect the Cable TV orSatellite signal to the IN Jack onthe Cable Box/Satellite Receiver.
2. Connect an RF coaxial cable(not supplied) to the OUT Jackon the Cable Box/ SatelliteReceiver and to the 75 OHMANTENNA INPUT on theTV/DVD.
3. To view any channel, set theTV/DVD to the output channel(3 or 4) of the CableBox/Satellite Receiver.Then,select channels at the CableBox/Satellite Receiver.
2 When all other connectionsare complete, plug in theTV/DVD’s power cord.
INOUT
75 OHMANTENNA
INPUT
CABLE TV OR SATELLITE SIGNAL
RF COAXIAL CABLE
75 OHMANTENNA
INPUT VIDEO AUDIO-R
AV INPUT
L(MONO)
AV OUTPUT
COAXIAL
DVD DIGITALOUTPUT
L

CONNECTING OTHER EQUIPMENT TO THE TV/DVD2You may want to connect a VCR,
Camcorder, or Video Game to thisTV/DVD.After making this connection,press TV/AV/DVD to select VIDEO mode.The materials playing on the other equip-ment will show on the TV/DVD’s VIDEOchannel. Audio and video cables are notsupplied.
1Connect a video cable to theVIDEO OUT jack of the otherequipment and to the yellowVIDEO AV INPUT jack on theback of the TV/DVD.
2Connect audio cables to theAUDIO OUT jacks of the otherequipment and to the red andwhite AUDIO L/R AV INPUTjacks on the back of the TV/DVD.
3Turn on the TV/DVD and theother equipment.
4 Press TV/AV/DVD on theremote to set the TV/DVD to theVIDEO channel.VIDEO willappear in the top left corner ofthe TV screen.
5 Play the tape, game, etc. as usualon the other equipment.You willwatch and hear it at the TV/DVD.
If the other equipment has only asingle AUDIO OUT jack (usuallywhite), connect it to only the white(left) AUDIO AV INPUT jack on theTV/DVD.The sound will come froma single channel (the left) and willnot be in Stereo.Remember to match the cable col-ors to the jack colors. ConnectOUT jacks on the other equipmentto AV INPUTs on the TV/DVD.
HELPFUL HINT
ANTENNAIN
L
R
L
R
AUDIOOUT
AUDIOIN
ANTENNAOUTVIDEO
INVIDEOOUT
75 OHMANTENNA
INPUT VIDEO AUDIO-R
AV INPUT
L(MONO)
AV OUTPUT
COAXIAL
DVD DIGITALOUTPUT
L
From VCR’s AUDIO and VIDEO OUT jacks to VIDEO and AUDIO A/V INPUT jacks on TV/DVD
VCR
TV/DVD

CONNECTING THE TV/DVD TO OTHER SYSTEMS3You may want to connect the TV/DVD
to other devices such as a VCR or aStereo. For example, you can record a TVprogram from the TV/DVD to a VCR, orhear the sound from the TV/DVD on aStereo. You will use the AV OUTPUTs onthe back of the TV/DVD to send the pic-ture and/or sound to another device.
1Two different audio connec-tions are possible - analog ordigital.If the VCR, Stereo, etc., has redand white Audio In jacks, this isan analog connection. Connectaudio cables to the red andwhite AUDIO AV OUTPUTjacks on the TV/DVD and tothe AUDIO IN jacks on theStereo,VCR, etc.These cables are not suppliedwith the TV/DVD, but may comewith the other equipment. UseRCA-style cables, matching cablecolors to jack colors.
Or, if your Stereo has a CoaxialDigital Audio In jack, you canmake a digital connection. Use acoaxial digital audio cable(not supplied) to connect theTV/DVD’s DVD DIGITALOUTPUT COAXIAL jack tothe Stereo’s Coaxial DigitalAudio In jack.
2 If you are connecting to aVCR or other video device,also connect a video cablefrom the TV/DVD’s VIDEOAV OUTPUT jack (yellow)to the VCR’s VIDEO IN jack.There is no video connection toa stereo.
3Set the Stereo,VCR, etc., toits Auxiliary In,Audio/VideoIn, or Source mode. See itsowner’s manual for details.
ANTENNAIN
L
R
AUDIOOUT
L
R
AUDIOIN
ANTENNAOUTVIDEO
INVIDEOOUT
L
R
AUDIOIN OR
75 OHMANTENNA
INPUT VIDEO AUDIO-R
AV INPUT
L(MONO)
AV OUTPUT
COAXIAL
DVD DIGITALOUTPUT
L
From VIDEO and AUDIO A/V OUTPUT jacks onTV/DVD to AUDIO IN jacks on Stereo or VCRand VIDEO IN jacks on VCR
VCR
STEREO
TV/DVD

REMOTE CONTROL4TV/AV/DVD ButtonPress to select a Video Inmode. Choose TV for regu-lar TV programming, DVDfor Disc play, or VIDEO towatch materials playing onother equipment connectedto the TV/DVD (VCR, videogames, etc.).
OPEN/CLOSE ButtonPress to open or close thedisc tray.This automaticallyputs the unit in DVD mode.
MUTE ButtonPress to silence the sound.The H will appear on thescreen. Press MUTE again torestore the volume to itsprevious level.
Number (0-9) ButtonsUse to select TV channels,to select Disc chapters ortracks, or to enter informa-tion in menus.When choosing one- ortwo-digit TV channels (i.e. 6or 12), there will be a pausebefore the channel changes.
TITLE ButtonPress to access a DVD’s titlemenu.
SETUP ButtonPress to access the SETUPmenu of the DVD Player.
REPEAT ButtonPress to repeatedly play aDisc portion (Track,Chapter, etc.).
REPEAT A-B ButtonPress to play a specific Discsegment repeatedly.
POWER yy ButtonPress to turn the unit on oroff.
SLEEP ButtonPress to have the TV/DVDturn itself off after a setamount of time.
CLOCK ButtonIn TV mode, press to godirectly to the Timer menuto set up clock or timer fea-tures.
S. EFFECT ButtonPress to choose a soundeffect (Personal,Voice, Music,or Theatre).
MTS ButtonPress to choose an audiooption (MONO, STEREO,SAP-second audio program,or MONO+SAP), dependingon the TV channel. MTS willnot function if the volume ismuted.
VOL. +,VOL. - ButtonsUse to increase or decreasethe volume.
MENU ButtonPress to access or removethe TV menu. It will disap-pear after 15-20 seconds ofinactivity.
ZOOM ButtonPress to enlarge or reduce aDVD or Video CD imageduring play.
STOP C ButtonPress to stop Disc play.
POWER
SLEEP
CLOCK
VOL+
PICTURE/DEL.
S.EFFECT
VOL-
MTS
MENU
TV/AV/DVD
DISPLAY
R/L
SKIP
SEARCHMODE
SUBTITLE ZOOM
STOP PLAY/PAUSE
/
9
6
3
MUTE
RECALL
OPEN/CLOSE
TITLE
MENU/PBC SETUP
SCAN
REPEAT
LANGUAGE ANGLE
REPEATA-B
ENTER
21
FAV.
87
54
0
SLOW
DVD10+
CH+
CH-

REMOTE CONTROL5
POWER
SLEEP
CLOCK
VOL+
PICTURE/DEL.
S.EFFECT
VOL-
MTS
MENU
TV/AV/DVD
DISPLAY
R/L
SKIP
SEARCHMODE
SUBTITLE ZOOM
STOP PLAY/PAUSE
/
9
6
3
MUTE
RECALL
OPEN/CLOSE
TITLE
MENU/PBC SETUP
SCAN
REPEAT
LANGUAGE ANGLE
REPEATA-B
ENTER
21
FAV.
87
54
0
SLOW
DVD10+
CH+
CH-
RECALLPress to switch between thelast channel and the currentchannel.
FAV./DVD10+ ButtonPress to move through yourfive favorite TV channels. InDVD mode, use to select aTrack or Chapter.
MENU/PBC ButtonPress to access a DVD’smenu or to enable PlaybackControl (PBC) on a VideoCD.
ENTER ButtonPress to confirm a menuselection.
CH+o, CH-p, 2, 3ButtonsUse to select items in theon-screen menu. UseCH+o and CH-p tochange TV channels.
SCAN 1h, g6 ButtonsPress to fast forward or fastreverse a Disc during play.
SLOW ButtonsPress to play a Disc forwardor backward in slowmotion.
LANGUAGE ButtonPress to select a languagefor the audio of a DVD.
ANGLE ButtonPress to select a differentcamera angle or perspectiveduring DVD play.
DISPLAY ButtonPress to see the current TVchannel number or time orto see Disc information.
PICTURE/DEL ButtonPress to choose a prede-fined picture setting(Multimedia, Personal,Movies, Sports,Weak Signal).
SKIP j, G ButtonsPress to skip to the next orprevious Disc Chapter orTrack.
SEARCH MODE ButtonPress to access or removethe search menu for a DVDor Video CD.
R/L ButtonPress to hear sound fromthe right or left channel of aVideo CD or Audio CD.
SUBTITLE ButtonPress to select a languagefor subtitles during DVDplay.
PLAY/PAUSE M
ButtonPress to play a Disc. Press topause or freeze the pictureduring play; press again toresume play.

BASIC FEATURES6Watching TV
1 Press POWER yy to turn on theTV/DVD.
2 Press TV/AV/DVD to select TVmode. The current channel num-ber will appear in the top left cor-ner.
3 Use CH+o and CH-p to selectTV channels.
Playing a Disc
4 Press TV/AV/DVD to select DVDmode. The large DVD Video logowill appear on the screen.
5 Press OPEN/CLOSE to openthe disc tray. Insert a Disc withthe label facing up.If a DVD has movies on both sidesof the Disc, make sure the label ofthe side you want to play is facingup. In this case, the labelling is prob-ably on the inner ring of the Disc.
6 Press OPEN/CLOSE again toclose the tray.Play may begin automatically. If not,press PLAY/PAUSE M.
Remote Control Batteries
1 Remove the battery compart-ment lid on the back of theremote by sliding the lid down andoff.
2 Insert two AAA batteries. Installthem as marked inside the com-partment.
3 Replace the compartment lid.
POWERbutton
HEADPHONE jackConnect headphones (not supplied)here for personal listening.
TV/AV/DVD,MENU,VOL(ume),CH(annel),(ENTER,PLAY/PAUSE)buttons
POWER
SLEEP
CLOCK
VOL+
PICTURE/DEL.
S.EFFECT
VOL-
MTS
MENU
TV/AV/DVD
DISPLAY
R/L
SKIP
SEARCHMODE
SUBTITLE ZOOM
STOP PLAY/PAUSE
/
9
6
3
MUTE
RECALL
OPEN/CLOSE
TITLE
MENU/PBC SETUP
SCAN
REPEAT
LANGUAGE ANGLE
REPEATA-B
ENTER
21
FAV.
87
54
0
SLOW
DVD10+
CH+
CH-
12,4
3
5,6
6

PROGRAMMING TV CHANNELS7
POWER
SLEEP
CLOCK
VOL+
PICTURE/DEL.
S.EFFECT
VOL-
MTS
MENU
TV/AV/DVD
DISPLAY
R/L
SKIP
SEARCHMODE
SUBTITLE ZOOM
STOP PLAY/PAUSE
/
9
6
3
MUTE
RECALL
OPEN/CLOSE
TITLE
MENU/PBC SETUP
SCAN
REPEAT
LANGUAGE ANGLE
REPEATA-B
ENTER
21
FAV.
87
54
0
SLOW
DVD10+
CH+
CH-
The TV can receive channels via anAntenna or Cable TV signal, then
memorize the available channels.Thismakes it easy for you to select only avail-able TV stations when you use CH+o
and CH-p.Make sure the Antenna or Cable TV sig-nal is connected securely to the 75 OHMANTENNA INPUT before you begin.
1 Press MENU. Press 2 or 3 tochoose the Preset menu.
2 Press CH+o or CH-p to selectTuner Mode.
3 Press 2 or 3 to chooseAntenna or Cable. ChooseCable if you have Cable TV serv-ice. Channels 1-125 will be possi-ble. Choose Antenna if you con-nected an indoor or outdoorantenna to the TV/DVD. Channels2-69 will be possible.
4 Press CH+o or CH-p to selectAuto Search.
5 Press 3 to start scanning chan-nels.The channels will count upon the screen during the search.When finished, the TV will go tothe lowest available channel.“Completed” will appear briefly.
Tuner Mode• Cable• Channel 3• Skipped Off• Manual Up• Auto Search ·• Favorite list
In this same Preset menu, chooseManual and use 2 or 3 to changeTV channels Up or Down.
You cannot select the Preset menuif CH lock is On or when the unit isin AV or DVD mode.
You can start Auto Search directlyby pressing and holding the MENUbutton on the top of the TV/DVD.
HELPFUL HINTS
11-5

SKIPPING CHANNELS8You can skip memorized channels or
add channels that the TV did notmemorize.
1 Press MENU. Press 2 or 3 tochoose the Preset menu.
2 Press CH+o or CH-p to selectChannel. Use 2 or 3 tochoose the channel you want toadd or skip.
3 Press CH-p to select Skipped,then press 2 or 3 to chooseOn or Off. Choose ON to skipthe channel when usingCH+o/CH-p. Choose OFF toaccess the channel withCH+o/CH-p.You can still selectskipped channels using theNumber buttons on the remote.
You can put five TV channels in a quick-selection or “surf ” ring.Then, using
FAV./DVD10+ on the remote, you canquickly flip through only your five favoritechannels.
1 Press MENU, then press 2 or 3to choose the Preset menu.
2 Press p to select Favorite list,then press ENTER.
3 Five channel slots will appear. UseCH+o or CH-p to choose aslot (1-5), then use 2 or 3 tochoose the channel you want inthat slot. (Antenna or Cable willindicate whether you are using anantenna or Cable TV service toreceive your TV channels.)
4 While watching TV, pressFAV./DVD+10 repeatedly to scanthrough your five favorite channelscontinuously.
FAVORITE CHANNELS
Tuner Mode• Cable• Channel 3• Skipped Off• Manual Up• Auto Search ·• Favorite list
Tuner Mode• Cable• Channel 3• Skipped Off• Manual Up• Auto Search ·• Favorite list
POWER
SLEEP
CLOCK
VOL+
PICTURE/DEL.
S.EFFECT
VOL-
MTS
MENU
TV/AV/DVD
DISPLAY
R/L
SKIP
SEARCHMODE
SUBTITLE ZOOM
STOP PLAY/PAUSE
/
9
6
3
MUTE
RECALL
OPEN/CLOSE
TITLE
MENU/PBC SETUP
SCAN
REPEAT
LANGUAGE ANGLE
REPEATA-B
ENTER
21
FAV.
87
54
0
SLOW
DVD10+
CH+
CH-
11-3
POWER
SLEEP
CLOCK
VOL+
PICTURE/DEL.
S.EFFECT
VOL-
MTS
MENU
TV/AV/DVD
DISPLAY
R/L
SKIP
SEARCHMODE
SUBTITLE ZOOM
STOP PLAY/PAUSE
/
9
6
3
MUTE
RECALL
OPEN/CLOSE
TITLE
MENU/PBC SETUP
SCAN
REPEAT
LANGUAGE ANGLE
REPEATA-B
ENTER
21
FAV.
87
54
0
SLOW
DVD10+
CH+
CH-
11-34

LANGUAGE9
CLOCK
Language• English• C-Capt Off• AutoLock• SmartTimer Off
You can set the TV’s on-screen menu toappear in English, French, or Spanish.
1 Press MENU.
2 Press 3 to select the Featuresmenu.
3 Press CH-p to selectLanguage.
4 Press 2 or 3 to select English,Francais (French), or Espanol(Spanish).This changes the language for theTV menus. It does not affect thelanguage of other text features,such as Closed Captions.
Follow these steps to set the clock onthe TV/DVD. Once the clock is set,
press DISPLAY until you see the currenttime on the screen during TV viewing.
1 Press MENU. Press 2 or 3 tochoose the Timer menu.
2 Press CH+o or CH-p to selectClock.
3 Press 2 or 3 to change thetime minute by minute. Pressand hold 2 or 3 to change thetime quickly in 10-minute incre-ments.The clock is only availablein “military” time (no AM or PM),also known as 24-hour time.
• Off Time Off• 11:30• On Time Off 0:00• Channel 6 Tuner Mode• Antenna• Clock 13:05
POWER
SLEEP
CLOCK
VOL+
PICTURE/DEL.
S.EFFECT
VOL-
MTS
MENU
TV/AV/DVD
DISPLAY
R/L
SKIP
SEARCHMODE
SUBTITLE ZOOM
STOP PLAY/PAUSE
/
9
6
3
MUTE
RECALL
OPEN/CLOSE
TITLE
MENU/PBC SETUP
SCAN
REPEAT
LANGUAGE ANGLE
REPEATA-B
ENTER
21
FAV.
87
54
0
SLOW
DVD10+
CH+
CH-
12-4
POWER
SLEEP
CLOCK
VOL+
PICTURE/DEL.
S.EFFECT
VOL-
MTS
MENU
TV/AV/DVD
DISPLAY
R/L
SKIP
SEARCHMODE
SUBTITLE ZOOM
STOP PLAY/PAUSE
/
9
6
3
MUTE
RECALL
OPEN/CLOSE
TITLE
MENU/PBC SETUP
SCAN
REPEAT
LANGUAGE ANGLE
REPEATA-B
ENTER
21
FAV.
87
54
0
SLOW
DVD10+
CH+
CH-
11-3

ON TIME10
OFF TIME
With the clock set, you can set theunit to turn off at a certain time.
1 While in the Timer menu, pressCH+o or CH-p to select OffTime.
2 Press 2 or 3 to set Off Time toOnce, Daily, or Off.
3 Press CH-p to select thetime beneath Off Time. Press 2or 3 to change the time.Press and hold 2 or 3 tochange the time quickly in 10-minute increments.
4 Press MENU to remove themenu.The TV/DVD will turn itselfoff at the time you specified.Before it turns off, the timersymbol will flash on the screen.
Once the clock is set, you can set theunit to turn on at a certain time.
1 In the Timer menu, press CH+o
or CH-p to select On Time.
2 Press 2 or 3 to set On Timeto Once, Daily, or Off.
3 Press CH-p to select the timebeneath On Time. Press 2 or3 to change the time. Press andhold 2 or 3 to change the timequickly in 10-minute increments.
4 Press CH+o or CH-p to selectChannel. Press 2 or 3 to selectthe channel you want when thepower comes on.Make sure Tuner Mode is correct,whether you have an Antenna orCable TV service.
5 Turn off the TV/DVD. It will turnon at the time you set.
• Off Time Off• 11:30• On Time Off 0:00• Channel 6 Tuner Mode• Antenna• Clock 13:05
• Off Time Off• 11:30• On Time Off 0:00• Channel 6 Tuner Mode• Antenna• Clock 13:05
POWER
SLEEP
CLOCK
VOL+
PICTURE/DEL.
S.EFFECT
VOL-
MTS
MENU
TV/AV/DVD
DISPLAY
R/L
SKIP
SEARCHMODE
SUBTITLE ZOOM
STOP PLAY/PAUSE
/
9
6
3
MUTE
RECALL
OPEN/CLOSE
TITLE
MENU/PBC SETUP
SCAN
REPEAT
LANGUAGE ANGLE
REPEATA-B
ENTER
21
FAV.
87
54
0
SLOW
DVD10+
CH+
CH-
1-4
POWER
SLEEP
CLOCK
VOL+
PICTURE/DEL.
S.EFFECT
VOL-
MTS
MENU
TV/AV/DVD
DISPLAY
R/L
SKIP
SEARCHMODE
SUBTITLE ZOOM
STOP PLAY/PAUSE
/
9
6
3
MUTE
RECALL
OPEN/CLOSE
TITLE
MENU/PBC SETUP
SCAN
REPEAT
LANGUAGE ANGLE
REPEATA-B
ENTER
21
FAV.
87
54
0
SLOW
DVD10+
CH+
CH-
41-3

PICTURE
SMARTTIMER
11• Color 30• Brightness 47• Picture 70• Sharpness 25• Tint +05• DNR Off• C-Temp Normal
Language• English• C-Capt Off• AutoLock• SmartTimer Off
T o adjust your TV picture, select achannel and use the controls described
below.
1 Press MENU. The Picture menuwill be selected.
2 Press o or p to select a picturecontrol, then use 2 or 3 toadjust the setting.Color Add or eliminate color.Brightness Brighten dark areasof the picture.Picture Add detail to the lightareas of the picture.Sharpness Improve detail in thepicture.Tint Obtain natural skin tones.DNR (Dynamic NoiseReduction) Choose On toimprove the picture when recep-tion is poor by sharpening thepicture quality. Black areas of thepicture become richer in darknessand white areas become brighter.C.Temp (Color Temperature)Select Normal, Cool, or Warm.Normal whitens the whites; Cooladds blue to the whites;Warmadds red to the whites.
Activate SmartTimer to have the unitturn off after four hours of non-use.
1 Press MENU. Press 2 or 3 tochoose the Features menu.
2 Press CH+o or CH-p to selectSmartTimer.
3 Press 2 or 3 to select On orOff.
POWER
SLEEP
CLOCK
VOL+
PICTURE/DEL.
S.EFFECT
VOL-
MTS
MENU
TV/AV/DVD
DISPLAY
R/L
SKIP
SEARCHMODE
SUBTITLE ZOOM
STOP PLAY/PAUSE
/
9
6
3
MUTE
RECALL
OPEN/CLOSE
TITLE
MENU/PBC SETUP
SCAN
REPEAT
LANGUAGE ANGLE
REPEATA-B
ENTER
21
FAV.
87
54
0
SLOW
DVD10+
CH+
CH-
12
POWER
SLEEP
CLOCK
VOL+
PICTURE/DEL.
S.EFFECT
VOL-
MTS
MENU
TV/AV/DVD
DISPLAY
/
9
6
3
MUTE
RECALL
OPEN/CLOSE
TITLE
MENU/PBC SETUP
ENTER
21
FAV.
87
54
0DVD10+
CH+
CH-
11-3

SOUND12T o adjust your TV sound, use the Sound
menu as described.
1 Press MENU, then press 3 toselect the Sound menu.
2 Press CH+o or CH-p to selecta sound control, then use 2 or 3to adjust the setting.
Bass Adjust the low frequencysounds.
Treble Adjust high frequencysounds.
Balance Evenly distribute thesound to the left and right speak-ers.
Surround Select On or Off.
AVL (Auto Volume Leveler)Select On or Off.Turning On AVLregulates sudden volume changes(commercials, channel changes,etc.).
• Bass 90• Treble 90• Balance +01• Surround On• AVL On
MTS
Multi-channel Television Sound (MTS)accesses different audio options
broadcast by a TV station. For example, ashow may broadcast a different language,or a Second Audio Program (SAP).
1 Press MTS repeatedly to chooseMONO, STEREO, SAP, orMONO+SAP.MONO distributes the sound viaone audio channel. STEREO pro-duces sound through left andright audio channels. SAP meansthe program has a second audioor language available. ChooseMONO+SAP to hear both theoriginal audio and the secondaudio at the same time.To use MTS, the volume cannotbe muted, and the TV stationmust have different audio optionsavailable.
15 SAP
STEREO
MONO
MONO+SAP
POWER
SLEEP
CLOCK
VOL+
PICTURE/DEL.
S.EFFECT
VOL-
MTS
MENU
TV/AV/DVD
DISPLAY
R/L
SKIP
SEARCHMODE
SUBTITLE ZOOM
STOP PLAY/PAUSE
/
9
6
3
MUTE
RECALL
OPEN/CLOSE
TITLE
MENU/PBC SETUP
SCAN
REPEAT
LANGUAGE ANGLE
REPEATA-B
ENTER
21
FAV.
87
54
0
SLOW
DVD10+
CH+
CH-
11,2
POWER
SLEEP
CLOCK
VOL+
PICTURE/DEL.
S.EFFECT
VOL-
MTS
MENU
TV/AV/DVD
DISPLAY
R/L
SKIP
SEARCHMODE
SUBTITLE ZOOM
STOP PLAY/PAUSE
/
9
6
3
MUTE
RECALL
OPEN/CLOSE
TITLE
MENU/PBC SETUP
SCAN
REPEAT
LANGUAGE ANGLE
REPEATA-B
ENTER
21
FAV.
87
54
0
SLOW
DVD10+
CH+
CH-
1

CLOSED CAPTIONS13Closed Captioning (CC) displays the
voice content of TV programs on theTV screen. Designed to help the hearingimpaired, this feature uses on-screen “textboxes” to show dialog and conversationswhile the TV program is in progress.
1 Press MENU. Press 2 or 3 tochoose the Features menu.
2 Press CH+o or CH-p to selectC. Capt.
3 Press 2 or 3 to select Off, CC1(most commonly available), CC2or CC3(black text box), or C.Mute (captions will only showwhen the volume is muted).
Language• English• C-Capt Off• AutoLock• SmartTimer Off
You can set the TV to turn itself offwithin a certain amount of time.
1 Press SLEEP on the remote sothe SLEEP display appears.
2 Press SLEEP repeatedly to pickthe amount of time (10-120 min-utes in 10-minute increments)before the TV will turn off.An on-screen count down willappear during the last minutebefore the TV shuts itself off.Pressing SLEEP during this timecancels the Sleep Timer.
Sleep 60 Min.
SLEEPTIMER
POWER
SLEEP
CLOCK
VOL+
PICTURE/DEL.
S.EFFECT
VOL-
MTS
MENU
TV/AV/DVD
DISPLAY
R/L
SKIP
SEARCHMODE
SUBTITLE ZOOM
STOP PLAY/PAUSE
/
9
6
3
MUTE
RECALL
OPEN/CLOSE
TITLE
MENU/PBC SETUP
SCAN
REPEAT
LANGUAGE ANGLE
REPEATA-B
ENTER
21
FAV.
87
54
0
SLOW
DVD10+
CH+
CH-
11-3
POWER
SLEEP
CLOCK
VOL+
PICTURE/DEL.
S.EFFECT
VOL-
MTS
MENU
TV/AV/DVD
DISPLAY
R/L
SKIP
SEARCHMODE
SUBTITLE ZOOM
STOP PLAY/PAUSE
/
9
6
3
MUTE
RECALL
OPEN/CLOSE
TITLE
MENU/PBC SETUP
SCAN
REPEAT
LANGUAGE ANGLE
REPEATA-B
ENTER
21
FAV.
87
54
0
SLOW
DVD10+
CH+
CH-
1,2

PICTURE14
SOUND EFFECTS
Whether you’re watching a movie orsports, your TV has a video setting
to enhance your current program content.
1 Press PICTURE/DEL repeatedlyto select Multimedia, Personal,Movies, Sports, or Weak Signal.
Multimedia Use when playingvideo games connected to the TV.
Personal Uses the specific settingsfor Color, Brightness, Picture,Sharpness, and Tint as you define inthe TV’s Picture menu.
Movies Enhances the picturewhen watching videotapes orDVDs.
Sports Use when watching sport-ing events.
Weak Signal Use when watchingprograms that have poor recep-tion.
PersonalMovies
Sports
Weak Signal
Multimedia
T he Auto Sound feature allows the listen-er to select between four different facto-
ry set sound options.
1 Press S. EFFECT repeatedly tochoose Personal,Voice, Music, orTheatre.
Personal Uses the specific settingsfor Bass, Treble, and Balance as youdefine in the Sound menu.
Voice Use if a program is mostlydialog.
Music Use for musical program-ming with little dialog.
Theatre Enhances the sound whenwatching movies.
Personal
Theatre
Music
Voice
POWER
SLEEP
CLOCK
VOL+
PICTURE/DEL.
S.EFFECT
VOL-
MTS
MENU
TV/AV/DVD
DISPLAY
R/L
SKIP
SEARCHMODE
SUBTITLE ZOOM
STOP PLAY/PAUSE
/
9
6
3
MUTE
RECALL
OPEN/CLOSE
TITLE
MENU/PBC SETUP
SCAN
REPEAT
LANGUAGE ANGLE
REPEATA-B
ENTER
21
FAV.
87
54
0
SLOW
DVD10+
CH+
CH-
1
POWER
SLEEP
CLOCK
VOL+
PICTURE/DEL.
S.EFFECT
VOL-
MTS
MENU
TV/AV/DVD
DISPLAY
/
9
6
3
MUTE
RECALL
OPEN/CLOSE
TITLE
MENU/PBC SETUP
ENTER
21
FAV.
87
54
0DVD10+
CH+
CH-
1

AUTOLOCKTM SECRET CODE15AutoLockTM enables you to block or cen-
sor TV programming, preventing chil-dren from watching programming youconsider inappropriate for them.You will need an access code to set upAutoLockTM or to watch blocked program-ming.To set a code, follow these steps.
1 Press MENU, then press 2 or 3to go to the Features menu.
2 Press CH+o or CH-p to high-light AutoLock, then pressENTER.
3 The screen will read, “EnterSecret Code - - - - .” Use theNumber buttons to enter 0, 0,0, 0. “XXXX” appears on thescreen as you enter the numbers.
If you enter an incorrect code,“Incorrect Secret Code” willappear. Press MENU to return tothe Features menu.
POWER
SLEEP
CLOCK
VOL+
PICTURE/DEL.
S.EFFECT
VOL-
MTS
MENU
TV/AV/DVD
DISPLAY
R/L
SKIP
SEARCHMODE
SUBTITLE ZOOM
STOP PLAY/PAUSE
/
9
6
3
MUTE
RECALL
OPEN/CLOSE
TITLE
MENU/PBC SETUP
SCAN
REPEAT
LANGUAGE ANGLE
REPEATA-B
ENTER
21
FAV.
87
54
0
SLOW
DVD10+
CH+
CH-
11,2
3
Language• English• C-Capt Off• AutoLock• SmartTimer Off
Enter Secret Code
_ _ _ _
Incorrect
Secret code
To change the code later, highlightAutoLockTM as detailed in steps 1-2.While it is highlighted, press CHAN-NEL o on the TV/DVD and VOL. +on the remote at the same time.Next use the Number buttons toenter a new four-digit code. PressENTER to save the new code.
HELPFUL HINTS
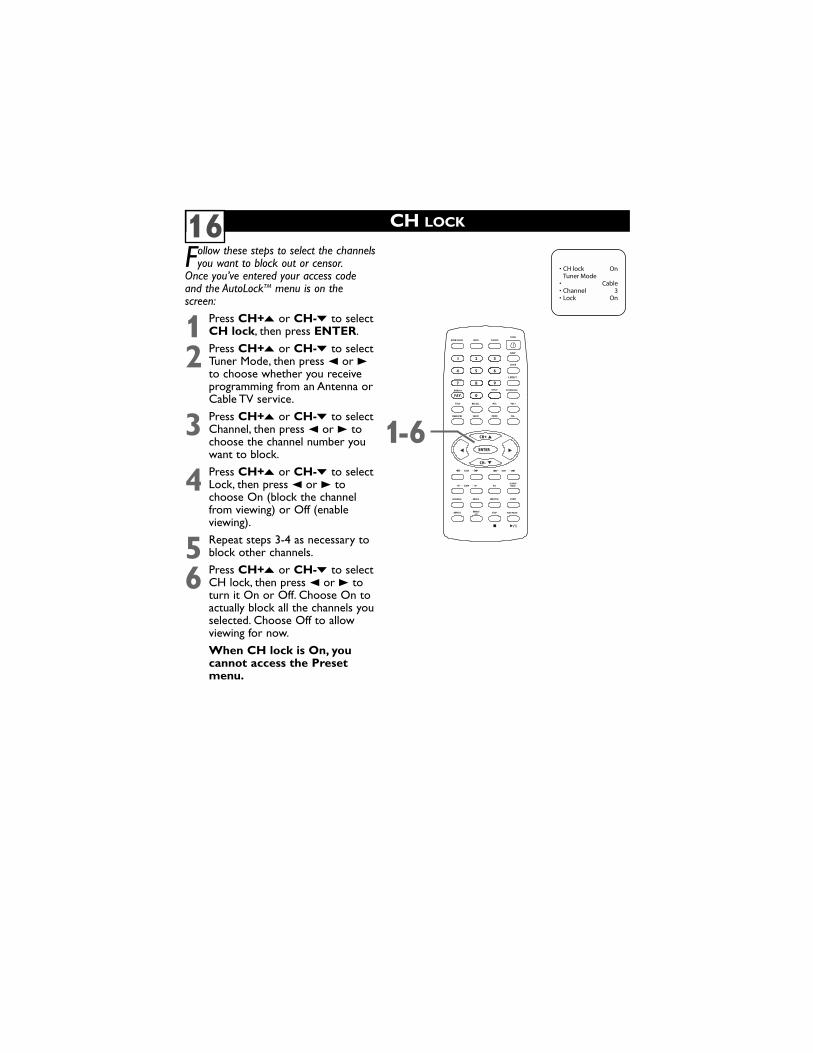
CH LOCK16Follow these steps to select the channels
you want to block out or censor.Once you’ve entered your access codeand the AutoLockTM menu is on thescreen:
1 Press CH+o or CH-p to selectCH lock, then press ENTER.
2 Press CH+o or CH-p to selectTuner Mode, then press 2 or 3to choose whether you receiveprogramming from an Antenna orCable TV service.
3 Press CH+o or CH-p to selectChannel, then press 2 or 3 tochoose the channel number youwant to block.
4 Press CH+o or CH-p to selectLock, then press 2 or 3 tochoose On (block the channelfrom viewing) or Off (enableviewing).
5 Repeat steps 3-4 as necessary toblock other channels.
6 Press CH+o or CH-p to selectCH lock, then press 2 or 3 toturn it On or Off. Choose On toactually block all the channels youselected. Choose Off to allowviewing for now.
When CH lock is On, youcannot access the Presetmenu.
• CH lock On Tuner Mode• Cable• Channel 3• Lock On
POWER
SLEEP
CLOCK
VOL+
PICTURE/DEL.
S.EFFECT
VOL-
MTS
MENU
TV/AV/DVD
DISPLAY
R/L
SKIP
SEARCHMODE
SUBTITLE ZOOM
STOP PLAY/PAUSE
/
9
6
3
MUTE
RECALL
OPEN/CLOSE
TITLE
MENU/PBC SETUP
SCAN
REPEAT
LANGUAGE ANGLE
REPEATA-B
ENTER
21
FAV.
87
54
0
SLOW
DVD10+
CH+
CH-
1-6

MASTER ENABLE17
MPAA RATINGS
Master Enable is like a “masterswitch” for AutoLockTM.When On,TV
programming will be blocked as you havespecified for MPAA rating,TV parentalguidelines, Canadian english rating, andCanadian french rating.Once you’ve entered your access codeand the AutoLockTM menu appears:
1 Press CH+o or CH-p to selectMaster Enable.
2 Press 2 or 3 to choose On ifyou want to activate yourAutoLockTM settings.To disableyour AutoLockTM settings, chooseOff.
You can block programming based onMPAA (Motion Pictures Association of
America) Ratings. Once you’ve enteredyour access code and the AutoLockTM fea-tures are displayed on the screen:
1 Press CH+o or CH-p to selectMPAA rating.
2 Press ENTER to see the options(N/A, G, PG, PG-13, R, NC-17,or X).
3 Press CH+o or CH-p tochoose a rating. Each rating canbe turned ON or checked(which will block viewing) or OFF(which will allow viewing).
4 Use ENTER to turn the ratingON (checked) or OFF.When a rating is blocked, anyhigher level will also be blockedfrom viewing. (For example, if R isblocked, NC-17 and X will beblocked automatically.)
• N/A - Not active; all ratings are viewable.• G - General Audience• PG - Parental Guidance suggested.• PG-13 - Unsuitable for children under 13• R - Restricted; under 17 requires accompa-
nying parent or adult guardian• NC-17 - No one under 17 admitted• X - Mature audience only
POWER
SLEEP
CLOCK
VOL+
PICTURE/DEL.
S.EFFECT
VOL-
MTS
MENU
TV/AV/DVD
DISPLAY
/
9
6
3
MUTE
RECALL
OPEN/CLOSE
TITLE
MENU/PBC SETUP
ENTER
21
FAV.
87
54
0DVD10+
CH+
CH-
1,2
POWER
SLEEP
CLOCK
VOL+
PICTURE/DEL.
S.EFFECT
VOL-
MTS
MENU
TV/AV/DVD
DISPLAY
/
9
6
3
MUTE
RECALL
OPEN/CLOSE
TITLE
MENU/PBC SETUP
ENTER
21
FAV.
87
54
0DVD10+
CH+
CH-
1-4

TV PARENTAL GUIDELINES18AutoLockTM can block programming
based on Parental Guideline ratings setby the TV industry.Once you’ve entered your access codeand the AutoLockTM features are on thescreen:
1 Press CH+o or CH-p to selectTV parental guidelines, thenpress ENTER.
2 Press CH+o or CH-p tochoose the rating level at whichyou want to block viewing, thenpress ENTER. Programs rated atthis level or higher will beblocked.Choose None to disable blockingand view all rating levels.
3 Sub-ratings are available for TV-Y7,TV-PG,TV-14 or TV-MA:F (fantasy or make-believe);V (violence); S (sex); L (coarselanguage); or D (suggestive dia-log).
Press CH+o or CH-p tochoose CONTENT, then pressENTER.
4 Press CH+o or CH-p tochoose a rating (TV-PG, etc.),then press 3.
5 Press CH+o or CH-p tochoose a sub-rating (Violence,etc.). Press ENTER repeatedly toBlock or View it.
Press 2 to go back and chooseanother rating for which youwant to specifically adjust thesub-ratings. Repeat steps 4-5 asnecessary to block or view all theratings and sub-ratings.
• None - View all ratings• TV-Y - Appropriate for
all children• TV-Y7 - Appropriate for
children seven and older• TV-G - General
Audience• TV-PG - Parental
Guidance suggested.• TV-14 - Unsuitable for
children under 14• TV-MA - Mature audi-
ence only
POWER
SLEEP
CLOCK
VOL+
PICTURE/DEL.
S.EFFECT
VOL-
MTS
MENU
TV/AV/DVD
DISPLAY
R/L
SKIP
SEARCHMODE
SUBTITLE ZOOM
STOP PLAY/PAUSE
/
9
6
3
MUTE
RECALL
OPEN/CLOSE
TITLE
MENU/PBC SETUP
SCAN
REPEAT
LANGUAGE ANGLE
REPEATA-B
ENTER
21
FAV.
87
54
0
SLOW
DVD10+
CH+
CH-
1-5

CANADIAN ENGLISH OR FRENCH RATINGS19Canadian movie ratings differ from
those used in the United States. Followthese steps to block TV viewing accordingto Canadian standards. Once you’veentered your access code and theAutoLockTM features are on the screen:
1 Press CH+o or CH-p to selectCanadian English rating orCanadian French rating, thenpress ENTER.
2 Press CH+o or CH-p tochoose the level at which youwant to block viewing, then pressENTER. Programs rated at thislevel or higher will be blocked.TVshows with a lower rating may beviewed.
Canadian English Ratings• E - Exempt - Unblocks all ratings and
enables viewing.• C - Child-appropriate programming• C8+ - Appropriate for children 8 or
older• G - General programming; suitable for
all audiences• PG - Parental Guidance suggested• 14+ - Viewers should be 14 or older.• 18+ - Viewers should be 18 or older.
Canadian French Ratings• E - Exémptees• G - Général• 8 ans + - Général - Déconseillé aux
jeunes enfants• 13 ans + - Gette émission peut convenir
aux enfants de moins de 13 ans• 16 ans + - Gette émission ne convenient
pas aux moins de 16 ans• 18 ans + - Gette émission est réservée
aux adult
POWER
SLEEP
CLOCK
VOL+
PICTURE/DEL.
S.EFFECT
VOL-
MTS
MENU
TV/AV/DVD
DISPLAY
R/L
SKIP
SEARCHMODE
SUBTITLE ZOOM
STOP PLAY/PAUSE
/
9
6
3
MUTE
RECALL
OPEN/CLOSE
TITLE
MENU/PBC SETUP
SCAN
REPEAT
LANGUAGE ANGLE
REPEATA-B
ENTER
21
FAV.
87
54
0
SLOW
DVD10+
CH+
CH-
1,2
• PE• PC• PC8+• PG• PPG• P14+• P18+
• PE• PG• P8 ans+• P13 ans+• P16 ans+• P18 ans+
OR

GENERAL DISC INFORMATION20Playable DiscsIn DVD mode, this TV/DVD will playthe Disc types shown at right. FinalizeCD-Rs, CD-RWs, DVD+Rs, andDVD+RWs before playing them. ADVD also must meet the require-ments for Region Codes and ColorSystems as described below.
Available Disc Features...Features described in this manual arenot available on every Disc. An “�”will appear in the top left corner ofthe screen if you try a feature that isnot available. Some features are avail-able only during play, while others areavailable only if play is stopped. If youcannot access a feature, try stoppingor starting play, or changing Discs,then try the feature again.
Region CodesThis TV/DVD has a Region One (1)DVD Player. DVDs must be labeledfor ALL regions or for Region 1 inorder to play. Look for the symbols atright on your DVDs.
Color SystemsDVDs are recorded in different colorsystems. The most common areNTSC (for the United States andNorth America), PAL, and SECAM.This TV/DVD will play NTSC and PALDiscs. Set TV TYPE according to theDVDs you play most often.
Cleaning a Disc• Use a soft, dry cloth to wipe Discs.• Wipe Discs in a straight line from
the center to the edge. Never wipeDiscs in a circular motion.
• Do not use detergent or abrasivecleaning agents.
• Handle Discs by the edges so finger-prints and dust do not adhere tothe surfaces of the Discs.
• Always store a Disc in its protectivecase when it is not in use.
MP3/JPEG: Digital audio files (MP3) or pictures(JPEGs) recorded on a CD-R (Compact DiscRecordable), CD-RW (Compact DiscRewritable), or Picture CD
Video CDs
Region Codes
RecordableReWritable
DVD: Prerecorded Digital Video Discs
DVD+R (Recordable once)or DVD+RW (Rewritable)
Audio CDs

DVD FEATURES21
Disc MenusPress TITLE orMENU/PBC to seethe main Disc menu.These vary amongDiscs, depending on thefeatures available onthe Disc.Use CH+o, CH-p, 2,3, or the Number but-tons to select items inthe menu, then pressENTER. Continue untilyou set up all the fea-tures you want or untilplay begins.Follow the informationsupplied on the individ-ual Disc, as each will bedifferent.
Playback Control(VCDs 2.0 or above)Press MENU/PBC toturn Playback Control(PBC) on or off.Choosing On will acti-vate the VCD’s on-screen menu if avail-able.Use the Number but-tons to play a Trackfrom the menu.Follow the informationon the VCD, as eachwill be different.
Selecting Tracks,Chapters,Titles
Press a Number but-ton during play toselect a Track orChapter. Use theNumber buttons whenplay is stopped toselect a new Title.To select a double-digititem, use FAV/DVD10+.For example, to selectchapter 12, pressFAV/DVD10+, then 2.For Track 28, pressFAV/DVD10+ twice,then 8.
DisplaysPress DISPLAYrepeatedly to see theelapsed or remainingplaying time of a DVDTitle or Chapter or aVideo CD Track.Press DISPLAY to turnoff the displays or toactivate Pro Logic on aVideo CD.
POWER
SLEEP
CLOCK
VOL+
PICTURE/DEL.
S.EFFECT
VOL-
MTS
MENU
TV/AV/DVD
DISPLAY
R/L
SKIP
SEARCHMODE
SUBTITLE ZOOM
STOP PLAY/PAUSE
/
9
6
3
MUTE
RECALL
OPEN/CLOSE
TITLE
MENU/PBC SETUP
SCAN
REPEAT
LANGUAGE ANGLE
REPEATA-B
ENTER
21
FAV.
87
54
0
SLOW
DVD10+
CH+
CH-

DVD FEATURES22Scanning
Press SCAN 1h orSCAN g6 repeatedlyto search or scan aDisc during play.Use SCAN 1h tosearch backward at 2,4, 8, 16, or 32 times thenormal speed.Use SCAN g6 tofast forward play at 2,4, 8, 16, or 32 times thenormal playing speed.Sound will be muteduring scanning.To resume normal play,press PLAY/PAUSEM.
Audio LanguageSome DVDs have dif-ferent audio languagesavailable.This varies byDisc, but could includeforeign languages, direc-tor’s commentary, orsoundtracks. PressLANGUAGE repeat-edly during play toselect one of the lan-guages available on theDisc.
Skipping Chaptersor Tracks
Press SKIP j orSKIP G during playto move to the previ-ous or next Chapter orTrack.Press SKIP j onceto go to the beginningof the current Track orChapter. Quickly pressit repeatedly to go toprevious Tracks orChapters.
Zoom/ReducePress ZOOM repeat-edly during DVD orVideo CD play toenlarge or reduce thepicture.The blue box thatappears inside a graybox during zoomedplay indicates the loca-tion of the zoomedarea within the overallpicture. Press CH+o
or CH-p to movearound in the zoomedpicture.
POWER
SLEEP
CLOCK
VOL+
PICTURE/DEL.
S.EFFECT
VOL-
MTS
MENU
TV/AV/DVD
DISPLAY
R/L
SKIP
SEARCHMODE
SUBTITLE ZOOM
STOP PLAY/PAUSE
/
9
6
3
MUTE
RECALL
OPEN/CLOSE
TITLE
MENU/PBC SETUP
SCAN
REPEAT
LANGUAGE ANGLE
REPEATA-B
ENTER
21
FAV.
87
54
0
SLOW
DVD10+
CH+
CH-
Stop/Resume PlayFor a DVD or VCD,press STOP C once;when you resume play,it will start at the samepoint. If you pressSTOP C twice, playwill start at the begin-ning of the Disc whenyou resume play.You cannot select thePREFERENCE PAGE inthe Setup menu if playhas not been stoppedcompletely (by pressingSTOP C twice).

DVD FEATURES23
Slow Motion
Press SLOW duringplay to begin slowmotion playback.
You can play a Disc for-ward or backward at1/2, 1/4, 1/8, or 1/16 thenormal speed. (Reverseslow motion is availableonly on DVDs.)
Sound will be muteduring slow motionplay.
To resume play at thenormal speed, pressPLAY/PAUSE M.
R/L (right/left)Some Audio CDs andVideo CDs are record-ed on multiple audiochannels. For example,music may be on theleft channel whilevocals are on the rightchannel. Press R/Lrepeatedly during playto choose which chan-nels you want to hear(MONO LEFT, MONORIGHT, MIX-MONO,or STEREO). Checkyour Disc case fordetails.
Angles
Press ANGLE repeat-edly during play to seethe movie from a differ-ent angle or perspec-tive.A DVD must havedifferent angles record-ed. If it does not, � willshow in the screen’stop left corner.
Repeat Play
Press REPEAT contin-uously to play a Track,Chapter,Title, or Discrepeatedly. Choose Offto cancel Repeat play.Your Repeat setting willappear in the screen’stop left corner.
Repeat a Segment
To play a portion of aDisc over and over,press REPEAT A-Bduring play at thebeginning of the seg-ment. At the end ofthe segment, pressREPEAT A-B again.The segment will playrepeatedly. To cancelRepeat play, pressREPEAT A-B again.
Subtitles
Some DVDs have subti-tles in multiple lan-guages. Options vary byDisc. Press SUBTI-TLE during play toselect a language forSubtitles, or to turn offSubtitles.
POWER
SLEEP
CLOCK
VOL+
PICTURE/DEL.
S.EFFECT
VOL-
MTS
MENU
TV/AV/DVD
DISPLAY
R/L
SKIP
SEARCHMODE
SUBTITLE ZOOM
STOP PLAY/PAUSE
/
9
6
3
MUTE
RECALL
OPEN/CLOSE
TITLE
MENU/PBC SETUP
SCAN
REPEAT
LANGUAGE ANGLE
REPEATA-B
ENTER
21
FAV.
87
54
0
SLOW
DVD10+
CH+
CH-

MP3/JPEG PLAYBACK24The TV/DVD will play CD-Rs that contain
MP3 (music) or JPEG (picture) files.
1 After you insert a CD-R, a menuwill appear, showing the Folders(groups of Files) or Files (music orpictures) available.
2 While play is stopped, pressCH+o or CH-p to select aFolder or File. Press ENTER toopen the Folder or play the File.To go to a previous Folder levelwhile play is stopped, select thetop item in the column and pressENTER.
JPEG Zoom/ReducePress ZOOM to enlarge an image125%, 150%, or 200% or to reduce theimage 50% or 75%. Press 2,3, CH+o,or CH-p to move the image around.
Search ModePress SEARCH MODE during play tochoose a new Track or select a specificelapsed playing time (MP3 Tracks only).With either the Track or Time spacehighlighted, use the Number buttons toenter the Track or Time you want.
Rotate a JPEG imageDuring play, press 2 or 3 to rotate animage. Use CH+o or CH-p to flip animage vertically or horizontally.
Repeat PlayPress REPEAT to choose: SINGLE(play will stop after the current File orTrack plays); FOLDER (plays all files inthe Folder once); REPEAT ONE (plays asingle Track or image repeatedly);REPEAT FOLDER (plays all files in theFolder repeatedly); SHUFFLE (plays allfiles in the Folder in random order);REPEAT ALL (plays all JPEG files repeat-edly); RANDOM (plays Tracks in theFolder); and REPEAT OFF.
Kodak Picture CDThis unit will play Kodak Picture CDs,but the menus and features may differ.
POWER
SLEEP
CLOCK
VOL+
PICTURE/DEL.
S.EFFECT
VOL-
MTS
MENU
TV/AV/DVD
DISPLAY
R/L
SKIP
SEARCHMODE
SUBTITLE ZOOM
STOP PLAY/PAUSE
/
9
6
3
MUTE
RECALL
OPEN/CLOSE
TITLE
MENU/PBC SETUP
SCAN
REPEAT
LANGUAGE ANGLE
REPEATA-B
ENTER
21
FAV.
87
54
0
SLOW
DVD10+
CH+
CH-
2

SEARCH MODE25Different Search features are available
for DVDs and Video CDs.
1 Press SEARCH MODE duringplay.
2 Press CH+o or CH-p to select afeature, then press 3.
3 TITLE, CHAPTER,TRACK: Usethe Number buttons to choose adifferent Title, Chapter, or Track.Thenumber of available Titles, Chapters,or Tracks shows in the display. (TheFAV/DVD10+ button has no opera-tion.)
AUDIO or SUBTITLE: PressCH+o or CH-p to select a lan-guage for the Audio or Subtitles,then press ENTER.
ANGLE: Use the Number buttonsto select an available angle.The num-ber of available angles appears in thedisplay. Multiple angles must berecorded on the DVD. See the DVDfor availability.
TT TIME, CH TIME, DISC TIME,or TRACK TIME: Use the Numberbuttons to enter the desired elapsedplaying time (in hours, minutes, andseconds) of a DVD Title (TT or TitleTotal); DVD Chapter (CH); VideoCD Track, or Video CD Disc. Playwill skip to that point on the Disc.
REPEAT: Press CH+o or CH-p
to play a Chapter,Title,Track, orDisc (ALL) repeatedly. Select OFF todisable Repeat play.Then press ENTER.(For VCDs, PBC must be OFF.)
TIME DISP: Press CH+o or CH-p to choose whether you want tosee the elapsed or remaining playingtime of a Title, Chapter, or Track atthe bottom of the Search Mode dis-play.Then press ENTER.
4 Press SEARCH MODE again toremove the display.
TITLE 01/01CHAPTER 0_/66AUDIO 5.1 CH ENGLISHSUBTITLE ENGLISH
MENU
BITRATE 48 llllllll TITLE ELAPSED 0:21:40
POWER
SLEEP
CLOCK
VOL+
PICTURE/DEL.
S.EFFECT
VOL-
MTS
MENU
TV/AV/DVD
DISPLAY
R/L
SKIP
SEARCHMODE
SUBTITLE ZOOM
STOP PLAY/PAUSE
/
9
6
3
MUTE
RECALL
OPEN/CLOSE
TITLE
MENU/PBC SETUP
SCAN
REPEAT
LANGUAGE ANGLE
REPEATA-B
ENTER
21
FAV.
87
54
0
SLOW
DVD10+
CH+
CH-
2,3
3
1,4

DVD GENERAL SETUP261Press SETUP. Press 2 or 3 to go
to the GENERAL SETUP PAGE.
2Press CH+o or CH-p to select afeature, then press 3.
3Press CH+o or CH-p to choosea setting, then press ENTER.
TV DISPLAYNORMAL/PS (panscan):Trims the pic-ture to fit the TV screen.NORMAL/LB (letterbox):Widens thepicture, displays black bars at the topand bottom of the screen.WIDE: If your DVD/VCD is recordedin widescreen format, the image willbe squeezed to fit the TV screen. If theimage is distorted, chooseNORMAL/PS or NORMAL/LBinstead.The format must be available on theDisc.
ANGLE MARK Select ON to seethe angle symbol on the screenwhen different camera angles areavailable on a DVD. (Press ANGLEon the remote to choose a differentperspective or angle.)
OSD LANG The Setup menus(on-screen displays) can be inEnglish, French, or Spanish.
CAPTIONS Choose ON to seecaptions for Discs. Different thansubtitles, captions show sound effectsin addition to spoken text. Captionsmust be available on the Disc. ClosedCaptions must be on in TV mode.
LAST MEMORY Choose ON ifyou want a DVD to resume play atthe same point when you switchfrom TV mode back to DVD mode.
4Press SETUP to remove the menu.
POWER
SLEEP
CLOCK
VOL+
PICTURE/DEL.
S.EFFECT
VOL-
MTS
MENU
TV/AV/DVD
DISPLAY
R/L
SKIP
SEARCHMODE
SUBTITLE ZOOM
STOP PLAY/PAUSE
/
9
6
3
MUTE
RECALL
OPEN/CLOSE
TITLE
MENU/PBC SETUP
SCAN
REPEAT
LANGUAGE ANGLE
REPEATA-B
ENTER
21
FAV.
87
54
0
SLOW
DVD10+
CH+
CH-
1-3 1,4
TV DISPLAYANGLE MARKOSD LANGCAPTIONSLAST MEMORY
- - GENERAL SETUP PAGE - -
GO TO GENERAL SETUP PAGE

DVD ANALOG AUDIO SETUP271 Press SETUP. Press 2 or 3 to go to
the ANALOG AUDIO SETUPPAGE.
2 Press CH+o or CH-p to select afeature, then press 3.
3 Press CH+o or CH-p to select thesetting you want (as described below),then press ENTER.DOWNMIX: Choose LT/RT if youconnected the TV/DVD to a Stereothat has Dolby Pro Logic.Select STEREO if you connected theTV/DVD to an audio system that doesnot have Dolby Pro Logic.POST DRC (Dynamic RangeControl): Choose ON to level the vol-ume during Disc play, reducing therange between loud and soft sounds.To hear the highs and lows of the vol-ume, choose OFF. AUTO distributesthe sound as it is received.
4 Press SETUP to remove the menu.
DOWNMIX LTIRTPOST DRC STEREO
- - ANALOG AUDIO SETUP PAGE - -
SET STEREO DOWNMIX
POWER
SLEEP
CLOCK
VOL+
PICTURE/DEL.
S.EFFECT
VOL-
MTS
MENU
TV/AV/DVD
DISPLAY
/
9
6
3
MUTE
RECALL
OPEN/CLOSE
TITLE
MENU/PBC SETUP
ENTER
21
FAV.
87
54
0DVD10+
CH+
CH-
1-3 1,4
TV TYPE PAL MULTI
NTSC
- - VIDEO SETUP PAGE - -
SET TV STANDARD
1 Press SETUP, then press 2 or 3 togo to the VIDEO SETUP PAGE.
2 Press CH-p to select TV TYPE,then press 3.
3 Press CH+o or CH-p to choosePAL, MULTI, or NTSC.DVDs are recorded in a color sys-tem, usually NTSC in the UnitedStates.The color system will be iden-tified on the DVD or its case.
Set TV TYPE to the type of DVDsyou will play (PAL or NTSC). If youplan to play both, choose MULTI.Theunit will recognize and play bothtypes of Discs.
4 Press SETUP to remove the menu.
POWER
SLEEP
CLOCK
VOL+
PICTURE/DEL.
S.EFFECT
VOL-
MTS
MENU
TV/AV/DVD
DISPLAY
/
9
6
3
MUTE
RECALL
OPEN/CLOSE
TITLE
MENU/PBC SETUP
ENTER
21
FAV.
87
54
0DVD10+
CH+
CH-
1-3 1,4
DVD VIDEO SETUP

DIGITAL SETUP281 Press SETUP. Press 2 or 3 to
choose DIGITAL SETUP.
2 Press CH+o or CH-p to selecta feature, then press 3.
3 Press CH+o or CH-p toselect a setting. Press ENTER.
DUAL MONO: Adjust whenDisc sound is in Stereo (fromleft/right channels).Choose STEREO to separate theleft/right sounds into theleft/right speakers. Choose L-MONO or R-MONO to heareither the left or right channel atboth speakers. Choose MIX-MONO to hear a mixture of theleft and right channels at eachspeaker.
DYNAMIC: If your Disc hasDolby Digital sound, use DYNAM-IC to minimize volume extremes.Adjust the gap between soft andloud sounds by choosing a ratiobetween 1/8 and FULL, or chooseOFF.
SPDIF OUTPUT (Sony-PhilipsDigital Interface): Choose SPDIFOFF if the TV/DVD is connectedto a Stereo using the red/whiteAUDIO OUTPUT jacks.Choose SPDIF RAW if it’s con-nected to an audio system usingthe DVD DIGITAL OUTPUTCOAXIAL jack.Discs are recorded in a certainsampling rate.The higher the rate,the better the sound quality.Choose PCM/96K if you playDiscs recorded at the high rate of96 kHz. Otherwise, choosePCM/48K.
4 Press SETUP to remove themenu.
POWER
SLEEP
CLOCK
VOL+
PICTURE/DEL.
S.EFFECT
VOL-
MTS
MENU
TV/AV/DVD
DISPLAY
R/L
SKIP
SEARCHMODE
SUBTITLE ZOOM
STOP PLAY/PAUSE
/
9
6
3
MUTE
RECALL
OPEN/CLOSE
TITLE
MENU/PBC SETUP
SCAN
REPEAT
LANGUAGE ANGLE
REPEATA-B
ENTER
21
FAV.
87
54
0
SLOW
DVD10+
CH+
CH-
1-3 1,4
DUAL MONO STEREODYNAMIC L-MONOSPDIF OUTPUT R-MONO
MIX-MONO
- - DIGITAL SETUP - -
SET LEFT MONO MODE

DVD PREFERENCES291 Press SETUP. Press 2 or 3 to
go to the PREFERENCEPAGE.You can select this only if youstopped Disc play by pressingSTOP C twice.
2 Press CH+o or CH-p to selecta feature, then press 3.
3 Press CH+o or CH-p to selectthe setting you want, then pressENTER.
AUDIO, SUBTITLE, DISCMENUChoose the language you want fora DVD’s Audio, Subtitles, or DiscMenu. The language must berecorded on the DVD. If there is alanguage on the DVD that is notshown in this list, choose OTH-ERS.
DEFAULT: With RESET select-ed, press ENTER.This restoresall the DVD Player’s settings totheir factory defaults.The settingsyou have made will be erased.
4 Press SETUP to remove themenu.
AUDIO FRENCHSUBTITLE SPANISHDISC MENU CHINESEPARENTAL JAPANESEPASSWORD KOREANDEFAULT RUSSIAN
THAIOTHERS
- - PREFERENCE PAGE - -
PREFERRED AUDIO LANGUAGE
POWER
SLEEP
CLOCK
VOL+
PICTURE/DEL.
S.EFFECT
VOL-
MTS
MENU
TV/AV/DVD
DISPLAY
R/L
SKIP
SEARCHMODE
SUBTITLE ZOOM
STOP PLAY/PAUSE
/
9
6
3
MUTE
RECALL
OPEN/CLOSE
TITLE
MENU/PBC SETUP
SCAN
REPEAT
LANGUAGE ANGLE
REPEATA-B
ENTER
21
FAV.
87
54
0
SLOW
DVD10+
CH+
CH-
1-3 1,4

DVD PARENTAL CONTROL30PARENTAL blocks DVD viewing if its rating
exceeds the level you allow.This featureonly affects DVDs; it does not affect TV view-ing.You will need a four-digit password tochange the PARENTAL level, disable the fea-ture, or view blocked DVDs.
1 Stop play by pressing STOP C
twice.Press SETUP. Press 2 or 3 to goto the PREFERENCE PAGE.
2 Press CH+o or CH-p to selecta feature, then press 3.
3 PASSWORDWith CHANGE selected, pressENTER.Use the Number buttons toenter your old four-digit pass-word. If this is your first time set-ting a password, use the 1009default code.Next, enter a NEW PASS-WORD. It must have exactly fourdigits. Four Xs will appear, protect-ing the code’s identity.Enter the same new passwordagain for CONFIRM PWD.Finally, press ENTER.
PARENTALPress CH+o or CH-p to choosea movie rating level at which youwant to ban play. Press ENTER.You must enter your four-digitpassword, then press ENTERagain to confirm your setting.
If a DVD is rated higher than thelevel you select, play will be prohib-ited.You must either change theDisc or enter your password.Choose OFF to disable this featureand watch all DVDs, regardless oftheir rating.
4 Press SETUP to remove themenu.
PARENTAL RATINGS
• 1 KID SAF - Safe viewing for children• 2 G - General Audience• 3 PG - Parental Guidance suggested• 4 PG-13 - Unsuitable for children under 13• 5 PGR - Movie elements range from PG to R.• 6 R - Restricted; those under 17 should be
accompanied by a parent or adult guardian• 7 NC-17 - Not suitable for those under 17• 8 ADULT - Mature audience only• OFF - PARENTAL is disabled; all DVDs can
be watched.
POWER
SLEEP
CLOCK
VOL+
PICTURE/DEL.
S.EFFECT
VOL-
MTS
MENU
TV/AV/DVD
DISPLAY
R/L
SKIP
SEARCHMODE
SUBTITLE ZOOM
STOP PLAY/PAUSE
/
9
6
3
MUTE
RECALL
OPEN/CLOSE
TITLE
MENU/PBC SETUP
SCAN
REPEAT
LANGUAGE ANGLE
REPEATA-B
ENTER
21
FAV.
87
54
0
SLOW
DVD10+
CH+
CH-
1-3 1,4
3
AUDIO 1 KID SAFSUBTITLE 2 GDISC MENU 3 PGPARENTAL 4 PG 13PASSWORD 5 PGRDEFAULT 6 R
7 NC178 ADULT
- - PREFERENCE PAGE - -
SET PARENTAL CONTROL

TROUBLESHOOTING31No Power• Check the power cord. Disconnect the power cord from power, wait 10 seconds, then
reinsert the plug into the outlet. Press POWER yy again.• Make sure the power outlet is not controlled by a wall switch.• Be sure a fuse has not blown on the AC power strip, if one is in use.
No TV Channels• Make sure the Cable TV signal or Antenna is connected securely to the 75 OHM
ANTENNA INPUT on the rear of the TV/DVD.• Activate Auto Search to find all available channels.• Press TV/AV/DVD repeatedly to put the unit in TV mode.The current channel number
will appear briefly in the top left corner of the screen.• Check the AutoLockTM settings. Make sure CH Lock is OFF or enter your secret code
to access TV channels.
No Sound• Check the MUTE button on the remote control.• If you are connecting the TV/DVD to other equipment, check the cable connections
between the equipment. Connect RIGHT OUT jacks to RIGHT IN jacks, LEFT OUTto LEFT IN, etc.
Remote Does Not Work• Check the batteries. If necessary, replace them with AAA Heavy Duty (Zinc Chloride)
or Alkaline batteries.• Press TV/AV/DVD to put the unit in TV, DVD, or Video mode. TV features only work
with the unit in TV mode, DVD menus are only available in DVD mode, etc.• Point the remote control toward the front of the TV/DVD, not at other equipment.
Disc will not play.• Insert a playable Disc. You may play DVDs; Audio CDs; MP3/JPEG files on a finalized
CD-R, CD-RW or Picture CD; finalized DVD+Rs or DVD+RWs; or Video CDs.• Place the Disc correctly in the recesses in the Disc tray. If the Disc is one-sided, place
the Disc in the tray with the label facing up and the shiny side facing down. If the Discis two-sided, make sure the label of the side you want to play is facing up.
• Clean the Disc.• Check Parental controls and adjust as necessary.• Press TV/AV/DVD repeatedly to put the unit in DVD mode.The large DVD logo will
appear on the screen. Disc features are only available in DVD mode.
Disc feature is not available.• An “�” will appear on the screen if you try a feature that is not available. Some fea-
tures are available only during play, while others are available only if play is stopped. Ifyou cannot access a feature, try stopping or starting play, or changing Discs, then trythe feature again.

RENEWED90 DAY
LIMITED WARRANTY