User Manual Synclavier V - Arturiadownloads.arturia.com/products/synclavier-v/manual/...Manual Kevin...
117
ARTURIA – Synclavier V – USER MANUAL 1 USER MANUAL
Transcript of User Manual Synclavier V - Arturiadownloads.arturia.com/products/synclavier-v/manual/...Manual Kevin...
ARTURIA – Synclavier V – USER MANUAL 1
USER MANUAL
ARTURIA – Synclavier V – USER MANUAL 2
Direction
Frédéric Brun Kevin Molcard
Development
Cameron Jones (lead)
Baptiste Le Goff (project manager)
Stefano D’Angelo
Baptiste Aubry
Corentin Comte
Pierre-Lin Laneyrie
Valentin Lepetit
Samuel Limier
Germain Marzin
Mathieu Nocenti
Pierre Pfister
Benjamin Renard
Design
Glen Darcey
Shaun Ellwood
Morgan Perrier
Sebastien Rochard
Greg Vezon
Sound Design
Drew Anderson
Jean-Baptiste Arthus
Wally Badarou
Jean-Michel Blanchet
Marion Demeulemeester
Richard Devine
Thomas Koot
Victor Morello
Dave Polich
Stéphane Schott
Paul Shilling
Edware Ten Eyck
Nori Ubukata
Manual
Kevin E. Maloney
Corentin Comte
Jason Valax
ARTURIA – Synclavier V – USER MANUAL 3
Special Thanks
Brandon Amison
Matt Bassett
François Best
Alejandro Cajica
Chuck Capsis
Dwight Davies
Kosh Dukai
Ben Eggehorn
Simon Franglen
Boele Gerkes
Jeff Haler
Neil Hester
Chris Jasper
Laurent Lemaire
Steve Lipson
Terence Marsden
Bruce Mariage
Sergio Martinez
Shaba Martinez
Jay Marvalous
Miguel Moreno
Ken Flux Pierce
Fernando Manuel Rodrigues
Daniel Saban
Carlos Tejeda
James Wadell
Chad Wagner
Chuck Zwick
© ARTURIA S.A. – 1999-2016 – All rights reserved.
11 Chemin de la Dhuy
38240 Meylan
FRANCE
http://www.arturia.com
ARTURIA – Synclavier V – USER MANUAL 4
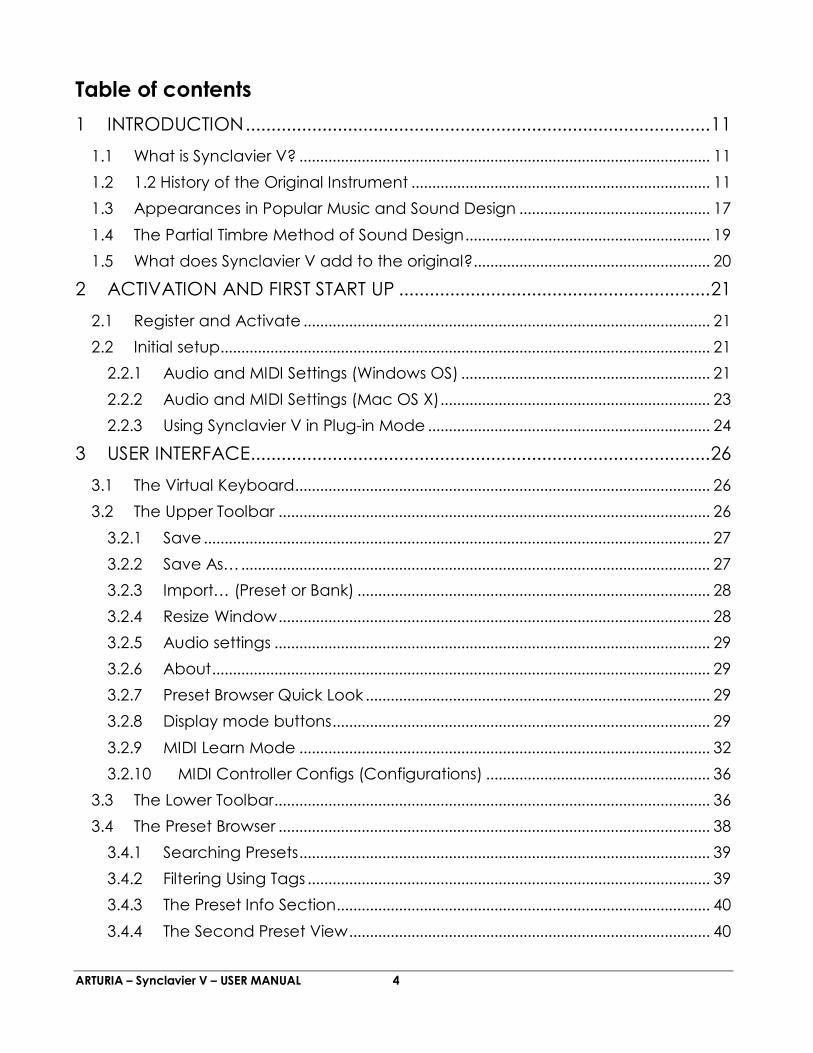
Table of contents
1 INTRODUCTION ........................................................................................... 11
1.1 What is Synclavier V? ................................................................................................... 11
1.2 1.2 History of the Original Instrument ........................................................................ 11
1.3 Appearances in Popular Music and Sound Design .............................................. 17
1.4 The Partial Timbre Method of Sound Design ........................................................... 19
1.5 What does Synclavier V add to the original?......................................................... 20
2 ACTIVATION AND FIRST START UP ............................................................. 21
2.1 Register and Activate .................................................................................................. 21
2.2 Initial setup...................................................................................................................... 21
2.2.1 Audio and MIDI Settings (Windows OS) ............................................................ 21
2.2.2 Audio and MIDI Settings (Mac OS X) ................................................................. 23
2.2.3 Using Synclavier V in Plug-in Mode .................................................................... 24
3 USER INTERFACE.......................................................................................... 26
3.1 The Virtual Keyboard .................................................................................................... 26
3.2 The Upper Toolbar ........................................................................................................ 26
3.2.1 Save .......................................................................................................................... 27
3.2.2 Save As… ................................................................................................................. 27
3.2.3 Import… (Preset or Bank) ..................................................................................... 28
3.2.4 Resize Window ........................................................................................................ 28
3.2.5 Audio settings ......................................................................................................... 29
3.2.6 About ........................................................................................................................ 29
3.2.7 Preset Browser Quick Look ................................................................................... 29
3.2.8 Display mode buttons ........................................................................................... 29
3.2.9 MIDI Learn Mode ................................................................................................... 32
3.2.10 MIDI Controller Configs (Configurations) ...................................................... 36
3.3 The Lower Toolbar ......................................................................................................... 36
3.4 The Preset Browser ........................................................................................................ 38
3.4.1 Searching Presets ................................................................................................... 39
3.4.2 Filtering Using Tags ................................................................................................. 39
3.4.3 The Preset Info Section.......................................................................................... 40
3.4.4 The Second Preset View ....................................................................................... 40
ARTURIA – Synclavier V – USER MANUAL 5
3.4.1 Playlists ...................................................................................................................... 41
4 STANDARD PANEL MODE CONTROLS ...................................................... 44
4.1 TIMBRE SETTINGS ............................................................................................................ 44
4.1.1 Volume ..................................................................................................................... 44
4.1.2 Pan ............................................................................................................................ 44
4.1.3 Transpose ................................................................................................................. 44
4.1.4 Tuning ....................................................................................................................... 45
4.1.5 Voice Chorus .......................................................................................................... 45
4.1.6 Chorus Fine .............................................................................................................. 46
4.1.7 F.M. Modulation ..................................................................................................... 46
4.1.8 Bit Depth .................................................................................................................. 46
4.2 AMP ENV OFFSET ........................................................................................................... 46
4.2.1 Attack ....................................................................................................................... 47
4.2.2 Decay ....................................................................................................................... 47
4.2.3 Release..................................................................................................................... 47
4.3 HARM ENV OFFSET......................................................................................................... 48
4.3.1 Attack ....................................................................................................................... 48
4.3.2 Decay ....................................................................................................................... 48
4.3.3 Release..................................................................................................................... 48
4.4 5.4 REPEAT/ARPEGGIO ................................................................................................. 48
4.4.1 5.4.1 Repeat ............................................................................................................ 49
4.4.2 5.4.2 Arpeggio ........................................................................................................ 49
4.4.3 Sync .......................................................................................................................... 49
4.4.4 Rate .......................................................................................................................... 49
4.4.5 Pattern ...................................................................................................................... 50
4.5 POLYPHONIC MODE ..................................................................................................... 51
4.5.1 Poly Normal ............................................................................................................. 51
4.5.2 Poly Retrig. ............................................................................................................... 51
4.5.3 Mono Porta ............................................................................................................. 51
4.5.4 Mono Retrig............................................................................................................. 52
4.6 PORTAMENTO ................................................................................................................ 52
4.6.1 On.............................................................................................................................. 52
4.6.2 Log/Lin ...................................................................................................................... 52
ARTURIA – Synclavier V – USER MANUAL 6
4.6.3 Rate .......................................................................................................................... 52
4.7 BEND WHEEL & MOD WHEEL ....................................................................................... 52
5 EXTENDED PANEL MODE CONTROLS ....................................................... 54
5.1 PARTIAL SELECT .............................................................................................................. 54
5.1.1 PARTIAL SELECT #1-12............................................................................................ 54
5.1.2 Copy & Paste .......................................................................................................... 54
5.1.3 Solo............................................................................................................................ 55
5.1.4 Mute.......................................................................................................................... 55
5.2 PARTIAL SETTINGS .......................................................................................................... 55
5.2.1 Volume ..................................................................................................................... 55
5.2.2 Pan ............................................................................................................................ 55
5.2.3 Pitch Track ............................................................................................................... 56
5.2.4 Octave ..................................................................................................................... 56
5.2.5 Transpose ................................................................................................................. 56
5.2.6 Tuning ....................................................................................................................... 56
5.2.7 Voice Chorus .......................................................................................................... 56
5.2.8 Chorus Fine .............................................................................................................. 57
5.2.9 F.M. Ratio ................................................................................................................. 57
5.2.10 F.M. Fine ................................................................................................................ 58
5.2.11 F.M. Amount ........................................................................................................ 58
5.2.12 Frame Speed ....................................................................................................... 58
5.3 AMPLITUDE ENVELOPE .................................................................................................. 58
5.3.1 Delay ........................................................................................................................ 59
5.3.2 Attack ....................................................................................................................... 59
5.3.3 Peak .......................................................................................................................... 59
5.3.4 Decay ....................................................................................................................... 59
5.3.5 Sustain ...................................................................................................................... 59
5.3.6 Release..................................................................................................................... 60
5.4 HARMONIC ENVELOPE ................................................................................................. 60
5.4.1 Delay ........................................................................................................................ 60
5.4.2 Attack ....................................................................................................................... 60
5.4.3 Peak .......................................................................................................................... 61
5.4.4 Decay ....................................................................................................................... 61
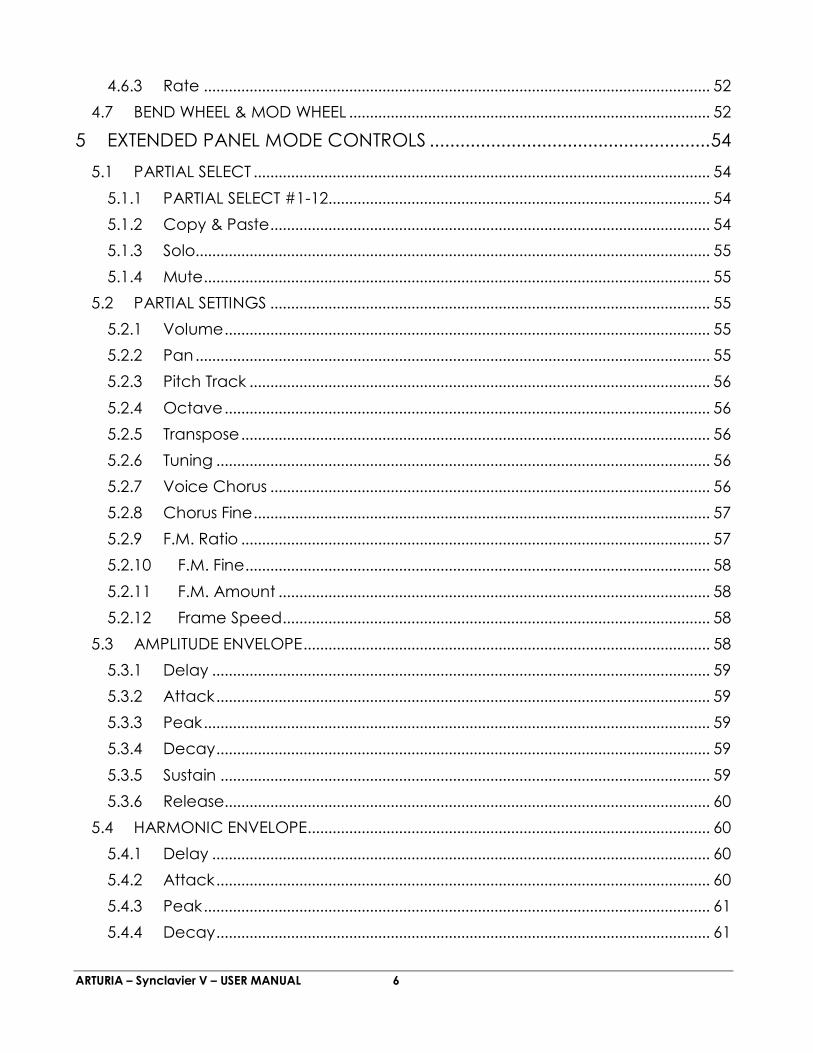
ARTURIA – Synclavier V – USER MANUAL 7
5.4.5 Sustain ...................................................................................................................... 61
5.4.6 Release..................................................................................................................... 61
5.5 VIBRATO .......................................................................................................................... 61
5.5.1 Wave ........................................................................................................................ 62
5.5.2 Sync .......................................................................................................................... 62
5.5.3 Rate .......................................................................................................................... 62
5.5.4 Carrier ....................................................................................................................... 63
5.5.5 Link ............................................................................................................................ 63
5.5.6 Modulator ................................................................................................................ 63
5.5.7 Attack ....................................................................................................................... 63
5.5.8 Bias ............................................................................................................................ 63
5.5.9 S-Curve ..................................................................................................................... 63
5.5.10 Quantize ............................................................................................................... 63
5.5.11 Invert ..................................................................................................................... 64
5.6 STEREO ............................................................................................................................. 64
5.6.1 Wave ........................................................................................................................ 64
5.6.2 Sync .......................................................................................................................... 64
5.6.3 Rate .......................................................................................................................... 64
5.6.4 Depth ........................................................................................................................ 65
5.6.5 Attack ....................................................................................................................... 65
5.6.6 Phase ........................................................................................................................ 65
5.6.7 S-Curve ..................................................................................................................... 65
5.6.8 Alternate .................................................................................................................. 65
5.6.9 Invert ......................................................................................................................... 65
6 7. GRAPHIC SCREEN MODE CONTROLS .................................................. 66
6.1 ENVELOPES ..................................................................................................................... 67
6.1.1 Delay (AMPLITUDE) ................................................................................................ 69
6.1.2 Attack (AMPLITUDE) .............................................................................................. 69
6.1.3 Peak (AMPLITUDE) .................................................................................................. 69
6.1.4 Decay (AMPLITUDE) .............................................................................................. 69
6.1.5 Sustain (AMPLITUDE) .............................................................................................. 70
6.1.6 Release (AMPLITUDE) ............................................................................................ 70
6.1.7 Delay (HARMONIC) ............................................................................................... 71
ARTURIA – Synclavier V – USER MANUAL 8
6.1.8 Attack (HARMONIC) ............................................................................................. 71
6.1.9 Peak (HARMONIC) ................................................................................................ 71
6.1.10 Decay (HARMONIC) .......................................................................................... 72
6.1.11 Sustain (HARMONIC) ......................................................................................... 72
6.1.12 Release (HARMONIC)........................................................................................ 72
6.2 KEY DYNAMICS .............................................................................................................. 73
6.2.1 Key Range ............................................................................................................... 73
6.2.2 Key Range Fade Up & Down .............................................................................. 74
6.3 TIME SLICES ..................................................................................................................... 75
6.3.1 Anatomy of a TIMBRE SLICE FRAME Event ........................................................ 75
6.3.2 CARRIER & MODULATOR ...................................................................................... 76
6.3.3 Adding & Deleting TIME SLICE FRAMES ............................................................. 80
6.3.4 7.3.3 SLICE SETTINGS ............................................................................................... 81
6.3.5 TOOLS ....................................................................................................................... 83
6.3.6 HARMONICS SELECT .............................................................................................. 85
6.4 MIXER ............................................................................................................................... 86
6.4.1 VOLUME ................................................................................................................... 89
6.4.2 PAN ........................................................................................................................... 89
6.4.3 TUNING ..................................................................................................................... 89
6.4.4 TRANSPOSE .............................................................................................................. 89
6.4.5 OCTAVE.................................................................................................................... 89
6.4.6 CHORUS ................................................................................................................... 90
6.4.7 FINE (Chorus) ........................................................................................................... 90
6.4.8 FM MOD ................................................................................................................... 91
6.4.9 FM RATIO .................................................................................................................. 91
6.4.10 FINE (FM Ratio) .................................................................................................... 91
6.4.11 PITCH TRACK ........................................................................................................ 91
6.5 MODS (SOURCES).......................................................................................................... 91
6.5.1 PITCH BEND .............................................................................................................. 93
6.5.2 SUSTAIN (Sustain Pedal) ........................................................................................ 94
6.5.3 VELOCITY ................................................................................................................. 94
6.5.4 MODWHEEL ............................................................................................................. 94
6.5.5 AFTERTOUCH ........................................................................................................... 94
ARTURIA – Synclavier V – USER MANUAL 9
6.5.6 EXPR (Expression Pedal) ........................................................................................ 95
6.5.7 RELEASE (Release Velocity) ................................................................................. 95
6.5.8 KEYBOARD (Keyboard Envelope) ...................................................................... 95
6.6 MODS (DESTINATIONS) ................................................................................................. 96
6.6.1 VOLUME ................................................................................................................... 97
6.6.2 PAN ........................................................................................................................... 97
6.6.3 TUNING ..................................................................................................................... 98
6.6.4 CHORUS ................................................................................................................... 98
6.6.5 FM RATIO .................................................................................................................. 98
6.6.6 FM AMOUNT ............................................................................................................ 98
6.6.7 FRAME SPEED .......................................................................................................... 99
6.6.8 FRAME TUNING ....................................................................................................... 99
6.6.9 PORTAMENTO RATE ............................................................................................... 99
6.6.10 REPEAT/ARP RATE (Repeat/Arpeggiate) ...................................................... 99
6.6.11 NOTE SUSTAIN .................................................................................................... 100
6.6.12 STEREO:RATE ...................................................................................................... 100
6.6.13 STEREO:DEPTH .................................................................................................... 100
6.6.14 STEREO:ATTACK ................................................................................................. 101
6.6.15 STEREO:PHASE.................................................................................................... 101
6.6.16 VIBRATO:RATE .................................................................................................... 101
6.6.17 VIBRATO:DEPTH ................................................................................................. 101
6.6.18 VIBRATO:ATTACK .............................................................................................. 102
6.6.19 HARMONIC:DELAY ........................................................................................... 102
6.6.20 HARMONIC:ATTACK ......................................................................................... 102
6.6.21 HARMONIC:DECAY .......................................................................................... 103
6.6.22 HARMONIC:SUSTAIN......................................................................................... 103
6.6.23 HARMONIC:RELEASE ........................................................................................ 103
6.6.24 HARMONIC:PEAK .............................................................................................. 103
6.6.25 AMPLITUDE:DELAY ............................................................................................ 104
6.6.26 AMPLITUDE:ATTACK .......................................................................................... 104
6.6.27 AMPLITUDE:DECAY ........................................................................................... 104
6.6.28 AMPLITUDE:SUSTAIN .......................................................................................... 105
6.6.29 AMPLITUDE:RELEASE ......................................................................................... 105

ARTURIA – Synclavier V – USER MANUAL 10
6.6.30 AMPLITUDE:PEAK ............................................................................................... 105
6.7 FX (Effects) .................................................................................................................... 105
6.7.1 Flanger ................................................................................................................... 106
6.7.2 Phaser ..................................................................................................................... 107
6.7.3 Chorus .................................................................................................................... 107
6.7.4 Delay ...................................................................................................................... 108
6.7.5 Reverb .................................................................................................................... 108
6.7.6 Dub Delay.............................................................................................................. 109
6.8 SETTINGS ........................................................................................................................ 110
6.8.1 PITCH BEND RANGE ............................................................................................. 110
6.8.2 TIMBRE NORMALIZE .............................................................................................. 110
6.8.3 NOISE FLOOR ........................................................................................................ 111
6.8.4 ANIMATIONS .......................................................................................................... 111
6.8.5 OVERSAMPLING ................................................................................................... 111
6.8.6 BIT DEPTH ................................................................................................................ 111
6.8.7 OCTAVE RATIO ..................................................................................................... 112
6.8.8 SCALE TUNING ...................................................................................................... 113
7 END USER LICENSE AGREEMENT ............................................................. 114

ARTURIA – Synclavier V – USER MANUAL 11
1 INTRODUCTION
Congratulations on purchasing Synclavier V! We are confident that it will give you
many hours of synthesizing and playing unique sounds (or as we prefer to call them on
the Synclavier V, Timbres).
Synclavier V is the newest addition to our extensive family of instruments that recreate
hard-to-find synthesizers and classic keyboards.
1.1 What is Synclavier V?
The Synclavier V is a software recreation of the Synclavier Digital Synthesizer,
combining Additive, FM (Frequency Modulation) and Timbre Frame synthesis. In
addition to bringing the authentic and instantly recognizable timbres of the Synclavier
to your studio or stage, we have expanded some of the features and added some
21st century features not available in the original Synclavier!
Developed by the original Synclavier software designer Cameron Jones, the DSP
engine of Synclavier V authentically reproduces the sound of the FM 8-bit voice cards
of the Synclavier right down to the noise floor! It runs both as a stand-alone instrument
on Windows and Mac OS X and as a plug-in in all major formats inside your DAW
(Digital Audio Workstation). It has easy MIDI learn functionality for hands-on control of
many of its parameters and in plug-in mode supports automation for greater creative
control.
1.2 1.2 History of the Original Instrument
The original Synclavier® (pronounced “sin-cla-veer” by its creators), is a digital music
synthesizer workstation. The brain is an ABLE 16-bit minicomputer processor controlling
8-bit additive, FM (frequency modulation), and Timbre Frame synthesizer voices. The
computer is connected to a separate organ type on/off 5-octave keyboard for live
performance and recording into a 16-track “Memory Recorder” (a.k.a. sequencer).
A “Green screen” monitor was also used to enter and edit sounds, music events and
computer files, all stored on 5.25” floppy disks and later, hard disk drives.
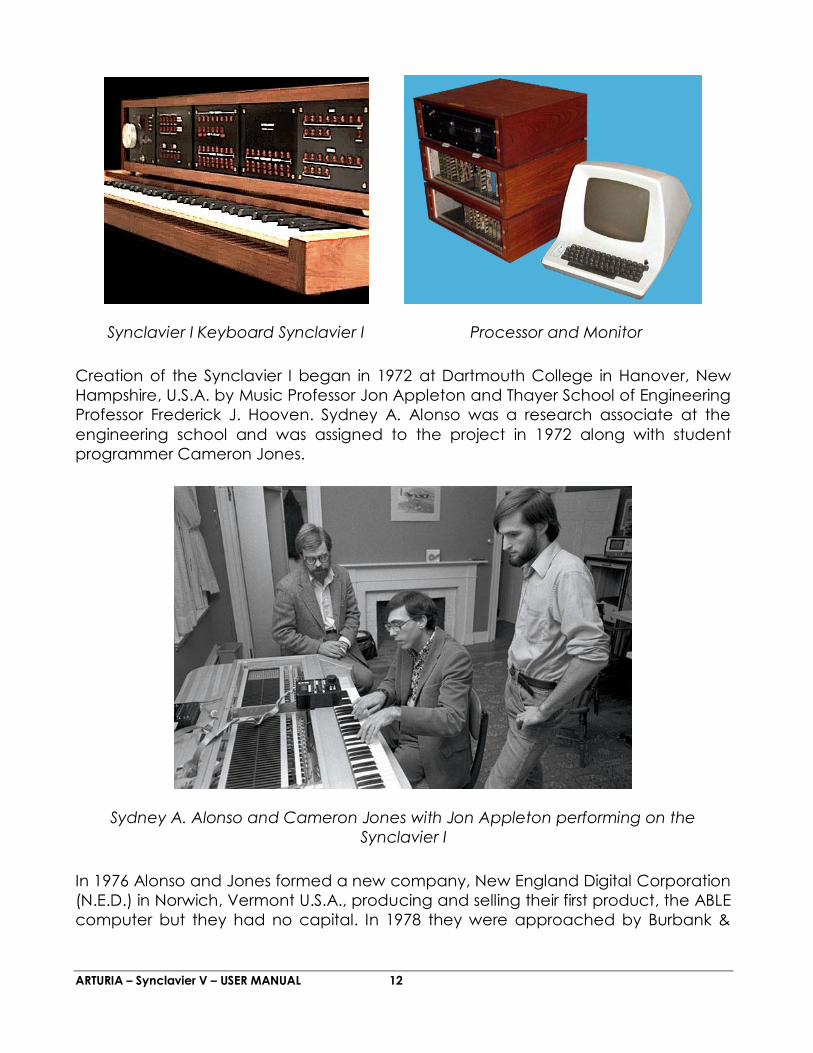
ARTURIA – Synclavier V – USER MANUAL 12
Synclavier I Keyboard Synclavier I Processor and Monitor
Creation of the Synclavier I began in 1972 at Dartmouth College in Hanover, New
Hampshire, U.S.A. by Music Professor Jon Appleton and Thayer School of Engineering
Professor Frederick J. Hooven. Sydney A. Alonso was a research associate at the
engineering school and was assigned to the project in 1972 along with student
programmer Cameron Jones.
Sydney A. Alonso and Cameron Jones with Jon Appleton performing on the
Synclavier I
In 1976 Alonso and Jones formed a new company, New England Digital Corporation
(N.E.D.) in Norwich, Vermont U.S.A., producing and selling their first product, the ABLE
computer but they had no capital. In 1978 they were approached by Burbank &

ARTURIA – Synclavier V – USER MANUAL 13
Company investment advisors. That finally yielded a substantial capital investment
with the focus of expanding the computer division.
New England Digital Headquarters (White River Junction, Vermont USA)
Brad Naples, a Berklee College of Music graduate with a degree in music composition,
was living in Boston and saw a Channel 4 TV spot on Jon Appleton with the Synclavier,
immediately saw the potential, and came knocking on N.E.D.’s door. He was soon
hired as business manager and would later take the Synclavier II to the Audio
Engineering Society (AES) convention. Being the first time anyone other than Alonso
or Jones had sold anything for the company, Brad Naples was promoted to Sales
Manager and in 1982 became President.
Synthesist, sound designer, and composer Denny Jaeger convinced Alonso of the
commercial potential for the musical instrument and with his major design
contributions, development of the Synclavier II began.
Synclavier II Keyboard (ORK) DEC VT-100/640 Monitor
Other features later added were monophonic Sample-to-Disk with 16-bit 50khz
sampling rate, many software updates including Resynthesis, a method of converting
a sampled sound into Timbre Frames of additive synthesis sound. These Timbre Frames
ARTURIA – Synclavier V – USER MANUAL 14
were chained together, similar to film frames, and could be edited. The Music Printing
Option was one of the first and most advanced print music editors allowing note entry
from the Memory Recorder or direct monitor screen entry and printing to either a dot-
matrix printer, laser printer, or output to a digital typesetting format.
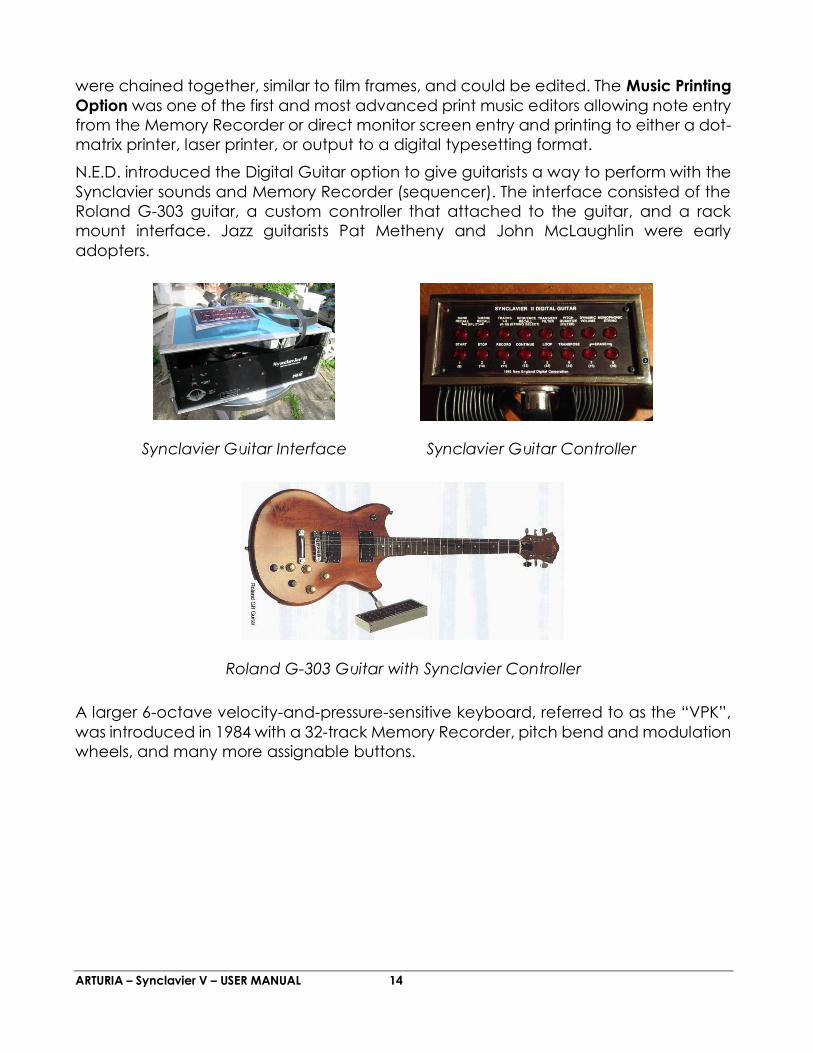
N.E.D. introduced the Digital Guitar option to give guitarists a way to perform with the
Synclavier sounds and Memory Recorder (sequencer). The interface consisted of the
Roland G-303 guitar, a custom controller that attached to the guitar, and a rack
mount interface. Jazz guitarists Pat Metheny and John McLaughlin were early
adopters.
Synclavier Guitar Interface Synclavier Guitar Controller
Roland G-303 Guitar with Synclavier Controller
A larger 6-octave velocity-and-pressure-sensitive keyboard, referred to as the “VPK”,
was introduced in 1984 with a 32-track Memory Recorder, pitch bend and modulation
wheels, and many more assignable buttons.
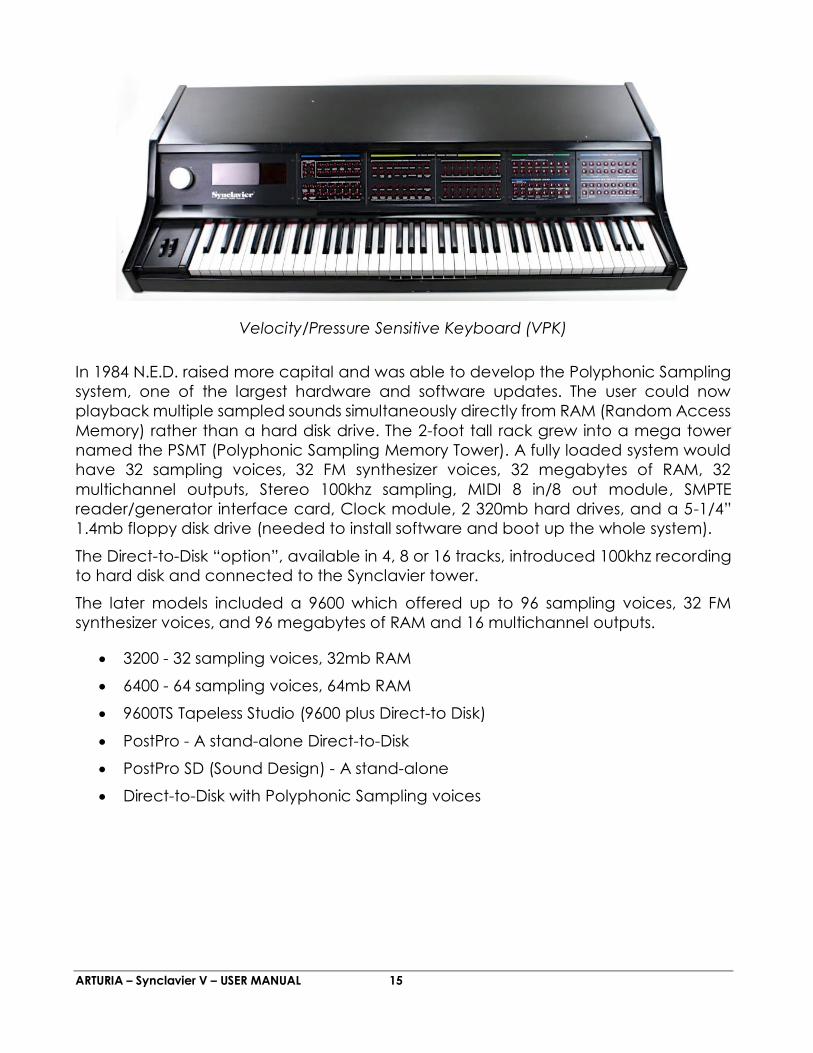
ARTURIA – Synclavier V – USER MANUAL 15
Velocity/Pressure Sensitive Keyboard (VPK)
In 1984 N.E.D. raised more capital and was able to develop the Polyphonic Sampling
system, one of the largest hardware and software updates. The user could now
playback multiple sampled sounds simultaneously directly from RAM (Random Access
Memory) rather than a hard disk drive. The 2-foot tall rack grew into a mega tower
named the PSMT (Polyphonic Sampling Memory Tower). A fully loaded system would
have 32 sampling voices, 32 FM synthesizer voices, 32 megabytes of RAM, 32
multichannel outputs, Stereo 100khz sampling, MIDI 8 in/8 out module, SMPTE
reader/generator interface card, Clock module, 2 320mb hard drives, and a 5-1/4”
1.4mb floppy disk drive (needed to install software and boot up the whole system).
The Direct-to-Disk “option”, available in 4, 8 or 16 tracks, introduced 100khz recording
to hard disk and connected to the Synclavier tower.
The later models included a 9600 which offered up to 96 sampling voices, 32 FM
synthesizer voices, and 96 megabytes of RAM and 16 multichannel outputs.
3200 - 32 sampling voices, 32mb RAM
6400 - 64 sampling voices, 64mb RAM
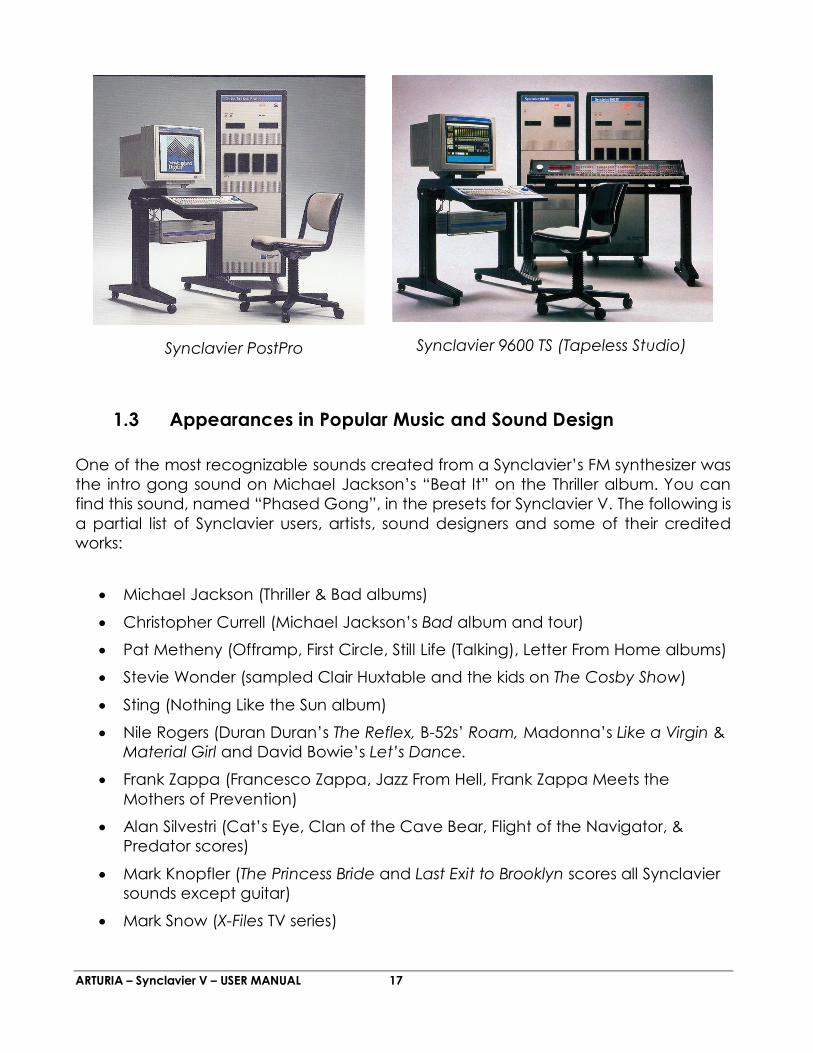
9600TS Tapeless Studio (9600 plus Direct-to Disk)
PostPro - A stand-alone Direct-to-Disk
PostPro SD (Sound Design) - A stand-alone
Direct-to-Disk with Polyphonic Sampling voices

ARTURIA – Synclavier V – USER MANUAL 16
Synclavier II Processor with 5.25” Floppy Disk Drive Synclavier 3200
Synclavier PSMT with Memory Expansion Bin
ARTURIA – Synclavier V – USER MANUAL 17
1.3 Appearances in Popular Music and Sound Design
One of the most recognizable sounds created from a Synclavier’s FM synthesizer was
the intro gong sound on Michael Jackson’s “Beat It” on the Thriller album. You can
find this sound, named “Phased Gong”, in the presets for Synclavier V. The following is
a partial list of Synclavier users, artists, sound designers and some of their credited
works:
Michael Jackson (Thriller & Bad albums)
Christopher Currell (Michael Jackson’s Bad album and tour)
Pat Metheny (Offramp, First Circle, Still Life (Talking), Letter From Home albums)
Stevie Wonder (sampled Clair Huxtable and the kids on The Cosby Show)
Sting (Nothing Like the Sun album)
Nile Rogers (Duran Duran’s The Reflex, B-52s’ Roam, Madonna’s Like a Virgin &
Material Girl and David Bowie’s Let’s Dance.
Frank Zappa (Francesco Zappa, Jazz From Hell, Frank Zappa Meets the
Mothers of Prevention)
Alan Silvestri (Cat’s Eye, Clan of the Cave Bear, Flight of the Navigator, &
Predator scores)
Mark Knopfler (The Princess Bride and Last Exit to Brooklyn scores all Synclavier
sounds except guitar)
Mark Snow (X-Files TV series)
Synclavier 9600 TS (Tapeless Studio) Synclavier PostPro
ARTURIA – Synclavier V – USER MANUAL 18
Tony Banks (Genesis’ Genesis & Invisible Touch albums and tours)
Suzanne Ciani: sound designer
Chick Corea (Elektric Band albums and tours)
Jean-Luc Ponty (Fables & Storytelling albums)
John McLaughlin (Adventures in Radioland & Mahavishnu albums)
Oscar Peterson
Kashif
We Are The World intro bells and fanfare (Kevin Maloney & Michael Omartian)
Depeche Mode (Construction Time Again, Some Great Reward, & Black
Celebration albums)
Patrick Gleeson (Apocalypse Now score, Knot’s Landing TV series)
Michael Hoenig (Xcept One album, as guest artist on Wayne Shorter’s Atlantis
album)
Trevor Horn (producer for Frankie Goes to Hollywood, Yes, Grace Jones)
Mannheim Steamroller (most albums)
Eddie Jobson (Theme of Secrets - 100% Synclavier)
Mr. Mister (I Wear the Face, Welcome to the Real World albums)
Pete Townshend (All the Best Cowboys Have Chinese Eyes and later albums)
Men Without Hats (Folk of the 80’s Part III album)
Paul Simon, Shane Keister (Ernest Goes to Camp score)
Peter Wolf (producer for Wang Chung)
Jack Nitzsche (Starman score)
Denny Jaeger (The Hunger score)
Michel Rubini (The Hunger, Manhunter, & Nemesis scores, The Hitchhiker TV
series)
James Wolvington (sound designer for most Star Trek series and films)
Gary Rydstrom (Jurassic Park sound design)
Ken Lauber (Tales From the Darkside TV series)
Sean Callery (24, Bones, Medium , & Elementary TV series)

ARTURIA – Synclavier V – USER MANUAL 19
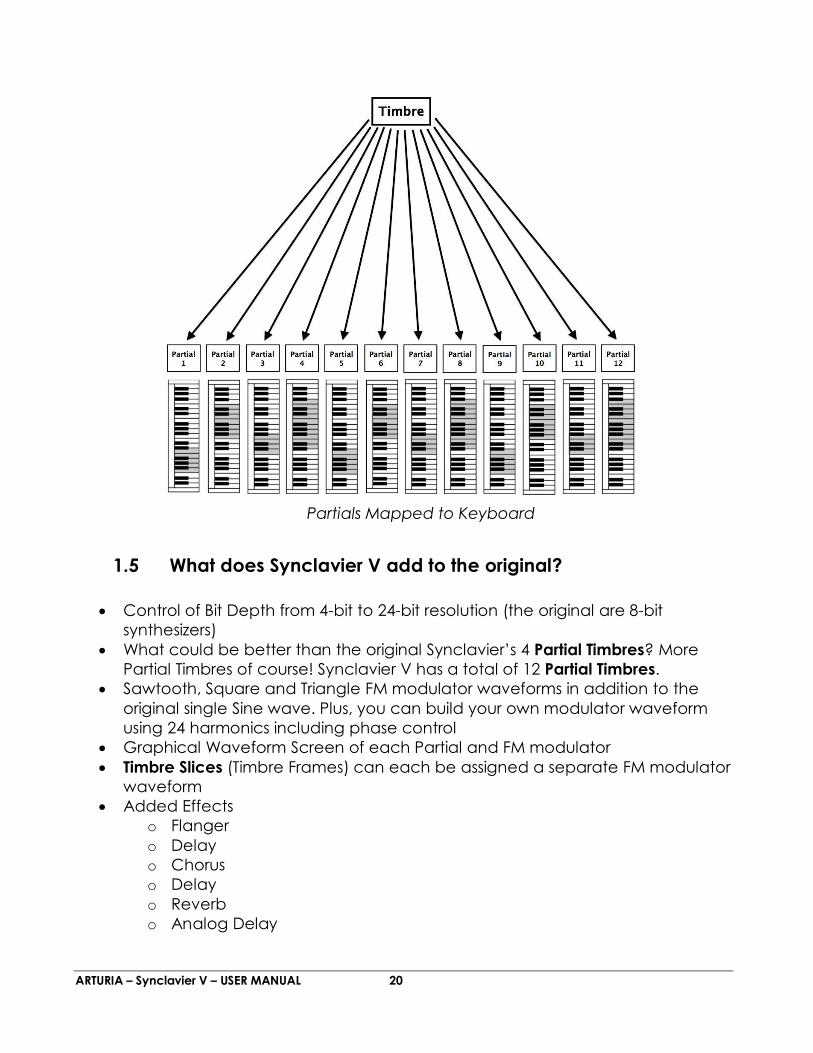
1.4 The Partial Timbre Method of Sound Design
The Partial Timbre Method of Sound Design was first described in US Patent 4,554,855.
The intent of the Partial Timbre Method is to be able to design new complex musical
sounds by easily creating and modifying acoustically identifiable subcomponents of
the sound. The original Synclavier Digital Synthesizer used a custom button panel that
gave the operator control over the soloing and design of each component when a
note was performed; each subcomponent was referred to as a “Partial Timbre”.
This Synclavier V instrument implementation expands the number of Partial Timbres to
12, from the original total of 4 Partial Timbres.
Each Partial of Synclavier V has a 24-harmonic carrier waveform with phase control
for each harmonic. These harmonics in any combination, create a waveform that can
be played and also viewed graphically. In addition, there is a 24-harmonic modulator
waveform, FM (frequency modulation), which can modulate this carrier waveform.
The FM modulator waveform can be a single sinusoidal (sine) wave, sawtooth wave,
square wave, triangle wave, or any 24 harmonic waveform of your own design.
Now, imagine chaining up to 50 of these waveforms together to form a constantly
evolving timbre. These Timbre Slices (the original Synclavier called them Timbre
Frames) can have varying time lengths, crossfade times, and pitch and volumes. Just
think about the infinite possibilities of 12 different continuously varying waveforms
sounding at the same time! Add in some stereo placement and you’ll have a huge
soundscape.
ARTURIA – Synclavier V – USER MANUAL 20
1.5 What does Synclavier V add to the original?
Control of Bit Depth from 4-bit to 24-bit resolution (the original are 8-bit
synthesizers)
What could be better than the original Synclavier’s 4 Partial Timbres? More
Partial Timbres of course! Synclavier V has a total of 12 Partial Timbres.
Sawtooth, Square and Triangle FM modulator waveforms in addition to the
original single Sine wave. Plus, you can build your own modulator waveform
using 24 harmonics including phase control
Graphical Waveform Screen of each Partial and FM modulator
Timbre Slices (Timbre Frames) can each be assigned a separate FM modulator
waveform
Added Effects
o Flanger
o Delay
o Chorus
o Delay
o Reverb
o Analog Delay
Partials Mapped to Keyboard
ARTURIA – Synclavier V – USER MANUAL 21
2 ACTIVATION AND FIRST START UP
2.1 Register and Activate
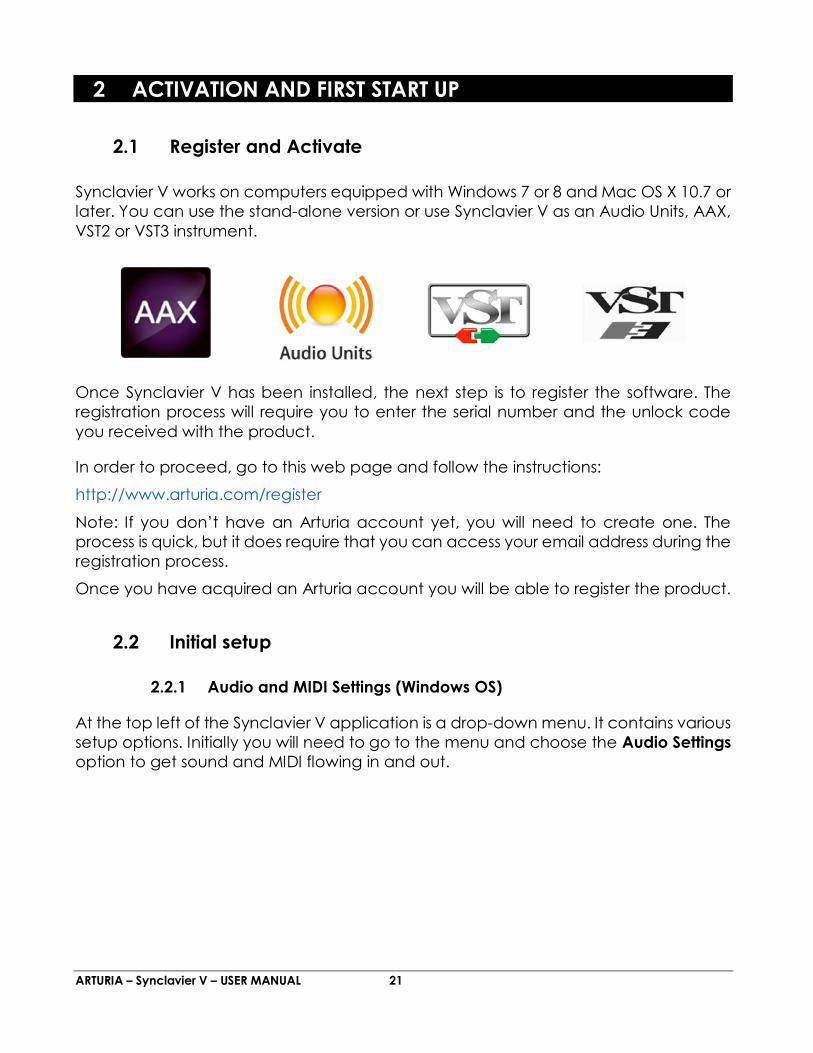
Synclavier V works on computers equipped with Windows 7 or 8 and Mac OS X 10.7 or
later. You can use the stand-alone version or use Synclavier V as an Audio Units, AAX,
VST2 or VST3 instrument.
Once Synclavier V has been installed, the next step is to register the software. The
registration process will require you to enter the serial number and the unlock code
you received with the product.
In order to proceed, go to this web page and follow the instructions:
http://www.arturia.com/register
Note: If you don’t have an Arturia account yet, you will need to create one. The
process is quick, but it does require that you can access your email address during the
registration process.
Once you have acquired an Arturia account you will be able to register the product.
2.2 Initial setup
2.2.1 Audio and MIDI Settings (Windows OS)
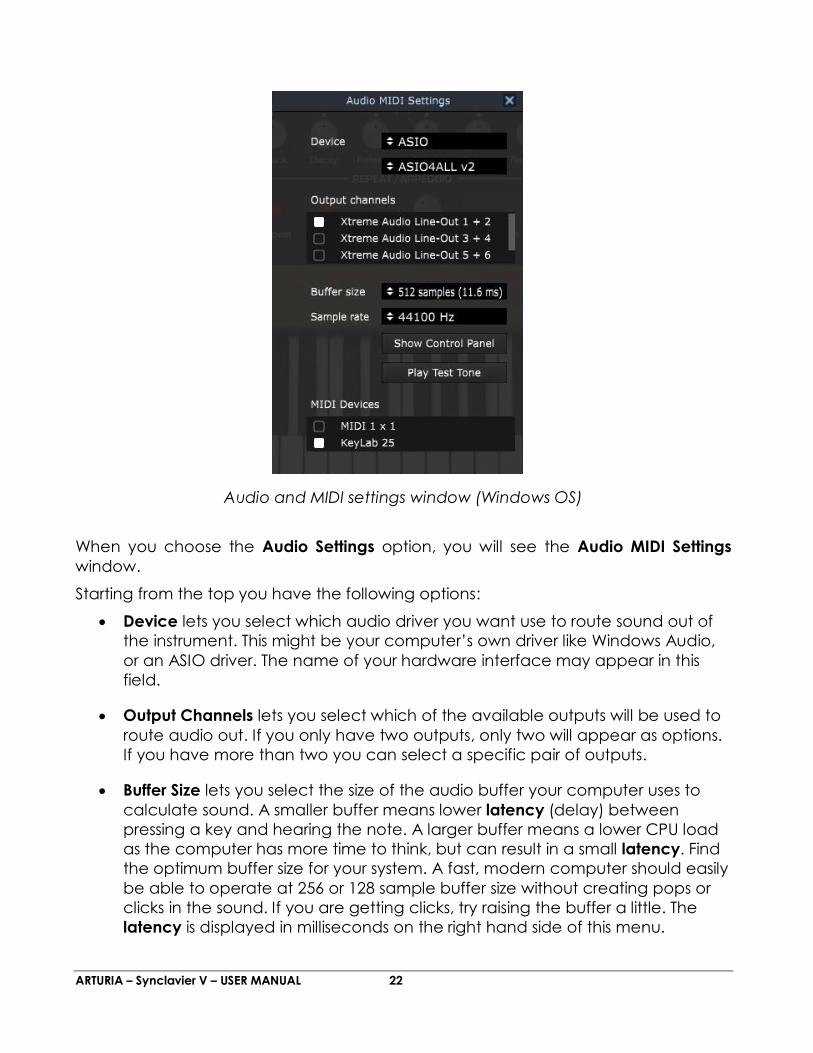
At the top left of the Synclavier V application is a drop-down menu. It contains various
setup options. Initially you will need to go to the menu and choose the Audio Settings
option to get sound and MIDI flowing in and out.
ARTURIA – Synclavier V – USER MANUAL 22
When you choose the Audio Settings option, you will see the Audio MIDI Settings
window.
Starting from the top you have the following options:
Device lets you select which audio driver you want use to route sound out of
the instrument. This might be your computer’s own driver like Windows Audio,
or an ASIO driver. The name of your hardware interface may appear in this
field.
Output Channels lets you select which of the available outputs will be used to
route audio out. If you only have two outputs, only two will appear as options.
If you have more than two you can select a specific pair of outputs.
Buffer Size lets you select the size of the audio buffer your computer uses to
calculate sound. A smaller buffer means lower latency (delay) between
pressing a key and hearing the note. A larger buffer means a lower CPU load
as the computer has more time to think, but can result in a small latency. Find
the optimum buffer size for your system. A fast, modern computer should easily
be able to operate at 256 or 128 sample buffer size without creating pops or
clicks in the sound. If you are getting clicks, try raising the buffer a little. The
latency is displayed in milliseconds on the right hand side of this menu.
Audio and MIDI settings window (Windows OS)
ARTURIA – Synclavier V – USER MANUAL 23
Sample Rate allows you set the sample rate at which audio is sent out of the
instrument. The options here will depend on the capability of your audio
interface hardware, though most computers’ own hardware can operate at
up to 48kHz which is perfectly adequate. Higher sample rates use more CPU
power so unless you have a good reason to go up to 96kHz, then 44.1kHz or
48kHz are fine. The Show Control Panel button here will jump to the system
control panel for whatever audio device is selected.
Play Test Tone helps you troubleshoot audio issues by checking that sound can
be heard through the correct device.
Your connected MIDI devices will appear in the MIDI Devices area. Click the
check box to accept MIDI from the device you want to use to trigger the
instrument. In stand-alone mode, Synclavier V listens for all MIDI channels so
there’s no need to specify a channel. You can specify more than one MIDI
device at once.
2.2.2 Audio and MIDI Settings (Mac OS X)
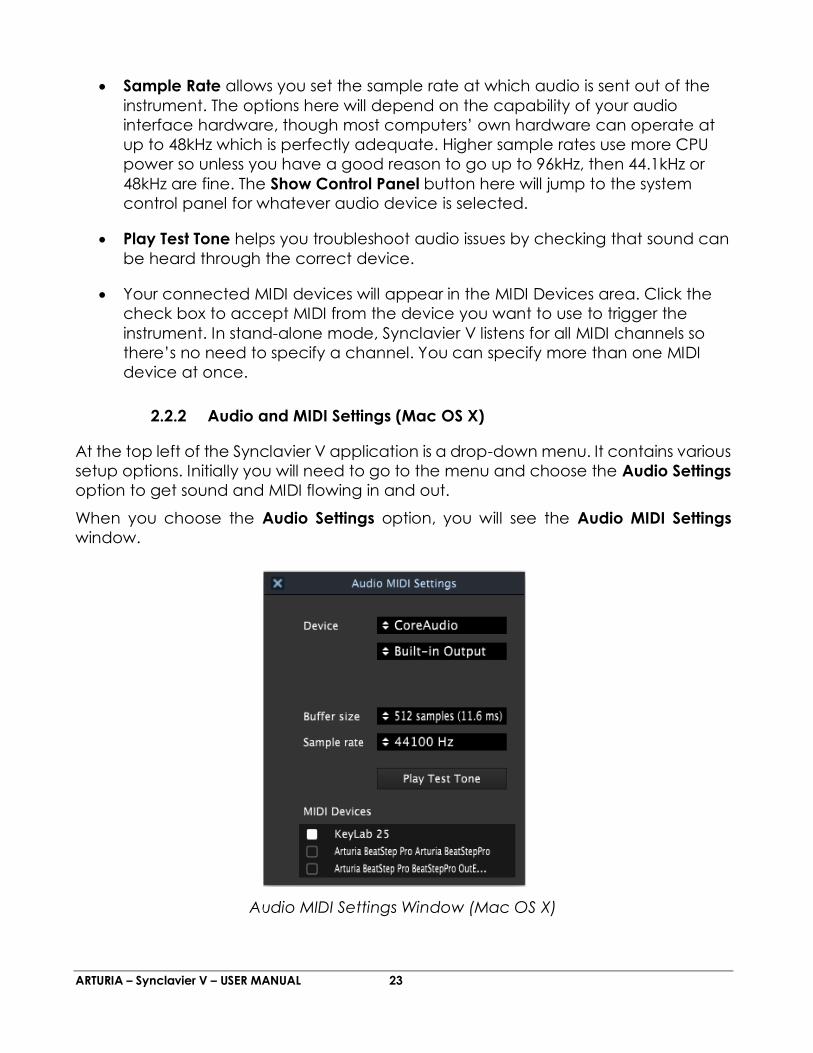
At the top left of the Synclavier V application is a drop-down menu. It contains various
setup options. Initially you will need to go to the menu and choose the Audio Settings
option to get sound and MIDI flowing in and out.
When you choose the Audio Settings option, you will see the Audio MIDI Settings
window.
Audio MIDI Settings Window (Mac OS X)
ARTURIA – Synclavier V – USER MANUAL 24
Starting from the top you have the following options:
Device lets you choose the audio driver you want to route sound out of the
instrument. This will be either your Mac’s own driver, CoreAudio, or another
driver. If you are using another hardware interface it will appear in this field.
Output Channels lets you select which of the available outputs will be used to
route audio out. If you only have two outputs, only two will appear as options.
If you have more than two you can select a specific pair of outputs.
Buffer Size lets you select the size of the audio buffer your computer uses to
calculate sound. A smaller buffer means lower latency (delay) between
pressing a key and hearing the note. A larger buffer means a lower CPU load
as the computer has more time to think, but can result in a small latency. Find
the optimum buffer size for your system. A fast, modern computer should easily
be able to operate at 256 or 128 sample buffer size without creating pops or
clicks in the sound. If you are getting clicks, try raising the buffer a little. The
latency is displayed in milliseconds on the right hand side of this menu.
Sample Rate allows you set the sample rate at which audio is sent out of the
instrument. The options here will depend on the capability of your audio
interface hardware, though most computers’ own hardware can operate at
up to 48kHz which is perfectly adequate. Higher sample rates use more CPU
power so unless you have a good reason to go up to 96kHz, then 44.1kHz or
48kHz are fine. The Show Control Panel button here will jump to the system
control panel for whatever audio device is selected.
Play Test Tone helps you to troubleshoot audio issues by checking that sound
can be heard through the correct device.
Your connected MIDI devices will appear in the MIDI Devices area. Click the check
box to accept MIDI from the device you want to use to trigger the instrument. In stand-
alone mode, Synclavier V listens for all MIDI channels so there’s no need to specify a
channel. You can specify more than one MIDI device at once.
2.2.3 Using Synclavier V in Plug-in Mode
Synclavier V comes in VST, AU and AAX plug-in formats for use in all major DAW
software like Cubase, Logic, Pro Tools and so on. You load it as a plug-in instrument. Its
interface and settings work in the same way as in stand-alone mode, with a couple of
differences.
The instrument will now synchronize to your DAW’s host tempo/bpm rate, when
tempo is a factor. When you activate the Sync buttons on the front panel,
VIBRATO rate, STEREO pan rate, and REPEAT/ARPEGGIO controls will synchronize
to the DAW tempo/bpm.
ARTURIA – Synclavier V – USER MANUAL 25
You can automate numerous parameters using your DAW’s automation system.
You can use more than one instance of Synclavier V in a DAW project. In stand-
alone mode you can only use one at a time.
You can route Synclavier V’s audio outputs more creatively inside your DAW
using the DAW’s own audio routing system.
ARTURIA – Synclavier V – USER MANUAL 26
3 USER INTERFACE
Synclavier V has many great features, and in this chapter we’ll make sure you know
what each one does. You will be amazed at how quickly Synclavier V provides you
with sounds that are inspiring and perfect for all sorts of projects.
It’s also really easy to work with: just a few tweaks here and there and suddenly you’re
in a new world of sound. That will always be the main focus of every Arturia product:
unleashing your creativity while remaining easy to use.
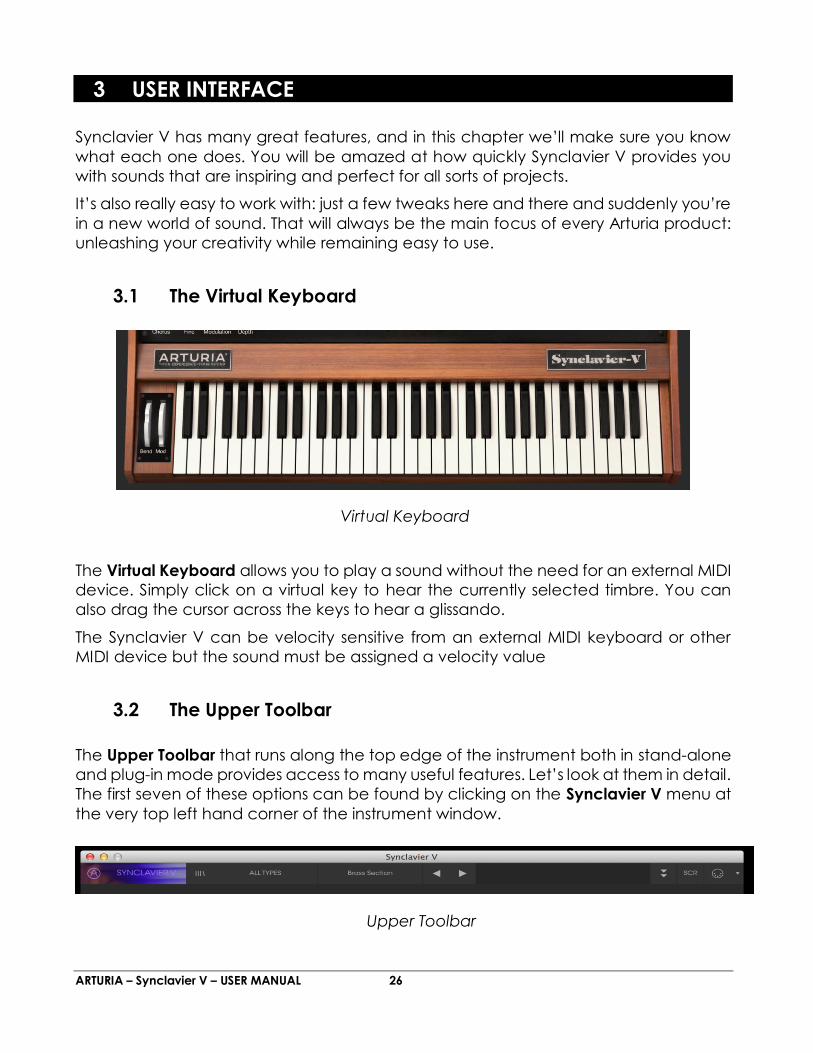
3.1 The Virtual Keyboard
The Virtual Keyboard allows you to play a sound without the need for an external MIDI
device. Simply click on a virtual key to hear the currently selected timbre. You can
also drag the cursor across the keys to hear a glissando.
The Synclavier V can be velocity sensitive from an external MIDI keyboard or other
MIDI device but the sound must be assigned a velocity value
3.2 The Upper Toolbar
The Upper Toolbar that runs along the top edge of the instrument both in stand-alone
and plug-in mode provides access to many useful features. Let’s look at them in detail.
The first seven of these options can be found by clicking on the Synclavier V menu at
the very top left hand corner of the instrument window.
Virtual Keyboard
Upper Toolbar
ARTURIA – Synclavier V – USER MANUAL 27
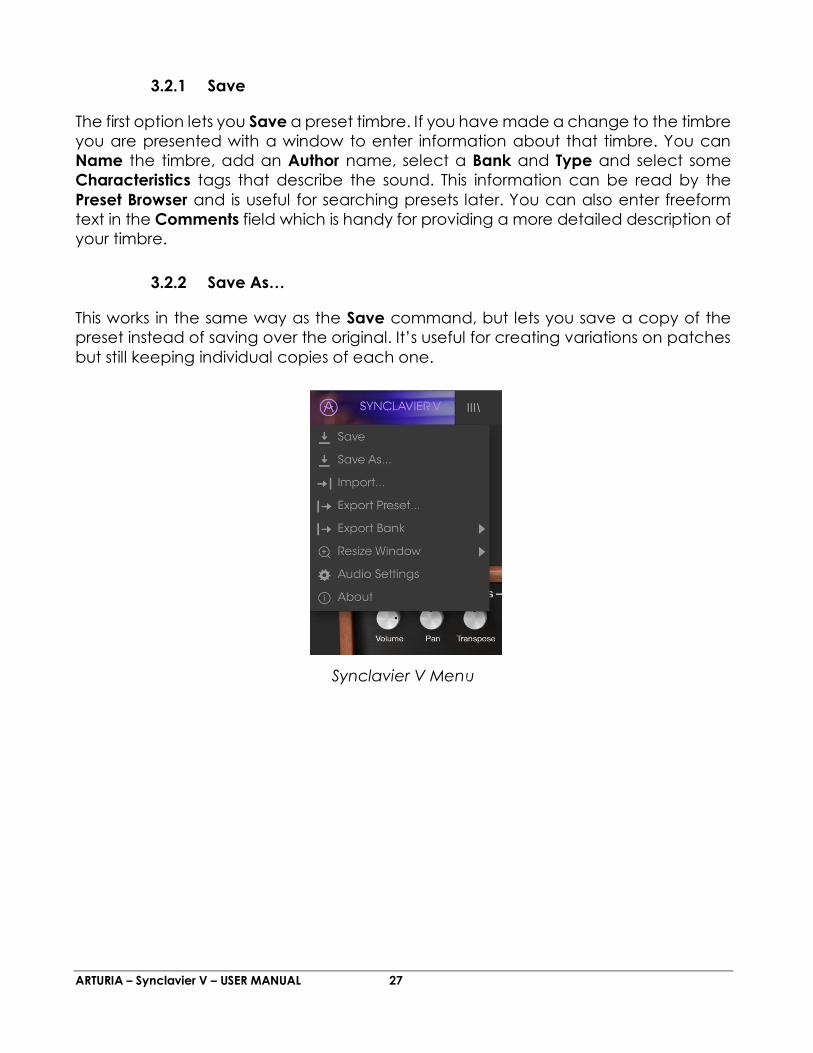
3.2.1 Save
The first option lets you Save a preset timbre. If you have made a change to the timbre
you are presented with a window to enter information about that timbre. You can
Name the timbre, add an Author name, select a Bank and Type and select some
Characteristics tags that describe the sound. This information can be read by the
Preset Browser and is useful for searching presets later. You can also enter freeform
text in the Comments field which is handy for providing a more detailed description of
your timbre.
3.2.2 Save As…
This works in the same way as the Save command, but lets you save a copy of the
preset instead of saving over the original. It’s useful for creating variations on patches
but still keeping individual copies of each one.
Synclavier V Menu
ARTURIA – Synclavier V – USER MANUAL 28
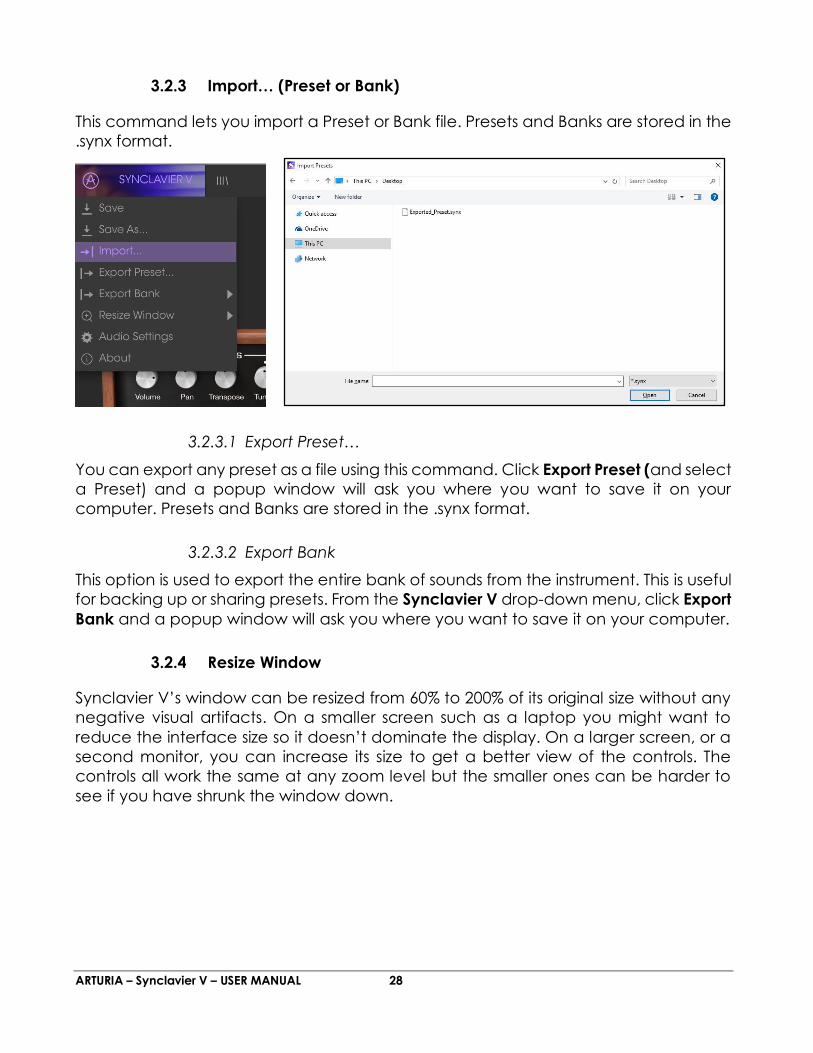
3.2.3 Import… (Preset or Bank)
This command lets you import a Preset or Bank file. Presets and Banks are stored in the
.synx format.
3.2.3.1 Export Preset…
You can export any preset as a file using this command. Click Export Preset (and select
a Preset) and a popup window will ask you where you want to save it on your
computer. Presets and Banks are stored in the .synx format.
3.2.3.2 Export Bank
This option is used to export the entire bank of sounds from the instrument. This is useful
for backing up or sharing presets. From the Synclavier V drop-down menu, click Export
Bank and a popup window will ask you where you want to save it on your computer.
3.2.4 Resize Window
Synclavier V’s window can be resized from 60% to 200% of its original size without any
negative visual artifacts. On a smaller screen such as a laptop you might want to
reduce the interface size so it doesn’t dominate the display. On a larger screen, or a
second monitor, you can increase its size to get a better view of the controls. The
controls all work the same at any zoom level but the smaller ones can be harder to
see if you have shrunk the window down.

ARTURIA – Synclavier V – USER MANUAL 29
3.2.5 Audio settings
Here you manage the way the instrument transmits sound and receives MIDI. (See
section 2.2 of the manual for full details)
3.2.6 About
Here you can view the Synclavier V software version, and designer credits.
3.2.7 Preset Browser Quick Look
Presets can be viewed by clicking on the Preset Browser button III\ on the left side of
the Toolbar (See Section 4.3 of the manual for full details). The All Types name field
and left & right arrows < > in the toolbar also are used for preset selection.
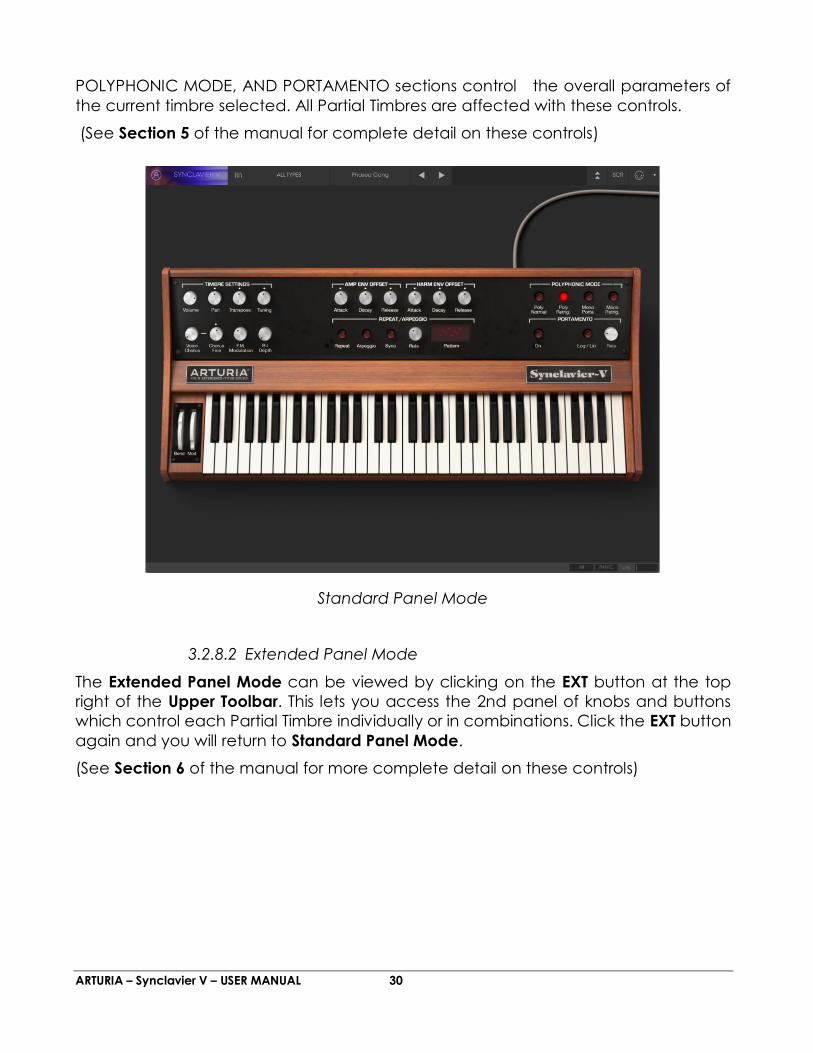
3.2.8 Display mode buttons
3.2.8.1 Standard Panel Mode
The Standard Panel Mode is a single panel of knobs and buttons above the Virtual
Keyboard. TIMBRE SETTINGS, AMP ENV OFFSET, HARM ENV OFFSET, REPEAT/ARPEGGIO,
Resize Window
ARTURIA – Synclavier V – USER MANUAL 30
POLYPHONIC MODE, AND PORTAMENTO sections control the overall parameters of
the current timbre selected. All Partial Timbres are affected with these controls.
(See Section 5 of the manual for complete detail on these controls)
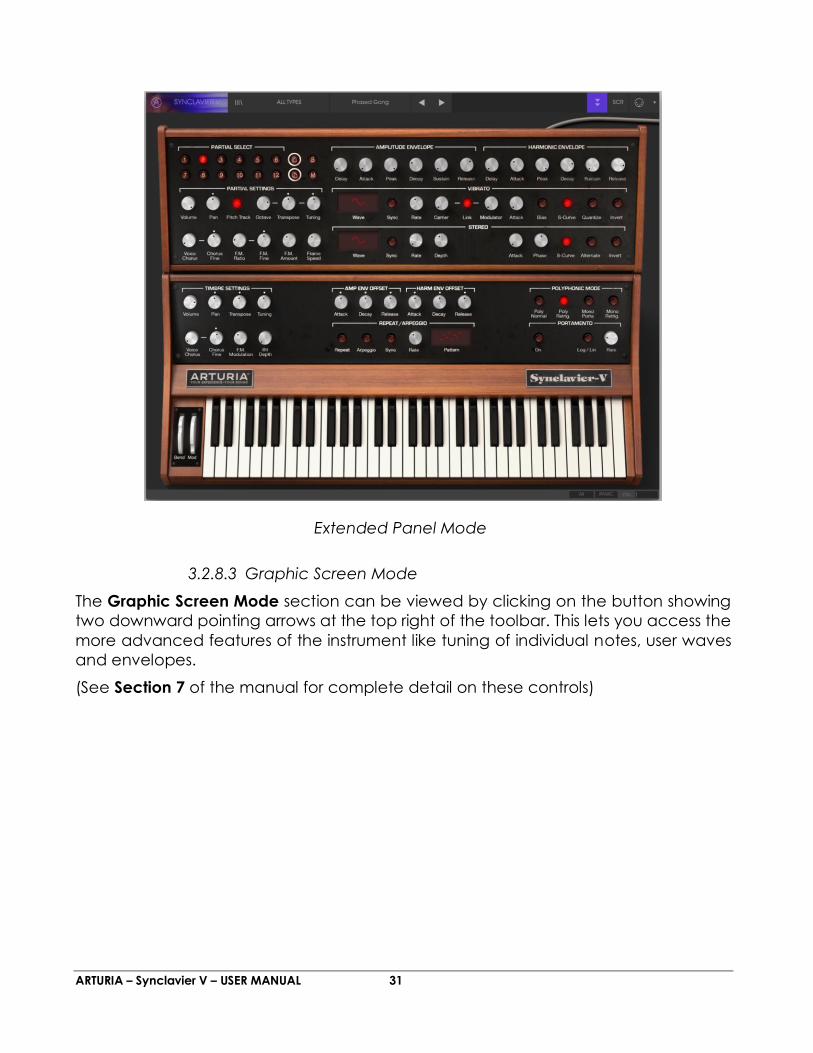
3.2.8.2 Extended Panel Mode
The Extended Panel Mode can be viewed by clicking on the EXT button at the top
right of the Upper Toolbar. This lets you access the 2nd panel of knobs and buttons
which control each Partial Timbre individually or in combinations. Click the EXT button
again and you will return to Standard Panel Mode.
(See Section 6 of the manual for more complete detail on these controls)
Standard Panel Mode
ARTURIA – Synclavier V – USER MANUAL 31
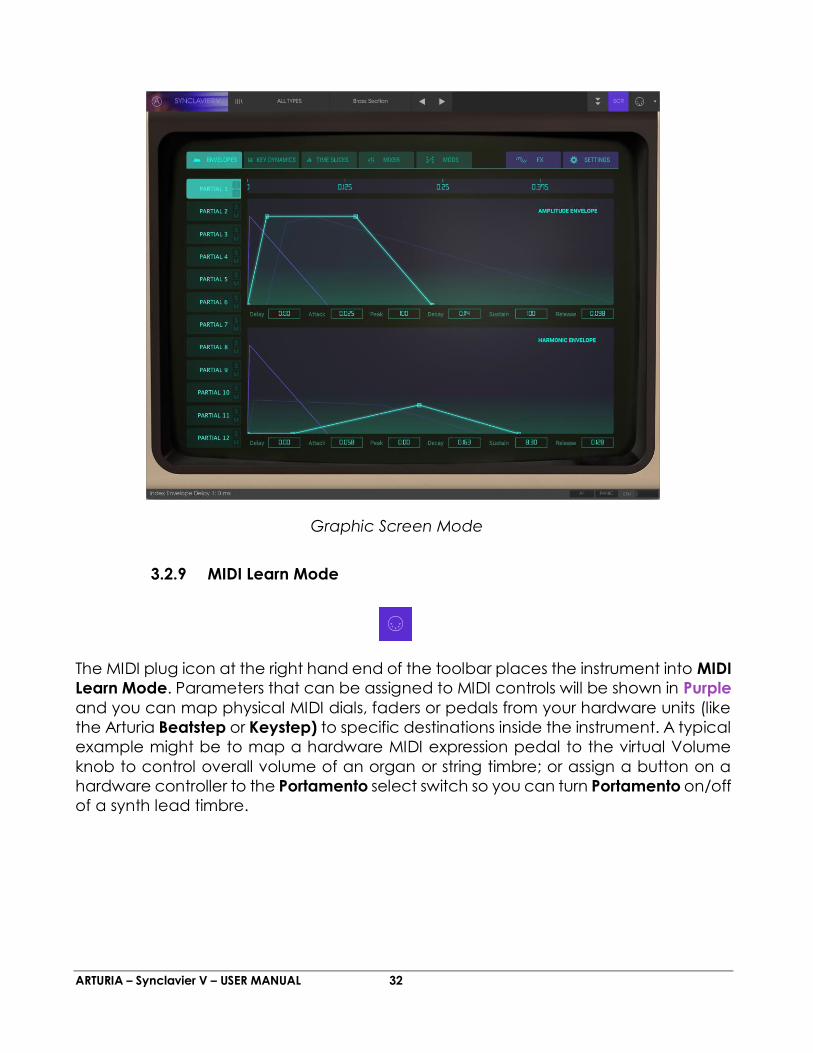
3.2.8.3 Graphic Screen Mode
The Graphic Screen Mode section can be viewed by clicking on the button showing
two downward pointing arrows at the top right of the toolbar. This lets you access the
more advanced features of the instrument like tuning of individual notes, user waves
and envelopes.
(See Section 7 of the manual for complete detail on these controls)
Extended Panel Mode
ARTURIA – Synclavier V – USER MANUAL 32
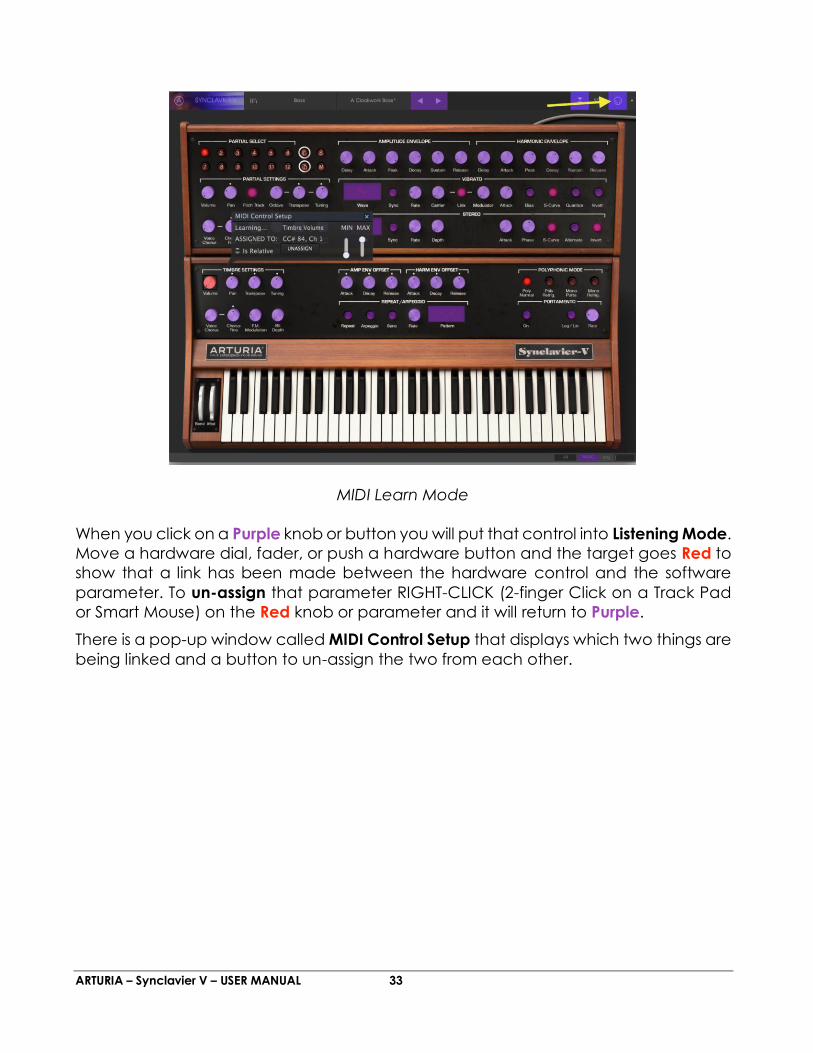
3.2.9 MIDI Learn Mode
The MIDI plug icon at the right hand end of the toolbar places the instrument into MIDI
Learn Mode. Parameters that can be assigned to MIDI controls will be shown in Purple
and you can map physical MIDI dials, faders or pedals from your hardware units (like
the Arturia Beatstep or Keystep) to specific destinations inside the instrument. A typical
example might be to map a hardware MIDI expression pedal to the virtual Volume
knob to control overall volume of an organ or string timbre; or assign a button on a
hardware controller to the Portamento select switch so you can turn Portamento on/off
of a synth lead timbre.
Graphic Screen Mode
ARTURIA – Synclavier V – USER MANUAL 33
When you click on a Purple knob or button you will put that control into Listening Mode.
Move a hardware dial, fader, or push a hardware button and the target goes Red to
show that a link has been made between the hardware control and the software
parameter. To un-assign that parameter RIGHT-CLICK (2-finger Click on a Track Pad
or Smart Mouse) on the Red knob or parameter and it will return to Purple.
There is a pop-up window called MIDI Control Setup that displays which two things are
being linked and a button to un-assign the two from each other.
MIDI Learn Mode

ARTURIA – Synclavier V – USER MANUAL 34
The MIN (minimum) and MAX (maximum) value slider is used to restrict the parameter
change range to something other than 0%-100%. For example, you might want the
instrument’s Timbre Volume to be controllable via hardware from 30% to 90%. If you
made this setting (Min set to 0.30 and Max set to 0.90), your physical dial would not
alter the volume any lower than 30% or any higher than 90% no matter how far you
turned it. This is very useful for making sure you can’t accidentally make the sound too
quiet or too loud when performing.
With buttons that have only two positions (up or down) you can still use minimum and
maximum values in the MIDI Control Setup pop-up window, but in these cases the
behavior is a little different.
It's about what values the controller sends and whether those are high or low enough
to trigger the state change in a switch - which is always 0.5 or in the case of the three
stage switch, 33.3/33.3/33.3 (or near enough). You can set the minimum and
maximum values of the hardware MIDI control but whether it affects the software
parameter depends on whether it crosses the threshold required to make the change.
Let's take an example. We want to control a 2-position button with a hardware fader.
The fader value goes from 0.0 to 1.0 and the switch state will always change when 0.5
is crossed.
The MIN value in the MIDI Control Setup window corresponds with the value that will
be sent (from the controller to the engine) when the fader is at its minimum position.
The MAX value in the MIDI Control Setup window corresponds with the value that will
be sent (from the controller to the engine) when the fader is at its maximum position.
Timbre Volume knob selected and assigned
ARTURIA – Synclavier V – USER MANUAL 35
To explain this, try these 5 use cases:
Set MIN value to 0.0 and MAX value to 0.49 => the switch cannot be
switched on because the 0.5 value can never be crossed.
Set MIN value to 0.51 and MAX value to 1.0 => the switch cannot be
switched off because the 0.5 value can never be crossed.
Set MIN value to 0.0 and MAX value to 1.0 => the switch state changes
when the fader crosses its central position.
Set MIN value to 0.49 and MAX value to 1.0 => the switch state changes
when the fader is very low.
Set MIN value to 0.0 and MAX value to 0.51 => the switch state changes
when the fader is very high.
The final option in this window is a button labeled “Is Relative”. It is required to use “Is
Relative” when using a Relative controller, and to avoid using it with an Absolute
controller.
Absolute and Relative controllers send Absolute and Relative data respectively. When
you move a physical Relative controller, the parameter will start from its current
position, sending either a “plus” or “minus” message. When you move a physical
Relative controller, the controller sends a value between 0 (zero) and 127. The
parameter will jump, not to 0 (zero), but will pick up the current value of the absolute
controller.
3.2.9.1 Reserved MIDI CC numbers
Certain MIDI Continuous Controller (MIDI CC) numbers are reserved and cannot be
reassigned to other controls. These are:
PitchBend
Ctrl Mod Wheel (CC #1)
Ctrl Expression (CC #11)
AfterTouch
Ctrl Sustain On/Off (CC #64)
Ctrl All Notes Off (CC #123)
Ctrl All Sounds Off (CC #120)
All other MIDI CC numbers may be used to control any assignable parameter in
Synclavier V.
ARTURIA – Synclavier V – USER MANUAL 36
3.2.10 MIDI Controller Configs (Configurations)
MIDI Controller Configs are accessed at the far right hand side of the Upper Toolbar
just to the right of a MIDI Plug icon. It’s a small down-facing arrow drop-down menu.
MIDI Controller Configs allow you to manage different sets of MIDI maps that you may
have set up for controlling the instrument’s parameters from MIDI hardware. You can
copy the current MIDI assignment setup or delete it, import a configuration file or
export the currently active one. This can be used to quickly set up different hardware
MIDI keyboards or controllers with Synclavier V without having to build all the
assignments from scratch each time you swap hardware.
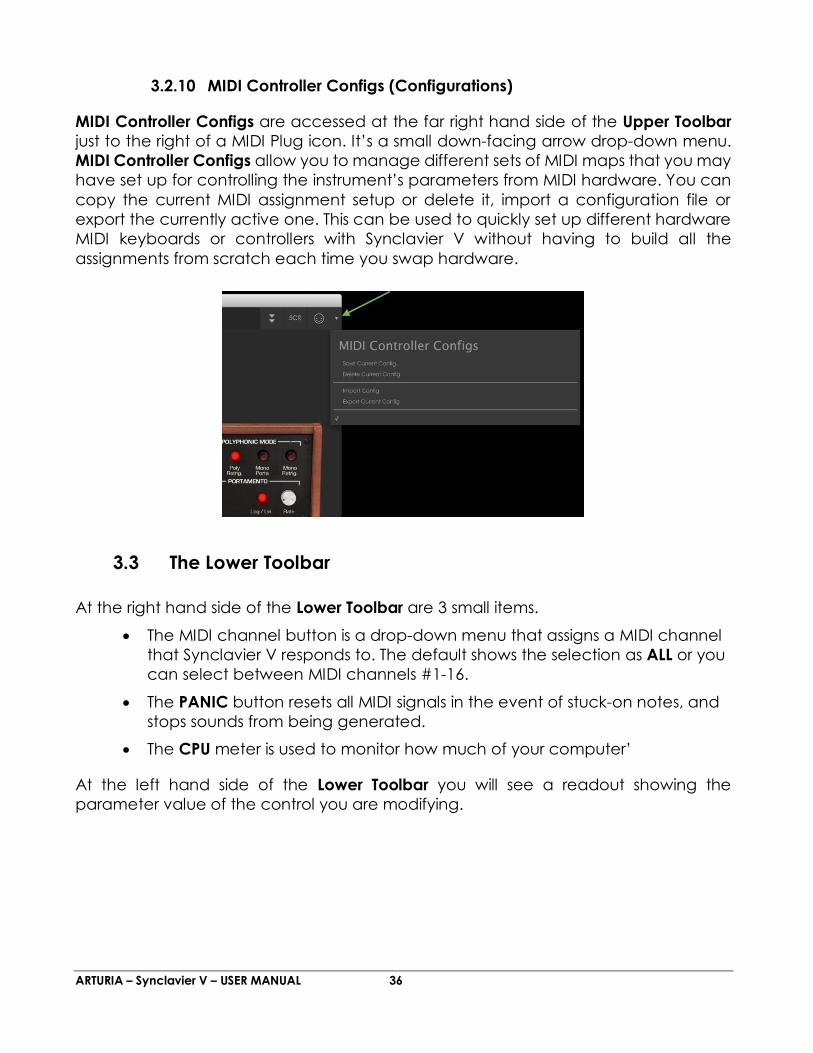
3.3 The Lower Toolbar
At the right hand side of the Lower Toolbar are 3 small items.
The MIDI channel button is a drop-down menu that assigns a MIDI channel
that Synclavier V responds to. The default shows the selection as ALL or you
can select between MIDI channels #1-16.
The PANIC button resets all MIDI signals in the event of stuck-on notes, and
stops sounds from being generated.
The CPU meter is used to monitor how much of your computer’
At the left hand side of the Lower Toolbar you will see a readout showing the
parameter value of the control you are modifying.

ARTURIA – Synclavier V – USER MANUAL 37
Lower Toolbar (left) Lower Toolbar (right)
ARTURIA – Synclavier V – USER MANUAL 38
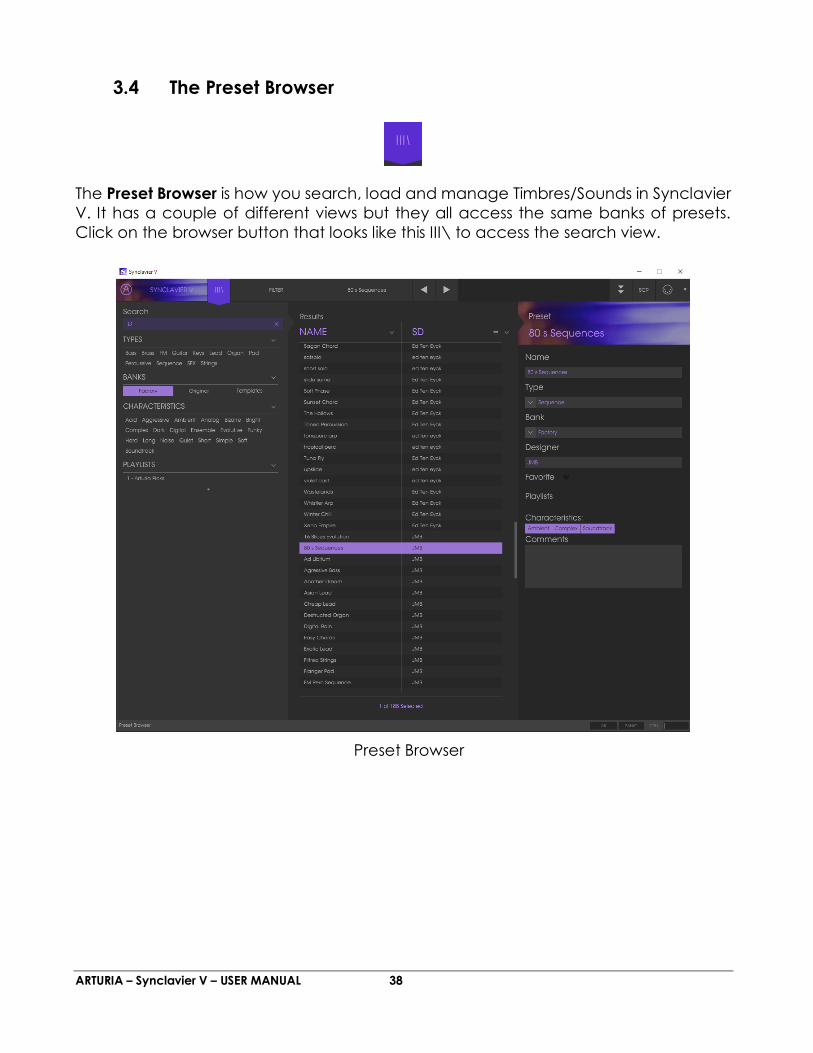
3.4 The Preset Browser
The Preset Browser is how you search, load and manage Timbres/Sounds in Synclavier
V. It has a couple of different views but they all access the same banks of presets.
Click on the browser button that looks like this III\ to access the search view.
Preset Browser

ARTURIA – Synclavier V – USER MANUAL 39
3.4.1 Searching Presets
The Search display has a number of sections. By clicking on the Search field at the top
left you can quickly enter any search term like “Pad” to filter the preset list by patch
name. The Results column is updated to show the results of your search. Press the X
button in the search field to clear the search.
3.4.2 Filtering Using Tags
You can also search using different tags. For example, by clicking on the Lead and
Organ options in the Types field you can show only presets that match those tags. The
tag fields can be shown or hidden by using the small down arrow buttons in their title
fields. Results columns can be sorted by clicking the same arrow button in their own
section.
You can use multiple search fields to perform narrower searches. So by entering a text
search and also specifying Types, Banks and Characteristics options, you can see only
the presets that match those exact criteria. Deselect any tag in any area to remove
that criteria and widen the search without having to go back and start again. Using
“Ctrl + click” (Windows) or “Cmd + click” (Mac) will allow you to select multiple
elements in the same area.
The second Results column can be switched to show Type, Bank, or Designer, tags
depending on how you like to search. Click on its options menu button just next to its
sort arrow.
Preset Search
ARTURIA – Synclavier V – USER MANUAL 40
3.4.3 The Preset Info Section
The Preset Info column on the right of the search field shows information about any
preset. If you want to make changes to a factory preset such as changing its name,
adding comments or tags, you have to re-save it as a user preset using the Save As…
command in the main Synclavier V Menu. When you have done this, the Info section
will gain Edit and Delete buttons that you can use to change the information stored
inside the preset. Factory presets can’t be overwritten.
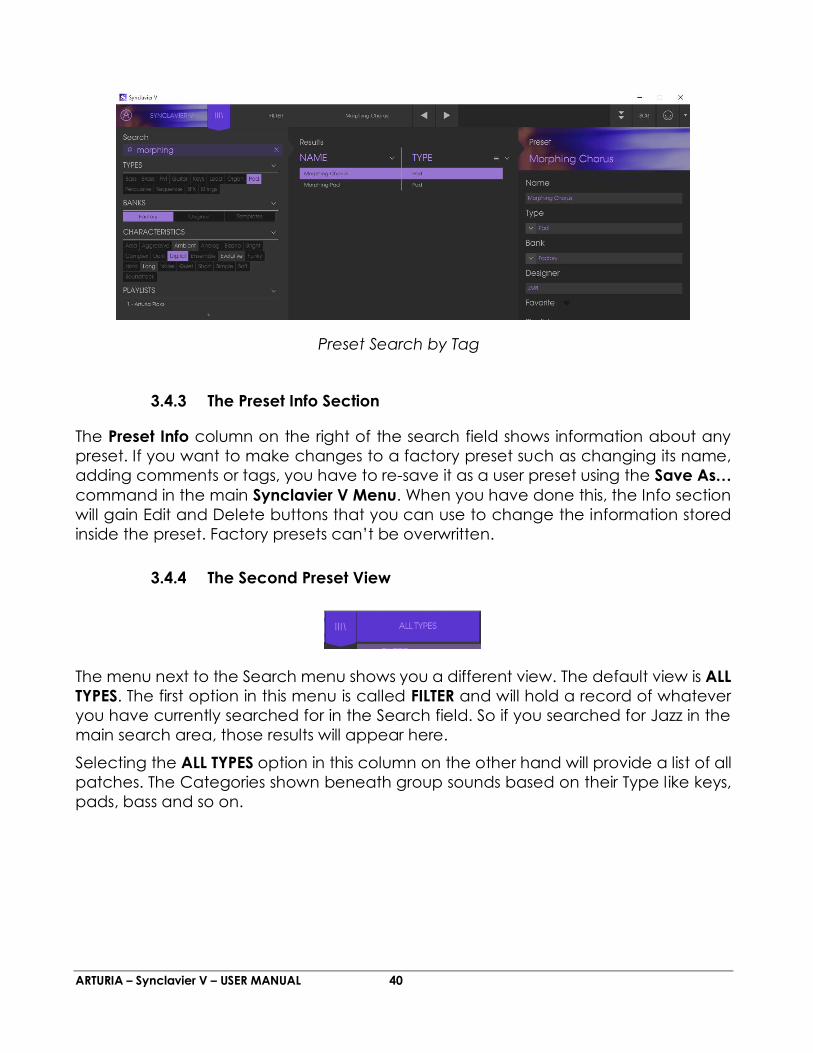
3.4.4 The Second Preset View
The menu next to the Search menu shows you a different view. The default view is ALL
TYPES. The first option in this menu is called FILTER and will hold a record of whatever
you have currently searched for in the Search field. So if you searched for Jazz in the
main search area, those results will appear here.
Selecting the ALL TYPES option in this column on the other hand will provide a list of all
patches. The Categories shown beneath group sounds based on their Type like keys,
pads, bass and so on.
Preset Search by Tag
ARTURIA – Synclavier V – USER MANUAL 41
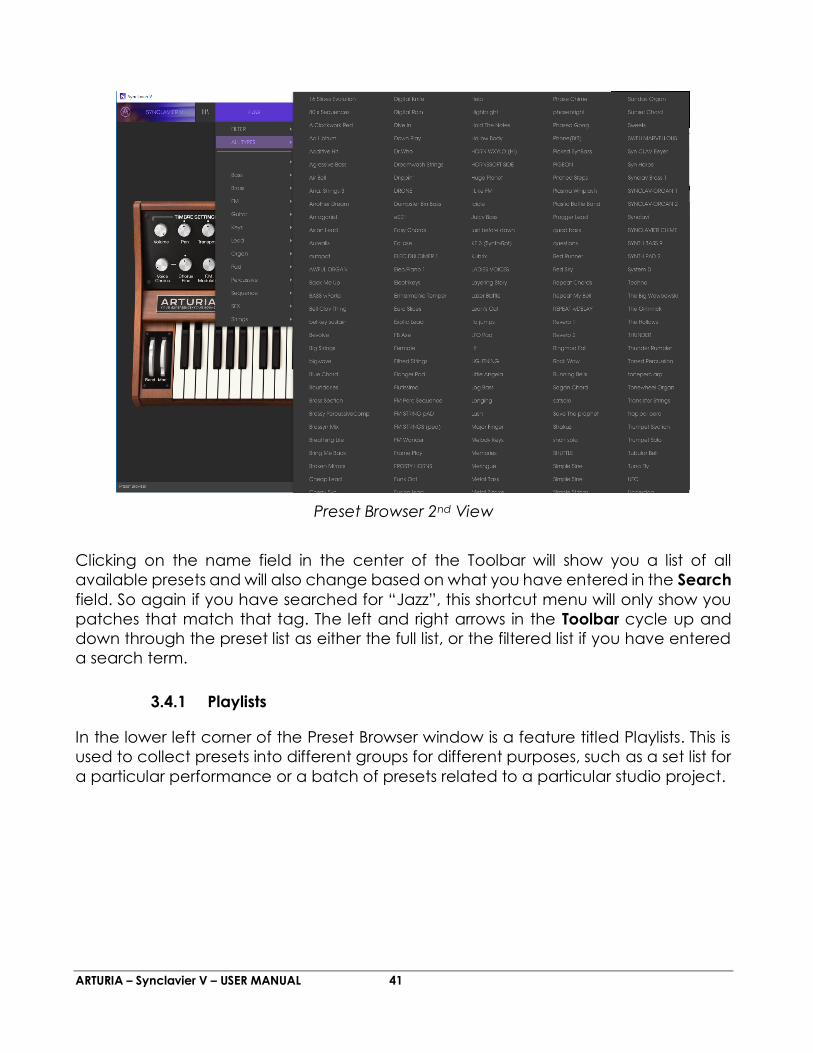
Clicking on the name field in the center of the Toolbar will show you a list of all
available presets and will also change based on what you have entered in the Search
field. So again if you have searched for “Jazz”, this shortcut menu will only show you
patches that match that tag. The left and right arrows in the Toolbar cycle up and
down through the preset list as either the full list, or the filtered list if you have entered
a search term.
3.4.1 Playlists
In the lower left corner of the Preset Browser window is a feature titled Playlists. This is
used to collect presets into different groups for different purposes, such as a set list for
a particular performance or a batch of presets related to a particular studio project.
Preset Browser 2nd View
ARTURIA – Synclavier V – USER MANUAL 42
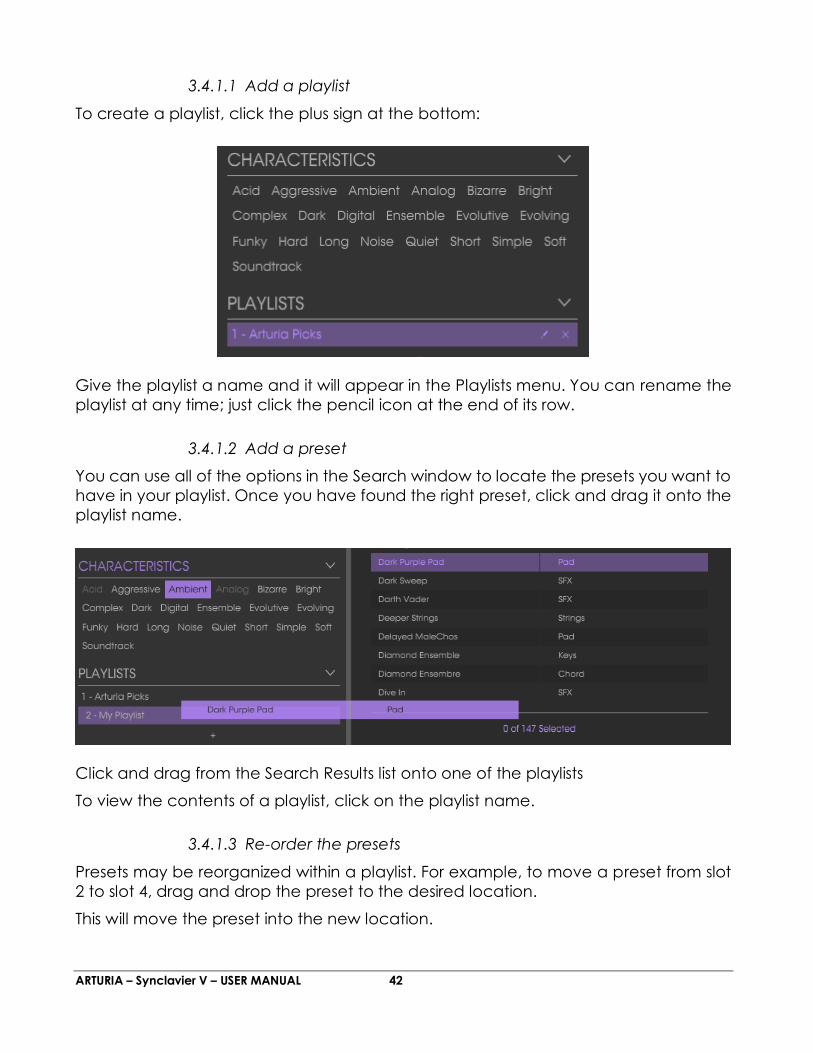
3.4.1.1 Add a playlist
To create a playlist, click the plus sign at the bottom:
Give the playlist a name and it will appear in the Playlists menu. You can rename the
playlist at any time; just click the pencil icon at the end of its row.
3.4.1.2 Add a preset
You can use all of the options in the Search window to locate the presets you want to
have in your playlist. Once you have found the right preset, click and drag it onto the
playlist name.
Click and drag from the Search Results list onto one of the playlists
To view the contents of a playlist, click on the playlist name.
3.4.1.3 Re-order the presets
Presets may be reorganized within a playlist. For example, to move a preset from slot
2 to slot 4, drag and drop the preset to the desired location.
This will move the preset into the new location.
ARTURIA – Synclavier V – USER MANUAL 43
3.4.1.4 Remove a preset
To delete a preset from a playlist, click the x at the end of the preset row.
Click the X to remove a preset from a playlist
3.4.1.5 Delete a playlist
To delete a playlist, click the x directly to the right of the playlist name.
Click the X to delete a playlist.

ARTURIA – Synclavier V – USER MANUAL 44
4 STANDARD PANEL MODE CONTROLS
4.1 TIMBRE SETTINGS
All of the TIMBRE SETTINGS controls are global and affect all of the Partials, but relative
to the Partials’ individual settings. For example, if a the PAN in PARTIAL SETTINGS is
panned far right for one Partial, it will only have a range of far right to center when
setting the PAN in the TIMBRE SETTINGS section full left.
Timbre Settings
4.1.1 Volume
The Volume knob is the overall loudness of the Timbre/Sound affecting all Partials. Its
range is from 0.0db at full gain up to -50db (OFF) in increments of .1dB.
4.1.2 Pan
The Pan knob globally moves the Partials stereo positioning left/right. Setting the knob
straight up is center. The range is from -63 (hard left) to +63 (hard right). After turning
the knob left or right you can return to center position by double-clicking on the knob.
4.1.3 Transpose
The Transpose knob sets the pitch of your overall Timbre/Sound up or down in semitone
increments. At the knob’s center position there is No Transposition. You can view the
semitone value in the Lower Toolbar at the lower left side while you are turning the
knob or placing your cursor over the knob. Double clicking the knob returns the knob
to center or No Transposition. The range is from -24 to +24 semitones.
ARTURIA – Synclavier V – USER MANUAL 45
4.1.4 Tuning
The Tuning knob fine tunes the pitch of your overall Timbre/Sound up or down in
individual Cents (100ths of a semitone). At the knob’s center position there is no pitch
change. The parameter value is displayed in Cents in the Lower Toolbar at the lower
left. The range is from -125 to +125 Cents below and above the setting of the Transpose
knob.
4.1.5 Voice Chorus
The Voice Chorus creates a duplicate voice of all of the Partials with a different pitch
of your overall Timbre/Sound. At the knob’s center position there is no added voice, a
value of 1.000. You can view the Chorus value in the Lower Toolbar at the lower left
side while you are turning the knob or by placing your cursor over the knob. The range
is from 0.000 to 16.000 in steps of .100. Double clicking on the knob returns the value to
1.000 or NO Voice Chorus.
Chorus: Relationship of added voice
Setting: to fundamental frequency
0.500: One octave below
1.000: Unison (no added Voice Chorus)
1.500: Perfect fifth above
2.000: Second harmonic (one octave above)
3.000: Third harmonic (one octave plus a perfect fifth above)
4.000: Fourth harmonic (two octaves above)
5.000: Fifth harmonic (two octaves plus a major third above)
6.000: Sixth harmonic (two octaves plus a perfect fifth above)
7.000: Seventh harmonic (two octaves plus a minor seventh above)
8.000: Eighth harmonic (three octaves above)
9.000: Ninth harmonic (three octaves plus a major second above)
10.000: Tenth harmonic (three octaves plus a major third above)
11.000: Eleventh harmonic (three octaves plus an augmented fourth above)
12.000: Twelfth harmonic (three octaves plus a perfect fifth above)
13.000: Thirteenth harmonic (three octaves plus a perfect sixth above)

ARTURIA – Synclavier V – USER MANUAL 46
14.000: Fourteenth harmonic (three octaves plus a minor seventh above)
15.000: Fifteenth harmonic (three octaves plus a major seventh above)
16.000: Sixteenth harmonic (four octaves above)
4.1.6 Chorus Fine
The Chorus Fine knob is a much smaller tuning adjustment of the Voice Chorus. Range
is from -.100 to +.100 and are between the Voice Chorus steps of .100. These values
read out in the Lower Toolbar left side as well.
Double clicking on the knob returns it to its center position 0.000.
4.1.7 F.M. Modulation
The F.M. Modulation knob controls the overall amount of F.M. modulation for all the
Partials in the current Timbre. The parameter range is from 0.000 to 1.000.
Important: For this control to have ANY effect on the Timbre:
There must be a CARRIER wave AND a MODULATOR wave assigned to one
or more Partials under the TIME SLICES Tab (Graphic Screen Mode).
The F.M. Amount control in Partial Settings (Extended Panel Mode) must be
greater than
0.000
The Modulation value in SLICE SETTINGS for one or more Partials under the
TIME SLICES Tab (Graphic Screen Mode) must be greater than 0.00
4.1.8 Bit Depth
Bit Depth controls the digital resolution of the current timbre. The original Synclavier
voices were 8-bit but Synclavier V has added a range from 4-bit all the way up to 24-
bit resolution in increments of 2. On the lower end, you will hear a digital noise or
aliasing causing a grittiness to the sound. As you increase the Bit Depth knob, the sound
will sound “smoother” with no noise.
4.2 AMP ENV OFFSET
All of the AMP ENV OFFSET controls are global and affect all of the Partials in the current
Timbre, but relative to the Partials’ individual settings. For example, if one Partial #1 has
a slow attack and Partial #2 has a fast attack, decreasing the value will only affect
the attack of Partial #1.

ARTURIA – Synclavier V – USER MANUAL 47
4.2.1 Attack
The Attack knob increases or decreases volume envelope ramp up time of all Partials
in the current Timbre. The volume envelope, or how fast the sound ramps up in volume
from the note-on, is affected. The default is a value of 0.00 and the range is -1.00 to
+1.00.
(See also section 6.3.2 Attack of an individual Partial)
4.2.2 Decay
The Decay knob increases or decreases values of all Partials’ Decay in the current
Timbre.
When the Peak level is greater than 0.00, Decay controls how fast the
sound ramps down from the Peak volume to the Sustain volume.
When the Peak level is 0.00, Decay controls how fast the sound ramps up to
the Sustain volume.
The default is a value of 0.00 and the range is -1.00 to +1.00.
(See also section 6.3.4 Decay of an individual Partial)
4.2.3 Release
The Release knob increases or decreases values of all Partials’ Release in the current
Timbre. Release is the time for the sound to decay to zero after the key on the
keyboard is let go.
(See also section 6.3.6 Release of an individual Partial)
ARTURIA – Synclavier V – USER MANUAL 48
4.3 HARM ENV OFFSET
All of the HARM ENV OFFSET controls are global and affect all of the Partials in the
current Timbre, but relative to the Partials’ individual settings. For example, if one Partial
#1 has a slow harmonic (F.M.) attack and Partial #2 has a fast harmonic (F.M.) attack,
decreasing the value will only affect the attack of Partial #1.
4.3.1 Attack
The Attack knob increases or decreases values of all the Partials’ harmonic (F.M.)
envelope in the current Timbre. The harmonic (F.M.) envelope, or how fast the F.M.
amount ramps up in volume from the beginning, is affected. The default is a value of
0.00 and the range is -1.00 to +1.00.
(See also section 6.3.2 harmonic Attack of an individual Partial).
4.3.2 Decay
The Decay knob increases or decreases values of all the Partials’ harmonic Decay of
the current Timbre.
When the Peak level is greater than 0.00, Decay controls how fast the
harmonic envelope ramps down from the Peak volume to the harmonic
Sustain level.
When the Peak level is 0.00, Decay controls how fast the harmonic
envelope ramps up to the harmonic Sustain level.
The default is a value of 0.00 and the range is -1.00 to +1.00.
(See also section 6.4.4 harmonic Decay of an individual Partial)
4.3.3 Release
The Release knob increases or decreases values of all the Partials’ harmonic (F.M.)
Release in the current Timbre. Release is the time for the sound to decay to zero after
the key on the keyboard is let go.
(See also section 6.4.6 harmonic Release of an individual Partial)
4.4 5.4 REPEAT/ARPEGGIO
The REPEAT/ARPEGGIO section of Synclavier V is a global control affecting all of the
Partials in your current Timbre.
ARTURIA – Synclavier V – USER MANUAL 49
4.4.1 5.4.1 Repeat
When the Repeat button is turned on, all of the notes being played on your keyboard
will repeat while a key is being depressed. When multiple keys are depressed, any
delay between notes will remain. The repeat rate will be determined by the Rate knob.
4.4.2 5.4.2 Arpeggio
When the Arpeggio button is turned on, any notes simultaneously performed on your
keyboard will sound independently in an arpeggio pattern. If the Repeat button is also
turned on, the selected notes held down will continue to arpeggiate at the tempo set
by the Rate knob.
4.4.3 Sync
When using Synclavier V as an instrument plug-in in your DAW project, the Sync button
allows both the Repeat and Arpeggio functions to synchronize with the tempo of your
DAW project. The tempo is set by the Rate knob.
4.4.4 Rate
The Rate knob determines the speed of your repeating notes or arpeggios. When the
Sync button is OFF the Rate value reads in Hz (Hertz or cycles per second) in the Lower
Toolbar. The range is 0.00 to 50.0Hz.
When the Sync button is ON the Rate value reads as Timbre BPM Multiplier in the Lower
Toolbar.
When Synclavier V is used as an instrument plug-in in your DAW project and the Sync
button is turned ON, the speed will synchronize to the tempo of your DAW project. The
Rate adjustment is a BPM Multiplier (Beats Per Minute). Values are:
BPM/8: 1/8 speed of your tempo
BPM/6: 1/6 speed of your tempo
BPM/5: 1/8 speed of your tempo
BPM/4: 1/4 speed of your tempo
BPM/3: 1/3 speed of your tempo
BPM/2: 1/2 speed of your tempo
BPMx1: Exact speed of your tempo
BPMx2: 2x speed of your tempo
BPMx3: 3x speed of your tempo
ARTURIA – Synclavier V – USER MANUAL 50
BPMx4: 4x speed of your tempo
BPMx5: 5x speed of your tempo
BPMx6: 6x speed of your tempo
BPMx8: 8x speed of your tempo
4.4.5 Pattern
Pattern is a drop-down menu with 6 different arpeggio styles
(top to bottom order):
Performance order: the notes will play in the order in which you perform
them on the keyboard RATE Sets the speed of the sweep
Keyboard Up: Notes play from the lowest to the highest continuously
Keyboard Down: Notes play from the highest to the lowest continuously
Keyboard Up/Down (Repeat): Notes play up, down and repeat the top
and bottom notes
Keyboard Up/Down (No Repeat): Notes play up, down without repeating
the top and bottom notes
Random: Notes play in a continuously random pattern
Arpeggiate Pattern Selector Window
ARTURIA – Synclavier V – USER MANUAL 51
4.5 POLYPHONIC MODE
The POLYPHONIC MODE section contains global functions that affect all Partials in the
current Timbre.
4.5.1 Poly Normal
The Poly Normal mode provides for full polyphony. When a Note On event is received
(either keyboard or sequencer) a new voice is activated for the desired sound in all
cases. Earlier notes of the same pitch that are in the Final Decay state are not
affected; their decay continues without interruption. With very long final decay
settings this can lead to undesirable phase cancellations or overloading the audio
output.
4.5.2 Poly Retrig.
Poly Retrig. mode allows for full polyphony, however if a Note On event is received
that matches a note that is currently in the Final Decay state, the envelope generators
for the matching note are retriggered. The Poly Retrig. mode is very natural for sounds
with a long final decay such as bells or gongs. Polyphonic Retrig. is the default
polyphony mode.
4.5.3 Mono Porta
Mono Porta mode restricts the audio output to one note of the current Timbre at a
time. The effect is a legato phrase similar to the tonguing and slurring technique of a

ARTURIA – Synclavier V – USER MANUAL 52
wind or brass instrument. The monophonic settings are also useful for recreating the
sounds of early analog and digital synthesizers that were monophonic by design.
In this mode, when a new note is played while an earlier note is being held, the
previous note ends and the result is a “slur” to the new note. The envelope generators
are NOT retriggered. Synthesists refer to this as “Single Triggering”.
4.5.4 Mono Retrig.
Mono Retrig. mode also restricts the audio output to one note of the current Timbre at
a time. When a new note is received while an earlier note is being held, the pitch of
the earlier note is adjusted to match the new note and the envelope generators ARE
retriggered. The effect is a more percussive sound from every note. Synthesists refer to
this as “Multi-Triggering”.
4.6 PORTAMENTO
PORTAMENTO is a global parameter affecting all Partials in the current Timbre. It makes
the pitch “glide” between the notes you play, rather than changing the pitch instantly
as soon as you hit another key or keys on your keyboard. The effect works on
Polyphonic or Monophonic Timbres.
4.6.1 On
The On button turns the PORTAMENTO function ON or OFF.
4.6.2 Log/Lin
Log/Line button switches between a Linear or a Logarithmic curve for the
PORTAMENTO “glide” effect. OFF is Linear and ON is Logarithmic.
4.6.3 Rate
Rate knob controls the speed at which the sound glides from one pitch to the next.
The range is from 0.0 milliseconds to 30 seconds.
4.7 BEND WHEEL & MOD WHEEL
The BEND WHEEL & MOD WHEEL are located on the left hand side of the Virtual
Keyboard and can also be controlled from a MIDI keyboard or other MIDI controller.
The BEND WHEEL raises or lowers the pitch of your current Timbre up or down gradually.
The default Pitch bend Depth is 2 (two) semitones but can be increased or decreased,

ARTURIA – Synclavier V – USER MANUAL 53
from 0 (zero) semitones to 25 (twenty five) semitones, under the SETTINGS tab of the
Graphic Screen Mode.
The BEND WHEEL is “spring loaded” and comes to rest in the center position. It can also
be routed to control other Partial parameters in the MODS section of the Graphic
Screen Mode. See section 7.5.1 for further details on routing.
The MOD WHEEL can also be routed to many Partial parameters. Not “spring loaded”
like the BEND WHEEL, it operates like a slider down and up. Its range is from 0.000 to
1.000. A common routing is to control vibrato depth.
Bend & Mod Wheels
ARTURIA – Synclavier V – USER MANUAL 54
5 EXTENDED PANEL MODE CONTROLS
The Extended Panel Mode can be viewed by clicking on the button showing two
downward pointing arrows at the top right of the Toolbar. The controls are used to
enter parameter settings for individual Partials ANY number of grouped Partials.
Clicking on this button returns you to Standard Panel Mode.
5.1 PARTIAL SELECT
The PARTIAL SELECT section is located at the top left of the Extended Panel Mode.
There are 12 Partial buttons, a Solo button, a Mute button, a Copy button (with icon),
and a Paste button (with icon).
5.1.1 PARTIAL SELECT #1-12
At the top left of the Extended Panel Mode are the PARTIAL SELECT #1-12 Red buttons.
While listening to any preset Timbre you will be hearing the combined sound of
anywhere from 1 to 12 Partial timbres simultaneously.
To change any parameter setting for an individual Partial, click on that PARTIAL SELECT
button number. While that Partial button is on (bright Red), any parameter you change
on the Extended Panel Mode will affect ONLY that Partial.
To make changes to 2 or more Partials at a time, hold down the <shift> key and click
any range of Partial buttons from #1 to 12. For instance, if you want to select #1
through #6, hold down the <shift> key and click on #1 and #6. If you’d rather just
select, only #1, #4, and #6, hold down the <command> key (<ctrl> key for Windows
users) and then click on #1, #4 and #6. You will see the first Red button selected and
the other selected Partial buttons darkened out slightly.
5.1.2 Copy & Paste
To Copy all of the parameters of one Partial to another, select the Partial button
number (#1-12) you want to copy “from” and then click once on the top copy icon
button. This copies the parameters to a clipboard. To then Paste those Partial
parameters to another Partial, select the Partial button number (#1-12) you would like
to copy “to” and then click once on the bottom paste icon button. You have now
copied one Partial’s parameters to the other.
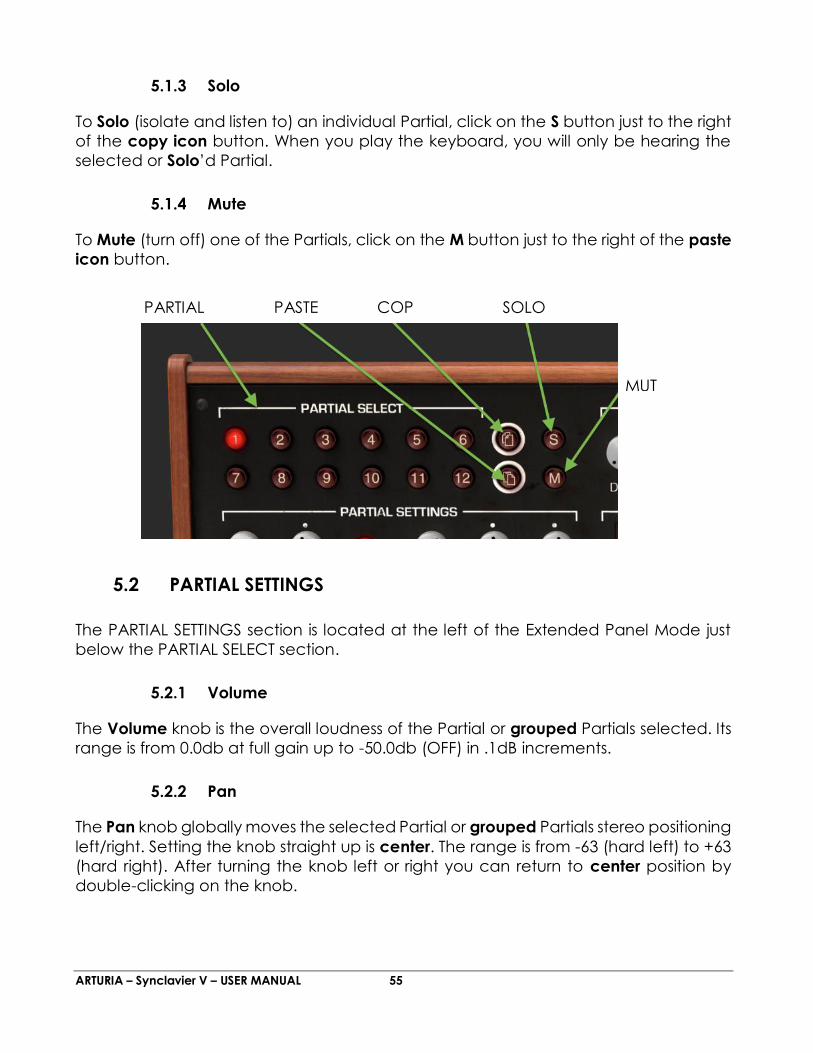
ARTURIA – Synclavier V – USER MANUAL 55
5.1.3 Solo
To Solo (isolate and listen to) an individual Partial, click on the S button just to the right
of the copy icon button. When you play the keyboard, you will only be hearing the
selected or Solo’d Partial.
5.1.4 Mute
To Mute (turn off) one of the Partials, click on the M button just to the right of the paste
icon button.
5.2 PARTIAL SETTINGS
The PARTIAL SETTINGS section is located at the left of the Extended Panel Mode just
below the PARTIAL SELECT section.
5.2.1 Volume
The Volume knob is the overall loudness of the Partial or grouped Partials selected. Its
range is from 0.0db at full gain up to -50.0db (OFF) in .1dB increments.
5.2.2 Pan
The Pan knob globally moves the selected Partial or grouped Partials stereo positioning
left/right. Setting the knob straight up is center. The range is from -63 (hard left) to +63
(hard right). After turning the knob left or right you can return to center position by
double-clicking on the knob.
PARTIAL
SELECT
PASTE COP
Y
SOLO
MUT
E

ARTURIA – Synclavier V – USER MANUAL 56
5.2.3 Pitch Track
The Pitch Track button On/Off determines if the selected Partial or grouped Partials
track the Virtual Keyboard or external MIDI keyboard/controller. When turned OFF, the
pitch will be constant (A-440 Note MIDI note #69) with any note depressed.
5.2.4 Octave
The Octave knob controls the octave placement of the A-440 Hz (MIDI key #69) of the
selected Partial or grouped Partials. It can be set to 1 of 9 discrete values from 6.875
Hz. to 1760 Hz. Double clicking will return it to the default value of 440.0 Hz.
Tip: Values in the extreme low range can be useful for unusual sound effects. Select
the Preset “Syn Harpsi”(a 1-Partial Timbre), lower the Octave button to 13.75 Hz and
play notes in the lowest octave on the Virtual Keyboard. At the default 8-bit Bit Depth
setting you will hear digital aliasing noise added to the original Timbre/Sound.
5.2.5 Transpose
The Transpose knob sets the pitch of the selected Partial or grouped Partials up or
down in semitone increments. At the knob’s center position there is No Transposition.
You can view the semitone value in the Lower Toolbar at the lower left side while you
are turning the knob or placing your cursor over the knob. Double clicking the knob
returns the knob to center or No Transposition. The range is from -24 to +24 semitones.
5.2.6 Tuning
The Tuning knob fine tunes the pitch of selected Partial or grouped Partials up or down
in individual Cents (100ths of a semitone). At the knob’s center position there is no
pitch change. The parameter value is displayed in Cents in the Lower Toolbar at the
lower left. Double clicking the knob returns the knob to center or 0.00 Cents. The range
is from -125 to +125 Cents below and above the setting of the Transpose knob.
5.2.7 Voice Chorus
The Voice Chorus knob creates a duplicate voice of the selected Partial or grouped
Partials with a different pitch of your Partial or Partials. At the knob’s center position
there is no added voice, a value of 1.000. You can view the Chorus value in the Lower
Toolbar at the lower left side while you are turning the knob or by placing your cursor
over the knob. The range is from 0.000 to 16.000 in steps of .100. Double clicking on the
knob returns the value to 1.000 or NO Voice Chorus.
ARTURIA – Synclavier V – USER MANUAL 57
Chorus: Relationship of added voice
Setting: to fundamental frequency
0.500: One octave below
1.000: Unison (no added Voice Chorus)
1.500: Perfect fifth above
2.000: Second harmonic (one octave above)
3.000: Third harmonic (one octave plus a perfect fifth above)
4.000: Fourth harmonic (two octaves above)
5.000: Fifth harmonic (two octaves plus a major third above)
6.000: Sixth harmonic (two octaves plus a perfect fifth above)
7.000: Seventh harmonic (two octaves plus a minor seventh above)
8.000: Eighth harmonic (three octaves above)
9.000: Ninth harmonic (three octaves plus a major second above)
10.000: Tenth harmonic (three octaves plus a major third above)
11.000: Eleventh harmonic (three octaves plus an augmented fourth above)
12.000: Twelfth harmonic (three octaves plus a perfect fifth above)
13.000: Thirteenth harmonic (three octaves plus a perfect sixth above)
14.000: Fourteenth harmonic (three octaves plus a minor seventh above)
15.000: Fifteenth harmonic (three octaves plus a major seventh above)
16.000: Sixteenth harmonic (four octaves above)
5.2.8 Chorus Fine
The Chorus Fine knob is a much smaller tuning adjustment of the Voice Chorus for the
selected Partial or grouped Partials. Range is from -.100 to +.100 in increments of .100.
These values read out in the Lower Toolbar left side as well. Double clicking on the
knob returns it to its center position 0.000.
5.2.9 F.M. Ratio
The F.M. Ratio knob controls the ratio of the F.M. Modulator frequency to the F.M.
Carrier frequency for the selected Partial or grouped Partials. There must be a CARRIER
wave AND a MODULATOR wave assigned to a Partial on the Time Slices page in
Graphic Screen Mode for this control to have any effect on the Partial. The Range is
from 0.000 to 16.000 in increments of .100.
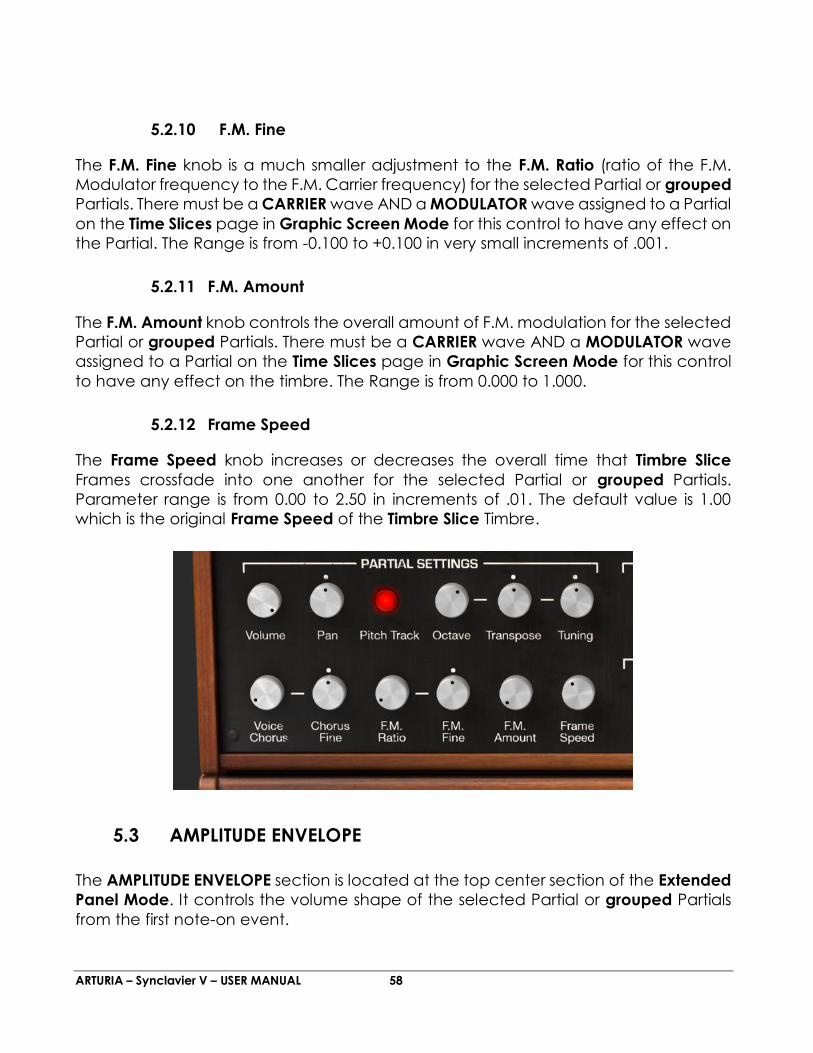
ARTURIA – Synclavier V – USER MANUAL 58
5.2.10 F.M. Fine
The F.M. Fine knob is a much smaller adjustment to the F.M. Ratio (ratio of the F.M.
Modulator frequency to the F.M. Carrier frequency) for the selected Partial or grouped
Partials. There must be a CARRIER wave AND a MODULATOR wave assigned to a Partial
on the Time Slices page in Graphic Screen Mode for this control to have any effect on
the Partial. The Range is from -0.100 to +0.100 in very small increments of .001.
5.2.11 F.M. Amount
The F.M. Amount knob controls the overall amount of F.M. modulation for the selected
Partial or grouped Partials. There must be a CARRIER wave AND a MODULATOR wave
assigned to a Partial on the Time Slices page in Graphic Screen Mode for this control
to have any effect on the timbre. The Range is from 0.000 to 1.000.
5.2.12 Frame Speed
The Frame Speed knob increases or decreases the overall time that Timbre Slice
Frames crossfade into one another for the selected Partial or grouped Partials.
Parameter range is from 0.00 to 2.50 in increments of .01. The default value is 1.00
which is the original Frame Speed of the Timbre Slice Timbre.
5.3 AMPLITUDE ENVELOPE
The AMPLITUDE ENVELOPE section is located at the top center section of the Extended
Panel Mode. It controls the volume shape of the selected Partial or grouped Partials
from the first note-on event.
ARTURIA – Synclavier V – USER MANUAL 59
A simple comparison would be the Volume Envelope ADSR in an Analog subtractive
synthesizer.
5.3.1 Delay
The Delay knob increases the time for the selected Partial or grouped Partials to be
heard after the initial note-on (key depression). The default value is 0 MSec
(milliseconds) and the range is 0 MSec to 30.0 Secs (seconds) in 1 millisecond
increments.
5.3.2 Attack
The Attack knob adjusts how fast or slow the Timbre/Sound ramps UP in volume from
the note-on (key depression) to the Peak setting for the selected Partial or grouped
Partials. The default is a value of 3 MSecs (milliseconds) and the range is 0 MSec to 30
Secs (seconds).
The actual Attack “time” will vary depending on the Peak level. At the maximum Peak
level of 100.0, the Attack time will be as read. As the Peak level is reduced, the Attack
“time” will decrease, as it takes less time to reach the lower Peak level.
5.3.3 Peak
The Peak knob adjusts the next volume level point in the Timbre/Sound after the initial
Attack of the selected Partial or grouped Partials. The level ranges from 0.00 to 100.0.
5.3.4 Decay
The Decay knob adjusts how fast or slow the Timbre/Sound ramps DOWN in volume
from the Peak setting to the Sustain level setting of the selected Partial or grouped
Partials. The default is a value of 3 MSecs (milliseconds) and the time range is from 0
MSec to 30 Secs (seconds).
The actual Decay “time” will vary depending on the Sustain level. At the minimum
Sustain level of 0.0, the Decay time will be as read. As the Sustain level is increased,
the Decay “time” will decrease, as it takes less time to reach the lower Sustain level.
5.3.5 Sustain
The Sustain knob adjusts sound volume level after the Decay portion of the envelope.
The level ranges from 0.00 to 100.0.

ARTURIA – Synclavier V – USER MANUAL 60
5.3.6 Release
The Release knob adjusts the final decay time after the note-off (key release) for the
selected Partial or grouped Partials. The time range is from 0 MSec (milliseconds) to 30
Secs (seconds).
5.4 HARMONIC ENVELOPE
The HARMONIC ENVELOPE section is located at the top right section of the Extended
Panel Mode. It controls the F.M. (Frequency Modulator) volume shape of the selected
Partial or grouped Partials from the first note-on (key depression).
A simple comparison would be the Filter Envelope ADSR in an Analog subtractive
synthesizer.
5.4.1 Delay
The Delay knob increases the time for the selected Partial or grouped Partials’ F.M.
(Frequency Modulator) to be heard after the initial note-on (key depression). Any
AMPLITUDE Delay value will add to the total Delay time for the F.M. to be heard after
the initial note-on. The default delay value is 0 MSec (milliseconds) and the range is 0
MSec to 30.0 Secs (seconds) in 1 millisecond increments.
5.4.2 Attack
The Attack knob adjusts how fast or slow the F.M. (Frequency Modulator) ramps UP in
volume of the selected Partial or grouped Partials from the note-on (key depression)
to the Peak setting. The default is a value of 3 MSecs (milliseconds) and the range is 0
MSec to 30 Secs (seconds).

ARTURIA – Synclavier V – USER MANUAL 61
5.4.3 Peak
The Peak knob adjusts the next level point in the F.M. (Frequency Modulator) after the
initial Attack of the selected Partial or grouped Partials. The level ranges from 0.00 to
100.0.
5.4.4 Decay
The Decay knob adjusts how fast or slow the F.M. (Frequency Modulator) ramps DOWN
in volume from the Peak setting to the Sustain level setting of the selected Partial or
grouped Partials. The default is a value of 3 MSecs (milliseconds) and the time range
is from 0 MSec to 30 Secs (seconds).
5.4.5 Sustain
The Sustain knob adjusts F.M. (Frequency Modulator) level of the selected Partial or
grouped Partials after the Decay portion of the envelope. The level ranges from 0.00
to 100.0.
5.4.6 Release
The Release knob adjusts the final decay time of the F.M. (Frequency Modulator) after
the note-off (key release) for the selected Partial or grouped Partials. The time range
is from 0 MSec (milliseconds) to 30 Secs (seconds).
5.5 VIBRATO
The VIBRATO section is located at the middle/center section of the Extended Panel
Mode. It provides a wide range of vibrato effects similar to the LFO (Low Frequency
Oscillator) of an Analog synthesizer which modulates the selected Partial or grouped
Partials. The pitch fluctuates equally above and below the pitch of the key played.
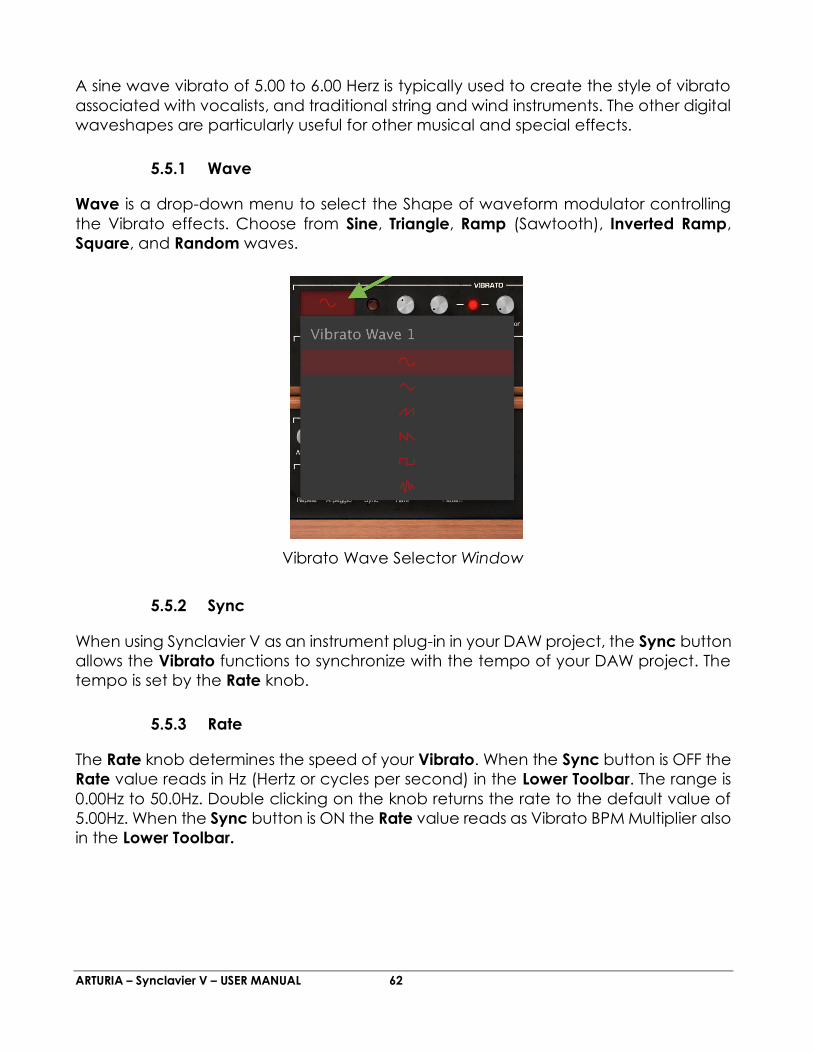
ARTURIA – Synclavier V – USER MANUAL 62
A sine wave vibrato of 5.00 to 6.00 Herz is typically used to create the style of vibrato
associated with vocalists, and traditional string and wind instruments. The other digital
waveshapes are particularly useful for other musical and special effects.
5.5.1 Wave
Wave is a drop-down menu to select the Shape of waveform modulator controlling
the Vibrato effects. Choose from Sine, Triangle, Ramp (Sawtooth), Inverted Ramp,
Square, and Random waves.
5.5.2 Sync
When using Synclavier V as an instrument plug-in in your DAW project, the Sync button
allows the Vibrato functions to synchronize with the tempo of your DAW project. The
tempo is set by the Rate knob.
5.5.3 Rate
The Rate knob determines the speed of your Vibrato. When the Sync button is OFF the
Rate value reads in Hz (Hertz or cycles per second) in the Lower Toolbar. The range is
0.00Hz to 50.0Hz. Double clicking on the knob returns the rate to the default value of
5.00Hz. When the Sync button is ON the Rate value reads as Vibrato BPM Multiplier also
in the Lower Toolbar.
Vibrato Wave Selector Window
ARTURIA – Synclavier V – USER MANUAL 63
5.5.4 Carrier
The Carrier knob controls the Depth of the Vibrato. The pitch fluctuates equally above
and below the pitch of the key played. The range is 0 semitones to 25 semitones.
5.5.5 Link
The Link button allows the Modulator (F.M.) to be simultaneously affected by the
Vibrato Carrier (depth of the Vibrato effect). When the Link button is ON you will notice
the Modulator knob will match the position of the Carrier knob as you turn it. With the
Link button OFF, you can get quite different vibrato effects but adjusting the knobs
independently.
5.5.6 Modulator
The Modulator knob controls the amount of F.M. modulation (Harmonic variation) or
Depth affected by the Vibrato Carrier. The range is 0 semitones to 25 semitones. When
the Link button is ON, the Modulator (depth) is connected to the Carrier (depth).
5.5.7 Attack
The Attack knob adjusts the amount of delay before the Vibrato effect begins after
the note-on. The range is 0 MSecs to 30 seconds.
5.5.8 Bias
Normally when vibrato is added to a Partial Timbre, the pitch of each note fluctuates
an equal amount above and below the pitch of the key played. When the Bias button
is turned ON, the lowest point of pitch fluctuation is the pitch of the note played. The
highest point is twice the number of semitones set for the vibrato Depth.
5.5.9 S-Curve
When the S-Curve button is OFF and Vibrato begins, the attack ramps in a straight line
(Linear) to the carrier and modulator depths. When the S-curve button is turned ON,
there is a more gently start to the Vibrato attack.
5.5.10 Quantize
The Quantize button steps the Vibrato curve to the nearest semitone. This feature is
only useful with large Vibrato depths greater than 1.00 semitone. This quantization
function observes the current scale tuning parameters.
(See Section 7.8.6 Timbre Octave Ratio and 7.8.7 Tuning (Scale))
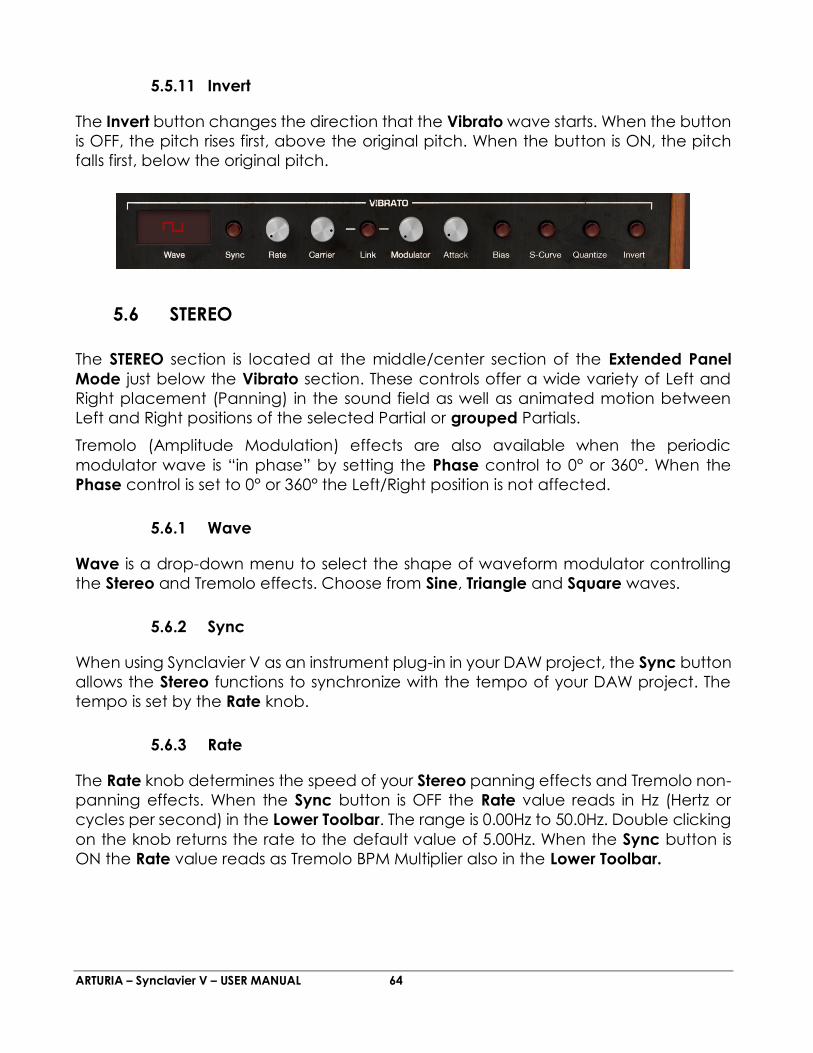
ARTURIA – Synclavier V – USER MANUAL 64
5.5.11 Invert
The Invert button changes the direction that the Vibrato wave starts. When the button
is OFF, the pitch rises first, above the original pitch. When the button is ON, the pitch
falls first, below the original pitch.
5.6 STEREO
The STEREO section is located at the middle/center section of the Extended Panel
Mode just below the Vibrato section. These controls offer a wide variety of Left and
Right placement (Panning) in the sound field as well as animated motion between
Left and Right positions of the selected Partial or grouped Partials.
Tremolo (Amplitude Modulation) effects are also available when the periodic
modulator wave is “in phase” by setting the Phase control to 0° or 360°. When the
Phase control is set to 0° or 360° the Left/Right position is not affected.
5.6.1 Wave
Wave is a drop-down menu to select the shape of waveform modulator controlling
the Stereo and Tremolo effects. Choose from Sine, Triangle and Square waves.
5.6.2 Sync
When using Synclavier V as an instrument plug-in in your DAW project, the Sync button
allows the Stereo functions to synchronize with the tempo of your DAW project. The
tempo is set by the Rate knob.
5.6.3 Rate
The Rate knob determines the speed of your Stereo panning effects and Tremolo non-
panning effects. When the Sync button is OFF the Rate value reads in Hz (Hertz or
cycles per second) in the Lower Toolbar. The range is 0.00Hz to 50.0Hz. Double clicking
on the knob returns the rate to the default value of 5.00Hz. When the Sync button is
ON the Rate value reads as Tremolo BPM Multiplier also in the Lower Toolbar.

ARTURIA – Synclavier V – USER MANUAL 65
5.6.4 Depth
The Depth knob controls the width of the Stereo panning effects or the depth of the
Tremelo effects. The range is 0.0% to 100% and displays at the left side of the Lower
Toolbar.
5.6.5 Attack
The Attack knob adjusts the amount of delay before the Stereo effect begins after the
note-on. The range is 0 MSecs to 30 seconds and displayed at the left side of the Lower
Toolbar
5.6.6 Phase
The Phase knob defaults to 180° which allow full Left/Right Stereo panning effects.
Turning the knob full down to 0° or full up to 360° will allow Tremolo (Amplitude
Modulation) effects with NO Left/Right Stereo panning. Other settings between 0° and
360° will display varying degrees of Left/Right panning depth.
5.6.7 S-Curve
When the S-Curve button is OFF and Stereo modulation effects begins, the attack
ramps in a straight line (Linear) to the carrier and modulator depths. When the S-curve
button is turned ON, there is a more gently start to the Stereo attack.
5.6.8 Alternate
The Alternate button turns on a function that alternates the starting Left/Right side of
a Left/Right Pan for every new MIDI note-on event. The Depth control sets the range
of the Left/Right Pan for the Alternate effect.
5.6.9 Invert
The Invert button changes the direction that the Wave starts. When the button is OFF,
the stereo position moves to the LEFT first, from the original stereo position. When the
button is ON, the stereo position moves to the RIGHT first, from the original stereo
position. If the Alternate button is ON, the Left/Right position of the sound is switched.
This function is useful to vary the Left/Right position of multiple Partials occurring at the
same note-on event.

ARTURIA – Synclavier V – USER MANUAL 66
6 7. GRAPHIC SCREEN MODE CONTROLS
The Graphic Screen Mode provides visual and spacial representation and
manipulation of all control parameters for each and all Partials of the current
Timbre/Sound including ENVELOPES of the Partials, KEY DYNAMICS (which keys each
Partial starts and stops), TIME SLICES, a MIXER, and MODS (Controller routings).
To view the Graphic Screen Mode click on the SCR button at the top right of the
Toolbar. Click the SCR button again to return to Standard Panel Mode or Extended
Panel Mode.
Two (2) sections have functions also available in Standard Panel and Extended Panel
Modes: ENVELOPES and MIXER.
Five (5) additional sections have functions not available in Standard Panel or
Extended Panel Modes: KEY DYNAMICS, TIME SLICES, MODS, FX, and SETTINGS.
Graphic Screen Mode
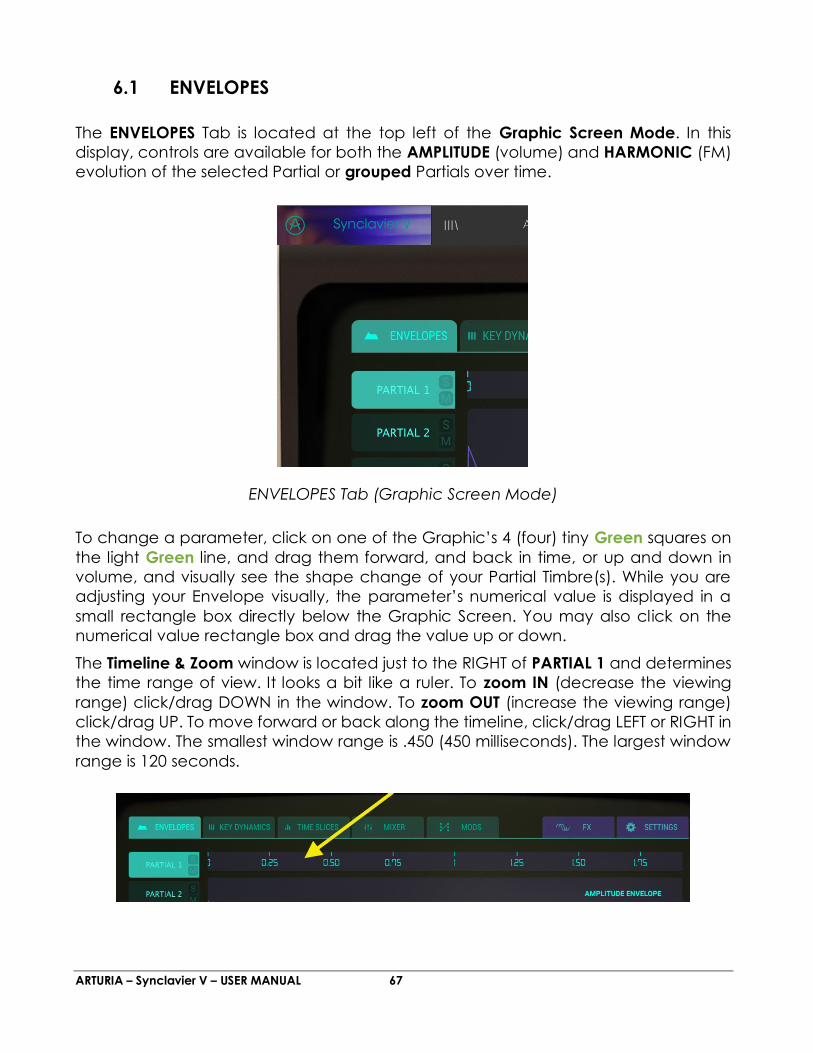
ARTURIA – Synclavier V – USER MANUAL 67
6.1 ENVELOPES
The ENVELOPES Tab is located at the top left of the Graphic Screen Mode. In this
display, controls are available for both the AMPLITUDE (volume) and HARMONIC (FM)
evolution of the selected Partial or grouped Partials over time.
ENVELOPES Tab (Graphic Screen Mode)
To change a parameter, click on one of the Graphic’s 4 (four) tiny Green squares on
the light Green line, and drag them forward, and back in time, or up and down in
volume, and visually see the shape change of your Partial Timbre(s). While you are
adjusting your Envelope visually, the parameter’s numerical value is displayed in a
small rectangle box directly below the Graphic Screen. You may also click on the
numerical value rectangle box and drag the value up or down.
The Timeline & Zoom window is located just to the RIGHT of PARTIAL 1 and determines
the time range of view. It looks a bit like a ruler. To zoom IN (decrease the viewing
range) click/drag DOWN in the window. To zoom OUT (increase the viewing range)
click/drag UP. To move forward or back along the timeline, click/drag LEFT or RIGHT in
the window. The smallest window range is .450 (450 milliseconds). The largest window
range is 120 seconds.

ARTURIA – Synclavier V – USER MANUAL 68
As you play your Timbre from an external MIDI keyboard, controller or sequencer, you
will notice a small Purple circle follow the Amplitude and Harmonic Envelopes as they
evolve over time.
Each of 12 PARTIALs are available on the LEFT hand side of the display. You can make
changes to one Partial at a time or multiple Partials.
To select a PARTIAL, simply click on the PARTIAL number you’d like to
change. It will be highlighted in light Green.
To select multiple PARTIALs in succession, hold <shift> and click on the first
PARTIAL you’d like to change. Then click on the last PARTIAL you’d like to
change in the succession. The first PARTIAL will be highlighted in light Green
and the successive PARTIALs will be highlighted in a slightly darker Green.
Any changes to the Graphic will now affect all PARTIALs selected.
To select multiple Partials one by one, hold <command> (<ctrl> for
Windows users) and click on each of the Partials you’d like to change. The
first PARTIAL will be highlighted in light Green and the next selected
PARTIALs will be highlighted in a slightly darker Green. Any changes to the
Graphic will now affect all PARTIALs selected. To go back to a single Partial,
simply click on one PARTIAL only, NOT holding down either <shift> or
<command>.
To listen to a PARTIAL individually, click on the small S (Solo) button just to
the right of the PARTIAL number.
To turn off the sound of an individual Partial, click on the small M (Mute)
button, just to the right of the Partial number.
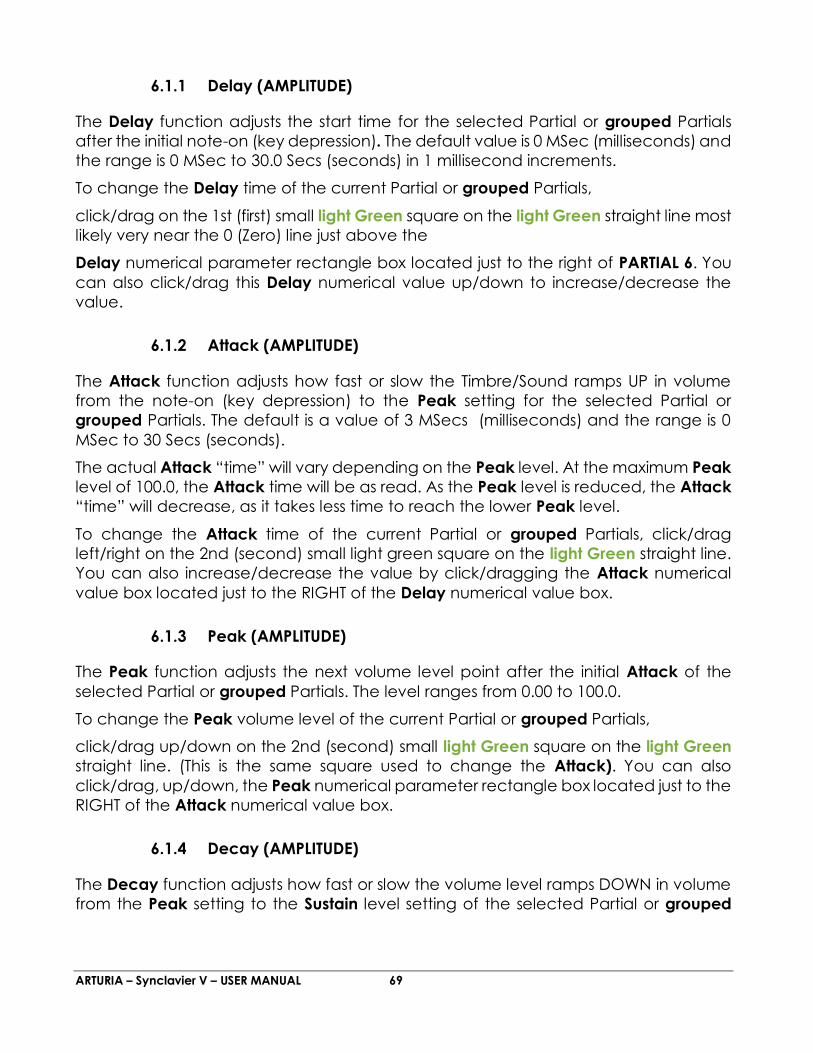
ARTURIA – Synclavier V – USER MANUAL 69
6.1.1 Delay (AMPLITUDE)
The Delay function adjusts the start time for the selected Partial or grouped Partials
after the initial note-on (key depression). The default value is 0 MSec (milliseconds) and
the range is 0 MSec to 30.0 Secs (seconds) in 1 millisecond increments.
To change the Delay time of the current Partial or grouped Partials,
click/drag on the 1st (first) small light Green square on the light Green straight line most
likely very near the 0 (Zero) line just above the
Delay numerical parameter rectangle box located just to the right of PARTIAL 6. You
can also click/drag this Delay numerical value up/down to increase/decrease the
value.
6.1.2 Attack (AMPLITUDE)
The Attack function adjusts how fast or slow the Timbre/Sound ramps UP in volume
from the note-on (key depression) to the Peak setting for the selected Partial or
grouped Partials. The default is a value of 3 MSecs (milliseconds) and the range is 0
MSec to 30 Secs (seconds).
The actual Attack “time” will vary depending on the Peak level. At the maximum Peak
level of 100.0, the Attack time will be as read. As the Peak level is reduced, the Attack
“time” will decrease, as it takes less time to reach the lower Peak level.
To change the Attack time of the current Partial or grouped Partials, click/drag
left/right on the 2nd (second) small light green square on the light Green straight line.
You can also increase/decrease the value by click/dragging the Attack numerical
value box located just to the RIGHT of the Delay numerical value box.
6.1.3 Peak (AMPLITUDE)
The Peak function adjusts the next volume level point after the initial Attack of the
selected Partial or grouped Partials. The level ranges from 0.00 to 100.0.
To change the Peak volume level of the current Partial or grouped Partials,
click/drag up/down on the 2nd (second) small light Green square on the light Green
straight line. (This is the same square used to change the Attack). You can also
click/drag, up/down, the Peak numerical parameter rectangle box located just to the
RIGHT of the Attack numerical value box.
6.1.4 Decay (AMPLITUDE)
The Decay function adjusts how fast or slow the volume level ramps DOWN in volume
from the Peak setting to the Sustain level setting of the selected Partial or grouped
ARTURIA – Synclavier V – USER MANUAL 70
Partials. The default is a value of 3 MSecs (milliseconds) and the time range is from 0
MSec to 30 Secs (seconds).
The actual Decay “time” will vary depending on the Sustain level. At the minimum
Sustain level of 0.0, the Decay time will be as read. As the Sustain level is increased,
the Decay “time” will decrease, as it takes less time to reach the lower Sustain level.
To change the Decay time of the current Partial or grouped Partials,
click/drag LEFT/RIGHT on the 3rd (third) small light Green square on the light Green
straight line. You can also click/drag LEFT/RIGHT the Decay numerical parameter
rectangle box located just to the RIGHT of the Peak numerical value box.
6.1.5 Sustain (AMPLITUDE)
The Sustain function adjusts volume level after the Decay portion of the envelope. The
level ranges from 0.00 to 100.0.
To change the Sustain volume level of the current Partial or grouped Partials,
click/drag UP/DOWN on the 3rd (third) small light Green square on the light Green
straight line on the Graphic after the Peak square. You can also click/drag, UP/DOWN,
the Sustain numerical value rectangle box located just to the RIGHT of the Decay
numerical value box.
6.1.6 Release (AMPLITUDE)
The Release function adjusts the final decay time to the end of the
Timbre/Sound after the note-off (key release) for the selected Partial or grouped
Partials. The time range is from 0 MSec (milliseconds) to 30 Secs (seconds).
To change the Release time of the current Partial or grouped Partials, click/drag
LEFT/RIGHT on the 4th (FOURTH) small light green square on the light Green straight line
after the Peak square. You can also click/drag, LEFT/RIGHT, the Release numerical
value rectangle box located just to the RIGHT of the Decay numerical value box.
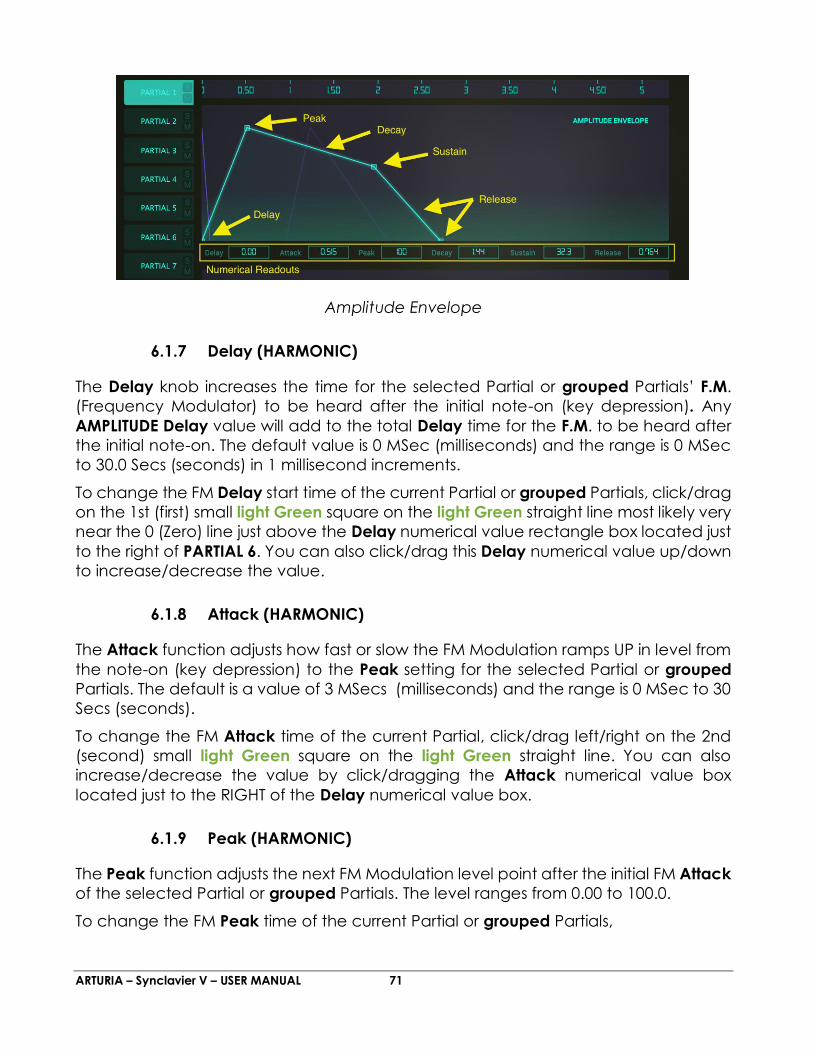
ARTURIA – Synclavier V – USER MANUAL 71
Amplitude Envelope
6.1.7 Delay (HARMONIC)
The Delay knob increases the time for the selected Partial or grouped Partials’ F.M.
(Frequency Modulator) to be heard after the initial note-on (key depression). Any
AMPLITUDE Delay value will add to the total Delay time for the F.M. to be heard after
the initial note-on. The default value is 0 MSec (milliseconds) and the range is 0 MSec
to 30.0 Secs (seconds) in 1 millisecond increments.
To change the FM Delay start time of the current Partial or grouped Partials, click/drag
on the 1st (first) small light Green square on the light Green straight line most likely very
near the 0 (Zero) line just above the Delay numerical value rectangle box located just
to the right of PARTIAL 6. You can also click/drag this Delay numerical value up/down
to increase/decrease the value.
6.1.8 Attack (HARMONIC)
The Attack function adjusts how fast or slow the FM Modulation ramps UP in level from
the note-on (key depression) to the Peak setting for the selected Partial or grouped
Partials. The default is a value of 3 MSecs (milliseconds) and the range is 0 MSec to 30
Secs (seconds).
To change the FM Attack time of the current Partial, click/drag left/right on the 2nd
(second) small light Green square on the light Green straight line. You can also
increase/decrease the value by click/dragging the Attack numerical value box
located just to the RIGHT of the Delay numerical value box.
6.1.9 Peak (HARMONIC)
The Peak function adjusts the next FM Modulation level point after the initial FM Attack
of the selected Partial or grouped Partials. The level ranges from 0.00 to 100.0.
To change the FM Peak time of the current Partial or grouped Partials,

ARTURIA – Synclavier V – USER MANUAL 72
click/drag up/down on the 2nd (second) small light Green square on the light Green
straight line. (This is the same square used to change the FM Attack). You can also
click/drag, up/down, the Peak numerical parameter rectangle box located just to the
RIGHT of the Attack numerical value box.
6.1.10 Decay (HARMONIC)
The Decay function adjusts how fast or slow the FM Modulator ramps DOWN in level
from the FM Peak setting to the FM Sustain level setting of the selected Partial or
grouped Partials. The default is a value of 3 MSecs (milliseconds) and the time range
is from 0 MSec to 30 Secs (seconds).
To change the FM Decay time of the current Partial or grouped Partials,
click/drag LEFT/RIGHT on the 3rd (third) small light Green square on the light Green
straight line. You can also click/drag LEFT/RIGHT the Decay numerical parameter
rectangle box located just to the RIGHT of the Peak numerical value box.
6.1.11 Sustain (HARMONIC)
The Sustain function adjusts FM level after the FM Decay portion of the envelope. The
level ranges from 0.00 to 100.0.
To change the FM Sustain level of the current Partial or grouped Partials, click/drag
UP/DOWN on the 3rd (third) small light green square on the light Green straight line on
the Graphic after the Peak square. You can also click/drag, UP/DOWN, the Sustain
numerical value rectangle box located just to the RIGHT of the Decay numerical value
box.
6.1.12 Release (HARMONIC)
The Release function adjusts the FM final decay time to the end of the
Timbre/Sound after the note-off (key release) for the selected Partial or grouped
Partials. The time range is from 0 MSec (milliseconds) to 30 Secs (seconds).
To change the Release time of the current Partial or grouped Partials, click/drag
LEFT/RIGHT on the 4th (FOURTH) small light green square on the light Green straight line
after the Peak square. You can also click/drag, LEFT/RIGHT, the Release numerical
value rectangle box located just to the RIGHT of the Decay numerical value box.
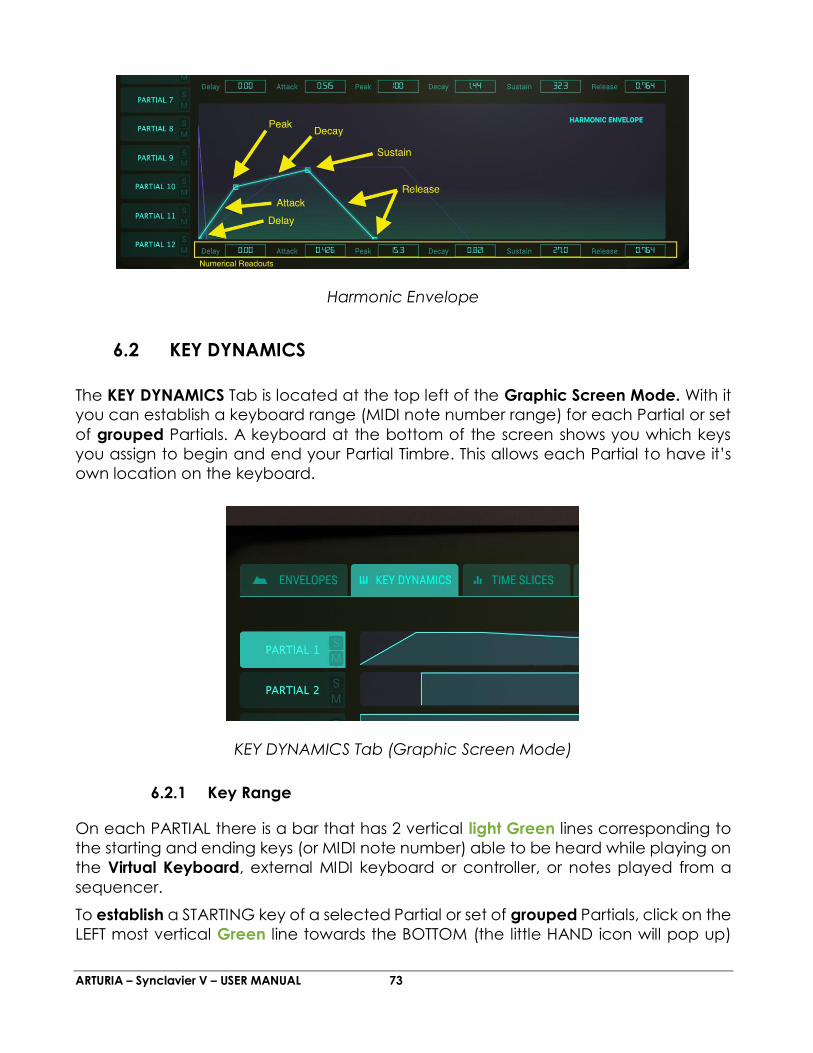
ARTURIA – Synclavier V – USER MANUAL 73
Harmonic Envelope
6.2 KEY DYNAMICS
The KEY DYNAMICS Tab is located at the top left of the Graphic Screen Mode. With it
you can establish a keyboard range (MIDI note number range) for each Partial or set
of grouped Partials. A keyboard at the bottom of the screen shows you which keys
you assign to begin and end your Partial Timbre. This allows each Partial to have it’s
own location on the keyboard.
KEY DYNAMICS Tab (Graphic Screen Mode)
6.2.1 Key Range
On each PARTIAL there is a bar that has 2 vertical light Green lines corresponding to
the starting and ending keys (or MIDI note number) able to be heard while playing on
the Virtual Keyboard, external MIDI keyboard or controller, or notes played from a
sequencer.
To establish a STARTING key of a selected Partial or set of grouped Partials, click on the
LEFT most vertical Green line towards the BOTTOM (the little HAND icon will pop up)
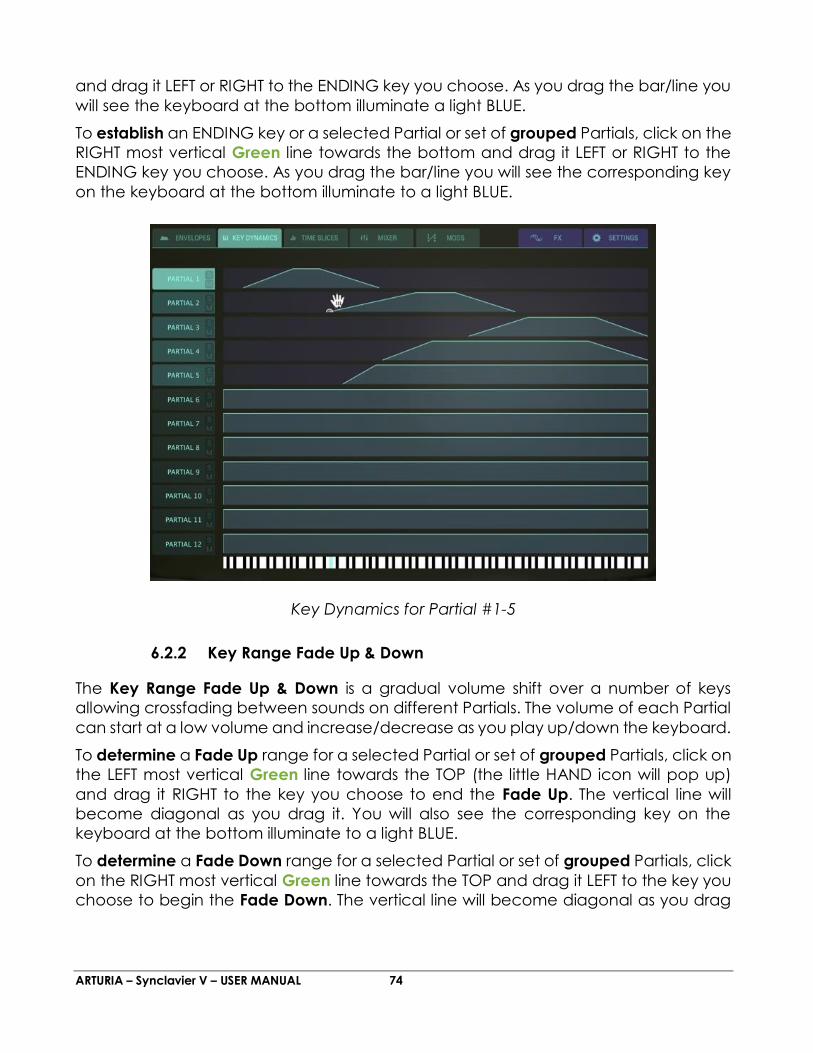
ARTURIA – Synclavier V – USER MANUAL 74
and drag it LEFT or RIGHT to the ENDING key you choose. As you drag the bar/line you
will see the keyboard at the bottom illuminate a light BLUE.
To establish an ENDING key or a selected Partial or set of grouped Partials, click on the
RIGHT most vertical Green line towards the bottom and drag it LEFT or RIGHT to the
ENDING key you choose. As you drag the bar/line you will see the corresponding key
on the keyboard at the bottom illuminate to a light BLUE.
Key Dynamics for Partial #1-5
6.2.2 Key Range Fade Up & Down
The Key Range Fade Up & Down is a gradual volume shift over a number of keys
allowing crossfading between sounds on different Partials. The volume of each Partial
can start at a low volume and increase/decrease as you play up/down the keyboard.
To determine a Fade Up range for a selected Partial or set of grouped Partials, click on
the LEFT most vertical Green line towards the TOP (the little HAND icon will pop up)
and drag it RIGHT to the key you choose to end the Fade Up. The vertical line will
become diagonal as you drag it. You will also see the corresponding key on the
keyboard at the bottom illuminate to a light BLUE.
To determine a Fade Down range for a selected Partial or set of grouped Partials, click
on the RIGHT most vertical Green line towards the TOP and drag it LEFT to the key you
choose to begin the Fade Down. The vertical line will become diagonal as you drag

ARTURIA – Synclavier V – USER MANUAL 75
it. You will also see the corresponding key on the keyboard at the bottom illuminate
to a light BLUE.
6.3 TIME SLICES
The TIME SLICES Tab is located at the top left of the Graphic Screen Mode, just to the
RIGHT of the KEY DYNAMICS Tab.
TIME SLICES Tab (Graphic Screen Mode)
The TIME SLICES section allows Graphic and Numeric parameter control for ONLY the
selected Partial. This is where you enter 24 Harmonic Coefficients for both Carrier and
Modulator waves (or choose a preset waveform) for both Carrier and Modulator
waves, and create TIME SLICE FRAMES. A FRAME, similar to a film frame, can contain
up to 24 harmonic coefficients, with individual phases for each, for both the FM Carrier
and FM Modulator waveforms.
TIME SLICE FRAMES are then “chained” together and evolve over time. Beginning with
the BASIC PARTIAL, a total of 50 TIME SLICE FRAMES can be created.
6.3.1 Anatomy of a TIMBRE SLICE FRAME Event
Synclavier V creates sound in response to MIDI Note-On events. The 12 Partial Timbres
occur simultaneously; each Partial Timbre is independent.
The precise point in time when the MIDI Note-On event is received establishes the
precise timing for the entire note. Scientifically speaking, this point in time is referred to
as Time T = 0.
At Time T = 0 Synclavier V begins by creating the Delay segment of the Volume
Envelope (if any). During the Delay segment no audio is created for the Partial Timbre.
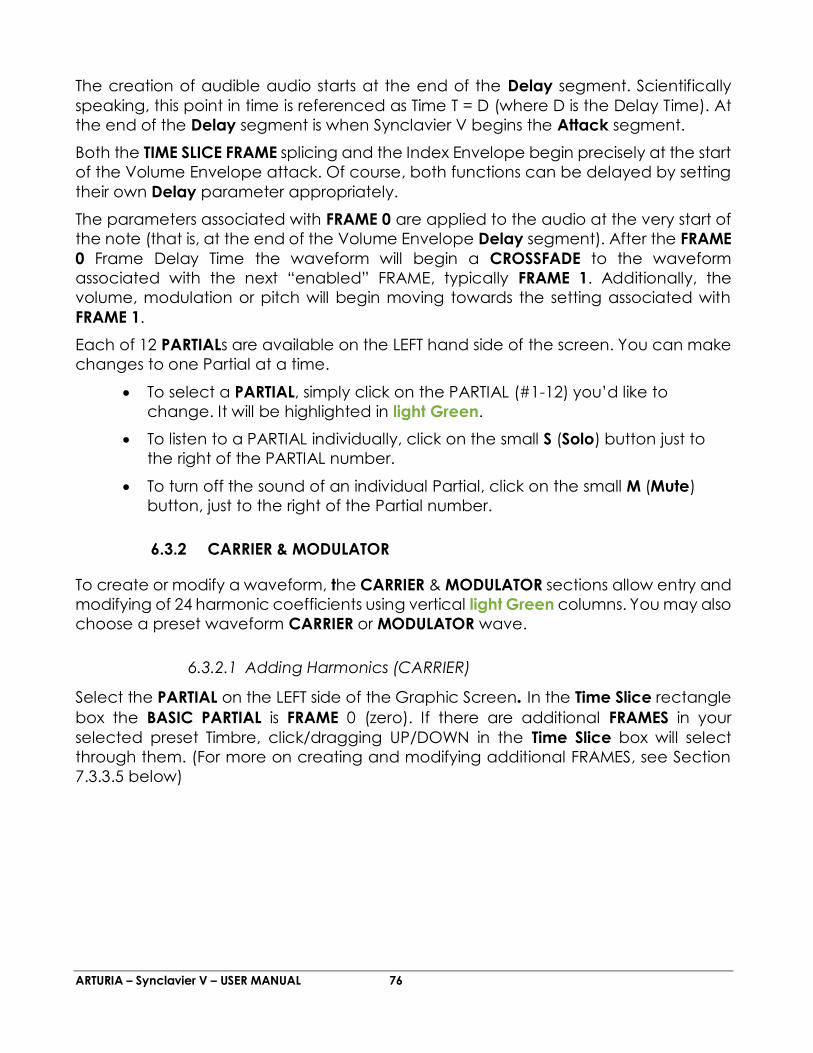
ARTURIA – Synclavier V – USER MANUAL 76
The creation of audible audio starts at the end of the Delay segment. Scientifically
speaking, this point in time is referenced as Time T = D (where D is the Delay Time). At
the end of the Delay segment is when Synclavier V begins the Attack segment.
Both the TIME SLICE FRAME splicing and the Index Envelope begin precisely at the start
of the Volume Envelope attack. Of course, both functions can be delayed by setting
their own Delay parameter appropriately.
The parameters associated with FRAME 0 are applied to the audio at the very start of
the note (that is, at the end of the Volume Envelope Delay segment). After the FRAME
0 Frame Delay Time the waveform will begin a CROSSFADE to the waveform
associated with the next “enabled” FRAME, typically FRAME 1. Additionally, the
volume, modulation or pitch will begin moving towards the setting associated with
FRAME 1.
Each of 12 PARTIALs are available on the LEFT hand side of the screen. You can make
changes to one Partial at a time.
To select a PARTIAL, simply click on the PARTIAL (#1-12) you’d like to
change. It will be highlighted in light Green.
To listen to a PARTIAL individually, click on the small S (Solo) button just to
the right of the PARTIAL number.
To turn off the sound of an individual Partial, click on the small M (Mute)
button, just to the right of the Partial number.
6.3.2 CARRIER & MODULATOR
To create or modify a waveform, the CARRIER & MODULATOR sections allow entry and
modifying of 24 harmonic coefficients using vertical light Green columns. You may also
choose a preset waveform CARRIER or MODULATOR wave.
6.3.2.1 Adding Harmonics (CARRIER)
Select the PARTIAL on the LEFT side of the Graphic Screen. In the Time Slice rectangle
box the BASIC PARTIAL is FRAME 0 (zero). If there are additional FRAMES in your
selected preset Timbre, click/dragging UP/DOWN in the Time Slice box will select
through them. (For more on creating and modifying additional FRAMES, see Section
7.3.3.5 below)
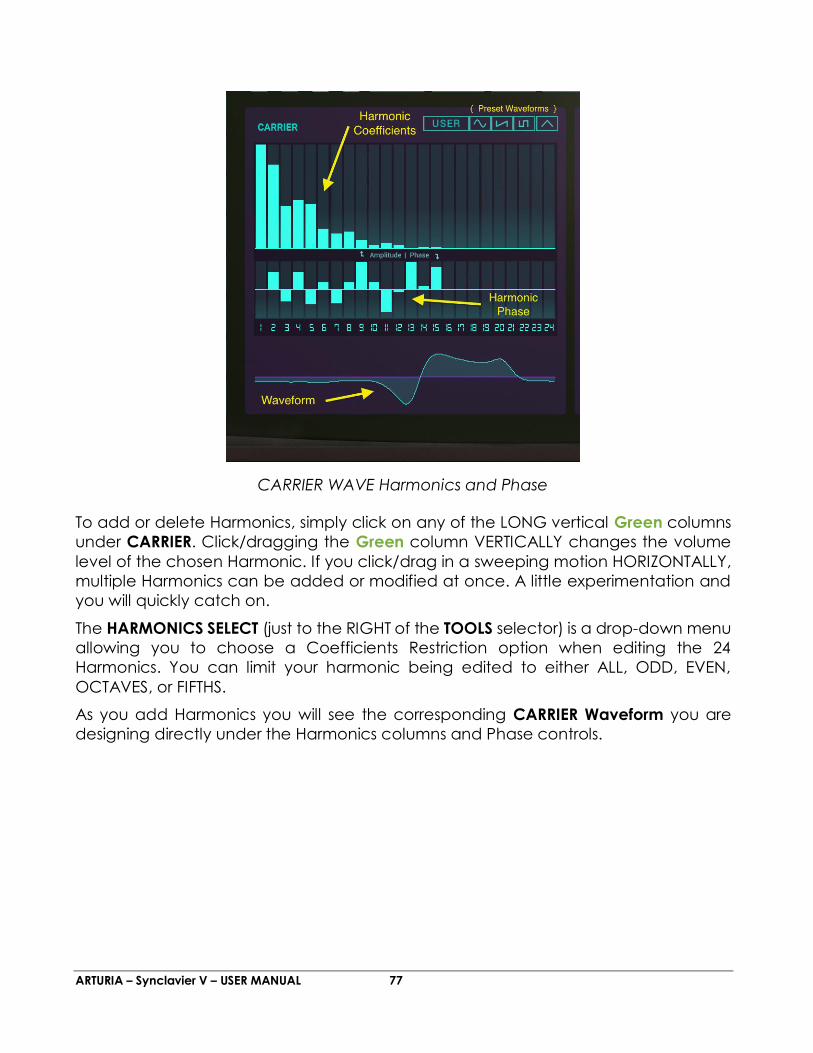
ARTURIA – Synclavier V – USER MANUAL 77
To add or delete Harmonics, simply click on any of the LONG vertical Green columns
under CARRIER. Click/dragging the Green column VERTICALLY changes the volume
level of the chosen Harmonic. If you click/drag in a sweeping motion HORIZONTALLY,
multiple Harmonics can be added or modified at once. A little experimentation and
you will quickly catch on.
The HARMONICS SELECT (just to the RIGHT of the TOOLS selector) is a drop-down menu
allowing you to choose a Coefficients Restriction option when editing the 24
Harmonics. You can limit your harmonic being edited to either ALL, ODD, EVEN,
OCTAVES, or FIFTHS.
As you add Harmonics you will see the corresponding CARRIER Waveform you are
designing directly under the Harmonics columns and Phase controls.
CARRIER WAVE Harmonics and Phase
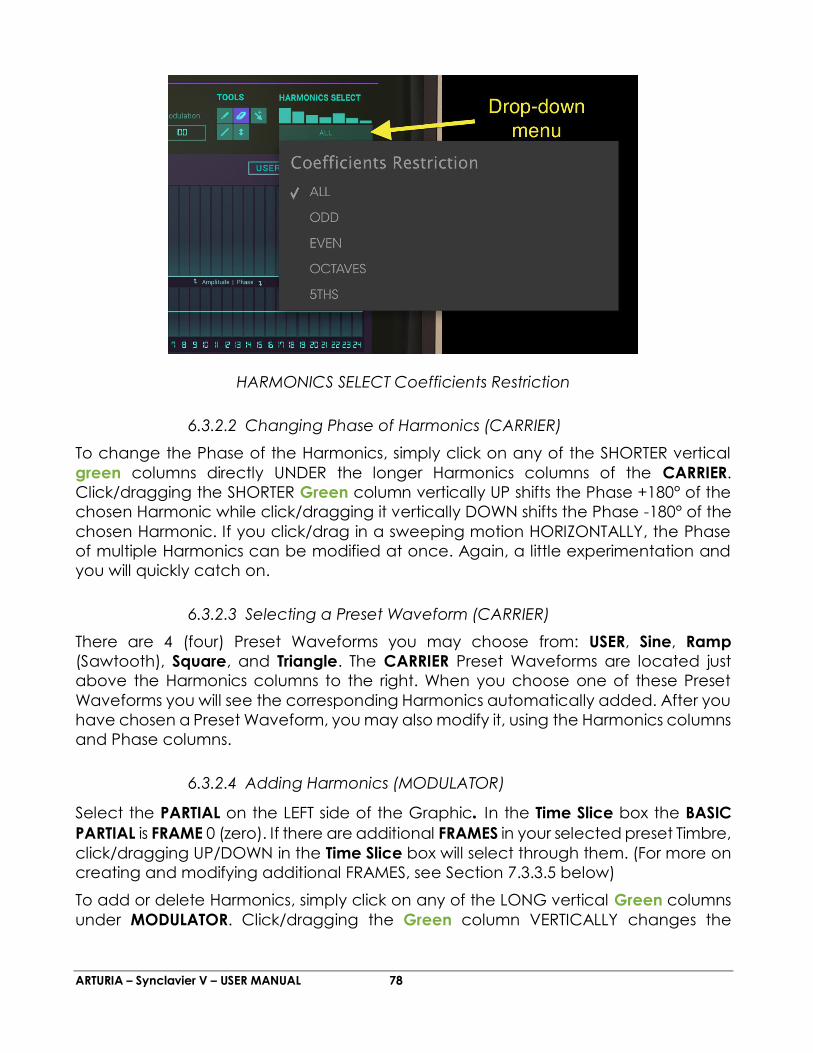
ARTURIA – Synclavier V – USER MANUAL 78
HARMONICS SELECT Coefficients Restriction
6.3.2.2 Changing Phase of Harmonics (CARRIER)
To change the Phase of the Harmonics, simply click on any of the SHORTER vertical
green columns directly UNDER the longer Harmonics columns of the CARRIER.
Click/dragging the SHORTER Green column vertically UP shifts the Phase +180° of the
chosen Harmonic while click/dragging it vertically DOWN shifts the Phase -180° of the
chosen Harmonic. If you click/drag in a sweeping motion HORIZONTALLY, the Phase
of multiple Harmonics can be modified at once. Again, a little experimentation and
you will quickly catch on.
6.3.2.3 Selecting a Preset Waveform (CARRIER)
There are 4 (four) Preset Waveforms you may choose from: USER, Sine, Ramp
(Sawtooth), Square, and Triangle. The CARRIER Preset Waveforms are located just
above the Harmonics columns to the right. When you choose one of these Preset
Waveforms you will see the corresponding Harmonics automatically added. After you
have chosen a Preset Waveform, you may also modify it, using the Harmonics columns
and Phase columns.
6.3.2.4 Adding Harmonics (MODULATOR)
Select the PARTIAL on the LEFT side of the Graphic. In the Time Slice box the BASIC
PARTIAL is FRAME 0 (zero). If there are additional FRAMES in your selected preset Timbre,
click/dragging UP/DOWN in the Time Slice box will select through them. (For more on
creating and modifying additional FRAMES, see Section 7.3.3.5 below)
To add or delete Harmonics, simply click on any of the LONG vertical Green columns
under MODULATOR. Click/dragging the Green column VERTICALLY changes the
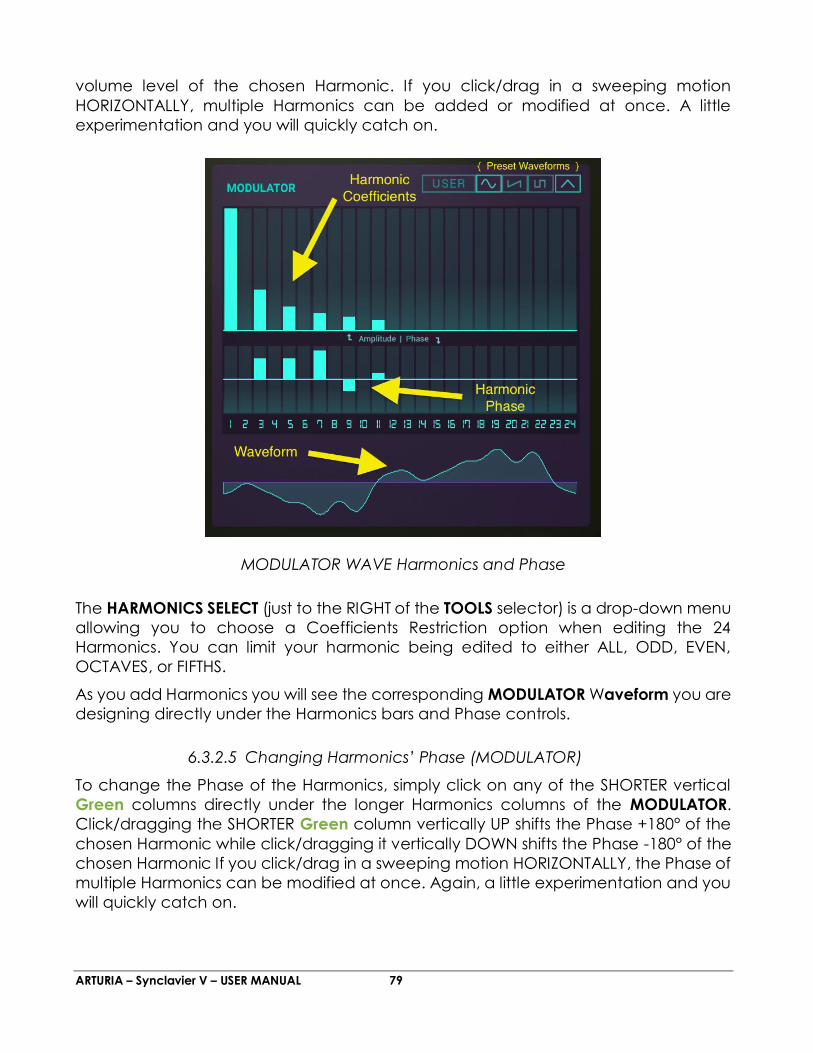
ARTURIA – Synclavier V – USER MANUAL 79
volume level of the chosen Harmonic. If you click/drag in a sweeping motion
HORIZONTALLY, multiple Harmonics can be added or modified at once. A little
experimentation and you will quickly catch on.
MODULATOR WAVE Harmonics and Phase
The HARMONICS SELECT (just to the RIGHT of the TOOLS selector) is a drop-down menu
allowing you to choose a Coefficients Restriction option when editing the 24
Harmonics. You can limit your harmonic being edited to either ALL, ODD, EVEN,
OCTAVES, or FIFTHS.
As you add Harmonics you will see the corresponding MODULATOR Waveform you are
designing directly under the Harmonics bars and Phase controls.
6.3.2.5 Changing Harmonics’ Phase (MODULATOR)
To change the Phase of the Harmonics, simply click on any of the SHORTER vertical
Green columns directly under the longer Harmonics columns of the MODULATOR.
Click/dragging the SHORTER Green column vertically UP shifts the Phase +180° of the
chosen Harmonic while click/dragging it vertically DOWN shifts the Phase -180° of the
chosen Harmonic If you click/drag in a sweeping motion HORIZONTALLY, the Phase of
multiple Harmonics can be modified at once. Again, a little experimentation and you
will quickly catch on.
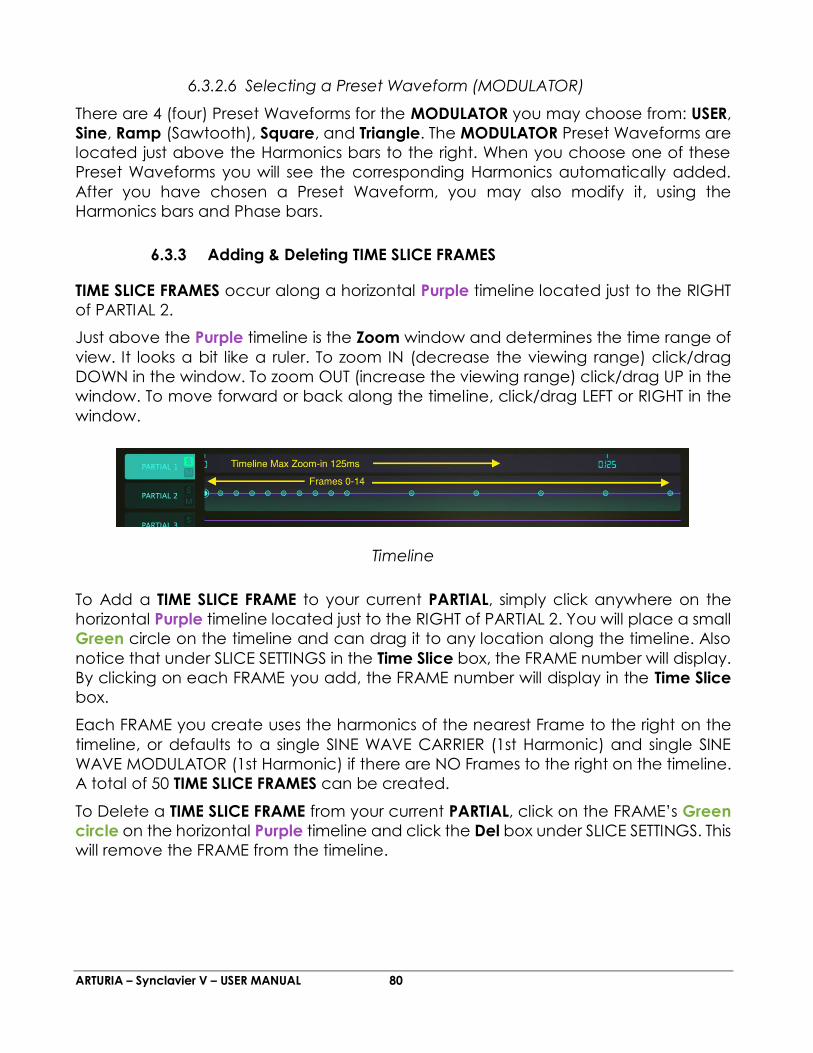
ARTURIA – Synclavier V – USER MANUAL 80
6.3.2.6 Selecting a Preset Waveform (MODULATOR)
There are 4 (four) Preset Waveforms for the MODULATOR you may choose from: USER,
Sine, Ramp (Sawtooth), Square, and Triangle. The MODULATOR Preset Waveforms are
located just above the Harmonics bars to the right. When you choose one of these
Preset Waveforms you will see the corresponding Harmonics automatically added.
After you have chosen a Preset Waveform, you may also modify it, using the
Harmonics bars and Phase bars.
6.3.3 Adding & Deleting TIME SLICE FRAMES
TIME SLICE FRAMES occur along a horizontal Purple timeline located just to the RIGHT
of PARTIAL 2.
Just above the Purple timeline is the Zoom window and determines the time range of
view. It looks a bit like a ruler. To zoom IN (decrease the viewing range) click/drag
DOWN in the window. To zoom OUT (increase the viewing range) click/drag UP in the
window. To move forward or back along the timeline, click/drag LEFT or RIGHT in the
window.
Timeline
To Add a TIME SLICE FRAME to your current PARTIAL, simply click anywhere on the
horizontal Purple timeline located just to the RIGHT of PARTIAL 2. You will place a small
Green circle on the timeline and can drag it to any location along the timeline. Also
notice that under SLICE SETTINGS in the Time Slice box, the FRAME number will display.
By clicking on each FRAME you add, the FRAME number will display in the Time Slice
box.
Each FRAME you create uses the harmonics of the nearest Frame to the right on the
timeline, or defaults to a single SINE WAVE CARRIER (1st Harmonic) and single SINE
WAVE MODULATOR (1st Harmonic) if there are NO Frames to the right on the timeline.
A total of 50 TIME SLICE FRAMES can be created.
To Delete a TIME SLICE FRAME from your current PARTIAL, click on the FRAME’s Green
circle on the horizontal Purple timeline and click the Del box under SLICE SETTINGS. This
will remove the FRAME from the timeline.
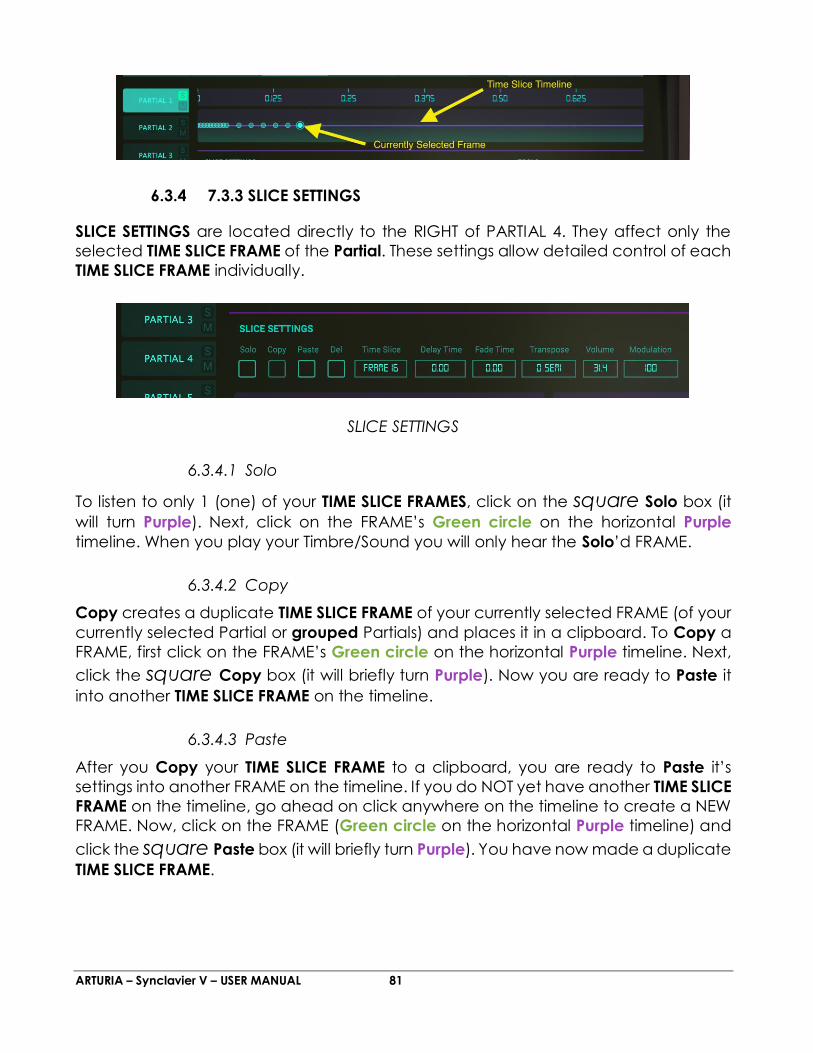
ARTURIA – Synclavier V – USER MANUAL 81
6.3.4 7.3.3 SLICE SETTINGS
SLICE SETTINGS are located directly to the RIGHT of PARTIAL 4. They affect only the
selected TIME SLICE FRAME of the Partial. These settings allow detailed control of each
TIME SLICE FRAME individually.
SLICE SETTINGS
6.3.4.1 Solo
To listen to only 1 (one) of your TIME SLICE FRAMES, click on the square Solo box (it
will turn Purple). Next, click on the FRAME’s Green circle on the horizontal Purple
timeline. When you play your Timbre/Sound you will only hear the Solo’d FRAME.
6.3.4.2 Copy
Copy creates a duplicate TIME SLICE FRAME of your currently selected FRAME (of your
currently selected Partial or grouped Partials) and places it in a clipboard. To Copy a
FRAME, first click on the FRAME’s Green circle on the horizontal Purple timeline. Next,
click the square Copy box (it will briefly turn Purple). Now you are ready to Paste it
into another TIME SLICE FRAME on the timeline.
6.3.4.3 Paste
After you Copy your TIME SLICE FRAME to a clipboard, you are ready to Paste it’s
settings into another FRAME on the timeline. If you do NOT yet have another TIME SLICE
FRAME on the timeline, go ahead on click anywhere on the timeline to create a NEW
FRAME. Now, click on the FRAME (Green circle on the horizontal Purple timeline) and
click the square Paste box (it will briefly turn Purple). You have now made a duplicate
TIME SLICE FRAME.

ARTURIA – Synclavier V – USER MANUAL 82
6.3.4.4 Del (Delete)
To Delete any TIME SLICE FRAME, first click on the FRAME (Green circle on the horizontal
Purple timeline). Next, simply click on the square Del box. The FRAME will now be
deleted.
Slice Settings
7.3.3.5 Time Slice
The Time Slice box is the first rectangle light Green box located under SLICE
SETTINGS. It displays the current TIME SLICE FRAME. You can also click/drag UP/DOWN
in the Time Slice box to select a FRAME number. The default is BASIC PARTIAL (FRAME
0).
The Time Slice box displays the current TIME SLICE FRAME. You can also click/drag
UP/DOWN in the Time Slice box to select a FRAME number.
6.3.4.5 Delay Time
The Delay Time rectangle light Green box (numerical readout) is located under
SLICE SETTINGS and displays the amount of time “paused” before the currently
selected TIME SLICE FRAME audio begins. You can click/drag UP/DOWN in the Delay
Time box to increase or decrease the Delay Time.
Delay Time does NOT affect BASIC PARTIAL (FRAME 0). To delay the BASIC PARTIAL,
refer to the AMPLITUDE ENVELOPE Delay in Extended Panel Mode (Section 6.3.1), or
Delay in Graphic Screen Mode ENVELOPES (Section 7.1.1).
When viewing the TIME SLICE FRAME Purple timeline, you will see the Delay Time
represented by a Purple square on the timeline. When the Purple square becomes
visible you can click/drag it left/right along the timeline and will notice the numerical
changes in the Delay Time rectangle light Green box. The range is from 0MSECS
(zero milliseconds) to 30.0SECS (30 seconds), in 1 millisecond increments.

ARTURIA – Synclavier V – USER MANUAL 83
6.3.4.6 Fade Time
The Fade Time rectangle light Green box (numerical readout) is located under SLICE
SETTINGS and displays the Crossfade time between your currently selected TIME SLICE
FRAME and the previous TIME SLICE FRAME on the Purple timeline. The BASIC PARTIAL
(Frame 0) is not affected. You can click/drag UP/DOWN in the Fade Time box to
increase or decrease the numerical Fade Time setting and will see the changes occur
on the Purple timeline.
You may also click on the FRAME (Green circle on the horizontal Purple timeline) and
drag it left/right along the timeline, increasing/decreasing the FRAME’s Fade Time. The
range is from 0MSECS (zero milliseconds) to 30.0SECS (30 seconds), in 1 millisecond
increments.
6.3.4.7 Pitch
The Pitch rectangle light Green box is located under SLICE SETTINGS and displays the
Pitch Transposition for the currently selected TIME SLICE FRAME. Each FRAME over time
can have it’s own pitch offset in semitones. The default setting is NO TRANSPOSITION
and the range is ±48 SEMITONES in 1 (one) SEMITONE steps.
6.3.4.8 Volume
The Volume rectangle light Green box (numerical value) is located under SLICE
SETTINGS and sets the loudness level of the currently selected TIME SLICE FRAME.
Click/drag UP/DOWN in the Volume box to increase/decrease the loudness level from
0.00 to 100 in .1 increments.
6.3.4.9 Modulation
The Modulation rectangle light Green box (numerical value) is located under SLICE
SETTINGS. Modulation controls the amount of the FM CARRIER waveform applied to
the currently selected TIME SLICE FRAME. The range is 0.00 to 100 in increments of 1.00.
6.3.5 TOOLS
TOOLS are located in between SLICE SETTINGS and HARMONICS SELECT. TOOLS are a
selection of buttons to help in entering the CARRIER and MODULATOR 24 Harmonics
and Phase light Green columns.
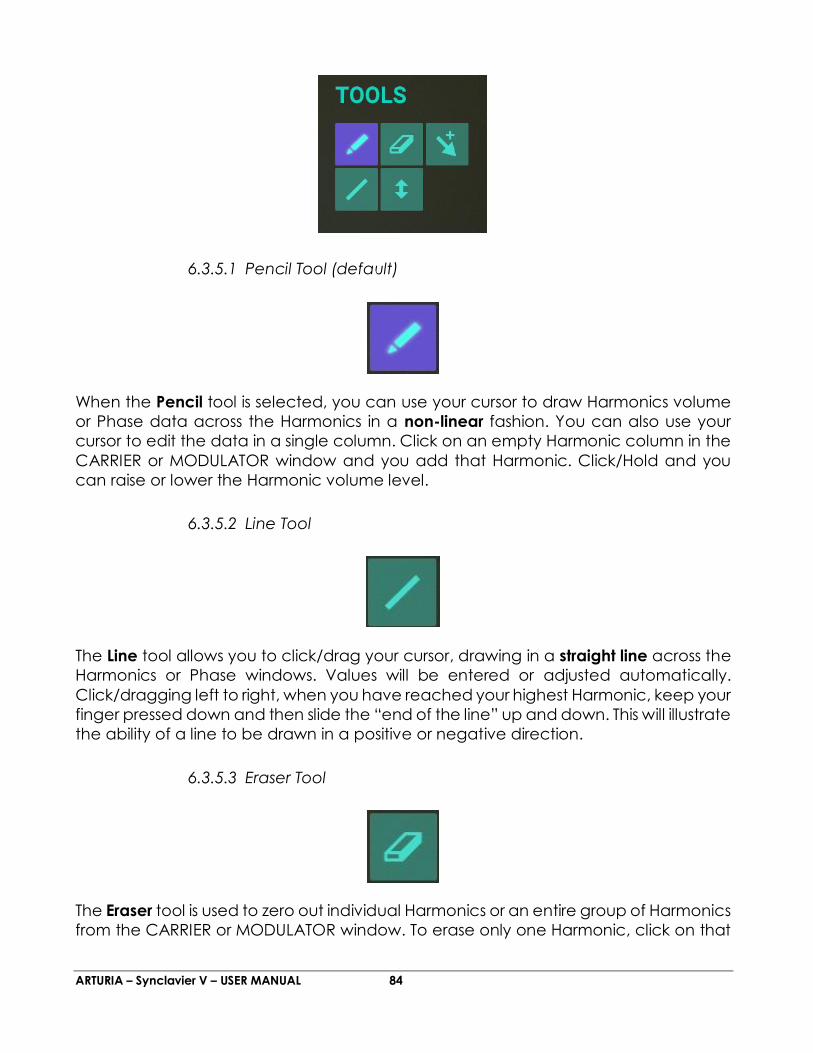
ARTURIA – Synclavier V – USER MANUAL 84
6.3.5.1 Pencil Tool (default)
When the Pencil tool is selected, you can use your cursor to draw Harmonics volume
or Phase data across the Harmonics in a non-linear fashion. You can also use your
cursor to edit the data in a single column. Click on an empty Harmonic column in the
CARRIER or MODULATOR window and you add that Harmonic. Click/Hold and you
can raise or lower the Harmonic volume level.
6.3.5.2 Line Tool
The Line tool allows you to click/drag your cursor, drawing in a straight line across the
Harmonics or Phase windows. Values will be entered or adjusted automatically.
Click/dragging left to right, when you have reached your highest Harmonic, keep your
finger pressed down and then slide the “end of the line” up and down. This will illustrate
the ability of a line to be drawn in a positive or negative direction.
6.3.5.3 Eraser Tool
The Eraser tool is used to zero out individual Harmonics or an entire group of Harmonics
from the CARRIER or MODULATOR window. To erase only one Harmonic, click on that

ARTURIA – Synclavier V – USER MANUAL 85
Harmonic column. To erase a range of Harmonics, click the first Harmonic you want to
erase and swipe your finger to the right. Alternatively, you could tap the last Harmonic
you want to erase and swipe your finger to the left.
6.3.5.4 Offset Tool
Select the Offset tool to adjust ALL of the values of the selected CARRIER or
MODULATOR Harmonics and Phases proportionately. You will be able to move them
up/down with your cursor.
6.3.5.5 Multi Tool
Selecting this button will allow you to switch between tools using Shift/click, Alt/Click,
or Right/click.
Shift/click = Line tool
Alt/click (Mac & Windows users) = Offset tool
Right/click = Eraser tool
6.3.6 HARMONICS SELECT
The HARMONICS SELECT (just to the RIGHT of the TOOLS selector) is a drop-down menu
allowing you to choose a Coefficients Restriction option when editing the 24
Harmonics or Phases. You can limit your harmonics being edited to either ALL (default),
ODD, EVEN, OCTAVES, or FIFTHS.
(See also Section 7.3.1 CARRIER & MODULATOR for more details on adding & editing
the 24 Harmonics & Phases)
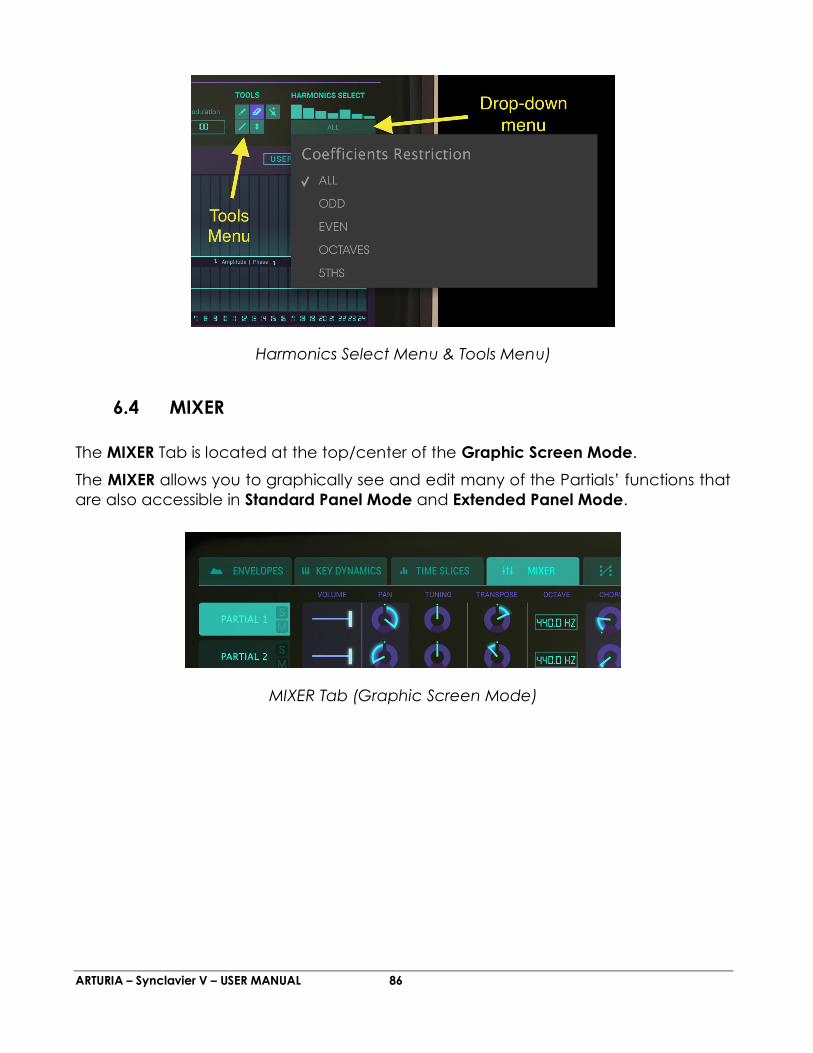
ARTURIA – Synclavier V – USER MANUAL 86
Harmonics Select Menu & Tools Menu)
6.4 MIXER
The MIXER Tab is located at the top/center of the Graphic Screen Mode.
The MIXER allows you to graphically see and edit many of the Partials’ functions that
are also accessible in Standard Panel Mode and Extended Panel Mode.
MIXER Tab (Graphic Screen Mode)
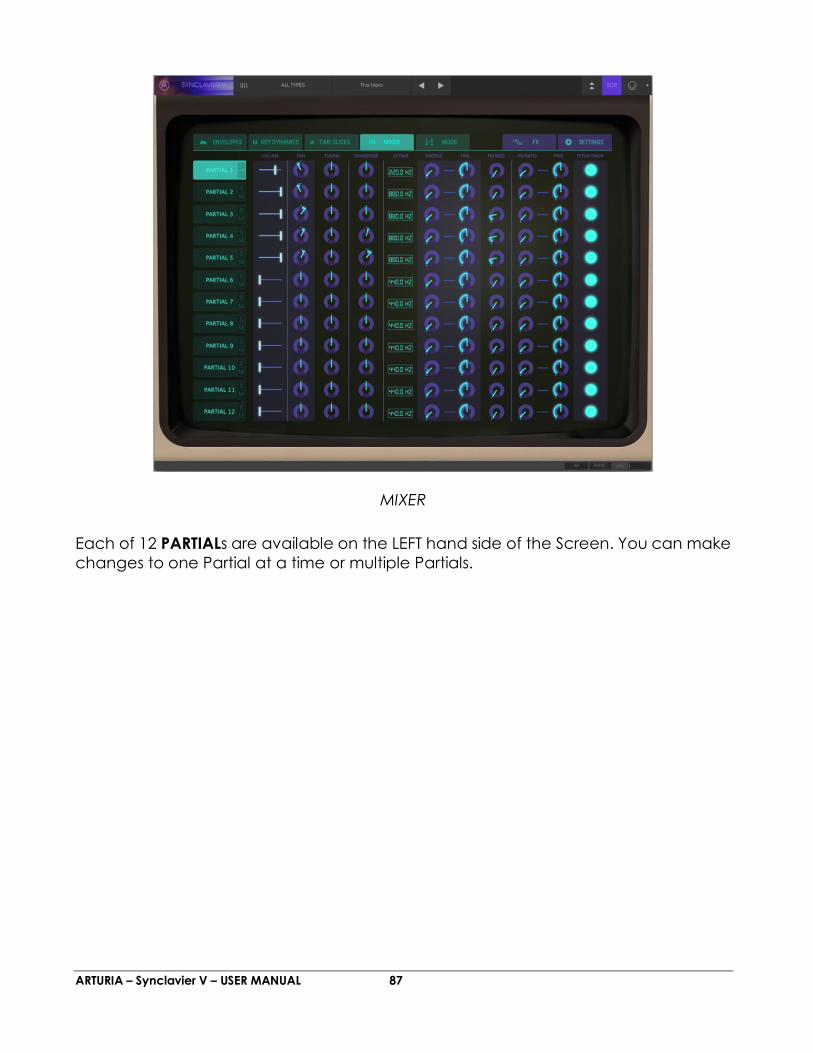
ARTURIA – Synclavier V – USER MANUAL 87
MIXER
Each of 12 PARTIALs are available on the LEFT hand side of the Screen. You can make
changes to one Partial at a time or multiple Partials.
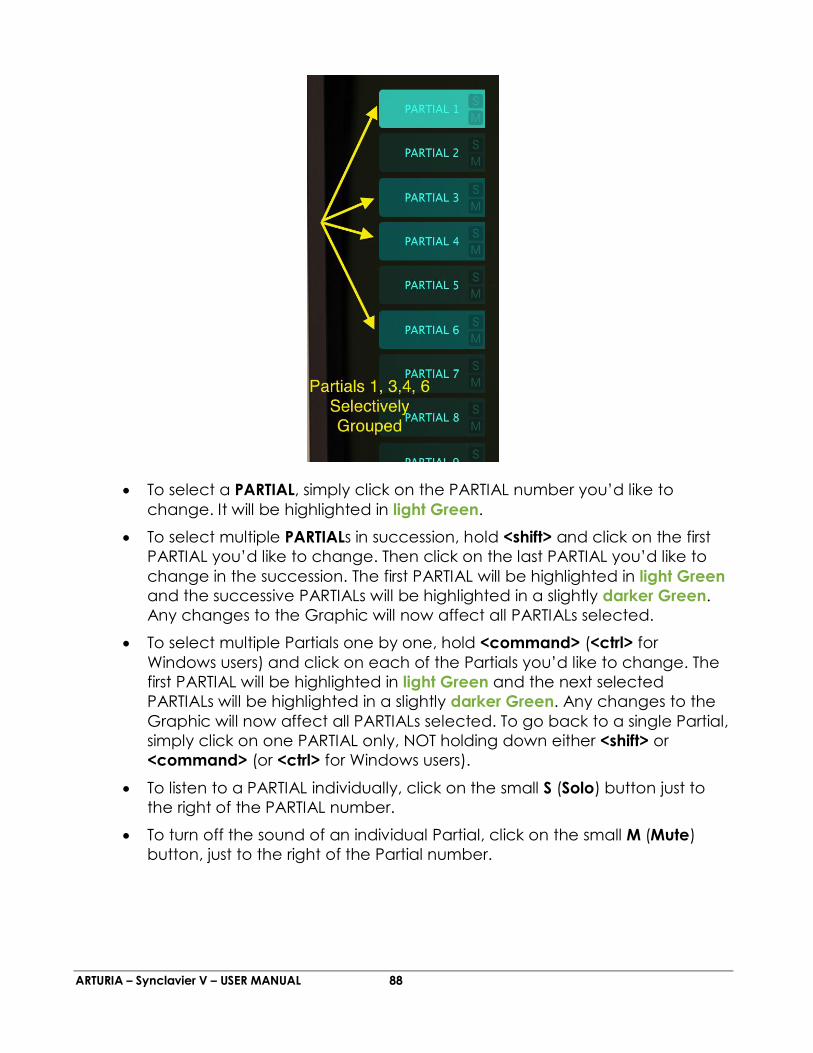
ARTURIA – Synclavier V – USER MANUAL 88
To select a PARTIAL, simply click on the PARTIAL number you’d like to
change. It will be highlighted in light Green.
To select multiple PARTIALs in succession, hold <shift> and click on the first
PARTIAL you’d like to change. Then click on the last PARTIAL you’d like to
change in the succession. The first PARTIAL will be highlighted in light Green
and the successive PARTIALs will be highlighted in a slightly darker Green.
Any changes to the Graphic will now affect all PARTIALs selected.
To select multiple Partials one by one, hold <command> (<ctrl> for
Windows users) and click on each of the Partials you’d like to change. The
first PARTIAL will be highlighted in light Green and the next selected
PARTIALs will be highlighted in a slightly darker Green. Any changes to the
Graphic will now affect all PARTIALs selected. To go back to a single Partial,
simply click on one PARTIAL only, NOT holding down either <shift> or
<command> (or <ctrl> for Windows users).
To listen to a PARTIAL individually, click on the small S (Solo) button just to
the right of the PARTIAL number.
To turn off the sound of an individual Partial, click on the small M (Mute)
button, just to the right of the Partial number.
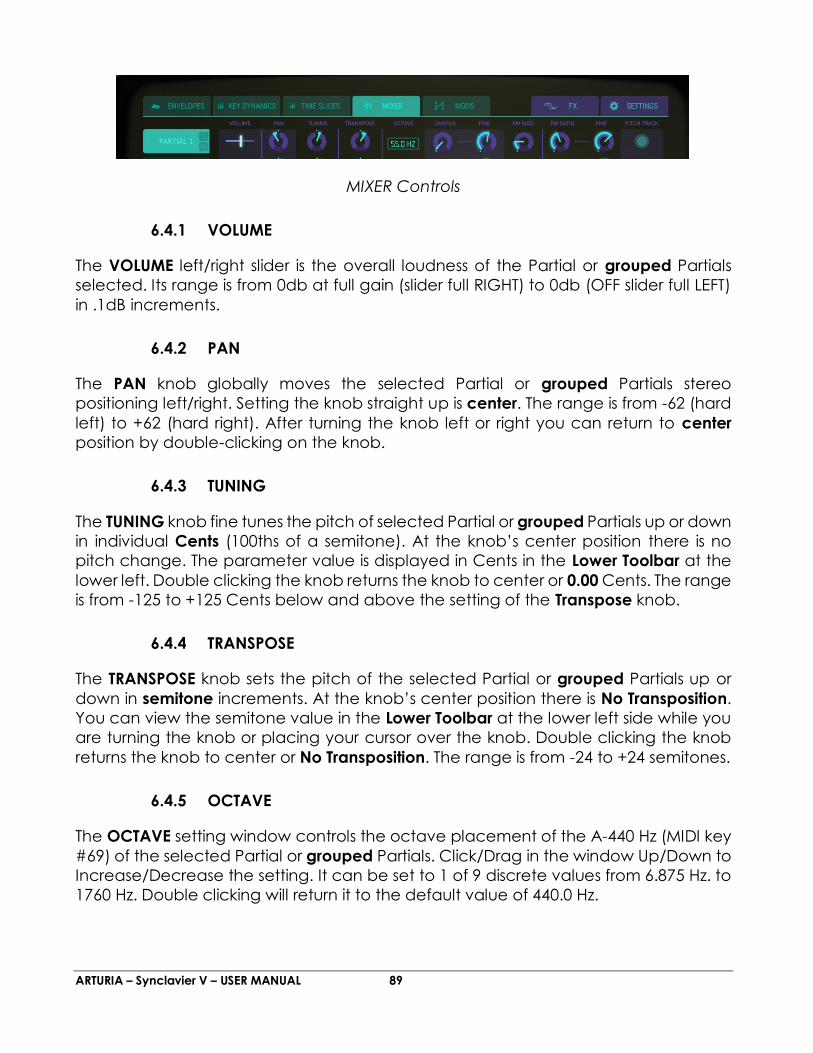
ARTURIA – Synclavier V – USER MANUAL 89
MIXER Controls
6.4.1 VOLUME
The VOLUME left/right slider is the overall loudness of the Partial or grouped Partials
selected. Its range is from 0db at full gain (slider full RIGHT) to 0db (OFF slider full LEFT)
in .1dB increments.
6.4.2 PAN
The PAN knob globally moves the selected Partial or grouped Partials stereo
positioning left/right. Setting the knob straight up is center. The range is from -62 (hard
left) to +62 (hard right). After turning the knob left or right you can return to center
position by double-clicking on the knob.
6.4.3 TUNING
The TUNING knob fine tunes the pitch of selected Partial or grouped Partials up or down
in individual Cents (100ths of a semitone). At the knob’s center position there is no
pitch change. The parameter value is displayed in Cents in the Lower Toolbar at the
lower left. Double clicking the knob returns the knob to center or 0.00 Cents. The range
is from -125 to +125 Cents below and above the setting of the Transpose knob.
6.4.4 TRANSPOSE
The TRANSPOSE knob sets the pitch of the selected Partial or grouped Partials up or
down in semitone increments. At the knob’s center position there is No Transposition.
You can view the semitone value in the Lower Toolbar at the lower left side while you
are turning the knob or placing your cursor over the knob. Double clicking the knob
returns the knob to center or No Transposition. The range is from -24 to +24 semitones.
6.4.5 OCTAVE
The OCTAVE setting window controls the octave placement of the A-440 Hz (MIDI key
#69) of the selected Partial or grouped Partials. Click/Drag in the window Up/Down to
Increase/Decrease the setting. It can be set to 1 of 9 discrete values from 6.875 Hz. to
1760 Hz. Double clicking will return it to the default value of 440.0 Hz.
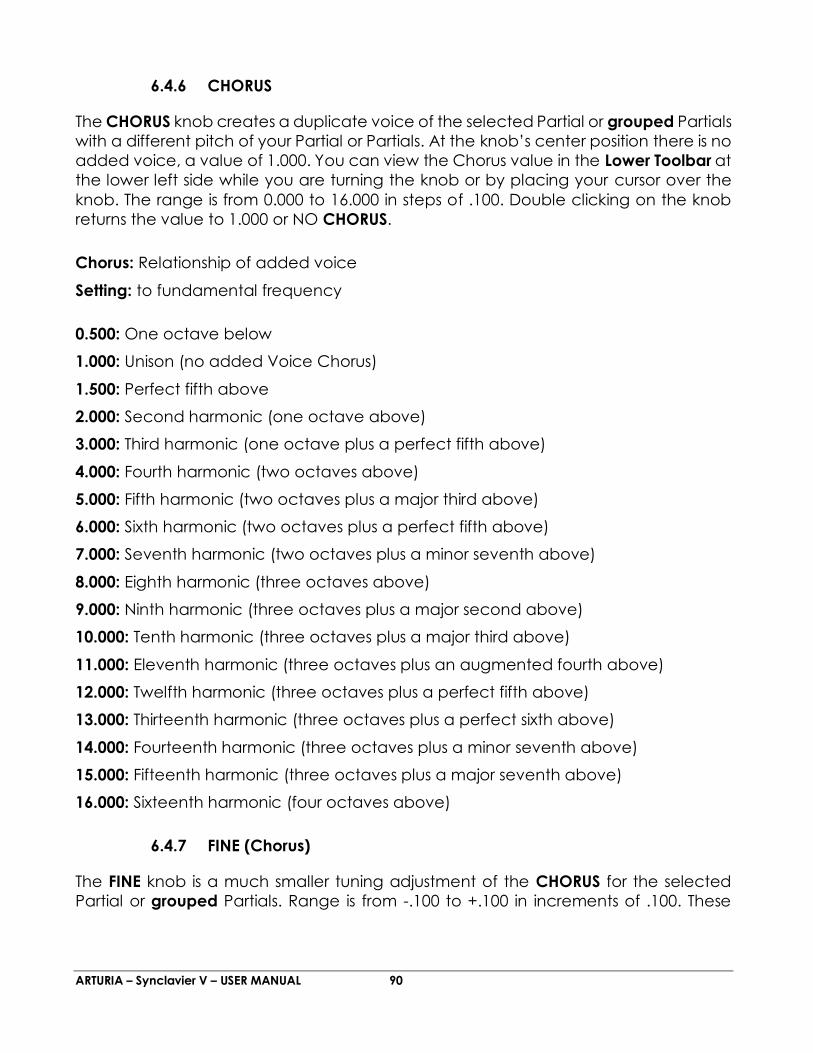
ARTURIA – Synclavier V – USER MANUAL 90
6.4.6 CHORUS
The CHORUS knob creates a duplicate voice of the selected Partial or grouped Partials
with a different pitch of your Partial or Partials. At the knob’s center position there is no
added voice, a value of 1.000. You can view the Chorus value in the Lower Toolbar at
the lower left side while you are turning the knob or by placing your cursor over the
knob. The range is from 0.000 to 16.000 in steps of .100. Double clicking on the knob
returns the value to 1.000 or NO CHORUS.
Chorus: Relationship of added voice
Setting: to fundamental frequency
0.500: One octave below
1.000: Unison (no added Voice Chorus)
1.500: Perfect fifth above
2.000: Second harmonic (one octave above)
3.000: Third harmonic (one octave plus a perfect fifth above)
4.000: Fourth harmonic (two octaves above)
5.000: Fifth harmonic (two octaves plus a major third above)
6.000: Sixth harmonic (two octaves plus a perfect fifth above)
7.000: Seventh harmonic (two octaves plus a minor seventh above)
8.000: Eighth harmonic (three octaves above)
9.000: Ninth harmonic (three octaves plus a major second above)
10.000: Tenth harmonic (three octaves plus a major third above)
11.000: Eleventh harmonic (three octaves plus an augmented fourth above)
12.000: Twelfth harmonic (three octaves plus a perfect fifth above)
13.000: Thirteenth harmonic (three octaves plus a perfect sixth above)
14.000: Fourteenth harmonic (three octaves plus a minor seventh above)
15.000: Fifteenth harmonic (three octaves plus a major seventh above)
16.000: Sixteenth harmonic (four octaves above)
6.4.7 FINE (Chorus)
The FINE knob is a much smaller tuning adjustment of the CHORUS for the selected
Partial or grouped Partials. Range is from -.100 to +.100 in increments of .100. These

ARTURIA – Synclavier V – USER MANUAL 91
values read out in the Lower Toolbar left side as well. Double clicking on the knob
returns it to its center position 0.000.
6.4.8 FM MOD
The FM MOD knob controls the overall amount of F.M. modulation for the selected
Partial or grouped Partials. There must be a CARRIER wave AND a MODULATOR wave
assigned to a Partial on the Time Slices page in Graphic Screen Mode for this control
to have any effect on the timbre. The Range is from 0.000 to 1.000.
6.4.9 FM RATIO
The FM RATIO knob controls the ratio of the F.M. Modulator frequency to the FM Carrier
frequency for the selected Partial or grouped Partials. There must be a CARRIER wave
AND a MODULATOR wave assigned to a Partial on the Time Slices page in Graphic
Screen Mode for this control to have any effect on the Partial. The Range is from 0.000
to 16.000 in increments of .100.
6.4.10 FINE (FM Ratio)
The FM Fine knob is a much smaller adjustment to the FM Ratio (ratio of the F.M.
Modulator frequency to the F.M. Carrier frequency) for the selected Partial or grouped
Partials. There must be a CARRIER wave AND a MODULATOR wave assigned to a Partial
on the Time Slices page in Graphic Screen Mode for this control to have any effect on
the Partial. The Range is from -0.100 to +0.100 in very small increments of .001.
6.4.11 PITCH TRACK
The TRACK button On/Off determines if the selected Partial or grouped Partials track
the Virtual Keyboard or external MIDI keyboard/controller.
When turned ON (bright Green), the pitch tracks the notes on the keyboard. When
turned OFF, the pitch will be constant (A-440 MIDI note #69) with any note depressed.
6.5 MODS (SOURCES)
The MODS Tab is located at the top/center of the Graphic Panel Screen just to the
right of the MIXER Tab. The MODS section provides extensive source and destination
modulator routings not available in Standard Panel or Extended Panel Modes. Routings
are assignable to the selected Partial or grouped Partials.
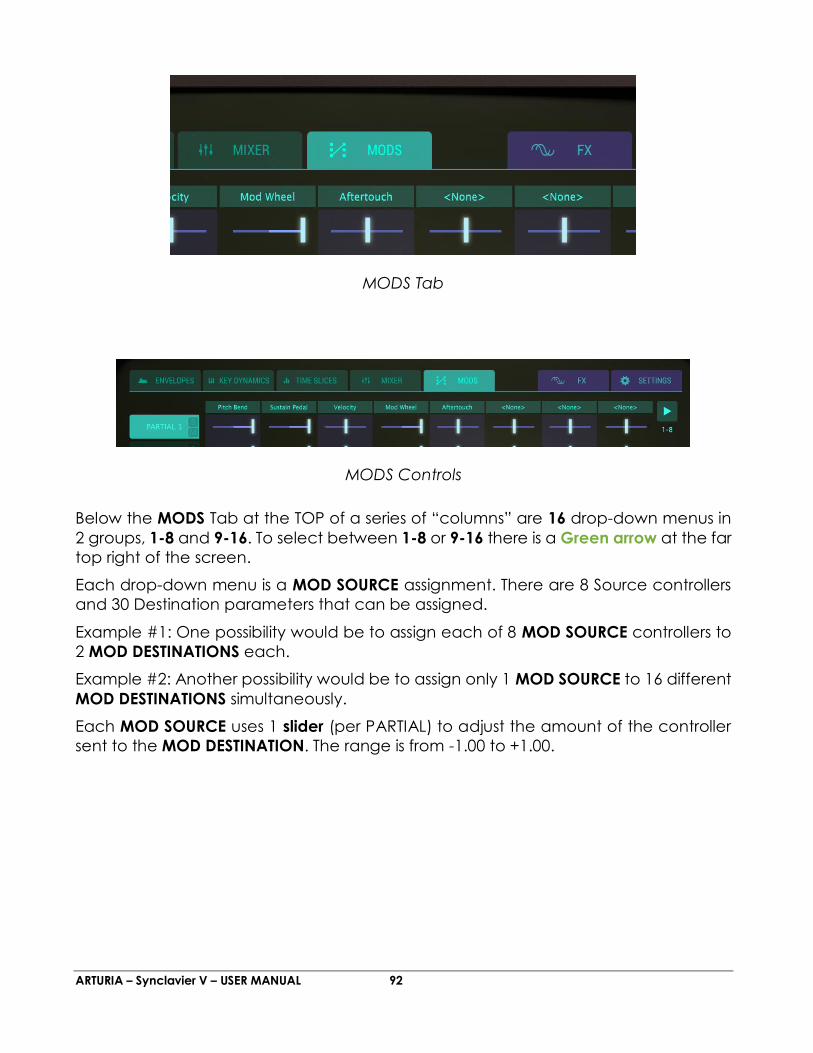
ARTURIA – Synclavier V – USER MANUAL 92
MODS Tab
MODS Controls
Below the MODS Tab at the TOP of a series of “columns” are 16 drop-down menus in
2 groups, 1-8 and 9-16. To select between 1-8 or 9-16 there is a Green arrow at the far
top right of the screen.
Each drop-down menu is a MOD SOURCE assignment. There are 8 Source controllers
and 30 Destination parameters that can be assigned.
Example #1: One possibility would be to assign each of 8 MOD SOURCE controllers to
2 MOD DESTINATIONS each.
Example #2: Another possibility would be to assign only 1 MOD SOURCE to 16 different
MOD DESTINATIONS simultaneously.
Each MOD SOURCE uses 1 slider (per PARTIAL) to adjust the amount of the controller
sent to the MOD DESTINATION. The range is from -1.00 to +1.00.
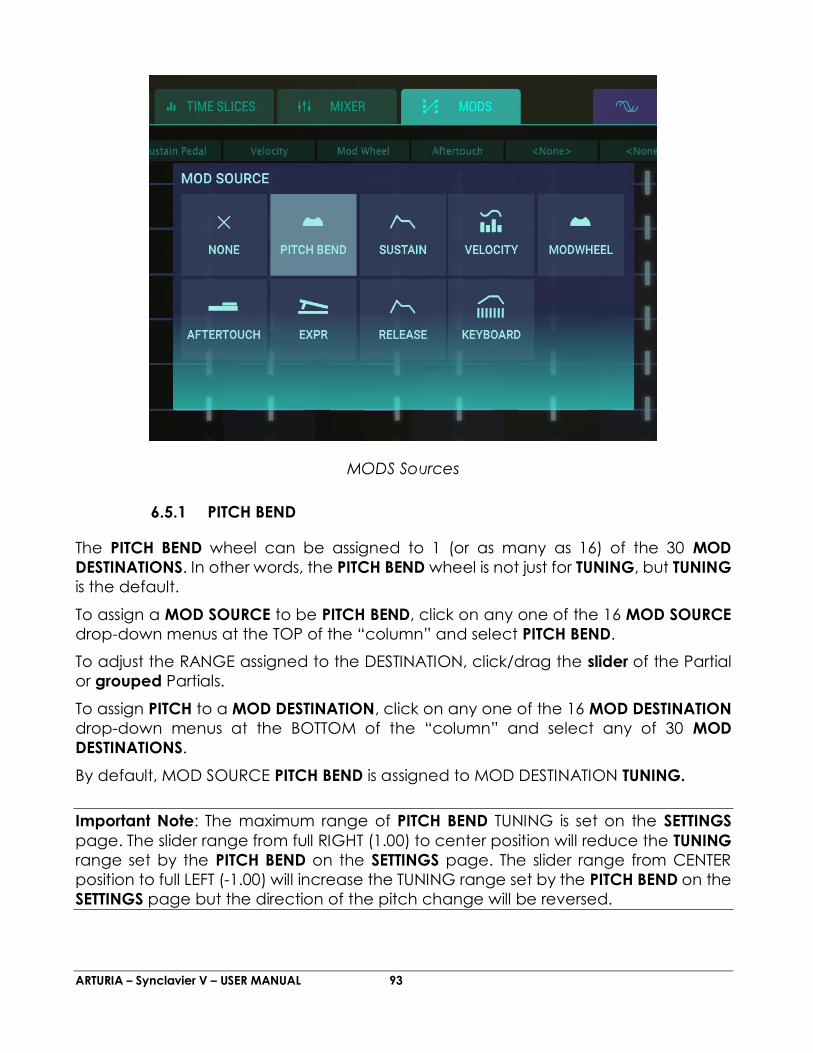
ARTURIA – Synclavier V – USER MANUAL 93
MODS Sources
6.5.1 PITCH BEND
The PITCH BEND wheel can be assigned to 1 (or as many as 16) of the 30 MOD
DESTINATIONS. In other words, the PITCH BEND wheel is not just for TUNING, but TUNING
is the default.
To assign a MOD SOURCE to be PITCH BEND, click on any one of the 16 MOD SOURCE
drop-down menus at the TOP of the “column” and select PITCH BEND.
To adjust the RANGE assigned to the DESTINATION, click/drag the slider of the Partial
or grouped Partials.
To assign PITCH to a MOD DESTINATION, click on any one of the 16 MOD DESTINATION
drop-down menus at the BOTTOM of the “column” and select any of 30 MOD
DESTINATIONS.
By default, MOD SOURCE PITCH BEND is assigned to MOD DESTINATION TUNING.
Important Note: The maximum range of PITCH BEND TUNING is set on the SETTINGS
page. The slider range from full RIGHT (1.00) to center position will reduce the TUNING
range set by the PITCH BEND on the SETTINGS page. The slider range from CENTER
position to full LEFT (-1.00) will increase the TUNING range set by the PITCH BEND on the
SETTINGS page but the direction of the pitch change will be reversed.
ARTURIA – Synclavier V – USER MANUAL 94
6.5.2 SUSTAIN (Sustain Pedal)
The SUSTAIN pedal can be assigned to 1 (or as many as 16) of the 30 MOD
DESTINATIONS.
To assign a MOD SOURCE to be the SUSTAIN Pedal, click on any one of the 16 MOD
SOURCE drop-down menus at the TOP of the “column” and select SUSTAIN.
To adjust the amount to be sent to the DESTINATION, click/drag the slider of the Partial
or grouped Partials.
To assign the SUSTAIN pedal to a MOD DESTINATION, click on any one of the 16 MOD
DESTINATION drop-down menus at the BOTTOM of the “column” and select any of 30
MOD DESTINATIONS.
6.5.3 VELOCITY
VELOCITY can be assigned to 1 (or as many as 16) of the 30 MOD DESTINATIONS.
To assign a MOD SOURCE to be VELOCITY, click on any one of the 16 MOD SOURCE
drop-down menus at the TOP of the “column” and select VELOCITY.
To adjust the amount to be sent to the DESTINATION, click/drag the slider of the Partial
or grouped Partials.
To assign VELOCITY to a MOD DESTINATION, click on any one of the 16 MOD
DESTINATION drop-down menus at the BOTTOM of the “column” and select any of 30
MOD DESTINATIONS.
6.5.4 MODWHEEL
The MODWHEEL can be assigned to 1 (or as many as 16) of the 30 MOD DESTINATIONS.
To assign a MOD SOURCE to be the MODWHEEL, click on any one of the 16 MOD
SOURCE drop-down menus at the TOP of the “column” and select MODWHEEL.
To adjust the amount to be sent to the DESTINATION, click/drag the slider of the Partial
or grouped Partials.
To assign the MODWHEEL to a MOD DESTINATION, click on any one of the 16 MOD
DESTINATION drop-down menus at the BOTTOM of the “column” and select any of 30
MOD DESTINATIONS.
6.5.5 AFTERTOUCH
AFTERTOUCH can be assigned to 1 (or as many as 16) of the 30 MOD DESTINATIONS.
ARTURIA – Synclavier V – USER MANUAL 95
To assign a MOD SOURCE to be AFTERTOUCH, click on any one of the 16 MOD SOURCE
drop-down menus at the TOP of the “column” and select AFTERTOUCH.
To adjust the amount to be sent to the DESTINATION, click/drag the slider of the Partial
or grouped Partials.
To assign AFTERTOUCH to a MOD DESTINATION, click on any one of the 16 MOD
DESTINATION drop-down menus at the BOTTOM of the “column” and select any of 30
MOD DESTINATIONS.
6.5.6 EXPR (Expression Pedal)
EXPR (Expression Pedal) can be assigned to 1 (or as many as 16) of the 30 MOD
DESTINATIONS.
To assign a MOD SOURCE to be EXPR (Expression Pedal), click on any one of the 16
MOD SOURCE drop-down menus at the TOP of the “column” and select EXPR
(Expression Pedal).
To adjust the amount to be sent to the DESTINATION, click/drag the slider of the Partial
or grouped Partials.
To assign EXPR (Expression Pedal) to a MOD DESTINATION, click on any one of the 16
MOD DESTINATION drop-down menus at the BOTTOM of the “column” and select any
of 30 MOD DESTINATIONS.
6.5.7 RELEASE (Release Velocity)
RELEASE (Release Velocity) can be assigned to 1 (or as many as 16) of the 30 MOD
DESTINATIONS.
To assign a MOD SOURCE to be RELEASE (Release Velocity), click on any one of the 16
MOD SOURCE drop-down menus at the TOP of the “column” and select RELEASE
(Release Velocity).
To adjust the amount to be sent to the DESTINATION, click/drag the slider of the Partial
or grouped Partials.
To assign RELEASE (Release Velocity) to a MOD DESTINATION, click on any one of the
16 MOD DESTINATION drop-down menus at the BOTTOM of the “column” and select
any of 30 MOD DESTINATIONS.
6.5.8 KEYBOARD (Keyboard Envelope)
KEYBOARD (Keyboard Envelope) can be assigned to 1 (or as many as 16) of the 30
MOD DESTINATIONS.
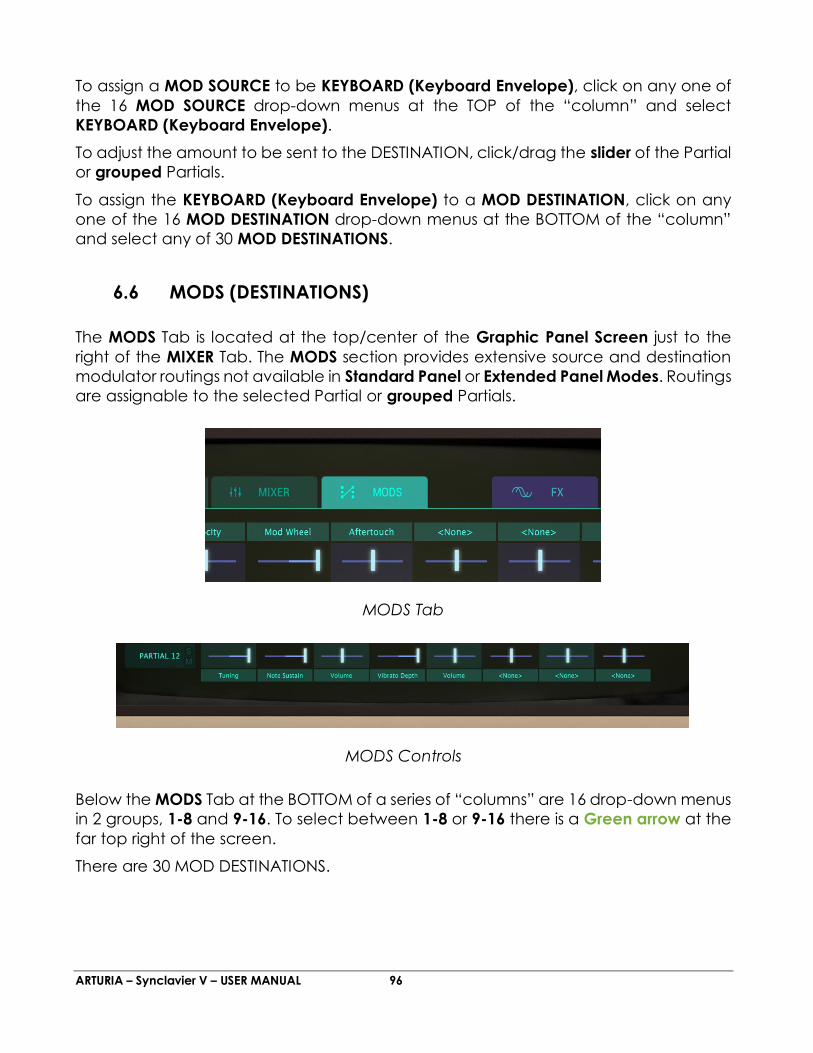
ARTURIA – Synclavier V – USER MANUAL 96
To assign a MOD SOURCE to be KEYBOARD (Keyboard Envelope), click on any one of
the 16 MOD SOURCE drop-down menus at the TOP of the “column” and select
KEYBOARD (Keyboard Envelope).
To adjust the amount to be sent to the DESTINATION, click/drag the slider of the Partial
or grouped Partials.
To assign the KEYBOARD (Keyboard Envelope) to a MOD DESTINATION, click on any
one of the 16 MOD DESTINATION drop-down menus at the BOTTOM of the “column”
and select any of 30 MOD DESTINATIONS.
6.6 MODS (DESTINATIONS)
The MODS Tab is located at the top/center of the Graphic Panel Screen just to the
right of the MIXER Tab. The MODS section provides extensive source and destination
modulator routings not available in Standard Panel or Extended Panel Modes. Routings
are assignable to the selected Partial or grouped Partials.
MODS Tab
MODS Controls
Below the MODS Tab at the BOTTOM of a series of “columns” are 16 drop-down menus
in 2 groups, 1-8 and 9-16. To select between 1-8 or 9-16 there is a Green arrow at the
far top right of the screen.
There are 30 MOD DESTINATIONS.
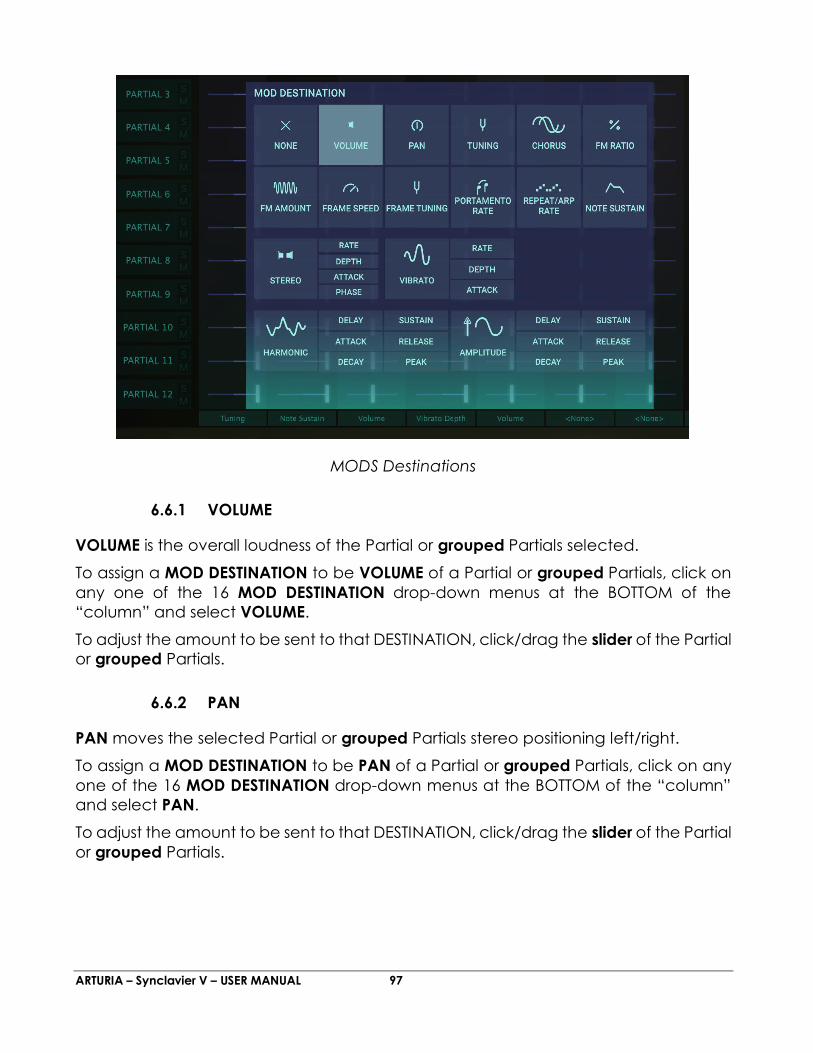
ARTURIA – Synclavier V – USER MANUAL 97
MODS Destinations
6.6.1 VOLUME
VOLUME is the overall loudness of the Partial or grouped Partials selected.
To assign a MOD DESTINATION to be VOLUME of a Partial or grouped Partials, click on
any one of the 16 MOD DESTINATION drop-down menus at the BOTTOM of the
“column” and select VOLUME.
To adjust the amount to be sent to that DESTINATION, click/drag the slider of the Partial
or grouped Partials.
6.6.2 PAN
PAN moves the selected Partial or grouped Partials stereo positioning left/right.
To assign a MOD DESTINATION to be PAN of a Partial or grouped Partials, click on any
one of the 16 MOD DESTINATION drop-down menus at the BOTTOM of the “column”
and select PAN.
To adjust the amount to be sent to that DESTINATION, click/drag the slider of the Partial
or grouped Partials.
ARTURIA – Synclavier V – USER MANUAL 98
6.6.3 TUNING
TUNING fine tunes the pitch of selected Partial or grouped Partials up or down in
individual Cents (100ths of a semitone).
To assign a MOD DESTINATION to be TUNING of a Partial or grouped Partials, click on
any one of the 16 MOD DESTINATION drop-down menus at the BOTTOM of the
“column” and select TUNING.
To adjust the amount to be sent to that DESTINATION, click/drag the slider of the Partial
or grouped Partials.
6.6.4 CHORUS
CHORUS creates a duplicate voice of the selected Partial or grouped Partials with a
different pitch of your Partial or Partials.
To assign a MOD DESTINATION to be CHORUS of a Partial or grouped Partials, click on
any one of the 16 MOD DESTINATION drop-down menus at the BOTTOM of the
“column” and select CHORUS.
To adjust the amount to be sent to that DESTINATION, click/drag the slider of the Partial
or grouped Partials.
6.6.5 FM RATIO
FM Ratio controls the ratio of the FM Modulator frequency to the FM Carrier frequency
for the selected Partial or grouped Partials. There must be a CARRIER wave AND a
MODULATOR wave assigned to a Partial on the Time Slices page in Graphic Screen
Mode for this control to have any effect on the Partial.
To assign a MOD DESTINATION to be FM RATIO of a Partial or grouped Partials, click on
any one of the 16 MOD DESTINATION drop-down menus at the BOTTOM of the
“column” and select FM RATIO.
To adjust the amount to be sent to that DESTINATION, click/drag the slider of the Partial
or grouped Partials.
6.6.6 FM AMOUNT
FM AMOUNT controls the overall amount of FM modulation for the selected Partial or
grouped Partials. There must be a CARRIER wave AND a MODULATOR wave assigned
to a Partial on the Time Slices page in Graphic Screen Mode for this control to have
any effect on the timbre.
To assign a MOD DESTINATION to be FM AMOUNT of a Partial or grouped Partials, click
on any one of the 16 MOD DESTINATION drop-down menus at the BOTTOM of the
“column” and select FM AMOUNT.

ARTURIA – Synclavier V – USER MANUAL 99
To adjust the amount to be sent to that DESTINATION, click/drag the slider of the Partial
or grouped Partials.
6.6.7 FRAME SPEED
FRAME SPEED increases or decreases the overall time that Timbre Slice Frames
crossfade into one another for the selected Partial or grouped Partials.
To assign a MOD DESTINATION to be FRAME SPEED of a Partial or grouped Partials, click
on any one of the 16 MOD DESTINATION drop-down menus at the BOTTOM of the
“column” and select FRAME SPEED.
To adjust the amount to be sent to that DESTINATION, click/drag the slider of the Partial
or grouped Partials.
6.6.8 FRAME TUNING
FRAME TUNING increases or decreases the overall Pitch offset for Timbre Slice Frames
for the selected Partial or grouped Partials.
To assign a MOD DESTINATION to FRAME TUNING of a Partial or grouped Partials, click
on any one of the 16 MOD DESTINATION drop-down menus at the BOTTOM of the
“column” and select FRAME TUNING.
To adjust the amount to be sent to that DESTINATION, click/drag the slider of the Partial
or grouped Partials.
6.6.9 PORTAMENTO RATE
PORTAMENTO is a a global parameter affecting all Partials in the current Timbre. It
makes the pitch “glide” between the notes you play, rather than changing the pitch
instantly as soon as you hit another key or keys on your keyboard. The effect works on
Polyphonic or Monophonic Timbres.
PORTAMENTO RATE controls the speed at which the sound glides from one pitch to the
next.
To assign a MOD DESTINATION to PORTAMENTO RATE of a Partial or grouped Partials,
click on any one of the 16 MOD DESTINATION drop-down menus at the BOTTOM of the
“column” and select PORTAMENTO RATE. (See Figure #22 above)
To adjust the amount to be sent to that DESTINATION, click/drag the slider of the Partial
or grouped Partials.
6.6.10 REPEAT/ARP RATE (Repeat/Arpeggiate)
REPEAT/ARP RATE is a a global parameter affecting all Partials in the current Timbre.
REPEAT/ARP RATE determines the speed of your repeating notes or arpeggios.
ARTURIA – Synclavier V – USER MANUAL 100
To assign a MOD DESTINATION to REPEAT/ARP RATE of a Partial or grouped Partials, click
on any one of the 16 MOD DESTINATION drop-down menus at the BOTTOM of the
“column” and select REPEAT/ARP RATE.
To adjust the amount to be sent to that DESTINATION, click/drag the slider of the Partial
or grouped Partials.
6.6.11 NOTE SUSTAIN
NOTE SUSTAIN holds the MIDI Note-on event ON for the selected Partial or grouped
Partials.
To assign a MOD DESTINATION to NOTE SUSTAIN of a Partial or grouped Partials, click
on any one of the 16 MOD DESTINATION drop-down menus at the BOTTOM of the
“column” and select NOTE SUSTAIN.
(The most common MOD SOURCE for this destination would be SUSTAIN PEDAL.)
Click/dragging the slider of the Partial or grouped Partials RIGHT to the positive side
will set the NOTE SUSTAIN ON.
6.6.12 STEREO:RATE
STEREO:RATE determines the speed of your Stereo panning effects and Tremolo non-
panning effects for the selected Partial or grouped Partials.
To assign a MOD DESTINATION to STEREO:RATE of a Partial or grouped Partials, click on
any one of the 16 MOD DESTINATION drop-down menus at the BOTTOM of the
“column” and select STEREO:RATE.
To adjust the amount to be sent to that DESTINATION, click/drag the slider of the Partial
or grouped Partials.
6.6.13 STEREO:DEPTH
STEREO:DEPTH controls the width of the Stereo panning effects or the depth of the
Tremelo effects.
To assign a MOD DESTINATION to STEREO:DEPTH of a Partial or grouped Partials, click
on any one of the 16 MOD DESTINATION drop-down menus at the BOTTOM of the
“column” and select STEREO:DEPTH.
To adjust the amount to be sent to that DESTINATION, click/drag the slider of the Partial
or grouped Partials.
ARTURIA – Synclavier V – USER MANUAL 101
6.6.14 STEREO:ATTACK
STEREO:ATTACK adjusts the amount of delay before the Stereo effect begins after the
note-on.
To assign a MOD DESTINATION to STEREO:ATTACK of a Partial or grouped Partials, click
on any one of the 16 MOD DESTINATION drop-down menus at the BOTTOM of the
“column” and select STEREO:ATTACK.
To adjust the amount to be sent to that DESTINATION, click/drag the slider of the Partial
or grouped Partials.
6.6.15 STEREO:PHASE
STEREO:PHASE defaults to 180° which allow full Left/Right Stereo panning effects.
Turning the knob full down to 0° or full up to 360° will allow Tremelo (Amplitude
Modulation) effects with NO Left/Right Stereo panning.
Other settings between 0° and 360° will display varying degrees of Left/Right panning
depth.
To assign a MOD DESTINATION to STEREO:PHASE of a Partial or grouped Partials, click
on any one of the 16 MOD DESTINATION drop-down menus at the BOTTOM of the
“column” and select STEREO:PHASE.
To adjust the amount to be sent to that DESTINATION, click/drag the slider of the Partial
or grouped Partials.
6.6.16 VIBRATO:RATE
VIBRATO:RATE determines the speed of your Modulator. The Rate is in Hz (Hertz or
cycles per second). The range is 0.00Hz to 50.0Hz.
To assign a MOD DESTINATION to STEREO:PHASE of a Partial or grouped Partials, click
on any one of the 16 MOD DESTINATION drop-down menus at the BOTTOM of the
“column” and select STEREO:PHASE.
To adjust the amount to be sent to that DESTINATION, click/drag the slider of the Partial
or grouped Partials.
6.6.17 VIBRATO:DEPTH
VIBRATO:DEPTH controls the level of the Carrier creating Vibrato. The pitch fluctuates
equally above and below the pitch of the key played. The range is 0 semitones to 25
semitones.
To assign a MOD DESTINATION to VIBRATO:DEPTH of a Partial or grouped Partials, click
on any one of the 16 MOD DESTINATION drop-down menus at the BOTTOM of the
“column” and select VIBRATO:DEPTH.

ARTURIA – Synclavier V – USER MANUAL 102
To adjust the amount to be sent to that DESTINATION, click/drag the slider of the Partial
or grouped Partials.
6.6.18 VIBRATO:ATTACK
VIBRATO:ATTACK adjusts the amount of delay before the Vibrato effect begins after
the note-on. The range is 0 MSecs to 30 seconds.
To assign a MOD DESTINATION to VIBRATO:ATTACK of a Partial or grouped Partials, click
on any one of the 16 MOD DESTINATION drop-down menus at the BOTTOM of the
“column” and select VIBRATO:ATTACK.
To adjust the amount to be sent to that DESTINATION, click/drag the slider of the Partial
or grouped Partials.
6.6.19 HARMONIC:DELAY
HARMONIC:DELAY increases the time for the selected Partial or grouped Partials’ F.M.
(Frequency Modulator) to be heard after the initial note-on (key depression). The
default value is 0 MSec (milliseconds) and the range is 0 MSec to 30.0 Secs (seconds)
in 1 millisecond increments.
To assign a MOD DESTINATION to HARMONIC:DELAY of a Partial or grouped Partials,
click on any one of the 16 MOD DESTINATION drop-down menus at the BOTTOM of the
“column” and select HARMONIC:DELAY.
To adjust the amount to be sent to that DESTINATION, click/drag the slider of the Partial
or grouped Partials.
6.6.20 HARMONIC:ATTACK
HARMONIC:ATTACK adjusts how fast or slow the F.M. (Frequency Modulator) ramps UP
in volume of the selected Partial or grouped Partials from the note-on (key depression)
to the Peak setting. The default is a value of 3 MSecs (milliseconds) and the range is 0
MSec to 30 Secs (seconds).
To assign a MOD DESTINATION to HARMONIC:ATTACK of a Partial or grouped Partials,
click on any one of the 16 MOD DESTINATION drop-down menus at the BOTTOM of the
“column” and select HARMONIC:ATTACK.
To adjust the amount to be sent to that DESTINATION, click/drag the slider of the Partial
or grouped Partials.

ARTURIA – Synclavier V – USER MANUAL 103
6.6.21 HARMONIC:DECAY
HARMONIC:DECAY adjusts how fast or slow the F.M. (Frequency Modulator) ramps
DOWN in volume from the Peak setting to the Sustain level setting of the selected
Partial or grouped Partials. The default is a value of 3 MSecs (milliseconds) and the
time range is from 0 MSec to 30 Secs (seconds).
To assign a MOD DESTINATION to HARMONIC:DECAY of a Partial or grouped Partials,
click on any one of the 16 MOD DESTINATION drop-down menus at the BOTTOM of the
“column” and select HARMONIC:DECAY.
To adjust the amount to be sent to that DESTINATION, click/drag the slider of the Partial
or grouped Partials.
6.6.22 HARMONIC:SUSTAIN
HARMONIC:SUSTAIN adjusts F.M. (Frequency Modulator) level of the selected Partial
or grouped Partials after the Decay portion of the envelope. The level ranges from 0.00
to 100.0.
To assign a MOD DESTINATION to HARMONIC:SUSTAIN of a Partial or grouped Partials,
click on any one of the 16 MOD DESTINATION
drop-down menus at the BOTTOM of the “column” and select HARMONIC:SUSTAIN.
To adjust the amount to be sent to that DESTINATION, click/drag the slider of the Partial
or grouped Partials.
6.6.23 HARMONIC:RELEASE
HARMONIC:RELEASE adjusts the final decay time of the F.M. (Frequency Modulator)
after the note-off (key release) for the selected Partial or grouped Partials. The time
range is from 0 MSec (milliseconds) to 30 Secs (seconds).
To assign a MOD DESTINATION to HARMONIC:RELEASE of a Partial or grouped Partials,
click on any one of the 16 MOD DESTINATION drop-down menus at the BOTTOM of the
“column” and select HARMONIC:RELEASE.
To adjust the amount to be sent to that DESTINATION, click/drag the slider of the Partial
or grouped Partials.
6.6.24 HARMONIC:PEAK
HARMONIC:PEAK adjusts the next level point in the F.M. (Frequency Modulator) after
the initial Attack of the selected Partial or grouped Partials. The level ranges from 0.00
to 100.0.
ARTURIA – Synclavier V – USER MANUAL 104
To assign a MOD DESTINATION to HARMONIC:PEAK of a Partial or grouped Partials, click
on any one of the 16 MOD DESTINATION drop-down menus at the BOTTOM of the
“column” and select HARMONIC:PEAK.
To adjust the amount to be sent to that DESTINATION, click/drag the slider of the Partial
or grouped Partials.
6.6.25 AMPLITUDE:DELAY
AMPLITUDE:DELAY increases the time for the selected Partial or grouped Partials to be
heard after the initial note-on (key depression). The default value is 0 MSec
(milliseconds) and the range is 0 MSec to 30.0 Secs (seconds) in 1 millisecond
increments.
To assign a MOD DESTINATION to AMPLITUDE:DELAY of a Partial or grouped Partials,
click on any one of the 16 MOD DESTINATION drop-down menus at the BOTTOM of the
“column” and select AMPLITUDE:DELAY.
To adjust the amount to be sent to that DESTINATION, click/drag the slider of the Partial
or grouped Partials.
6.6.26 AMPLITUDE:ATTACK
AMPLITUDE:ATTACK adjusts how fast or slow the Timbre/Sound ramps UP in volume from
the note-on (key depression) to the Peak setting for the selected Partial or grouped
Partials. The default is a value of 3 MSecs (milliseconds) and the range is 0 MSec to 30
Secs (seconds).
To assign a MOD DESTINATION to AMPLITUDE:ATTACK of a Partial or grouped Partials,
click on any one of the 16 MOD DESTINATION drop-down menus at the BOTTOM of the
“column” and select AMPLITUDE:ATTACK.
To adjust the amount to be sent to that DESTINATION, click/drag the slider of the Partial
or grouped Partials.
6.6.27 AMPLITUDE:DECAY
AMPLITUDE:DECAY adjusts how fast or slow the Timbre/Sound ramps DOWN in volume
from the Peak setting to the Sustain level setting of the selected Partial or grouped
Partials. The default is a value of 3 MSecs (milliseconds) and the time range is from 0
MSec to 30 Secs (seconds).
To assign a MOD DESTINATION to AMPLITUDE:DECAY of a Partial or grouped Partials,
click on any one of the 16 MOD DESTINATION drop-down menus at the BOTTOM of the
“column” and select AMPLITUDE:DECAY.
To adjust the amount to be sent to that DESTINATION, click/drag the slider of the Partial
or grouped Partials.
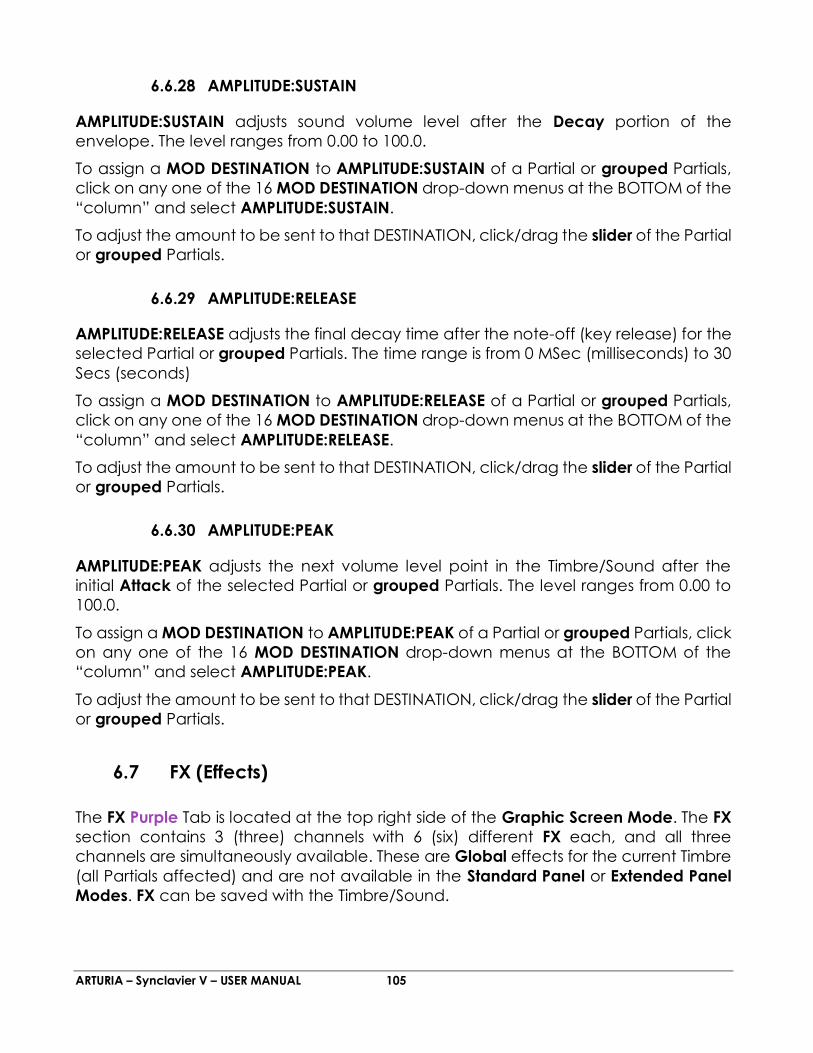
ARTURIA – Synclavier V – USER MANUAL 105
6.6.28 AMPLITUDE:SUSTAIN
AMPLITUDE:SUSTAIN adjusts sound volume level after the Decay portion of the
envelope. The level ranges from 0.00 to 100.0.
To assign a MOD DESTINATION to AMPLITUDE:SUSTAIN of a Partial or grouped Partials,
click on any one of the 16 MOD DESTINATION drop-down menus at the BOTTOM of the
“column” and select AMPLITUDE:SUSTAIN.
To adjust the amount to be sent to that DESTINATION, click/drag the slider of the Partial
or grouped Partials.
6.6.29 AMPLITUDE:RELEASE
AMPLITUDE:RELEASE adjusts the final decay time after the note-off (key release) for the
selected Partial or grouped Partials. The time range is from 0 MSec (milliseconds) to 30
Secs (seconds)
To assign a MOD DESTINATION to AMPLITUDE:RELEASE of a Partial or grouped Partials,
click on any one of the 16 MOD DESTINATION drop-down menus at the BOTTOM of the
“column” and select AMPLITUDE:RELEASE.
To adjust the amount to be sent to that DESTINATION, click/drag the slider of the Partial
or grouped Partials.
6.6.30 AMPLITUDE:PEAK
AMPLITUDE:PEAK adjusts the next volume level point in the Timbre/Sound after the
initial Attack of the selected Partial or grouped Partials. The level ranges from 0.00 to
100.0.
To assign a MOD DESTINATION to AMPLITUDE:PEAK of a Partial or grouped Partials, click
on any one of the 16 MOD DESTINATION drop-down menus at the BOTTOM of the
“column” and select AMPLITUDE:PEAK.
To adjust the amount to be sent to that DESTINATION, click/drag the slider of the Partial
or grouped Partials.
6.7 FX (Effects)
The FX Purple Tab is located at the top right side of the Graphic Screen Mode. The FX
section contains 3 (three) channels with 6 (six) different FX each, and all three
channels are simultaneously available. These are Global effects for the current Timbre
(all Partials affected) and are not available in the Standard Panel or Extended Panel
Modes. FX can be saved with the Timbre/Sound.

ARTURIA – Synclavier V – USER MANUAL 106
FX Tab
The 3 (three) channels of FX are located on the left side of the FX screen. Each
channel has an on/off button with the default selection as ON but in BYPASS (no
effect) mode. To select an FX type, click on the drop-down menu just to the right of
the ON/OFF button.
6.7.1 Flanger
The Flanger effect works by by mixing two identical signals together, one signal
delayed by a small and gradually changing time period. This produces a swept comb
filter effect. The controls are:
DELAY TIME Sets amount of time offset applied to the affected signal
DEPTH Sets modulation amount
RATE Sets modulation speed
FEEDBACK Sets positive or negative resonance
WET/DRY Mix Sets how much effect is added to the input signal
Flanger
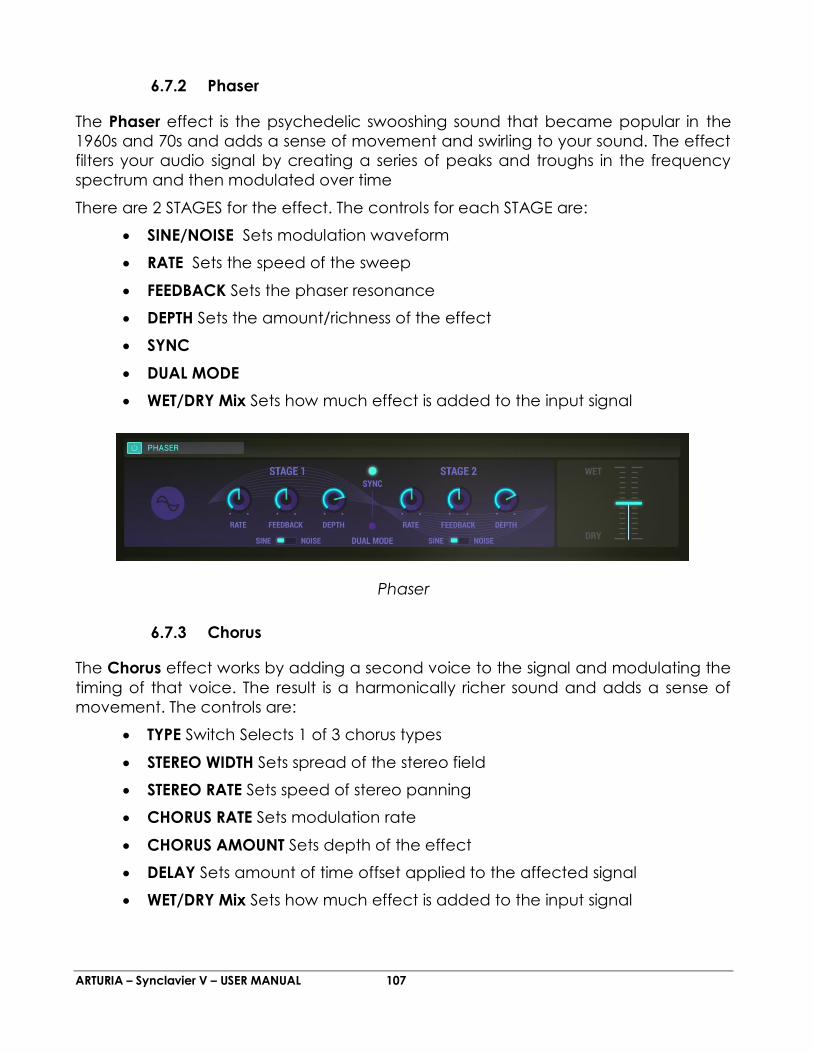
ARTURIA – Synclavier V – USER MANUAL 107
6.7.2 Phaser
The Phaser effect is the psychedelic swooshing sound that became popular in the
1960s and 70s and adds a sense of movement and swirling to your sound. The effect
filters your audio signal by creating a series of peaks and troughs in the frequency
spectrum and then modulated over time
There are 2 STAGES for the effect. The controls for each STAGE are:
SINE/NOISE Sets modulation waveform
RATE Sets the speed of the sweep
FEEDBACK Sets the phaser resonance
DEPTH Sets the amount/richness of the effect
SYNC
DUAL MODE
WET/DRY Mix Sets how much effect is added to the input signal
Phaser
6.7.3 Chorus
The Chorus effect works by adding a second voice to the signal and modulating the
timing of that voice. The result is a harmonically richer sound and adds a sense of
movement. The controls are:
TYPE Switch Selects 1 of 3 chorus types
STEREO WIDTH Sets spread of the stereo field
STEREO RATE Sets speed of stereo panning
CHORUS RATE Sets modulation rate
CHORUS AMOUNT Sets depth of the effect
DELAY Sets amount of time offset applied to the affected signal
WET/DRY Mix Sets how much effect is added to the input signal
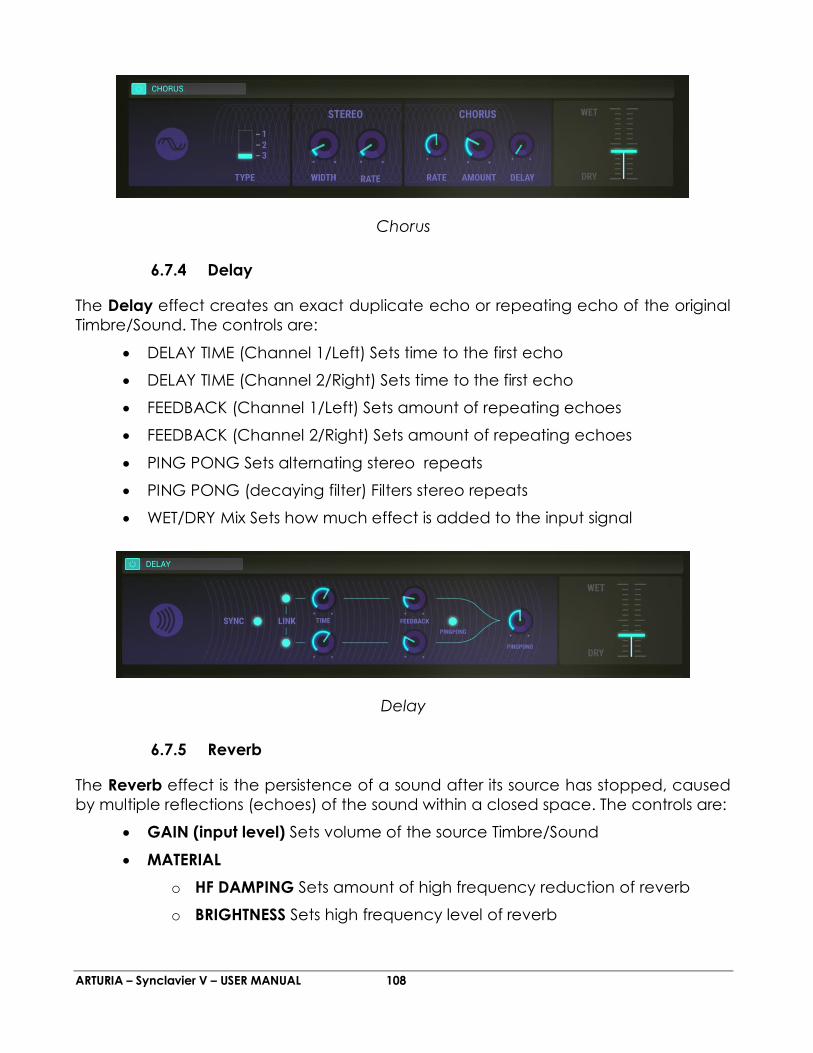
ARTURIA – Synclavier V – USER MANUAL 108
Chorus
6.7.4 Delay
The Delay effect creates an exact duplicate echo or repeating echo of the original
Timbre/Sound. The controls are:
DELAY TIME (Channel 1/Left) Sets time to the first echo
DELAY TIME (Channel 2/Right) Sets time to the first echo
FEEDBACK (Channel 1/Left) Sets amount of repeating echoes
FEEDBACK (Channel 2/Right) Sets amount of repeating echoes
PING PONG Sets alternating stereo repeats
PING PONG (decaying filter) Filters stereo repeats
WET/DRY Mix Sets how much effect is added to the input signal
Delay
6.7.5 Reverb
The Reverb effect is the persistence of a sound after its source has stopped, caused
by multiple reflections (echoes) of the sound within a closed space. The controls are:
GAIN (input level) Sets volume of the source Timbre/Sound
MATERIAL
o HF DAMPING Sets amount of high frequency reduction of reverb
o BRIGHTNESS Sets high frequency level of reverb
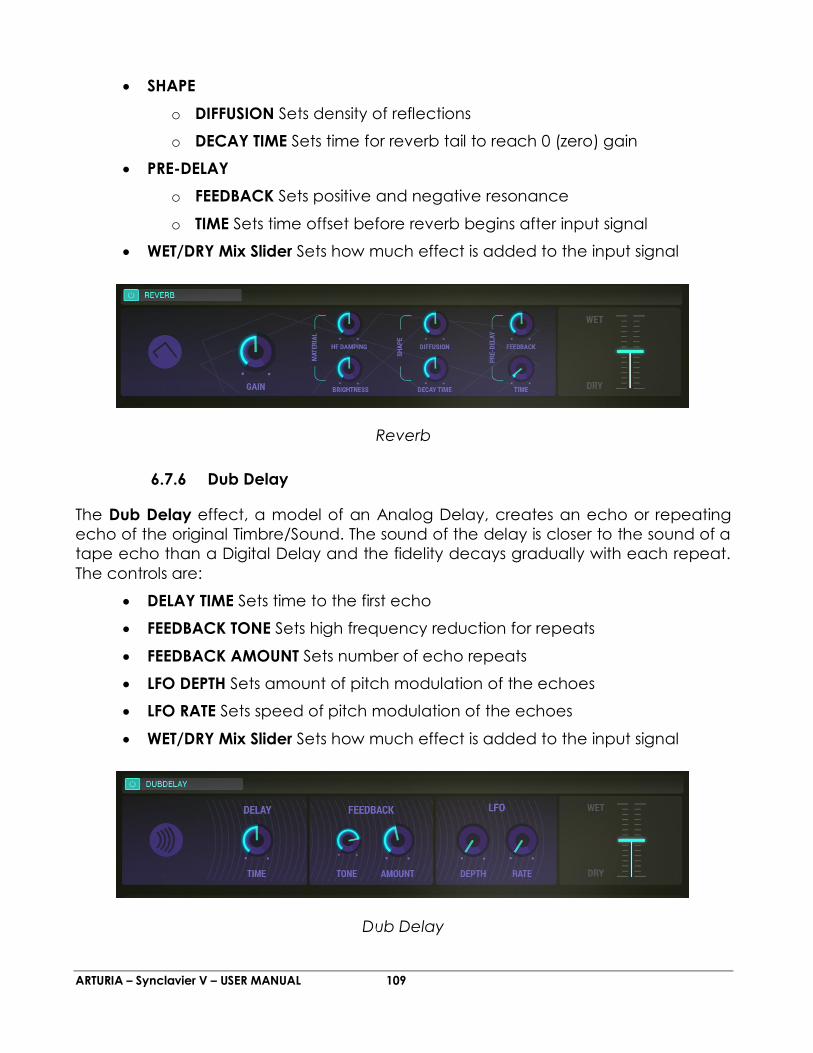
ARTURIA – Synclavier V – USER MANUAL 109
SHAPE
o DIFFUSION Sets density of reflections
o DECAY TIME Sets time for reverb tail to reach 0 (zero) gain
PRE-DELAY
o FEEDBACK Sets positive and negative resonance
o TIME Sets time offset before reverb begins after input signal
WET/DRY Mix Slider Sets how much effect is added to the input signal
Reverb
6.7.6 Dub Delay
The Dub Delay effect, a model of an Analog Delay, creates an echo or repeating
echo of the original Timbre/Sound. The sound of the delay is closer to the sound of a
tape echo than a Digital Delay and the fidelity decays gradually with each repeat.
The controls are:
DELAY TIME Sets time to the first echo
FEEDBACK TONE Sets high frequency reduction for repeats
FEEDBACK AMOUNT Sets number of echo repeats
LFO DEPTH Sets amount of pitch modulation of the echoes
LFO RATE Sets speed of pitch modulation of the echoes
WET/DRY Mix Slider Sets how much effect is added to the input signal
Dub Delay
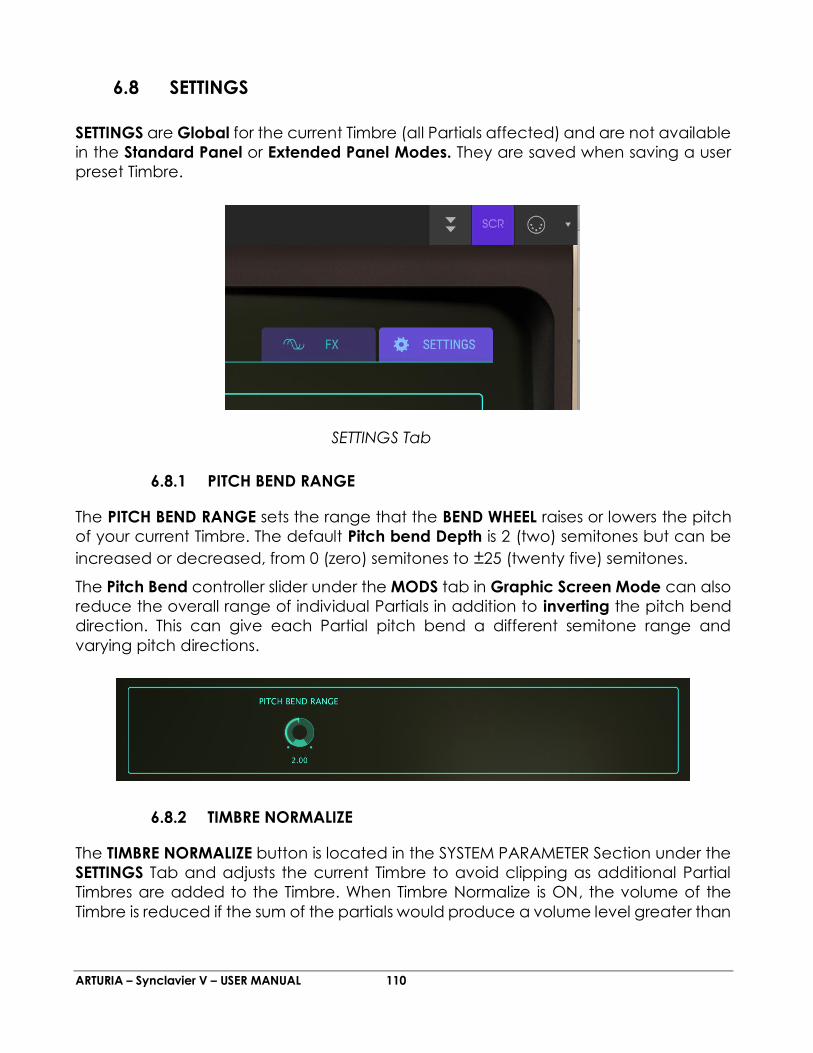
ARTURIA – Synclavier V – USER MANUAL 110
6.8 SETTINGS
SETTINGS are Global for the current Timbre (all Partials affected) and are not available
in the Standard Panel or Extended Panel Modes. They are saved when saving a user
preset Timbre.
SETTINGS Tab
6.8.1 PITCH BEND RANGE
The PITCH BEND RANGE sets the range that the BEND WHEEL raises or lowers the pitch
of your current Timbre. The default Pitch bend Depth is 2 (two) semitones but can be
increased or decreased, from 0 (zero) semitones to ±25 (twenty five) semitones.
The Pitch Bend controller slider under the MODS tab in Graphic Screen Mode can also
reduce the overall range of individual Partials in addition to inverting the pitch bend
direction. This can give each Partial pitch bend a different semitone range and
varying pitch directions.
6.8.2 TIMBRE NORMALIZE
The TIMBRE NORMALIZE button is located in the SYSTEM PARAMETER Section under the
SETTINGS Tab and adjusts the current Timbre to avoid clipping as additional Partial
Timbres are added to the Timbre. When Timbre Normalize is ON, the volume of the
Timbre is reduced if the sum of the partials would produce a volume level greater than
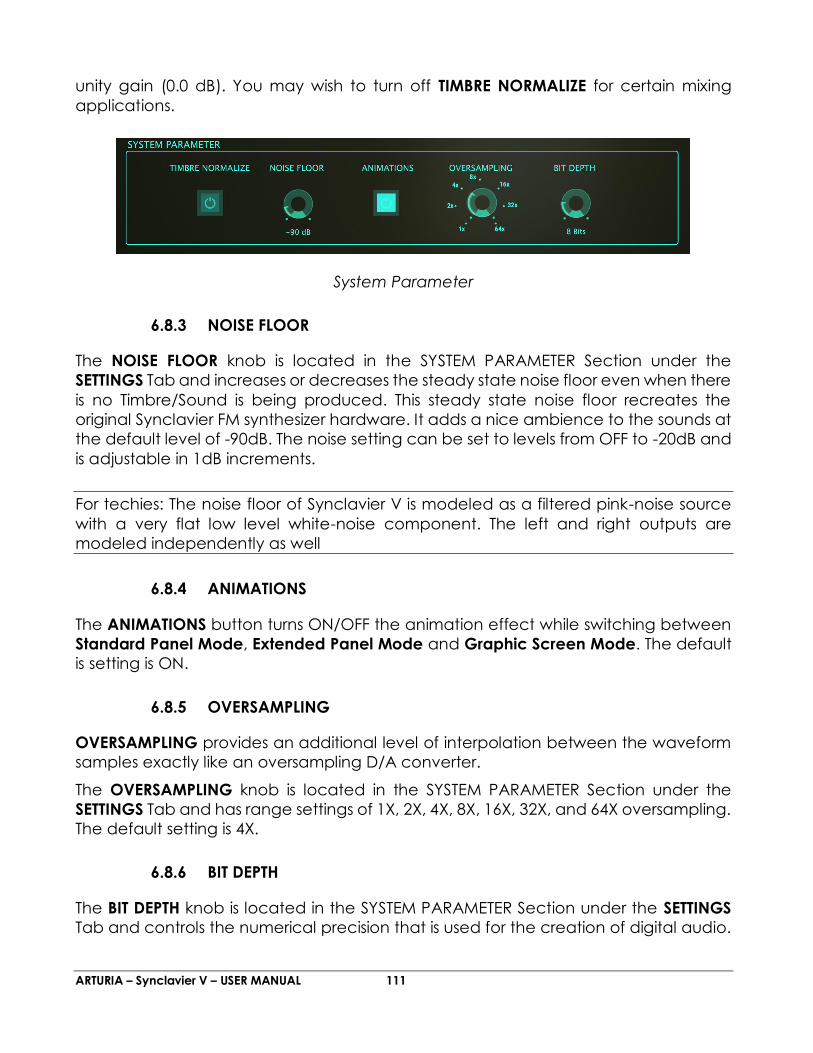
ARTURIA – Synclavier V – USER MANUAL 111
unity gain (0.0 dB). You may wish to turn off TIMBRE NORMALIZE for certain mixing
applications.
System Parameter
6.8.3 NOISE FLOOR
The NOISE FLOOR knob is located in the SYSTEM PARAMETER Section under the
SETTINGS Tab and increases or decreases the steady state noise floor even when there
is no Timbre/Sound is being produced. This steady state noise floor recreates the
original Synclavier FM synthesizer hardware. It adds a nice ambience to the sounds at
the default level of -90dB. The noise setting can be set to levels from OFF to -20dB and
is adjustable in 1dB increments.
For techies: The noise floor of Synclavier V is modeled as a filtered pink-noise source
with a very flat low level white-noise component. The left and right outputs are
modeled independently as well
6.8.4 ANIMATIONS
The ANIMATIONS button turns ON/OFF the animation effect while switching between
Standard Panel Mode, Extended Panel Mode and Graphic Screen Mode. The default
is setting is ON.
6.8.5 OVERSAMPLING
OVERSAMPLING provides an additional level of interpolation between the waveform
samples exactly like an oversampling D/A converter.
The OVERSAMPLING knob is located in the SYSTEM PARAMETER Section under the
SETTINGS Tab and has range settings of 1X, 2X, 4X, 8X, 16X, 32X, and 64X oversampling.
The default setting is 4X.
6.8.6 BIT DEPTH
The BIT DEPTH knob is located in the SYSTEM PARAMETER Section under the SETTINGS
Tab and controls the numerical precision that is used for the creation of digital audio.
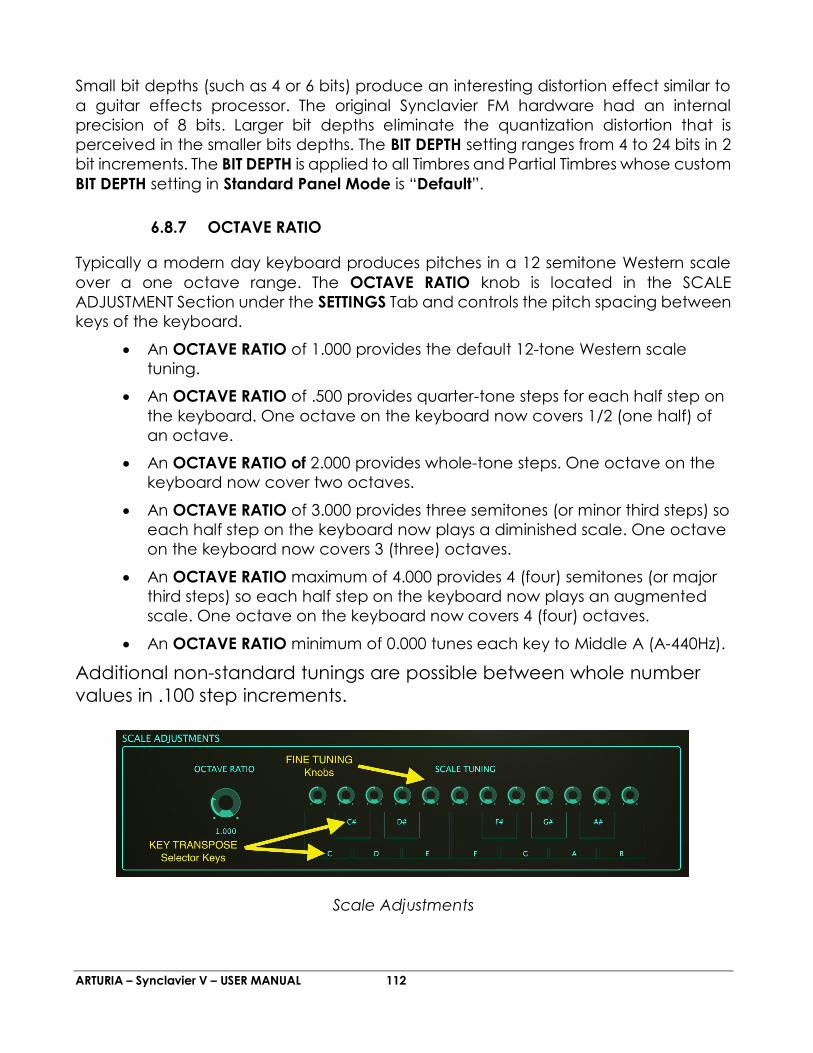
ARTURIA – Synclavier V – USER MANUAL 112
Small bit depths (such as 4 or 6 bits) produce an interesting distortion effect similar to
a guitar effects processor. The original Synclavier FM hardware had an internal
precision of 8 bits. Larger bit depths eliminate the quantization distortion that is
perceived in the smaller bits depths. The BIT DEPTH setting ranges from 4 to 24 bits in 2
bit increments. The BIT DEPTH is applied to all Timbres and Partial Timbres whose custom
BIT DEPTH setting in Standard Panel Mode is “Default”.
6.8.7 OCTAVE RATIO
Typically a modern day keyboard produces pitches in a 12 semitone Western scale
over a one octave range. The OCTAVE RATIO knob is located in the SCALE
ADJUSTMENT Section under the SETTINGS Tab and controls the pitch spacing between
keys of the keyboard.
An OCTAVE RATIO of 1.000 provides the default 12-tone Western scale
tuning.
An OCTAVE RATIO of .500 provides quarter-tone steps for each half step on
the keyboard. One octave on the keyboard now covers 1/2 (one half) of
an octave.
An OCTAVE RATIO of 2.000 provides whole-tone steps. One octave on the
keyboard now cover two octaves.
An OCTAVE RATIO of 3.000 provides three semitones (or minor third steps) so
each half step on the keyboard now plays a diminished scale. One octave
on the keyboard now covers 3 (three) octaves.
An OCTAVE RATIO maximum of 4.000 provides 4 (four) semitones (or major
third steps) so each half step on the keyboard now plays an augmented
scale. One octave on the keyboard now covers 4 (four) octaves.
An OCTAVE RATIO minimum of 0.000 tunes each key to Middle A (A-440Hz).
Additional non-standard tunings are possible between whole number
values in .100 step increments.
Scale Adjustments
ARTURIA – Synclavier V – USER MANUAL 113
6.8.8 SCALE TUNING
The SCALE TUNING is located in the SCALE ADJUSTMENT Section under the SETTINGS
Tab. The SCALE TUNING (FINE TUNE) knobs (C, C#, D, D#, E, F, F#, G, G#, A, A#, and B)
adjust the pitch of each note of the 12-tone scale independently, ±125 cents above
and below the default tuning. To FINE TUNE the pitch of a note, click on a SCALE
TUNING knob and drag it UP/DOWN to INCREASE/DECREASE the pitch. Double clicking
on the knob returns the function to its default value 0 CENTS.
The KEY TRANSPOSE function raises or lowers any key of the scale in single semitone
steps. Click/drag up/down on any of the letters below the knobs to raise/lower the
pitch of that key. Double clicking on the knob returns the function to its default pitch.
ARTURIA – Synclavier V – USER MANUAL 114
7 END USER LICENSE AGREEMENT
1. General
1.1 In consideration of payment of the Licensee fee, which is a portion of the price
you paid, Arturia, as Licensor, grants to you (hereinafter termed “Licensee”) a
nonexclusive right for the use of software including related media, documentation (for
example program descriptions, manuals) and other documents and materials
manufactured by Arturia SA ("Product(s)").
All intellectual property rights in the software belong to Arturia SA (hereinafter:
“Arturia”).
1.2 The following editions of the Product are available: “Demo”, “Standard”, “EDU”
and “NFR”. Whilst each edition equips the User with the same software, the editions
vary as regards both the scope of functions activated in the Product, and the rights
of use granted under this EULA.
1.3 By installing the software on your computer you agree to these terms and
conditions. If you do not approve these terms and conditions, you must not install this
software.
1.4 If you do not approve these terms and conditions, please return the complete
Product (including all written matter, packaging and similar material) to the dealer
from whom it was originally bought within 14 (fourteen) days after the day of purchase.
For purchases from the Arturia Online Store, please contact Arturia on the internet
website: www.arturia.com/support/askforhelp/purchase.
1.5 Arturia reserves all rights not expressly granted in the EULA.
2. Right of use
2.1 The Product is protected by copyright. The Licensee may not lease, loan or sub-license
the software. The Licensee is not authorized to modify the software.
2.2 Owning any product provided to the Licensee as “Standard” version grants the Licensee
a non-exclusive right to use the Product in perpetuity including commercial purposes.
The Licensee can activate the Product on up to five computers, as long as only one
installation is used at any given time. The Licensee must register the Product to Arturia
to get access to client support, and to activate his Product. (An internet connection
is required to register and activate the Product, either on the computer on which the
Product is installed, either on another device able to exchange files with the computer
on which the Product is installed). Owning a license of the Products entitles the
Licensee to get access to the future updates of this Product.
2.3 Any Products provided to you as "NFR" (Not For Resale) version grants the Licensee
a non-exclusive right to use the Product for a limited period of time. The Product shall
only be used for demonstration, testing and evaluation purposes. NFR Products must
ARTURIA – Synclavier V – USER MANUAL 115
not be used for commercial purposes, and must not be resold or transferred. The
Licensee can activate the Product on up to five computers, as long as only one
installation is used at any given time. The Licensee must register the Product to Arturia
to get access to client support, and to activate his Product. (An internet connection
is required to register and activate the Product, either on the computer on which the
Product is installed, either on another device able to exchange files with the computer
on which the Product is installed). NFR Products are exempt from update, upgrade or
crossgrade offers, and cannot be purchased with or exchanged for vouchers or
coupons. Furthermore, as an owner of a NFR Product, you are not entitled to any
vouchers that ship with the standard version of the Product.
2.4 Any Products labelled or otherwise provided to you as an “Educational” version
grants the Licensee a non-exclusive right to use the Product in perpetuity. The Product
shall only be used by students or those working in educational institutions. This definition
includes students, faculty, staff and administration attending and / or working at an
educational institutional facility: private / public schools, colleges, universities and
similar. These Products must not be used for commercial purposes, and must not be
resold or transferred. The Licensee can activate the Product on up to five computers,
as long as only one installation is used at any given time. The Licensee must register
the Product to Arturia to get access to client support, and to activate his Product. (An
internet connection is required to register and activate the Product, either on the
computer on which the Product is installed, either on another device able to
exchange files with the computer on which the Product is installed). These Products
are exempt from upgrade or crossgrade offers, and cannot be purchased with or
exchanged for vouchers or coupons. Furthermore, as an owner of an educational
Product, you are not entitled to any vouchers that ship with the standard version of
the Product.
2.5 Any Products labelled or otherwise provided to you as a “Demo” version grants the
Licensee a right to use the Product only for demonstration and evaluation purposes.
These Products must not be used for commercial purposes, and must not be resold or
transferred. These Products are exempt from upgrade or crossgrade offers, and
cannot be exchanged for vouchers or coupons.
3. No Unbundling
Bundles (product bundles are an association of software and hardware or software-
only products) can only be resold / transferred as a whole. The individual components
of a bundle must not be resold / transferred separately.
4. Resell
4.1 Renting or lending the licensed Software to a third party is expressly forbidden.
Apart from that and if not provided otherwise within this EULA.

ARTURIA – Synclavier V – USER MANUAL 116
4.2 Except if otherwise stated within this EULA, Licensee may resell the software to a
third party or transfer the software permanently free of charge, provided the third
party agrees in writing with this EULA and Licensee ceases all use of the software,
completely removes all installed copies of the software from his computers and – if the
software was not purchased via download – deletes or transfers the original media
delivered with the software to the third party. In addition, Licensee is required to de-
register the purchased software with Arturia (more information available on
www.arturia.com).
5. In case a sound library is part of the purchased Product the following shall apply in
addition to the EULA
The provided samples, instruments and presets can be used for commercial or non-
commercial music and audio Productions without the prior permission from Arturia
under the terms of this Agreement. The usage of this Product (in particular samples,
instruments and presets) for the creation of a sound library or as a sound library for any
kind of synthesizer, virtual instrument, sample library, sample-based Product or other
musical instrument is strictly prohibited. Individual samples, sound sets or audio loops
may not be distributed (commercially or otherwise) standalone. Furthermore these
samples, sound sets or audio may not be repackaged in whole or in part as audio
samples, sound libraries or sound effects.
6. Data Protection
Arturia attaches great importance to compliance with legislation on data protection.
The User data collected are used exclusively for performing its contractual obligations.
No data is passed on to third parties. Further information can be obtained from our
Privacy Policy at
www.arturia.com/privacy.
7. Limited Warranty
Arturia warrants that the physical media on which the software is provided is free from
defects in materials and workmanship under normal use for a period of thirty (30) days
from the date of purchase. The Licensee’s invoice shall be evidence of the date of
purchase. Any implied warranties on the software are limited to thirty (30) days from
the date of purchase. Some states do not allow limitations on duration of an implied
warranty, so the above limitation may not apply to the Licensee in this case. All
programs and accompanying materials are provided “as is”.
8. No Liability for Consequential Damages
ARTURIA – Synclavier V – USER MANUAL 117
Neither Arturia nor anyone else involved in the creation, production, or delivery of this
Product shall be liable for any direct, indirect, consequential, or incidental damages
arising out of the use of, or inability to use this Product (including without limitation,
damages for loss of business profits, business interruption, loss of business information
and the like) even if Arturia was previously advised of the possibility of such damages.
Some states do not allow limitations on the length of an implied warranty or the
exclusion or limitation of incidental or consequential damages, so the above limitation
or exclusions may not apply to the Licensee in this case. This warranty gives the
Licensee specific legal rights, and the Licensee may also have other rights which vary
from state to state.