User Manual of CAM-Java
24
1 User Manual of CAM-Java Authors: Fan Meng ([email protected]) Niya Wang ([email protected]) Last Modified: Apr. 10. 2013 *This software is under the license BSD 3.
Transcript of User Manual of CAM-Java

1
User Manual of CAM-Java
Authors: Fan Meng ([email protected])
Niya Wang ([email protected])
Last Modified: Apr. 10. 2013
*This software is under the license BSD 3.
2
Table of Contents
1. Introduction ................................................................................................................ 3
2. Software Installation and Preparation ........................................................................ 4
3. Software Usage Instruction ........................................................................................ 6
3.1 How to use the software .................................................................................................. 6
3.2 Parameter Setting (Model Selection) ............................................................................... 7
4. Case Study ............................................................................................................... 10
4.1 Dissecting DCE-MRI by CAM-CM .............................................................................. 10
4.2 Decomposing high correlation data by CAM-nICA ...................................................... 13
4.3 Dissecting natural images by CAM-nWCA .................................................................. 14
5. Plug-in Mechanism .................................................................................................. 16
Frequent Asked Questions ........................................................................................... 23

3
1. Introduction
This software is an algorithm suite of Blind Source Separation (BSS) algorithms. It includes
three Convex Analysis of Mixtures (CAM) based algorithms - CAM compartment modeling
(CAM-CM), CAM non-negative independent component analysis (CAM-nICA), and CAM
non-negative well-grounded component analysis (CAM-nWCA) algorithms, which are
developed by researchers in Computational Bioinformatics & Bio-imaging Laboratory (CBIL,
http://www.cbil.ece.vt.edu), and are intended to address real-world blind source separation
(BSS) problems. You may find detailed explanations and examples of usages of the
algorithms through papers [1, 2]. Also, it provides several classic BSS algorithms, such as
Principal Component Analysis (PCA), Nonnegative Matrix Factorization (NMF), Independent
Component Analysis (ICA) and Factor Analysis (FA) that have been widely used in different
areas. As open source software, it also provides a plug-in mechanism so that later researchers
or users can add their algorithms into it readily by following the instructions to increase its
usability in the community.
The software is implemented in R and Java. Both of them are free software environment that
researchers and developers can develop their algorithms or tools on the platforms freely. The
two environments can be freely downloaded from the following website links:
http://cran.r-project.org/
http://www.oracle.com/technetwork/java/javase/downloads/index.html
In this software, R module implements core algorithms, and Java module implements GUI.
Users can simply use GUI to run the whole software, while they can also run the R module
alone in R environment. Please refer to the “readme” file in R module for more instructions.

4
2. Software Installation and Preparation
When you download the CAM-Java software as a single compressed file (zip file, for
example, “CAM-Java_v04092013.zip”), first unzip it to any directory. Then you can find files
and sub-directories as below:
“CAM-Java.jar”, main executable file of the software.
“RCaller-2.1.0-SNAPSHOT.jar”, auxiliary Java package which establishes connection
between Java and R environments.
“User Manual.doc”, user manual of the software.
“Software Plugin Adding Guide.doc”, describes how to add a new R function into the
Java GUI
“Readme.txt”, a brief introduction for how to use the software
Subdirectory “data”, contains some sample input data with different file formats.
Subdirectory “r_func”, contains R module, demo files, and configuration files of the
software.
Subdirectory “results”, contains calculation results. Each time one use the software and
run a specific algorithm, the results (in comma-separated values, CSV format) will be
saved automatically into this subdirectory.
Software Environment Requirement
1. Before you run the software, make sure you have properly installed Java and R on your
computer. The current CAM-Java software is implemented by using Java SE 6 Update 31,
and R 2.15.3, so make sure the versions of your Java and R are compatible with them.
NOTICE that if you want to use NMF algorithm, you have to install R 2.15.3 or newer
version since current version of NMF is created based on R 2.15.3.
2. Please also install “Runiversal” and “R.matlab” packages in your R environment.
Runiversal package is used for the communication between R and Java, and R.matlab
package is used to read MAT files.
Just run the following commands in your R environment and they will automatically
download and install the packages.
install.packages("Runiversal")
install.packages("R.matlab")
If you want to use NMF or fastICA algorithms, you may also need to install the two packages
first. The install commands for the two packages are:
install.packages("fastICA")

5
install.packages('NMF', repos=c('http://web.cbio.uct.ac.za/~renaud/CRAN',
getOption('repos')))
6
3. Software Usage Instruction
3.1 How to use the software
After accomplishing the installation and all preparation, if you use Windows/Mac operating
system, you can run the CAM-Java by double-clicking the “CAM-Java.jar” file. Or in system
shell, first go to the folder containing the whole software, and type the command:
java -jar CAM-Java.jar
If you use Ubuntu system, since it treats .jar file as a package, you cannot open the file by
double-clicking without modifying the system properties, please go to the folder where the
software is, and then type the above command in the terminal.
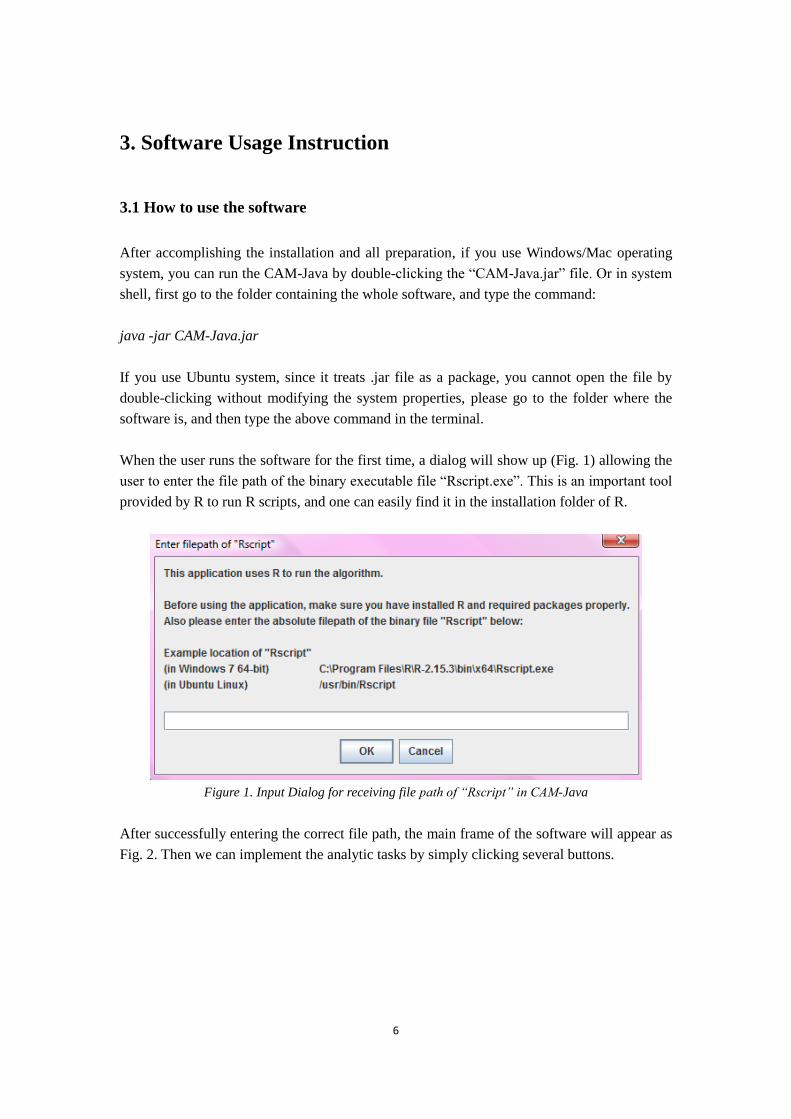
When the user runs the software for the first time, a dialog will show up (Fig. 1) allowing the
user to enter the file path of the binary executable file “Rscript.exe”. This is an important tool
provided by R to run R scripts, and one can easily find it in the installation folder of R.
Figure 1. Input Dialog for receiving file path of “Rscript” in CAM-Java
After successfully entering the correct file path, the main frame of the software will appear as
Fig. 2. Then we can implement the analytic tasks by simply clicking several buttons.

7
Figure 2. The main frame of CAM software
3.2 Parameter Setting (Model Selection)
How to decide the number of sources K is an essential problem in blind source separation. In
this software, the users can decide the number of sources by themselves, or they can use the
function “MDL.R” to calculate the optimal source number based on minimum descriptive
length.
For the convenience of display, we only set the number of sources from 2 to 10 in the
algorithms we provide. However, users can set the source number to any integers they want
by simply changing the XML file of corresponding algorithms. For example, if user wants to
decompose the data into 50 sources by using NMF algorithm, he or she just needs to simply
add “50” in the parameter setting of “NMF.xml”.
Before adding:
<parameter name="K" type="IntegerSet" range="2,3,4,5,6,7,8,9,10" default="0"

8
info="Number of sources to be extracted">
After adding:
<parameter name="K" type="IntegerSet" range="2,3,4,5,6,7,8,9,10,50" default="0"
info="Number of sources to be extracted">
Starting CAM-Java.jar, you will find the integer 50 appears in the algorithm settings.
Figure 3. After adjusting the parameter settings of NMF
Another way we provide is to find the optimal model by using this software. The model
selection procedure is to use information theoretic to find the optimal models, which best fits
the observed data, among several candidates. Specifically, a model selected with K sources by
minimizing the total description length is defined as [3]:
MDL log( )+ log + log2 2
K
KL KNK NL N L
where K is number of sources; N is the number of data points; L is the number of
observations/ samples; K is the standard deviation of Gaussian noise.
We provide an R script called MDL.R to realize the function. In the later version of this
software, this function will be combined on the Java GUI. Following is the content of this
function:
MDL <- function(X,S,A,K){
cat("Calculating MDL")

9
L<-dim(X)[1]
data_size <- dim(X)[2]
likelihood <- (L*data_size)/2*log(var(as.vector(X-A%*%S)))
sigma <- var(as.vector(X-A%*%S))
penalty <- (K*L)/2*log(data_size)+(K*data_size)/2*log(L)
MDL <- likelihood+penalty
return(list(MDL,likelihood,penalty,sigma))
}
The input parameters of this function are observed data matrix X, estimated sources S, estimated
mixing matrix A and the corresponding source number. Both S and A are from the calculation
results of this software. After obtaining the MDL values of all the candidate source numbers, the
one with the minimum value is the optimal model.

10
4. Case Study
4.1 Dissecting DCE-MRI by CAM-CM
We can apply CAM-CM algorithm to a real DCE-MRI dataset. Here is the procedure:
Select “Load Data file”
Click “…” button
In the file selection dialog, first select “R / Matlab Data (*.rda, *.mat)” in “Files of
Type:”, then select one dataset “data / data_DCE_MRI / typical_case.rda”
Click “Open”
Click “Load”
Select “CAM-CM”
Set “number of organs” to 3, time interval to 0.5 min
Check the box “Use multivariate clustering to denoise”, “Do visualization of the
convexity”, and “Show concentration” results in a figure
Click “Run”
Then after about 2 to 3 minutes*, the results will be shown in the table areas (Figure 3(a)) ,
together with two figures (Fig. 4(b) and (c)) displayed in separated windows.
In this case, the number of compartments 3 is decided by Minimum Descriptive Length principle.
Calculated by using MDL.R function, MDL value obtains minimum when the number of
compartments is 3.

11
(a)
(b) (c)

12
Figure 4. Results of applying CAM-CM algorithm to data of a typical DCE-MRI case
(a) Tables displaying contrast/ tracer concentration results and CM estimated kinetic parameter.
(b) Figure showing convexity visualization
(c) Figure showing tracer concentration results
* Running time may be slightly different based on different computer configuration

13
4.2 Decomposing high correlation data by CAM-nICA
Another example is running the CAM–nICA algorithm on a high correlation dataset. Similar
to the procedure we detailed above, we first select the data file “data / data_correlation /
mix_correlation_data_2dim.txt”, then select “CAM-ICA” algorithm, set the number of
sources to 2. After about half a minute, we can get results as well as a scatter plot of the final
demixed signals (Fig. 5).
Figure 5. Dissecting results and a scatter plot of final demixing signals
Finally, all results will be saved automatically in the subdirectory “results”, you can check
them later.

14
4.3 Dissecting natural images by CAM-nWCA
In this case, we use CAM-nWCA to dissect several mixing natural images. We have three
natural images (Fig 7(a)), and each of them contains 103*103 pixels. By transferring the pixel
matrix into a vector, and combining all three vectors into one matrix, we can obtain a data
matrix whose size is 3*10609 as the input of CAM-nWCA algorithm. Set source number K
equal to 3, and run CAM-nWCA, we can get the estimated mixing matrix in the upper left
table.
Figure 6. The dissection result from CAM-nWCA
By multiplying the inversion of the estimated mixing matrix with the input data matrix, we
can recover the three images, which are very close to the original images.

15
(a) (b) (c)
Figure 7. Application of CAM-nWCA to dissect natural image mixtures. (a) Three original images. (b)
Three mixing images. (c) The recovered images

16
5. Plug-in Mechanism
In this software, we provide a plug-in mechanism to ease other researcher to add their
algorithms into it so that they can use this software to compare the results from different BSS
algorithms. To find the detailed description for how to add a plugin into this software, please
refer to the document “Software Plugin Adding Guide”. Basically, the users only need to
write two files, one is the R function file, and the other is XML configuration file to plug their
algorithm into this software, and this is easy to realize by modifying the examples for existing
algorithms in this software. Below we will use an example to show how to add a new R
function into the software by following every step in “Software Plugin Adding Guide”.
Factor analysis describes variability among observed, correlated variables in terms of a
potentially lower number of unobserved variables called factors, which has been used as an
efficient blind source separation algorithm [4]. There is an existing R package “stats” that
includes a function called “factanal” performing maximum-likelihood factor analysis on a
covariance or data matrix, which can be freely downloaded. We will show how to combine
the function “factanal” into our software.
In terms of the “Software Plugin Adding Guide”, first we need to write an R script to connect
the R function and Java GUI, and put it into “r_func” folder. Following the guide, the content
of the R script file named as “Java-runFA.R” is shown as below:
# ------------------ Perform Factor Analysis Algorithm -------------------------------
# load the library "stats" for the function "factanal"
packageExist <- require("stats")
if (!packageExist) {
install.packages("stats")
library("stats")
}
packageExist <- require("MASS")
if (!packageExist) {
install.packages("MASS")
library("MASS")
}
cat("Performing Factor Analysis to decompose data ... \n")
FAresult <- factanal(X_mask,K,scores="regression")
A_est <- matrix(FAresult$loadings,ncol=K)
S_est <- FAresult$scores
cat("Done\n")

17
# pass results to Java environment
final.result <- list(Aest=A_est)
# save data
source("Java-saveData.R")
saveData(A_est, S_est)
detach()
This R script implements the function of factor analysis, and will be called Java GUI. Then
the next step is to write an XML configuration document, whose purpose is to register the
new algorithm – factor analysis in this software. It is named as “FA.xml”. The content of this
document is shown as below:
<?xml version="1.0" encoding="UTF-8"?>
<!DOCTYPE configuration SYSTEM "config.dtd">
<configuration>
<algorithm name="Factor Analysis" script="Java-runFA.R">
<parameter name="K" type="IntegerSet" range="2,3,4,5,6,7,8,9,10" default="0" info="Number
of sources to be extracted">
</parameter>
</algorithm>
</configuration>
After putting the XML document into the “config” folder, the “Factor Analysis” will appear in
the Algorithm Settings on the software as shown in Fig. 8(b).
(a)

18
(b)
Figure 8. (a) Algorithm Settings before adding FA.xml into “config” folder (b) Algorithm Settings after
adding FA.xml into “config” folder
A simple demo can be written for the convenience use of future users, although this step is not
necessary for the plugin mechanism. The demo is as following:
# load matrix
rm(list=ls())
X_mask <- read.table("../data/data_test/testdata1_uniform.txt")
X_mask <- as.matrix(X_mask)
# set source number
K <- 5
source("Java-runFA.R")
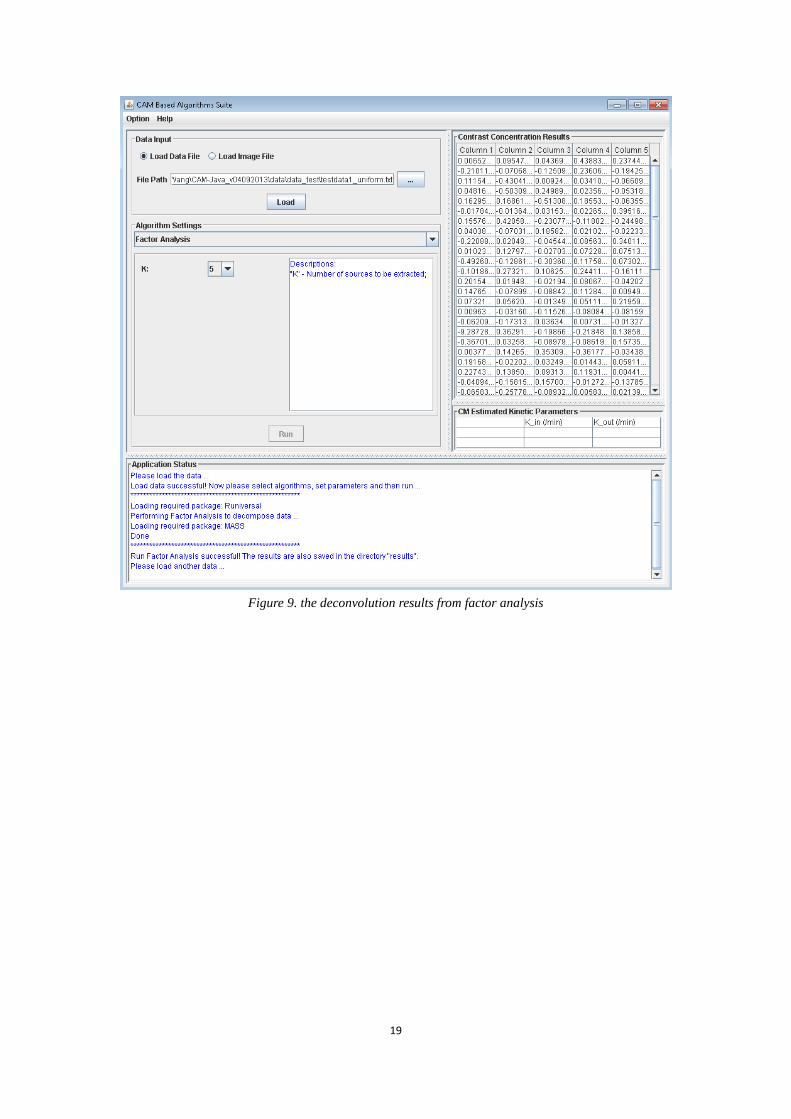
After finishing all the previous steps, we use a small dataset to test whether this algorithm can
work well. The procedure of using this algorithm is the same as the procedure we described in
previous case study. The deconvolution result is shown in Fig.9 and also saved in “results”
folder.
19
Figure 9. the deconvolution results from factor analysis

20
Reference
[1] Chen, L., et al., Tissue-specific compartmental analysis for dynamic contrast-enhanced
MR imaging of complex tumors. IEEE Trans Med Imaging, 2011. 30: p.2044-2058.
[2] Chen, L., et al, CAM-CM: a signal deconvolution tool for in vivo dynamic
contrast-enhanced imaging of complex tissues. Bioinformatics, 2011. 27: p.2607-2609.
[3] Rissanen, J. Modeling by shortest data description. Automatica 14, 465-471(1978).
[4] Child, D. (2006) The Essentials of Factor Analysis. Continuum International.

21
Appendix
1. Background
Blind source separation (BSS) has proven to be a powerful and widely-applicable tool for the
analysis and interpretation of composite patterns in engineering and science, where both
source patterns and mixing proportions are of interest but unknown. BSS is often described by
a linear latent variable model X = AS, where X is the observation data matrix, A is the
unknown mixing matrix, and S is the unknown source data matrix. The fundamental objective
of BSS is to estimate both the unknown mixing proportions and source signals based on only
the observed mixtures. Convex analysis of mixtures (CAM) method has been recently
developed and implemented via various algorithms for different real-world applications.
CAM-CM algorithm has been developed for deconvolving intra-tumor vascular heterogeneity
and identifying pharmacokinetics changes in many biological contexts. This method works by
exploiting convex analysis of mixtures that enables geometrically-principled delineation of
distinct vascular structures from DCE-MRI data. Dynamic contrast-enhanced magnetic
resonance imaging (DCE-MRI) provides a noninvasive method for evaluating tumor
vasculature patterns based on contrast accumulation and washout. Because there are often
significant numbers of partial-volume pixels, CAM-CM instead estimates pharmacokinetics
parameters (flux rate constants) via the time-activity curves of pure-volume pixels (pixels
whose signal is highly enriched in a particular vascular compartment). Convex analysis of
mixtures automatically identifies pure-volume pixels resided at the vertices of the clustered
pixel time series scatter simplex, without any knowledge of compartment distribution [2].
Furthermore, CAM-nWCA and CAM-nICA algorithm have also been developed to directly
address non-negative BSS problems. Assume that sources contain sufficient number of
well-grounded points (WGPs) at which signals are highly expressed in one source relative to
each of the remaining sources, the goal is to estimate the column vectors of mixing matrix by
identifying WGPs located at the corners of mixture observation scatter simplex and
subsequently recover the hidden source signals. Based on a geometrical latent variable model,
CAM learns the mixing matrix by identifying the lateral edges of convex data scatter plot.
The algorithm is supported theoretically by a well-grounded mathematical framework.
Main steps of CAM algorithm are as follows:
(1) Projecting all the observations onto standard scatter simplex.
(2) Three additional core algorithms are implemented to processing the data in order to
further reduce noise or outliers. Including multivariate clustering based on standard finite
normal mixture (SFNM) model, affinity propagation clustering (APC), and the
expectation maximization (EM) algorithm.
(3) Well-grounded points can then be picked by identifying corner cluster centers of the
scatter plot convex hull.
22
2. Function Description
All the R functions called by the software are contained in the folder “r_func”. Each of them
can be used separately to implement a specific purpose.
“affinity.R” performs Affinity Propagation Clustering algorithm.
“SL_EM.R” performs Expectation-Maximization (EM) algorithm.
“measure_conv.R” performs minimum-error-margin convex optimization algorithm
to identify vertices of a convex hull that best confines a set of points.
“PCA.R” performs principal component analysis for dimension reduction.
“multinorm.R” evaluates a multidimensional Gaussian value at a specified point with
given mean vector and covariance matrix.
“ve_cov_Jain.R” deals with the singularity problem and the “realmin” problem, being
used in “multinorm.R”.
“nnls.R” implements the Lawson and Hanson method for solving the least squares
problems with non-negativity constraints.
“nnls_wrapper.R” is the wrapper function of the “nnls.R”.
“Whiten.R” is used to transform the input matrix to the form of “white noise” that is
uncorrelated and has uniform variance.
“nICA.R” is to perform nonnegative independent component analysis to separate a
multivariate signal into two matrix, mixing matrix and nonnegative sources.
“Preprocess.R” is to perform centering for input matrix.
“remmean.R” is to remove the mean of input matrix.
“Gradient.R” is called by nICA.R to minimize the cost function in nICA algorithm.
All the listed functions can be readily used under R platform. Users can also use the plug-in
mechanism to add those functions into the Java GUI so that they can use them directly
through the GUI.

23
Frequent Asked Questions
1. When I double click CAM-Java.jar, why is there no dialog show up?
Answer: Make sure you followed all the steps in “Software installation and Preparation”. You
need to install R and Java environment correctly beforehand. If you use Ubuntu operation
system, you may not open it by double clicking without modification of the system properties.
However, you can open it by typing “ java -jar CAM-Java.jar” in the terminal after entering
the folder where the software is in the terminal.
2. I loaded the data successfully. Then when I clicked the “run” button, an error information
dialog is shown as below:
Answer:The most possible reason of this error information occurring is that you did not
install Runiversal or R.matlab correctly. You need to install these two packages manually
beforehand. Another possible reason is that when you use the test dataset, you did not select
the right corresponding algorithm for the data. For example, you should apply CAM-ICA to
datasets in data_correlation folder, CAM-CM to data_DCE_MRI, and CAM-nWCA to
data_image. If this is not the case, you may need to check the detailed information in
Application status bar.
3. The demo of NMF works well, but when I use GUI to call NMF on the same dataset, there
is always error.
Answer: One of the most possible reasons is that you did not install NMF package correctly.
After package update, the mirror of NMF package is transferred from http://cran.r-project.org
to http://web.cbio.uct.ac.za/~renaud/CRAN. To avoid this problem, the best way is to install
NMF package manually beforehand through the command
install.packages('NMF', repos=c('http://web.cbio.uct.ac.za/~renaud/CRAN',
getOption('repos')))
Besides, when error happens, please check the Application Status carefully. Detailed

24
information will tell you how to solve this problem. Most error happenings are because of
missing necessary packages or loading the wrong dataset.