
User / installation guide Easee Home Easee Charge
40
Easee Home Easee Charge User / installation guide
Transcript of User / installation guide Easee Home Easee Charge

Easee HomeEasee Charge
User / installation guide

IMPORTANT: Read carefully before use. Keep for future reference.
Join Easee Owners Club on Facebook and be the first to get valuable product insights!
You can find other languages available on our website: easee.support

3
Introduction
Introduction
Product overview
Features
Technical specifications
Safety
Safety instructions
Before the installation
Planning the installation
Your house, power grid and EV
Installation
Installation instructions
Daily use and operation
How do I charge?
Apps and interfaces
Charging Robot interface
Troubleshooting
Maintenance
Practical details
4
5
6
8
10
13
17
18
30
31
32
33
34
35
Table of contents

4
This product is intended solely for charging electrically powered vehicles equipped with non-gassing batteries (e.g. lead-acid batteries).
The product shall only be used with a charging cable according to IEC 62196. The product must be firmly mounted on a wall or structure that covers the entire back side of the product and has a sufficient load-bearing capacity. It may only be operated with the approved operating parameters and under the specified environmental conditions (see page 8).
Uses other than those specified here are not permitted.
Introduction
Intended use
Conventions This symbol indicates that the respective instructions must only be carried out by an authorised electrician.
This symbol indicates an immediate danger to life and health of individuals due to the effects of electrical energy.Non-observance of these instructions will result in serious damage to health – up to and including life-threatening injuries.

5
Product overview
Installation kit Tool
x5x2x3 x4x2 x1(Easee Home only)
x1
Front cover
Protects the electronics from external influences.
Chargeberry
Contains the electronics for charging the vehicle.
Backplate
For attaching and connecting to the charging infrastructure.
6
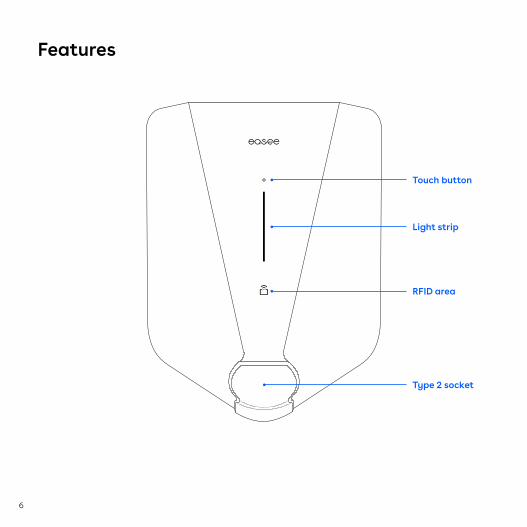
Features
Touch button
Light strip
RFID area
Type 2 socket

7
Touch button: With the touch button it is possible to override smart/ postponed charging* in those situations where you need immediate charging. Hold your finger on the touch button for 2 seconds. The Charging Robot cancels the smart charging mode and starts charging in accordance with the settings. The colour of the light strip changes from blue to white. To reactivate smart charging, press and hold the touch button for 2 seconds again.*Smart charging is enabled only by some operators.
Light strip: The light strip communicates the status of the Charging Robot at all times. Read more about this on page 32.
RFID area: The integrated RFID reader enables access control of the Charging Robot and identification of different users. You can use it to unlock the charger with an Easee Key. Check our knowledge base at easee.support for more details on how to add and manage your Easee Keys.
Type 2 socket: The Type 2 socket is completely universal and allows you to charge any type of electric vehicle using the appropriate charging cable. This makes it possible to change cars without having to redo the installation and your charger. Furthermore, it is possible to permanently lock the charging cable, so you do not have to worry about it being stolen.
NOTICE! Permanent locking of the charging cable can be activated after the charger and the car have been connected.

8
Technical specifications
Dimensions (mm): 256 x 193 x 106 (H x W x D)Wall mounting (mm): c/c 160 x 125 (H x W)Operating temperature: -30 °C to +50 °CWeight: 1.5 kgWarranty: 3 years (warranty may be longer in some countries)
Charging power: 1.4–22 kW6 A 1 phase – 32 A 3 phase (automatically adjusted in relation to available capacity)Up to 7.36 kW at 32 A 1 phaseUp to 22 kW at 32 A 3 phase (TN grid)Connection point: Type 2 socket (IEC 62196-2)Number of phases: 1 or 3 (fully dynamic)Voltage: 3 x 400 V AC/ 230 V AC (±10 %)Mains frequency: 50/60 HzBuilt-in energy meter (±2 %)Easee Home: Load balancing of up to 3 units per circuitEasee Charge: Load balancing of up to 101 units per circuit
Light strip with LEDs showing the status of the chargerTouch button for manual adjustmentTemperature sensors in all main contacts
General
Charging
Sensors and indicators

9
Protection
Connectivity
Installation
Built-in eSIM (LTE Cat M1/ 2G /GPRS)WiFi 2.4 GHz b/g/n connectionEasee Link RFTM
Control charging via Easee appRFID/NFC readerOCPP 1.6 via our API
Built-in RCD for ground fault protection (30 mA AC/ 6 mA DC) RCD is automatically reset by disconnecting the charging cableDegree of protection: IP54 (the backplate is IP22 without cover)Impact resistance: IK10Fire class: UL94Insulation class: IIOvervoltage category III
Installation network: TN, IT and TT (detected automatically)Installation circuit breaker: Max 40 A (Easee Home) and 80 A (Easee Charge) overload protection. The short-circuit current at the charging point (IkMax) must not exceed 10 kA. If required by the installation method, class A earth fault protection can be used for the circuit.Cable cross-section: up to 16 mm2 (single cable)/ up to 10 mm2 (parallel connection)Cable diameter: 8–22 mmTerminal tightening: 5 NmCable strip length: 12 mm

10
—
—
—
—
—
—
—
—
This product shall only be installed, repaired or serviced by an authorised electrician. All applicable local, regional and national regulations for electrical installations must be respected. Danger to life due to high electrical voltage. Never make any changes to components, software or connecting cables. The installation must not be carried out in the vicinity of explosive atmospheres or in areas where there is a risk of flowing water. The product must be installed on a permanent location. The connections of the Chargeberry and backplate are designed for a limited number of plugging cycles. The product must be installed on a wall or structure with sufficient load bearing capacity. The charger should always be installed on a surface that covers the entire back side area of the product. The terminals in the backplate are energised when the power circuit is closed and must never be in direct contact or in contact with anything other than the plug-in electronics (Chargeberry).The PIN code is located on the front of the Chargeberry and is required for installation. After installation, paste the PIN code on the back of the manual or in a safe place, e.g. inside of the fuse cabinet door.
Safety instructions for the installation
Safety instructions
Read the entire manual carefully before installing and operating the product. Observe the following instructions:

11
Safety instructions for operation
A padlock is supplied (Easee Home only) to prevent unauthorised removal of the plug-in electronics (Chargeberry). The key must be kept safe and inaccessible to children.
Danger to life due to high electrical voltage. Never make any changes to components, software or connecting cables. Never use or touch the product if it is damaged or does not function properly. Always have the prescribed maintenance, installation and any repair work carried out by an authorised electrician and in accordance with local requirements. If a fire occurs, do not use water for extinguishing. Never clean the Charging Robot with high pressure or running water. Do not immerse the product in water or other liquids. If the light strip on the product lights up red, there is a fault. For more information, see page 33. Make sure that children do not play with the product. Never touch the contacts of the Type 2 socket and never insert foreign objects into the product. Never use the charging cable if it is damaged or if the connections are wet or dirty. Do not use extension cords or unapproved adapters in combination with the product. Never bend or run over the charging cable with a car or expose it to excessive heat.The charging cable must only be removed from the Charging Robot by pulling the plug handle as close to the Charging Robot as possible, not by pulling the cable. Do not place the charging cable in the path of other road users. Always position it in such a way that there is no risk of tripping.
—
—
—
—
—
——
——
—
—
—
—
—

12
Even if the Charging Robot is designed to withstand normal weather conditions, we recommend protecting it from direct sunlight or exposure to extreme weather conditions. Never connect the charging cable to the Charging Robot when the cable connector is wet.Do not use the product near strong electromagnetic fields or in the direct vicinity of radio transmitters.
—
—

13
WARNING! This product shall only be installed, repaired or serviced by an authorised electrician. All applicable local, regional and national regulations for electrical installations must be respected. After completion, a safety certificate must always be issued by the installer.
Prior to the installation, it is important that you consider present and future charging needs, so that you can easily expand accordingly in the future.
If several Charging Robots are used on one circuit, the total current is dynamically distributed between the connected Charging Robots. The connected Charging Robots communicate via radio signal with the main unit, thus ensuring that the specified total charging current of the charging infrastructure is not exceeded. The maximum charging current is set during configuration.
Planning the installation

14
Where should the Charging Robot be installed?Is the connected electrical load of the house sufficient or does it need to be increased? Does a new cable have to be laid? (An external approval may be required). Should the incoming supply cable be upgraded?Do you intend to install additional Charging Robots in the future?How is the electrical circuit protected?Which installation method is planned to be used?
The correct selection of the grounding/earthing system, conductors and protective measures (basic protection/ fault protection)The correct insulation of touchable and conductive partsSufficient dimensioning of cables and linesThe selection of the overcurrent and overvoltage protectionThe correct calculation of the short-circuit current as well as a short-circuit proof installation method
We recommend to install a RCD Type A in the fuse cabinet. The Type A RCD will then protect the installation supplying the Charging Robot(s). If a Class II installation method is used, it is up to the electrician to determine whether or not a RCD is needed. Relevant local requirements must always be followed.
NOTICE! A residual current device (RCD) (30 mA AC/ 6 mA DC) is already integrated in the Charging Robot. This switches off the current to the electric car if a DC residual current of 4–6 mA and/or an AC residual current of 20–30 mA occurs. The integrated residual currrent protective device (RCD) has no influence on the function of other (external) protective
Check the following before starting the installation
Pay attention to the following when planning the installation
——
—
——
—
————

15
For an optimal result, we recommend that you do the following
Special notes for Easee Home and Easee Charge
—
—
—
—
—
—
—
—
—
devices. The integrated protective device can be reset byunplugging the charging cable and plugging it in again. The integrated RCD is automatically tested on every software update or power cycle.
We always recommend a 3 phase installation if possible, to make it future-proof.If possible, use the largest approved cable cross-section (see page 9).Consider the installation of Easee Ready backplates if the acquisition of further Charging Robots is planned for the future.To avoid overloading the building's main fuse, the Easee Equalizer can be used for dynamic load balancing. The maximum current value can also be set as required during configuration.
In addition to the integrated residual current device (RCD), an overload protection is integrated in the Charging Robots.Several Charging Robots can also be connected in parallel, as each Charging Robot has its own protective devices.The Charging Robots can handle a maximum short-circuit current (Ipk, max) of 10 kA. When surveying the installation, it must be checked whether further protection should be provided.If the charging infrastructure includes more than one Charging Robot, the Charging Robot that is configured first becomes the master of its circuit.If more than 2 units are installed, the master unit should be located in the middle of the installation (if possible) for an optimal Easee Link communication.

16
Technical notes for Easee Home
Technical notes for Easee Charge
—
—
—
—
—
The circuit with one or more Charging Robots can be fused up to 40 A as long as the maximum short-circuit current (Ipk, max) of 10 kA is not exceeded.A maximum of 3 Charging Robots on the same circuit (fuse) is supported with Easee Home.
The circuit with one or more Charging Robots can be fused up to 80 A as long as the maximum short-circuit current (Ipk, max) of 10 kA is not exceeded.A maximum of 101 Charging Robots on the same circuit (fuse) is supported with Easee Charge. Site Key: During installation, a Site Key must be used to assign the Charging Robots to the correct location inside the Easee Cloud. A Site Key can be obtained by creating a new charging site at easee.cloud.

17
The Charging Robot will never be the bottleneck. It automatically adapts to the power grid, the electric car and the capacity of your house. In the diagrams below you can see what charging effect you can achieve in your installation and situation. The table below is only meant as a guide.
NOTICE! The type of installation as well as cable cross-sections must be determined by a qualified electrician in accordance with valid local, regional and national regulations for electrical systems.
Your house, power grid and EV
1 Protection limit based on max 80% of the fuse rating can be set in the WiFi interface.2 Example for 400 V TN, deviating values for other grid types.
Rated circuit fuse size
Max continuous fuse load1 400 V TN2
Ampere (A) Ampere (A) 1 phase (kW) 3 phase (kW)
10 8 1.4 4.2
16 13 3.0 8.9
20 16 3.7 11
25 20 4.6 13.8
32 25 5.8 17.3
40 32 7.4 22

18
WARNING! This product shall only be installed, repaired or serviced by an authorised electrician. All applicable local, regional and national regulations for electrical installations must be respected.
WARNING! Turn off the power before you begin the wiring. Use extreme caution and follow instructions carefully.
In addition to the instructions presented on the next pages, we recommend that you watch the installation videos available on our website: easee.support.
Installation instructions

19
WARNING! Be sure to read the safety instructions (page 10) of this product before you start the installation.
Bend down the lower part of the rubber cover and insert the two ends of the supplied tool into the two openings at the bottom of the front cover.Pull the tool until the front cover comes loose and remove the cover.Grasp the Type 2 socket and push upwards with good force until the Chargeberry disconnects.
1
1
2
1
1
3
1.
2.
3.
OpeningCharging Robot

20
Fix the backplate to a wall or structure with sufficient load-bearing capacity using the 4 screws provided in the mounting kit. Use suitable wall plugs for mounting and observe the recommended installation height (see below).Turn off the power before proceeding with the installation.
NOTICE! If you are going to install multiple backplates, now would be a good time to mount them as well.
IMPORTANT! The installation wall must cover the entire back of the product.
1
Backplate
Mounting2
130–140 cmRecommended installation height
1
1
1
1
1.
2.

21
3
2
1
Shorten the sealing plug to fit the cable. The hole should be slightly smaller to ensure a good seal.Insert the cable through one of the 4 cable entries and secure it to the backplate with the strain relief provided.Close all cable entries that are not in use with the blind sealing plugs supplied.
Backplate
Preparing3 1.
2.
3.
1 2
3
33

22
Strip the cable cores by 12 mm. If the cable has flexible conductors, it is recommended to use cable end sleeves on all wires. Use correct tools to press them.Tighten the screws with a torque of 5 Nm.
NOTICE! Before attaching the Chargeberry, pull each wire to double check that they are connected properly.
NOTICE! When connecting multiple backplates in parallel, each terminal serves as a coupling point for adjacent backplates. All backplates must be connected with the same phase sequence. External junction boxes or flat cables can be used if it is most convenient.
Backplate
Wiring4 1.
2.
1
PE
2

23
TN networkWiring TN is the most common grid type in Europe. It uses five
conductors to provide both 230 V and 400 V. This makes it very efficient and thus the preferred grid type for charging electric vehicles.
NOTICE! Depending on the time of installation and national standards, the colours of the cables can vary from the illustrations below. Make sure the conductors are properly connected before turning on the power for the Charging Robot(s).
TN 3 phase
PE N L1 L2 L3
TN 1 phase
PE N L1 – –

24
IT/TT networkWiring IT and TT grid systems are mostly used in Norway and
Albania, but occur in Belgium, France and Spain too. These systems have no neutral connector and use 4 conductors only. They can thus only provide 230 V.
NOTICE! Depending on the time of installation and national standards, the colours of the cables can vary from the illustrations below. Make sure the conductors are properly connected before turning on the power for the Charging Robot(s).
IT/TT 3 phase
PE L1 L2 L3 –
IT/TT 1 phase
PE L1 L2 – –

25
Turn on the power. The terminals of the backplates are now electrically live.Position the Chargeberry to fit into the slots on the backplate located in the center of the installation.When the Chargeberry is in the track, press it forcefully down until you hear a click.
NOTICE! If the charging circuits include more than one Charging Robot, the backplate that is configured first becomes the master unit of the charging infrastructure. To achieve the best communication flow, the centre backplate should be configured first.
NOTICE! You must use the same Chargeberry to program all the backplates that are connected to the same fuse/cable. Alternatively, you can program the backplates using the Easee Installer app (available soon). If more than one Charging Robot is to be installed, wait until the configuration of all backplates is complete before attaching the remaining Chargeberries.
Chargeberry
Attaching5 1.
2.
3.
3
2
”CLICK!”

26
To configure the Charging Robot, connect a smartphone to the Charging Robot's own WiFi or download the Easee Installer app (available soon).
NOTICE! For an Easee Charge installation, a Site Key should be created prior to the installation. It can be obtained by creating a new charging site at easee.cloud.
Activate the WiFi of the Charging Robot by holding the touch button for 5 seconds. The light strip lights up green. The charger has now started sharing its local WiFi network.Select the WiFi of the Charging Robot. The name of the network starts with ”Easee...”. If unable to connect, try using flight mode.Open the browser on your smartphone and enter 192.168.4.1 in the address bar.Log in using the four-digit PIN code located on the front of the Chargeberry or on the back cover of this manual. You can also use the Easee app to retrieve the PIN code.
Chargeberry
Connecting6
1.
2.
3.
4.
1
4
WiFi
Easee-Exx ...
192.168.4.1
147
2580
369
2 3

27
Enter the installation details and follow the on-screen instructions. Press on the screen for more information.
WARNING! Maximum charging current and fuse values must always be specified by an authorised electrician.
NOTICE! After 15 minutes of commissioning, the values cannot be changed anymore via WiFi interface. In order to repeat this operation, turn off and on the supplying power to the charger.
NOTICE! If the backplate has been used before or you are unsure whether it has, please remove all data stored in the RFID chip on the backplate(s) before installation. This can be done via the Easee Installer app (available soon).
NOTICE! For several Charging Robots connected to the same fuse, all backplates must be programmed with the same Chargeberry in order for the load balancing to work.
Chargeberry
Installation details
7
”CLICK!”
28
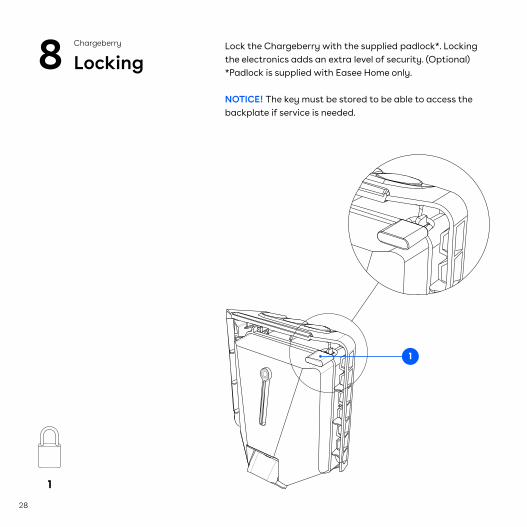
Lock the Chargeberry with the supplied padlock*. Locking the electronics adds an extra level of security. (Optional)*Padlock is supplied with Easee Home only.
NOTICE! The key must be stored to be able to access the backplate if service is needed.
1
Chargeberry
Locking8
1
29
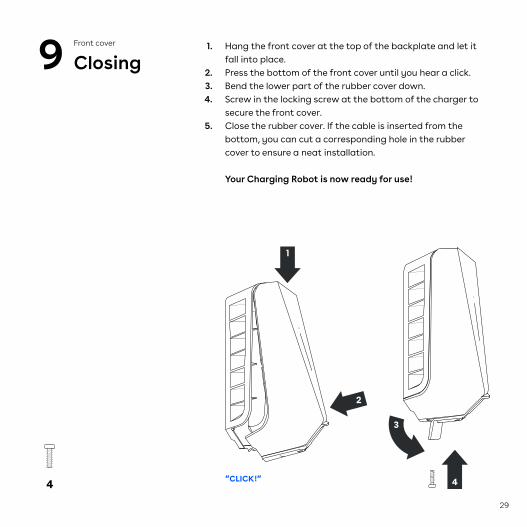
Hang the front cover at the top of the backplate and let it fall into place.Press the bottom of the front cover until you hear a click.Bend the lower part of the rubber cover down.Screw in the locking screw at the bottom of the charger to secure the front cover.Close the rubber cover. If the cable is inserted from the bottom, you can cut a corresponding hole in the rubber cover to ensure a neat installation.
Your Charging Robot is now ready for use!
4
Front cover
Closing9
1
2
4
1.
2.3.4.
5.
”CLICK!”
3

30
WARNING! Observe the safety instructions on page 10 before using the product.
Make sure that the following requirements are met before using the Charging Robot:The authorised electrician have set up the electrical connection properlyThe charger is properly configured (see page 26)The software is up to date (see page 32)If you have set up access control, unlock it by using a registered RFID tag or disable it from the Easee App or the local WiFi interface (see page 31)
Check the charging cable and connector for damage and impurities such as foreign objects and water ingress before charging.Connect the charging cable to the Charging Robot and your electric car. The charging process starts and adapts automatically to the electric car and the available energy at any time according to the configuration.
If the car does not start charging, check that charging is activated in your car and that the connectors are properly plugged in. If charging still does not start, check what might be the cause under troubleshooting on page 33.
How do I charge?
—
———
1.
2.

31
Apps and interfaces
WiFi interface
The WiFi interface is intended for local operation of the charger. It is not depended on an internet connection, but it needs a smartphone to be accessed.
You can connect to the WiFi interface by following the instructions on page 26 of this manual.
Easee app
The Easee app is intended for everyday use of your Easee products. It can be used anywhere in the world through the Easee Cloud.
The Easee app can be downloaded from the application store of your iOS or Android mobile device.
Easee Portal
The Easee Portal is a tool intended for administration of one or several Easee sites.
The Portal is mainly intended for site owners, installers, administrators, service providers and people who need to manage several products and sites from one interface.
Go to easee.support for more information on our interfaces.

32
Charging Robot interface
Light description Status
White – constant light, only at the bottom
2 LEDs – master unit 1 LED – secondary units
Standby
White – constant light Car connected
White – pulsating light Charging in progress
Blue – constant light Smart charging enabled (car connected)
Blue – pulsating light Smart charging in progress
At startup, the LEDs turn on one by one.
When the charger is updating, one or more LEDs will flash green while this is in progress.
Updating software (updating can take up to 30 minutes)
NOTICE! The car must be disconnected before a software update can be completed.
White – flashing light Waiting for authentication by an RFID tag. Hold the RFID tag against the RFID area of the Charging Robot in order to authenticate and initiate the charging.
White – fast flashing light RFID-tag received (awaiting key verification)

33
Troubleshooting
Light description Status
Red – constant light General error. Unplug the charging cable and replug it to the Charging Robot. If the red light persists, check the Easee app or our knowledge base3 for further information.
Red – constant light, with warning sounds
Wires are connected incorrectly. Consult an authorised electrician.
Red – pulsating light The Charging Robot has measured an abnormal temperature and has entered in safe mode. Please go to our knowledge base3 for further information.
White – flashing light, only at the bottom
The Charging Robot is searching for its main unit. Please check the status of the main unit. For further information, please check our knowledge base3.
Yellow – flashing light, only at the bottom
The Charging Robot is waiting to be configured. Follow the installation process described on page 26.
3 Easee public knowledge base can be found at easee.support.

34
If the product is installed in public spaces and is accessible to everyone, observe local and national requirements (e.g. Norway NEK400 part 6.1) in addition to the procedures below.Ensure that the charger does not have any signs of mechanical damage.Visually inspect the Type 2 socket for wear and tear at regular intervals according to local regulations. If the pins are discoloured or damaged, please contact your authorised electrician.
The charger does not require cleaning to operate properly. Nevertheless, if the product needs to be cleaned for cosmetic reasons, this is possible.Use a damp cloth and an all-purpose household cleaner. Avoid using strong chemicals that contain oil or alcohol, as this may discolour the plastic. Do not use running water or high pressure water jets.
When carrying out periodic insulation testing of a charging circuit, it is recommended that you remove the Chargeberry from its backplate before measuring between all phases joined together towards earth. Testing the circuit insulation with the Chargeberry installed in the backplate may damage the electronics or impact the reading negatively.
General maintenance
Cleaning
Insulation testing (authorised electrician only)
Maintenance
—
—
—
—
35
Practical details
The device is free from material defects and is in accordance with laws and regulations for consumer protection in the country where the product is purchased or where the consumer lives.
The product shall be installed according to local regulations for low voltage electrical installations. The product is designed and tested according to the EN 61851 standards for electric vehicle conductive charging system. It includes a built-in RCD able to safely break the circuit in the event of a 30 mA AC or 6 mA DC fault in accordance with IEC 61008 and IEC 62955.
Hereby, Easee AS declares that this product, Easee EV Charging Robot E01-CB, is in compliance with the Low Voltage Directive 2014/35/EU, Radio Equipment Directive 2014/53/EU, EMC Directive 2014/30/EU and RoHS Directive 2011/65/EU. The full text of the EU Declaration of Conformity is available at the following internet address: easee.support.
Radio: 100 mW at 863–870 MHz. WiFi: 50 mW at 2.4–2.472 GHz. GSM: 2 W at 880–915 MHz, 1 W at 1710–1785 MHz, 200 mW at 703–748 MHz, 832–862 MHz, 880–915 MHz, 1710–1785 MHz and 1920–1980 MHz.
Quality and safety
Standards
Max transmitted power

36
Product life cycle Transportation: The charger should always be transported within its original packaging. No other items should be stored on top of the box other than Easee chargers. Should the box be dropped or otherwise impacted, a visual inspection should be done in order to verify potential damage.
Storage: The electronics are hermetically sealed and will not get damaged if stored in humid areas. However, in order to preserve the packaging and its contents, we recommend storage in a tempered, dry and well-ventilated area. Relative humidity should not exceed 80% and no corrosive gas should be present. Storage or transportation environment should never exceed the limits provided in the technical specifications of the charger (see page 8).
Dismounting: Perform a factory reset of the device before powering it down. This is done via the charger's local WiFi interface. Dismounting shall only be performed by an authorised electrician. The power supply to the charger must be isolated before dismounting starts. Use the installation guide and follow the steps in reverse in order to dismount the Charging Robot in the correct order.
Disposal: This electronic equipment must not be disposed of in household waste. For the return of old devices, free collection and acceptance points may be available in your vicinity. Observe local regulations for correct and environmentally friendly disposal. If the old electronic equipment contains personal data, you are responsible for deleting it yourself before returning it.

37
Returns and complaints
Customer support
Contact details
Repair
When the product connects to the Internet, personal data is sent to Easee AS. You will receive more information about data protection during the configuration of your Charging Robot.
If your charger needs to be repaired, please contact your Easee supplier.
Contact your distributor or Easee Customer Support regarding the return and complaint of your product.
Download the latest manuals, find answers to frequently asked questions and useful documents and videos for your product at easee.support.
Easee ASProfessor Olav Hanssens vei 7A4021 Stavanger, NorwayOrg. nr: 920 292 046
You can find additional contact details for your country at easee-international.com.
Data protection

38
THIS DOCUMENT CONTAINS INFORMATION THAT IS SUBJECT TO CHANGE WITHOUT NOTICE.
The latest version of this publication can be downloaded at http://easee.support
No part of this publication may be reproduced or transmitted in any form or by any means, electronic or mechanical, including, but not limited to, copying, recording, retrieving data, or computer networks without the written permission of Easee AS.
Easee and all other Easee product names and slogans are trademarks or registered trademarks of Easee AS. Easee products can be protected by one or more patents.
All other products and services mentioned may be tra-demarks or service marks of their respective owners.
Illustrations of the product and user interface are exemplary and may differ from the actual appearance.
December 2020 – Version 3.00 © 2019 by Easee AS. All rights reserved.

39

40
Easee ASProfessor Olav Hanssens vei 7A4021 Stavanger, Norway
.easee-international.com


