User Guide - Aberdeen Disk Manager (3DM 2) 30 3ware 9000 Series Serial ATA RAID Controller User...
46
3ware ® Serial ATA RAID Controller Supports the 9000 Series PN 720-0104-00 April, 2004 User Guide
Transcript of User Guide - Aberdeen Disk Manager (3DM 2) 30 3ware 9000 Series Serial ATA RAID Controller User...

3ware®
Serial ATA RAID ControllerSupports the 9000 Series
PN 720-0104-00April, 2004
User
Gu
ide
Copyright ©2004 3ware, Inc. All rights reserved. No part of this publication may be reproduced, stored in a retrieval system, or transmitted in any form by any means, electronic, mechanical, photocopying, recording or otherwise, without the proper written consent of 3ware, Inc., 455 West Maude Ave., Sunnyvale, CA 94085.
Trademarks3ware, Escalade, and 3DM are all registered trademarks of 3ware, Inc. The 3ware logo, 3BM, StorSwitch, TwinStor, and R5 Fusion are all trademarks of 3ware, Inc. All other trademarks herein are property of their respective owners.
Disclaimer3ware, Inc. assumes no responsibility for errors or omissions in this document, nor does 3ware, Inc. make any commitment to update the information contained herein.

3ware Disk Manager (3DM 2)
Note: 3DM 2 includes software developed by the OpenSSL Project for use in the OpenSSL Toolkit (http://www.openssl.org/).
3ware Disk Manager 2 (3DM 2), allows you to view the status of and manage 3ware RAID controllers and associated drives. 3DM runs as a service under Microsoft Windows, and as a daemon under Linux. When it is running, you can use your browser to view status and perform administrative tasks locally or remotely.
3DM 2 can display information about 3ware RAID 7000-, 8000- and 9000-series RAID controllers. However, some version 2 features are only available for 9000-series controllers.
Two levels of access are provided: user and administrator. Users have view-only access—they can check the status of drives and units—while Administrators can view and make changes, using 3DM to configure RAID units and designate hot spares, and to perform maintenance tasks on RAID units.
In this section, information about 3DM is organized into the following topics:■ “Browser Requirements for 3DM” on page 28■ “Installing 3DM” on page 29■ “Starting 3DM and Logging In” on page 35■ “Working with the 3DM Screens” on page 37■ “Setting Up 3DM Preferences” on page 41■ “Running Two Versions of 3DM” on page 44■ “3DM 2 Reference” on page 45
www.3ware.com 27

3ware Disk Manager (3DM 2)
“3DM 2 Reference”contains information about the fields and settings on each page in 3DM. For additional information about doing particular tasks in 3DM, see the remaining sections in this guide.
Browser Requirements for 3DM3DM runs in most current web browsers. Tested and supported browsers include:
■ Mozilla 1.2 and above
■ Internet Explorer 5.5 and above
Additional requirements:
■ JavaScript must be enabled
■ Cookies must be enabled
■ For best viewing, use a screen resolution of 1024 X 768 or greater, and set colors to 16 bit color or greater.
Note: Because 3DM may be viewed in different browsers, the format and style of the 3DM browser windows illustrated in this chapter are examples only. (Screenshots were taken in Internet Explorer.) The actual “look” of the windows will depend on the browser, 3DM version and operating system in use.
Setting up MozillaDetails about accessing all ports, including port 888, by adding a list of ports to /Mozilla/default/all.js
Note: For security reasons, some web browsers do not allow connections to certain ports including port-1080 and 888. To override this on a per-port basis, the Mozilla release notes recommend to add a comma-separated list of ports to default/all.js (in your Mozilla installation directory). For example, to unblock port 888, use the following line:pref(“network.security.ports.banned.override”, “888”)
This file is located at:/usr/lib/mozilla/defaults/pref/all.js
28 3ware 9000 Series Serial ATA RAID Controller User Guide
Installing 3DM
Installing 3DM3DM 2 can be installed from the main 3ware CD that came with your 3ware RAID controller. You can also download the current version from the website at http://www.3ware.com/support/download.asp.
3DM must be installed on the system in which the controller is installed. 3DM does not have to be installed on remote systems in order to remotely manage a 3ware controller.During installation, you will be asked to enter the following preferences for 3DM use. (Each of these preferences can be changed later, from within 3DM.)
■ The HTTP port to be used as the listening port■ Whether remote access will be allowed■ Whether you want email alerts to be sent when errors occur, and who
should receive them
Installing 3DM on a Windows systemThe 3ware RAID controller works with Windows 2000, Windows XP, and Windows Server 2003. The latest service packs should be installed for any Windows release.
To install 3DM on a Windows system
1 Insert the 3DM CD-ROM and click Install 3DM 2 when the menu appears.Or, if you downloaded 3DM from the website, find the file 3DM2_x86.exe or 3DM2_AMD64.exe and double-click it to launch the setup.
2 If a command window opens, press any key to begin the installation process.
3 When the License Agreement screen appears, read and agree to the license information; then let the InstallShield Wizard guide you through the installation process.
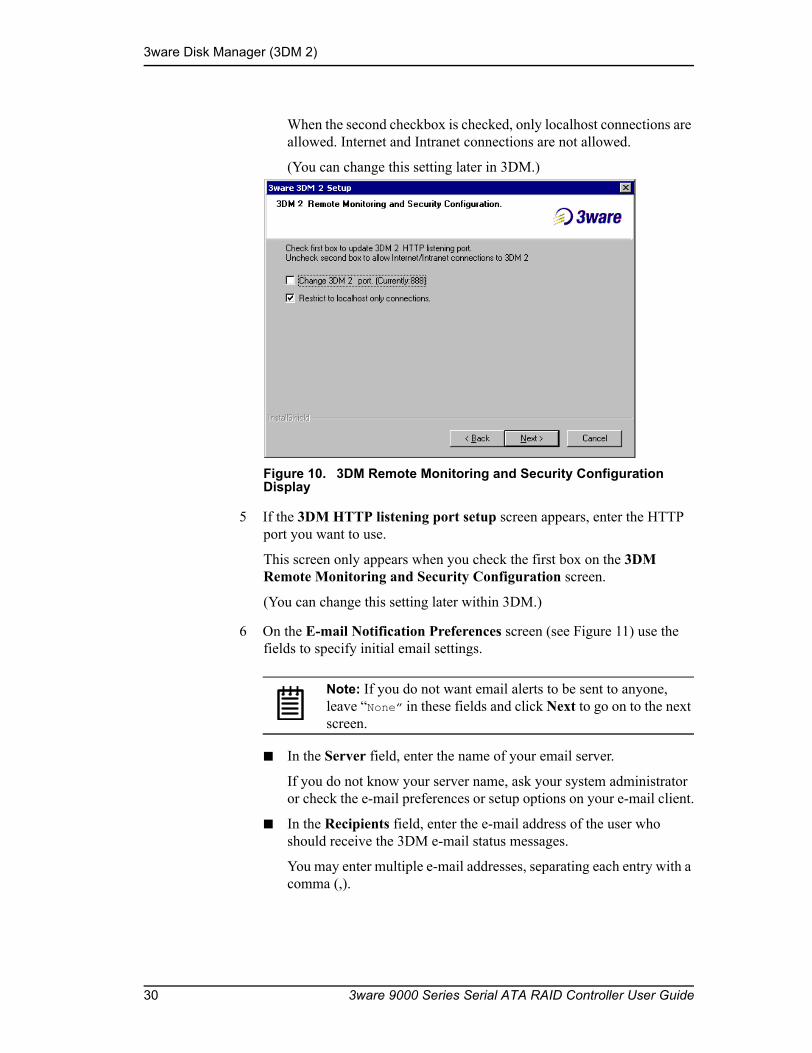
4 On the 3DM Remote Monitoring and Security Configuration screen (see Figure 10), use the settings to specify these things:
■ To change the HTTP port that 3DM will use as a listening port, check the first box. If you do not know which port to use, leave the box unchecked and use the default port.
■ To allow remote administration, uncheck the second checkbox.
www.3ware.com 29
3ware Disk Manager (3DM 2)
When the second checkbox is checked, only localhost connections are allowed. Internet and Intranet connections are not allowed.
(You can change this setting later in 3DM.)
Figure 10. 3DM Remote Monitoring and Security Configuration Display
5 If the 3DM HTTP listening port setup screen appears, enter the HTTP port you want to use.
This screen only appears when you check the first box on the 3DM Remote Monitoring and Security Configuration screen.
(You can change this setting later within 3DM.)
6 On the E-mail Notification Preferences screen (see Figure 11) use the fields to specify initial email settings.
Note: If you do not want email alerts to be sent to anyone, leave “None” in these fields and click Next to go on to the next screen.
■ In the Server field, enter the name of your email server.
If you do not know your server name, ask your system administrator or check the e-mail preferences or setup options on your e-mail client.
■ In the Recipients field, enter the e-mail address of the user who should receive the 3DM e-mail status messages.
You may enter multiple e-mail addresses, separating each entry with a comma (,).
30 3ware 9000 Series Serial ATA RAID Controller User Guide

Installing 3DM
■ In the Sender field, enter the email address from which the email notifications will be sent. This is typically the local host name.
(You can change these settings later within 3DM.)SCSI
Figure 11. 3DM E-mail Notification Preferences
7 Continue with the installation as prompted, clicking Next to move to the next screen, and Finish when you reach the last screen.
3DM Installation gives you the option of starting 3DM and opening the browser window.
8 If you elect to launch the web interface, a Security Alert may appear, as shown in Figure 12. Click Yes continue.
You may install the certificate if you do not want to see this alert in the future. To do so, click View Certificate and then click Install Certificate.
Figure 12. Security Alert dialog box
9 When the first 3DM screen appears in your browser, log in as Administrator and use the default password, 3ware.
www.3ware.com 31
3ware Disk Manager (3DM 2)
Notes: You can start 3DM later by choosing 3DM from the Start menu.
If you change, add, or remove an IP address, or change the machine name of the machine on which you have installed 3DM 2, you will need to recreate the security certificate. You can do so by re-installing 3DM 2, or by deleting the file 3dm2.pem and restarting the 3DM 2 service. Under Windows, this file is located in the same directory in which you installed 3DM 2. Under Linux, the file resides in /etc/3dm2. You may also want to delete the installed/cached security certificate from your browser.
Uninstalling 3DM under Microsoft WindowsUse the Add or Remove Programs control panel to uninstall 3DM.
■ From the Startup menu, choose Control Panels > Add or Remove Programs.
■ In the Add or Remove Programs control panel, select 3DM and click Change/Remove.
Installing 3DM for Linux or FreeBSDYou can install 3DM from the command line, or from a GUI. The steps below describe how to install 3DM from the command line. If you are using a GUI, you can access the CD-ROM and folders from the windows in the GUI.
Note: If you downloaded 3DM_Linux.zip from the website, unzip the file to root (or to any other working directory) and change Directory (CD) to that directory (for example: /root). Then start the following procedure at step 3, substituting /mnt with /root or your installation directory.
To start the installation1 Insert the 3ware software installation CD-ROM for Linux into the CD-
ROM drive.2 Mount the CD-ROM disk:
mount /dev/cdrom /mnt
3 Change the directory and run the install script:
For Linux:cd /mnt/packages/3dm2/linux/x86./install.3dm
For FreeBSD:cd /mnt/packages/3dm2/freebsd/x86./install.3dm
32 3ware 9000 Series Serial ATA RAID Controller User Guide

Installing 3DM
To specify initial setup for 3DM 2During installation, you will be prompted with a series of questions that determine initial 3DM settings. You can change these later, from within 3DM.
(The first question appears for Linux, but not for FreeBSD.)
1 Was RPM used to install the Escalade driver and/or 3DM?
The default answer is no.
2 Please enter the location of the help documentation (default is /usr/local/doc/3dm)
Press Enter to accept the default location and display the next question, or enter the path at which you want the documentation to be installed.
3 Would you like to have e-mail notification enabled (Y/N)?
E-mail notification sends an email message when an event occurs.
The default answer to this question is “yes”.
If you enable e-mail notification you will be asked to provide additional information: the name of the mail server, the user name for the person who will send the E-mail notification (typically the local host name) and the user name for the person who will receive the e-mail notification (typically the system administrator).
Please enter the name of your mail server: (default is local host name)Please enter the name of the user you want sending e-mail notification: (default is root)Please enter the name of the user you want receiving e-mail notification: (default is 3ware_admin)
To enter multiple e-mail addresses, separate them by a comma or a semicolon:
4 Please enter the port number you would like to use for web monitoring (default is 888)
If you do not know what port to use, select the default:
5 Would you like 3DM connection security to limit connections to localhost only? (default is yes)
If you want to be able to use 3DM for remote administration, change this to No.
6 Change the directory and then eject the CD-ROM disk when finished:cd /homeeject cdrom
www.3ware.com 33

3ware Disk Manager (3DM 2)
Uninstalling 3DM under Linux or FreeBSD
To uninstall 3DM for Linux or FreeBSD
1 Insert the 3ware software installation CD-ROM into the CD-ROM drive.
2 Mount the CD-ROM disk:mount /dev/cdrom /mnt
3 Change the directory and run the uninstall script:
(For FreeBSD, replace “linux” with “freebsd” in the path shown in this step.)
cd /mnt/packages/3dm2/linux/x86./install.3dm --u
Note that if you downloaded 3DM from the web, replace “/mnt/” in the previous command with “/root/”
4 Eject the CD-ROM disk when finished:cd /homeeject cdrom
Note: If 3DM Linux is reinstalled or restarted, close any open web browsers before starting 3DM again to close the server socket.
34 3ware 9000 Series Serial ATA RAID Controller User Guide

Starting 3DM and Logging In
Starting 3DM and Logging In3DM runs as a service under Windows, and as a daemon under Linux.
It is a good idea to leave 3DM running on the system that contains your 3ware RAID controller. That way email alerts can be sent by 3DM, and administrators can manage the controller remotely, if remote administration is enabled.
You can access the 3DM screens to check status information and manage your 3ware RAID controller by logging in to the 3DM screens in your browser.
Starting 3DM under Linux3DM should start automatically after installation and upon bootup.
To start 3DM manually
1 Login as root.
1 Afterwards, type:
For Red Hat Linux:/etc/rc.d/init.d/3dm start
For SuSE Linux:/etc/rc.d/3dm start
2 Open your browser and enter the URL for your system.
The default URL is https://localhost:888/.
You can also replace “localhost” with the IP address of the computer that contains the 3ware controller. For example: https://<IP address>:888/
The 3DM login screen appears.
Starting 3DM under Windows■ From the Start menu, choose Programs > 3ware > 3DM 2.
Your default browser opens and displays the URL for your local controller.
The default URL is https://localhost:888/.
You can also replace “localhost” with the IP address of the computer that contains the 3ware controller. For example:
https://<IP address>:888/
www.3ware.com 35
3ware Disk Manager (3DM 2)
Note: If you close your browser, 3DM continues to run in the background on the system.
Viewing 3DM Remotely via a Standard Web BrowserWhen remote administration is enabled, you can use 3DM to check status and administer your 3ware RAID controller from a browser on any computer, over an internet connection.
You do not need to install the 3DM software on the remote computer.
Remote connections can be enabled or disabled from the 3DM Settings page.
■ In the address line of your browser, enter the URL or IP of the system containing the 3ware RAID controller.
If you don’t know the URL or IP for the system, you can contact your network administrator or from a Windows command prompt, type ipconfig. From a Linux command prompt, type ifconfig.
Logging InWhen you first view 3DM in a browser, you must log in before you can view or change any information.
Two levels of access are provided:
■ Users can check the status of the controller, units, and drives attached to it.
■ Administrators can check status, configure, and maintain the equipment.
(Administrator and User status in 3DM is not related to Administrator/User settings in the operating system.)
To log in to 3DM
1 On the 3DM logon screen, select whether you are a User or Administrator.
2 Enter your password and click Login.
If you are logging in for the first time after installing 3DM, the default password for both User and Administrator is 3ware.
Note: If you forget the passwords, uninstalling and reinstalling 3DM resets the passwords to 3ware.
36 3ware 9000 Series Serial ATA RAID Controller User Guide

Working with the 3DM Screens
Working with the 3DM Screens3DM’s features are organized on a series of pages you view in your browser.
After you log in to 3DM, the Summary page shows a list of controllers installed in the computer at the URL you specified.
Note: If you expect to see a controller that is not listed, it may not be compatible with the driver that is loaded; a firmware flash upgrade may be required.
Figure 13. 3DM Main Screen
The menu bar across the top of the screen gives you access to other pages in 3DM. You can move between pages by using the menu bar, or by clicking a link on the page.
The main area of the page provides summary or detail information about your 3ware RAID controller and the resources connected to it.
As you work in 3DM, the Messages area just below the menu bar displays information about the results of commands you have selected.
www.3ware.com 37
3ware Disk Manager (3DM 2)
3DM MenusThe 3DM menu bar groups access to a number of 3DM pages on menus, and provides direct link access to others.
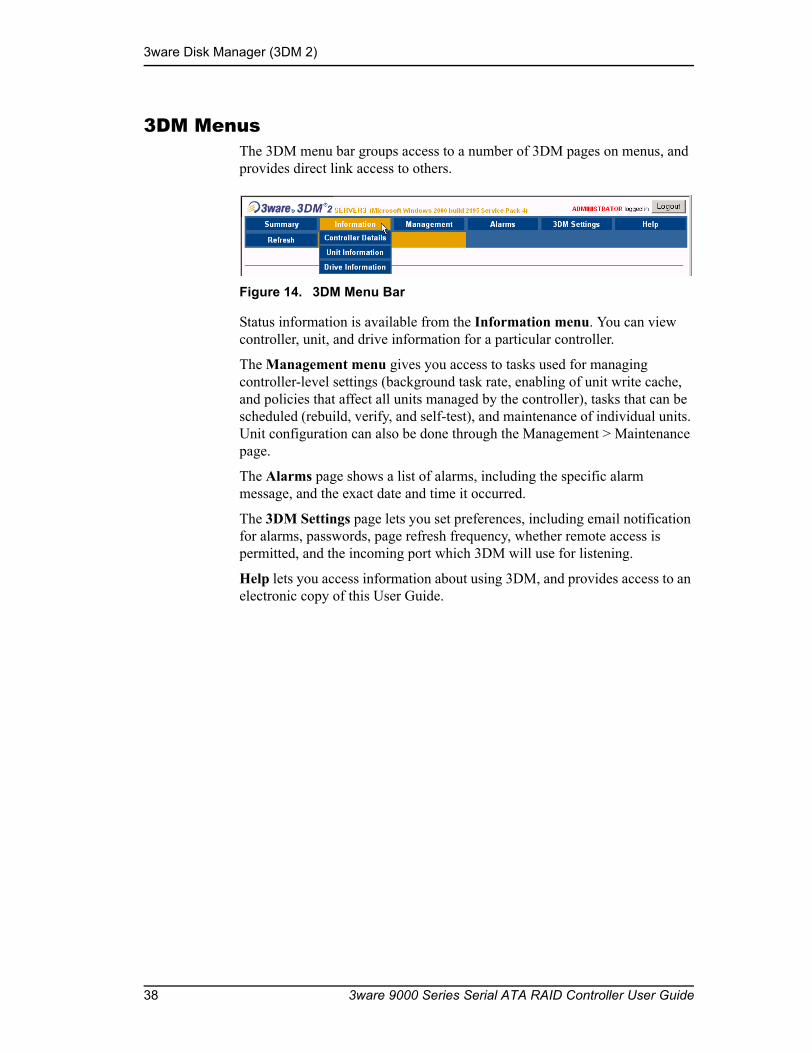
Figure 14. 3DM Menu Bar
Status information is available from the Information menu. You can view controller, unit, and drive information for a particular controller.
The Management menu gives you access to tasks used for managing controller-level settings (background task rate, enabling of unit write cache, and policies that affect all units managed by the controller), tasks that can be scheduled (rebuild, verify, and self-test), and maintenance of individual units. Unit configuration can also be done through the Management > Maintenance page.
The Alarms page shows a list of alarms, including the specific alarm message, and the exact date and time it occurred.
The 3DM Settings page lets you set preferences, including email notification for alarms, passwords, page refresh frequency, whether remote access is permitted, and the incoming port which 3DM will use for listening.
Help lets you access information about using 3DM, and provides access to an electronic copy of this User Guide.
38 3ware 9000 Series Serial ATA RAID Controller User Guide
Working with the 3DM Screens
Viewing Information About Different Controllers in 3DM
If you have more than one controller in the system, you select the one you want to see details about from the drop-down list at the right of the menu bar.
This drop-down is available on all pages that provide controller-specific features.
Note: Throughout these instructions, current controller is used to refer to the controller which is currently selected in this drop-down list.
Refreshing the ScreenYou can refresh the data on the screen at any time by clicking Refresh Page in the menu bar. This causes 3DM to update the information shown with current information from the controller and associated drives.
Automatic refreshes can also be set. For details, see “Setting the Frequency of Page Refreshes” on page 43.
Note: If you click Refresh on the browser window, you will be taken back to the Summary page.
3DM Screens and What They're Used For Table 5 shows a list of the pages you work with in 3DM and describes what they are used for. Details about each page and the fields and features on it are provided in the section “3DM 2 Reference” on page 45. The page names in Table 5 provide links to details about that page.
Table 5: List of 3DM Pages
3DM Page Description
Controller Summary Page
Provides basic information about each 3ware RAID controller in your system.To see this page, click Summary in the menu bar.
Controller Details Page
Provides detailed information about the current controller.To see this page, choose Information > Controller Details from the menu bar.
www.3ware.com 39

3ware Disk Manager (3DM 2)
Unit Information Page Shows a list of the units on the current controller and provides summary information about each unit.To see this page, choose Information > Unit Information from the menu bar or click an ID number on the Controller Summary.
Unit Details Page Shows details about a particular unit. To see this page, click an ID number on the Unit Information page.
Drive Information Page
Shows a list of drives on the current controller and provides summary information about each drive.To see this page, choose Information > Drive Information from the menu bar.
SMART Details About Drive at Particular Port Page
Shows the SMART data for a specific drive.To see this page, click the Port # for a drive on the Drive Information page.
Controller Settings Page
Lets you view and change settings that affect the units on the current controller.To see this page, choose Management > Controller Settings from the menu bar.
Scheduling Page Lets you view and change the schedule for tasks that affect all units on the current controller.To see this page, choose Management > Scheduling from the menu bar.
Maintenance Page Lets you configure new units and make changes to existing units.To view this page, choose Management > Maintenance from the menu bar.
Alarms Page Shows a list of alarms, including the specific alarm message, and the exact date and time it occurred.To view this page, click Alarms on the menu bar.
3DM Settings Page Lets you set preferences, including email notification for alarms, passwords, page refresh frequency, whether remote access is permitted, and the incoming port which 3DM will use for listening.To view this page, click 3DM Settings on the menu bar.
Table 5: List of 3DM Pages
3DM Page Description
40 3ware 9000 Series Serial ATA RAID Controller User Guide

Setting Up 3DM Preferences
Setting Up 3DM PreferencesThe 3DM Settings page lets you define preference settings that affect the overall operation of 3DM. Most of these settings are specified initially during installation of 3DM.
On the 3DM Settings page you can perform the following tasks:■ Setting and Changing 3DM Passwords■ Managing E-mail Event Notification■ Enabling and Disabling Remote Access■ Setting the Incoming Port #■ Setting the Frequency of Page Refreshes
Setting and Changing 3DM Passwords 3DM provides different access levels for users and administrators.
The Administrator access level allows the user to fully configure 3DM. The User access level allows the user to view pages within 3DM. These passwords work independently of each other.
The default password for both the User and Administrator is “3ware”.
Passwords are case sensitive.
You can only change passwords if you are logged in as Administrator. If you change the Administrator password, you will be automatically logged out, and must log back in with the new password.
To set or change the password
1 Click 3DM Settings on the 3DM menu bar.
2 On the 3DM Settings page, in the Password section, select the type of password you want to change: User or Administrator.
3 Type the current password in the Current Password field.
If you are changing the password for the first time, the factory-set default password is 3ware.
4 Enter the new password in the New Password field and again in the Confirm New Password field.
5 Click the Change Password button to enact the change.
Note: If you forget your password, you can uninstall 3DM and then reinstall it. This will reset the password to the default password, 3ware.
www.3ware.com 41

3ware Disk Manager (3DM 2)
Managing E-mail Event Notification3DM can notify you when the 3ware RAID controller requires attention, such as when a disk unit becomes degraded and is no longer fault tolerant.
Event notification can only occur while 3DM is running, so it is recommended that 3DM be left running on the system that contains the 3ware RAID controller.
When events occur, notification can be e-mailed to one or more recipients. You can specify the type of events for which notifications will be sent by selecting the severity:
■ Information will send e-mails for all alarms
■ Warning will send e-mail for alarms with severity of Warning and Error only.
■ Error will send e-mail for alarms with severity of Error only.
For more information about events and alarms, see “Viewing Alarms” on page 107.
Event notification is initially set up during 3DM installation, but can be changed on the 3DM Settings page.
To set up event notification
1 Click 3DM Settings on the menu bar.
2 In the E-mail Notification section of the 3DM Settings page, enter or change the settings you want.
■ Enable or Disable all notifications.
■ Set the severity level of events for which e-mail notifications are sent.
■ Specify the email address of the sender. This will appear in the “From” field of the e-mail.
■ Enter the e-mail address(es) to which notifications are sent. (Separate multiple addresses with a comma (,) or a semicolon (;).
■ Enter the SMTP server name or IP of your mail server.
3 Click Save E-mail Settings.
To send a test messageYou can send a test message to make sure you’ve entered the e-mail notification settings correctly.
■ Click Send Test Message.
42 3ware 9000 Series Serial ATA RAID Controller User Guide
Setting Up 3DM Preferences
Enabling and Disabling Remote AccessWhen remote access is enabled, a user can connect to 3DM over the internet or an intranet, to check status or administer the controller and associated drives.
If remote access is disabled and a user attempts to connect to 3DM remotely, they will see the following error message: “Remote Access to 3DM has been disabled. Please connect using the local machine by entering “localhost” in the URL bar.”
Remote access can be enabled or disabled on the 3DM Settings page.
To enable or disable remote access
1 Click 3DM Settings on the menu bar.
2 In the Remote Access section of the 3DM Settings page, select either Enabled or Disabled in the Allow Remote Connections field.
The page refreshes, and a message at the top of the screen confirms that remote access has been enabled or disabled.
Setting the Incoming Port #You can set the port which 3DM uses to listen for incoming messages. If you are not sure which port would be the best to use, leave this set to the default port of 888.
To set the incoming port
1 Click 3DM Settings on the menu bar.
2 In the Incoming Port # section of the 3DM Settings page, enter the port number in the Listening Port field.
The page refreshes, and a message at the top of the screen confirms that the listening port has been changed.
Setting the Frequency of Page RefreshesSince the status of the drives attached to your 3ware RAID controller can change while you are viewing information about them in 3DM, it’s important to refresh the page information regularly. That way you can be assured that the information you see in 3DM is current.
You can manually refresh the information on a page by clicking Refresh Page in the menu bar. But you can also have 3DM refresh the information on a regular basis.
www.3ware.com 43

3ware Disk Manager (3DM 2)
To set the frequency of page refreshes
1 Click 3DM Settings on the menu bar.
2 In the Page Refresh section of the 3DM Settings page, select how often you want the page to be refreshed in the Minutes Between Refresh field.
Note: If you don’t want 3DM to refresh the screen automatically, select Never in the Minutes Between Refresh field. You can then refresh manually by clicking Refresh on your web browser.
Running Two Versions of 3DMAlthough you can view information about 7000- and 8000-series controllers in 3DM 2, some features of version 2 are only available for the 9000-series, because they require that the firmware contain associated capabilities. When this is the case, a message appears in the 3DM page indicating that the feature is not available for the current controller.
The scheduling feature is one that works differently in 9000-series controllers and earlier controllers. If you want to set the schedule for background tasks for a 7000- or 8000-series controller, you must do so by using 3DM version 1.x.
If you have multiple controllers in the same system, and the controllers are from different series, it is possible to install and run both 3DM 2 and 3DM version 1.x on the same system.
Note: If two different versions of 3DM are both running, they have to be listening on different ports.
In addition, alarms cannot be captured by both versions.
44 3ware 9000 Series Serial ATA RAID Controller User Guide

3DM 2 Reference
3DM 2 ReferenceThis section includes details about the fields and features available on the pages you work with throughout 3DM 2. It is organized by page, as the pages are organized on the 3DM menu bar.
■ Controller Summary Page■ Controller Details Page■ Unit Information Page■ Unit Details Page■ Drive Information Page■ SMART Details About Drive at Particular Port Page■ Controller Settings Page■ Scheduling Page■ Maintenance Page■ Alarms Page■ 3DM Settings Page
Controller Summary Page
Figure 15. Controller Summary Page
Note: The software version shown in the screenshots in this manual are preliminary examples only. For the current released and tested version number, refer to the 9000 release notes.
www.3ware.com 45

3ware Disk Manager (3DM 2)
The Summary page appears after you first logon to 3DM, and when you click the Summary link in the menu bar.
The Summary page provides basic information about each 3ware RAID controller in your system. To see details about the units in a controller, click the link in the ID column.
ID. The ID that the operating system assigns to the controller.
Note: The controller ID you see in 3DM 2 may not match the number that you see for the same controller in 3DM version 1.x.
Model. The model name of the controller. (The model number is also printed on a sticker on the outside bracket of the controller.)
Serial #. The serial number of the controller. (The serial number is also printed on a sticker on the outside bracket of the controller.)
Firmware. The firmware version running on the controller.
Driver. The driver version being used to interact with the controller.
Status. The overall status of the controller. Possible statuses include OK, Warning, Error, and No Units. Warning indicates that a background task is currently being performed (rebuilding, verifying, or initializing). Error indicates that a unit is degraded or inoperable. If both Error and Warning conditions exist, the status will appear as Error.
46 3ware 9000 Series Serial ATA RAID Controller User Guide

3DM 2 Reference
Controller Details Page
Figure 16. Controller Details Page
The Controller Details page appears when you choose Information > Controller Details from the menu bar.
The Controller Details page provides detailed information about the controller specified in the drop-down list on the menu bar. You can also open or download an error log from this screen. Model. The model name of the controller. Serial #. The serial number of the controller.Firmware. The firmware version running on the controller.Driver. The driver version being used to interact with the controller.BIOS. The BIOS version on the controller.Monitor. The Monitor version on the controller.This field appears only for 7000- and 8000-series controllers.) Boot Loader. Boot Loader version on the controller. This field appears only for 9000-series controllers.# of Units. The number of units on the controller.# of Ports. The number of total ports on the controller, regardless of whether each currently has a drive connected.Error Log. Provides access to the firmware’s error log. When you click this link, a dialog box gives you the option to save the log to your computer, or open it.
www.3ware.com 47
3ware Disk Manager (3DM 2)
Unit Information Page
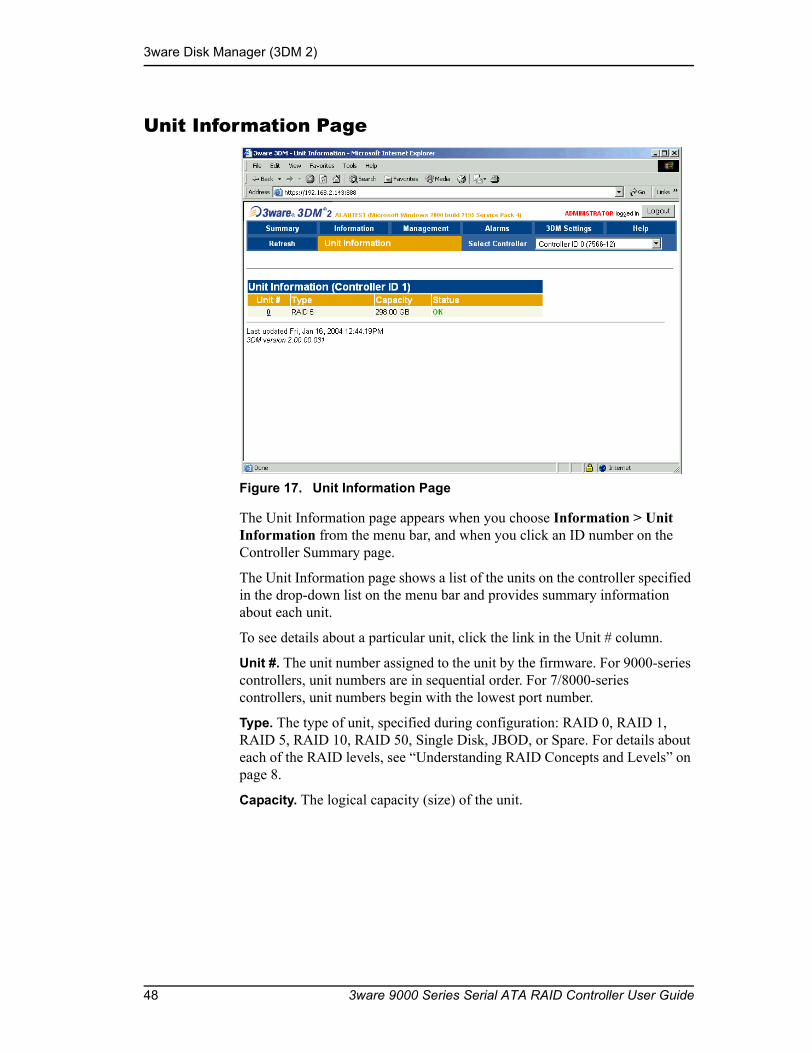
Figure 17. Unit Information Page
The Unit Information page appears when you choose Information > Unit Information from the menu bar, and when you click an ID number on the Controller Summary page.
The Unit Information page shows a list of the units on the controller specified in the drop-down list on the menu bar and provides summary information about each unit.
To see details about a particular unit, click the link in the Unit # column.
Unit #. The unit number assigned to the unit by the firmware. For 9000-series controllers, unit numbers are in sequential order. For 7/8000-series controllers, unit numbers begin with the lowest port number.
Type. The type of unit, specified during configuration: RAID 0, RAID 1, RAID 5, RAID 10, RAID 50, Single Disk, JBOD, or Spare. For details about each of the RAID levels, see “Understanding RAID Concepts and Levels” on page 8.
Capacity. The logical capacity (size) of the unit.
48 3ware 9000 Series Serial ATA RAID Controller User Guide

3DM 2 Reference
Note: 3DM 2 displays the capacity (in MBytes or GBytes) the same way that Microsoft Windows and Linux operating systems do: as 1KB = 1024 bytes. Previous versions of 3DM 1.x used the 1KB = 1000 bytes definition. Consequently capacities of units listed under 3DM v 1.x may appear to be larger than they do under 3DM 2.
Status. The operational status of the unit: OK, Rebuilding, Initializing, Verifying, Degraded, or Inoperable (missing drives). When a unit is Rebuilding, Initializing, or Verifying, the percentage (%) complete is also shown.
Unit Details Page
Figure 18. Unit Details Page
The Unit Details page appears when you click an ID number on the Unit Information page. Because it is a sub-page of Unit Information, the page title in the menu bar continues to display “Unit Information” even when you view details of a unit. To return to the list of units, click Unit Information in the menu bar.
The Unit Details page shows details about a particular unit. The specific information shown depends on what type of unit it is. For example, details about a RAID 10 unit made up of two subunits, each of which contains two drives, will include details about the unit and each subunit, as shown in
www.3ware.com 49

3ware Disk Manager (3DM 2)
Figure 18. However, if the unit was a Single Disk, only information about one disk would be shown.
Details on this page may include all or some of the following information described below.
To see details about a particular drive, click the Port #. You’ll see a list of all drives, with the drive you selected highlighted.
Status. The operational status of the unit or subunit: OK, Rebuilding, Initializing, Verifying, Degraded, or Inoperable (missing drives). When a unit is Rebuilding, Initializing, or Verifying, the percentage (%) complete is also shown.
Capacity. The total capacity of the unit (capacities of subunits are not shown).
Type. The type of unit or subunit it is. RAID 0, RAID 1, RAID 5, RAID 10, RAID 50, Single Disk, Spare, JBOD, or Disk
Stripe. The stripe size of the unit, if applicable.
Subunits. If the unit has subunits, details of the subunits are shown.
Port #. If the Type is Disk, Single Disk, JBOD, or Spare, the port to which the drive is connected is shown. For multiple drive units, the port numbers are shown in the subunits section. The port number is a link to the Drive Information page.
50 3ware 9000 Series Serial ATA RAID Controller User Guide
3DM 2 Reference
Drive Information Page
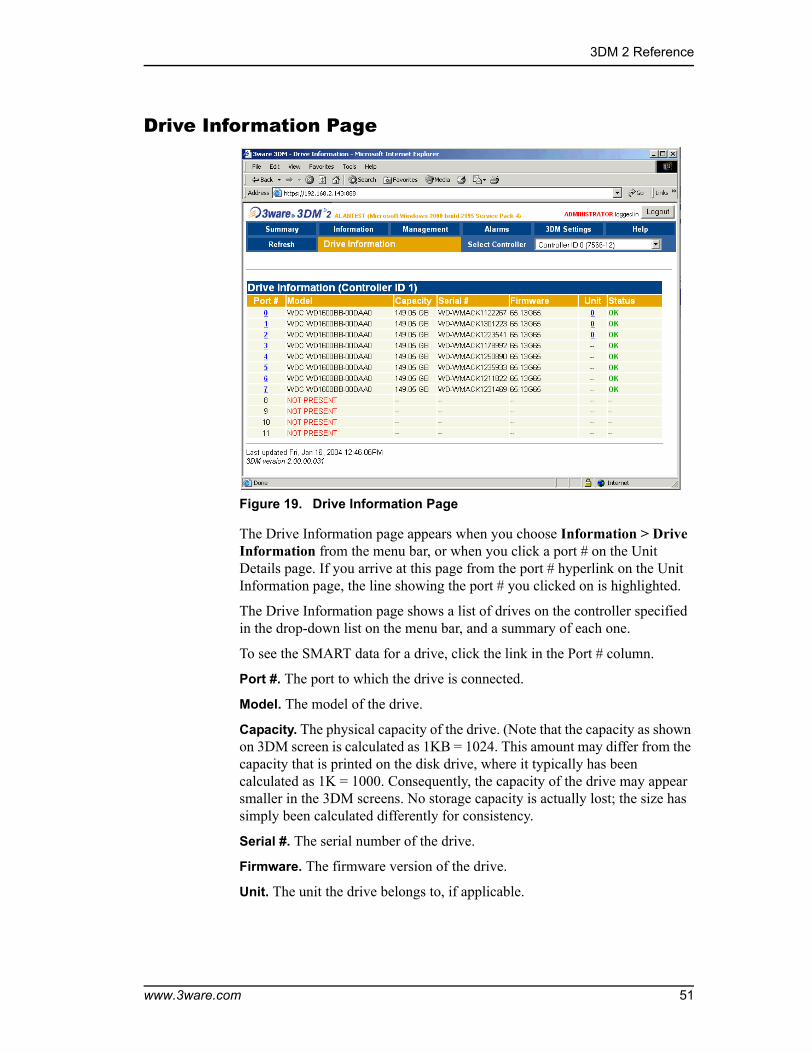
Figure 19. Drive Information Page
The Drive Information page appears when you choose Information > Drive Information from the menu bar, or when you click a port # on the Unit Details page. If you arrive at this page from the port # hyperlink on the Unit Information page, the line showing the port # you clicked on is highlighted.
The Drive Information page shows a list of drives on the controller specified in the drop-down list on the menu bar, and a summary of each one.
To see the SMART data for a drive, click the link in the Port # column.
Port #. The port to which the drive is connected.
Model. The model of the drive.
Capacity. The physical capacity of the drive. (Note that the capacity as shown on 3DM screen is calculated as 1KB = 1024. This amount may differ from the capacity that is printed on the disk drive, where it typically has been calculated as 1K = 1000. Consequently, the capacity of the drive may appear smaller in the 3DM screens. No storage capacity is actually lost; the size has simply been calculated differently for consistency.
Serial #. The serial number of the drive.
Firmware. The firmware version of the drive.
Unit. The unit the drive belongs to, if applicable.
www.3ware.com 51
3ware Disk Manager (3DM 2)
Status. The status of the drive: OK, Not Supported, Read Timeout, Read Failure, Orphan, DCB Data Check, Unsupp DCB, Unconv DCB, Offline JBOD, or Not Present. (In the event of a problem, the status shown for the drive can be useful to customer support.)
Note: In most cases, the status of the drive will not correspond to the status of the unit, shown on the Unit Information page.
SMART Details About Drive at Particular Port Page
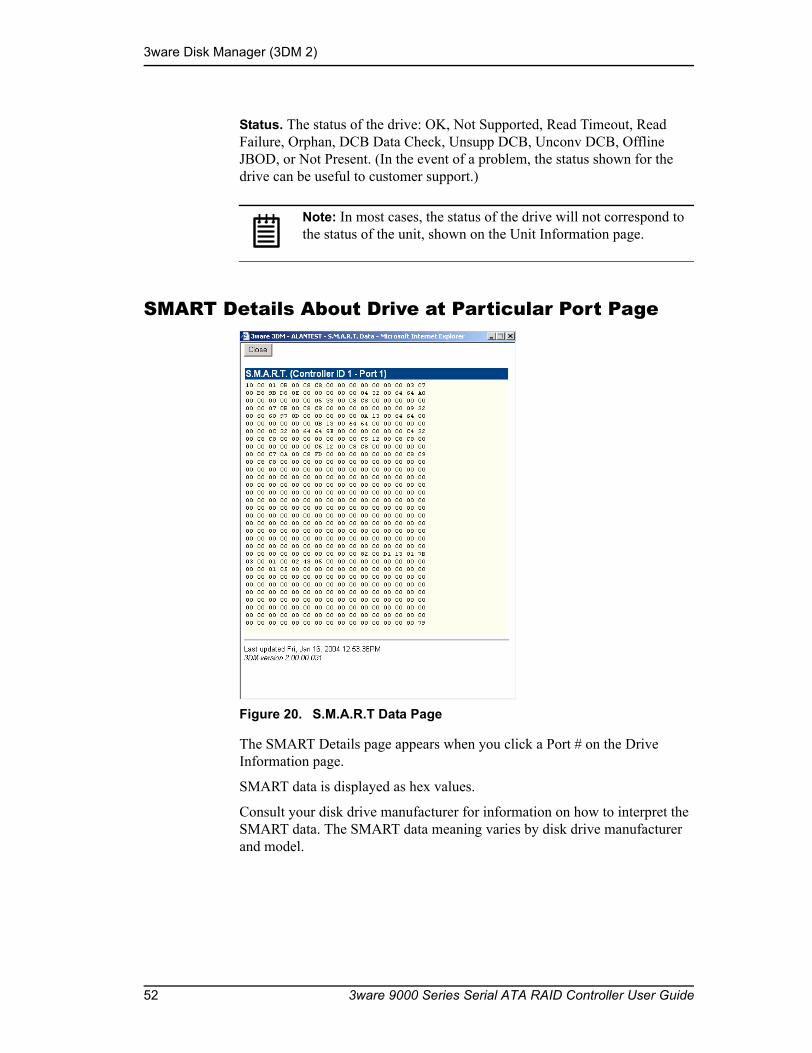
Figure 20. S.M.A.R.T Data Page
The SMART Details page appears when you click a Port # on the Drive Information page.
SMART data is displayed as hex values.
Consult your disk drive manufacturer for information on how to interpret the SMART data. The SMART data meaning varies by disk drive manufacturer and model.
52 3ware 9000 Series Serial ATA RAID Controller User Guide

3DM 2 Reference
Controller Settings Page
Figure 21. Controller Settings Page
The Controller Settings page appears when you choose Management > Controller Settings from the menu bar.
The Controller Settings page lets you view and change settings that affect the units on the controller specified in the drop-down list on the menu bar.
Background Task RateThe Background Task Rate fields let you change the balance of background tasks (rebuild and verify) and I/O performed by the controller.
9000-series controllers show separate settings for Rebuild Rate and Verify Rate, as shown in Figure 21. 7000- and 8000-series controllers show only one setting for Task Rate; it applies to both rebuild and verify rates.This rate is not persistent following a reboot for 7/8000.
The 5 radio buttons let you set the ratio at which rebuilds and verifies are performed. The furthest left buttons set the firmware to the fastest rebuild and verify settings. This means, maximum processing time will be given to rebuilds or verifies rather than I/O. The furthest right buttons set the firmware to the slowest rebuild and verify settings, giving maximum processing time to I/O.
www.3ware.com 53
3ware Disk Manager (3DM 2)
For additional information, see“Setting Background Task Rate” on page 113.
Unit Write CacheYou can enable or disable write cache for each unit.3DM lists each unit on the controller specified in the drop-down list on the menu bar, and shows you whether the write cache is currently enabled or disabled for it.
Write cache is a combination of the physical hard drives’ write cache as well as the controller’s memory, depending on what type of unit you are using.
For 9000-series controllers, a Disable Write Cache on Unit Degrade setting can be set in 3ware BIOS Manager (3BM). You can see if this setting is enabled in the Other Controller Settings field at the bottom of this Controller Settings page. If Disable Write Cache on Unit Degrade is enabled, upon degrade of a unit, the write cache will automatically be disabled, even if you enable write cache in the Unit Write Cache field.
For additional information, see “Enabling and Disabling the Unit Write Cache” on page 89.
Unit PoliciesFor units on 9000-series controllers, you can enable or disable two policies: Auto-verify and Continue on Source Error During Rebuild. 3DM lists each unit on the controller specified in the drop-down list on the menu bar, and shows you whether the policies are currently enabled or disabled for each unit.
This section does not appear for 7000- and 8000- series controllers.
Auto-verify. The Auto-verify policy causes verify tasks to be performed repeatedly during a scheduled verify window. When Auto-verify is disabled, verify is not initiated automatically by the controller. Verify can still be started manually with 3DM, 3BM, or CLI. Once a manually-started verification is complete, no further verify tasks for the unit is performed.
Continue on Source Error During Rebuild. This policy applies only to units which are redundant. (For units which are not redundant, a check box is not available.) When this policy is set, ECC errors are ignored when they are encountered during a rebuild. When this policy is not set, a rebuild will abort upon encountering an ECC error and the unit will be set back to Degraded.
Since this option could result in the loss of some source data in the event of source errors, select this option only if you want to ensure that a rebuild will complete successfully without manually intervention. If the rebuild fails and Continue on Source Error During Rebuild is not selected, then you have the option to start a rebuild manually. It is recommended that a file system check be executed when the rebuild completes.
54 3ware 9000 Series Serial ATA RAID Controller User Guide

3DM 2 Reference
Note: The policy Continue on Source Error During Rebuild is equivalent to the “Force continue on source errors” option in 3DM v 1.x and the “ignoreEcc” option in the CLI.
Other Controller SettingsFor 9000-series controllers, the Other Controller settings displays information about additional settings that can only be changed in the BIOS (3BM). For more information see “Setting Policies for a Controller through 3BM” on page 74.
This section does not appear for 7000- and 8000- series controllers.
Number of Drives Per Spin-up. Number of drives that will spin up at the same time when the controller is powered up. (This setting only applies when the feature is supported by the disk drives and has been enabled in 3BM.)
Delay between Spin-ups. The delay between drive groups that spin up at one time on this particular controller.
Export JBOD (Unconfigured) Disks. Indicates whether unconfigured disks (JBODs) should be exported to the operating system. By default, this setting is disabled. For more information about this feature, see “Exporting JBOD Disks” on page 75.
Disable Write Cache on Unit Degrade. Indicates whether write cache will be automatically disabled on a unit if it becomes degraded. After the unit is rebuilt, the write cache will be re-enabled automatically.
www.3ware.com 55
3ware Disk Manager (3DM 2)
Scheduling Page
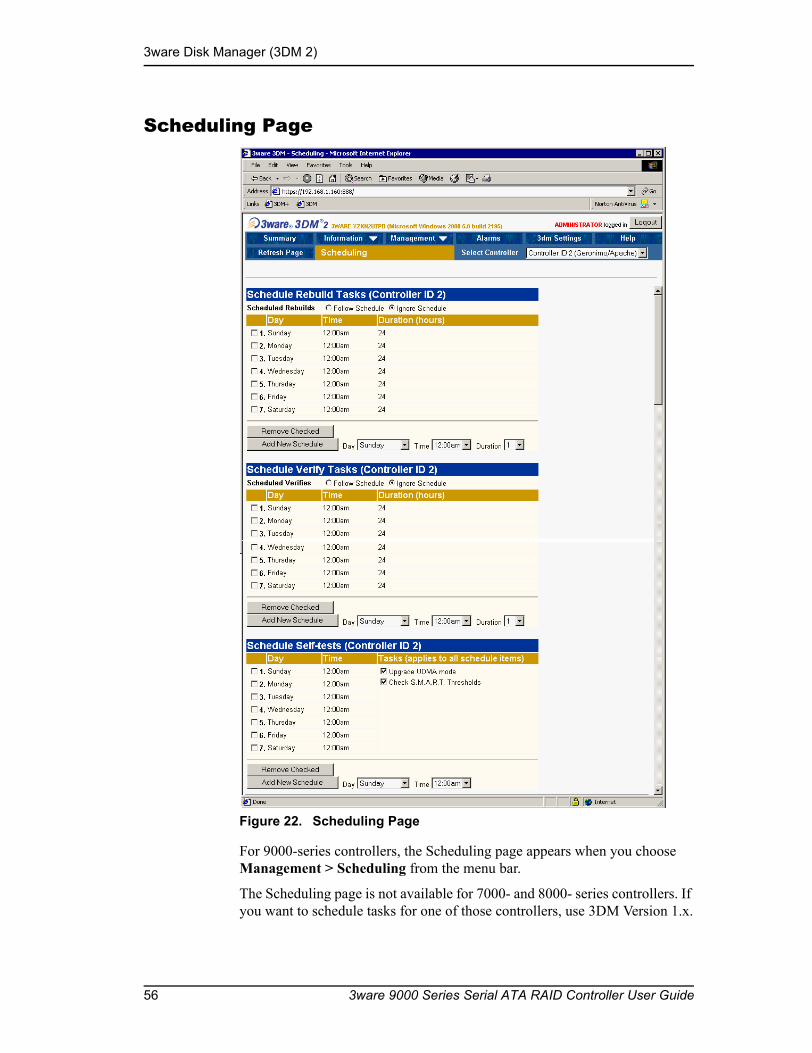
Figure 22. Scheduling Page
For 9000-series controllers, the Scheduling page appears when you choose Management > Scheduling from the menu bar.
The Scheduling page is not available for 7000- and 8000- series controllers. If you want to schedule tasks for one of those controllers, use 3DM Version 1.x.
56 3ware 9000 Series Serial ATA RAID Controller User Guide

3DM 2 Reference
The Scheduling page lets you view and change the schedule for tasks that affect all units on the controller specified in the drop-down list on the menu bar, including:
■ Rebuild tasks (also applies to initialization tasks)
■ Verify tasks (also applies to media scans)
■ Self-tests
You can also enable or disable use of the schedule for Rebuild and Verify tasks by selecting either Follow Schedule or Ignore Schedule. When these schedules are set to be ignored, these tasks can be performed at any time, and are not restricted to the scheduled times.
Note: Scheduling of these tasks is only available on the 9000-series controllers.
For details about the different background tasks, see “About Background Tasks” on page 109.
About Task SchedulesEach type of task may be scheduled for up to 7 times per week. This limits active initializing, rebuilding, verifying, and testing of a unit to the times you specify, so that the task does not interfere with peak I/O times.
If all 7 schedule slots are filled, you must first remove one or more schedule times before you can add another.
You may set schedule times whether scheduling is set to be followed or ignored. This is useful if you want to temporarily disable the schedule.
If you remove all the schedule times for a particular background task, initializations and rebuilds will run anytime, as they are needed. Verify will only run if started by the CLI or if the Verify Unit button is clicked.
For information about adding and removing schedules, and setting schedules to be followed or ignored, see “Scheduling Background Tasks” on page 114
About Self-testsUnlike scheduling of rebuilds and verifies, scheduling of self-tests is always followed. To disable self-tests you either remove all schedule times, or uncheck the tests listed in the Tasks column.
Note: Only the checked tasks will be run during the scheduled times. If none of the tasks are checked, self-tests will never run, even if you have scheduled time slots set.
www.3ware.com 57
3ware Disk Manager (3DM 2)
Two self-tests can be scheduled:
Upgrade UDMA mode. This test checks the speed at which data transfer to drives is occurring, to see if the UDMA mode can be increased. (If you are already running at the fastest UDMA mode, then this self-test has no effect.)
The UDMA mode can become downgraded in the event that cable CRC errors are encountered, requiring multiple retries to read sectors. In severe cases, the UDMA mode may be downgraded from ATA 150 to ATA 133, to ATA 100, to 66, to 33.
This check is also done every time the system is booted.
UDMA mode does not apply to SATA.
Check SMART Thresholds. This test checks to see whether SMART thresholds have been exceeded.
The SMART thresholds indicate when a drive is likely to fail, based on the number of errors that have been recorded through SMART (Self-Monitoring, Analysis and Reporting Technology).
If any of the disk drives have detected a “threshold exceeded” condition, then an AEN is logged to the 3DM Alarms page. Moreover, if anything unusual is found during any self-test, it will be logged as an Alarm.
58 3ware 9000 Series Serial ATA RAID Controller User Guide
3DM 2 Reference
Maintenance Page
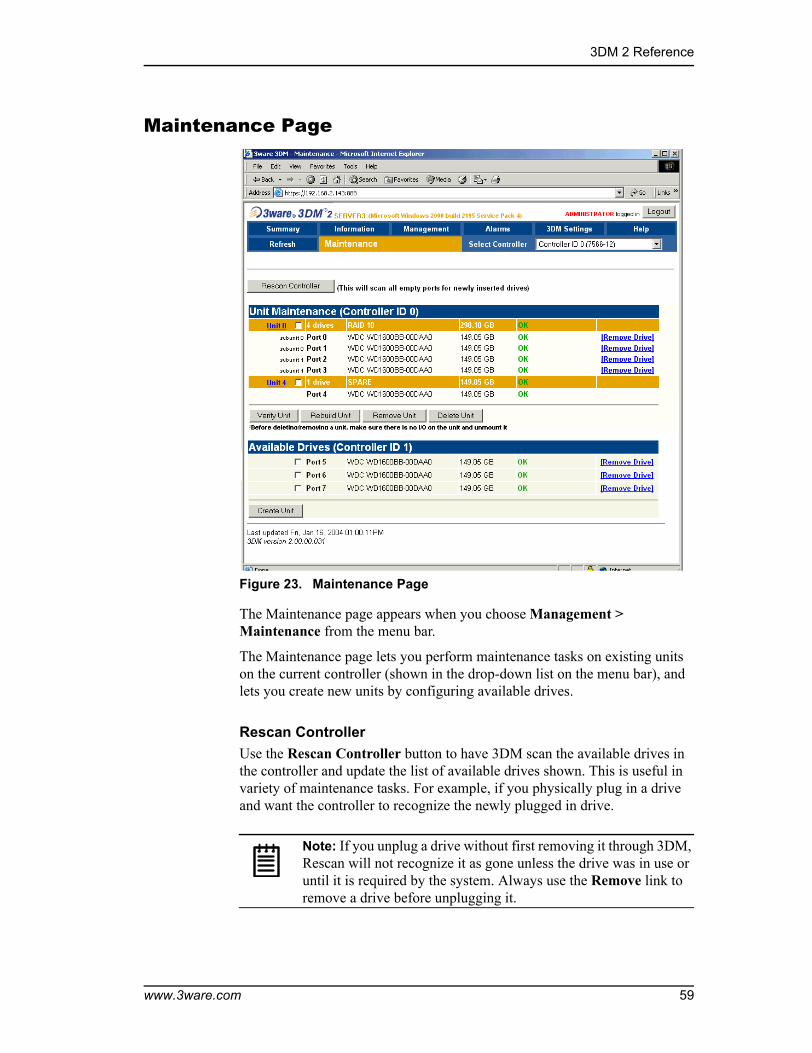
Figure 23. Maintenance Page
The Maintenance page appears when you choose Management > Maintenance from the menu bar.
The Maintenance page lets you perform maintenance tasks on existing units on the current controller (shown in the drop-down list on the menu bar), and lets you create new units by configuring available drives.
Rescan ControllerUse the Rescan Controller button to have 3DM scan the available drives in the controller and update the list of available drives shown. This is useful in variety of maintenance tasks. For example, if you physically plug in a drive and want the controller to recognize the newly plugged in drive.
Note: If you unplug a drive without first removing it through 3DM, Rescan will not recognize it as gone unless the drive was in use or until it is required by the system. Always use the Remove link to remove a drive before unplugging it.
www.3ware.com 59

3ware Disk Manager (3DM 2)
Warning: Removing or adding drives which are not in hotswap carriers can result in a system hang or may even damage the system and the drive.
In 9000-series controllers, rescan checks empty ports for newly plugged in drives. If those drives were previously part of a 3ware RAID configuration and they still have valid DCB (Disk Configuration Block) information on them, the controller tries to piece them back together into a working unit. If a working unit can be formed, it will appear in the Unit Maintenance list when the scan is complete, and the operating system will be notified of the unit. In Linux or FreeBSD, a device node will be associated with each unit created. In Windows the device manager will reflect the changes under the disk drives icon. This process is known as importing drives.
If new drives do not have any data indicating they were previously part of a 3ware RAID configuration, they will appear in the Available Drives list.
In addition, if there is a unit with the status Inoperable before a rescan (for example, a RAID 5 unit missing 2 or more drives), and a rescan finds drives that complete the unit, the inoperable unit will become a valid unit.
Note: In 8000-series controllers, only JBOD units can be removed and rescanned while keeping the data intact. Clicking Rescan Controller after removing units other than a JBOD unit (e.g. RAID 5) will cause the drives that make up the unit to be seen as individual available drives; they will not be pieced together to form a unit. This is unlike the 9000 series controllers, which will piece together the unit for you and display the drives as a unit. If you still want to use the drives together as a unit, restart the computer before creating a new unit with those drives. Creating a new unit with those drives will destroy any existing data on them. After you restart, the 8000 will again see the drives as a valid unit.
Unit Maintenance The Unit Maintenance section of the page lists all existing units on the current controller, and displays summary information about them.
The top row shows information about the unit, while subsequent rows show summary information about each drive in the unit.
Unit Information
Unit Number. The unit number assigned to the unit by the firmware. Unit numbers for 9000 series are in sequential order. Unit numbers for the 7/8000 series will begin with the lowest port number of the unit. Use the checkbox next to the unit to select a unit before clicking one of the task buttons.
60 3ware 9000 Series Serial ATA RAID Controller User Guide

3DM 2 Reference
# Drives. Number of drives in the unit.
Type of Unit. Type of unit specified during configuration: RAID 0, RAID 1, RAID 5, RAID 10, RAID 50, Single Disk, Spare, or JBOD.
Capacity. The usable capacity (size) of the unit.
Status. Operational status of the unit: Ok, Rebuilding, Initializing, Verifying, Degraded, or Inoperable (missing drives). When Rebuilding, Initializing, or Verifying, the percentage (%) complete is also shown. The % complete can be active or paused. To see whether this task is currently active or paused, click on the unit number to display the Unit Information page, which has that information.
Drive Information
Port. The port to which the drive is connected.
Model. The model of the drive.
Capacity. The capacity (size) of the drive.
Status. The status of the drive: OK, Not Supported, Not Present, and so forth. If you need help regarding a status displayed here, please contact Technical Support.
Remove Drive. The Remove Drive link removes a drive from the controller so that you can safely unplug it. In the Unit Maintenance section, this link is only provided for drives that can be safely removed without creating an inoperable unit. (For example, a RAID 5 missing 2 or more drives or a RAID 0 missing 1 or more drives would become inoperable.) If you remove a drive from a redundant unit, the unit will become degraded. Once a unit has become degraded, additional drives cannot be removed without making it inoperable, so no Remove Drive link will display.
Warning: Physically removing drives which are not in hotswap carriers can result in a system hang or may even damage the system and the drive.
Maintenance Task ButtonsBelow the list of units, a row of task buttons lets you preform maintenance and configuration tasks related to the unit. Before clicking one of these buttons, select the appropriate unit.
Verify Unit. Puts the selected unit in verifying mode. If verify scheduling is enabled on the Scheduling page, the unit will not start actively verifying until the scheduled time, and the status will indicate “Verify-Paused.” (The Unit Details page will indicate whether a unit is actively verifying.) If verify scheduling is not enabled, clicking Verify Unit begins the verification process.
www.3ware.com 61
3ware Disk Manager (3DM 2)
If the unit you selected to verify is a redundant unit, the redundancy of the unit will be verified. For example it will check parity for a RAID 5 or check data consistency for a RAID 1. If the unit you checked is not a redundant unit, verify will do a surface scan of the media. During verification, I/O continues normally. For RAID 0, single disks, JBODs, and spares, there is only a slight performance loss. For redundant units, you can set the background task rate on the Controller Settings page to specify whether more processing time should be given to verifying or to I/O.
While a unit is verifying, the status changes to Verifying and a Stop Verify link appears in the right-most column of the Unit Maintenance table.
Note: If the unit has not previously been initialized and you click Verify Unit, the initialization process starts. Initialization cannot be halted, so no Stop Verify link appears. (Initialization can be paused, however, through Scheduling. Initialization follows the Rebuild schedule, so turning on scheduling for Rebuild will pause initialization, as well.) For more information about initialization, see “About Initialization” on page 109.
Rebuild Unit. Replaces a degraded drive in a degraded unit with an available drive and begins rebuilding the RAID. When you select a degraded unit and click Rebuild Unit, a dialog box listing available drives appears, so that you can select the drive you want to use. If the degraded unit has more than one degraded drives (for example, a RAID 10 where both mirrored pairs each have a degraded drive), you will repeat this process a second time.
If rebuild scheduling is enabled on the Scheduling page, the unit will not start actively rebuilding until the scheduled time, and the status will change to say “Rebuild-Paused.” (The Unit Details page indicates whether a unit is actively rebuilding.) If rebuild scheduling is not enabled, the rebuild process will begin right away.
Remove Unit. Removes a selected unit and allows you to unplug the drives and move the unit to another controller. the data on the unit remain intact.
62 3ware 9000 Series Serial ATA RAID Controller User Guide
3DM 2 Reference
Caution: Before you click Remove Unit, make sure the unit you are removing is unmounted and no I/Os are being issued. (For example, make sure you are not copying files to the unit, and make sure that there are no applications with open files on that unit.) If a unit is not unmounted and you remove it, it is the equivalent of physically yanking a hard drive out from under the operating sys-tem. Resulting behavior depends on which operating system you are using and what kind of I/O is being done, however you will typically see really bad results, bad errors, and most likely a reset of the controller or a system hang.To unmount a unit under windows, use Administrative Tools > Computer Management > Disk Management. In the Computer Management window, right-click on the partition and Remove the logical drive letter associated with the unit. To unmount a unit under Linux, unmount the mount point to where the RAID unit is mounted. For example, if you want to remove unit 0 and you know that 0 corresponds to /dev/sdb, you should unmount all partitions for sdbx (where x is the number of the parti-tion). umount /dev/sdbx
For FreeBSD, the command would beumount /dev/twedx
When you click Remove Unit, you will be asked to confirm that you want to proceed. When you confirm the removal, the unit number and information will be removed from 3DM. (Units created in the future can reclaim this unit number.)
The operating system is notified that the unit was removed. In Linux the device node associated with this unit is removed. In Windows the Device Manager will reflect the changes under the disk drives icon.
Information about the unit remains intact on the drives. This allows the drive or drives to be reassembled into a unit again on this controller, or if moved to another controller.
Warning: Physically removing drives which are not in hotswap carriers can result in a system hang or may even damage the system and the drive.
Delete Unit. Deletes the selected unit and allows you to use the drives to create another unit. The drives appear in the list of Available Drives.
www.3ware.com 63
3ware Disk Manager (3DM 2)
Caution: Before you click Delete Unit, make sure the unit you are removing is unmounted and no I/Os are being issued. If a unit is not unmounted and you delete it, it is the equivalent of physically yanking a hard drive out from under the operating system. Resulting behavior depends on which operating system you are using and what kind of I/O is being done, however you will typically see really bad results, bad errors, and most likely a reset of the controller or a system hang.
Devices can be unmounted through the operating system. For details, see the discussion under Remove Unit, above.
Warning: When a unit is deleted, the data will be permanently deleted: the drives cannot be reassembled into the same unit. If you want to reassemble the drives on another controller and access the existing data, use Remove Unit instead of Delete Unit.
After deletion, the operating system is notified that the unit was deleted. In Linux the device node associated with this unit is removed. In Windows the Device Manager will reflect the changes under the disk drives icon.
Available Drives (to Create Units)This section lists the drives on the controller which are not currently configured as part of a unit. The Port number, model, capacity, and status are all displayed, as they are for drives in existing units.
Remove Drive. The Remove Drive link removes a drive from the controller so that you can safely unplug it. Any drive in the Available Drives list can be removed.
Warning: Physically removing drives which are not in hotswap carriers can result in a system hang or may even damage the system and the drive.
Create Unit
Use the Create Unit button to create a unit for use on the current controller. Begin by selecting the drives you want to use in the list of Available Drives, and then click Create Unit. You will be prompted to select the unit Type, Stripe size (if applicable), Write Cache, and Auto Verify settings.
A window like the one in Figure 24 shows the drives you selected, and lets you specify configuration settings.
64 3ware 9000 Series Serial ATA RAID Controller User Guide
3DM 2 Reference
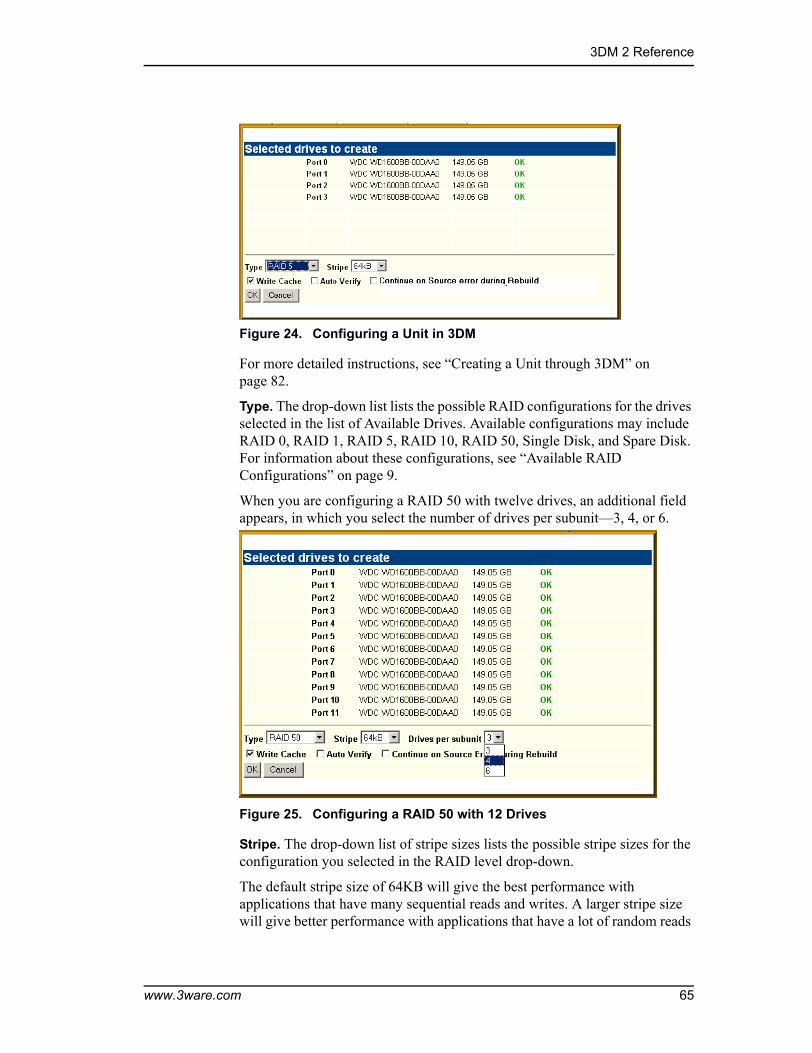
Figure 24. Configuring a Unit in 3DM
For more detailed instructions, see “Creating a Unit through 3DM” on page 82.
Type. The drop-down list lists the possible RAID configurations for the drives selected in the list of Available Drives. Available configurations may include RAID 0, RAID 1, RAID 5, RAID 10, RAID 50, Single Disk, and Spare Disk. For information about these configurations, see “Available RAID Configurations” on page 9.
When you are configuring a RAID 50 with twelve drives, an additional field appears, in which you select the number of drives per subunit—3, 4, or 6.
Figure 25. Configuring a RAID 50 with 12 Drives
Stripe. The drop-down list of stripe sizes lists the possible stripe sizes for the configuration you selected in the RAID level drop-down.
The default stripe size of 64KB will give the best performance with applications that have many sequential reads and writes. A larger stripe size will give better performance with applications that have a lot of random reads
www.3ware.com 65

3ware Disk Manager (3DM 2)
and writes. In general, the smaller the stripe size, the better the sequential I/O and the worse the random I/O. The larger the stripe size, the worse the sequential I/O and the better the random I/O.
Write Cache, Auto-Verify, and Continue on Source Error during Rebuild. These check boxes let you set the policies for the unit. These policies can also be set and changed on the Controller Settings page. For details about these policies, see “Unit Policies” on page 54.
Note: If the configuration window disappears while you are selecting drives, 3DM 2 may have refreshed. Click Create Unit again. If desired, you can reduce the frequency with which information refreshes in 3DM 2, or disable refresh temporarily, on the 3DM Settings page.
Alarms Page
Figure 26. Alarms Page
The Alarms page appears when you click Alarms on the menu bar.
66 3ware 9000 Series Serial ATA RAID Controller User Guide
3DM 2 Reference
This page displays a list of AENs (asynchronous event notifications) received from the controller displayed in the drop-down list in the menu bar.
Up to 1000 alarms can be listed. After the 1000-limit is reached, the oldest alarms are deleted, as new ones occur.
You can sort the alarms by severity or time. To do so, just click the column header.
For 8000 and 9000-series controllers, alarms can be used by either 3DM or CLI, but not both. Whichever issues an alarms command first determines which can see alarm data.
Clear Alarms. The Clear Alarms button removes all alarms shown in the list.
Sev. Shows the severity of the event. Three levels are provided:
■ Errors are shown next to a red box
■ Warnings are shown next to a yellow box
■ Information is shown next to a blue box
Time. The time shown for alarms generated by 7000- and 8000- series controllers is the time retrieved from the driver by 3DM. The time shown for alarms generated by 9000-series controllers is the time received by the driver from firmware.
Message. The specific text relating to the alarm condition.
www.3ware.com 67
3ware Disk Manager (3DM 2)
3DM Settings Page
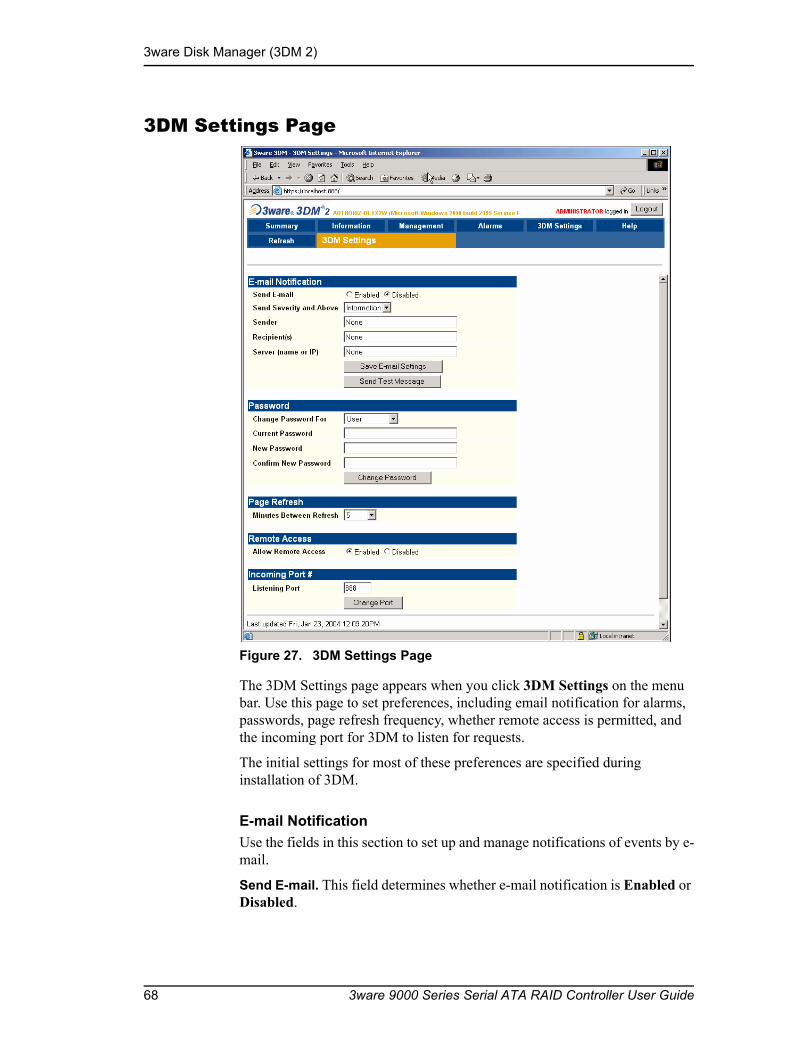
Figure 27. 3DM Settings Page
The 3DM Settings page appears when you click 3DM Settings on the menu bar. Use this page to set preferences, including email notification for alarms, passwords, page refresh frequency, whether remote access is permitted, and the incoming port for 3DM to listen for requests.
The initial settings for most of these preferences are specified during installation of 3DM.
E-mail NotificationUse the fields in this section to set up and manage notifications of events by e-mail.
Send E-mail. This field determines whether e-mail notification is Enabled or Disabled.
68 3ware 9000 Series Serial ATA RAID Controller User Guide

3DM 2 Reference
Send Severity and Above. Specifies the type of events for which notifications should be sent. A severity of Information will send e-mails for all alarms, a severity of Warning will send e-mail for alarms with severity of Warning and Error. A severity of Error will send e-mail for alarms with severity of Error.
Sender. Enter the email address which will appear in the “From” field.
Recipient. The e-mail address to which notifications should be sent. You can enter multiple addresses, separated by commas (,).
Server (name or IP). If the machine on which you are running 3DM has access to a nameserver, you may enter the machine name of the mail server in the Server field. Otherwise, use the IP address.
Save E-mail Settings button. Saves the e-mail notification settings.
Send Test Message button. Sends a test message using the saved e-mail settings.
PasswordUse the fields in this section to set the passwords for the User and Administrator. When 3DM is first installed, the default password for both is 3ware.
Change Password For. Select the access level for which you are setting the password: User or Administrator. Users can only view status information in 3DM, while Administrators can make changes and administer the controller and associated drives.
Current Password. Enter the current password.
New Password. Enter the new password.
Confirm New Password. Enter the new password a second time, to be sure you have entered it correctly.
Change Password button. Saves password changes.
Page RefreshMinutes Between Refresh. Displays how frequently pages in 3DM will be refreshed with new data from the controller. To change this setting, select another option from the drop-down. If you prefer 3DM to only refresh when you click Refresh Page, select Never.
The Login, Help and Drive SMART data pages do not automatically refresh. All other 3DM pages do.
www.3ware.com 69

3ware Disk Manager (3DM 2)
Remote AccessAllow Remote Connections. This field enables or disables the ability for users and administrators to access 3DM from a remote computer.
Incoming Port #Listening Port. This field specifies the HTTP: port to be used by 3DM when listening for communications. The default port setting is 888.
If you change this port, make sure the port you specify is not being used. Failure to do so will cause 3DM to stop responding and you will have to restart it by hand.
Change Port button. Saves a new port number.
70 3ware 9000 Series Serial ATA RAID Controller User Guide