Use MC/S with QNAP Turbo NASfiles.qnap.com/news/pressresource/product/MCS.pdf · that...
25
Use MC/S with QNAP Turbo NAS
Transcript of Use MC/S with QNAP Turbo NASfiles.qnap.com/news/pressresource/product/MCS.pdf · that...

Use MC/S with QNAP Turbo NAS

How to connect to your QNAP Turbo NAS from
Windows Server 2012 using MC/S
QNAP provides you what others cannot!
In addition to the other available features on your Turbo NAS, MPIO (Multipath Input Output)
enables you to have multiple paths to reach an iSCSI target. Notice only x-86 based QNAP
NAS support MC/S.
Benefits of using MPIO with a Turbo NAS:
- It allows better performance. By using several TCP connections for data transmission, it
will enhance network throughput.
- Ensures failover. It will avoid downtime in the event of network problems (faulty cable,
switch power unit malfunction) with every application remaining online.
- It can provide load balancing. Whenever a large transfer occurs, it can use different
switches to avoid the possibility of overloading a switch.
In this application note, we will set an iSCSI target with multiple connections to access your
favorite Turbo NAS from Windows Server 2012.
Before getting started, please note:
- DO NOT use NIC Teaming on the server: NIC Teaming used with iSCSI is not supported
by Microsoft.
- DO NOT use MC/S and MPIO together to connect a target. Microsoft does not support
that configuration: “Although it is technically possible to layer Microsoft MPIO and MCS
together since they function at different layers in the Windows stack, Microsoft does not
support the layering of MPIO and MCS due to complexities this can introduce if
troubleshooting is needed on a configuration.”
- See “Microsoft iSCSI Software Initiator Version 2.X Users Guide”
http://download.microsoft.com/download/A/E/9/AE91DEA1-66D9-417C-ADE4-92D824B
871AF/uGuide.doc
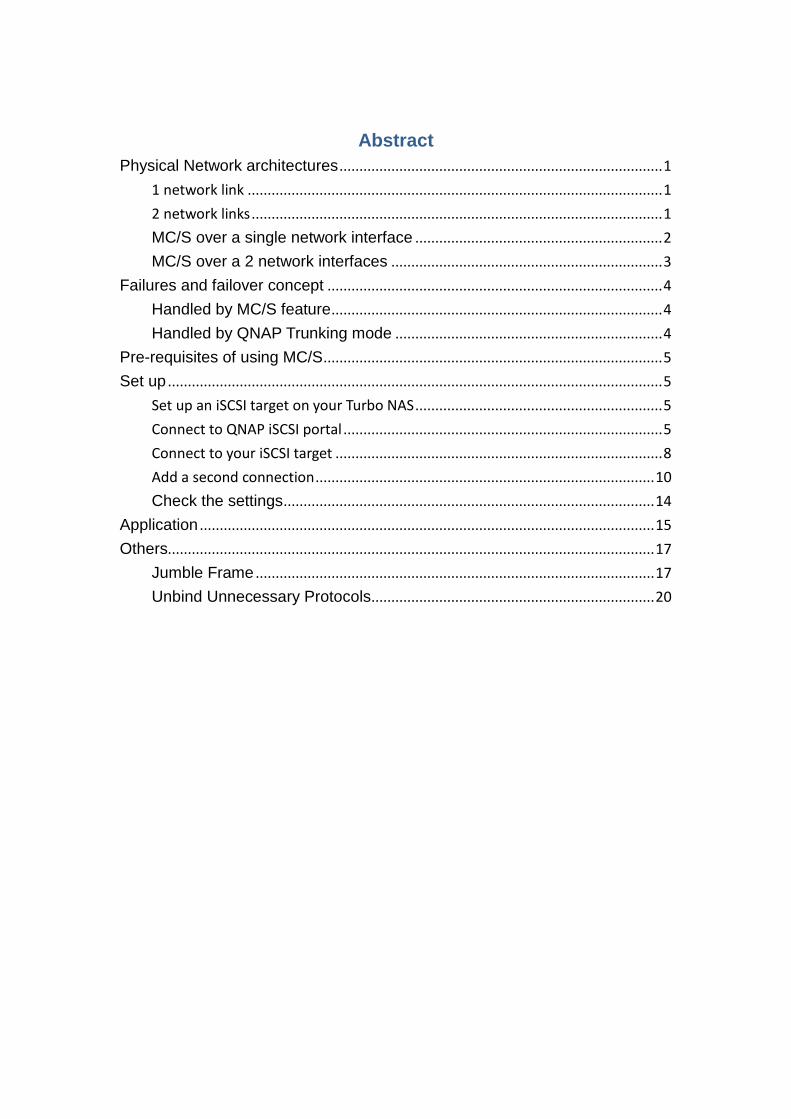
Abstract
Physical Network architectures ................................................................................. 1
1 network link ........................................................................................................ 1
2 network links ....................................................................................................... 1
MC/S over a single network interface .............................................................. 2
MC/S over a 2 network interfaces .................................................................... 3
Failures and failover concept .................................................................................... 4
Handled by MC/S feature ................................................................................... 4
Handled by QNAP Trunking mode ................................................................... 4
Pre-requisites of using MC/S ..................................................................................... 5
Set up ............................................................................................................................ 5
Set up an iSCSI target on your Turbo NAS .............................................................. 5
Connect to QNAP iSCSI portal ................................................................................ 5
Connect to your iSCSI target .................................................................................. 8
Add a second connection ..................................................................................... 10
Check the settings ............................................................................................. 14
Application .................................................................................................................. 15
Others.......................................................................................................................... 17
Jumble Frame .................................................................................................... 17
Unbind Unnecessary Protocols ....................................................................... 20
1 © Copyright 2014. QNAP Systems, Inc.
Two different configurations will be demonstrated in this application note.
- The first one is based on simple network architecture.
- The second one will use a more advanced configuration to allow failover and load
balancing.
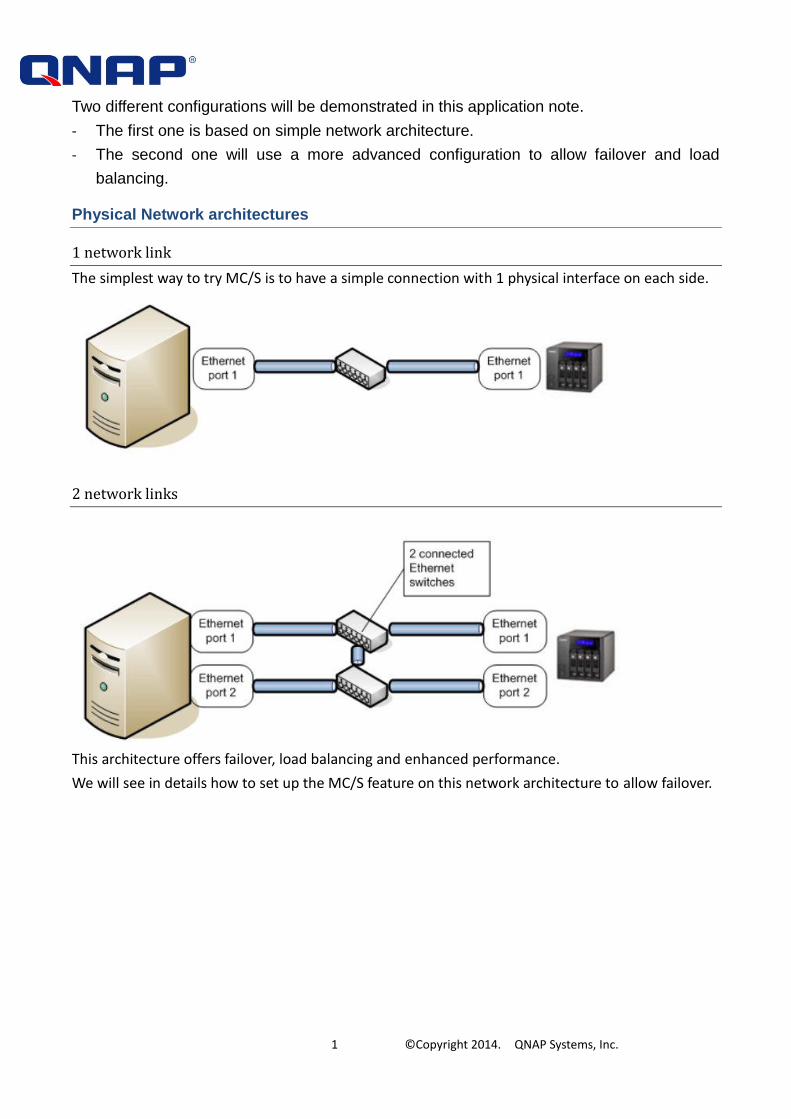
Physical Network architectures
1 network link
The simplest way to try MC/S is to have a simple connection with 1 physical interface on each side.
2 network links
This architecture offers failover, load balancing and enhanced performance.
We will see in details how to set up the MC/S feature on this network architecture to allow failover.
2 © Copyright 2014. QNAP Systems, Inc.
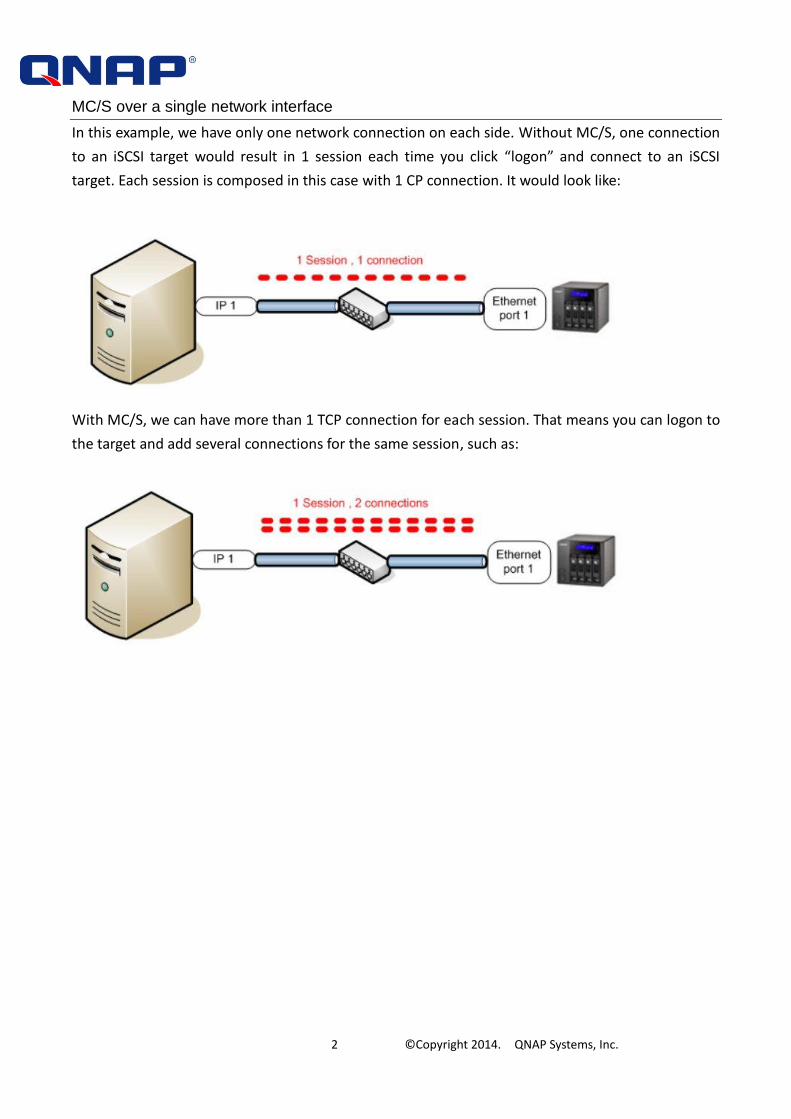
MC/S over a single network interface
In this example, we have only one network connection on each side. Without MC/S, one connection
to an iSCSI target would result in 1 session each time you click “logon” and connect to an iSCSI
target. Each session is composed in this case with 1 CP connection. It would look like:
With MC/S, we can have more than 1 TCP connection for each session. That means you can logon to
the target and add several connections for the same session, such as:

3 © Copyright 2014. QNAP Systems, Inc.
MC/S over a 2 network interfaces
MC/S can also provide failover. If your server has multiple network interfaces, it is possible to use
MC/S in that purpose.
As seen previously, after an iSCSI logon, we can add TCP connections to the same session (this
procedure will be explained in details later). When adding a TCP connection to a session, it is
possible to specify the source interface. In that case, if we connect through the first interface, then
add a connection through the second interface. The session will remain alive even if one on the
network interface fails.
If your Turbo NAS has 2 network interfaces, you can enable failover mode (trunking mode) to allow
failover on both sides.

4 © Copyright 2014. QNAP Systems, Inc.
Failures and failover concept
Handled by MC/S feature
If the cable or the switch linked to IP1 or IP2 fails, one of the 2 connections will fail, but the other
connection will remain connected:
Handled by QNAP Trunking mode
If one of the cables linked to the Turbo NAS failed, the all path will remain UP, because it is
protected by the QNAP port trunking mode:
5 © Copyright 2014. QNAP Systems, Inc.
Pre-requisites of using MC/S
- Have an existing iSCSI target created on the Turbo NAS (firmware version 3.2.0 or later).
- To allow full network failover, have trunking mode enabled on the Turbo NAS.
Set up
Set up an iSCSI target on your Turbo NAS
You can refer the online application note “How to create and use the iSCSI target service on
the QNAP NAS” on http://www.qnap.com/i/en/trade_teach/
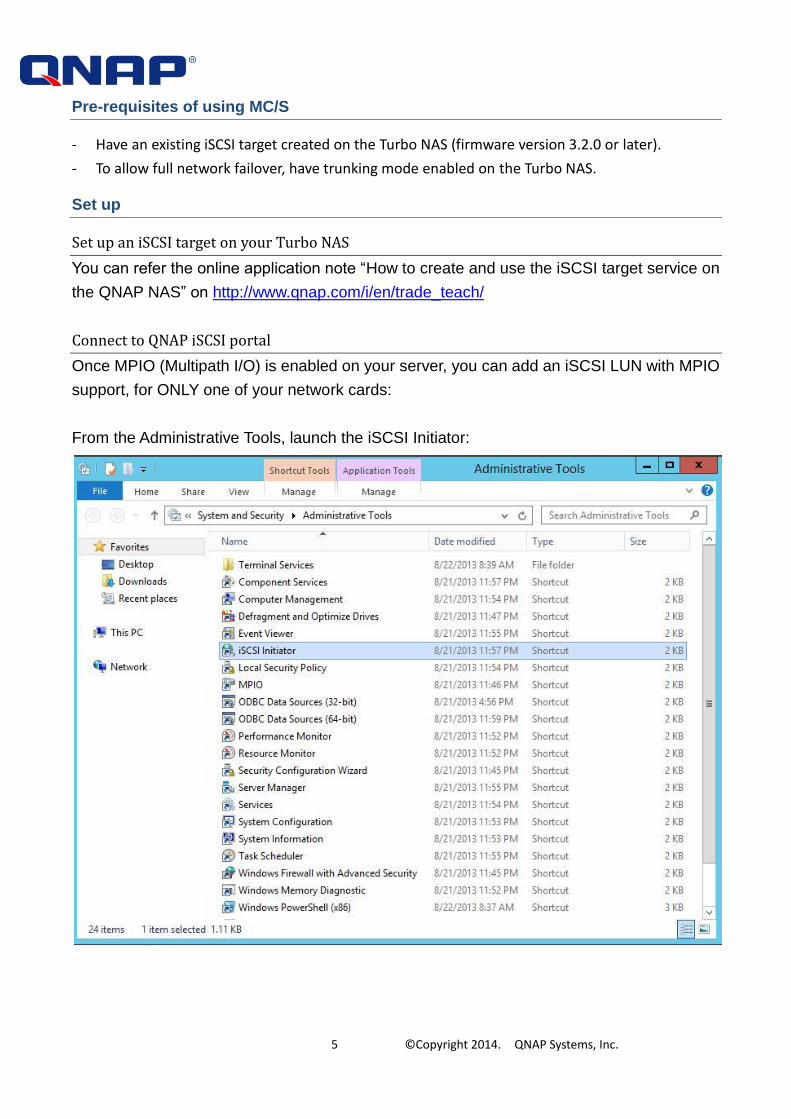
Connect to QNAP iSCSI portal
Once MPIO (Multipath I/O) is enabled on your server, you can add an iSCSI LUN with MPIO
support, for ONLY one of your network cards:
From the Administrative Tools, launch the iSCSI Initiator:
6 © Copyright 2014. QNAP Systems, Inc.
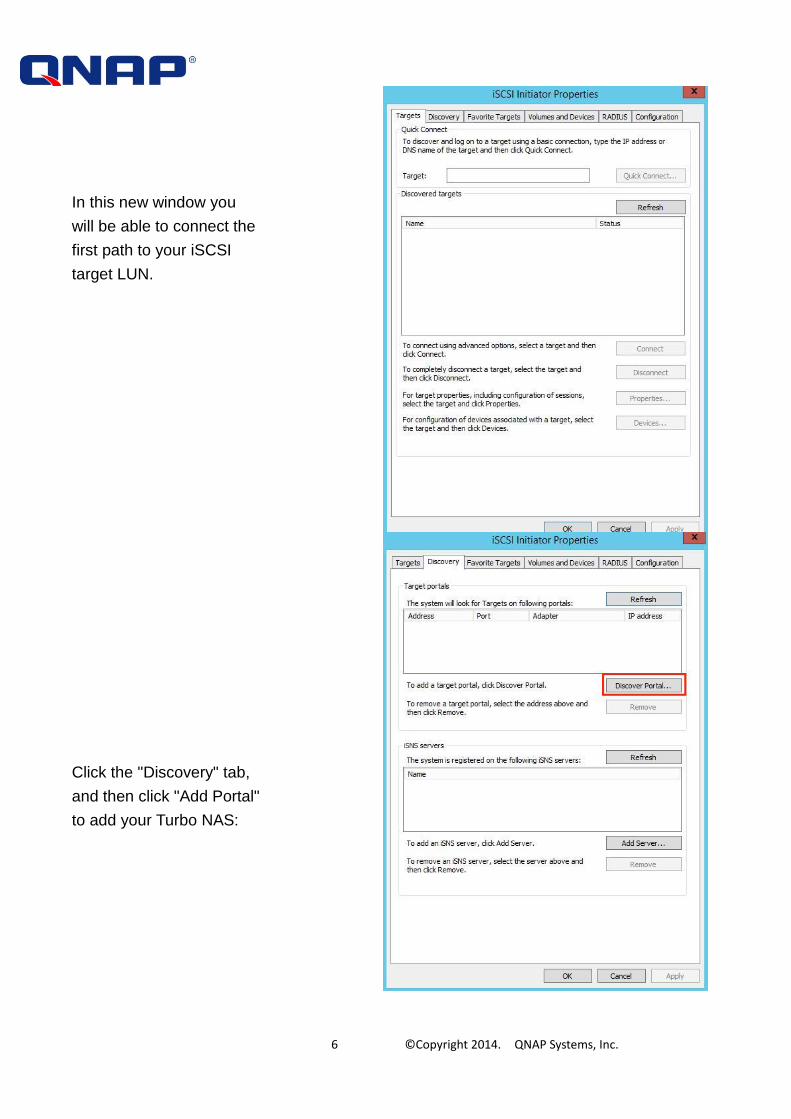
In this new window you
will be able to connect the
first path to your iSCSI
target LUN.
Click the "Discovery" tab,
and then click "Add Portal"
to add your Turbo NAS:

7 © Copyright 2014. QNAP Systems, Inc.
Enter the IP address or
DNS name of your
Turbo NAS and click “OK”.
Return to the initiator
window; go to the
“Targets” tab.
You will see all the targets
on your Turbo NAS.
8 © Copyright 2014. QNAP Systems, Inc.
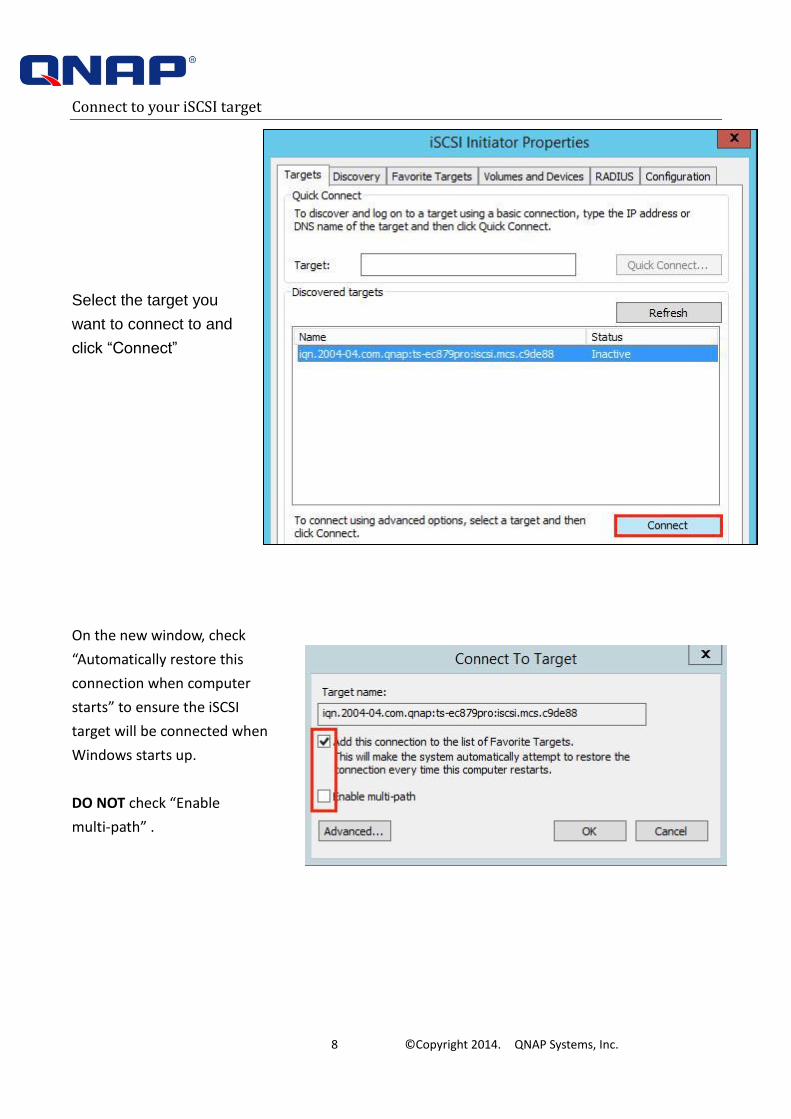
Connect to your iSCSI target
Select the target you
want to connect to and
click “Connect”
On the new window, check
“Automatically restore this
connection when computer
starts” to ensure the iSCSI
target will be connected when
Windows starts up.
DO NOT check “Enable
multi-path” .

9 © Copyright 2014. QNAP Systems, Inc.
If you have only 1 network interface, click “OK”
If you have more than 2 network interfaces, click “Advanced”
In Advanced Settings you can set the specific target-initiator pair in one of the iSCSI networks ONLY
by choosing the initiator, IP source and portal. Assuming we have 2 IP addresses: 172.17.32.161 and
172.17.32.175, we choose the first one:
Click “OK”
Click “OK” again.
Then, you can see your iSCSI target connected.
10 © Copyright 2014. QNAP Systems, Inc.
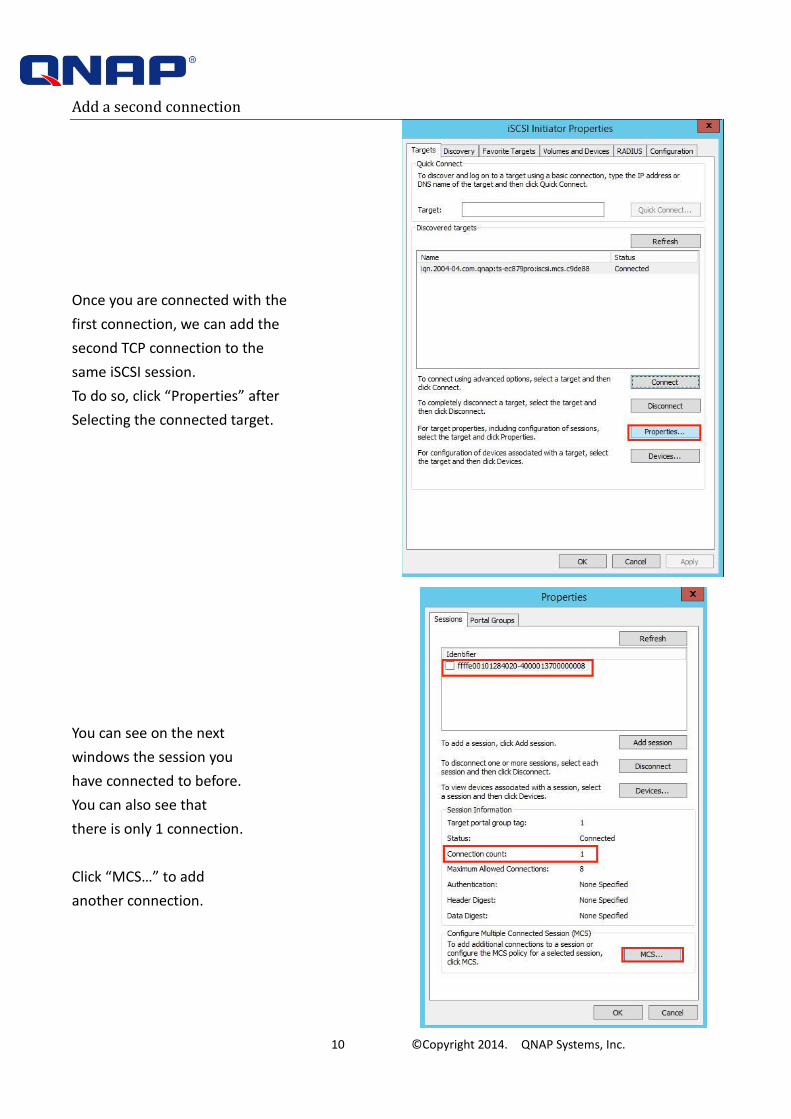
Add a second connection
Once you are connected with the
first connection, we can add the
second TCP connection to the
same iSCSI session.
To do so, click “Properties” after
Selecting the connected target.
You can see on the next
windows the session you
have connected to before.
You can also see that
there is only 1 connection.
Click “MCS…” to add
another connection.
11 © Copyright 2014. QNAP Systems, Inc.
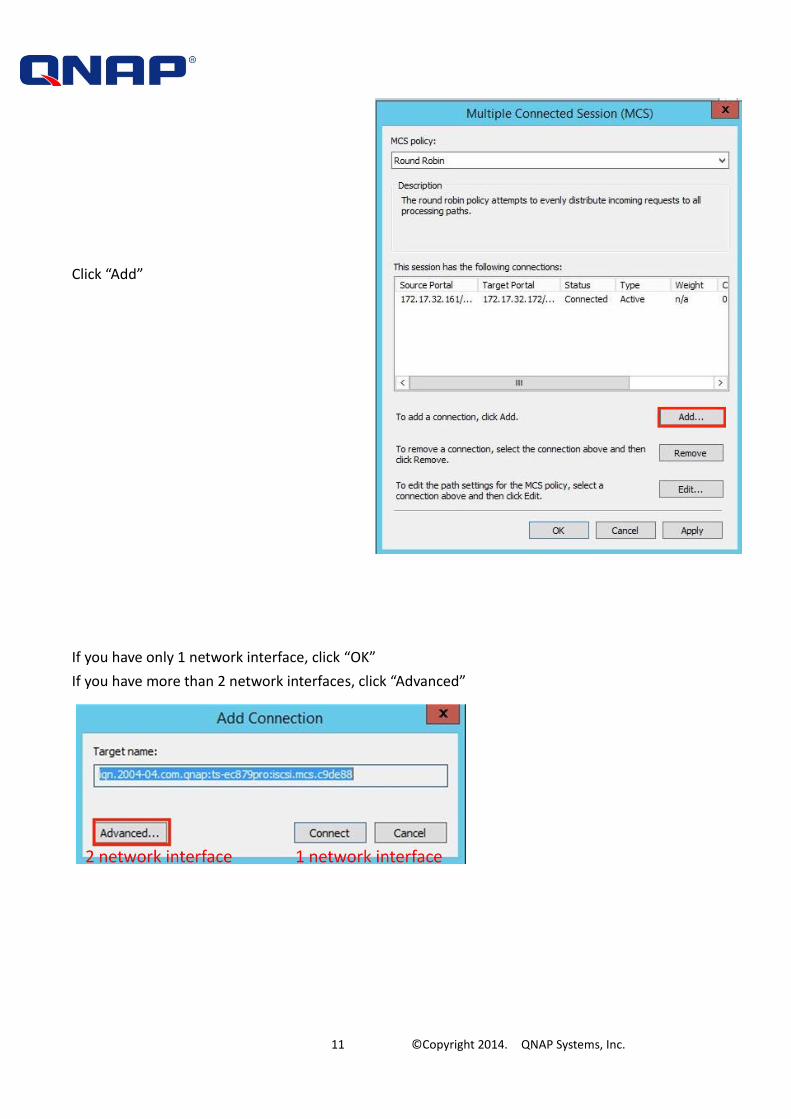
Click “Add”
If you have only 1 network interface, click “OK”
If you have more than 2 network interfaces, click “Advanced”
12 © Copyright 2014. QNAP Systems, Inc.
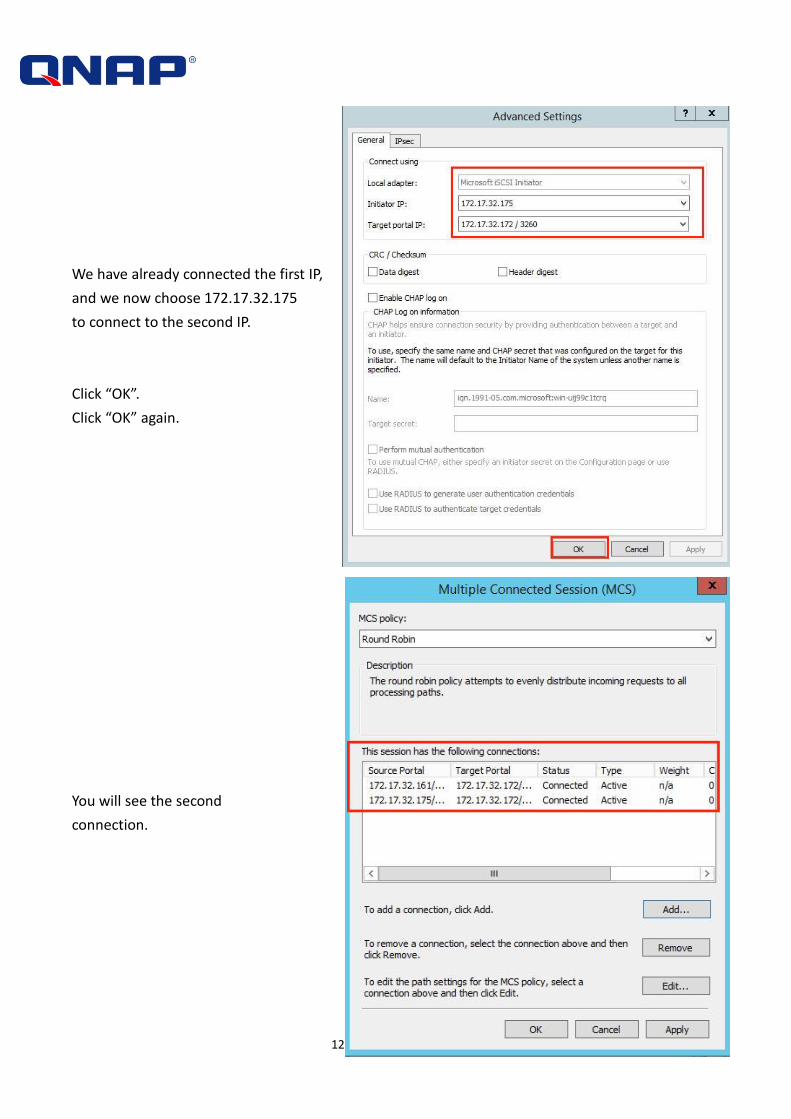
We have already connected the first IP,
and we now choose 172.17.32.175
to connect to the second IP.
Click “OK”.
Click “OK” again.
You will see the second
connection.

13 © Copyright 2014. QNAP Systems, Inc.
Click “Properties” in
“Targets” tab.
In Properties, you
will find one connected
session and two connections.

14 © Copyright 2014. QNAP Systems, Inc.
Check the settings
You can also find those 2 connections by opening a command prompt window (cmd.exe) and use
“netstat.exe”.
If you have 2 network interfaces, we can see the 2 connections that you made from 2 different IP
addresses.
If you only have one network interface, we can see the 2 connections that you made from the same
IP address
15 © Copyright 2014. QNAP Systems, Inc.
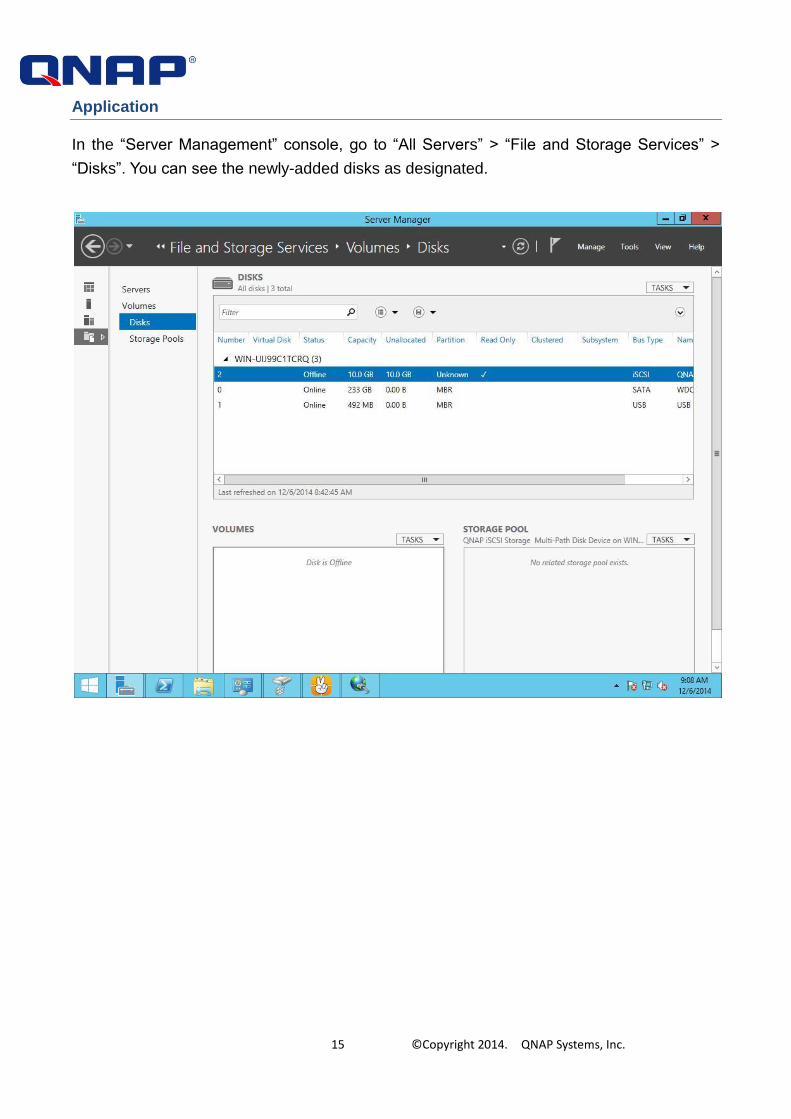
Application
In the “Server Management” console, go to “All Servers” > “File and Storage Services” >
“Disks”. You can see the newly-added disks as designated.
16 © Copyright 2014. QNAP Systems, Inc.
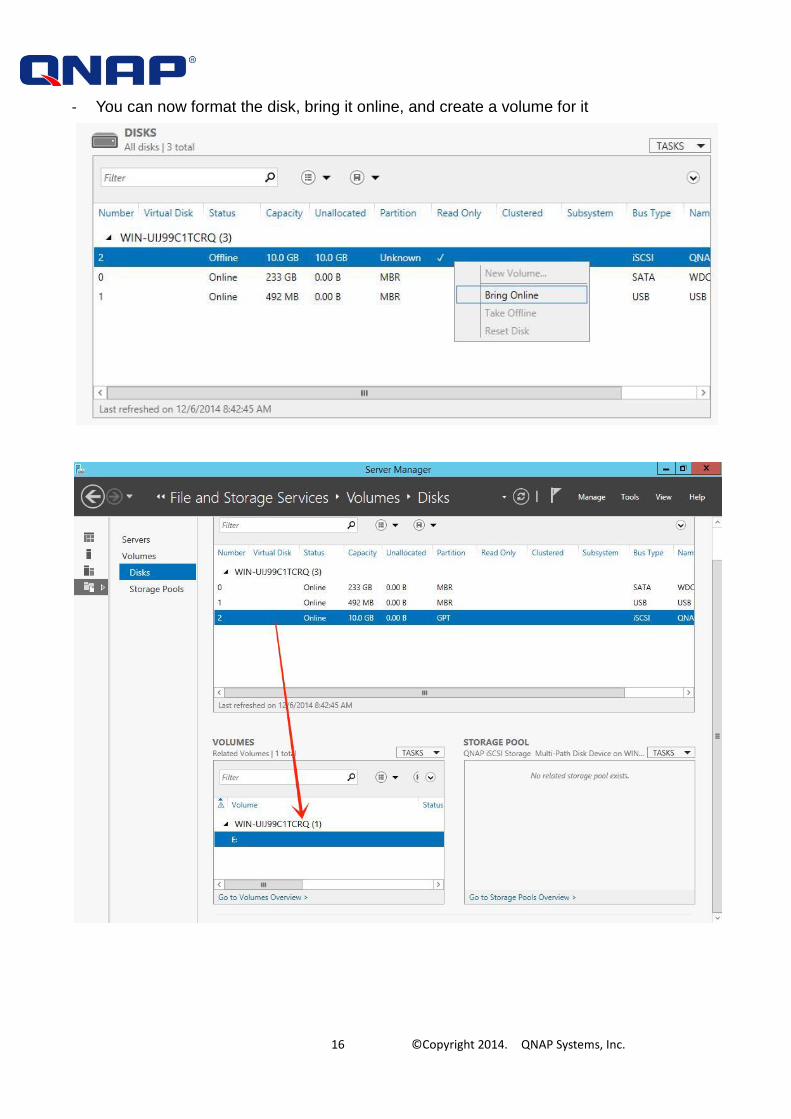
- You can now format the disk, bring it online, and create a volume for it
17 © Copyright 2014. QNAP Systems, Inc.
Others
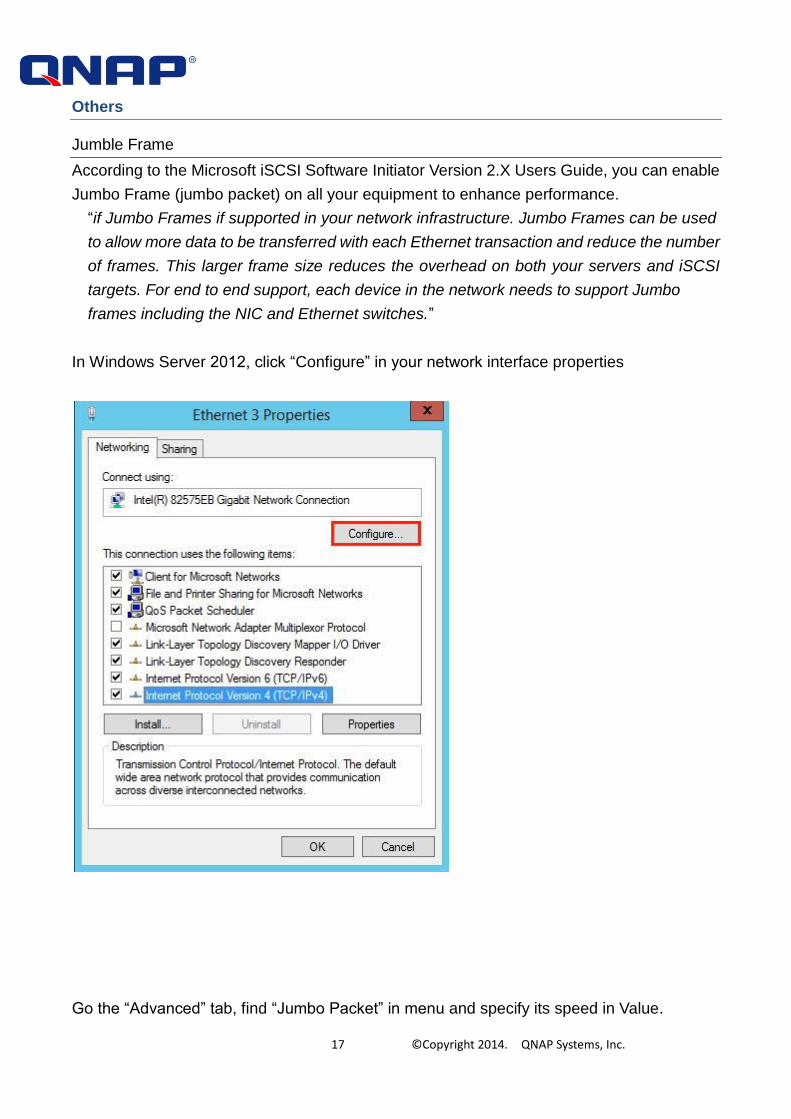
Jumble Frame
According to the Microsoft iSCSI Software Initiator Version 2.X Users Guide, you can enable
Jumbo Frame (jumbo packet) on all your equipment to enhance performance.
“if Jumbo Frames if supported in your network infrastructure. Jumbo Frames can be used
to allow more data to be transferred with each Ethernet transaction and reduce the number
of frames. This larger frame size reduces the overhead on both your servers and iSCSI
targets. For end to end support, each device in the network needs to support Jumbo
frames including the NIC and Ethernet switches.”
In Windows Server 2012, click “Configure” in your network interface properties
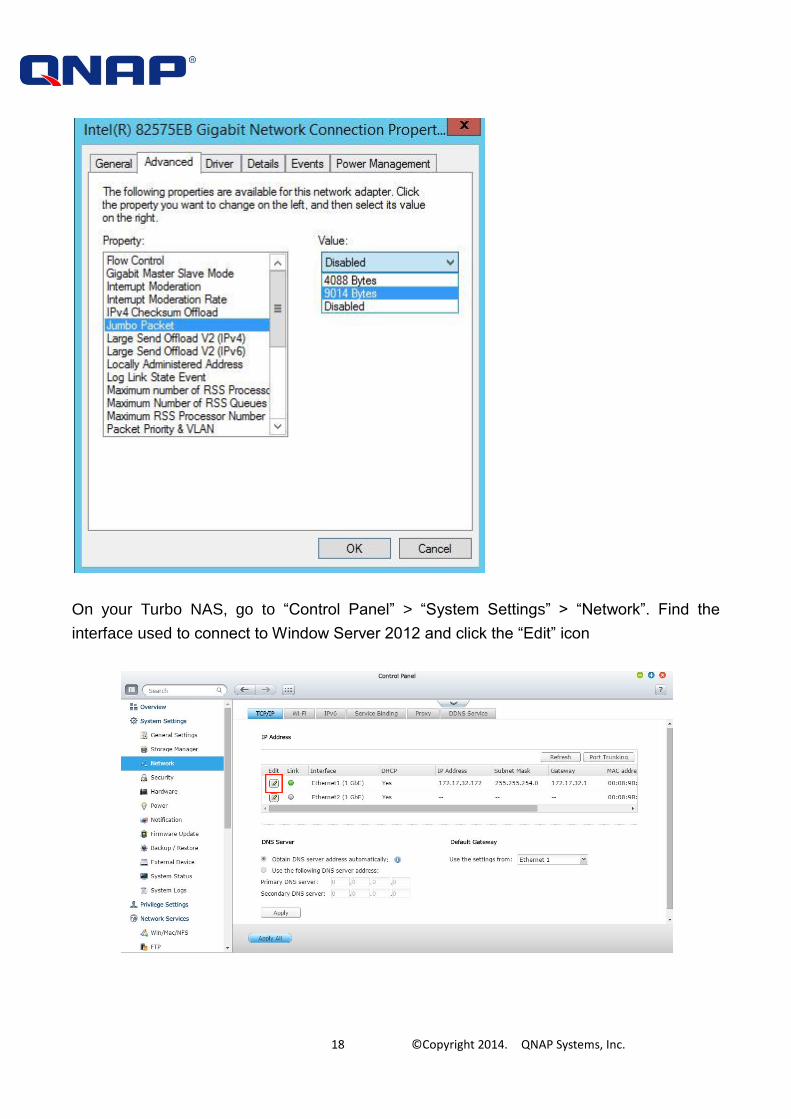
Go the “Advanced” tab, find “Jumbo Packet” in menu and specify its speed in Value.
18 © Copyright 2014. QNAP Systems, Inc.
On your Turbo NAS, go to “Control Panel” > “System Settings” > “Network”. Find the
interface used to connect to Window Server 2012 and click the “Edit” icon

19 © Copyright 2014. QNAP Systems, Inc.
In the “Network Parameters” tab, specify the speed in the “Jumbo Frame” menu.
20 © Copyright 2014. QNAP Systems, Inc.
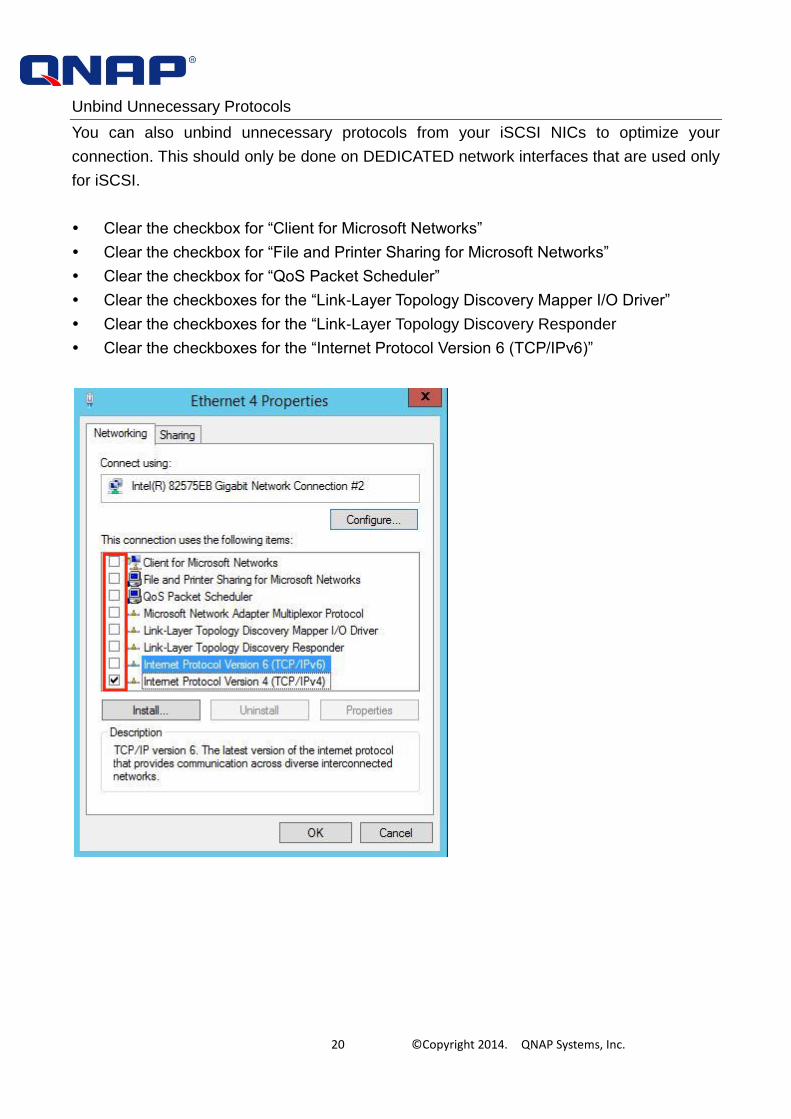
Unbind Unnecessary Protocols
You can also unbind unnecessary protocols from your iSCSI NICs to optimize your
connection. This should only be done on DEDICATED network interfaces that are used only
for iSCSI.
Clear the checkbox for “Client for Microsoft Networks”
Clear the checkbox for “File and Printer Sharing for Microsoft Networks”
Clear the checkbox for “QoS Packet Scheduler”
Clear the checkboxes for the “Link-Layer Topology Discovery Mapper I/O Driver”
Clear the checkboxes for the “Link-Layer Topology Discovery Responder
Clear the checkboxes for the “Internet Protocol Version 6 (TCP/IPv6)”

21 © Copyright 2014. QNAP Systems, Inc.
Double-click “Internet Protocol
Version 4 (TCP/IP4)”; click
“Advanced” in the “General” tab
Go to the “DNS” tab and clear the
checkbox for “Register this
connection's addresses in DNS”
22 © Copyright 2014. QNAP Systems, Inc.
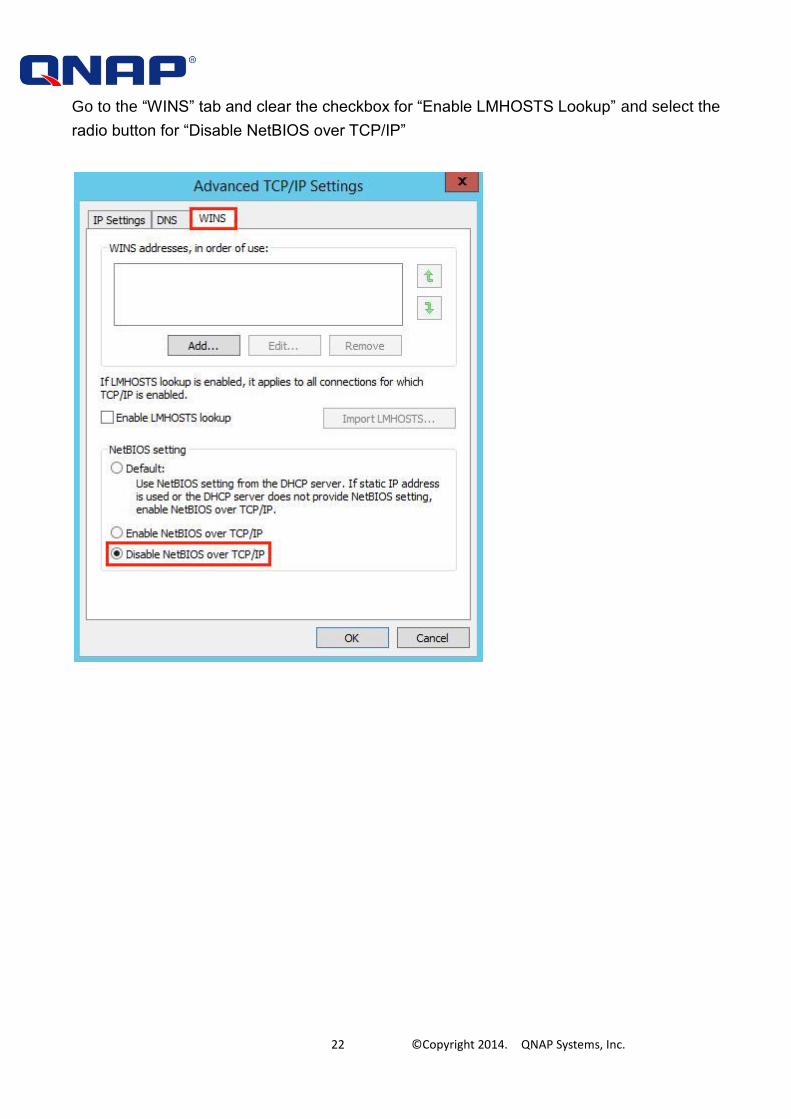
Go to the “WINS” tab and clear the checkbox for “Enable LMHOSTS Lookup” and select the
radio button for “Disable NetBIOS over TCP/IP”