Unity 5: First-Person Tutorial
86
By Shahed Chowdhuri Senior Technical Evangelist Unity 5: First Person Tutorial First-person controls, terrain & environment @shahedC WakeUpAndCode.com
-
Upload
shahed-chowdhuri -
Category
Technology
-
view
6.449 -
download
2
Transcript of Unity 5: First-Person Tutorial

By Shahed ChowdhuriSenior Technical Evangelist
Unity 5: First Person TutorialFirst-person controls, terrain & environment
@shahedC
WakeUpAndCode.com

AgendaInitial Setup, Asset Store
> First-Person Controls> Terrain, Trees, Colliders> Textures, Grass & Rocks, Water
Wrap-Up

Initial Setup

Assign Code Editor
Click Edit PreferencesUnder External Tools, select your Script Editore.g. MonoDevelop or Visual Studio
Tip: Browse for devenv.exe in your Program Files folder if you don’t see Visual Studio"C:\Program Files (x86)\Microsoft Visual Studio 12.0\Common7\IDE\devenv.exe"

VS Code Setup on Windows
http://darkgenesis.zenithmoon.com/configuring-unity3d-to-use-the-new-lightweight-visual-studio-code-editor/
1. Click Edit Preferences
2. External Tools
3. Browse to:• “C:\Users\<profile>\AppData\Local\Code\Bin\”
4. Select code.cmd
OPTIONAL:In VS Code, open the project folder to use Intellisense

VS Code Setup on Mac
http://unreferencedinstance.com/how-to-integrate-visual-studio-code-with-unity3d-project/
1. Click Assets Sync MonoDevelop Project
2. Open VS Code, pick project folder
3. Pick a project (-csharp.sln) file
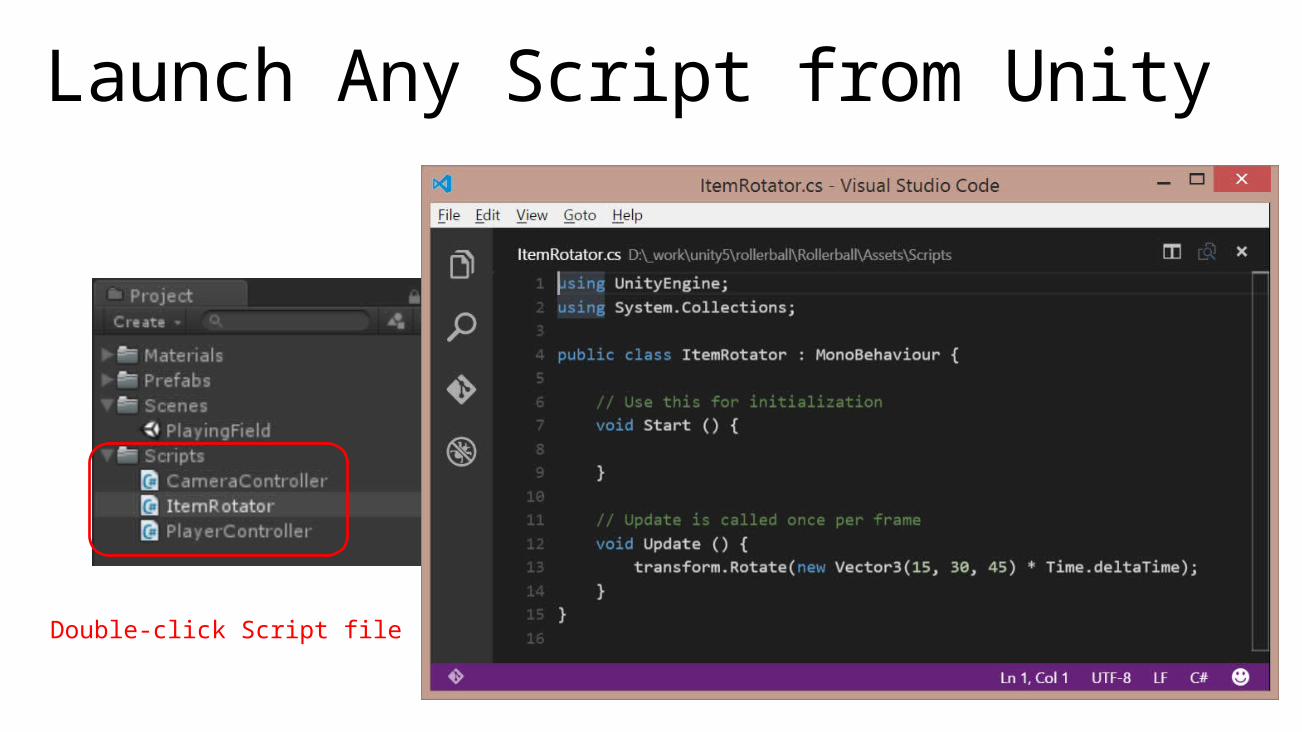
Launch Any Script from Unity
Double-click Script file

Choose Theme: Light, Dark, High Contrast
On the top menu,1.Click View2.Click Theme3.Choose a theme:
• Light Theme• Dark Theme• High Contrast Theme

Asset Store

Launch Unity’s Asset Store
On the top menu,1.Click Window 2.Click Asset Store
Shortcut: Ctrl+9

Asset Store WindowVerify that you’re logged in.

Asset Store: Top Paid
Scroll downfor top charts

Asset Store: Top Free
Click on Top Free
(below Top Paid)

AgendaInitial Setup, Asset Store
> First-Person Controls> Terrain, Trees, Colliders> Textures, Grass & Rocks, Water
Wrap-Up

First-Person Controls

Create New 3D Project
… choose 3D, then click “Create project”
Name your project…
Click File New Project…

Create GroundFrom top menu, click GameObject 3D Object Plane

Import Characters Package Click Assets Import Package Characters
Import All!

Locate FPS Controller in Project Panel In the Project Panel,
Open the following:• Standard Assets
• Characters• FirstPersonCharacter
• Prefabs• FPSController

Drag FPSController to Scene

Run the Game!Click Play button, move with arrow keys
Notice FPSController in Hierachy

FirstPersonController Script
Locate FirstPersonController script under:/Assets/Standard Assets/Characters/FirstPersonCharacter/Scripts/

Inspect FirstPerson Code

Start()

FPSController Components

FixedUpdate()
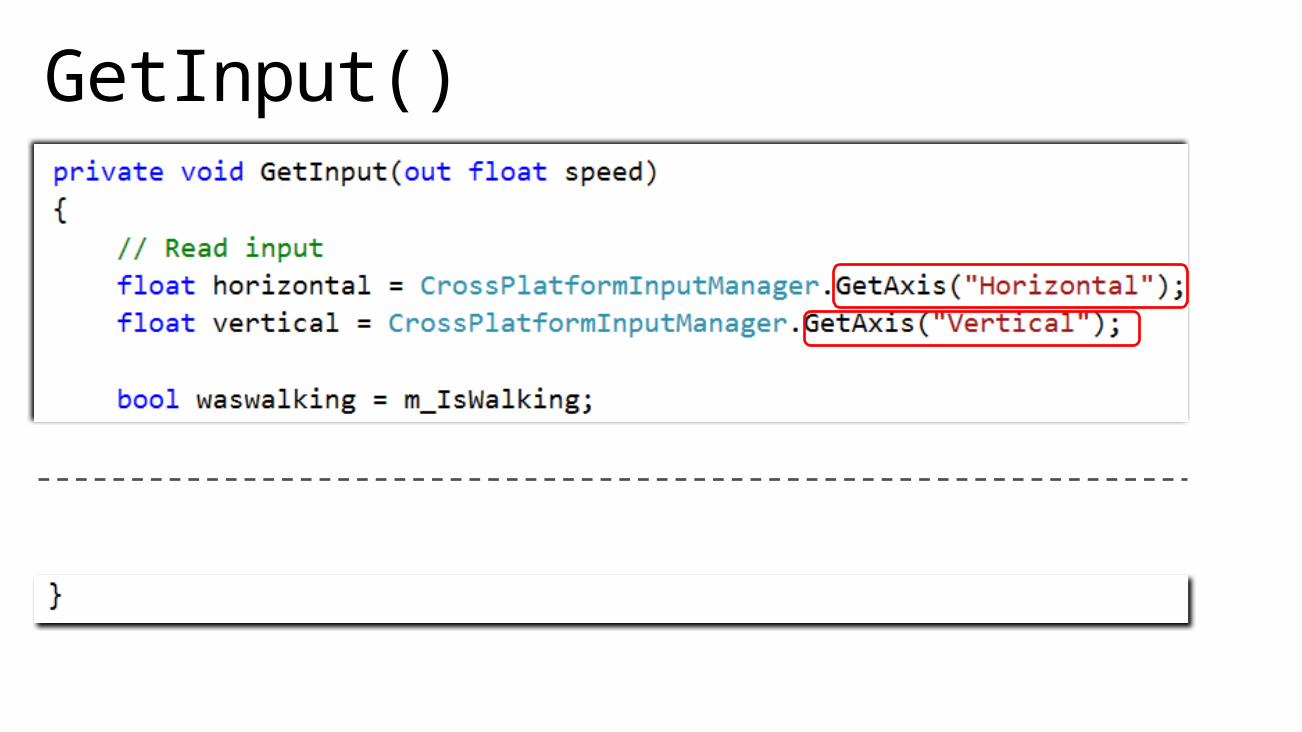
GetInput()

Edit
Project Settings
Input

Update()

Terrain

Add Terrain From top menu, click GameObject 3D Object Terrain

Zoom Out and Focus on Terrain

Select Tool to Raise/Lower Terrain
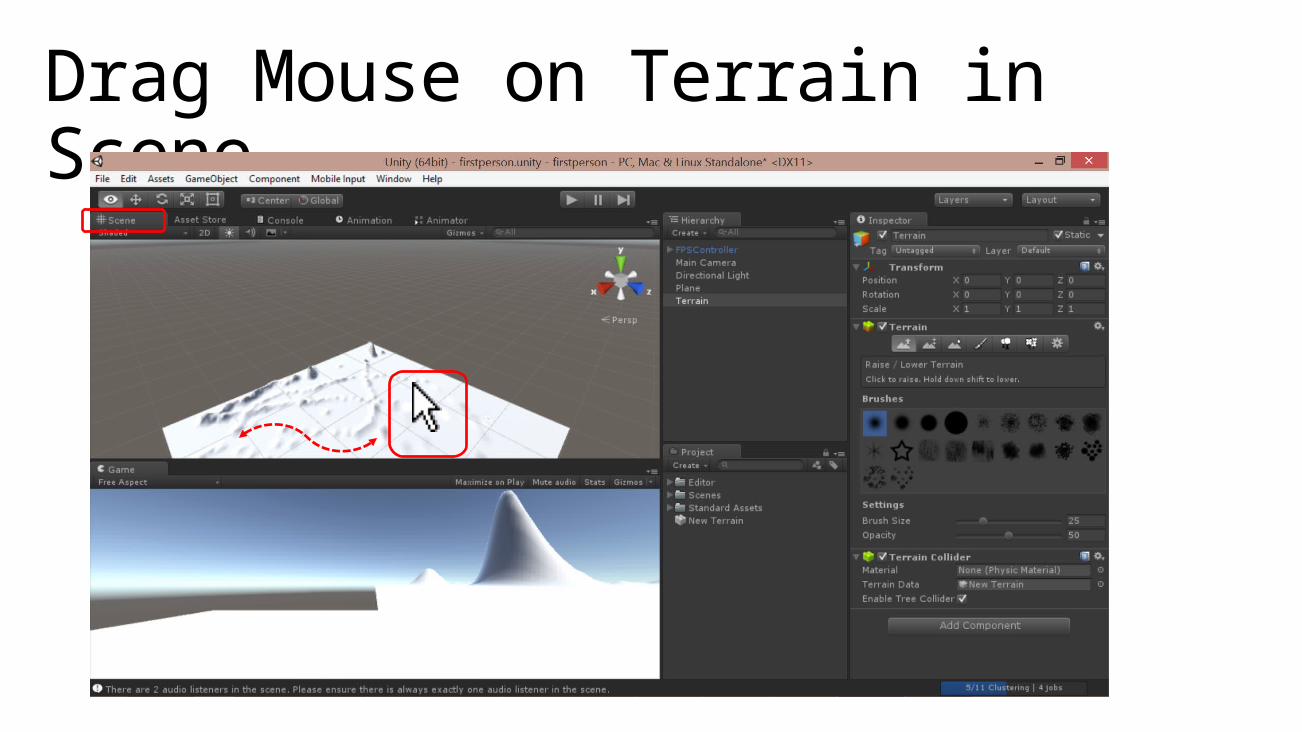
Drag Mouse on Terrain in Scene

Run the game!Click Play button, move with arrow keys

Trees

Download & Import Unity’s Terrain Assets

Select Tool to Place Trees

Edit Trees for Terrain to Add Tree
In the Terrain’s Inspector window, click Edit Trees Add Tree

Assign Tree Prefab
In the Add Tree dialog, click the tiny circle, then choose a tree, e.g. Banyan

Confirm Add
Click the Add button to confirm.

Mass Place Trees
Click “Mass Place Trees, then click Place to confirm

Trees Too Small…?
Too Small!

Update Scale for Tree PrefabIn the Project panel,
click the Prefabfor the tree you selected,
e.g. Banyan
Enter a larger Scale Factor
e.g. 1
Click Apply to update all trees!

Enjoy Larger Trees!

Colliders
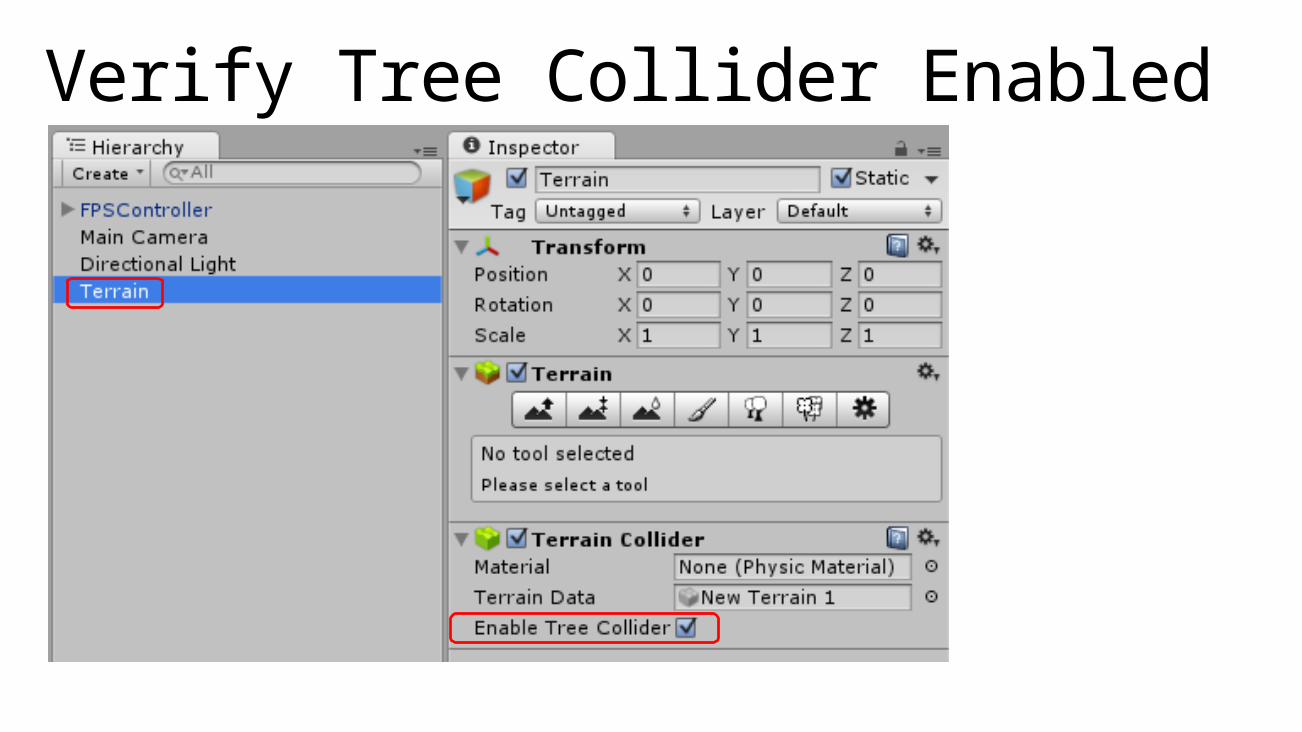
Verify Tree Collider Enabled

Drag Tree Prefab to Scene
From Project panel, drag any tree prefab to the Scene
Path: /Assets/Terrain Assets/Trees Ambient-Occlusion/

Verify Tree in Hierarchy
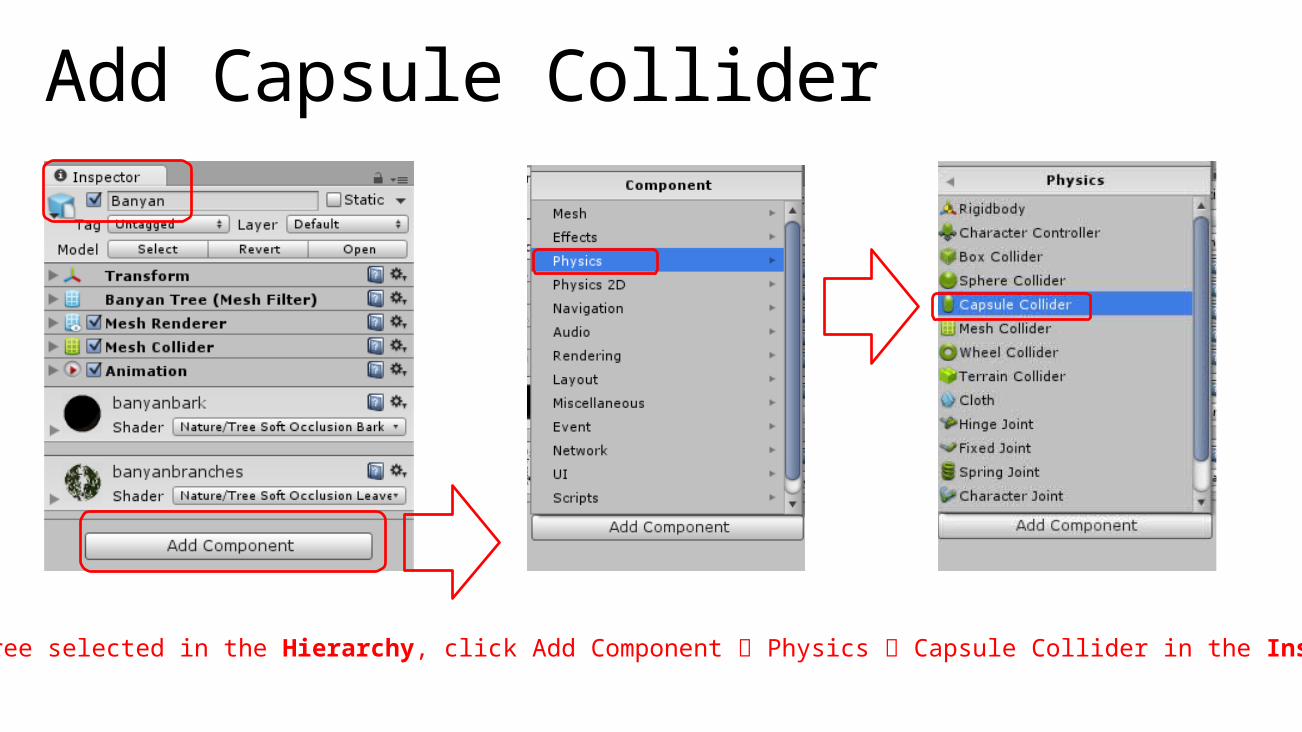
Add Capsule Collider
With the tree selected in the Hierarchy, click Add Component Physics Capsule Collider in the Inspector panel

Edit Collider Position & Dimensions

Create Folder for Prefabs

Create New Prefab in Prefabs Folder
Rename it, e.g. “BanyanCollider”

Drag Tree into Prefab
NOTE: You may now delete the tree from the Hierarchy.

Mass Place New Tree with Collider
1. Click “Place Trees” tool in Inspector with Terrain selected in Hierarchy2. Click Edit Trees… to Add Tree (prefab with collider)3. Mass Place Trees!
3 2
1

Textures

Import Environment Package Click Assets Import Package Environment
Import All!

Add Texture to Terrain
1. Click “Paint Texture” tool2. Click Edit Textures…3. Click Add Texture…
1
2 3

Choose Terrain Texture
1. Click Select button2. Choose a Texture, e.g. SandAlbedo3. Click Add
1
2
3

Verify New Terrain Texture

Add Another Texture with Normal Map
1. Click Select button2. Choose another Texture, e.g. Mud Rocky Albedo and Mud Rocky Normal3. Click Add
1
2
3

Apply New Texture
With new Texture selected, drag mouse cursor along terrain to apply it.

Add a Grassy Texture
1. Click Select button2. Choose another Texture, e.g. Grassy Hill Albedo3. Click Add
1
2
3

Apply Grassy Texture
With new Texture selected, drag mouse cursor along terrain to apply it.

Grass & Rocks

Add Grass
1. Click “Paint Details” tool2. Click Edit Details…3. Click Add Grass Texture…
1
2 3

Choose Grass Texture
1. Click icon next to Detail Texture2. Choose a Grass Texture, e.g. Grass Hill Albedo3. Click Add
1
23
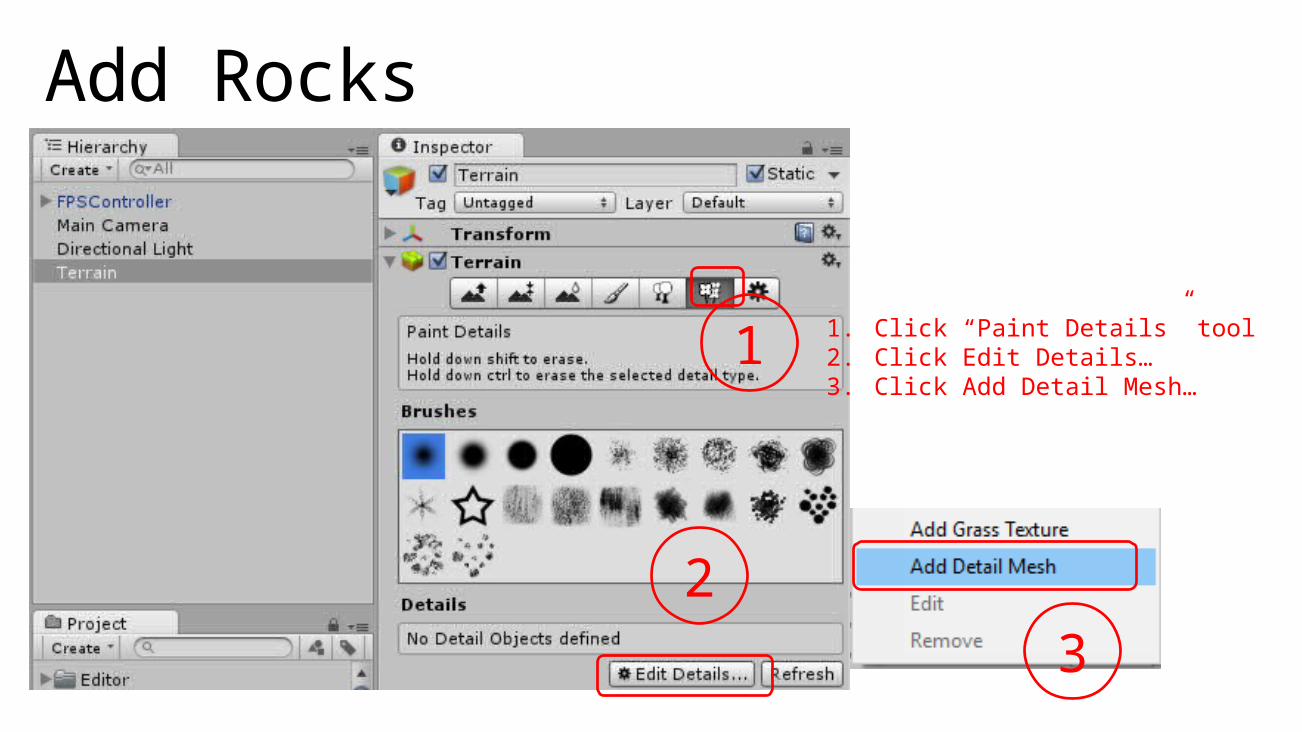
Add Rocks
1. Click “Paint Details” tool2. Click Edit Details…3. Click Add Detail Mesh…
1
23

Choose Rock Texture
1. Click icon next to Detail Texture2. Choose a Rock Texture, e.g. Rock Mesh3. Update color and change Render Mode (Vertex Lit)4. Click Add
1 2
4
3

Apply Grass and Rocks
With Grass/Rock selected, drag mouse cursor along terrain to apply each.

Need a Rock with Collider?1. Drag
RockMesh into Scene.
2. Rename it in Hierachy.
3. Create empty Prefab, and drag rock into it.
1
2
3

Add Capsule Collider
With the rock selected in the Hierarchy, click Add Component Physics Capsule Collider in the Inspector panel

Edit Collider Position & Dimensions

Water

Drag Water Prefab into Scene

AgendaInitial Setup, Asset Store
> First-Person Controls> Terrain, Trees, Colliders> Textures, Grass & Rocks, Water
Wrap-Up

Weapon

From OneDrive: http://1drv.ms/1TUMufE Extract into Assets folder…
Download Models Zip File

Verify Models Folder in Project Panel

Drag Prefab into Hierarchy
Drag “bazooka” prefab into “FirstPersonCharacter”(just below FPSController)

Adjust Weapon PositionAdjust Position: X, Y and Z values

Adjust Weapon PositionAdjust Position: X, Y and Z values

For More Info:• Unity Indie Devs:
• http://facebook.com/groups/UnityIndieDevs • http://WakeUpAndCode.com/unity
• Xbox One Indie Devs:• http://facebook.com/groups/XboxOneIndieDevs• http://WakeUpAndCode.com/xb1

AgendaInitial Setup, Asset Store
> First-Person Controls> Terrain, Trees, Colliders> Textures, Grass & Rocks, Water
Wrap-Up