Unit Plan - Weeblyallysonpageportfolio.weebly.com/.../manip._skills_unit_plan.pdf · Manipulative...
104
1 Manipulative Skills Unit Plan 3rd Grade Allyson Barber ED 331 Section 13 9/12/11
Transcript of Unit Plan - Weeblyallysonpageportfolio.weebly.com/.../manip._skills_unit_plan.pdf · Manipulative...

1
Manipulative Skills Unit Plan
3rd Grade
Allyson Barber ED 331 Section 13
9/12/11

2
Table of Contents
Rationale for Teaching the Unit Page 3 Unit Instructional Objectives Pages 4-7
Unit Overview - Instructional Block Plan Calendar Pages 8-15
Detailed Daily Lesson Plans Pages 16-76
Unit Assessments Pages 77-84
Appendix: Pages 85-102
a) Type of Activity b) Name of Activity c) Source of Activity Information d) Equipment Needed e) Facility Needed f) Description/Instructions for Activity
References Page 103 Resource Materials Page 104

3
Rational for Teaching the Unit Unit Goal:
In this second grade manipulative skills unit (catching, throwing, kicking, striking), students will
demonstrate developmentally appropriate form in selected manipulative skills, while establishing a vocabulary
of movement concepts (speed, force, aim, pathways), while also showing appropriate social behaviors
(teamwork, following directions, responsibility) throughout the unit.
Rational:
Manipulative skills are the basis for many sport related and lifelong activities. Students have many
opportunities to see many sports and activities being played that incorporate manipulative skills. By learning
manipulative skills (throwing, catching, kicking, striking) in elementary school, students will be introduced to
the skills so they can incorporate them in future sports and activities. Learning manipulative skills addresses
Michigan Content Standards and GLECs. Students will learn these skills, and quite possibly join an outside
sport or activity. For others, these same skills and knowledge will provide students with the basis of sports and
activities so they can play with friends at school or in their neighborhood. Manipulative skills provide
opportunity to work on speed, accuracy, and coordination.

4
List of Unit Objectives
Psychomotor Objectives:
PM1:
During a partner practice task, the student will demonstrate the underhand throw by:
Facing the target (“Face”) as he/she
Steps with opposite foot towards target (“Step”) while
Using a pendulum arm motion with their throwing arm (“Throw”) and
Following through toward the sky (“Sky”).
PM2:
During a partner practice task, the student will demonstrate an overhand throw by:
Placing the ball in the dominant hand and turning body sideways to target (“sideways”) as he/she
Steps at the target while swinging arms up and out to the side (“t-position”) while
Twisting body so tummy faces the target and brings throwing arm around (“twist”) and
Follows through to your knee (“scratch knee”).
PM3:
During a partner practice task, the student will demonstrate catching a ball with hands by:
Keeping their eyes on the ball (“eyes”) as he/she
Reaches arms towards ball and gives with the ball as it hits hands (“arms”) and
Having pinkies together if ball is below waist, thumbs if above (“pinkies or thumbs”).
PM4:
During a partner practice task, the student will demonstrate catching a ball with glove by:
Keeping their eyes on the ball, reaching arm toward ball and giving with the ball as it hits glove
(“eyes”) as he/she
Has fingers pointed up if the ball is above waist and fingers down if it is below waist (“fingers”) and
Squeezing the ball and placing hand over the ball (“Squeeze”).

5
PM5:
During a partner practice task, the student will demonstrate an inside foot pass by:
Placing the non-kicking foot next to the side of the ball (“side”) as he/she
Contacts the ball in the middle with inside of kicking foot (“inside foot”) while
Following through towards their target (“follow through”)
PM6:
During a partner practice task, the student will kicking for distance by:
Placing the non-kicking foot next to the ball (“side”) as he/she
Contacts the ball below the middle of the ball and contact with laces (“shoelaces”) while
Kicking hard and following through towards target (“follow through”)
PM7:
During a partner practice task, the student will kicking for distance by:
Placing the non-kicking foot next to the ball (“side”) as he/she
Contacts the ball below the middle of the ball and contact with laces (“shoelaces”) while
Kicking hard and following through towards target (“follow through”)
PM8:
During a partner practice task, the student will demonstrate striking a ball with a bat by:
Being on the balls of their feet with knees slightly bent (“ready position”) as he/she
Brings the paddle back with whole arm and weight on back foot (“back”) while
Transferring weight from back to front and move paddle low to high and contact ball at waist level
(“contact”) while
Paddle continues toward shoulder by following through across body (“follow through”).
Cognitive Objectives:
C1:
When asked during the lesson closure, the students will demonstrate the correct action to go with cue
words as stated by the teacher.

6
C2:
When prompted during the lesson, the students will respond correctly by showing movements that
illustrate the concept the overhand throw taught in the lesson.
C3:
When asked during the lesson closure, the students will identify, describe or show the meaning of an
underhand throw.
C4:
When prompted during the lesson, the students will respond correctly by showing movements
that illustrate the concept of catching a ball in a glove.
C5:
When asked during the lesson closure, the students will demonstrate the correct action of the inside
foot pass as stated by the teacher.
C6:
When asked during the lesson closure, the students will demonstrate the correct action of the kick for
distance as stated by the teacher.
C7:
When asked during the lesson closure, the students will demonstrate the correct action of the forearm
pass in volleyball as stated by the teacher.
C8:
When asked during the lesson closure, the students will demonstrate the correct action of the inside
foot pass as stated by the teacher.
Affective Objectives:
A1:
The students will demonstrate personal responsibility by:
-Following safety rules
-Staying in his or her own personal space during practice
-Following the rules for the applied activity called “Passing to a Target”
A2:

7
The students will demonstrate active listening skills by being quiet during management
instruction and responding appropriately to management signals.
A3:
The students will demonstrate personal responsibility by:
-Following safety rules
-Listening to instruction
-Following the rules for the applied activity called “Latch on the that Catch”
A4:
The students will demonstrate active listening skills by being quiet during management
instruction and responding appropriately to management signals.
A5:
The students will demonstrate personal responsibility by:
-Following safety rules
-Staying in his or her own personal space during practice
-Following the rules for the applied activity called “Kick to Partner”
A6:
The students will demonstrate active listening skills by being quiet during management
instruction and responding appropriately to management signals.
A7:
The students will demonstrate active listening skills by being quiet during management
instruction and responding appropriately to management signals.
A8:
The students will demonstrate personal responsibility by:
-Following safety rules
-Staying in his or her own personal space during practice
-Following the rules for the applied activity called “Pickle Ball”

8
BLOCK PLAN CALENDAR WEEK #1 UNIT DAY #1 UNIT DAY #2
Instructional objectives linked to standards:
PM1: (Standard 1)
During a partner practice task, the
student will demonstrate the
underhand throw by:
Facing the target (“Face”) as
he/she
Steps with opposite foot
towards target (“Step”) while
Using a pendulum arm motion
with their throwing arm
(“Throw”) and
Following through toward the
sky (“Sky”).
C1: (Standard 2)
When asked during the lesson closure,
the students will demonstrate the
correct action to go with cue words as
stated by the teacher.
A1: (Standard 5)
The students will demonstrate
personal responsibility by:
Following safety rules
Staying in his or her own
personal space during practice
Following the rules for the
applied activity called “Passing
to a Target”
PM2: (Standard 1)
During a partner practice task, the
student will demonstrate an overhand
throw by:
Placing the ball in the
dominant hand and turning
body sideways to target
(“sideways”) as he/she
Steps at the target while
swinging arms up and out to
the side (“t-position”) while
Twisting body so tummy faces
the target and brings throwing
arm around (“twist”) and
Follows through to your knee
(“scratch knee”).
C2: (Standard 2)
When prompted during the lesson,
the students will respond correctly by
showing movements that illustrate
the concept the overhand throw
taught in the lesson.
A2: (Standard 5)
The students will demonstrate
active listening skills by being quiet
during management instruction
and responding appropriately to
management signals.
Warm-up activity/topic Stretch Stretch
Fitness activity/topic Fitness Relay Fitness Relay
Review topic(s) if applicable N/A Underhand Throw
Lesson focus Underhand Throw Overhand Throw

9
“Face”
“Step”
“Throw”
“Sky”
“Sideways”
“T-Position”
“Twist”
“Scratch Knee”
Applied activity(ies) Stations: -Bags -Ladder Ball -Bocce Ball
Stations: -Baseball -Softball -Football
Assessment(s) Rating Scale N/A

10
WEEK #2 UNIT DAY #3 UNIT DAY #4
Instructional objectives linked to standards:
PM3: (Standard 1)
During a partner practice task, the
student will demonstrate catching a
ball with hands by:
Keeping their eyes on the ball
(“eyes”) as he/she
Reaches arms towards ball
and gives with the ball as it
hits hands (“arms”) and
Having pinkies together if ball
is below waist, thumbs if
above (“pinkies or thumbs”).
C3: (Standard2)
When asked during the lesson closure,
the students will identify, describe or
show the meaning of an underhand
throw.
A3: (Standard 5)
The students will demonstrate
personal responsibility by:
-Following safety rules
-Listening to instruction
-Following the rules for the applied
activity called “Latch on the that
Catch”
PM4: (Standard 1)
During a partner practice task,
the student will demonstrate catching
a ball with glove by:
Keeping their eyes on the ball,
reaching arm toward ball and
giving with the ball as it hits
glove (“eyes”) as he/she
Has fingers pointed up if the
ball is above waist and fingers
down if it is below waist
(“fingers”) and
Squeezing the ball and placing
hand over the ball
(“Squeeze”).
C4: (Standard 2)
When prompted during the lesson,
the students will respond correctly
by showing movements that
illustrate the concept of catching a
ball in a glove.
A4: (Standard 5)
The students will demonstrate
active listening skills by being quiet
during management instruction
and responding appropriately to
management signals.
Warm-up activity Stretch Stretch
Fitness activity Fitness Relay Fitness Relay
Review topic(s) if applicable Overhand Throw Catch with Hands
Lesson focus Catching with Hands Catching with Glove

11
“Eyes”
“Arms”
“Pinkies or Thumbs”
“Eyes”
“Fingers”
“Squeeze”
Applied activity Scooter Handball Stations: -With a Partner -Fly Balls -Grounders
Assessment(s) N/A N/A
12
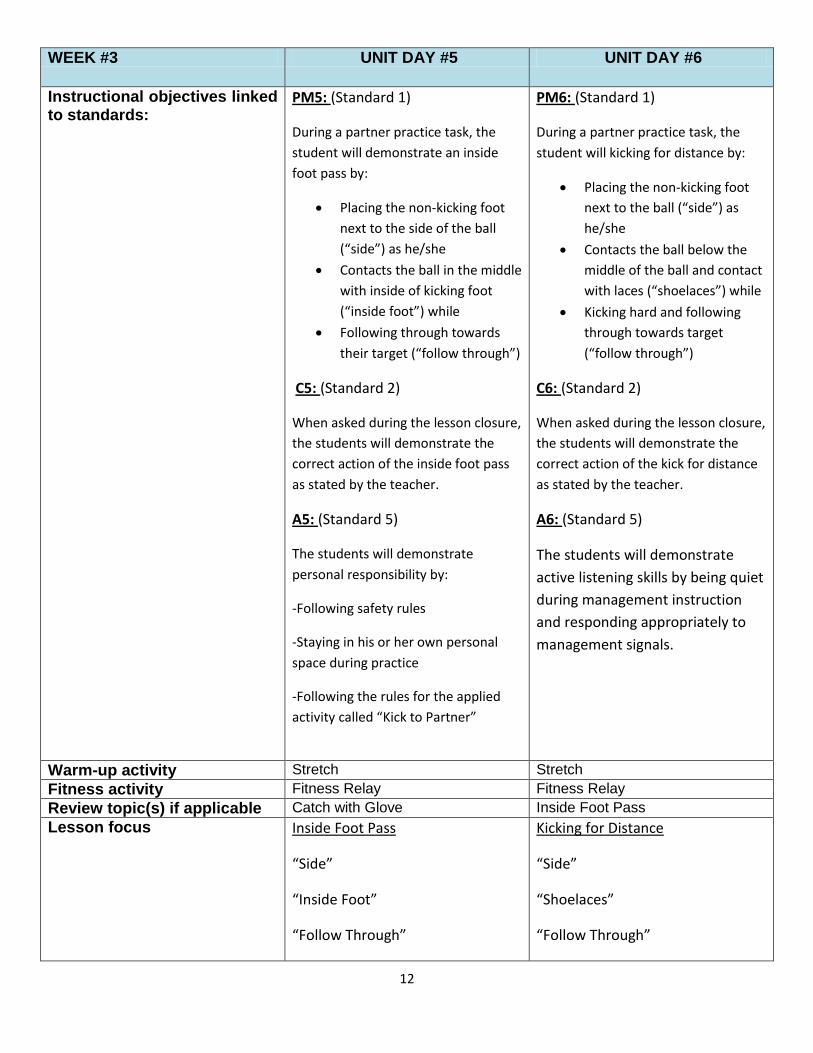
WEEK #3 UNIT DAY #5 UNIT DAY #6
Instructional objectives linked to standards:
PM5: (Standard 1)
During a partner practice task, the
student will demonstrate an inside
foot pass by:
Placing the non-kicking foot
next to the side of the ball
(“side”) as he/she
Contacts the ball in the middle
with inside of kicking foot
(“inside foot”) while
Following through towards
their target (“follow through”)
C5: (Standard 2)
When asked during the lesson closure,
the students will demonstrate the
correct action of the inside foot pass
as stated by the teacher.
A5: (Standard 5)
The students will demonstrate
personal responsibility by:
-Following safety rules
-Staying in his or her own personal
space during practice
-Following the rules for the applied
activity called “Kick to Partner”
PM6: (Standard 1)
During a partner practice task, the
student will kicking for distance by:
Placing the non-kicking foot
next to the ball (“side”) as
he/she
Contacts the ball below the
middle of the ball and contact
with laces (“shoelaces”) while
Kicking hard and following
through towards target
(“follow through”)
C6: (Standard 2)
When asked during the lesson closure,
the students will demonstrate the
correct action of the kick for distance
as stated by the teacher.
A6: (Standard 5)
The students will demonstrate
active listening skills by being quiet
during management instruction
and responding appropriately to
management signals.
Warm-up activity Stretch Stretch
Fitness activity Fitness Relay Fitness Relay
Review topic(s) if applicable Catch with Glove Inside Foot Pass
Lesson focus Inside Foot Pass
“Side”
“Inside Foot”
“Follow Through”
Kicking for Distance
“Side”
“Shoelaces”
“Follow Through”

13
Applied activity Pass with Partner Kicking at Targets
Assessment(s) Exit Slip N/A

14
WEEK #4 UNIT DAY #7 UNIT DAY #8
Instructional objectives linked to standards:
PM7: (Standard 1)
During a partner practice task, the
student will kicking for distance by:
Placing the non-kicking foot
next to the ball (“side”) as
he/she
Contacts the ball below the
middle of the ball and contact
with laces (“shoelaces”) while
Kicking hard and following
through towards target
(“follow through”)
C7: (Standard 2)
When asked during the lesson closure,
the students will demonstrate the
correct action of the forearm pass in
volleyball as stated by the teacher.
A7: (Standard 5)
The students will demonstrate
active listening skills by being quiet
during management instruction
and responding appropriately to
management signals.
PM8: (Standard 1)
During a partner practice task, the
student will demonstrate striking a
ball with a bat by:
Being on the balls of their
feet with knees slightly
bent (“ready position”) as
he/she
Brings the paddle back
with whole arm and
weight on back foot
(“back”) while
Transferring weight from
back to front and move
paddle low to high and
contact ball at waist level
(“contact”) while
Paddle continues toward
shoulder by following
through across body
(“follow through”).
C8: (Standard 2)
When asked during the lesson closure,
the students will demonstrate the
correct action of striking with a paddle
as stated by the teacher.
A8: (Standard 5)
The students will demonstrate
personal responsibility by:
-Following safety rules
-Staying in his or her own personal
space during practice
-Following the rules for the applied
activity called “Pickle Ball”

15
Warm-up activity Stretch Stretch
Fitness activity Fitness Relay Fitness Relay
Review topic(s) if applicable Kicking for Distance Striking with Arms
Lesson focus Striking with Arms
“Feet”
“Bend”
“Arms Flat”
“Contact”
Striking with Paddle
“Ready Position”
“Back”
“Contact”
“Follow Through”
Applied activity Ball Directing Pickle-Ball
Assessment(s) N/A Rubric

16
Give it a Heave-Ho with an Underhand Throw! LESSON #1 AND DIRECT
GRADE LEVEL: 3rd
Allyson Barber
PED 331 13
9/19/11

17
Skill Performance Analysis:
3rd Grade: Underhand Throw
ALL STEPS OF THE SKILL:
1) Face your target
2) Step with opposite foot towards target (ex: if throwing with right hand, step towards target with
your left foot)
3) Use a pendulum arm motion with the arm you are throwing (ex: like you are bowling)
4) Follow through to the sky or ceiling with hand you are throwing with
CRTITICAL STEPS: CUE WORDS:
1) Face your target 1) “Face”
2) Step with opposite foot towards target 2) “Step”
3) Use a pendulum arm motion with throwing arm 3) “Throw”
4) Follow through toward sky 4) “Sky”
PSYCHOMOTOR OBJECTIVE:
During a partner practice task, the student will demonstrate the underhand throw by:
Facing the target (“Face”) as he/she
Steps with opposite foot towards target (“Step”) while
Using a pendulum arm motion with their throwing arm (“Throw”) and
Following through toward the sky (“Sky”).
Underhand Throw
COMMON ERROR PREVENTION STRATEGY CORRECTION
Release of the ball too high or too low
Have students practice throwing the ball at all different release
points so they can see the differences
Give targets to try and hit at different heights to practice throwing at different heights
Stepping with wrong foot forward
Make sure students understand that they will always step
opposite of what they throw with
Practice stepping and have students realize opposites

18
LESSON CONTEXTUAL INFORMATION
Lesson Title: Give it a Heave-Ho with an Underhand Throw!
Grade: 3rd
Skill Level: Developmental Level II
Time Required: 50 minutes
Day in Unit: 1 out of 8
Content Standards addressed within this lesson: Standard 2: Demonstrates understanding of movement concepts, principles and tactics as they apply to the learning and performance of physical activities Standard 5: Exhibits responsible personal and social behavior that respects self and others in physical activity
Lesson Objectives:
Psychomotor- During a partner practice task, the student will demonstrate the underhand throw by:
Facing the target (“Face”) as he/she Steps with opposite foot towards target (“Step”) while Using a pendulum arm motion with their throwing arm (“Throw”) and Following through toward the sky (“Sky”).
Cognitive-
When asked during the lesson closure, the students will demonstrate the correct action to go with cue words as stated by the teacher.
Affective- The students will demonstrate personal responsibility by:
-Following safety rules -Staying in his or her own personal space during practice -Following the rules for the applied activity called “Passing to a Target”
Student Characteristics: Psychomotor:
Improved hand-eye coordination
More interest in sports
Sport related skill patterns matured in some cases
Developing more interest in skills
Cognitive:
Attention span is longer

19
Curious to see what they can do
Loved to be challenged and will try anything
Affective:
Like physical contact and belligerent games
Want to excel
Becoming more conscious socially
Like to perform well and be admired for accomplishments
Essentially honest and truthful
Do not lose willingly
Gender difference is of little importance
Pre-Requisite skills or knowledge needed for success:
One pre-requisite skill needed for this lesson would be the skill of rolling the ball. Students should be able to successfully underhand roll the ball with one arm before learning the underhand throw.
Also, students need to be aware of others and where they are throwing, so another concept that students will need to know is space awareness and body management.
Adaptations and/or extensions to accommodate individuals in this lesson:
For students who are having trouble, possibly give them a larger object to throw and make the rules to the game easier to understand and complete as long as their goal is to underhand throw toward the target like everyone else. For students who are excelling, change the rules up to make the activity more challenging.
Management issues for this lesson: Students will remember and use all of the management cues we went over on the first
day of class: -Stop when they hear: “Freeze” -“When I say go” (go) -Color Groups
Safety issues for this lesson:
When students are playing catch with a partner, make sure students are throwing the ball so that the other person has a chance of catching it. There is no whipping the balls as this lesson works on accuracy not speed.
When students are performing the underhand throw at stations, make sure they are responsible with their throwing and are aiming for the targets.
Equipment and/or supplies needed: (See Appendix C & D)
Facility set-up needed: (See Appendix C & D)
20
Notes to self: Make sure to say the cues loud and clear so all the students can hear Have an open mind and if things are not working properly, adjust and refresh the students
minds on how to perform the skill properly

21
BASIC LESSON PLAN FORMAT FOR DIRECT INSTRUCTION
Time: Instruction: Management/Cues:
1 min Welcome and overview: Hello boys and girls! Today we are going to learn the underhand throw. We will do a bunch of different activities related to the underhand throw so you can see different areas where you use it.
“When I say go”, will help students transfer into activities
3 min Introductory activity: First, let’s stretch. Stretching helps our muscles warm up. It elongates our muscles and makes them more elastic making it less likely to pull a muscle.
Reach for toes (Right, Left)
Reach for toes (both)
Leg Hug (Right, Left)
Butterfly
Right arm
Left arm
Reach (across, up, behind) (See Appendix A)
On white circle
10 min Fitness activity: Now we are going to do our fitness relay. I will organize you by your color groups and then we will begin.
4 Laps
Stations Jumping Jacks Jump Forward and Back Windmills Jump and Twist
(See Appendix B)
Laps around perimeter and stations in the middle Head outside after
Lesson focus:
1 min Anticipatory set: Today we are going to learn the underhand throw! You use an underhand throw in many areas of your life. You could use the underhand motion in bowling, bags, ladder ball, and bocce ball. You could also use an underhand motion while tossing your dirty laundry in the clothes basket or tossing trash in the garbage. This motion is used in numerous areas so today we are going to learn the skill so you can apply it to activities and into your lives.
On cement in circle

22
2 min Instruction/demonstration and/or explanation:
1) Face your target 2) Step with opposite foot towards target
(ex: if throwing with right hand, step towards target with your left foot)
3) Use a pendulum arm motion with the arm you are throwing (ex: like you are bowling)
4) Follow through to the sky or ceiling with hand you are throwing with
On cement in circle
3 min Guided practice: 1) Face your target “Face” 2) Step with opposite foot towards target “Step” 3) Use a pendulum arm motion with throwing
arm “Throw” 4) Follow through toward sky “Sky”
On cement in circle
5 min Individual/partner practice: Now that we have learned the steps of the underhand throw, we are going to work in partners and practice tossing back and forth. I would like you to get toe to toe with a person near you. One person raise your hand. When I say go, the person raising your hand needs to get a ball and then one partner stand on the black sideline and the other on the red line across from them and face each other. Go! Continue practicing until I say freeze. *Face, Step, Throw, Sky (See Appendix D)
In partners, practice the underhand throw
20 min Applied activity: The students will work on the underhand throw at 3 different stations. Each is a recreational activity. Stations: Bags Ladder Ball Bocce Ball (See Appendix C)
Rotate students approximately every 7 minutes

23
2 min Equipment management: Beginning: Have stations set up before students come to class. Make sure to remind students not to touch equipment until told to do so. Middle: Have students get a ball for them and their partner for the drills/practice End: Have students help pick up equipment.
3 min Lesson closure: Great job today boys and girls! I would like you to raise your hand if you can tell and show me the first step to the underhand throw. Second? Third? Fourth? Great job boys and girls! Your teacher is waiting for you at the door. I would like you to line up quietly. Review-Remind-Recognize-Reinforce-Reward
Group students up, and have them in circle

24
Bravo for the Overhand Throw! GRADE LEVEL: 3rd
Allyson Barber
PED 331 13
9/19/11

25
Skill Performance Analysis:
3rd Grade: Overhand Throw
ALL STEPS OF THE SKILL:
1) Place ball in dominant hand
2) Turn your body sideways to the target so that the ball is farthest from where you are throwing to and your non-
dominant foot is in front
3) Step at the target while swinging arms up and out to the side
4) Start twisting your body so your tummy faces the target
5) Bring throwing arm around towards the front of your body
6) Follow through so your hand can scratch your knee
CRTITICAL STEPS: CUE WORDS:
1) Place the ball in dominant hand and turn body sideways to target 1) “Sideways”
2) Step at the target while swinging arms up and out to the side 2) “T-Position”
3) Twist body so tummy faces the target and bring throwing arm around 3) “Twist”
4) Follow through to your knee 4) “Scratch Knee”
PSYCHOMOTOR OBJECTIVE:
During a partner practice task, the student will demonstrate an overhand throw by:
Placing the ball in the dominant hand and turning body sideways to target (“sideways”) as he/she
Steps at the target while swinging arms up and out to the side (“t-position”) while
Twisting body so tummy faces the target and brings throwing arm around (“twist”) and
Follows through to your knee (“scratch knee”).
Overhand Throw
COMMON ERROR PREVENTION STRATEGY CORRECTION
Release of the ball too high or too low
Have students practice throwing the ball at all different release
points so they can see the differences
Give targets to try and hit at different heights to practice throwing at different heights
Stepping with wrong foot forward
Make sure students understand that they will always step
opposite of what they throw with
Practice stepping and have students realize opposites

26
LESSON CONTEXTUAL INFORMATION
Lesson Title: Bravo for the Overhand Throw!
Grade: 3rd
Skill Level: Developmental Level II
Time Required: 50 Minutes
Day in Unit: 2 out of 8
Content Standards addressed within this lesson: Standard 1: Demonstrates competency in motor skills and movement patters needed to perform a variety of physical activities Standard 4: Achieves and maintains a health enhancing level of physical fitness Standard 5: Exhibits responsible personal and social behavior that respects self and others in physical activity
Lesson Objectives:
Psychomotor-
During a partner practice task, the student will demonstrate an overhand throw by: Placing the ball in the dominant hand and turning body sideways to target
(“sideways”) as he/she Steps at the target while swinging arms up and out to the side (“t-position”) while Twisting body so tummy faces the target and brings throwing arm around (“twist”)
and Follows through to your knee (“scratch knee”).
Cognitive When prompted during the lesson, the students will respond correctly by showing
movements that illustrate the concept the overhand throw taught in the lesson.
Affective-
The students will demonstrate personal responsibility by: -Following safety rules -Staying in his or her own personal space during practice -Following the rules for the applied activity called “Passing to a Target”
Student Characteristics: Psychomotor:
Improved hand-eye coordination
More interest in sports
Sport related skill patterns matured in some cases
Developing more interest in skills
Cognitive:

27
Attention span is longer
Curious to see what they can do
Loved to be challenged and will try anything
Affective:
Like physical contact and belligerent games
Want to excel
Becoming more conscious socially
Like to perform well and be admired for accomplishments
Essentially honest and truthful
Do not lose willingly
Gender difference is of little importance
Pre-Requisite skills or knowledge needed for success:
Personal space and body awareness are important when students are throwing. Students need some prior practice at throwing, particularly the underhand throw.
Adaptations and/or extensions to accommodate individuals in this lesson:
For students who are having difficulty throwing, possibly give them a smaller gator ball that is easier to hold onto, and move the partners closer together.
For students who are excelling, move students farther apart and have them throw at different levels.
Management issues for this lesson: Students will remember and use all of the management cues we went over on the first
day of class: -Stop when they hear: “Freeze” -“When I say go” (go) -Color Groups
Safety issues for this lesson:
Make sure to address safety with throwing the balls. The students are not to whip the balls at each other and are to throw under control. The lesson is focusing on accuracy not speed.
Make sure that when students are throwing at their stations that they are aware of where other students are when they are throwing and that the person collecting the balls does not do so until the person is done throwing.
Equipment and/or supplies needed: (See Appendix E & F)
Facility set-up needed: (See Appendix E & F)

28
Notes to self: Make sure to say the cues loud and clear so all the students can hear Have an open mind and if things are not working properly, adjust and refresh the students
minds on how to perform the skill properly
29
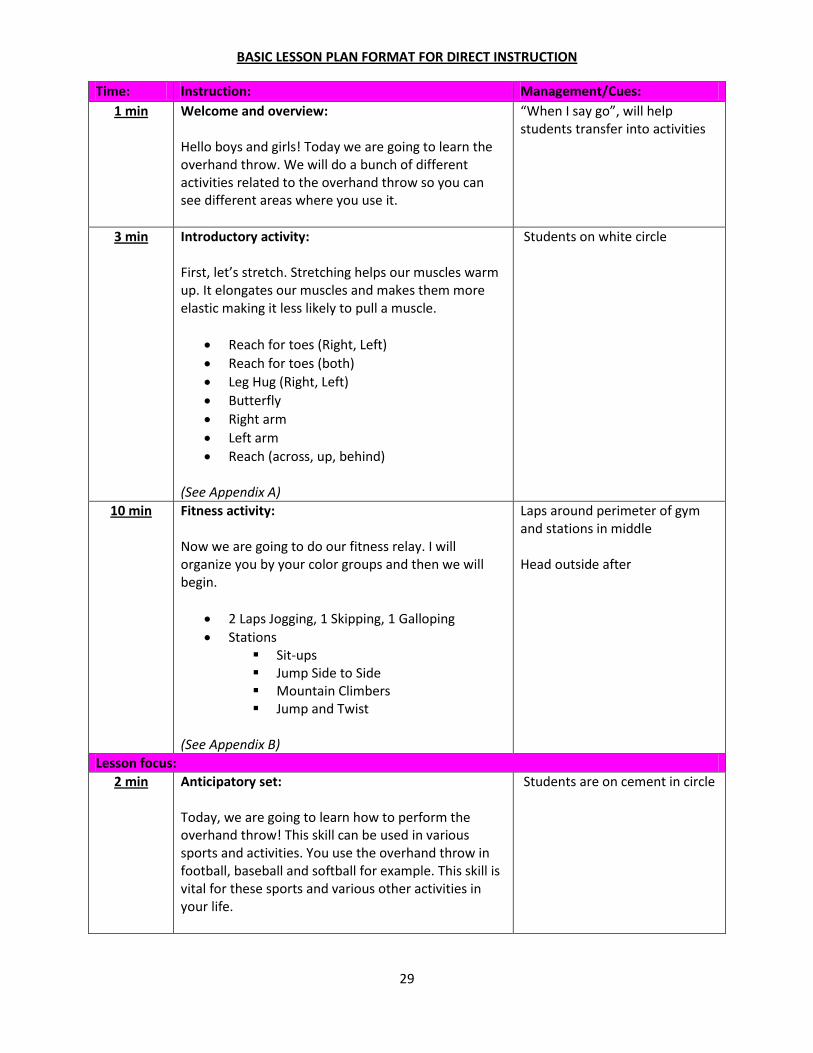
BASIC LESSON PLAN FORMAT FOR DIRECT INSTRUCTION
Time: Instruction: Management/Cues:
1 min Welcome and overview: Hello boys and girls! Today we are going to learn the overhand throw. We will do a bunch of different activities related to the overhand throw so you can see different areas where you use it.
“When I say go”, will help students transfer into activities
3 min Introductory activity: First, let’s stretch. Stretching helps our muscles warm up. It elongates our muscles and makes them more elastic making it less likely to pull a muscle.
Reach for toes (Right, Left)
Reach for toes (both)
Leg Hug (Right, Left)
Butterfly
Right arm
Left arm
Reach (across, up, behind) (See Appendix A)
Students on white circle
10 min Fitness activity: Now we are going to do our fitness relay. I will organize you by your color groups and then we will begin.
2 Laps Jogging, 1 Skipping, 1 Galloping
Stations Sit-ups Jump Side to Side Mountain Climbers Jump and Twist
(See Appendix B)
Laps around perimeter of gym and stations in middle Head outside after
Lesson focus:
2 min Anticipatory set: Today, we are going to learn how to perform the overhand throw! This skill can be used in various sports and activities. You use the overhand throw in football, baseball and softball for example. This skill is vital for these sports and various other activities in your life.
Students are on cement in circle

30
2 min Review if needed: Before we learn the overhand throw, let’s quickly review the steps to the underhand throw that we learned last class period. Review underhand throw:
1) Face your target “Face” 2) Step with opposite foot towards target “Step” 3) Use a pendulum arm motion with throwing
arm “Throw” 4) Follow through toward sky “Sky”
Have students on cement in circle
2 min Instruction/demonstration and/or explanation:
1) Place ball in dominant hand 2) Turn your body sideways to the target so that
the ball is farthest from where you are throwing to and your non-dominant foot is in front
3) Step at the target while swinging arms up and out to the side
4) Start twisting your body so your tummy faces the target
5) Bring throwing arm around towards the front of your body
6) Follow through so your hand can scratch your knee
Have students on cement in circle
2 min Guided practice:
1) Place the ball in dominant hand and turn body sideways to target “Sideways”
2) Step at the target while swinging arms up and out to the side “T-Position”
3) Twist body so tummy faces the target and bring throwing arm around “Twist”
4) Follow through to your knee “Scratch Knee”
On cement in circle
5 min Individual/partner practice: Now, you are going to practice the overhand throw with a partner. Make sure to throw the ball light enough that your partner can catch it. Right now we are not throwing for speed, just accuracy. I would like you to throw it so your partner can catch it. I would
In partners, stand across from one another

31
like you and your partner to stand across from one another, one partner on the side line of the soccer field and the other across. When I say go, one partner get a ball and then continue this until I say freeze. (See Appendix E)
20 min Applied activity: Students will rotate around to all three stations where they will practice throwing the ball into targets to work on their accuracy Stations: Baseball Softball Football (See Appendix F)
Use softer versions on baseball and softball that are used indoors
Equipment management: Beginning: Have stations set up, hoops hung with jump ropes from goals Middle: Make sure to go over safety issues with equipment End:Have students help pick up equipment
3 min Lesson closure: Great job today boys and girls! I would like to review the steps of the overhand throw. Can someone raise their hand and tell the first step and show the step to the class. Second? Third? Fourth? Very good today boys and girls. When I say go, I would like you to line up at the door, your teacher is waiting for you. Go! Review-Remind-Recognize-Reinforce-Reward
Bring students in and form a circle
32
Latch on to that Catch! GRADE LEVEL: 3rd
Allyson Barber
PED 331 13
9/19/11

33
Skill Performance Analysis:
3rd Grade: Catching with Two Hands
ALL STEPS OF THE SKILL:
1) Keep eyes on ball
2) Reach arms towards ball
3) Give with ball as ball hits hands (bring ball into body)
4) Pinkies together if ball is below waist
5) Thumbs together if ball is above waist
CRTITICAL STEPS: CUE WORDS:
1) Keep eyes on ball 1) “Eyes”
2) Reach arms towards ball and give with the ball as it hits hands 2) “Arms”
3) Pinkies together if below waist, thumbs if above 3) “Pinkies or Thumbs”
PSYCHOMOTOR OBJECTIVE:
During a partner practice task, the student will demonstrate catching a ball with hands by:
Keeping their eyes on the ball (“eyes”) as he/she
Reaches arms towards ball and gives with the ball as it hits hands (“arms”) and
Having pinkies together if ball is below waist, thumbs if above (“pinkies or thumbs”).
Catching a Ball with Hands
COMMON ERROR PREVENTION STRATEGY CORRECTION
Not getting in the path of the ball
Tell students to move their feet in order to get in front of the ball
Have students practice throwing to the sides of the student so the student has to move toward ball
Not giving with the ball Tell students to be gentle with the ball
Have students practice catching and dropping hands as they
catch the ball

34
LESSON CONTEXTUAL INFORMATION
Lesson Title: Latch on to that Catch!
Grade: 3rd
Skill Level: Developmental Level II
Time Required: 50 minutes
Day in Unit: 3 out of 8
Content Standards addressed within this lesson: Standard 1: Demonstrates competency in motor skills and movement patters needed to perform a variety of physical activities Standard 2: Demonstrates understanding of movement concepts, principles and tactics as they apply to the learning and performance of physical activities Standard 5: Exhibits responsible personal and social behavior that respects self and others in physical activity
Lesson Objectives:
Psychomotor- During a partner practice task, the student will demonstrate catching a ball with hands by:
Keeping their eyes on the ball (“eyes”) as he/she Reaches arms towards ball and gives with the ball as it hits hands (“arms”) and Having pinkies together if ball is below waist, thumbs if above (“pinkies or thumbs”).
Cognitive- When asked during the lesson closure, the students will identify, describe or show the
meaning of an underhand throw.
Affective-
The students will demonstrate personal responsibility by: -Following safety rules -Staying in his or her own personal space during practice -Following the rules for the applied activity called “Passing to Partners”
Student Characteristics: Psychomotor:
Improved hand-eye coordination
More interest in sports
Sport related skill patterns matured in some cases
Developing more interest in skills
Cognitive:
Attention span is longer
Curious to see what they can do

35
Loved to be challenged and will try anything
Affective:
Like physical contact and belligerent games
Want to excel
Becoming more conscious socially
Like to perform well and be admired for accomplishments
Essentially honest and truthful
Do not lose willingly
Gender difference is of little importance
Pre-Requisite skills or knowledge needed for success:
Students should have some prior experience catching in previous grades. Also, students need background in personal space and body awareness.
Adaptations and/or extensions to accommodate individuals in this lesson:
For students who are struggling, give them a larger ball to catch and have the students move closer together. For students who are excelling, have them use a smaller ball and move farther apart.
Management issues for this lesson: Students will remember and use all of the management cues we went over on the first
day of class: -Stop when they hear: “Freeze” -“When I say go” (go) -Color Groups
Safety issues for this lesson:
During practice with partners, make sure students are throwing the ball carefully and under control and not whipping it hard at the student. During the activity, make sure students are following safety rules and throwing for accuracy, not speed.
Equipment and/or supplies needed: (See Appendix G & H)
Facility set-up needed: (See Appendix G & H)
Notes to self: Make sure to say the cues loud and clear so all the students can hear Have an open mind and if things are not working properly, adjust and refresh the students
minds on how to perform the skill properly

36
BASIC LESSON PLAN FORMAT FOR DIRECT INSTRUCTION
Time: Instruction: Management/Cues:
1 min Welcome and overview: Hello boys and girls! Today we are going to learn to catch with our hands. We will do a bunch of different activities related to catching with our hands so you can see different areas where you use it.
“When I say go”, will help students transfer into activities
3 min Introductory activity: First, let’s stretch. Stretching helps our muscles warm up. It elongates our muscles and makes them more elastic making it less likely to pull a muscle.
Reach for toes (Right, Left)
Reach for toes (both)
Leg Hug (Right, Left)
Butterfly
Right arm
Left arm
Reach (across, up, behind) (See Appendix A)
On white circle
10 min Fitness activity: Now we are going to do our fitness relay. I will organize you by your color groups and then we will begin.
2 Laps Jogging, 1 Lap Side Slide, 1 Skipping
Stations Jumping Jacks Jump Forward and Back Windmills Jump and Twist
(See Appendix B)
Laps around perimeter of gym, stations in middle
Lesson focus:
2 min Anticipatory set: Today, we are going to learn how to catch with our hands. Catching can be seen in various sports and activities throughout your life. Sports where you need to know how to catch in order to succeed are in baseball, softball, football, soccer if you are goalie, and lacrosse. There are so many and catching takes a lot of hand-eye coordination. So today, I am going to teach you how to properly catch a ball with your hands!
On white circle

37
2 min Review if needed: First, let’s review the steps to the overhand throw.
1) Place the ball in dominant hand and turn body sideways to target “Sideways”
2) Step at the target while swinging arms up and out to the side “T-Position”
3) Twist body so tummy faces the target and bring throwing arm around “Twist”
4) Follow through to your knee “Scratch Knee”
On white circle
2 min Instruction/demonstration and/or explanation:
1) Keep eyes on ball 2) Reach arms towards ball 3) Give with ball as ball hits hands (bring ball
into body) 4) Pinkies together if ball is below waist 5) Thumbs together if ball is above waist
On white circle
3 min Guided practice:
1) Keep eyes on ball “Eyes” 2) Reach arms towards ball and give with the
ball as it hits hands “Arms” 3) Pinkies together if below waist, thumbs if
above “Pinkies or Thumbs”
On white circle
5 min Individual/partner practice: Now, you are going to practice catching using your hands with a partner. Make sure to throw the ball light enough that your partner can catch it. Right now we are not throwing for speed, just accuracy. I would like you to throw it so your partner can catch it since we are working on catching. I would like you and your partner to stand across from one another, one partner on the black side line and the other across on the red line. When I say go, one partner get a ball and then continue this until I say freeze. (See Appendix G)
Catching with partner, one on black line, other on red

38
20 min Applied activity: Now that you have practiced catching, and you have learned the overhand throw, we are going to play an activity called “scooter handball” that works on both of these skills. (See Appendix H)
4 goals, 4 teams, 2 teams on each side of the half court line that play each other
Equipment management: Beginning: Have fitness relay set up before students arrive Middle: Have students help take down fitness relay and set up scooter handball End: Have students help take care of equipment
3 min Lesson closure: Great job today boys and girls! I would like to review the steps of the overhand throw. Can someone raise their hand and tell the first step and show the step to the class. Second? Third? Fourth? Very good today boys and girls. When I say go, I would like you to line up at the door, your teacher is waiting for you. Go! Review-Remind-Recognize-Reinforce-Reward
On white circle

39
Snatch that Catch!
GRADE LEVEL: 3rd
Allyson Barber
PED 331 13
9/19/11

40
Skill Performance Analysis:
3rd Grade: Catching with a Glove
ALL STEPS OF THE SKILL:
1) Keep eyes on ball
2) Reach arm towards ball
3) Give with ball as ball hits glove (bring ball into body)
4) Fingers pointing down if ball is below waist
5) Fingers up if ball is above waist
6) Squeeze ball in glove
7) Place hand over ball to make sure it does not fall out
CRTITICAL STEPS: CUE WORDS:
1) Keep eyes on ball, reach arm towards ball, Give with the ball as ball hits glove 1) “Eyes”
2) Fingers up if above waist, down if below waist 2) “Fingers”
3) Squeeze ball and place hand over ball 3) “Squeeze”
PSYCHOMOTOR OBJECTIVE:
During a partner practice task, the student will demonstrate catching a ball with glove by:
Keeping their eyes on the ball, reaching arm toward ball and giving with the ball as it hits glove (“eyes”) as
he/she
Has fingers pointed up if the ball is above waist and fingers down if it is below waist (“fingers”) and
Squeezing the ball and placing hand over the ball (“Squeeze”).
Catching a Ball with Glove
COMMON ERROR PREVENTION STRATEGY CORRECTION
Not getting in the path of the ball
Tell students they need to move their feet and get in front of the
ball
Have students practice throwing ball to the sides of their partner
so they practice moving their feet
Not giving with the ball Tell students to catch the ball gently
Have students practice catching the ball and slightly dropping
arms down when catching
Not squeezing/covering ball with hand
Tell students to always catch the ball and then cover it up!
Have students practice catching and constantly remind them to
cover the ball up

41
LESSON CONTEXTUAL INFORMATION
Lesson Title: Snatch that Catch!
Grade: 3rd
Skill Level: Developmental Level II
Time Required: 50 minutes
Day in Unit: 4 out of 8
Content Standards addressed within this lesson: Standard 1: Demonstrates competency in motor skills and movement patters needed to perform a variety of physical activities Standard 2: Demonstrates understanding of movement concepts, principles and tactics as they apply to the learning and performance of physical activities Standard 5: Exhibits responsible personal and social behavior that respects self and others in physical activity
Lesson Objectives:
Psychomotor- During a partner practice task, the student will demonstrate catching a ball with glove by:
Keeping their eyes on the ball, reaching arm toward ball and giving with the ball as it hits glove (“eyes”) as he/she
Has fingers pointed up if the ball is above waist and fingers down if it is below waist (“fingers”) and
Squeezing the ball and placing hand over the ball (“Squeeze”).
Cognitive- When asked during the lesson closure, the students will demonstrate the correct action
to go with cue words for catching a ball in a glove as stated by the teacher.
The students will demonstrate active listening skills by being quiet during management instruction and responding appropriately to management signals.
Affective-
The students will demonstrate personal responsibility by: -Following safety rules -Staying in his or her own personal space during practice -Following the rules for the applied activity called “Passing to a Partner”
Student Characteristics: Psychomotor:
Improved hand-eye coordination
More interest in sports
Sport related skill patterns matured in some cases
Developing more interest in skills

42
Cognitive:
Attention span is longer
Curious to see what they can do
Loved to be challenged and will try anything
Affective:
Like physical contact and belligerent games
Want to excel
Becoming more conscious socially
Like to perform well and be admired for accomplishments
Essentially honest and truthful
Do not lose willingly
Gender difference is of little importance
Pre-Requisite skills or knowledge needed for success:
Students need prior practice catching with hands and knowledge of space and body awareness.
Adaptations and/or extensions to accommodate individuals in this lesson:
For students who are struggling, have them move closer to partner and practice with a larger ball at first. Not too large though because it has to fit in glove.
For students who are excelling, have them practice catching the ball at different heights and farther distances apart.
Management issues for this lesson: Students will remember and use all of the management cues we went over on the first
day of class: -Stop when they hear: “Freeze” -“When I say go” (go) -Color Groups
Safety issues for this lesson:
Never use a real baseball or softball. Use either the soft, indoor forms of baseballs/softballs or tennis balls during this lesson.
Inform students that they are to throw the ball so that their partner is able to practice catching. Do not whip the ball fast.
Equipment and/or supplies needed: (See Appendix I & J)
Facility set-up needed: (See Appendix I & J)

43
Notes to self: Make sure to say the cues loud and clear so all the students can hear Have an open mind and if things are not working properly, adjust and refresh the students
minds on how to perform the skill properly

44
BASIC LESSON PLAN FORMAT FOR DIRECT INSTRUCTION
Time: Instruction: Management/Cues:
1 min Welcome and overview: Hello boys and girls! Today we are going to learn to catch with a glove. We will do a bunch of different activities related to catching with a glove so you can see different areas where you use it.
“When I say go”, will help students transfer into activities
3 min Introductory activity: First, let’s stretch. Stretching helps our muscles warm up. It elongates our muscles and makes them more elastic making it less likely to pull a muscle.
Reach for toes (Right, Left)
Reach for toes (both)
Leg Hug (Right, Left)
Butterfly
Right arm
Left arm
Reach (across, up, behind) (See Appendix A)
On white circle
10 min Fitness activity: Now we are going to do our fitness relay. I will organize you by your color groups and then we will begin.
2 Laps Jogging, 2 Laps Galloping
Stations Jumping Jacks Mountain Climbers Windmills Kick and Touch
(See Appendix B)
Laps around perimeter of gym and stations in the middle Head outside after
Lesson focus:
2 min Anticipatory set:
In circle on cement
2 min Review if needed: Review the steps of catching with hands and inform students that just like catching with our hands, we have to concentrate and use our hand-eye coordination for catching with a glove.
1) Keep eyes on ball “Eyes”
In circle on cement

45
2) Reach arms towards ball and give with the ball as it hits hands “Arms”
3) Pinkies together if below waist, thumbs if above “Pinkies or Thumbs”
2 min Instruction/demonstration and/or explanation:
1) Keep eyes on ball 2) Reach arm towards ball 3) Give with ball as ball hits glove (bring ball
into body) 4) Fingers pointing down if ball is below
waist 5) Fingers up if ball is above waist 6) Squeeze ball in glove 7) Place hand over ball to make sure it does
not fall out
In circle on cement
2 min Guided practice: Each student needs to have a glove to practice. If not enough gloves for each student, and students take turns practicing the steps of the skill with the glove on.
1) Keep eyes on ball, reach arm towards ball, Give with the ball as ball hits glove “Eyes”
2) Fingers up if above waist, down if below waist “Fingers”
3) Squeeze ball and place hand over ball “Squeeze”
In circle on cement
5 min Individual/partner practice: Now, you are going to practice catching using your gloves with a partner. Make sure to throw the ball light enough that your partner can catch it. Right now we are not throwing for speed, just accuracy. I would like you to throw it so your partner can catch it since we are working on catching. I would like you and your partner to stand across from one another in the outfield of the baseball field. One partner on the
In partners, have them stand across from one another facing each other in the outfield of the baseball field

46
sideline and the other across. When I say go, one partner get a ball and then continue this until I say freeze. (See Appendix I)
20 min Applied activity: Now that we have practiced catching with gloves with our partners, we are going to practice catching at various stations. Catching with Partner Catching Fly Balls Catching Grounders (See Appendix J)
Make sure all stations are catching and throwing in same direction. Catching grounders is done on the baseball infield and the other two in the outfield.
Equipment management: Beginning: Have fitness relay set up inside, and stations set up outside Middle: Have students help pick up fitness relay before heading outside End: Have students help pick up stations outside
3 min Lesson closure: Great job today boys and girls! You did a great job working in partners and during the stations! Now I would like to review the steps to catching with a glove. Can I have someone raise their hand and show and tell us how to perform the first step of catching with a glove? Second? Third? Great job! Your teacher is waiting for you at the door. I would like you to walk quietly to the door when I say go. Go! Have a great day! Review-Remind-Recognize-Reinforce-Reward
Students circle up around me

47
Learn the Kick Quick! GRADE LEVEL: 3rd
Allyson Barber
PED 331 13
9/19/11

48
Skill Performance Analysis:
3rd Grade: Inside Foot Pass
ALL STEPS OF THE SKILL:
1) Place the non-kicking foot next to the ball (side)
2) Contact the ball in the middle with inside of foot
3) Follow through so your kicking foot goes to your target
4) Use a firm kick so it reaches your target
CRTITICAL STEPS: CUE WORDS:
1) Place the non-kicking foot next to the side of the ball 1) “Side”
2) Contact the ball in the middle with inside of foot 2) “Inside Foot”
3) Follow through towards your target 3) “Follow Through”
PSYCHOMOTOR OBJECTIVE:
During a partner practice task, the student will demonstrate an inside foot pass by:
Placing the non-kicking foot next to the side of the ball (“side”) as he/she
Contacts the ball in the middle with inside of kicking foot (“inside foot”) while
Following through towards their target (“follow through”)
Inside Foot Pass
COMMON ERROR PREVENTION STRATEGY CORRECTION
Not staying balanced Tell students to put arms out to side for balance
Have students practice kicking with arms out for balance and non-kicking foot on side of ball
Using toes instead of inside of foot
Tell students to use inside of foot
Have students practice the form for using inside of foot before
kicking a ball

49
LESSON CONTEXTUAL INFORMATION
Lesson Title: Learn the Kick Quick!
Grade: 3rd
Skill Level: Developmental Level II
Time Required: 50 minutes
Day in Unit: 5 out of 8
Content Standards addressed within this lesson: Standard 1: Demonstrates competency in motor skills and movement patters needed to perform a variety of physical activities Standard 2: Demonstrates understanding of movement concepts, principles and tactics as they apply to the learning and performance of physical activities Standard 5: Exhibits responsible personal and social behavior that respects self and others in physical activity
Lesson Objectives:
Psychomotor-
During a partner practice task, the student will demonstrate an inside foot pass by: Placing the non-kicking foot next to the side of the ball (“side”) as he/she Contacts the ball in the middle with inside of kicking foot (“inside foot”) while Following through towards their target (“follow through”)
Cognitive- When asked during the lesson closure, the students will demonstrate the correct
action of the inside foot pass as stated by the teacher.
Affective-
The students will demonstrate personal responsibility by: -Following safety rules -Staying in his or her own personal space during practice -Following the rules for the applied activity called “Kick to Partner”
Student Characteristics: Psychomotor:
Improved hand-eye coordination
More interest in sports
Sport related skill patterns matured in some cases
Developing more interest in skills
Cognitive:
Attention span is longer

50
Curious to see what they can do
Loved to be challenged and will try anything
Affective:
Like physical contact and belligerent games
Want to excel
Becoming more conscious socially
Like to perform well and be admired for accomplishments
Essentially honest and truthful
Do not lose willingly
Gender difference is of little importance
Pre-Requisite skills or knowledge needed for success:
Space and body awareness are vital for students to be successful at kicking a ball. Students need to be aware of where they are in the environment and how to control their bodies.
Adaptations and/or extensions to accommodate individuals in this lesson:
For students who are struggling, possibly give them a lighter ball or a larger ball. For students who are excelling, have them work on kicking a further distance.
Management issues for this lesson: Students will remember and use all of the management cues we went over on the first
day of class: -Stop when they hear: “Freeze” -“When I say go” (go) -Color Groups
Safety issues for this lesson:
Make sure students know that they are not kicking for speed at this point, they are kicking for accuracy and trying to kick it to their partner. They do not need to kick it as hard as they can as someone could get hurt.
Equipment and/or supplies needed: (See Appendix K & L)
Facility set-up needed: (See Appendix K & L)
Notes to self: Make sure to say the cues loud and clear so all the students can hear Have an open mind and if things are not working properly, adjust and refresh the students
minds on how to perform the skill properly

51
BASIC LESSON PLAN FORMAT FOR DIRECT INSTRUCTION
Time: Instruction: Management/Cues:
1 min Welcome and overview: Hello boys and girls! Today we are going to learn the inside foot pass. We will do a bunch of different activities related to the inside foot pass so you can see different areas where you use it.
“When I say go”, will help students transfer into activities
3 min Introductory activity: First, let’s stretch. Stretching helps our muscles warm up. It elongates our muscles and makes them more elastic making it less likely to pull a muscle.
Reach for toes (Right, Left)
Reach for toes (both)
Leg Hug (Right, Left)
Butterfly
Right arm
Left arm
Reach (across, up, behind) (See Appendix A)
On white circle
10 min Fitness activity: Now we are going to do our fitness relay. I will organize you by your color groups and then we will begin.
3 Laps Jogging, 1 Lap Leaping, 1 Lap Skipping
Stations Jumping Jacks Jump Forward and Back Jump Side to Side Sit-Ups
(See Appendix B)
Laps around perimeter of gym and stations in the middle Head outside after
Lesson focus:
1 min Anticipatory set: Today, we are going to learn how to do the inside foot pass. This skill is seen in the game of soccer. The name of the skill tells us exactly how to perform this kick. The goal of this kick is to keep the ball on the ground when you pass it. We will learn the skill and then do a couple of activities.
In circle on cement

52
2 min Review if needed: Review the skill of catching with a glove.
1) Keep eyes on ball, reach arm towards ball, Give with the ball as ball hits glove “Eyes”
2) Fingers up if above waist, down if below waist “Fingers”
3) Squeeze ball and place hand over ball “Squeeze”
In circle on cement
2 min Instruction/demonstration and/or explanation:
1) Place the non-kicking foot next to the ball (side)
2) Contact the ball in the middle with inside of foot
3) Follow through so your kicking foot goes to your target
4) Use a firm kick so it reaches your target
In circle on cement
2 min Guided practice:
1) Place the non-kicking foot next to the side of the ball “Side”
2) Contact the ball in the middle with inside of foot “Inside Foot”
3) Follow through towards your target “Follow Through”
In circle on cement
10 min Individual/partner practice: Now, you are going to practice the inside foot pass with a partner. Make sure to kick the ball light enough that your partner can stop it. Right now we are not kicking for speed, just accuracy. I would like you to kick it so your partner can stop it. I would like you and your partner to stand across from one another on the soccer field. One partner on the sideline and the other across. When I say go, one partner get a ball and then continue this until I say freeze. (See Appendix K)

53
15 min Applied activity: The students will perform a relay with their partner, passing the ball back and forth down the field and kicking it into the goal at the other end. (See Appendix L)
Equipment management: Beginning: Make sure fitness relay and equipment outside is set up before class starts. Middle: Have students pick up fitness relay before heading outside. End: Have students take care of outside equipment.
4 min Lesson closure: Great job today boys and girls! I would like to review the steps of the inside foot pass with you. Can someone please raise their hand and tell me the first step to the skill and show us? Second? Third? Great job working together today! Your teacher is at the door waiting for you. I would like you to line up quietly at the door. Have a great day! Review-Remind-Recognize-Reinforce-Reward
Circle up to review

54
Learn the Trick to the Perfect Long Kick! GRADE LEVEL: 3rd
Allyson Barber
PED 331 13
9/19/11

55
Skill Performance Analysis:
3rd Grade: Kicking for Distance
ALL STEPS OF THE SKILL:
1) Place the non-kicking foot next to the ball
2) Contact the ball below the middle of the ball
3) Contact ball with shoelaces
4) Kick hard and follow through towards target
CRTITICAL STEPS: CUE WORDS:
1) Place the non-kicking foot next to the ball 1) “Side”
2) Contact the ball below the middle of the ball and contact with laces 2) “Shoelaces”
3) Kick hard and follow through towards target 3) “Follow Through”
PSYCHOMOTOR OBJECTIVE:
During a partner practice task, the student will kicking for distance by:
Placing the non-kicking foot next to the ball (“side”) as he/she
Contacts the ball below the middle of the ball and contact with laces (“shoelaces”) while
Kicking hard and following through towards target (“follow through”)
Kicking for Distance
COMMON ERROR PREVENTION STRATEGY CORRECTION
Not staying balance Tell students to put their arms out to the side to help balance
themselves
Have students practice the form before having them actually kick
Kicking the ball with toes instead of laces
Tells students we never kick the ball with our toes, it will hurt
Have students practice using the tops of their feet or laces, and
have them practice form before actually kicking

56
LESSON CONTEXTUAL INFORMATION
Lesson Title: Learn the Trick to the Perfect Kick!
Grade: 3rd
Content Standards addressed within this lesson: Standard 1: Demonstrates competency in motor skills and movement patters needed to perform a variety of physical activities Standard 2: Demonstrates understanding of movement concepts, principles and tactics as they apply to the learning and performance of physical activities Standard 5: Exhibits responsible personal and social behavior that respects self and others in physical activity
Lesson Objectives:
Psychomotor-
During a partner practice task, the student will kicking for distance by: Placing the non-kicking foot next to the ball (“side”) as he/she Contacts the ball below the middle of the ball and contact with laces (“shoelaces”)
while Kicking hard and following through towards target (“follow through”)
Cognitive- When asked during the lesson closure, the students will demonstrate the correct
action of the kick for distance as stated by the teacher.
Affective-
The students will demonstrate personal responsibility by: -Following safety rules -Staying in his or her own personal space during practice -Following the rules for the applied activity called “Kick it Far”
Student Characteristics: Psychomotor:
Improved hand-eye coordination
More interest in sports
Sport related skill patterns matured in some cases
Developing more interest in skills
Cognitive:
Attention span is longer
Curious to see what they can do

57
Loved to be challenged and will try anything
Affective:
Like physical contact and belligerent games
Want to excel
Becoming more conscious socially
Like to perform well and be admired for accomplishments
Essentially honest and truthful
Do not lose willingly
Gender difference is of little importance
Pre-Requisite skills or knowledge needed for success:
Students will need some background in kicking, and be well aware of personal space and body awareness.
Adaptations and/or extensions to accommodate individuals in this lesson:
For students who are struggling, give them a larger ball to practice with since it has a larger surface area. Maybe even a lighter ball as well. For students who are excelling, have them move further back from the targets and give them specific targets to aim for.
Management issues for this lesson: Students will remember and use all of the management cues we went over on the first
day of class: -Stop when they hear: “Freeze” -“When I say go” (go) -Color Groups
Safety issues for this lesson:
Make sure when students are kicking, that they are all kicking in the same direction from the same starting line to avoid students getting hit with a flying ball. Make sure all students have kicked their ball before you let them retrieve their ball.
Equipment and/or supplies needed: (See Appendix M & N)
Facility set-up needed: (See Appendix M & N)
Notes to self: Make sure to say the cues loud and clear so all the students can hear Have an open mind and if things are not working properly, adjust and refresh the students
minds on how to perform the skill properly

58
BASIC LESSON PLAN FORMAT FOR DIRECT INSTRUCTION
Time: Instruction: Management/Cues:
1 min Welcome and overview: Hello boys and girls! Today we are going to learn to kick for distance. We will do a bunch of different activities related kicking for distance so you can see different areas where you use it.
“When I say go”, will help students transfer into activities
3 min Introductory activity: First, let’s stretch. Stretching helps our muscles warm up. It elongates our muscles and makes them more elastic making it less likely to pull a muscle.
Reach for toes (Right, Left)
Reach for toes (both)
Leg Hug (Right, Left)
Butterfly
Right arm
Left arm
Reach (across, up, behind) (See Appendix A)
On white circle
10 min Fitness activity: Now we are going to do our fitness relay. I will organize you by your color groups and then we will begin.
3 Laps Jogging, 1 Lap Leaping, 1 Lap Skipping
Stations Mountain Climbers Jumping Jacks Sliding Windmills
(See Appendix B)
Laps around perimeter of gym and stations in the middle Head outside after
Lesson focus:
2 min Anticipatory set: Today, you are going to learn to kick for distance. Kicking for distance involves kicking as far as you can. You kick for distance in the game of soccer and sometimes in football as well! We will review the inside step kick and then learn how to kick for distance!

59
2 min Review if needed: Review the inside step kick.
1) Place the non-kicking foot next to the side of the ball “Side”
2) Contact the ball in the middle with inside of foot “Inside Foot”
3) Follow through towards your target “Follow Through”
2 min Instruction/demonstration and/or explanation:
1) Place the non-kicking foot next to the ball 2) Contact the ball below the middle of the
ball 3) Contact ball with shoelaces 4) Kick hard and follow through towards
target
2 min Guided practice:
1) Place the non-kicking foot next to the ball “Side”
2) Contact the ball below the middle of the ball and contact with laces “Shoelaces”
3) Kick hard and follow through towards target “Follow Through”
5 min Individual/partner practice: Before you do an activity kicking as far as you can, we have to practice the steps of the skill. I would like everyone to lineup on the end line on the soccer field and then we are going to all kick at the same time. Then, you will wait until I say go to go and retrieve your ball! We will do this a few times. (See Appendix M)
Make sure all students are kicking in the same direction at the same time. Then have students go and get their balls.
20 min Applied activity: Now, you will be at different stations and aiming for different targets. Station 1: Hula Hoops
On soccer field

60
Station 2: Cones Station 3: Soccer Goal (See Appendix N)
Equipment management: Beginning: Have fitness relay set up before class arrives and equipment set up outside Middle: Have students take care of fitness relay End: Have students take care of equipment outside
3 min Lesson closure: Great job today boys and girls! I would like to review the steps of the kick for distance with you. Can someone please raise their hand and tell me the first step to the skill and show us? Second? Third? Great job working together today! Your teacher is at the door waiting for you. I would like you to line up quietly at the door. Have a great day! Review-Remind-Recognize-Reinforce-Reward

61
Bump and Strike! GRADE LEVEL: 3rd
Allyson Barber
PED 331 13
9/19/11

62
Skill Performance Analysis:
3rd Grade: Forearm Pass in Volleyball
ALL STEPS OF THE SKILL:
1) Move into the path of the ball
2) Feet staggered, shoulder width apart
3) Bend the knees
4) Lean forward with waist flexed
5) Clasp hands together with sides of thumbs touching
6) Make a table with arms flat
7) Guide the ball with your shoulders
8) Contact ball with forearms
CRTITICAL STEPS: CUE WORDS:
1) Move into path, feet staggered and shoulder width apart 1) “Feet”
2) Bend knees, lean forward 2) “Bend”
3) Clasp hands together, arms flat 3) “Arms Flat”
4) Guide with shoulders, contact ball with forearms 4) “Contact”
PSYCHOMOTOR OBJECTIVE:
During a partner practice task, the student will demonstrate passing a volleyball by:
Moving into the path of the ball, feet staggered shoulder width apart (“feet) as he/she
Bends knees and leans forward (“bend”) while
Clasping hands together and has arms flat (“arms flat”) and
Guides the ball with shoulders while contacting the ball with forearms (“contact”).
Forearm Passing in Volleyball
COMMON ERROR PREVENTION STRATEGY CORRECTION
Not getting in the path of the ball
Practice running to the ball and put hands out to touch ball
Use a beach ball so children are able to learn correctly and have
more time to get in the path
Passing the ball with the wrist instead of forearms
Practice with the students standing still and tossing it right at their forearms to give them a
feel of where it should hit off their arms
Have arms fully extended out in front of the body, watch the ball
hit the arms
Swinging at the ball Practice with students standing still and tossing it to them,
making sure they do not swing to show them the ball will move
without them swinging
Bend at the knees and lean forward to prevent too much
swinging of the arms

63
LESSON CONTEXTUAL INFORMATION
Lesson Title: Use your hands to Spike and Strike!
Grade: 3rd
Skill Level: Developmental Level II
Time Required: 50 minutes
Day in Unit: 7 out of 8
Content Standards addressed within this lesson: Standard 1: Demonstrates competency in motor skills and movement patters needed to perform a variety of physical activities Standard 2: Demonstrates understanding of movement concepts, principles and tactics as they apply to the learning and performance of physical activities Standard 3: Participates regularly in physical activity Standard 4: Achieves and maintains a health enhancing level of physical fitness Standard 5: Exhibits responsible personal and social behavior that respects self and others in physical activity Standard 6: Values physical activity for health, enjoyment, challenge, self-expression, and/or social interaction
Lesson Objectives:
Psychomotor- During a partner practice task, the student will demonstrate passing a volleyball by:
Moving into the path of the ball, feet staggered shoulder width apart (“feet) as he/she
Bends knees and leans forward (“bend”) while Clasping hands together and has arms flat (“arms flat”) and Guides the ball with shoulders while contacting the ball with forearms (“contact”).
Cognitive- When asked during the lesson closure, the students will demonstrate the correct
action of the forearm pass in volleyball as stated by the teacher.
Affective-
The students will demonstrate personal responsibility by: -Following safety rules -Staying in his or her own personal space during practice -Following the rules for the applied activity called “Passing to a Target”
Student Characteristics: Psychomotor:
Improved hand-eye coordination

64
More interest in sports
Sport related skill patterns matured in some cases
Developing more interest in skills
Cognitive:
Attention span is longer
Curious to see what they can do
Loved to be challenged and will try anything
Affective:
Like physical contact and belligerent games
Want to excel
Becoming more conscious socially
Like to perform well and be admired for accomplishments
Essentially honest and truthful
Do not lose willingly
Gender difference is of little importance
Pre-Requisite skills or knowledge needed for success: The pre-requisite skills third graders will need for success for a forearm pass in volleyball
are body management skills, space awareness, and body awareness.
Adaptations and/or extensions to accommodate individuals in this lesson:
For students who are struggling, give them a larger ball or a lighter ball that is easier for them to volley. For students who are excelling, move them further away from the targets.
Management issues for this lesson: Students will remember and use all of the management cues we went over on the first
day of class: -Partner up when they hear: “Elbow to elbow” or “Toe to toe” -Stop when they hear: “Freeze” -“When I say go” (go) -Once students freeze: “Hands on knees, eyes on me” For each activity each set of partners will pass the ball 10 times to their partner and
then switch
Safety issues for this lesson: The bean bags will be a safety issue, so I will need to make sure to warn students about
their presence so they are more aware and have less chance of tripping over them. Students will need to be aware of personal space and to stay within their “bubble or
hula hoop”. We will be using beach balls, so if a student does get hit, it will not hurt but it may
startle them. Students need to try and be careful not to hit people with their balls, and if a ball if going toward another student to warn them.

65
Equipment and/or supplies needed: (See Appendix O & P)
Facility set-up needed: (See Appendix O & P)
Notes to self: Make sure to say the cues loud and clear so all the students can hear Have an open mind and if things are not working properly, adjust and refresh the students
minds on how to perform the skill properly

66
BASIC LESSON PLAN FORMAT FOR DIRECT INSTRUCTION
Time: Instruction: Management/Cues:
1 min Welcome and overview: Welcome boys and girls! I am so glad you are all here this morning. Today we are going to learn how to pass a ball using our arms for a sport skill. Is everyone ready? Ok, when I say go you are all going to jog over to the end line and line up facing me. Go!
-Make sure I have the students attention -“When I say go” will help students transfer into the practice and activities -Make sure to go over safety issues and that they will see objects laying around the gym and to leave the hula hoops alone for the whole class period.
5 min Introductory activity: First, let’s stretch. Stretching helps our muscles warm up. It elongates our muscles and makes them more elastic making it less likely to pull a muscle.
Reach for toes (Right, Left)
Reach for toes (both)
Leg Hug (Right, Left)
Butterfly
Right arm
Left arm
Reach (across, up, behind) (See Appendix A)
On white circle
12 min Fitness activity: Now we are going to do our fitness relay. I will organize you by your color groups and then we will begin.
4 Laps Jogging, 1 Lap Galloping
Stations Jumping Jacks Jump Forward and Back Windmills Jump and Twist
(See Appendix B)
Laps around perimeter of gym, stations in the middle
Lesson focus:
2 min Anticipatory set: Thank you boys and girls for lining up so straight and quietly. Today we are going to work on passing a ball with our arms. This skill is important for the game of volleyball. Though, since we are just beginning to
On white circle

67
learn this skill we are going to use a beach ball instead of a volleyball. We will learn the skill and then we will do a couple of activities passing the ball with partners.
2 min Review if needed: Review the steps of the kick for distance.
1) Place the non-kicking foot next to the ball “Side”
2) Contact the ball below the middle of the ball and contact with laces “Shoelaces”
3) Kick hard and follow through towards target “Follow Through”
On white circle
2 min Instruction/demonstration and/or explanation: Now we will go over how to properly pass a volleyball with our arms. I would like you to listen and watch me do the skill. First, you will always move into the path of the ball. Once you are in the path of the ball you need to have your feet staggered and as wide as your shoulders. Then, bend your knees and lean your upper body forward. Clasp your hands together with the sides of your thumbs touching. Then make your arms flat like a table. Then you will contact the ball and you will always direct where you want the ball to go with your shoulders.
On white circle
3 min Guided practice: Now I would like you all to do the skill with me. I am going to add in some cue words to help you learn the steps of passing easier. The first cue word is “feet”. You need to have your feet staggered and as wide as your shoulders. “Feet”. The second cue word is “bend”. You need to bend your knees and lean your upper body forward. “Bend”. The third cue word is “arms flat”. You clasp your hands together with the sides of your thumbs touching. Then make your arms flat like a table. “Arms flat”. The last cue word is “contact”. You will contact the ball and you will always direct where you want the ball to go with your shoulders. “Contact”. Now I am just going to say the cue word as we demonstrate each part of the skill together.
On white circle

68
10 min Individual/partner practice: Ok boys and girls, now that we have gone over the passing skill for the game of volleyball a few times, I will say the cue words and you will show me that part of the passing skill on your own without my help this time. Alright students, are you ready to practice our amazing passing skills? Ok, when I say go I would like you to start skipping around the outside of the gym, not touching any of the equipment. Go! Freeze! Hands on knees eyes on me. Ok, when I say go get toe to toe with the person closest to you. Go! Now this is your partner for this activity. First I would like one person to raise their hand. Ok, when I say go that person needs to go stand in between a set of 2 hula hoops. Go! Now, when I say go the person that was not raising their hand within the partners needs to go stand across from their partner on the line. Go! Now, the person standing in between the hula hoops is going to toss the ball to their partner and that person is going to use the passing skill we just learned to pass the ball back to their partner. You need to do this 5 times and then switch. Keep repeating this until I say freeze. (See Appendix O)
10 min Applied activity: Good job boys and girls! Now that you have practiced passing straight back to your partner, we are going to add a fun activity to do with your partners. This time we are going to work on directing where the ball goes with our shoulders. With your partners, the person in between the hula hoops is going to toss the ball to the other partner, that partner will then pass the ball with their arms and try to make the ball into one of the hula hoops on either side of their partner. You need to try and pass the ball into the hula hoop on the left 3 times, and try and pass the ball 3 times to the right hula hoop. Then you will switch and the person that was tossing the ball is going to pass. Do this until I say freeze. (See Appendix P)
Equipment management: Beginning: When you enter the gym you are going to see equipment laying around. You need to be aware

69
of this equipment so you do not trip over it. Also, please leave the equipment alone until I say we are ready to use it. Middle: After each activity or freeze, make sure they place the beach ball in one of the hula hoops so it does not roll around the gym or distract them. End: Make sure they put the beach balls in one of the hula hoops.
3 min Lesson closure: Ok, can everyone please walk over the end line and take a seat please? Ok boys and girls, did everyone have fun today? I am now going to do a part of the passing skill we learned today and you need to tell me which cue word we used for it. Ok? Great job today boys and girls it is now time to go back to your classroom, so if you could slowly stand up and in a single file line follow me out to Mrs. Davis. High fives for everyone, have a great rest of the day! Review-Remind-Recognize-Reinforce-Reward
On white circle

70
Swing and Strike with a Paddle GRADE LEVEL: 3rd
Allyson Barber
PED 331 13
9/19/11

71
Skill Performance Analysis:
3rd Grade: Striking with Implement (Paddle)
ALL STEPS OF THE SKILL:
1) Before ball arrives, always be in “ready position” on the balls of your feet with knees slightly bent
2) Bring paddle back, move whole arm, weight on back foot
3) Transfer weight from back foot to front foot while moving paddle from low to high
4) Contact ball at waist level
5) Follow through with the racket continues to rise across body, up towards opposite shoulder
CRTITICAL STEPS: CUE WORDS:
1) Be on the balls of feet with knees slightly bent 1) “Ready Position”
2) Bring paddle back with whole arm and weight on back foot 2) “Back”
3) Transfer weight from back to front and move paddle low to high and contact
ball at waist level 3) “Contact”
4) Paddle continues toward shoulder by following through across body 4) “Follow Through”
PSYCHOMOTOR OBJECTIVE:
During a partner practice task, the student will demonstrate striking a ball with a bat by:
Being on the balls of their feet with knees slightly bent (“ready position”) as he/she
Brings the paddle back with whole arm and weight on back foot (“back”) while
Transferring weight from back to front and move paddle low to high and contact ball at waist level
(“contact”) while
Paddle continues toward shoulder by following through across body (“follow through”).
Striking a Ball with Paddle
COMMON ERROR PREVENTION STRATEGY CORRECTION
Not keeping eyes on the ball Tell students to always keep their eyes on the ball all the way
into the paddle
Have students practice watching the ball into their hands before
using a paddle
Not keeping paddle level Tell students the paddle has to be level and not angled toward
the ground or ceiling to go straight
Have students practice watching the ball into the paddle and
show them where the ball goes with different angles

72
LESSON CONTEXTUAL INFORMATION
Lesson Title: Swing and Strike with a Paddle
Grade: 3rd
Skill Level: Developmental Level II
Time Required: 50 minutes
Day in Unit: 8 out of 8
Content Standards addressed within this lesson: Standard 1: Demonstrates competency in motor skills and movement patters needed to perform a variety of physical activities Standard 2: Demonstrates understanding of movement concepts, principles and tactics as they apply to the learning and performance of physical activities Standard 5: Exhibits responsible personal and social behavior that respects self and others in physical activity
Lesson Objectives:
Psychomotor- During a partner practice task, the student will demonstrate striking a ball with a bat by:
Being on the balls of their feet with knees slightly bent (“ready position”) as he/she
Brings the paddle back with whole arm and weight on back foot (“back”) while
Transferring weight from back to front and move paddle low to high and contact ball at waist level (“contact”) while
Paddle continues toward shoulder by following through across body (“follow through”).
Cognitive- When asked during the lesson closure, the students will demonstrate the correct
action of striking with a paddle as stated by the teacher.
Affective-
The students will demonstrate personal responsibility by: -Following safety rules -Staying in his or her own personal space during practice -Following the rules for the applied activity called “Pickle Ball”
Student Characteristics: Psychomotor:
Improved hand-eye coordination
More interest in sports
Sport related skill patterns matured in some cases
Developing more interest in skills
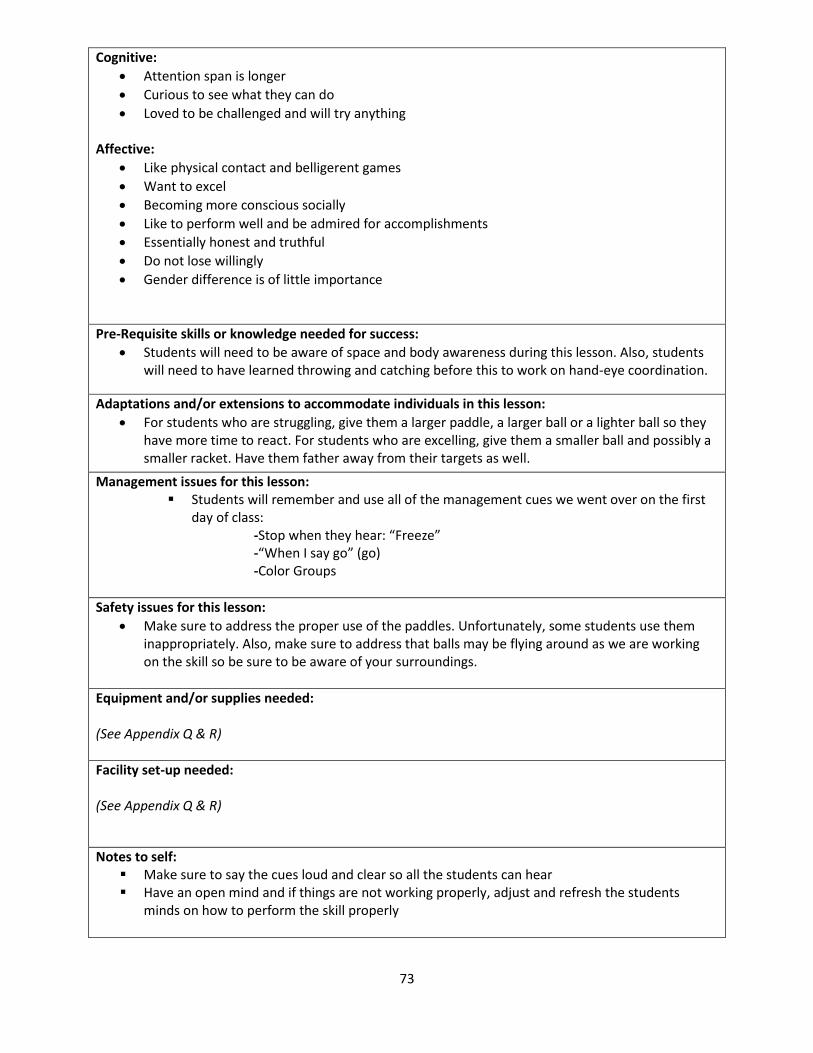
73
Cognitive:
Attention span is longer
Curious to see what they can do
Loved to be challenged and will try anything
Affective:
Like physical contact and belligerent games
Want to excel
Becoming more conscious socially
Like to perform well and be admired for accomplishments
Essentially honest and truthful
Do not lose willingly
Gender difference is of little importance
Pre-Requisite skills or knowledge needed for success:
Students will need to be aware of space and body awareness during this lesson. Also, students will need to have learned throwing and catching before this to work on hand-eye coordination.
Adaptations and/or extensions to accommodate individuals in this lesson:
For students who are struggling, give them a larger paddle, a larger ball or a lighter ball so they have more time to react. For students who are excelling, give them a smaller ball and possibly a smaller racket. Have them father away from their targets as well.
Management issues for this lesson: Students will remember and use all of the management cues we went over on the first
day of class: -Stop when they hear: “Freeze” -“When I say go” (go) -Color Groups
Safety issues for this lesson:
Make sure to address the proper use of the paddles. Unfortunately, some students use them inappropriately. Also, make sure to address that balls may be flying around as we are working on the skill so be sure to be aware of your surroundings.
Equipment and/or supplies needed: (See Appendix Q & R)
Facility set-up needed: (See Appendix Q & R)
Notes to self: Make sure to say the cues loud and clear so all the students can hear Have an open mind and if things are not working properly, adjust and refresh the students
minds on how to perform the skill properly

74
BASIC LESSON PLAN FORMAT FOR DIRECT INSTRUCTION
Time: Instruction: Management/Cues:
1 min Welcome and overview: Welcome boys and girls! Today we are going to learn how to strike a ball with a paddle! First, let’s stretch and get warmed up for today’s activities.
“When I say go”, will help students transfer into activities On white circle
3 min Introductory activity: First, let’s stretch. Stretching helps our muscles warm up. It elongates our muscles and makes them more elastic making it less likely to pull a muscle.
Reach for toes (Right, Left)
Reach for toes (both)
Leg Hug (Right, Left)
Butterfly
Right arm
Left arm
Reach (across, up, behind) (See Appendix A)
On white circle
10 min Fitness activity: Now we are going to do our fitness relay. I will organize you by your color groups and then we will begin.
4 Laps Jogging, 1 Lap Skipping
Stations Mountain Climbers Jump Side to Side Sit- ups Kick and Touch
(See Appendix B)
Laps around perimeter of gym and stations in the middle
Lesson focus:
2 min Anticipatory set: Today you will be learning how to strike a ball with a paddle. You use a paddle in ping-pong and pickle-ball. You use a racket, which is similar to a paddle, in tennis and badminton. The skill of striking is also used in golf and baseball. Striking a ball is used in many sports and activities so today we will learn how to strike with a paddle to start off!
On white circle

75
2 min Review if needed: Review the steps to the forearm pass in volleyball.
1) Move into path, feet staggered and shoulder width apart “Feet”
2) Bend knees, lean forward “Bend” 3) Clasp hands together, arms flat “Arms Flat” 4) Guide with shoulders, contact ball with
forearms “Contact”
On white circle
2 min Instruction/demonstration and/or explanation:
1) Before ball arrives, always be in “ready position” on the balls of your feet with knees slightly bent
2) Bring paddle back, move whole arm, weight on back foot
3) Transfer weight from back foot to front foot while moving paddle from low to high
4) Contact ball at waist level 5) Follow through with the racket continues
to rise across body, up towards opposite shoulder
On white circle
2 min Guided practice:
1) Be on the balls of feet with knees slightly bent “Ready Position”
2) Bring paddle back with whole arm and weight on back foot “Back”
3) Transfer weight from back to front and move paddle low to high and contact ball at waist level “Contact”
4) Paddle continues toward shoulder by following through across body “Follow Through”
On white circle
10 min Individual/partner practice: First, you are going to practice bouncing the ball on the paddle up and down. Then I will have you work in partners and paddle the ball back and forth. (See Appendix Q)
One person on end line the other at half court line.

76
15 min Applied activity: Now, we are going to play a modified game of pickle-ball. There will be three courts and be subs for each team. There will be three people on each side of the court. This is a lot like the game of tennis, but is played with paddles instead. (See Appendix R)
Equipment management: Beginning: Have fitness relay set up before students enter gym and have paddles, balls and nets off to side. Middle: Have students take care of fitness relay and set up nets while they are doing individual/partner practice End: Have students take care of paddles and balls
3 min Lesson closure: Great job today boys and girls! You did a great job working together and playing pickle-ball! Now let’s go over the steps to striking with a paddle. Someone please raise their hand and tell and show the first step to the skill. Second? Third? Fourth? Great job today boys and girls. Your teacher is now here so I would like you to line up quietly at the door. Have a great day! Review-Remind-Recognize-Reinforce-Reward
On white circle

77
Assessment in the Psychomotor Domain:
Formative/Alternative Assessment: Rating Scale
Underhand Throw
Criteria for Competence:
Demonstrates proper form for the underhand throw by:
1) Face your target 1) “Face”
2) Step with opposite foot towards target 2) “Step”
3) Use a pendulum arm motion with throwing arm 3) “Throw”
4) Follow through toward sky 4) “Sky”
Level Form
4 Demonstrates all of the selected elements with flowing motion
3 Demonstrates underhand throw by: - Facing target -Stepping with opposite foot towards target -Using a pendulum arm motion with throwing arm -Following through towards sky
2 Demonstrates throwing with three to four elements present
1 Demonstrates throwing with two or fewer elements present
0 Does not complete the assessment task
Level 0= 0pts, Level 1= 1 pt, Level 2= 2 pts, Level 3= 3 pts, Level 4= 4 pts
*Each student gets 3 attempts. After 3 attempts, their 3 scores will be added together for their total score.

78
Assessment Score Sheet
Psychomotor: Underhand Throw
Grade:_________ Teacher:_______________________ Date:________________
Student Name Form First Second Third
Total Score (0-12)
9=Competent

79
Psychomotor Assessment
Rating Scale Rationale For this rating scale assessment, I am assessing in the psychomotor domain. I am assessing objective
PM1 for the first lesson called “Give it a Heave-Ho with an Underhand Throw”. I am assessing this skill because
I believe by third grade this skill should be mastered and I want to assess their mastery level of this skill. This
assessment will take place in the first lesson of the unit, during the individual/partner practice.
For this assessment, I chose to use a rating scale. I chose a rating scale because this form of assessment
is great for a psychomotor domain assessment. It looks at each component of the skill and makes sure the
student has mastered each component. I will watch each student throw a total of three times. I will look at
each component for each of the three throws and rate them according to their mastery level.
This assessment was chosen because the students should have mastered the underhand throw by third
grade, and this assessment measures mastery level of achievement. This assessment will measure student
achievement by giving a certain number of points for each throw. Each throw is worth a total of 4 points. They
can earn up to 12 points total in this assessment. These 12 points are them calculated into the final unit grade
which is worth a total of 30 points.

80
Assessment in the Cognitive Domain:
Exit Slip
Inside Foot Pass
Name:_____________
Exit Slip
Which skill did we learn today? (3 points):_________________________________________
What were the steps of the skill we learned today (cue words used)?
List them in order (3 points):
1)______________________________________
2)______________________________________
3)______________________________________

81
Cognitive Assessment
Exit Slip Rationale
For this exit assessment, I am assessing in the cognitive domain. I am assessing objective C5 for the
fifth lesson called “Learn the Kick Quick”. I am assessing this skill because I believe in third grade the steps of
this skill should be known. This assessment will take place in the fifth lesson of the unit, during the lesson
closure.
For this assessment, I chose to use an exit slip. I chose an exit slip because this form of assessment is
great for a cognitive domain assessment. It looks at each component of the skill and makes sure the student
knows each component. I will hand out the exit slip at the end of the lesson and provide them with
instructions on how to complete it.
This assessment was chosen because the students should learn the steps of the inside foot pass in third
grade, and this assessment measures knowledge of the steps of the skill. This assessment will measure student
achievement by giving a certain number of points for each answer. The first question is worth a total of 3
points and the second question is worth 3 as well. They can earn up to 6 points total in this assessment. These
6 points are them calculated into the final unit grade which is worth a total of 30 points.
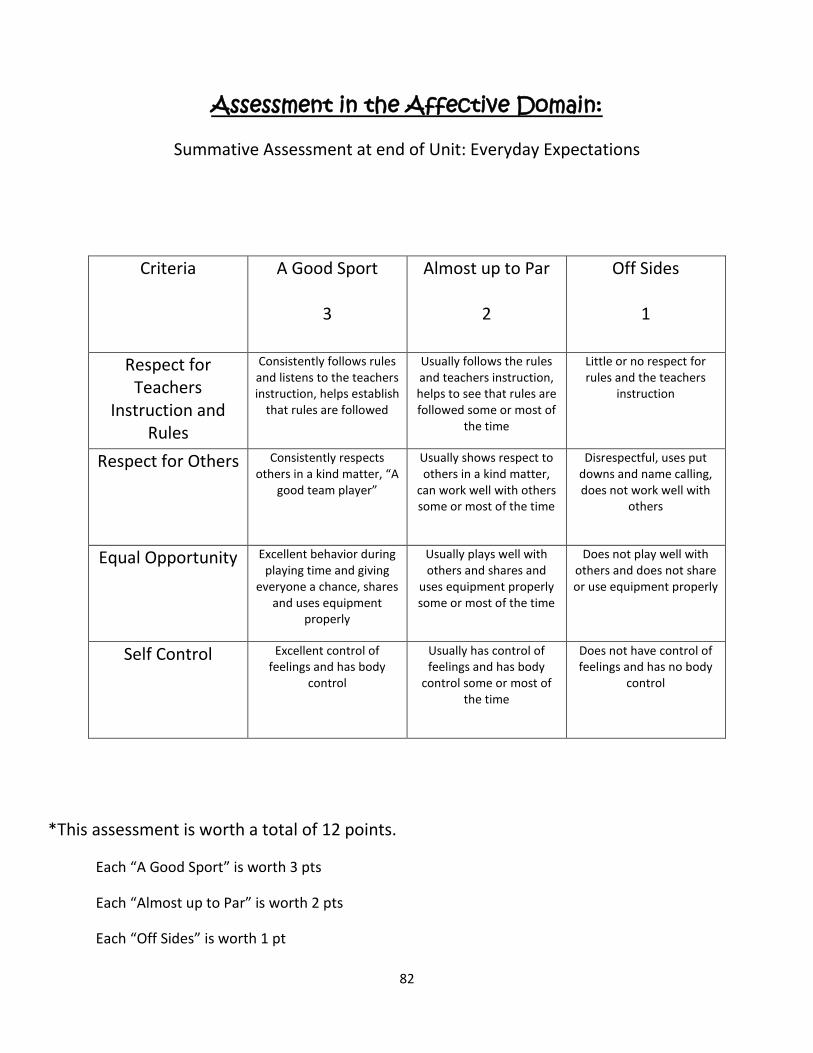
82
Assessment in the Affective Domain:
Summative Assessment at end of Unit: Everyday Expectations
Criteria A Good Sport
3
Almost up to Par
2
Off Sides
1
Respect for Teachers
Instruction and Rules
Consistently follows rules and listens to the teachers instruction, helps establish
that rules are followed
Usually follows the rules and teachers instruction, helps to see that rules are followed some or most of
the time
Little or no respect for rules and the teachers
instruction
Respect for Others Consistently respects others in a kind matter, “A
good team player”
Usually shows respect to others in a kind matter,
can work well with others some or most of the time
Disrespectful, uses put downs and name calling, does not work well with
others
Equal Opportunity Excellent behavior during playing time and giving
everyone a chance, shares and uses equipment
properly
Usually plays well with others and shares and
uses equipment properly some or most of the time
Does not play well with others and does not share or use equipment properly
Self Control Excellent control of feelings and has body
control
Usually has control of feelings and has body
control some or most of the time
Does not have control of feelings and has no body
control
*This assessment is worth a total of 12 points.
Each “A Good Sport” is worth 3 pts
Each “Almost up to Par” is worth 2 pts
Each “Off Sides” is worth 1 pt

83
Affective Assessment
Rubric Rationale For this rubric assessment, I am assessing in the affective domain. I am assessing objective A8 for the
eighth lesson called “Swing and Strike with a Paddle”. I am assessing student behavior within this lesson
because students have to work together during the individual/partner practice and applied activity in this
lesson. This assessment will take place in the eighth lesson of the unit, during the applied activity.
For this assessment, I chose to use a rubric. I chose a rubric because this form of assessment is great
for an affective domain assessment. It looks at the behavior of each student. I will watch the behavior of each
student during the lesson and write down notes I may need to complete the rubric on each student later.
This assessment was chosen because the students should be expected to behave appropriately and
listen to instruction and rules during lessons. This assessment will measure student achievement by giving a
certain number of points for certain behavior. They can earn up to 12 points total in this assessment. These 12
points are them calculated into the final unit grade which is worth a total of 30 points.

84
Summary Manipulative Skills Rubric- Third Grade
NAMES Psychomotor skill Obj. # PM1 “Underhand Throw”
Cognitive knowledge Obj. # C5
“Inside Foot Pass Exit
Slip”
6
P-S behavior Obj. # A8 Everyday Expect.
12
TOTAL POINTS
30
NOTES
First Attempt
4
Second Attempt
4
Third Attempt
4
Avery 4 4 4 6 12 30 Excellent
Nolan 3 3 3 5 10 24 Almost aiming
Olivia 2 2 2 2 12 20 Does not connect point w/aim/target
Marley 4 4 4 6 0 18 P-S needs help sharing
Etc.

85
Appendix A
Type of Activity: Warm Up
Name of Activity: Stretching
Source of activity information: Created by Allyson Barber
Equipment needed: None
Facility needed: Sit on white circle in gymnasium
Descriptions/instructions for activity:
Have students sitting on the white circle. Explain to them that stretching helps our
muscles warm up. It elongates our muscles and makes them more elastic making it
less likely to pull a muscle. Below are stretching ideas. Vary the stretches from day
to day.
Reach for toes (Right, Left)
Reach for toes (both)
Leg Hug (Right, Left)
Butterfly
Right arm
Left arm
Reach (across, up, behind)

86
Appendix B
Type of Activity: Fitness
Name of Activity: Fitness Relay
Source of activity information: Created by Sarah Bulthuis
Equipment needed: Station Signs, Cones, Rings, Poly Spots
Facility needed:
Descriptions/instructions for activity:
Organize class into color groups. Have color groups at different areas on perimeter of gym. This is where they
will start the relay. In the middle of the gymnasium have station fitness signs. Once a person performs their
locomotor laps, they pass the ring to the next person and then goes to the middle of the gymnasium and
perform their stations. Once they are finished they go back to their group and have a seat. Once everyone is
finished the relay is done.
The students who are waiting for their turn to do laps, they count for the person who is performing the laps.
Give the students a number of laps to perform, and a number to perform at the stations.

87
Appendix C
Type of Activity: Applied Activity
Name of Activity: Underhand Throw Stations
Source of activity information: Created by Allyson Barber
Equipment needed: Ladder Ball Equipment (Ladders, Ball/String), Bocce Ball Equipment (Balls), Bags
Equipment (Boards, Bean Bags)
Facility needed: (Outside)
Descriptions/instructions for activity:
Students will rotate around to all three stations throughout class period to work on their underhand throw. Students will
have already played these activities before.
Bags: Students will find a partner. Each set of partners stand beside the board and throws at the board across from
them. The goal is to get the bean bag in the hole. If the bean bag lands off of the board it is 0 points, if it lands on the
board it is 1 point and if it lands in the hole it is 3 points. At this age, there is no washing out of points from the other
team. Continually add points together, there is no limit to reach.
Bocce Ball: Students will all be against each other. First, someone throws out the little ball. This is the target. Then each
student takes a turn to try and underhand throw their bocce ball the closest to the little ball. Once they have all throw,
they go and measure to see who is closest.
Ladder Ball: The students will be in partners again. This game is a lot like bags. The object is to underhand throw the
balls on the string at the ladder. The top pole is 3 points, the middle is 2 and the bottom is 1 point. Continually add
points together with partner, there is no limit to reach.
Bags Bocce Ball Ladder Ball

88
Appendix D
Type of Activity: Individual/Partner Practice
Name of Activity: Underhand Throw with Partner
Source of activity information: Created by Allyson Barber
Equipment needed: Gator Balls
Facility needed:
Descriptions/instructions for activity:
After learning the steps of the underhand throw, have students work in partners and practice tossing back and forth.
Have students get toe to toe with a person near them. One person raises their hand. The person raising their hand gets a
ball and then one partner stands on the black sideline and the other on the red line across from them and faces each
other.
Have students continue practicing until you say freeze.

89
Appendix E
Type of Activity: Individual/Partner Practice
Name of Activity: Overhand Throw with Partner
Source of activity information: Created by Allyson Barber
Equipment needed: Gator Balls
Facility needed:
Descriptions/instructions for activity:
After learning the steps of the overhand throw, have students work in partners and practice throwing back and forth.
Have students get toe to toe with a person near them. One person raises their hand. The person raising their hand gets a
ball and then one partner stands on the black sideline and the other on the red line across from them and faces each
other. Make sure to tell students to throw the ball under control and make sure it is thrown at a speed that their partner
can catch it. Right now we are working on accuracy, not speed.
Have students continue practicing until you say freeze.

90
Appendix F
Type of Activity: Applied Activity
Name of Activity: Overhand Throw Stations
Source of activity information: Created by Allyson Barber
Equipment needed: Baseballs, Softballs, Footballs, Hula Hoops, Jump Ropes
Facility needed: Outside
Descriptions/instructions for activity:
Each station is set up so students can practice throwing at targets. At each station, have 6 to 10 students
depending on your class size. Split the group in half and have each group throw at one of the targets. When
students are not throwing they are lined up behind the person throwing. For each group, rotate the person
who stands off to the side of the net to retrieve the balls thrown. Make sure to tell students to not collect the
balls until all balls are thrown! Each student will throw three balls and then rotate.
Baseball: At this station, use indoor baseballs that are a bit softer than regular baseballs.
Softball: At this station, use indoor softballs that are a bit softer than regular softballs.
Football: At this station, use kid size footballs.
*Having three stations with different types of balls gives the students practice throwing with different sized
balls.

91
Appendix G
Type of Activity: Individual/Partner Practice
Name of Activity: Catching with Hands in Partners
Source of activity information: Created by Allyson Barber
Equipment needed: Gator balls
Facility needed:
Descriptions/instructions for activity:
Have students lined up on two different lines facing each other. Their partner should be
standing across from them. Each set of partners will play catch with the other. Make sure to
address that if the ball is below their waist they will catch the ball with pinkies together. If the
ball is above their waist they will catch the ball with their thumbs together. Have students try
to throw the ball at different levels, but under control to one another. Have students continue
playing catch until you say freeze.

92
Appendix H
Type of Activity: Applied Activity
Name of Activity: Scooter Handball
Source of activity information: Dr. Michael Roskamp
Equipment needed: Scooters, 4 Goals, 2 Large Gator Balls
Facility needed:
Descriptions/instructions for activity:
There will be 4 teams, 2 teams on each side of the half court line. Make sure that each team is wearing a
different color pinnie to differentiate between the teams and each player has a scooter. There is one goalie for
each team and the goalie may be switched at any time after a goal is scored.
The object of this game is to score goals against the other team. This activity works on throwing and catching.
The rules for this game are as follows. Students may fall off their scooter at any time if they do not have the
ball. If a student falls off of their scooter and they have the ball, they have to surrender the ball to the other
team. The students may not whip the ball around. They may throw the ball with one arm if it is to another
teammate, but if they are throwing the ball at the goal they must throw with two hands.

93
Appendix I
Type of Activity: Individual/Partner Practice
Name of Activity: Catching with Glove and Partner
Source of activity information: Created by Allyson Barber
Equipment needed: Tennis ball and gloves for each student
Facility needed: (Outdoors)
Descriptions/instructions for activity:
The students will be in partners. Each set of partners is to stand across from one another. They
will each have a glove on their hands. If there are not enough gloves for everyone, then have
one student at a time practice catching with the glove. The students will simply be playing
catch with their partner and their gloves back and forth until the teacher says freeze.
It is very important to emphasize the importance of keeping their eye on the ball, to watch out
for others throwing the ball and to put their non-dominant hand over top of the ball once they
catch it!

94
Appendix J
Type of Activity: Applied Activity
Name of Activity: Catching with Glove Stations
Source of activity information: Created by Allyson Barber
Equipment needed: Soft baseballs, soft softballs or tennis balls and gloves for each
student
Facility needed: (Outdoors)
Descriptions/instructions for activity:
Catch with a Partner: At this station, have students working in the outfield, playing catch with a partner.
Students can throw the ball underhand, overhand, high and low. Make sure all students are throwing in the
same direction.
Fly Balls: At this station, students will work on catching fly balls in the outfield, or balls that are high in the air.
Students need to practice getting to the ball, under the ball and catching it in their gloves. Again, students will
work in partners at this station. Make sure all students are throwing in the same direction.
Grounders: At this station, have students working in the infield, catching ground balls. Students will work in
partners again and students will roll the ball back and forth between them and their partner. Make sure all
students are throwing in the same direction.
Grounders Fly Balls Catch with
Partner

95
Appendix K
Type of Activity: Individual/Partner Practice
Name of Activity: Inside Foot Pass with Partner
Source of activity information: Created by Allyson Barber
Equipment needed: Soccer Ball for each set of partners
Facility needed: (Outdoors)
Descriptions/instructions for activity:
The students will be in partners. Each set of partners is to stand across from one another. Each
set of partners will have a soccer ball. The students will simply be passing the ball back and
forth with their partner until the teacher says freeze.
It is very important to emphasize the importance of keeping their eye on the ball, to watch out
for others kicking the ball and to stress the importance of keeping the ball on the ground and
not kicking for speed but accuracy to their partner.
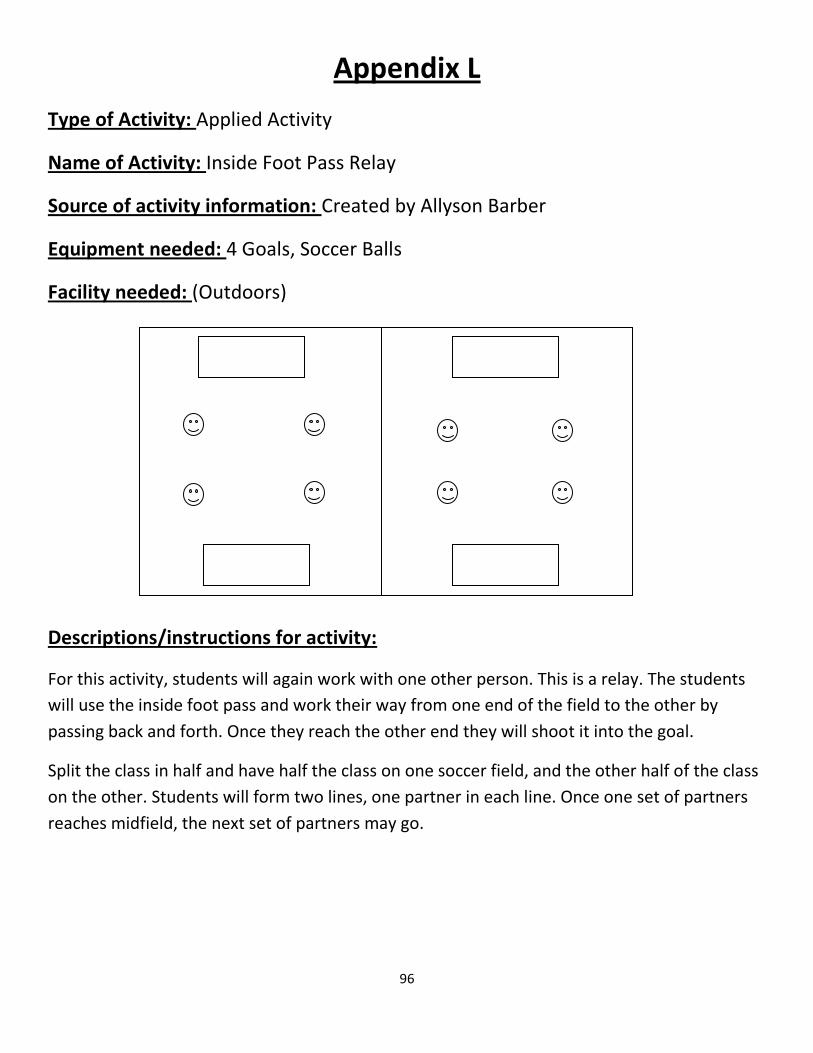
96
Appendix L
Type of Activity: Applied Activity
Name of Activity: Inside Foot Pass Relay
Source of activity information: Created by Allyson Barber
Equipment needed: 4 Goals, Soccer Balls
Facility needed: (Outdoors)
Descriptions/instructions for activity:
For this activity, students will again work with one other person. This is a relay. The students
will use the inside foot pass and work their way from one end of the field to the other by
passing back and forth. Once they reach the other end they will shoot it into the goal.
Split the class in half and have half the class on one soccer field, and the other half of the class
on the other. Students will form two lines, one partner in each line. Once one set of partners
reaches midfield, the next set of partners may go.

97
Appendix M
Type of Activity: Individual/Partner Practice
Name of Activity: Kicking for Distance Individually
Source of activity information: Created by Allyson Barber
Equipment needed: Soccer balls
Facility needed:
Descriptions/instructions for activity:
This activity is working on the skill of kicking for distance. Put the students in partners. On
partner will go at a time. The students will be lined up along the end line of the soccer field.
When the teacher says go, the first set of partners will kick the ball. Then they wait until the
teacher says it is ok and they go and retrieve their ball. Then they give the ball to the second
partner and they do the same thing. Make sure students are all standing on the end line and
facing the same direction when kicking!

98
Appendix N
Type of Activity: Applied Activity
Name of Activity: Kicking for Distance at Targets
Source of activity information: Created by Allyson Barber
Equipment needed: Hula Hoops, Cones, Soccer Goals, Soccer Balls
Facility needed:
Descriptions/instructions for activity:
Cones: Students will kick from the side line. Every student will kick all of the balls. Once all of
the balls at that station have been kicked, the students will go and retrieve the balls. The goal
is to hit one of the cones.
Hula Hoops: Students will kick from the side line. Every student will kick all of the balls. The
red hoops are the hardest to hit, the green are a bit easier, and the blue are the easiest. Once
all of the balls at that station have been kicked, the students will go and retrieve the balls. The
goal is to have the ball land in one of the hoops on the first bounce. You can also use dome
cones for this station if they are easier to see for the students.
Soccer Goal: Students will kick from the side line. Every student will kick all of the balls. Once
all of the balls at that station have been kicked, the students will go and retrieve the balls. The
goal is to have the ball go in the goal.

99
Appendix O
Type of Activity: Individual/Partner Practice
Name of Activity: Forearm Pass with Partner
Source of activity information: Created by Allyson Barber
Equipment needed: Trainer volleyballs
Facility needed:
Descriptions/instructions for activity:
The students will be in partners for this activity. The partners will take turns being the tosser
and the passer. The tosser will toss the ball 10 times to the passer and then they will switch.
The passer is trying to pass it directly back to the tosser. Students will continue this until the
teacher says freeze.

100
Appendix P
Type of Activity: Applied Activity
Name of Activity: Forearm Pass to Target
Source of activity information: Created by Allyson Barber
Equipment needed: Trainer Volleyballs, Hula Hoops
Facility needed:
Descriptions/instructions for activity:
For this activity, students will work in partners. The partners will stand across from one
another. One partner will have a hula hoop placed on each side of where they are standing.
This partner will be the tosser first. The tosser will toss the ball to the other partner across
from them. This partner will pass the ball back toward the partner and try to direct the ball so
that it lands in one of the hula hoops. The tosser will toss the ball 10 times and the passer will
try and direct the ball to each hoop 5 times. Then the tosser and passer will switch. Continue
this until the teacher says freeze.
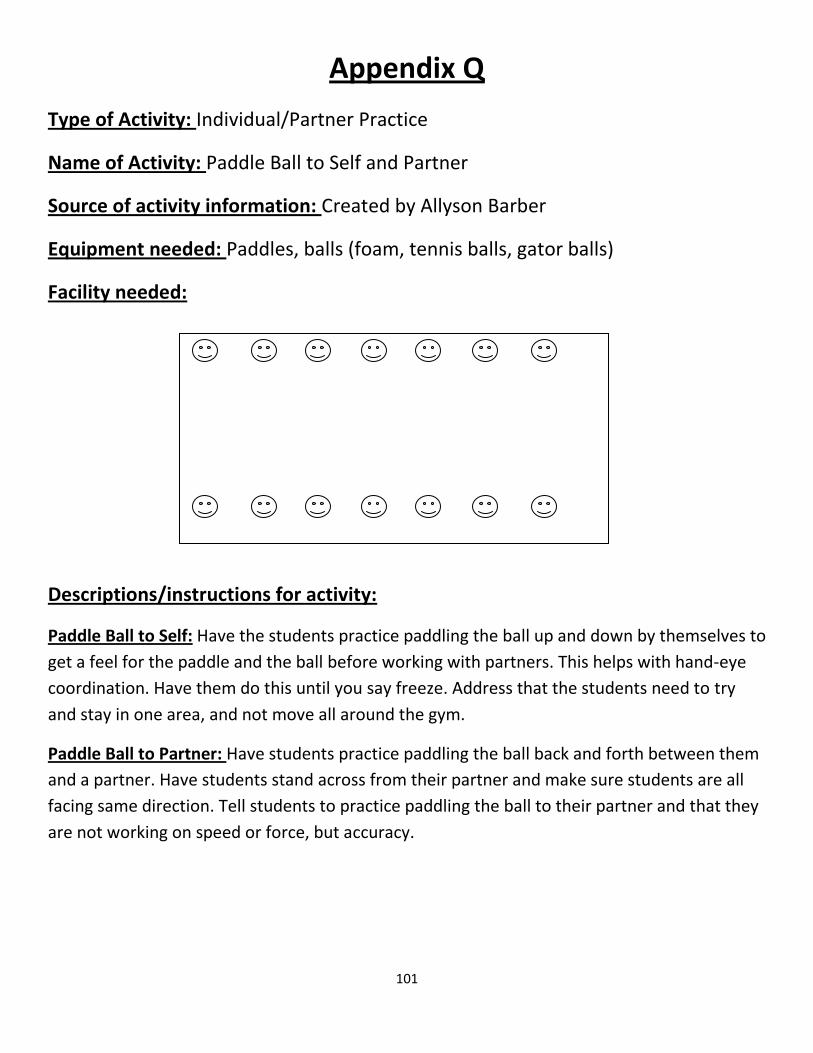
101
Appendix Q
Type of Activity: Individual/Partner Practice
Name of Activity: Paddle Ball to Self and Partner
Source of activity information: Created by Allyson Barber
Equipment needed: Paddles, balls (foam, tennis balls, gator balls)
Facility needed:
Descriptions/instructions for activity:
Paddle Ball to Self: Have the students practice paddling the ball up and down by themselves to
get a feel for the paddle and the ball before working with partners. This helps with hand-eye
coordination. Have them do this until you say freeze. Address that the students need to try
and stay in one area, and not move all around the gym.
Paddle Ball to Partner: Have students practice paddling the ball back and forth between them
and a partner. Have students stand across from their partner and make sure students are all
facing same direction. Tell students to practice paddling the ball to their partner and that they
are not working on speed or force, but accuracy.

102
Appendix R
Type of Activity: Applied Activity
Name of Activity: Modified Pickle-Ball
Source of activity information: Created by Allyson Barber
Equipment needed: Badminton Nets, Poles, Paddles, Gator Balls
Facility needed:
Descriptions/instructions for activity:
Each team will have 4 to 5 people on it. 3 people will be on the court at a time for a team. So
this activity is played 3 v. 3. The 4th and/or 5th teammate will stand off the court and sub in
when the teacher tells them to.
The goal of this activity is to work solely on paddling the ball. There are not many rules. One of
the rules is that if the ball goes out of bounds. The team that hit the ball out of bounds has to
give the ball up to the other team. The ball may only bounce once in between each hit. The
ball may not be spiked at any point in time. If the ball goes in the net, the ball goes to the
other team as well. There is no scoring in this activity. This activity is for beginners to paddle
and racket games. Basic concepts are beginning to be addressed. No huge rule concepts are
used.

103
References
Assessing National Standards 1-6 in Elementary School. (2012). Reston, VA: PE Metrics.
Borsdorf, L. L., & Boeyink, L. A. (2011). Elementary Level Physical Best Activity Guide (Third ed.). Champaign, IL: Human
Kinetics.
Bulthuis, S. (2011). Fitness Relay. , Physical Education Teacher.
Pangrazi, R. P., & Beighle, A. (2010). Dynamic Physical Education for Elementary School Children (16th
ed., pp. 704-706). San Francisco: Benjamin Cummings.
Schmottlach, N., & McManama, J. (2010). Physical Education Activity Handbook (Twelfth ed.). Glenview, IL: Benjamin Cummings.
104
Resource Materials
www.pecentral.org
www.pelinks4u.org
www.aapherd.org
www.kidshealth.org
www.pesoftware.com