Unit contract tracking in primavera contract management
88
Bryan Gardner Critical Business Analysis, Inc. April 11, 2011 in Primavera Contract Management Unit Contract Tracking
Transcript of Unit contract tracking in primavera contract management

Bryan Gardner
Critical Business Analysis, Inc.
April 11, 2011
in Primavera Contract Management
Unit Contract Tracking
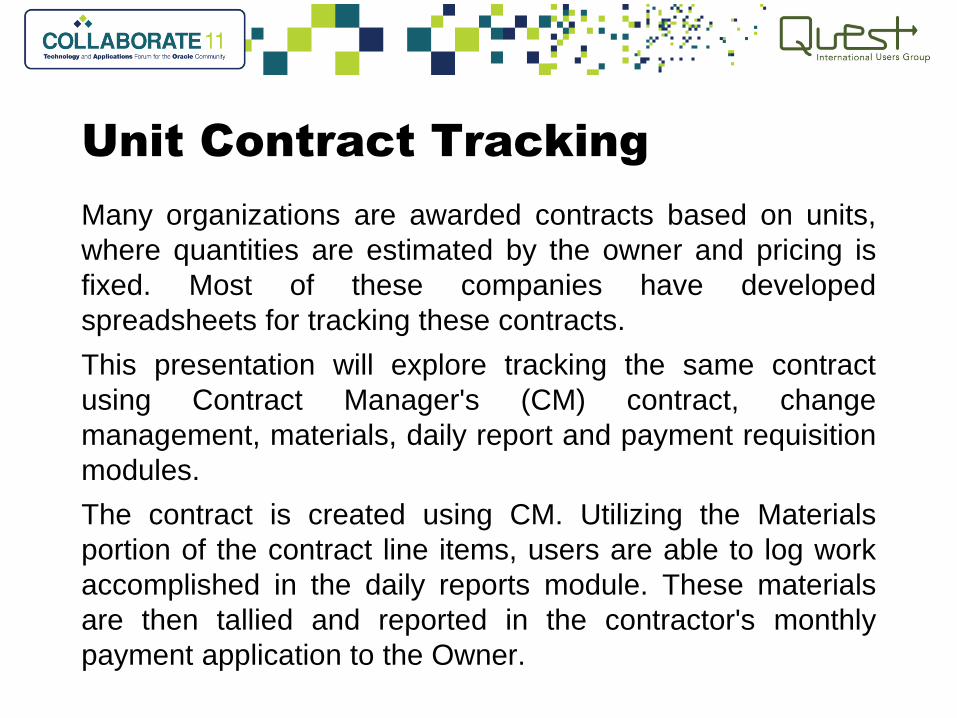
Unit Contract Tracking
Many organizations are awarded contracts based on units,
where quantities are estimated by the owner and pricing is
fixed. Most of these companies have developed
spreadsheets for tracking these contracts.
This presentation will explore tracking the same contract
using Contract Manager's (CM) contract, change
management, materials, daily report and payment requisition
modules.
The contract is created using CM. Utilizing the Materials
portion of the contract line items, users are able to log work
accomplished in the daily reports module. These materials
are then tallied and reported in the contractor's monthly
payment application to the Owner.

Unit Contract Tracking
Two Phases
• Initial Setup
• Monitoring the Work

Initial Setup
• Create the Project
• Enter Company and Contacts
• Create the Contract
• Add 1st line
• Export the Contract to spreadsheet
• Add remaining line items to spreadsheet
• Import the updated spreadsheet
• Generate Materials Records
• Generate Schedule of Values

Create the Project
Using the New Project Wizard, create the project.

Create the Project
Using the New Project Wizard, create the project.
Enter the Name and Title of the Project, plus additional information as needed.

Create the Project
Using the New Project Wizard, create the project.
Start with a blank project, unless a template or other project is relevant.

Create the Project
Using the New Project Wizard, create the project.
Include the Contractor, Owner, and Architect/Engineer, adding if necessary.

Create the Project
Using the New Project Wizard, create the project.
Assign the Key Parties.

Create the Project
Using the New Project Wizard, create the project.
Complete the remaining tabs or click ‘Finish’ if done. Confirm with ‘Yes’.

Create the Project
Using the New Project Wizard, create the project.

Create the Contract in Contract Management
Select Contracts - Budgeted if this is an income project for your company.
Use Contracts – Committed if the contract is a cost to your company.
Create the Contract in Contract Management
In the Contracts log, Add the contract document.

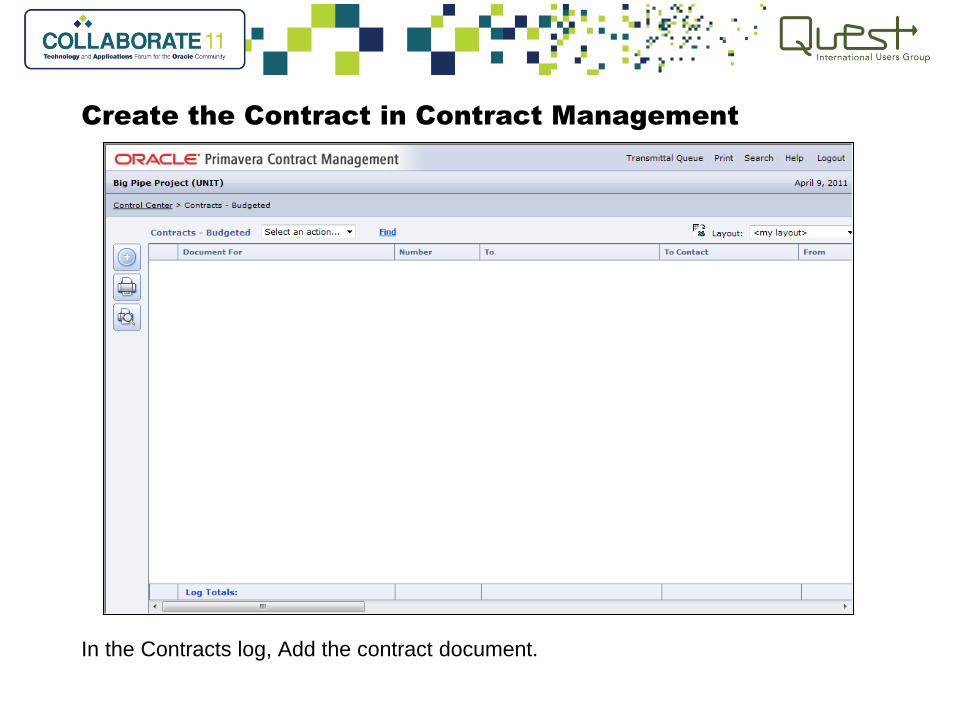
Create the Contract in Contract Management
Select the To and From parties. Enter the Number Title and Date of the Contract.
Click Save.

Add the 1st
Line of the Contract
Click Add Lump Sum or Add Unit Price to enter the first line of the contract.

Adding a Lump Sum line item
Use Lump Sum for non-quantity items.
Note: Do not use a Unit Price item with a quantity of one.

Adding a Unit Price line item
Use Unit Price for measureable items such as Linear Feet or Tons.
Note: Do not use a Unit Price item with a quantity of one for Lump Sum items.
Create the Contract in Contract Management
Review the information entered. Return to the Contracts log.

Export the Contract to a spreadsheet
Select Export from the Select an action… dropdown in the contract log.

Export the Contract to a spreadsheet
Preview the export data. Click Save As to complete the export.
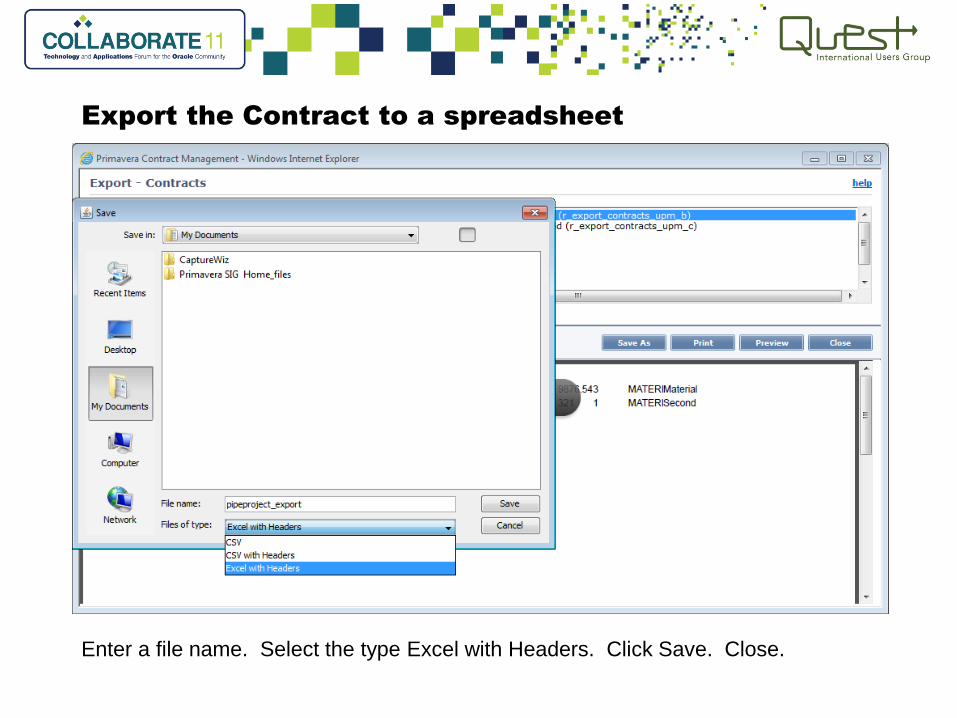
Export the Contract to a spreadsheet
Enter a file name. Select the type Excel with Headers. Click Save. Close.

Complete the spreadsheet
Open the newly created spreadsheet. Enter all remaining line items of the Contract.
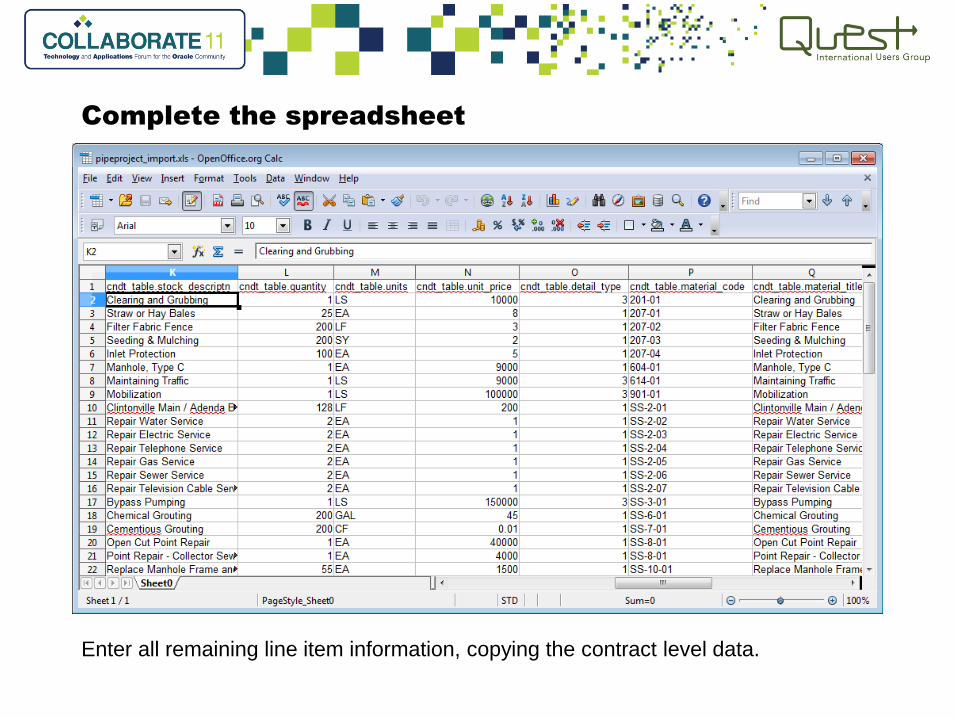
Complete the spreadsheet
Enter all remaining line item information, copying the contract level data.

Spreadsheet columns
Provided for reference.
Column Field Name Value / Comment

Spreadsheet columns
Provided for reference.
Column Field Name Value / Comment
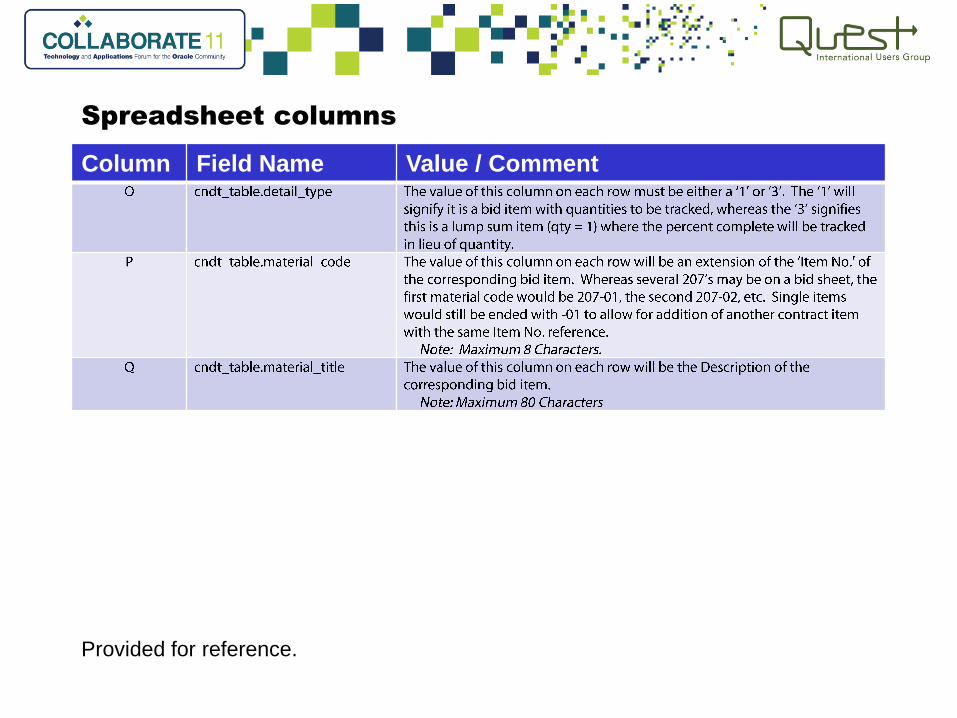
Spreadsheet columns
Provided for reference.
Column Field Name Value / Comment

Import the Contract from a spreadsheet
Select Import from the Select an action… dropdown in the contract log

Import the Contract from a spreadsheet
Browse and select the spreadsheet to be imported. Click Import.

Import the Contract from a spreadsheet
Cross your fingers… Review the Import Statistics. Click Close if no errors occurred.
If errors occur, print list and correct them. Try Import steps again.

Review the Contract
Verify the To, From, Number, Title and Date have not changed.
Verify the Total Cost is correct.

Review the Contract
Review the Line Items and make any necessary corrections.

Generate Materials Records from contract
Review Material column of line items.
Select Generate Materials Delivery from the Select an action… dropdown
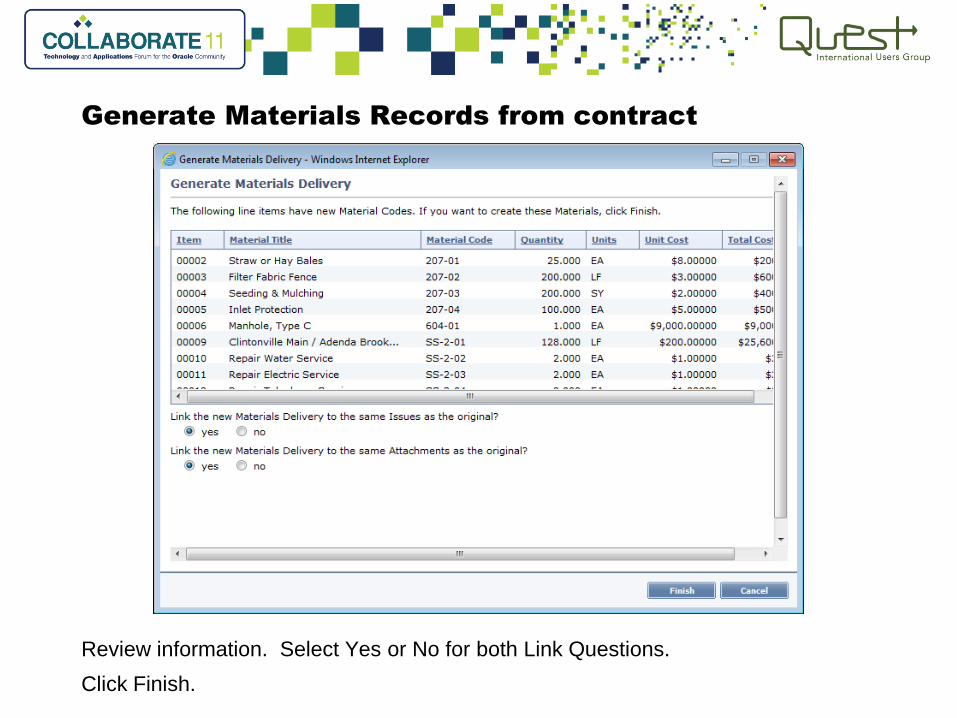
Generate Materials Records from contract
Review information. Select Yes or No for both Link Questions.
Click Finish.

Generate Materials Records from contract
Review line items. Verify hyperlinks now exist for Materials.
Return to Control Center.
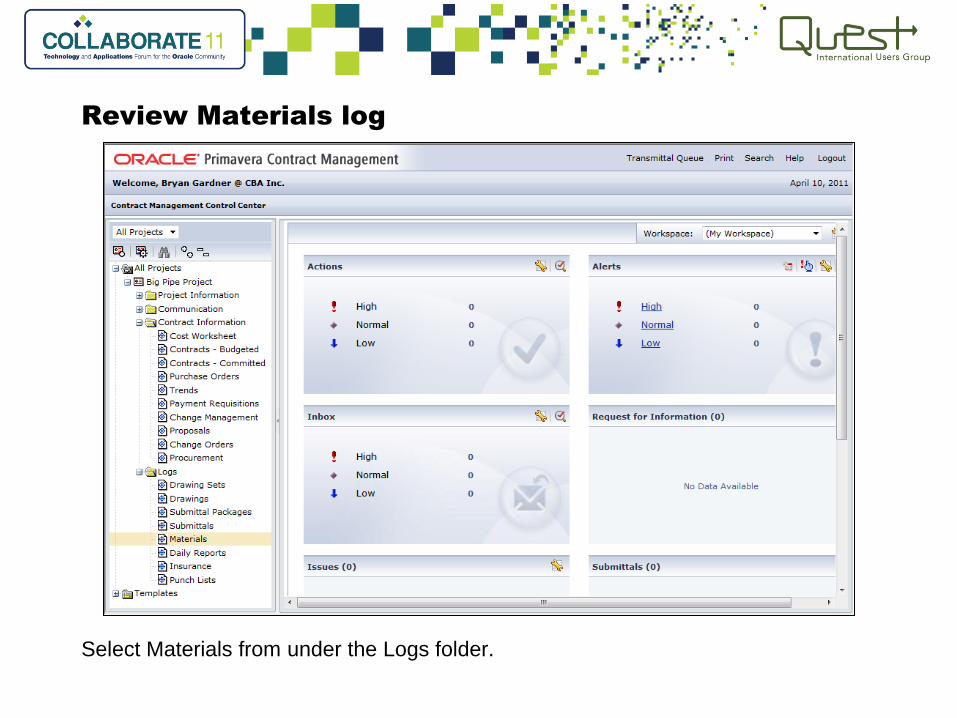
Review Materials log
Select Materials from under the Logs folder.

Review Materials log
Review Quantities. Create a Quantities layout if desired.
Return to Control Center.
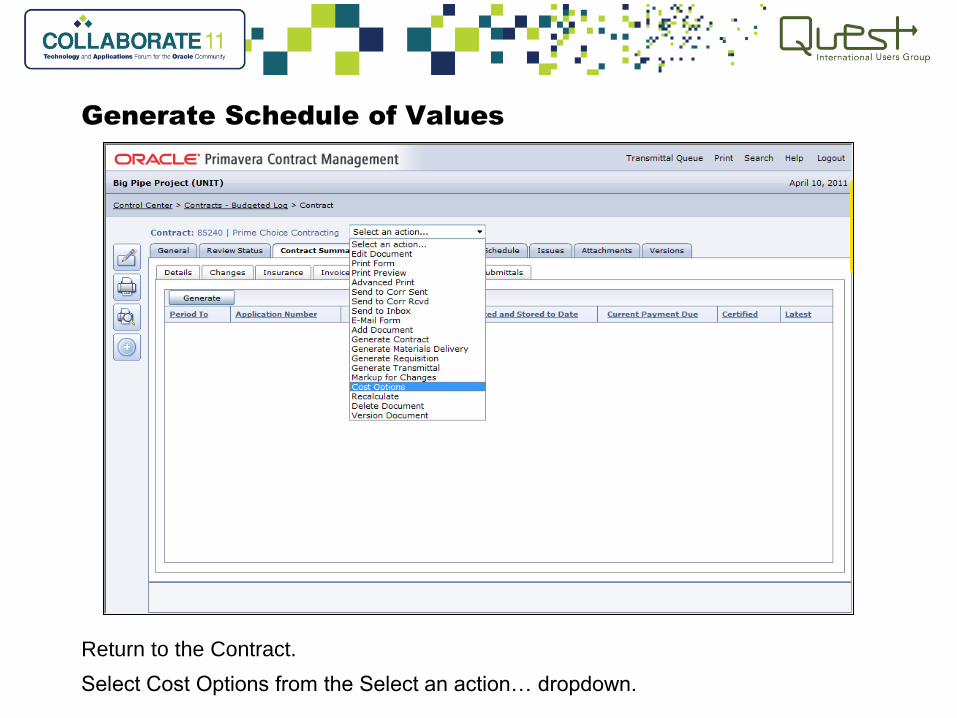
Generate Schedule of Values
Return to the Contract.
Select Cost Options from the Select an action… dropdown.

Set Cost Options for Requisitions
Review and set Cost Options per your company standards or project requirements.
Click Save.

Generate Schedule of Values
Prepare a Schedule of Values for approval, using Generate Requisition.

Generate Schedule of Values
Set the date equal to the Contract Date. Select Yes or No for both Link Questions.
Click Finish.

Generate Schedule of Values
Edit the Requisition. Change Application number to 00000 (Zero).

Generate Schedule of Values
Enter the correct percentages for Completed Work and Stored Material.
If using Summary Percentages.

Generate Schedule of Values
Verify the Log Total for the Scheduled Value (C) matches the contract amount.
Edit any line items not using the default line item retainage percent.

Monitoring the Work
• Create Daily/Weekly Report
• Record Delivery Ticket for Work Completed
• Review Materials Report
• Look for overages/incomplete
• Correct Errors
• Generate Pay Estimate
• Get Materials function
• Update/Review Lump Sum items
• Certify when accepted
• Repeat from the top until complete

Create a Daily Report
Select Daily Reports in the Logs folder of your project.

Create a Daily Report
In the Daily Reports log, click the Add Document button.
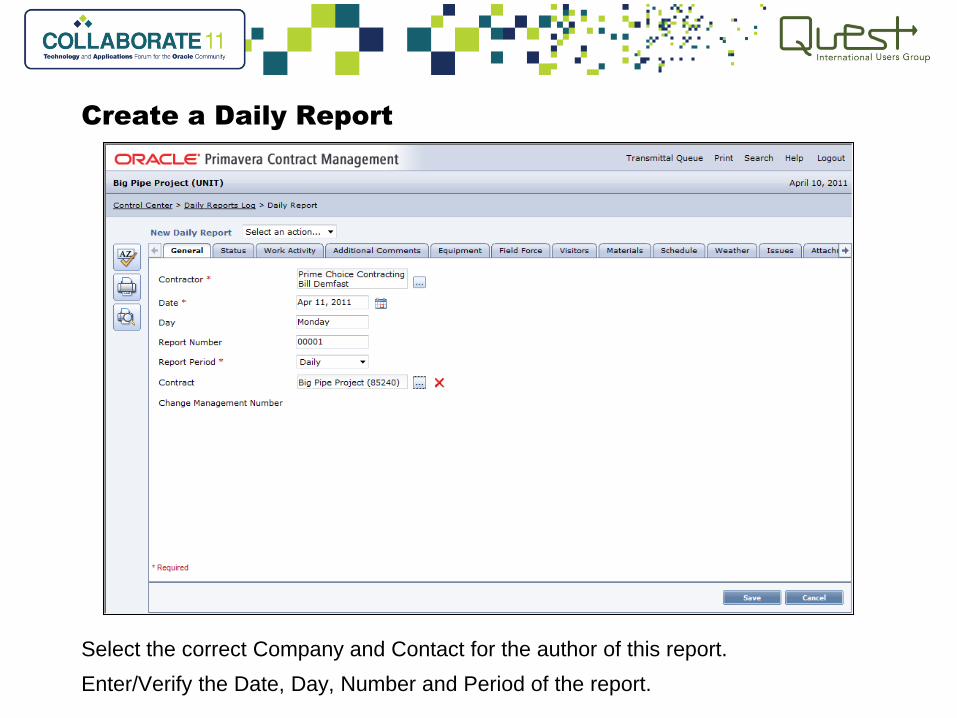
Create a Daily Report
Select the correct Company and Contact for the author of this report.
Enter/Verify the Date, Day, Number and Period of the report.
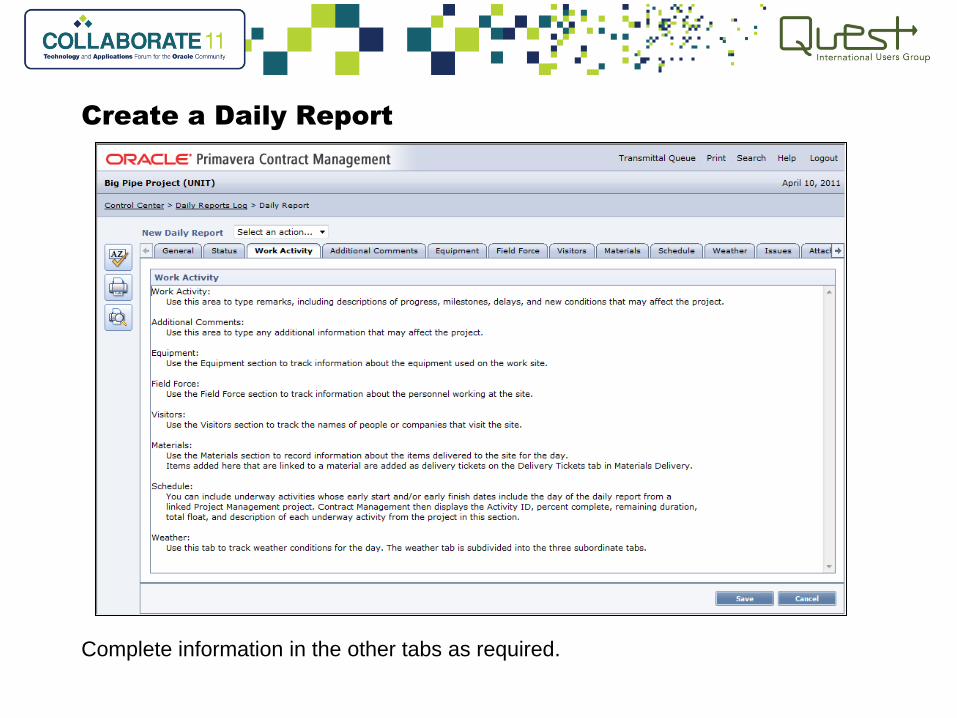
Create a Daily Report
Complete information in the other tabs as required.

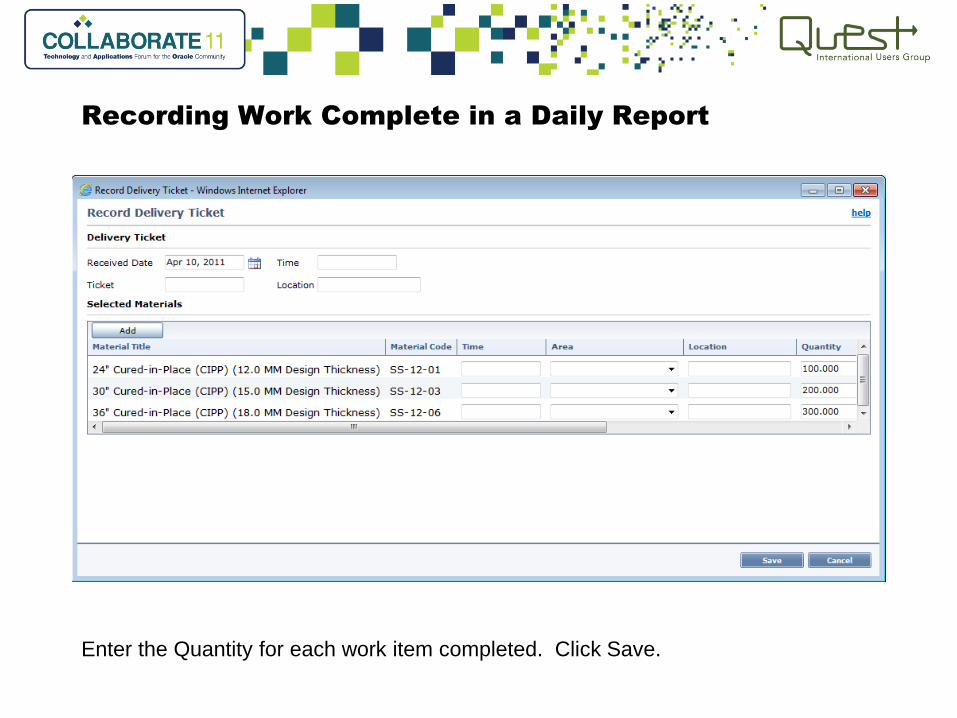
Recording Work Complete in a Daily Report
Click the Record Delivery Ticket button.

Recording Work Complete in a Daily Report
Enter the Date for the Report in the Received Date field.
Enter Time or Location if multiple shifts or locations are being utilized.

Recording Work Complete in a Daily Report
Click select for the items being reported on. Click Save.
Recording Work Complete in a Daily Report
Enter the Quantity for each work item completed. Click Save.

Recording Work Complete in a Daily Report
Click Save.
Return to Control Center.

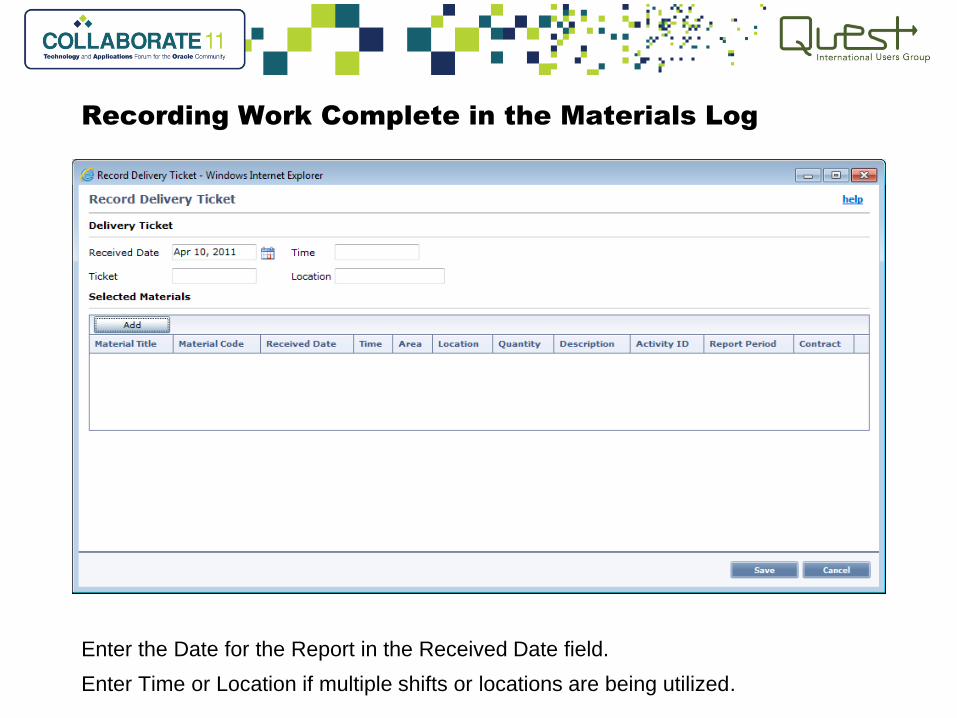
Recording Work Complete in the Materials Log
Select Materials from the Logs folder.

Recording Work Complete in the Materials Log
Click the Record Deliveries button.
Recording Work Complete in the Materials Log
Enter the Date for the Report in the Received Date field.
Enter Time or Location if multiple shifts or locations are being utilized.

Recording Work Complete in the Materials Log
Click select for the items being reported on. Click Save.

Recording Work Complete in the Materials Log
Enter the Quantity for each work item completed. Click Save.

Review Materials Log
Review Materials Log and Reports for errors, such as overages.
Select Advanced Print from the Select an action… dropdown.
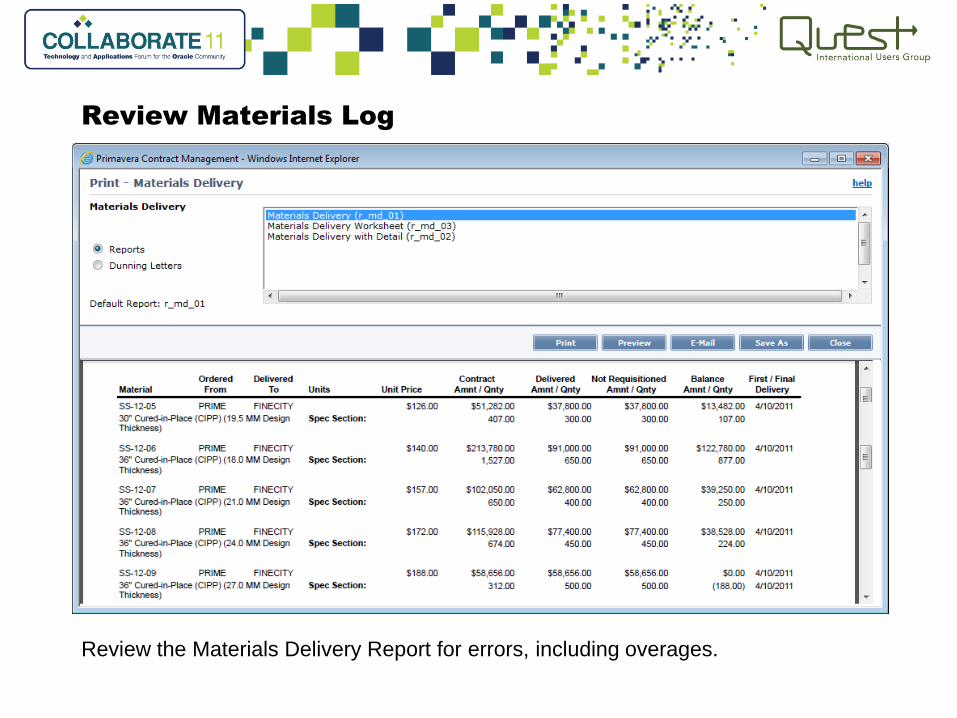
Review Materials Log
Review the Materials Delivery Report for errors, including overages.

Materials Delivery Worksheet
Create a report that can be printed as a worksheet for field staff without direct
access to Primavera Contract Management.

Materials Delivery Report with Detail
Create a report that show the material log with detailed delivery information.

Generate Payment Requisition
Select Payment Requisitions from the Contract Information folder.

Generate Payment Requisition
Select the date of the last payment requisition in the log for this contract.
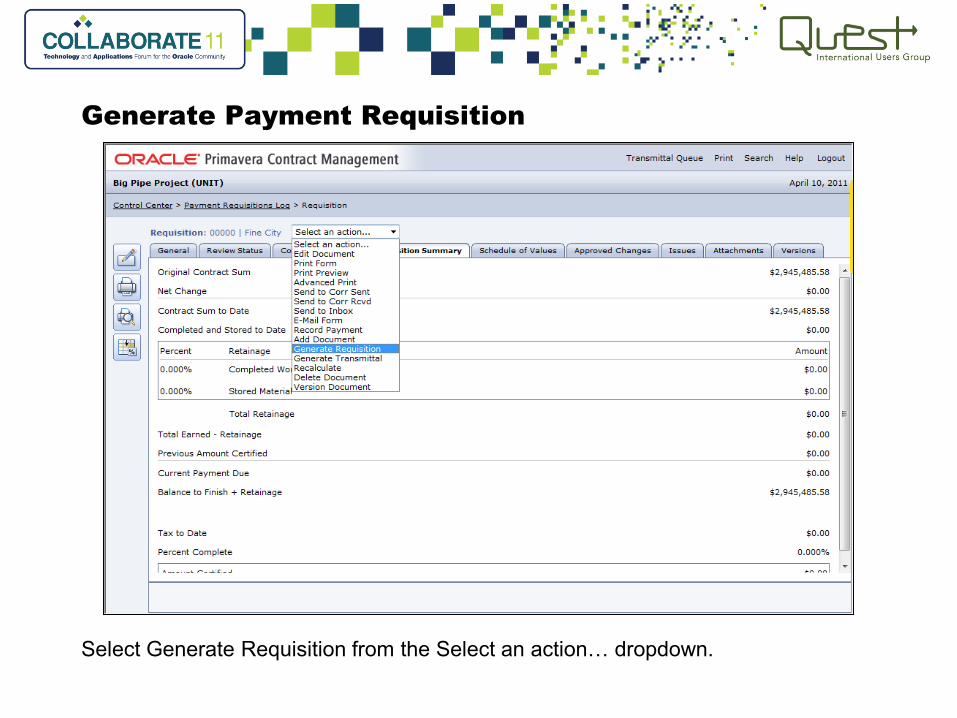
Generate Payment Requisition
Select Generate Requisition from the Select an action… dropdown.

Generate Payment Requisition
Enter/Verify the Period To date. Place a checkmark in Get Materials Delivery.
Click Next.

Generate Payment Requisition
Select the deliveries up to your Period To date.
Click Finish.

Prepare Payment Requisition
Review the total of the this Period (E) column.
Update/Review Lump Sum Line Items.
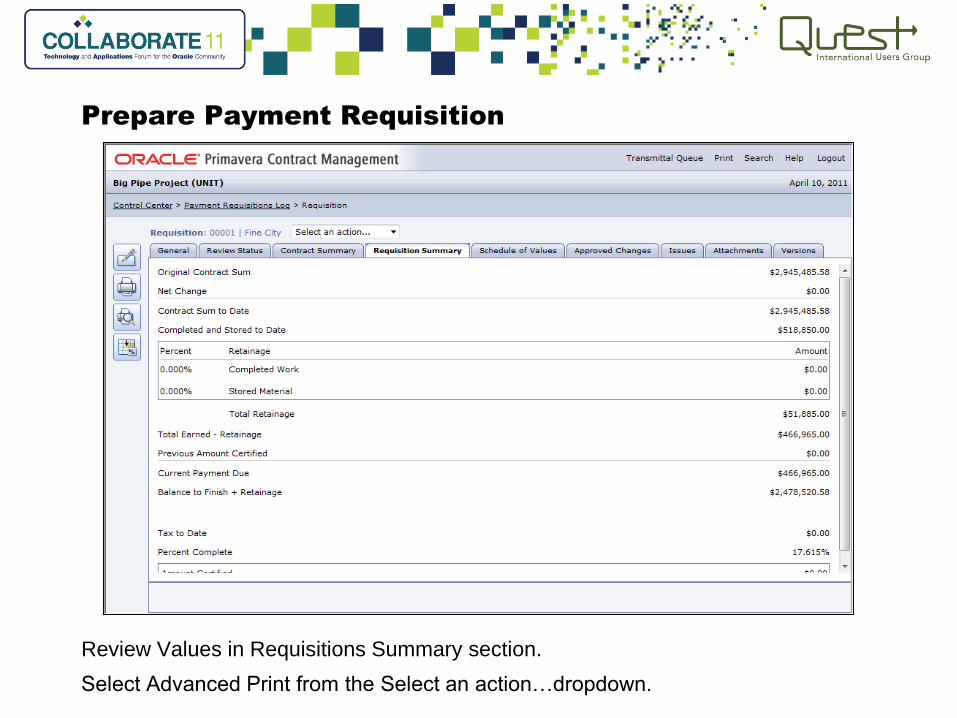
Prepare Payment Requisition
Review Values in Requisitions Summary section.
Select Advanced Print from the Select an action…dropdown.
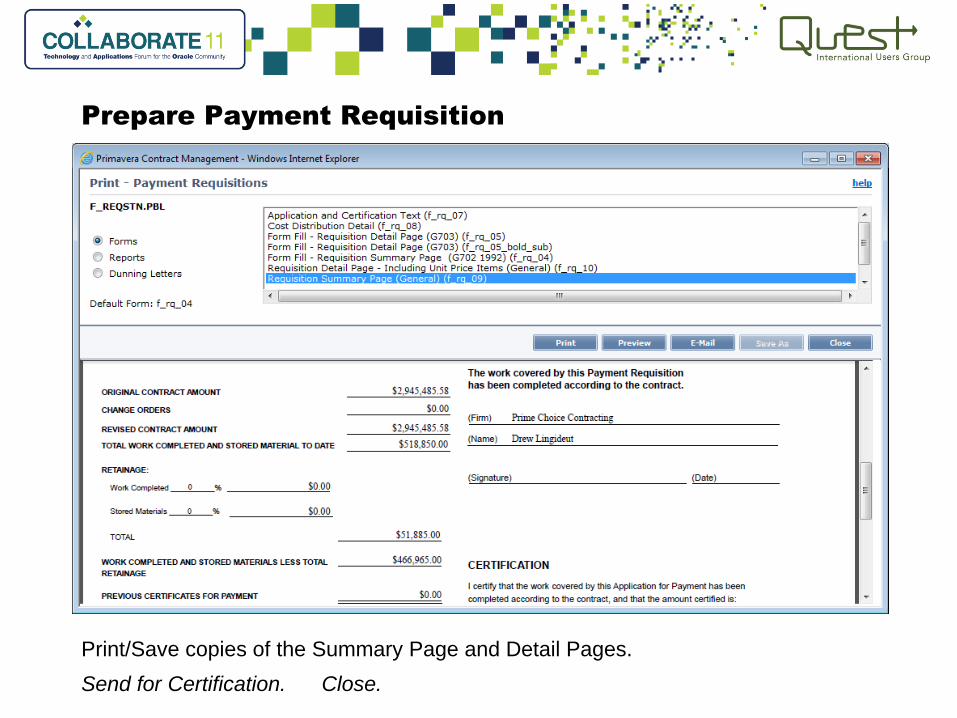
Prepare Payment Requisition
Print/Save copies of the Summary Page and Detail Pages.
Send for Certification. Close.

Certify the Payment Requisition
Enter the Current Payment Due amount in the Amount Certified field.*
*Unless reduced

Certify the Payment Requisition
Enter the Approved Date for the Contractor: Application and Certification.
Click Certify and Save. Click OK to confirm.

Changing Quantities
Select Change Management from the Contract Information folder.
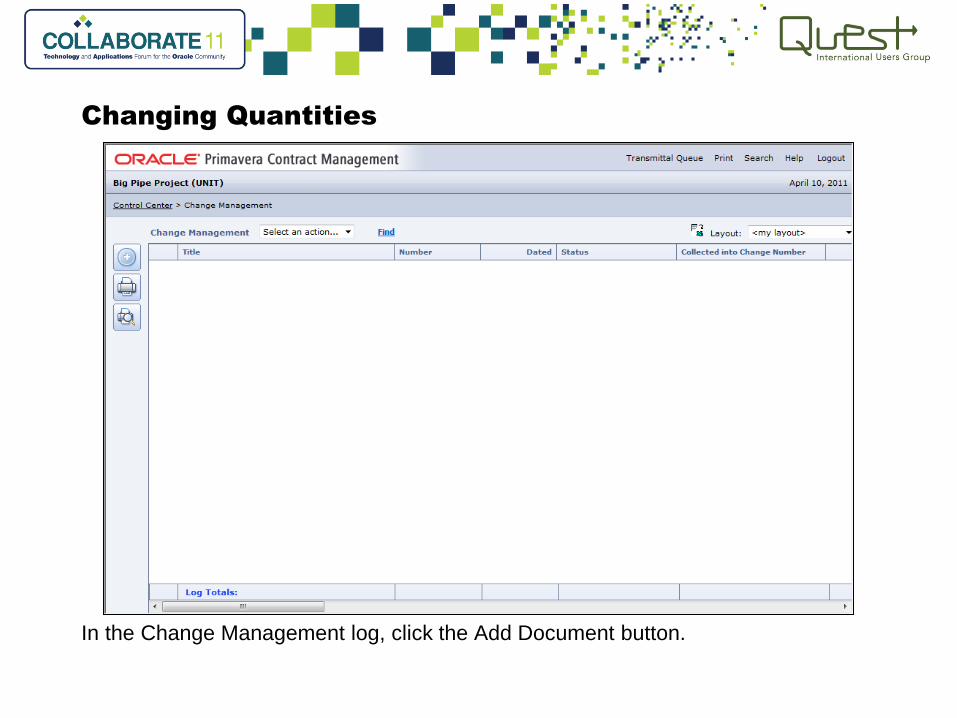
Changing Quantities
In the Change Management log, click the Add Document button.

Changing Quantities
Enter the Date and Title of the Change Management.
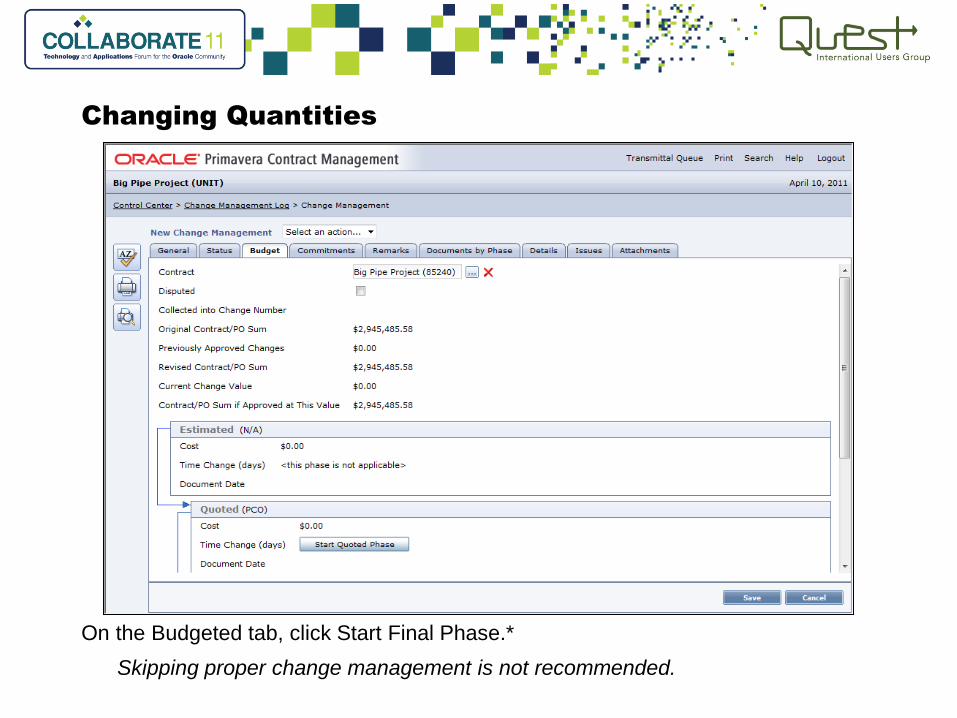
Changing Quantities
On the Budgeted tab, click Start Final Phase.*
Skipping proper change management is not recommended.

Changing Quantities
Verify/Update default information in the change proposal/order.

Changing Quantities
On the line items tab, click Copy from Contract to reuse lines.
If a NEW item, use Add Lump Sum or Add Unit Price as appropriate.

Changing Quantities
Select the line items you wish to copy into this change order. Click Finish.
Quantities will come in as zero.
Changing Quantities
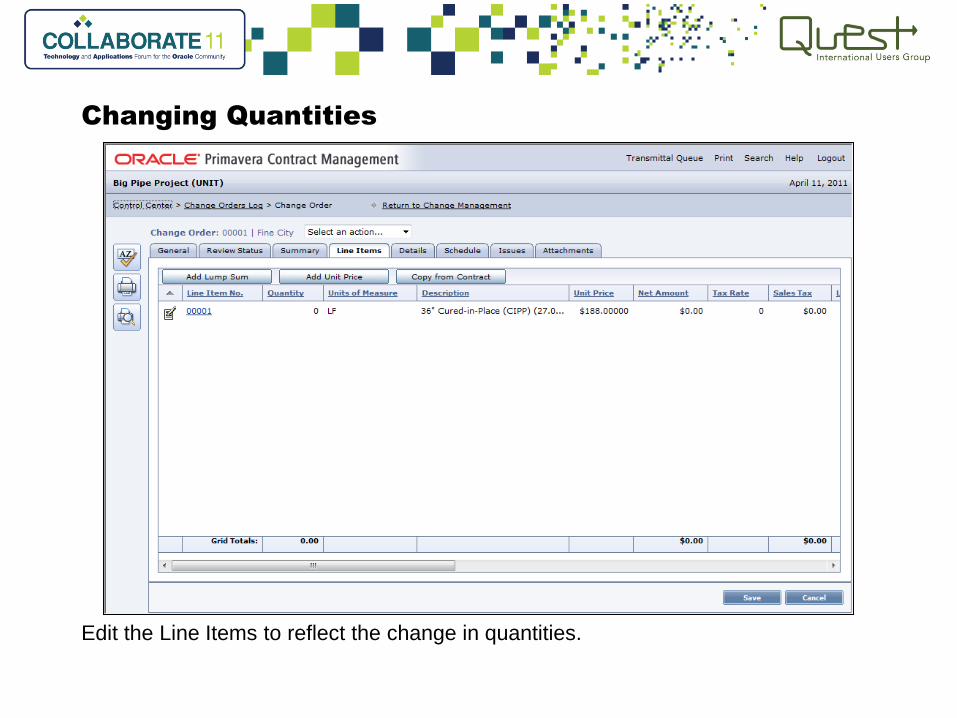
Edit the Line Items to reflect the change in quantities.

Changing Quantities
Enter the new quantity. Click Save and Close.

Changing Quantities
Review the line items of the Change Order.

Changing Quantities
Enter the Approved Date for the parties Contractor, Owner & Architect/Engineer.
Click Approve and Save. Click OK to confirm.

Changing Quantities in the Materials log
Edit the line item where the overage occurred.

Changing Quantities in the Materials log
Enter the change in quantity in the Amendment field. Click Save.
Return to the Materials log.

Review the Quantities in the Materials log.

in Primavera Contract Management
Unit Contract Tracking

Primavera Highlights During COLLABORATE Primavera Key Note: Making the Most of Your Oracle Primavera Investment
Dick Faris, Primavera Co-Founder & Oracle Senior Vice President Tues 9:15 am Room 102B
Overview and Roadmap of Primavera Contract Management Mon 2:30pm Room 101B
Oracle Primavera Enterprise Project Portfolio Management Roadmap Tues 10:30am Room 102B
Oracle Primavera Executive Q&A Session Weds 4:00pm Room 102B
OPSIG Welcome and Membership Meeting Weds 5:00pm Room 102B
OPSIG Kiosk Booth #230 –meet the OPSIG Board and join. Membership is FREE!
Oracle Primavera One-On-One Support Clinic. Sign up at the Primavera Pavilion to schedule your session.
More Primavera Education, Collaboration, and Participation at www.PrimaveraSIG.com!
All COLLABORATE content will be available at www.primaveraSIG.com beginning May 1st.
www.PrimaveraSIG.com
Oracle Primavera Special Interest Group