
Unit 1: Presentation Basics Welcome Freshmen Message 1
12
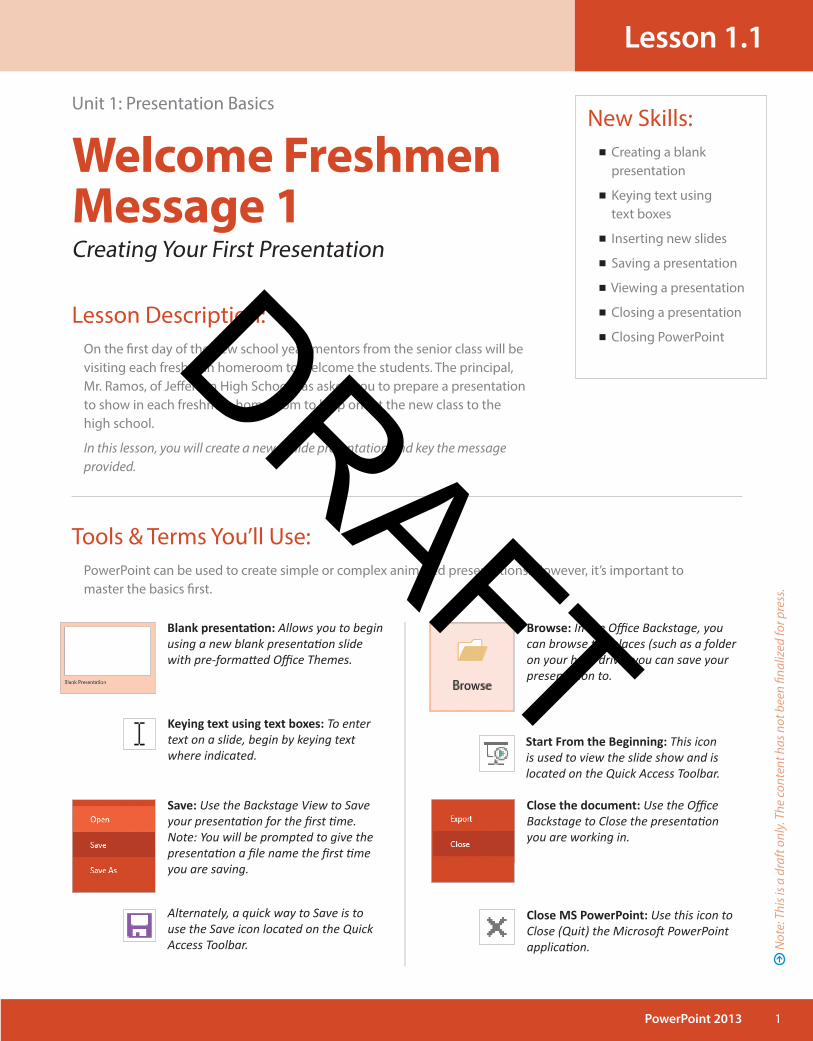
1 PowerPoint 2013 New Skills: Creating a blank presentation Keying text using text boxes Inserting new slides Saving a presentation Viewing a presentation Closing a presentation Closing PowerPoint Tools & Terms You’ll Use: PowerPoint can be used to create simple or complex animated presentations. However, it’s important to master the basics first. Lesson Description: On the first day of the new school year, mentors from the senior class will be visiting each freshman homeroom to welcome the students. The principal, Mr. Ramos, of Jefferson High School has asked you to prepare a presentation to show in each freshman homeroom to help orient the new class to the high school. In this lesson, you will create a new 6-slide presentation and key the message provided. Unit 1: Presentation Basics Welcome Freshmen Message 1 Creating Your First Presentation Lesson 1.1 Close the document: Use the Office Backstage to Close the presentaon you are working in. Start From the Beginning: This icon is used to view the slide show and is located on the Quick Access Toolbar. Blank presentaon: Allows you to begin using a new blank presentaon slide with pre-formaed Office Themes. Keying text using text boxes: To enter text on a slide, begin by keying text where indicated. Save: Use the Backstage View to Save your presentaon for the first me. Note: You will be prompted to give the presentaon a file name the first me you are saving. Alternately, a quick way to Save is to use the Save icon located on the Quick Access Toolbar. Browse: In the Office Backstage, you can browse the places (such as a folder on your hard drive) you can save your presentaon to. Close MS PowerPoint: Use this icon to Close (Quit) the Microsoſt PowerPoint applicaon. Note: This is a draft only. The content has not been finalized for press. DRAFT
Transcript of Unit 1: Presentation Basics Welcome Freshmen Message 1
1PowerPoint 2013
New Skills: Creating a blank presentation
Keying text using text boxes
Inserting new slides
Saving a presentation
Viewing a presentation
Closing a presentation
Closing PowerPoint
Tools & Terms You’ll Use:PowerPoint can be used to create simple or complex animated presentations. However, it’s important to master the basics fi rst.
Lesson Description:On the fi rst day of the new school year, mentors from the senior class will be visiting each freshman homeroom to welcome the students. The principal, Mr. Ramos, of Jeff erson High School has asked you to prepare a presentation to show in each freshman homeroom to help orient the new class to the high school.
In this lesson, you will create a new 6-slide presentation and key the message provided.
Unit 1: Presentation Basics
Welcome Freshmen Message 1Creating Your First Presentation
Lesson 1.1
Close the document: Use the Offi ce Backstage to Close the presentati on you are working in.
Start From the Beginning: This icon is used to view the slide show and is located on the Quick Access Toolbar.
Blank presentati on: Allows you to begin using a new blank presentati on slide with pre-formatt ed Offi ce Themes.
Keying text using text boxes: To enter text on a slide, begin by keying text where indicated.
Save: Use the Backstage View to Save your presentati on for the fi rst ti me. Note: You will be prompted to give the presentati on a fi le name the fi rst ti me you are saving.
Alternately, a quick way to Save is to use the Save icon located on the Quick Access Toolbar.
Browse: In the Offi ce Backstage, you can browse the places (such as a folder on your hard drive) you can save your presentati on to.
Close MS PowerPoint: Use this icon to Close (Quit) the Microsoft PowerPoint applicati on. N
ote:
Thi
s is a
dra
ft o
nly.
The
cont
ent h
as n
ot b
een
fi nal
ized
for p
ress
.
DRAFT
2 PowerPoint 2013
Instructions
Lesson 1.1
Unit 1: Presentation Basics
Creating Your First Presentation
8
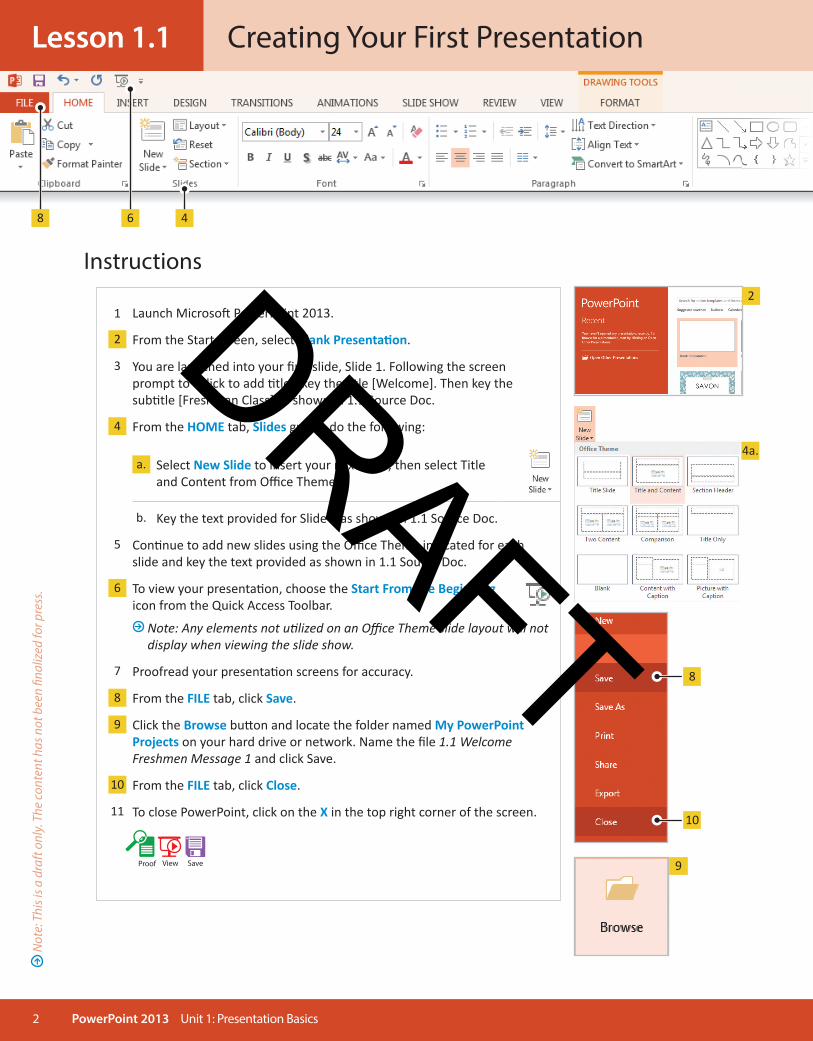
21 Launch Microsoft PowerPoint 2013.
2 From the Start screen, select Blank Presentati on.
3 You are launched into your fi rst slide, Slide 1. Following the screen prompt to “Click to add ti tle”, key the ti tle [Welcome]. Then key the subti tle [Freshman Class] as shown in 1.1 Source Doc.
4 From the HOME tab, Slides group, do the following:
a. Select New Slide to insert your next slide, then select Title and Content from Offi ce Theme.
b. Key the text provided for Slide 2 as shown in 1.1 Source Doc.
5 Conti nue to add new slides using the Offi ce Theme indicated for each slide and key the text provided as shown in 1.1 Source Doc.
6 To view your presentati on, choose the Start From the Beginning icon from the Quick Access Toolbar.
Note: Any elements not uti lized on an Offi ce Theme slide layout will not display when viewing the slide show.
7 Proofread your presentati on screens for accuracy.
8 From the FILE tab, click Save.
9 Click the Browse butt on and locate the folder named My PowerPoint Projects on your hard drive or network. Name the fi le 1.1 Welcome Freshmen Message 1 and click Save.
10 From the FILE tab, click Close.
11 To close PowerPoint, click on the X in the top right corner of the screen.
Proof View Save
8
10
9
6
4a.
4
Not
e: T
his i
s a d
raft
onl
y. T
he co
nten
t has
not
bee
n fi n
aliz
ed fo
r pre
ss.
DRAFT
3PowerPoint 2013
LessonFormatting Text
Unit 1: Presentation Basics
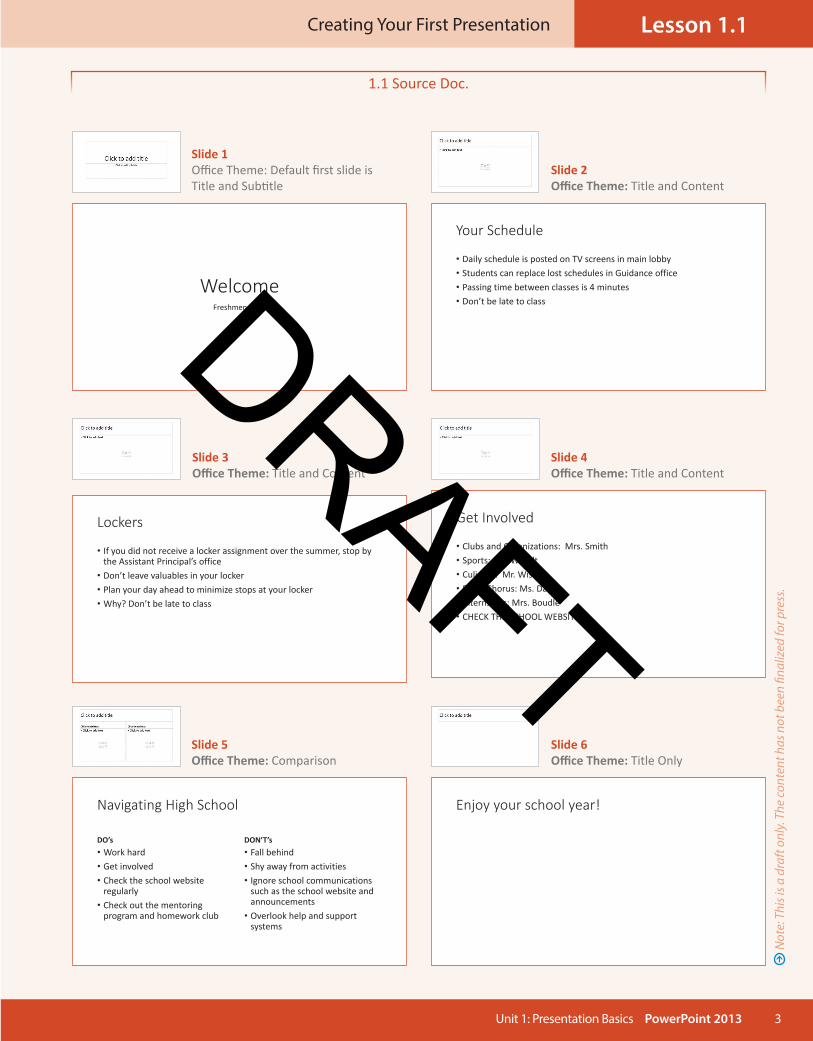
Enjoy your school year!Navigating High School
DO’s• Work hard• Get involved• Check the school website regularly
• Check out the mentoring program and homework club
DON’T’s• Fall behind• Shy away from activities• Ignore school communications such as the school website and announcements
• Overlook help and support systems
Lockers
• If you did not receive a locker assignment over the summer, stop by the Assistant Principal’s office
• Don’t leave valuables in your locker• Plan your day ahead to minimize stops at your locker• Why? Don’t be late to class
Get Involved
• Clubs and Organizations: Mrs. Smith• Sports: Mr. Wreidt• Culinary: Mr. Wish• Band/Chorus: Ms. Daly• Internships: Mrs. Boudle• CHECK THE SCHOOL WEBSITE!
Your Schedule
• Daily schedule is posted on TV screens in main lobby• Students can replace lost schedules in Guidance office• Passing time between classes is 4 minutes• Don’t be late to class
WelcomeFreshmen Class
Lesson 1.1Creating Your First Presentation
Slide 2Office Theme: Title and Content
Slide 3 Office Theme: Title and Content
Slide 4Office Theme: Title and Content
Slide 5Office Theme: Comparison
Slide 6Office Theme: Title Only
Slide 1Office Theme: Default first slide is Title and Subtitle
1.1 Source Doc.
Not
e: T
his i
s a d
raft
onl
y. T
he co
nten
t has
not
bee
n fin
aliz
ed fo
r pre
ss.
DRAFT
4 PowerPoint 2013
Lesson 1.2
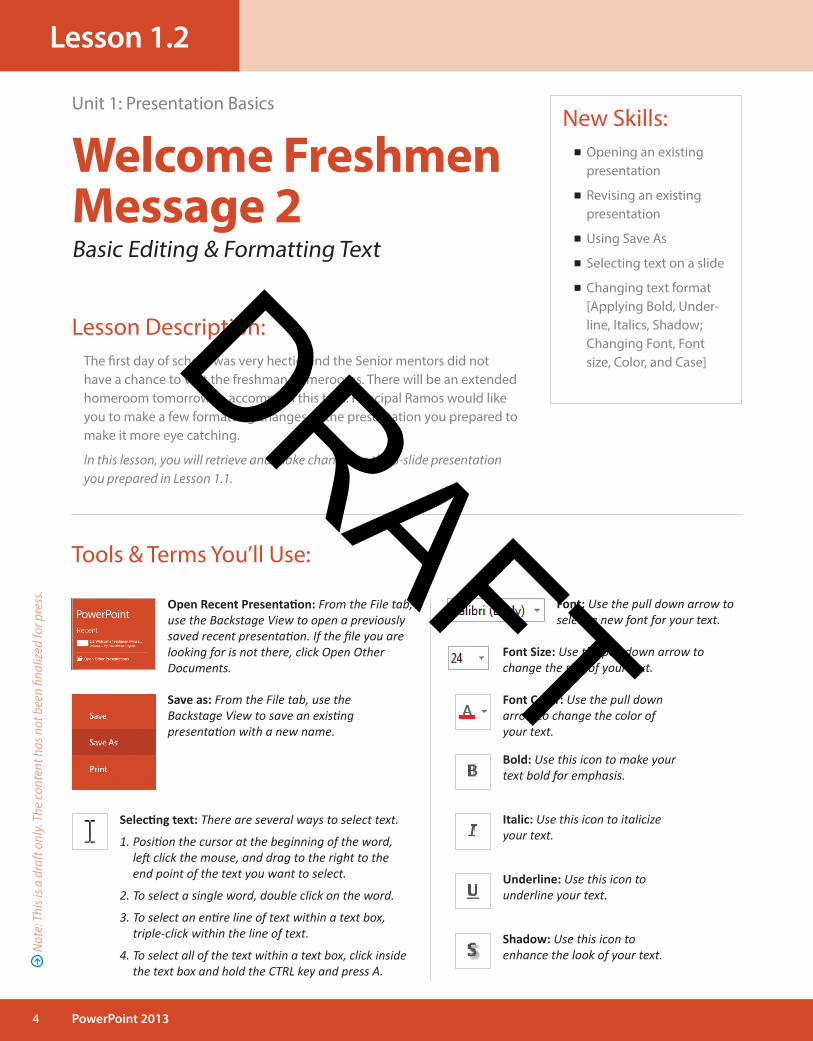
Tools & Terms You’ll Use:
Open Recent Presentation: From the File tab, use the Backstage View to open a previously saved recent presentation. If the file you are looking for is not there, click Open Other Documents.
Save as: From the File tab, use the Backstage View to save an existing presentation with a new name.
Lesson Description:The first day of school was very hectic, and the Senior mentors did not have a chance to visit the freshman homerooms. There will be an extended homeroom tomorrow to accomplish this task. Principal Ramos would like you to make a few formatting changes to the presentation you prepared to make it more eye catching.
In this lesson, you will retrieve and make changes to the 6-slide presentation you prepared in Lesson 1.1.
New Skills: Opening an existing presentation
Revising an existing presentation
Using Save As
Selecting text on a slide
Changing text format [Applying Bold, Under-line, Italics, Shadow; Changing Font, Font size, Color, and Case]
Unit 1: Presentation Basics
Welcome Freshmen Message 2Basic Editing & Formatting Text
Font: Use the pull down arrow to select a new font for your text.
Font Size: Use the pull down arrow to change the size of your text.
Font Color: Use the pull down arrow to change the color of your text.
Bold: Use this icon to make your text bold for emphasis.
Italic: Use this icon to italicize your text.
Underline: Use this icon to underline your text.
Shadow: Use this icon to enhance the look of your text.
Selecting text: There are several ways to select text.
1. Position the cursor at the beginning of the word, left click the mouse, and drag to the right to the end point of the text you want to select.
2. To select a single word, double click on the word.
3. To select an entire line of text within a text box, triple-click within the line of text.
4. To select all of the text within a text box, click inside the text box and hold the CTRL key and press A.
Not
e: T
his i
s a d
raft
onl
y. T
he co
nten
t has
not
bee
n fin
aliz
ed fo
r pre
ss.
DRAFT
5PowerPoint 2013
Instructions
Unit 1: Presentation Basics
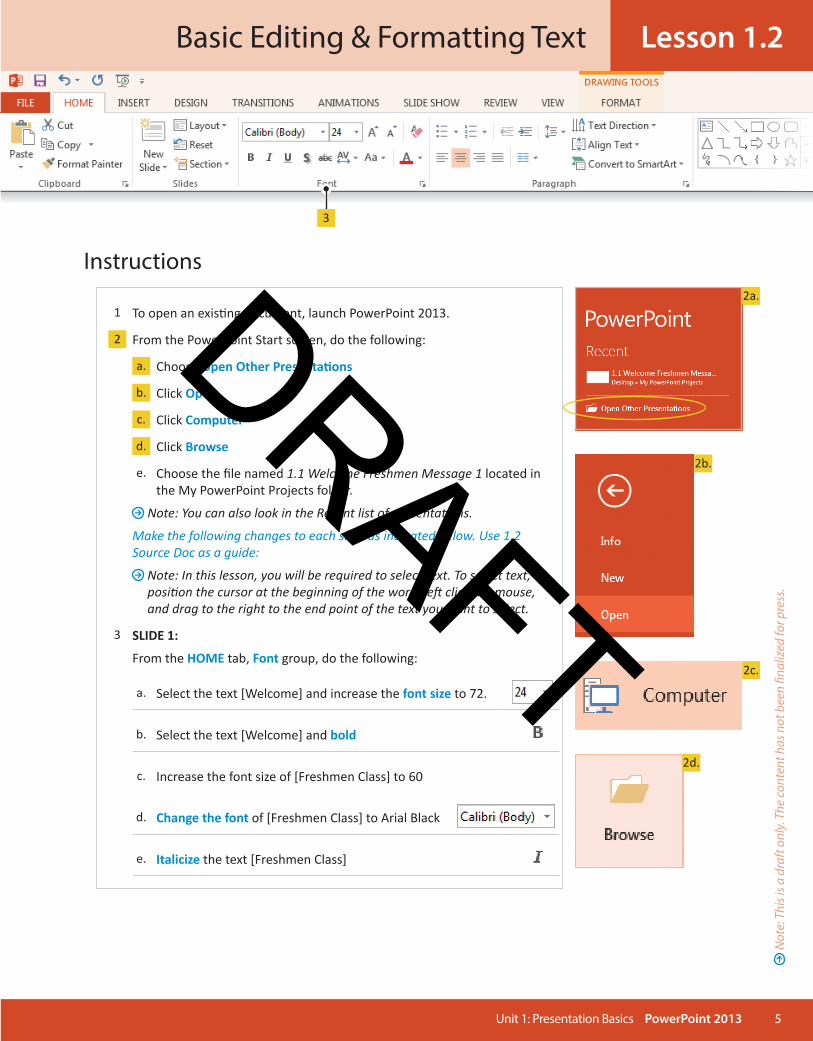
1 To open an existi ng document, launch PowerPoint 2013.
2 From the PowerPoint Start screen, do the following:
a. Choose Open Other Presentati ons
b. Click Open
c. Click Computer
d. Click Browse
e. Choose the fi le named 1.1 Welcome Freshmen Message 1 located in the My PowerPoint Projects folder.
Note: You can also look in the Recent list of presentati ons.
Make the following changes to each slide as indicated below. Use 1.2 Source Doc as a guide:
Note: In this lesson, you will be required to select text. To select text, positi on the cursor at the beginning of the word, left click the mouse, and drag to the right to the end point of the text you want to select.
3 SLIDE 1:
From the HOME tab, Font group, do the following:
a. Select the text [Welcome] and increase the font size to 72.
b. Select the text [Welcome] and bold
c. Increase the font size of [Freshmen Class] to 60
d. Change the font of [Freshmen Class] to Arial Black
e. Italicize the text [Freshmen Class]
Basic Editing & Formatting Text Lesson 1.2
2a.
2b.
2c.
2d.
3
Not
e: T
his i
s a d
raft
onl
y. T
he co
nten
t has
not
bee
n fi n
aliz
ed fo
r pre
ss.
DRAFT
6 PowerPoint 2013
3
Unit 1: Presentation Basics
Lesson 1.2 Basic Editing & Formatting Text
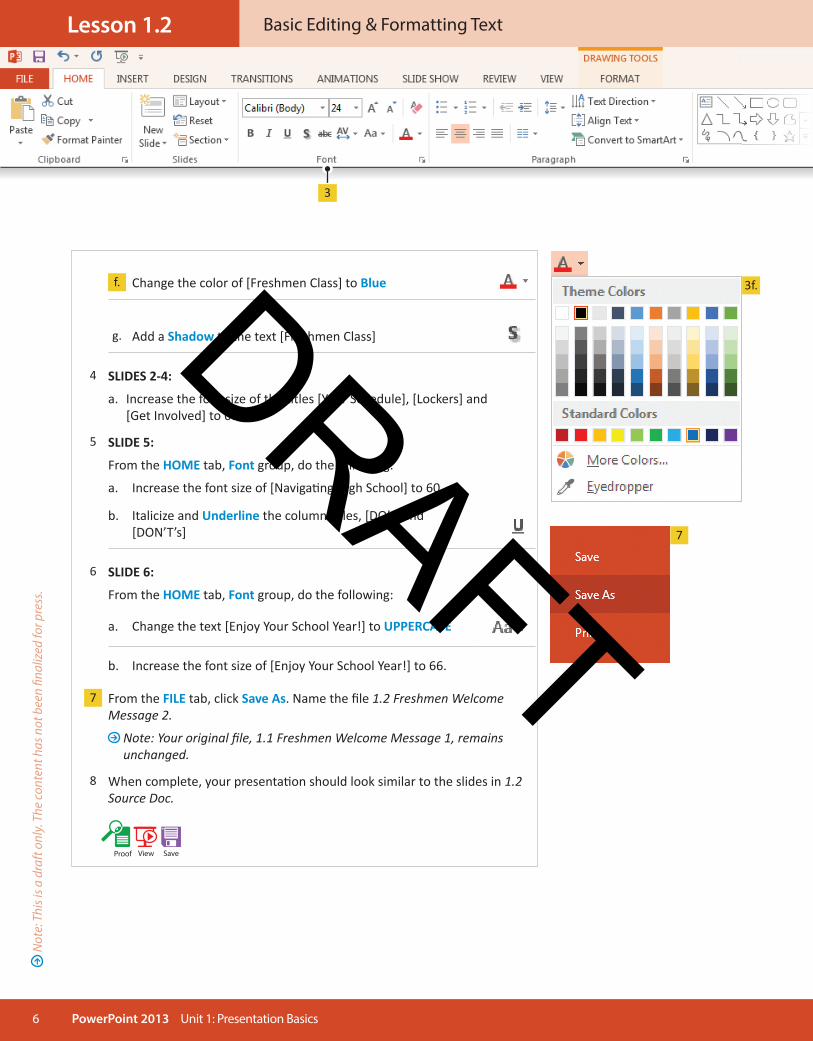
f. Change the color of [Freshmen Class] to Blue
g. Add a Shadow to the text [Freshmen Class]
4 SLIDES 2-4:
a. Increase the font size of the ti tles [Your Schedule], [Lockers] and [Get Involved] to 60.
5 SLIDE 5:
From the HOME tab, Font group, do the following:
a. Increase the font size of [Navigati ng High School] to 60
b. Italicize and Underline the column ti tles, [DO’s] and [DON’T’s]
6 SLIDE 6:
From the HOME tab, Font group, do the following:
a. Change the text [Enjoy Your School Year!] to UPPERCASE
b. Increase the font size of [Enjoy Your School Year!] to 66.
7 From the FILE tab, click Save As. Name the fi le 1.2 Freshmen Welcome Message 2.
Note: Your original fi le, 1.1 Freshmen Welcome Message 1, remains unchanged.
8 When complete, your presentati on should look similar to the slides in 1.2 Source Doc.
Proof View Save
3f.
7
Not
e: T
his i
s a d
raft
onl
y. T
he co
nten
t has
not
bee
n fi n
aliz
ed fo
r pre
ss.
DRAFT
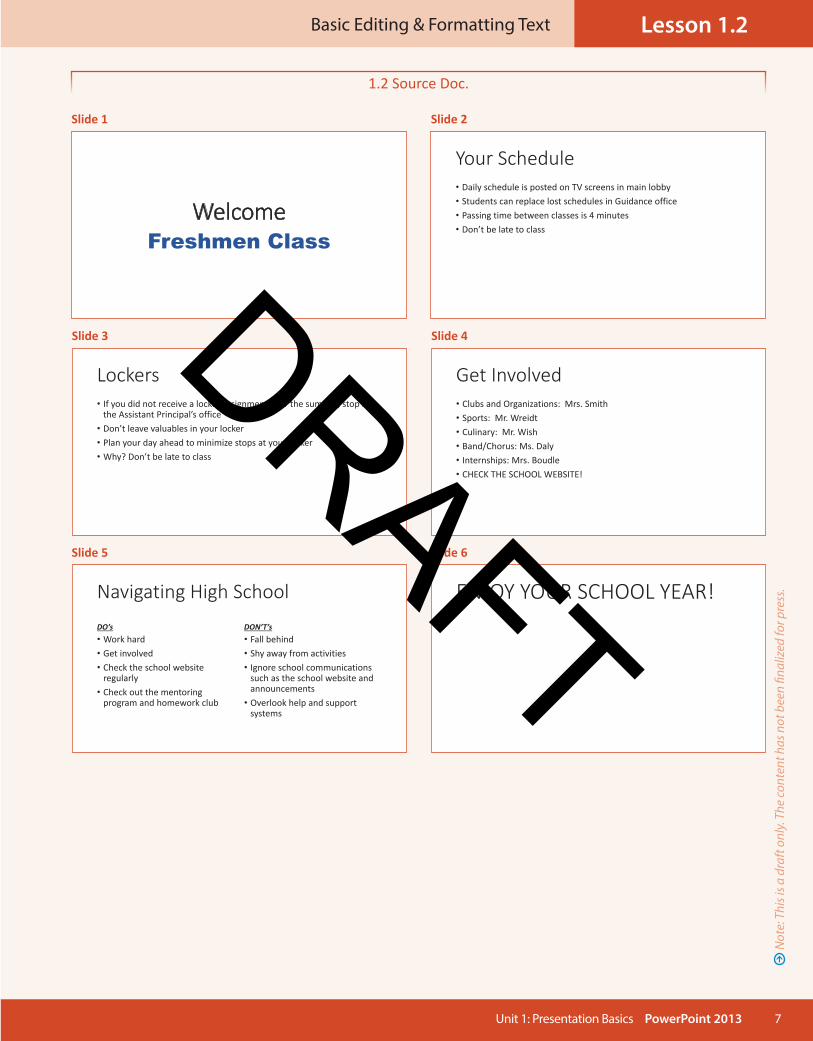
7PowerPoint 2013 Unit 1: Presentation Basics
Lesson 1.2Basic Editing & Formatting Text
ENJOY YOUR SCHOOL YEAR!Navigating High SchoolDO’s• Work hard• Get involved• Check the school website regularly
• Check out the mentoring program and homework club
DON’T’s• Fall behind• Shy away from activities• Ignore school communications such as the school website and announcements
• Overlook help and support systems
Lockers• If you did not receive a locker assignment over the summer, stop by the Assistant Principal’s office
• Don’t leave valuables in your locker• Plan your day ahead to minimize stops at your locker• Why? Don’t be late to class
Get Involved• Clubs and Organizations: Mrs. Smith• Sports: Mr. Wreidt• Culinary: Mr. Wish• Band/Chorus: Ms. Daly• Internships: Mrs. Boudle• CHECK THE SCHOOL WEBSITE!
Your Schedule• Daily schedule is posted on TV screens in main lobby• Students can replace lost schedules in Guidance office• Passing time between classes is 4 minutes• Don’t be late to class
WelcomeFreshmen Class
Slide 3
Slide 5 Slide 6
Slide 4
Slide 2 Slide 1
1.2 Source Doc.
Not
e: T
his i
s a d
raft
onl
y. T
he co
nten
t has
not
bee
n fin
aliz
ed fo
r pre
ss.
DRAFT

8 PowerPoint 2013
Lesson 1.3
New Skills: Aligning text [Left, Center, Right]
Numbered list
Removing a bullet
Insert hard return
Line spacing
Unit 1: Presentation Basics
The Decision Making ProcessFormatting Text & Paragraphs
Tools & Terms You’ll Use:
Line and paragraph spacing: This icon allows you to choose how much space appears between lines of text or between paragraphs.
Hard return: Entering a return that moves your cursor to the next line. Holding Shift and hitting the enter key allows you to do this.
Left Alignment: This icon aligns your text to the left side of the slide.
Right Alignment: This icon aligns your text to the right side of the slide.
Center Alignment: This icon allows you to horizontally center your text on the slide. Center aligning text is often used with titles and cover pages.
Numbered list: This icon allows you to create a numbered list.
Lesson Description:You have to give an oral presentation for the Speech unit in your English class. You have been struggling with a topic, so you met with your teacher, Mrs. Crandall. She was impressed with the organized plan you have been following for your college search. She suggested that you give a presentation on the decision making process to the class in the hope that others can improve their decision making skills.
In this lesson, you will prepare an 8-slide presentation using the Blank Presentation option from the Office templates. You will apply text formatting techniques.
Enter
Bulleted list: This icon allows you to create a bulleted list.
Not
e: T
his i
s a d
raft
onl
y. T
he co
nten
t has
not
bee
n fin
aliz
ed fo
r pre
ss.
DRAFT
9PowerPoint 2013 Unit 2: Presentation Basics
Instructions
Lesson 1.3Formatting Text & Paragraphs
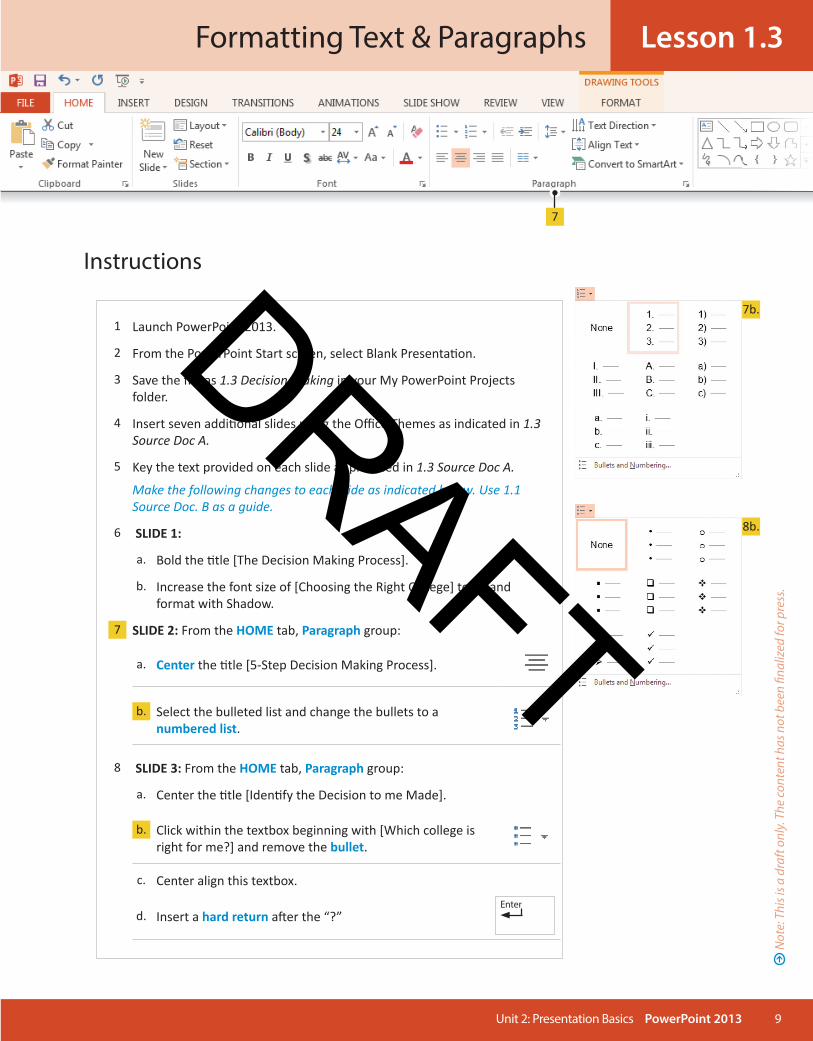
1 Launch PowerPoint 2013.
2 From the PowerPoint Start screen, select Blank Presentati on.
3 Save the fi le as 1.3 Decision Making in your My PowerPoint Projects folder.
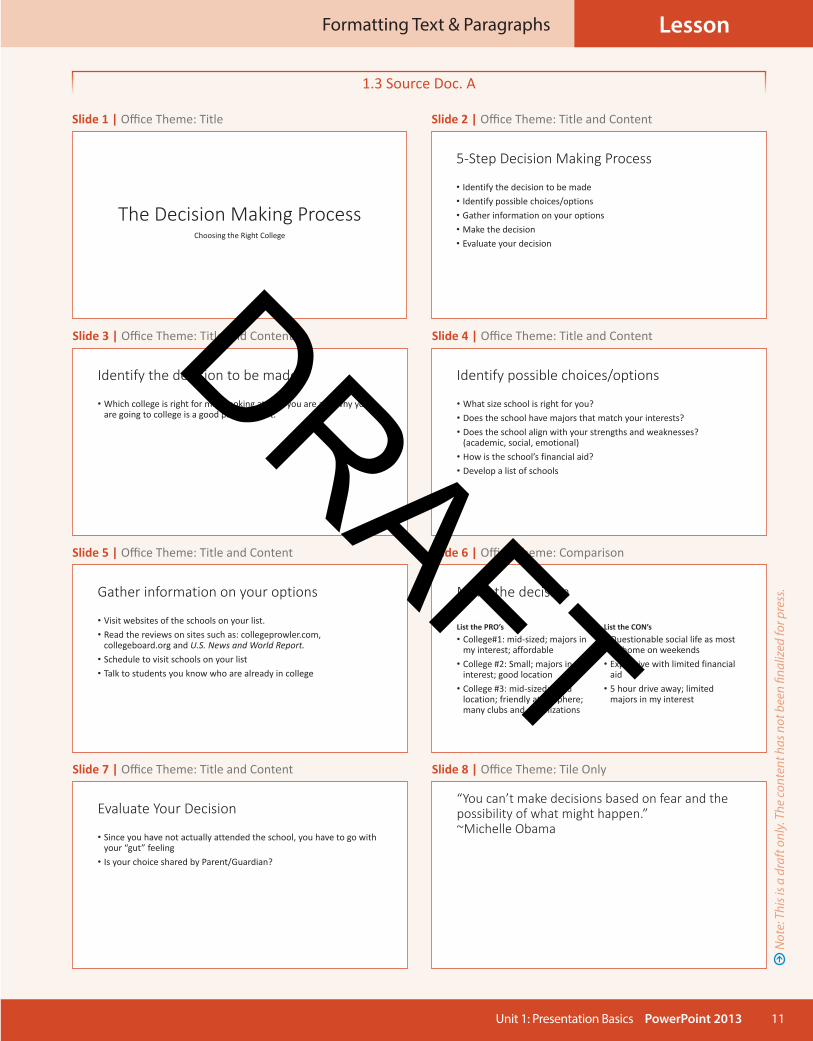
4 Insert seven additi onal slides using the Offi ce Themes as indicated in 1.3 Source Doc A.
5 Key the text provided on each slide as provided in 1.3 Source Doc A.
Make the following changes to each slide as indicated below. Use 1.1 Source Doc. B as a guide.
6 SLIDE 1:
a. Bold the ti tle [The Decision Making Process].
b. Increase the font size of [Choosing the Right College] to 36 and format with Shadow.
7 SLIDE 2: From the HOME tab, Paragraph group:
a. Center the ti tle [5-Step Decision Making Process].
b. Select the bulleted list and change the bullets to a numbered list.
8 SLIDE 3: From the HOME tab, Paragraph group:
a. Center the ti tle [Identi fy the Decision to me Made].
b. Click within the textbox beginning with [Which college is right for me?] and remove the bullet.
c. Center align this textbox.
d. Insert a hard return aft er the “?” Enter
7b.
8b.
7
Not
e: T
his i
s a d
raft
onl
y. T
he co
nten
t has
not
bee
n fi n
aliz
ed fo
r pre
ss.
DRAFT
10 PowerPoint 2013
Formatting Text & Paragraphs
Unit 1: Presentation Basics
Lesson 1.3
9 SLIDES 4 and 5:
a. Center align the ti tles [Identi fy Possible Choices/Opti ons] and [Gather Informati on on Your Opti ons].
10 SLIDE 6:
a. Center the ti tle [Make the Decision].
b. Underline the column ti tles [List the PRO’s] and [List the CON’s].
11 SLIDE 7:
a. Center the ti tle [Evaluate Your Decision]
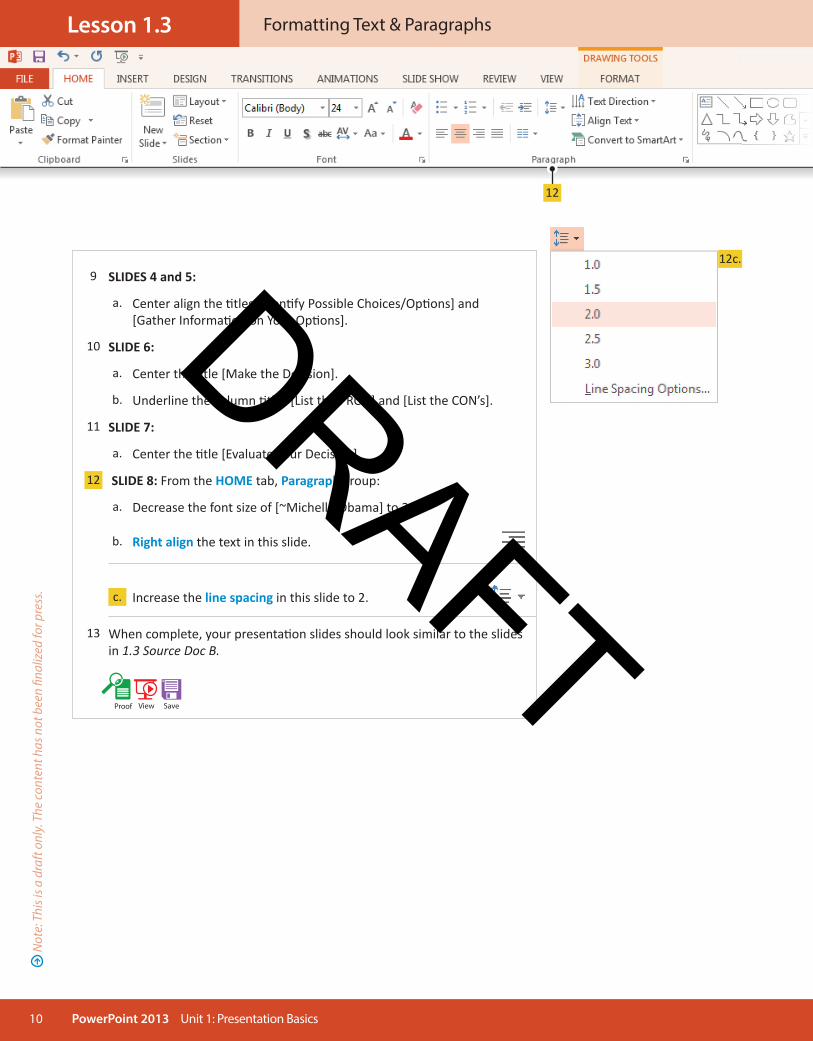
12 SLIDE 8: From the HOME tab, Paragraph group:
a. Decrease the font size of [~Michelle Obama] to 22.
b. Right align the text in this slide.
c. Increase the line spacing in this slide to 2.
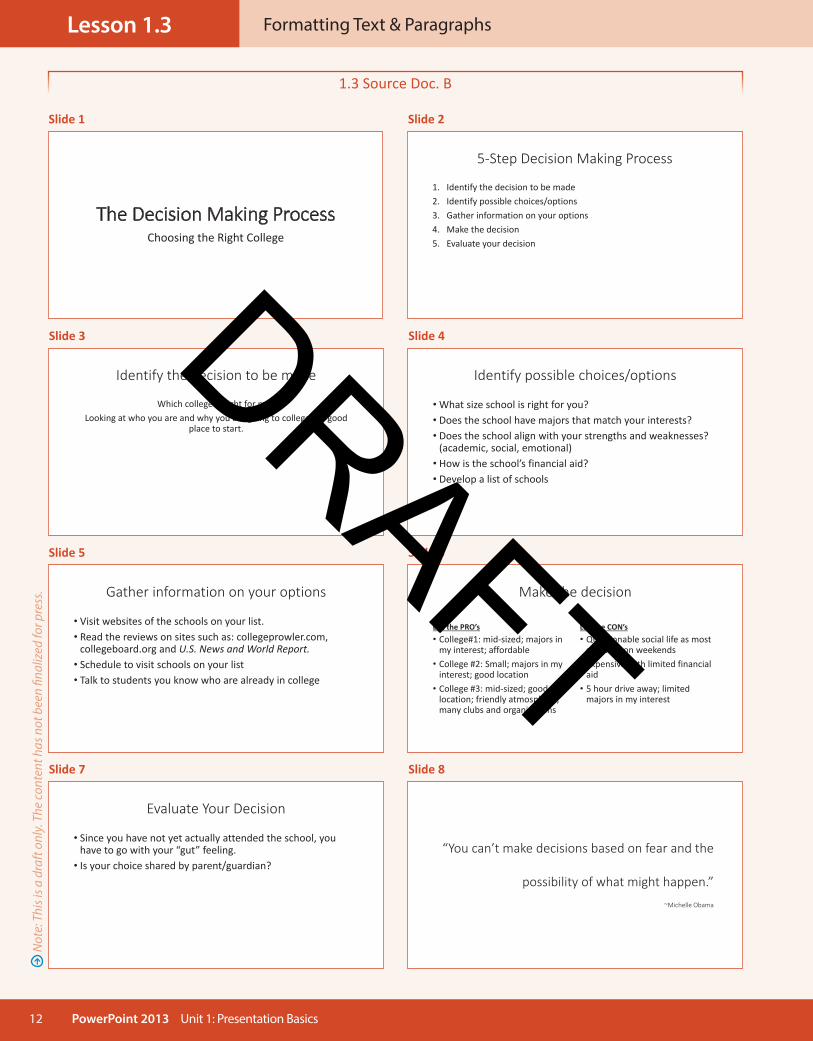
13 When complete, your presentati on slides should look similar to the slides in 1.3 Source Doc B.
Proof View Save
12c.
12
Not
e: T
his i
s a d
raft
onl
y. T
he co
nten
t has
not
bee
n fi n
aliz
ed fo
r pre
ss.
DRAFT
11PowerPoint 2013
Lesson
Unit 1: Presentation Basics
Formatting Text & Paragraphs
Slide 7 | Office Theme: Title and Content Slide 8 | Office Theme: Tile Only
Slide 6 | Office Theme: ComparisonSlide 5 | Office Theme: Title and Content
Slide 3 | Office Theme: Title and Content Slide 4 | Office Theme: Title and Content
Slide 2 | Office Theme: Title and ContentSlide 1 | Office Theme: Title
“You can’t make decisions based on fear and the possibility of what might happen.”~Michelle Obama
Evaluate Your Decision
• Since you have not actually attended the school, you have to go with your “gut” feeling
• Is your choice shared by Parent/Guardian?
Make the decision
List the PRO’s• College#1: mid‐sized; majors in my interest; affordable
• College #2: Small; majors in my interest; good location
• College #3: mid‐sized; good location; friendly atmosphere; many clubs and organizations
List the CON’s• Questionable social life as most go home on weekends
• Expensive with limited financial aid
• 5 hour drive away; limited majors in my interest
Gather information on your options
• Visit websites of the schools on your list.• Read the reviews on sites such as: collegeprowler.com, collegeboard.org and U.S. News and World Report.
• Schedule to visit schools on your list• Talk to students you know who are already in college
Identify the decision to be made
• Which college is right for me? Looking at who you are and why you are going to college is a good place to start.
Identify possible choices/options
• What size school is right for you?• Does the school have majors that match your interests?• Does the school align with your strengths and weaknesses? (academic, social, emotional)
• How is the school’s financial aid?• Develop a list of schools
5‐Step Decision Making Process
• Identify the decision to be made• Identify possible choices/options• Gather information on your options• Make the decision• Evaluate your decision
The Decision Making ProcessChoosing the Right College
1.3 Source Doc. A
Not
e: T
his i
s a d
raft
onl
y. T
he co
nten
t has
not
bee
n fin
aliz
ed fo
r pre
ss.
DRAFT
12 PowerPoint 2013
Lesson 1.3 Formatting Text & Paragraphs
Unit 1: Presentation Basics
“You can’t make decisions based on fear and the
possibility of what might happen.”~Michelle Obama
Evaluate Your Decision
• Since you have not yet actually attended the school, you have to go with your “gut” feeling.
• Is your choice shared by parent/guardian?
Make the decision
List the PRO’s• College#1: mid‐sized; majors in my interest; affordable
• College #2: Small; majors in my interest; good location
• College #3: mid‐sized; good location; friendly atmosphere; many clubs and organizations
List the CON’s• Questionable social life as most go home on weekends
• Expensive with limited financial aid
• 5 hour drive away; limited majors in my interest
Gather information on your options
• Visit websites of the schools on your list.• Read the reviews on sites such as: collegeprowler.com, collegeboard.org and U.S. News and World Report.
• Schedule to visit schools on your list• Talk to students you know who are already in college
Identify possible choices/options
• What size school is right for you?• Does the school have majors that match your interests?• Does the school align with your strengths and weaknesses? (academic, social, emotional)
• How is the school’s financial aid?• Develop a list of schools
Identify the decision to be made
Which college is right for me? Looking at who you are and why you are going to college is a good
place to start.
5‐Step Decision Making Process
1. Identify the decision to be made2. Identify possible choices/options3. Gather information on your options4. Make the decision5. Evaluate your decision
The Decision Making ProcessChoosing the Right College
1.3 Source Doc. B
Slide 7 Slide 8
Slide 6Slide 5
Slide 3 Slide 4
Slide 2Slide 1
Not
e: T
his i
s a d
raft
onl
y. T
he co
nten
t has
not
bee
n fin
aliz
ed fo
r pre
ss.
DRAFT