Unified Threat Management - SmoothWall · Unified Threat Management Advanced Firewall Installation...
54
Unified Threat Management Advanced Firewall Installation Guide For future reference Advanced Firewall serial number: Date installed: Smoothwall contact:
Transcript of Unified Threat Management - SmoothWall · Unified Threat Management Advanced Firewall Installation...
Unified Threat ManagementAdvanced Firewall Installation Guide
For future reference
Advanced Firewall serial number:
Date installed:
Smoothwall contact:

Smoothwall® Advanced Firewall, Installation Guide, August 2014Smoothwall publishes this guide in its present form without any guarantees. This guide replaces any other guides delivered with earlier versions of Advanced Firewall.No part of this document may be reproduced or transmitted in any form or by any means, electronic or mechanical, for any purpose, without the express written permission of Smoothwall. For more information, contact: [email protected]© 2001 – 2014 Smoothwall Ltd. All rights reserved.
Trademark notice
Smoothwall and the Smoothwall logo are registered trademarks of Smoothwall Ltd.Linux is a registered trademark of Linus Torvalds. Snort is a registered trademark of Sourcefire INC. DansGuardian is a registered trademark of Daniel Barron. Microsoft, Internet Explorer, Window 95, Windows 98, Windows NT, Windows 2000 and Windows XP are either registered trademarks or trademarks of Microsoft Corporation in the United States and/or other countries. Netscape is a registered trademark of Netscape Communications Corporation in the United States and other countries. Apple and Mac are registered trademarks of Apple Computer Inc. Intel is a registered trademark of Intel Corporation. Core is a trademark of Intel Corporation. All other products, services, companies, events and publications mentioned in this document, associated documents and in Smoothwall software may be trademarks, registered trademarks or service marks of their respective owners in the UK, US and/or other countries.
Acknowledgements
Smoothwall acknowledges the work, effort and talent of the Smoothwall GPL development team: Lawrence Manning and Gordon Allan, William Anderson, Jan Erik Askildt, Daniel Barron, Emma Bickley, Imran Chaudhry, Alex Collins, Dan Cuthbert, Bob Dunlop, Moira Dunne, Nigel Fenton, Mathew Frank, Dan Goscomb, Pete Guyan, Nick Haddock, Alan Hourihane, Martin Houston, Steve Hughes, Eric S. Johansson, Stephen L. Jones, Toni Kuokkanen, Luc Larochelle, Osmar Lioi, Richard Morrell, Piere-Yves Paulus, John Payne, Martin Pot, Stanford T. Prescott, Ralf Quint, Guy Reynolds, Kieran Reynolds, Paul Richards, Chris Ross, Scott Sanders, Emil Schweickerdt, Paul Tansom, Darren Taylor, Hilton Travis, Jez Tucker, Bill Ward, Rebecca Ward, Lucien Wells, Adam Wilkinson, Simon Wood, Nick Woodruffe, Marc Wormgoor. Advanced Firewall contains graphics taken from the Open Icon Library project http://openiconlibrary.sourceforge.net/
Address Smoothwall Limited1 John Charles WayLeeds. LS12 6QAUnited Kingdom
Email [email protected]
Web www.smoothwall.net
Telephone USA and Canada:United Kingdom:All other countries:
1 800 959 37600870 1 999 500+44 870 1 999 500
Fax USA and Canada:United Kingdom:All other countries:
1 888 899 91640870 1 991 399+44 870 1 991 399
ContentsAbout This Guide ...................................................... 1Audience and Scope......................................................................... 1Organization and Use ....................................................................... 1Conventions....................................................................................... 2Related Documentation.................................................................... 2
Chapter 1 Introduction ............................................................... 3Welcome ............................................................................................ 3Advanced Firewall Overview............................................................ 3
Advanced Firewall Add-on Modules ...................................... 4Minimum Hardware Requirements ................................................. 4About Registration ............................................................................ 4
Chapter 2 Installing Advanced Firewall .................................... 5Warning! ............................................................................................. 5Before You Start................................................................................ 5Messages and Conventions............................................................. 6Running Advanced Firewall’s Quick Install .................................... 6Running Advanced Firewall’s Advanced Install ........................... 12
Chapter 3 Setting up Advanced Firewall ................................ 19Setting up Advanced Firewall ........................................................ 19Running the Setup Program........................................................... 20
Configuring Web Proxy Settings .......................................... 21Enabling Access via the Serial Console .............................. 22Configuring Hardware Options............................................. 22Enabling ADSL ....................................................................... 23Enabling ISDN ........................................................................ 26Configuring Outgoing Defaults............................................. 28Enabling DHCP....................................................................... 29
Setting Account Passwords........................................................... 30About Passwords................................................................... 31
iii

Advanced Firewall Installation Guide Contents
Setting Passwords................................................................. 31
Chapter 4 Migrating and Restoring Settings.......................... 33Prerequisites ................................................................................... 33Migrating/Restoring Settings......................................................... 33
Chapter 5 Accessing Advanced Firewall ................................ 39Accessing Advanced Firewall for the First Time.......................... 39Connecting to the Internet ............................................................. 42Installing Updates ........................................................................... 43
Appendix A ADSL Settings ......................................................... 45VPI, VCI and Encapsulation Settings............................................. 45
Index......................................................................... 47
iv Smoothwall Ltd

About This GuideAdvanced Firewall is a licenced feature of your Smoothwall System.
This manual provides guidance for installing and managing Advanced Firewall.
Audience and ScopeThis guide is aimed at system administrators maintaining and deploying Advanced Firewall.
This guide assumes the following prerequisite knowledge:
• An overall understanding of the functionality of the Smoothwall System
• An overall understanding of networking concepts
Note: We strongly recommend that everyone working with Smoothwall products attend Smoothwall training. For information on our current training courses, contact your Smoothwall representative.
Organization and UseThis guide is made up of the following chapters and appendices:
• Chapter 1, Introduction on page 3
• Chapter 2, Installing Advanced Firewall on page 5
• Chapter 3, Setting up Advanced Firewall on page 19
• Chapter 4, Migrating and Restoring Settings on page 33
• Chapter 5, Accessing Advanced Firewall on page 39
• Appendix A:ADSL Settings on page 45
• Index on page 47
1
Advanced Firewall Installation Guide About This Guide
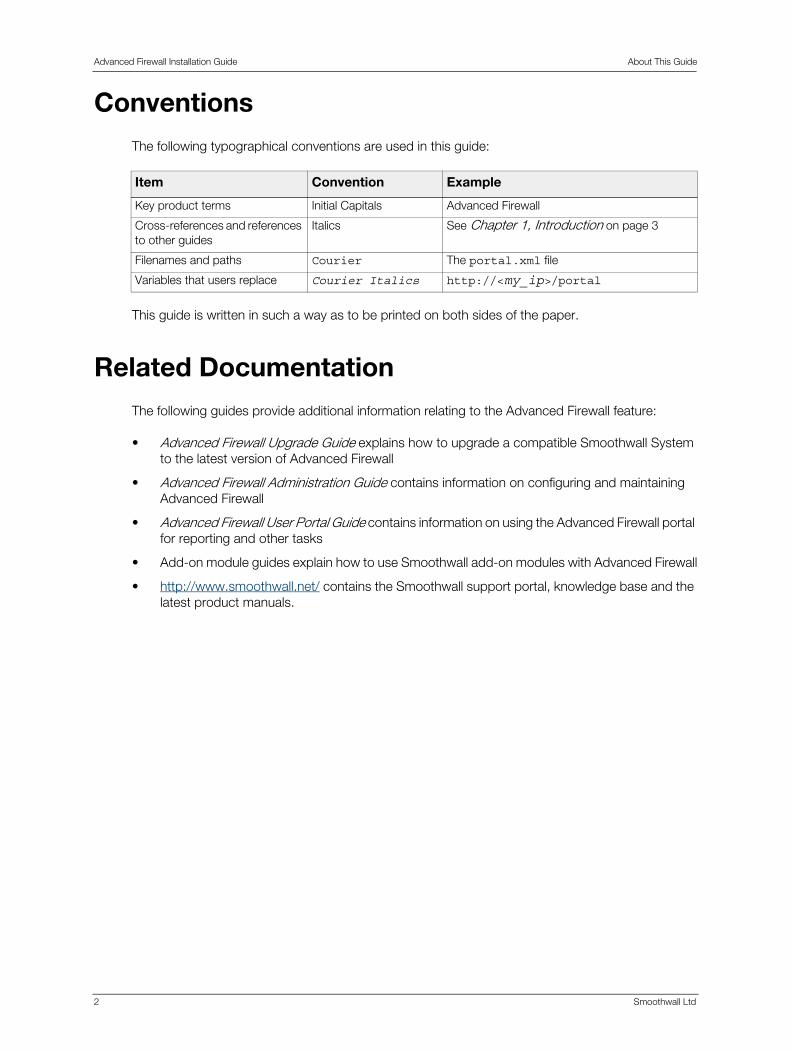
ConventionsThe following typographical conventions are used in this guide:
This guide is written in such a way as to be printed on both sides of the paper.
Related DocumentationThe following guides provide additional information relating to the Advanced Firewall feature:
• Advanced Firewall Upgrade Guide explains how to upgrade a compatible Smoothwall System to the latest version of Advanced Firewall
• Advanced Firewall Administration Guide contains information on configuring and maintaining Advanced Firewall
• Advanced Firewall User Portal Guide contains information on using the Advanced Firewall portal for reporting and other tasks
• Add-on module guides explain how to use Smoothwall add-on modules with Advanced Firewall
• http://www.smoothwall.net/ contains the Smoothwall support portal, knowledge base and the latest product manuals.
Item Convention Example
Key product terms Initial Capitals Advanced Firewall
Cross-references and references to other guides
Italics See Chapter 1, Introduction on page 3
Filenames and paths Courier The portal.xml file
Variables that users replace Courier Italics http://<my_ip>/portal
2 Smoothwall Ltd

1 IntroductionIn this chapter:
• An overview of Advanced Firewall
• System and hardware information
• Support information.
WelcomeAdvanced Firewall is Smoothwall’s Unified Threat Management system for enterprise networks. Combining the functions of perimeter and internal firewalls, Advanced Firewall employs Microsoft Active Directory®/LDAP user authentication for policy based access control to local network zones and Internet services.
Secure wireless, secure remote access and site-to-site IPSec connectivity are provided by the integrated VPN gateway. Add-on modules broaden the capabilities of Advanced Firewall to include web security/content filtering, bandwidth management (QoS) and email anti-virus protection.
Advanced Firewall Overview
Advanced Firewall provides:
• Perimeter firewall – multiple Internet connections with load sharing and automatic connection failover
• User authentication – policy-based access control and user authentication with support for Microsoft Active Directory, Novell eDirectory and other LDAP authentication servers
• Load balancer – the ideal solution for the efficient and resilient use of multiple Internet connections
• Internal firewall – segregation of networks into physically separate zones with user-level access control of inter-zone traffic
• VPN Gateway – site-to-site, secure remote access and secure wireless connections.
3

Advanced Firewall Installation Guide Introduction
Advanced Firewall Add-on Modules
Advanced Firewall has the following add-on module:
• SmoothTraffic – enables you to prioritize interactive traffic such as VoIP and web browsing for consistent performance and quality whilst maximizing the use of Internet connections.
• Guardian3 – an intelligent, web content filter which dynamically analyzes, understands and categorizes all web content requested by your users.
Minimum Hardware RequirementsThe following are the minimum hardware specifications:
About RegistrationAfter you install Advanced Firewall, it registers itself online with Smoothwall and checks for the latest updates available. This registration also activates the 30 day email support package that is included as standard with Advanced Firewall.
The following information is communicated to Smoothwall during the registration process:
• CPU specifications
• System memory (RAM) specifications
• Storage system specifications
• Interface configuration
• Module configuration
• Software version
• Installation date
• Enabled status for optional services
• Number of configured interfaces and whether they are internal or external
• Authentication type and LDAP server type
• Manufacturer name and product name
• Main board manufacturer name and product board name.
Note: All registration data is stored securely, in accordance with BS5750 and the Data Protection Act 1998.
Smoothwall does not, and cannot, capture any information other than that which is stated here, and which is transmitted as part of this one-time registration process.
Hardware Minimum requirement
Processor Core 2 Duo or later.
Memory Ram: 2 Gbytes or more.
4 Smoothwall Ltd

2 Installing AdvancedFirewall
In this chapter:
• Warning!
• What to consider before installing Advanced Firewall
• Install program messages and conventions
• How to run Advanced Firewall’s quick and advanced installation programs.
Warning!Do not install Advanced Firewall on your main or only computer.
Advanced Firewall’s installation program ERASES ALL DATA on the hard disk or storage device it detects. This includes any inserted USB storage device. Smoothwall cannot be held responsible for any loss of data.
Before you start the installation, ensure that all valuable data is safely backed up. Smoothwall cannot be held responsible for any loss of data.
Before You StartBefore you start, we strongly recommend that you:
• Consult your organization’s acceptable usage policy to determine what is acceptable when users access the Internet
• Consult your organization’s security policy to determine the Advanced Firewall configuration that will suit your organization best
5
Advanced Firewall Installation Guide Installing Advanced Firewall
• Determine where your Advanced Firewall installation will be located physically and how you will control physical access to it
• Install, configure and test Advanced Firewall in a test environment to ensure that you have the correct level of security before you install it in a production environment
• Ensure everyone who will be working with Advanced Firewall has good networking and information security skills, has received adequate Advanced Firewall training and can be trusted to carry out their duties professionally and without malice.
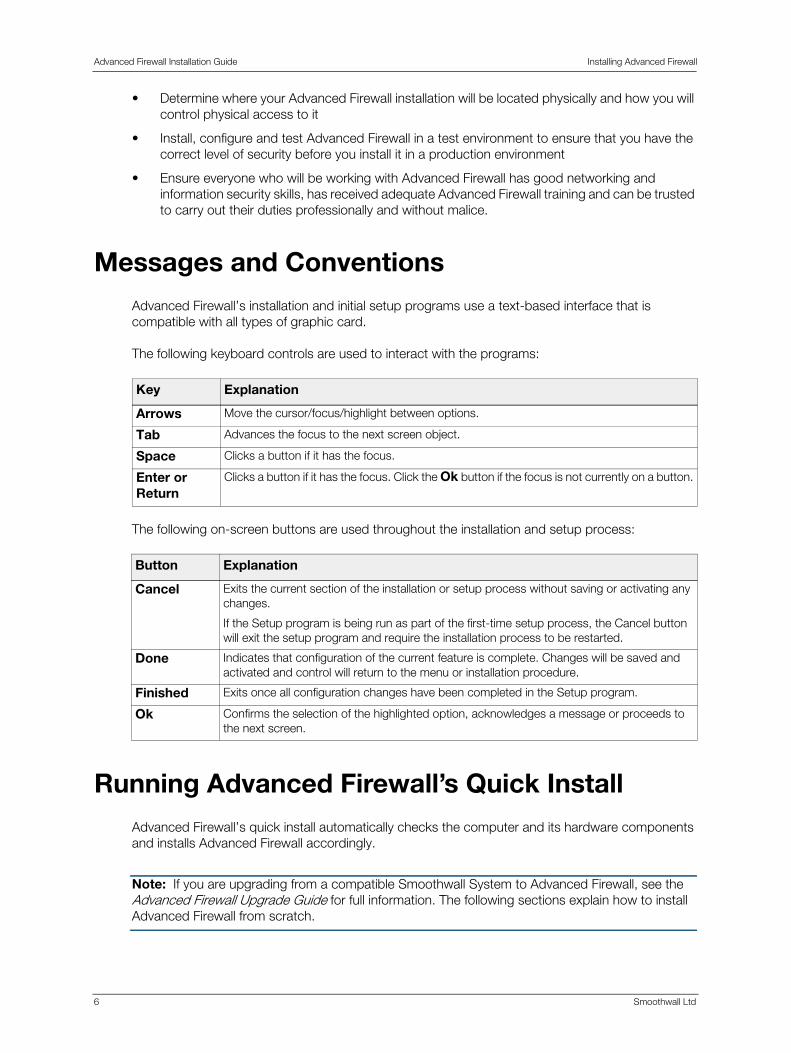
Messages and ConventionsAdvanced Firewall’s installation and initial setup programs use a text-based interface that is compatible with all types of graphic card.
The following keyboard controls are used to interact with the programs:
The following on-screen buttons are used throughout the installation and setup process:
Running Advanced Firewall’s Quick InstallAdvanced Firewall’s quick install automatically checks the computer and its hardware components and installs Advanced Firewall accordingly.
Note: If you are upgrading from a compatible Smoothwall System to Advanced Firewall, see the Advanced Firewall Upgrade Guide for full information. The following sections explain how to install Advanced Firewall from scratch.
Key Explanation
Arrows Move the cursor/focus/highlight between options.
Tab Advances the focus to the next screen object.
Space Clicks a button if it has the focus.
Enter or Return
Clicks a button if it has the focus. Click the Ok button if the focus is not currently on a button.
Button Explanation
Cancel Exits the current section of the installation or setup process without saving or activating any changes.
If the Setup program is being run as part of the first-time setup process, the Cancel button will exit the setup program and require the installation process to be restarted.
Done Indicates that configuration of the current feature is complete. Changes will be saved and activated and control will return to the menu or installation procedure.
Finished Exits once all configuration changes have been completed in the Setup program.
Ok Confirms the selection of the highlighted option, acknowledges a message or proceeds to the next screen.
6 Smoothwall Ltd
Advanced Firewall Installation Guide Installing Advanced Firewall
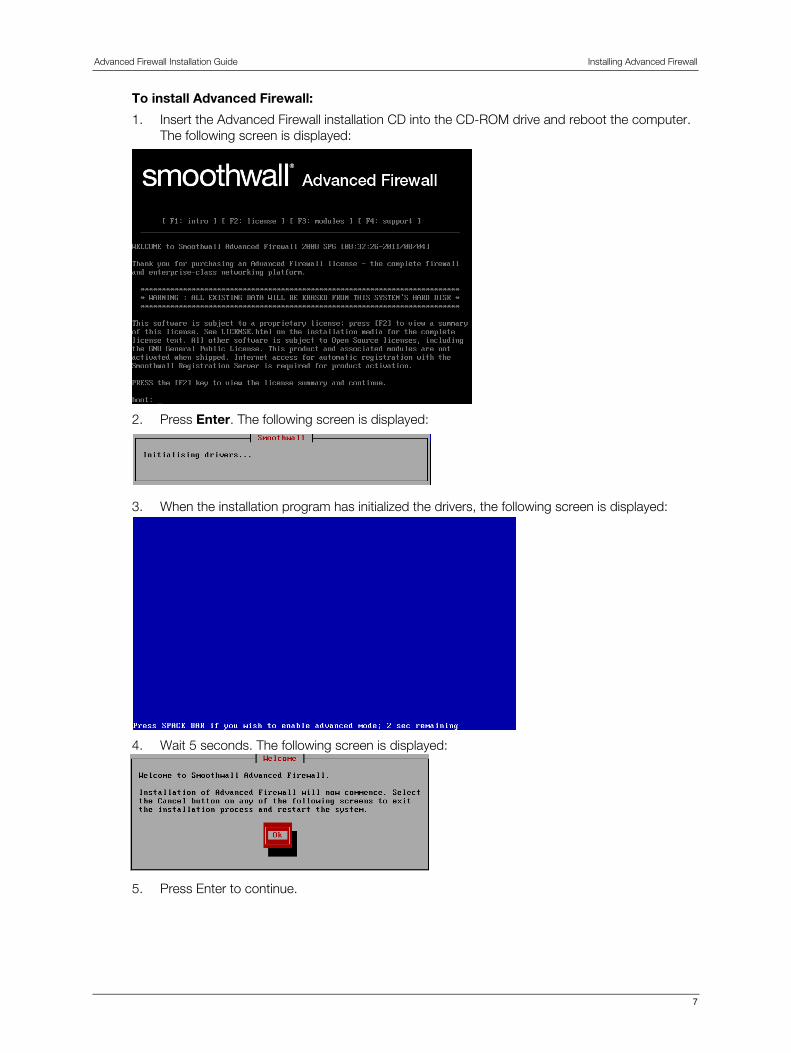
To install Advanced Firewall:
1. Insert the Advanced Firewall installation CD into the CD-ROM drive and reboot the computer. The following screen is displayed:
2. Press Enter. The following screen is displayed:
3. When the installation program has initialized the drivers, the following screen is displayed:
4. Wait 5 seconds. The following screen is displayed:
5. Press Enter to continue.
7

Advanced Firewall Installation Guide Installing Advanced Firewall
If you have more than one hard disk/storage device, the following screen is displayed:
6. Select Yes and press Enter to enable Advanced Firewall software RAID 1 support. Continue the installation at step 8..
Note: When using a hardware RAID device, the first volume on the first detected RAID card will be used – this is typically set up by RAID BIOS.
Or, select No and press Enter to continue. The following screen is displayed:
7. Select Yes and press Enter to use all of the second disk as a separate logging disk. This is mostly useful if the two disks are different sizes, in which case, the bigger disk should be second one and the smaller (OS) disk should be the first one. It also works in Hardware RAID setups. An example would be: volume 1: 2 disks in Mirror (OS) and volume 2: 4 disks in RAID5 (Logging).
Or, select No and press Enter to continue.
8. The following screen is displayed:
Note: Installing Advanced Firewall will ERASE ALL DATA from the computer’s hard disk/storage device. This includes any inserted USB storage device. Ensure that all valuable data is safely backed up before you continue.
This screen is the last opportunity you have to cancel the installation before data is erased. Smoothwall cannot be held responsible for any loss of data.
9. Press Enter to continue. Advanced Firewall files are installed. When complete, the Congratulations! screen is displayed:
8 Smoothwall Ltd
Advanced Firewall Installation Guide Installing Advanced Firewall
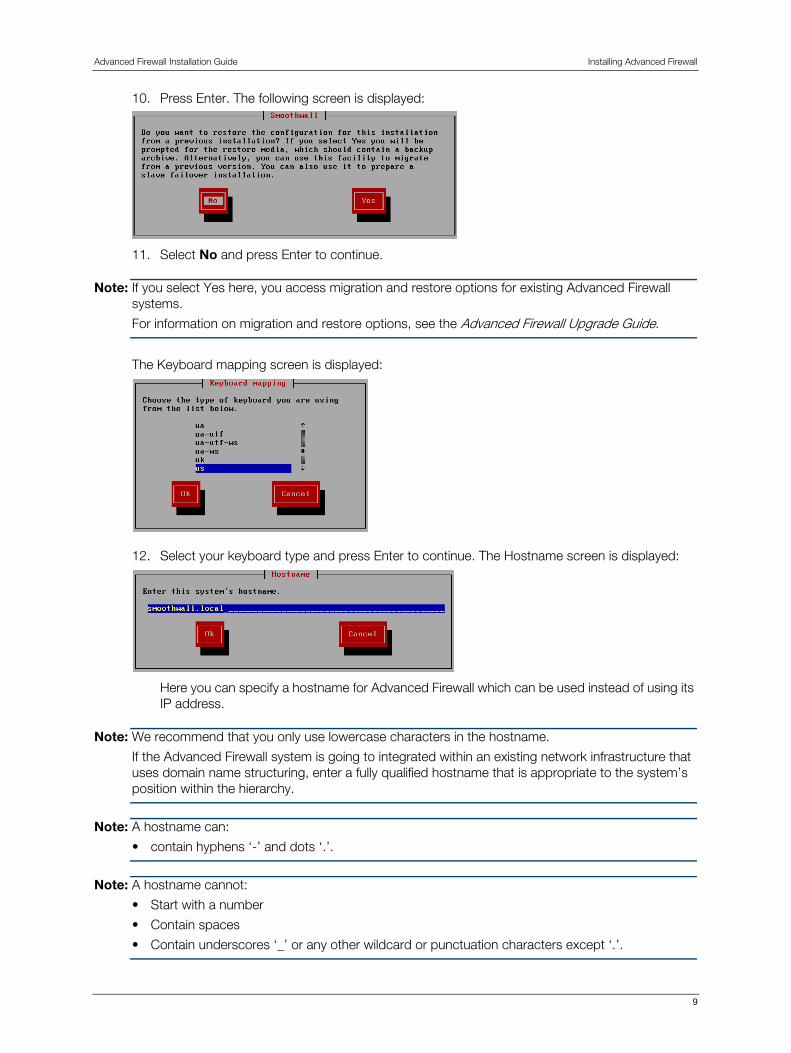
10. Press Enter. The following screen is displayed:
11. Select No and press Enter to continue.
Note: If you select Yes here, you access migration and restore options for existing Advanced Firewall systems.
For information on migration and restore options, see the Advanced Firewall Upgrade Guide.
The Keyboard mapping screen is displayed:
12. Select your keyboard type and press Enter to continue. The Hostname screen is displayed:
Here you can specify a hostname for Advanced Firewall which can be used instead of using its IP address.
Note: We recommend that you only use lowercase characters in the hostname.
If the Advanced Firewall system is going to integrated within an existing network infrastructure that uses domain name structuring, enter a fully qualified hostname that is appropriate to the system’s position within the hierarchy.
Note: A hostname can:
• contain hyphens ‘-’ and dots ‘.’.
Note: A hostname cannot:
• Start with a number
• Contain spaces
• Contain underscores ‘_’ or any other wildcard or punctuation characters except ‘.’.
9
Advanced Firewall Installation Guide Installing Advanced Firewall
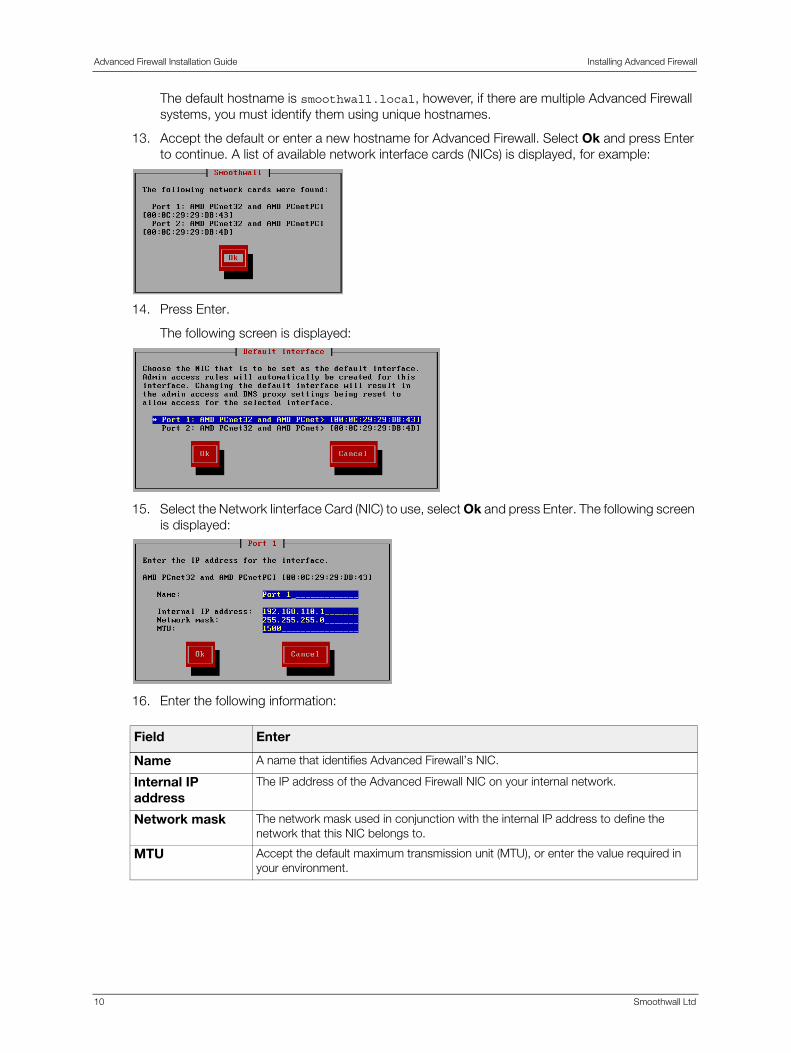
The default hostname is smoothwall.local, however, if there are multiple Advanced Firewall systems, you must identify them using unique hostnames.
13. Accept the default or enter a new hostname for Advanced Firewall. Select Ok and press Enter to continue. A list of available network interface cards (NICs) is displayed, for example:
14. Press Enter.
The following screen is displayed:
15. Select the Network Iinterface Card (NIC) to use, select Ok and press Enter. The following screen is displayed:
16. Enter the following information:
Field Enter
Name A name that identifies Advanced Firewall’s NIC.
Internal IP address
The IP address of the Advanced Firewall NIC on your internal network.
Network mask The network mask used in conjunction with the internal IP address to define the network that this NIC belongs to.
MTU Accept the default maximum transmission unit (MTU), or enter the value required in your environment.
10 Smoothwall Ltd
Advanced Firewall Installation Guide Installing Advanced Firewall
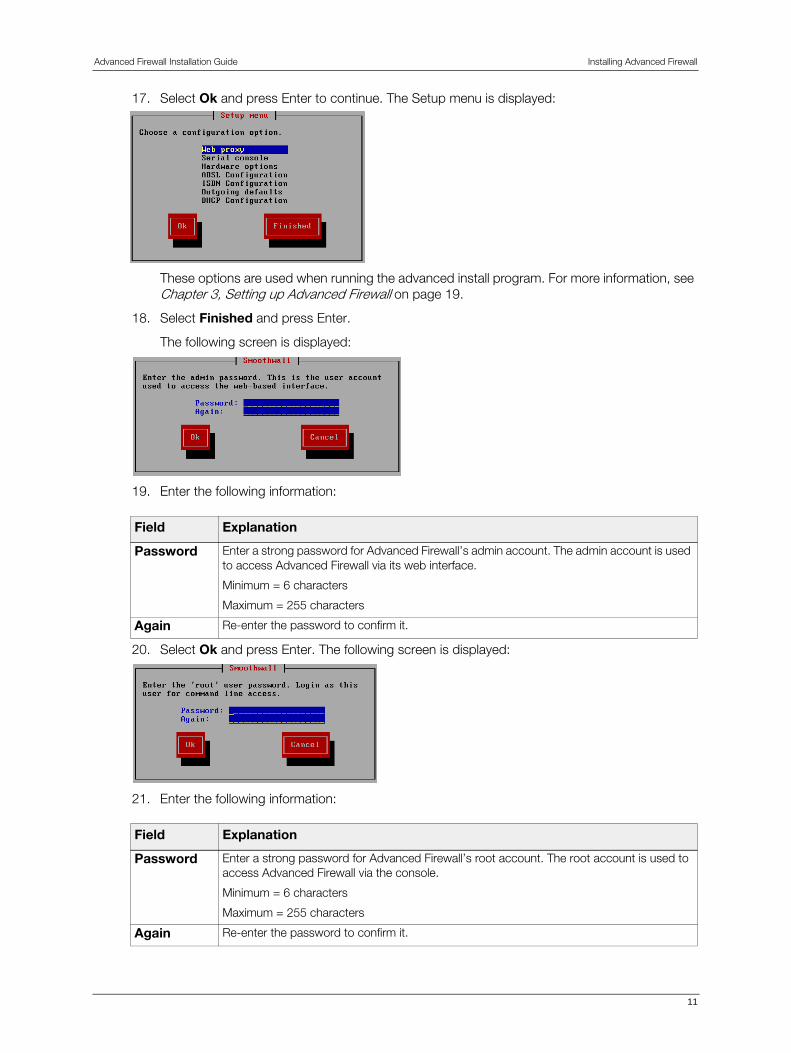
17. Select Ok and press Enter to continue. The Setup menu is displayed:
These options are used when running the advanced install program. For more information, see Chapter 3, Setting up Advanced Firewall on page 19.
18. Select Finished and press Enter.
The following screen is displayed:
19. Enter the following information:
20. Select Ok and press Enter. The following screen is displayed:
21. Enter the following information:
Field Explanation
Password Enter a strong password for Advanced Firewall’s admin account. The admin account is used to access Advanced Firewall via its web interface.
Minimum = 6 characters
Maximum = 255 characters
Again Re-enter the password to confirm it.
Field Explanation
Password Enter a strong password for Advanced Firewall’s root account. The root account is used to access Advanced Firewall via the console.
Minimum = 6 characters
Maximum = 255 characters
Again Re-enter the password to confirm it.
11
Advanced Firewall Installation Guide Installing Advanced Firewall
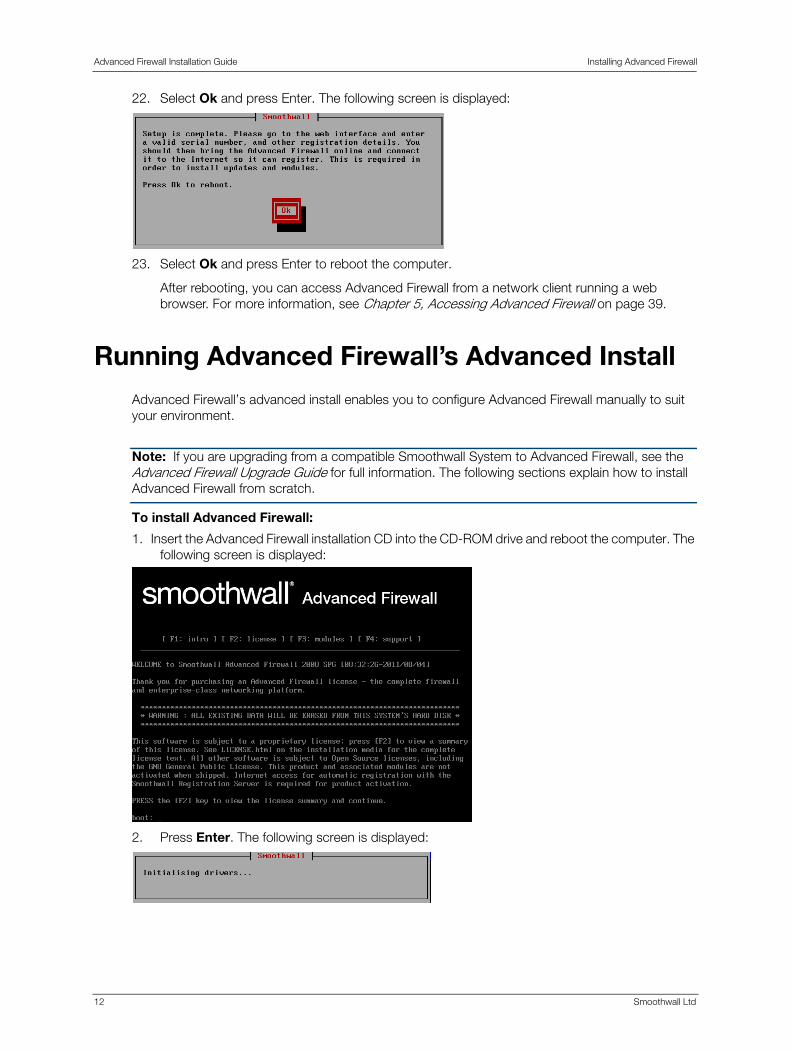
22. Select Ok and press Enter. The following screen is displayed:
23. Select Ok and press Enter to reboot the computer.
After rebooting, you can access Advanced Firewall from a network client running a web browser. For more information, see Chapter 5, Accessing Advanced Firewall on page 39.
Running Advanced Firewall’s Advanced InstallAdvanced Firewall’s advanced install enables you to configure Advanced Firewall manually to suit your environment.
Note: If you are upgrading from a compatible Smoothwall System to Advanced Firewall, see the Advanced Firewall Upgrade Guide for full information. The following sections explain how to install Advanced Firewall from scratch.
To install Advanced Firewall:
1. Insert the Advanced Firewall installation CD into the CD-ROM drive and reboot the computer. The following screen is displayed:
2. Press Enter. The following screen is displayed:
12 Smoothwall Ltd
Advanced Firewall Installation Guide Installing Advanced Firewall
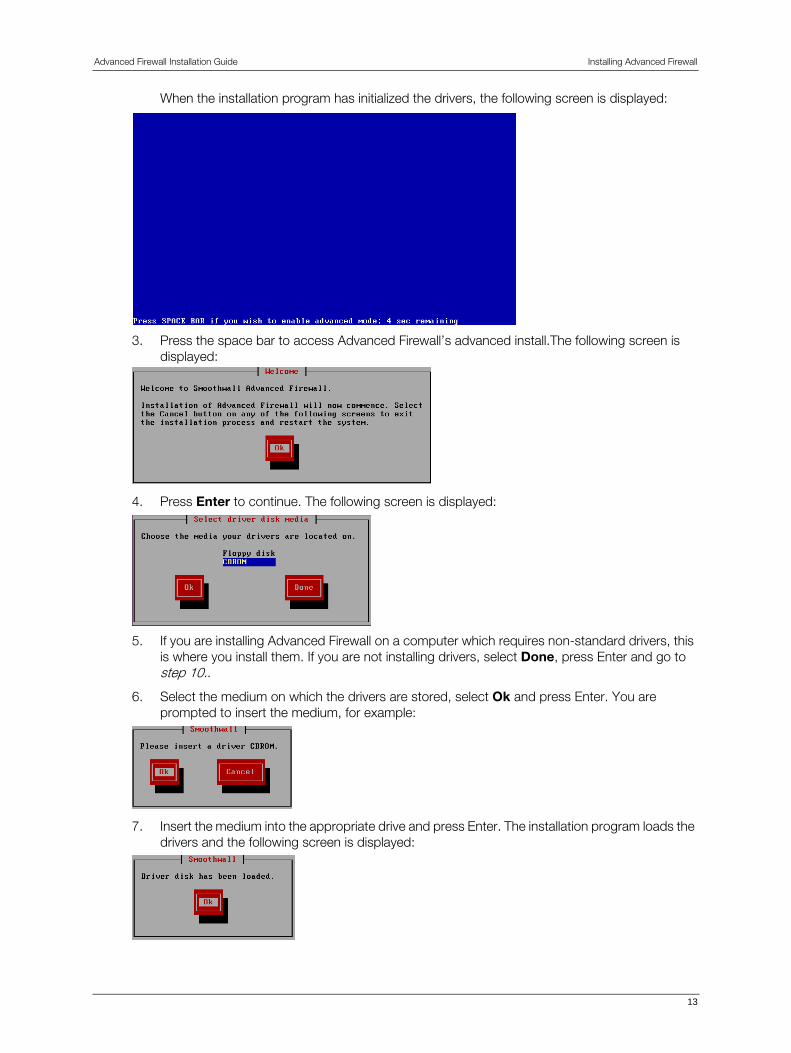
When the installation program has initialized the drivers, the following screen is displayed:
3. Press the space bar to access Advanced Firewall’s advanced install.The following screen is displayed:
4. Press Enter to continue. The following screen is displayed:
5. If you are installing Advanced Firewall on a computer which requires non-standard drivers, this is where you install them. If you are not installing drivers, select Done, press Enter and go to step 10..
6. Select the medium on which the drivers are stored, select Ok and press Enter. You are prompted to insert the medium, for example:
7. Insert the medium into the appropriate drive and press Enter. The installation program loads the drivers and the following screen is displayed:
13

Advanced Firewall Installation Guide Installing Advanced Firewall
8. Press Enter. The following screen is displayed:
9. Repeat step 6. to step 8. above if you need to install more drivers. To continue, select Done and press Enter. The following screen is displayed:
10. When the drivers have been initialized again, if you have more than one hard disk/storage device, the following screen is displayed:
11. Select Yes and press Enter to enable Advanced Firewall software RAID 1 support. Continue the installation at step 13..
Note: When using a hardware RAID device, the first volume on the first detected RAID card will be used – this is typically set up by RAID BIOS.
Or, select No and press Enter to continue. The following screen is displayed:
12. Select Yes and press Enter to use all of the second disk as a separate logging disk. This is mostly useful if the two disks are different sizes, in which case, the bigger disk should be second one and the smaller (OS) disk should be the first one. It also works in Hardware RAID setups. An example would be: volume 1: 2 disks in Mirror (OS) and volume 2: 4 disks in RAID5 (Logging).
Or, select No and press Enter to continue.
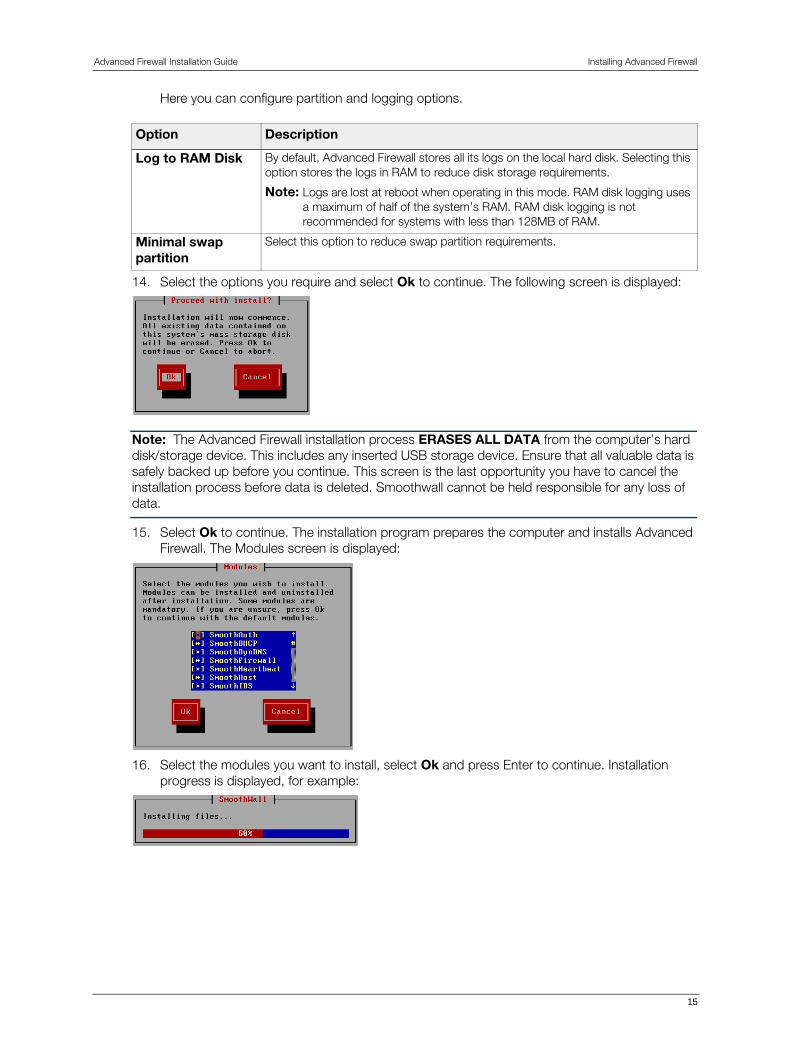
13. The Disk partitioning options screen is displayed, for example:
14 Smoothwall Ltd
Advanced Firewall Installation Guide Installing Advanced Firewall
Here you can configure partition and logging options.
14. Select the options you require and select Ok to continue. The following screen is displayed:
Note: The Advanced Firewall installation process ERASES ALL DATA from the computer’s hard disk/storage device. This includes any inserted USB storage device. Ensure that all valuable data is safely backed up before you continue. This screen is the last opportunity you have to cancel the installation process before data is deleted. Smoothwall cannot be held responsible for any loss of data.
15. Select Ok to continue. The installation program prepares the computer and installs Advanced Firewall. The Modules screen is displayed:
16. Select the modules you want to install, select Ok and press Enter to continue. Installation progress is displayed, for example:
Option Description
Log to RAM Disk By default, Advanced Firewall stores all its logs on the local hard disk. Selecting this option stores the logs in RAM to reduce disk storage requirements.
Note: Logs are lost at reboot when operating in this mode. RAM disk logging uses a maximum of half of the system’s RAM. RAM disk logging is not recommended for systems with less than 128MB of RAM.
Minimal swap partition
Select this option to reduce swap partition requirements.
15

Advanced Firewall Installation Guide Installing Advanced Firewall
Once complete, the Congratulations! screen is displayed:
17. Select Ok to continue.
The following screen is displayed:
18. Select No to start configuring your new installation of Advanced Firewall.
Note: If you select Yes here, you access migrate and restore options for existing Advanced Firewall systems. For information, see Chapter 4, Migrating and Restoring Settings on page 33.
When the Keyboard screen is displayed:
19. Select your keyboard type, select Ok and press Enter to continue. The Hostname screen is displayed:
Here you can specify a hostname for Advanced Firewall which can be used instead of using its IP address. We recommend that you only use lowercase characters in the hostname.
If the Advanced Firewall system is going to integrated within an existing network infrastructure that uses domain name structuring, enter a fully qualified hostname that is appropriate to the system’s position within the hierarchy.
16 Smoothwall Ltd
Advanced Firewall Installation Guide Installing Advanced Firewall
Note: A hostname can:
• contain hyphens ‘-’ and dots ‘.’
A hostname cannot:
• Start with a number
• Contain spaces
• Contain underscores ‘_’ or any other wildcard or punctuation characters except ‘.’.
The default hostname is smoothwall.local, however, if there are multiple Advanced Firewall systems, you must identify them using unique hostnames.
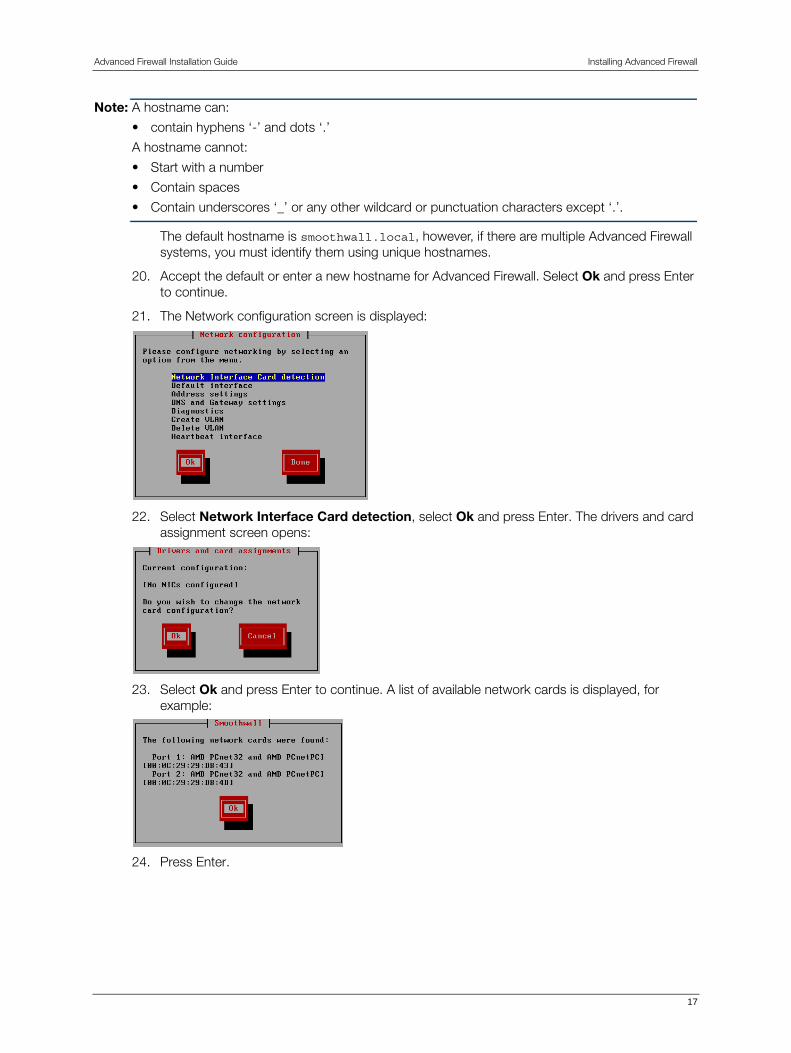
20. Accept the default or enter a new hostname for Advanced Firewall. Select Ok and press Enter to continue.
21. The Network configuration screen is displayed:
22. Select Network Interface Card detection, select Ok and press Enter. The drivers and card assignment screen opens:
23. Select Ok and press Enter to continue. A list of available network cards is displayed, for example:
24. Press Enter.
17

Advanced Firewall Installation Guide Installing Advanced Firewall
You return to the Network configuration screen. Select Default interface and press Enter. The Default interface screen is displayed:
25. Select which NIC to use as the default interface, select Ok and press Enter to continue.
26. On the Network configuration screen. Select Address settings and press Enter.
The Address settings screen is displayed:
27. Select the Network Interface Card (NIC) you want to use, select Ok and press Enter. The following screen is displayed:
28. Enter the following information:
29. Select Ok and press Enter to continue. On the Address settings screen, select Done and press Enter.
30. On the Network configuration screen, select Done and press Enter.
The Setup program starts and displays the Setup menu.
The next step is to set up Advanced Firewall. See Chapter 3, Setting up Advanced Firewall on page 19 for more information.
Field Enter
Name A name that identifies Advanced Firewall’s NIC.
Internal IP address
The IP address of the Advanced Firewall NIC on your internal network, for example.
Network mask The network mask used in conjunction with the internal IP address to define the network that this NIC belongs to.
MTU Accept the default maximum transmission unit (MTU), or enter the value required in your environment.
18 Smoothwall Ltd

3 Setting up AdvancedFirewall
In this chapter:
• Running the setup program
• How to configure the admin and root accounts required to administer Advanced Firewall.
Setting up Advanced FirewallSetting up Advanced Firewall entails configuring network and other connection settings using the Setup program.
Note: You can configure settings after Advanced Firewall has been installed and configured. See the Advanced Firewall Administration Guide for more information.
To setup Advanced Firewall:
1. Complete installing Advanced Firewall and configuring keyboard, hostname and network settings. The Setup menu is displayed:
2. Here you can choose to run the setup program to configure advanced Advanced Firewall settings or select to finish configuring settings.
• Select OK and press Enter to start the Setup program and see Running the Setup Program on page 20 for more information
19

Advanced Firewall Installation Guide Setting up Advanced Firewall
• Or, select Finished to complete Advanced Firewall basic configuration. Your next step will be to configure administration accounts for Advanced Firewall. See Setting Account Passwords on page 30 for more information.
Running the Setup ProgramAfter completing the basic installation of Advanced Firewall, the Setup menu is displayed:
The Setup program contains the following optional settings that you may need to configure depending on your ISP, hardware and network:
The sections that follow explain how to configure the setup options.
Option Description
Web proxy Select to set web proxy settings that your Internet Service Provider (ISP) requires you to use to access the Internet.
Select and press Enter to continue. See Configuring Web Proxy Settings on page 21 for more information.
Serial console Used to enable terminal or console access via the computer’s serial port.
Select and press Enter to continue. See Enabling Access via the Serial Console on page 22 for more information.
Hardware options
Used to configure motherboard and processor settings, including SMP support.
Select and press Enter to continue. See Configuring Hardware Options on page 22 for more information.
ADSL configuration
Used to configure an ADSL device that is directly connected, internally or externally, to the system.
Select and press Enter to continue. See Enabling ADSL on page 23 for more information.
ISDN configuration
Used to configure an ISDN device that is directly connected, internally or externally, to the system.
Select and press Enter to continue. See Enabling ISDN on page 26 for more information.
Outgoing defaults
Determines how Advanced Firewall handles outgoing requests. See Configuring Outgoing Defaults on page 28 for more information.
DHCP configuration
Used to configure Advanced Firewall’s built in Dynamic Host Configuration Protocol server.
Select and press Enter to continue. See Enabling DHCP on page 29 for more information.
20 Smoothwall Ltd

Advanced Firewall Installation Guide Setting up Advanced Firewall
Configuring Web Proxy Settings
Note: As the majority of Internet Service Providers (ISPs) do not use web proxy servers, it is unlikely that you will need to make changes on this screen. If your ISP does use a proxy server, you should already know the configuration details. If you do not, consult your ISP.
Some ISPs require you to connect to the Internet via a web proxy server. The Setup program’s Web proxy option enables you to configure Advanced Firewall to use such a proxy server. This ensures that Advanced Firewall will be able to connect to the Internet, register itself and download any updates available from Smoothwall.
To configure web proxy settings required by your ISP:
Note: These settings do not apply to your Advanced Firewall proxy service.
1. From the Setup menu, select Web proxy. The following screen is displayed:
2. Enter the following information:
Note: The settings here have nothing to do with Advanced Firewall’s own web proxy service, which is configured separately using the web-based interface. See the Advanced Firewall Administration Guide for more information.
3. Select Ok to return to the Setup menu. To continue with the Setup program, select another Setup menu option and press Enter. To end the Setup program, select Finished and press Enter.
If you have finished with the Setup program, the next step is to set administration account passwords. For more information, see Setting Account Passwords on page 30.
Field Enter
Hostname The hostname of the web proxy your ISP requires you to use to access the Internet. Contact your ISP if you are unsure of the address.
Port The port number of the port used by the web proxy. 80 and 8080 are the most commonly used ports for web proxies. Contact your ISP if you are unsure of the number.
Username A username for the proxy, if one has been allocated by your ISP.
Password A password for the proxy, if one has been allocated by your ISP.
21
Advanced Firewall Installation Guide Setting up Advanced Firewall
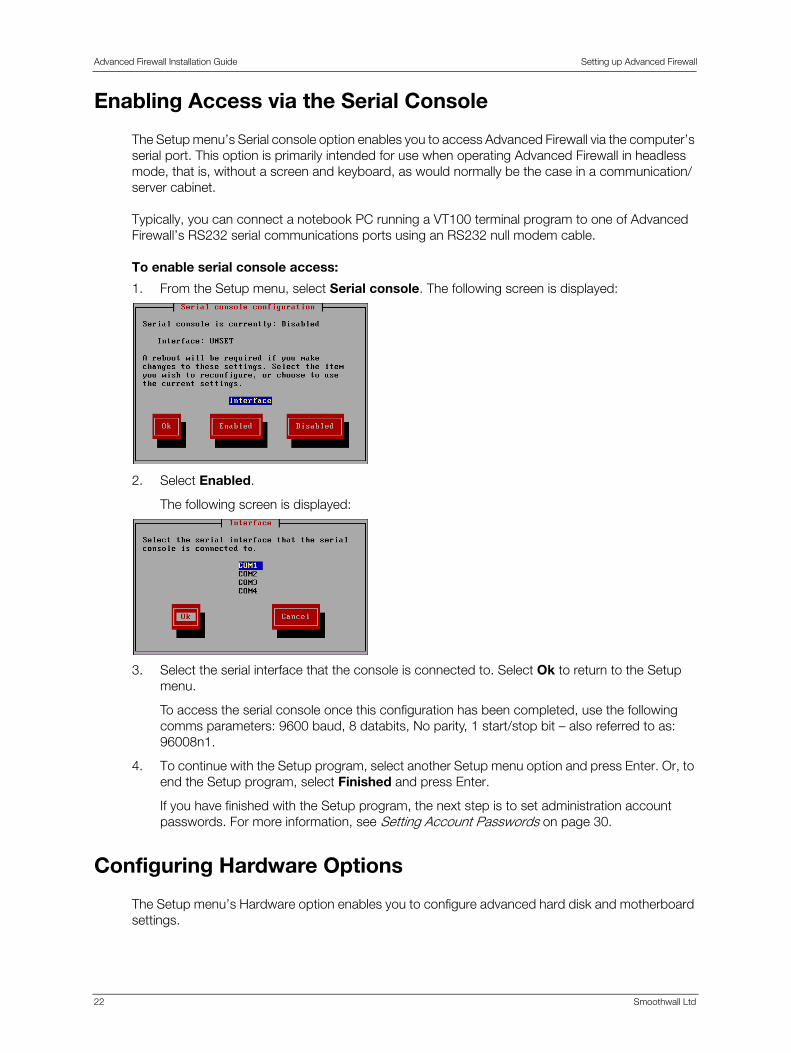
Enabling Access via the Serial Console
The Setup menu’s Serial console option enables you to access Advanced Firewall via the computer’s serial port. This option is primarily intended for use when operating Advanced Firewall in headless mode, that is, without a screen and keyboard, as would normally be the case in a communication/server cabinet.
Typically, you can connect a notebook PC running a VT100 terminal program to one of Advanced Firewall’s RS232 serial communications ports using an RS232 null modem cable.
To enable serial console access:
1. From the Setup menu, select Serial console. The following screen is displayed:
2. Select Enabled.
The following screen is displayed:
3. Select the serial interface that the console is connected to. Select Ok to return to the Setup menu.
To access the serial console once this configuration has been completed, use the following comms parameters: 9600 baud, 8 databits, No parity, 1 start/stop bit – also referred to as: 96008n1.
4. To continue with the Setup program, select another Setup menu option and press Enter. Or, to end the Setup program, select Finished and press Enter.
If you have finished with the Setup program, the next step is to set administration account passwords. For more information, see Setting Account Passwords on page 30.
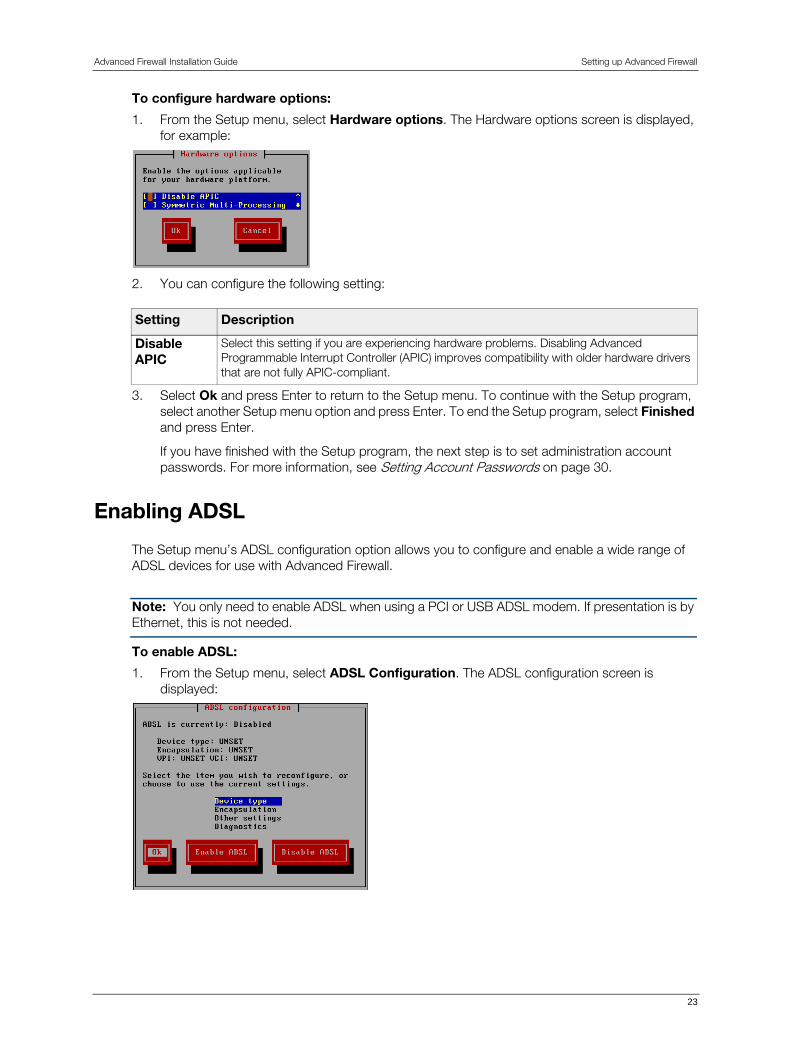
Configuring Hardware Options
The Setup menu’s Hardware option enables you to configure advanced hard disk and motherboard settings.
22 Smoothwall Ltd
Advanced Firewall Installation Guide Setting up Advanced Firewall
To configure hardware options:
1. From the Setup menu, select Hardware options. The Hardware options screen is displayed, for example:
2. You can configure the following setting:
3. Select Ok and press Enter to return to the Setup menu. To continue with the Setup program, select another Setup menu option and press Enter. To end the Setup program, select Finished and press Enter.
If you have finished with the Setup program, the next step is to set administration account passwords. For more information, see Setting Account Passwords on page 30.
Enabling ADSL
The Setup menu’s ADSL configuration option allows you to configure and enable a wide range of ADSL devices for use with Advanced Firewall.
Note: You only need to enable ADSL when using a PCI or USB ADSL modem. If presentation is by Ethernet, this is not needed.
To enable ADSL:
1. From the Setup menu, select ADSL Configuration. The ADSL configuration screen is displayed:
Setting Description
Disable APIC
Select this setting if you are experiencing hardware problems. Disabling Advanced Programmable Interrupt Controller (APIC) improves compatibility with older hardware drivers that are not fully APIC-compliant.
23

Advanced Firewall Installation Guide Setting up Advanced Firewall
The following options are available:
Option Explanation
Device type Specifies the ADSL device type.
To specify an ADSL device:
1. On the ADSL configuration screen, select Device type and press Enter. The following screen is displayed:
2. Select the type of ADSL device you want to use and press Enter to continue.
Encapsulation Specifies how Advanced Firewall communicates with the ADSL device.
To specify encapsulation options:
1. On the ADSL configuration screen, select Encapsulation and press Enter. The following screen is displayed:
2. Select one of the following options:
PPPOATM – Select this option if your ADSL device uses, or your ISP specifies, the Point-to-Point Protocol Over Asynchronous Transfer Mode.
PPPOE – Select this mode if your ADSL device uses, or ISP specifies, the Point-to-Point Protocol Over Ethernet.
3. Press Enter to continue. For more encapsulation information, see Appendix A:ADSL Settings on page 45.
24 Smoothwall Ltd

Advanced Firewall Installation Guide Setting up Advanced Firewall
After configuring the settings, the ADSL configuration screen displays the settings, for example:
3. Select Enable ADSL and press Enter to enable your ADSL settings and return to the Setup menu.
Note: You must complete the configuration using Advanced Firewall’s web-based interface. See the Advanced Firewall Administration Guide for more information.
4. To continue with the Setup program, select another Setup menu option and press Enter. To end the Setup program, select Finished and press Enter.
If you have finished with the Setup program, the next step is to set administration account passwords. For more information, see Setting Account Passwords on page 30.
Other settings Sets the Virtual Path Identifier (VPI) and Virtual Circuit Identifier (VCI). Refer to your ADSL device documentation for more information on your device. See also, Appendix A:ADSL Settings on page 45.
To specify other settings:
1. On the ADSL configuration screen, select Other settings and press Enter. The following screen is displayed:
2. Enter the VPI value. The default setting = 0.3. Enter the VCI value. The default setting = 38.4. Press Enter to continue.
Diagnostics Displays device and link status information.
Note: You cannot run diagnostics if there is an active connection.To view diagnostics:
1. On the ADSL configuration screen, select Diagnostics and press Enter.2. Review the information and press Enter to continue.Note: Advanced Firewall diagnostics does not support all ADSL devices
Option Explanation
25

Advanced Firewall Installation Guide Setting up Advanced Firewall
Enabling ISDN
The Setup menu’s ISDN configuration option enables you to configure a wide range of ISDN devices for use with Advanced Firewall.
To enable ISDN:
1. From the Setup menu, select ISDN Configuration. The ISDN configuration menu screen is displayed:
The following options are available:
Option Explanation
Protocol/Country
Lists regional settings. Consult your ISP documentation for details regarding which protocol and country settings to use.
To specify an ISDN protocol:
1. On the ISDN configuration menu screen, select Protocol/Country and press Enter. The following screen is displayed:
2. Select the protocol you want to use and press Enter to continue.
26 Smoothwall Ltd
Advanced Firewall Installation Guide Setting up Advanced Firewall
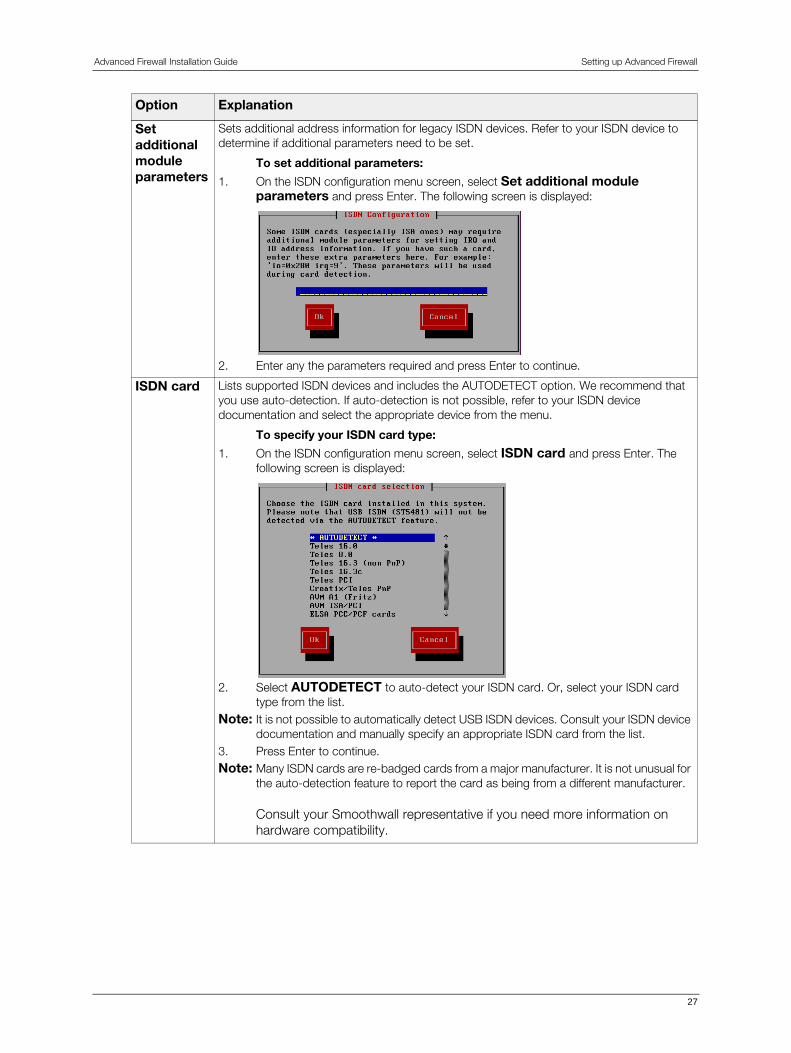
Set additional module parameters
Sets additional address information for legacy ISDN devices. Refer to your ISDN device to determine if additional parameters need to be set.
To set additional parameters:
1. On the ISDN configuration menu screen, select Set additional module parameters and press Enter. The following screen is displayed:
2. Enter any the parameters required and press Enter to continue.
ISDN card Lists supported ISDN devices and includes the AUTODETECT option. We recommend that you use auto-detection. If auto-detection is not possible, refer to your ISDN device documentation and select the appropriate device from the menu.
To specify your ISDN card type:
1. On the ISDN configuration menu screen, select ISDN card and press Enter. The following screen is displayed:
2. Select AUTODETECT to auto-detect your ISDN card. Or, select your ISDN card type from the list.
Note: It is not possible to automatically detect USB ISDN devices. Consult your ISDN device documentation and manually specify an appropriate ISDN card from the list.
3. Press Enter to continue. Note: Many ISDN cards are re-badged cards from a major manufacturer. It is not unusual for
the auto-detection feature to report the card as being from a different manufacturer.
Consult your Smoothwall representative if you need more information on hardware compatibility.
Option Explanation
27

Advanced Firewall Installation Guide Setting up Advanced Firewall
After configuring the settings, the ISDN configuration menu screen displays the settings, for example:
3. Select Enable ISDN and press Enter to enable your ISDN settings and return to the Setup menu.
Note: You must complete the configuration using Advanced Firewall’s web-based interface. See the Advanced Firewall Administration Guide for more information.
4. To continue with the Setup program, select another Setup menu option and press Enter. To end the Setup program, select Finished and press Enter.
If you have finished with the Setup program, the next step is to set administration account passwords. For more information, see Setting Account Passwords on page 30.
Configuring Outgoing Defaults
The Setup menu’s outgoing defaults option enable you to configure a default security policy.
Local phone number (MSN/EAZ)
Used to enter the local phone number on which the ISDN service is enabled.
To enter the phone number:
1. On the ISDN configuration menu screen, select Local phone number (MSN/EAZ) and press Enter. The following screen is displayed:
2. Enter the phone number and press Enter to continue.
Option Explanation
28 Smoothwall Ltd

Advanced Firewall Installation Guide Setting up Advanced Firewall
To configure outgoing defaults:
1. From the Setup menu, select Outgoing defaults. The Default security policy screen is displayed:
2. Select one of the following settings:
3. Select Ok and press Enter.
Note: After successfully installing Advanced Firewall, you can adjust these settings to suit your organization via the web interface.
4. To continue with the Setup program, select another Setup menu option and press Enter. To end the Setup program, select Finished and press Enter.
If you have finished with the Setup program, the next step is to set administration account passwords. For more information, see Setting Account Passwords on page 30.
Enabling DHCP
The Setup menu’s DHCP option enables you to use Advanced Firewall’s Dynamic Host Configuration Protocol (DHCP) server to provide all the necessary network information for the client desktop computers on your network.
Policy Description
Open Allows all outgoing requests. This is the default policy.
Half-open
Allows most outgoing requests and blocks potentially harmful requests.
Closed Blocks all outgoing requests. Everything must be explicitly enabled.
29

Advanced Firewall Installation Guide Setting up Advanced Firewall
To enable DHCP:
1. From the Setup menu, select DHCP. The DHCP server configuration screen is displayed:
2. Press the spacebar to enable the DHCP server and enter the following information:
3. After reviewing the information you have entered, select Ok and press Enter to return to the Setup menu.
4. To continue with the Setup program, select another Setup menu option and press Enter. To end the Setup program, select Finished and press Enter.
Note: Finalize the DHCP configuration on the Services > DHCP > Global page after you complete the setup process. See the Advanced Firewall Administration Guide for more information.
Setting Account PasswordsAs part of setting up Advanced Firewall, you must specify passwords for the default admin and root accounts used to administer Advanced Firewall.
Field Information
Start address Enter the first IP address you want Advanced Firewall’s DHCP server to offer to its client PCs.
End address Enter the highest IP address that Advanced Firewall’s DHCP server will allocate.
Primary DNS Advanced Firewall also runs a DNS proxy server and can provide a DNS service to all network clients that connect through it.
By default, the primary DNS is set to the IP address of the internal network connection you configured earlier.
You can accept this DNS or enter another DNS server, such as your ISP’s.
Secondary DNS Optionally, enter the IP address of a second DNS server to use if the primary DNS becomes unavailable.
Default lease (mins)
Enter the default lease time, in minutes, that a client PC can retain an IP address provided by the DHCP server. Upon expiry of the lease, the client PC has to re-request a new IP address. For most users, this field should be left at its default value.
Max lease (mins) Enter the maximum lease time, in minutes, to specify the maximum length of time that a client PC can retain an IP address provided by the DHCP server. Upon expiry of the lease, the client PC has to re-request a new IP address. For most users, this field should be left at its default value.
Domain name suffix
Entering a domain name suffix entry allows you to define the domain name that will be given to systems requesting an IP address.
For many small networks this field should be left blank.
30 Smoothwall Ltd

Advanced Firewall Installation Guide Setting up Advanced Firewall
The passwords entered here will be required by administrators when accessing Advanced Firewall via the web-based interface and root account users when accessing Advanced Firewall using a console.
About Passwords
The passwords used by these accounts should be strong passwords that fulfil the following recommended conditions:
• Contain both upper and lower case characters: a-z, A-Z
• Contain numbers: 0-9
• Contain special characters, such as: !@#$%^&*()_+|~-=\`{}[]:";'<>?,./)
• Are at least eight alphanumeric characters long
• Are not a word in any language, slang, dialect, or jargon
• Are not based on personal information, such as family or pet names
• Are never written down or stored on-line.
Setting Passwords
After completing the basic installation and either running or skipping the Setup program, you must set passwords for Advanced Firewall’s admin and root accounts.
To set passwords:
When the following screen is displayed:
1. Enter the following information:
Field Explanation
Password Enter a strong password for Advanced Firewall admin account. The admin account is used to access Advanced Firewall via its web interface.
Minimum = 6 characters
Maximum = 255 characters
Again Re-enter the password to confirm it.
31

Advanced Firewall Installation Guide Setting up Advanced Firewall
2. Select Ok and press Enter. The following screen is displayed:
3. Enter the following information:
4. Select Ok and press Enter. The following screen is displayed:
5. Select Ok and press Enter to reboot the computer.
After rebooting, you can access Advanced Firewall from a network client running a web browser. For more information, see Chapter 5, Accessing Advanced Firewall on page 39.
Field Explanation
Password Enter a strong password for Advanced Firewall’s root account. The root account is used to access Advanced Firewall via the console.
Minimum = 6 characters
Maximum = 255 characters
Again Re-enter the password to confirm it.
32 Smoothwall Ltd
4 Migrating and RestoringSettings
In this chapter:
• How to migrate or restore settings from an Advanced Firewall installation or other compatible Smoothwall System.
PrerequisitesIn order to migrate or restore settings, you must have:
• An archive containing the settings you want to migrate, see the Administration Guide delivered with your current Smoothwall System for information on how to archive settings
• Carried out the initial Advanced Firewall installation, see Chapter 2, Installing Advanced Firewall on page 5 for more information.
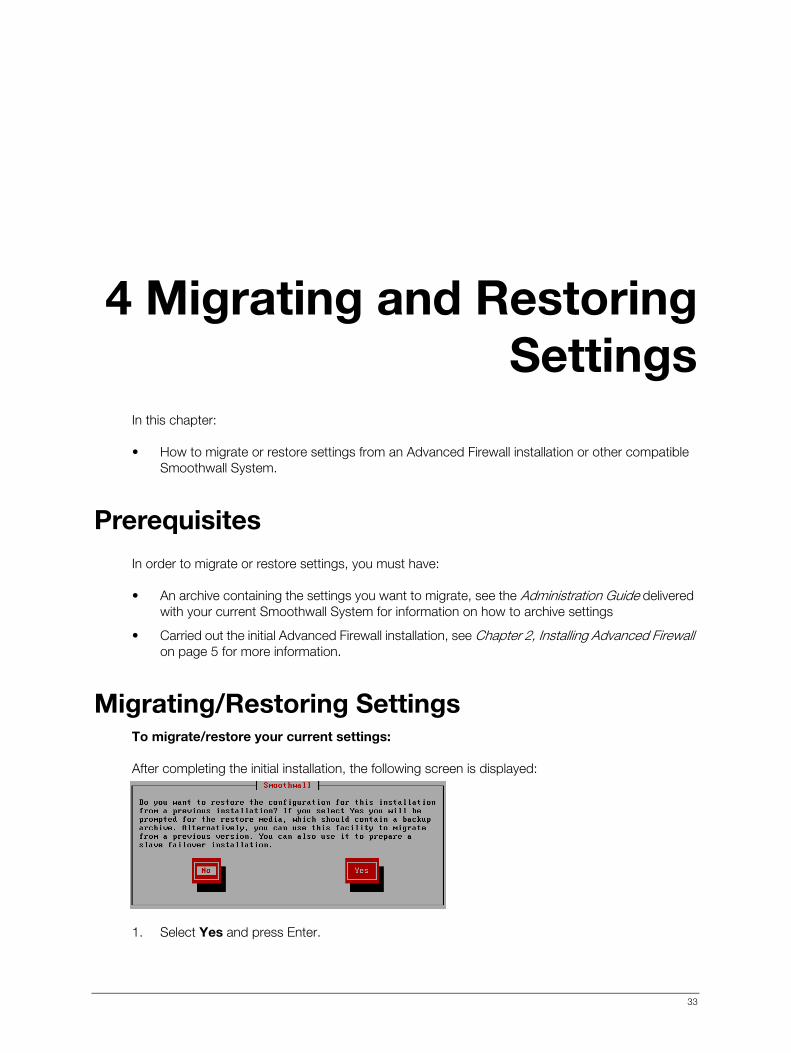
Migrating/Restoring SettingsTo migrate/restore your current settings:
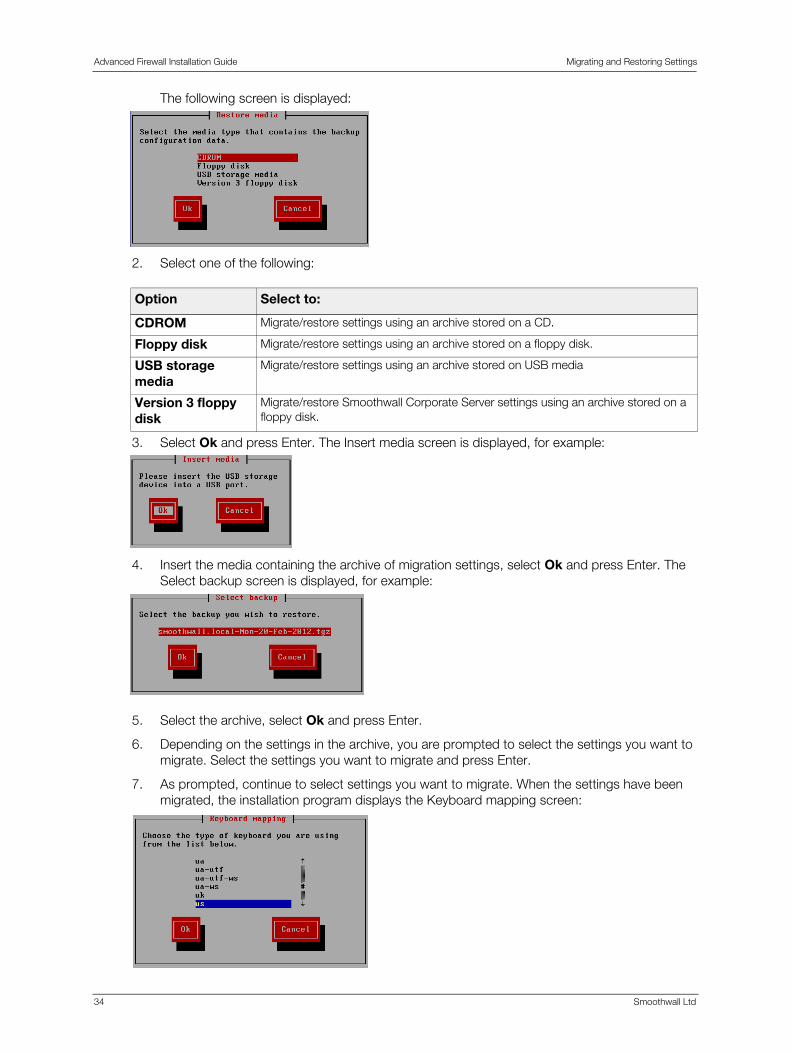
After completing the initial installation, the following screen is displayed:
1. Select Yes and press Enter.
33
Advanced Firewall Installation Guide Migrating and Restoring Settings
The following screen is displayed:
2. Select one of the following:
3. Select Ok and press Enter. The Insert media screen is displayed, for example:
4. Insert the media containing the archive of migration settings, select Ok and press Enter. The Select backup screen is displayed, for example:
5. Select the archive, select Ok and press Enter.
6. Depending on the settings in the archive, you are prompted to select the settings you want to migrate. Select the settings you want to migrate and press Enter.
7. As prompted, continue to select settings you want to migrate. When the settings have been migrated, the installation program displays the Keyboard mapping screen:
Option Select to:
CDROM Migrate/restore settings using an archive stored on a CD.
Floppy disk Migrate/restore settings using an archive stored on a floppy disk.
USB storage media
Migrate/restore settings using an archive stored on USB media
Version 3 floppy disk
Migrate/restore Smoothwall Corporate Server settings using an archive stored on a floppy disk.
34 Smoothwall Ltd
Advanced Firewall Installation Guide Migrating and Restoring Settings
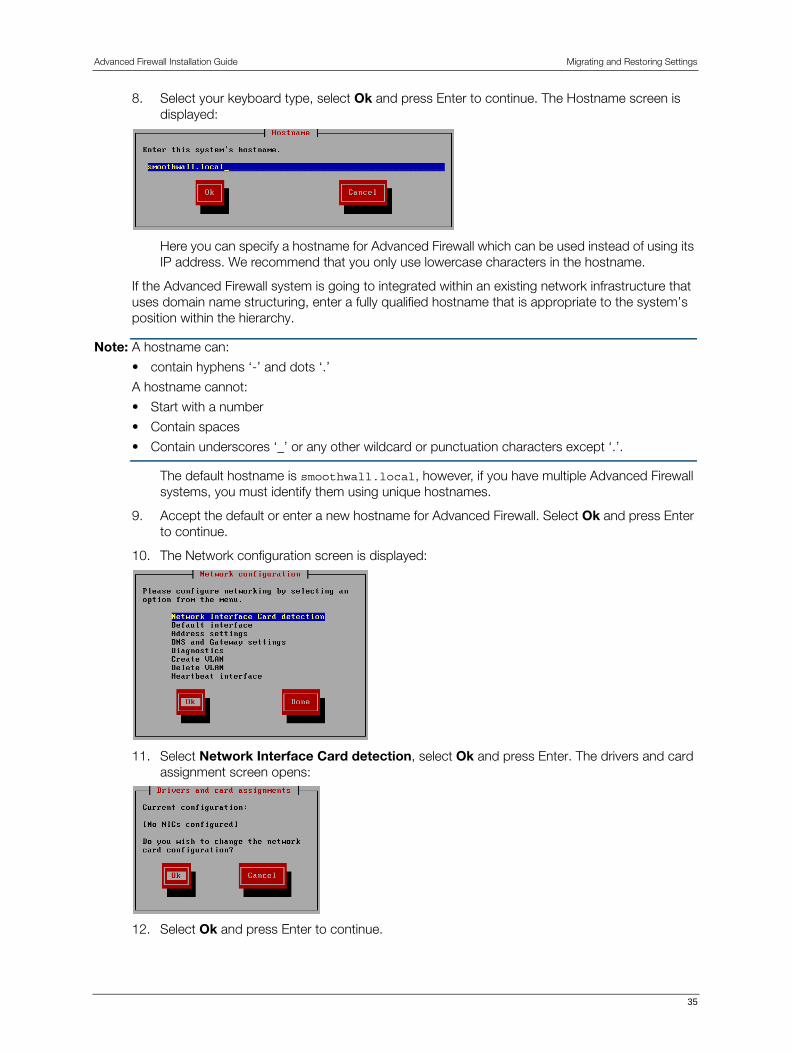
8. Select your keyboard type, select Ok and press Enter to continue. The Hostname screen is displayed:
Here you can specify a hostname for Advanced Firewall which can be used instead of using its IP address. We recommend that you only use lowercase characters in the hostname.
If the Advanced Firewall system is going to integrated within an existing network infrastructure that uses domain name structuring, enter a fully qualified hostname that is appropriate to the system’s position within the hierarchy.
Note: A hostname can:
• contain hyphens ‘-’ and dots ‘.’
A hostname cannot:
• Start with a number
• Contain spaces
• Contain underscores ‘_’ or any other wildcard or punctuation characters except ‘.’.
The default hostname is smoothwall.local, however, if you have multiple Advanced Firewall systems, you must identify them using unique hostnames.
9. Accept the default or enter a new hostname for Advanced Firewall. Select Ok and press Enter to continue.
10. The Network configuration screen is displayed:
11. Select Network Interface Card detection, select Ok and press Enter. The drivers and card assignment screen opens:
12. Select Ok and press Enter to continue.
35

Advanced Firewall Installation Guide Migrating and Restoring Settings
A list of available network cards is displayed, for example:
13. Press Enter. You return to the Network configuration screen. Select Default interface and press Enter. The Default interface screen is displayed:
14. Select which NIC to use as the default interface, select Ok and press Enter to continue.
15. On the Network configuration screen. Select Address settings and press Enter. The Address settings screen is displayed:
16. Select the Network Interface Card (NIC) you want to use, select Ok and press Enter. The following screen is displayed:
17. Enter the following information:
Field Enter
Name A name that identifies Advanced Firewall’s NIC.
Internal IP address
The IP address of the Advanced Firewall NIC on your internal network, for example.
Network mask The network mask used in conjunction with the internal IP address to define the network that this NIC belongs to.
36 Smoothwall Ltd
Advanced Firewall Installation Guide Migrating and Restoring Settings
18. Select Ok and press Enter to continue. On the Address settings screen, select Done and press Enter.
19. On the Network configuration screen, select Done and press Enter. The Setup program starts and displays the Setup menu.
The next step is to set up Advanced Firewall. See Chapter 3, Setting up Advanced Firewall on page 19 for more information.
MTU Accept the default maximum transmission unit (MTU), or enter the value required in your environment.
Field Enter
37

5 Accessing AdvancedFirewall
In this chapter:
• How to access Advanced Firewall for the first time
• Registering Advanced Firewall
• Checking for updates
Accessing Advanced Firewall for the First TimeNote: The examples in the following sections are illustrated using Mozilla Firefox. You can access and administer Advanced Firewall using a browser of your choice.
To access Advanced Firewall for the first time:
1. In the browser of your choice, enter the address of your Advanced Firewall, for example: https://10.0.0.3:441
Note: The example address above uses HTTPS to ensure secure communication with your Advanced Firewall. It is possible to use HTTP on port 81 if you are satisfied with less security.
2. Accept Advanced Firewall’s certificate. The login screen is displayed.
3. Enter the following information:
4. Click Login.
Field Information
Username Enter admin. This is the name of the default Advanced Firewall administrator account.
Password Enter the password you specified for the admin account when installing Advanced Firewall. See Chapter 2, Installing Advanced Firewall on page 5 for more information.
39
Advanced Firewall Installation Guide Accessing Advanced Firewall
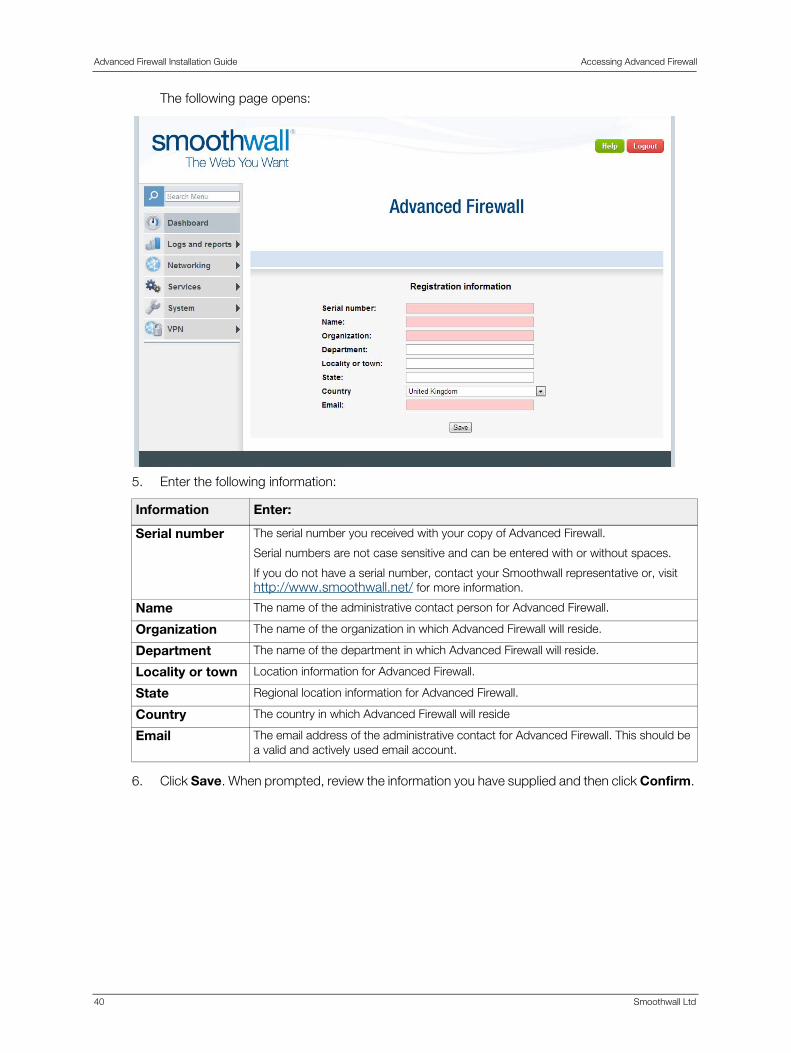
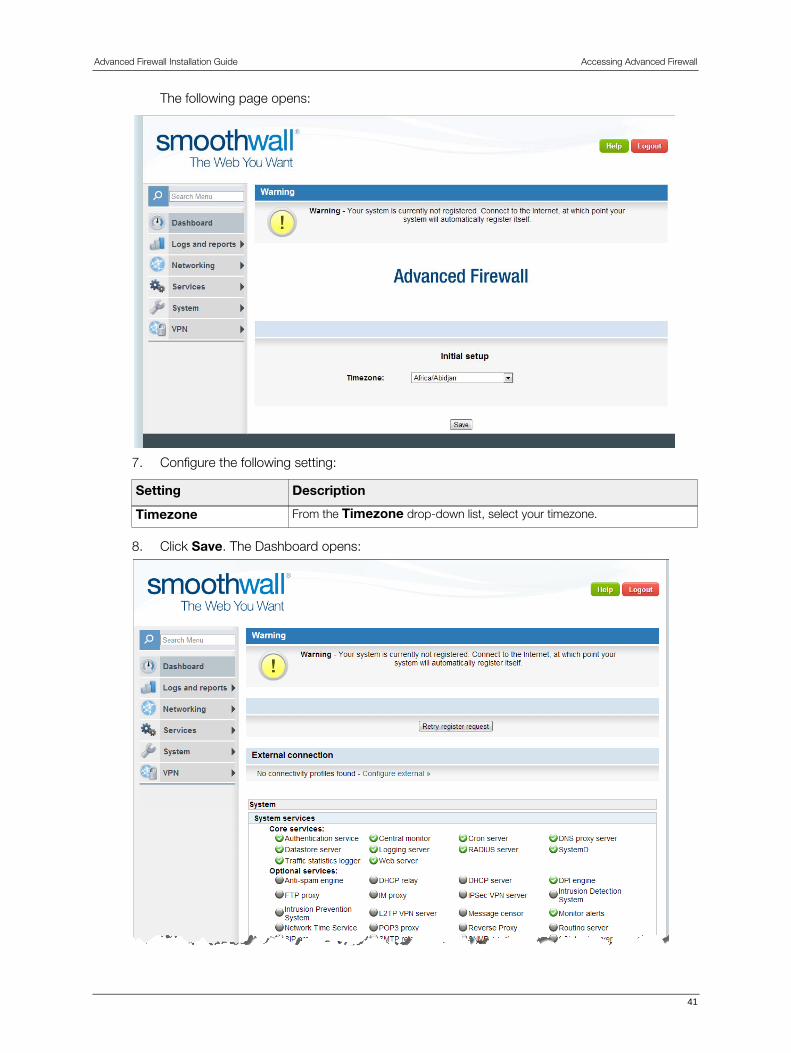
The following page opens:
5. Enter the following information:
6. Click Save. When prompted, review the information you have supplied and then click Confirm.
Information Enter:
Serial number The serial number you received with your copy of Advanced Firewall.
Serial numbers are not case sensitive and can be entered with or without spaces.
If you do not have a serial number, contact your Smoothwall representative or, visit http://www.smoothwall.net/ for more information.
Name The name of the administrative contact person for Advanced Firewall.
Organization The name of the organization in which Advanced Firewall will reside.
Department The name of the department in which Advanced Firewall will reside.
Locality or town Location information for Advanced Firewall.
State Regional location information for Advanced Firewall.
Country The country in which Advanced Firewall will reside
Email The email address of the administrative contact for Advanced Firewall. This should be a valid and actively used email account.
40 Smoothwall Ltd
Advanced Firewall Installation Guide Accessing Advanced Firewall
The following page opens:
7. Configure the following setting:
8. Click Save. The Dashboard opens:
Setting Description
Timezone From the Timezone drop-down list, select your timezone.
41

Advanced Firewall Installation Guide Accessing Advanced Firewall
The Dashboard is Advanced Firewall’s default home page. The next step is to connect to the Internet.
Connecting to the InternetTo connect to the Internet, you use a connectivity profile.
To connect Advanced Firewall to the Internet:
1. Browse to the Networking > Interfaces > Connectivity page:
2. Configure the following settings:
3. Click Update and in the area below, enter the settings that apply to the connection method you have chosen.
4. Click Save and Connect to save the profile and connect Advanced Firewall to the Internet.
You can now review Advanced Firewall functionality. For more information, see the Advanced Firewall Administrator's Guide.
Setting Description
Profile name Enter a name for the connectivity profile.
Method From the drop-down list, select the connection method that fits your ISP’s specifications.
For full information on the different ways you can connect Advanced Firewall to the Internet, see the Advanced Firewall Administration Guide.
42 Smoothwall Ltd

Advanced Firewall Installation Guide Accessing Advanced Firewall
Installing UpdatesYou should ensure that Advanced Firewall has the latest updates installed.
To check for and install updates:
1. Navigate to the System > Maintenance > Updates page:
2. Click Refresh update list. The Available updates area displays any updates available.
3. Click Download updates to get the updates and then click Install updates. The updates are installed.
For full information on working with Advanced Firewall, see the Advanced Firewall Administration Guide.
43

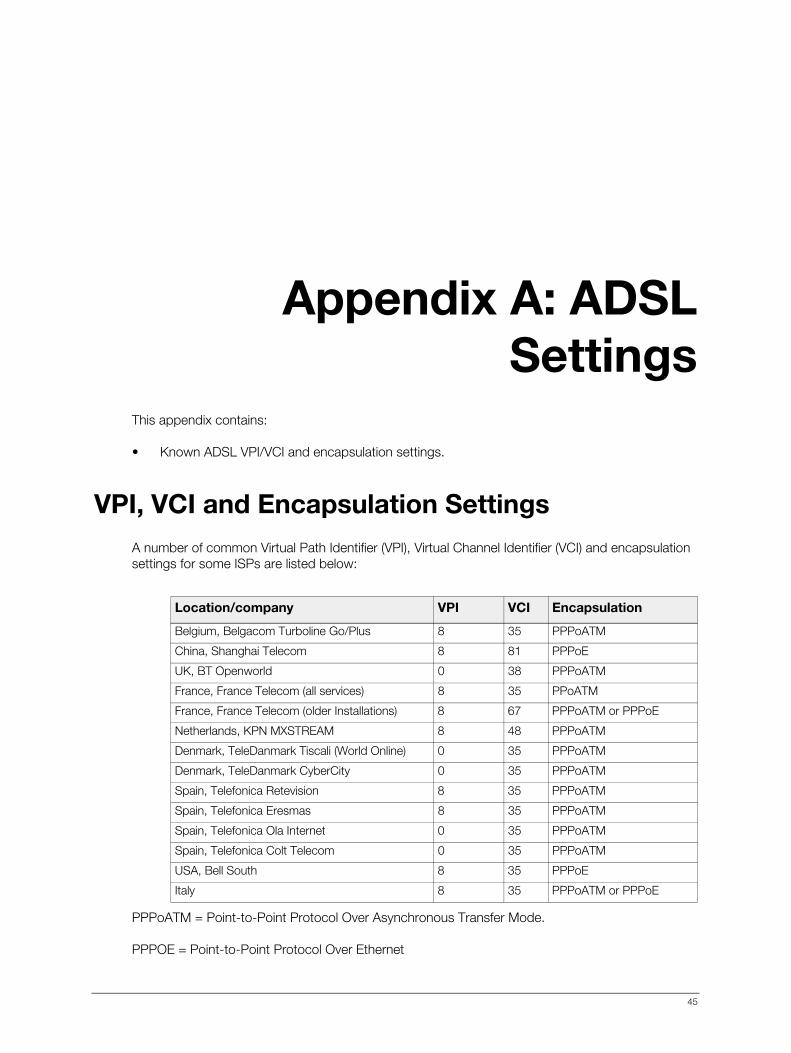
Appendix A: ADSLSettings
This appendix contains:
• Known ADSL VPI/VCI and encapsulation settings.
VPI, VCI and Encapsulation SettingsA number of common Virtual Path Identifier (VPI), Virtual Channel Identifier (VCI) and encapsulation settings for some ISPs are listed below:
PPPoATM = Point-to-Point Protocol Over Asynchronous Transfer Mode.
PPPOE = Point-to-Point Protocol Over Ethernet
Location/company VPI VCI Encapsulation
Belgium, Belgacom Turboline Go/Plus 8 35 PPPoATM
China, Shanghai Telecom 8 81 PPPoE
UK, BT Openworld 0 38 PPPoATM
France, France Telecom (all services) 8 35 PPoATM
France, France Telecom (older Installations) 8 67 PPPoATM or PPPoE
Netherlands, KPN MXSTREAM 8 48 PPPoATM
Denmark, TeleDanmark Tiscali (World Online) 0 35 PPPoATM
Denmark, TeleDanmark CyberCity 0 35 PPPoATM
Spain, Telefonica Retevision 8 35 PPPoATM
Spain, Telefonica Eresmas 8 35 PPPoATM
Spain, Telefonica Ola Internet 0 35 PPPoATM
Spain, Telefonica Colt Telecom 0 35 PPPoATM
USA, Bell South 8 35 PPPoE
Italy 8 35 PPPoATM or PPPoE
45


1st Edition
IndexAacceptable use 5accessing 39admin 39ADSL 23
device 24diagnostics 25encapsulation 24
PPPOATM 24PPPOE 24
VCI 25VPI 25
advanced install 16
Cconnecting 42
DDHCP 29diagnostics 25DNS
primary 30secondary 30
drivers 13
Ffirewall
setting up 19
Hhostname
rules 9, 17, 35
Iinstalling 12
before 5Internet 42ISDN 26
Mmalice 6memory 4migrating 33
prerequisites 33modules 15
Nnetwork configuration 17, 35nic
settings 10, 18, 36
Ooutgoing defaults 20
Pphysical access 6PPPOATM 24PPPOE 24primary DNS 30processor 4
Rraid 14
software 14registering 4
Ssecondary DNS 30security policy 5setup menu
ADSL configuration 20DHCP configuration 20hardware options 20ISDN configuration 20outgoing defaults 20serial console 20web proxy 20
SmoothTraffic 4storage 14
Ttest environment 6training 1
Uupdates 43
VVCI 25VPI 25
Wwarning 5
47