
SmoothWall Express 2 - Mirror...
86
SmoothWall Express 2.0 Administrator’s Guide
-
Upload
nguyenthien -
Category
Documents
-
view
219 -
download
1
Transcript of SmoothWall Express 2 - Mirror...

SmoothWall Express 2.0
Administrator’s Guide
SmoothWall Express 2.0Administrator’s Guide
SmoothWall Express 2.0Administrator’s Guide
IntroductionWelcomeThe General Public Licence (GPL) and Open Source SoftwareRegistration and SupportSecurity ConceptsAcknowledgementsTrademark and Copyright Notices
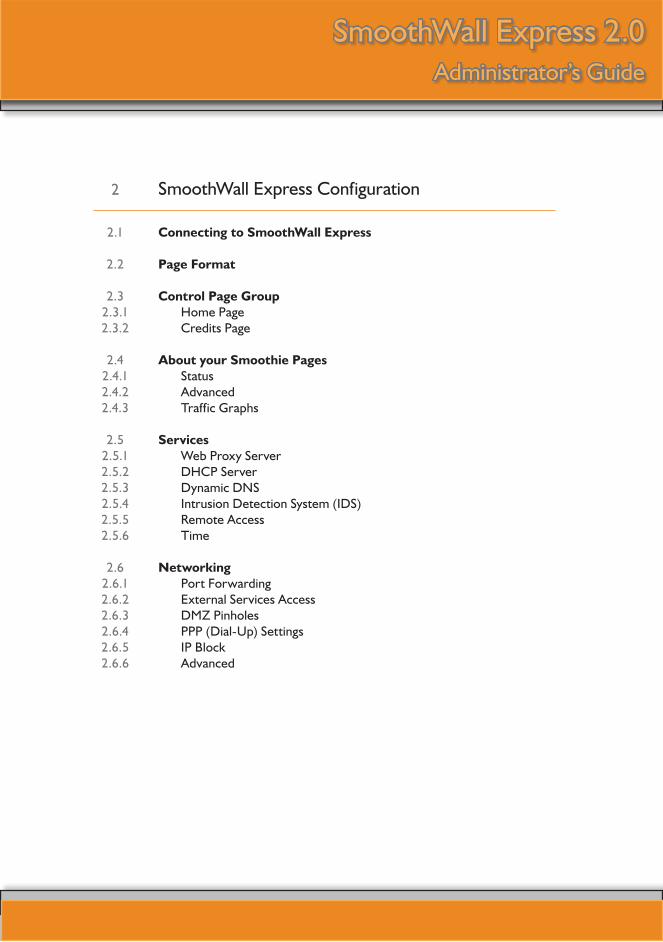
Configuring SmoothWall Express Connecting to SmoothWall Express Page Format Control Page Group Home Page Credits Page About your Smoothie Pages Status Advanced Traffic Graphs Services Web Proxy Server DHCP Server Dynamic DNS Intrusion Detection System (IDS) Remote Access Time Networking Port Forwarding External Services Access DMZ Pinholes PPP (Dial-Up) Settings IP Block Advanced
11.11.21.31.41.51.6
22.12.22.3
2.3.12.3.22.4
2.4.12.4.22.4.32.5
2.5.12.5.22.5.32.5.42.5.52.5.62.6
2.6.12.6.22.6.32.6.42.6.52.6.6
Table of Contents
SmoothWall Express 2.0Administrator’s Guide
SmoothWall Express 2.0Administrator’s Guide
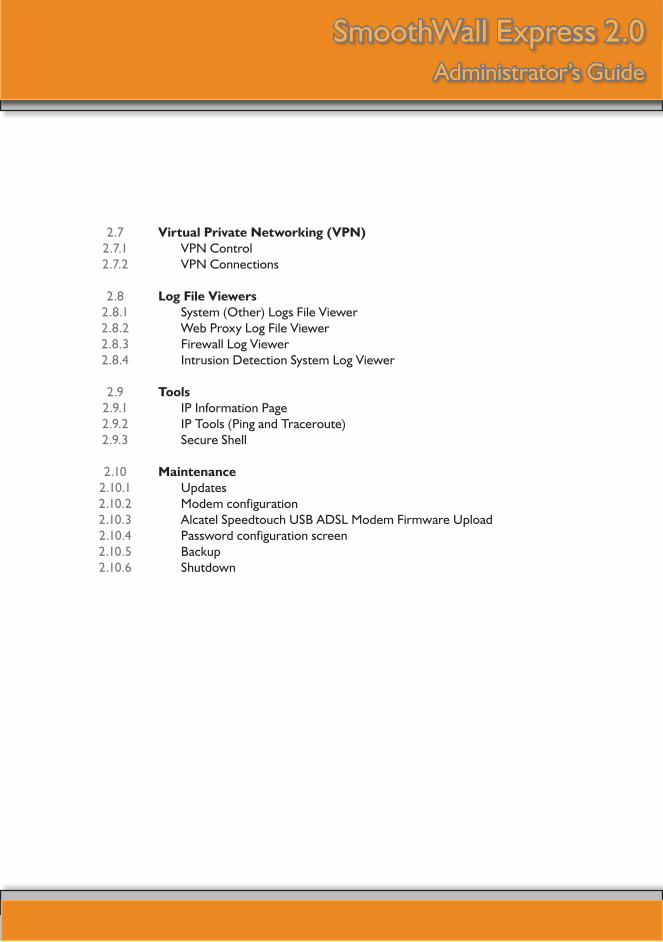
Virtual Private Networking (VPN) VPN Control VPN Connections Log File Viewers System (Other) Logs File Viewer Web Proxy Log File Viewer Firewall Log Viewer Intrusion Detection System Log Viewer Tools IP Information Page IP Tools (Ping and Traceroute) Secure Shell Maintenance Updates Modem configuration Alcatel Speedtouch USB ADSL Modem Firmware Upload Password configuration screen Backup Shutdown
Configuring Microsoft Windows clients to use SmoothWall Express as their Internet Gateway Configuring Microsoft Windows XP Configuring Microsoft Windows 98
Configuring Apple Macintosh systems to use SmoothWall Express as their Internet Gateway
Configuring Client Computers to Use SmoothWall Express’s Proxy Server in Non-Transparent Mode Configuring Internet Explorer 5.x or 6.x to use Non-Transparent Proxy Server Configuring Netscape Communicator 4.6 to use Non-Transparent Proxy Server
Client Applications and Protocols currently known to be supported by SmoothWall
Maintenance Day to day administration
Troubleshooting Hardware problems Software problems
Reference Sources
2.72.7.12.7.22.8
2.8.12.8.22.8.32.8.42.9
2.9.12.9.22.9.32.10
2.10.12.10.22.10.32.10.42.10.52.10.6
3
3.13.2
4
5
5.1
5.2
6
77.1
AA.1A.2
B
SmoothWall Express 2.0Administrator’s Guide
Welcome
The General Public Licence (GPL) and Open Source Software
Registration and Support
Security Concepts
Acknowledgements
Trademark and Copyright Notices
Introduction
1.1
1.2
1.3
1.4
1.5
1.6
1
5
1. Introduction
1.1 Welcome
Welcome to SmoothWall and secure Internet connectivity.
SmoothWall Express allows non-technical users to easily build a firewall to securely connect a network of computers to the Internet. Almost any Pentium class PC can be used, such as an old low specification PC long redundant as a user workstation or server. SmoothWall Express creates a dedicated hardware firewall, offering the facilities and real security associated with hardware devices.
This manual follows on from the SmoothWall Express Installation Guide. Having installed SmoothWall Express and performed the initial Setup you are ready to configure details of Internet connections, enable and disable services, create security rules etc. This is all achieved using a simple to use web browser interface. The same interface provides access to the management and administration features, such as its Intrusion Detection System, log file viewing and the graphical presentation of Internet traffic.
During their development, SmoothWall products have been subjected to exhaustive testing, which has shown no insecurities in a standard SmoothWall system. SmoothWall Express comes pre-configured to stop all incoming traffic that is not the result of an outgoing request. The rules files that implement this policy are part of the system configuration and should not normally be edited by other than the configuration procedure. Should any of the Linux system or configuration files be changed by other than the SmoothWall configuration and installation procedures there is a risk of compromising security, for which the SmoothWall Project Team cannot be held responsible. However we do not discourage people from experimenting with and further developing their SmoothWall system – it is just that we must point out that ill conceived or badly executed changes might compromise the security of the SmoothWall Express system.
1.2 The General Public License (GPL) and Open Source Software
SmoothWall Express is licensed under the General Public Licence (GPL); see www.gnu.org and www.copyleft.org for the full terms and conditions of the licence. All program code written specifically for SmoothWall Express is licensed under the GPL, the copyright to which remains with the original author. All code contributed to SmoothWall Express by SmoothWall Limited, even if previously released as part of their commercial products, is licensed under the GPL, the copyright of the code remaining with SmoothWall Limited.
The CD image file (.iso) by which SmoothWall Express is distributed also contains a large amount of Linux operating system and general purpose code, libraries etc. that was not written specifically for SmoothWall Express. Indeed it is the use of this pre-existing code base that makes the Open Source concept so powerful and enabled the rapid development of the initial SmoothWall firewall. The licensing and copyright of all this non SmoothWall specific code is the responsibility of the original author, ie the person who wrote the code. In general this code is licensed under the GPL or the Lesser GPL (LGPL). In adherence with the terms of the GPL, any changes that have been made to other people’s GPL or LGPL licensed code in the creation of SmoothWall Express are published by the SmoothWall Open Source Project Team via the www.smoothwall.org website. All program code specifically written for SmoothWall Express is also available from the website. You can reproduce, modify or distribute any of this code without payment of any royalty or fees – but you are expected to publish any changes that you make so that other may benefit, especially if you distribute your changed code to other people.
Open Source is not Shareware and vice versa. Shareware may be available “free of charge”, without royalties or fees but the whole source code of the software is not usually made freely available to you, unlike Open Source. The confusion is a result of the English language having two meanings for the word free, as in free of charge and free as in liberty (free to do what you want).
6
SmoothWall Express 2.0: Administrator’s Guide
7
1. Introduction
Your use and installation of SmoothWall Express acknowledges your acceptance of the terms of the General Public Licence (GPL).
You are encouraged to participate in and support the Open Source movement. The Free Software Foundation (FSF) is generally seen as the champion of the Open Source movement and you are encouraged to support their efforts to promote and defend Open Source.
1.3 Registration and Support
The first time you connect to the Internet from your newly installed SmoothWall Express, a registration script will run once only. In a manner similar to the way in which a web site cookie records a small amount of information for future viewing of that particular site, the registration script sends a few key pieces of information about your installation back to SmoothWall Limited. This data enables the development team to gauge the type of platforms on which SmoothWall Express is being deployed and to better judge what features it would be helpful to add to future releases. The information that is sent back is completely devoid of any personal details - it simply contains technical details about the hardware present in your SmoothWall Express system. The following system information is recorded:
o The date of installationo The processor type and speedo Interface configurationo SmoothWall Express Versiono The size of hard drive presento The amount of memory (RAM) present and
Please note that none of this information is sensitive and that all the information is stored securely in our database according to BS5750 and the Data Protection Act requirements. SmoothWall does not capture any other user information or any other data secretly or covertly – all information recorded is impersonal. We appreciate your concerns about security and data integrity. If you would like to voluntarily provide any further information to assist the future development of SmoothWall products there is a registration form on the web site that can be used for this purpose.
Support for SmoothWall Express is provided by way of mailing lists and forums accessible for the www.smoothwall.org website. This support is provided on an entirely voluntary basis by members of the SmoothWall Open Source community - nobody is paid to provide support for SmoothWall Express. Thus, the SmoothWall Open Source Project Team cannot be held responsible for the quality, accuracy or timeliness of the information provided by the volunteers who are kind enough to offer their time and knowledge to the benefit of others. For those users, particularly commercial users, who want professional support, we recommend the use of the commercial products of SmoothWall Limited, which are fully supported by both Smoothwall Limited and its world-wide network of Resellers. For further details see SmoothWall Limited’s website at: www.smoothwall.net.
The SmoothWall Open Source Project Team would like to welcome you as a user of SmoothWall Express.
1.4 Security Concepts
SmoothWall Express supports a De-Militarized Zone (DMZ), a network normally used for servers that need to be accessible from the Internet, such as Mail and Web Servers. By default SmoothWall blocks all traffic to hosts and servers behind SmoothWall that originates from the Internet. If external users need to use servers behind SmoothWall then access to these servers has to be specifically unblocked - see the Port Access section for details. Obviously the less un-blocking that is configured the more secure the firewall. It is better
6
SmoothWall Express 2.0: Administrator’s Guide
7
1. Introduction
that such un-blocking is limited to the DMZ network, where the information stored is not highly confidential. Keep private and confidential information on servers and hosts within the Local (Green) network that cannot be accessed from the Internet. Be very careful about un-blocking traffic going from the Internet (Red) to the Local (Green) network as you are opening a potential hole for hackers.
Unlike many firewalls SmoothWall Express does not support Telnet connections to gain access to the configuration and management facilities. This is considered to be unsafe by the designers. Normally an encrypted https connection should be used to configure and manage SmoothWall Express. The option is also provided to enable Secure Shell access to SmoothWall Express allowing login as either the root or setup users. Do not enable this facility when it is not needed - the less that is enabled the better from a security viewpoint.
Remember SmoothWall is only part of a security solution. There is little point in having the most impenetrable front door in the world yet the back door is left wide open. Security is a specialist area; experience, knowing what to look for, understanding how hackers and crackers operate, being up to date with the latest security threats etc. Commercial networks should be subjected to regular Security Audit and Penetration Testing. SmoothWall Limited strongly recommends that all computers, especially public Internet facing servers, are kept up-to-date with all available security patches from the suppliers of the system software. This particularly applies to SmoothWall Express itself – please check regularly that all available Security Updates have been applied.
1.5 Acknowledgements
We acknowledge the work, effort and talent of all those who have contributed to the SmoothWall Project. For the latest team list see the www.smoothwall.org website but we would particularly like to thank: Lawrence Manning, Richard Morrell, William Anderson, Steve Hughes, Gordon Allan, Alex Collins, Bob Dunlop, Nigel Fenton, Mathew Frank, Pete Guyan, Toni Kuokkanen, Luc Larochelle, Piere-Yves Paulus, John Payne, Guy Reynolds, Kieran Reynolds, Chris Ross, Hilton Travis, Jez Tucker, Lucien Wells, Adam Wilkinson, Nick Woodruffe, Simon Wood, Dan Cuthbert, Dan Goscomb, Emma Bickley, Paul Tansom, Eric S. Johansson, Alan Hourihane, Rebecca Ward, Bill Ward, Marc Wormgoor.
1.6 Trademark and Copyright Notices
SmoothWall is a registered trademark of SmoothWall Limited. This manual is the copyright of SmoothWall Limited, 2001-2003 and is not currently distributed under an Open Source licence. Any portions of this or other manuals and documentation that were not written by SmoothWall Limited will be acknowledged to the original author by way of a copyright/licensing statement within the text. You are free to copy the manual, convert it to another form, distribute it in its entirety, in any form and by any means. However, you may not modify the manual nor use any part of within any other document, publication, web page or computer software without the express permission of SmoothWall Limited. These restrictions are necessary to protect the legitimate commercial interests of SmoothWall Limited – similar conditions are imposed by other Open Source Projects (see: http://www.mysql.com/documentation/mysql/bychapter/manual_Introduction.html#Copyright for example).
Unless specifically stated otherwise, all program code within SmoothWall Express is the copyright of the original author, ie the person who wrote the code.
Microsoft, the Microsoft logo, NetMeeting, Outlook and Windows are trademarks of the Microsoft Corporation. Apple, Mac and PowerBook are trademarks of Apple Computer Incorporated. Netscape and Netscape Communicator are trademarks of Netscape Communications Corporation. Pentium is a trademark of Intel Corporation. LINUX is a registered trademark of Linus Torvalds.

8
SmoothWall Express 2.0: Administrator’s GuideSmoothWall Express 2.0
Administrator’s GuideAll other products, services, companies, events and publications mentioned in this document, associated documents and in SmoothWall software may be trademarks, registered trademarks or servicemarks of their respective owners in the US or other countries.
This document was created and published in the United Kingdom on behalf of the SmoothWall Open Source Project by SmoothWall Limited.
8
SmoothWall Express 2.0: Administrator’s GuideSmoothWall Express 2.0
Administrator’s Guide
Connecting to SmoothWall Express
Page Format
Control Page Group Home Page Credits Page
About your Smoothie Pages Status Advanced Traffic Graphs
Services Web Proxy Server DHCP Server Dynamic DNS Intrusion Detection System (IDS) Remote Access Time Networking Port Forwarding External Services Access DMZ Pinholes PPP (Dial-Up) Settings IP Block Advanced
SmoothWall Express Configuration2
2.1
2.2
2.32.3.12.3.2
2.42.4.12.4.22.4.3
2.52.5.12.5.22.5.32.5.42.5.52.5.6
2.62.6.12.6.22.6.32.6.42.6.52.6.6
SmoothWall Express 2.0Administrator’s Guide
11
2. SmoothWall Express Configuration
Virtual Private Networking (VPN) VPN Control VPN Connections
Log File Viewers System (Other) Logs File Viewer Web Proxy Log File Viewer Firewall Log Viewer Intrusion Detection System Log Viewer
Tools IP Information Page IP Tools (Ping and Traceroute) Secure Shell
Maintenance Updates Modem configuration Alcatel Speedtouch USB ADSL Modem Firmware Upload Password configuration screen Backup Shutdown
2.72.7.12.7.2
2.82.8.12.8.22.8.32.8.4
2.92.9.12.9.22.9.3
2.102.10.12.10.22.10.32.10.42.10.52.10.6
SmoothWall Express 2.0Administrator’s Guide
11
2. SmoothWall Express Configuration
This section contains information about the post-installation configuration of SmoothWall Express. It is assumed that if you are reading this far you have already installed SmoothWall (as detailed in the SmoothWall Express Installation Guide). 2.1 Connecting to SmoothWall Express
Using the browser-based interface from a second machine on your LAN you can now carry out any additional post-installation configuration and system maintenance of your SmoothWall system. The browser-based interface has been tested with both Internet Explorer and Netscape Navigator versions 4 and above on a variety of different platforms.
If during installation SmoothWall Express’s DHCP server was enabled then it will automatically allocate an IP address to each client computer connected to its Local (Green) network. It may be necessary to restart the client computers in order for them to request and receive their IP address. If DHCP is not enabled during installation it will be necessary to configure SmoothWall Express using a PC with a static (fixed) IP address, or utilise a separate DHCP server to provide the IP address.
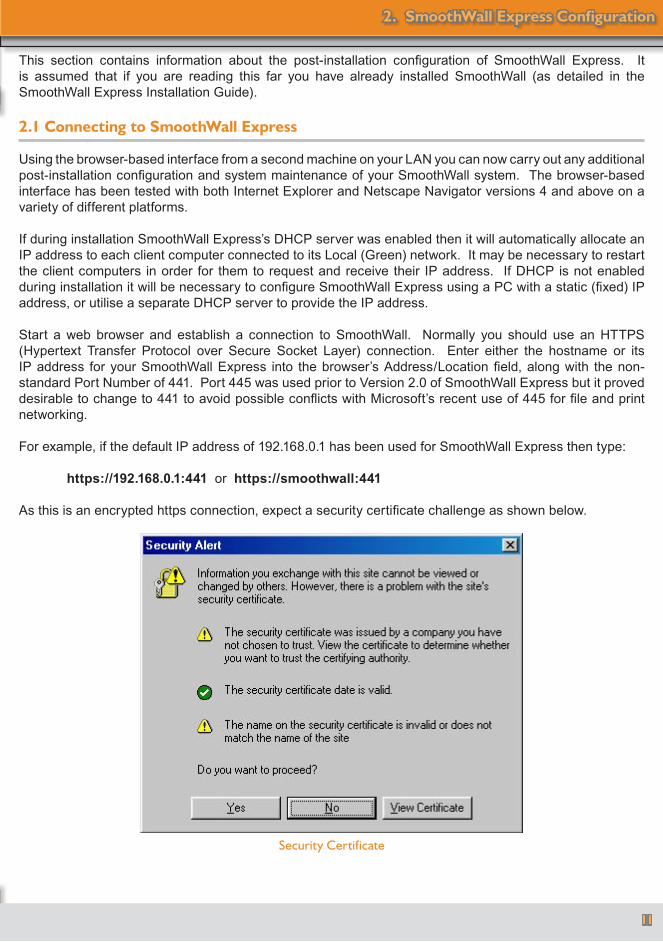
Start a web browser and establish a connection to SmoothWall. Normally you should use an HTTPS (Hypertext Transfer Protocol over Secure Socket Layer) connection. Enter either the hostname or its IP address for your SmoothWall Express into the browser’s Address/Location field, along with the non-standard Port Number of 441. Port 445 was used prior to Version 2.0 of SmoothWall Express but it proved desirable to change to 441 to avoid possible conflicts with Microsoft’s recent use of 445 for file and print networking.
For example, if the default IP address of 192.168.0.1 has been used for SmoothWall Express then type:
https://192.168.0.1:441 or https://smoothwall:441
As this is an encrypted https connection, expect a security certificate challenge as shown below.
Security Certificate
12
SmoothWall Express 2.0: Administrator’s Guide
13
2. SmoothWall Express Configuration
Alternatively you can use non-encrypted HTTP, by typing:
192.168.0.1:81 or http://smoothwall:81
Again, note the non-standard port number used to facilitate the port forwarding of commonly used ports and also increase security as a side effect.
2.2 Page Format
You should now be presented with the SmoothWall Express Control page. In the event that this is not displayed and you cannot access the SmoothWall Express system, the most likely problem is an error in the local network configuration. Please refer to Appendix B for information on troubleshooting.
A Navigation Bar is displayed at the top of all the individual configuration, information, control and help pages. The bar is presented in the form of two horizontal rows of links. Click on the appropriate link to select the required page group, eg About your Smoothie, Networking etc.
Configuration pages are grouped into what are termed Page Groups. Pages within a group are displayed in a tabbed format. To switch between pages in a page group, simply click the desired page name displayed on its tab. Moving the mouse pointer over a tab causes the page (tab) name to change colour.
The Navigation Bars provides a quick method of access to all of the configuration and maintenance pages that determine the specific Setup of your SmoothWall Express system. Note that all of these options require the admin User Name and Password to be entered.
Control – returns you to the SmoothWall Express Control (or home) pageAbout your Smoothie – display Status information, network traffic graphs and network statisticsServices – configure Web proxy server, DHCP server, Dynamic DNS support, Static DNS
entries, enable the Intrusion Detection System (IDS), enable SSH remote access and set the system time
Networking – configure Port Forwarding, External Service Access, DMZ Pinholes and PPP Dialup Connections (modem, ISDN and USB DSL)
VPN – control and configure basic (Pre-Shared key) Virtual Private Network (VPN) connections
Logs – display a large number of log files, including PPP dialup, ISDN, IPSec, Web Proxy, Firewall and Intrusion Detection System
Tools – run Ping and Traceroute commands, run Whois to find out information about an IP address or Domain name and invoke a Secure Shell (SSH) connection from the web browser PC to SmoothWall Express
Maintenance – apply updates to SmoothWall Express, backup the SmoothWall Express configuration, update Alcatel USB DSL modem firmware and change the admin/dial user passwords
Shutdown – Shutdown or restart SmoothWall ExpressHelp – On-line help for SmoothWall Express
12
SmoothWall Express 2.0: Administrator’s Guide
13
2. SmoothWall Express Configuration
2.3 Control Page Group
The SmoothWall Express Control page group consists of just two pages, the home page, and a credits page.
2.3.1 Home Page
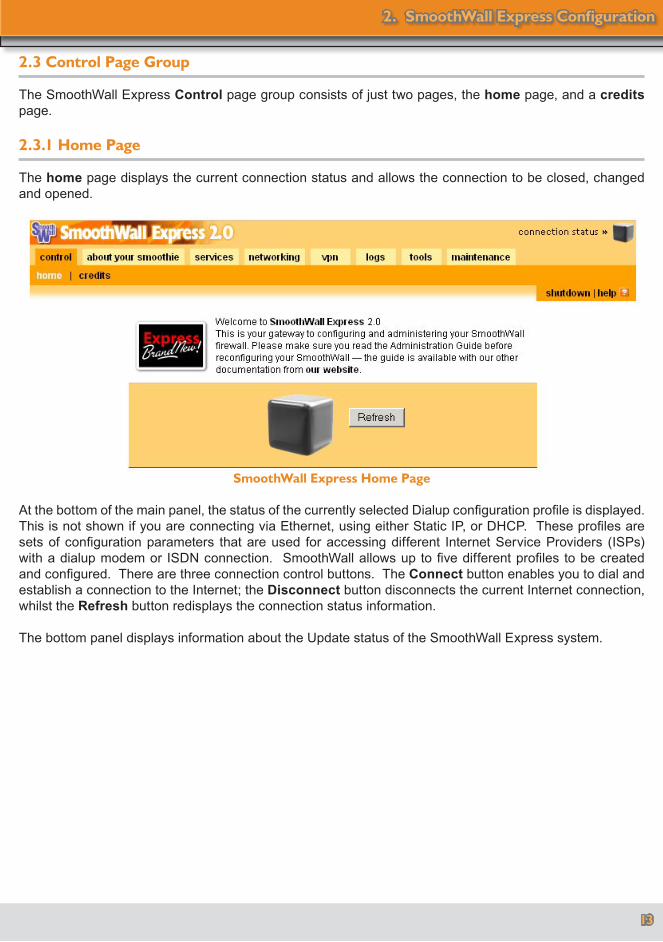
The home page displays the current connection status and allows the connection to be closed, changed and opened.
SmoothWall Express Home Page
At the bottom of the main panel, the status of the currently selected Dialup configuration profile is displayed. This is not shown if you are connecting via Ethernet, using either Static IP, or DHCP. These profiles are sets of configuration parameters that are used for accessing different Internet Service Providers (ISPs) with a dialup modem or ISDN connection. SmoothWall allows up to five different profiles to be created and configured. There are three connection control buttons. The Connect button enables you to dial and establish a connection to the Internet; the Disconnect button disconnects the current Internet connection, whilst the Refresh button redisplays the connection status information.
The bottom panel displays information about the Update status of the SmoothWall Express system.
14
SmoothWall Express 2.0: Administrator’s Guide
15
2. SmoothWall Express Configuration
2.3.2 Credits Page
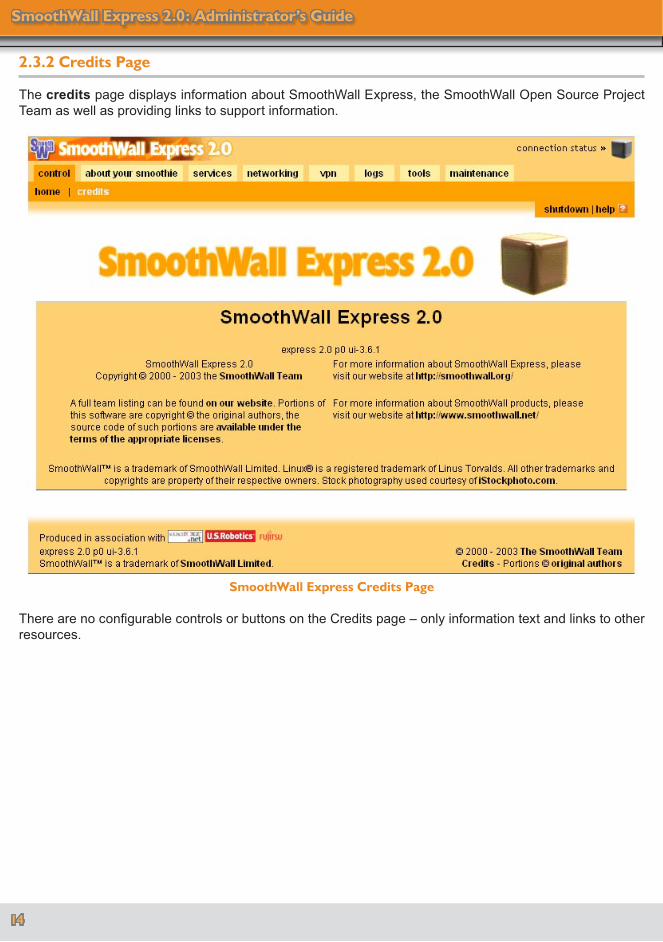
The credits page displays information about SmoothWall Express, the SmoothWall Open Source Project Team as well as providing links to support information.
SmoothWall Express Credits Page
There are no configurable controls or buttons on the Credits page – only information text and links to other resources.

14
SmoothWall Express 2.0: Administrator’s Guide
15
2. SmoothWall Express Configuration
2.4 About your Smoothie Pages
Two pages are accessed from the About your Smoothie page group: Status and Traffic graphs.
2.4.1 Status
This page allows you to view the current operational status of SmoothWall Express.
Status page showing Services
The Status page displays information about the network services available on the SmoothWall system. An easily visible sign of whether or not the service is running is displayed alongside each service.
2.4.2 Advanced
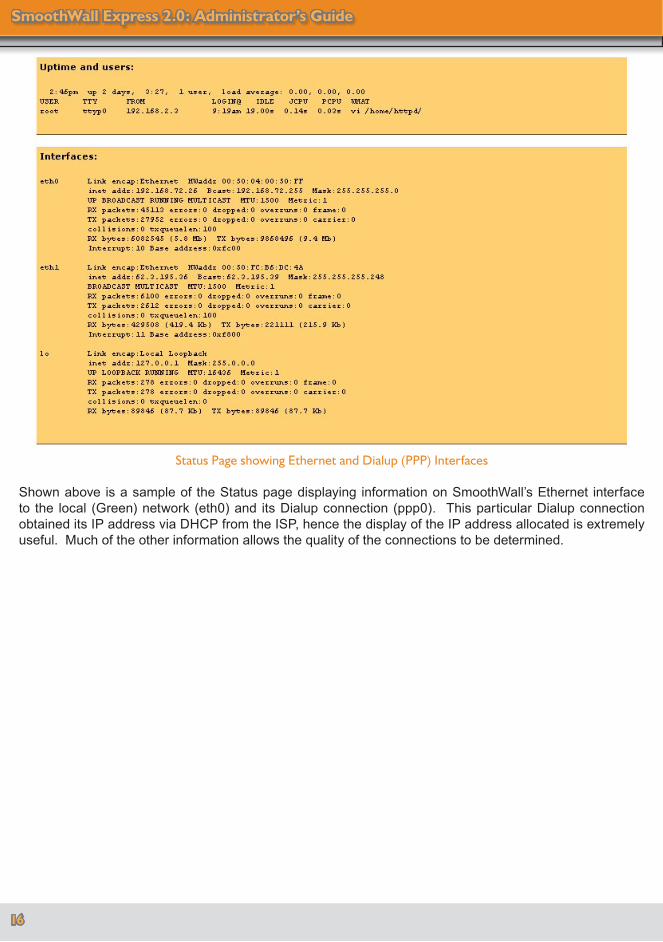
The advanced page consists of a number of sections containing information regarding the use of system resources, such as available memory, hard disk and the uptime of the SmoothWall system (how long it has been running). Details of any users (eg from the console or via SSH) are also listed (note this does not include people using SmoothWall as their Internet gateway).
16
SmoothWall Express 2.0: Administrator’s Guide
17
2. SmoothWall Express Configuration
Status Page showing Ethernet and Dialup (PPP) Interfaces
Shown above is a sample of the Status page displaying information on SmoothWall’s Ethernet interface to the local (Green) network (eth0) and its Dialup connection (ppp0). This particular Dialup connection obtained its IP address via DHCP from the ISP, hence the display of the IP address allocated is extremely useful. Much of the other information allows the quality of the connections to be determined.
16
SmoothWall Express 2.0: Administrator’s Guide
17
2. SmoothWall Express Configuration
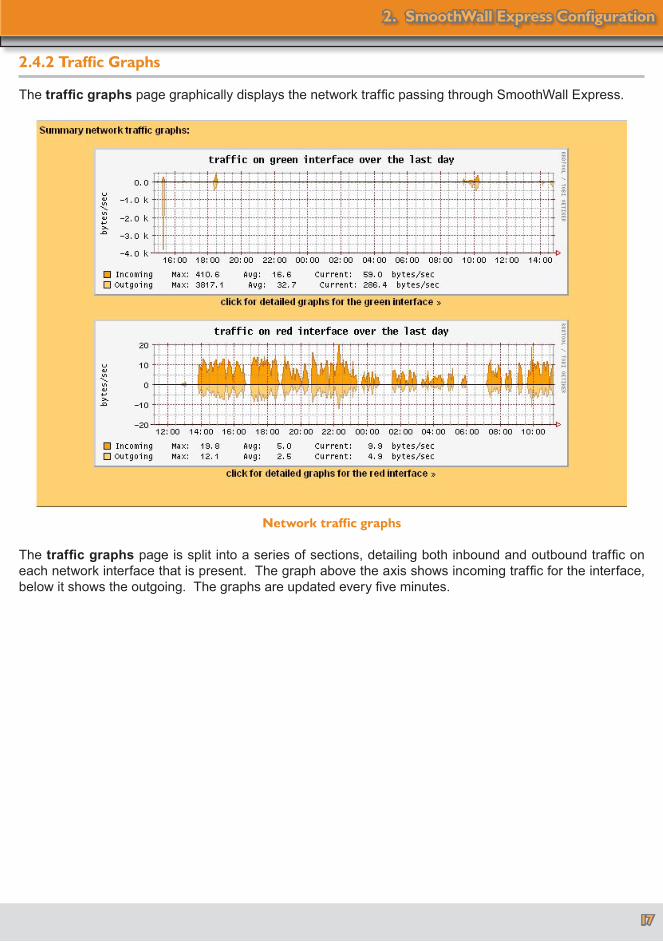
2.4.2 Traffic Graphs
The traffic graphs page graphically displays the network traffic passing through SmoothWall Express.
Network traffic graphs
The traffic graphs page is split into a series of sections, detailing both inbound and outbound traffic on each network interface that is present. The graph above the axis shows incoming traffic for the interface, below it shows the outgoing. The graphs are updated every five minutes.
18
SmoothWall Express 2.0: Administrator’s Guide
19
2. SmoothWall Express Configuration
5. Services
Six pages are accessed from the Services page group: web proxy, dhcp, dynamic dns, intrusion detection system, remote access and time.
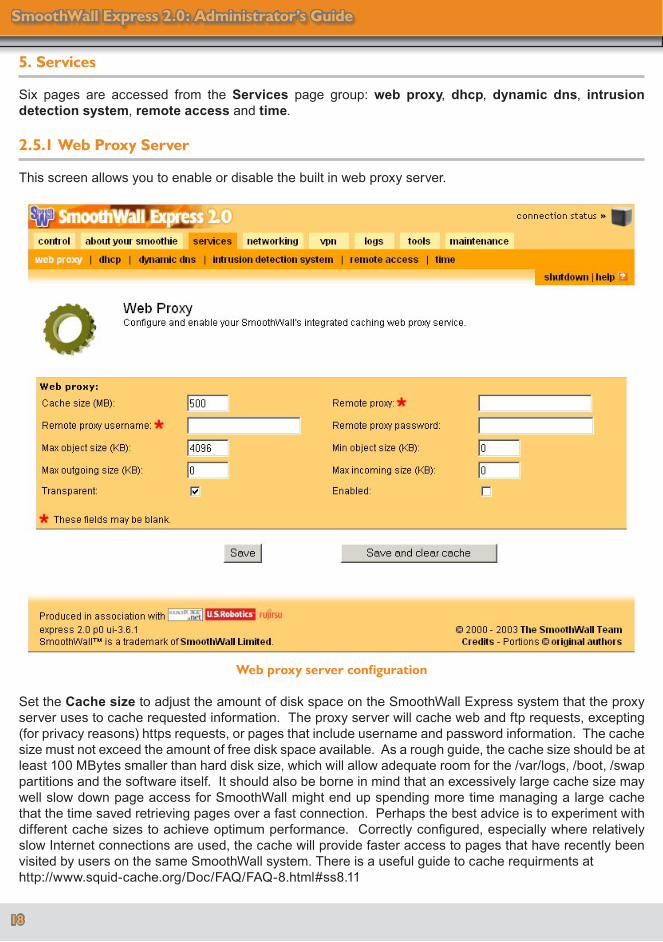
2.5.1 Web Proxy Server
This screen allows you to enable or disable the built in web proxy server.
Web proxy server configuration
Set the Cache size to adjust the amount of disk space on the SmoothWall Express system that the proxy server uses to cache requested information. The proxy server will cache web and ftp requests, excepting (for privacy reasons) https requests, or pages that include username and password information. The cache size must not exceed the amount of free disk space available. As a rough guide, the cache size should be at least 100 MBytes smaller than hard disk size, which will allow adequate room for the /var/logs, /boot, /swap partitions and the software itself. It should also be borne in mind that an excessively large cache size may well slow down page access for SmoothWall might end up spending more time managing a large cache that the time saved retrieving pages over a fast connection. Perhaps the best advice is to experiment with different cache sizes to achieve optimum performance. Correctly configured, especially where relatively slow Internet connections are used, the cache will provide faster access to pages that have recently been visited by users on the same SmoothWall system. There is a useful guide to cache requirments at http://www.squid-cache.org/Doc/FAQ/FAQ-8.html#ss8.11
18
SmoothWall Express 2.0: Administrator’s Guide
19
2. SmoothWall Express Configuration
It is also possible to make use of a Remote proxy server by filling in the IP address of such a system in the appropriate box, although for most users this field will normally be left blank. Some large networks might employ a dedicated proxy server; alternatively there might be a remote proxy server available on your ISP’s network, in which case your ISP will be able to provide you with the necessary information.
If a remote proxy server is to be used then it may well need SmoothWall Express to authenticate itself to it, in which case the Remote proxy username and the Remote proxy password fields will need to be completed.
The Max object size and Min object size controls set the largest and smallest object size that will be stored in the cache. This facility enables the administrator to force the proxy to only cache objects that are within a certain size range. This is ideal for ensuring that large downloads do not clog up the cache. The default is not to cache objects larger then 4096 KBytes (4 MBytes) with no minimum object size set.
The purpose of Max outgoing size is to limit the amount of data that a browser is allowed to send through the proxy, regardless of whether the data is cached or not. This could be used to limit the size of outgoing file uploads or form submissions but the default is not to impose a limit. More useful is the Max incoming size control, where you can limit the maximum download file size that can pass through the proxy server. This can be used to stop people from downloading excessively large files that would slow down your Internet connection. Again, the default is not to place any restriction on the file download size.
The Transparent feature of the SmoothWall proxy server avoids the need to configure user’s web browsers to work with a proxy server. In transparent mode, all requests are automatically redirected through the cache. In this way, it is possible to stop desktop clients from browsing without going through the proxy server. If transparent mode is not enabled, then to make use of the proxy server you must configure the browser on user PCs and MACs to use port 800 rather than the standard port 80, as described in the later sections on configuring desktop client computers.
The Enabled checkbox enables or disables the proxy server as required. Note that if the Transparent checkbox is not checked then this will be a Non-Transparent Proxy Server, which requires each PC’s browser to be configured to use the proxy server. This does have the potential advantage of allowing some users to go through the proxy and others not to, however in most situations it is recommended that transparent mode is used.
Press the Save button to record the changes and restart the proxy server to run with the new configuration information.
20
SmoothWall Express 2.0: Administrator’s Guide
21
2. SmoothWall Express Configuration
2.5.2 DHCP Server
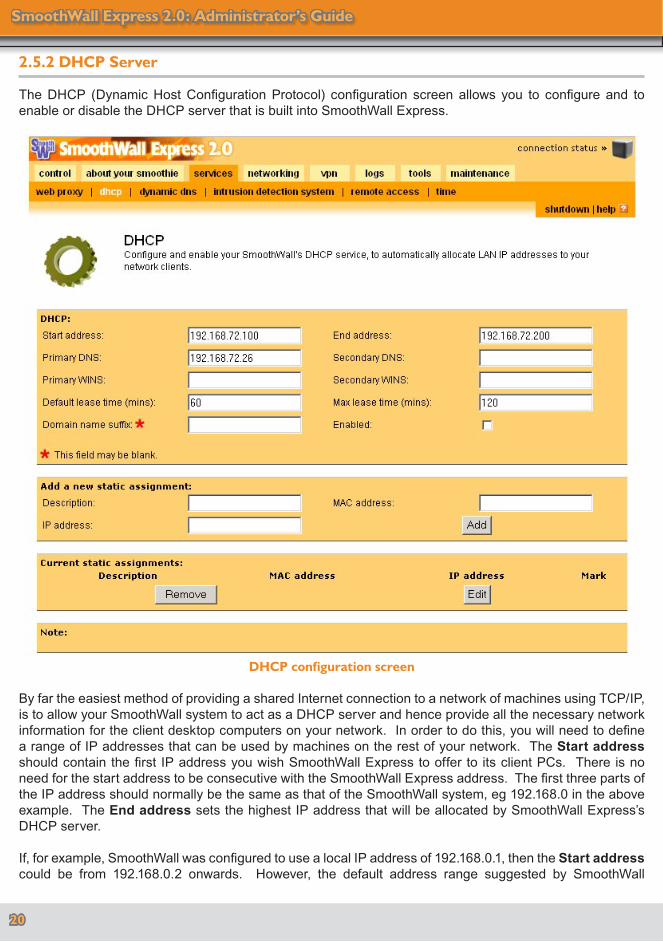
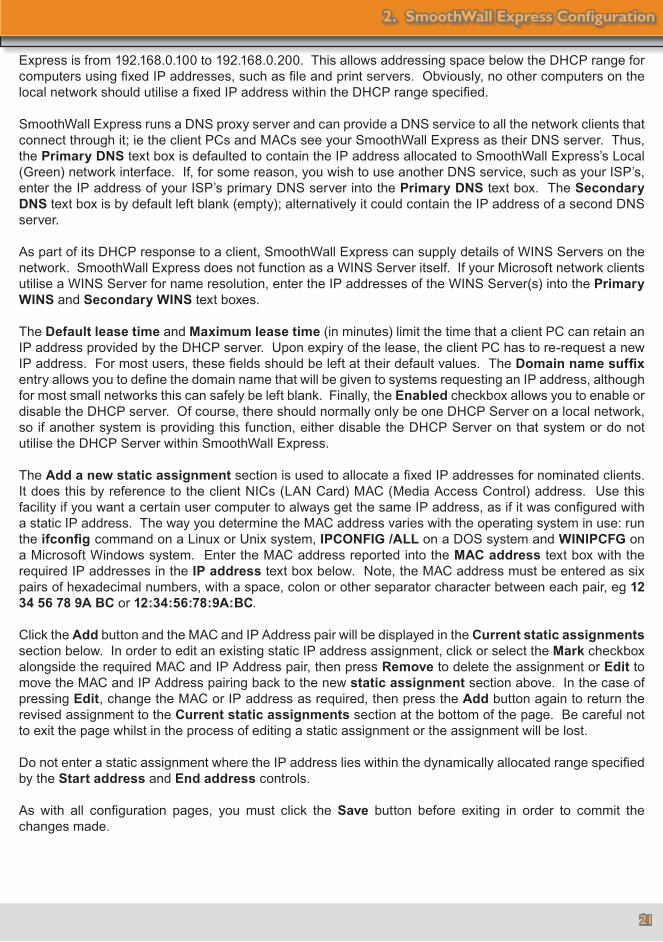
The DHCP (Dynamic Host Configuration Protocol) configuration screen allows you to configure and to enable or disable the DHCP server that is built into SmoothWall Express.
DHCP configuration screen
By far the easiest method of providing a shared Internet connection to a network of machines using TCP/IP, is to allow your SmoothWall system to act as a DHCP server and hence provide all the necessary network information for the client desktop computers on your network. In order to do this, you will need to define a range of IP addresses that can be used by machines on the rest of your network. The Start address should contain the first IP address you wish SmoothWall Express to offer to its client PCs. There is no need for the start address to be consecutive with the SmoothWall Express address. The first three parts of the IP address should normally be the same as that of the SmoothWall system, eg 192.168.0 in the above example. The End address sets the highest IP address that will be allocated by SmoothWall Express’s DHCP server.
If, for example, SmoothWall was configured to use a local IP address of 192.168.0.1, then the Start address could be from 192.168.0.2 onwards. However, the default address range suggested by SmoothWall
20
SmoothWall Express 2.0: Administrator’s Guide
21
2. SmoothWall Express Configuration
Express is from 192.168.0.100 to 192.168.0.200. This allows addressing space below the DHCP range for computers using fixed IP addresses, such as file and print servers. Obviously, no other computers on the local network should utilise a fixed IP address within the DHCP range specified.
SmoothWall Express runs a DNS proxy server and can provide a DNS service to all the network clients that connect through it; ie the client PCs and MACs see your SmoothWall Express as their DNS server. Thus, the Primary DNS text box is defaulted to contain the IP address allocated to SmoothWall Express’s Local (Green) network interface. If, for some reason, you wish to use another DNS service, such as your ISP’s, enter the IP address of your ISP’s primary DNS server into the Primary DNS text box. The Secondary DNS text box is by default left blank (empty); alternatively it could contain the IP address of a second DNS server.
As part of its DHCP response to a client, SmoothWall Express can supply details of WINS Servers on the network. SmoothWall Express does not function as a WINS Server itself. If your Microsoft network clients utilise a WINS Server for name resolution, enter the IP addresses of the WINS Server(s) into the Primary WINS and Secondary WINS text boxes.
The Default lease time and Maximum lease time (in minutes) limit the time that a client PC can retain an IP address provided by the DHCP server. Upon expiry of the lease, the client PC has to re-request a new IP address. For most users, these fields should be left at their default values. The Domain name suffix entry allows you to define the domain name that will be given to systems requesting an IP address, although for most small networks this can safely be left blank. Finally, the Enabled checkbox allows you to enable or disable the DHCP server. Of course, there should normally only be one DHCP Server on a local network, so if another system is providing this function, either disable the DHCP Server on that system or do not utilise the DHCP Server within SmoothWall Express.
The Add a new static assignment section is used to allocate a fixed IP addresses for nominated clients. It does this by reference to the client NICs (LAN Card) MAC (Media Access Control) address. Use this facility if you want a certain user computer to always get the same IP address, as if it was configured with a static IP address. The way you determine the MAC address varies with the operating system in use: run the ifconfig command on a Linux or Unix system, IPCONFIG /ALL on a DOS system and WINIPCFG on a Microsoft Windows system. Enter the MAC address reported into the MAC address text box with the required IP addresses in the IP address text box below. Note, the MAC address must be entered as six pairs of hexadecimal numbers, with a space, colon or other separator character between each pair, eg 12 34 56 78 9A BC or 12:34:56:78:9A:BC.
Click the Add button and the MAC and IP Address pair will be displayed in the Current static assignments section below. In order to edit an existing static IP address assignment, click or select the Mark checkbox alongside the required MAC and IP Address pair, then press Remove to delete the assignment or Edit to move the MAC and IP Address pairing back to the new static assignment section above. In the case of pressing Edit, change the MAC or IP address as required, then press the Add button again to return the revised assignment to the Current static assignments section at the bottom of the page. Be careful not to exit the page whilst in the process of editing a static assignment or the assignment will be lost.
Do not enter a static assignment where the IP address lies within the dynamically allocated range specified by the Start address and End address controls.
As with all configuration pages, you must click the Save button before exiting in order to commit the changes made.
22
SmoothWall Express 2.0: Administrator’s Guide
23
2. SmoothWall Express Configuration
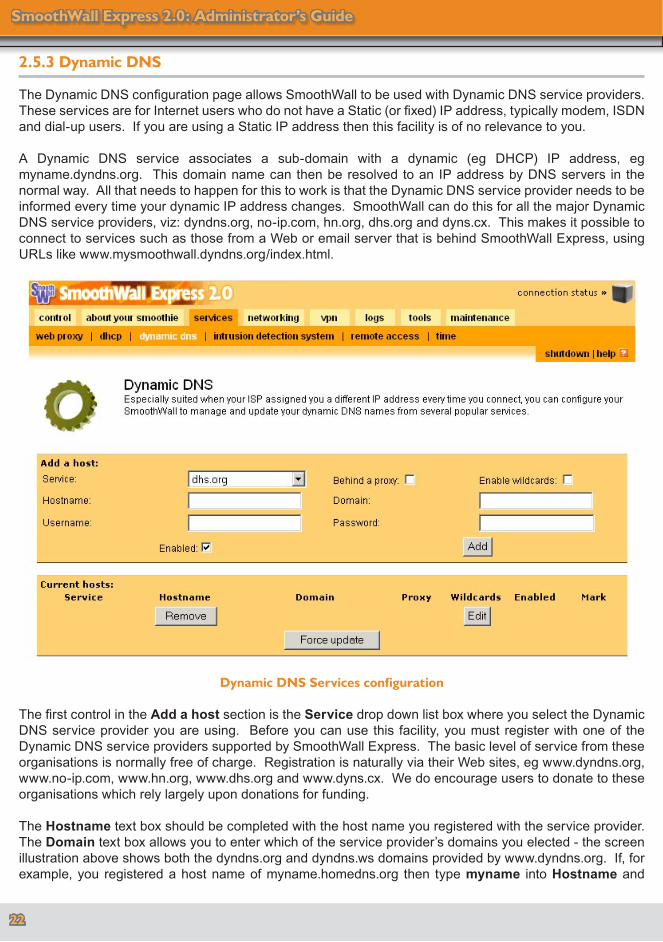
2.5.3 Dynamic DNS
The Dynamic DNS configuration page allows SmoothWall to be used with Dynamic DNS service providers. These services are for Internet users who do not have a Static (or fixed) IP address, typically modem, ISDN and dial-up users. If you are using a Static IP address then this facility is of no relevance to you.
A Dynamic DNS service associates a sub-domain with a dynamic (eg DHCP) IP address, eg myname.dyndns.org. This domain name can then be resolved to an IP address by DNS servers in the normal way. All that needs to happen for this to work is that the Dynamic DNS service provider needs to be informed every time your dynamic IP address changes. SmoothWall can do this for all the major Dynamic DNS service providers, viz: dyndns.org, no-ip.com, hn.org, dhs.org and dyns.cx. This makes it possible to connect to services such as those from a Web or email server that is behind SmoothWall Express, using URLs like www.mysmoothwall.dyndns.org/index.html.
Dynamic DNS Services configuration
The first control in the Add a host section is the Service drop down list box where you select the Dynamic DNS service provider you are using. Before you can use this facility, you must register with one of the Dynamic DNS service providers supported by SmoothWall Express. The basic level of service from these organisations is normally free of charge. Registration is naturally via their Web sites, eg www.dyndns.org, www.no-ip.com, www.hn.org, www.dhs.org and www.dyns.cx. We do encourage users to donate to these organisations which rely largely upon donations for funding.
The Hostname text box should be completed with the host name you registered with the service provider. The Domain text box allows you to enter which of the service provider’s domains you elected - the screen illustration above shows both the dyndns.org and dyndns.ws domains provided by www.dyndns.org. If, for example, you registered a host name of myname.homedns.org then type myname into Hostname and
22
SmoothWall Express 2.0: Administrator’s Guide
23
2. SmoothWall Express Configuration
homedns.org into Domain.
Enter into the Username text box the user name you registered with the service provider. The Password text box naturally should contain the associated password for your user name.
The Behind a Proxy checkbox must be checked if you are using no-ip.com as the service provider or if SmoothWall Express is sitting behind a Proxy Server. The default is that this is not checked.
The checkbox Enable wildcards allows you to have all the subdomains of your dynamic dns hostname pointing to the same IP as your hostname (eg with this Enable wildcards enabled, www.mysmoothwall.dyndns.org will point to the same IP as smoothwall.dyndns.org). This check box does not work with the no-ip.com service, as they only allow this feature to be activated or deactivated directly from their website.
As standard, the Enabled checkbox is checked, ie the Dynamic DNS host entry will be activated and updated each time SmoothWall Express is allocated a new IP address. If you want to create a host entry but not have it enabled, then un-check the Enabled checkbox. For example, if you want to keep the information for one of your Dynamic DNS Hostnames saved but want to avoid having your IP updated by its Dynamic DNS service provider, then do not enable it. However, do note that Dynamic DNS service providers may disable Hostnames that have not been updated with a new IP address, say in the last thirty days. Use it or lose it? Click the Add button and the information will be transferred to the Current hosts section below, with the Add a host entry controls being cleared, ready for the entry of the next host’s details. There is no Save button – all changes take effect immediately the Add button is clicked, unless of course, there is a validation failure, which will be reported in the Error messages panel.
An entry in Current hosts can be edited by checking the Mark checkbox for the host entry and clicking the Edit button. All the information about the Dynamic DNS host will be copied back to the Add a host section above and cleared from the Current hosts section. As per usual, only one host at a time can be edited. Edit as required and click the Add button to return the information to the Current hosts section. Be careful not to exit the page whilst in the process of editing a host entry or the data will be lost.
To delete or remove a Dynamic DNS host entry, check its Mark checkbox and click the Remove button. Multiple entries can be deleted simultaneously if desired.
The Force update button forces a refresh of SmoothWall Express’s current dynamic IP address for all the enabled Host names back to their respective Dynamic DNS service providers. Don’t do it too often, as Dynamic DNS service providers don’t like people who update their IP when it hasn’t changed - they may consider you an abusive user and block your hostnames. In the future, you won’t need to Force update as your IP will automatically be updated each time your IP changes, allowing you always to be able to find your SmoothWall Express and the services and servers behind it.
24
SmoothWall Express 2.0: Administrator’s Guide
25
2. SmoothWall Express Configuration
2.5.4 Intrusion Detection System (IDS)
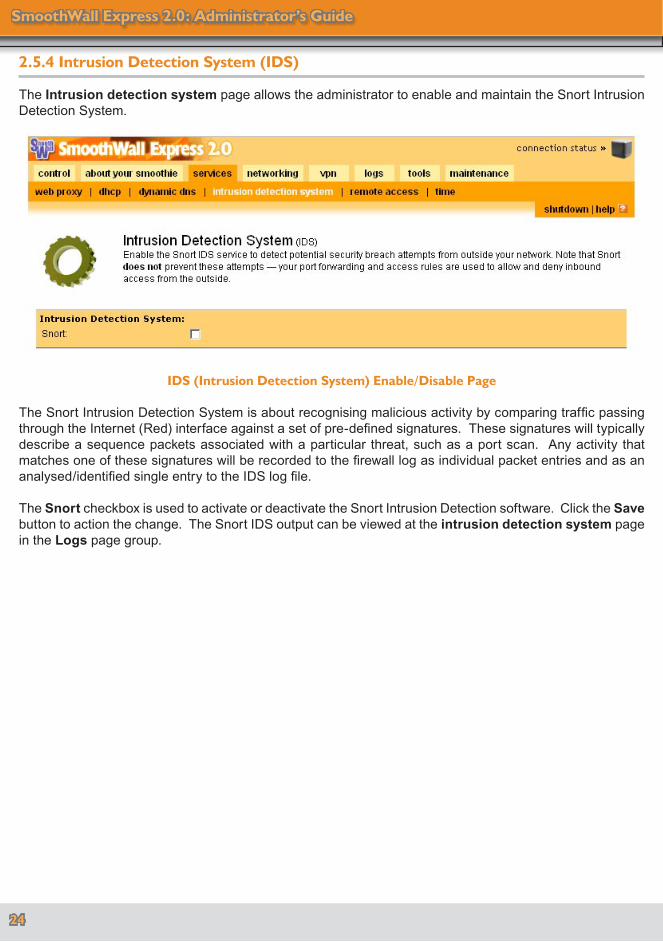
The Intrusion detection system page allows the administrator to enable and maintain the Snort Intrusion Detection System.
IDS (Intrusion Detection System) Enable/Disable Page
The Snort Intrusion Detection System is about recognising malicious activity by comparing traffic passing through the Internet (Red) interface against a set of pre-defined signatures. These signatures will typically describe a sequence packets associated with a particular threat, such as a port scan. Any activity that matches one of these signatures will be recorded to the firewall log as individual packet entries and as an analysed/identified single entry to the IDS log file.
The Snort checkbox is used to activate or deactivate the Snort Intrusion Detection software. Click the Save button to action the change. The Snort IDS output can be viewed at the intrusion detection system page in the Logs page group.
24
SmoothWall Express 2.0: Administrator’s Guide
25
2. SmoothWall Express Configuration
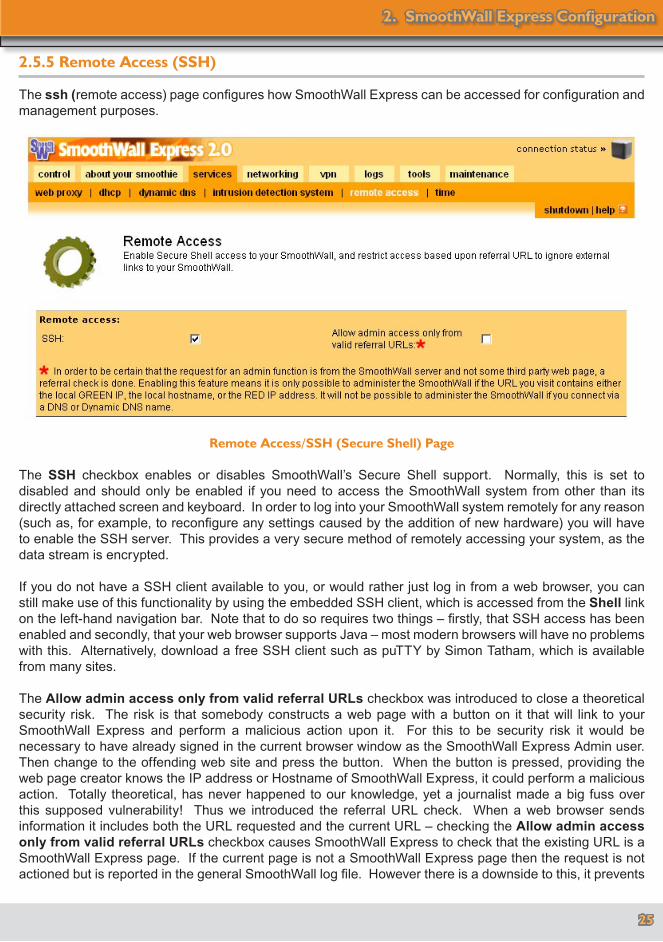
2.5.5 Remote Access (SSH)
The ssh (remote access) page configures how SmoothWall Express can be accessed for configuration and management purposes.
Remote Access/SSH (Secure Shell) Page
The SSH checkbox enables or disables SmoothWall’s Secure Shell support. Normally, this is set to disabled and should only be enabled if you need to access the SmoothWall system from other than its directly attached screen and keyboard. In order to log into your SmoothWall system remotely for any reason (such as, for example, to reconfigure any settings caused by the addition of new hardware) you will have to enable the SSH server. This provides a very secure method of remotely accessing your system, as the data stream is encrypted.
If you do not have a SSH client available to you, or would rather just log in from a web browser, you can still make use of this functionality by using the embedded SSH client, which is accessed from the Shell link on the left-hand navigation bar. Note that to do so requires two things – firstly, that SSH access has been enabled and secondly, that your web browser supports Java – most modern browsers will have no problems with this. Alternatively, download a free SSH client such as puTTY by Simon Tatham, which is available from many sites.
The Allow admin access only from valid referral URLs checkbox was introduced to close a theoretical security risk. The risk is that somebody constructs a web page with a button on it that will link to your SmoothWall Express and perform a malicious action upon it. For this to be security risk it would be necessary to have already signed in the current browser window as the SmoothWall Express Admin user. Then change to the offending web site and press the button. When the button is pressed, providing the web page creator knows the IP address or Hostname of SmoothWall Express, it could perform a malicious action. Totally theoretical, has never happened to our knowledge, yet a journalist made a big fuss over this supposed vulnerability! Thus we introduced the referral URL check. When a web browser sends information it includes both the URL requested and the current URL – checking the Allow admin access only from valid referral URLs checkbox causes SmoothWall Express to check that the existing URL is a SmoothWall Express page. If the current page is not a SmoothWall Express page then the request is not actioned but is reported in the general SmoothWall log file. However there is a downside to this, it prevents
26
SmoothWall Express 2.0: Administrator’s Guide
27
2. SmoothWall Express Configuration
SmoothWall Express being accessed remotely via a DNS or a Dynamic DNS address. To remotely manage a SmoothWall Express system via a DNS or a Dynamic DNS address it is necessary to disable the referral URL check. Also, alternatively, you may look up the IP address by resolving the DNS address and use this to securely manage your SmoothWall Express.
Don’t forget to click the Save button to action any changes.
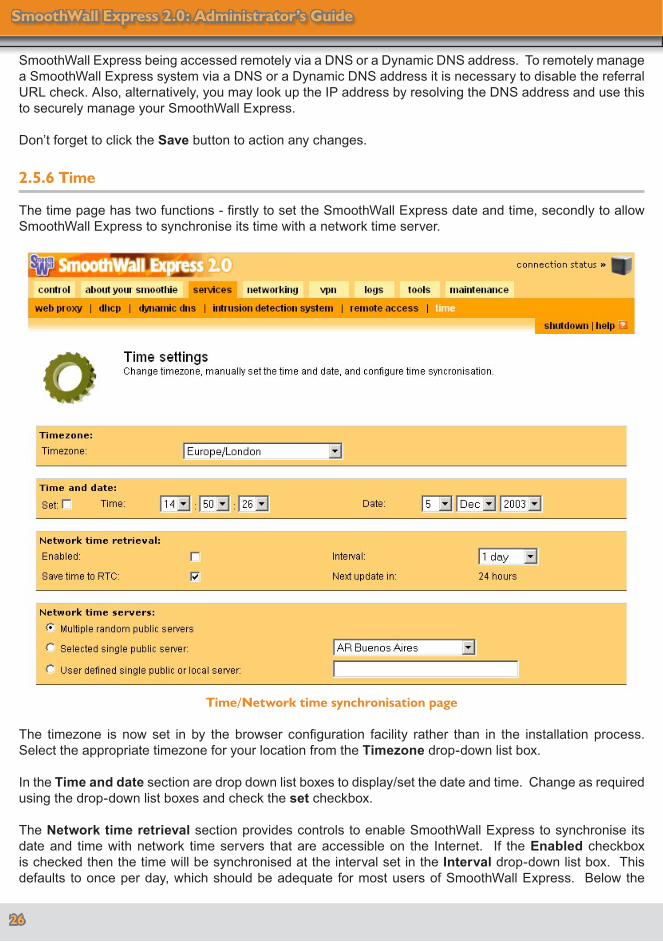
2.5.6 Time
The time page has two functions - firstly to set the SmoothWall Express date and time, secondly to allow SmoothWall Express to synchronise its time with a network time server.
Time/Network time synchronisation page
The timezone is now set in by the browser configuration facility rather than in the installation process. Select the appropriate timezone for your location from the Timezone drop-down list box.
In the Time and date section are drop down list boxes to display/set the date and time. Change as required using the drop-down list boxes and check the set checkbox.
The Network time retrieval section provides controls to enable SmoothWall Express to synchronise its date and time with network time servers that are accessible on the Internet. If the Enabled checkbox is checked then the time will be synchronised at the interval set in the Interval drop-down list box. This defaults to once per day, which should be adequate for most users of SmoothWall Express. Below the
26
SmoothWall Express 2.0: Administrator’s Guide
27
2. SmoothWall Express Configuration
interval control is a display informing you when the next time retrieval will occur. The final option in this panel, Save time to RTC, is used to make SmoothWall Express update the Real-Time Clock (RTC) of the PC on which it is running with the time retrieved from the network time server.
The Network time servers section allows the user to choose which network time server(s) to use. The first of three radio buttons sets SmoothWall Express to use Multiple random public servers, ie use a different server each time, which is the default and recommended option. The second radio button, Selected single public server, makes SmoothWall Express use a single time server each time. The adjoining drop-down list box selects which of approximately 40 world-wide time servers that will be. The third radio button, User defined single public or local server, allows for a user specified time server to be used. Either an IP address can be entered or a name that can be resolved by SmoothWall Express (eg using its Static DNS/Hostnames table).
Finish by clicking the Save button to record the changes made.
2.6 Networking
Six pages are accessed from the Networking page group: port forwarding, external services access, DMZ pinholes and ppp settings.
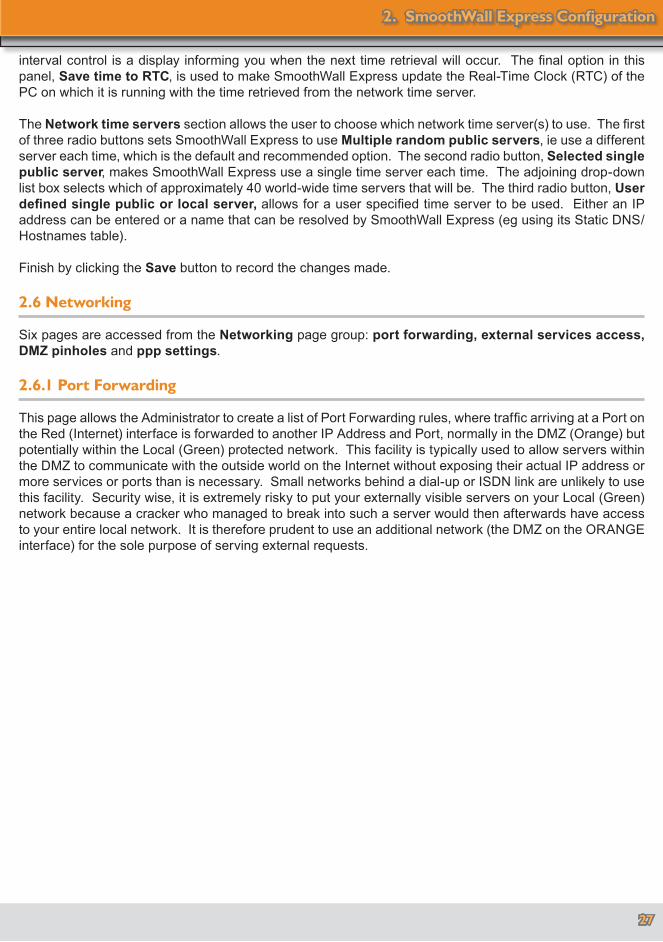
2.6.1 Port Forwarding
This page allows the Administrator to create a list of Port Forwarding rules, where traffic arriving at a Port on the Red (Internet) interface is forwarded to another IP Address and Port, normally in the DMZ (Orange) but potentially within the Local (Green) protected network. This facility is typically used to allow servers within the DMZ to communicate with the outside world on the Internet without exposing their actual IP address or more services or ports than is necessary. Small networks behind a dial-up or ISDN link are unlikely to use this facility. Security wise, it is extremely risky to put your externally visible servers on your Local (Green) network because a cracker who managed to break into such a server would then afterwards have access to your entire local network. It is therefore prudent to use an additional network (the DMZ on the ORANGE interface) for the sole purpose of serving external requests.
28
SmoothWall Express 2.0: Administrator’s Guide
29
2. SmoothWall Express Configuration
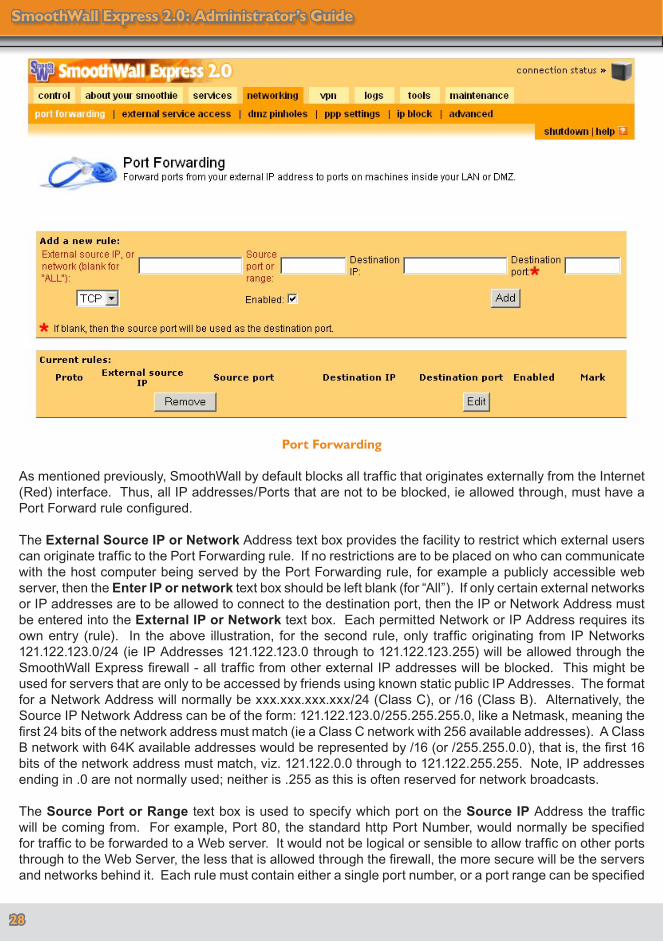
Port Forwarding
As mentioned previously, SmoothWall by default blocks all traffic that originates externally from the Internet (Red) interface. Thus, all IP addresses/Ports that are not to be blocked, ie allowed through, must have a Port Forward rule configured.
The External Source IP or Network Address text box provides the facility to restrict which external users can originate traffic to the Port Forwarding rule. If no restrictions are to be placed on who can communicate with the host computer being served by the Port Forwarding rule, for example a publicly accessible web server, then the Enter IP or network text box should be left blank (for “All”). If only certain external networks or IP addresses are to be allowed to connect to the destination port, then the IP or Network Address must be entered into the External IP or Network text box. Each permitted Network or IP Address requires its own entry (rule). In the above illustration, for the second rule, only traffic originating from IP Networks 121.122.123.0/24 (ie IP Addresses 121.122.123.0 through to 121.122.123.255) will be allowed through the SmoothWall Express firewall - all traffic from other external IP addresses will be blocked. This might be used for servers that are only to be accessed by friends using known static public IP Addresses. The format for a Network Address will normally be xxx.xxx.xxx.xxx/24 (Class C), or /16 (Class B). Alternatively, the Source IP Network Address can be of the form: 121.122.123.0/255.255.255.0, like a Netmask, meaning the first 24 bits of the network address must match (ie a Class C network with 256 available addresses). A Class B network with 64K available addresses would be represented by /16 (or /255.255.0.0), that is, the first 16 bits of the network address must match, viz. 121.122.0.0 through to 121.122.255.255. Note, IP addresses ending in .0 are not normally used; neither is .255 as this is often reserved for network broadcasts.
The Source Port or Range text box is used to specify which port on the Source IP Address the traffic will be coming from. For example, Port 80, the standard http Port Number, would normally be specified for traffic to be forwarded to a Web server. It would not be logical or sensible to allow traffic on other ports through to the Web Server, the less that is allowed through the firewall, the more secure will be the servers and networks behind it. Each rule must contain either a single port number, or a port range can be specified

28
SmoothWall Express 2.0: Administrator’s Guide
29
2. SmoothWall Express Configuration
as two port numbers separated by a colon (:) character. For example, 123:456 would forward all ports from 123 through to an including 456. Except for the colon separator character, port numbers must be numeric and have a value of less than 65536.
Use the Destination IP text box to specify the IP address in the DMZ or the Local (Green) network where the traffic is to be forwarded to. Forwarding ports to the Local (Green) network is not generally recommended – publicly accessible servers should be located in the DMZ if at all possible.
The Destination Port specifies which port on the Destination IP address is to receive the traffic. Normally, this will be the same as the Source Port; eg Port 80 goes to Port 80 for a Web Server. However, it is not uncommon to use non-standard port numbers for security reasons. Indeed, SmoothWall itself does this - witness the use of Port 81 for http access to these configuration pages. If the Destination Port is left blank then it will be set to the same port or port range as the Source Port.
The Protocol list box defaults to TCP but this can be set for the connection-less UDP protocol if required.
As standard, the Enabled checkbox is checked, ie the rule will be enabled. If, for some reason, you wish to enter a rule but not have it enabled, then un-check the Enabled checkbox. Click the Add button and the information will be transferred to the Current rules section below, with the rule entry controls being cleared ready for the entry of the next rule. Unlike most other pages, there is no Save button – all changes take effect immediately the Add button is clicked. This is the same for External Service Access and DMZ Pinholes.
An existing rule can be edited by checking the Mark checkbox for the rule and clicking the Edit button. All the information about the rule will be copied back to the Add a new rule section above and cleared from the Current rules section. As per usual, only one rule at a time can be edited. Edit as required and click the Add button to return the information to the Current rules section. Be careful not to exit the page whilst in the process of editing an existing rule or the rule will be lost.
To delete or remove a rule, check its Mark checkbox and click the Remove button. Multiple rules can be deleted simultaneously if desired.
Notes:
Clients on the local network are by default, allowed to make outgoing TCP connections to hosts in the DMZ (Orange) network but not the other way around. They are unable to partake in any UDP traffic whatsoever. Users on the Local (Green) network are able to connect to resources such as web and mail servers in the DMZ without having to create any security policy rules. To enable hosts in the DMZ network to make restricted connections to hosts on the Local (Green) network use the DMZ Pinhole facility.
By default, SmoothWall Express blocks all traffic that originates externally from the Internet. Clients behind SmoothWall can talk out to the Internet – but outside computers cannot instigate a connection to a service behind SmoothWall Express, unless rules are created to stop the traffic being blocked. Prior to version 2.0 of SmoothWall Express, Port 113, the Auth Port and the “High Ports”, ie those above 1024, were handled differently to all other ports. The introduction of “Stateful Packet Inspection” in Version 2.0 means that all ports are treated identically and are by default blocked.
The handling of FTP (File Transfer Protocol has also been made simpler by the introduction of Stateful Packet Inspection in Version 2.0 of SmoothWall Express. It is simply necessary to Forward Port 21 (the default port for FTP) and the appropriate FTP helper code is automatically invoked. This enables both Active and Passive FTP to hosts on either the DMZ (Orange) or the Local Protected Network (Green)
30
SmoothWall Express 2.0: Administrator’s Guide
31
2. SmoothWall Express Configuration
without any further configuration settings being required.
Prior to SmoothWall Express Version 2.0, in order to access a server in the DMZ (Orange network) from the Local (Green) Protected Network it was necessary to use the server’s private IP address. With SmoothWall Express Version 2.0 this is no longer necessary – servers in the DMZ can be accessed from the Green network by their public IP address or URL, the port forwarding logic automatically takes care of this.
If a Port Forward is configured to a host on the Local Protected (Green) network, then the port forwarding logic does not automatically allow access to that host from another computer on the Green network using either the server’s public (forwarded) IP address or a URL. It is still necessary to access the host via its private IP address.
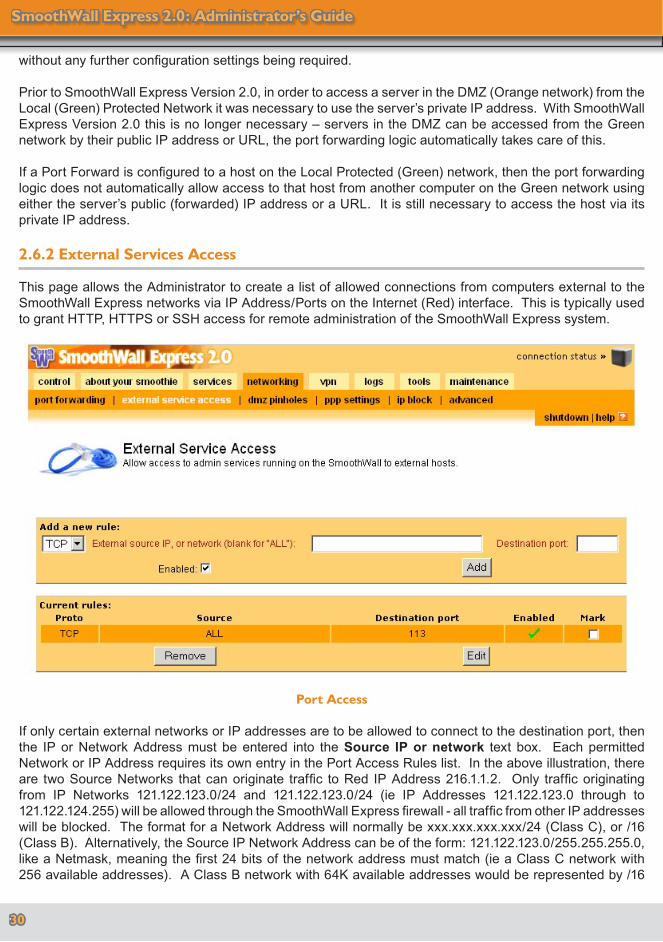
2.6.2 External Services Access
This page allows the Administrator to create a list of allowed connections from computers external to the SmoothWall Express networks via IP Address/Ports on the Internet (Red) interface. This is typically used to grant HTTP, HTTPS or SSH access for remote administration of the SmoothWall Express system.
Port Access
If only certain external networks or IP addresses are to be allowed to connect to the destination port, then the IP or Network Address must be entered into the Source IP or network text box. Each permitted Network or IP Address requires its own entry in the Port Access Rules list. In the above illustration, there are two Source Networks that can originate traffic to Red IP Address 216.1.1.2. Only traffic originating from IP Networks 121.122.123.0/24 and 121.122.123.0/24 (ie IP Addresses 121.122.123.0 through to 121.122.124.255) will be allowed through the SmoothWall Express firewall - all traffic from other IP addresses will be blocked. The format for a Network Address will normally be xxx.xxx.xxx.xxx/24 (Class C), or /16 (Class B). Alternatively, the Source IP Network Address can be of the form: 121.122.123.0/255.255.255.0, like a Netmask, meaning the first 24 bits of the network address must match (ie a Class C network with 256 available addresses). A Class B network with 64K available addresses would be represented by /16
30
SmoothWall Express 2.0: Administrator’s Guide
31
2. SmoothWall Express Configuration
(or /255.255.0.0), that is, the first 16 bits of the network address must match, viz. 121.122.0.0 through to 121.122.255.255. Note, IP addresses ending in .0 are not normally used; neither is .255 as this is often reserved for network broadcasts.
The Destination Port text box is used to specify which ports on the SmoothWall Express system will accept data from the specified Source addresses - all other ports will be blocked to these Source addresses. For HTTPS specify port 441, for SSH specify port 222. External access using HTTP is not recommended because this protocol does not encrypt the data. The Protocol list box defaults to TCP but this can be set for the connection-less UDP protocol if required.
As standard, the Enabled checkbox is checked; ie the rule will be enabled. If, for some reason, you wish to enter a rule but not have it enabled, then un-check the Enabled checkbox. Click the Add button and the information will be transferred to the Current rules section below, with the rule entry controls being cleared ready for the entry of the next rule. Unlike most other pages, there is no Save button – all changes take effect immediately the Add button is clicked. This is the same for Port Forwarding and DMZ Pinholes.An existing rule can be edited by checking the Mark checkbox for the rule and clicking the Edit button. All the information about the rule will be copied back to the Add a new rule section above and cleared from the Current rules section. Naturally, only one rule at a time can be edited. Edit as required and click the Add button to return the information to the Current rules section. Be careful not to exit the page whilst in the process of editing an existing rule or the rule will be lost.
If you are administering the SmoothWall Express system remotely then do not edit the rule granting HTTPS access for the connection would immediately be lost upon pressing the Edit button.
To delete or remove a rule, check its Mark checkbox and click the Remove button. Multiple rules can be deleted simultaneously if desired.
Notes
The typical use of the External Service Access rules is to enable remote configuration and management of a SmoothWall Express system. Create a rule un-blocking port 441, this being the port used for secure http (https) by SmoothWall Express. It is strongly advised that a Source IP address be specified so that only one known and trusted remote computer can gain administration or root access to the SmoothWall Express system – this will stop anybody else being able to open the port. However, there is still the normal password protection in place. With this done, you can remotely configure and manage the SmoothWall Express system. Enabling SSH in services>remote access and un-blocking port 222 would allow you to shell into a remote SmoothWall Express system as either the ‘root’ or ‘setup’ user.
2.6.3 DMZ Pinholes
This configuration page is only applicable to installations where a De-Militarized Zone (DMZ) is configured on the Orange interface. It allows the Administrator to configure “holes” between the DMZ (Orange network) and the Local (Green) network. The standard configuration, without any holes configured, blocks any host in the DMZ from connecting to a host on the Local (Green) network. Every hole so opened is a potential security risk; however, there are good reasons for doing so. The name pinhole implies the size of the hole that should be opened. A typical example of the use of pinholes is where Web servers located in the DMZ need to access back-end SQL Database Servers on the Local network. Another example is where External (facing) Mail Servers in the DMZ relay messages to Internal Mail Servers on the Local network.
32
SmoothWall Express 2.0: Administrator’s Guide
33
2. SmoothWall Express Configuration
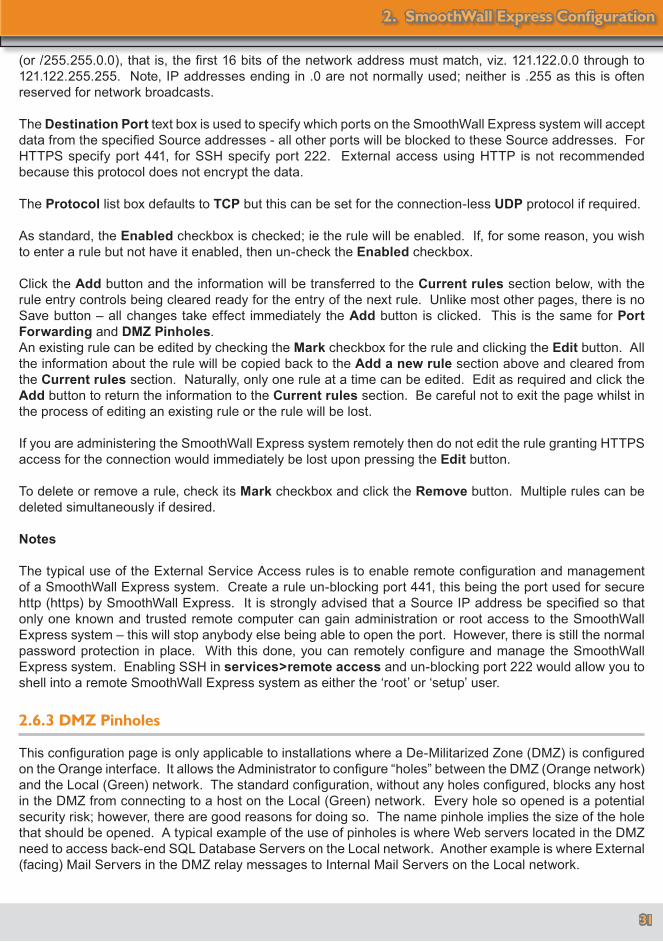
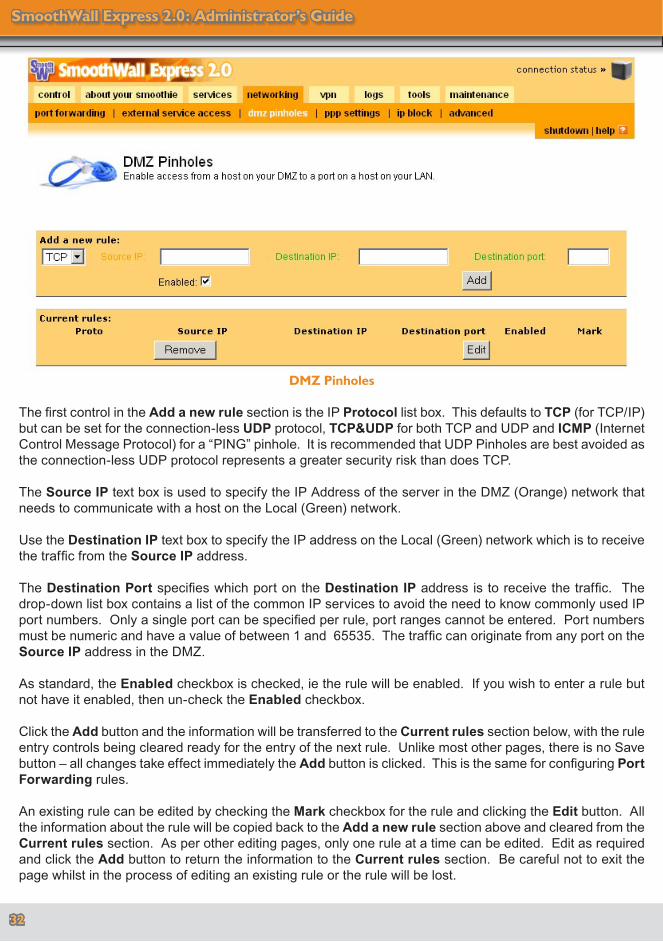
DMZ Pinholes
The first control in the Add a new rule section is the IP Protocol list box. This defaults to TCP (for TCP/IP) but can be set for the connection-less UDP protocol, TCP&UDP for both TCP and UDP and ICMP (Internet Control Message Protocol) for a “PING” pinhole. It is recommended that UDP Pinholes are best avoided as the connection-less UDP protocol represents a greater security risk than does TCP.
The Source IP text box is used to specify the IP Address of the server in the DMZ (Orange) network that needs to communicate with a host on the Local (Green) network.
Use the Destination IP text box to specify the IP address on the Local (Green) network which is to receive the traffic from the Source IP address.
The Destination Port specifies which port on the Destination IP address is to receive the traffic. The drop-down list box contains a list of the common IP services to avoid the need to know commonly used IP port numbers. Only a single port can be specified per rule, port ranges cannot be entered. Port numbers must be numeric and have a value of between 1 and 65535. The traffic can originate from any port on the Source IP address in the DMZ.
As standard, the Enabled checkbox is checked, ie the rule will be enabled. If you wish to enter a rule but not have it enabled, then un-check the Enabled checkbox. Click the Add button and the information will be transferred to the Current rules section below, with the rule entry controls being cleared ready for the entry of the next rule. Unlike most other pages, there is no Save button – all changes take effect immediately the Add button is clicked. This is the same for configuring Port Forwarding rules.
An existing rule can be edited by checking the Mark checkbox for the rule and clicking the Edit button. All the information about the rule will be copied back to the Add a new rule section above and cleared from the Current rules section. As per other editing pages, only one rule at a time can be edited. Edit as required and click the Add button to return the information to the Current rules section. Be careful not to exit the page whilst in the process of editing an existing rule or the rule will be lost.
32
SmoothWall Express 2.0: Administrator’s Guide
33
2. SmoothWall Express Configuration
To delete or remove a rule, check its Mark checkbox and click the Remove button. Multiple rules can be deleted simultaneously if desired.
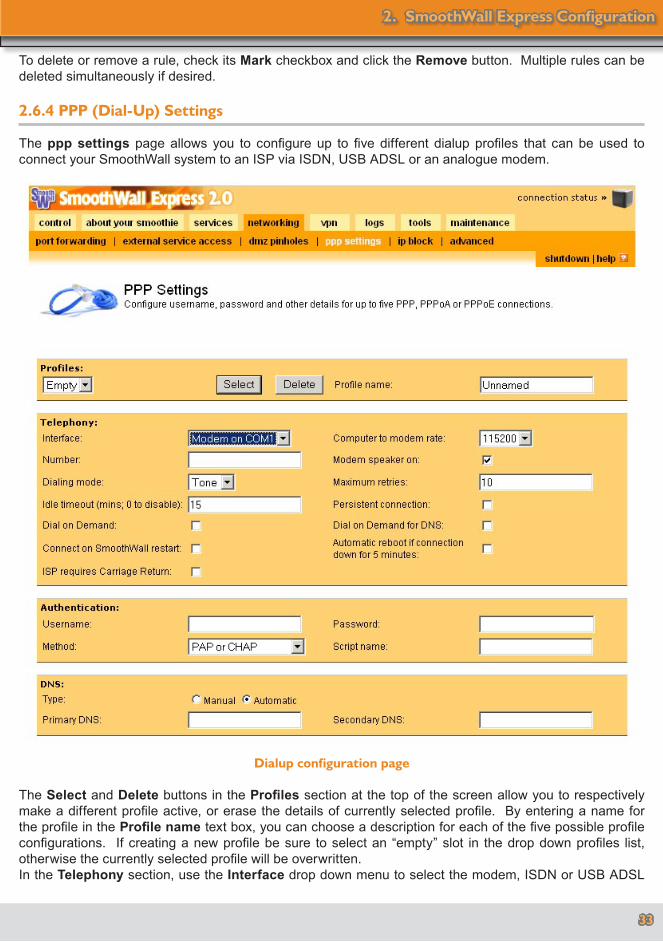
2.6.4 PPP (Dial-Up) Settings
The ppp settings page allows you to configure up to five different dialup profiles that can be used to connect your SmoothWall system to an ISP via ISDN, USB ADSL or an analogue modem.
Dialup configuration page
The Select and Delete buttons in the Profiles section at the top of the screen allow you to respectively make a different profile active, or erase the details of currently selected profile. By entering a name for the profile in the Profile name text box, you can choose a description for each of the five possible profile configurations. If creating a new profile be sure to select an “empty” slot in the drop down profiles list, otherwise the currently selected profile will be overwritten.In the Telephony section, use the Interface drop down menu to select the modem, ISDN or USB ADSL
34
SmoothWall Express 2.0: Administrator’s Guide
35
2. SmoothWall Express Configuration
(PPPoE) device for this connection. Configure an external ISDN terminal adapter by selecting the COM port it is connected to. Put the telephone number you want SmoothWall to dial into the Number field, without any spaces, hyphens etc. If SmoothWall is connected via a PABX line, then it may be necessary to prefix the number with an outside (exchange) line access code (normally a single digit). Some older PABXs require modems to pause between requesting an outside line and starting to dial the number, which can be achieved by placing a comma (,) between the access code and the number.
The Computer to modem rate can normally be safely left at its default value of 115,200 bits/second, as this ensures modems with data compression capabilities run at their maximum possible speed. A few old 486 PCs may need this rate to be reduced to 57,600 bits/second.
The function of the Modem speaker on checkbox should be self evident, although it should be noted that in general, only analogue modems are equipped with speakers.
There can be few telephone exchanges remaining that still use Pulse Dialling … but for those rare instances, the Dialling Mode drop down menu can be set to Pulse rather than its normal and default setting of Tone.
By selecting the Persistent connection checkbox, you will enable the SmoothWall system to keep the link to your ISP up and available for use all of the time – if the connection drops for any reason, it will automatically be redialled. The Idle timeout setting defaults to 15 minutes of inactivity before the connection is dropped. By setting this to zero (0), you can disable the idle timeout feature and you will have to disconnect and hang-up manually.
The Dial on Demand checkbox configures the SmoothWall system to automatically connect to the ISP detailed in the current profile, whenever a user on the network initiates a connection to the Internet. Note that if dial on demand is enabled and your Internet connection is charged on a per minute basis, you may get an unpleasant surprise when the next telephone invoice arrives! Windows-based PCs are particularly likely to generate unnecessary network traffic, as they routinely check that other systems are still present on the network. Likewise, email programs are often configured to look for new mail at regular intervals, day and night. The Dial on Demand for DNS checkbox will, if enabled, allow the SmoothWall system to dial up to the Internet each time a DNS request is made by any machine on the local private network – this can happen a lot when reading e-mail with embedded HTML, for example. If this checkbox is disabled, the system will not dialup to the Internet each time a DNS request is made, but instead only when a specific connection is requested. This is one simple way to help reduce telephone charges when the ISP connection is one that is paid for on a per minute basis.
The Connect on SmoothWall restart checkbox will cause SmoothWall upon being rebooted to automatically connect to the ISP.
The Automatic reboot if connection down for 5 minutes checkbox will cause SmoothWall Express to automatically reboot itself if the external (Red) interface is detected as being down for 5 minutes, ie the Internet connection has failed. This is primarily intended for users of Alcatel USB ADSL modems, which appear not to automatically reconnect in some circumstances. However this facility can be used with any interface type configurable via this page. This option is useful when combined with Connect on Restart but cannot be used in conjunction with Dial on Demand.
The ISP requires Carriage Return option is used to stop SmoothWall from sending a Carriage Return before commencing the PPP dialogue. Most ISPs either ignore the Carriage Return or expect it to be sent; thus the default is to have the option enabled. However, a few ISPs have been found to drop the line upon receiving the Carriage Return. Turn this option off if your ISP behaves in this non-standard way. Currently, this is only known to apply to BT Internet in the UK using an analogue modem connection.
34
SmoothWall Express 2.0: Administrator’s Guide
35
2. SmoothWall Express Configuration
The controls in the ISDN settings section enable the action of the second data channel to be controlled for high-speed, 128Kbit access. If the data throughput keeps changing this may cause the ISDN channel to be going up and down. The Keep second channel up will force the second channel to remain up, instead of automatically closing once the data-rate decreases below a threshold where the second channel is of no benefit. The Minimum time to keep second channel up (sec) control is provided to cater for the possibility of the second channel repeatedly going up and down due to the threshold being exceeded for short periods of time. Entering a higher value in the Minimum time to keep second channel up (sec) control will force the second channel to stay up for longer, so a momentary lull in the data traffic will not cause the second channel to go down. However if the throughput is too irregular it may be necessary to force the second channel to stay constantly up with the Keep second channel up control.
With SmoothWall Express Version 2.0 the configuration of USB ADSL modems has been moved to the Setup program, which is where the former “Additional USB ADSL settings” of the VPI (Virtual Path Identifier) and VCI (Virtual Circuit Identifier) are now configured.
The Authentication section has entries for the Username and Password combination that your ISP requires for connection. The authentication Method used by most ISP’s is the default setting of PAP or CHAP, but if your ISP uses a standard text based login script, select that option instead. Users of the UK’s Demon Internet ISP will have to use a slightly modified version of the normal method to connect to Demon’s authentication servers and there is a special setting provided specifically for these users. The final option, Other login script, allows the use of a custom login script if none of the other methods permit a connection. If you need this, you will need to login to the SmoothWall box as the root user and create a file in /etc/ppp. This filename (without the /etc/ppp prefix) should be entered into the Script name text box. The script should contain ‘expect send’ pairs, separated by a tab. Use the demonloginscript in /etc/ppp as an example. The variables USERNAME and PASSWORD in the script will be replaced by the Username and Password entered earlier.
In the DNS section, the default option is Automatic where your IPS automatically passes details of their DNS servers back to your SmoothWall Express. This is the way most ISPs work. Alternatively, if your ISP does not provide this function or you wish to use another DNS, select Manual and enter the IP addresses of the Primary DNS and Secondary DNS servers into the two text boxes provided.
Click on the Save button at the bottom of the screen to record the details of your newly created or modified profile, or the Restore button to recall a previously saved profile for further editing. If any errors are detected in the Dialup configuration, these will be reported in the Error messages section at the bottom of the page. Note that the Dialup configuration cannot be changed whilst an Internet connection is established via the Red interface.
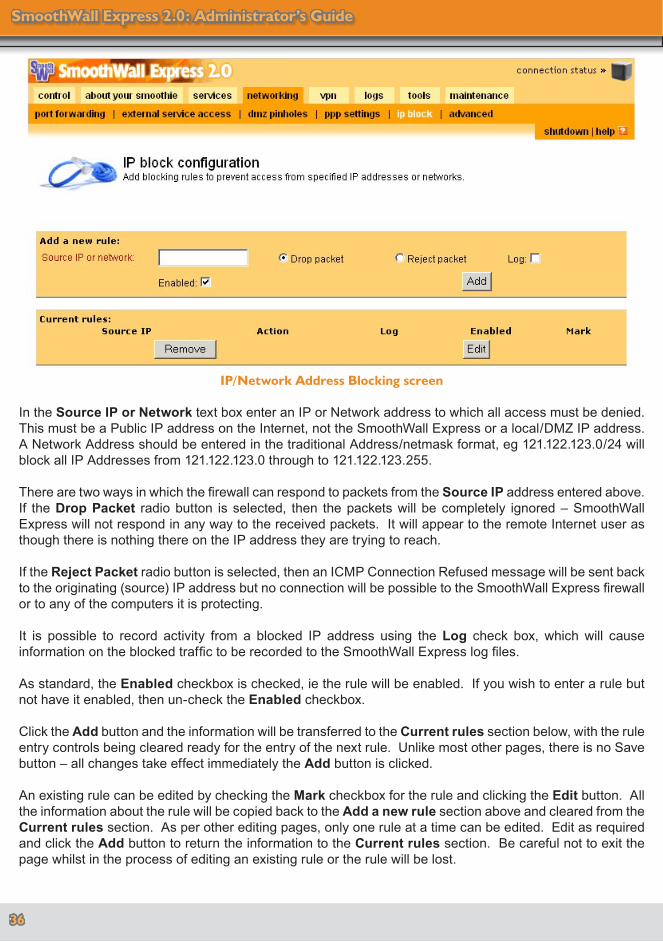
2.6.5 IP Block
This configuration page allows the administrator to prevent certain IP addresses from being able to access the SmoothWall Express firewall or any of the host/user computers protected by it. Typically this would be used to record the IP addresses of known hostile parties, spyware sites or any organisation or individual that is seen as a threat. If attacks or network probes are appearing in the Firewall or IDS log files then it may be sensible to totally block them out using this facility.
36
SmoothWall Express 2.0: Administrator’s Guide
37
2. SmoothWall Express Configuration
IP/Network Address Blocking screen
In the Source IP or Network text box enter an IP or Network address to which all access must be denied. This must be a Public IP address on the Internet, not the SmoothWall Express or a local/DMZ IP address. A Network Address should be entered in the traditional Address/netmask format, eg 121.122.123.0/24 will block all IP Addresses from 121.122.123.0 through to 121.122.123.255.
There are two ways in which the firewall can respond to packets from the Source IP address entered above. If the Drop Packet radio button is selected, then the packets will be completely ignored – SmoothWall Express will not respond in any way to the received packets. It will appear to the remote Internet user as though there is nothing there on the IP address they are trying to reach.
If the Reject Packet radio button is selected, then an ICMP Connection Refused message will be sent back to the originating (source) IP address but no connection will be possible to the SmoothWall Express firewall or to any of the computers it is protecting.
It is possible to record activity from a blocked IP address using the Log check box, which will cause information on the blocked traffic to be recorded to the SmoothWall Express log files.
As standard, the Enabled checkbox is checked, ie the rule will be enabled. If you wish to enter a rule but not have it enabled, then un-check the Enabled checkbox. Click the Add button and the information will be transferred to the Current rules section below, with the rule entry controls being cleared ready for the entry of the next rule. Unlike most other pages, there is no Save button – all changes take effect immediately the Add button is clicked.
An existing rule can be edited by checking the Mark checkbox for the rule and clicking the Edit button. All the information about the rule will be copied back to the Add a new rule section above and cleared from the Current rules section. As per other editing pages, only one rule at a time can be edited. Edit as required and click the Add button to return the information to the Current rules section. Be careful not to exit the page whilst in the process of editing an existing rule or the rule will be lost.

36
SmoothWall Express 2.0: Administrator’s Guide
37
2. SmoothWall Express Configuration
To delete or remove a rule, check its Mark checkbox and click the Remove button. Multiple rules can be deleted simultaneously if desired.
2.6.6 Advanced
The advanced page allows controls of a number of advanced TCP/IP features.
Advanced Network Options
Block ICMP Ping – Stops SmoothWall Express responding to PING messages, from either the Internet or from the local (Green) network. Like SYN attacks described below, it is possible to perform a Denial of Service attack by flooding a box with PING messages.
Block and ignore IGMP packets – Blocks and ignores IGMP packets. If your log files contain lots of spurious messages referring to IGMP packets, then enabling this option will cause these packets to be ignored and not to be logged. This problem is typically seen with cable modems.
Enable SYN cookies – Defends SmoothWall Express against SYN Flood attacks. A SYN Flood attack is where somebody sends a huge number of connection requests (SYN packets) to a machine in the hope that it will be overwhelmed trying to make so many connections. SYN cookies are a standard defence mechanism against this sort of attack, the aim being to avoid a Denial of Service (DOS) situation where the machine is too busy to do any real work.
Block and ignore multicast traffic – Some ISPs configure their users to receive multi-cast messages on network address 224.0.0.0. Enabling this option will block such multi-cast messages and stop them being logged which can otherwise fill the log files with useless entries.
Don’t forget to click the Save button to action any changes.
2.7 Virtual Private Network (VPN)
SmoothWall Express includes a basic VPN capability which can establish a Pre-Shared Key (PSK/Shared Secret) IPSec VPN tunnel to a compatible system. This is managed from the VPN page that which comprises the control and connections pages.
38
SmoothWall Express 2.0: Administrator’s Guide
39
3. SmoothWall Express Configuration
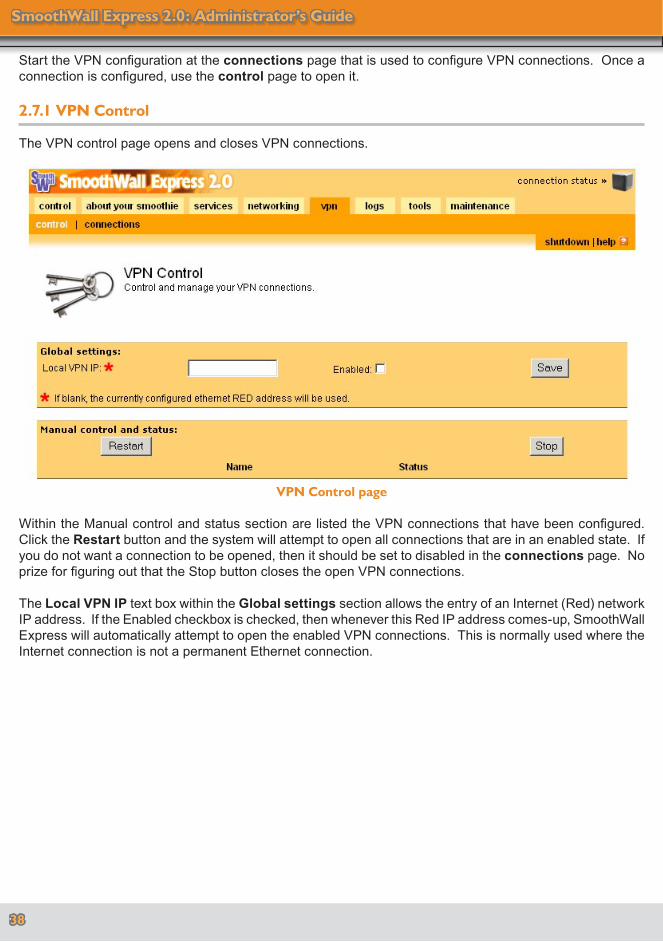
Start the VPN configuration at the connections page that is used to configure VPN connections. Once a connection is configured, use the control page to open it.
2.7.1 VPN Control
The VPN control page opens and closes VPN connections.
VPN Control page
Within the Manual control and status section are listed the VPN connections that have been configured. Click the Restart button and the system will attempt to open all connections that are in an enabled state. If you do not want a connection to be opened, then it should be set to disabled in the connections page. No prize for figuring out that the Stop button closes the open VPN connections.
The Local VPN IP text box within the Global settings section allows the entry of an Internet (Red) network IP address. If the Enabled checkbox is checked, then whenever this Red IP address comes-up, SmoothWall Express will automatically attempt to open the enabled VPN connections. This is normally used where the Internet connection is not a permanent Ethernet connection.
38
SmoothWall Express 2.0: Administrator’s Guide
39
3. SmoothWall Express Configuration
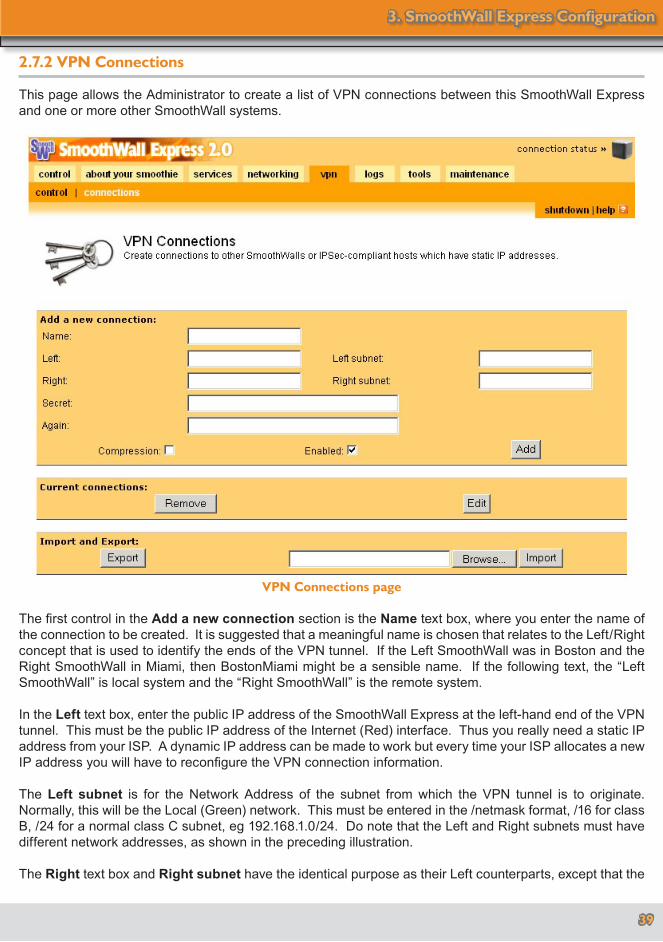
2.7.2 VPN Connections
This page allows the Administrator to create a list of VPN connections between this SmoothWall Express and one or more other SmoothWall systems.
VPN Connections page
The first control in the Add a new connection section is the Name text box, where you enter the name of the connection to be created. It is suggested that a meaningful name is chosen that relates to the Left/Right concept that is used to identify the ends of the VPN tunnel. If the Left SmoothWall was in Boston and the Right SmoothWall in Miami, then BostonMiami might be a sensible name. If the following text, the “Left SmoothWall” is local system and the “Right SmoothWall” is the remote system.
In the Left text box, enter the public IP address of the SmoothWall Express at the left-hand end of the VPN tunnel. This must be the public IP address of the Internet (Red) interface. Thus you really need a static IP address from your ISP. A dynamic IP address can be made to work but every time your ISP allocates a new IP address you will have to reconfigure the VPN connection information.
The Left subnet is for the Network Address of the subnet from which the VPN tunnel is to originate. Normally, this will be the Local (Green) network. This must be entered in the /netmask format, /16 for class B, /24 for a normal class C subnet, eg 192.168.1.0/24. Do note that the Left and Right subnets must have different network addresses, as shown in the preceding illustration.
The Right text box and Right subnet have the identical purpose as their Left counterparts, except that the
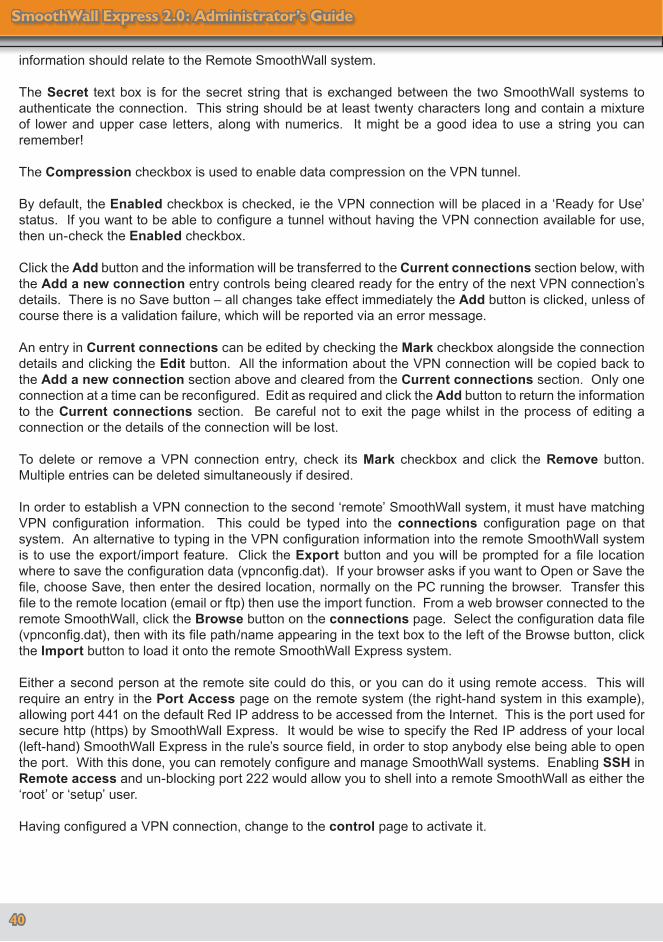
40
SmoothWall Express 2.0: Administrator’s Guide
41
3. SmoothWall Express Configuration
information should relate to the Remote SmoothWall system.
The Secret text box is for the secret string that is exchanged between the two SmoothWall systems to authenticate the connection. This string should be at least twenty characters long and contain a mixture of lower and upper case letters, along with numerics. It might be a good idea to use a string you can remember!
The Compression checkbox is used to enable data compression on the VPN tunnel.
By default, the Enabled checkbox is checked, ie the VPN connection will be placed in a ‘Ready for Use’ status. If you want to be able to configure a tunnel without having the VPN connection available for use, then un-check the Enabled checkbox.
Click the Add button and the information will be transferred to the Current connections section below, with the Add a new connection entry controls being cleared ready for the entry of the next VPN connection’s details. There is no Save button – all changes take effect immediately the Add button is clicked, unless of course there is a validation failure, which will be reported via an error message.
An entry in Current connections can be edited by checking the Mark checkbox alongside the connection details and clicking the Edit button. All the information about the VPN connection will be copied back to the Add a new connection section above and cleared from the Current connections section. Only one connection at a time can be reconfigured. Edit as required and click the Add button to return the information to the Current connections section. Be careful not to exit the page whilst in the process of editing a connection or the details of the connection will be lost.
To delete or remove a VPN connection entry, check its Mark checkbox and click the Remove button. Multiple entries can be deleted simultaneously if desired.
In order to establish a VPN connection to the second ‘remote’ SmoothWall system, it must have matching VPN configuration information. This could be typed into the connections configuration page on that system. An alternative to typing in the VPN configuration information into the remote SmoothWall system is to use the export/import feature. Click the Export button and you will be prompted for a file location where to save the configuration data (vpnconfig.dat). If your browser asks if you want to Open or Save the file, choose Save, then enter the desired location, normally on the PC running the browser. Transfer this file to the remote location (email or ftp) then use the import function. From a web browser connected to the remote SmoothWall, click the Browse button on the connections page. Select the configuration data file (vpnconfig.dat), then with its file path/name appearing in the text box to the left of the Browse button, click the Import button to load it onto the remote SmoothWall Express system.
Either a second person at the remote site could do this, or you can do it using remote access. This will require an entry in the Port Access page on the remote system (the right-hand system in this example), allowing port 441 on the default Red IP address to be accessed from the Internet. This is the port used for secure http (https) by SmoothWall Express. It would be wise to specify the Red IP address of your local (left-hand) SmoothWall Express in the rule’s source field, in order to stop anybody else being able to open the port. With this done, you can remotely configure and manage SmoothWall systems. Enabling SSH in Remote access and un-blocking port 222 would allow you to shell into a remote SmoothWall as either the ‘root’ or ‘setup’ user.
Having configured a VPN connection, change to the control page to activate it.
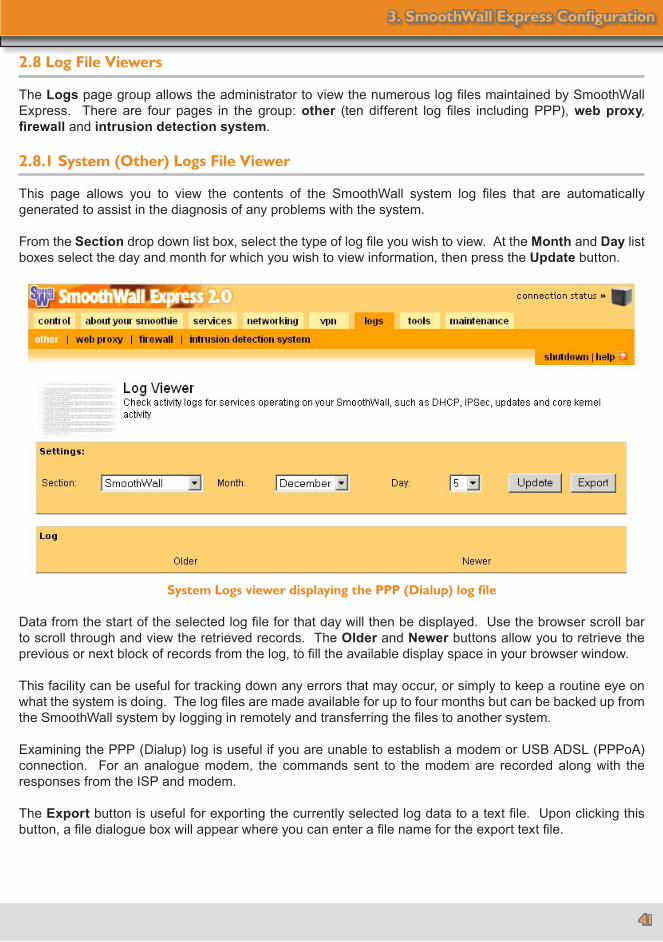
40
SmoothWall Express 2.0: Administrator’s Guide
41
3. SmoothWall Express Configuration
2.8 Log File Viewers
The Logs page group allows the administrator to view the numerous log files maintained by SmoothWall Express. There are four pages in the group: other (ten different log files including PPP), web proxy, firewall and intrusion detection system.
2.8.1 System (Other) Logs File Viewer
This page allows you to view the contents of the SmoothWall system log files that are automatically generated to assist in the diagnosis of any problems with the system.
From the Section drop down list box, select the type of log file you wish to view. At the Month and Day list boxes select the day and month for which you wish to view information, then press the Update button.
System Logs viewer displaying the PPP (Dialup) log file
Data from the start of the selected log file for that day will then be displayed. Use the browser scroll bar to scroll through and view the retrieved records. The Older and Newer buttons allow you to retrieve the previous or next block of records from the log, to fill the available display space in your browser window. This facility can be useful for tracking down any errors that may occur, or simply to keep a routine eye on what the system is doing. The log files are made available for up to four months but can be backed up from the SmoothWall system by logging in remotely and transferring the files to another system.
Examining the PPP (Dialup) log is useful if you are unable to establish a modem or USB ADSL (PPPoA) connection. For an analogue modem, the commands sent to the modem are recorded along with the responses from the ISP and modem.
The Export button is useful for exporting the currently selected log data to a text file. Upon clicking this button, a file dialogue box will appear where you can enter a file name for the export text file.
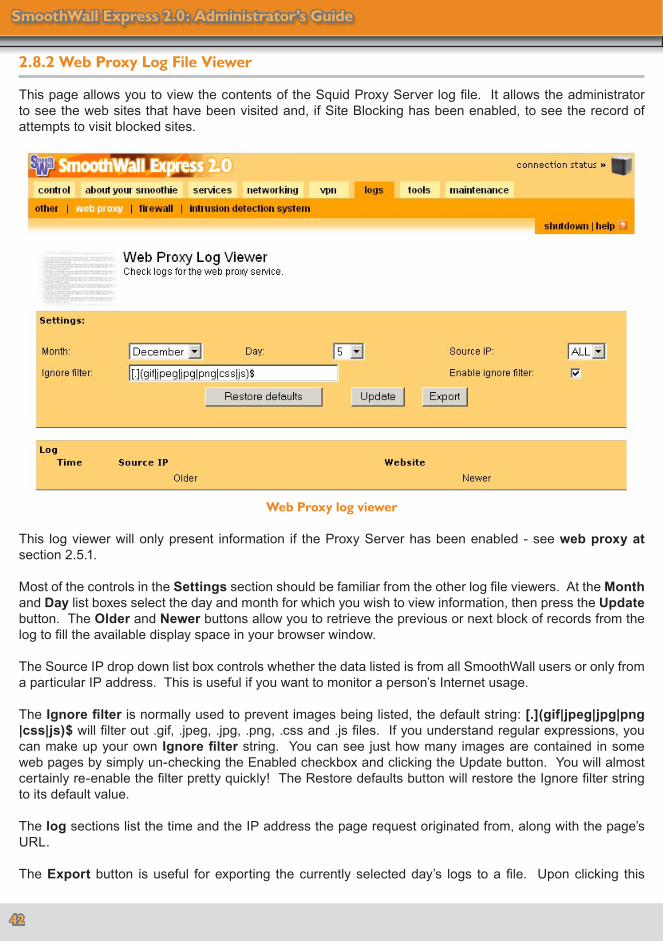
42
SmoothWall Express 2.0: Administrator’s Guide
43
3. SmoothWall Express Configuration
2.8.2 Web Proxy Log File Viewer
This page allows you to view the contents of the Squid Proxy Server log file. It allows the administrator to see the web sites that have been visited and, if Site Blocking has been enabled, to see the record of attempts to visit blocked sites.
Web Proxy log viewer
This log viewer will only present information if the Proxy Server has been enabled - see web proxy at section 2.5.1.
Most of the controls in the Settings section should be familiar from the other log file viewers. At the Month and Day list boxes select the day and month for which you wish to view information, then press the Update button. The Older and Newer buttons allow you to retrieve the previous or next block of records from the log to fill the available display space in your browser window.
The Source IP drop down list box controls whether the data listed is from all SmoothWall users or only from a particular IP address. This is useful if you want to monitor a person’s Internet usage.
The Ignore filter is normally used to prevent images being listed, the default string: [.](gif|jpeg|jpg|png|css|js)$ will filter out .gif, .jpeg, .jpg, .png, .css and .js files. If you understand regular expressions, you can make up your own Ignore filter string. You can see just how many images are contained in some web pages by simply un-checking the Enabled checkbox and clicking the Update button. You will almost certainly re-enable the filter pretty quickly! The Restore defaults button will restore the Ignore filter string to its default value.
The log sections list the time and the IP address the page request originated from, along with the page’s URL.
The Export button is useful for exporting the currently selected day’s logs to a file. Upon clicking this
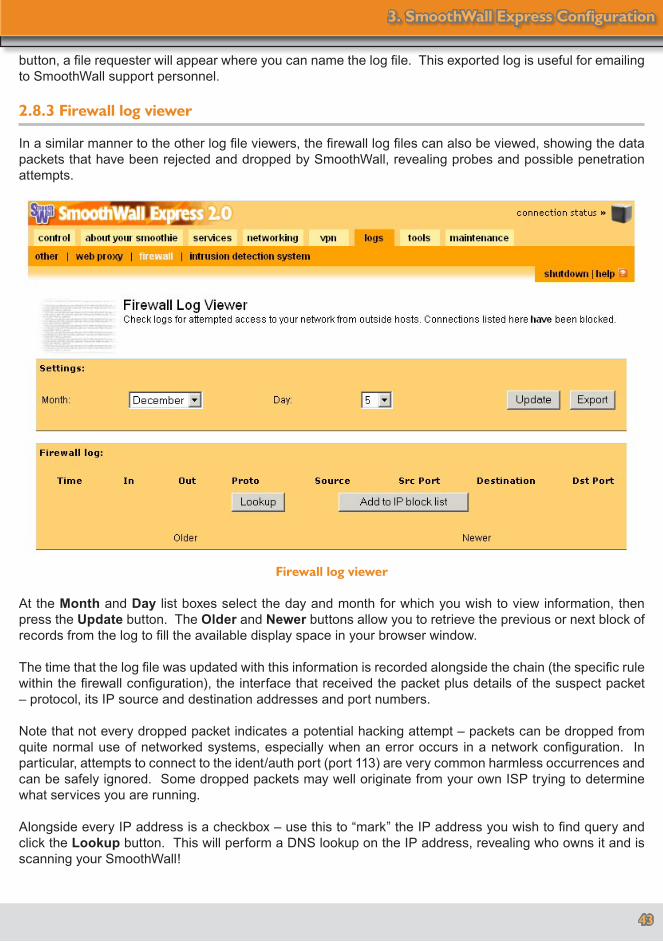
42
SmoothWall Express 2.0: Administrator’s Guide
43
3. SmoothWall Express Configuration
button, a file requester will appear where you can name the log file. This exported log is useful for emailing to SmoothWall support personnel.
2.8.3 Firewall log viewer
In a similar manner to the other log file viewers, the firewall log files can also be viewed, showing the data packets that have been rejected and dropped by SmoothWall, revealing probes and possible penetration attempts.
Firewall log viewer
At the Month and Day list boxes select the day and month for which you wish to view information, then press the Update button. The Older and Newer buttons allow you to retrieve the previous or next block of records from the log to fill the available display space in your browser window.
The time that the log file was updated with this information is recorded alongside the chain (the specific rule within the firewall configuration), the interface that received the packet plus details of the suspect packet – protocol, its IP source and destination addresses and port numbers.
Note that not every dropped packet indicates a potential hacking attempt – packets can be dropped from quite normal use of networked systems, especially when an error occurs in a network configuration. In particular, attempts to connect to the ident/auth port (port 113) are very common harmless occurrences and can be safely ignored. Some dropped packets may well originate from your own ISP trying to determine what services you are running.
Alongside every IP address is a checkbox – use this to “mark” the IP address you wish to find query and click the Lookup button. This will perform a DNS lookup on the IP address, revealing who owns it and is scanning your SmoothWall!
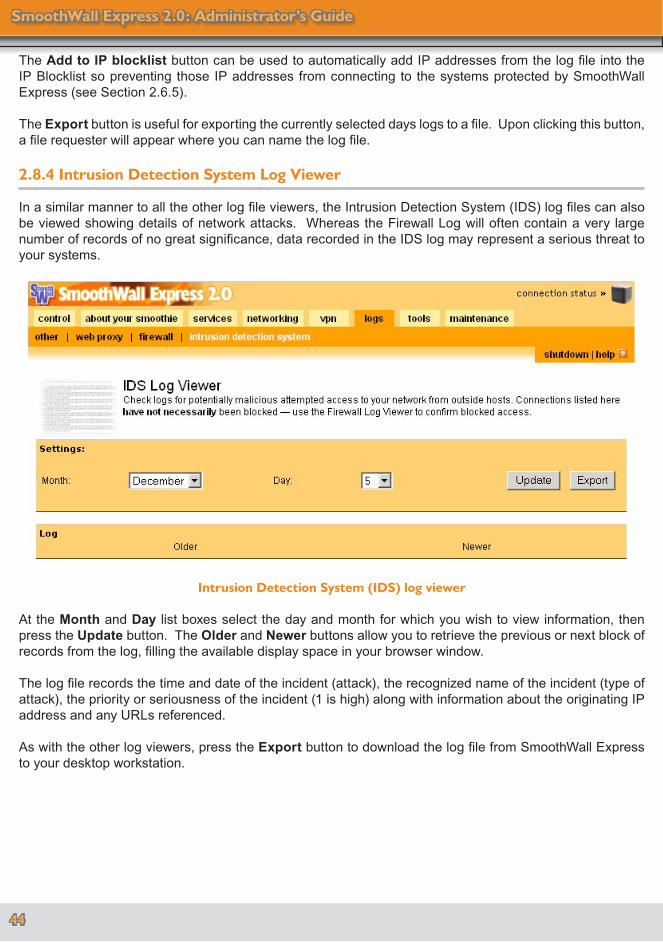
44
SmoothWall Express 2.0: Administrator’s Guide
45
3. SmoothWall Express Configuration
The Add to IP blocklist button can be used to automatically add IP addresses from the log file into the IP Blocklist so preventing those IP addresses from connecting to the systems protected by SmoothWall Express (see Section 2.6.5).
The Export button is useful for exporting the currently selected days logs to a file. Upon clicking this button, a file requester will appear where you can name the log file.
2.8.4 Intrusion Detection System Log Viewer
In a similar manner to all the other log file viewers, the Intrusion Detection System (IDS) log files can also be viewed showing details of network attacks. Whereas the Firewall Log will often contain a very large number of records of no great significance, data recorded in the IDS log may represent a serious threat to your systems.
Intrusion Detection System (IDS) log viewer
At the Month and Day list boxes select the day and month for which you wish to view information, then press the Update button. The Older and Newer buttons allow you to retrieve the previous or next block of records from the log, filling the available display space in your browser window.
The log file records the time and date of the incident (attack), the recognized name of the incident (type of attack), the priority or seriousness of the incident (1 is high) along with information about the originating IP address and any URLs referenced.
As with the other log viewers, press the Export button to download the log file from SmoothWall Express to your desktop workstation.
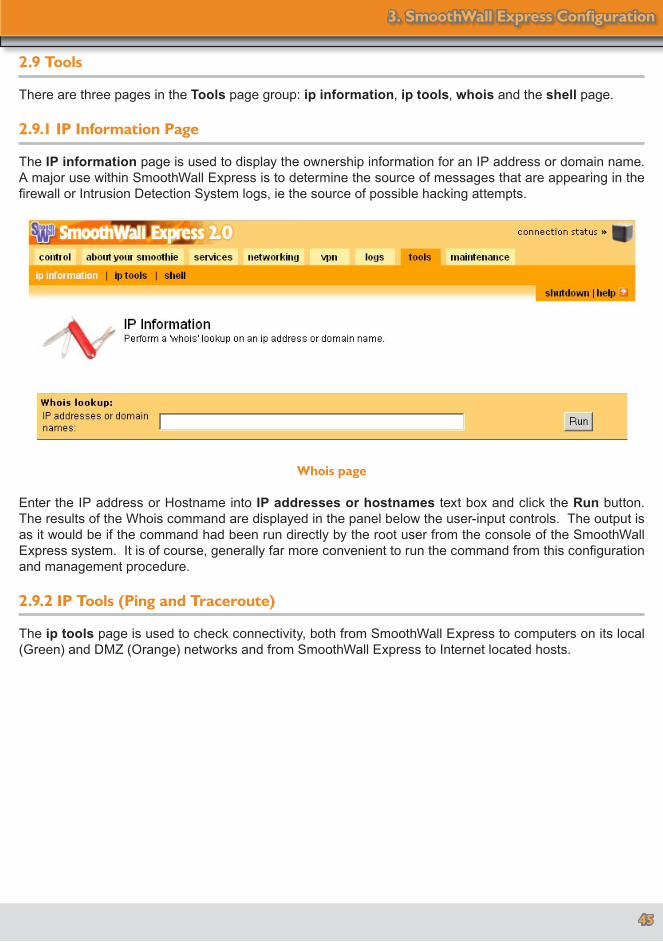
44
SmoothWall Express 2.0: Administrator’s Guide
45
3. SmoothWall Express Configuration
2.9 Tools
There are three pages in the Tools page group: ip information, ip tools, whois and the shell page.
2.9.1 IP Information Page
The IP information page is used to display the ownership information for an IP address or domain name. A major use within SmoothWall Express is to determine the source of messages that are appearing in the firewall or Intrusion Detection System logs, ie the source of possible hacking attempts.
Whois page
Enter the IP address or Hostname into IP addresses or hostnames text box and click the Run button. The results of the Whois command are displayed in the panel below the user-input controls. The output is as it would be if the command had been run directly by the root user from the console of the SmoothWall Express system. It is of course, generally far more convenient to run the command from this configuration and management procedure.
2.9.2 IP Tools (Ping and Traceroute)
The ip tools page is used to check connectivity, both from SmoothWall Express to computers on its local (Green) and DMZ (Orange) networks and from SmoothWall Express to Internet located hosts.
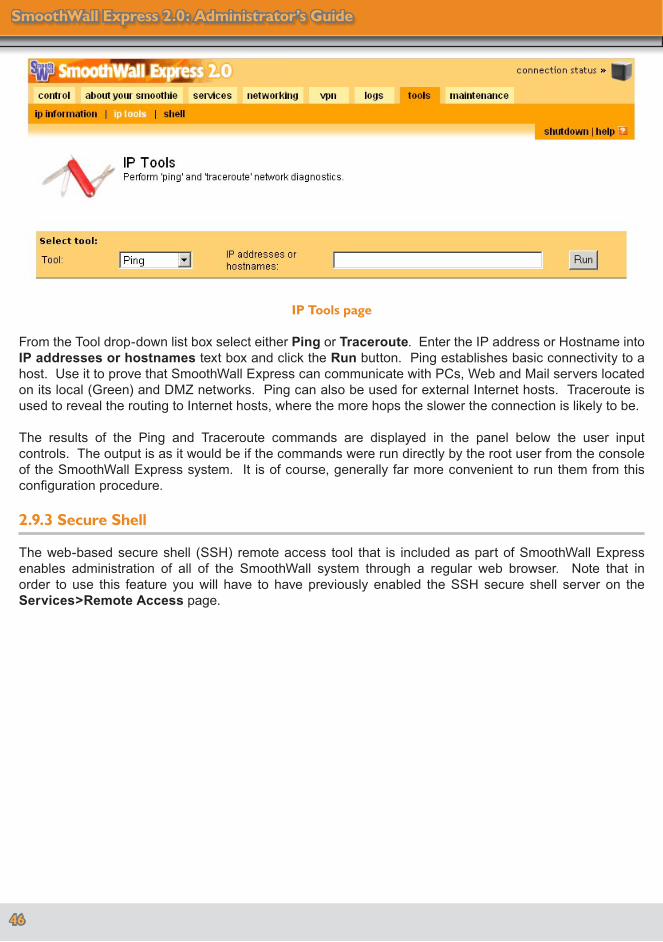
46
SmoothWall Express 2.0: Administrator’s Guide
47
3. SmoothWall Express Configuration
IP Tools page
From the Tool drop-down list box select either Ping or Traceroute. Enter the IP address or Hostname into IP addresses or hostnames text box and click the Run button. Ping establishes basic connectivity to a host. Use it to prove that SmoothWall Express can communicate with PCs, Web and Mail servers located on its local (Green) and DMZ networks. Ping can also be used for external Internet hosts. Traceroute is used to reveal the routing to Internet hosts, where the more hops the slower the connection is likely to be. The results of the Ping and Traceroute commands are displayed in the panel below the user input controls. The output is as it would be if the commands were run directly by the root user from the console of the SmoothWall Express system. It is of course, generally far more convenient to run them from this configuration procedure.
2.9.3 Secure Shell
The web-based secure shell (SSH) remote access tool that is included as part of SmoothWall Express enables administration of all of the SmoothWall system through a regular web browser. Note that in order to use this feature you will have to have previously enabled the SSH secure shell server on the Services>Remote Access page.

46
SmoothWall Express 2.0: Administrator’s Guide
47
3. SmoothWall Express Configuration
The secure shell (SSH)
In order to use the Java SSH tool for changing Setup details, you will have to use a Java-enabled browser. Later versions of both Internet Explorer and Netscape Navigator are suitable for this purpose.
Clicking the Shell link will start the SSH Java client. You will be presented with the prompt “SSH server/Alias”, followed by the IP address of your SmoothWall Express. Simply press the ENTER key to connect to SmoothWall. If a “Connection Refused” message is displayed, it is most likely that SSH has not been enabled in the Services>Remote Access page.
The only users that are permitted to log in to the system using a secure shell are the ‘setup’ and ‘root’ users – the admin and dial users are not Linux users and have no account. At the login prompt, type in either setup or root as the user name and press ENTER. The message “File operations disabled, server identity can’t be verified” will be displayed, which is an indication of the restricted access granted by SmoothWall. In response to the following password prompt, type in the corresponding password and press ENTER again.
Logging in as the ‘setup’ user will automatically run the Setup program to allow you to reconfigure the network settings, make adjustments for different hardware, or just simply change the admin, ‘setup’ or ‘root’ user passwords. This Setup program is the same one that runs upon initial installation of SmoothWall, so it should look familiar. When you have finished, select the Quit option. This will complete the Setup program and log you out of the system.
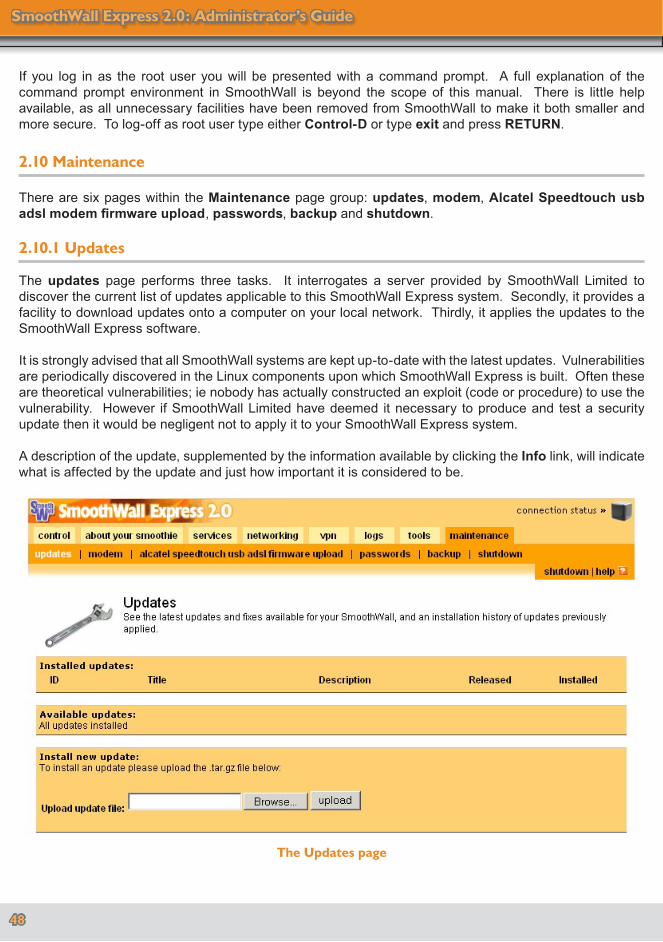
48
SmoothWall Express 2.0: Administrator’s Guide
49
3. SmoothWall Express Configuration
If you log in as the root user you will be presented with a command prompt. A full explanation of the command prompt environment in SmoothWall is beyond the scope of this manual. There is little help available, as all unnecessary facilities have been removed from SmoothWall to make it both smaller and more secure. To log-off as root user type either Control-D or type exit and press RETURN.
2.10 Maintenance
There are six pages within the Maintenance page group: updates, modem, Alcatel Speedtouch usb adsl modem firmware upload, passwords, backup and shutdown.
2.10.1 Updates
The updates page performs three tasks. It interrogates a server provided by SmoothWall Limited to discover the current list of updates applicable to this SmoothWall Express system. Secondly, it provides a facility to download updates onto a computer on your local network. Thirdly, it applies the updates to the SmoothWall Express software.
It is strongly advised that all SmoothWall systems are kept up-to-date with the latest updates. Vulnerabilities are periodically discovered in the Linux components upon which SmoothWall Express is built. Often these are theoretical vulnerabilities; ie nobody has actually constructed an exploit (code or procedure) to use the vulnerability. However if SmoothWall Limited have deemed it necessary to produce and test a security update then it would be negligent not to apply it to your SmoothWall Express system.
A description of the update, supplemented by the information available by clicking the Info link, will indicate what is affected by the update and just how important it is considered to be.
The Updates page
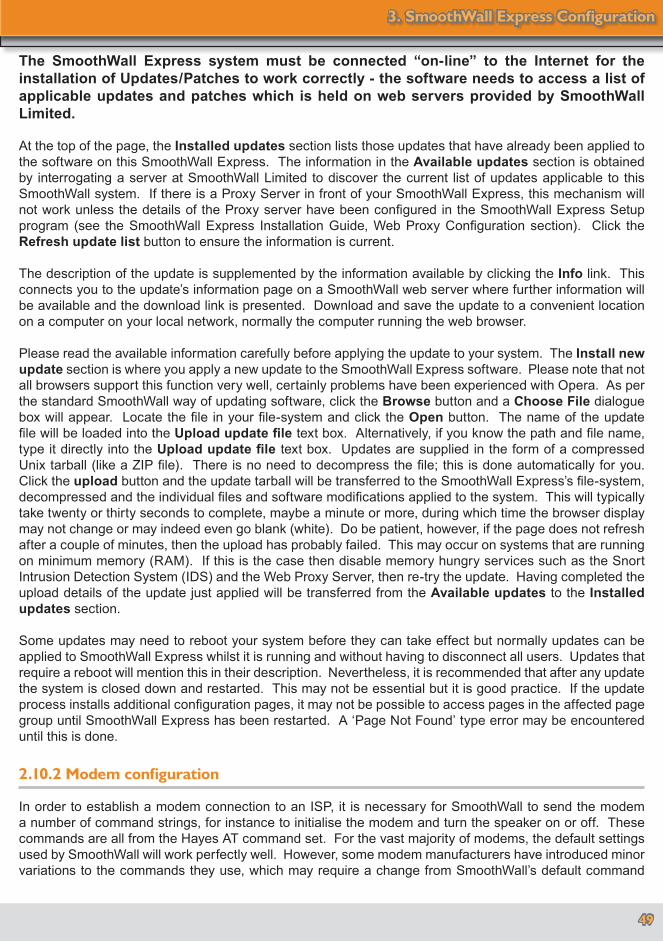
48
SmoothWall Express 2.0: Administrator’s Guide
49
3. SmoothWall Express Configuration
The SmoothWall Express system must be connected “on-line” to the Internet for the installation of Updates/Patches to work correctly - the software needs to access a list of applicable updates and patches which is held on web servers provided by SmoothWall Limited.
At the top of the page, the Installed updates section lists those updates that have already been applied to the software on this SmoothWall Express. The information in the Available updates section is obtained by interrogating a server at SmoothWall Limited to discover the current list of updates applicable to this SmoothWall system. If there is a Proxy Server in front of your SmoothWall Express, this mechanism will not work unless the details of the Proxy server have been configured in the SmoothWall Express Setup program (see the SmoothWall Express Installation Guide, Web Proxy Configuration section). Click the Refresh update list button to ensure the information is current.
The description of the update is supplemented by the information available by clicking the Info link. This connects you to the update’s information page on a SmoothWall web server where further information will be available and the download link is presented. Download and save the update to a convenient location on a computer on your local network, normally the computer running the web browser.
Please read the available information carefully before applying the update to your system. The Install new update section is where you apply a new update to the SmoothWall Express software. Please note that not all browsers support this function very well, certainly problems have been experienced with Opera. As per the standard SmoothWall way of updating software, click the Browse button and a Choose File dialogue box will appear. Locate the file in your file-system and click the Open button. The name of the update file will be loaded into the Upload update file text box. Alternatively, if you know the path and file name, type it directly into the Upload update file text box. Updates are supplied in the form of a compressed Unix tarball (like a ZIP file). There is no need to decompress the file; this is done automatically for you. Click the upload button and the update tarball will be transferred to the SmoothWall Express’s file-system, decompressed and the individual files and software modifications applied to the system. This will typically take twenty or thirty seconds to complete, maybe a minute or more, during which time the browser display may not change or may indeed even go blank (white). Do be patient, however, if the page does not refresh after a couple of minutes, then the upload has probably failed. This may occur on systems that are running on minimum memory (RAM). If this is the case then disable memory hungry services such as the Snort Intrusion Detection System (IDS) and the Web Proxy Server, then re-try the update. Having completed the upload details of the update just applied will be transferred from the Available updates to the Installed updates section.
Some updates may need to reboot your system before they can take effect but normally updates can be applied to SmoothWall Express whilst it is running and without having to disconnect all users. Updates that require a reboot will mention this in their description. Nevertheless, it is recommended that after any update the system is closed down and restarted. This may not be essential but it is good practice. If the update process installs additional configuration pages, it may not be possible to access pages in the affected page group until SmoothWall Express has been restarted. A ‘Page Not Found’ type error may be encountered until this is done.
2.10.2 Modem configuration
In order to establish a modem connection to an ISP, it is necessary for SmoothWall to send the modem a number of command strings, for instance to initialise the modem and turn the speaker on or off. These commands are all from the Hayes AT command set. For the vast majority of modems, the default settings used by SmoothWall will work perfectly well. However, some modem manufacturers have introduced minor variations to the commands they use, which may require a change from SmoothWall’s default command
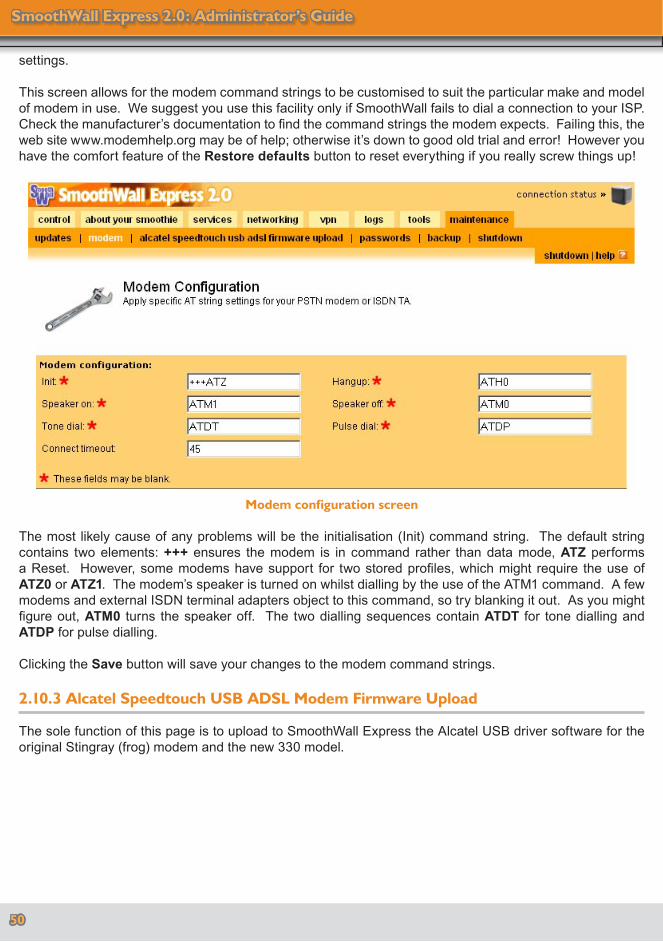
50
SmoothWall Express 2.0: Administrator’s Guide
51
3. SmoothWall Express Configuration
settings.
This screen allows for the modem command strings to be customised to suit the particular make and model of modem in use. We suggest you use this facility only if SmoothWall fails to dial a connection to your ISP. Check the manufacturer’s documentation to find the command strings the modem expects. Failing this, the web site www.modemhelp.org may be of help; otherwise it’s down to good old trial and error! However you have the comfort feature of the Restore defaults button to reset everything if you really screw things up!
Modem configuration screen
The most likely cause of any problems will be the initialisation (Init) command string. The default string contains two elements: +++ ensures the modem is in command rather than data mode, ATZ performs a Reset. However, some modems have support for two stored profiles, which might require the use of ATZ0 or ATZ1. The modem’s speaker is turned on whilst dialling by the use of the ATM1 command. A few modems and external ISDN terminal adapters object to this command, so try blanking it out. As you might figure out, ATM0 turns the speaker off. The two dialling sequences contain ATDT for tone dialling and ATDP for pulse dialling.
Clicking the Save button will save your changes to the modem command strings.
2.10.3 Alcatel Speedtouch USB ADSL Modem Firmware Upload
The sole function of this page is to upload to SmoothWall Express the Alcatel USB driver software for the original Stingray (frog) modem and the new 330 model.
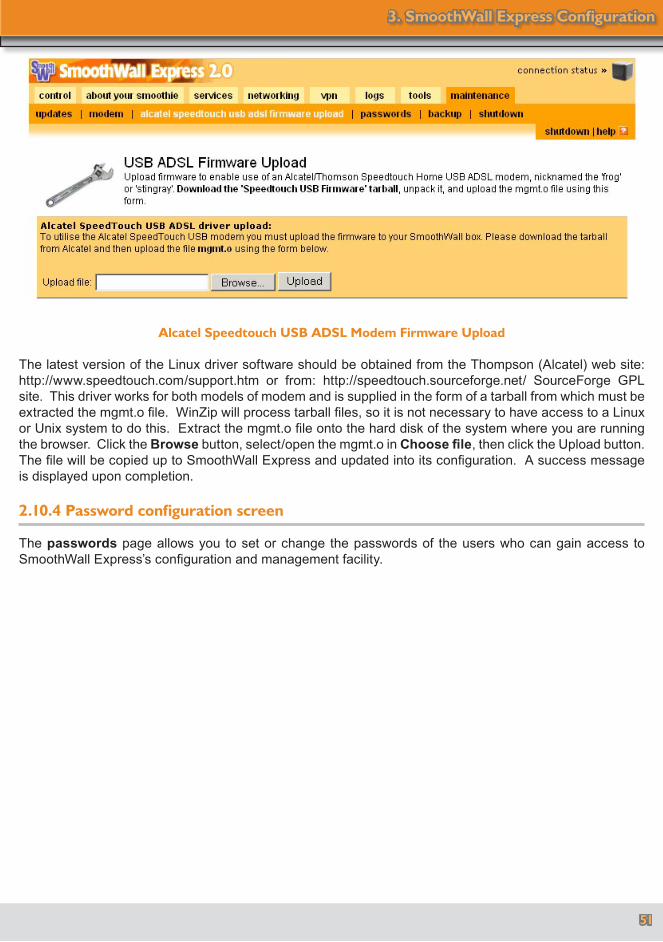
50
SmoothWall Express 2.0: Administrator’s Guide
51
3. SmoothWall Express Configuration
Alcatel Speedtouch USB ADSL Modem Firmware Upload
The latest version of the Linux driver software should be obtained from the Thompson (Alcatel) web site: http://www.speedtouch.com/support.htm or from: http://speedtouch.sourceforge.net/ SourceForge GPL site. This driver works for both models of modem and is supplied in the form of a tarball from which must be extracted the mgmt.o file. WinZip will process tarball files, so it is not necessary to have access to a Linux or Unix system to do this. Extract the mgmt.o file onto the hard disk of the system where you are running the browser. Click the Browse button, select/open the mgmt.o in Choose file, then click the Upload button. The file will be copied up to SmoothWall Express and updated into its configuration. A success message is displayed upon completion.
2.10.4 Password configuration screen
The passwords page allows you to set or change the passwords of the users who can gain access to SmoothWall Express’s configuration and management facility.
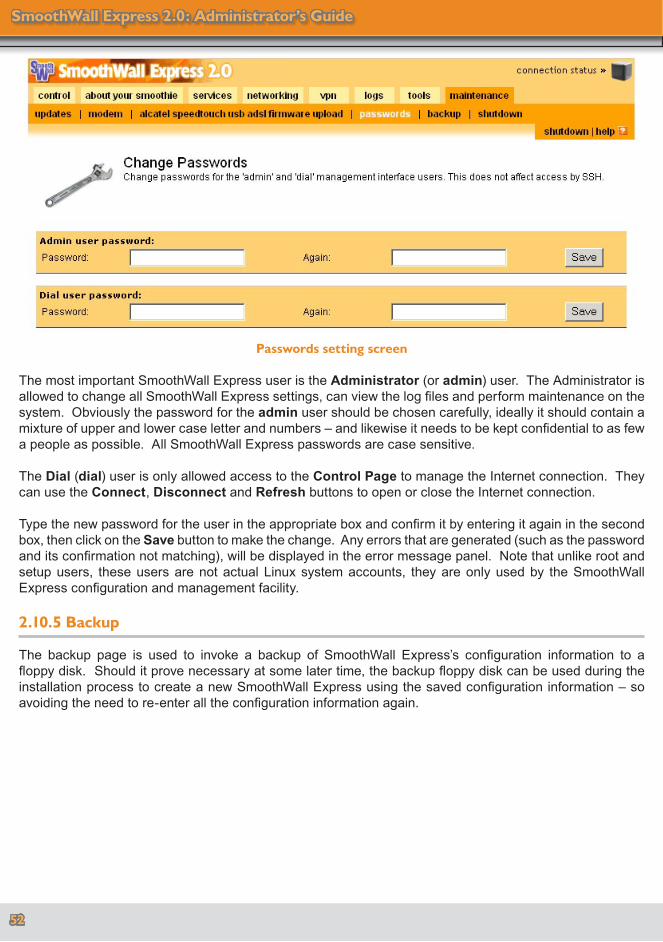
52
SmoothWall Express 2.0: Administrator’s Guide
53
3. SmoothWall Express Configuration
Passwords setting screen
The most important SmoothWall Express user is the Administrator (or admin) user. The Administrator is allowed to change all SmoothWall Express settings, can view the log files and perform maintenance on the system. Obviously the password for the admin user should be chosen carefully, ideally it should contain a mixture of upper and lower case letter and numbers – and likewise it needs to be kept confidential to as few a people as possible. All SmoothWall Express passwords are case sensitive.
The Dial (dial) user is only allowed access to the Control Page to manage the Internet connection. They can use the Connect, Disconnect and Refresh buttons to open or close the Internet connection.
Type the new password for the user in the appropriate box and confirm it by entering it again in the second box, then click on the Save button to make the change. Any errors that are generated (such as the password and its confirmation not matching), will be displayed in the error message panel. Note that unlike root and setup users, these users are not actual Linux system accounts, they are only used by the SmoothWall Express configuration and management facility.
2.10.5 Backup
The backup page is used to invoke a backup of SmoothWall Express’s configuration information to a floppy disk. Should it prove necessary at some later time, the backup floppy disk can be used during the installation process to create a new SmoothWall Express using the saved configuration information – so avoiding the need to re-enter all the configuration information again.
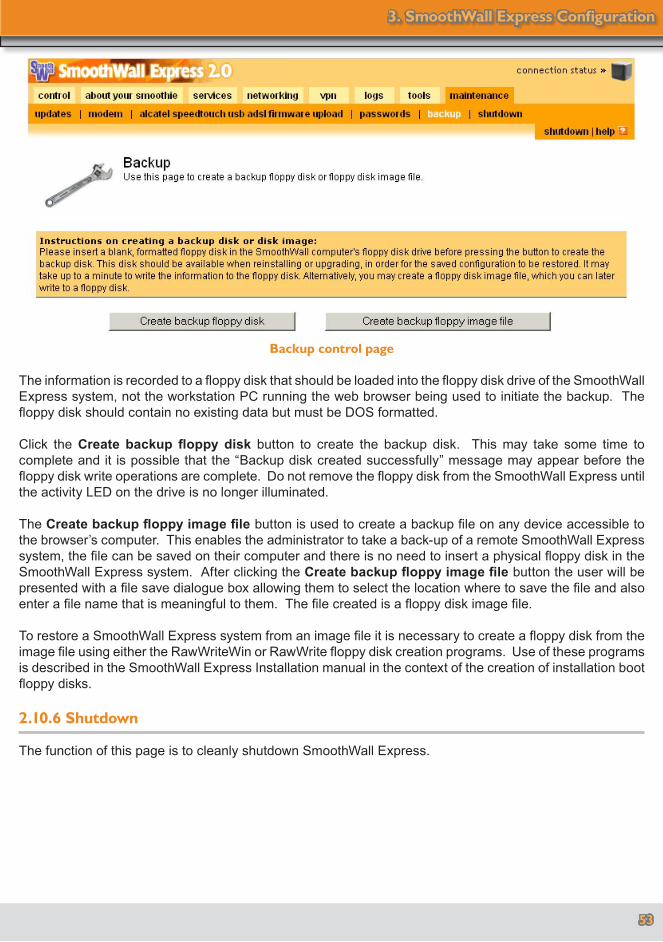
52
SmoothWall Express 2.0: Administrator’s Guide
53
3. SmoothWall Express Configuration
Backup control page
The information is recorded to a floppy disk that should be loaded into the floppy disk drive of the SmoothWall Express system, not the workstation PC running the web browser being used to initiate the backup. The floppy disk should contain no existing data but must be DOS formatted.
Click the Create backup floppy disk button to create the backup disk. This may take some time to complete and it is possible that the “Backup disk created successfully” message may appear before the floppy disk write operations are complete. Do not remove the floppy disk from the SmoothWall Express until the activity LED on the drive is no longer illuminated.
The Create backup floppy image file button is used to create a backup file on any device accessible to the browser’s computer. This enables the administrator to take a back-up of a remote SmoothWall Express system, the file can be saved on their computer and there is no need to insert a physical floppy disk in the SmoothWall Express system. After clicking the Create backup floppy image file button the user will be presented with a file save dialogue box allowing them to select the location where to save the file and also enter a file name that is meaningful to them. The file created is a floppy disk image file.
To restore a SmoothWall Express system from an image file it is necessary to create a floppy disk from the image file using either the RawWriteWin or RawWrite floppy disk creation programs. Use of these programs is described in the SmoothWall Express Installation manual in the context of the creation of installation boot floppy disks.
2.10.6 Shutdown
The function of this page is to cleanly shutdown SmoothWall Express.
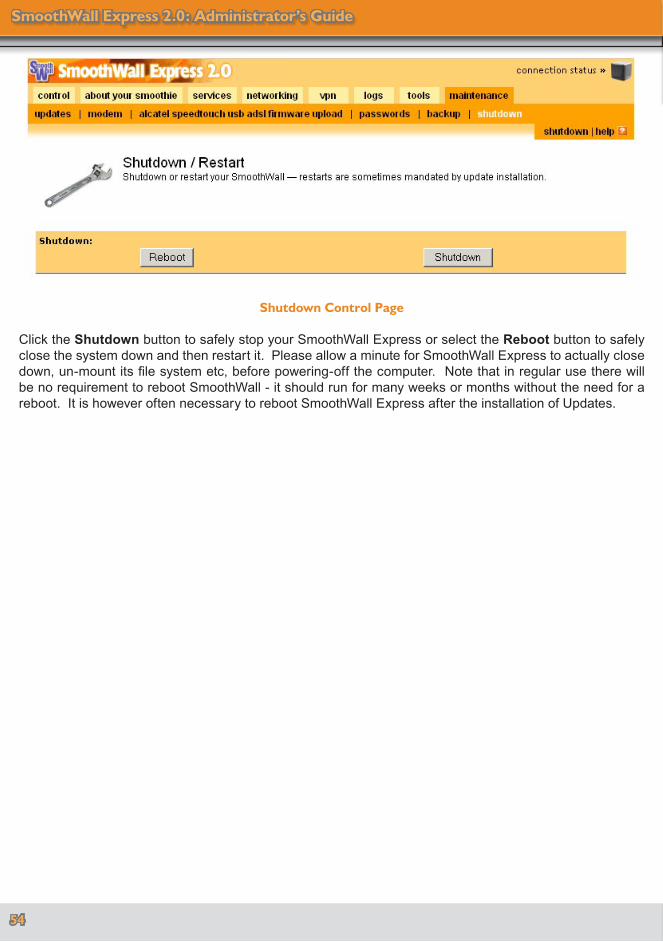
54
SmoothWall Express 2.0: Administrator’s GuideSmoothWall Express 2.0
Administrator’s Guide
Shutdown Control Page
Click the Shutdown button to safely stop your SmoothWall Express or select the Reboot button to safely close the system down and then restart it. Please allow a minute for SmoothWall Express to actually close down, un-mount its file system etc, before powering-off the computer. Note that in regular use there will be no requirement to reboot SmoothWall - it should run for many weeks or months without the need for a reboot. It is however often necessary to reboot SmoothWall Express after the installation of Updates.
54
SmoothWall Express 2.0: Administrator’s GuideSmoothWall Express 2.0
Administrator’s Guide
Microsoft Windows PC Configuration
Configuring Microsoft Windows XP
Configuring Microsoft Windows 98
3.1
3.2
3
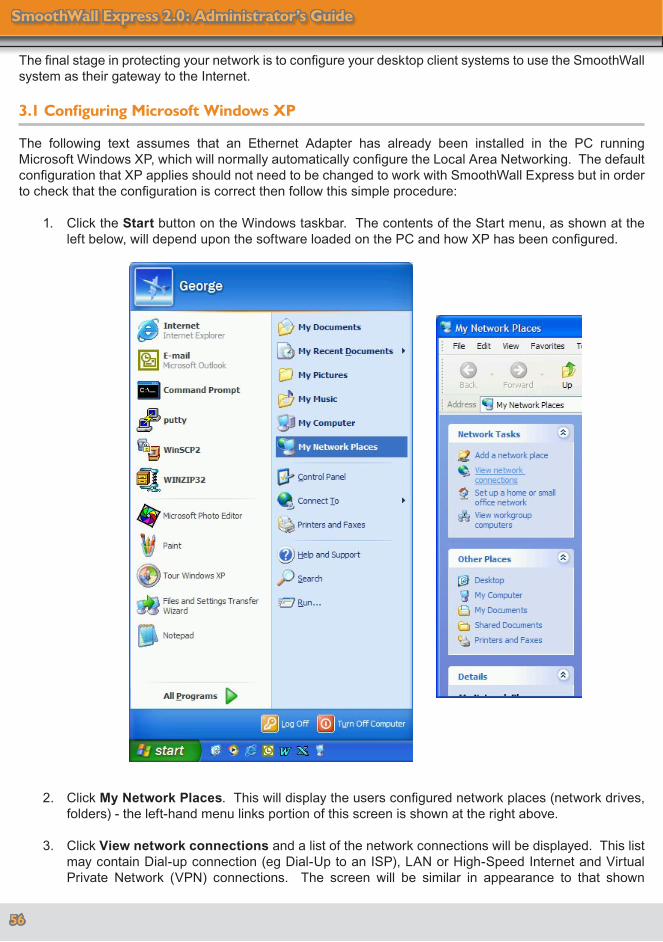
56
SmoothWall Express 2.0: Administrator’s Guide
57
3. Microsoft Windows PC Configuration
The final stage in protecting your network is to configure your desktop client systems to use the SmoothWall system as their gateway to the Internet.
3.1 Configuring Microsoft Windows XP
The following text assumes that an Ethernet Adapter has already been installed in the PC running Microsoft Windows XP, which will normally automatically configure the Local Area Networking. The default configuration that XP applies should not need to be changed to work with SmoothWall Express but in order to check that the configuration is correct then follow this simple procedure:
1. Click the Start button on the Windows taskbar. The contents of the Start menu, as shown at the left below, will depend upon the software loaded on the PC and how XP has been configured.
2. Click My Network Places. This will display the users configured network places (network drives, folders) - the left-hand menu links portion of this screen is shown at the right above.
3. Click View network connections and a list of the network connections will be displayed. This list may contain Dial-up connection (eg Dial-Up to an ISP), LAN or High-Speed Internet and Virtual Private Network (VPN) connections. The screen will be similar in appearance to that shown
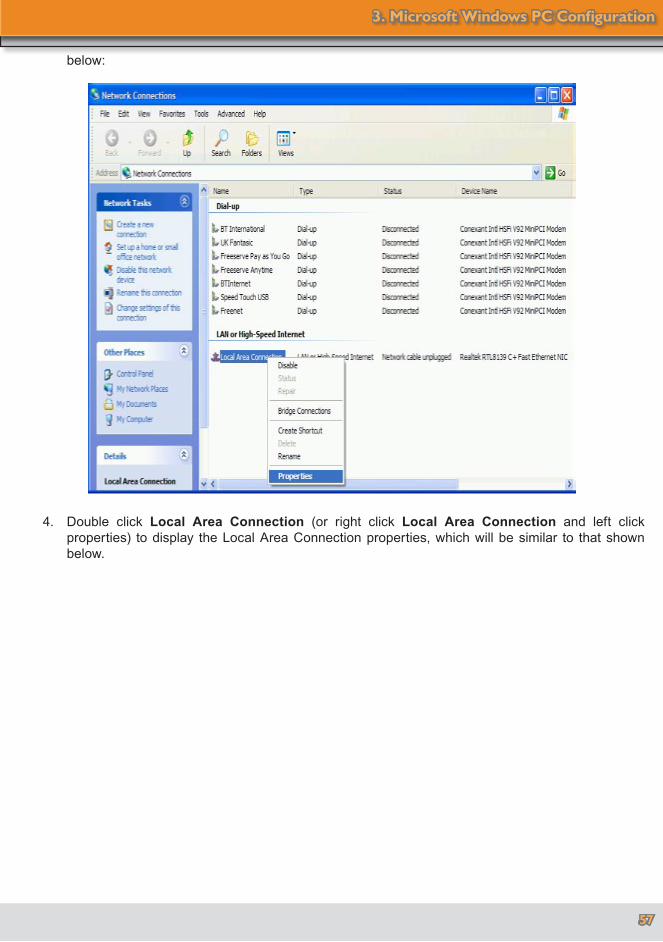
56
SmoothWall Express 2.0: Administrator’s Guide
57
3. Microsoft Windows PC Configuration
below:
4. Double click Local Area Connection (or right click Local Area Connection and left click properties) to display the Local Area Connection properties, which will be similar to that shown below.
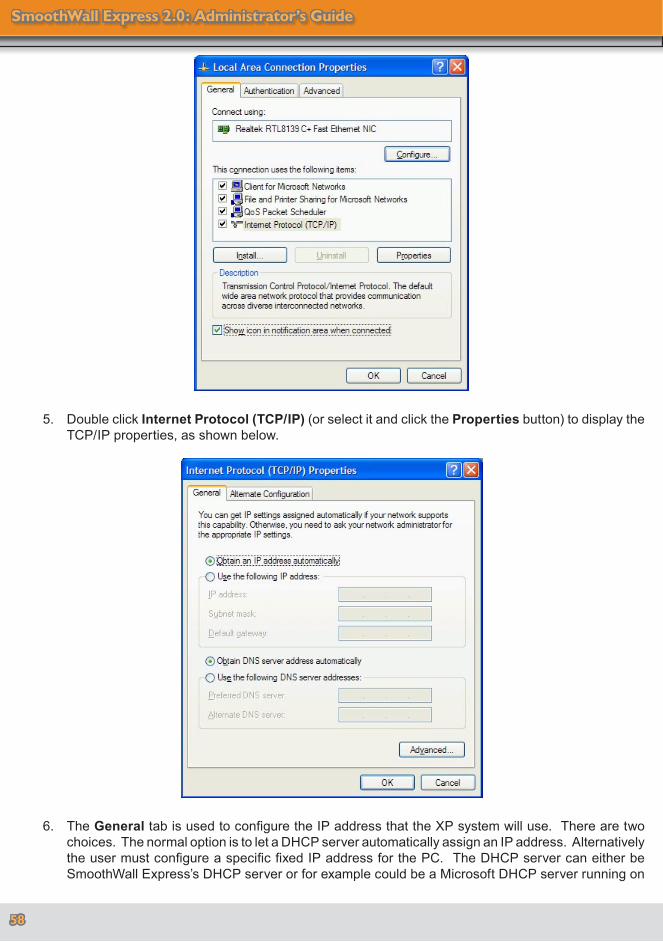
58
SmoothWall Express 2.0: Administrator’s Guide
59
3. Microsoft Windows PC Configuration
5. Double click Internet Protocol (TCP/IP) (or select it and click the Properties button) to display the TCP/IP properties, as shown below.
6. The General tab is used to configure the IP address that the XP system will use. There are two choices. The normal option is to let a DHCP server automatically assign an IP address. Alternatively the user must configure a specific fixed IP address for the PC. The DHCP server can either be SmoothWall Express’s DHCP server or for example could be a Microsoft DHCP server running on
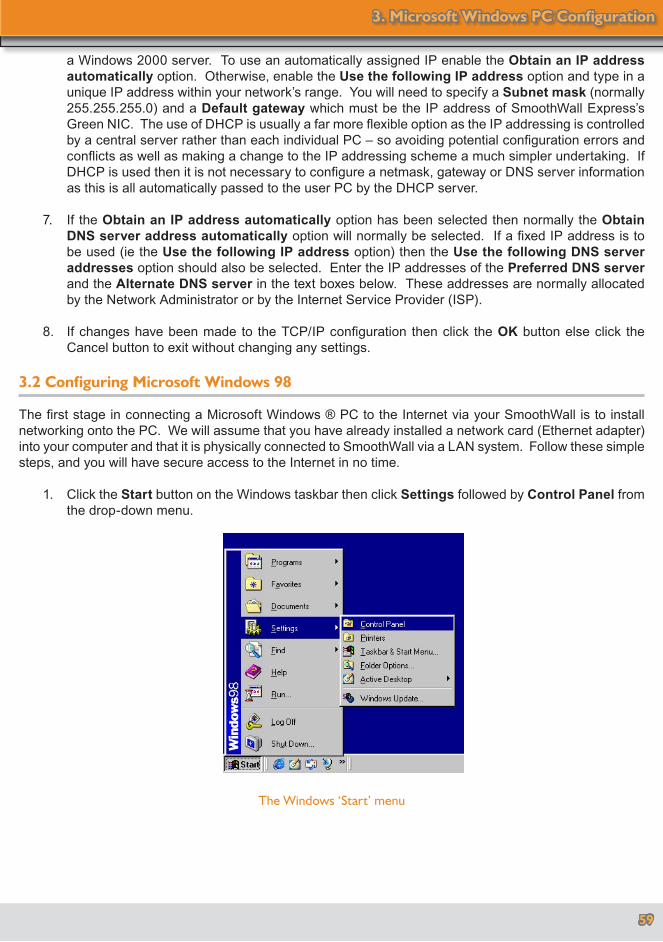
58
SmoothWall Express 2.0: Administrator’s Guide
59
3. Microsoft Windows PC Configuration
a Windows 2000 server. To use an automatically assigned IP enable the Obtain an IP address automatically option. Otherwise, enable the Use the following IP address option and type in a unique IP address within your network’s range. You will need to specify a Subnet mask (normally 255.255.255.0) and a Default gateway which must be the IP address of SmoothWall Express’s Green NIC. The use of DHCP is usually a far more flexible option as the IP addressing is controlled by a central server rather than each individual PC – so avoiding potential configuration errors and conflicts as well as making a change to the IP addressing scheme a much simpler undertaking. If DHCP is used then it is not necessary to configure a netmask, gateway or DNS server information as this is all automatically passed to the user PC by the DHCP server.
7. If the Obtain an IP address automatically option has been selected then normally the Obtain DNS server address automatically option will normally be selected. If a fixed IP address is to be used (ie the Use the following IP address option) then the Use the following DNS server addresses option should also be selected. Enter the IP addresses of the Preferred DNS server and the Alternate DNS server in the text boxes below. These addresses are normally allocated by the Network Administrator or by the Internet Service Provider (ISP).
8. If changes have been made to the TCP/IP configuration then click the OK button else click the Cancel button to exit without changing any settings.
3.2 Configuring Microsoft Windows 98
The first stage in connecting a Microsoft Windows ® PC to the Internet via your SmoothWall is to install networking onto the PC. We will assume that you have already installed a network card (Ethernet adapter) into your computer and that it is physically connected to SmoothWall via a LAN system. Follow these simple steps, and you will have secure access to the Internet in no time.
1. Click the Start button on the Windows taskbar then click Settings followed by Control Panel from the drop-down menu.
The Windows ‘Start’ menu
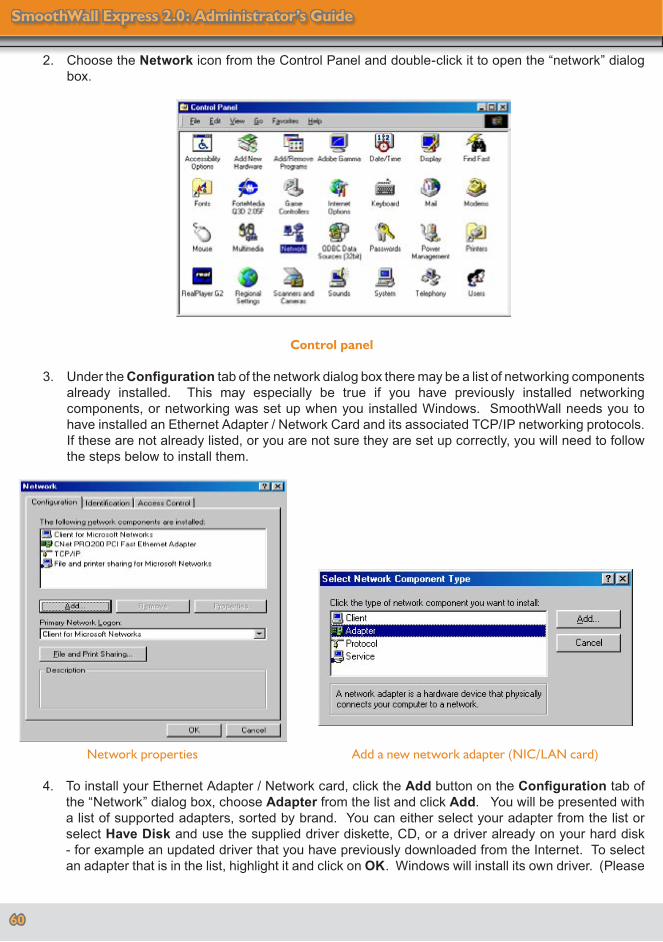
60
SmoothWall Express 2.0: Administrator’s Guide
61
3. Microsoft Windows PC Configuration
2. Choose the Network icon from the Control Panel and double-click it to open the “network” dialog box.
Control panel
3. Under the Configuration tab of the network dialog box there may be a list of networking components already installed. This may especially be true if you have previously installed networking components, or networking was set up when you installed Windows. SmoothWall needs you to have installed an Ethernet Adapter / Network Card and its associated TCP/IP networking protocols. If these are not already listed, or you are not sure they are set up correctly, you will need to follow the steps below to install them.
Network properties Add a new network adapter (NIC/LAN card)
4. To install your Ethernet Adapter / Network card, click the Add button on the Configuration tab of the “Network” dialog box, choose Adapter from the list and click Add. You will be presented with a list of supported adapters, sorted by brand. You can either select your adapter from the list or select Have Disk and use the supplied driver diskette, CD, or a driver already on your hard disk - for example an updated driver that you have previously downloaded from the Internet. To select an adapter that is in the list, highlight it and click on OK. Windows will install its own driver. (Please
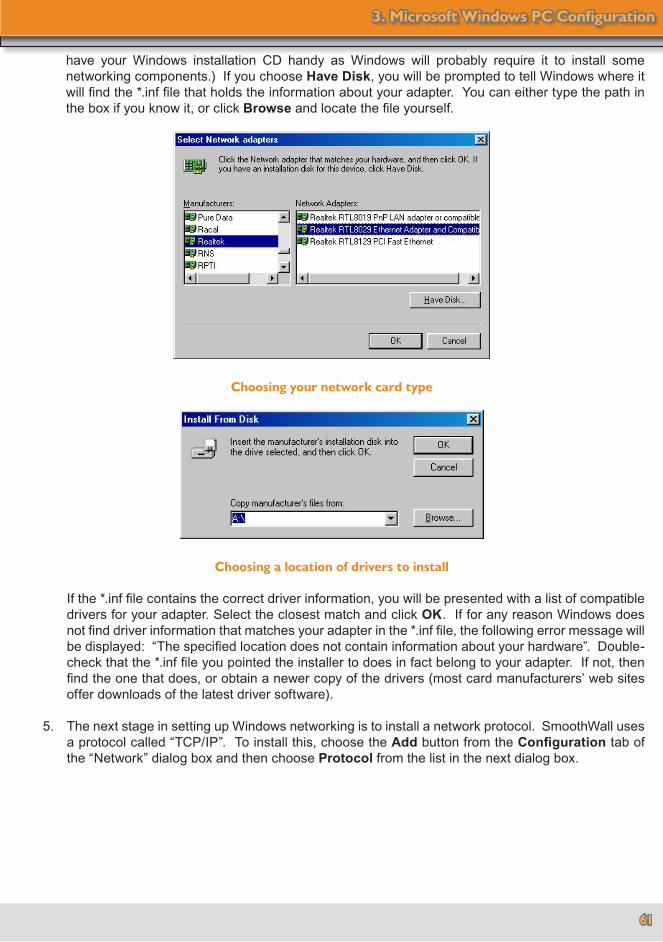
60
SmoothWall Express 2.0: Administrator’s Guide
61
3. Microsoft Windows PC Configuration
have your Windows installation CD handy as Windows will probably require it to install some networking components.) If you choose Have Disk, you will be prompted to tell Windows where it will find the *.inf file that holds the information about your adapter. You can either type the path in the box if you know it, or click Browse and locate the file yourself.
Choosing your network card type
Choosing a location of drivers to install
If the *.inf file contains the correct driver information, you will be presented with a list of compatible drivers for your adapter. Select the closest match and click OK. If for any reason Windows does not find driver information that matches your adapter in the *.inf file, the following error message will be displayed: “The specified location does not contain information about your hardware”. Double-check that the *.inf file you pointed the installer to does in fact belong to your adapter. If not, then find the one that does, or obtain a newer copy of the drivers (most card manufacturers’ web sites offer downloads of the latest driver software).
5. The next stage in setting up Windows networking is to install a network protocol. SmoothWall uses a protocol called “TCP/IP”. To install this, choose the Add button from the Configuration tab of the “Network” dialog box and then choose Protocol from the list in the next dialog box.
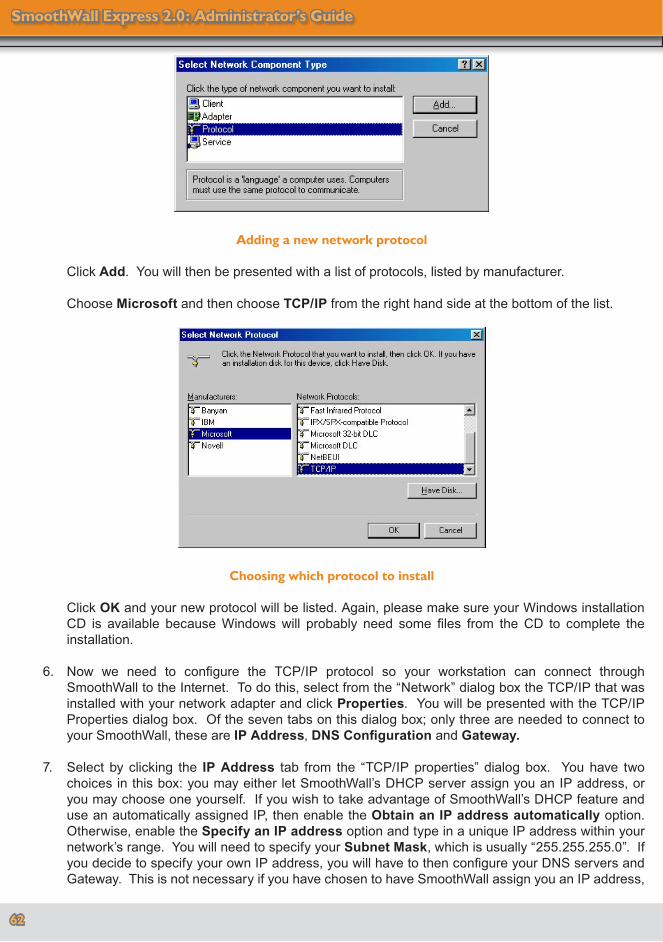
62
SmoothWall Express 2.0: Administrator’s Guide
63
3. Microsoft Windows PC Configuration
Adding a new network protocol
Click Add. You will then be presented with a list of protocols, listed by manufacturer.
Choose Microsoft and then choose TCP/IP from the right hand side at the bottom of the list.
Choosing which protocol to install
Click OK and your new protocol will be listed. Again, please make sure your Windows installation CD is available because Windows will probably need some files from the CD to complete the installation.
6. Now we need to configure the TCP/IP protocol so your workstation can connect through SmoothWall to the Internet. To do this, select from the “Network” dialog box the TCP/IP that was installed with your network adapter and click Properties. You will be presented with the TCP/IP Properties dialog box. Of the seven tabs on this dialog box; only three are needed to connect to your SmoothWall, these are IP Address, DNS Configuration and Gateway.
7. Select by clicking the IP Address tab from the “TCP/IP properties” dialog box. You have two choices in this box: you may either let SmoothWall’s DHCP server assign you an IP address, or you may choose one yourself. If you wish to take advantage of SmoothWall’s DHCP feature and use an automatically assigned IP, then enable the Obtain an IP address automatically option. Otherwise, enable the Specify an IP address option and type in a unique IP address within your network’s range. You will need to specify your Subnet Mask, which is usually “255.255.255.0”. If you decide to specify your own IP address, you will have to then configure your DNS servers and Gateway. This is not necessary if you have chosen to have SmoothWall assign you an IP address,
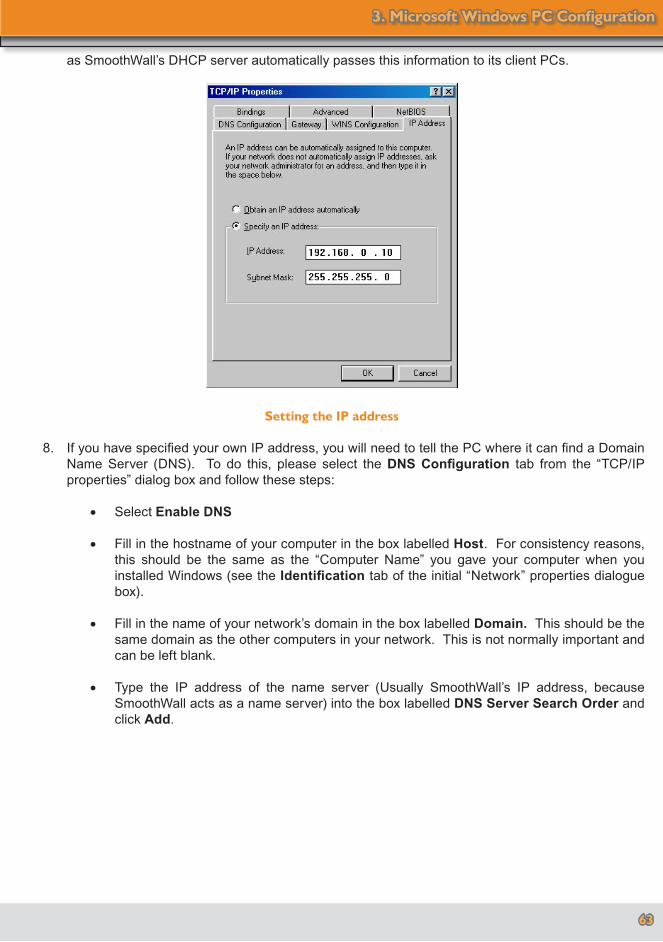
62
SmoothWall Express 2.0: Administrator’s Guide
63
3. Microsoft Windows PC Configuration
as SmoothWall’s DHCP server automatically passes this information to its client PCs.
Setting the IP address
8. If you have specified your own IP address, you will need to tell the PC where it can find a Domain Name Server (DNS). To do this, please select the DNS Configuration tab from the “TCP/IP properties” dialog box and follow these steps:
• Select Enable DNS
• Fill in the hostname of your computer in the box labelled Host. For consistency reasons, this should be the same as the “Computer Name” you gave your computer when you installed Windows (see the Identification tab of the initial “Network” properties dialogue box).
• Fill in the name of your network’s domain in the box labelled Domain. This should be the same domain as the other computers in your network. This is not normally important and can be left blank.
• Type the IP address of the name server (Usually SmoothWall’s IP address, because SmoothWall acts as a name server) into the box labelled DNS Server Search Order and click Add.
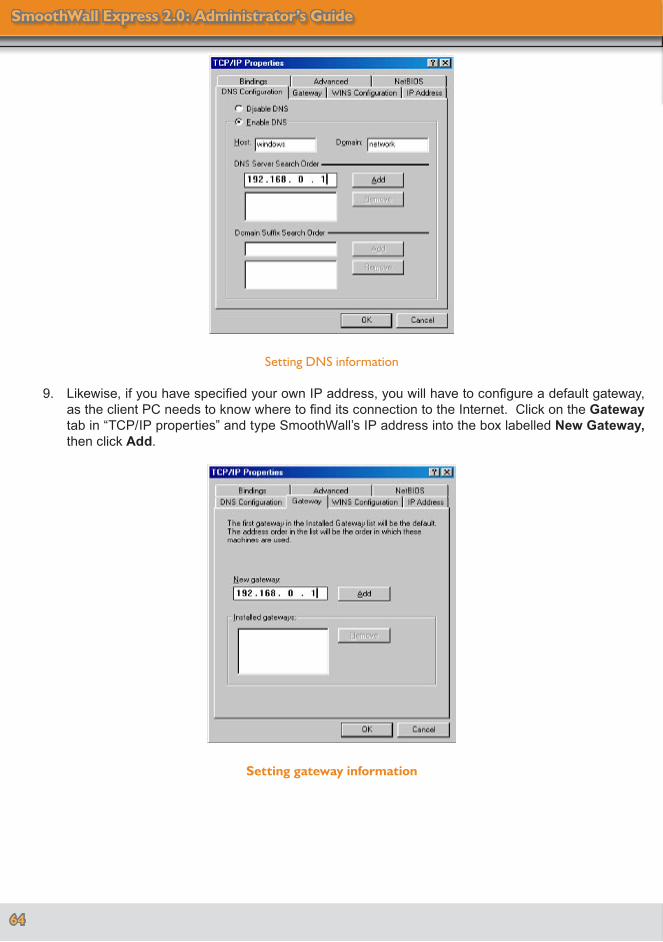
64
SmoothWall Express 2.0: Administrator’s GuideSmoothWall Express 2.0
Administrator’s Guide
Setting DNS information
9. Likewise, if you have specified your own IP address, you will have to configure a default gateway, as the client PC needs to know where to find its connection to the Internet. Click on the Gateway tab in “TCP/IP properties” and type SmoothWall’s IP address into the box labelled New Gateway, then click Add.
Setting gateway information
64
SmoothWall Express 2.0: Administrator’s GuideSmoothWall Express 2.0
Administrator’s Guide
General
Using Open Transport or an iMac (newer systems)
Using Mac TCP (older systems)
4.1
4.2
4.3
Configuring Apple Macintosh systems to use SmoothWall Express as their Internet Gateway4

66
SmoothWall Express 2.0: Administrator’s Guide
67
5. Non-Transparent Proxy Client Configuration
4.1 General
SmoothWall uses the common TCP/IP networking protocol so that a whole network of computers can share a single protected connection to the Internet. Although the majority of this user guide has focused on the installation and configuration of SmoothWall in combination with PCs using Microsoft Windows, the TCP/IP protocol is universal and will also allow Apple Macintosh computers to be a part of the protected network.
In order to connect an Apple Macintosh computer to such a network it will have to be configured to use the TCP/IP protocol. In addition, you will obviously have to have a network card present in your Macintosh system.
The means to configure TCP/IP varies a little depending on the version of the MacOS operating system that is installed on your Mac. More recent MacOS versions have TCP/IP support included as standard, but earlier versions require the use of additional software to enable support for the TCP/IP protocol.
The first thing, therefore, is to determine is the type of TCP/IP support that is currently installed. Under the Apple Menu, open the Control Panels menu item. Look to see if there is a menu item called either MacTCP or TCP/IP. If you have the former you are using the older MacTCP software and should refer to section 4.2.2 below, and if you see the TCP/IP menu option you are using the newer Open Transport software and should instead refer to section 4.2.1 below for configuration details.
An alternative method to determine the type of TCP/IP support is based upon the version of MacOS that is installed on your computer. Open the Apple Menu again, and select About this Computer/Mac. In the window that appears you should see information that refers to either Version or System Software. If this number is 7.6 or greater then you are using a version of MacOS that has the newer Open Transport software installed as standard. For the purposes of these instructions additional numbers after the 7.6, 8.0, 8.1, 8.5, 8.6, or 9.0 (such as 9.0.4) do not matter.
If the version number of MacOS that is present is less than 7.6 you will most likely be using the older MacTCP software. MacTCP is included with MacOS version 7.5.2 and greater, but versions previous to this require either additional software or an upgrade to the operating system to be able to work properly with a TCP/IP network. If this is the case please obtain the appropriate upgrade to the version of your operating system.
4.2 Using Open Transport or an iMac (newer systems)
From the Apple menu, select the Control Panels menu item. Select the TCP/IP option from the Control Panels pop-out menu, or alternatively double-click on the TCP/IP icon in the Control Panels window. If you are asked to make TCP/IP active, click the Yes button.
Selecting TCP/IP Control Panel
In the TCP/IP Control Panel, confirm that the Connect via: option is set to use Ethernet. PowerBook users may have to set this to use Alternate Ethernet if using a PCMCIA Ethernet card instead to connect to the network.
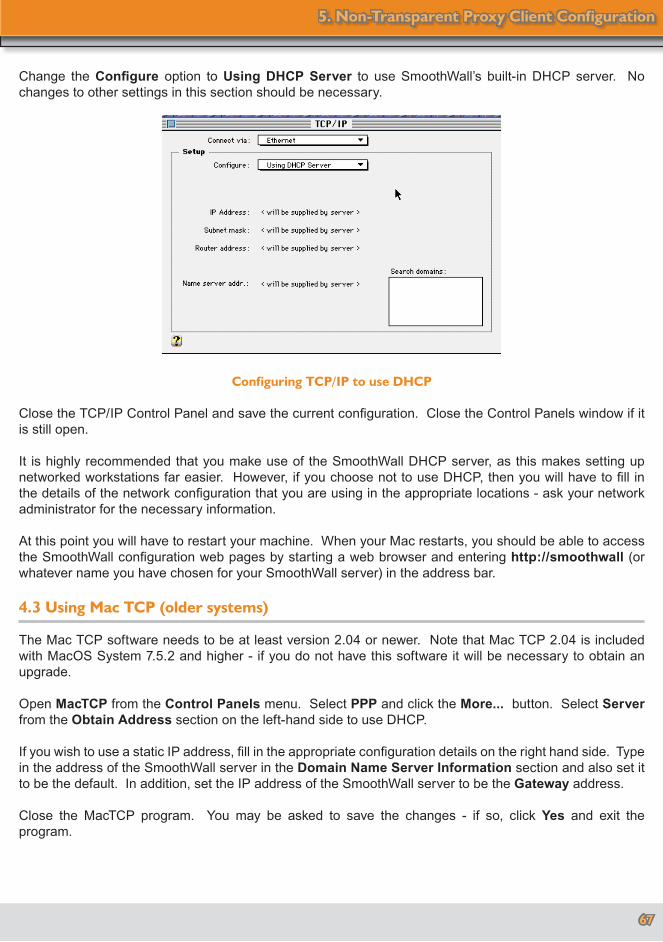
66
SmoothWall Express 2.0: Administrator’s Guide
67
5. Non-Transparent Proxy Client Configuration
Change the Configure option to Using DHCP Server to use SmoothWall’s built-in DHCP server. No changes to other settings in this section should be necessary.
Configuring TCP/IP to use DHCP
Close the TCP/IP Control Panel and save the current configuration. Close the Control Panels window if it is still open.
It is highly recommended that you make use of the SmoothWall DHCP server, as this makes setting up networked workstations far easier. However, if you choose not to use DHCP, then you will have to fill in the details of the network configuration that you are using in the appropriate locations - ask your network administrator for the necessary information.
At this point you will have to restart your machine. When your Mac restarts, you should be able to access the SmoothWall configuration web pages by starting a web browser and entering http://smoothwall (or whatever name you have chosen for your SmoothWall server) in the address bar.
4.3 Using Mac TCP (older systems)
The Mac TCP software needs to be at least version 2.04 or newer. Note that Mac TCP 2.04 is included with MacOS System 7.5.2 and higher - if you do not have this software it will be necessary to obtain an upgrade.
Open MacTCP from the Control Panels menu. Select PPP and click the More... button. Select Server from the Obtain Address section on the left-hand side to use DHCP.
If you wish to use a static IP address, fill in the appropriate configuration details on the right hand side. Type in the address of the SmoothWall server in the Domain Name Server Information section and also set it to be the default. In addition, set the IP address of the SmoothWall server to be the Gateway address.
Close the MacTCP program. You may be asked to save the changes - if so, click Yes and exit the program.
SmoothWall Express 2.0Administrator’s Guide
69
5. Non-Transparent Proxy Client Configuration
Configuring Client Computers to Use SmoothWall Express’s Proxy Server in Non-Transparent Mode
Configuring Internet Explorer 5.x or 6.x to use Non-Transparent Proxy Server
Configuring Netscape Communicator 4.6 to use Non-Transparent Proxy Server
5.1
5.2
5
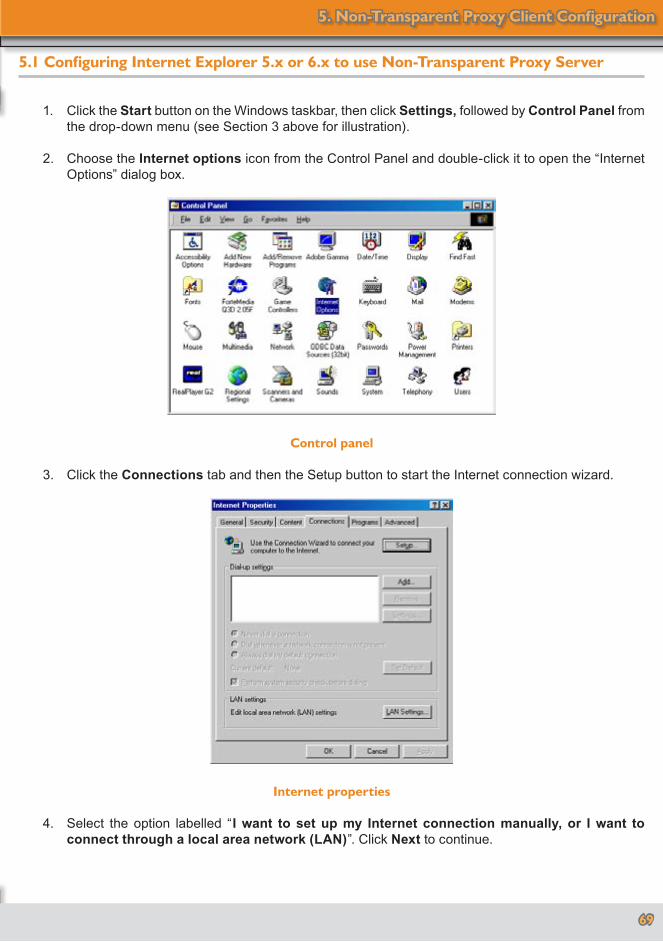
SmoothWall Express 2.0Administrator’s Guide
69
5. Non-Transparent Proxy Client Configuration
5.1 Configuring Internet Explorer 5.x or 6.x to use Non-Transparent Proxy Server
1. Click the Start button on the Windows taskbar, then click Settings, followed by Control Panel from the drop-down menu (see Section 3 above for illustration).
2. Choose the Internet options icon from the Control Panel and double-click it to open the “Internet Options” dialog box.
Control panel
3. Click the Connections tab and then the Setup button to start the Internet connection wizard.
Internet properties
4. Select the option labelled “I want to set up my Internet connection manually, or I want to connect through a local area network (LAN)”. Click Next to continue.
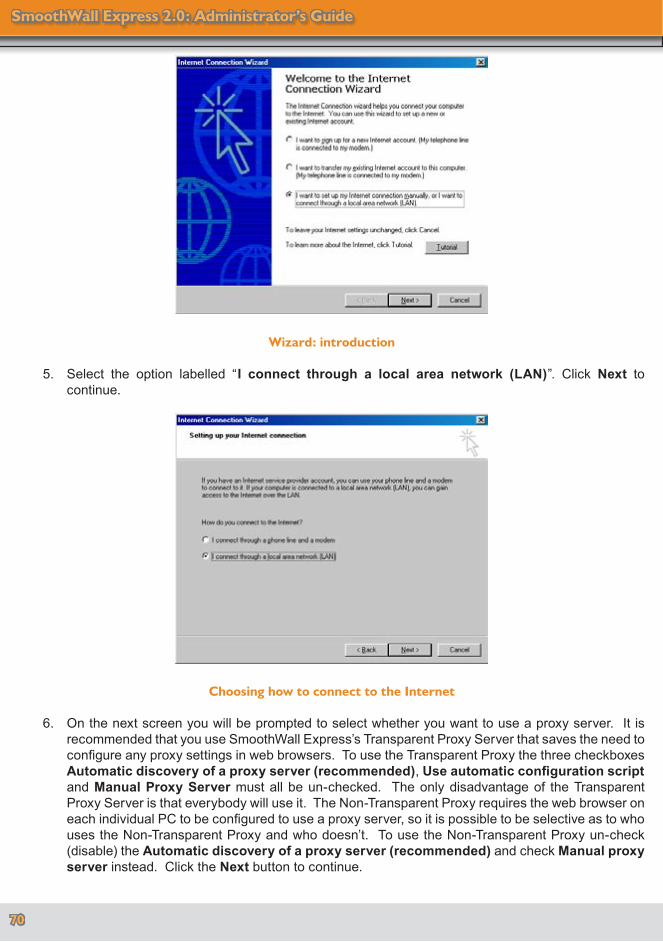
70
SmoothWall Express 2.0: Administrator’s Guide
71
5. Non-Transparent Proxy Client Configuration
Wizard: introduction
5. Select the option labelled “I connect through a local area network (LAN)”. Click Next to continue.
Choosing how to connect to the Internet
6. On the next screen you will be prompted to select whether you want to use a proxy server. It is recommended that you use SmoothWall Express’s Transparent Proxy Server that saves the need to configure any proxy settings in web browsers. To use the Transparent Proxy the three checkboxes Automatic discovery of a proxy server (recommended), Use automatic configuration script and Manual Proxy Server must all be un-checked. The only disadvantage of the Transparent Proxy Server is that everybody will use it. The Non-Transparent Proxy requires the web browser on each individual PC to be configured to use a proxy server, so it is possible to be selective as to who uses the Non-Transparent Proxy and who doesn’t. To use the Non-Transparent Proxy un-check (disable) the Automatic discovery of a proxy server (recommended) and check Manual proxy server instead. Click the Next button to continue.
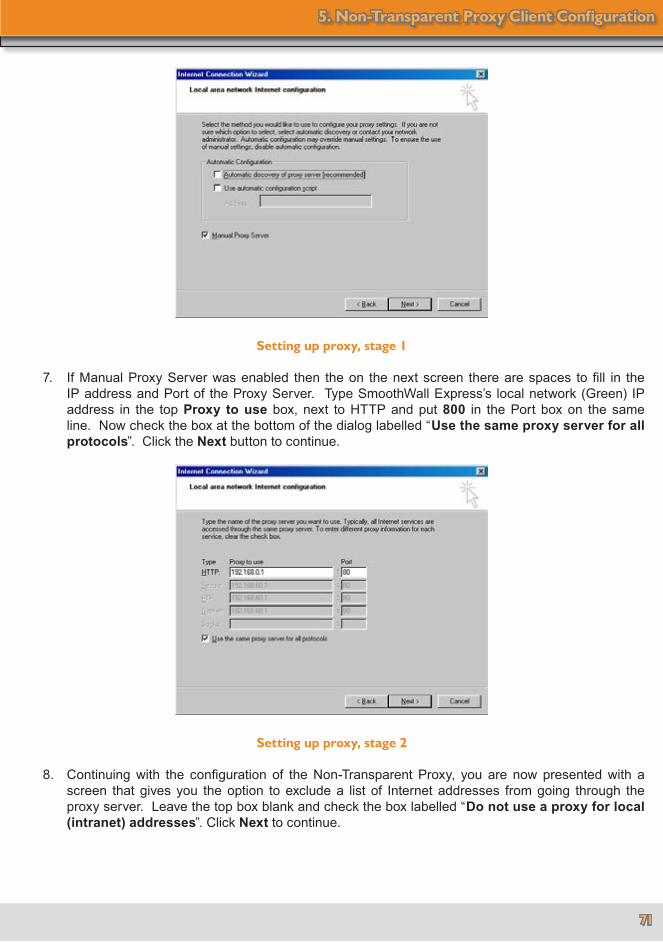
70
SmoothWall Express 2.0: Administrator’s Guide
71
5. Non-Transparent Proxy Client Configuration
Setting up proxy, stage 1
7. If Manual Proxy Server was enabled then the on the next screen there are spaces to fill in the IP address and Port of the Proxy Server. Type SmoothWall Express’s local network (Green) IP address in the top Proxy to use box, next to HTTP and put 800 in the Port box on the same line. Now check the box at the bottom of the dialog labelled “Use the same proxy server for all protocols”. Click the Next button to continue.
Setting up proxy, stage 2
8. Continuing with the configuration of the Non-Transparent Proxy, you are now presented with a screen that gives you the option to exclude a list of Internet addresses from going through the proxy server. Leave the top box blank and check the box labelled “Do not use a proxy for local (intranet) addresses”. Click Next to continue.

72
SmoothWall Express 2.0: Administrator’s Guide
73
5. Non-Transparent Proxy Client Configuration
Setting up proxy, stage 3
9. The wizard’s next few steps are to do with setting up mail and news accounts; you may do this if you wish. Please refer to the Windows documentation if you require help.
10. The last step of setting up the Internet connection gives you the option to connect to the Internet right away. If you want to do this, check the box, otherwise just click Finish.
Wizard: finished
5.2 Configuring Netscape Communicator 4.6 to use Non-Transparent Proxy Server
1. Start Netscape as you do normally.
2. Select Preferences from the Edit menu.

72
SmoothWall Express 2.0: Administrator’s Guide
73
5. Non-Transparent Proxy Client Configuration
Netscape Edit menu
3. Click the “+” symbol at the side of Advanced option at the left of the dialog box to expand the options. Click proxies and the basic proxy setup information will appear in the right hand side of the dialog box.
Netscape preferences
It is recommended that you use SmoothWall Express’s Transparent Proxy Server as amongst other benefits it saves the need to configure any proxy settings in web browsers. To use the Transparent Proxy select the Direct connection to the Internet radio button. The Non-Transparent Proxy requires the web browser on each individual computer to be configured to use it, so it is possible to be selective as to who uses the Non-Transparent Proxy and who doesn’t.
4. To use SmoothWall Express’s Non-Transparent Proxy, select “Manual Proxy Configuration” from the list of 3 options, then click the View button.
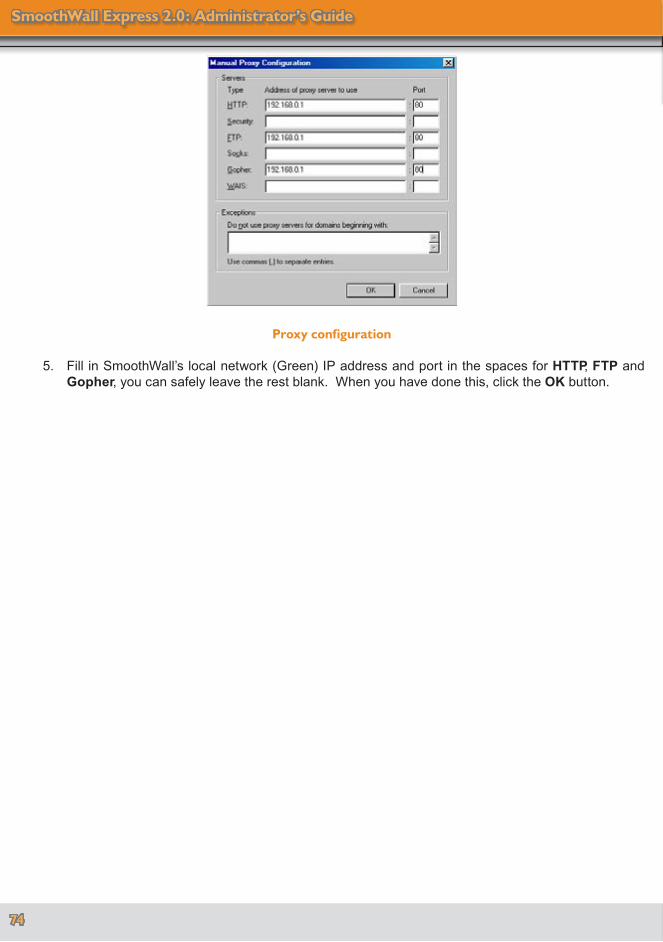
74
SmoothWall Express 2.0: Administrator’s GuideSmoothWall Express 2.0
Administrator’s Guide
Proxy configuration
5. Fill in SmoothWall’s local network (Green) IP address and port in the spaces for HTTP, FTP and Gopher, you can safely leave the rest blank. When you have done this, click the OK button.

74
SmoothWall Express 2.0: Administrator’s GuideSmoothWall Express 2.0
Administrator’s Guide
Client Applications and Protocols currently known to be supported by SmoothWall6
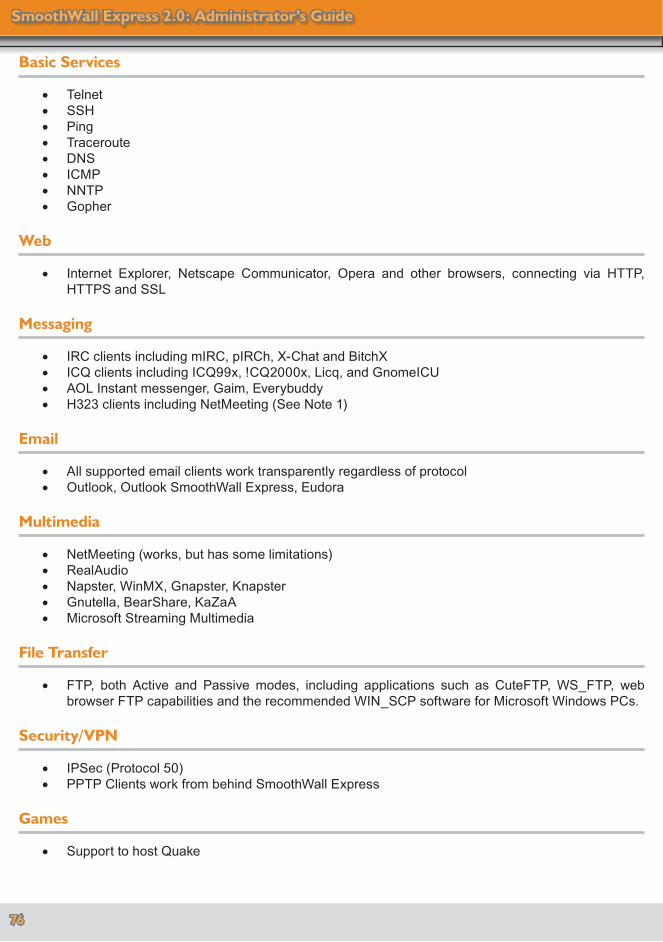
76
SmoothWall Express 2.0: Administrator’s Guide
77
Basic Services
• Telnet• SSH• Ping• Traceroute• DNS• ICMP• NNTP• Gopher
Web
• Internet Explorer, Netscape Communicator, Opera and other browsers, connecting via HTTP, HTTPS and SSL
Messaging
• IRC clients including mIRC, pIRCh, X-Chat and BitchX• ICQ clients including ICQ99x, !CQ2000x, Licq, and GnomeICU• AOL Instant messenger, Gaim, Everybuddy• H323 clients including NetMeeting (See Note 1)
• All supported email clients work transparently regardless of protocol• Outlook, Outlook SmoothWall Express, Eudora
Multimedia
• NetMeeting (works, but has some limitations)• RealAudio• Napster, WinMX, Gnapster, Knapster• Gnutella, BearShare, KaZaA• Microsoft Streaming Multimedia
File Transfer
• FTP, both Active and Passive modes, including applications such as CuteFTP, WS_FTP, web browser FTP capabilities and the recommended WIN_SCP software for Microsoft Windows PCs.
Security/VPN
• IPSec (Protocol 50)• PPTP Clients work from behind SmoothWall Express
Games
• Support to host Quake
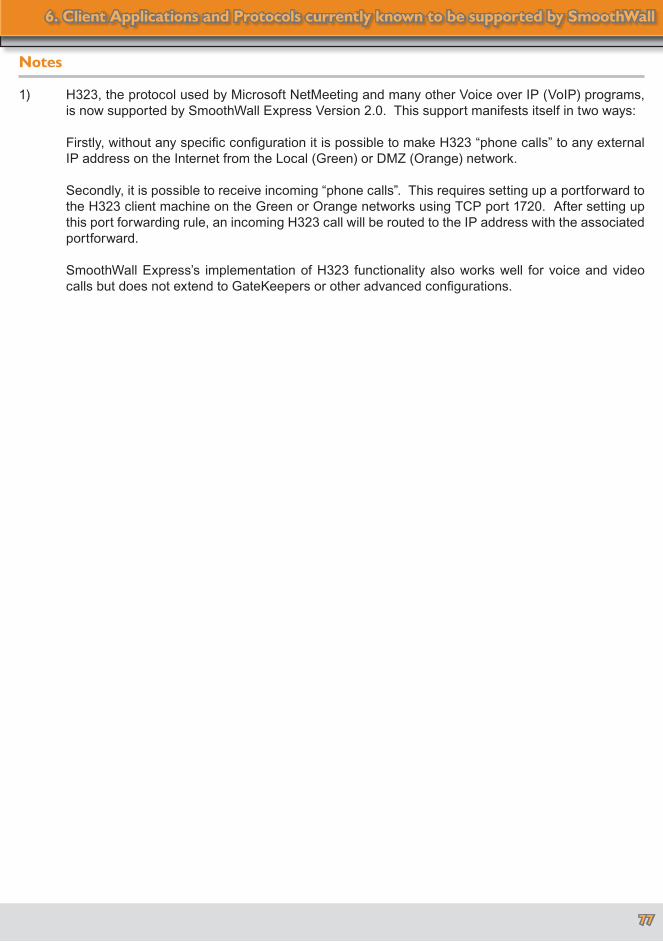
76
SmoothWall Express 2.0: Administrator’s Guide
77
Notes
1) H323, the protocol used by Microsoft NetMeeting and many other Voice over IP (VoIP) programs, is now supported by SmoothWall Express Version 2.0. This support manifests itself in two ways:
Firstly, without any specific configuration it is possible to make H323 “phone calls” to any external IP address on the Internet from the Local (Green) or DMZ (Orange) network.
Secondly, it is possible to receive incoming “phone calls”. This requires setting up a portforward to the H323 client machine on the Green or Orange networks using TCP port 1720. After setting up this port forwarding rule, an incoming H323 call will be routed to the IP address with the associated portforward.
SmoothWall Express’s implementation of H323 functionality also works well for voice and video calls but does not extend to GateKeepers or other advanced configurations.
6. Client Applications and Protocols currently known to be supported by SmoothWall

SmoothWall Express 2.0Administrator’s Guide
79
Maintenance7
7.1 Day to day maintenance
SmoothWall Express 2.0Administrator’s Guide
79
Although your private network is now secured against unwanted outside intruders, it is always wise to keep an eye on the activities of those trying to get in. A good practice to get into is to routinely check the status of your SmoothWall Express, as with any other network server, to remain aware of and hopefully pre-empt any problems that could crop up.
7.1 Day to day maintenance
It is suggested that you regularly view the system logs to keep an eye on the SmoothWall server. In the event that you encounter any problems with SmoothWall you will find a reference in the system log files. In addition the system information page allows you to keep an eye on the amount of disk space being used, so that your system does not run out of storage space or inodes.
Checking the firewall logs on a regular basis can reveal the activity of any attempts to hack into your network from the outside, detailing the attacker’s address and what they were trying to reach. Many times during its development SmoothWall has been subjected to exhaustive penetration testing, which has shown no insecurities in a standard SmoothWall system. You can remain safe in the knowledge that each of these entries in the log file is evidence of a frustrated hacker.
One important maintenance activity is to apply all update patches that are released by SmoothWall Limited. Vulnerabilities are periodically discovered in the Linux components upon which SmoothWall Express is built. Often these are theoretical vulnerabilities; ie nobody has actually constructed an exploit (code or procedure) to use the vulnerability. However if SmoothWall have deemed it necessary to produce and test a security update then it would be negligent not to apply it to your SmoothWall Express system. A list of the currently available/applied updates can be viewed for the Updates page.
7. Maintenance
SmoothWall Express 2.0Administrator’s Guide
81
A. Troubleshooting
Troubleshooting
Hardware Problems
Software Problems
A.1
A.2
A
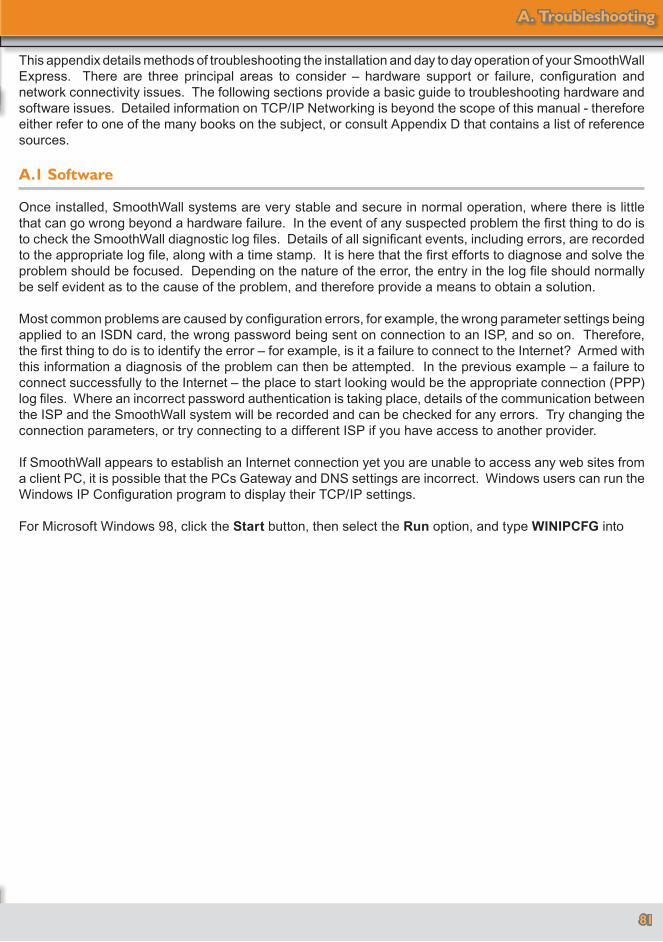
SmoothWall Express 2.0Administrator’s Guide
81
A. Troubleshooting
This appendix details methods of troubleshooting the installation and day to day operation of your SmoothWall Express. There are three principal areas to consider – hardware support or failure, configuration and network connectivity issues. The following sections provide a basic guide to troubleshooting hardware and software issues. Detailed information on TCP/IP Networking is beyond the scope of this manual - therefore either refer to one of the many books on the subject, or consult Appendix D that contains a list of reference sources.
A.1 Software
Once installed, SmoothWall systems are very stable and secure in normal operation, where there is little that can go wrong beyond a hardware failure. In the event of any suspected problem the first thing to do is to check the SmoothWall diagnostic log files. Details of all significant events, including errors, are recorded to the appropriate log file, along with a time stamp. It is here that the first efforts to diagnose and solve the problem should be focused. Depending on the nature of the error, the entry in the log file should normally be self evident as to the cause of the problem, and therefore provide a means to obtain a solution.
Most common problems are caused by configuration errors, for example, the wrong parameter settings being applied to an ISDN card, the wrong password being sent on connection to an ISP, and so on. Therefore, the first thing to do is to identify the error – for example, is it a failure to connect to the Internet? Armed with this information a diagnosis of the problem can then be attempted. In the previous example – a failure to connect successfully to the Internet – the place to start looking would be the appropriate connection (PPP) log files. Where an incorrect password authentication is taking place, details of the communication between the ISP and the SmoothWall system will be recorded and can be checked for any errors. Try changing the connection parameters, or try connecting to a different ISP if you have access to another provider.
If SmoothWall appears to establish an Internet connection yet you are unable to access any web sites from a client PC, it is possible that the PCs Gateway and DNS settings are incorrect. Windows users can run the Windows IP Configuration program to display their TCP/IP settings.
For Microsoft Windows 98, click the Start button, then select the Run option, and type WINIPCFG into
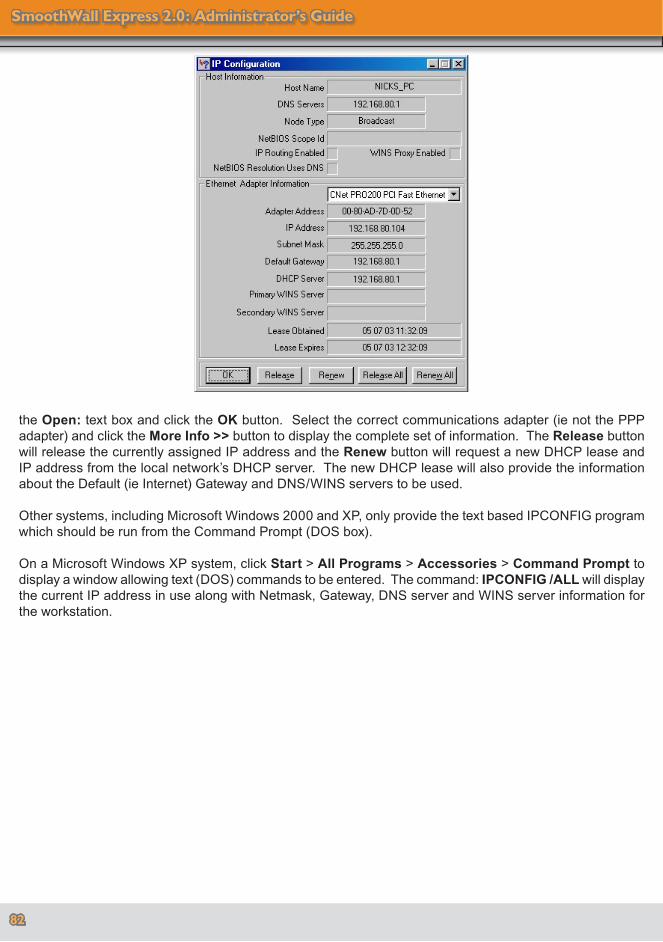
82
SmoothWall Express 2.0: Administrator’s Guide
83
A. Troubleshooting
the Open: text box and click the OK button. Select the correct communications adapter (ie not the PPP adapter) and click the More Info >> button to display the complete set of information. The Release button will release the currently assigned IP address and the Renew button will request a new DHCP lease and IP address from the local network’s DHCP server. The new DHCP lease will also provide the information about the Default (ie Internet) Gateway and DNS/WINS servers to be used.
Other systems, including Microsoft Windows 2000 and XP, only provide the text based IPCONFIG program which should be run from the Command Prompt (DOS box).
On a Microsoft Windows XP system, click Start > All Programs > Accessories > Command Prompt to display a window allowing text (DOS) commands to be entered. The command: IPCONFIG /ALL will display the current IP address in use along with Netmask, Gateway, DNS server and WINS server information for the workstation.
82
SmoothWall Express 2.0: Administrator’s Guide
83
A. Troubleshooting
For PCs set to use a DHCP (automatically provided) IP address, the IPCONFIG /RELEASE command will release the currently assigned IP address whereas the IPCONFIG /RENEW command will request the assignment of a new IP address (DHCP lease).
Use the SmoothWall Express’s Ping tool on the ip tools page to test connectivity. It should be possible to PING other PC’s on the local network and the IP addresses of SmoothWall Express’s Green and Red NICs. Alternatively this can be done from the Command Prompt (DOS box or text window). It should be possible to Ping the IP addresses of your ISP’s DNS servers; type PING, a space, followed by the IP address and then press ENTER. For a dial-up connection these IP addresses will be listed in the PPP Diagnostics Log File (see section 3.1.10). If the DNS server responds to the Ping then you have an Internet connection from your client PC, so perhaps the DNS settings are wrong. If the PING command fails then check the PC’s Gateway setting.
Note that it is not possible to Ping SmoothWall Express’s Orange NIC from a computer within the De-Militarized Zone (DMZ). This restriction is designed to protect SmoothWall Express from being accessible from the inside in the event of a public facing server being hacked. It must be borne in mind that although SmoothWall Express would normally be configured to open only the minimum necessary ports through to a DMZ server, if that server has not been kept up-to-date with all available security patches it may still be vulnerable to being compromised. “Buffer overflow” style attacks are often directed at normal data ports such as Port 80 used for normal HTTP web browser traffic. Hence the reason that we have tried to protect SmoothWall Express from a possible attack from a compromised server within the DMZ. SmoothWall Limited strongly recommends that all computers, especially public Internet facing servers, are kept up-to-date with all available security patches from the suppliers of the system software.
Some browsers may not correctly execute functions that involve transferring and updating software on SmoothWall Express. Opera has been known to cause problems, if problems like this are encountered then try using another browser. Microsoft Internet Explorer Version 6 is recommended but any version of Internet Explorer or Netscape Navigator at versions 4 and above should work fine.
Troubleshooting your VPN Setup
Here is a list of items to check if you are having problems bringing up your VPN tunnels.
84
SmoothWall Express 2.0: Administrator’s GuideSmoothWall Express 2.0
Administrator’s Guide1. Does your ISP allow VPN traffic across its routers? Some ISPs choose to block VPN protocols and so it is not possible to use VPN software with them. The following ports and protocols must be allowed through: UDP port 500, and IP protocols 47, 50 and 51. If any of these are not available, the VPN will not function.
2. Is the Internet link between the two SmoothWall servers operating? Each SmoothWall must be able to see each other across the Internet for the tunnel to work. If you cannot PING the remote SmoothWall, do not even bother trying to setup a VPN between them until this is resolved first.
3. You can gain more diagnostic information from the /var/log/secure log file. You must SSH into your SmoothWall to view this log file.

84
SmoothWall Express 2.0: Administrator’s GuideSmoothWall Express 2.0
Administrator’s Guide
Reference SourcesB
86
SmoothWall Express 2.0: Administrator’s Guide
Note: Neither the SmoothWall Open Source Project Team nor SmoothWall Limited has verified the information provided by the following sources and cannot be held responsible for any errors or omissions in such information.
Microsoft TCP and UDP Port Usage Information:
http://www.microsoft.com/windows2000/techinfo/reskit/en-us/default.asp?url=/WINDOWS2000/techinfo/reskit/en-us/cnet/cnfc_por_rbjg.asp
http://www.microsoft.com/windows2000/techinfo/reskit/samplechapters/cnfc/cnfc_por_simw.asp
General TCP and UDP Port Usage Information:
http://www.iana.org/assignments/port-numbershttp://www.networkice.com/advice/Exploits/Ports/
Ports Used by Trojan horse viruses/programs:
http://www.austin.rr.com/rrsec/computer_ports.html
Games usage of TCP and UDP Ports: http://www.u.arizona.edu/~trw/games/ports.htm
Information on SmoothWall Limited’s commercial products, partners, general news, security news and services: http://www.smoothwall.net/
The FreeS/WAN homepage. In depth information on the IPSec stack used by SmoothWall for its VPN functionality: http://www.freeswan.org
Homepage for the OpenH323 project: http://www.openh323.org
Homepage for Microsoft’s NetMeeting: http://www.microsoft.com/windows/netmeeting/
Homepage for the GnomeMeeting program: http://www.gnomemeeting.org
SpeakFreely’s home page: http://www.speakfreely.org
List of IP Protocols: http://www.openbsd.org/cgi-bin/cvsweb/src/etc/protocols?rev=1.8
Understanding IP Addressing: http://www.3com.com/other/pdfs/infra/corpinfo/en_US/501302.pdf
GNU General Public Licence (GPL) version 2: www.gnu.org/copyleft/gpl.html
Information on modems: www.modemhelp.org
Linux DHCP min-HowTo: http://www.linuxdoc.org/HOWTO/mini/DHCP/
Linux IP Sub-Networking min-HowTo: http://www.linuxdoc.org/HOWTO/mini/IP-Subnetworking.html


![[eBook] SmoothWall Basic TCP-IP Networking Guide](https://static.fdocuments.us/doc/165x107/56d6bd431a28ab30168d49de/ebook-smoothwall-basic-tcp-ip-networking-guide.jpg)

