
Tutorial City Highlights - App Inventor for...
28
Tutorial City Highlights by Sjaak Bosman - Rotterdam, The Netherlands – [email protected] - © 2016 Page 1 of 28 Tutorial City Highlights Content 1. Tutorial Overview ............................................................................................................................. 2 1.1. Learning objectives................................................................................................................... 2 1.2. Preview ....................................................................................................................................... 2 2. App Inventor Designer window ...................................................................................................... 3 2.1. Screen layout............................................................................................................................. 5 2.2. Add User Interface components ............................................................................................. 7 2.3. Modify properties ...................................................................................................................... 9 2.4. The User Interface ...................................................................................................................11 2.5. Non-visible components..........................................................................................................12 2.6. Upload remaining media files.................................................................................................13 3. App Inventor Blocks Editor window .............................................................................................. 14 3.1. Initialize the app ......................................................................................................................15 3.2. Select city and language.........................................................................................................17 3.3. Show POI...................................................................................................................................19 3.4. Swipe to previous or next POI ............................................................................................... 20 4. Adding Content ................................................................................................................................ 21 4.1. Data structure ..........................................................................................................................21 4.2. Insert data ................................................................................................................................ 23 5. Test the app so far. .........................................................................................................................24 5.1. Troubleshooting........................................................................................................................24 6. Embellish your app ..........................................................................................................................25 6.1. Website link .............................................................................................................................. 25 6.2. Google Maps ............................................................................................................................. 25 7. Variations ..........................................................................................................................................27 7.1. TextToSpeech ........................................................................................................................... 27 7.2. Single unique POI information ............................................................................................... 27 7.3. Replace the Dutch language with your own language .......................................................27 7.4. Replace Rotterdam with your own city. ................................................................................27 8. Documents and Files .......................................................................................................................28
-
Upload
phungduong -
Category
Documents
-
view
218 -
download
0
Transcript of Tutorial City Highlights - App Inventor for...

Tutorial City Highlights by Sjaak Bosman - Rotterdam, The Netherlands – [email protected] - © 2016
Page 1 of 28
Tutorial City Highlights
Content 1. Tutorial Overview ............................................................................................................................. 2
1.1. Learning objectives ................................................................................................................... 2 1.2. Preview ....................................................................................................................................... 2
2. App Inventor Designer window ...................................................................................................... 3 2.1. Screen layout ............................................................................................................................. 5 2.2. Add User Interface components ............................................................................................. 7 2.3. Modify properties ...................................................................................................................... 9 2.4. The User Interface ...................................................................................................................11 2.5. Non-visible components ..........................................................................................................12 2.6. Upload remaining media files .................................................................................................13
3. App Inventor Blocks Editor window ..............................................................................................14 3.1. Initialize the app ......................................................................................................................15 3.2. Select city and language .........................................................................................................17 3.3. Show POI ...................................................................................................................................19 3.4. Swipe to previous or next POI ...............................................................................................20
4. Adding Content ................................................................................................................................21 4.1. Data structure ..........................................................................................................................21 4.2. Insert data ................................................................................................................................23
5. Test the app so far. .........................................................................................................................24 5.1. Troubleshooting ........................................................................................................................24
6. Embellish your app ..........................................................................................................................25 6.1. Website link ..............................................................................................................................25 6.2. Google Maps .............................................................................................................................25
7. Variations ..........................................................................................................................................27 7.1. TextToSpeech ...........................................................................................................................27 7.2. Single unique POI information ...............................................................................................27 7.3. Replace the Dutch language with your own language .......................................................27 7.4. Replace Rotterdam with your own city. ................................................................................27
8. Documents and Files .......................................................................................................................28

Tutorial City Highlights by Sjaak Bosman - Rotterdam, The Netherlands – [email protected] - © 2016
Page 2 of 28
1. TUTORIAL OVERVIEW
In this tutorial you are going to create a multilanguage touristic app for visitors to a city. As an example this tutorial includes two cities and two languages. A Google account is required, so if you don’t have one yet please create it prior to this tutorial.
Our multilanguage touristic app will contain Point Of Interest (POI’s) that can be defined by 5 values:
- A title. - Textual information. - An optional website link. - A photo. - Its location.
All content that is necessary for this app can be downloaded, so you don’t have to create it by yourself.
The extended version of this City Highlights app can be found on http://www.WalktheCity.eu/en.
1.1. Learning objectives
Participants of this tutorial learn to create a fully functional Android-app with MIT’s App Inventor, a platform for designing and developing mobile apps.
As part of this tutorial the following key issues will be addressed:
- An overview of the App Inventor environment. - Design a graphical user interface. - Write clear, obvious and readable code to make the app maintainable. - Include content and implement a data structure. - Handle user interaction. - Use sensors to embellish the app. - Test the app using AI Companion.
1.2. Preview
This is how your app is going to look like, so have fun!

Tutorial City Highlights by Sjaak Bosman - Rotterdam, The Netherlands – [email protected] - © 2016
Page 3 of 28
2. APP INVENTOR DESIGNER WINDOW
Go to the website http://ai2.appinventor.mit.edu/. If this is your first time, follow the questions after which the App Inventor Designer Window will be shown. Click on Projects, select Start new project and fill in the name CityHighlights.
The App Inventor Designer window consists out of 5 panes:
- Palette : Containing all the components that can be included in the app. The components are arranged in several categories, such as User Interface and Layout.
- Viewer : The appearance of the app. Enable (check) the Display hidden components in Viewer setting in the Viewer pane.
- Components : A list of components that are included in the app. - Properties : A list of properties of the component that is selected in the Components pane. - Media : A list of all media files, such as images and sounds, that has been uploaded into the app.
App Inventor Designer window:
Browse through the categories in the Palette pane, to become a little familiar with the components.
Download the Zip-archive that holds the media files for this app from http://www.BBI.nl/MIT/CityHighlights.zip. Unzip the archive after downloading. Later on you need to upload the media files into the app. The Zip-archive also contains a Word-document that contains all the textual content you need to cut and paste into the app.
Tutorial City Highlights by Sjaak Bosman - Rotterdam, The Netherlands – [email protected] - © 2016
Page 4 of 28
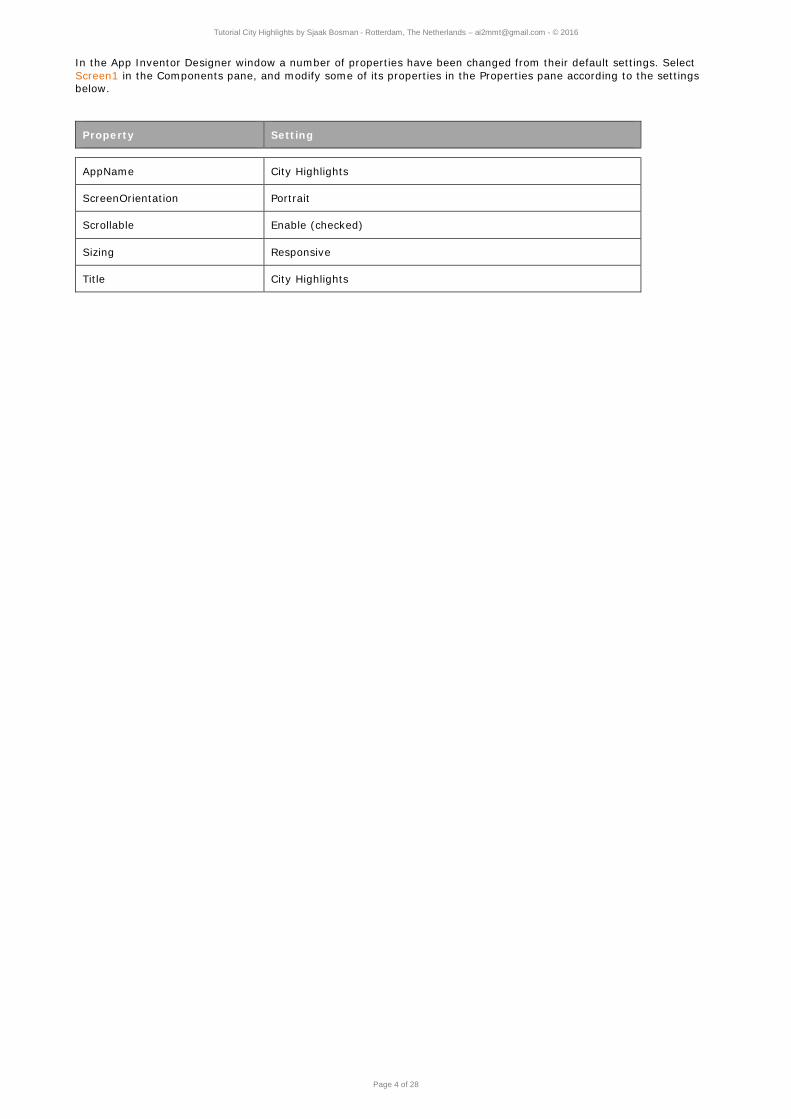
In the App Inventor Designer window a number of properties have been changed from their default settings. Select Screen1 in the Components pane, and modify some of its properties in the Properties pane according to the settings below.
Property Setting
AppName City Highlights
ScreenOrientation Portrait
Scrollable Enable (checked)
Sizing Responsive
Title City Highlights

Tutorial City Highlights by Sjaak Bosman - Rotterdam, The Netherlands – [email protected] - © 2016
Page 5 of 28
2.1. Screen layout
To create a smooth interface you have to define some small white space around the content. This is to prevent text to be displayd against the side.
From the Palette pane (hint: User interface), drag a label into Screen1 in the Viewer pane.
Next, drag a HorizontalArrangement (hint: Layout) into Screen1 and place it right below the label.
The picture on the left also contains some components you are going to place in the following chapters.
Modify some of the properties in the Properties pane according to the settings below. To rename a component select it in the Component pane and click the Rename button.
Property Setting
Label
Rename sepScreenTop
Height 2 pixels
Width Fill parent
Text Empty (Remove text)
HorizontalArrangement
Rename shaScreen
Width Fill parent
To create white spaces to the left and right of the content, drag two labels into shaScreen. Finally drag a VerticalArrangement from the Layout section and place it between the two labels.
Modify some of the properties in the Properties pane according to the settings below. To rename a component select it in the Component pane and click the Rename button.
Property Setting
Left Label
Rename sepScreenLeft
Height Fill parent
Width 2 pixels
Text Empty (Remove text)
Tutorial City Highlights by Sjaak Bosman - Rotterdam, The Netherlands – [email protected] - © 2016
Page 6 of 28
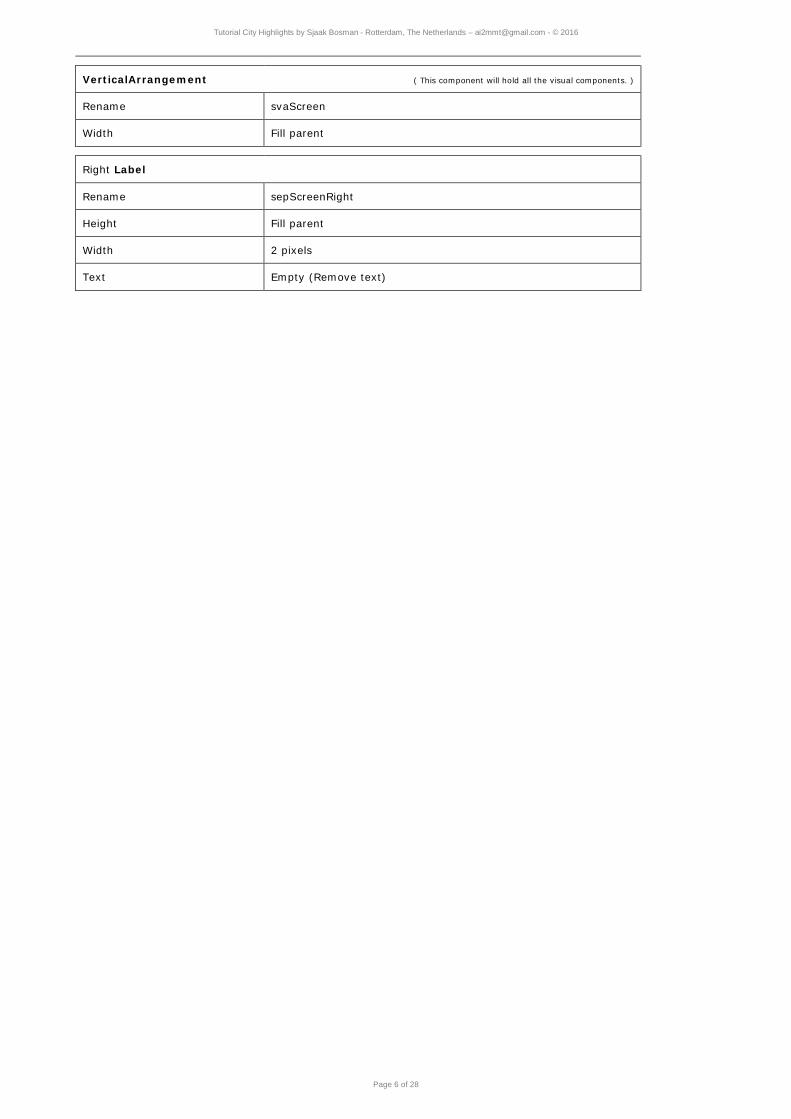
VerticalArrangement ( This component will hold all the visual components. )
Rename svaScreen
Width Fill parent
Right Label
Rename sepScreenRight
Height Fill parent
Width 2 pixels
Text Empty (Remove text)

Tutorial City Highlights by Sjaak Bosman - Rotterdam, The Netherlands – [email protected] - © 2016
Page 7 of 28
2.2. Add User Interface components
Drag the components listed in the tables below from the Palette pane into the vertical arrangement svaScreen, and place them below each other in this order. Rename a component directly after you placed it.
Component Rename Set property
Canvas (hint: Drawing and Animation)
cnvPhoto Width to Fill parent
Label sepPhotoTitle
HorizontalArrangement shaTitleLanguage Width to Fill parent
Label sepTitleText
Label lblPOIText
Label sepTextWebsiteLink
HorizontalArrangement shaWebsiteLink Width to Fill parent
Label sepWebsiteLinkBottom
Label sepBottomLine
Drag the components listed in the tables below from the Palette pane into the canvas cnvPhoto. Rename a component directly after you placed it.
Component Rename
ImageSprite (hint: Drawing and Animation) sprCityName
ImageSprite sprGoogleMaps
Drag the components listed in the tables below from the Palette pane into the horizontal arrangement shaTitleLanguage, and place them next to each other in this order. Rename a component directly after you placed it.
Component Rename
Label lblPOITitle
Button btnEnglish
Label sepBetweenFlags
Button btnDutch

Tutorial City Highlights by Sjaak Bosman - Rotterdam, The Netherlands – [email protected] - © 2016
Page 8 of 28
Drag the next components from the Palette pane into the horizontal arrangement shaWebsiteLink, and place them next to each other in this order. Rename the component directly after you placed it.
Component Rename
Button btnPOIWebsiteLink
Label lblPOIWebsiteLink
Tutorial City Highlights by Sjaak Bosman - Rotterdam, The Netherlands – [email protected] - © 2016
Page 9 of 28
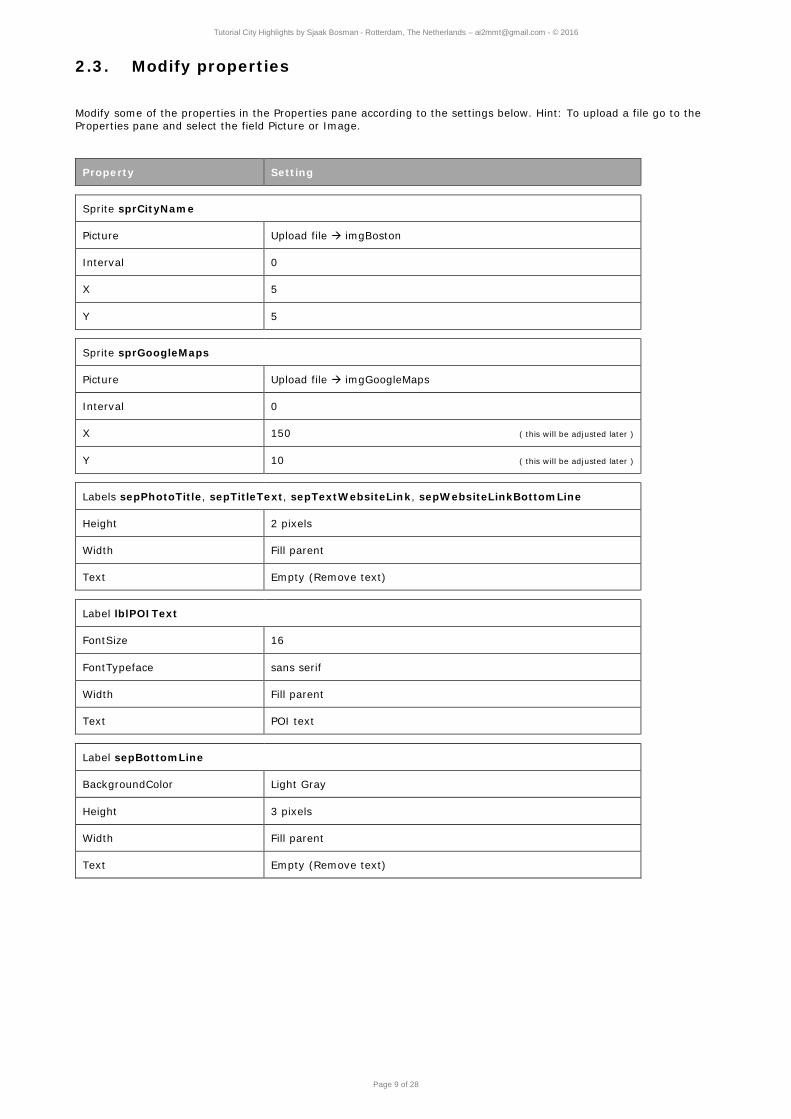
2.3. Modify properties Modify some of the properties in the Properties pane according to the settings below. Hint: To upload a file go to the Properties pane and select the field Picture or Image.
Property Setting
Sprite sprCityName
Picture Upload file imgBoston
Interval 0
X 5
Y 5
Sprite sprGoogleMaps
Picture Upload file imgGoogleMaps
Interval 0
X 150 ( this will be adjusted later )
Y 10 ( this will be adjusted later )
Labels sepPhotoTitle, sepTitleText, sepTextWebsiteLink, sepWebsiteLinkBottomLine
Height 2 pixels
Width Fill parent
Text Empty (Remove text)
Label lblPOIText
FontSize 16
FontTypeface sans serif
Width Fill parent
Text POI text
Label sepBottomLine
BackgroundColor Light Gray
Height 3 pixels
Width Fill parent
Text Empty (Remove text)

Tutorial City Highlights by Sjaak Bosman - Rotterdam, The Netherlands – [email protected] - © 2016
Page 10 of 28
Modify some of the properties in the horizontal arrangement shaTitlelanguage in the Properties pane according to the settings below.
Property Setting
Label lblPOITitle
FontSize 18
FontTypeface serif
Width Fill parent
Text POI title
Button btnEnglish
Image Upload file imgEnglish
Text Empty (Remove text)
Label sepBetweenFlags
Height Fill Parent
Width 10 pixels
Text Empty (Remove text)
Button btnDutch
Image Upload file imgDutch
Text Empty (Remove text)
Modify some of the properties in the horizontal arrangement shaWebsiteLink in the Properties pane according to the settings below.
Property Setting
Button btnPOIWebsiteLink
Image imgPOIWebsiteLink
Text Empty (Remove text)
Height 30 pixels
Width 30 pixels
Label lblPOIWebsiteLink
FontSize 14
FontTypeface Sans serif
Width Fill parent
Text POI Website link
Tutorial City Highlights by Sjaak Bosman - Rotterdam, The Netherlands – [email protected] - © 2016
Page 11 of 28
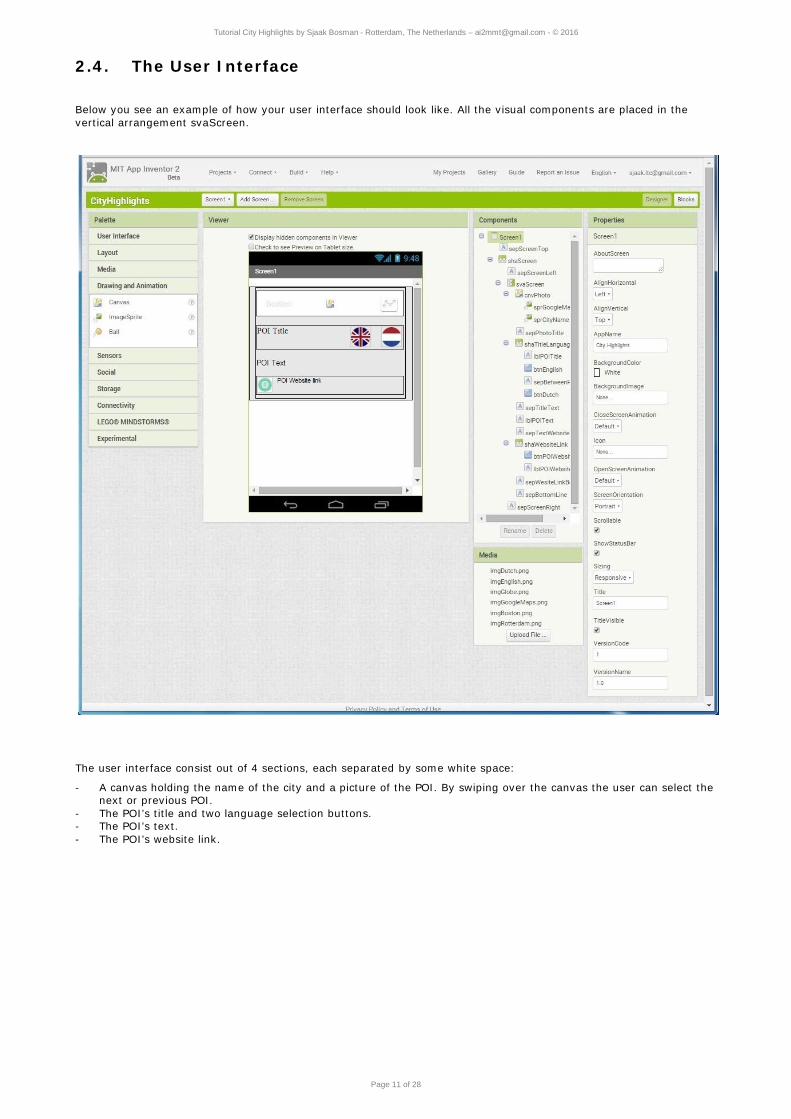
2.4. The User Interface
Below you see an example of how your user interface should look like. All the visual components are placed in the vertical arrangement svaScreen.
The user interface consist out of 4 sections, each separated by some white space:
- A canvas holding the name of the city and a picture of the POI. By swiping over the canvas the user can select the next or previous POI.
- The POI’s title and two language selection buttons. - The POI’s text. - The POI’s website link.
Tutorial City Highlights by Sjaak Bosman - Rotterdam, The Netherlands – [email protected] - © 2016
Page 12 of 28
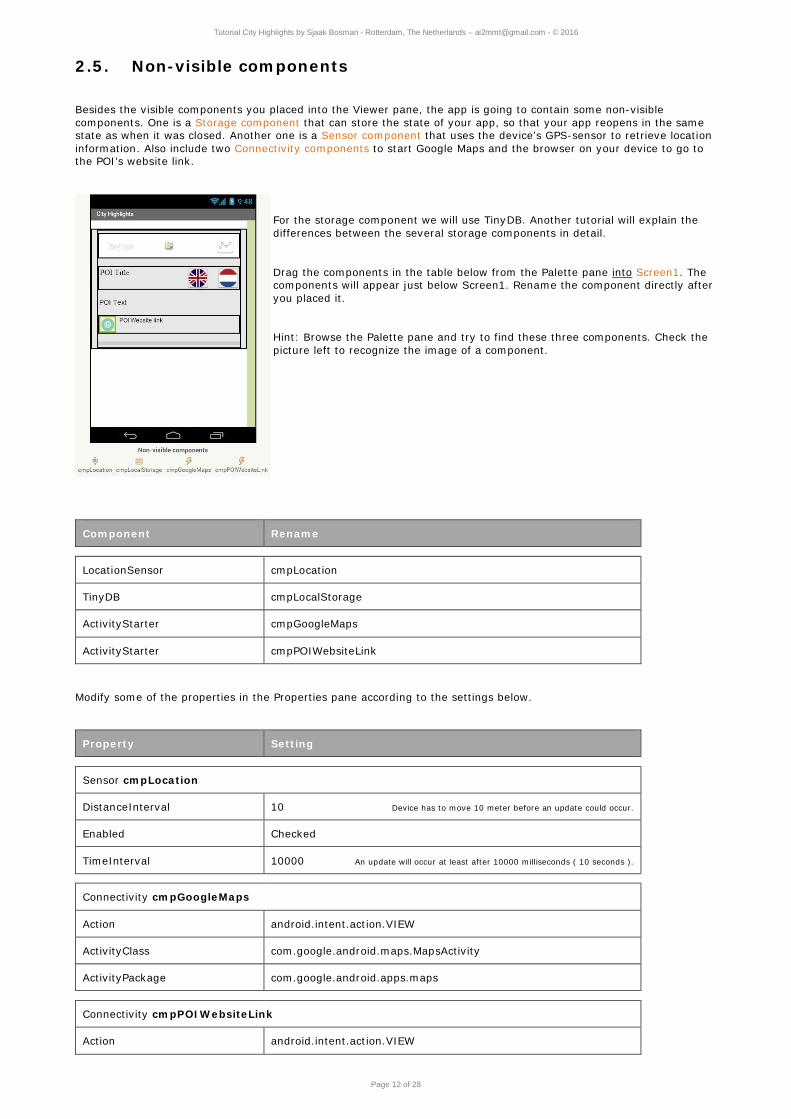
2.5. Non-visible components
Besides the visible components you placed into the Viewer pane, the app is going to contain some non-visible components. One is a Storage component that can store the state of your app, so that your app reopens in the same state as when it was closed. Another one is a Sensor component that uses the device’s GPS-sensor to retrieve location information. Also include two Connectivity components to start Google Maps and the browser on your device to go to the POI’s website link.
For the storage component we will use TinyDB. Another tutorial will explain the differences between the several storage components in detail.
Drag the components in the table below from the Palette pane into Screen1. The components will appear just below Screen1. Rename the component directly after you placed it.
Hint: Browse the Palette pane and try to find these three components. Check the picture left to recognize the image of a component.
Component Rename
LocationSensor cmpLocation
TinyDB cmpLocalStorage
ActivityStarter cmpGoogleMaps
ActivityStarter cmpPOIWebsiteLink
Modify some of the properties in the Properties pane according to the settings below.
Property Setting
Sensor cmpLocation
DistanceInterval 10 Device has to move 10 meter before an update could occur.
Enabled Checked
TimeInterval 10000 An update will occur at least after 10000 milliseconds ( 10 seconds ).
Connectivity cmpGoogleMaps
Action android.intent.action.VIEW
ActivityClass com.google.android.maps.MapsActivity
ActivityPackage com.google.android.apps.maps
Connectivity cmpPOIWebsiteLink
Action android.intent.action.VIEW
Tutorial City Highlights by Sjaak Bosman - Rotterdam, The Netherlands – [email protected] - © 2016
Page 13 of 28
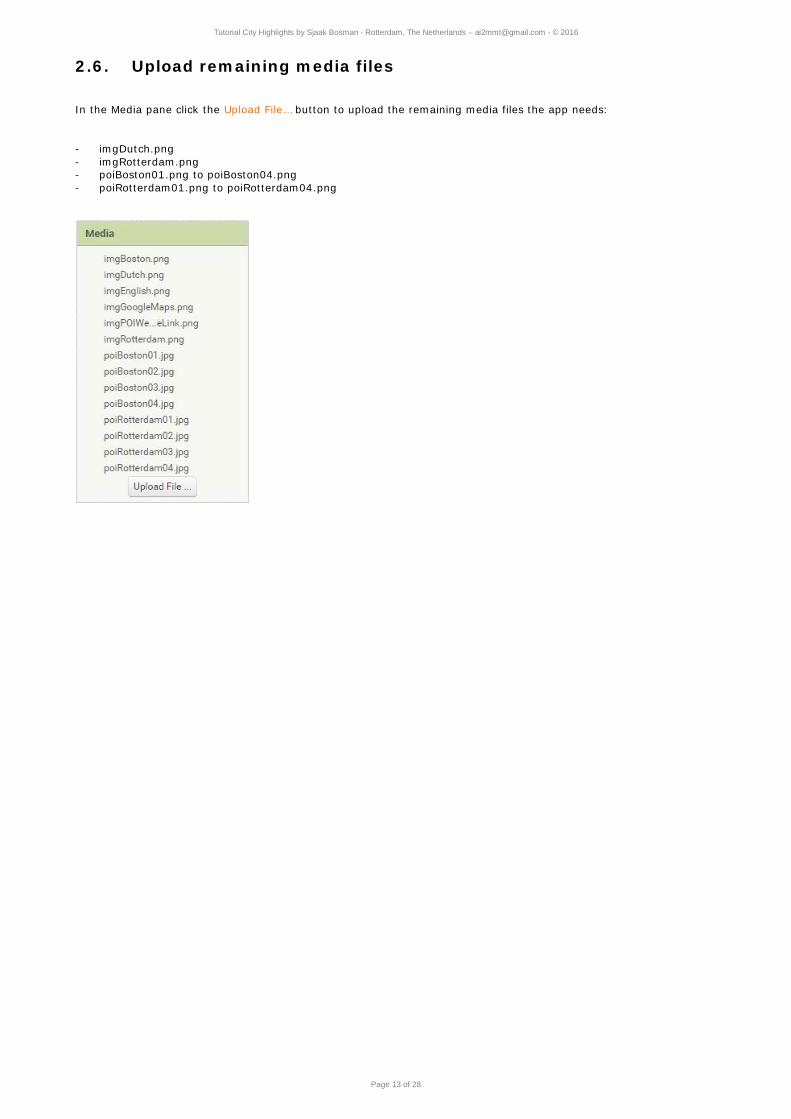
2.6. Upload remaining media files
In the Media pane click the Upload File… button to upload the remaining media files the app needs:
- imgDutch.png - imgRotterdam.png - poiBoston01.png to poiBoston04.png - poiRotterdam01.png to poiRotterdam04.png

Tutorial City Highlights by Sjaak Bosman - Rotterdam, The Netherlands – [email protected] - © 2016
Page 14 of 28
3. APP INVENTOR BLOCKS EDITOR WINDOW
Click on the Blocks button in the upper right corner to switch from the Designer window to the Blocks Editor window.
The App Inventor Blocks Editor window consists out of 2 panes:
- Blocks : Containing all the code blocks that can be included in the app. The blocks are arranged in 3 categories, Built-in, Screen1 and Any component. All the different kinds of blocks has each own specific color.
- Viewer : The code blocks or source code of the app. With the blocks you program the behaviour of your app.
App Inventor Blocks Editor window:
Browse through the Built-in category in the Blocks pane, to become a little familiar with the Built-in blocks.

Tutorial City Highlights by Sjaak Bosman - Rotterdam, The Netherlands – [email protected] - © 2016
Page 15 of 28
3.1. Initialize the app
In the Blocks pane click on Screen1, and find and click the when Screen1.Initialize block. The block will appear in the Viewer. All blocks in the Screen1.Initialize block will be executed when the app is started. At first we want to setup the screen layout, and second to initialize the app to start properly.
In the Blocks pane find the to Procedure do block and click it. An empty procedure block appears in the viewer. Change the name of the procedure to prcScreenLayout by clicking on the word procedure and typing the new name. Repeat this step and rename the second procedure to prcInitialize. Using procedure is good way to keep code compact and readable or to reuse code.
The next step is to include both newly created procedures into the Screen1.Initialize block. In the Blocks pane find the two new procedures and click them. In the viewer drag them into the Screen1.Initialize block until you hear a click sound.
The last step is to define a global variable which will hold the value for a color we are going to use to give the user interface a neat design. Find the necessary blocks by yourself and modify the name and the values according to the settings in the picture below.
In the picture above there are several blocks in the prcScreenLayout procedure. One of them is the initialize loc locIntPhotoHeight to block. It is a local variable to hold the height of the POI’s photo, which is calculated as the width of the svaScreen component (which holds the POI’s photo) divided by 4 and multiplied by 3 for having a correct width/height ratio for the photo.
The three blocks within the initialize loc locIntPhotoHeight to block sets the height of the POI’s photo and the location of the sprGoogleMaps sprite by setting its X and Y coordinate. Find the necessary blocks by yourself and complete the srcScreenLayout procedure. Hint: Explore the Screen1 category in the Blocks pane.
Hint: If you need a getter or setter for a variable, just hover the mouse pointer over the name in the initialize part of the block.
Another tutorial will explain the differences between global and local variables and the different kind of blocks in detail.

Tutorial City Highlights by Sjaak Bosman - Rotterdam, The Netherlands – [email protected] - © 2016
Page 16 of 28
The prcInitialize procedure holds the blocks to initialize the app upon startup. That is to display the appropriate information, such as the last used POI of the active city in the selected language. First, define some globale variables to hold the number of the active city, active language and active POI. Active means the city, language and POI that is being displayed in the app. Name the global variables according to the settings in the picture below.
Next, complete the prcInitialize procedure according to the picture above. It includes 3 new procedures. For now just create empty procedures. Hint: cmpLocalStorage can be found in the Screen1 category.
The component cmpLocalStorage holds tagged values on your device, so that they can be used after the app reopens. If there isn’t a value available for the specified tag (which is the case when the app opens for the first time), a default value will be used. The values correspond to the name of city, the name of a language and number of a POI, which will be explained later.

Tutorial City Highlights by Sjaak Bosman - Rotterdam, The Netherlands – [email protected] - © 2016
Page 17 of 28
3.2. Select city and language
Every city in the app is represented by its own number. In this tutorial Boston is city number 1 and Rotterdam is city number 2. Selecting a city is putting the number of that city into the global variable intCity. The number is an index that points to the list of POI’s for that city. After selecting a city, its number must be stored in the local storage so when the app reopens, that city will be shown at first.
Complete the procedure prcSelectCity as shown in the picture below. The global variables lstPOIBoston and lstPOIRotterdam are defined as empty lists, but you will replace these empty lists with POI data later on. The global variable lstPOICity will hold the list of POI’s of the selected city in all languages.
Hint: If you drag an if then block from the Control section in the Built-in category onto the Viewer pane, click on the little dark blue square in the uppler left corner of the if then block. A mini editor will be displayed, from which you can drag an else if into the if then block.
Like the city is represented by a number, the language is also. English is represented by the number 1, Dutch is represented by the number 2. After selecting a language, its number must be stored in the local storage so when the app reopens, that language will be used.
Complete the procedure prcSelectLanguage as shown in the picture below. The global variable lstPOIActive will hold the list of POI’s of the selected city in the selected language. This list will be used to display POI information in the app.

Tutorial City Highlights by Sjaak Bosman - Rotterdam, The Netherlands – [email protected] - © 2016
Page 18 of 28
Both procedures have been designed so that they can also be used when the user wants to select another city or another language. Therefor you have included the visual components sprCityName, btnEnglish and btnDutch earlier.
When the user touches sprCityName, we want to select the next city. This kind of functionality is called toggling. Implement this functionality according to the blocks in the picture below. Remember that a city is represented by a number. So if intCity is 1, we want it to be 2 which represents the next city. If it is 2, the next city will be 1 because we have no other cities in our app.
After setting the new value for intCity depending on the current value, set de variable intPOI to 1 because for a new city we want to start at the first POI.
Finally include a call to the procedure prcSelectCity to select the appropriate city, a call to prcSelectLanguage to select the current language and a call to the procedure prcShowPOI to display the POI.
To switch to another language the user can press one of the language buttons. Remember that a language is represented by a number. English is represented by 1, the Dutch language by 2. Implement this functionality according to the blocks in the picture below.
After setting the new value for intLanguage include a call to the procedure prcSelectLanguage to select the appropriate language and a call to the procedure prcShowPOI to display the current POI in the selected language.

Tutorial City Highlights by Sjaak Bosman - Rotterdam, The Netherlands – [email protected] - © 2016
Page 19 of 28
3.3. Show POI
Showing a POI’s information is retreiving the data from the list that holds the POI data and assign it to the property of the appropriate component such as a label’s text or canvas background.
A POI is defined by 5 values:
- A title. - The informational text. - An optional website link. - The filename of a photograph of the POI. - Its location, defined by the latitude and longitude.
These values can be stored in one POI list:
In the next paragraph you will add all the content to the app. For now it is important to know which index in the list holds which value. That is 1 for POI Title to 5 for POI Latitude,Longitude. In fact the index is the number of the slot in the make a list block.
Complete the procedure prcShowPOI as shown in the picture below. The numbers that are attached to the index slots of the select list item block are the indices that points to the slot of the requested data in the POI list.
Remember: The global variable lstPOIActive holds the list of POI’s of the selected city in the selected language. The local variable locLstPOI will hold the information of the current POI, which can be selected from the active list of POI’s
Because you don’t want to show an empty Website link, the Visible property of the horizontal arrangement shaWebsiteLink must be set to False if the Text property of the label lblPOIWebsiteLink is empty, which is the case if there is no link specified for that particular POI.
To set the Visible property, you have to include some logic: the is empty block returns True or False, depending on whether the property Text is empty or not. If it returns True for being empty, then the Visibility property must be set to False: Don’t show an empty website link.
Hint: If you click on the sign next to the variable’s, component’s or property’s name, a list of valid items which can be selected will be shown. By doing so you don’t have to find and select a component in the Blocks pane and drag it into the Viewer pane each time. You can just copy and paste a same block and select the requested variable, component or property from the menu.

Tutorial City Highlights by Sjaak Bosman - Rotterdam, The Netherlands – [email protected] - © 2016
Page 20 of 28
3.4. Swipe to previous or next POI
To display the previous or next POI, the user just has to swipe over the canvas. When that happens, the Flung event will be triggered. Find the cnvPhoto.Flung event handler in the Screen1 category of the Blocks pane and drag it into the Viewer of the Blocks Editor window.
Because the list of POI’s is limited, some logic have to be built in so that when the last POI is shown, the next POI will be the first one. And when the first POI is shown, the previous POI will be the last one. Remember: a POI is represented by a number that is stored in the global variable intPOI.
When the Flung event is triggered, it passes some values to the event handler. The one that is important for now is the xvel value, which tells us in which direction and velocity the user flunged. If xvel is negative there was a flung from right to left, which can be interpreted as the next POI. If xvel is positive there was a flung from left ro right, which can be interpreted as the previous POI.
Complete the cnvPhoto.Flung event handler according to the picture below. Recognize the logic to set intPOI to the first or last POI when it is out of bounds, that is when it exceeds the list boundaries.
Finally, when a new intPOI has been calculated, the new POI can be shown by including a call to the prcShowPOI procedure, which you created earlier.
Another tutorial will explain the usage of the canvas component in detail.

Tutorial City Highlights by Sjaak Bosman - Rotterdam, The Netherlands – [email protected] - © 2016
Page 21 of 28
4. ADDING CONTENT
4.1. Data structure
The last step to make a fully functional app is to add the content. This can be achieved in many ways, which will be discussed in another tutorial. This app holds all the non textual content in media files and all textual content in lists.
In paragraph 3.2 you defined two global variables, one for each city: lstPOIBoston and lstPOIRotterdam. These variables must contain all the POI information for that city in two languages, English and Dutch.
The picture belows shows this data structure. The leftmost list, you can call it the city list, contains the lists for each language, which are the lists in the middle (in the picture below just one language list so far). This language list contains lists that holds the POI’s information (in the picture below just one POI list so far). The number of a slot represents the index in the list.
For this tutorial we included 4 POI’s in 2 languages for each city. For each POI you have to create a POI list. Click it into a slot of the middle language list. First create the complete data-structure for one language by creating 4 POI lists. Read the two hints below before you start.
Hint 1: To add a new item to the list, click on the little dark blue square in the uppler left corner of the make a list block. A mini editor will be displayed, from which you can drag an item into the list.
Tutorial City Highlights by Sjaak Bosman - Rotterdam, The Netherlands – [email protected] - © 2016
Page 22 of 28
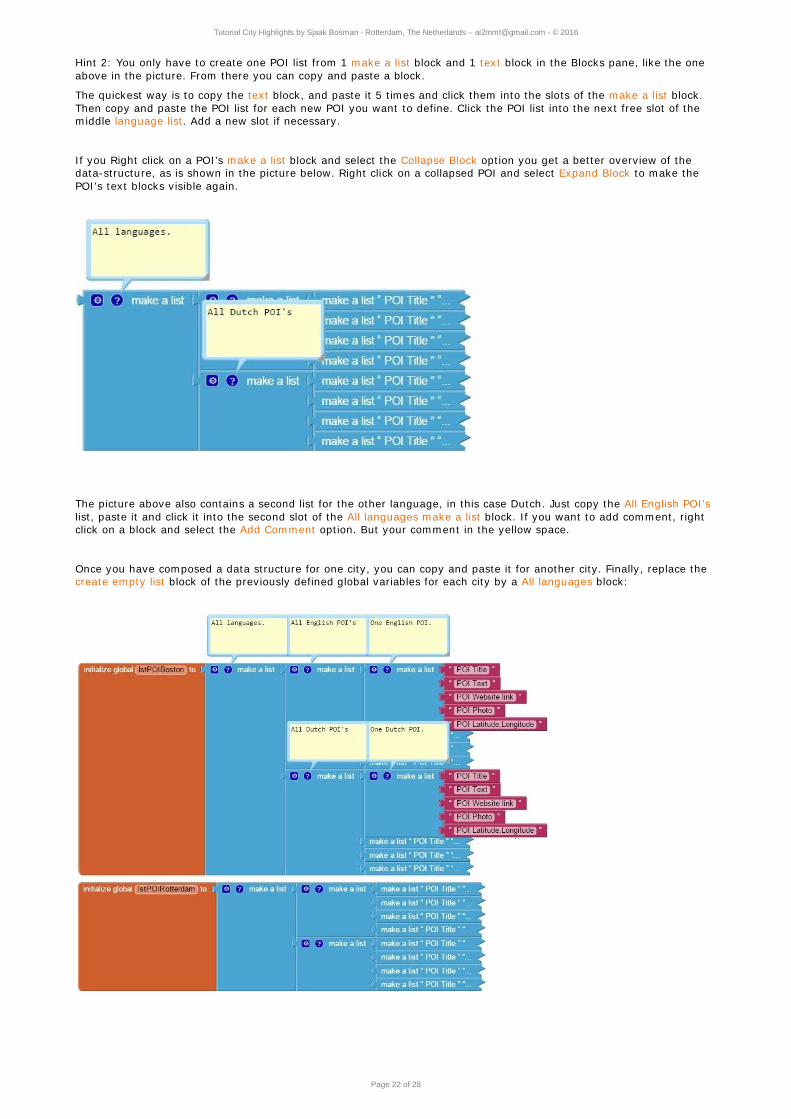
Hint 2: You only have to create one POI list from 1 make a list block and 1 text block in the Blocks pane, like the one above in the picture. From there you can copy and paste a block.
The quickest way is to copy the text block, and paste it 5 times and click them into the slots of the make a list block. Then copy and paste the POI list for each new POI you want to define. Click the POI list into the next free slot of the middle language list. Add a new slot if necessary.
If you Right click on a POI’s make a list block and select the Collapse Block option you get a better overview of the data-structure, as is shown in the picture below. Right click on a collapsed POI and select Expand Block to make the POI’s text blocks visible again.
The picture above also contains a second list for the other language, in this case Dutch. Just copy the All English POI’s list, paste it and click it into the second slot of the All languages make a list block. If you want to add comment, right click on a block and select the Add Comment option. But your comment in the yellow space.
Once you have composed a data structure for one city, you can copy and paste it for another city. Finally, replace the create empty list block of the previously defined global variables for each city by a All languages block:
Tutorial City Highlights by Sjaak Bosman - Rotterdam, The Netherlands – [email protected] - © 2016
Page 23 of 28
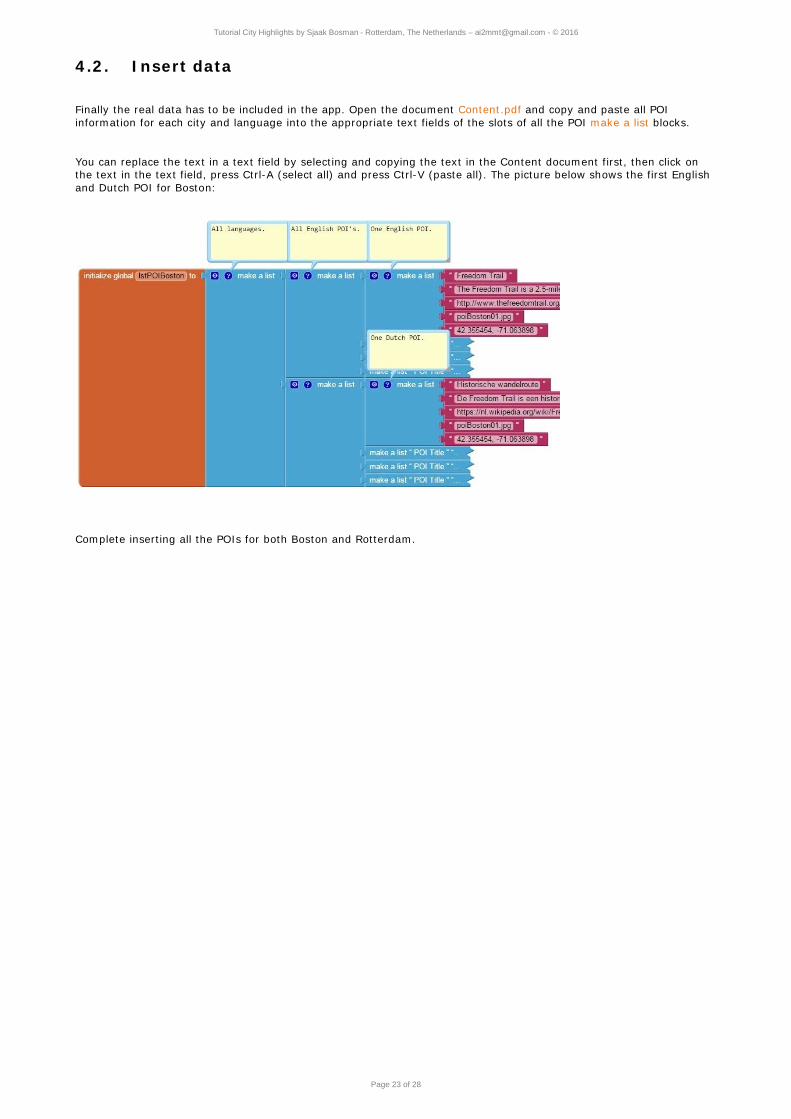
4.2. Insert data
Finally the real data has to be included in the app. Open the document Content.pdf and copy and paste all POI information for each city and language into the appropriate text fields of the slots of all the POI make a list blocks.
You can replace the text in a text field by selecting and copying the text in the Content document first, then click on the text in the text field, press Ctrl-A (select all) and press Ctrl-V (paste all). The picture below shows the first English and Dutch POI for Boston:
Complete inserting all the POIs for both Boston and Rotterdam.
Tutorial City Highlights by Sjaak Bosman - Rotterdam, The Netherlands – [email protected] - © 2016
Page 24 of 28
5. TEST THE APP SO FAR.
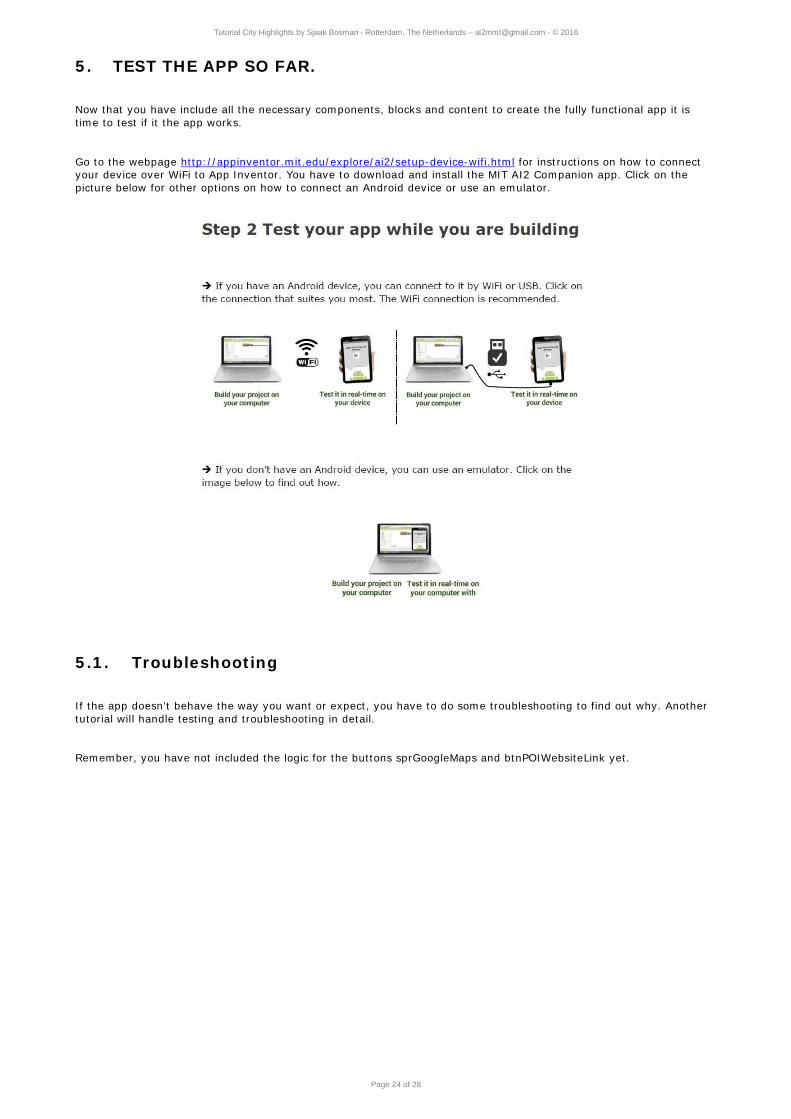
Now that you have include all the necessary components, blocks and content to create the fully functional app it is time to test if it the app works.
Go to the webpage http://appinventor.mit.edu/explore/ai2/setup-device-wifi.html for instructions on how to connect your device over WiFi to App Inventor. You have to download and install the MIT AI2 Companion app. Click on the picture below for other options on how to connect an Android device or use an emulator.
5.1. Troubleshooting
If the app doesn’t behave the way you want or expect, you have to do some troubleshooting to find out why. Another tutorial will handle testing and troubleshooting in detail.
Remember, you have not included the logic for the buttons sprGoogleMaps and btnPOIWebsiteLink yet.

Tutorial City Highlights by Sjaak Bosman - Rotterdam, The Netherlands – [email protected] - © 2016
Page 25 of 28
6. EMBELLISH YOUR APP
6.1. Website link
If there was a website link specified for the POI, it was placed in the Text property of the label lblPOIWebsiteLink (check out paragraph 3.3 for the details).
Find and insert the btnPOIWebsiteLink.Click event handler and complete it according to the picture below.
The DataUri property must be set to the POI’s website link. The browser on the device will be started by the cmpPOIWebsiteLink.StartActivity procedure, and the requested page will be shown.
6.2. Google Maps
While designing the user interface, you included a Google Maps icon into the canvas. By tapping this ImageSprite, which acts as a button, the app will fire Google Maps on your device and show de location of the POI.
If the current location is known to the device (when the location service is enabled) Google Maps will show the walking route from your location to the POI.
Getting the location of the POI or the route from the device’s location to the POI requires a different URL to pass to Google Maps. Like the btnPOIWebsiteLink code, the URL to pass to Google Maps must be specified in the DataUri property of the activity starter, in this case cmpGoogleMaps.
This tutorial doesn’t explain details of the Google Maps URL.
Add a new global variable and name it strPOILatitudeLongitude. This variable wil hold the POI’s location. Modify the prcPOIShowPOI procedure according to the picture below. The segment slot of the replace all text block contains a single space. The replacement slot text block is empty. By doing so all spaces, if there are any, are being removed from the coordinate.

Tutorial City Highlights by Sjaak Bosman - Rotterdam, The Netherlands – [email protected] - © 2016
Page 26 of 28
Complete the sprGoogleMaps.Touched event handler according to the picture below. Due to local settings of the device (some countries like The Netherlands use a decimal comma instead of a decimal point) the latitude and longitude that are returned by the cmpLocation component must be modified so that a decimal comma will be replaced by a decimal point.

Tutorial City Highlights by Sjaak Bosman - Rotterdam, The Netherlands – [email protected] - © 2016
Page 27 of 28
7. VARIATIONS
7.1. TextToSpeech
Add a TextToSpeech component to your app that will speak out the title of the POI. Take care of the appropriate language in which the title must be spoken.
7.2. Single unique POI information
In the data structure the POI contains language independent information such as the filename of the photograph and the location. Modify the data structure so that language independent information only will be stored once.
7.3. Replace the Dutch language with your own language
Why not include your own language? Find out which components have to be changed.
7.4. Replace Rotterdam with your own city.
Why not include your own city? Find out which components have to be changed.
Tutorial City Highlights by Sjaak Bosman - Rotterdam, The Netherlands – [email protected] - © 2016
Page 28 of 28
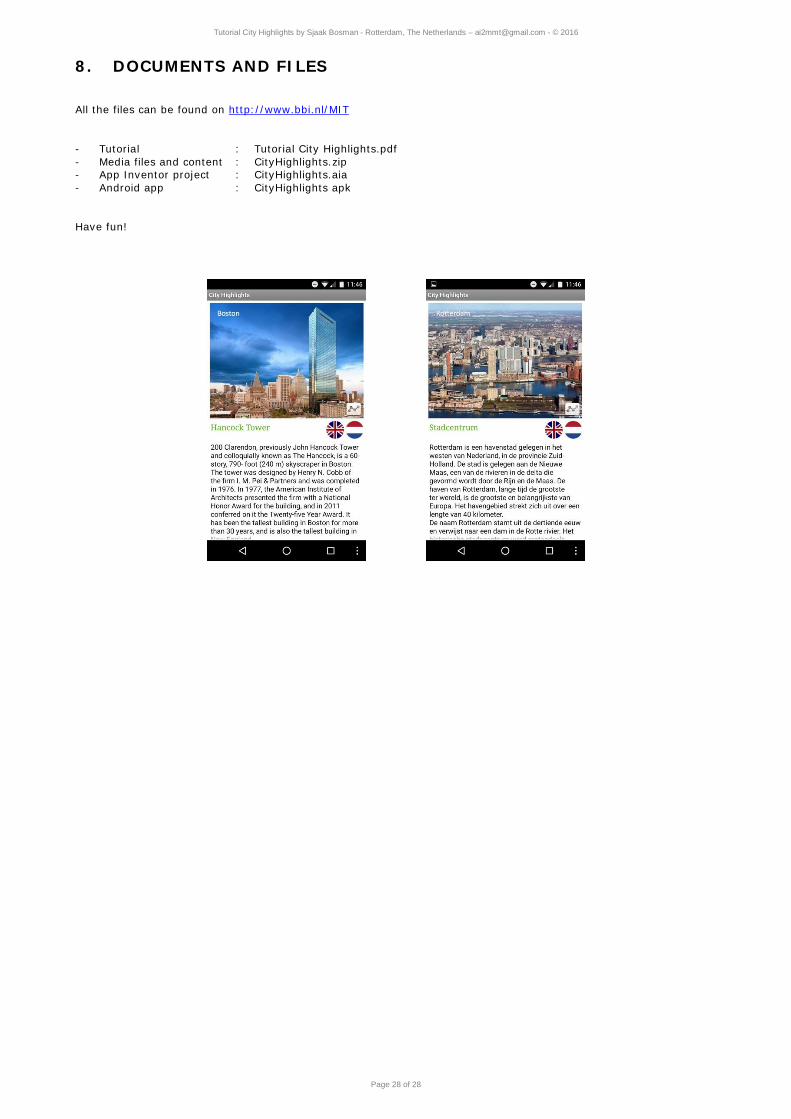
8. DOCUMENTS AND FILES
All the files can be found on http://www.bbi.nl/MIT
- Tutorial : Tutorial City Highlights.pdf - Media files and content : CityHighlights.zip - App Inventor project : CityHighlights.aia - Android app : CityHighlights apk
Have fun!