
Triathlon Knee System Surgical Protocol...Triathlon Knee System Surgical Protocol Femoral...
46
Triathlon ® Knee System Surgical Protocol Posterior Stabilized & Cruciate Retaining Posterior Stabilized & Cruciate Retaining This document is intended to be used by healthcare professionals only.
Transcript of Triathlon Knee System Surgical Protocol...Triathlon Knee System Surgical Protocol Femoral...

Triathlon®
Knee System Surgical Protocol
Posterior Stabilized & Cruciate Retaining
Posterior Stabilized & Cruciate Retaining
This document is intended to be used by healthcare professionals only.


Indications . . . . . . . . . . . . . . . . . . . . . . . . . . . . . . . . . . . . . . . . . . . . . . . . . . . . . . . . . . . . .2Exposure . . . . . . . . . . . . . . . . . . . . . . . . . . . . . . . . . . . . . . . . . . . . . . . . . . . . . . . . . . . . . . .4Femoral Preparation . . . . . . . . . . . . . . . . . . . . . . . . . . . . . . . . . . . . . . . . . . . . . . . . . . . . .4
Femoral Intramedullary Alignment . . . . . . . . . . . . . . . . . . . . . . . . . . . . . . . . . . . . . . . . 4Femoral Sizing . . . . . . . . . . . . . . . . . . . . . . . . . . . . . . . . . . . . . . . . . . . . . . . . . . . . . . . . . . 6Femoral Anterior, Posterior, and Chamfer Resections . . . . . . . . . . . . . . . . . . . . . . . . 8
PS Box Preparation . . . . . . . . . . . . . . . . . . . . . . . . . . . . . . . . . . . . . . . . . . . . . . . . . . . . . .9Femoral Trial Assessment . . . . . . . . . . . . . . . . . . . . . . . . . . . . . . . . . . . . . . . . . . . . . . . 14
Tibial Preparation . . . . . . . . . . . . . . . . . . . . . . . . . . . . . . . . . . . . . . . . . . . . . . . . . . . . 16Option 1 – Extramedullary Referencing . . . . . . . . . . . . . . . . . . . . . . . . . . . . . . . . . . . 16Flexion/Extension Alignment . . . . . . . . . . . . . . . . . . . . . . . . . . . . . . . . . . . . . . . . . . . . 16Varus/Valgus Alignment . . . . . . . . . . . . . . . . . . . . . . . . . . . . . . . . . . . . . . . . . . . . . . . . 17Tibial Slope Adjustment . . . . . . . . . . . . . . . . . . . . . . . . . . . . . . . . . . . . . . . . . . . . . . . . . 17Rotational Alignment . . . . . . . . . . . . . . . . . . . . . . . . . . . . . . . . . . . . . . . . . . . . . . . . . . . 17Option 2 – Intramedullary Referencing . . . . . . . . . . . . . . . . . . . . . . . . . . . . . . . . . . . . 18Rotational Alignment . . . . . . . . . . . . . . . . . . . . . . . . . . . . . . . . . . . . . . . . . . . . . . . . . . . 18Varus/Valgus Alignment . . . . . . . . . . . . . . . . . . . . . . . . . . . . . . . . . . . . . . . . . . . . . . . . 19Establish Tibial Resection Level . . . . . . . . . . . . . . . . . . . . . . . . . . . . . . . . . . . . . . . . . . 20Tibial Resection . . . . . . . . . . . . . . . . . . . . . . . . . . . . . . . . . . . . . . . . . . . . . . . . . . . . . . . . 20Tibial Component Sizing . . . . . . . . . . . . . . . . . . . . . . . . . . . . . . . . . . . . . . . . . . . . . . . . 21Tibial Keel Punching . . . . . . . . . . . . . . . . . . . . . . . . . . . . . . . . . . . . . . . . . . . . . . . . . . . . 22
Patellar Preparation . . . . . . . . . . . . . . . . . . . . . . . . . . . . . . . . . . . . . . . . . . . . . . . . . . . 24Trial Assessment . . . . . . . . . . . . . . . . . . . . . . . . . . . . . . . . . . . . . . . . . . . . . . . . . . . . . . . 24
Component Implantation . . . . . . . . . . . . . . . . . . . . . . . . . . . . . . . . . . . . . . . . . . . . . . 25Femoral Component - Cemented/Cementless . . . . . . . . . . . . . . . . . . . . . . . . . . . . . . 25Primary Tibial Baseplate - Cemented/Cementless . . . . . . . . . . . . . . . . . . . . . . . . . . . 26Tibial Insert . . . . . . . . . . . . . . . . . . . . . . . . . . . . . . . . . . . . . . . . . . . . . . . . . . . . . . . . . . . 26Patellar Component - Cemented/Cementless . . . . . . . . . . . . . . . . . . . . . . . . . . . . . . . 26
Closure . . . . . . . . . . . . . . . . . . . . . . . . . . . . . . . . . . . . . . . . . . . . . . . . . . . . . . . . . . . . . . 27Catalog . . . . . . . . . . . . . . . . . . . . . . . . . . . . . . . . . . . . . . . . . . . . . . . . . . . . . . . . . . . . . . . 28
Triathlon Knee System Surgical Protocol
AcknowledgmentsStryker Orthopaedics wishes to thank the global Triathlon Knee System Surgeon Panel for their dedication to the development and refinement of the Triathlon Knee System and instrumentation.

Triathlon Knee System Surgical Protocol
IndicationsGeneral Total Knee Arthroplasty (TKA) Indications include:• Painful, disabling joint disease of the knee resulting
from: non-inflammatory degenerative joint disease (including osteoarthritis, traumatic arthritis or avascular necrosis) rheumatoid arthritis or post-traumatic arthritis.
• Post-traumatic loss of knee joint configuration and function.
• Moderate varus, valgus, or flexion deformity in which the ligamentous structures can be returned to adequate function and stability.
• Revision of previous unsuccessful knee replacement or other procedure.
• Fracture of the distal femur and/or proximal tibia that cannot be stabilized by standard fracture management techniques.
Additional Indications for Posterior Stabilized (PS) Components:• Ligamentous instability requiring implant bearing
surface geometries with increased constraint.• Absent or non-functioning posterior cruciate ligament.• Severe anteroposterior instability of the knee joint.
The Triathlon Total Knee System beaded and beaded with Peri-Apatite components are intended for uncemented use only.
The Triathlon Tritanium Tibial Baseplate and Tritanium Metal-Backed Patella components are indicated for both uncemented and cemented use.
Contraindications• Any active or suspected latent infection in or about the
knee joint.• Distant foci of infection which may cause hematogenous
spread to the implant site.• Any mental or neuromuscular disorder which would
create an unacceptable risk of prosthesis instability, prosthesis fixation failure, or complications in post-operative care.
• Bone stock compromised by disease, infection or prior implantation which cannot provide adequate support and/or fixation to the prosthesis.
• Skeletal immaturity.• Severe instability of the knee joint secondary to the
absence of collateral ligament integrity and function.
See package insert for warnings, precautions, adverse effects, information for patients and other essential product information. Before using Triathlon instrumentation, verify:• Instruments have been properly disassembled prior to
cleaning and sterilization;• Instruments have been properly assembled post-
sterilization;• Instruments have maintained design integrity; and,• Proper size configurations are available. For Instructions for Cleaning, Sterilization, Inspection and Maintenance of Orthopaedic Medical Devices, refer to LSTPI-B.
2

SurgicalProcedure

Figure 1
Figure 2
Figure 3
Exposure
> A standard anterior mid-line incision is utilized. Any previous incision can be used or incorporated to decrease the risk of skin slough.
> The capsule is entered through a medial parapatellar approach.
4
Femoral PreparationFemoral Intramedullary Alignment> The Universal Driver allows for attachment of
all drills and pins. The Universal Driver may be attached directly to a reamer, drill, or a Jacob’s Chuck.
> Locate the IM drill hole. It is approximately 1cm anterior to the femoral attachment of the posterior cruciate ligament and slightly medial to the mid-line of the distal femur.
> Attach the 3/8” IM Drill to the Universal Driver and drill into the IM canal. The first diameter will create a tight fit around the IM Rod. If further clearance is desired, continue to drill until the larger step diameter opens the hole.
> Attach the T-Handle Driver to the 5/16” IM Rod. Insert the IM Rod into the Femoral Alignment Guide. The Femoral Alignment Guide is designed for use on either the left or right knee and may be set to 5, 6 or 7º of valgus. Set the instrument to the desired angle by pulling back on the black knob of the Femoral Alignment Guide and placing it in the appropriate notch. Advance the rod, with attached guide, slowly up the IM canal until the desired depth is reached.
Triathlon Knee System Surgical Protocol
Fem
ora
lP
repara
tion

6541-4-801Universal Driver
6541-4-5383/8” IM Drill
6541-4-800T-Handle Driver
Figure 4
Instrument Bar
5
> Snap the Universal Resection Guide onto the Adjustment Block and insert the posts of the Adjustment Block into the two holes in the Femoral Alignment Guide.
> Place the Femoral Alignment Guide in contact with the more prominent distal femoral condyle and align the guide in neutral position.
> Impact the distal captured pins in the Femoral Alignment Guide to aid in stabilization.
Note: Impacting a distal capture pin that does not make contact with the femoral condyle may result in a change in the alignment setting.
> Pin the Distal Resection Guide to the anterior femur.
Fem
ora
lP
repara
tionButton
UniversalResectionGuide
AdjustmentBlock
6541-4-5165/16” IM Rod
6541-1-657Femoral Alignment Guide
6541-1-600Adjustment Block
6541-1-721Universal Resection Guide

Figure 5
Figure 6
Figure 7
> After the Universal Resection Guide is pinned in place, remove the IM Rod. The Femoral Alignment Guide and the Adjustment Block may be removed by squeezing the black tabs on the Adjustment Block.
> The distal femoral resection is made. An optional Modular Capture - may be attached to the Universal Resection Guide. Squeeze the black tabs on the Modular Capture - Distal Resection to insert into the Universal Resection Guide. When using a modular capture, a .050” (1.25mm) blade is used.
> Remove the Modular Capture and check the resection for flatness. Remove the Universal Resection Guide.
> The Adjustment Block allows for an 8mm (the distal thickness of the femoral component) and 10mm (used to aid in the correction of a flexion contracture) resection level. Press the black button on the end of the Adjustment Block and pull to set the resection to the desired level.
> Pin the Universal Resection Guide to the anterior femur.
Note: If the medial “O” pin hole is too close to the edge of the bone (on smaller femurs), use the holes marked “2” which are closer to the center of the bone.
Femoral Sizing> Assemble the Femoral Sizer with the Femoral Stylus
in the appropriate lateral hole, setting the stylus length to an approximate size. Set the rotation to “LEFT” for a left leg and “RIGHT” for a right leg and adjust to the desired amount of external rotation.
> A secondary rotational check can be made by lining up the epicondyles with the reference lines marked “EPI”. A tertiary check is to assess Whiteside’s line with a pin through the hole in the top of the guide.
> In the event of a hypoplastic femoral condyle: Pin the Femoral Sizer through the EPI hole on the unaffected side for stability. Rotate the Femoral Sizer and assess rotation using the rotational checks mentioned above.
Triathlon Knee System Surgical Protocol
Fem
ora
lP
repara
tion
Button
Hole for Pinto Reference Whiteside’s Line
“EPI” Line Indicator
6

6541-1-600Adjustment Block
6541-1-657Femoral Alignment Guide
Figure 8
Instrument Bar
7
> Position the assembly flush on the resected distal femur, sliding the feet of the Femoral Sizer under the posterior condyles. The Femoral Stylus point should be placed on the lateral cortex.
> It is important that the Femoral Stylus point rest on bone and not on soft tissue.
Fem
ora
lP
repara
tion
Figure 9
> The size is determined by the position of the scribe mark on the Femoral Stylus shaft within the sizing window.
6541-4-806Universal Alignment Handle
6541-4-602Universal Alignment Rods
6541-1-721Universal Resection Guide
6541-1-723Modular Capture - Distal Resection
6541-4-003Headless Pins - 3”
6541-1-603Femoral Sizer
6541-1-605Femoral Stylus

Figure 10
Figure 11
Figure 12
> It is recommended that the anterior resection level be checked to further confirm the correct size by sliding a Bladerunner through the sizing guide’s size-specific anterior slots and assessing the resection.
> Once size confirmation is complete, attach the 1/8” Peg Drill to the Universal Driver and create fixation pin-holes (for the 4:1 Cutting Block) through the holes on the face of the Femoral Sizer marked “EPI”.
> Locate the fixation pegs of the appropriate size Express 4:1 Cutting Block into the pin holes created on the distal femur.
Note: Check run-out of the anterior cut. If there is a pronounced positive step, consider selecting the next smaller size 4:1 Cutting Block if the anterior femur preparation is not adequate.
Femoral Anterior, Posterior and Chamfer Resections> Complete the remaining four femoral bone
resections.
> The use of a .050” (1.25mm) thick sawblade is recommended.
> The order of bone resections is not critical; however, a recommended sequence for improved stability of the 4:1 Cutting Block is:
1. Anterior cortex.
2. Posterior condyles. 3. Posterior chamfer. 4. Anterior chamfer.
Note: Cutting the anterior chamfer later helps stabilize the cutting guide.
> Remove the 4:1 Cutting Block.
Triathlon Knee System Surgical Protocol
Fem
ora
lP
repara
tion
8
6541-1-603Femoral Sizer
6541-1-605Femoral Stylus
Instrument Bar
9
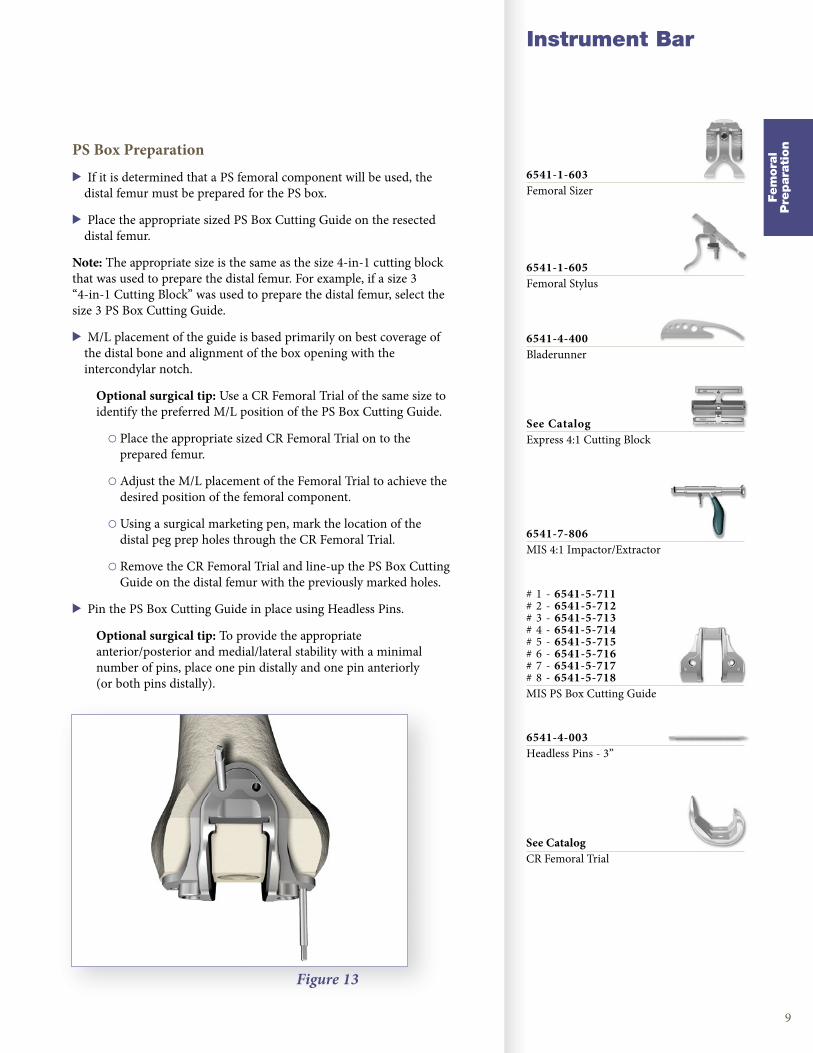
Figure 13
PS Box Preparation
> If it is determined that a PS femoral component will be used, the distal femur must be prepared for the PS box.
> Place the appropriate sized PS Box Cutting Guide on the resected distal femur.
Note: The appropriate size is the same as the size 4-in-1 cutting block that was used to prepare the distal femur. For example, if a size 3 “4-in-1 Cutting Block” was used to prepare the distal femur, select the size 3 PS Box Cutting Guide.
> M/L placement of the guide is based primarily on best coverage of the distal bone and alignment of the box opening with the intercondylar notch.
Optional surgical tip: Use a CR Femoral Trial of the same size to identify the preferred M/L position of the PS Box Cutting Guide.
@ Place the appropriate sized CR Femoral Trial on to the prepared femur.
@ Adjust the M/L placement of the Femoral Trial to achieve the desired position of the femoral component.
@ Using a surgical marketing pen, mark the location of the distal peg prep holes through the CR Femoral Trial.
@ Remove the CR Femoral Trial and line-up the PS Box Cutting Guide on the distal femur with the previously marked holes.
> Pin the PS Box Cutting Guide in place using Headless Pins.
Optional surgical tip: To provide the appropriate anterior/posterior and medial/lateral stability with a minimal number of pins, place one pin distally and one pin anteriorly (or both pins distally).
Fem
ora
lP
repara
tion
6541-4-400Bladerunner
See CatalogExpress 4:1 Cutting Block
6541-7-806MIS 4:1 Impactor/Extractor
# 1 - 6541-5-711# 2 - 6541-5-712# 3 - 6541-5-713# 4 - 6541-5-714# 5 - 6541-5-715# 6 - 6541-5-716# 7 - 6541-5-717# 8 - 6541-5-718MIS PS Box Cutting Guide
6541-4-003Headless Pins - 3”
See CatalogCR Femoral Trial
Triathlon Knee System Surgical Protocol
Figure 15
Figure 14
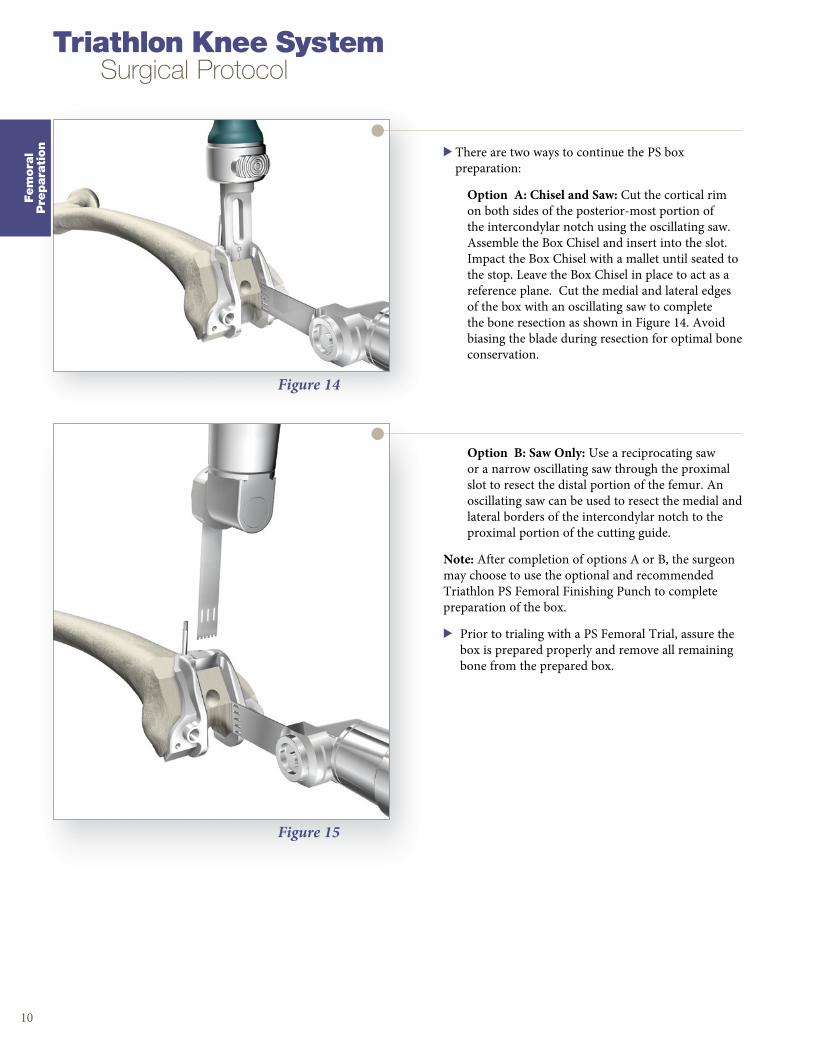
> There are two ways to continue the PS box preparation:
Option A: Chisel and Saw: Cut the cortical rim on both sides of the posterior-most portion of the intercondylar notch using the oscillating saw. Assemble the Box Chisel and insert into the slot. Impact the Box Chisel with a mallet until seated to the stop. Leave the Box Chisel in place to act as a reference plane. Cut the medial and lateral edges of the box with an oscillating saw to complete the bone resection as shown in Figure 14. Avoid biasing the blade during resection for optimal bone conservation.
Fem
ora
lP
repara
tion
Option B: Saw Only: Use a reciprocating saw or a narrow oscillating saw through the proximal slot to resect the distal portion of the femur. An oscillating saw can be used to resect the medial and lateral borders of the intercondylar notch to the proximal portion of the cutting guide.
Note: After completion of options A or B, the surgeon may choose to use the optional and recommended Triathlon PS Femoral Finishing Punch to complete preparation of the box.
> Prior to trialing with a PS Femoral Trial, assure the box is prepared properly and remove all remaining bone from the prepared box.
10

11
Figure 17
Instrument Bar
If the optional Triathlon PS Femoral Box Finishing Punch is chosen:
> The chisel should be fully removed from the PS Box Cutting Guide prior to using the Triathlon PS Femoral Box Finishing Punch.
> Secure the appropriate size Triathlon PS Femoral Box Finishing Punch to the Triathlon Impaction Handle. There are four Triathlon PS Femoral Box Finishing Punches (Size 1-2, Size 3-4, Size 5-6 and Size 7-8).
> Properly orient the Triathlon PS Femoral Box Finishing Punch, assuring the anterior side is facing upwards.
> Impact the Triathlon PS Femoral Box Finishing Punch through the PS Box Cutting Guide until properly seated. The Triathlon PS Femoral Box Finishing Punch is properly seated when the stop of the Finishing Punch is centered over the PS Box Cutting Guide drill holes. See Figures 17 & 18, which depicts the Triathlon PS Femoral Box Finishing Punch properly seated on the PS Box Cutting Guide. There should be a gap between the anterior nose of the Triathlon PS Femoral Box Finishing Punch and the PS Box Cutting Guide.
Fem
ora
lP
repara
tion
# 1 - 6541-5-711# 2 - 6541-5-712# 3 - 6541-5-713# 4 - 6541-5-714# 5 - 6541-5-715# 6 - 6541-5-716# 7 - 6541-5-717# 8 - 6541-5-718MIS PS Box Cutting Guide
6541-4-810Impaction Handle
6541-4-709Box Chisel
See CatalogTriathlon PS Femoral Box Finishing Punch
Figure 16
See CatalogPS Femoral Trial

Triathlon Knee System Surgical Protocol
Figure 18
Figure 19
> Remove the Triathlon PS Femoral Box Finishing Punch with the Triathlon Slap Hammer.
> Remove pins and the PS Box Cutting Guide from the prepared distal femur.
Note: The Triathlon PS Femoral Box Finishing Punch is designed to be used with the PS Box Cutting Guide and should not be impacted onto the prepared distal femur without the PS Box Cutting Guide in place.
If the optional and recommended Triathlon PS Femoral Box Trial/Protector is chosen:
> Remove the PS Box Cutting Guide.
> Place by hand (not through impaction) the appropriate size Triathlon PS Femoral Box Trial/Protector into the prepared box to assure accuracy of the box preparation. There are two Triathlon PS Femoral Box Trial/Protectors (Size 1-4 and Size 5-8). See Figure 19 for proper orientation.
> The box trial/protector is fully seated when both the distal and posterior “wings” are flush with the bone.
Note: Triathlon PS Femoral Box Trial/Protector assesses the accuracy of M/L box width and box depth.
Fem
ora
lP
repara
tion
12

13
Instrument Bar
> To protect the prepared femoral box prior to trialing with a femoral component, place the Triathlon PS Femoral Box Trial/Protector into the prepared box by hand (not through impaction). Ensure the box trial is fully seated on the distal and posterior resections as described above in the box trialing step.
@ The Triathlon PS Femoral Box Trial/Protector features a slot in which a retractor can be placed to lever against the distal femur during tibial subluxation.
@ If preferred, select an extraction tool that fits into the retractor hole for ease of removal.
@ Remove the PS Femoral Box Trial/Protector prior to assembling and implanting the Triathlon PS femoral component.
Figure 20
Fem
ora
lP
repara
tion
6541-4-003Headless Pins - 3”
6541-4-801Universal Driver
6541-4-809Headless Pin Driver
6541-4-810Impaction Handle
See CatalogTriathlon PS Femoral Box Trial/Protector
See CatalogTriathlon PS Femoral Box Finishing Punch
# 1 - 6541-5-711# 2 - 6541-5-712# 3 - 6541-5-713# 4 - 6541-5-714# 5 - 6541-5-715# 6 - 6541-5-716# 7 - 6541-5-717# 8 - 6541-5-718MIS PS Box Cutting Guide

Figure 21
To avoid femoral component impingement and to improve flexion, all osteophytes beyond the posterior condyles as well as those medially and laterally may be removed with an osteotome.
Note: If it is difficult to reach the posterior osteophytes in a tight knee, the tibial resection can be made and then the osteophytes can more easily be removed.
Figure 22
Figure 23
Femoral Trial Assessment The remaining portion of the technique should be used for a Posterior Stabilized or Cruciate Retaining knee.
Assemble the appropriate size and side (Left/Right) PS or CR Femoral Trial to the Femoral Impactor/Extractor with the Impaction Handle.
Impact the PS or CR Femoral Trial onto the prepared distal femur. Use the Impaction Handle to ensure the Femoral Trial is aligned with the distal plane.
Remove the Femoral Impactor/Extractor and Impaction Handle and assess the fit of the PS or CR Femoral Trial. Care must be taken to ensure that all of the osteophytes beyond the end of the posterior condyles are removed.
Cruciate Retaining Knee: Attach the 1/4” Peg Drill to the Universal Driver and create the Modular Femoral Distal Fixation Peg holes. Attach the Posterior Osteophyte Removal Tool to the Impaction Handle and remove posterior osteophytes.
Posterior Stabilized Knee: If the Modular Femoral Distal Fixation Pegs are to be used, the location holes may be prepared at this stage using the 1/4” Peg Drill attached to the Universal Driver.
> The peg holes may also be prepared through the PS Box Cutting Guide.
14
Triathlon Knee System Surgical Protocol
Fem
ora
lP
repara
tion

15
Figure 24
> Attach the Femoral Impactor Extractor to the Slap Hammer and remove the PS or CR Femoral Trial from the femur.
Fem
ora
lP
repara
tion
6541-4-801Universal Driver
6541-4-809Headless Pin Driver
6541-4-810Impaction Handle
See CatalogCR Femoral Trial
6541-4-807Femoral Impactor/Extractor
6541-4-5251/4” Peg Drill
6541-4-803Slap Hammer
Instrument Bar
See CatalogPS Femoral Trial
6541-4-710Posterior Osteophyte Removal Tool

Figure 25
Figure 26
16
Tibial Preparation
> There are two options for tibial preparation: extra-medullary (EM) referencing alignment and intra-medullary (IM) referencing alignment.
> The Tibial Resection Guide, available in left and right configurations, and the Universal Resection Guide are designed to avoid soft tissue impingement.
Option 1 – Extramedullary Referencing> The tibial resection assembly has five parts: the
appropriate Tibial Resection Guide, the Ankle Clamp, the Distal Assembly, the Proximal Rod and the Tibial Adjustment Housing. These are assembled first.
Note: The Tibial Adjustment Housing is available in 0° slope (optional) and 3° slope.
Flexion/Extension Alignment> Place the ankle clamp around the ankle and unlock
the locking switch.
> Flexion/Extension alignment is correct when the long axis of the assembly parallels the mid-coronal plane of the tibia. Flexion/Extension alignment can be checked by verifying that the long axis of the assembly is parallel to the tibia.
Triathlon Knee System Surgical Protocol
Tib
ial
Pre
para
tion
FixationPin
(6541-2-611 Proximal Rod Shown)
LockingSwitch

Right 6541-2-700Left 6541-2-701Tibial Resection Guide
Figure 27
Instrument Bar
17
Varus/Valgus Alignment> Medial/Lateral offset can be adjusted by pushing the
bronze button (1) and sliding the assembly medially until the shaft intersects the center of the tibia.
> Once triaxial alignment is achieved, release the bronze button.
Tibial Slope AdjustmentNote: If the Proximal Rod is parallel to the tibia, the slope is 0° or 3° depending on which Tibial Adjustment Housing is used.> Tibial slope can be adjusted by pressing the bronze
button (2).
Rotational Alignment> Rotate the entire assembly to ensure that the base
of the assembly is aligned with the center of the ankle. The center of the ankle is generally in line with the second metatarsal.
Once alignment is confirmed, set the bronze locking switch on the Distal Assembly to the locked position.
Tib
ial
Pre
para
tion
1
2
0º slope 6541-2-7043º slope 6541-2-705Tibial Adjustment Housing
6541-2-609Tibial Alignment Ankle Clamp EM
6541-2-611Tibial Alignment Proximal Rod EM
6541-2-610Tibial Alignment Distal Assembly EM
6541-2-611EExpress Proximal Rod EM

Figure 28
Figure 29
Figure 30
Option 2 – Intramedullary Referencing> Attach the 3/8” IM Drill to the Universal Driver and
create a hole in the location determined by the pre-operative X-rays.
18
> Attach the T-Handle Driver to the 5/16” IM Rod and slowly pass into the canal, ensuring clearance. Remove the 5/16” IM Rod and insert it into the body of the Tibial Alignment Jig IM. The assembly is then inserted into the canal beyond the isthmus.
Rotational Alignment With the body of the Tibial Alignment Jig IM rest-ing on the proximal tibia, proper rotational alignment is achieved by rotating the instrument about the 5/16” IM Rod so that the vertical mounting bar is over the medial 1/3 of the tibial tubercle. A Headless Pin or the 1/8” Drill are then inserted into the fixation hole to fix rotation (See Inset).
Triathlon Knee System Surgical Protocol
Tib
ial
Pre
para
tion
FixationHole
MountingBar

6541-4-5383/8” IM Drill
6541-4-800T-Handle Driver
6541-4-5165/16” IM Rod
6541-2-600Tibial Alignment Jig IM
6541-4-801Universal Driver
Figure 31
Instrument Bar
19
Varus/Valgus Alignment > Assemble the appropriate Tibial Resection Guide
(left, right or Universal Resection Guide) on the Tibial Adjustment Housing.
Note: The Tibial Adjustment Housing is available in 0° slope (optional) and 3° slope.> Attach the assembly onto the mounting bar by
pressing the bronze wheel on the Tibial Adjustment Housing. Attach the Universal Alignment Handle to the Tibial Resection Guide and slide a Universal Alignment Rod through the handle for sagittal assessment.
> When alignment is confirmed, the Universal Alignment Handle should be centered over the ankle.
Tib
ial
Pre
para
tion
0º slope 6541-2-7043º slope 6541-2-705Tibial Adjustment Housing
Right 6541-2-700Left 6541-2-701Tibial Resection Guide
6541-4-602Universal Alignment Rods
6541-1-721Universal Resection Guide
( Tibial Resection Guide shown)
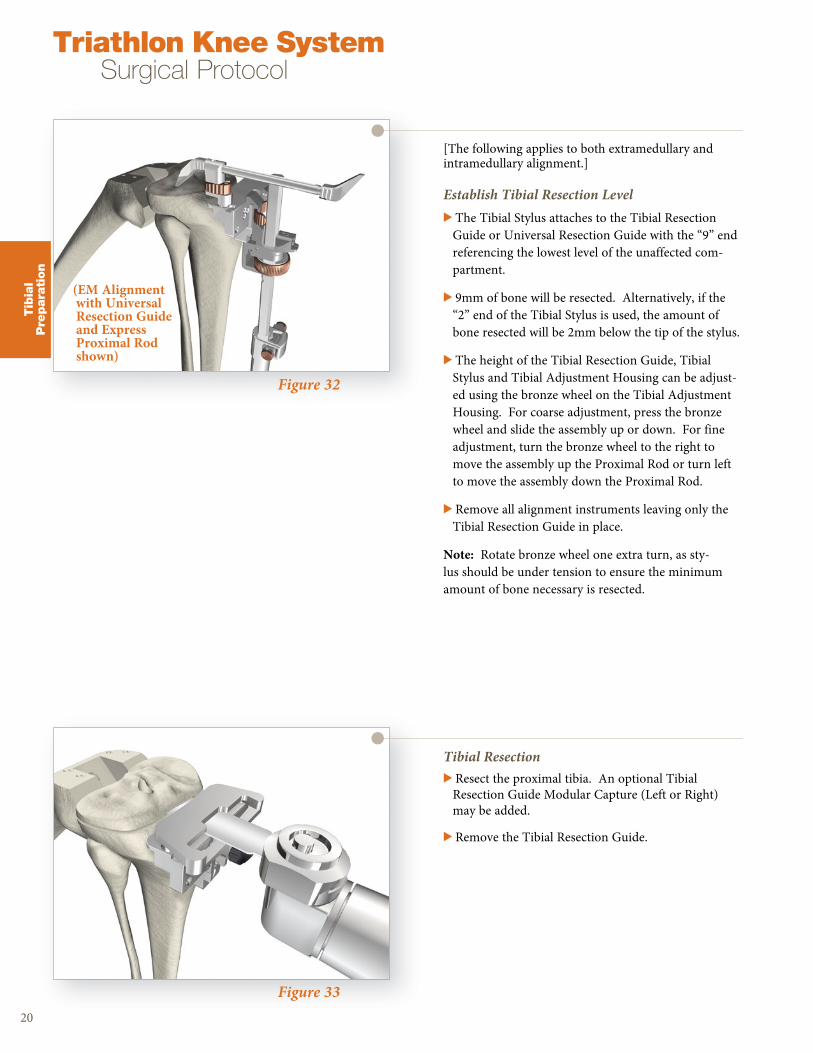
Figure 32
Figure 33
[The following applies to both extramedullary and intramedullary alignment.]
Establish Tibial Resection Level > The Tibial Stylus attaches to the Tibial Resection
Guide or Universal Resection Guide with the “9” end referencing the lowest level of the unaffected com-partment.
> 9mm of bone will be resected. Alternatively, if the “2” end of the Tibial Stylus is used, the amount of bone resected will be 2mm below the tip of the stylus.
> The height of the Tibial Resection Guide, Tibial Stylus and Tibial Adjustment Housing can be adjust-ed using the bronze wheel on the Tibial Adjustment Housing. For coarse adjustment, press the bronze wheel and slide the assembly up or down. For fine adjustment, turn the bronze wheel to the right to move the assembly up the Proximal Rod or turn left to move the assembly down the Proximal Rod.
> Remove all alignment instruments leaving only the Tibial Resection Guide in place.
Note: Rotate bronze wheel one extra turn, as sty-lus should be under tension to ensure the minimum amount of bone necessary is resected.
20
Tibial Resection> Resect the proximal tibia. An optional Tibial
Resection Guide Modular Capture (Left or Right) may be added.
> Remove the Tibial Resection Guide.
Triathlon Knee System Surgical Protocol
Tib
ial
Pre
para
tion
( EM Alignment with Universal Resection Guide and Express Proximal Rod shown)

Figure 34
Instrument Bar
21
Tibial Component Sizing> The Tibial Alignment Handle, Universal Tibial Template,
and Tibial Insert Trial are used to size the tibia, perform a trial reduction, and assess overall component fit, ligament stability and joint range of motion.
> Once the surgeon has determined alignment, the Universal Tibial Template has multiple pin-holes that can be used to secure the template in the desired position.
> If Headed Nails are placed in the anterior-vertical pin-holes (applicable only to sizes 3, 4, 5, 6, 7 and 8) of the Universal Tibial Template, ensure that the Tibial Insert Trial is inserted posterior to the Headed Nails.
Note: Do not impact the Tibial Insert Trial. In the event that excessive resistance is encountered during insertion of the Tibial Insert Trial, remove, reposition, and reinsert the Tibial Insert Trial. Ensure all excess debris (bone and soft tissue) is cleared from the Universal Tibial Template.
> After trial reduction, the Tibial Insert Trial can be removed by hand or with the aid of a blunt instrument.
Tib
ial
Pre
para
tion
6541-2-611EExpress Proximal Rod EM
0º slope 6541-2-7043º slope 6541-2-705Tibial Adjustment Housing
Right 6541-2-700Left 6541-2-701Tibial Resection Guide
6541-2-611Tibial Alignment Proximal Rod EM
6541-4-806Universal Alignment Handle
6541-2-429Tibial Stylus
6541-1-721Universal Resection Guide
Right 6541-2-702Left 6541-2-703Tibial Resection Guide Modular Capture
6541-1-723Modular Capture - Distal Resection
See CatalogCR & PS Tibial Insert Trials
See CatalogUniversal Tibial Template
See CatalogCR & PS Femoral Trials
Anterior Pin-holes
Anterior Pin-holes
Anterior Vertical Pin-holes
Size 1 & 2
Size 3–8
Posterior

Figure 35
Figure 36
22
Triathlon Knee System Surgical Protocol
Tib
ial
Pre
para
tion
Tibial Keel Punching> Assemble the Keel Punch Guide to the Universal
Tibial Template by inserting at a slight angle to the top of the Universal Tibial Template (into the two locating slots toward the posterior portion of the Universal Tibial Template). Allow the Keel Punch Guide to sit flat on the Universal Tibial Template and push forward on the handle to lock the Keel Punch Guide to the Universal Tibial Template.
Lock

See CatalogUniversal Tibial Template
See CatalogCR & PS Femoral Trials
6541-4-003Headless Pins - 3”
6541-4-809Headless Pin Driver
6541-4-801Universal Driver
Size 1, 2, 3 - 6541-2-713Size 4, 5, 6, 7, 8 - 6541-2-748Keel Punch Guide
6541-4-804Headless Pin Extractor
See CatalogKeel Punch
Figure 37
Instrument Bar
23
> Place the appropriate Keel Punch into the Keel Punch Guide. Use a mallet to impact the Keel Punch. Advance the Keel Punch until it seats fully in the Keel Punch Guide. In sclerotic bone, the use of a saw prior to the Keel Punch may be advisable.
Tib
ial
Pre
para
tion
Figure 38
> To extract the Keel Punch, lift up on the Keel Punch Guide handle and pull the handle to cantilever the Keel Punch out of the tibia.
> Remove the Headless Pins with the Headless Pin Extractor and remove the Universal Tibial Template.

Trial Assessment> Remove any residual cartilage and wash away all
debris. Place correct size Patella Trial (Symmetric or Asymmetric) onto the prepared patella.
> Replace all Trials and assess patellar tracking by taking the knee through a ROM. The patella should track normally throughout the ROM without tendency for tilting or lateral subluxation.
Figure 39
Figure 40
Figure 41
Patellar Preparation
Remove all osteophytes and synovial insertions around the patella, and measure thickness using a caliper. After determining the depth of the cut with a caliper, affix the stylus in the appropriate slot to the patella resection guide, and capture the patella between the jaws of the saw guide. Using .050” non-offset sawblade, resect the patella.
24
> Choose the appropriate size patella template and insert into the Patella Clamp.
> Center the chosen patellar drill guide over the patella with the clamp perpendicular to the trochlear groove. Drill three fixation holes with the appropriate drill (Metal-backed patella or All Poly).
> If a cemented component is to be used, prepare the resected bone surfaces for bone cement application.
Triathlon Knee System Surgical Protocol
Pate
lla
Pre
para
tion
Com
ponent
Impla
nta
tion

See CatalogSymmetric & Asymmetric Patella Trials
6541-4-810Impaction Handle
6541-4-807Femoral Impactor/Extractor
6541-3-524All-Poly Patella Drill w/Stop
6633-7-744Patella Clamp
See CatalogExpress Symmetric & Asymmetric Patella Drill Templates
6633-7-738Patella Stylus
6633-7-736Slotted Patella Resection Guide
Figure 42
Instrument Bar
25
Pate
lla
Pre
para
tion
Com
ponent
Impla
nta
tion
Component ImplantationFemoral Component - Cemented/Cementless> Attach the Femoral Impactor Extractor to the
Impaction Handle and attach to the appropriate size and side Femoral Component. Place the Femoral Component on the femur and impact it until fully seated.
• Posterior Stabilized Knee: If Modular Femoral Distal Fixation Pegs are to be used, assemble the pegs to the Femoral Component using the 1/8” Hex Drive and the Slip Torque Handle prior to implantation.
> The Femoral Impactor can be attached to the Impaction Handle to further seat the Femoral Component onto the prepared femur.
Note: Clear all excess bone cement (Does not apply to cementless component).

Figure 43
Figure 44
Figure 4526
Com
ponent
Impla
nta
tion
Primary Tibial Baseplate - Cemented/Cementless> Connect the Tibial Baseplate Impactor Extractor to
the Impaction Handle.
> Introduce the Primary Tibial Baseplate onto the prepared tibia and impact until the baseplate is seated. Unlock the locking lever and remove the assembly from the Primary Tibial Baseplate.
> To further seat the baseplate, attach the Tibial Baseplate Impactor to the Impaction Handle.
> Impact until the Primary Tibial Baseplate is fully seated.
Note: Clear all excess bone cement while maintaining position of the Primary Tibial Baseplate.
Tibial Insert > Prior to assembly of the Tibial Insert, the Tibial Trial
Insert may be placed on the Primary Tibial Baseplate to once more assess joint stability and range of motion.
> To assemble the Tibial Insert, distract the joint and angle the insert posteriorly into the Primary Tibial Baseplate. The posterior lip of the Tibial Insert must fit beneath the lip on the posterior Primary Tibial Baseplate wall.
> Attach the Tibial Insert Impactor to the Impaction Handle and impact to snap the Insert in place anteriorly. The Tibial Insert is fully seated once the locking wire locks under the barbs on the anterior/interior surface of the Primary Tibial Baseplate wall.
Triathlon Knee System Surgical Protocol
Patellar Component - Cemented/Cementless> Place the Patella Component onto the prepared
patella, making certain the fixation peg holes are aligned to the corresponding holes.
> Seat the Patellar Component onto the prepared patella by clamping the Patella Clamp.
> Leave the assembly clamped to the patella while excess cement is cleared and polymerization is complete (cemented only).
> Remove the patella clamp.
6541-4-805Baseplate Impactor/Extractor
See CatalogPrimary Tibial Baseplate - Cemented
See CatalogPrimary Tibial Baseplate - Cementless
6541-4-810Impaction Handle
6541-4-8021/8” Hex Drive
6541-4-825Slip Torque Handle
6541-4-811Femoral Impactor
See CatalogPS Femoral Component - Cemented
See CatalogPS Femoral Component - Cementless
See CatalogCR Femoral Component - Cementless
See CatalogCR Femoral Component - Cemented
See CatalogModular Femoral Distal Fixation Pegs
6541-4-813Tibial Insert Impactor
See CatalogCR & PS Tibial Inserts
See CatalogSymmetric & Asymmetric Patellas
6541-3-800EExpress Cement Cap
6633-7-744Patella Clamp
Figure 46
Instrument Bar
27
Com
ponent
Impla
nta
tion
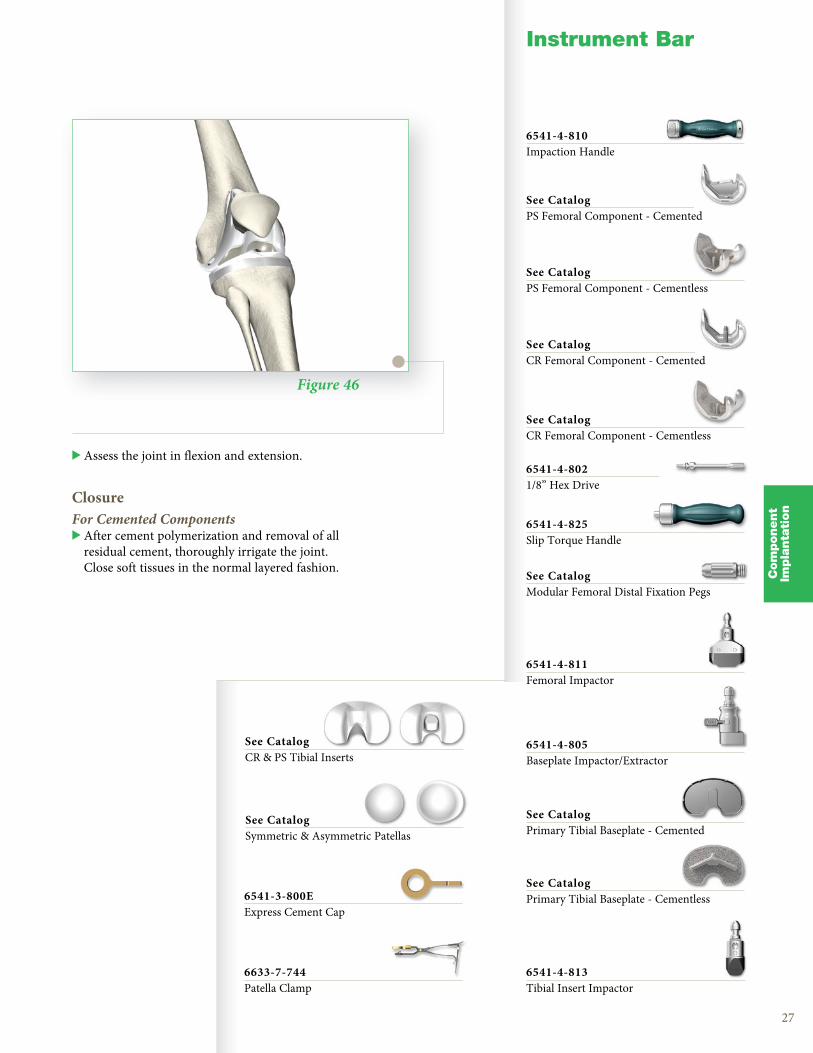
> Assess the joint in flexion and extension.
Closure For Cemented Components> After cement polymerization and removal of all
residual cement, thoroughly irrigate the joint. Close soft tissues in the normal layered fashion.

28
Triathlon Knee System Surgical Protocol
Cata
log
Miscellaneous Instruments Kit Contents
Total Quantity 39
Catalog # Description Quantity in Kit
3170-0000 1/8” Drill 2
6541-4-003 Headless Pins - 3” 4
6541-4-300 Headed Nail Impactor Extractor (Optional) 1
6541-4-400 Bladerunner 1
6541-4-515 Headed Nails - 1 1/2” (Optional) 2
6541-4-516 5/16” IM Rod 1
6541-4-518 1/8” Peg Drill 1
6541-4-525 1/4” Peg Drill 1
6541-4-538 3/8” IM Drill 1
6541-4-575 Headed Nails - 3/4” (Optional) 2
6541-4-602 Universal Alignment Rods 1
6541-4-610 Adjustable Spacer Block (Optional) 1
6541-4-700 Bone File (Optional) 1
6541-4-709 Box Chisel 1
6541-4-710 Posterior Osteophyte Removal Tool (Optional) 1
6541-4-800 T-Handle Driver 1
6541-4-801 Universal Driver 1
6541-4-802 1/8” Hex Drive (Optional) 1
6541-4-803 Slap Hammer 1
6541-4-804 Headless Pin Extractor 1
6541-4-805 Tibial Baseplate Impactor Extractor 1
6541-4-806 Universal Alignment Handle 1
6541-4-807 Femoral Impactor Extractor 1
6541-4-809 Headless Pin Driver 1
6541-4-810 Impaction Handle 2
6541-4-811 Femoral Impactor 1
6541-4-812 Tibial Baseplate Impactor 1
6541-4-813 Tibial Insert Impactor 1
6541-4-825 Slip Torque Handle (Optional) 1
6541-8-004 Triathlon Miscellaneous Upper Tray 1
6541-8-104 Triathlon Miscellaneous Lower Tray 1
6541-9-000 Triathlon Case 1

29
Patella Preparation & Trialing Part Numbers
Cata
log
Total Quantity 35
Catalog # Description Quantity in Kit
6633-7-736 Slotted Patella Resection Guide 1
6633-7-738 Patella Stylus 1
7650-1454 Patella Caliper 1
6541-3-524 All-PolyPatella Drill w/Stop 1
6541-3-617E Express Asymmetric Patella Drill Template - 29mm 1
6541-3-618E Express Asymmetric Patella Drill Template - 33mm 1
6541-3-619E Express Asymmetric Patella Drill Template - 35mm 1
6541-3-620E Express Asymmetric Patella Drill Template - 38mm 1
6541-3-621E Express Asymmetric Patella Drill Template - 40mm 1
6541-3-627E Express Symmetric Patella Drill Template - 27mm 1
6541-3-629E Express Symmetric Patella Drill Template - 29mm 1
6541-3-631E Express Symmetric Patella Drill Template - 31mm 1
6541-3-633E Express Symmetric Patella Drill Template - 33mm 1
6541-3-636E Express Symmetric Patella Drill Template - 36mm 1
6541-3-639E Express Symmetric Patella Drill Template - 39mm 1
6541-3-800E Express Cement Cap 1
6633-7-744 Patella Clamp 1
5550-T-278 Symmetric Patella 27mm x 8mm 1
5550-T-298 Symmetric Patella 29mm x 8mm 1
5550-T-319 Symmetric Patella 31mm x 9mm 1
5550-T-339 Symmetric Patella 33mm x 9mm 1
5550-T-360 Symmetric Patella 36mm x 10mm 1
5550-T-391 Symmetric Patella 39mm x 11mm 1
5551-T-299 Asymmetric Patella 29mm (S/I) x 33mm (M/L) x 9mm 1
5551-T-320 Asymmetric Patella 32mm (S/I) x 36mm (M/L) x 10mm 1
5551-T-350 Asymmetric Patella 35mm (S/I) x 39mm (M/L) x 10mm 1
5551-T-381 Asymmetric Patella 38mm (S/I) x 42mm (M/L) x 11mm 1
5551-T-401 Asymmetric Patella 40mm (S/I) x 44mm (M/L) x 11mm 1
6541-3-522 Metal-Backed Patella Drill w/Stop 1
6541-8-005E Patellar Preparation - Upper Tray 1
6541-8-105E Patellar Preparation - Lower Tray 1
6541-7-806 MIS 4:1 Impactor/Extractor 1
6541-1-701E #1 Express 4:1 Cutting Block (Optional) 1
6541-1-708E #8 Express 4:1 Cutting Block (Optional) 1
6541-9-000 Triathlon Case 1

30
Triathlon Knee System Surgical Protocol
Cata
log
Size 3-6 Femoral & Tibial Preparation Kit Contents
Total Quantity 34
Catalog # Description Quantity in Kit
6541-1-600 Adjustment Block 1
6541-1-603 Femoral Sizer 1
6541-1-605 Femoral Stylus 1
6541-1-657 Femoral Alignment Guide 1
6541-1-703E #3 Express 4:1 Cutting Block 1
6541-1-704E #4 Express 4:1 Cutting Block 1
6541-1-705E #5 Express 4:1 Cutting Block 1
6541-1-706E #6 Express 4:1 Cutting Block 1
6541-1-721 Universal Resection Guide 1
6541-1-723 Modular Capture - Distal Resection 1
6541-2-013 Size 1-3 Keel Punch 1
6541-2-046 Size 4-6 Keel Punch 1
6541-2-429 Tibial Stylus 1
6541-2-600 Tibial Alignment Jig IM (Optional) 1
6541-2-603 #3 Universal Tibial Template 1
6541-2-604 #4 Universal Tibial Template 1
6541-2-605 #5 Universal Tibial Template 1
6541-2-606 #6 Universal Tibial Template 1
6541-2-609 Tibial Alignment Ankle Clamp EM 1
6541-2-610 Tibial Alignment Distal Assembly EM 1
6541-2-611E Tibial Alignment Proximal Rod EM 1
6541-2-620 Tibial Template Converter 1
6541-2-700 Tibial Resection Guide Right 1
6541-2-701 Tibial Resection Guide Left 1
6541-2-702 Tibial Resection Guide Modular Capture Right 1
6541-2-703 Tibial Resection Guide Modular Capture Left 1
6541-2-704 Tibial Adjustment Housing - 0° slope (Optional) 1
6541-2-705 Tibial Adjustment Housing - 3° slope 1
6541-2-713 Size 1-3 Keel Punch Guide 1
6541-2-748 Size 4-8 Keel Punch Guide 1
6541-2-807 Tibial Alignment Handle 1
6541-8-002 Triathlon Size 3-6 Upper Tray 1
6541-8-102 Triathlon Size 3-6 Lower Tray 1
6541-9-000 Triathlon Case 1

31
Cata
log
Size 3-6 PS Femoral & Tibial Trialing Kit Contents
Total Quantity 35
Catalog # Description Quantity in Kit
5511-T-301 PS Femoral Trial #3 Left 1
5511-T-302 PS Femoral Trial #3 Right 1
5511-T-401 PS Femoral Trial #4 Left 1
5511-T-402 PS Femoral Trial #4 Right 1
5511-T-501 PS Femoral Trial #5 Left 1
5511-T-502 PS Femoral Trial #5 Right 1
5511-T-601 PS Femoral Trial #6 Left 1
5511-T-602 PS Femoral Trial #6 Right 1
5532-T-309A PS Tibial Insert Trial #3 - 9mm 1
5532-T-311A PS Tibial Insert Trial #3 - 11mm 1
5532-T-313A PS Tibial Insert Trial #3 - 13mm 1
5532-T-316A PS Tibial Insert Trial #3 - 16mm 1
5532-T-319A PS Tibial Insert Trial #3 - 19mm 1
5532-T-409A PS Tibial Insert Trial #4 - 9mm 1
5532-T-411A PS Tibial Insert Trial #4 - 11mm 1
5532-T-413A PS Tibial Insert Trial #4 - 13mm 1
5532-T-416A PS Tibial Insert Trial #4 - 16mm 1
5532-T-419A PS Tibial Insert Trial #4 - 19mm 1
5532-T-509A PS Tibial Insert Trial #5 - 9mm 1
5532-T-511A PS Tibial Insert Trial #5 - 11mm 1
5532-T-513A PS Tibial Insert Trial #5 - 13mm 1
5532-T-516A PS Tibial Insert Trial #5 - 16mm 1
5532-T-519A PS Tibial Insert Trial #5 - 19mm 1
5532-T-609A PS Tibial Insert Trial #6 - 9mm 1
5532-T-611A PS Tibial Insert Trial #6 - 11mm 1
5532-T-613A PS Tibial Insert Trial #6 - 13mm 1
5532-T-616A PS Tibial Insert Trial #6 - 16mm 1
5532-T-619A PS Tibial Insert Trial #6 - 19mm 1
6541-5-713 #3 MIS PS Box Cutting Guide 1
6541-5-714 #4 MIS PS Box Cutting Guide 1
6541-5-715 #5 MIS PS Box Cutting Guide 1
6541-5-716 #6 MIS PS Box Cutting Guide 1
6541-8-009 Triathlon 3-6 PS Upper Tray 1
6541-8-109 Triathlon 3-6 PS Lower Tray 1
6541-9-000 Triathlon Case 1

32
Triathlon Knee System Surgical Protocol
Cata
log
Size 3-6 CR Femoral & Tibial Trialing Kit Contents
Catalog # Description Quantity in Kit
Total Quantity 31
5510-T-301 CR Femoral Trial #3 Left 1
5510-T-302 CR Femoral Trial #3 Right 1
5510-T-401 CR Femoral Trial #4 Left 1
5510-T-402 CR Femoral Trial #4 Right 1
5510-T-501 CR Femoral Trial #5 Left 1
5510-T-502 CR Femoral Trial #5 Right 1
5510-T-601 CR Femoral Trial #6 Left 1
5510-T-602 CR Femoral Trial #6 Right 1
5530-T-309A CR Tibial Insert Trial #3 - 9mm 1
5530-T-311A CR Tibial Insert Trial #3 - 11mm 1
5530-T-313A CR Tibial Insert Trial #3 - 13mm 1
5530-T-316A CR Tibial Insert Trial #3 - 16mm 1
5530-T-319A CR Tibial Insert Trial #3 - 19mm 1
5530-T-409A CR Tibial Insert Trial #4 - 9mm 1
5530-T-411A CR Tibial Insert Trial #4 - 11mm 1
5530-T-413A CR Tibial Insert Trial #4 - 13mm 1
5530-T-416A CR Tibial Insert Trial #4 - 16mm 1
5530-T-419A CR Tibial Insert Trial #4 - 19mm 1
5530-T-509A CR Tibial Insert Trial #5 - 9mm 1
5530-T-511A CR Tibial Insert Trial #5 - 11mm 1
5530-T-513A CR Tibial Insert Trial #5 - 13mm 1
5530-T-516A CR Tibial Insert Trial #5 - 16mm 1
5530-T-519A CR Tibial Insert Trial #5 - 19mm 1
5530-T-609A CR Tibial Insert Trial #6 - 9mm 1
5530-T-611A CR Tibial Insert Trial #6 - 11mm 1
5530-T-613A CR Tibial Insert Trial #6 - 13mm 1
5530-T-616A CR Tibial Insert Trial #6 - 16mm 1
5530-T-619A CR Tibial Insert Trial #6 - 19mm 1
6541-8-008 Triathlon 3-6 CR Upper Tray 1
6541-8-108 Triathlon 3-6 CR Lower Tray 1
6541-9-000 Triathlon Case 1

33
Cata
log
Size 1, 8 PS Preparation & Trialing Kit Contents
Catalog # Description Quantity in Kit
Total Quantity 21
5511-T-101 PS Femoral Trial #1 Left 1
5511-T-102 PS Femoral Trial #1 Right 1
5511-T-801 PS Femoral Trial #8 Left 1
5511-T-802 PS Femoral Trial #8 Right 1
5532-T-109A PS Tibial Insert Trial #1 - 9mm 1
5532-T-111A PS Tibial Insert Trial #1 - 11mm 1
5532-T-113A PS Tibial Insert Trial #1 - 13mm 1
5532-T-116A PS Tibial Insert Trial #1 - 16mm 1
5532-T-119A PS Tibial Insert Trial #1 - 19mm 1
5532-T-809A PS Tibial Insert Trial #8 - 9mm 1
5532-T-811A PS Tibial Insert Trial #8 - 11mm 1
5532-T-813A PS Tibial Insert Trial #8 - 13mm 1
5532-T-816A PS Tibial Insert Trial #8 - 16mm 1
5532-T-819A PS Tibial Insert Trial #8 - 19mm 1
6541-5-711 #1 MIS PS Box Cutting Guide 1
6541-5-718 #8 MIS PS Box Cutting Guide 1
6541-2-078 Size 7-8 Keel Punch (Optional) 1
6541-2-601 #1 Universal Tibial Template (Optional) 1
6541-2-608 #8 Universal Tibial Template (Optional) 1
6541-8-113 Triathlon 1 & 8 PS Lower Tray 1
6541-9-000 Triathlon Case 1

34
Triathlon Knee System Surgical Protocol
Cata
log
Size 1, 8 CR Preparation & Trialing Kit Contents
Size 2, 7 PS Preparation & Trialing Kit Contents
Catalog # Description Quantity in Kit
Total Quantity 19
Total Quantity 23
5510-T-101 CR Femoral Trial #1 Left 15510-T-102 CR Femoral Trial #1 Right 15510-T-801 CR Femoral Trial #8 Left 15510-T-802 CR Femoral Trial #8 Right 15530-T-109A CR Tibial Insert Trial #1 - 9mm 15530-T-111A CR Tibial Insert Trial #1 - 11mm 15530-T-113A CR Tibial Insert Trial #1 - 13mm 15530-T-116A CR Tibial Insert Trial #1 - 16mm 15530-T-119A CR Tibial Insert Trial #1 - 19mm 15530-T-809A CR Tibial Insert Trial #8 - 9mm 15530-T-811A CR Tibial Insert Trial #8 - 11mm 15530-T-813A CR Tibial Insert Trial #8 - 13mm 15530-T-816A CR Tibial Insert Trial #8 - 16mm 15530-T-819A CR Tibial Insert Trial #8 - 19mm 16541-2-078 Size 7-8 Keel Punch 16541-2-601 #1 Universal Tibial Template 16541-2-608 #8 Universal Tibial Template 16541-8-112 Triathlon 1 & 8 CR Lower Tray 16541-9-000 Triathlon Case 1
5511-T-201 PS Femoral Trial #2 Left 15511-T-202 PS Femoral Trial #2 Right 15511-T-701 PS Femoral Trial #7 Left 15511-T-702 PS Femoral Trial #7 Right 15532-T-209A PS Tibial Insert Trial #2 - 9mm 15532-T-211A PS Tibial Insert Trial #2 - 11mm 15532-T-213A PS Tibial Insert Trial #2 - 13mm 15532-T-216A PS Tibial Insert Trial #2 - 16mm 15532-T-219A PS Tibial Insert Trial #2 - 19mm 15532-T-709A PS Tibial Insert Trial #7 - 9mm 15532-T-711A PS Tibial Insert Trial #7 - 11mm 15532-T-713A PS Tibial Insert Trial #7 - 13mm 15532-T-716A PS Tibial Insert Trial #7 - 16mm 15532-T-719A PS Tibial Insert Trial #7 - 19mm 16541-1-702E #2 Express 4:1 Cutting Block (Optional) 16541-1-707E #7 Express 4:1 Cutting Block (Optional) 16541-5-712 #2 MIS PS Box Cutting Guide 16541-5-717 #7 MIS PS Box Cutting Guide 16541-2-078 Size 7-8 Keel Punch (Optional) 16541-2-602 #2 Universal Tibial Template (Optional) 16541-2-607 #7 Universal Tibial Template (Optional) 16541-8-022 Triathlon 2 & 7 PS Upper Tray 16541-9-000 Triathlon Case 1

35
Cata
log
Catalog # Description Quantity in Kit
Size 2, 7 CR Preparation & Trialing Kit Contents
Size 1-8 Max PS Tibial Trialing Kit Contents
Total Quantity 21
Total Quantity 18
5532-T-122A PS Tibial Insert Trial #1 - 22mm 1
5532-T-125A PS Tibial Insert Trial #1 - 25mm 1
5532-T-222A PS Tibial Insert Trial #2 - 22mm 1
5532-T-225A PS Tibial Insert Trial #2 - 25mm 1
5532-T-322A PS Tibial Insert Trial #3 - 22mm 1
5532-T-325A PS Tibial Insert Trial #3 - 25mm 1
5532-T-422A PS Tibial Insert Trial #4 - 22mm 1
5532-T-425A PS Tibial Insert Trial #4 - 25mm 1
5532-T-522A PS Tibial Insert Trial #5 - 22mm 1
5532-T-525A PS Tibial Insert Trial #5 - 25mm 1
5532-T-622A PS Tibial Insert Trial #6 - 22mm 1
5532-T-625A PS Tibial Insert Trial #6 - 25mm 1
5532-T-722A PS Tibial Insert Trial #7 - 22mm 1
5532-T-725A PS Tibial Insert Trial #7 - 25mm 1
5532-T-822A PS Tibial Insert Trial #8 - 22mm 1
5532-T-825A PS Tibial Insert Trial #8 - 25mm 1
6541-8-120 Triathlon 1-8 Max PS - Upper Tray 1
6541-9-000 Triathlon Case 1
5510-T-201 CR Femoral Trial #2 Left 15510-T-202 CR Femoral Trial #2 Right 15510-T-701 CR Femoral Trial #7 Left 15510-T-702 CR Femoral Trial #7 Right 15530-T-209A CR Tibial Insert Trial #2 - 9mm 15530-T-211A CR Tibial Insert Trial #2 - 11mm 15530-T-213A CR Tibial Insert Trial #2 - 13mm 15530-T-216A CR Tibial Insert Trial #2 - 16mm 15530-T-219A CR Tibial Insert Trial #2 - 19mm 15530-T-709A CR Tibial Insert Trial #7 - 9mm 15530-T-711A CR Tibial Insert Trial #7 - 11mm 15530-T-713A CR Tibial Insert Trial #7 - 13mm 15530-T-716A CR Tibial Insert Trial #7 - 16mm 15530-T-719A CR Tibial Insert Trial #7 - 19mm 16541-1-702E #2 Express 4:1 Cutting Block 16541-1-707E #7 Express 4:1 Cutting Block 16541-2-078 Size 7-8 Keel Punch 16541-2-602 #2 Universal Tibial Template 16541-2-607 #7 Universal Tibial Template 16541-8-021 Triathlon 2 & 7 CR Upper Tray 16541-9-000 Triathlon Case 1

Triathlon CR Femoral Component - Cemented Part Numbers
Triathlon CR Femoral Cementless Component - Beaded Part Numbers
Triathlon CR Femoral Cementless Component - Beaded w/Peri-Apatite Part Numbers
Triathlon PS Femoral Component - Cemented Part Numbers
Triathlon PS Femoral Cementless Component - Beaded Part Numbers
Triathlon PS Femoral Cementless Component - Beaded w/Peri-Apatite Part Numbers
Catalog # Description Sizes Qty
5510-F-X01 Triathlon CR Femoral Component - Left Cemented X = 1,2,3,4,5,6,7 and 8 1 Each Size
5510-F-X02 Triathlon CR Femoral Component - Right Cemented X = 1,2,3,4,5,6,7 and 8 1 Each Size
5513-F-X01 Triathlon CR Femoral Component - Left Cementless Beaded X = 1,2,3,4,5,6,7 and 8 1 Each Size
5513-F-X02 Triathlon CR Femoral Component - Right Cementless Beaded X = 1,2,3,4,5,6,7 and 8 1 Each Size
5517-F-X01 Triathlon CR Femoral Component - Left Cementless Beaded w/PA X = 1,2,3,4,5,6,7 and 8 1 Each Size
5517-F-X02 Triathlon CR Femoral Component - Right Cementless Beaded w/PA X = 1,2,3,4,5,6,7 and 8 1 Each Size
5515-F-X01 Triathlon PS Femoral Component - Left Cemented X = 1,2,3,4,5,6,7 and 8 1 Each Size
5515-F-X02 Triathlon PS Femoral Component - Right Cemented X = 1,2,3,4,5,6,7 and 8 1 Each Size
5514-F-X01 Triathlon PS Femoral Component - Left Cementless Beaded X = 1,2,3,4,5,6,7 and 8 1 Each Size
5514-F-X02 Triathlon PS Femoral Component - Right Cementless Beaded X = 1,2,3,4,5,6,7 and 8 1 Each Size
5516-F-X01 Triathlon PS Femoral Component - Left Cementless Beaded w/PA X = 1,2,3,4,5,6,7 and 8 1 Each Size
5516-F-X02 Triathlon PS Femoral Component - Right Cementless Beaded w/PA X = 1,2,3,4,5,6,7 and 8 1 Each Size
36
Triathlon Knee System Surgical Protocol
Cata
log

37
Cata
log
Primary Tibial Baseplate Options Part Numbers
Triathlon CR Tibial Inserts - Conventional Polyethylene and X3 Part Numbers
Catalog # Description Sizes Additional Instruments Required
Conventional Polyethylene Inserts
5530-P-X09 Triathlon CR Tibial Insert - Conventional Polyethylene 9mm X = 1,2,3,4,5,6,7 and 8 1 Each Size
5530-P-X11 Triathlon CR Tibial Insert - Conventional Polyethylene 11mm X = 1,2,3,4,5,6,7 and 8 1 Each Size
5530-P-X13 Triathlon CR Tibial Insert - Conventional Polyethylene 13mm X = 1,2,3,4,5,6,7 and 8 1 Each Size
5530-P-X16 Triathlon CR Tibial Insert - Conventional Polyethylene 16mm X = 1,2,3,4,5,6,7 and 8 1 Each Size
5530-P-X19 Triathlon CR Tibial Insert - Conventional Polyethylene 19mm X = 1,2,3,4,5,6,7 and 8 1 Each Size
X3 Inserts
5530-G-X09 Triathlon CR Tibial Insert - X3 9mm X = 1,2,3,4,5,6,7 and 8 1 Each Size
5530-G-X11 Triathlon CR Tibial Insert - X3 11mm X = 1,2,3,4,5,6,7 and 8 1 Each Size
5530-G-X13 Triathlon CR Tibial Insert - X3 13mm X = 1,2,3,4,5,6,7 and 8 1 Each Size
5530-G-X16 Triathlon CR Tibial Insert - X3 16mm X = 1,2,3,4,5,6,7 and 8 1 Each Size
5530-G-X19 Triathlon CR Tibial Insert - X3 19mm X = 1,2,3,4,5,6,7 and 8 1 Each Size
Catalog # Description Sizes Qty
5520-B-X00 Primary Tibial Baseplate - Cemented X = 1,2,3,4,5,6,7 and 8
5520-M-X00 Primary MIS Baseplate - Cemented X = 1,2,3,4,5,6,7 and 8 6541-2-113 - Size 1-3 MIS Keel Punch
6541-2-146 - Size 4-6 MIS Keel Punch
6541-2-178 - Size 7-8 MIS Keel Punch
5523-B-X00 Primary Tibial Baseplate - Beaded X = 1,2,3,4,5,6,7 and 8 6541-6-013 - Sizes 1-3 Cementless Keel Punch
5526-B-X00 Primary Tibial Baseplate - Beaded with Peri-Apatite X = 1,2,3,4,5,6,7 and 8 6541-6-046 - Sizes 4-6 Cementless Keel Punch
6541-6-078 - Sizes 7-8 Cementless Keel Punch
5521-B-X00 Universal Baseplate X = 1,2,3,4,5,6,7 and 8 6543-7-527 - Boss Reamer
6543-4-818 - Torque Wrench

Total Quantity XX
Triathlon CS Tibial Inserts - Conventional Polyethylene and X3 Part Numbers
Triathlon PS Tibial Inserts - Conventional Polyethylene and X3 Part Numbers
Catalog # Description Sizes Qty
Conventional Polyethylene Inserts
5531-P-X09 Triathlon CS Tibial Insert - Conventional Polyethylene 9mm X = 1,2,3,4,5,6,7 and 8 1 Each Size
5531-P-X11 Triathlon CS Tibial Insert - Conventional Polyethylene 11mm X = 1,2,3,4,5,6,7 and 8 1 Each Size
5531-P-X13 Triathlon CS Tibial Insert - Conventional Polyethylene 13mm X = 1,2,3,4,5,6,7 and 8 1 Each Size
5531-P-X16 Triathlon CS Tibial Insert - Conventional Polyethylene 16mm X = 1,2,3,4,5,6,7 and 8 1 Each Size
5531-P-X19 Triathlon CS Tibial Insert - Conventional Polyethylene 19mm X = 1,2,3,4,5,6,7 and 8 1 Each Size
5531-P-X22 Triathlon CS Tibial Insert - Conventional Polyethylene 22mm X = 1,2,3,4,5,6,7 and 8 1 Each Size
5531-P-X25 Triathlon CS Tibial Insert - Conventional Polyethylene 25mm X = 1,2,3,4,5,6,7 and 8 1 Each Size
X3 Inserts
5531-G-X09 Triathlon CS Tibial Insert - X3 9mm X = 1,2,3,4,5,6,7 and 8 1 Each Size
5531-G-X11 Triathlon CS Tibial Insert - X3 11mm X = 1,2,3,4,5,6,7 and 8 1 Each Size
5531-G-X13 Triathlon CS Tibial Insert - X3 13mm X = 1,2,3,4,5,6,7 and 8 1 Each Size
5531-G-X16 Triathlon CS Tibial Insert - X3 16mm X = 1,2,3,4,5,6,7 and 8 1 Each Size
5531-G-X19 Triathlon CS Tibial Insert - X3 19mm X = 1,2,3,4,5,6,7 and 8 1 Each Size
5531-G-X22 Triathlon CS Tibial Insert - X3 22mm X = 1,2,3,4,5,6,7 and 8 1 Each Size
5531-G-X25 Triathlon CS Tibial Insert - X3 25mm X = 1,2,3,4,5,6,7 and 8 1 Each Size
Conventional Polyethylene Inserts
5532-P-X09 Triathlon PS Tibial Insert - Conventional Polyethylene 9mm X = 1,2,3,4,5,6,7 and 8 1 Each Size
5532-P-X11 Triathlon PS Tibial Insert - Conventional Polyethylene 11mm X = 1,2,3,4,5,6,7 and 8 1 Each Size
5532-P-X13 Triathlon PS Tibial Insert - Conventional Polyethylene 13mm X = 1,2,3,4,5,6,7 and 8 1 Each Size
5532-P-X16 Triathlon PS Tibial Insert - Conventional Polyethylene 16mm X = 1,2,3,4,5,6,7 and 8 1 Each Size
5532-P-X19 Triathlon PS Tibial Insert - Conventional Polyethylene 19mm X = 1,2,3,4,5,6,7 and 8 1 Each Size
5532-P-X22 Triathlon PS Tibial Insert - Conventional Polyethylene 22mm X = 1,2,3,4,5,6,7 and 8 1 Each Size
5532-P-X25 Triathlon PS Tibial Insert - Conventional Polyethylene 25mm X = 1,2,3,4,5,6,7 and 8 1 Each Size
X3 Inserts
5532-G-X09 Triathlon PS Tibial Insert - X3 9mm X = 1,2,3,4,5,6,7 and 8 1 Each Size
5532-G-X11 Triathlon PS Tibial Insert - X3 11mm X = 1,2,3,4,5,6,7 and 8 1 Each Size
5532-G-X13 Triathlon PS Tibial Insert - X3 13mm X = 1,2,3,4,5,6,7 and 8 1 Each Size
5532-G-X16 Triathlon PS Tibial Insert - X3 16mm X = 1,2,3,4,5,6,7 and 8 1 Each Size
5532-G-X19 Triathlon PS Tibial Insert - X3 19mm X = 1,2,3,4,5,6,7 and 8 1 Each Size
5532-G-X22 Triathlon PS Tibial Insert - X3 22mm X = 1,2,3,4,5,6,7 and 8 1 Each Size
5532-G-X25 Triathlon PS Tibial Insert - X3 25mm X = 1,2,3,4,5,6,7 and 8 1 Each Size
38
Triathlon Knee System Surgical Protocol
Cata
log

39
Cata
log
Symmetric Patella - Conventional Polyethylene and X3 Part Numbers
Asymmetric Patella - Conventional Polyethylene and X3 Part Numbers
Conventional Polyethylene Patellas
5550-L-278 Symmetric Patella - Conventional Polyethylene S27mm x 8mm 1
5550-L-298 Symmetric Patella - Conventional Polyethylene S29mm x 8mm 1
5550-L-319 Symmetric Patella - Conventional Polyethylene S31mm x 9mm 1
5550-L-339 Symmetric Patella - Conventional Polyethylene S33mm x 9mm 1
5550-L-360 Symmetric Patella - Conventional Polyethylene S36mm x 10mm 1
5550-L-391 Symmetric Patella - Conventional Polyethylene S39mm x 11mm 1
X3 Patellas
5550-G-278 Symmetric Patella - X3 S27mm x 8mm 1
5550-G-298 Symmetric Patella - X3 S29mm x 8mm 1
5550-G-319 Symmetric Patella - X3 S31mm x 9mm 1
5550-G-339 Symmetric Patella - X3 S33mm x 9mm 1
5550-G-360 Symmetric Patella - X3 S36mm x 10mm 1
5550-G-391 Symmetric Patella - X3 S39mm x 11mm 1
Catalog # Description Sizes Qty
Conventional Polyethylene Patellas
5551-L-299 Asymmetric Patella - Conventional Polyethylene A29mm (S/I*) x 9mm 1
5551-L-320 Asymmetric Patella - Conventional Polyethylene A32mm (S/I*) x 10mm 1
5551-L-350 Asymmetric Patella - Conventional Polyethylene A35mm (S/I*) x 10mm 1
5551-L-381 Asymmetric Patella - Conventional Polyethylene A38mm (S/I*) x 11mm 1
5551-L-401 Asymmetric Patella - Conventional Polyethylene A40mm (S/I*) x 11mm 1
X3 Patellas
5551-G-299 Asymmetric Patella - X3 A29mm (S/I*) x 9mm 1
5551-G-320 Asymmetric Patella - X3 A32mm (S/I*) x 10mm 1
5551-G-350 Asymmetric Patella - X3 A35mm (S/I*) x 10mm 1
5551-G-381 Asymmetric Patella - X3 A38mm (S/I*) x 11mm 1
5551-G-401 Asymmetric Patella - X3 A40mm (S/I*) x 11mm 1
*S/I - Superior/Inferior

Modular Femoral Distal Fixation Peg Part Number5575-X-000 Modular Femoral Distal Fixation Peg (2 per pack)
Catalog # Description
40
Triathlon Knee System Surgical Protocol
Cata
log
6541-5-212 Sizes 1-2 Triathlon PS Femoral Finishing Punch
6541-5-234 Sizes 3-4 Triathlon PS Femoral Finishing Punch
6541-5-256 Sizes 5-6 Triathlon PS Femoral Finishing Punch
6541-5-278 Sizes 7-8 Triathlon PS Femoral Finishing Punch
6541-5-814 Sizes 1-4 Triathlon PS Femoral Box Trial/Protector
6541-5-858 Sizes 5-8 Triathlon PS Femoral Box Trial/Protector
6541-8-122 Triathlon PS Box Preparation Sizes 1-8 Tray
Triathlon PS Box Preparation (Optional) Part Numbers

41
Cata
log
Notes

Notes
Triathlon Knee System Surgical Protocol

Femoral Component/Insert Compatibility
Size Matching: One up, one down, e.g., size 5 femur with size 4 or 6 insert/baseplate.
Note: Cementless implants are not to be used with cement.
Femoral Component/Patella Compatibility
Size Matching: Every patella articulates with every femur due to a common radius across all sizes.
Tibial Insert/Baseplate Compatibility Size Matching: Size Specific, e.g., size 4 insert to be used only with size 4 baseplate.
Note: TS insert can only be used with the cemented universal baseplate.
Insert Type
Femoral Components CR CS PS TS
CR Cemented No No
PS Cemented No
TS Cemented No No
Cem
entl
ess
CR Beaded No No
PS Beaded No No No
CR Beaded with PA No No
PS Beaded with PA No No No
4
4
4
44
4
4
44
4
4
44
Patella Type
Femoral Components AsymmetricAsymmetric
Metal BackedSymmetric
Metal BackedSymmetric
CR Cemented
PS Cemented
TS Cemented
Cem
entl
ess
CR Beaded
PS Beaded
CR Beaded with PA
PS Beaded with PA
4444444
4444444
4444444
4444444
Insert Type
Tibial Baseplates CR CS PS TS
Cemented Cruciform No
Cemented Universal
Cem
entl
ess
Beaded Cruciform No
Beaded Screw Fix No
Beaded with PA Cruciform No
Beaded with PA Screw Fix No
Tritanium No
4444444
4444444
4444444
4
Triathlon TS Augments
Distal Augments are for use with both the medial and lateral portions of the side indicated, e.g. #4 right is used for medial and lateral compartments on a right femur.
Posterior Augments are universal size specific, e.g. size 4 posterior augments are for the size 4 femur.
Tibial Augments are size specific and come in left medial/right lateral or right medial/left lateral configurations.

325 Corporate DriveMahwah, NJ 07430t: 201 831 5000
www.stryker.com
A surgeon must always rely on his or her own professional clinical judgment when deciding whether to use a particular product when treating a particular patient. Stryker does not dispense medical advice and recommends that surgeons be trained in the use of any particular product before using it in surgery.
The information presented is intended to demonstrate the breadth of Stryker product offerings. A surgeon must always refer to the package insert, product label and/or instructions for use before using any Stryker product. The products depicted are CE marked according to the Medical Device Directive 93/42/EEC. Products may not be available in all markets because product availability is subject to the regulatory and/or medical practices in individual markets. Please contact your Stryker representative if you have questions about the availability of Stryker products in your area.
Stryker Corporation or its divisions or other corporate affiliated entities own, use or have applied for the following trademarks or service marks: Stryker, Stryker Orthopaedics, Triathlon and X3. All other trademarks are trademarks of their respective owners or holders.
TRIATH-SP-3 Rev1 Copyright © 2015 Stryker