Traditional colors, a cozy plaid fabric, and metallic ...
4
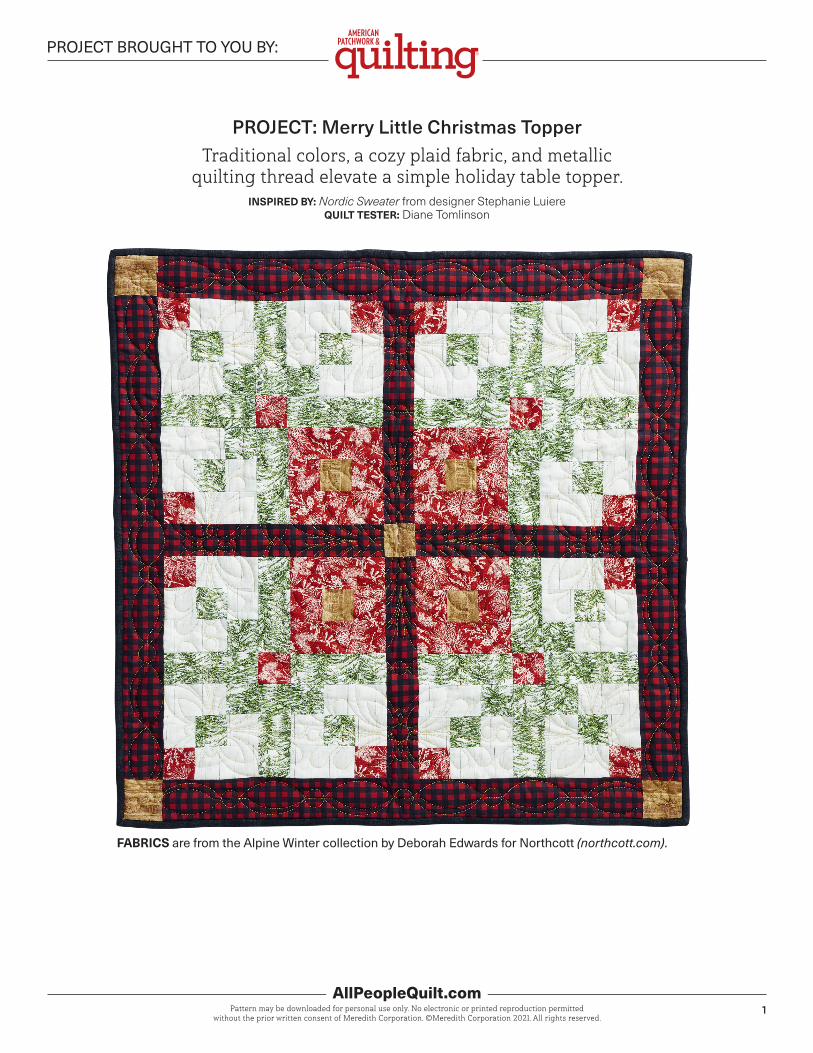
1 AllPeopleQuilt.com PROJECT BROUGHT TO YOU BY: Pattern may be downloaded for personal use only. No electronic or printed reproduction permitted without the prior written consent of Meredith Corporation. ©Meredith Corporation 2021. All rights reserved. FABRICS are from the Alpine Winter collection by Deborah Edwards for Northcott (northcott.com). PROJECT: Merry Little Christmas Topper Traditional colors, a cozy plaid fabric, and metallic quilting thread elevate a simple holiday table topper. INSPIRED BY: Nordic Sweater from designer Stephanie Luiere QUILT TESTER: Diane Tomlinson
Transcript of Traditional colors, a cozy plaid fabric, and metallic ...
1AllPeopleQuilt.com
PROJECT BROUGHT TO YOU BY:
Pattern may be downloaded for personal use only. No electronic or printed reproduction permitted without the prior written consent of Meredith Corporation. ©Meredith Corporation 2021. All rights reserved.
FABRICS are from the Alpine Winter collection by Deborah Edwards for Northcott (northcott.com).
PROJECT: Merry Little Christmas TopperTraditional colors, a cozy plaid fabric, and metallic
quilting thread elevate a simple holiday table topper.INSPIRED BY: Nordic Sweater from designer Stephanie Luiere
QUILT TESTER: Diane Tomlinson
2AllPeopleQuilt.com
PROJECT BROUGHT TO YOU BY:
Pattern may be downloaded for personal use only. No electronic or printed reproduction permitted without the prior written consent of Meredith Corporation. ©Meredith Corporation 2021. All rights reserved.
11" square including seam allowances. Repeat to make a second A block.
5 Referring to Diagram 9, repeat Step 4 using two of Unit 1, four
green print 2×5" rectangles, one Unit 2, one red print 2" square, and one Unit 3 to make Block B. Repeat to make a second B block.
ASSEMBLE QUILT TOP
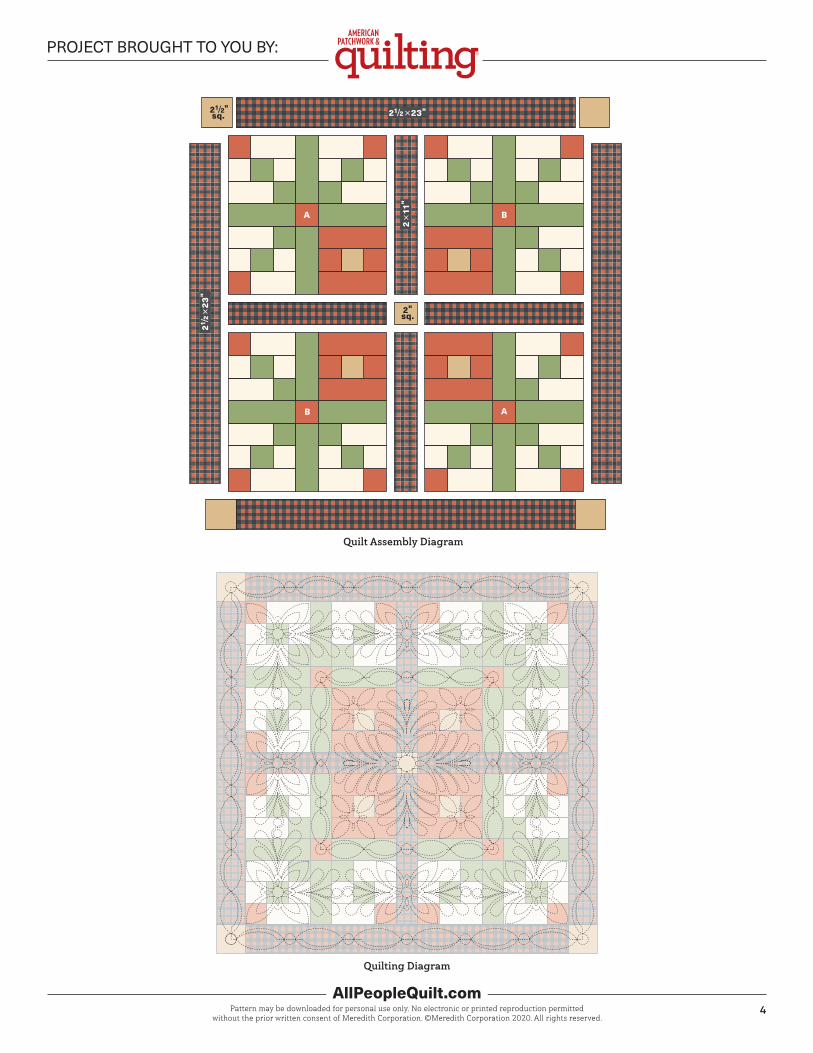
1 Referring to Quilt Assembly Diagram, lay out blocks, red plaid
2×11" sashing strips, and gold print 2" sashing square in three rows.
2 Sew together pieces in rows. Press seams toward sashing strips. Join
rows to make quilt center; press seams away from block rows. The quilt center should be 23" square including seam allowances.
3 Sew gold print 21⁄2" squares to ends of two red plaid 21⁄2×23" border
strips to make pieced border strips. Press seams toward red plaid strips. Sew remaining red plaid 21⁄2×23" border strips to opposite edges of quilt center. Sew pieced border strips to remaining edges of quilt center to complete quilt. Press seams toward border.
FINISH QUILT
1 Layer quilt top, batting, and backing; baste.
2 Quilt as desired. Handi Quilter Studio Educator Kimberly Sandberg
executed a medallion-based quilting design (Quilting Diagram). She started in the center and worked her way out using rounds of various designs, including Dawn’s Block 003 and Dawn’s Border 002 and 003 from the Sweet Dreams Quilt Studio folder in the Pro-Stitcher library. She used Superior Thread Military Gold metallic thread to add sparkle.
3 Bind with solid black binding strips.
FINISHED QUILT: 27" squareFINISHED BLOCKS: 101⁄2" square
MATERIALSYardages and cutting instructions are based on 42" of usable fabric width.
▫ 1⁄4 yard red print (blocks)
▫ 1⁄2 yard cream print (blocks)
▫ 1⁄3 yard each green print and solid black (blocks, binding)
▫ 10" square gold print (blocks, sashing)
▫ 3⁄8 yard red plaid (sashing, border)
▫ 1 yard backing fabric
▫ 35"-square batting
CUT FABRICS Cut pieces in the following order.
From red print, cut:▫ 1—2×28" strip▫ 2—2×10" strips▫ 8—2×5" rectangles▫ 4—2" squares
From cream print, cut:▫ 2—31⁄2×28" strips▫ 2—2×28" strips
From green print, cut:▫ 2—2×28" strips▫ 16—2×5" rectangles
From gold print, cut:▫ 4—21⁄2" squares▫ 1—2×10" strip▫ 1—2" square
From red plaid, cut:▫ 4—21⁄2×23" border strips▫ 4—2×11" sashing strips
From solid black, cut:▫ 3—21⁄2×42" binding strips
ASSEMBLE SEGMENTSMeasurements include 1⁄4" seam allowances. Sew with right sides together unless otherwise stated.
Press seams in directions indicated by arrows on diagrams. If no direction is specified, press seam toward darker fabric.
1 Sew together red print 2×28" strip and one cream print 31⁄2×28" strip to
make Strip Set A (Diagram 1). Cut strip set into twelve 2"-wide A segments.
2 Sew together cream print 2×28" strips and one green print 2×28"
strip to make Strip Set B (Diagram 2). Cut strip set into twelve 2"-wide B segments.
3 Sew together remaining green print 2×28" strip and remaining cream
print 31⁄2×28" strip to make Strip Set C (Diagram 3). Cut strip set into twelve 2"-wide C segments.
4 Sew together red print 2×10" strips and gold print 2×10" strip to make
Strip Set D (Diagram 4). Cut strip set into four 2"-wide D segments.
ASSEMBLE BLOCKS
1 Referring to Diagram 5 for segment orientation, sew together an
A segment, B segment, and C segment to make Unit 1. The unit should be 5" square including seam allowances. Repeat to make six total of Unit 1.
2 Reversing A and C segment orientations, repeat Step 1 to make
six of Unit 2 (Diagram 6).
3 Referring to Diagram 7, sew together two red print 2×5"
rectangles and one D segment to make Unit 3. The unit should be 5" square including seam allowances. Repeat to make four total of Unit 3.
4 Referring to Diagram 8, lay out one Unit 1, four green print 2×5"
rectangles, two of Unit 2, one red print 2" square, and one Unit 3 in three rows. Sew together pieces in rows. Join rows to make Block A. The block should be

Pattern may be downloaded for personal use only. No electronic or printed reproduction permitted without the prior written consent of Meredith Corporation. ©Meredith Corporation 2020. All rights reserved.
3AllPeopleQuilt.com
PROJECT BROUGHT TO YOU BY:
Strip Set ADiagram 1
31/2×28"
2×28"
2"
Strip Set BDiagram 2
2×28"
2"
Strip Set CDiagram 3
31/2×28"
2×28"
2"
Strip Set DDiagram 4
2×10"
2"
Unit 1Diagram 5
A
B
C
Unit 2Diagram 6
A
B
C
Unit 3Diagram 7
2×5"
D
Block ADiagram 8
2"sq.
1
3
2
2
2×5"
2"sq.
1
3
2
1
2×5"
Block BDiagram 9
1
Pattern may be downloaded for personal use only. No electronic or printed reproduction permitted without the prior written consent of Meredith Corporation. ©Meredith Corporation 2020. All rights reserved.
4AllPeopleQuilt.com
PROJECT BROUGHT TO YOU BY:
2×11"
21/ 2×23"
21/2×23"
2"sq.
21/2"sq.
Quilt Assembly Diagram
A
A
B
B
Quilting Diagram


![1 The Plaid Programming Languagealdrich/plaid/plaid-intro.pdf · 1 The Plaid Programming Language Plaid [PG10b, PG10a] is a new general purpose programming language developed at Carnegie](https://static.fdocuments.us/doc/165x107/5ae12e907f8b9a97518e2ff1/1-the-plaid-programming-aldrichplaidplaid-intropdf1-the-plaid-programming-language.jpg)