TPA Self Service User Guide - Mass.gov · TPA Self Service User Guide DUA QUEST Project Department...
103
TPA Self Service User Guide DUA QUEST Project Department of Unemployment Assistance (DUA) Commonwealth of Massachusetts August, 2016
Transcript of TPA Self Service User Guide - Mass.gov · TPA Self Service User Guide DUA QUEST Project Department...

TPA Self Service User Guide
DUA QUEST Project
Department of Unemployment Assistance (DUA)
Commonwealth of Massachusetts
August, 2016
UI ONLINE - TPA User Guide
2
TABLE OF CONTENTS
ABBREVIATIONS ............................................................................................................................. .6
UI ONLINE QUICK START ................................................................................................................. 7
HOW TO START WITH UI ONLINE ..................................................................................................... 8
For Regular Users .................................................................................................................... 8
For Administrators ................................................................................................................... 8
GETTING SUPPORT FROM DUA ........................................................................................................ 9
UI ONLINE REQUIREMENTS ............................................................................................................ 11
SYSTEM OVERVIEW ...................................................................................................................... 12
ACCESSING UI ONLINE ................................................................................................................. 13
First Time Account Access with Emailed Link .............................................................................. 13
Logging In ............................................................................................................................. 13
Logging Off ............................................................................................................................ 14
NAVIGATION AND SOFTWARE TIPS ................................................................................................. 15
TPA Home Page ...................................................................................................................... 15
System Timeout ..................................................................................................................... 16
Helpful Hints – Assistive Content .............................................................................................. 16
Additional Tips ........................................................................................................................ 16
FORGOTTEN PASSWORD ............................................................................................................... 17
CHANGING A PASSWORD .............................................................................................................. 18
TPA REGISTRATION ....................................................................................................................... 19
ABOUT TPA REGISTRATION ............................................................................................................ 20
TPA REGISTRATION ...................................................................................................................... 20
First Time Login After Registration ............................................................................................ 23
ACCOUNT MAINTENANCE ............................................................................................................... 25
ABOUT ACCOUNT MAINTENANCE .................................................................................................... 26
NAVIGATING TO ACCOUNT MAINTENANCE ....................................................................................... 26
UI ONLINE - TPA User Guide
3
TPA ACCOUNT PROFILE ................................................................................................................. 27
Modifying the TPA Account Profile ............................................................................................. 27
TPA ADDRESS INFORMATION ......................................................................................................... 28
Navigating to the Address Information Page ............................................................................... 28
Viewing or Modifying an Address ............................................................................................... 29
Viewing Address History .......................................................................................................... 30
Viewing or Modifying Your Email Address ................................................................................... 30
EMPLOYMENT AND WAGE DETAIL REPORTING............................................................................... 31
ABOUT EMPLOYMENT AND WAGE DETAIL REPORTING ........................................................................ 32
NAVIGATING TO EMPLOYMENT AND WAGE DETAIL REPORTING .......................................................... 33
SUBMIT EMPLOYMENT AND WAGE DETAIL FILE ................................................................................. 34
Performing a Merge or Overwrite .............................................................................................. 38
SUBMIT EMPLOYMENT AND WAGE DETAIL FILE FOR QUARTERS PRIOR TO 2010 .................................... 40
VIEW SUBMISSION HISTORY ......................................................................................................... 43
VIEW EMPLOYER HISTORY ............................................................................................................. 45
PAYMENT INFORMATION ............................................................................................................... 47
ABOUT PAYMENT INFORMATION ..................................................................................................... 48
ABOUT DEFERRALS ....................................................................................................................... 48
NAVIGATING TO PAYMENT INFORMATION ........................................................................................ 49
DOWNLOAD PAYMENT DUE FILE ..................................................................................................... 50
Downloading the Payment Due File ........................................................................................... 50
Reading the Payment Due File Format ....................................................................................... 51
Editing the Payment Due File to Use as the Payment File ............................................................. 51
Uploading the Payment File ...................................................................................................... 52
PAYMENT OPTIONS ....................................................................................................................... 53
Navigating to the Payment Options Page .................................................................................... 53
Paying -- Making Full Payment for All Assigned Employers ........................................................... 54

UI ONLINE - TPA User Guide
4
Paying -- Manually Entering Payment Information Online Per Employer ......................................... 55
Paying -- Making Payment Based on File Upload/Edits ................................................................. 58
Paying – Acting as a Single Employer ........................................................................................ 60
Applying to DUA to Make Payments Using ACH Credit .................................................................. 62
SEARCH PAYMENTS ...................................................................................................................... 63
Searching for Payments ........................................................................................................... 63
REVIEW EMPLOYER ACCOUNTS/PAYMENT ACCOUNT SUMMARY ........................................................ 655
USER MAINTENANCE .................................................................................................................... 677
ABOUT USER MAINTENANCE .......................................................................................................... 68
NAVIGATING TO USER MAINTENANCE ............................................................................................. 68
CREATING A NEW USER ................................................................................................................. 69
SEARCHING FOR USER DETAILS ................................................................................................... 711
MODIFYING USER INFORMATION .................................................................................................. 733
ASSIGNING USER ROLES ............................................................................................................. 744
RESETTING USER PASSWORDS .................................................................................................... 766
INACTIVATING A USER ACCOUNT ................................................................................................... 78
REINSTATING A USER ACCOUNT ..................................................................................................... 79
ASSIGN EMPLOYERS AND ROLES……………………………………………………………………………………………………………………80
CORRESPONDENCE ...................................................................................................................... 822
ABOUT CORRESPONDENCE .......................................................................................................... 833
NAVIGATING TO CORRESPONDENCE ............................................................................................. 833
SEARCHING FOR CORRESPONDENCE ............................................................................................ 844
SEARCHES - EMPLOYER ACCOUNT ACCESS ................................................................................... 855
ABOUT SEARCHING TO ACCESS EMPLOYER ACCOUNT HOME ............................................................ 866
NAVIGATING INTO THE EMPLOYER ACCOUNT ................................................................................. 866
VIEWING EMPLOYER-ASSIGNED TPA ROLES ..................................................................................... 88
PERFORMING FUNCTIONS AS AN EMPLOYER..................................................................................... 88

UI ONLINE - TPA User Guide
5
SEARCHES – CLIENT RATE DOWNLOAD .......................................................................................... 89
ABOUT CLIENT RATE DOWNLOADS ............................................................................................... 900
SEARCHING TO RETRIEVE A CLIENT RATE DOWNLOAD FILE ............................................................. 900
CLIENT/RATE INFORMATION ........................................................................................................ 922
Format for the Client Rate Download ....................................................................................... 922
Employer Medical Assistance Contribution Rates ....................................................................... 922
Unemployment Insurance Contribution Rate ............................................................................. 922
Workforce Training Fund Contribution ...................................................................................... 922
ADDENDUM .................................................................................................................................. 944
A. HOURS WORKED GUIDELINE ................................................................................................ 944
B. EMPLOYMENT AND WAGE DATA SUBMISSION GUIDELINES AND INFORMATION .......................... 955
C. ICESA FILE FORMAT SPECIFICATIONS ................................................................................... 955
D. EFW2 FILE FORMAT SPECIFICATIONS .................................................................................... 955
E. DELIMITED FILE FORMAT SPECIFICATIONS ............................................................................ 966
F. WAGE DETAIL FILE UPLOAD TROUBLESHOOTING .................................................................... 966
G. LIST OF ERRORS DURING EMPLOYMENT AND WAGE DETAIL UPLOAD ......................................... 966
H. REGISTRATION TO PAY DUA TAXES VIA ACH CREDIT ............................................................. 1022

UI ONLINE - TPA User Guide
6
Abbreviations DUA Department of Unemployment Assistance
DOR Department of Revenue
EMAC Employer Medical Assistance Contribution, formerly Unemployment Health
Insurance (UHI) prior to January 1, 2014
LLC Limited Liability Corporation
MA Massachusetts
SSN Social Security Number
TPA Third Party Administrator
UHI Unemployment Health Insurance
UI Unemployment Insurance
UI Online Unemployment Insurance Online
WTF Workforce Training Fund

UI ONLINE - TPA User Guide
7
UI Online Quick Start

UI ONLINE - TPA User Guide
8
HOW TO START WITH UI Online
Introduction How you start with UI Online depends on whether you are a regular user or an
Administrator who is registering (setting up) and/or configuring the UI Online
system so it can be used.
For Regular Users
Regular users can start using UI Online once they are notified that their account is ready. Start with these sections to get up and running:
UI Online Requirements
Accessing UI Online
Navigation and Software Tips
For Administrators
Before regular users can use UI Online, an Administrator must register the TPA with DUA, and create user
accounts. In addition, someone at your organization must coordinate with each of your client Employers to authorize you via UI Online to act on their behalf.
Register (Set Up) UI Online
A user who is trusted with administrative access must REGISTER the organization with the DUA. Registration is performed from the UI Online area of the DUA website. For detailed instructions, see the section, TPA Registration.
IMPORTANT NOTE: If you are a TPA operating with employees who work or live within Massachusetts, then before you can register as a TPA, you must first either register as an Employer with the DUA (if you are
new Employer) or activate your account (if you conducted business with DUA before December 7, 2009). The instructions for Employer Registration and Account Activation are both found in the UI Online Employer Self Service User Guide. This document can be found on the DUA website: www.mass.gov/uima.
Create Additional UI Online Users
The person who completes the TPA Registration is assigned the TPA System Administrator role by default. This
user receives login credentials to access the UI Online self – service account during the registration.
This user can in turn add additional users to the UI Online Account. Users can be assigned either the TPA
System Administrator role, or a TPA User role. For detailed instructions, see the section, User Maintenance.
Get Authorization and Role Assignments from your Client Employers
Before you as TPA can conduct business with the DUA on behalf of your client Employers, you must coordinate with each of them to:
Authorize you as their TPA in UI Online.
Assign you the Employer Roles in UI Online that allow you to perform the functions you are contracted to perform.
Detailed instructions can be found in the UI Online Employer Self Service User Guide.

UI ONLINE - TPA User Guide
9
GETTING SUPPORT FROM DUA
Revenue Service Information Line 617-626-5075
Option 1: Passwords for Employers and TPAs
Password Reset (for permanent passwords only)
Problems with User ID (delete or add new users)
Other issues accessing previously activated or registered account
Option 2: Business Transfers
Change of Ownership
Purchase, sale or transfer of business
Change in organizational type
Reporting new Federal Tax ID number
Option 3: Employer Liability
New Account Registration
Closing an Account
Address change
Method of Payment
Third Party Administrator Update
Account Activation
Temporary User ID Password
Option 4: Employment and Wage Reporting
How to file employment and wage detail reports
How to make payments
Employment and Wage Detail adjustments
Refunds
Payment information
Out of State Wage Detail Credits
ACH Credit Applications
FUTA Certifications
Option 5: Benefit Charges Protest and Submission
Contributory Benefit Charges
Reimbursable Benefit Charges
Bills/Charge Reviews
Seasonal Employer Certification
Option 6: Revenue Collections and Enforcement
Payment Plan
Notice and demand for payments
Tax Liens and Bankruptcy
Tax Intercept
Certificate of Compliance

UI ONLINE - TPA User Guide
10
Option 7: Revenue Audit in Boston area
Revenue Audit Western Region 413-452-4725
Option 8: Tax Rates
Experience Rating Information
Voluntary Contribution Program
Annual Rate Notice
Wage Processing 617-626-5039
Employers with claims/wage questions
Employer EAN corrections (EIRP)
Applicants requesting alternate base periods
Applicants for missing/incorrect wages or monetary determinations (W-2, pay stubs, Not3xWBA)
Status investigations: Status of Base Period Employer (ie: Employer not Liable, Ceased, Suspended),
Section 2 (form 1099), Section 3, Section 6
Monetary Appeal questions (prior to being referred to Hearings)
Extended Base period
Claimant Overpayment Recovery 617-626-6300
Mass Career Information System 617-626-5718
24-Hour Fraud Hotline 800-354-9927
Hearings Department
Greater Boston Regional Hearings Office 617-626-5200
Northeast Regional Hearings Office (Lawrence) 978-738-4400
Southeast Regional Hearings Office (Brockton) 508-894-4777
West/Central Regional Hearings Office (Springfield) 413-452-4700
Web Address: www.mass.gov/uima

UI ONLINE - TPA User Guide
11
UI Online REQUIREMENTS
To run the UI Online software the following are required:
A connection to the Internet
Web browser software. Any of the following browsers are recommended:
Microsoft Internet Explorer, versions 6, 7, 8, 9.
Mozilla Firefox, versions 1, 2.
Apple Safari, versions 2, 3.
Netscape Navigator, versions 8, 9.
Adobe Acrobat Reader, versions 7, 8.
IMPORTANT BROWSER SETTINGS:
Add https://uionline.detma.org to the list of Trusted Sites. Disable pop-up blockers.

UI ONLINE - TPA User Guide
12
SYSTEM OVERVIEW
Introduction to
UI Online
UI Online (Unemployment Insurance Online) is the system that currently provides
Employers and Third Party Administrators (TPAs) with a fast, interactive web-
enabled way to transact business with the Department of Unemployment
Assistance (DUA). These transactions involve in large part the processing of
Employer contributions to the Massachusetts UI system. These contributions are
part of the revenue from which Claimants who qualify for Unemployment
Insurance may be paid. This Revenue system was rolled out in December of
2009. UI Online
This user guide is limited to the Revenue System and is intended for use by TPAs
accessing UI Online. TPAs should also refer to the UI Online Employer Self Service
User Guide; it can be accessed at www.mass.gov/uima.
REVENUE
System
The DUA UI Online Revenue System automates the Registration, Wage and
Employment Reporting, Tax Calculation and Payment Processes with the following
time-saving improvements:
TPAs and Employers can get complete up-to-date account information and
access and maintain their accounts online, via self service.
Employment and Wage Detail reporting including UI, WTF, and EMAC Tax
filings can be completed in a single process.
TPAs and Employers can use online processing for quarterly tax filing and
either manually enter data, or upload files for larger submissions.
TPAs can process multiple Employer filings at the same time using file
uploads.
Employers and Third Party Administrators can make secure online
payments.
Disclaimer: The purpose of this user guide is to help TPAs navigate the UI Online system. It
should not be used as a reference for Unemployment Insurance Program policies
and procedures. Please refer to the DUA website at www.mass.gov/dua for
Unemployment Insurance Program Policies and Procedures.

UI ONLINE - TPA User Guide
13
ACCESSING UI Online
Introduction This section describes how to access the UI Online system.
Most new users typically access UI Online for the first time by clicking the link in an email they receive. See the section, First Time Account Access with Emailed Link.
After their first time accessing UI Online, all users can log in from the DUA website. See the section, Logging In.
IMPORTANT NOTE: The System Administrator who registers (sets up) the
TPA account accesses UI Online for the first time using a special login process that is described in the section on TPA Registration. See the section, First Time Login After Registration.
First Time Account Access with Emailed Link
When your System Administrator creates an account for you, the UI Online system automatically generates an
email message containing a link.
1. Click the link in the email message to launch a browser with a special login page.
2. Enter a Password of your choosing, select a security question, answer the security question, set a PIN,
and click Save.
Logging In
If you have previously logged into UI Online, you can log in using the following steps.
1. Navigate to the DUA – UI Online webpage at www.mass.gov/uima.
2. Scroll to the UI Online area of the page. Click Agent Login.

UI ONLINE - TPA User Guide
14
3. In the TPA Login page, enter the User ID and Password. Click Login.
4. When the TPA Home page appears you have successfully logged into the UI Online system.
Logging Off
Click Logoff to end your UI Online session.

UI ONLINE - TPA User Guide
15
NAVIGATION AND SOFTWARE TIPS
Introduction This section provides tips on navigating and using the UI Online software:
The TPA Home page
System Timeout
Helpful Hints – Assistive Content
Additional Tips
TPA Home Page
The first page that appears after you log in to the system is the TPA Home page.
The TPA Home page has three panes: the top pane, the left pane, and the main pane.
The top pane has links to Change Password, Login, and Logoff.
The left pane has links you can click to bring up the main UI Online functions. When you click
function links in UI Online, the list in the left pane expands to show the additional functions that are
available under the main functions. The left pane also has the TPA Home link. Click this link at any time to return to the TPA Home page.
The main pane initially displays the same links to TPA functions as the left pane. It also provides explanations about each function.
If you click a function link, the main pane displays information and controls that are specific to the function.
IMPORTANT NOTE: Not all functions will be accessible all users. The TPA System Administrator at your place
of business has configured which function links you can use when you use UI Online.

UI ONLINE - TPA User Guide
16
System Timeout
The UI Online system times out after 30 minutes. If you are entering detailed data, save frequently; otherwise
if a timeout does occur, the data may be lost. (Save by clicking the Save button or by navigating to the next
page and then returning to the previous page.)
Helpful Hints – Assistive Content
Most pages in UI Online provide helpful hints about using the software right on screen. In addition, there are
links that you can click to bring up a separate window with more in-depth information about a topic. This
information is known as Assistive Content in UI Online.
Assistive Content links are blue and underlined, with a small question mark to the right.
An example of an assistive content link for password guidelines:
Click the Assistive Content link to display information about the phrase in a separate window.
Click Close to close the Assistive Content window.
Additional Tips
Do not use your browser’s Back or Forward buttons to navigate in UI Online. Click the Previous or Next (or
Save or Submit) buttons that are provided right on each UI Online page.
Use the TPA Home link to return to the top-level TPA Home page at any time.
Data in some tables in UI Online can be sorted by column. Columns that can be used for sorting have a
bold blue underlined column heading. Click the column heading to sort data in the table by that column.

UI ONLINE - TPA User Guide
17
FORGOTTEN PASSWORD
NOTE: If you need to change your password because it has been forgotten, follow these instructions.
1. Navigate to www.mass.gov/uima, and click Agent Login.
2. The Login page appears. Click Forgot Password.
3. The User ID page appears. Enter your User ID and click Next.
4. The Verify Alternate Credentials page appears. Enter Last Name, FEIN, Employee ID, 4-digit PIN
Code, and your Security Answer. Click Submit.
NOTE: If you are the user that registered the TPA, your Employee ID is the same as the TPA ID. All
other users should get their Employee ID from their System Administrator.
UI ONLINE - TPA User Guide
18
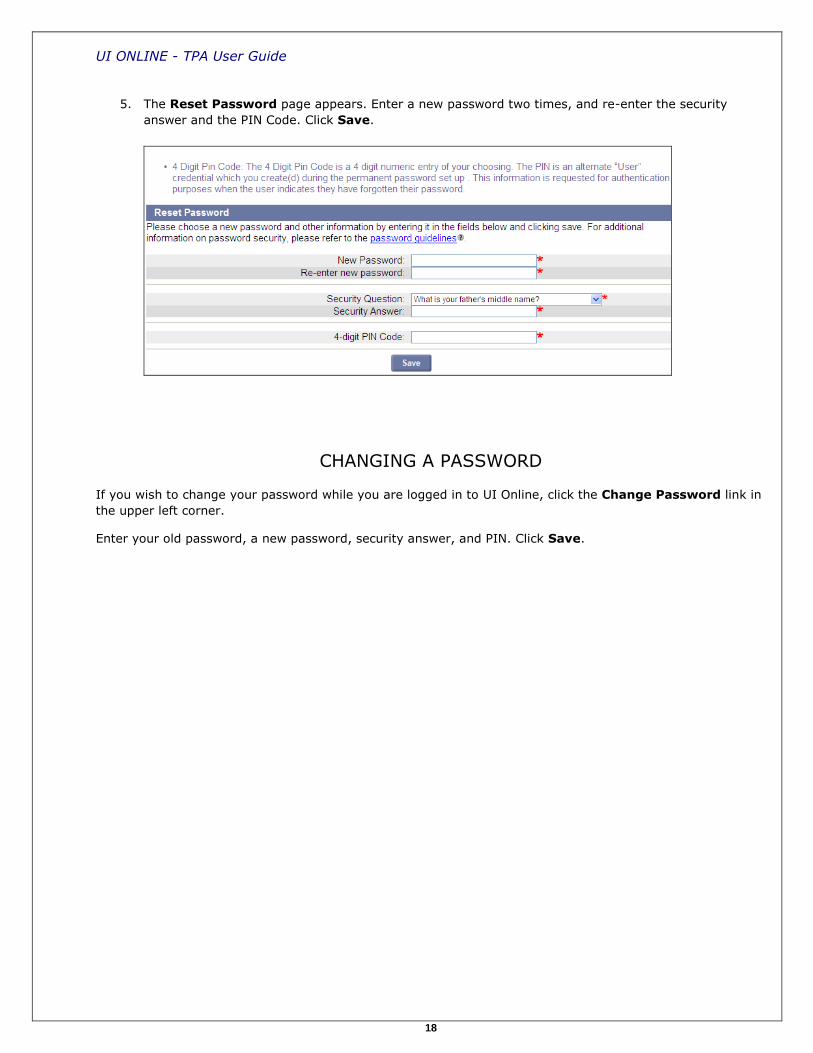
5. The Reset Password page appears. Enter a new password two times, and re-enter the security
answer and the PIN Code. Click Save.
CHANGING A PASSWORD
If you wish to change your password while you are logged in to UI Online, click the Change Password link in
the upper left corner.
Enter your old password, a new password, security answer, and PIN. Click Save.

UI ONLINE - TPA User Guide
19
TPA Registration

UI ONLINE - TPA User Guide
20
ABOUT TPA REGISTRATION
Introduction If you are an agent authorized to conduct business on behalf of an Employer who
is registered with the DUA, you must register your business with the DUA as a
Third Party Administrator (TPA) using the UI Online system. Registration is
required, even if you are an existing TPA already conducting business with the
DUA.
The following information is required to register as a TPA:
Federal Identification Number (FEIN)
Massachusetts Employer Account Number (EAN) if you have employees
who work or live within Massachusetts
IMPORTANT NOTE: If you are a TPA operating with employees who work or live
within Massachusetts, then before you can register as a TPA, you must first either
register as an Employer with the DUA (if you are new Employer) or activate
your account (if you conducted business with DUA before December 7, 2009).
The instructions for Employer Registration and Account Activation are both found
in the UI Online Employer Self Service User Guide. This document can be found on
the DUA website: www.mass.gov/uima.
Once your Employer account is registered/activated, return to these instructions to
complete the TPA registration. Note that the User ID and Password you use to
access your Employer account are distinct from the User ID and Password you use
to log in as a TPA.
IMPORTANT NOTE: The person who registers the account is actually creating a
user who is assigned the TPA System Administrator role by default. This user has
access to all information in the TPA’s account and is able to make changes,
perform transactions, add additional users to the account, and choose what
permissions those users get. This user can also perform functions directly within
Employers’ accounts. Therefore, the person chosen to register the account should
be a highly trusted employee.
TPA REGISTRATION
1. Navigate to the DUA – UI Online webpage at www.mass.gov/uima.
2. Scroll to the UI Online area of the page. Click Agent Login.

UI ONLINE - TPA User Guide
21
3. In the TPA Login page, click the TPA Registration link in the left pane.
The Register as a Third Party Administrator page appears. Enter the requested information.
Fields with a red asterisk (*) are required. Click Next to continue.
UI ONLINE - TPA User Guide
22
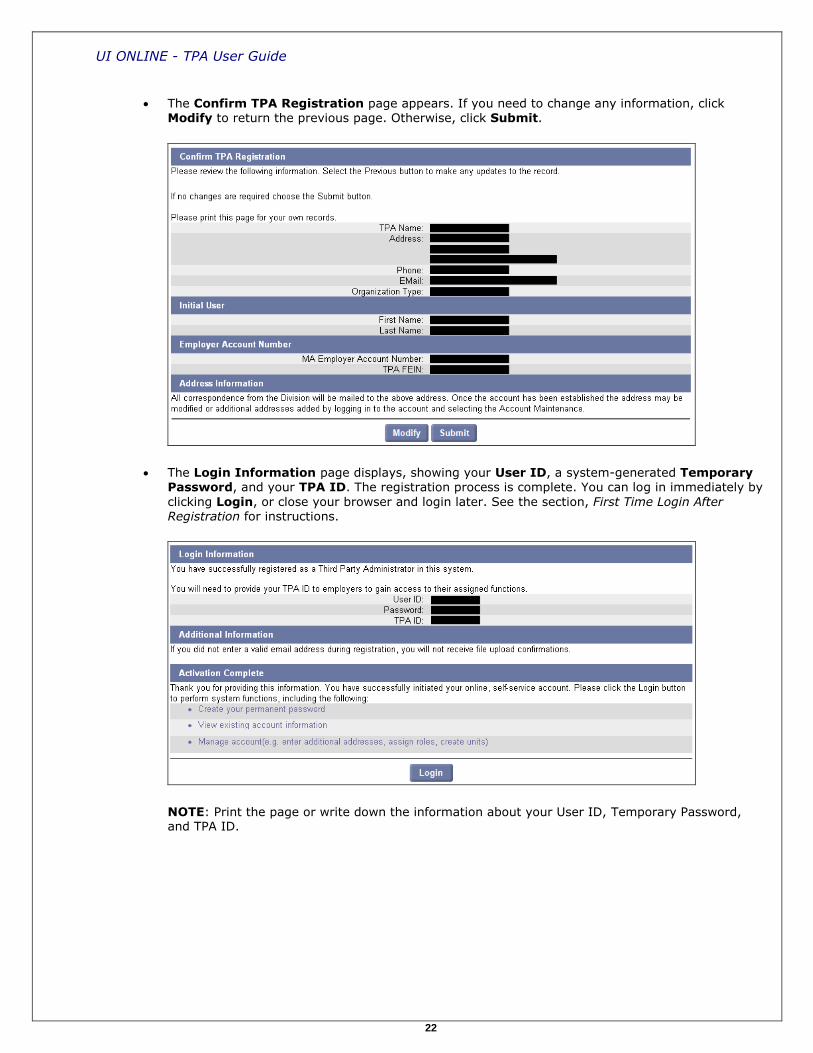
The Confirm TPA Registration page appears. If you need to change any information, click
Modify to return the previous page. Otherwise, click Submit.
The Login Information page displays, showing your User ID, a system-generated Temporary Password, and your TPA ID. The registration process is complete. You can log in immediately by
clicking Login, or close your browser and login later. See the section, First Time Login After Registration for instructions.
NOTE: Print the page or write down the information about your User ID, Temporary Password, and TPA ID.

UI ONLINE - TPA User Guide
23
First Time Login After Registration
This section applies only if you are logging in as a TPA for the first time after registering as a TPA. It
describes how to change the UI Online-generated password and establish your security question and PIN.
(If you have previously logged in using these instructions, then you should follow the regular log in procedure
in the section: Logging In.)
1. If you just registered your TPA account and you just clicked Home, skip to Step 3.
If you closed your browser before logging in, navigate to the DUA – UI Online webpage at
www.mass.gov/uima.
2. Scroll to the UI Online area of the page. Click Agent Login.
3. In the TPA Login page, enter the User ID and Password you received on screen when you completed
account registration. Click Login.

UI ONLINE - TPA User Guide
24
4. The Reset Password page appears. Enter the current password and a new password, select a
security question, answer the question, and enter a 4-digit PIN code. Click Save to continue.
5. When the TPA Home page appears you have successfully logged into the UI Online system.

UI ONLINE - TPA User Guide
25
Account Maintenance

UI ONLINE - TPA User Guide
26
ABOUT ACCOUNT MAINTENANCE
Introduction This section describes how to use the functions available from the Account
Maintenance page. Functions include:
Account Profile
Address Information
NAVIGATING TO ACCOUNT MAINTENANCE
To navigate to Account Maintenance, perform the following steps:
1. Log in to UI Online. Click the Account Maintenance link (the link appears in the left pane and the
main pane of the TPA Home page).
2. The Account Maintenance page appears. Available account maintenance functions are listed in links
in the left pane as well as the main pane. The main pane also displays explanations of the functions.
Click a link to access a function.
UI ONLINE - TPA User Guide
27
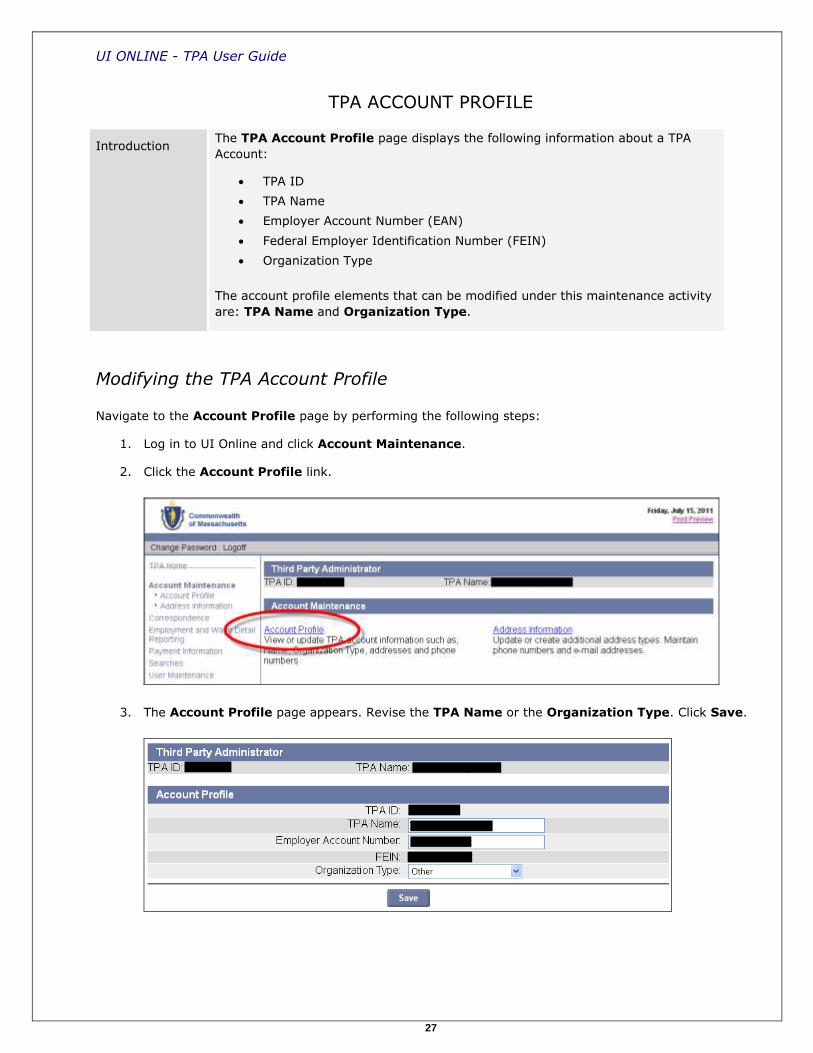
TPA ACCOUNT PROFILE
Introduction The TPA Account Profile page displays the following information about a TPA
Account:
TPA ID
TPA Name
Employer Account Number (EAN)
Federal Employer Identification Number (FEIN)
Organization Type
The account profile elements that can be modified under this maintenance activity
are: TPA Name and Organization Type.
Modifying the TPA Account Profile
Navigate to the Account Profile page by performing the following steps:
1. Log in to UI Online and click Account Maintenance.
2. Click the Account Profile link.
3. The Account Profile page appears. Revise the TPA Name or the Organization Type. Click Save.

UI ONLINE - TPA User Guide
28
TPA ADDRESS INFORMATION
Introduction This section describes how to:
View and modify the primary address information on a TPA account.
View TPA address history.
View and modify your primary email address.
Additional
Information
A TPA account can have up to four different types of addresses:
Headquarters
Mailing
Wage & Separation
Benefits Charge
Navigating to the Address Information Page
1. Log in to UI Online and click Account Maintenance.
2. Click the Address Information link.
3. The Address Information page appears. The page has links that allow you to:
View and modify each type of address
View an address history with list events associated with address changes in the past.
View or modify Email Preferences
UI ONLINE - TPA User Guide
29
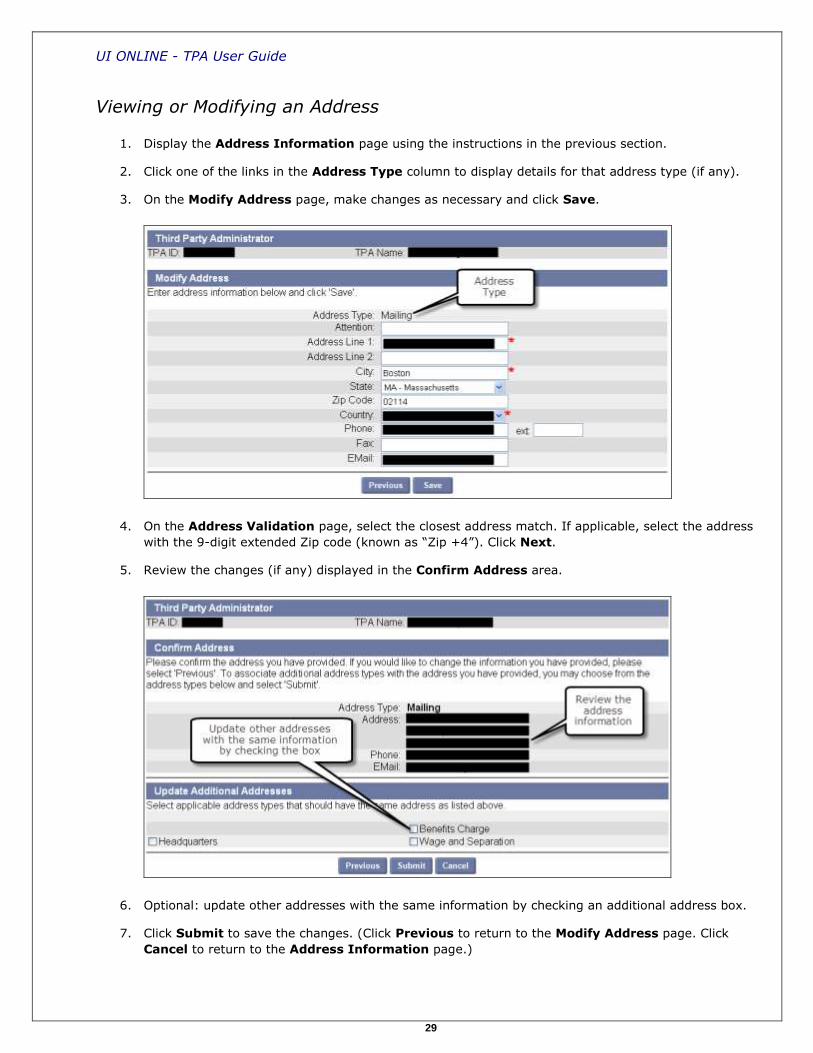
Viewing or Modifying an Address
1. Display the Address Information page using the instructions in the previous section.
2. Click one of the links in the Address Type column to display details for that address type (if any).
3. On the Modify Address page, make changes as necessary and click Save.
4. On the Address Validation page, select the closest address match. If applicable, select the address
with the 9-digit extended Zip code (known as “Zip +4”). Click Next.
5. Review the changes (if any) displayed in the Confirm Address area.
6. Optional: update other addresses with the same information by checking an additional address box.
7. Click Submit to save the changes. (Click Previous to return to the Modify Address page. Click
Cancel to return to the Address Information page.)

UI ONLINE - TPA User Guide
30
Viewing Address History
1. Perform the steps in the section, Navigating to the Address Information Page.
2. Click View Employer Address History.
3. The Address Historical Information page appears. Select an Address Type and click Search.
4. View the search results displayed below the search grid.
NOTE: If you need to clear the results and the search parameters click Reset. To return to the Address Information page click Previous.
Viewing or Modifying Your Email Address
1. Perform the steps in the section, Navigating to the Address Information Page.
2. Click Update Email Preference.
3. The Email Preference page appears. Enter your email address in the Contact Email field.
4. Click Submit.

UI ONLINE - TPA User Guide
31
Employment and Wage Detail Reporting

UI ONLINE - TPA User Guide
32
ABOUT EMPLOYMENT AND WAGE DETAIL REPORTING
Introduction TPAs can submit Employment and Wage Detail via file upload for multiple or
individual Employer accounts (adjustments and original reports) from the
Employment and Wage Detail Reporting function via the TPA Home page.
The submission procedure changed starting in 2010. This section includes both
procedures:
Submit Employment and Wage Detail File (for 2010 and forward)
Submit Employment and Wage Detail File for Quarters Prior to 2010
In addition, this section describes how to view employment and wage detail report
information for TPA submissions and client groups:
View Submission History
View Employer History
NOTE: TPAs can also navigate into an individual Employer account to file a “No
Employment and Wage Detail Report,” to “Copy from Previous” (Quarter,) or to
manually submit employment and wage detail. TPAs navigate into the Employer’s
account via the Search function. See the section, Searches - Employer Account
Access, for instructions. See the UI Online Employer Self Service User Guide for
instructions on using Employer functions for employment and wage detail
reporting.
NOTE: Paper reports and paper checks issued by TPAs will not be accepted by
DUA.
NOTE: If a TPA has more than $1,000 in debt to the DUA on their own Employer
Account, they are not allowed to file employment and wage detail reports for their
clients.
IMPORTANT NOTE: Your TPA account must have the required roles before you
can submit employment and wage detail reports for each assigned Employer
account. Coordinate with each Employer to get required roles assigned to you.

UI ONLINE - TPA User Guide
33
NAVIGATING TO EMPLOYMENT AND WAGE DETAIL REPORTING
To navigate to the Employment and Wage Detail Reporting page, perform the following steps:
1. Log in to UI Online. Click the Employment and Wage Detail Reporting link (the link appears in the
left pane and the main pane of the TPA Home page).
2. The Employment and Wage Detail Reporting page appears. Available functions are listed in links
in the left pane as well as the main pane. The main pane also displays explanations of the functions.
Click a link to access a function.

UI ONLINE - TPA User Guide
34
SUBMIT EMPLOYMENT AND WAGE DETAIL FILE
Introduction This section describes how to submit employment and wage detail files for
assigned Employer accounts, for 2010 and forward. Note that only the File Upload
method can be used from the TPA Home page, whether for one or multiple
Employers. (If you wish to submit employment and wage detail reports using any
other method from the individual Employer account, see the Employment and
Wage Detail Reporting section of the UI Online Employer Self Service User Guide.)
NOTE: If you wish to submit employment and wage details for quarters prior to
2010, see the section, Submit Employment and Wage Detail File for Quarters Prior
to 2010.
File Upload
method:
Three different file types can be used with the file upload method: ICESA, EFW2
and Delimited. Key facts about file upload method are:
The file upload method can be used to process up to 29,999 records. If
you have 30,000 or more records, please contact DUA at 617-626-5075,
Option 4.
The uploaded wage detail files will be processed immediately if your file
contains up to 299 records. If you have 300 or more records, your file will
be processed as part of an overnight scheduled batch. You should be able
to view the status of your submission the following day, using the View
Submission History link.
The process for uploading ICESA, EFW2 or Delimited files is identical, even
though the file formats are different.
For information about the ICESA, EFW2, or Delimited file formats, see the
document: Employment and Wage Detail Guidelines and Information. To
locate the document go to the main website, http://www.mass.gov/uima,
and click the Quarterly Employment and Wage Submission link under
the Key Resources topic.
Perform these steps to submit the employment and wage detail file:
1. Click Employment and Wage Detail Reporting.
2. Click Submit Employment and Wage Detail File.

UI ONLINE - TPA User Guide
35
3. The File Format page appears. Select Delimited, ICESA, or EFW2 and click Next.
NOTE: This example shows a file upload for a Delimited file, but the procedure is the same for the other two formats as well.
4. The Select Wage Detail File page appears. Click Browse. Navigate to and select the upload file.
Click Next to process the file.
UI ONLINE - TPA User Guide
36
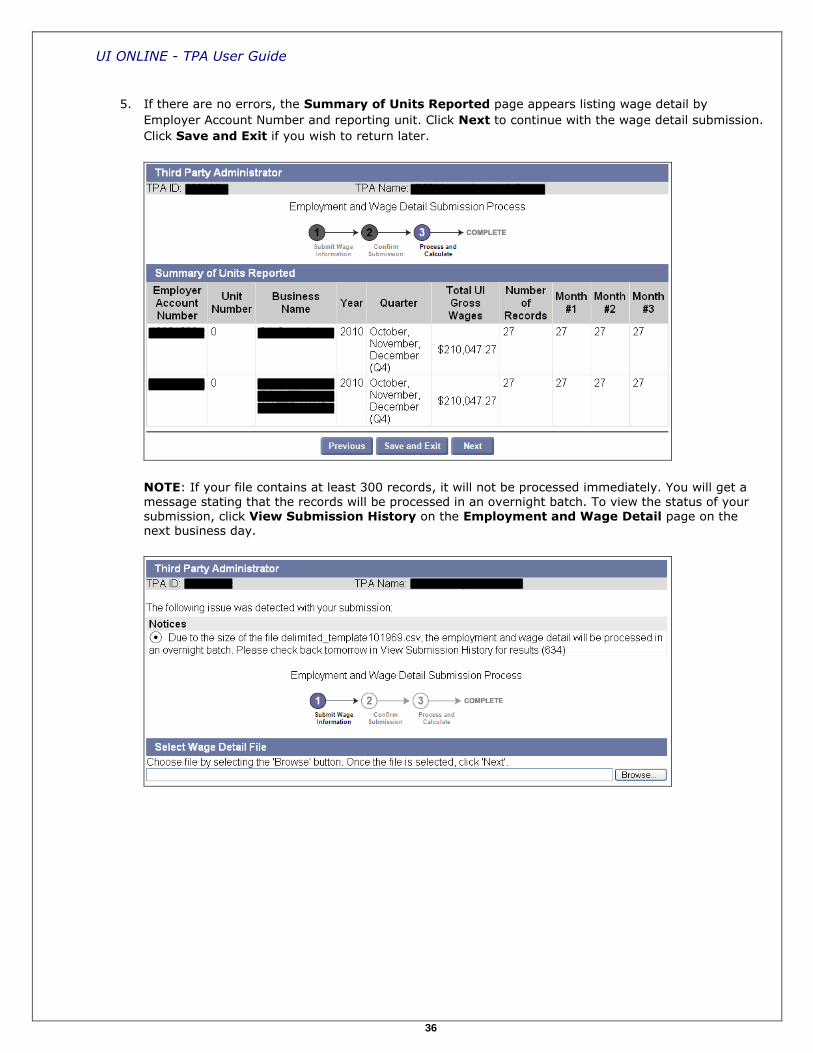
5. If there are no errors, the Summary of Units Reported page appears listing wage detail by
Employer Account Number and reporting unit. Click Next to continue with the wage detail submission.
Click Save and Exit if you wish to return later.
NOTE: If your file contains at least 300 records, it will not be processed immediately. You will get a message stating that the records will be processed in an overnight batch. To view the status of your submission, click View Submission History on the Employment and Wage Detail page on the next business day.
UI ONLINE - TPA User Guide
37
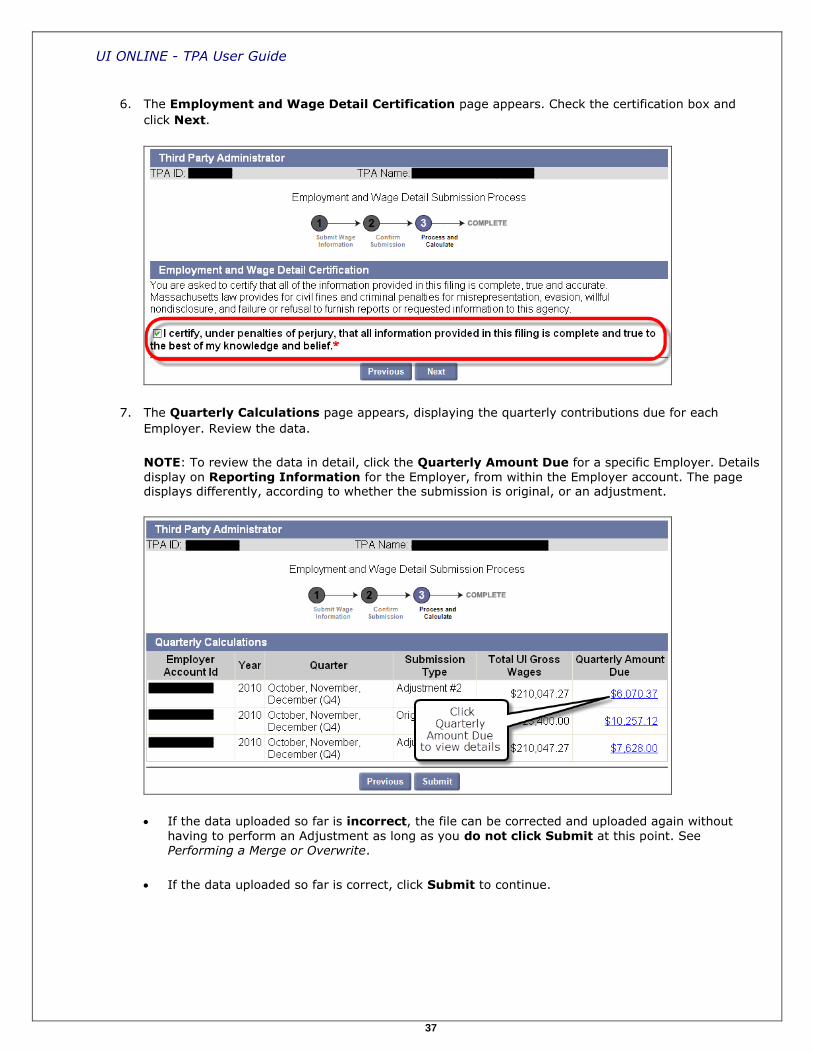
6. The Employment and Wage Detail Certification page appears. Check the certification box and
click Next.
7. The Quarterly Calculations page appears, displaying the quarterly contributions due for each
Employer. Review the data.
NOTE: To review the data in detail, click the Quarterly Amount Due for a specific Employer. Details
display on Reporting Information for the Employer, from within the Employer account. The page displays differently, according to whether the submission is original, or an adjustment.
If the data uploaded so far is incorrect, the file can be corrected and uploaded again without
having to perform an Adjustment as long as you do not click Submit at this point. See Performing a Merge or Overwrite.
If the data uploaded so far is correct, click Submit to continue.

UI ONLINE - TPA User Guide
38
8. The Employment and Wage Detail Report Submission Confirmation appears. If desired, click Make
Payment. See Payment Information for Payment Options and procedures.
Performing a Merge or Overwrite
If at the point of submitting Employment Wage and Detail information via file upload, you realize that the data
is incorrect, you can upload the data again without performing an Adjustment.
1. Do NOT click Submit.
2. Correct the file.
3. Click Previous on successive pages until you have returned to the Browse for file page.
4. Select the corrected file and click Next until you reach the Select Action page.
5. Select to either delete the records or merge them and click Next to continue with the upload. (See
below for Merge Rules.)

UI ONLINE - TPA User Guide
39
UI ONLINE - TPA User Guide
40
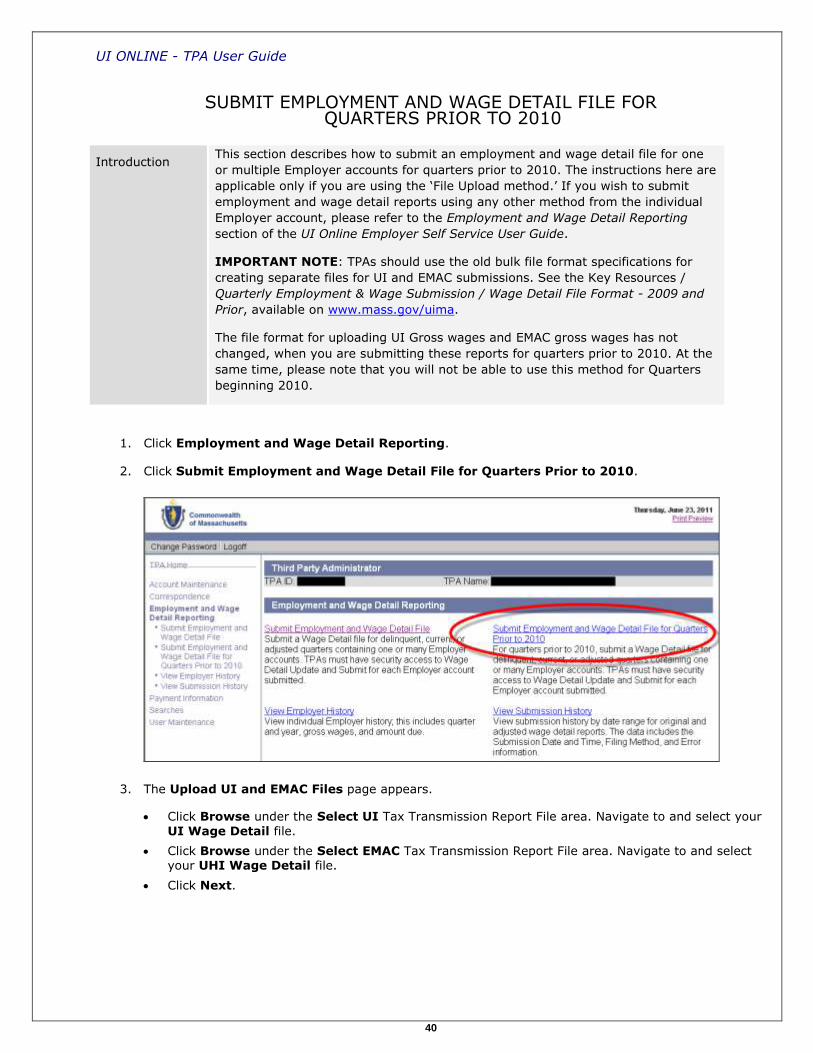
SUBMIT EMPLOYMENT AND WAGE DETAIL FILE FOR QUARTERS PRIOR TO 2010
Introduction This section describes how to submit an employment and wage detail file for one
or multiple Employer accounts for quarters prior to 2010. The instructions here are
applicable only if you are using the ‘File Upload method.’ If you wish to submit
employment and wage detail reports using any other method from the individual
Employer account, please refer to the Employment and Wage Detail Reporting
section of the UI Online Employer Self Service User Guide.
IMPORTANT NOTE: TPAs should use the old bulk file format specifications for
creating separate files for UI and EMAC submissions. See the Key Resources /
Quarterly Employment & Wage Submission / Wage Detail File Format - 2009 and
Prior, available on www.mass.gov/uima.
The file format for uploading UI Gross wages and EMAC gross wages has not
changed, when you are submitting these reports for quarters prior to 2010. At the
same time, please note that you will not be able to use this method for Quarters
beginning 2010.
1. Click Employment and Wage Detail Reporting.
2. Click Submit Employment and Wage Detail File for Quarters Prior to 2010.
3. The Upload UI and EMAC Files page appears.
Click Browse under the Select UI Tax Transmission Report File area. Navigate to and select your
UI Wage Detail file.
Click Browse under the Select EMAC Tax Transmission Report File area. Navigate to and select your UHI Wage Detail file.
Click Next.

UI ONLINE - TPA User Guide
41
4. Both the UI file and EMAC file will be uploaded to UI Online and will be processed by a batch process
that runs daily. After the upload is complete, the DOR Wage Detail Option page appears, asking if
you wish to submit the DOR wage detail files. Select Yes or No and click Next.
5. If you selected Yes in Step 4, skip to Step 6. If you selected No, the Employment and Wage
Detail Report Submission Confirmation page appears. The submission process is complete. Either
click Exit, or click Make Payment and see the section Payment Information for instructions. (Do not
perform the rest of the steps in this section.)

UI ONLINE - TPA User Guide
42
6. If you selected Yes in Step 4, the File Format page appears. Select Delimited, ICESA, or EFW2
and click Next.
7. The Select Wage Detail File page appears. Click Browse. Navigate to and select the upload file.
Click Next to process the file.
8. The Employment and Wage Detail Report Submission Confirmation page appears. The
submission process is complete. Either click Exit, or click Make Payment and see the section
Payment Information for instructions.
NOTE: When you are filing for a quarter prior to 2010, the DOR wage detail file you upload will not be used to calculate the Quarterly contributions due for the Employer account.

UI ONLINE - TPA User Guide
43
VIEW SUBMISSION HISTORY
Introduction This section describes how to view employment and wage detail submission
history. You can view submission history by date range for original and adjusted
wage detail reports. The data displayed includes the Submission Date and Time,
Confirmation Number, Filing Method, and error information. You can also view the
Employer Account Number and the summary of wage details specific to the
submission, by clicking on the Details for each submission.
1. Click Employment and Wage Detail Reporting.
2. Click View Submission History.
3. The Wage Detail Submission History Search page appears. Enter a date range for the history to
retrieve in the search. Click Search.
UI ONLINE - TPA User Guide
44
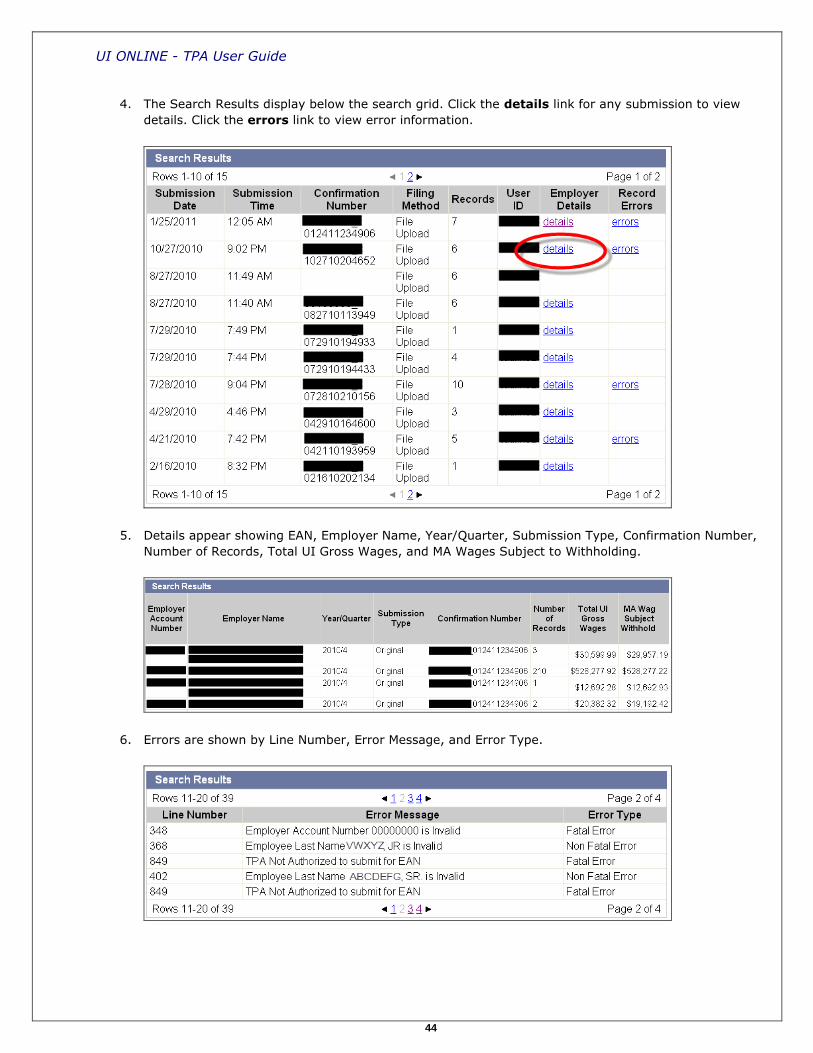
4. The Search Results display below the search grid. Click the details link for any submission to view
details. Click the errors link to view error information.
5. Details appear showing EAN, Employer Name, Year/Quarter, Submission Type, Confirmation Number,
Number of Records, Total UI Gross Wages, and MA Wages Subject to Withholding.
6. Errors are shown by Line Number, Error Message, and Error Type.

UI ONLINE - TPA User Guide
45
VIEW EMPLOYER HISTORY
Introduction This section describes how to view the summary of employment and wage detail
history by Employer accounts. You can view the employment and wage detail
summary for each assigned Employer account for a chosen quarter. The search
results will include the Employer Account Number, Employer Name, Year/Quarter,
Total UI Gross Wages, amounts due, and wages withheld.
1. Click Employment and Wage Detail Reporting.
2. Click View Employer History.
3. The View History Search page appears. Enter an Employer Account Number, and select a year and
quarter. Click Search.

UI ONLINE - TPA User Guide
46
4. The Search Results display below the search grid.

UI ONLINE - TPA User Guide
47
Payment Information

UI ONLINE - TPA User Guide
48
ABOUT PAYMENT INFORMATION
Introduction This section describes the functions that are available from the Payment
Information area. From Payment Information, TPAs can:
Review, modify, and make payments for multiple or individual Employer accounts
Cancel payments
Search payments
Review Employer accounts
Download payment due files
View payment information for agent submissions and client groups
NOTE: In order to manage the Employer account individually and perform other
payment related functions on behalf of the Employer, you must navigate into the
Employer’s account. Access the Employer’s account via the Search function. See
the section, Searches - Employer Account Access for instructions. In addition,
consult the UI Online Employer Self Service User Guide for detailed instructions on
performing Employer payment functions.
NOTE: Paper checks issued by TPAs will not be accepted by DUA.
IMPORTANT NOTE: Your TPA account must have the required roles before you
can submit payments for each assigned Employer account. Coordinate with each
Employer to get required roles assigned to you.
ABOUT DEFERRALS
Deferral eligibility will be given to private Contributory and non-profit 501(c)(3) Contributory Employers. The
option to defer will be provided in the month of April for Quarter 1 filing and July for Quarter 2 filing.
The option to defer is provided for a quarter only after the current quarter has been filed timely. All deferrals
become due by Quarter 3 due date (Oct. 31). All deferrals must be done manually from within an Employer
account.
Please remember that deferral is not a requirement and that Employer Medical Assistance Contribution (EMAC)
and Workforce Training Fund (WTF) contributions cannot be deferred.
IMPORTANT NOTE: Deferrals can only be performed for an assigned Employer when the TPA navigates into
the individual Employer’s Account Home and makes a deferred payment specifically on that Employer’s behalf.
Deferrals cannot be performed as part of any bulk payment activities. For more information see the UI
Online Employer Self Service User Guide.

UI ONLINE - TPA User Guide
49
NAVIGATING TO PAYMENT INFORMATION
To navigate to the Payment Information page, perform the following steps:
1. Log in to UI Online. Click the Payment Information link in the left pane (the link also appears on the
main pane of the TPA Home page).
2. The Payment Information page appears.

UI ONLINE - TPA User Guide
50
DOWNLOAD PAYMENT DUE FILE
Introduction The Payment Due file lists all Employers assigned to the TPA account, and the
corresponding amounts they each owe. This file is provided by DUA and is available
using the Download Payment Due File function. Use this file to review Employer
obligations, and to create a Payment File that can be uploaded as a payment statement
when you make payments towards multiple Employer accounts at once. This section
describes specifically how to:
Download the Payment Due file via the UI Online system.
Read the Payment Due file format.
Edit the Payment Due file to create the Payment File to upload.
Upload the Payment File.
NOTE: For instructions on making a payment using an uploaded Payment File, see the
section, Paying – Making Payment Based on File Upload/Edits.
Downloading the Payment Due File
1. Click Payment Information.
2. Click Download Payment Due File.
3. The following page appears. Click the link, Select here to download a payment due file.
4. The File Download pop-up window appears. Click Save and follow the prompts to download and save
the file to your local folder.

UI ONLINE - TPA User Guide
51
Reading the Payment Due File Format
The file layout of the downloaded bulk payment file is as follows:
TPA ID, Download Date, Record Count, Total Amount Due, Current Quarter Due (header row)
Employer Account Number, Total Amount Due, Current Quarter Due, Employer Name (Record 1)
Employer Account Number, Total Amount Due, Current Quarter Due, Employer Name (Record 2)….and so on.
Sample File Downloaded: 000001,08302011,3,914.58,885.75 00000001,54.06,25.23,Employer Name 1 00000002,0.00,0,Employer Name 2
00000003,860.52,860.52,Employer Name 3
Editing the Payment Due File to Use as the Payment File
Edit the Payment Due file so it can be used as a Payment File, using these steps:
1. Use the file you downloaded using the steps in the section, Downloading the Payment Due File.
2. Open the file and update the second value (Total Amount Due) for each record with the correct
payment amount to be applied to the Employer account associated. Change the value to 0 for
Employers for whom no payment is being included.
3. Save the file to your local computer.
NOTE: Only 1,000 records in an upload file will be reported with your payment. If there are over 1,000
Employers in your download file, you should divide the records between multiple upload files, each having
1,000 or fewer records. Be sure to customize the header row in each file to reflect its actual record count and
its sum of Total Payment Amount fields.
You may also consider applying to DUA to pay via ACH Credit.
NOTE: You cannot have a negative payment amount in the Payment File.
NOTE: The upload file will not be saved by the system. Data will be uploaded, and it can be reviewed online
after successful upload.
Sample File Edited: 000001,08302011,3,700.52,885.75 00000001,0,25.23,Employer Name 1
00000002,0.00,0, Employer Name 2
00000003,700.52,860.52, Employer Name 3
UI ONLINE - TPA User Guide
52
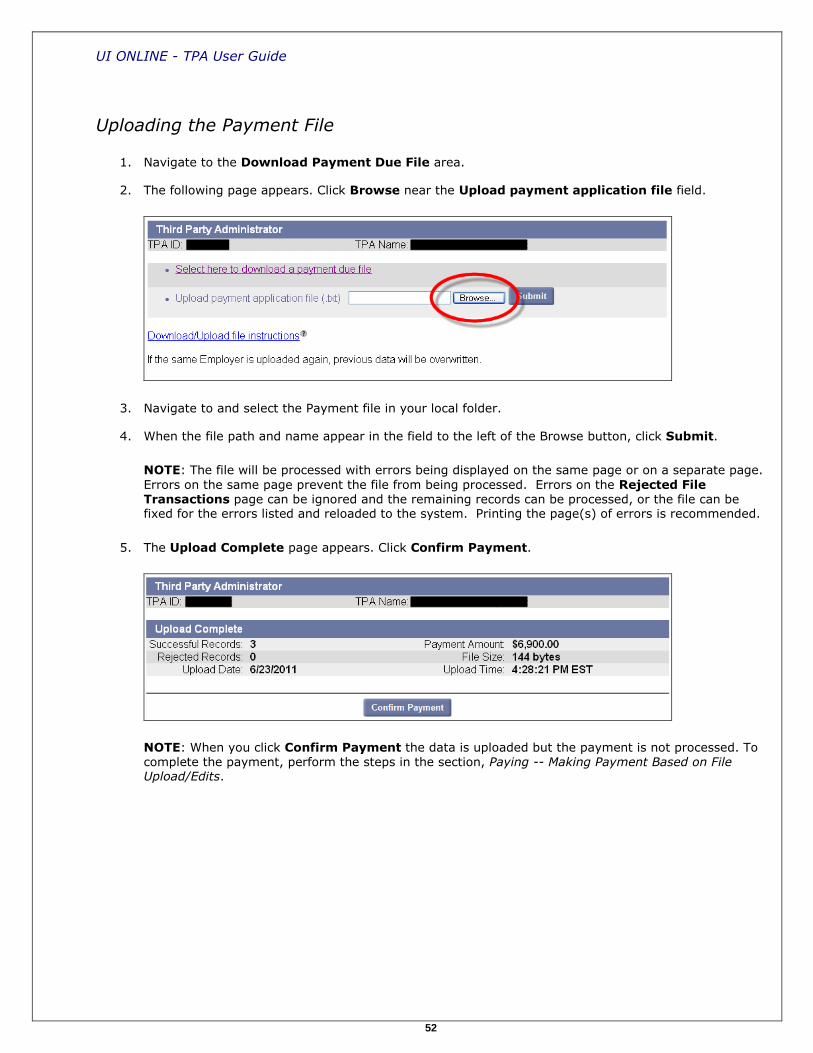
Uploading the Payment File
1. Navigate to the Download Payment Due File area.
2. The following page appears. Click Browse near the Upload payment application file field.
3. Navigate to and select the Payment file in your local folder.
4. When the file path and name appear in the field to the left of the Browse button, click Submit.
NOTE: The file will be processed with errors being displayed on the same page or on a separate page.
Errors on the same page prevent the file from being processed. Errors on the Rejected File Transactions page can be ignored and the remaining records can be processed, or the file can be fixed for the errors listed and reloaded to the system. Printing the page(s) of errors is recommended.
5. The Upload Complete page appears. Click Confirm Payment.
NOTE: When you click Confirm Payment the data is uploaded but the payment is not processed. To complete the payment, perform the steps in the section, Paying -- Making Payment Based on File Upload/Edits.
UI ONLINE - TPA User Guide
53
PAYMENT OPTIONS
Introduction This section describes the options TPAs have when making payments on behalf of
their assigned Employer accounts. Options include:
Making full payment for all assigned Employers
Pay all debt for all Employers in full without downloading/uploading a file or
editing the system-calculated amounts. Only payment via ACH Debit is allowed.
Manually entering payment information online per Employer
View the list of all Employers and edit their payment amounts manually. Only
payment via ACH Debit is allowed.
Making Payment based on file upload/edits
Using the Payment Due file downloaded in the previous section, upload the
edited data to make a payment. Only payment via ACH Debit is allowed.
Acting as a single Employer
Navigate into the Employer area, and process an individual Employer payment.
Only payment via ACH Debit is allowed if the TPA issues the payment. Paper
checks are only accepted if the check is issued by the Employer.
Paying via ACH Credit
ACH Credit payments are made separately from the UI Online software. TPAs
must apply with DUA to use ACH Credit. See the section, Applying to DUA to
Make Payments Using ACH Credit.
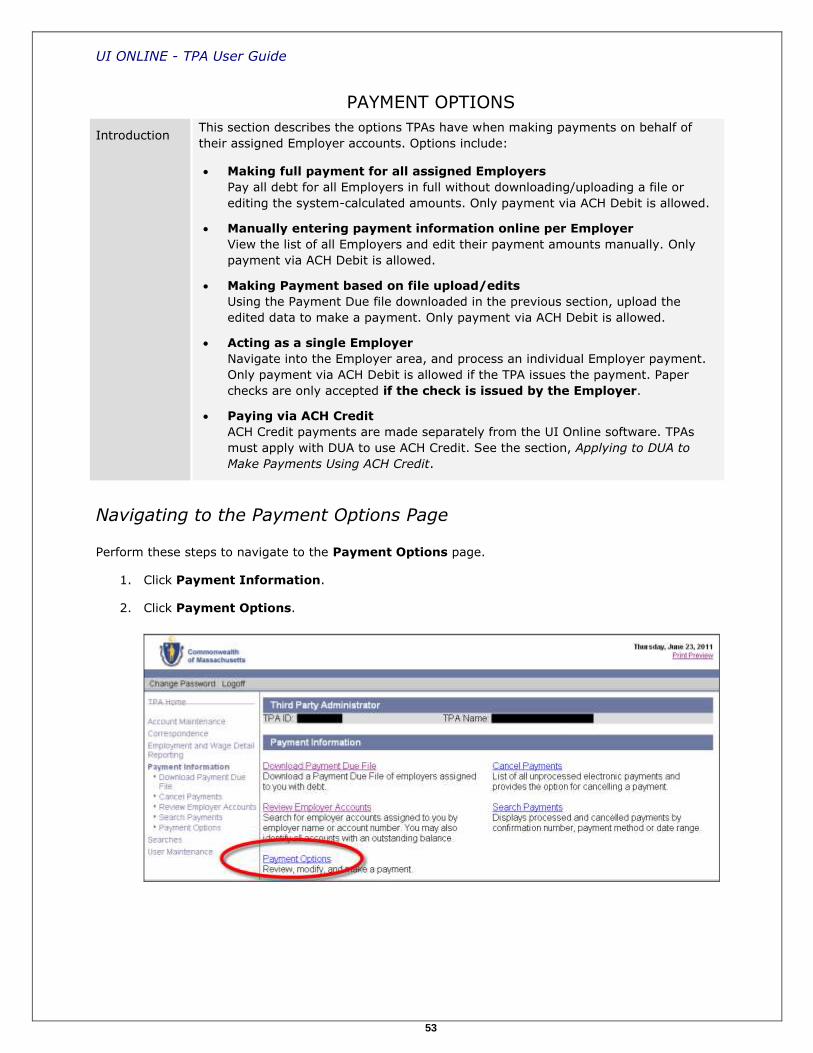
Navigating to the Payment Options Page
Perform these steps to navigate to the Payment Options page.
1. Click Payment Information.
2. Click Payment Options.

UI ONLINE - TPA User Guide
54
3. The Payment Options page appears, with links for all applicable payment options. The page also
displays links to edit or delete any previously entered payment details that are in progress (if any).
Example 1: Payment Options page when no file has been uploaded, and no information has been saved. The only options are for paying in full, or entering payment information per Employer.
Example 2: Payment Options page when a Payment File has been uploaded in preparation for making
a payment.
Paying -- Making Full Payment for All Assigned Employers
Use this method to make the full payment due on all your assigned Employer accounts. You will not be able
to make any changes to the payment amounts or remove any of the Employer accounts.
1. Click Payment Information.
2. Click Payment Options.
3. Click Make full payment for all assigned employers for all debt.
4. Continue with Step 5 of the section, Paying -- Manually Entering Payment Information Online Per
Employer, to complete this procedure.

UI ONLINE - TPA User Guide
55
Paying -- Manually Entering Payment Information Online Per Employer
1. Click Payment Information.
2. Click Payment Options.
3. Click View all employers and enter payment information online per employer.
4. The Search Employers page appears, listing up to 100 Employer accounts associated with your TPA
account, and their payments due.

UI ONLINE - TPA User Guide
56
Enter all the Payment Amounts in the Edit Assigned Employer Accounts area.
Use the links on the page to enter or clear all Employer Payment Amounts if desired.
Click Save frequently if you are entering custom Payment Amounts for each Employer.
Click Submit when all information is complete.
NOTE: Only 100 Employers are displayed on the screen with paging to move through them. To display other Employers, or a specific Employer, enter criteria in the search grid and click Search.
NOTE: Payments made for UI, EMAC, and WTF are held by law in separate fiduciary accounts. Credits are reviewed, approved, and remitted strictly separately as well. Do not underpay UI, EMAC, or WTF
obligations on the assumption that a possible credit for one obligation will offset the underpayment of another.
5. The Payment Method page appears, displaying information about the payment you are about to
make. Click Next.
NOTE: The only payment method available on this page is ACH Debit. For information on paying using ACH Credit, click on the link at the bottom of the page.

UI ONLINE - TPA User Guide
57
6. The ACH Payment page appears. Enter the Routing Transit Number and Bank Account Number,
select the Account Type, and enter the Payment Effective Date. Click Next.
IMPORTANT NOTE: The Routing Transit Number and the Bank Account Number are NOT retained in the UI Online system, as a security measure. Enter the numbers each time you submit a payment.
7. The Payment Verification page appears. Click Submit to complete the payment.
UI ONLINE - TPA User Guide
58
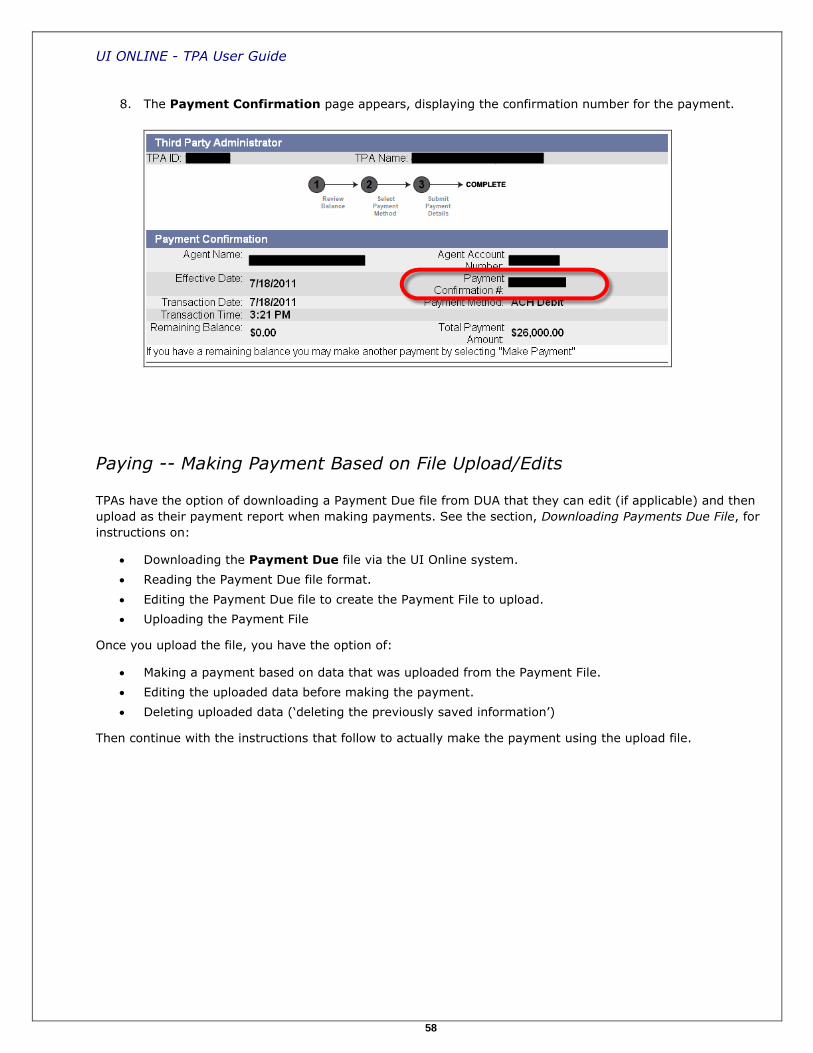
8. The Payment Confirmation page appears, displaying the confirmation number for the payment.
Paying -- Making Payment Based on File Upload/Edits
TPAs have the option of downloading a Payment Due file from DUA that they can edit (if applicable) and then
upload as their payment report when making payments. See the section, Downloading Payments Due File, for
instructions on:
Downloading the Payment Due file via the UI Online system.
Reading the Payment Due file format.
Editing the Payment Due file to create the Payment File to upload.
Uploading the Payment File
Once you upload the file, you have the option of:
Making a payment based on data that was uploaded from the Payment File.
Editing the uploaded data before making the payment.
Deleting uploaded data (‘deleting the previously saved information’)
Then continue with the instructions that follow to actually make the payment using the upload file.

UI ONLINE - TPA User Guide
59
Making a payment based on uploaded data
1. Click the Make payment based on file uploads/edits link.
2. Continue with Step 5 of the section, Paying -- Manually Entering Payment Information Online Per
Employer, to complete this procedure.
Editing the Uploaded Data Before Making the Payment
1. Click the Edit previously saved information link.
2. Continue with Step 4 of the section, Paying -- Manually Entering Payment Information Online Per
Employer, to complete this procedure.

UI ONLINE - TPA User Guide
60
Deleting Previously Saved Information
1. Click the Delete previously saved information link.
2. A Warning page appears. Click Delete to continue.
3. A Confirmation page appears, indicating that information has been deleted.
NOTE: Once uploaded data has been deleted, only two links are available from the Payment Options page (see Example 1 in Navigating to the Payment Options Page.)
Paying – Acting as a Single Employer
This section briefly describes how to navigate into the Employer account and make a payment for the
Employer. More detailed instructions on making the payment are available in the UI Online Employer Self
Service User Guide.
1. Click TPA Home.
2. Click Searches.
3. Click Employer Searches.

UI ONLINE - TPA User Guide
61
4. The Employer Search page appears. Enter search criteria for the Employer in the Employer Name,
Employer Account Number, and/or FEIN fields. Select a Role. Click Search.
5. The Search Results appear below the search grid on the Employer Search page. Click the Employer
Name link corresponding to the Payments Update and Submit Role.
NOTE: If the TPA is authorized to perform multiple roles for the Employer, the Search Results will list
the same Employer once for each role assignment. Click the Employer Name link corresponding to the Payments Update and Submit Role.
6. The TPA view of the Employer Home page appears. From this page you can perform functions on the
Employer account, much as the Employer can. Click Payment Information.

UI ONLINE - TPA User Guide
62
7. Click Payment Account Summary, and click Make Payment. For detailed instructions, see the UI
Online Employer Self Service User Guide.
8. Click Leave Employer to exit the Employer account when finished.
Applying to DUA to Make Payments Using ACH Credit
If you wish to use the ACH Credit method of payment, follow the instructions below to access the application.
1. Navigate to www.mass.gov/uima.
2. Click the Forms link under the Our Organization area, and click ACH Credit.
3. Fill out and submit the application according to the instructions.
NOTE: A sample form also appears in the Addendum to this document.

UI ONLINE - TPA User Guide
63
SEARCH PAYMENTS
Introduction This section describes how to search for payments and view payment status.
Processed and cancelled payments can be viewed by confirmation number,
payment method, or date range.
Searching for Payments
1. Click Payment Information.
2. Click Search Payments.
3. The Search Payments page appears. Enter search criteria and click Search.
4. The Search Results appear below the search grid on the Search Payments page. Click the
Confirmation Number link to view payment details.

UI ONLINE - TPA User Guide
64
5. The Payment Detail page appears. Click on an Employer Account Number to view additional
payment details from within the Employer Account.
6. The Payment Detail page of the Employer account displays.
UI ONLINE - TPA User Guide
65
REVIEW EMPLOYER ACCOUNTS/PAYMENT ACCOUNT SUMMARY
Introduction This section describes how to search for and review the Payment Account
Summary of a specific Employer account.
NOTE: For more information on the Employer Payment Account Summary, see the
UI Online Employer Self Service User Guide.
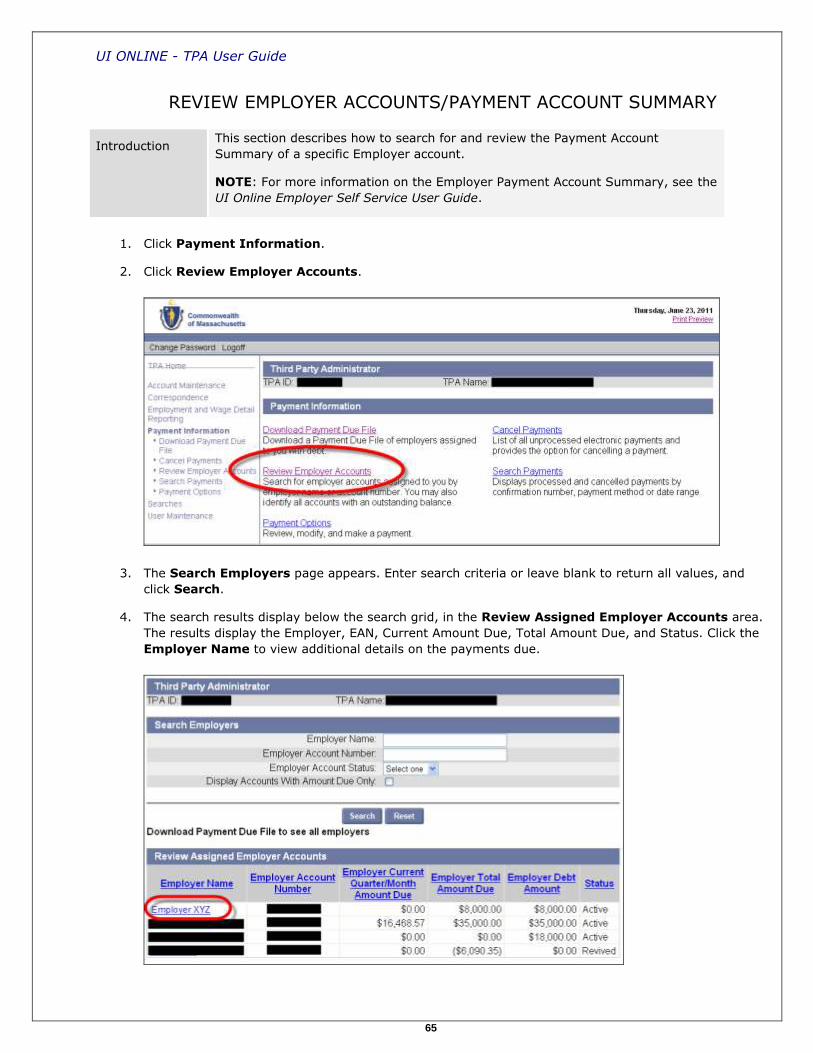
1. Click Payment Information.
2. Click Review Employer Accounts.
3. The Search Employers page appears. Enter search criteria or leave blank to return all values, and
click Search.
4. The search results display below the search grid, in the Review Assigned Employer Accounts area.
The results display the Employer, EAN, Current Amount Due, Total Amount Due, and Status. Click the
Employer Name to view additional details on the payments due.

UI ONLINE - TPA User Guide
66
5. The Account Summary page for the specific Employer appears.
NOTE: By default, the current Statement Period displays on the Payment Account Summary page.
Keep this Statement Period to display information about the most recently completed transactions. (The outstanding balance that comes due in the current Statement Period is incurred up to the end of the previous Statement period.)
NOTE: For more information on the Payment Account Summary, see the UI Online Employer Self Service User Guide. (Note that the TPA’s view of the Employer’s Payment Account Summary does not include the Quarterly Summary, or the Interest Rate Calculator.)
6. Click Leave Employer to exit the Employer’s account. Click Change Employer to bring up the
search grid again, where you can enter different criteria for a new search.

UI ONLINE - TPA User Guide
67
User Maintenance

UI ONLINE - TPA User Guide
68
ABOUT USER MAINTENANCE
Introduction This section describes how TPA System Administrators can manage user access
to the TPA account. The person who completes the TPA Registration is assigned
the TPA System Administrator role by default. This user receives login credentials
to access the UI Online self – service account during the registration.
The system administrator can in turn create accounts for other users and assign
roles to those users. Role assignments dictate which functions users can perform.
The administrative activities that are described in this section include:
Creating a new user
Searching for user details
Modifying user information
Assigning user roles
Resetting user passwords
Inactivating Reinstating a user account
a user account
Assign Employers and Roles
NAVIGATING TO USER MAINTENANCE
To navigate to User Maintenance, perform the following steps: 1. Log in to UI Online. Click the User Maintenance link in the left pane (the link also appears on the
main pane of the Employer Home page).
2. The User Maintenance page appears.
UI ONLINE - TPA User Guide
69
CREATING A NEW USER
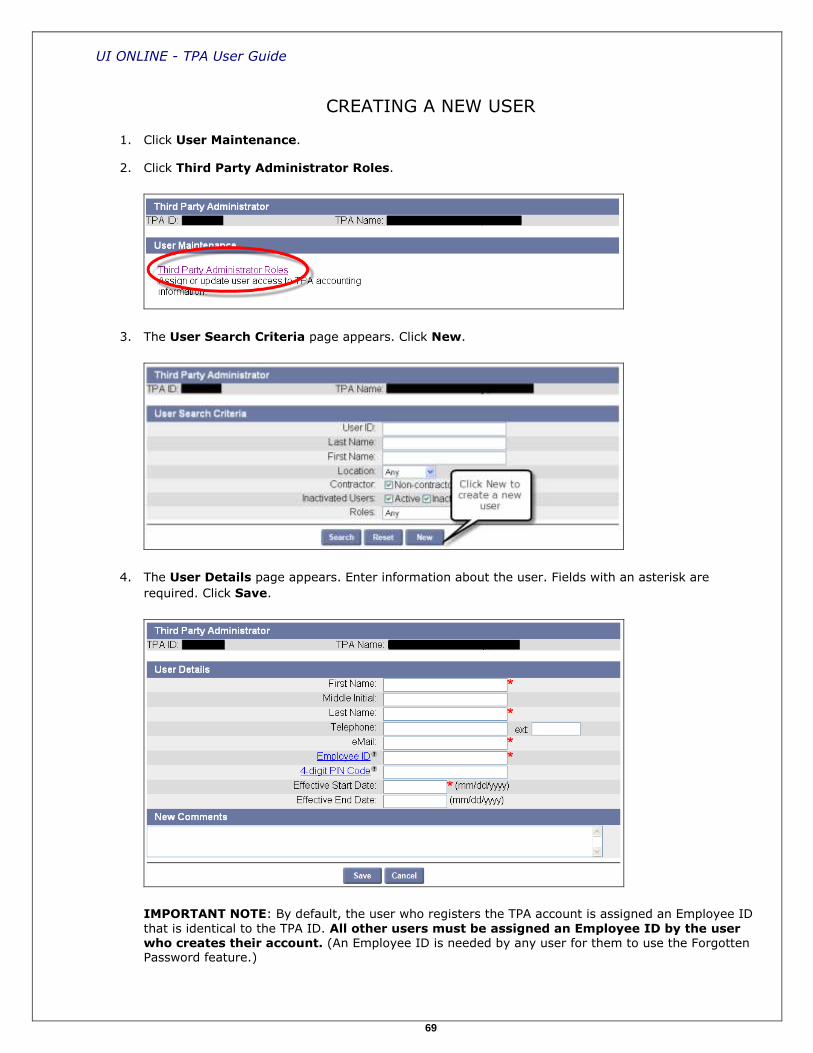
1. Click User Maintenance.
2. Click Third Party Administrator Roles.
3. The User Search Criteria page appears. Click New.
4. The User Details page appears. Enter information about the user. Fields with an asterisk are
required. Click Save.
IMPORTANT NOTE: By default, the user who registers the TPA account is assigned an Employee ID
that is identical to the TPA ID. All other users must be assigned an Employee ID by the user who creates their account. (An Employee ID is needed by any user for them to use the Forgotten Password feature.)

UI ONLINE - TPA User Guide
70
5. The Password Link Sent page appears. Click Next to return to the User Search Criteria page.
NOTE: When you create a new user, the system generates an email message to that user. The
message contains a link. When the user clicks the link, a browser launches with a special login page. The user enters a Password of their choosing, selects a security question, answers the security question, and sets a PIN from this page.
6. Before the user can access any functions in UI Online, you must assign them roles. See the section,
Assigning User Roles.
UI ONLINE - TPA User Guide
71
SEARCHING FOR USER DETAILS
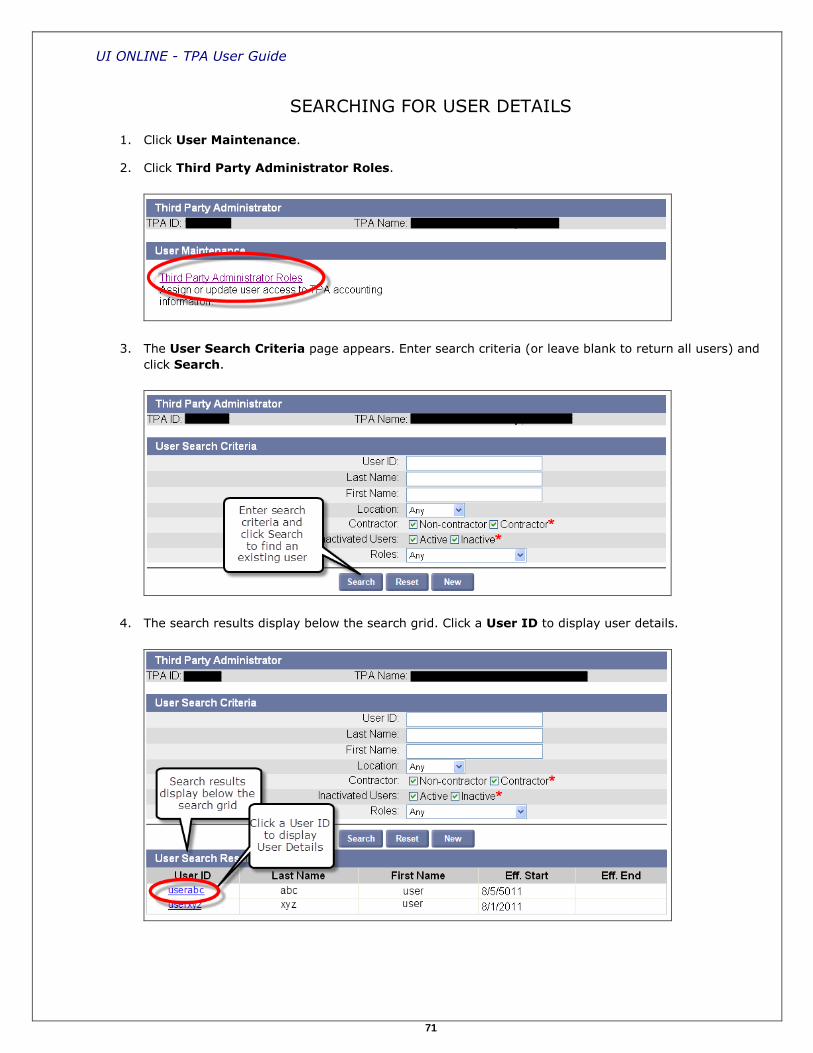
1. Click User Maintenance.
2. Click Third Party Administrator Roles.
3. The User Search Criteria page appears. Enter search criteria (or leave blank to return all users) and
click Search.
4. The search results display below the search grid. Click a User ID to display user details.

UI ONLINE - TPA User Guide
72
5. The User Details page appears.

UI ONLINE - TPA User Guide
73
MODIFYING USER INFORMATION
1. Display the User Details page for the user by performing the steps in Searching for User Details.
2. Click Modify.
3. An editable version of the User Details page appears. Add or edit information and click Save.

UI ONLINE - TPA User Guide
74
ASSIGNING USER ROLES
Introduction The specific functions a user can perform are dictated by the user’s role
assignments.
Roles include:
TPA System Administrator – Users assigned this role can:
use all functions in the TPA system, including User Maintenance;
use any function in an assigned Employer’s account for which the Employer has assigned the appropriate role to the TPA.
TPA User – Users assigned this role can:
use all functions in the TPA system, except User Maintenance;
use any function in an assigned Employer’s account for which the
Employer has assigned the appropriate role to the TPA.
To assign or change role assignments, follow these steps.
1. Display the User Details page for the user by performing the steps in Searching for User Details.
2. Click Roles.
UI ONLINE - TPA User Guide
75
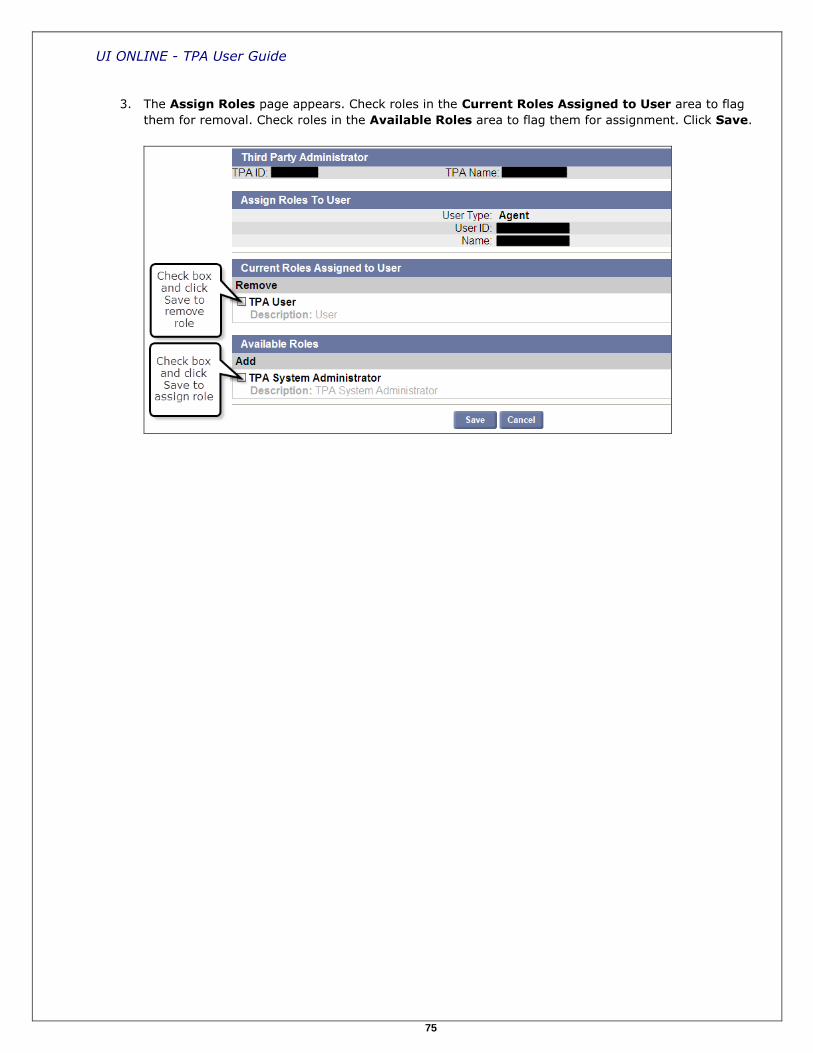
3. The Assign Roles page appears. Check roles in the Current Roles Assigned to User area to flag
them for removal. Check roles in the Available Roles area to flag them for assignment. Click Save.

UI ONLINE - TPA User Guide
76
RESETTING USER PASSWORDS
NOTE: When you perform a password reset for a user, an email message is automatically sent to that user.
The message contains a link; when the user clicks the link, a browser is launched in which the user can reset
their own password.
Follow these steps to begin the reset password process.
1. Display the User Details page for the user by performing the steps in Searching for User Details.
2. Click Reset Password.
3. The Reset Password page appears, requesting confirmation that you wish to reset the password.
Click Confirm to continue.

UI ONLINE - TPA User Guide
77
4. The Password Link Sent page appears. Click Next to return to the User Details page.
NOTE: Until the user follows the link to reset their password, their account access is blocked.
NOTE: The password link is only active for 96 hours.

UI ONLINE - TPA User Guide
78
INACTIVATING A USER ACCOUNT
Follow these steps to inactivate a user’s account.
1. Display the User Details page for the user by performing the steps in Searching for User Details.
2. Click Inactivate.
3. The Inactivate User page appears. Click Confirm.

UI ONLINE - TPA User Guide
79
REINSTATING A USER ACCOUNT
Follow these steps to reinstate a user’s account.
1. Display the User Details page for the user by performing the steps in Searching for User Details.
2. Click Reinstate.
3. The Reinstate User page appears. Click Confirm.

UI ONLINE - TPA User Guide
80
ASSIGN EMPLOYERS AND ROLES
Follow these steps to assign employers and roles to a TPA User ID.
1. Display the User Details page for the user by performing the steps in Searching for User Details.
2. Click Employer Roles.

UI ONLINE - TPA User Guide
81
3. The Assign Employers and Roles page appears.
4. To assign all employers to a user select the Assign all employers checkbox below and select Save.
5. To assign a single employer to a user, use the search function below to locate the employer, click the
Assign check box and select Save.
6. To remove an employer from a user, uncheck the Assigned check box and select Save.
UI ONLINE - TPA User Guide
82
Correspondence
UI ONLINE - TPA User Guide
83
ABOUT CORRESPONDENCE
Introduction This section describes how to view correspondence sent from DUA to the TPA
account on the UI Online system. All correspondence will be sent to your UI Online
account except for ad-hoc and registration correspondences. You will be notified
via email when a correspondence is sent to your account. You must login to the UI
Online system to view the correspondence. You can set up your preferred email
address to receive notifications using the instructions provided in the Address
Information section of this user guide.
NOTE: You must have Adobe Reader software installed to view the
correspondence. This software can be downloaded free from www.adobe.com.
NAVIGATING TO CORRESPONDENCE
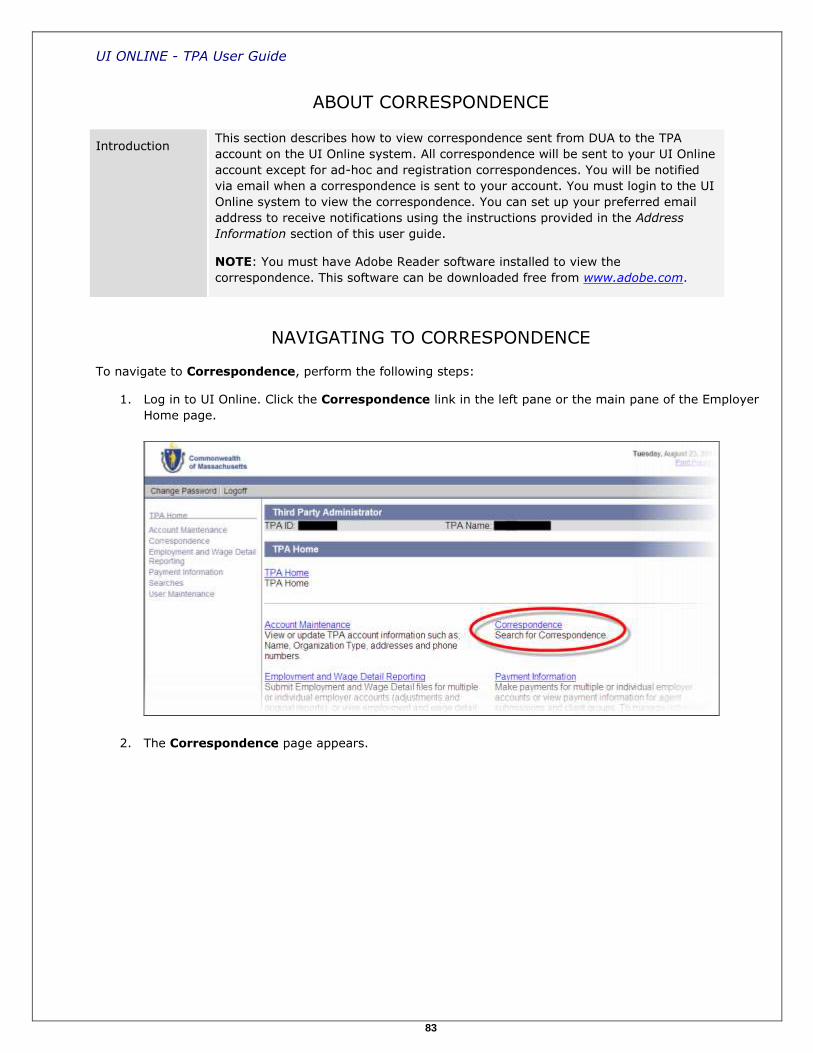
To navigate to Correspondence, perform the following steps:
1. Log in to UI Online. Click the Correspondence link in the left pane or the main pane of the Employer
Home page.
2. The Correspondence page appears.

UI ONLINE - TPA User Guide
84
SEARCHING FOR CORRESPONDENCE
Search for correspondence by performing the following steps:
1. Log in to UI Online and click Correspondence.
2. The Correspondence Search page appears. Enter Date Range From and To dates. Click Search.
3. The search results appear in the Details area below the search grid. Click a Document ID number to
display a PDF version of the actual correspondence in Acrobat Reader.
UI ONLINE - TPA User Guide
85
Searches - Employer Account Access

UI ONLINE - TPA User Guide
86
ABOUT SEARCHING TO ACCESS EMPLOYER ACCOUNT HOME
Introduction This section describes how search for and navigate into the individual Employer
Home pages of assigned Employers. Once at the Employer Home page, TPAs can
perform Employer functions on behalf of the Employer. Note that the roles
assigned to you by the Employer determine which functions you can perform, and
which links appear. See the UI Online Employer Self Service User Guide for
complete information on all the functions performed from an Employer account.
Coordinate with the Employer you are servicing to gain access to roles you require.
NOTE: The Search function can also be used to display TPA role assignments for a
specific Employer without navigating into the Employer account.
NAVIGATING INTO THE EMPLOYER ACCOUNT
To navigate into an Employer account, perform the following steps:
1. Log in to UI Online. Click the Searches link (the link appears in the left pane and the main pane of
the TPA Home page).
2. The Searches page appears. Click Employer Search.

UI ONLINE - TPA User Guide
87
3. The Employer Search page appears. Enter search criteria, select a Role, and click Search.
4. The Search Results appear below the search grid on the Employer Search page. Click the
Employer Name link corresponding to Role that grants access to the functions and/or information
you are seeking.
5. The TPA view of the Employer Home page appears. From this page you can perform functions on the
Employer account, much as the Employer can.
6. Click Leave Employer to return to the TPA Home page. Click Change Employer to redisplay the
search grid, where you search for and then navigate into a different Employer account.

UI ONLINE - TPA User Guide
88
VIEWING EMPLOYER-ASSIGNED TPA ROLES
Follow steps 1 through 3 of the previous section, Navigating into the Employer Account. In the search results that display, each Employer-assigned role is listed separately on the page.
PERFORMING FUNCTIONS AS AN EMPLOYER
For detailed instructions on performing functions from within the Employer account, see the UI Online Employer Self Service User Guide.

UI ONLINE - TPA User Guide
89
Searches – Client Rate Download

UI ONLINE - TPA User Guide
90
ABOUT CLIENT RATE DOWNLOADS
Introduction Client Rates for assigned Employers are available for download using the UI Online
system. This section describes how TPAs can retrieve client rates using the Search
function.
SEARCHING TO RETRIEVE A CLIENT RATE DOWNLOAD FILE
1. Log in to UI Online. Click the Searches link (the link appears in the left pane and the main pane of
the TPA Home page).
2. The Searches page appears. Click Client/Rate Download.

UI ONLINE - TPA User Guide
91
3. The Client/Rate Download page appears. Enter Date Range From and To values, and click
Search.
4. Available download files are listed by File Id and Create Date in the Details area. Click a File Id and
follow the prompts to save the file to your local drive.

UI ONLINE - TPA User Guide
92
CLIENT/RATE INFORMATION
The following information is provided in this section:
Format for the Client Rate Download
EMAC Contribution Rates
UI Contribution Rate
Workforce Training Fund Rate
USA Surcharge Rate
Format for the Client Rate Download
Header record: TPA ID, Date Time the Rate File was posted, Rate Year, Average Construction Rate for current year, New Employer Rate for current year, Workforce Training Fund Rate, UI Wage Base, EMAC Wage Base For each of the Employer Records: Employer Account Number, Employer Name, Employer UI Contribution Rate, Employer EMAC/UHI rate, USA Surcharge Rate, Employer account balance (debit or credit)
Example for 2016:
1000XX,7/2/2016 12:00:00 AM,2016,6.73,1.87,0.056,15000,15000
99999999,ABC INC,7.34,0.34,0,0
99999998,XYZ INC,1.67,0.34,0,{-1974.75}
99999997,ABC LLC,1.56,0.34,0,532.21
99999996,XYZ LLC,11.13,0.34,0,56322.60
NOTE: Employer records are displayed in numerical order by Employer Account Number.
Employer Medical Assistance Contribution Rates
The health insurance contribution rate is a flat rate of 0.34 percent for calendar year 2016 for all subject
employers – except for those meeting the exempt or reduced rate criteria. (Employers operating in the 1st two
calendar years are exempt as “newly subject” status, and employers in their 3rd and 4th year pay rates of 0.12
percent and 0.24 percent respectively.)
Unemployment Insurance Contribution Rate
Experience rates assigned to Employers are from Schedule C for calendar year 2016. Taxable wage base for
contributions is $15,000 for the year 2016.
Workforce Training Fund Contribution
The flat rate Workforce Training Contribution is 0.056 percent of the taxable wages in calendar year 2016.

UI ONLINE - TPA User Guide
93
This payment, which is in addition to the Unemployment Insurance contribution payment, is deposited in the
Workforce Training Fund which is used to award grants to companies to provide workforce training and
education programs for incumbent workers.
NOTE: Workforce Training Fund and EMAC contributions are not added to an employer’s account balance for
experience rating purposes, nor can they be deferred.
UI ONLINE - TPA User Guide
94
Addendum A. HOURS WORKED GUIDELINE
How do I report hours worked? General Rule:
1. If the employer knows the actual number of hours worked, the employer should report that figure.
2. If the employer does not know the actual number of hours worked, the employer should:
A. for full-time employees use 40 hours per week.
B. for part-time employees, employer should estimate the number of hours.
C. for full-time plus, employer should use 40 hours per week plus an estimate.
Overtime:
The employer should report the number of hours actually worked for which overtime pay or compensatory
time is paid without regard for the overtime pay rate. Compensatory time should be reported when taken, not
when earned.
Fractions of hours:
If the employee’s total number of hours in a quarter results in a fractional amount, the total figure should be
rounded to the nearest whole hour. If the fraction is “1/2 hour” or more it should be rounded up to the next
whole hour, and if it’s less than a 1/2 hour, it should be rounded down.
Vacation/sick/holiday pay:
The actual number of hours for which an employee receives vacation, sick or holiday pay should be reported.
Vacations, sick days and Holidays without pay should not be counted as hours worked.
On call:
Hours in which the employee is carrying a pager, or is otherwise “on call” should not be included in the “hours
worked” calculation.
Employees not paid by the hour:
These include salaried workers and those paid by commission. Also included are workers who are paid by the
mile, by piecework, by the acre, by the payload, by reductions in rent, or other non-hourly rates. When the
actual number of hours worked is available, it should be reported. In the absence of reliable figures, full-time
employees should be reported at the rate of 40 hours per week; hours worked by part-time employees and
those who work more than full-time should be estimated.
Wages paid less than once per quarter:
This will occur most often with corporate officers who are paid only once or twice a year. The employer should
report the number of hours worked in any quarter in which no wages were paid, along with $0 wages. Then,
when wages or salaries are finally paid, only the hours worked in that specific quarter should be reported. If
the actual number of hours worked is available, it should be reported. In the absence of reliable figures, full-
time employees should be reported at 40 hours per week; hours worked by part-time employees and those
who work more than full-time should be estimated.
UI ONLINE - TPA User Guide
95
Faculty members of colleges and universities (includes technical and community colleges):
If the faculty member is considered to be a full-time employee, 40 hours per week paid should be reported. If
the faculty member is considered to be part-time, an estimate of the actual hours worked should be made.
School teachers
When teachers or other staff work nine months but are paid over 12 months, their hours should be reported in
the quarters that they actually work. For part-time faculty, coaches, etc., if hours are not known, employers
may establish an hourly rate of pay and divide that into quarterly gross wages to obtain an estimate of hours.
Volunteer Firefighters:
Employers can establish an hourly rate of pay and divide that amount into the quarterly gross wages to obtain
an estimate of hours.
B. EMPLOYMENT AND WAGE DATA SUBMISSION GUIDELINES AND INFORMATION
This is a document available at the DUA UI Online website, providing extensive detail for processing
Employment and Wage data through the new UI Online System. This document focuses on process flows, key
business rules and changes, and provides employers and TPAs the contact information necessary to make the
necessary preparations for change. Go to the online version of the Table of Contents of this TPA User Guide
available at www.mass.gov/uima and click on the corresponding link under addendum to access this
document.
C. ICESA FILE FORMAT SPECIFICATIONS
This is a document available at the DUA UI Online website, providing extensive detail with key information,
data definitions, and formatting instructions for generating ICESA Employment and Wage File for submission
to the Massachusetts Department of Unemployment Assistance. Go to the online version of the Table of
Contents of this TPA User Guide available at www.mass.gov/uima and click on the corresponding link under
addendum to access this document.
D. EFW2 FILE FORMAT SPECIFICATIONS
This is a document available at the DUA UI Online website, providing extensive detail with key information,
data definitions, and formatting instructions for generating EFW2 Employment and Wage File for submission to
the Massachusetts Department of Unemployment Assistance. Go to the online version of the Table of
Contents of this TPA User Guide available at www.mass.gov/uima and click on the corresponding link under
addendum to access this document.

UI ONLINE - TPA User Guide
96
E. DELIMITED FILE FORMAT SPECIFICATIONS
This is a document available at the DUA UI Online website, providing extensive detail with key information,
data definitions, and formatting instructions for generating Delimited Employment and Wage File for
submission to the Massachusetts Department of Unemployment Assistance. Go to the online version of the
Table of Contents of this TPA User Guide available at www.mass.gov/uima and click on the corresponding link
under addendum to access this document.
F. WAGE DETAIL FILE UPLOAD TROUBLESHOOTING
Use these general pointers if you are having trouble uploads, or data from uploads does not seem to be
handled correctly by the system.
•When wage detail information seems to have imported or calculated incorrectly, many times it is
due to an incorrect employee SSN in a wage filing.
Always check for typos in SSNs first when reviewing data for problems.
For delimited file uploads, always verify that the cells in the delimited file had the right
number format. Many cells are formatted as ‘Text’ expressly to handle data (like SSNs and zip
codes) beginning with ‘0’.
•File uploads are rejected outright if:
The Employer Account Number (EAN) is not included in the file name.
25% or more of the errors with the file are fatal errors.
G. LIST OF ERRORS DURING EMPLOYMENT AND WAGE DETAIL UPLOAD
Element: Scenario Description
Record: Specific Line within a File
Edit/Error Message:
Error Code
Notes/Business Rules
Employer Account Number: Missing Account Number in Employer or TPA Submission
Fatal Missing Employer Account Number
error.missing.ean If a file is submitted without an employer account number or an invalid account number, the information for that specific set of records will not be accepted. All sub-records (units and wages) will be rejected. If not corrected, the employer will be subject to the non filer penalty and interest on late contribution due. If TPAs do not have employer account numbers, the employer must provide this to the TPA; or, the TPA/employer must register the employer online (UI Staff will not process data without pre-registered, active/valid employer account numbers.).
Employer Account Number: Invalid Employer Account Number -
Fatal Invalid Employer Number – Quarter/Year Not Open
error.invalid.ean If a file is submitted with an EAN for an employer and the quarter and year for the submission is prior to the subjectivity date for that employer, the information for that specific set of records will not be accepted. All sub-records (units and wages) will be rejected. If not corrected, the employer will be subject to a non-filer penalty and interest on late contribution due. If TPAs do not have employer account numbers, the employer must provide this to the TPA; or, the TPA/employer must register the employer online (UI Staff will not process data without pre-registered,

UI ONLINE - TPA User Guide
97
Element: Scenario Description
Record: Specific Line within a File
Edit/Error Message:
Error Code
Notes/Business Rules
active/valid employer account numbers.).
Employer Account Number: Invalid Employer Account Number (this includes alphanumeric invalidity) in Employer or TPA Submission
Fatal Invalid Employer Number – incorrect format
error.invalid.ean If a file is submitted with an invalid account number, the information for that specific set of records will not be accepted. All sub-records (units and wages) will be rejected. If not corrected, the employer will be subject to non-filer penalty and interest on late contribution due. If TPAs do not have employer account numbers, the employer must provide this to the TPA; or, the TPA/employer must register the employer online (UI Staff will not process data without pre-registered, active/valid employer account numbers.).
Employer Account Number: Invalid Employer Account Number – Does not Exist in Employer or TPA Submission
Fatal Invalid Employer Number – Does not Exist
error.invalid.ean If a file is submitted with an employer account number that does not exist, the information for that specific set of records will not be accepted. All sub-records (units and wages) will be rejected. If not corrected, the employer will be subject to non-filer penalty and interest on late contribution due. If TPAs do not have employer account numbers, the employer must provide this to the TPA; or, the TPA/employer must register the employer online (UI Staff will not process data without pre-registered, active/valid employer account numbers.).
Employer Account Number: Invalid Employer Account Number – Not Authorized to submit for EAN for TPA submissions
Fatal Invalid Employer Number -– Not Authorized to submit for EAN
error.invalid.ean Based on TPA Submissions: If a file is submitted with an employer account number for which the TPA is not authorized to submit, the information for that specific set of records will not be accepted. All sub-records (units and wages) will be rejected. If not corrected, the employer will be subject to non-filer penalty and interest on late contribution due. If TPAs do not have employer account numbers, the employer must provide this to them and authorize the TPA for the ‘submit’ functional role; or, the TPA/employer must register the employer online (UI Staff will not process data without pre-registered, active/valid employer account numbers.).
TPA ID: Not Authorized – TPA has Delinquent Debt
Fatal Invalid TPA ID – Not Authorized – TPA has Delinquent Debt
Error.invalid.TPA.DelinquentDebt
The System must reject employment and wage detail submitted by TPAs on behalf of employers if the TPA has delinquent debt of $1,000 or more (See use case: Establish Delinquent Debt).

UI ONLINE - TPA User Guide
98
Element: Scenario Description
Record: Specific Line within a File
Edit/Error Message:
Error Code
Notes/Business Rules
TPA ID: Not Authorized –TPA has delinquent employment and wage reports
Fatal Invalid TPA ID - Not Authorized –TPA has delinquent employment and wage reports
Error.invalid.TPA.DelinquentEmployment andWageReports
The System must reject employment and wage detail submitted by TPAs on behalf of employers if the TPA is delinquent in filing their employment and wage report for two or more consecutive quarters.
Invalid File – 25% or more record errors
Fatal Invalid File –25% or more record errors
Error.invalid.file The System will reject a file where 25% or greater of the total records have fatal record errors.
Employer Unit ID: Missing Unit Identifier in TPA or Employer Submission
Non-Fatal
Missing Unit Number
error.missing.unitid The records will be identified as an error, but the employer could note to "Ignore the Errors" and proceed to "Process and Calculate for the online file upload process. System will assign records to the Parent. System will display error message: Missing Reporting Unit on line {0}. If Reporting Unit is not reported, employee data will be processed and associated with the Parent. For FTP the records will be identified as an error and assigned to the Parent.
Employer Unit ID: Invalid Unit Identifier in TPA or Employer Submission
Non-Fatal
Invalid Unit Number
error.invalid.unitid Invalid records are considered those that do not match the employer’s recorded units or include alpha characters. The records will be identified as an error, but the employer could note to "Ignore the Errors" and proceed to "Process and Calculate for the online file upload process. System will assign records to the Parent. For FTP the records will be identified as an error and assigned to the Parent.
SSN: Missing SSN in TPA or Employer Submission, all other information included.
Fatal Missing Social Security Number
error.missing.ssn SSN is required field. Records without a SSN will be rejected and not included in calculations.
SSN: Invalid SSN in TPA or Employer Submission, all other information included.
Fatal Invalid Social Security Number
error.invalid.ssn Invalid SSNs include alpha-submissions or System identified invalid SSNs. These include: 123456789, 987654321, 000000000, 111111111, 222222222, 333333333, 444444444, 555555555, 666666666, 777777777, 888888888, 999999999, or SSNs with the last four digits as 0000. Must be 9 digits. Records without a valid SSN will be rejected and not included in calculations.

UI ONLINE - TPA User Guide
99
Element: Scenario Description
Record: Specific Line within a File
Edit/Error Message:
Error Code
Notes/Business Rules
SSN: Duplicate SSN within Unit-EAN in TPA or Employer Submission, all other information included.
Fatal Duplicate Social Security Number within Unit
error.duplicate.ssn Duplicate SSN within unit will be rejected and not included in calculations.
First Name: Missing First Name, all other data available.
Non-Fatal
Missing First Name
error.missing.firstname
Must be alpha. Error will be produced for each missing record, but if all other data is available, record will be processed
First Name: Invalid First Name, all other data available.
Non-Fatal
Invalid First Name
error.invalid.firstname Must be alpha. Error will be produced for each missing record, but if all other data is available, record will be processed, and message, “Invalid first name on line {0}. Record contained numeric characters. Names must be alpha. The record will be processed and included in calculations. Missing names may create benefit issues for the employee.”
Last Name: Missing Last Name, all other data available.
Non-Fatal
Missing Last Name
error.missing.lastname
Must be alpha. Error will be produced for each missing record, but if all other data is available, record will be processed.
Last Name: Invalid Last Name, all other data available.
Non-Fatal
Invalid Last Name
error.invalid.lastname Must be alpha. Error will be produced for each missing record, but if all other data is available, record will be processed and message, “Invalid last name on line {0}. Record contained numeric characters. Names must be alpha. The record will be processed and included in calculations. Missing names may create benefit issues for the employee.”
Last Name and First Name: Missing both First and Last Name, but SSN is available.
Non-Fatal
Missing First and Last Name
error.missing.lastname error.missing.firstname
Must be alpha. Error will be produced for each missing record, but if all other data is available, record will be processed.
Middle Initial: Invalid/Numeric
Non-Fatal
Numeric Middle Initial
error.invalid.middleinitial
Must be alpha. Or display error message: Invalid middle initial on line {0}. Record contained numeric characters. Names must be alpha. The record will be processed and included in calculations. Missing names may create benefit issues for the employee.

UI ONLINE - TPA User Guide
100
Element: Scenario Description
Record: Specific Line within a File
Edit/Error Message:
Error Code
Notes/Business Rules
UI Gross Wages: Missing Records within Employer or TPA Submission.
Fatal Missing Gross Wages
error.missing.grosswages
Gross Wages must include at least a "0" and must be a positive numeric value. Records without Gross Wages will not (can not) be included for calculations. Employer can submit "0" hours and "0" wages.
UI Gross Wages: Records include comma separating hundreds and thousands within Employer or TPA submission.
Fatal Gross Wages Contain Commas
error.commas.grosswages
No commas will be accepted, but the decimal for cents will be accepted. If commas are included, for delimited files, the entire file may be off-sync and could create a fatal file error. For TPAs, if all other Employer records are correct, other records will be processed. NOTE: Need to ensure that the system does not move the decimal over two spaces to the left if the decimal is given. For example 5000.00 should read as five thousand not fifty dollars.
UI Gross Wages--: Invalid records/non-numeric in employer or TPA submission.
Fatal Gross Wages Contain Non-Numeric Values
error.invalid.grosswages
No commas will be accepted, but the decimal for cents will be accepted. If commas are included, for delimited files, the entire file may be off-sync and could create a fatal file error. For Employers, individual records would be rejected, but if all or most records contained this error the file would be rejected. NOTE: Need to ensure that the system does not move the decimal over two spaces to the left if the decimal is given. For example 5000.00 should read as five thousand not fifty dollars.
MA Wages Subject to Withholding: Missing Records within Employer or TPA Submission
Fatal MA Wages Subject to Withholding Missing
error.missing.DORwithholding wages
MA Wages Subject to Withholding must include at least a "0" and must be a positive numeric value. Records without MA Wages Subject to Withholding will not (can not) be included for calculations
MA Wages Subject to Withholding : Invalid Records
within Employer or TPA Submission
Fatal MA Wages Subject to Withholding Invalid
error.invalid.DORwithholding wages
MA Wages Subject to Withholding must include at least a "0" and must be a positive numeric value. Records without MA Wages Subject to Withholding will not (can not) be included for
calculations. No commas will be accepted, but the decimal for cents will be accepted. If commas are included, for delimited files, the entire file may be off-sync and could create a fatal file error. For TPAs, if all other Employer records are correct, other records will be processed. NOTE: Need to ensure that the system does not move the decimal over two spaces to the left if the decimal is given. For example 5000.00 should read as five thousand not fifty dollars.
MA Income Tax Amount Withheld: Missing Records within Employer or TPA Submission
Fatal MA Income Tax Amount Withheld Missing
error.missing.DORAmount Withheld
MA Income Tax Amount Withheld must include at least a "0" and must be a positive numeric value. Records without MA Income Tax Amount Withheld will not (can not) be included for calculations

UI ONLINE - TPA User Guide
101
Element: Scenario Description
Record: Specific Line within a File
Edit/Error Message:
Error Code
Notes/Business Rules
MA Income Tax Amount Withheld Invalid Records within Employer or TPA Submission
Fatal MA Income Tax Amount Withheld Invalid
error.invalid.DORAmount Withheld
MA Income Tax Amount Withheld must include at least a "0" and must be a positive numeric value. Records without MA Income Tax Amount Withheld will not (can not) be included for calculations No commas will be accepted, but the decimal for cents will be accepted. If commas are included, for delimited files, the entire file may be off-sync and could create a fatal file error. For TPAs, if all other Employer records are correct, other records will be processed. NOTE: Need to ensure that the system does not move the decimal over two spaces to the left if the decimal is given. For example 5000.00 should read as five thousand not fifty dollars.
Hours Worked: Missing Hours Worked within Employer or TPA Submission
Non-Fatal
Missing Hours Worked
error.missing.hoursworked
Missing hours will default to zero
Hours Worked: Invalid/Non-Numeric, Negative, and/or Larger than Possible.
Non-Fatal
Invalid Hours Worked
error.invalid.hoursworked
Negative or non-numeric hours will default to zero. Hours in excess of 999 will default to 999.
Officer Code: Invalid
Non-Fatal
Invalid Officer Codes
error.invalid.officercode
Default to "No” if invalid. Error would be produced. If missing, system will default to “No” without an error being produced.
Employment (1-2-3): Missing Data
Fatal Missing 12th of Month Data
error.missing.month12
If the field is left blank, the system will reject the record and provide error message.
Employment (1-2-3): Invalid - Non-Numeric Data
Fatal Invalid/Non-Numeric 12th of Month Data
error.invalid.month12 If the field is invalid, the system will reject the record and provide error message.
Quarter/Year: Missing quarter/year
Fatal Missing quarter and year
error.missing.quarteryear
Quarter/year layout: Delimited – yyyyq (Quarter 1 2004 = ‘20041’) ICESA – mmyyyy (last month in the quarter being filed and year, for example Quarter 1 2004 = ‘032004’) EFW2 - mmyyyy (last month in the quarter being filed and year, for example Quarter 1 2004 = ‘032004’)
Quarter/Year: Invalid quarter/year
Fatal Invalid quarter and year format
error.invalid.quarteryear
Quarter/year layout: Delimited – yyyyq (Quarter 1 2004 = ‘20041’) ICESA – mmyyyy (last month in the quarter being filed and year, for example Quarter 1 2004 = ‘032004’) EFW2 - mmyyyy (last month in the quarter being filed and year, for example Quarter 1 2004 = ‘032004’)

UI ONLINE - TPA User Guide
102
Element: Scenario Description
Record: Specific Line within a File
Edit/Error Message:
Error Code
Notes/Business Rules
Quarter/Year: Quarter/year for record does not match quarter/year select for online file upload by employer
Fatal Invalid quarter and year – does not match quarter/year selected
error.invalid.quarteryear
If the quarter/year for the record does not match the quarter/year selected by the employer for the online file upload process, the System will produce a fatal error.
Quarter/Year: Quarter/year for record is prior to 2010
Fatal Invalid quarter and year – prior to 2010
error.invalid.quarteryear
If a record has a quarter/year <2010 and the filing is intended for the > Q4 2009 wage detail process, the system will reject the record. If a record has a quarter year > Q4 2009 and the filing is intended for the Prior to 2010 process, the system will reject the record. Wage records with qtr/yr prior to 2010 should not be mixed with > Q4 2009 records. NOTE: Prior to 2010 wage detail is indicated by the user selecting the Prior to 2010 link. For FTP filers a separate folder will be set up for prior to 2010 wage files.
H. REGISTRATION TO PAY DUA TAXES VIA ACH CREDIT
(See the following page.)
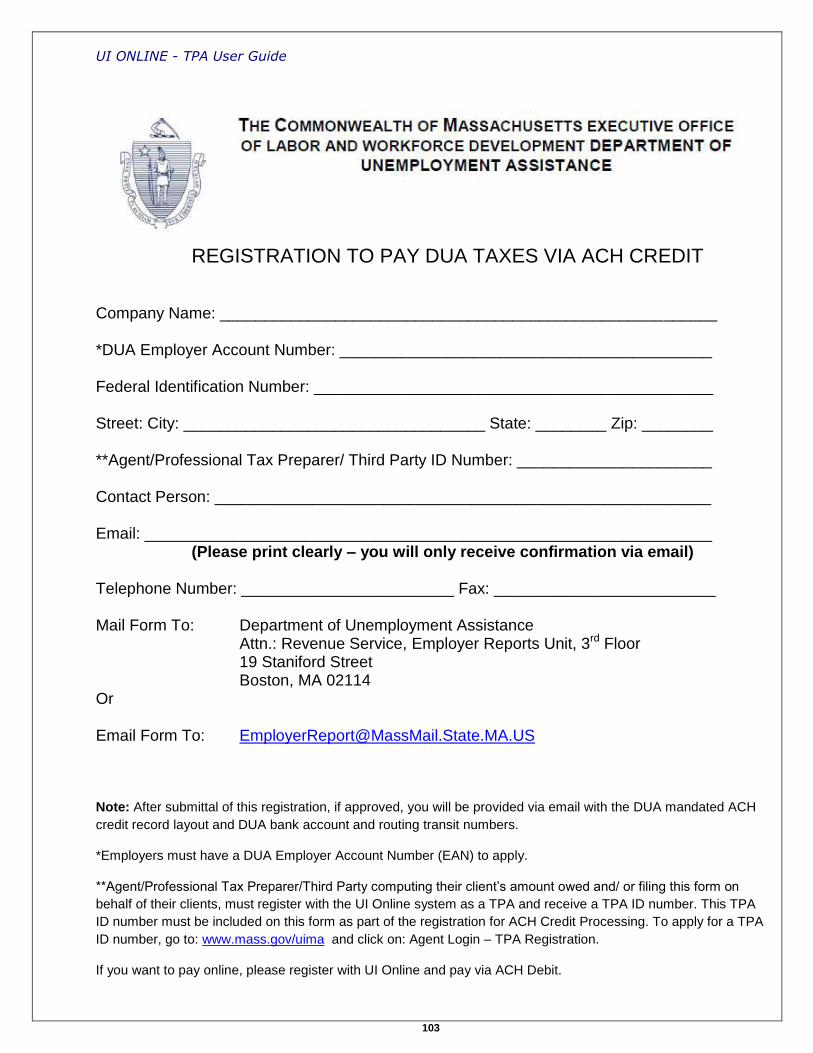
UI ONLINE - TPA User Guide
103
REGISTRATION TO PAY DUA TAXES VIA ACH CREDIT
Company Name: ________________________________________________________ *DUA Employer Account Number: __________________________________________ Federal Identification Number: _____________________________________________ Street: City: __________________________________ State: ________ Zip: ________ **Agent/Professional Tax Preparer/ Third Party ID Number: ______________________ Contact Person: ________________________________________________________ Email: ________________________________________________________________
(Please print clearly – you will only receive confirmation via email) Telephone Number: ________________________ Fax: _________________________ Mail Form To: Department of Unemployment Assistance
Attn.: Revenue Service, Employer Reports Unit, 3rd Floor 19 Staniford Street Boston, MA 02114
Or
Email Form To: [email protected]
Note: After submittal of this registration, if approved, you will be provided via email with the DUA mandated ACH
credit record layout and DUA bank account and routing transit numbers.
*Employers must have a DUA Employer Account Number (EAN) to apply.
**Agent/Professional Tax Preparer/Third Party computing their client’s amount owed and/ or filing this form on
behalf of their clients, must register with the UI Online system as a TPA and receive a TPA ID number. This TPA
ID number must be included on this form as part of the registration for ACH Credit Processing. To apply for a TPA
ID number, go to: www.mass.gov/uima and click on: Agent Login – TPA Registration.
If you want to pay online, please register with UI Online and pay via ACH Debit.