Tools Required Parts Included - SimplyPut Organizers...Lista de partes Equipo de Montaje de Puerta...
4
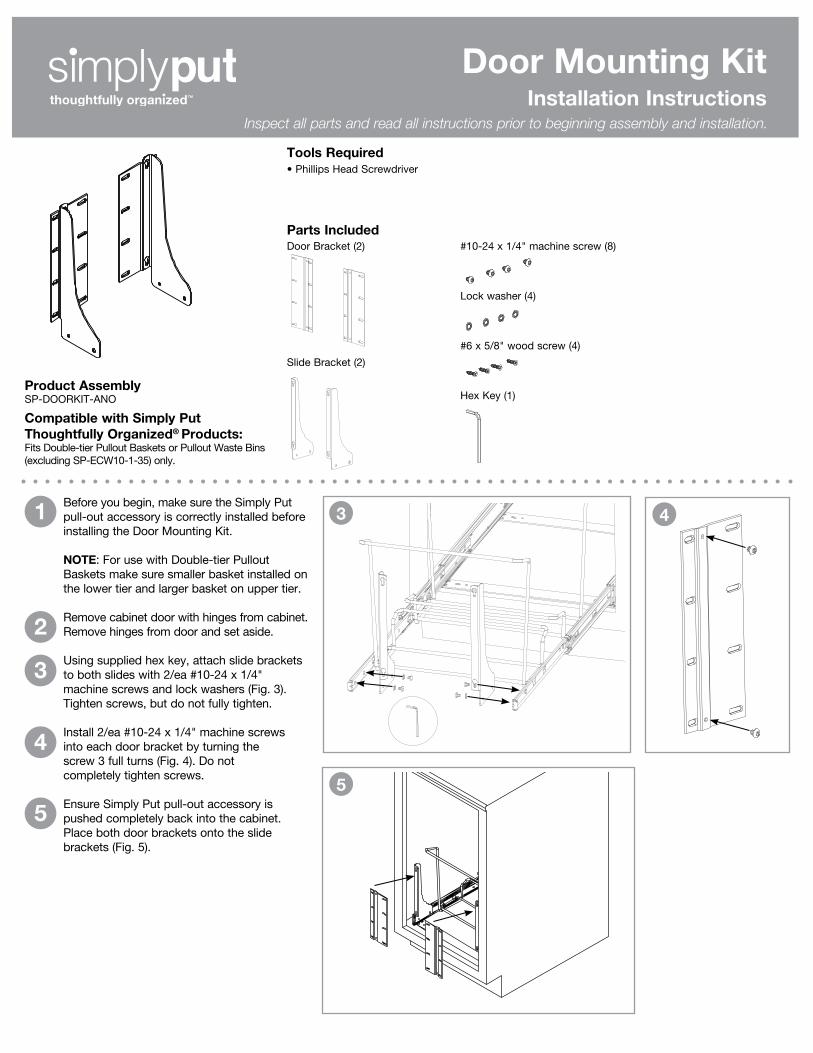
3 Door Mounting Kit Installation Instructions Inspect all parts and read all instructions prior to beginning assembly and installation. Before you begin, make sure the Simply Put pull-out accessory is correctly installed before installing the Door Mounting Kit. NOTE: For use with Double-tier Pullout Baskets make sure smaller basket installed on the lower tier and larger basket on upper tier. Remove cabinet door with hinges from cabinet. Remove hinges from door and set aside. Using supplied hex key, attach slide brackets to both slides with 2/ea #10-24 x 1/4" machine screws and lock washers (Fig. 3). Tighten screws, but do not fully tighten. Install 2/ea #10-24 x 1/4" machine screws into each door bracket by turning the screw 3 full turns (Fig. 4). Do not completely tighten screws. Ensure Simply Put pull-out accessory is pushed completely back into the cabinet. Place both door brackets onto the slide brackets (Fig. 5). 1 Tools Required • Phillips Head Screwdriver Product Assembly SP-DOORKIT-ANO Compatible with Simply Put Thoughtfully Organized ® Products: Fits Double-tier Pullout Baskets or Pullout Waste Bins (excluding SP-ECW10-1-35) only. Door Bracket (2) Slide Bracket (2) #10-24 x 1/4" machine screw (8) Lock washer (4) #6 x 5/8" wood screw (4) Hex Key (1) Parts Included 2 3 4 5 4 5
Transcript of Tools Required Parts Included - SimplyPut Organizers...Lista de partes Equipo de Montaje de Puerta...
3
Door Mounting KitInstallation Instructions
Inspect all parts and read all instructions prior to beginning assembly and installation.
Before you begin, make sure the Simply Put pull-out accessory is correctly installed before installing the Door Mounting Kit.
NOTE: For use with Double-tier Pullout Baskets make sure smaller basket installed on the lower tier and larger basket on upper tier.
Remove cabinet door with hinges from cabinet. Remove hinges from door and set aside.
Using supplied hex key, attach slide brackets to both slides with 2/ea #10-24 x 1/4" machine screws and lock washers (Fig. 3). Tighten screws, but do not fully tighten.
Install 2/ea #10-24 x 1/4" machine screws into each door bracket by turning the screw 3 full turns (Fig. 4). Do not completely tighten screws.
Ensure Simply Put pull-out accessory is pushed completely back into the cabinet. Place both door brackets onto the slide brackets (Fig. 5).
1
Tools Required• Phillips Head Screwdriver
Product AssemblySP-DOORKIT-ANO
Compatible with Simply Put Thoughtfully Organized® Products:Fits Double-tier Pullout Baskets or Pullout Waste Bins (excluding SP-ECW10-1-35) only.
Door Bracket (2)
Slide Bracket (2)
#10-24 x 1/4" machine screw (8)
Lock washer (4)
#6 x 5/8" wood screw (4)
Hex Key (1)
Parts Included
2
3
4
5
4
5
Grand Rapids, MI 800.253.1561 simplyputorganizers.com ©2019 Knape & Vogt. All rights reserved. Knape & Vogt® reserves the right to change specifications without notice. 310575/0119
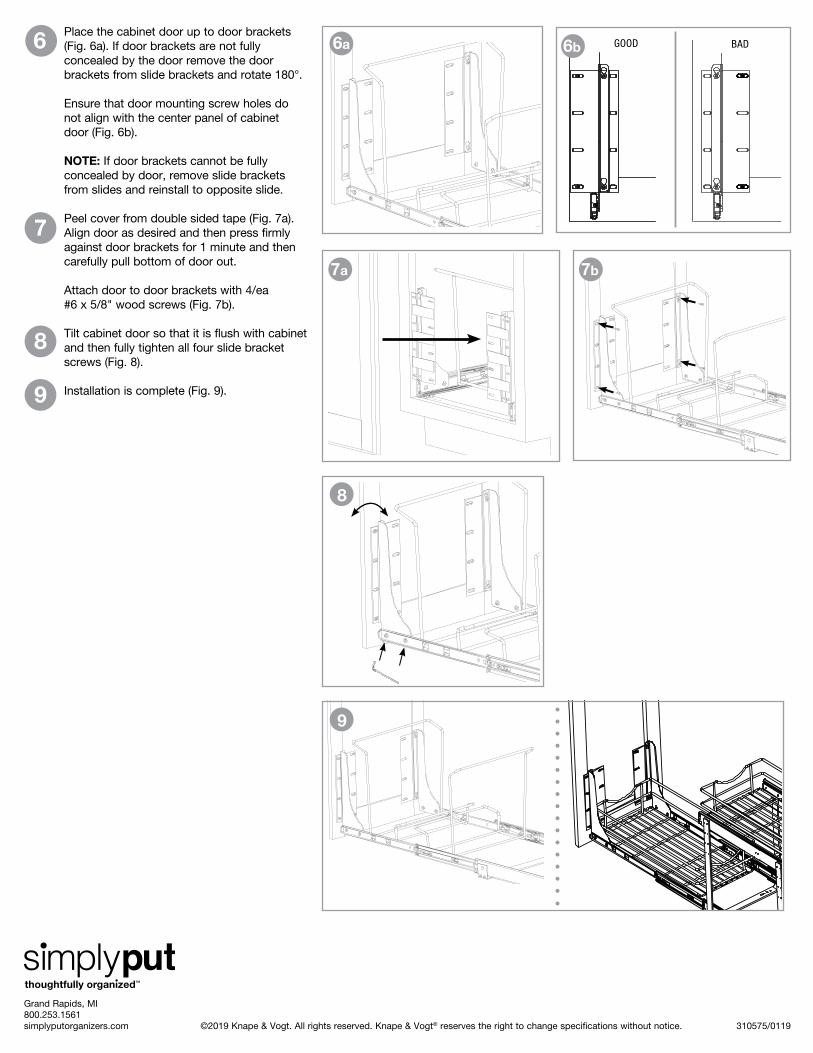
Place the cabinet door up to door brackets (Fig. 6a). If door brackets are not fully concealed by the door remove the door brackets from slide brackets and rotate 180°.
Ensure that door mounting screw holes do not align with the center panel of cabinet door (Fig. 6b).
NOTE: If door brackets cannot be fully concealed by door, remove slide brackets from slides and reinstall to opposite slide.
Peel cover from double sided tape (Fig. 7a). Align door as desired and then press firmly against door brackets for 1 minute and then carefully pull bottom of door out.
Attach door to door brackets with 4/ea #6 x 5/8" wood screws (Fig. 7b).
Tilt cabinet door so that it is flush with cabinet and then fully tighten all four slide bracket screws (Fig. 8).
Installation is complete (Fig. 9).
6
7
8
9
7b
6b
7a
8
GOOD BAD6a
9
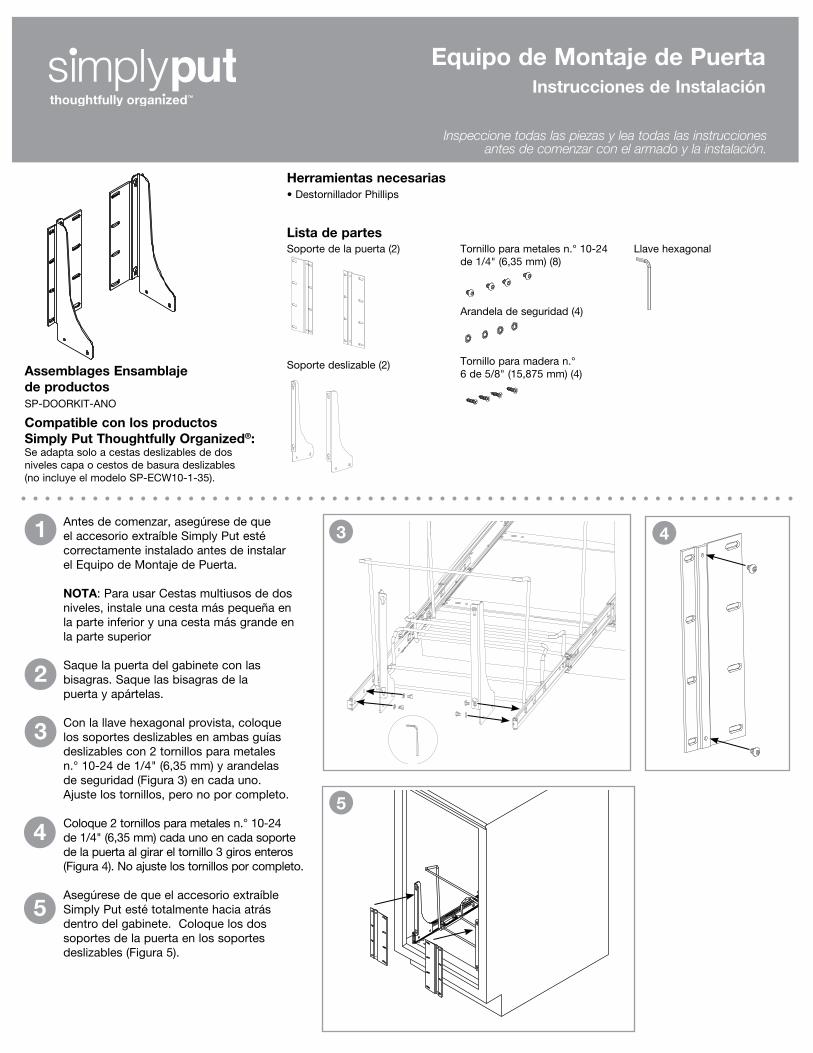
Herramientas necesarias• Destornillador Phillips
Assemblages Ensamblajede productosSP-DOORKIT-ANO
Compatible con los productos Simply Put Thoughtfully Organized®:Se adapta solo a cestas deslizables de dos niveles capa o cestos de basura deslizables (no incluye el modelo SP-ECW10-1-35).
Soporte de la puerta (2)
Soporte deslizable (2)
Tornillo para metales n.° 10-24 de 1/4" (6,35 mm) (8)
Arandela de seguridad (4)
Tornillo para madera n.° 6 de 5/8" (15,875 mm) (4)
Llave hexagonalLista de partes
Equipo de Montaje de Puerta Instrucciones de Instalación
Inspeccione todas las piezas y lea todas las instrucciones antes de comenzar con el armado y la instalación.
Antes de comenzar, asegúrese de que el accesorio extraíble Simply Put esté correctamente instalado antes de instalar el Equipo de Montaje de Puerta.
NOTA: Para usar Cestas multiusos de dos niveles, instale una cesta más pequeña en la parte inferior y una cesta más grande en la parte superior
Saque la puerta del gabinete con las bisagras. Saque las bisagras de la puerta y apártelas.
Con la llave hexagonal provista, coloque los soportes deslizables en ambas guías deslizables con 2 tornillos para metales n.° 10-24 de 1/4" (6,35 mm) y arandelas de seguridad (Figura 3) en cada uno. Ajuste los tornillos, pero no por completo.
Coloque 2 tornillos para metales n.° 10-24 de 1/4" (6,35 mm) cada uno en cada soporte de la puerta al girar el tornillo 3 giros enteros (Figura 4). No ajuste los tornillos por completo.
Asegúrese de que el accesorio extraíble Simply Put esté totalmente hacia atrás dentro del gabinete. Coloque los dos soportes de la puerta en los soportes deslizables (Figura 5).
1
2
3
4
5
3 4
5

Grand Rapids, MI 800.253.1561 simplyputorganizers.com
©2019 Knape & Vogt. Reservados todos los derechos.El Knape y Vogt® reservan el derecho de cambiar especificaciones sin el aviso. Hecho en los Estados Unidos. 310575/0119
Coloque la puerta del gabinete hasta los soportes de la puerta (Figura 6a). Si los soportes de la puerta no quedan totalmente ocultos por la puerta, saque la puerta de los soportes deslizables y gire a 180 grados.
Asegúrese de que los orificios del tornillo de montaje de la puerta no estén alineados con el panel central de la puerta del gabinete (Figura 6b).
NOTA: Si los soportes de la puerta no quedan completamente ocultos, saque los soportes deslizables de las guías y vuelva a instalar en la guía deslizable opuesta.
Saque la cubierta de la cinta de doble cara. Alinee la puerta como desee y presione firmemente contra los soportes de la puerta (Figura 7a). Espere 1 minuto y luego tire cuidadosamente de la parte inferior de la puerta hacia afuera.
Coloque la puerta en los soportes con 4 tornillos para madera n.° 6 de 5/8" (15,875 mm) en cada uno (Figura 7b).
Incline la puerta del gabinete para que esté al ras del gabinete y luego atornille firmemente los tornillos del soporte deslizable (Figura 8).
La instalación está completa (Fig. 9).
6
7
8
9
7b7a
8
6a
9
BUENO MALO6b