TM215 Suzuki 9.9 & 15 HP 2014 to Present Tiller...
14
TM215 Suzuki 9.9 & 15 HP 2014 to Present Tiller and Remote Shift and Throttle Motors TrollMaster is a precision throttle control designed to achieve the maximum in trolling speed accuracy. The memory feature included in this control will allow returning to the best fishing speed time and time again. Whether you are pulling your bait or back trolling, TrollMaster is the answer to your speed control needs. Spend your time trolling, not going to the motor to adjust the speed. PH: 866-228-7655 EMAIL: [email protected] MAIL: - NEW ADDRESS AS OF MARCH 1 ST , 2013 MARINETECH PRODUCTS, INC. TROLLMASTER 1360 EAST COUNTY ROAD E VADNAIS HEIGHTS, MN 55110
Transcript of TM215 Suzuki 9.9 & 15 HP 2014 to Present Tiller...

!
TM215
Suzuki 9.9 & 15 HP 2014 to Present
Tiller and Remote Shift and Throttle Motors
TrollMaster is a precision throttle control designed to achieve the maximum in trolling speed accuracy. The memory feature included in this control will allow returning to the best fishing speed time and time again. Whether you are pulling your bait or back trolling, TrollMaster is the answer to your speed control needs. Spend your time trolling, not going to the motor to adjust the speed. PH: 866-228-7655 EMAIL: [email protected] MAIL: - NEW$ADDRESS$AS$OF$MARCH$1ST, $2013$$MARINETECH PRODUCTS, INC. TROLLMASTER 1360 EAST COUNTY ROAD E VADNAIS HEIGHTS, MN 55110
!
!
!!! !

!Step%1:%%Instruction%for%Tiller%motors%only.%Loosen!the!Tiller!Arm!tension!control!knob!all!the!way!so!the!tiller!grip!can!move!freely.
!
Step%2:%%Instruction%for%both%Tiller%and%Remote%Shift%and%Throttle%motors.%Remove!the!engine!cowling.!
!!

Step%2%continued:%Instruction%for%Remote%Shift%and%Throttle%motors%only,%Tiller%motors%DO%NOT%need%to%remove%this%side%cover.%Remove!the!side!cover!by!removing!the!screws!indicated!below.
!
And!remove!the!cowling’s!rear!latch!pin!and!latch.
!!!

Step%3:%%Instruction%for%both%Tiller%and%Remote%Shift%and%Throttle%motors.%Install!the!first!cable!mount!clip!to!the!orange!cable!shield.!Please!note:!be!sure!the!orange!cable!shield!is!nearly!flush!with!the!cable!mount!clip!before!squeezing!it!closed!around!the!cable!shield.!See!photo!for!example.!
! !Step%4:%%Instruction%for%both%Tiller%and%Remote%Shift%and%Throttle%motors.%Add!the!bolt!and!four!spacers!provided!in!the!TrollMaster!kit!and!install!as!shown.
!
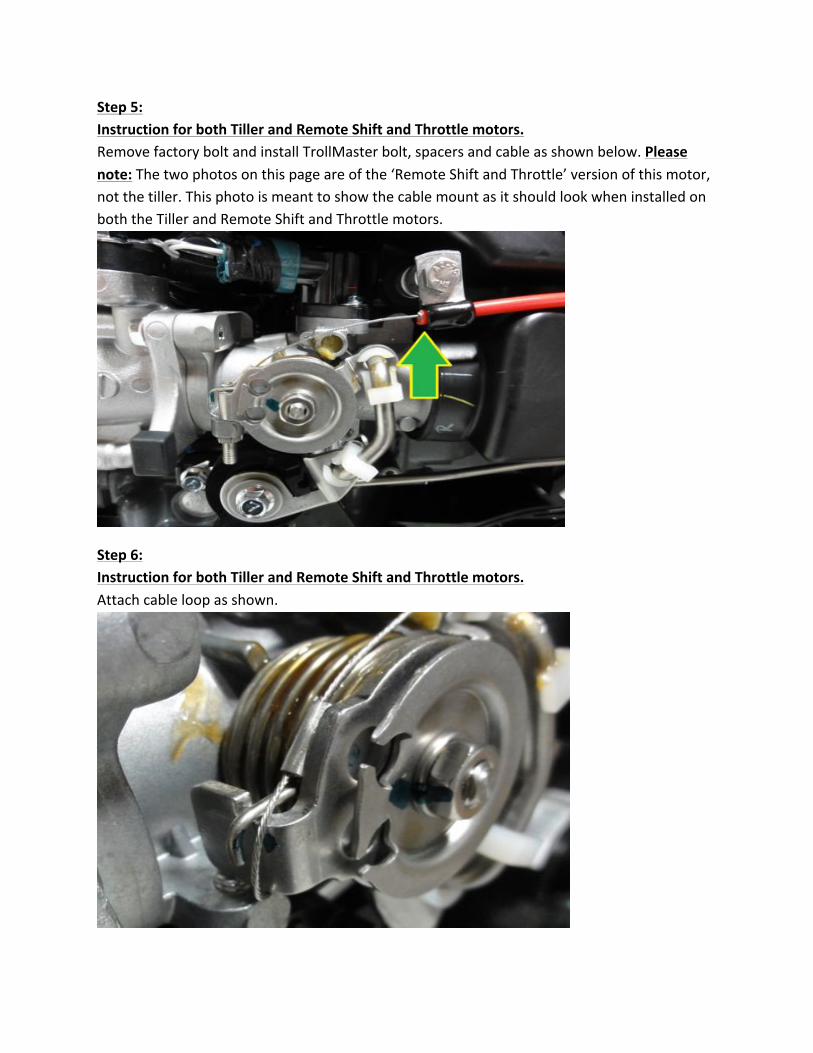
Step%5:%%Instruction%for%both%Tiller%and%Remote%Shift%and%Throttle%motors.%Remove!factory!bolt!and!install!TrollMaster!bolt,!spacers!and!cable!as!shown!below.!Please%note:!The!two!photos!on!this!page!are!of!the!‘Remote!Shift!and!Throttle’!version!of!this!motor,!not!the!tiller.!This!photo!is!meant!to!show!the!cable!mount!as!it!should!look!when!installed!on!both!the!Tiller!and!Remote!Shift!and!Throttle!motors.
!
Step%6:%%Instruction%for%both%Tiller%and%Remote%Shift%and%Throttle%motors.%Attach!cable!loop!as!shown.%
%

Step%7:%%Instruction%for%both%Tiller%and%Remote%Shift%and%Throttle%motors.%Using!the!factory!bolt,!mount!the!second!cable!clamp!on!the!bolt!identified!by!the!green!arrow!in!the!photo.!
!!
!
!
!

!
Step%8:%%Instruction%for%both%Tiller%and%Remote%Shift%and%Throttle%motors.%Mount!the!servo!bracket!as!shown!using!the!factory!screw!and!small!spacer!provided!in!the!TrollMaster!kit.!Please%note:!Make!sure!the!small!spacer!is!installed!under!the!servo!bracket!before!tightening!screw.!
!!
!

%%
Step%9:%%Instruction%for%both%Tiller%and%Remote%Shift%and%Throttle%motors.%Be!sure!the!servo!arm!is!in!the!position!shown!in!the!photos,!if!it!is!not,!plug!the!servo!into!the!grey!control!cable,!power!the!TrollMaster!controller!ON!and!leave!it!in!IDLE!mode.!By!removing!the!Phillips!head!screw!that!holds!the!servo!arm!on!the!servo!body!you!can!remove!the!servo!arm!by!pulling!it!off!of!the!servo!body,!do!not!twist!and!pull,!just!pull!it!straight!off.!Adjust!the!servo!arm!to!be!in!the!position!as!shown!in!the!installation!manual!photos,!place!the!servo!arm!back!on!the!servo!body!and!return!the!Phillips!head!screw!to!its!original!location!to!hold!the!servo!arm!in!place.!Remove!Philips!head!set!screw!from!the!brass!barrel!on!the!servo!arm!as!shown.!You!will!not!need!the!Philips!head!set!screw!in!the!brass!barrel!for!this!install.!Run!the!cable!through!the!brass!barrel!but!do!not!crimp!it!yet.%
!%!
!
!
!!!!

%Step%10:%Instruction%for%both%Tiller%and%Remote%Shift%and%Throttle%motors.%With!the!throttle!closed,!pull!the!cable!tight!to!remove!any!slack,!be!sure!the!throttle!remains!closed.!When!the!cable!is!tight,!slide!the!crimp!over!the!cable!and!crimp!it!tight!as!shown!in!the!photo.!You!can!then!cut!off!the!excess!cable.!
!!Step%11:%%Instruction%for%Remote%Shift%and%Throttle%motors%only.%Remove!the!factory!cam!by!first!removing!the!rod!and!white!rod!retainer!from!the!factory!cam.!!
!!%

Step%12:%%Instruction%for%Remote%Shift%and%Throttle%motors%only.%Remove!the!factory!cam!by!removing!the!bolt;!be!sure!the!cam!assembly!does!not!come!off!the!motor!when!removing!the!bolt.%
%%Step%13:%%Instruction%for%Remote%Shift%and%Throttle%motors%only.%Install!the!TrollMaster!cam!and!reinstall!the!factory!rod!&!rod!retainer!as!shown!below.!
!!!

Connecting to a power source: Connect the Red wire to +12 volts DC and the Black wire to -12 volts DC. PRO and PRO2 models come with three (3) amp fuses and PRO3 models come with a thirty (30) amp fuse. Connecting the servo: Connect the servo cable to the control cable with the brown wire aligned to the white mark on the control cable plug, if you have a lockable connector be sure the lock is engaged. After plugging in your servo motor test it to ensure proper function. Testing the controller: You do not have to run your outboard motor to test the TrollMaster. Test the controller by powering the unit on and press the IDLE button to put the unit into RUN mode. By turning the control knob with a clockwise rotation the servo should move the carburetor from IDLE to FULL THROTTLE. NOTE: Full throttle can be adjusted by changing the position of the servo arm on the servo motor. So if the servo motor wants to open your throttle too much, adjust the servo arm so there is slack in the linkage when in IDLE mode, that will keep the throttle from opening too far. !!!!!!!!!! !

Troubleshooting If you should encounter an issue with your TrollMaster use these tips to determine the best course of action to resolve the issue. Problem: The unit powers on and the display functions properly, your buttons show function on the screen and the numbers increase when turning the speed adjustment knob but there is no response from the servo motor. Solution: Verify the servo motor is plugged in accordingly with the brown wire aligned with the white mark on the control cable plug or that the lockable connector is locked in position and test again. If there is still no response, replace the servo motor with a new one and test again. If after replacing the servo motor and testing again there is still no response contact MarineTech Products Inc. 866-228-7655 to have the unit inspected at our facility. Problem: The unit powers on works momentarily then powers off. The unit will not stay powered on. Solution: Check your battery voltage; if the battery voltage is low the unit will not operate properly. When in doubt charge your battery to ensure there is enough voltage to operate the TrollMaster unit to its fullest potential. If the battery is fully charged and the unit is still not operating properly contact MarineTech Products, Inc. 866-228-7655 to have the unit inspected at our facility. If you need assistance with Troubleshooting contact MarineTech Products, Inc. Call 866-228-7655

TrollMaster Replacement Parts TrollMaster Servo Motor (TM-MG1) Note: A Servo Arm is included with the purchase of a replacement Servo Motor. TrollMaster Servo Arm (TM-Servo Arm) Note: A replacement screw to mount the Servo Arm to the Servo Body is included with the purchase of a replacement Servo Arm. TrollMaster Hardware Kit (TMXXXHRDWRKIT) Note: Replace the XXX with the Kit number that applies to your outboard motor. See the Application Guide for kit number. Example: TM206HRDWRKIT. TrollMaster Electronics Unit Only (TMXXXXUNITONLY) Note: Replace the XXXX with the model of Replacement TrollMaster Electronics you wish to purchase. Comes with controller and wiring only, does not include servo motor or hardware kit. Examples: TMPROUNITONLY, TMPRO2UNITONLY, TMPRO3UNITONLY. To Order Replacement Parts: If you would like to order any of the above mentioned replacement parts check with your local retailer, if they do not have the item in stock they can order it for you or you can order directly from MarineTech Products, Inc. For pricing and availability call MarineTech Products, Inc. 866-228-7655 Installation Guides: The installation Guide on this disk can also be found online at MarineTech Products website, visit: www.marinetechproducts.com and follow the TrollMaster link to the TrollMaster page where you will find the Installation Guides for every motor we make a kit to fit. The Application Guide is also on the same web page; the Application Guide shows the full list of motors we make kits to fit with the product part numbers for those kits.

SERVICE%AND%WARRANTY
Should!your!unit!ever!require!service!please!do#not#return#the#product#to#your#dealer.#Instead!call!the!number!below!for!special!instructions!on!shipping!and!handling.!Be!sure!to!call!between!9!00!AM!and!4.00!PM!(Central!Time)!Monday!through!Friday.!If!the!service!required!is!covered!by!the!warranty,!it!will!be!repaired!or!replaced!as!described!below.!If!the!service!required!is!NOT!covered!by!warranty!replacement!parts!are!available!for!purchase!and!paid!for!by!a!major!credit!card.
The!warranty!coverage!on!this!equipment!is!limited!to!the!terms!set!forth!below:
MarineTech!Products,!Inc.!warrants!this!product!to!be!free!of!defects!in!material!and!workmanship!for!a!period!of!ONE!(1)!YEAR!from!the!date!of!original!retail!purchase.!Positive!proof!of!date!of!purchase!is!required!for!warranty!service.!If!the!service!required!is!covered!by!warranty,!you!must#obtain!a!Return#Authorization#number!from!MarineTech!Products.!The!unit!will!be!repaired!or!replaced!with!new!or!factory!rebuilt!parts!at!no!charge.!The!defective!components!must!he!returned!to!the!address!specified,!with!shipping!charges!prepaid.!Be!sure!to!include!your!name,!address,!telephone!number!and!a!copy!of!the!sales!receipt!showing!the!date!of!original!retail!purchase.!All!sales!receipts!are!subject!to!verification.
This!warranty!does!not!apply!if!the!unit!has!been!damaged!by!accident,!abuse,!misuse,!poor!installation!or!misapplication,!or!if!It!has!been!modified!from!its!original!condition,!or!if!any!serial!number!has!been!removed!or!defaced!or!altered.!This!warranty!does!not!cover!any!expense!to!remove!or!reinstall!the!unit!or!any!of!its!components.!If!a!returned!unit!is!not!covered!by!warranty,!the!sender!will!he!notified!and!given!an!estimate!of!the!charges!to!repair!or!replace!the!unit!together!with!the!return!shipping!charges.
THIS!WARRANTY!DOES!NOT!COVER!SPECIAL,!INCIDENTAL,!OR!CONSEQUENTIAL!DAMAGES!RESULTING!FROM!ANY!BREACH!OF!WARRANTY,!OR!UNDER!ANY!OTHER!LEGAL!THEORY,!INCLUDING!BUT!NOT!LIMITED!TO!DAMAGE!TO!OR!REPLACEMENT!OF!OTHER!EQUIPMENT!AND!PROPERTY.!THE!WARRANTY!AND!REMEDIES!SET!FORTH!ARE!EXCLUSIVE!AND!IN!LIEU!OF!ALL!OTHERS,!WHETHER!ORAL!OR!WRITTEN,!EXPRESS!OR!IMPLIED.!DUE!TO!THE!SPECIAL!AND!UNIQUE!CONDITIONS!THAT!MAY!EXIST!IN!EACH!APPLICATION,!THE!MANUFACTURER!SPECIFICALLY!DISCLAIMS!ANY!AND!ALL!IMPLIED!WARRANTIES!OF!MERCHANTABILITY!AND!FITNESS!FOR!A!PARTICULAR!PURPOSE.!NO!DEALER,!AGENT!OR!EMPLOYEE!IS!AUTHORIZED!TO!MAKE!ANY!MODIFICATION,!EXTENSION!OR!ADDITION!TO!THIS!WARRANTY.
Some!states!do!not!allow!exclusion!of!incidental!or!consequential!damages,!so!the!above!exclusions!may!not!apply!to!you.!This!warranty!gives!you!specific!legal!rights,!and!you!may!also!have!other!legal!rights,!which!may!vary!from!state!to!state.
FOR%SERVICE%CALL:%1%651%486%2010