TIMBER TAX BILLING INSTRUCTIONS - NH Department of
17
Rev. 2012 YIELD TAX BILLING / CERTIFICATION OF YIELD PROGRAM INSTRUCTIONS (USING MICROSOFT EXCEL) GENERAL PURPOSE: The main goal of the Department of Revenue Administration is to provide to the Municipality a spreadsheet to make the Yield (Timber) Tax billing task easier and less time consuming. (Please note that the examples shown in the instructions may say “Timber Tax” but this has been changed in the 2012 billing to say “Yield Tax”) With the billing spreadsheet, you only have to type the information in one area and then it is "linked" and automatically transfers to all the other worksheets. You enter the data once and it generates a certification of yield, a warrant, and a bill. Please Note: There is no need, or statutory requirement, to wait and accumulate all of your reports of wood cut before billing them. The program makes it easy to bill them in small batches as the reports are received. This approach results in timely tax billing and generation of tax revenue for the municipality. GENERAL INFORMATION : There are essentially two "MICROSOFT EXCEL WORKBOOKS (spreadsheets)". One is entitled "Yield Tax Bill Worksheet-1 or -4" and the other is "Yield Tax Doomage Worksheet-1”. "Yield Tax Bill Worksheet-1 or -4" should be used when you will be using the "Suggested Average Stumpage Value List" as provided by the Department of Revenue. The workbook is designed to allow you to apply a "rating percentage" to the suggested values in order to take into consideration the location of the timber, the quality, the size of the sale, and other factors that may affect the value of the timber being cut. Worksheet -1 allows you to bill one owner, and Worksheet-4 allows you to bill up to four separate owners on one warrant. "Yield Tax Doomage Worksheet-1" is used to assess “Doomage” pursuant to RSA 79:12. The format is the same as the other workbooks except that the amount of tax owed is doubled. Do not double the stumpage rates for Doomage. The tax is automatically doubled on the certification of yield tax form and carried forward to the warrant and the tax bill.
Transcript of TIMBER TAX BILLING INSTRUCTIONS - NH Department of
Rev. 2012
YIELD TAX BILLING / CERTIFICATION OF YIELD PROGRAM INSTRUCTIONS
(USING MICROSOFT EXCEL)
GENERAL PURPOSE: The main goal of the Department of Revenue Administration is to provide to the Municipality a spreadsheet to make the Yield (Timber) Tax billing task easier and less time consuming. (Please note that the examples shown in the instructions may say “Timber Tax” but this has been changed in the 2012 billing to say “Yield Tax”) With the billing spreadsheet, you only have to type the information in one area and then it is "linked" and automatically transfers to all the other worksheets. You enter the data once and it generates a certification of yield, a warrant, and a bill. Please Note: There is no need, or statutory requirement, to wait and accumulate all of your reports of wood cut before billing them. The program makes it easy to bill them in small batches as the reports are received. This approach results in timely tax billing and generation of tax revenue for the municipality.
GENERAL INFORMATION: There are essentially two "MICROSOFT EXCEL WORKBOOKS (spreadsheets)". One is entitled "Yield Tax Bill Worksheet-1 or -4" and the other is "Yield Tax Doomage Worksheet-1”. "Yield Tax Bill Worksheet-1 or -4" should be used when you will be using the "Suggested Average Stumpage Value List" as provided by the Department of Revenue. The workbook is designed to allow you to apply a "rating percentage" to the suggested values in order to take into consideration the location of the timber, the quality, the size of the sale, and other factors that may affect the value of the timber being cut. Worksheet -1 allows you to bill one owner, and Worksheet-4 allows you to bill up to four separate owners on one warrant. "Yield Tax Doomage Worksheet-1" is used to assess “Doomage” pursuant to RSA 79:12. The format is the same as the other workbooks except that the amount of tax owed is doubled. Do not double the stumpage rates for Doomage. The tax is automatically doubled on the certification of yield tax form and carried forward to the warrant and the tax bill.
Rev. 2012
Page 2
GETTING STARTED
Before you begin, get your files setup on your computer. You will want to have your files organized. Setting up files on the computer is similar to setting up files in the office file cabinet. You want them in one location, easy to find, and organized. The following is a suggestion on how to accomplish this task. Remember, the following procedure can also be utilized in your other office tasks to organize all of your documents and templates that you use daily.
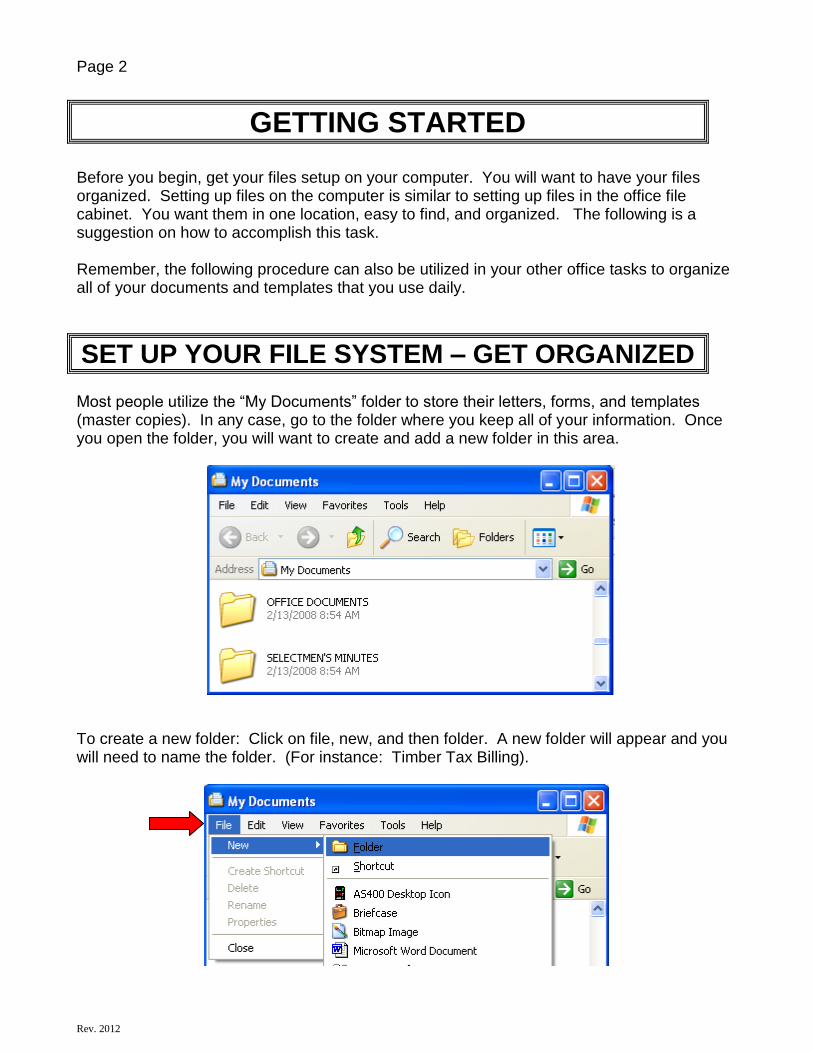
SET UP YOUR FILE SYSTEM – GET ORGANIZED Most people utilize the “My Documents” folder to store their letters, forms, and templates (master copies). In any case, go to the folder where you keep all of your information. Once you open the folder, you will want to create and add a new folder in this area.
To create a new folder: Click on file, new, and then folder. A new folder will appear and you will need to name the folder. (For instance: Timber Tax Billing).

Rev. 2012
Page 3 Once you have created and named the folder, double click on it to open it. You will notice that there is nothing in it. You will want to create additional folders within the “Timber Tax Billing” folder to store your “templates” (master copies), correspondence, sample letters, and copies of the bills you have generated, etc. With the “Timber Tax Billing” folder open, click on file, new, and folder. Or, if you have a newer version of Windows you will see the view to the left of the screen as shown below. If so, click on “Make a new folder”.
The following is a suggested way in which to organize your Timber Tax Billing data and information:
By creating folders to “save” your yearly timber bills, you preserve copies of what you have done in case you need to go back and correct something. It will also keep your spreadsheet templates “clean”. It is suggested that you keep extra copies of your “clean” templates just in case one of your templates accidentally gets “messed up”.

Rev. 2012
Page 4
SAVING WORK AND KEEPING THE TEMPLATES “CLEAN”
WHY DO I WANT A “CLEAN TEMPLATE” ? A clean template will save you time and will reduce the possibility of errors occurring. Your “template” is your master copy. You do not want to create extra work for yourself by having to delete “old” billing information from the spreadsheet every time you go to use it. You will want various fields in the spreadsheet (date of billing, owners name, address, wood volumes, etc) to be empty every time that you open it. HOW DO I KEEP IT “CLEAN” ? After you have gotten the spreadsheets setup with your “generic” municipality information (explained on Page 6), open the billing spreadsheet folder you created. Save a copy there. Open your “extra copies” folder and save it in there also.
WHEN YOU ARE READY TO PROCEED AND GENERATE BILLS (see Page 12):
1. Open your appropriate billing template copy. 2. Immediately go to “File”, “Save As”. 3. Click on the “down arrow” and choose the appropriate folder to save it in.
Rev. 2012
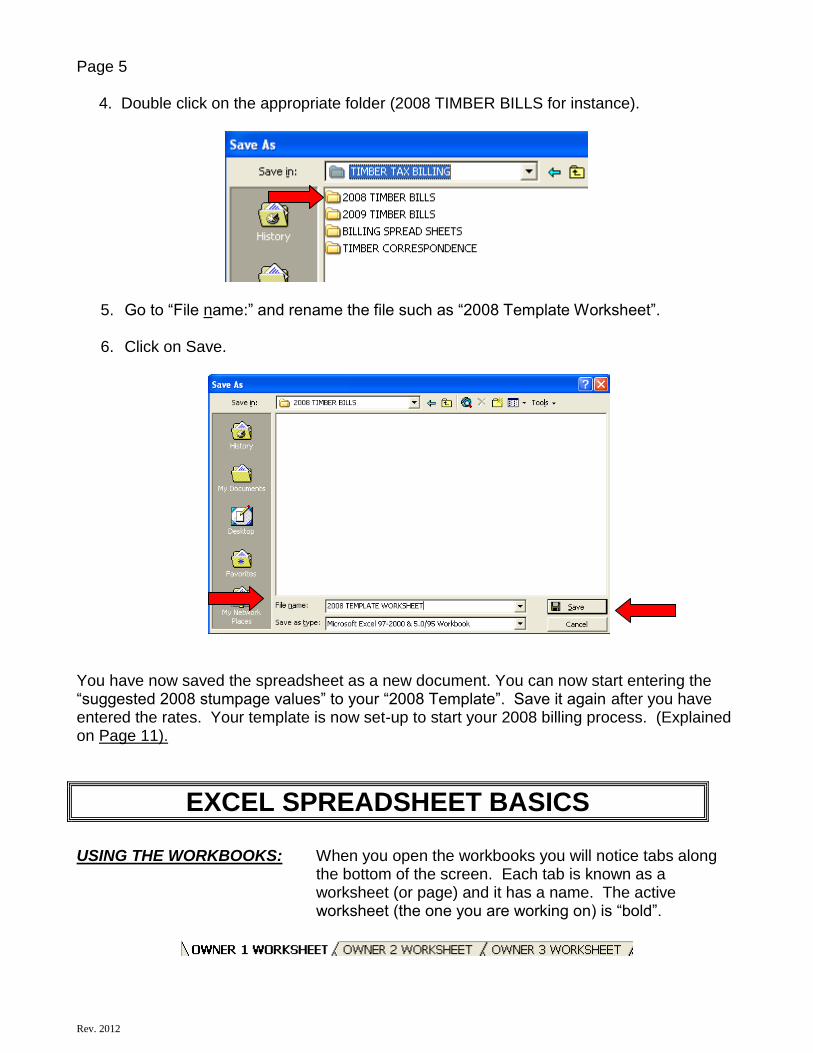
Page 5 4. Double click on the appropriate folder (2008 TIMBER BILLS for instance).
5. Go to “File name:” and rename the file such as “2008 Template Worksheet”. 6. Click on Save.
You have now saved the spreadsheet as a new document. You can now start entering the “suggested 2008 stumpage values” to your “2008 Template”. Save it again after you have entered the rates. Your template is now set-up to start your 2008 billing process. (Explained on Page 11).
EXCEL SPREADSHEET BASICS
USING THE WORKBOOKS: When you open the workbooks you will notice tabs along the bottom of the screen. Each tab is known as a worksheet (or page) and it has a name. The active worksheet (the one you are working on) is “bold”.

Rev. 2012
Page 6 Click on the tab (worksheet/page) to make it “active”.
To the bottom left of the worksheet the small arrow buttons allow you to move across the tabs (worksheets/pages) to the other tabs (worksheets/pages).
The first button brings you to the first worksheet, the two middle buttons move you either to the left or right worksheet one at a time, and the last button takes you to the last worksheet. The workbooks allow you to bill one owner or up to four separate owners (4 separate reports of wood cut). IMPORTANT TO REMEMBER: When you are done entering into a “cell” (space on the spreadsheet), always press your enter key when you are done. NOTE: The only worksheet pages you really need to print are the “certification, “warrant” and the “bill” (if your tax collector uses it). To print the page, click on the tab, (you will be viewing the page) and hit print.
SETTING UP YOUR TEMPLATE COPIES The first step in using the workbooks is to enter the “generic” information that is specific to your municipality (such as municipal name, county, tax collector, address).
NO MATTER WHICH WORKBOOK YOU ARE USING: ALWAYS START WITH THE OWNER 1 WORKSHEET (PAGE) TO
PUT IN THIS INFORMATION. The “generic” information (municipal, county, tax year, bill date) entered on the first page will carry over to other pages automatically. An example of how you enter the data is shown on the following pages.
Rev. 2012
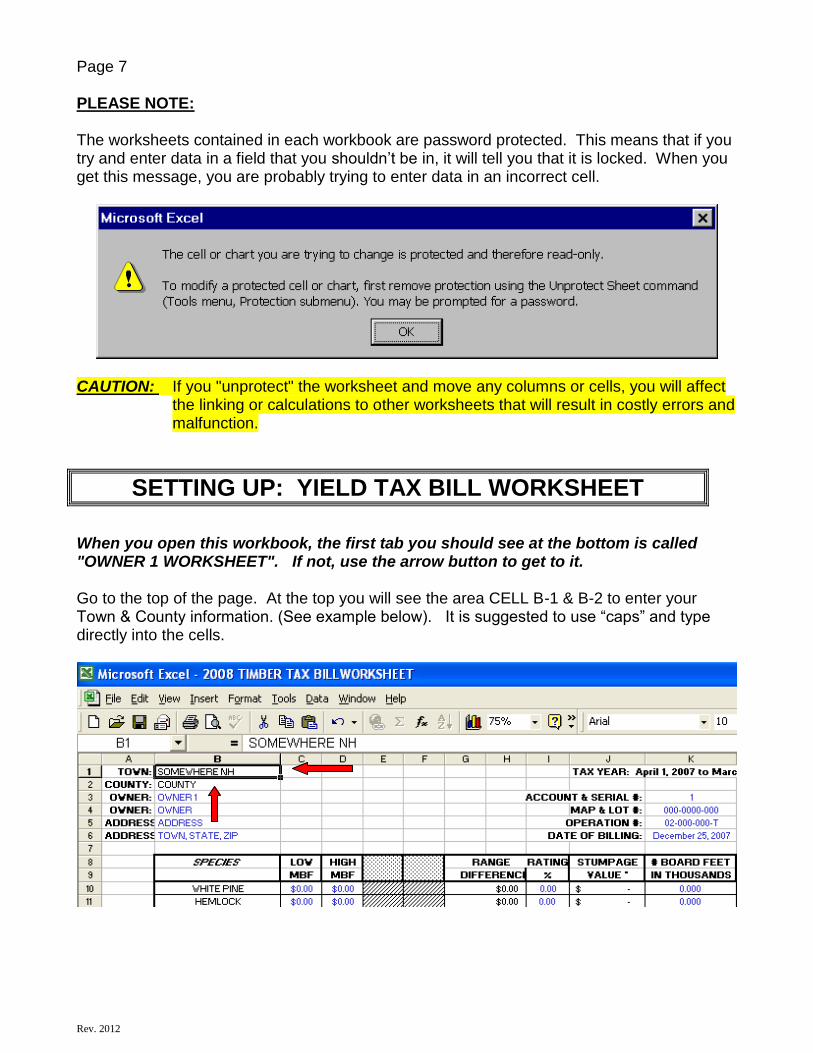
Page 7 PLEASE NOTE: The worksheets contained in each workbook are password protected. This means that if you try and enter data in a field that you shouldn’t be in, it will tell you that it is locked. When you get this message, you are probably trying to enter data in an incorrect cell.
CAUTION: If you "unprotect" the worksheet and move any columns or cells, you will affect
the linking or calculations to other worksheets that will result in costly errors and malfunction.
SETTING UP: YIELD TAX BILL WORKSHEET
When you open this workbook, the first tab you should see at the bottom is called "OWNER 1 WORKSHEET". If not, use the arrow button to get to it.
Go to the top of the page. At the top you will see the area CELL B-1 & B-2 to enter your Town & County information. (See example below). It is suggested to use “caps” and type directly into the cells.
Rev. 2012
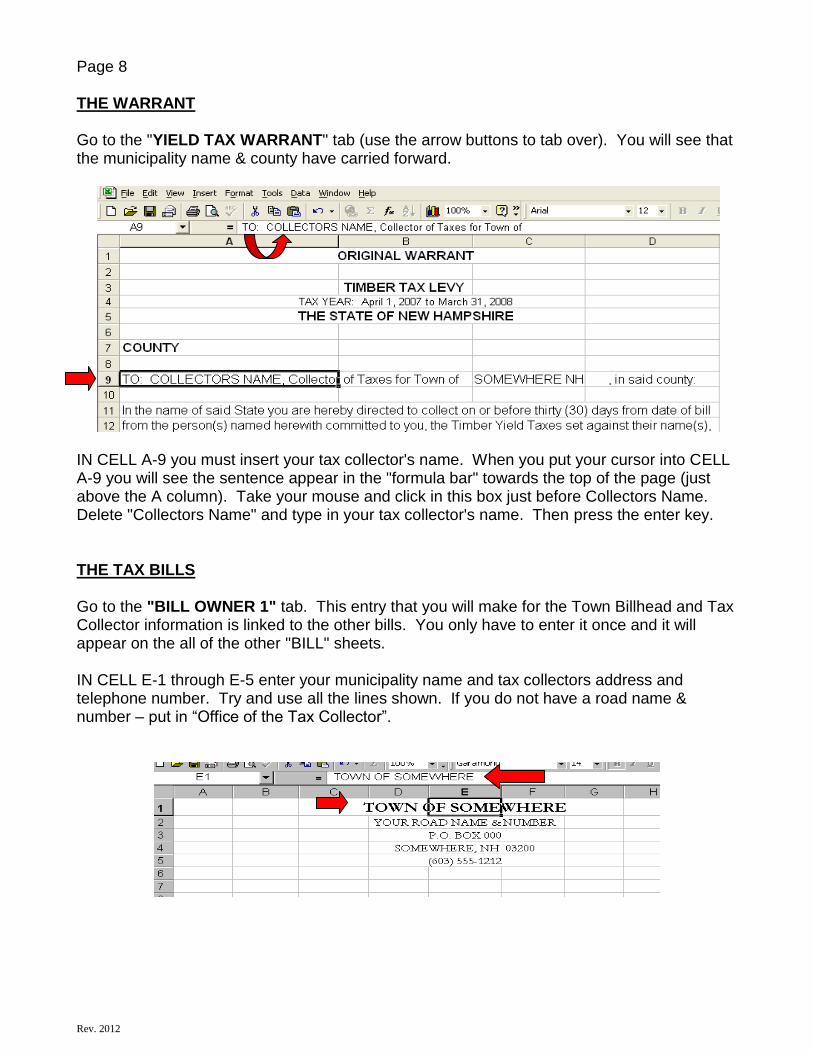
Page 8 THE WARRANT Go to the "YIELD TAX WARRANT" tab (use the arrow buttons to tab over). You will see that the municipality name & county have carried forward.
IN CELL A-9 you must insert your tax collector's name. When you put your cursor into CELL A-9 you will see the sentence appear in the "formula bar" towards the top of the page (just above the A column). Take your mouse and click in this box just before Collectors Name. Delete "Collectors Name" and type in your tax collector's name. Then press the enter key. THE TAX BILLS Go to the "BILL OWNER 1" tab. This entry that you will make for the Town Billhead and Tax Collector information is linked to the other bills. You only have to enter it once and it will appear on the all of the other "BILL" sheets. IN CELL E-1 through E-5 enter your municipality name and tax collectors address and telephone number. Try and use all the lines shown. If you do not have a road name & number – put in “Office of the Tax Collector”.

Rev. 2012
Page 9 IN CELL C-37 enter the tax collectors hours. IN CELL E-45 enter the tax collectors name.
NOTE: The bill is set up to be in "window envelope" position so that all the tax collector has to do is sign it, fold it, and send it.
DATE OF BILLING:
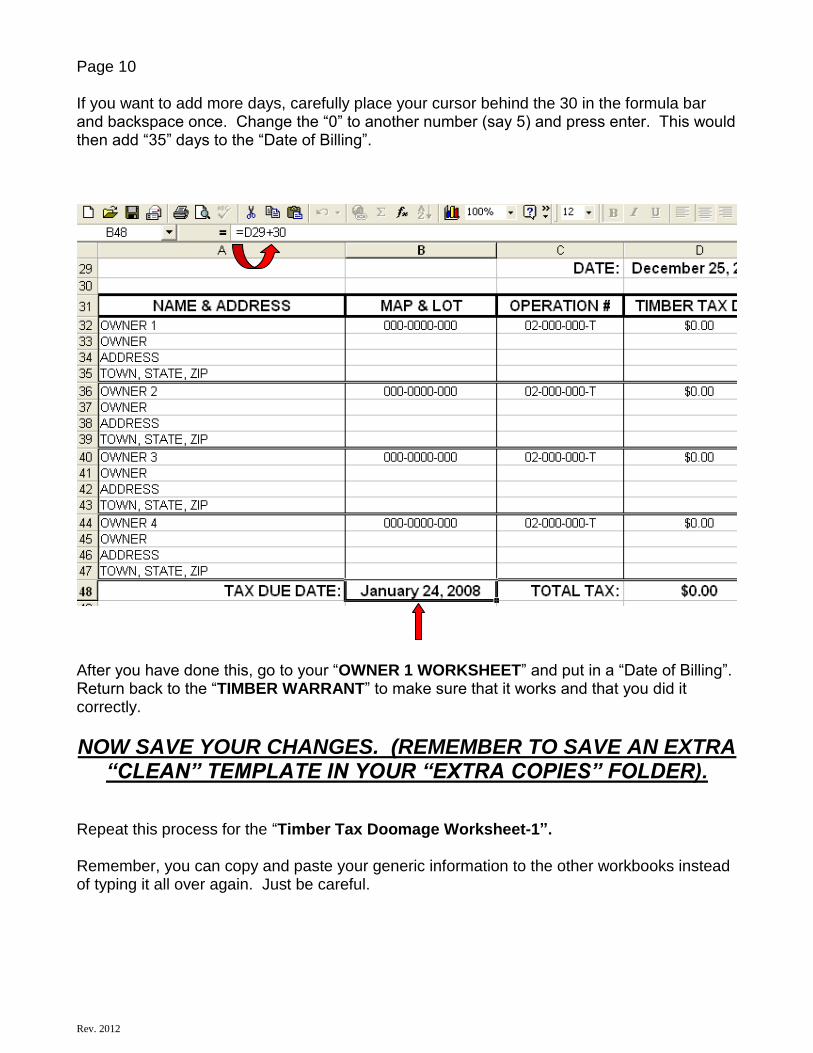
Please note that the spreadsheets are set up to automatically add 30 days to "Date Of Billing" in order to establish a due date for the timber tax. It usually takes a day to prepare the bills, another day or two to get the assessing officials to sign the warrant, and another day to get it to the tax collector and in the mail. You will want to either pre-date the “Date of Billing” to allow for the extra days needed, or you can add extra days to the “formula” within the spreadsheet. Make sure that you have spelled the month correctly and that you left a space between the comma and year. (Example: January 1, 2009) To change the due date “formula” in the spreadsheet, go to the “TIMBERWARRANT” tab. Scroll down and place your cursor in cell “B 48” next to the “TAX DUE DATE:”. When you do this, you will see a formula in the “formula bar” that says =D29+30. The formula is stating: “take what is in cell D29 and add 30 days”. See example on Page 10.
Rev. 2012
Page 10 If you want to add more days, carefully place your cursor behind the 30 in the formula bar and backspace once. Change the “0” to another number (say 5) and press enter. This would then add “35” days to the “Date of Billing”.
After you have done this, go to your “OWNER 1 WORKSHEET” and put in a “Date of Billing”. Return back to the “TIMBER WARRANT” to make sure that it works and that you did it correctly.
NOW SAVE YOUR CHANGES. (REMEMBER TO SAVE AN EXTRA “CLEAN” TEMPLATE IN YOUR “EXTRA COPIES” FOLDER).
Repeat this process for the “Timber Tax Doomage Worksheet-1”. Remember, you can copy and paste your generic information to the other workbooks instead of typing it all over again. Just be careful.
Rev. 2012
Page 11
ENTERING THE REPORT OF CUT INFORMATION USING THE TIMBER TAX BILL WORKSHEET
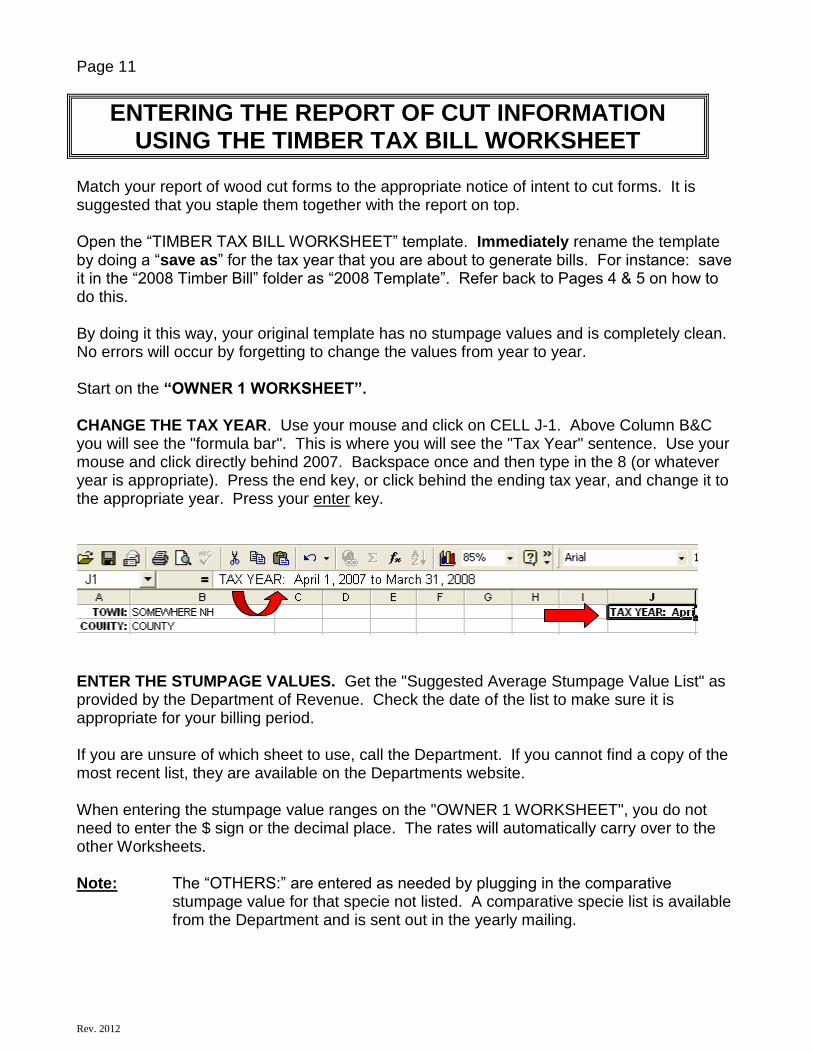
Match your report of wood cut forms to the appropriate notice of intent to cut forms. It is suggested that you staple them together with the report on top. Open the “TIMBER TAX BILL WORKSHEET” template. Immediately rename the template by doing a “save as” for the tax year that you are about to generate bills. For instance: save it in the “2008 Timber Bill” folder as “2008 Template”. Refer back to Pages 4 & 5 on how to do this. By doing it this way, your original template has no stumpage values and is completely clean. No errors will occur by forgetting to change the values from year to year. Start on the “OWNER 1 WORKSHEET”. CHANGE THE TAX YEAR. Use your mouse and click on CELL J-1. Above Column B&C you will see the "formula bar". This is where you will see the "Tax Year" sentence. Use your mouse and click directly behind 2007. Backspace once and then type in the 8 (or whatever year is appropriate). Press the end key, or click behind the ending tax year, and change it to the appropriate year. Press your enter key.
ENTER THE STUMPAGE VALUES. Get the "Suggested Average Stumpage Value List" as provided by the Department of Revenue. Check the date of the list to make sure it is appropriate for your billing period. If you are unsure of which sheet to use, call the Department. If you cannot find a copy of the most recent list, they are available on the Departments website. When entering the stumpage value ranges on the "OWNER 1 WORKSHEET", you do not need to enter the $ sign or the decimal place. The rates will automatically carry over to the other Worksheets. Note: The “OTHERS:” are entered as needed by plugging in the comparative
stumpage value for that specie not listed. A comparative specie list is available from the Department and is sent out in the yearly mailing.
Rev. 2012
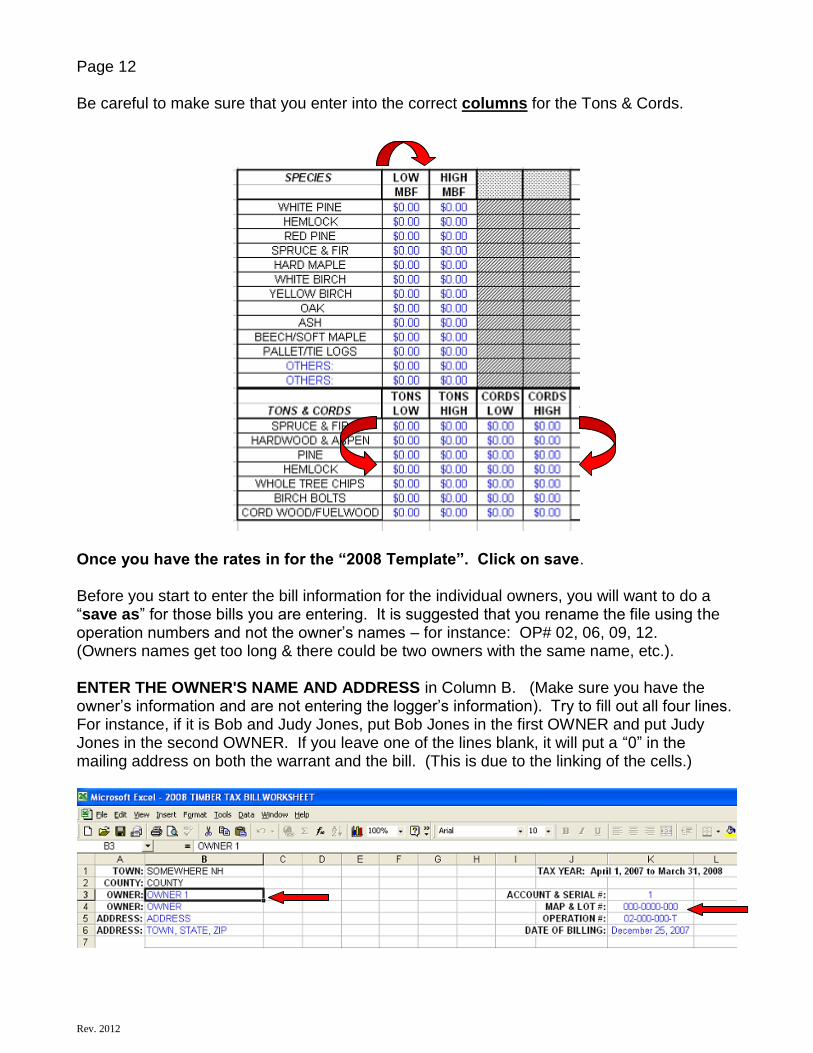
Page 12 Be careful to make sure that you enter into the correct columns for the Tons & Cords.
Once you have the rates in for the “2008 Template”. Click on save. Before you start to enter the bill information for the individual owners, you will want to do a “save as” for those bills you are entering. It is suggested that you rename the file using the operation numbers and not the owner’s names – for instance: OP# 02, 06, 09, 12. (Owners names get too long & there could be two owners with the same name, etc.). ENTER THE OWNER'S NAME AND ADDRESS in Column B. (Make sure you have the owner’s information and are not entering the logger’s information). Try to fill out all four lines. For instance, if it is Bob and Judy Jones, put Bob Jones in the first OWNER and put Judy Jones in the second OWNER. If you leave one of the lines blank, it will put a “0” in the mailing address on both the warrant and the bill. (This is due to the linking of the cells.)
Rev. 2012
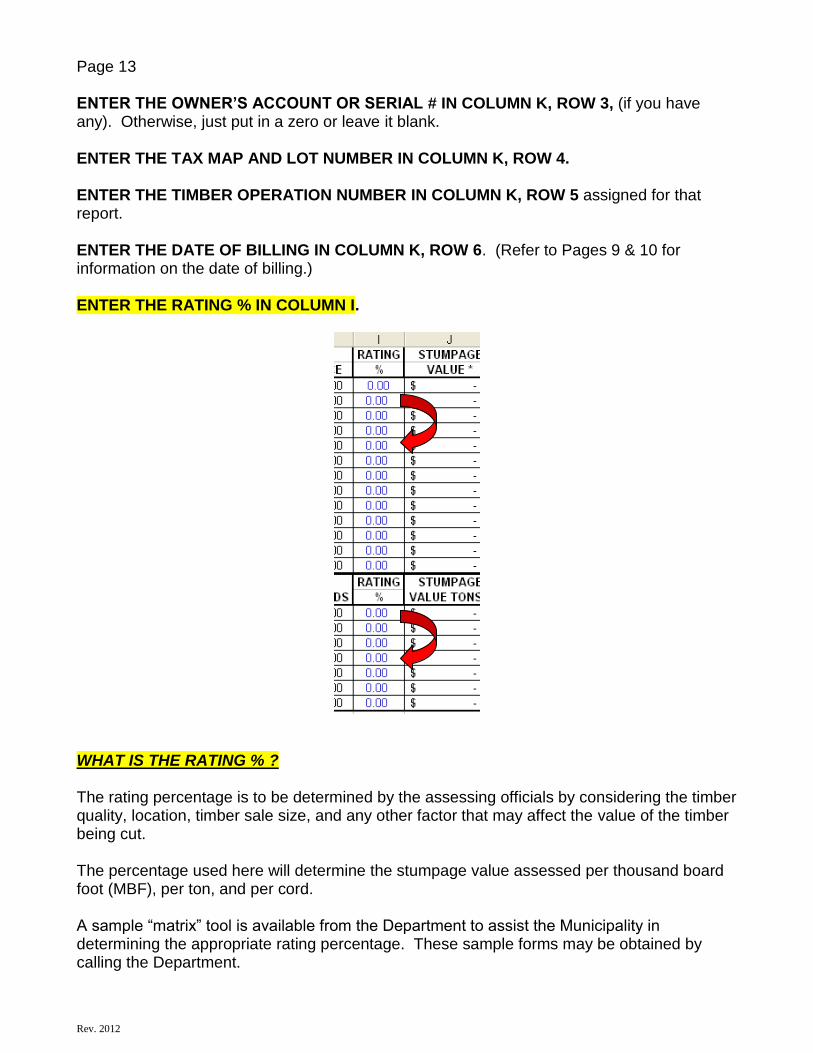
Page 13 ENTER THE OWNER’S ACCOUNT OR SERIAL # IN COLUMN K, ROW 3, (if you have any). Otherwise, just put in a zero or leave it blank. ENTER THE TAX MAP AND LOT NUMBER IN COLUMN K, ROW 4. ENTER THE TIMBER OPERATION NUMBER IN COLUMN K, ROW 5 assigned for that report. ENTER THE DATE OF BILLING IN COLUMN K, ROW 6. (Refer to Pages 9 & 10 for information on the date of billing.) ENTER THE RATING % IN COLUMN I.
WHAT IS THE RATING % ? The rating percentage is to be determined by the assessing officials by considering the timber quality, location, timber sale size, and any other factor that may affect the value of the timber being cut. The percentage used here will determine the stumpage value assessed per thousand board foot (MBF), per ton, and per cord. A sample “matrix” tool is available from the Department to assist the Municipality in determining the appropriate rating percentage. These sample forms may be obtained by calling the Department.

Rev. 2012
Page 14 The “rating %” must be done for each owner’s worksheet. It does not carry over.
THE PERCENTAGE MUST ALWAYS HAVE A DECIMAL POINT. FAILURE TO ENTER IT WILL RESULT IN AN EXTREME
OVERINFLATED ASSESSMENT.
If nothing is entered into the column it will default to the low MBF, Cord, or Ton value. To assess the high MBF, Cord, or Ton value enter: 1.00. To enter a value percentage somewhere in between, for instance: 33% = .33 50% = .50 66% = .66 (Failure to enter the decimal point will result in 33, 50, 66, or 100 times the appropriate value and will result in a very upset taxpayer.)
When you enter the "rating percentage", it will automatically calculate the "stumpage value" and “stumpage value tons & cords”.
ENTER THE REPORTED AMOUNTS.
The final step is to enter the board feet, tons, or cords from the Report of Wood Cut. The specie types are listed in the same order on the Timber Billing Worksheet as they appear on the Report of Wood Cut.
Rev. 2012
Page 15 To enter the board feet volumes from the report: If it is written as: 20,500 or 20.500 board feet (MBF), you enter 20.5 800 or .800 board feet (MBF), you enter .8 65 or .065 board feet (MBF), you enter .065. (MBF = thousand board feet)
The #TONS & #CORDS are entered as you see them on the report. 27.5 TONS = 27.5 10 CORDS = 10 If you cannot tell what they have actually written, or what they mean on the report – call the owner or logger. After you have entered the data, look at the certification, warrant & bill to make sure it is all there and that it looks appropriate. If you have more than one Report of Wood Cut, go to the "OWNER 2 WORKSHEET" and follow the same procedure. Each separate Report of Wood Cut is a separate worksheet. When you are all done, save your work and print it off. Printing directions are on Page 17.
ENTERING THE REPORT OF CUT INFORMATION USING STUMPAGE VALUE FROM OWNER/LOGGER
There may be times when you will need to manually plug in stumpage values due to information received from the owner, scale slips, logger, forester, etc. Match your report of wood cut forms to the appropriate notice of intent to cut forms. It is suggested that you staple them together with the report on top and any supporting value documentation to the back. Open the “TIMBER TAX BILLWORKSHEET” template. Immediately rename the template by doing a “save as” for the bill(s) that you are about to generate. Refer back to Pages 4 & 5 for an example.
Rev. 2012
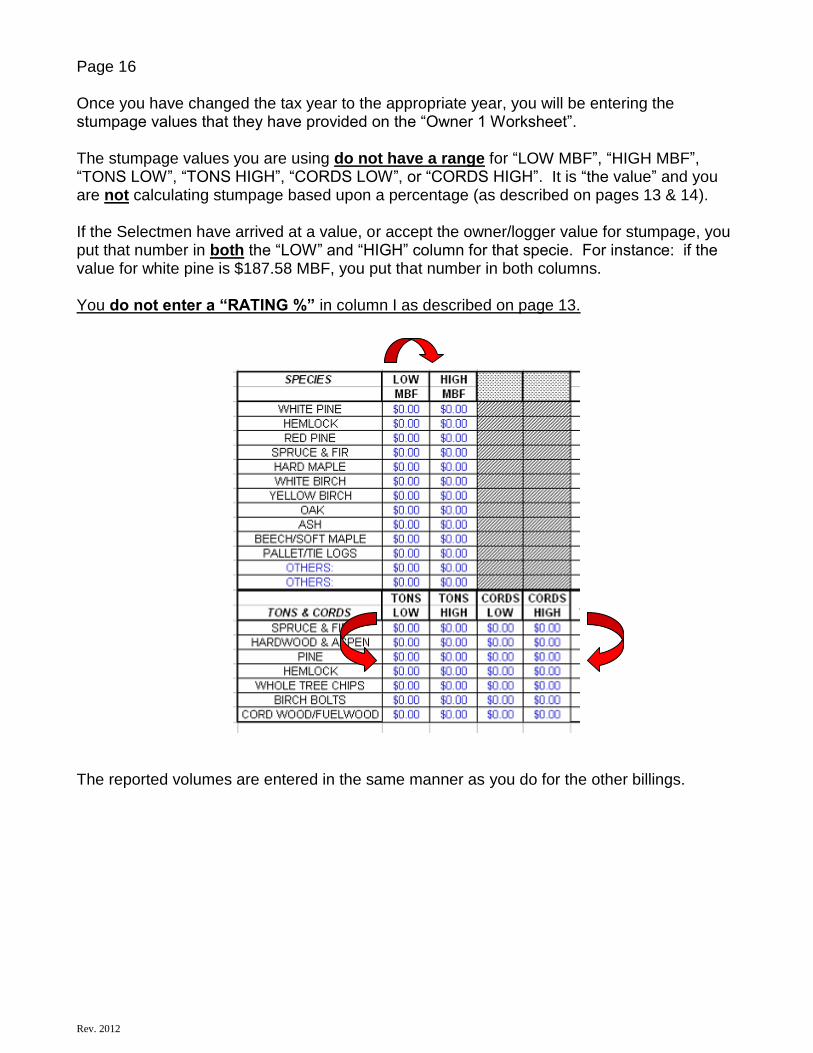
Page 16 Once you have changed the tax year to the appropriate year, you will be entering the stumpage values that they have provided on the “Owner 1 Worksheet”. The stumpage values you are using do not have a range for “LOW MBF”, “HIGH MBF”, “TONS LOW”, “TONS HIGH”, “CORDS LOW”, or “CORDS HIGH”. It is “the value” and you are not calculating stumpage based upon a percentage (as described on pages 13 & 14). If the Selectmen have arrived at a value, or accept the owner/logger value for stumpage, you put that number in both the “LOW” and “HIGH” column for that specie. For instance: if the value for white pine is $187.58 MBF, you put that number in both columns. You do not enter a “RATING %” in column I as described on page 13.
The reported volumes are entered in the same manner as you do for the other billings.
Rev. 2012
Page 17
CHECK THETAXABLE VALUE(S) THAT HAVE BEEN GENERATED FROM THE INFORMATION THAT YOU HAVE ENTERED. IT IS ON THE CERTIFICATION PAGES.
DOES THE ASSESSED VALUE LOOK REASONABLE?
IF NOT, YOU PROBABLY FORGOT TO PUT IN A DECIMEL POINT IN THE “RATING %” If you have more than one Report of Wood Cut, go to the "OWNER 2 CERTIFICATION" and follow the same procedure. Each separate Report of Wood Cut is a separate certification. When you are done, save your work and print it off.
IF YOU HAVE QUESTIONS OR NEED ASSISTANCE PLEASE CALL THE TIMBER CLERK AT 230-5969.