This Page is Intentionally Blank - parknationalcorp.com · ACH Manager User Guide 3.14.2018 8 CCD -...
24
Commercial Cash Management ACH Manager User Guide
Transcript of This Page is Intentionally Blank - parknationalcorp.com · ACH Manager User Guide 3.14.2018 8 CCD -...

Commercial Cash Management
ACH Manager User Guide

ACH Manager User Guide
3.14.2018 2
Table of Contents Introduction ................................................................................................................................................................... 3
Processing Schedule ...................................................................................................................................................... 3 Processing Time Frames for ACH Manager .................................................................................................................................. 3 Processing Time Frames for SFTP ................................................................................................................................................. 3 Banking Days & Federal Holidays ................................................................................................................................................. 3
ACH Terms & Definitions ............................................................................................................................................... 4 Standard Entry Class (SEC) Codes ................................................................................................................................................. 4 ACH Participants .......................................................................................................................................................................... 4
Creating New ACH Transfers ......................................................................................................................................... 5 PPD - Prearranged Payment or Deposit / Payroll / Health Savings Account Entry ....................................................................... 7 CCD - Corporate Credit or Debit / Vendor Payment / Remittance / Child Support Payment Entry ............................................. 8 CCD (TXP) – Federal Tax Payment ................................................................................................................................................ 9 CCD (TXP) – State/Local Tax Payment ........................................................................................................................................ 10 CTX - Corporate Trade Exchange Entry ...................................................................................................................................... 11
Special Features: Display Details, Holds, Undo ............................................................................................................ 12 Display/Hide Details ................................................................................................................................................................... 12 Single or Multiple Batch Processing ........................................................................................................................................... 12 Undo .......................................................................................................................................................................................... 13
Importing ACH Transfers ............................................................................................................................................. 13 Creating File & Batch Header Records in ACH Software ............................................................................................................ 13 Importing Prenotifications (Prenotes) ....................................................................................................................................... 14 Importing NACHA-Formatted Files ............................................................................................................................................. 14 Importing Non-NACHA Formatted Files ..................................................................................................................................... 14 Importing using Pre-built ACH File Import Template ................................................................................................................. 16
Inquiring into ACH Transfers ........................................................................................................................................ 16
Reports, Sorting, & Filtering ........................................................................................................................................ 17 Column Sorting .......................................................................................................................................................................... 18 Column Filtering ......................................................................................................................................................................... 19 View / Print / Export Reports for Individual ACH Transfers ....................................................................................................... 19
Changing ACH Transfers .............................................................................................................................................. 20
Reviewing ACH Transfers ............................................................................................................................................. 21
Resubmitting ACH Returned Items .............................................................................................................................. 21
Reversing ACH Transfers .............................................................................................................................................. 22
Deleting ACH Transfers ................................................................................................................................................ 22
Notification Emails ....................................................................................................................................................... 22
Tax Type Conversion Codes ......................................................................................................................................... 23

ACH Manager User Guide
3.14.2018 3
Introduction ACH Manager allows businesses to originate ACH transactions when and where you want, safely and quickly. This user guide explains how to use ACH Manager to submit electronic payments and deposits.
Processing Schedule Processing Time Frames for ACH Manager
ACH files are processed at 12 p.m. and 4 p.m. EST on banking days.*
• The Bank recommends that ACH files are sent two days prior to the Effective Date.** • For Same Day ACH^ files must be received by the bank by the 12 p.m. cutoff on banking days for
processing that day.
Processing Time Frames for SFTP
ACH files are processed at 4 p.m. EST on banking days.*
The Bank recommends that ACH files are sent two days prior to the Effective Date.**
*See Banking Days & Federal Holidays section below.
**Effective Date must be a banking day, or the file will be processed on the first banking day after the effective date.
^Same Day ACH refers to entries initiated by the Customer with an Effective Date of the current date, which are submitted to the Bank per the processing deadlines above for Same Day Settlement as permitted by NACHA and the ACH Operator. Same Day Entry Fees will apply to said Entries as noted in the Bank’s fee schedule. Any ACH Entries received by the Bank containing stale-dated or incorrect/invalid Effective Entry Dates will be processed as Same Day ACH Entries.
Banking Days & Federal Holidays
ACH processing is available on banking days, defined as days the Bank and the Federal Reserve are both open and typically do not include Saturdays, Sundays, or the following Federal holidays:
• New Year’s Day • Martin Luther King Jr. Day • Presidents’ Day* • Memorial Day • Independence Day
• Labor Day • Columbus Day* • Veteran’s Day • Thanksgiving Day • Christmas Day
*Bank is open for business, however the Federal Reserve is closed so ACH processing is not available.

ACH Manager User Guide
3.14.2018 4
ACH Terms & Definitions Standard Entry Class (SEC) Codes
Several types of ACH transactions can be initiated. The four ACH Standard Entry Class (SEC) codes are:
1. Prearranged Payment or Deposit Entries (PPD) Payroll Prearranged Deposit Prearranged Payment Health Savings Account (HSA)
2. Corporate Credit or Debit (CCD)
Corporate Debit Corporate Credit Vendor Payment Remittance Child Support Payment
3. Corporate Credit or Debit + TXP (CCD) Federal Tax Payment State/Local Tax Payment
4. Corporate Trade Exchange (CTX)
ACH Participants
There are six participants in ACH transactions, as defined in the ACH Rule Book:
Originator
Originator is the entity that initiates ACH entries according to an arrangement with a Receiver. The Originator is usually a business directing a transfer of funds to or from an individual’s or another business's account.
Receiver
Receiver is an individual or business that authorizes an Originator to initiate ACH entries to the Receiver's account.
Originating Depository Financial Institution (ODFI)
OFDI is the Originator’s bank that receives payment instructions from Originators and forwards ACH entries to the ACH Operator.
Receiving Depository Financial Institution (RDFI)
RDFI is the Receiver’s bank that receives ACH entries from the ACH Operator and posts them to the accounts of its depositors (Receivers).
Automated Clearing House (ACH) Operator
ACH Operator is the central clearing facility, operated by a Federal Reserve Bank (FRB) or a private organization, which receives ACH entries from ODFIs and distributes the entries to appropriate RDFIs.
NACHA
National Automated Clearing House Association (NACHA) provides operating guidelines for all ACH participants.

ACH Manager User Guide
3.14.2018 5
Creating New ACH Transfers
1. Login to Business Banking with your Access ID and token.
2. Select ACH Manager on the Funds Management menu. ACH Manager will open as a new window.
3. Select the appropriate option from the list on the left side of the page:
a. New ACH Transfer – to create a new ACH file from scratch, manually entering all information
b. New ACH Transfer Using Existing Transfer – to essentially make a copy of an ACH file you previously created, manually updating fields as needed to create a new file
c. ACH Transfer Template – to use a pre-built ACH transfer file
4. If you select:
a. New ACH Transfer – next you will select the type of ACH transfer you are completing from the drop-down and click Submit.
b. New ACH Transfer Using Existing Transfer – next you will enter information about the processed transfer (Transfer Description, Date Range, Amount Range, ACH Type) into the right side of the page, click Submit and click on the appropriate file name that appears in the ACH List.
c. ACH Transfer Template – click the icon to the right of the template name to initiate a New Transfer.
5. Complete the required information on the ACH transfer screen. For details on each field, refer to the appropriate section based on the type of file you’re creating:
• PPD – Prearranged Payment or Deposit / Payroll / Health Savings Account
• CCD – Corporate Credit or Debit / Vendor, Remittance, Child Support
• CCD (TXP) – Federal Tax Payment
• CCD (TXP) – State Tax Payment
• CTX – Corporate Trade Exchange
6. When finished entering the transfer information, click Save or Process:
a. Save will store your transfer as a pending transaction you can modify later. A Confirmation Screen displays a summary of the transfer with a Reference Number. Click Done.
b. Process will submit the transfer to the bank for processing. Continue following the steps below.
7. After clicking Process, when prompted by a Security Challenge, enter the One-Time Password from your token (8-digits) and click Submit.

ACH Manager User Guide
3.14.2018 6
8. Watch for a processing screen. a. If the file requires additional customer or bank review, you will see a Warning Message.
b. If the file is unable to process due to an error or missing information in the file, a red Error Message will appear (reasons may vary; read message to determine the nature of issue).
c. If the system flags a file as a duplicate, a warning message displays with information about each
suspected duplicate file. Click on Cancel or Done to stop the file from processing, or click on Process so the file can continue processing.
9. Once the file successfully processes, click Done.

ACH Manager User Guide
3.14.2018 7
PPD - Prearranged Payment or Deposit / Payroll / Health Savings Account Entry
A PPD is a credit or debit transaction for transferring funds into consumer accounts for payroll, memberships, tuition, etc. Complete the following fields:
• Description – Enter a description of this ACH file, which will appear on the Receiver’s account statement after your Company’s name (i.e. ABC Company Payroll for May 3).
• Effective Date – Enter the date the entry should post to the Receiver’s account.
• Same Day – Check the box if you want the transfer to post the day you process it. (Same Day ACH is subject to deadlines and higher per item fees; also individual transactions cannot exceed $25,000.00.)
• Recurring Frequency – To repeat daily, weekly, or monthly, choose an option from the drop-down.
• Recurring End Date – For recurring transfers, choose the final date for the transfer to recur.
• Transfer From
o Prearranged Payment – Enter the Receiver’s Name, Identification Number if appropriate, Account Number, Type of Account (checking, savings), Routing Transit (RT) number, and Amount. Columns can be sorted by clicking on the column name. Click on Description to display an optional field you can include, like the memo line on a check. Info in the Description field will appear on Receivers’ bank statements.
o Prearranged Deposit/Payroll – Use the drop-down to select your debit account and the Amount. Click on Description to display an optional field you can include, like the memo line on a check. Info in the Description field will appear on Recipients’/Employees’ bank statements.
Health Savings Account – Choose an option in the Contribution Type drop-down.
• Transfer To
o Prearranged Payment – Use the drop-down to select your debit account and the Amount. Click on Description to display an optional field you can include, like the memo line on a check. Info in the Description field will appear on Recipients’ bank statements.
o Prearranged Deposit/Payroll – Enter the Receiver or Employee’s Name, Identification Number if appropriate, Account Number, Type of Account (checking, savings), Routing Transit (RT) number, and Amount. Columns can be sorted by clicking on the column name. Click on Description to display an optional field you can include, like the memo line on a check. Info in the Description field will appear on Recipients’/Employees’ bank statements.

ACH Manager User Guide
3.14.2018 8
CCD - Corporate Credit or Debit / Vendor Payment / Remittance / Child Support Payment Entry
A CCD is a credit or debit transaction for transferring funds to or from business accounts for vendor payments, child support payments, etc. Complete the following fields:
• Description – Enter a description of this ACH file, which will appear on the Receiver’s account statement after your Company’s name (i.e. ABC Company Remittance 1057).
• Effective Date – Enter the date the entry should post to the Receiver’s account.
• Same Day – Check the box if you want the transfer to post the day you process it. (Same Day ACH is subject to deadlines and higher per item fees; also individual transactions cannot exceed $25,000.00.)
• Recurring Frequency – To repeat daily, weekly, or monthly, choose an option from the drop-down.
• Recurring End Date – For recurring transfers, choose the final date for the transfer to recur.
• Transfer From o Corporate Credit – Use the drop-down to select your debit account and the Amount. Click on
Description to display an optional field you can include, like the memo line on a check. Info in the Description field will appear on Receivers’ bank statements.
• Corporate Debit - Enter the Receiver’s Name, Identification Number if appropriate, Account Number, Type of Account (checking, savings), Routing Transit (RT) number, and Amount. Sort columns by clicking on the column name. Click on Description to display an optional field you can include, like the memo line on a check. Info in the Description will appear on Receivers’ bank statements.
• Transfer To • Corporate Credit – Enter the Receiver’s Name, Identification Number if appropriate, Account
Number, Type of Account (checking, savings), Routing Transit (RT) number, and Amount. Sort columns by clicking on the column name. Click on Description to display an optional field, like the memo line on a check. Info in the Description will appear on Receivers’ bank statements.
Child Support - Enter any of the information that applies: Case Identifier, Pay Date, Pay Amount, Non-Custodial Parent SSN, Medical Support Indicator, Non-Custodial Parent Last Name, Non-Custodial Parent First Name, FIPS Code, and Employment Termination Indicator.
• Corporate Debit – Use the drop-down to select your debit account and the Amount. Click on Description to display an optional field you can include, like the memo line on a check. Info in the Description will appear on Recipients’ bank statements.
Note: The Remittance file type is designed for $0 entries that serve as receipt of payment from
one business to another. If you need to send an actual payment, send a Corporate Credit.

ACH Manager User Guide
3.14.2018 9
CCD (TXP) – Federal Tax Payment
CCD (TXP) transfers are used to make federal tax payments. Taxes are required by the Secretary of the Treasury to be deposited with an authorized financial institution or the Federal Reserve Bank. Complete the following fields:
• Description – Enter a description of this ACH file, which will appear on the Receiver’s account statement after your Company’s name.
• Effective Date – Enter the date the entry should post to the Receiver’s account.
• From Account – Use the drop-down to select your debit account.
• Recurring Frequency – If this transfer should repeat daily, weekly, or monthly, choose an option from the drop-down.
• Transfer End Date – For recurring transfers, choose the final date for the transfer to recur.
• Name – Enter the name of the Taxpayer.
• Taxpayer ID – Enter the Tax ID number of the Company making the tax payment.
• Tax Period End Date – Enter the Tax Period End Date for this payment.
• Tax Description/Tax Type Code – Select the description of the tax file from the drop-down.
• Tax Amount 1 – Amount to be sent. (If sub-categories are used, enter Type 2 & 3 – unused fields may be deleted by clicking the “X” next to the row)
• Amount Type – This field will auto fill with the Tax Description Number. (If sub-categories are used, enter Type 2 & 3 – unused fields may be deleted by clicking the “X” next to the row).
• Amount Type Description – Tax description. (If sub-categories are used, enter Type 2 & 3. Unused fields may be deleted by clicking the “X” next to the row.)

ACH Manager User Guide
3.14.2018 10
CCD (TXP) – State/Local Tax Payment
CCD (TXP) transfers are used to make state and local tax payments. Complete the following fields:
• Description – Enter a description of this ACH file, which will appear on the Receiver’s account statement after your Company’s name (e.g. Sales Tax).
• Effective Date – Enter the date the entry should post to the Receiver’s account.
• From Account – Use the drop-down to select your debit account.
• Same Day – Check the box if you want the transfer to post the day you process it. (Same Day ACH is subject to deadlines and higher per item fees; also individual transactions cannot exceed $25,000.00.)
• Recurring Frequency – If this transfer should repeat daily, weekly, or monthly, choose an option from the drop-down.
• Transfer End Date – For recurring transfers, choose the final date for the transfer to recur.
• State – Select the state from the drop-down.
• Tax Description – Select the description of the tax file from the drop-down.
• Name – Enter the Receiver’s name.
• Taxpayer ID – Enter the Tax ID number of the Company making the tax payment.
• Tax Period End Date – Enter the Tax Period End Date for this payment.
• Taxpayer Verification – The ACH Credit Registration Number of the taxpayer.
• Tax Agency Account – The account number for the tax agency; this auto fills, but can be manually changed.
• Tax Agency RT – The routing number for the tax agency; this auto fills, but can be manually changed.
• Tax Amount 1 – Total tax to be sent to the agency.

ACH Manager User Guide
3.14.2018 11
CTX - Corporate Trade Exchange Entry
CTX transactions are used to transfer funds (debits or credits) between trading partners. Complete the following fields:
• Description – Enter a description of this ACH file, which will appear on the Receiver’s account statement after your Company’s name (i.e. ABC Company Main Street Project --- ‘ABC Company’ is the Company name, ‘Main Street Project’ is the Description).
• Effective Date – Enter the date the entry should post to the Receiver’s account.
• Same Day – Check the box if you want the transfer to post the day you process it. (Same Day ACH is subject to deadlines and higher per item fees; also individual transactions cannot exceed $25,000.00.)
• Same Day – Check the box if you want the transfer to occur the day you process it. Same Day ACH is subject to special pricing. Transfers cannot exceed $25,000.
• Recurring Frequency – If this transfer should repeat daily, weekly, or monthly, choose an option from the drop-down.
• Transfer End Date – For recurring transfers, choose the final date for the transfer to recur.
• Transfer From – Use the drop-down to select your debit account and the Amount. Click on Description to display an optional field you can include, which is like the memo line on a check. Information in the Description field will appear on Receivers’ bank statements.
• Transfer To – Enter the Receiver’s Name, Identification Number if appropriate, Account Number, Type of Account (checking, savings), Routing Transit (RT) number, and Amount. Columns can be sorted by clicking on the column name. Click on Description to display an optional field you can include, like the memo line on a check. For CTX transfers, you can add up to 9,999 Descriptions for each entry. Info in the Description will appear on Receivers’ bank statements.

ACH Manager User Guide
3.14.2018 12
Special Features: Display Details, Holds, Undo When entering ACH Transfers into ACH Manager, there are several features available on every file entry screen.
Display/Hide Details
The Display/Hide link is located just below Transfer Type. When clicking on Display Details, you’ll notice a few optional fields appear in the Transfer From and Transfer To sections, like Identification and Discretionary Data. The link name also changes to Hide Details. When clicking on Hide Details, those optional fields will be hidden from view. You can choose whether you Display or Hide the optional fields. If you don’t use them, you may as well keep them hidden.
Single or Multiple Batch Processing When the Hold box is selected beside an entry, the entry will not be processed with the rest of the file. This allows you to exclude a specific transaction from a transfer without deleting it from the file. You can also click on Hold Batch to hold all entries in a batch, even if they are on multiple pages. Remove the hold by clicking Unhold Batch. If a template transfer is put on hold, the review process is automatically initiated, ensuring a notification email is sent to the authorized administrator to approve the hold.
Use the Select All link to automatically select/un-select Hold boxes beside every entry on the screen. If you have more entries that extend onto multiple screens, you must click Select All on every page individually.
The dollar amount is excluded from your file totals
Select the check box to place a single
transaction on hold
Click on the Hold Batch or Unhold Batch links for
multiple entries

ACH Manager User Guide
3.14.2018 13
Undo If you delete an entry from an ACH Transfer, the information remains visible but appears with strikethrough and an “undo” icon appears at the far-right. To restore the deleted entry, click on undo and the information will be un-deleted. Importing ACH Transfers Many accounting programs will let you export payroll or other ACH files, which can then be imported into ACH Manager for processing. The method for importing files varies based on the type of file your software generates:
• If your files are NACHA-formatted files, they can be imported directly into ACH Manager by selecting Import ACH Transfer, then NACHA.
• If your files are not NACHA-formatted files – this typically means the file is a CSV or Excel format – you must import by selecting Import ACH Transfer, then Non NACHA.
If you worked with the bank to create a pre-built import template in ACH Manager, you’ll select the ACH File Import Template option and click the icon for New Transfer.
Creating File & Batch Header Records in ACH Software If your ACH software asks you to create your File and Batch Header Records, use the information below:
FILE HEADER RECORD (1 record) Example Definition
Immediate Destination TR 044101305 Typically your bank’s routing and transit number
Immediate Destination Name Bank Name (i.e. Park National Bank)
ACH Operator or Receiving Point for which the file is destined
Immediate Origin TR 044102362 Typically your bank’s routing and transit number
Immediate Origin Name Bank Name (i.e. Park National Bank)
ACH Operator or Sending Point
BATCH HEADER RECORD (5 record)
Company Short Name (16 characters) Company Name (16 characters)
Company Discretionary Data Field available for company use
Company Identification Employer Identification Number
Originating DFI Identification 04410130 Your bank’s routing and transit number (first 8-digits only)
Default Entry Description Transaction Type. Will appear on recipient’s account statement
OFFSET-BALANCED YES
Offset Transit Routing 044101305 Bank’s routing number
Offset Account Number Company account number to charge for file
Offset Description What will appear on the company bank statement

ACH Manager User Guide
3.14.2018 14
Importing Prenotifications (Prenotes) If you want to import an entire file of Prenotes:
1. Import the file with the appropriate prenote transactions codes (23 – checking credit, 28 – checking debit, 33 – savings credit, 38 – savings debit).
2. Do not re-use that file after it has been imported and processed. • If you attempt to create a new ACH file using an existing imported prenote file, your new file will
automatically generate prenotes again – even if you remove the prenote transaction codes. 3. To submit your first live entry file, import a whole new file with the appropriate transaction codes (22 –
checking credit, 27 – checking debit, 32 – savings credit, 37 – savings debit).
Importing NACHA-Formatted Files To submit ACH files from your own software that are already NACHA-formatted:
1. Under Import ACH Transfer, select NACHA from the Criteria menu and click Submit.
2. Browse to the ACH file you exported from your software. Click Next.
3. Select the effective date and click Next.
4. Review the summary of the imported ACH transfer.
5. If needed, click Back to return to the File Selection screen.
6. Click Finish to see an Import Confirmation screen.
7. You can review the transfer created by the file import or you can Process the transaction.
Importing Non-NACHA Formatted Files ACH files that aren’t NACHA-formatted files (i.e. CSV, Excel) can be imported and processed using a Template.
Creating New Templates A separate template must be created for each ACH Standard Entry Class (SEC) code.
1. Under Import ACH Transfer, select Non NACHA from the Criteria menu and click Submit.
2. Browse to select the non-NACHA-formatted file you want to import.
3. In the Template drop-down, choose Import Using New Template. Click Next.
4. Select the ACH Transfer Type, Transfer Description, Number of Header Rows to Exclude, Number of Footer Rows to Exclude, Insert Decimal into Amounts, and File Type. Click Next.

ACH Manager User Guide
3.14.2018 15
5. Select the Layout Preview and Column titles, apply any Additional Values to File. Select an Offset Account Option and Effective Date Option. Click Next.
6. Verify displayed information is correct and select Next.
7. Complete the Import process. A Confirmation Screen will appear successfully.
Importing Non NACHA files To import an ACH File using a New Template:
1. Under Import ACH Transfer, select Non NACHA from the Criteria menu and click Submit.
2. On the Step 1 – File Selection screen, browse to select the non-NACHA-formatted file you want to import.
3. In the Template drop-down, choose Import Using New Template. Click Next.
4. On the Step 2 - Data Mapping screen, enter the Effective Date. Click Next.

ACH Manager User Guide
3.14.2018 16
5. On the Step 3 – Import screen, click Finish.
6. The Import Confirmation box displays. Look for the “Following File was successfully imported” message at the top of the screen, then click Process.
7. Enter your token one-time password on the Security Challenge screen, then click Submit.
Importing using Pre-built ACH File Import Template To import using a pre-built template:
1. Select ACH File Import Template from the Criteria menu and click Submit. 2. To the right of the appropriate template name, select the icon to initiate a New Transfer. 3. Browse for your file and click Next. 4. Verify the effective date, debit and credit totals, and number of entries in the file. If all is correct, click
Process. 5. Enter your token one-time password on the Security Challenge screen, then click Submit.
Inquiring into ACH Transfers To see details about previous transactions, use the Inquire ACH Transfer option on the Select External Transfer Criteria menu.
1. Enter information about the transfer, such as the Transfer Description or a Date Range, click Submit.
2. The search results appear at the bottom of the screen in the ACH List section, which shows each file:
• Transfer Description – The file name, which you can click on to view details of the transfer.
• Transfer Date – The effective date, or date the file should post/settle.
• Debit Amount – The total dollar amount of debits in the file.
• Credit Amount – The total dollar amount of credits in the file.
• Transfer Status – The current status of the file:
Transfer Status What It Means
Saved The file has been created, but not processed.
Processed The file has been sent by the bank to the Federal Reserve for processing, so you may no longer change or delete the file.
Pending Origination
The file has been successfully submitted to the bank, and the bank will hold it until the appropriate processing day. You may still change or delete the file.
Recurring Entry The file is a repeating transfer that is being held by the bank until the appropriate processing day. You may still change or delete the file.
User Suspended The file was previously in Pending Origination status, then was changed by a User at your company and wasn’t re-submitted to be processed. This file will not process until the User goes back into the file and clicks on Process.
User Deleted The file was previously in Pending Origination status, then was deleted by a User at your company. This file will not process, but will remain visible to you for reference.
Partial Origination
The file has more than one batch and at least one of the batches has been sent to the Federal Reserve for processing, so you may no longer change or delete any batch within the file.

ACH Manager User Guide
3.14.2018 17
Transfer Status What It Means
Transfer Exceeds Review: Pending
Approval
The file has been submitted, but still requires additional review based on your company’s review thresholds, or the number of files submitted. This file will not process until it has been approved by the appropriate individual.
Resubmit Required: System was Unavailable
The file was not submitted to the bank and will not process. The User must go to the Change ACH Transfer List, go back into the file, and click on Process again.
File Not Originated
The file was not submitted to the bank and will not process. The User must go to the Change ACH Transfer List, go back into the file, and click on Process again.
Transfer Processing
The file was not submitted to the bank and will not process. The User should call the bank to have the file processed.
• Details – Includes the type of file, the person who submitted the file, the item count and r number.
3. On the right-side of the screen, you’ll see three icons to view reports, sort or filter the list. Refer to the next section for details on using these options.
4. You can also click on any of the column headings to sort the list alphabetically or in date order (i.e. click on column heading “Transfer Date” to re-order the list of files with the earliest date at the top, then click it again to reverse the order and show the most recent date at the top).
Reports, Sorting, & Filtering
After inquiring for ACH files, you can view reports of the ACH transfers in your search results, printing or exporting as PDF (Portable Document Format) or as CSV (Comma Separated Value) formatted files.
1. After using the Inquire ACH Transfer option, click the View Report icon.
2. An Export ACH List will appear, with a checkbox beside each transfer.
ACH Manager User Guide
3.14.2018 18
3. Check the box beside individual transfers, or click Select All, to choose the transfers you want to export or print.
• If you have multiple pages of files, Select All will only select those files on the current page. To select all files on multiple pages, you must click Select All on each individual page.
4. Use the drop-down at the bottom of the screen to choose the format of the information:
• Transfer List – Gives the same information that appears on the screen above.
• Batch List – Gives the same information that appears on the screen above, plus it includes a Batch Number.
• All Transactions – Gives all transactions within each of the files on the screen above, including each Recipient’s Name and Account Number.
5. Click Print or Export:
• After clicking Print, you’ll be asked to Open or Save a PDF document. Choose either option, then you can print the document.
• After clicking Export, you’ll be asked to Open or Save a CSV file. Choose either option. Most CSV files will automatically open in Excel.
6. On the Export ACH List screen, click Cancel to return to the ACH List screen.
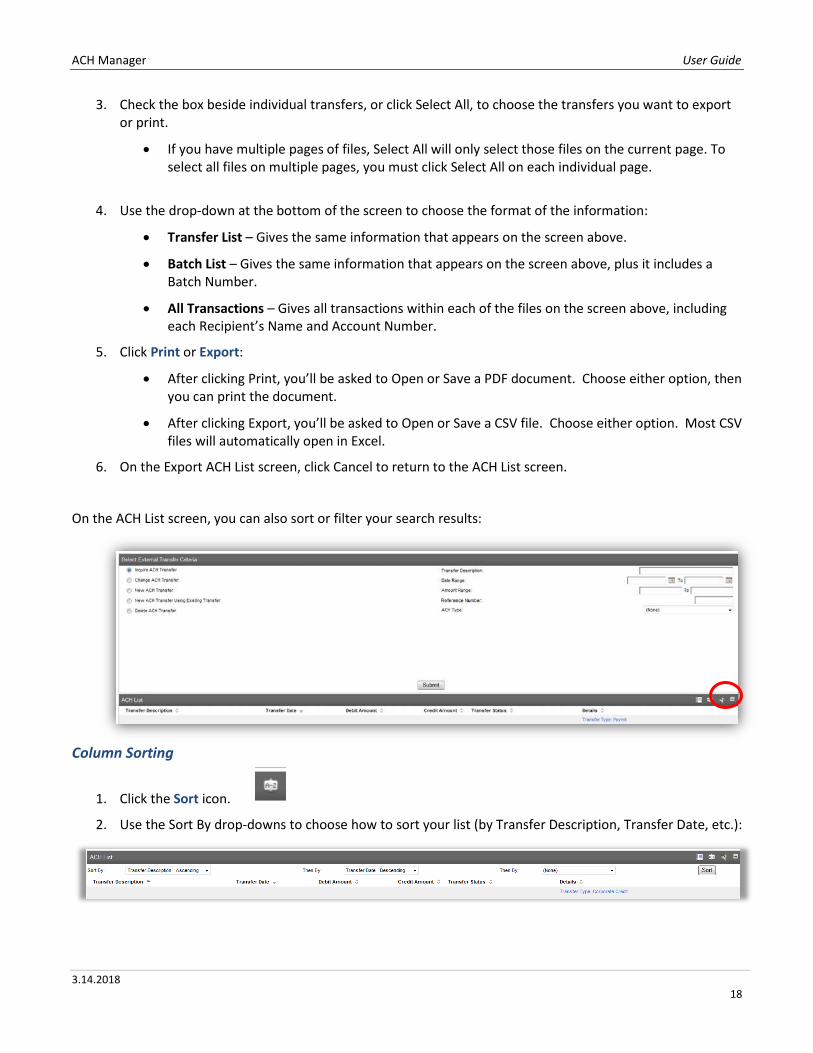
On the ACH List screen, you can also sort or filter your search results:
Column Sorting
1. Click the Sort icon.
2. Use the Sort By drop-downs to choose how to sort your list (by Transfer Description, Transfer Date, etc.):

ACH Manager User Guide
3.14.2018 19
Column Filtering
1. Click the Filter icon.
2. Complete the fields you want to filter by (to see only a particular Transfer Date, Debit Amount, Transfer Status, etc.):
View / Print / Export Reports for Individual ACH Transfers
You can also view, print and export reports when inquiring into individual ACH transfers.
1. After using the Inquire ACH Transfer option, click on an individual Transfer Description.
2. The file will open, with buttons at the bottom: Print, Export, Next (only if the file was submitted in the past 5 business days and is still eligible to be reversed) and Cancel.
• Click Print to open or save the file as a PDF.
• Click Export to open or save the file as a CSV file (most CSV files will automatically open in Excel).

ACH Manager User Guide
3.14.2018 20
Changing ACH Transfers Specific detail of pending transfers may be changed at any time prior to final execution of the transfer.
1. Select Change ACH Transfer option and provide any specific information about the pending transfer you want to change.
2. Select the transfer you want to change from the pending list. Only transfers with a status of Saved, Pending Origination, Recurring Entry, or User Suspended can be changed.
3. Transfers with a status of Pending Origination or Recurring Entry will display a warning that the original transfer will be deleted and will not process if the user continues on with the change. The transfer must be resubmitted for it to process.
4. The pending transfer will open in an editing screen. You can change the Description, Recurring Frequency, Dates, Accounts and Transfer To details. Depending on the transfer status, some fields may not be available to change.
5. When the pending transfer information is correct, Save or Process the transaction.
a. Saving your transaction stores the transfer as a pending transaction allowing you to make modification at a later time. A Confirmation screen displays a summary of your ACH transfer.
b. Selecting Process activates the ACH transfer prompting a Security Challenge that will require a One Time Password.
6. A processing screen displays. a. If the file requires additional Client or Bank review a yellow Warning Message will appear. b. If the file is unable to process due to an error or missing information in the file, a red Error
Message will appear. 7. Once the file has been successfully processed, click Done.

ACH Manager User Guide
3.14.2018 21
Reviewing ACH Transfers
Some ACH Transfers require additional Client Review. Users set up with this review option will be able to review and submit transfers to the bank for processing.
1. Select Review ACH Transfer from the Criteria menu and click Submit.
2. Review any ACH Transfers listed. Select Approve or Disapprove from the drop-down and click Save.
3. Approved files will be sent to the Bank for processing. Disapproved files will not be processed.
Resubmitting ACH Returned Items ACH entries may be returned to the Originator for various reasons, such as NSF, invalid account number, etc. The bank will contact the ACH Originator if a return is received, explaining the reason and any options available to resolve. The bank will also credit or debit the Originator’s account for the returned entry, at which time the Originator may choose to resubmit the ACH entry. NOTE: The Company name, Company ID and amount used for the original entry must be identical in the resubmitted file.
Originators have two ways to resubmit returned ACH items: using the original file or creating a new file.
To use the original file:
1. In ACH Manager, select New ACH Transfer Using Existing Transfer. 2. Click on the ACH file that included the returned item. 3. When the file opens:
A. Change the Description to “RETRY PYMT” B. Change the “offset” debit or credit amount to match the item being resubmitted C. Locate the original entry that was returned and change the appropriate information (if
needed) D. Place holds on all other entries in the file so they aren’t submitted again.
4. When finished, click Process.
To use a new file:
1. In ACH Manager, select New ACH Transfer. 2. Choose the ACH Type (the same as the original file). 3. Enter the Description as “RETRY PYMT”. 4. Enter the “offset” debit or credit amount to match the item being resubmitted. 5. Enter detail about the entry that was returned and change the appropriate information (if needed). 6. When finished, click Process.

ACH Manager User Guide
3.14.2018 22
Reversing ACH Transfers An ACH transfer may only be reversed within five banking days of the effective date of the original file. Only the User who submitted the original file may submit a reversal of that file.
1. To reverse a processed transaction, select Inquire ACH Transfer and provide any specific information about the transaction you want to reverse.
2. From the list, click on the Transfer Description of the file to be reversed.
3. Review the details of the transfer to ensure you have selected the correct transaction.
4. Select the transaction(s) that you want to reverse by checking the box beside each entry (or click the “select all” option to reverse all transactions in the file) and click Next.
5. Enter the total dollar amount being reversed in the offsetting entry amount field and click Process.
6. At the Security Challenge, enter a One Time Password from your token.
7. The reversal of the transaction will be confirmed. Click Done and the reversal process is complete.
Deleting ACH Transfers 1. To delete a scheduled transaction select Delete ACH Transfer and provide any specific information
about the transaction you want to delete.
2. From the list, click on the Transfer Description of the file to be deleted. Only transfers with a status of Saved, Pending Origination, Recurring Entry, or User Suspended can be deleted.
3. Review the details of the transfer to ensure you have selected the correct transaction then click Next.
4. If this is a recurring transfer you can choose to delete only the Next Transfer or you can Delete All Transfers that are scheduled in the future. Choose the appropriate option and Finish.
5. The deletion of the transfer will be Confirmed. Click Done and the scheduled transfer is deleted.
Notification Emails ACH emails may be received if an ACH Transfer has exceeded the ACH Limit Check or is pending Bank approval. Contact your Bank’s Commercial Cash Management department for instructions on handling these emails.

ACH Manager User Guide
3.14.2018 23
Tax Type Conversion Codes Tax Type Definition Tax
Type Code Valid Months
720 Quarterly Excise Tax Federal Tax Deposit Payment due on a return, or an IRS Notice IRS Numbers for Tax Type 720 and 720M (See Pages 33-35)
72005 72007
Mar, June, Sept, Dec
940 Employer’s Annual Unemployment Tax Return Federal Tax Deposit Payment due on a return or and IRS notice A deficiency assessed by the IRS
09405 09407 09404
December
941 Employer’s Quarterly Tax Return, Federal Tax Deposit Payment due on a return or an IRS notice A deficiency assessed by the IRS
94105 94107 94104
Mar, June Sept, Dec
941 Subcategory breakdown for 941 Social Security = “1” Medicare = “2” Withheld = “3” 945 Withheld Federal Income Tax
Federal Tax Deposit Payment due on a return or an IRS notice
09455 09457
December
1041 Fiduciary Income Tax Return Payment due on a return or an IRS notice An estimated payment Payment on an extension
10417 10416 10412
Jan – Dec (FY – Month)
1042 Annual Withholding Tax for Income of Foreign persons Federal Tax Deposit Payment due on a return or an IRS notice
10425 10427
December
1120 U.S. Corporation Income Tax Federal Tax Deposit Payment due on a return or IRS notice Payment due for an extension Amended Return (1120X)
11206 11207 11202 11200
Jan – Dec (FY – Month)
Note: IRS Numbers are subject to change at any time based on legislation. Contact the IRS for an updated version of the above table.
IRS Numbers for Tax Type 720 and 720M
Number Description
53 16 54 17
Superfund Trust Fund Domestic petroleum superfund tax Imported petroleum products superfund tax Chemicals Imported chemical substance
36 37 38 39
Black Lung Disease Trust Fund Coal – Underground mined @ 50/$1.10 per ton Coal – Underground mined @ 2/4%4/4% limitation of ton price Coal – Surface mined @ 50/$1.10 per ton Coal – Surface mined @ 2/4%4.4% limitation of ton price
64
Inland Warranty Trust Fund Inland waterways fuel use tax
81 82 83 84 89 97
Superfund Trust Fund DPT vaccine DT vaccine MMR vaccine Polio vaccine Vaccine Numbers 81-84 floor stock, 8-08-93 Vaccines
33 58 59 60 61 62 66 73
Highway Trust Fund Truck, trailer and semi-trailer chassis and bodies, and tractors Gasoline sold for gasohol production containing at least 10% alcohol Gasohol containing at least 10% alcohol Diesel fuel Liquefied Petroleum Gas (LPG) (a) Gasoline, tax on removal at terminal rack (b) Gasoline, tax on taxable events other than removal at terminal rack Highway type tires Gasoline sold for gasohol production containing at least 7.7% alcohol but less than 10% alcohol

ACH Manager User Guide
3.14.2018 24
Number Description
74
75 76 78
Gasoline sold for gasohol production containing at least 5.7% alcohol but less than 7.7% alcohol Gasohol containing at least 7.7% - 9.9% alcohol Gasohol containing at least 5.7% - 7.6% alcohol Diesel fuel for use in certain intercity buses Other Special Fuels Compressed natural gas (tax rate per thousand cubic feet)
65 67 70 72 85 86 88
103
HTF Floor Stock Gasoline floor stock Gasohol floor stock Diesel floor stock Gas to make gasohol floor stock Diesel floor stock Other alcohol fuels floor stock Diesel fuel, based on January 1, 1994 inventory floor stock Kerosene (Floor Stock) effective July 1, 1998
19 20 98
Ozone Depleting Chemicals Taxes Imported products containing ODCs Ozone-depleting chemicals (floor stocks) Ozone-depleting chemicals (ODCs)
14 26 27 28 69 77
Airport and Airways Trust Funds Gasoline for use in noncommercial aviation Transportation of person by air Use of international air travel facilities Transportation of property by air Aviation fuel (other than gasoline) LUST tax on aviation fuel (other than gasoline)
41 42
Aquatic Resources Trust Fund Sport fishing equipment Electric outboard motors and sonar devices
44
102
Earmarked Funds Bows Arrow-Component Parts
22 29 30 31 35 40 51 71 87 92 95 96
Non-Trust Funds Toll telephone service, teletype-writer exchange service, and local telephone service Transportation by water Life insurance, sickness and accident policies, and annuity contracts Obligations not in registered form Kerosene effective July 1, 1998 Gas guzzler tax Alcohol sold but not used as fuel Diesel fuel for use in trains Aviation fuel (other than gasoline) floor stock Passenger vehicles Aviation Fuel (other than gasoline) floor stock, 8-08-97 Aviation Gasoline (Floor Stock)
18 21
Transferred to ATF, Expired or Repealed Oil spill – imported (repealed) Oil spill – domestic (repealed)
Note: IRS Numbers are subject to change at any time based on legislation. Contact the IRS for an updated version of the above table.
IRS Numbers for Tax Type 941
Number Description 941 (TXP04, 06, 08)
Transferred to ATF, Expired or Repealed Subcategory Breakdown for 941: Social Security = “1” Medicare = “2” Withheld = “3”