User Guide for ACH Transactions - treasurypathways.com€¦ · User Guide for ACH Transactions ......
12
User Guide for ACH Transactions This guide explains the Direct Deposit application in detail. Creating a New ACH Template: • Select the ACH Tab in the navigation bar • Choose ‘maintenance’ from the options presented • Click on the to display the ‘Select Profile Type’ page • Click on the drop down arrow of the ‘payment method’ field to display the list of available payment method types. Click on the type that is to be associated with the profile being added General Tab Complete the fields as shown below: • General Information Section o Profile Name: enter a value that will identify the profile to users who will be using the profile to create ACH Payments o Description: create a description that identifies this profile to users when they create payments
Transcript of User Guide for ACH Transactions - treasurypathways.com€¦ · User Guide for ACH Transactions ......

User Guide for ACH Transactions This guide explains the Direct Deposit application in detail.
Creating a New ACH Template:
• Select the ACH Tab in the navigation bar
• Choose ‘maintenance’ from the options presented
• Click on the to display the ‘Select Profile Type’ page
• Click on the drop down arrow of the ‘payment method’ field to display the list of available payment
method types. Click on the type that is to be associated with the profile being added
General Tab
Complete the fields as shown below:
• General Information Section
o Profile Name: enter a value that will identify the profile to users who will be using the profile
to create ACH Payments
o Description: create a description that identifies this profile to users when they create payments

• Payment Information Section
o Account: list containing accounts available to the active user
o Company: auto-populated with the company information associated with the selected account.
o Company Entry Description: (1-10 characters) is sent to the receivers of transactions contained
in payments created from this profile, this should help identify the reason for this transaction
o Discretionary Data: is reserved for data given to you by your financial institution, and should
be left blank unless directed to enter a value in this field by your bank
• Processing Information Section
o Start Date: select the date upon which this profile is to be available from which to create
payments.
o End Date: select the date for which this profile is no longer available for profile payment
creation
o Maximum Executions: select a specific number of times this profile may be used to create a
payment
o Warning Days: User will receive a warning if an additional payment is created on this profile
within the specified number of days
o Confidential: will maintain the confidentiality regarding transaction dollar amount detail only
o Prenote Required: indicate that Prenote transactions are to be sent to the receiving financial
institution prior to sending live dollar transactions on new or changed transactions level
record. The system will automatically create the Prenote and queue it for processing. These
transactions will be placed on a prenote hold for three business days before a live transaction
can take place.
o Hold $0 Record: used to automatically place on hold (at payment creation), any transactions in
payments created from this profile that have a value of $0.00 when the payment is submitted
o Approval Required: used if approval of transfers creating using this profile required approval
before submission
o Schedule Required: used if payments created using this profile are to be placed on a recurring
schedule. See scheduled information section on how to set up

The table on the Transaction Tab contains a ‘Transaction Summary’ listing all of the transaction records
associated with this profile. If this is the first transaction being entered, the list will be empty. The Transaction
Statistics section of the page is a recap area displaying information regarding this profile.
Transaction Tab
• Click to display the ‘Add a Transaction’ page.
• Enter the receiver identification number of the entity entered in the ‘name’ field.
• In the ‘account number’ field, enter the receiving account number (the account held by the entity
entered in the ‘name’ field.)
• Click the arrow button at the right of the ‘account type role’ field, and select the value that represents
the type of account (Checking, Savings, etc.) to which this transaction will settle.
• Enter the receiving financial institution's RT (routing transit) number in the ‘receiving bank RT number’
field.
• Click ‘add and continue’ to register your entries and refresh the screen to add another transaction.
• Click ‘add and end’ to add your entries and return to the Transaction Summary.
• Click ‘save’ to save your changes to the profile.
To Edit An Existing Profile:
• Select the ACH Tab in the navigation bar
• Choose ‘maintenance’ from the options presented.
• The ACH: Profile Maintenance page is displayed, containing a list of currently set up profiles.

• Highlight the record that represents the profile to be modified and click , or right click the record
and select ‘modify’ from the options presented. The Modify Profile for (Profile Name) page is
displayed.
• Depending on your configuration, the following fields may be available for edits:
o General Tab
� Company field
� Description field
o Schedule Information
� All fields
o Transaction Tab
� All fields
o User and Approval (Structure) Tab
� All fields
o Click ‘Save’ after completing your edits to save the changes and return to the ACH Profile
Summary Page.
o Profiles may be placed in Pending Approval status, and must be approved by an authorized
user (other than the creator/editor).
o Click Cancel to exit without saving your edits/changes.

Import Transactions into Profile You must set up your File Mapping before you can import a file: File Mapping:
• Select the Administration Tab. Choose ‘File Mapping’ from the options displayed.
• Click to display the Issue Import File Layout Page.
• Import Definition Name: enter a name for the mapping being set up.
o Click for the list of Import Definition Type
• Click on the appropriate option for this mapping.
• Select the format of the file(s) to be imported using this mapping by click the radio button next to the
appropriate value. Valid values include:
o Delimited - field size determined by a field separator (comma, tab, semi-colon, etc.)
o Fixed-width - field size static, based on position and length
o Date Format Section: Click the radio button next to the appropriate field, either mm/dd/yyyy,
yyyymmdd, mm/dd/yy, yymmdd
o Amount Format Section: Click the radio button next to the appropriate field, either 100.00
(explicit decimal) or 10000 (implied decimal)
o Click ‘Continue’ to access the next steps in the process.
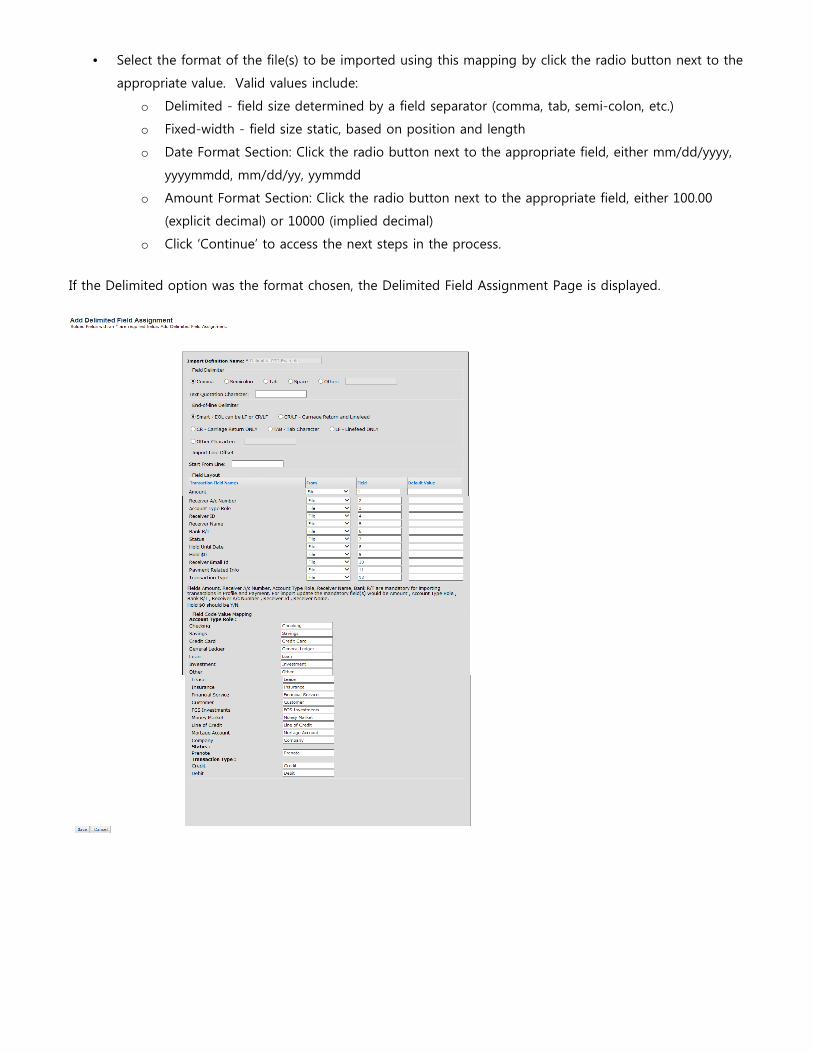
If the Delimited option was the format chosen, the Delimited Field Assignment Page is displayed.
Field Delimiter Section
• Field Delimiter: click the appropriate radio button next to the appropriate option. Valid options
include: Comma, Semicolon, Tab space or Other
• Text Quotation Character: enter quotation marks ("") in this field.
• End-of-line Delimiter Section Click the box next to the end of line identifier used in files imported
using this mapping.
• Values include:
o Smart: EOL can be CR, LF, or CR/LF -End of line delimiter can be carriage return, linefeed, or
both carriage return and linefeed
o CR/LF: Carriage Return and Linefeed - End of line delimiter is carriage return and linefeed
o CR: Carriage Return ONLY - End of line delimiter is carriage return only
o TAB: Tab Character - End of line delimiter is tab character
o LF: Linefeed ONLY - End of line delimiter is line feed only
o Other Character: end of line delimiter is something other than the selections available above
o Start From Line: enter the line number that indicates where the system should begin looking
for data in files imported using this mapping
Field Layout Section
In this section of the page, you will tell the system where (field position, within the file, or default value, the
mapping field provided) the information for each data element to be found.
• Click the drop down arrow at the right of the ‘from’ field to indicate:
o Default: indicate that value in the Default Value field.
o File: indicate the field number in the field provided (Field)
o Ignore: the system will not look for this data element
• Repeat this process for each of the ‘Transaction Field Names’ listed.
• When finished, click ‘Save’ to add this mapping to the system.
• The fixed-width option was the format chosen, the fixed-width Field Assignment Page is displayed.
Import file:
• Select the ACH Tab in the navigation bar
• Choose ‘maintenance’ from the options presented.
• You can create a new profile to import the transaction data, or you can modify an existing profile to
importing transaction data. (see sections on how to create a new or modify an existing profile)

• At the Transaction within the profile; Click to display the Import Dialog.
• Click drop down arrow at the right of the ‘Select Import File Mapping’ field to display the list of
available file mappings. Click on the appropriate mapping for this file/import.
• Browse for the file you want to import
• Choose if you want to ‘append to existing,’ ‘overwrite existing’ or ‘update’
• Click ‘OK’
• The system will access the designated file and validate the information. If errors are discovered during
the validation, a message will show identifying the error, causing the process to terminate.
• If an error is found in the import you will see the following message at the top of your profile.

• The Error Report can be found in the transaction section of the profile.
o Click the icon and you will have a report explaining why the file couldn’t be uploaded.
o If no errors are encountered, the data will be queued for entry into the profile during
the next execution at the bank of the import event.
o During this time the status of the profile will be ‘import’
o When the event executes, the transactions will be written to the profile. After the
execution of the event by your bank, you should return to this profile and by clicking
the transaction tab, review the imported data.
• Click the Submit button to accept the imported data into the profile. Once displayed, the profile is
ready for the next step in the operational process (approval, prenoting [if required], payment creation,
etc.)
• Click ‘Save’ to complete the process
Creating a Payment
• Select the ACH Tab in the navigation bar
o Choose the ‘Create Payment’ option from the list presented.

• Click drop down arrow at the right of the ‘profile’ field to display the list of available profiles.
• Click on the appropriate profile name (for the payment being created) to auto-fill the field.
• The remainder of the fields will populate based on the selection made.
• Click ‘Next’ to proceed.
• The General Tab is displayed. The information contained in the selected profile auto-populates the
static fields on this page.
o Effective Entry Date: enter the date on which the transactions contained in this payment
should settle in their respective receiving accounts.
• Editing the transaction:
o If the amount ($) of transactions are to be edited for this submission, make the changes for a
selected record in the ‘amount’ column.
o If there are transactions in this payment that you wish to hold from payment during this

payment cycle, change the status of those transactions by clicking drop down arrow at the
right of the ‘status’ field to display a list of appropriate options, and choosing ‘hold.’ Those
marked as held will not be included in this payment.
o You may also mark selected transactions to be prenoted, if required, by following the same
steps outlined above, but substituting the Prenote option. When saved, the system will create
and process a prenote transaction for those so marked, placing the transactions on prenote
hold for 3 business days. These transactions will not be included in the live payment being
processed.
o You can use one of the automatic update options Quick Update, Manual Update, or Status All,
to assign new values for dollar amount, or status.
� Quick Update: This feature allows the user to increase or decrease the transaction
amount for selective or all transactions.
� Manual Update: This feature allows the user to edit only a selected field or fields in a
transaction
� Status All: This feature allows the use to update the status of all records on the click of
a button.
o Once completed, Click ‘ Submit’ to proceed
Single Initiate
The ACH: Summary Page will show the profile that was submitted for payment.
• If the profile doesn’t require dual control the status will show ‘Submitted’, once the bank receives the
status will change to ‘Processed.’
Dual Control – Approval
To approve payments that is in a Pending Approval Status:
• Approval Tab
o Select ACH from the navigation bar.
o Choose the ‘approval’ option from the list of options presented. A list of payments that are in
Pending Approval status will appear
• Summary Tab
o View and Approve
o From the Summary Tab highlight the record to be approved and click .
o The Approve ACH Detail Page is displayed. This page is a mirror of the Create Payment Page,
in that it contains the information on the referenced page. The only difference is that it is a
view only option, and all the fields are inaccessible.
o If edits are required, click the ‘Modify’ button to make any necessary changes.
o If no edits are required, review the information displayed on the General, Transaction, and
Status/History Tabs as needed, then click the ‘Approve’ button.
Quick Approval
• From the Summary Tab highlight the record to be approved and click .
• Choose the ‘approval’ option from the list of options presented.
• Highlight the record to be approved and click. The selected item is placed in the ACH Summary, and
is assigned a pending status.
Modify an ACH Payment:
Note: Payments that have a processed status may not be modified.
• Select ACH from the navigation bar.
• Select the ‘summary’ option from the list presented. The ACH Summary Page is displayed (if the
Summary Page automatically displays after selecting the ACH option, skip step 2).
• Highlight the record that represents the payment to be modified and click , or right click the
record and select ‘modify’ from the list of options presented. The Modify Payment for (Payment Type
Name) Page is displayed.
• Make the required changes to the selected payment on either the General or Transaction tabs. You
may use the Status/History tab to review historical data regarding the selected payment.
o Changes may include edits to the following fields:
� Value (Effective Entry) Date General Tab
� Amount Transaction Tab
� Status Transaction Tab
• Click ‘Save’ to complete the modify process and return to the ACH Summary Page.
• The saved record is again queued for the next step in processing.
• Click ‘Cancel’ to exit the modify page without saving your changes/edits.