
The Tune-up - bobcatsrecreation.com · The Tune-up. should/will stand on it's own, since there are...
9
Post Delivery Inspection & Set Up Brought to you by, I just ordered/receive my Chinese crate scooter, what do I do now? You on the other hand, have found your way here, and after reading this article, can make informed choices to heed the advise or not. If you choose to follow the advise of this article and take the few hours necessary to prep your scooter, you will not find yourself on the discussion boards screaming for help! 99% of the China scoot problems will be addressed here, and prepping the scoot right will ensure years of problem free miles and enjoyment! So let's get started! Gather a few tools, such as a metric socket set, pliers, rubber mallet, Phillips head screwdriver, oil drain pan and some mechanic or hospital gloves. Congratulations on your new scooter! If you've found this page, you have just received or ordered your new Chinese crate scooter, great choice! China scoots, contrary to what many people will tell you, can be a great experience and not only fun to own, but dependable, stylish and economical! Yes, there are a lot of folks out there that want to trash the China name, and the root of this problem are mainly dealers, who don't want to loose the business! Of course, there are a lot of end users trashing them too, but these buyers went into the transaction with little or no knowledge or research on the product they were buying, except maybe the price. The Crate - 2 people recommended So, your scooter has arrived and you're ready to ride, right? Nope, not just yet! When you take off the cardboard, you'll see something like this. Depending on the seller, there will be some assembly required. Some scoots, like this one, require that you attach the front wheel, gages, luggage rack, etc. Save the cardboard and foam wrapping, you'll need this later to put the plastic panels on. The first thing to do is get it out of the metal crate without damaging it! Start by taking all of the top bolts out first and remove the top angle iron. Next, remove all of the bottom bolts on the vertical supports. You may find that the handlebars might be attached to the supports, cut the attachment wires and carefully remove the wire and protective covers on them. The scoot Page 1 of 9 9/25/2010 The Tune-up
Transcript of The Tune-up - bobcatsrecreation.com · The Tune-up. should/will stand on it's own, since there are...

The PDI Post Delivery Inspection & Set Up
Brought to you by, The "Big Guy"
I just ordered/receive my Chinese crate scooter, what do I do now?
You on the other hand, have found your way here, and after reading this article, can make informed choices to heed the advise or not. If you choose to follow the advise of this article and take the few hours necessary to prep your scooter, you will not find yourself on the discussion boards screaming for help! 99% of the China scoot problems will be addressed here, and prepping the scoot right will ensure years of problem free miles and enjoyment! So let's get started!
Gather a few tools, such as a metric socket set, pliers, rubber mallet, Phillips head screwdriver, oil
drain pan and some mechanic or hospital gloves.
FlyScooters Cadenza 150
Congratulations on your new scooter!
If you've found this page, you have just received or ordered your new Chinese crate scooter, great choice! China scoots, contrary to what many people will tell you, can be a great experience and not only fun to own, but dependable, stylish and economical!
Yes, there are a lot of folks out there that want to trash the China name, and the root of this problem are mainly dealers, who don't want to loose the business! Of course, there are a lot of end users trashing them too, but these buyers went into the transaction with little or no knowledge or research on the product they were buying, except maybe the price.
This publication is copywrite © 2008, LPSF and may not reproduced or redistributed
The Crate - 2 people recommended
So, your scooter has arrived and you're ready to ride, right? Nope,
not just yet!
When you take off the cardboard, you'll see something like this. Depending on the seller, there will be some assembly required. Some scoots, like this one, require that you attach the front wheel, gages, luggage rack, etc.
Save the cardboard and foam wrapping, you'll need this later to put the plastic panels on.
The first thing to do is get it out of
the metal crate without damaging it! Start by taking all of the top bolts out first and remove the top angle iron.
Next, remove all of the bottom bolts on the vertical supports. You may find that the handlebars might be attached to the supports, cut the attachment wires and carefully remove the wire and protective covers on them. The scoot
Page 1 of 9Scooter PDI, Brought to you by The Big Guy
9/25/2010http://x1scooters.com/pdi.html
The Tune-up
should/will stand on it's own, since there are four more attachment points on the bottom.
I like to free the scoot of it's metal prison before continuing, so with two people, one balances the front of the scooter while the other cuts and removes the remaining support wires. Next, the helper unbolts the front axle bolt from the frame and slides it out, saving all the removable parts - this will free the front wheel. Now both pick up the scoot and place it on firm ground on the center stand. Most all smaller scooters will stand up fine without the front wheel, but a cardboard box under the floorboard will make sure it won't fall forward. Scoots larger than 150cc will require support, since they will tip forward.
Before we get started, look for the accessory box with the battery in it. It may be in a box on the step-through, or under the seat. Follow the directions for adding the electrolyte to the battery and put the battery on charge with no more than a 2 amp charger. We'll need to have this fully charged a little later on in the PDI.
Once the electrolyte has finished emptying into the battery, let it sit for at least 30 minutes before placing it on charge. Charge it with the cover off, and once the charge is complete, let it sit a few more minutes before attaching the cover.
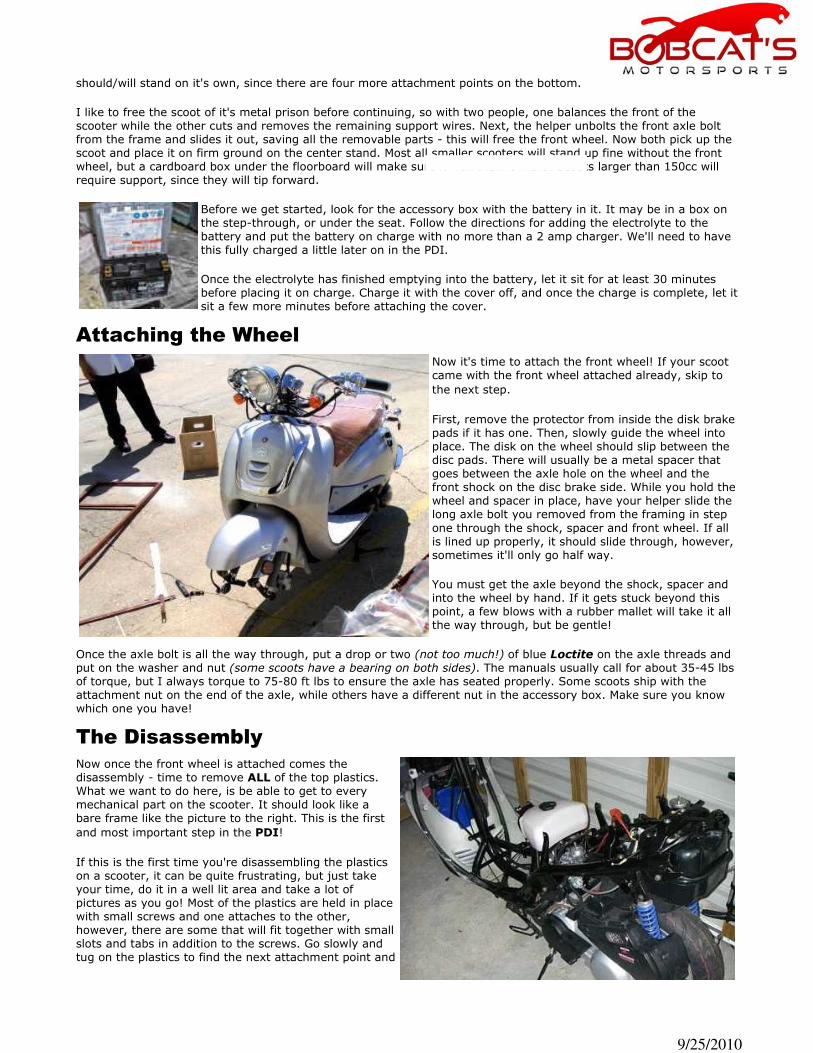
Attaching the Wheel
Now it's time to attach the front wheel! If your scoot came with the front wheel attached already, skip to
the next step.
First, remove the protector from inside the disk brake pads if it has one. Then, slowly guide the wheel into place. The disk on the wheel should slip between the disc pads. There will usually be a metal spacer that goes between the axle hole on the wheel and the front shock on the disc brake side. While you hold the wheel and spacer in place, have your helper slide the long axle bolt you removed from the framing in step
one through the shock, spacer and front wheel. If all is lined up properly, it should slide through, however, sometimes it'll only go half way.
You must get the axle beyond the shock, spacer and into the wheel by hand. If it gets stuck beyond this point, a few blows with a rubber mallet will take it all the way through, but be gentle!
Once the axle bolt is all the way through, put a drop or two (not too much!) of blue Loctite on the axle threads and put on the washer and nut (some scoots have a bearing on both sides). The manuals usually call for about 35-45 lbs of torque, but I always torque to 75-80 ft lbs to ensure the axle has seated properly. Some scoots ship with the attachment nut on the end of the axle, while others have a different nut in the accessory box. Make sure you know which one you have!
The DisassemblyThis publication is copywrite © 2008, LPSF and may not reproduced or redistributed
Now once the front wheel is attached comes the disassembly - time to remove ALL of the top plastics. What we want to do here, is be able to get to every mechanical part on the scooter. It should look like a bare frame like the picture to the right. This is the first
and most important step in the PDI!
If this is the first time you're disassembling the plastics on a scooter, it can be quite frustrating, but just take your time, do it in a well lit area and take a lot of pictures as you go! Most of the plastics are held in place with small screws and one attaches to the other, however, there are some that will fit together with small slots and tabs in addition to the screws. Go slowly and tug on the plastics to find the next attachment point and
Page 2 of 9Scooter PDI, Brought to you by The Big Guy
9/25/2010http://x1scooters.com/pdi.html
http://www.family-motorsports.com

you'll get them all off! On some scoots, like the MC-54 for example, the entire rear section can come off as one piece.
A little trick I have to save a lot of time and confusion is a having a box of Ziploc baggies on hand. I put all the screws from each panel in a separate bag and tape it to panel, this way when I reassemble the panels, I know what screws go where.
Make sure you have a tube of good commercial grade outdoor Silicon ready, because we're going to use it virtually everywhere! It's also a good idea to get a can of black Rustoleum paint and some fine 200-400 grit sandpaper as well.
First we'll start with the welds - check every frame weld on the scoot for rust. You'll probably find at least one or two places where rust or bubbling has started. Sand these areas down to the metal and paint them with the Rustoleum. If the rust is bad, a wire wheel and drill works best in the nooks and crannies.
Next, we'll move on to the electrical connectors. There will be a lot of electrical slip connectors all over the scoot! I start from the front and work my way back. Pull each one apart; they should NOT pull apart easily, and if they do, a little pressure on the female end with a needle-nose pliers will tighten it up. Replacing them with new ones is the best practice, but as long as the crimp hasn't cut through the wire, you can use the factory ones to save time. After you rejoin the slip connector, put blob of silicon across the outside of the connector's plastic cover, from one side to the other - this will prevent them from coming apart. By doing this, you will alleviate ALL of the electrical gremlins so many folks have with these scoots. You can also check things like the speedometer cluster, make sure all of the
screws where the electrical connectors connect to the cluster are tight and cover them with a blob of silicon as well.
You'll also find a lot of gang connectors, or little white boxes with more than one wire plugged together. I like to open these and make sure all the prongs inside are in the right position and none of the male or female ends are pushed in. If they are, a needle nose pliers can pull the pin up easily until it snaps in position. I then carefully and slowly close them again until they snap closed and then put some silicon on both sides of the outside of the connector. Of course, replacing these with a better quality connector is always best. Next, I look for grounding straps, or where wires attach to the frame with a screw or bolt. You'll usually find anywhere between one and three of these - check for rust and tightness and cover in silicon. I like to clean these grounds, reattach them, and then paint over them just to make sure.
NOTE: Many scoots will have some gang connectors that appear to be unplugged, and there is no other matching connector near it to plug them together. Don't worry about these! These are optional accessory wiring for things such as Alarm systems, Stereos, trunk lights, etc. All china manufacturers use generic wiring harnesses and not all wiring will be used on your scooter.
NOTE: Check ALL wiring routes and look for unsecured or dangling wiring! Use some small tie-downs to secure them to the frame where necessary. Loose or dangling wiring can rub on the frame and short out. For wires and hoses that attach to the engine, be careful not to take up the slack, since the engine, by design, pivots with the rear suspension.
While we're in the electrical, in the battery compartment, there will be a small red wire with an inline 15 or 20amp fuse. This is a glass fuse in the cheapest possible container.
This is must to replace! Auto Zone has a Blade Fuse replacement for about $5 and it's well worth the money! I can't tell you how many people get left out on the road with a dead scooter because of this fuse! Don't forget to buy the 15amp fuse too!
You simply cut out the OEM fuse about 3" from the plastic on either side. The blade fuse will come with plenty of excess wire. Use good quality crimp connectors to attach the blade fuse to your battery accessory wire. I also like to use heat shrink wrap on mine, but you can use electrical or Gorilla tape as well.
Now with the plastics off, it's time to check every single screw, bolt or nut on the scoot! I take all the screws out, one-by-one, apply silicon and screw them back in.
The Chinese like to use what they call Speed Nuts to fasten a lot of things down on a scooter, and sometimes these can be problematic. First off, remove them one-by one, and once removed, give the rounded end a little squeeze with the pliers. Not so much to crush it though! Next, squeeze the open end together with your fingers and fill the
Page 3 of 9Scooter PDI, Brought to you by The Big Guy
9/25/2010http://x1scooters.com/pdi.html
http://www.family-motorsports.com

space between the metal with silicon. Now slide the speed nut back on to the area it was on and make sure the larger hole is on the screw side. The goal is for the speed nut to be tight and some slight force needed to reapply it.
I like to keep a big blob of silicon ready on a piece of cardboard so I can just dip my screws in it before screwing them on. If you find one that is stripped, or the screw does not tighten, you can re-bend the small hole to tighten it up, or simply buy a box of new ones from any auto parts store. I have never had one I couldn't re-bend and reuse.
I also take out every permanent bolt in the same manner and apply a drop of blue Loctite to the threads and
reinstall them. If you don't want to get as anal as I do, just check to make sure they're all tight. However, ALL of the bolts on the exhaust should be removed and reinstalled with Loctite on them, as well as the plastic wheel covers (fenders) or they WILL come out! A lot of folks go out and buy lock-washers to use on the bolts as well.
The next step is some preventative maintenance. We'll start by spending about $20 and replacing the following: 1) Fuel Filter 2) Fuel lines - ALL - They tend to be low quality and crack and kink easily. Also, the cheap China hoses disintegrate from the inside out, so you wind up with small pieces of liquefied rubber in your carb! Since different scoots use different size hoses, you can snip off about a 1" piece of each line to bring to the auto parts store and match up the inside diameter. I always use a 1/4" replacement with a 50psi rating. Changing over to screw clamps is also a good idea, and since I use the 1/4" line it requires these clamps when replacing a 3/16" line. I also like to use really small zip-ties. They pull from all sides and once on behind the barb on a nipple, they can't come off unless you cut them. 3) Vacuum lines - ALL - Also usually very low quality and sometimes much longer than necessary. 4) Hose clamps - Optional, but recommended. Clamps or zip ties will work fine.
I like to use small zip ties instead of clamps. You can tighten them snugly and behind the barb on the nipple of the fitting so they will never come off and have to actually be cut off.
NOTE: As of mid-2009, the EPA is now requiring ASE certified and stamped fuel lines. You can take your
chances if yours are stamped and leave them on hoping that the Chinese didn't fudge and just stamp them, or you can make a worthwhile investment of $3 or $4 and change them... your choice.
Now, get out the flashlight and look inside the fuel
tank! You might find things like, animal droppings, plastic wrap, Styrofoam flakes, paper, etc. All of these things WILL decompose and cause you big problems later on! Styrofoam bits are a regular problem and they disintegrate within minutes of filling the tank and then gum up the fuel filter. Next, we'll remove the sparkplug wire and make sure the wire is properly attached to the boot and that you can see the wire inside the boot itself. While we're here, you can remove the sparkplug and check the gap. See your owner's manual for the proper gap setting. If you see the name Torch or anything other than NGK, replace it with an NGK plug. Just bring your plug to Pep Boys or Auto Zone and they will cross reference the part number. Remember to cover the plug hole while you're gone with a rag.
Reinstall the plug, but be careful! If it doesn't tighten all the way down by hand, you have it cross threaded - a common mistake! On some engines, you can start it in any position! Make sure you have it in right and tighten it down by hand. Only tighten it slightly with the plug wrench, you don't want to strip it. 7 ft lbs is enough pressure. When you put the plug wire back on, you should hear a series of clicks when you push down until it seats all the
way.
The Fluid DumpThis publication is copywrite © 2008, LPSF and may not reproduced or redistributed
Water Cooled Engine - Dump and Refill the Anti-Freeze
Now that we have finished tightening all the nuts, bolts and made sure all of our electrical connections are tight and
sealed with silicon, it's time to dump out all the crappy fluids in the scoot!
Page 4 of 9Scooter PDI, Brought to you by The Big Guy
9/25/2010http://x1scooters.com/pdi.html
http://www.family-motorsports.com

I'm starting with the water, if you have an air cooled scoot, skip to the next section.
This example shows a CFMoto 244cc engine. On the right side of the scoot you'll see the water pump. Unscrew the drain plug and take it all the way out. Then take off the radiator cap up above. Once all of the water has drained, I disconnect the hoses and drain the reserve tank with a wet-vac. Then I put the wet-vac in reverse and blow air through the reserve tank which blows the excess fluid out of the top hose.
Next, I reattach the water hoses and put a garden hose in the radiator on very low and let it run for about 20 minutes. Once the water is running clean out of the water pump's drain, take out the garden hose and let the pump run out dry.
Next, put a small amount of Loctite on the bolt and
reinstall it. Torque the bolt to 27 ft lbs, but do NOT attempt to tighten any of the other bolts on the water pump! They are torqued from the factory with Loctite already. You can check them with some slight pressure on the ratchet and see if they move, but not too much pressure! If you feel a "pop", you broke the Loctite seal and have to remove it and reapply the Loctite!
Next, get a good brand of anti-freeze - Any good brand made for aluminum engines will do. The common polyethylene glycol (yellow) is not good to use on aluminum engines. Ask the auto parts store for a recommendation if you don't know which one to buy. Some you'll find at the auto parts store will be under the names of Sierra & Prestone Low Tox among others. It should say formulated for aluminum engines on the label somewhere.
Slowly fill from the radiator cap until the the fluid comes to the top, and then fill the overflow half way. Now with the radiator cap off, squeeze the bottom hose several times very quickly. You'll notice that the radiator will now need more fluid - refill it. Repeat this process with the top hose, and then the bottom again (squeezing). Keep doing this until the radiator takes no more fluid.
Now put some gas in the tank. I also like to use a small piece of the fuel line I removed earlier and hook it up to the carb. Then with a small funnel, I pour a little gas in it to prime the carb, remove the temporary line and reattach the regular fuel line. This makes the first fire up instantaneous. You can also remove the little overflow hose and prime it from there. The overflow hose is a short hose that protrudes about 1/2" out from the carb, then a 90 degree bend downward 2" or so and goes nowhere. 1 to 1 1/2 oz of gas will do the trick.
Next, temporarily hook up the battery, the two red wires to the positive and black or green to the negative, twist the throttle a few times and start the engine. It may take a few tries to get it started if you haven't primed the carb, but never crank the engine for more than 4 seconds at a time. If it doesn't start, wait 20-30 seconds and try again. Do
not overheat your starter or it'll burn out!
Let the engine heat up to the normal operating temperature with the radiator cap still off. You'll see the fluid drop yet again - keep it refilled as you go. If it doesn't drop, race the motor some and the thermostat will open and level will drop. Again, but this time gently, squeeze the bottom and top hoses to make sure there is no air in the system. Now you can turn off the scoot and put the radiator cap back on, but before you do, apply a little motor oil to the gasket with your fingers. You'll want to recheck the level after the first 10 miles of normal driving and add any fluid if necessary.
This publication is copywrite © 2008, LPSF and may not reproduced or redistributed
Engine Oil Change
Next we're going to dump the oil from the crankcase. The engine should still be warm from the anti-freeze change
above, but if not, start it and warm it up first.
ALL China scoots come with inferior oil. Some folks like to keep it in for 30-50 miles, but I like to dump it out right away. Depending on the size and model of your engine, you may have one or two oil plugs to remove.
We'll start by removing the dipstick.
Page 5 of 9Scooter PDI, Brought to you by The Big Guy
9/25/2010http://x1scooters.com/pdi.html
http://www.family-motorsports.com
Place a container under the engine to catch the waste oil, and then remove the bolt under the motor and drain the oil.
Now as you remove the bottom plug, there will be a spring and a screen that will come out with it. You'll need to
save these for reinstallation, since they are reusable.
I clean these parts with some spray carb cleaner and put them aside for the moment. If your scoot has a kick starter, go ahead and give it one good kick with the key and kill switch off. This will cause a bit more of the oil in the engine to come out of the drain hole.
Next, with the oil now completely drained, put the screen inside the spring and
reinstall it in the engine with the drain plug. You do NOT have to over tighten the plug! Not only might you strip it, but over tightening can cause leaks as well, so go gentle on the plug!
With the plug and screen reinstalled, place a funnel in the dipstick hole and add your oil. For the initial break-in, we're going to use a good grade of petroleum oil, such as Castrol, 5W-30 weight, Rotella 15W-40 or straight 30 weight - 750ml or 3/4 of a quart is the norm. DO NOT OVER FILL! Check your oil with the dipstick, but don't screw it in. I do not use any synthetic blends during the first 1,000 miles.
This publication is copywrite © 2008, LPSF and may not reproduced or redistributed
Gear Oil Change
Next we're going to dump the gear oil from the CVT. For this explanation, we're describing a CVT that has the drain and filler bolts under the CVT cover, however, not all scoots are built this way. Some, usually 50-150ccs have
the drain and fill outside the cover, so make sure yours are not inside before proceeding!
The first thing you want to do is remove the CVT cover. It's silly for me to take a picture of mine since they are all different. What they do have in common is either 2 or 3 bolts holding them on, mine has 2 in the middle of the cover. If you have a kick starter, you might have 6 bolts around the edges, plus you'll also need to remove the kick starter as well. Note the way you remove it and reinstall it the same way. You might have to give the cover a whack with a rubber mallet the first time you take it off. Some factories use a clear glue spray for ease of installation, but it pops right off. Be sure to handle the cover gently and make sure you remove it slowly, ensuring that you do not damage the gasket!
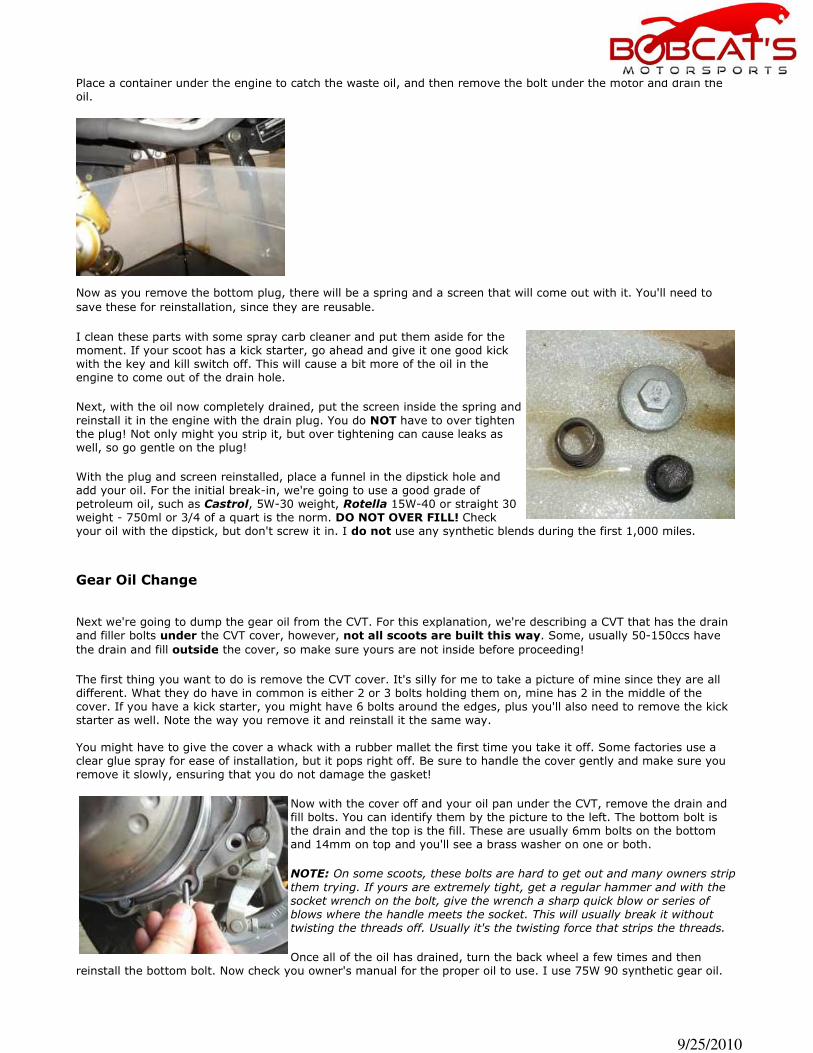
Now with the cover off and your oil pan under the CVT, remove the drain and fill bolts. You can identify them by the picture to the left. The bottom bolt is the drain and the top is the fill. These are usually 6mm bolts on the bottom and 14mm on top and you'll see a brass washer on one or both.
NOTE: On some scoots, these bolts are hard to get out and many owners strip
them trying. If yours are extremely tight, get a regular hammer and with the socket wrench on the bolt, give the wrench a sharp quick blow or series of blows where the handle meets the socket. This will usually break it without twisting the threads off. Usually it's the twisting force that strips the threads.
Once all of the oil has drained, turn the back wheel a few times and then reinstall the bottom bolt. Now check you owner's manual for the proper oil to use. I use 75W 90 synthetic gear oil.
Page 6 of 9Scooter PDI, Brought to you by The Big Guy
9/25/2010http://x1scooters.com/pdi.html
http://www.family-motorsports.com

There are many different ways to add the oil to the top hole, but I find that the oil I buy has a nice long tapered nose on it, so I just clip off the end and stick it in the top hole and squeeze the bottle. You'll know when it's full - the oil will start to run out the top. At this point, remove the bottle and you'll see the oil coming out the top hole. You're now ready to reinstall the top bolt, but be careful! Again, these bolts are problematic and prone to stripping, so snug it up good, but not too tight!
It's now time to reinstall the CVT cover. A little trick I have used for a long time is putting a tiny amount of adhesive on the CVT gasket before reinstalling the cover. This keeps the gasket in place and prevents kinking and failure. I do this when I first take off the gasket so it has time to dry while I'm changing the oil.
When you reinstall the CVT cover, make sure you have the brake cable above the little bracket that holds it in place (if you have one) before you tighten the screws.
If you have the CVT cover aligned and seated properly, there will be no movement if you try and move it back and forth. Don't tighten the screws all the way until the cover is fully seated, and then hold it in place with one hand and tighten with the other. Do not tighten it so far as the gasket starts to deform. The gasket keeps pressure on the screws so they will not back out.
NOTE: After changing the anti-freeze, engine and gear oil, clean and dry all areas and remove any excess fluids.
After your first mile of driving, check all areas for leaks.
This page sponsored by:
FX Motorsports - 3248 Chippewa Street, New Orleans, LA Please support us by visiting our sponsors!
Initial Carburetor Adjustment
Fuel Adjustment Steps for All Environments: CAUTION: This procedure requires working on a hot, running engine. Always take precautions to avoid getting burned or having any clothing or body parts caught in a spinning wheel! This, as with all mechanical procedures is a CENTER STAND adjustment - you MUST have your scoot on the C-Stand, and you MUST do this in a well ventilated area! 1) Start and run your scoot until it reaches normal operating temperature. Make sure you have clear access to the fuel screw and idle speed adjustment. The idle speed adjuster is the sort of round mechanism that attaches your throttle cable to the top of the carb.
2) Turn the idle speed adjustment screw clockwise to increase the RPMs at
idle to about 2000 RPMs.
3) With your scoot now at high idle, slowly turn the fuel adjustment screw clockwise until the point where the scoot is about to die. The fuel adjustment screw will be a brass screw on either the side or bottom of the carb. In some cases, there will be a brass cover that you have to snip off. This is NOT the screw at the very bottom of the carb, that is the fuel drain. 4) When the scoot is about to die, SLOWLY start turning counter-clockwise until the scoot reaches it's peak RPMs, the point where the idle will get no faster. Don't go too far! If you do, you'll notice that the exhaust will start sounding hollow - this is too far, start over. 5) Once your fuel mixture is set, re-set your idle speed adjustment. The
optimum idle speed is when the rear wheel just starts to move, and then back off a hair until the wheel stops - on
my 250, it's 1800 RPMs, manual says 1700. On my 150, it's 1200 RPMs, on my 50, it's 800 RPMs... every scoot seems to be different. 6) The "vroom vroom" test! No, I don't mean sit on it and make vroom vroom noises! What I mean is, snap the throttle! You should have a clean, responsive burst of RPMs. If you have a dead spot, you need to re-adjust it. The
Page 7 of 9Scooter PDI, Brought to you by The Big Guy
9/25/2010http://x1scooters.com/pdi.html
http://www.family-motorsports.com

The procedures described herein are the opinions of the "Big Guy" from Powerscooters.org This publication is copywrite © 2007-2008, LPSF and may not reproduced or redistributed without permission from the author. You can write to the "Big Guy" here and ask for permission. Under NO circumstances shall this publication be used for commercial purposes or sold for profit.
Some of the procedures described within are dangerous, and should always be performed while the scooter in on the center-stand. The LPSF, Powerscooters.org, and or the "Big Guy" take no responsibility whatsoever for damage to your person or scooter while performing the PDI as
throttle should be responsive through all ranges now. This adjustment will also compliment the more recent automatic choke, or enricher unit on your scoot and prevent it from bogging down when cold. As a final note, after your scoot is reassembled and you take it for a test ride, say four or five miles or so, stop the engine and pull your spark plug as soon as possible. You can photograph it and put it back in. Then, when you get a few more miles on it, say fifty or more, pull it again and take another photo, and then compare the two pictures. You should have a nice coffee color, not white or black.
This publication is copywrite © 2008, LPSF and may not reproduced or redistributed
Tire Pressure Adjustment
The next step is to adjust the tire pressure. Your scoot will usually come with under-inflated tires. Check the sidewall of the tires and note the max pressure rating. A good rule of thumb is to inflate the tire to about 10% below the max pressure. So if your tire is rated for 36lbs, inflate it to 32. This will compensate for the increase in pressure
from the friction heating while riding and keep your tires under the max pressure.
Tire pressure is a personal preference, and I do it slightly different. I ride on a compacted dirt patch and look at the tracks in the dirt to see how much tire contact there is with the road. I then adjust the air for the most contact, but not so low as the sidewall can buckle under. On my scoot, I have the rear wheel at 29 and the front at 30, both have a max pressure rating of 33psi. Other factors, such as riding 2-up would require a pressure adjustment as well.
NOTE: Tire pressure must always be checked when the tire is COLD. A hot tire will give you false readings!
This publication is copywrite © 2008, LPSF and may not reproduced or redistributed
Finally, The Home Stretch!
Now we're finally in the home stretch! Time to reassemble the plastics!
I usually just reinstall the seat and seat bucket at this point and take her out for a spin! This way I can check for any leaks and make any necessary adjustments easily. Once everything feels okay and the scoot rides and runs well, I park it again and start the reassembly process. Make sure you use the photos you took earlier to identify where and in what order the panels go on. Watch for plastic tabs that join the panels together, and make sure you use silicon on the speed nuts and screws! You don't want to have any rattles or lost parts!
If you have followed this tutorial in whole, you'll find that you will have a solid running scoot that drives nice and does not have any of the typical rattles and loose panels.
You should budget anywhere from 4 to 8 hours for the entire process, and take your time! If you do it right the first time, you'll have many thousand miles of problem free scootin'...
This tutorial is a work in progress and is not complete. Please check back often, since there will be more steps added throughout this summer, with better pictures as well as video tutorials of the entire process!
Click here for a suggested supply list.
Now Get Out and RIDE!
Photos and information used in this tutorial were gathered from The Louisiana Powerscooters Foundation and The ScootDawg Forum - credits and thank you to both discussion boards and their wonderful users!
Page 8 of 9Scooter PDI, Brought to you by The Big Guy
9/25/2010http://x1scooters.com/pdi.html
http://www.family-motorsports.com

The procedures described herein are the opinions of the "Big Guy" from Powerscooters.org This publication is copywrite © 2007-2008, LPSF and may not reproduced or redistributed without permission from the author. You can write to the "Big Guy" here and ask for permission. Under NO circumstances shall this publication be used for commercial purposes or sold for profit.
Some of the procedures described within are dangerous, and should always be performed while the scooter in on the center-stand. The LPSF, Powerscooters.org, and or the "Big Guy" take no responsibility whatsoever for damage to your person or scooter while performing the PDI as described in this procedure.
The PDI Post Delivery Inspection & Set Up
Brought to you by, The "Big Guy"
What supplies might I need for the PDI? Partial supply list as suggested by Steve H. from our discussion board
Battery Charger - no more than 2Amp, preferably a float charger.
Air Compressor/Foot Pump - good to have on hand at all times. Check pressure on COLD tires only.
Gasoline Can/Gas - one gallon plastic can filled with gas.
Oil drain pan - any type will do, but the sealable ones are best. Always dispose of fluids properly!
Oil - 5W-30 weight, or straight 30 weight for break in. Gear Oil - 75W 90, 80W 90 or any good synthetic gear oil. Anti-Freeze - Formulated for Aluminum engines, 50% anti freeze, 50% water. Flashlight - to look inside the gas tank. Metric socket set - basic set, 8, 9, 10mm are the most common sizes used. Pliers Rubber mallet Phillips head screwdrivers Locktite - blue Silicone - commercial or outdoor grade. Ziplock Bags Black Rustoleum Paint & Sandpaper Vacuum Lines Fuel lines - snip off a piece of each to bring to the auto parts store for the right inside diameter.
Tire pressure gage
Back to the PDI link
Now Get Out and PDI!
Photos and information used in this tutorial were gathered from The Louisiana Powerscooters Foundation and The ScootDawg Forum - credits and thank you to both discussion boards and their wonderful users!
Page 1 of 1PDI Supply List
9/25/2010http://x1scooters.com/pdisupplies.html
The Tool
tune-up ?
9 of 9