The Mobile AgentInternal walls are locked together so that if there are some minor adjustments to be...
40
Transcript of The Mobile AgentInternal walls are locked together so that if there are some minor adjustments to be...
Page 2 of 40
Contents
Welcome to PlanUp ........................................................................................................................................... 3
Using PlanUp ................................................................................................................................................. 3
Login or Create a New PlanUp Account..................................................................................................... 3 Starting a New Plan .................................................................................................................................... 5 Adding Another Room .............................................................................................................................. 11 Adding a Floor .......................................................................................................................................... 11 Landings – Starting a New Floor .............................................................................................................. 12
Using EPC Functionality .............................................................................................................................. 13
EPC Symbols ........................................................................................................................................... 13 Item Specific Data .................................................................................................................................... 13 Room Specific EPC Data ......................................................................................................................... 16 Heat Loss and Construction Details ......................................................................................................... 17
Saving Final Images ..................................................................................................................................... 19
How to Get Images and Other Files ......................................................................................................... 20 Image Emails and Further Output Types ................................................................................................. 27 Allow Clients to Customise or Edit Plans ................................................................................................. 29
Appendices .................................................................................................................................................. 32
Appendix 1: Top Toolbar Reference ........................................................................................................ 32 Appendix 2: Bottom Toolbar Reference ................................................................................................... 36 Appendix 3: Room Toolbar ....................................................................................................................... 37
Further Help and Information ....................................................................................................................... 37
FAQs ............................................................................................................................................................ 38
How do I use stairs? ................................................................................................................................. 38 Can I change the measurements shown on the plan? ............................................................................. 39 Can I change a floor title? ........................................................................................................................ 40 Can I add a disclaimer? ............................................................................................................................ 40 Can I remove the square area? ................................................................................................................ 40 Can I hide all measurements by default? ................................................................................................. 40 How can I change the type and size of an image to be saved? ............................................................... 40 Can I customise the look of the plan e.g. colours, shadows etc? ............................................................ 40 Other FAQs .............................................................................................................................................. 40

Page 3 of 40
Welcome to PlanUp
This ‘Getting Started’ guide will help you with the basics of using PlanUp to create floor plans and property descriptions on your Windows PC and iPad.
Using PlanUp
On opening PlanUp you will see a window similar to the below open:
You can either:
Tap on login to login or create a new PlanUp account; or,
Tap New to start drawing a plan – you do not need to log in first.
Login or Create a New PlanUp Account
You will then see the following screen:
If you already have an account with us enter your email and password details and tap Sign in.

Page 4 of 40
If you do not have an account tap on Sign up for free and fill in the form as required.
NB: You will be sent an email to verify your email address before you can start using your account.
If you have set up a new account you will be returned to exactly the same screen as before. If you have logged in to an existing account the original screen will have changed slightly to show who you are logged in as, similar to the example below:
To begin tap Create a new plan and you can start drawing your first room.

Page 5 of 40
Starting a New Plan
There are four steps to follow for drawing each room. There are a few exceptions, but best practise is to follow the four steps in order for each. Working through each room in the same order every time will soon become second nature.
The following sections will give you the basic ideas for drawing rooms and creating a plan. For a complete run through drawing an example plan please see our Getting Started Guide available from:
http://www.planup.co.uk/help/default.aspx
It is best practise to complete each room fully before moving on to the next room.
Step 1 - Draw the outline of the room and enter measurements
Step 2 - Name the room
Step 3 - Add items to the room
Step 4 – Add room descriptions (only if you plan to use our property descriptions)
Step 1 - Draw the outline of the room and enter measurements
Once you have tapped on new plan you will see the following:
The first wall is started for you – this does not have to be the front wall though many start from this point.
Resize this wall as necessary by tapping and dragging the white arrow handle to extend/reduce the length of the wall.
As you drag the arrows a ruler will appear as a guide - you can drag the wall to the exact measurement, or just release to enter the measurement using the keypad that appears in the top right of the screen (note you can also simply type the measurement using your keyboard on Windows).
Note that typing or entering the measurement will then 'lock' the measurement into that wall. The wall can still be moved afterwards if you need to snap it to another wall, but the measurement will remain the one you entered.
NB: If the wall length is changed beyond tolerance the measurement will flag as red.

Page 6 of 40
To move onto the next wall, tap the blue circle with a plus sign:
Drag in the new direction you require - and use the same process as the first wall, either drag to the required size or let go of the handle, and enter the exact measurement. When dragging the handle you can move at any angle necessary.
Once you have added a second wall you will see that the quick room button at the bottom right of the screen has now become an auto-complete button. This now means the software can complete the room as illustrated by the picture on the button.
If the suggestion is correct tap this button; or,
If the suggestion is not correct add more walls until you get the correct suggestion.
If you make a mistake adding a corner it can be deleted by pressing the undo button ( ) on the bottom toolbar or by selecting undo last corner from the yellow banner at the top of the screen.
If you need to draw off of the visible screen area, tap and drag anywhere on the plan (apart from the handles) to move it to a more convenient position or zoom out. To zoom in/out:
Pinch and pull on the iPad/Windows Tablet.
Use the scroll wheel on your mouse in Windows.
Use Ctrl and +/- in Windows.
Should you need to change the guideline units between metric and imperial this can be done by

Page 7 of 40
tapping on the Metres/Feet button on the number pad as indicated below:
Re-shaping Rooms
Once you have drawn a room, it is possible to re-shape it. In normal use you should not need to do this, as you can draw the room to the correct shape in the first place. However if you do here are some helpful tips and tools.
Separating Internal Walls
Internal walls are the walls between rooms that show thinner than those without attached rooms.
Internal walls are locked together so that if there are some minor adjustments to be made you can move both walls together rather than moving each individually.
However, on occasions you may need to separate the walls to allow for instance the addition of perhaps an awkward shaped cupboard, or if perhaps one walled is joined to more than one other.
To separate internal walls:
Select the room with the wall that you want to move.
On an iPad or desktop:
o Tap on the internal wall to bring up the popup menu.
o Select the tick box for drag away from other wall and move as necessary.

Page 8 of 40
o Alternatively, tap on the wall and drag 1m away to detach it from the other wall.
o To start off with outlines will indicate that the wall of the other room is being moved as well – as soon as you have reached a 1m move, the outline will change and the wall you tapped on will be the only one being moved.
On a desktop PC:
o Hold down the Ctrl key on the keyboard.
o Tap and hold to drag the wall as necessary.
Wall Splitter (Keyboard shortcut - X):
To split a wall (for instance to create an L-shaped room), tap the Wall Splitter button so it is highlighted, then tap the wall where you want it to be split. If the splitter is not quite where you want it, you can place your mouse on it and drag it to a new position.
Once you have placed a splitter on a wall, the wall is effectively split in two - you can now drag the two sections of wall independently.
You can also double tap on a wall to add a wall splitter without having to select it first.
Please note you cannot split internal walls – please see Separating Internal Walls above for information.
Diagonal Wall (Keyboard shortcut - /):
There is also a tool to create a diagonal wall. Once you have tapped on this you can tap on a corner of the room to ‘flatten’ the corner to create the diagonal wall.
Curved Wall (Keyboard shortcut - U):
It is also possible to make a curved wall. Tap on the curved wall symbol and then tap on the corner you want to make a curve.
Alternatively you can tap on the wall you wish to make curved and selecting ‘Make Curve’ from the popup menu.
It is possible to edit the curve by tapping on the curve and selecting ‘Edit Curve’ from the popup menu. This will make handles available to manipulate the wall.
Step 2 - Name the room
It may sound obvious, but if you forget to name the room you will have to go back to it at some stage, so it’s best to do it after shaping the room.
Simply tap where it says ‘Unnamed’ in the room – a screen will open with an alphabetical list room titles to choose from.

Page 9 of 40
Simply select the title you wish to use or you can type your own custom room names in the white box at the top of the screen.
If you need to rename a room simply tap in the room to bring up the room toolbar and then tap on the
top left icon ( ).
Step 3 – Add items to the room
All icons for doors, windows, etc can be found on the top toolbar.
The toolbar shown here is the Estate Agent version, though the DEA version is the same, just with EPC items. A complete list of items on both versions of the toolbar and their keyboard shortcuts (for Windows PCs only) can be found in Appendix 1.
Estate Agent Version Toolbar:
DEA Version Toolbar:
Tap on the item type you want to add. The screen will now show the sub menu with different options to add plus a message about adding items – it will look similar to the below:
As shown in the symbol help dialogue at the bottom, there are three ways to add a symbol:
1. Drag from the toolbar and drop into place, or
Tap to select and then:
2. Single tap to add. Some symbols will add at their normal size, others will automatically fit the wall.
3. Tap and drag. Drag along the wall to the size you want.
Once you have selected the specific item you want to add a yellow banner will give you the specific instructions for that item.

Page 10 of 40
NB: Tapping on the More button ( ) gives options to add a number of additional items. Please see Appendix 1 for more information.
You will see that once an item has been added to a wall it has small black square boxes, or ‘handles’, attached to it. These allow you to change the size of the item you have placed on the plan by tapping on them and dragging.
In Addition to the square handles, some items will have circular handles which can be used to rotate the items.
Step 4 – Room descriptions
PlanUp automatically builds up a property description as you draw a floorplan. It's your choice whether you wish to use them or not.
This includes rooms, measurements, and basic descriptions of items you add (for example Lounge: 21" x 10". Window to front, fireplace, door to....).
In addition to PlanUp creating the basic descriptions, you can add further detail (for example, describing a window as double glazed etc). To do this simply click on a symbol you have added in the room, and you will see a describe option. Tap that to enter the descriptions for that item.
You can also describe the floor, walls, ceiling and other aspects of the room.
Once you have named a room you will see that a box appears in the bottom right corner with the room title and then it will say Description.
NB: Using the DEA version this box will also have the menu to access EPC functionality – the EPC Settings option will be available as soon as the room has been drawn. Please see Recording EPC Data for more information.
Tap on this and a window will popup giving you options of what to describe e.g. floor, walls, ceiling, shape etc. Some room titles will have additional options for descriptions e.g. kitchens will have the option to describe units and appliances as well as the standard options.
Tapping on one of these allows you to choose the description you want to add from a preset list.

Page 11 of 40
Adding Another Room
Once you have completed your first room you are ready to move on to the next. To add another room add a door, then tap Create room from the door menu that appears. Alternatively you can tap on a wall and choose Create room from the popup menu.
The process for drawing all following rooms is very similar to drawing the first room, as described in Step 1 - Draw the outline of the room and enter measurements.
However, there is a small difference in that you have to choose a corner to start from. Simply tap on whichever corner you wish to start from.
You can now proceed with this room in the same fashion as the first room. Where possible always start a new room from a corner of the previous room.
It is highly recommended completing each room fully before moving on to the next room.
Adding a Floor
There are two ways to add a new floor:
1) Floor button on bottom toolbar
o On the bottom toolbar are two arrows with Floor written in the middle of them.
o Tapping either arrow will ask if you want to add a new floor if one does not already exist in the relevant direction – if a floor already exists you will simply be taken to it.
2) Using stairs:
o Add a set of stairs to the property; or,
o Tap Go Upstairs... on the stairs menu (if not showing simply tap on the stairs).
We suggest using option 1 so that the stairs are not a potential distraction when drawing the next floor.
Page 12 of 40
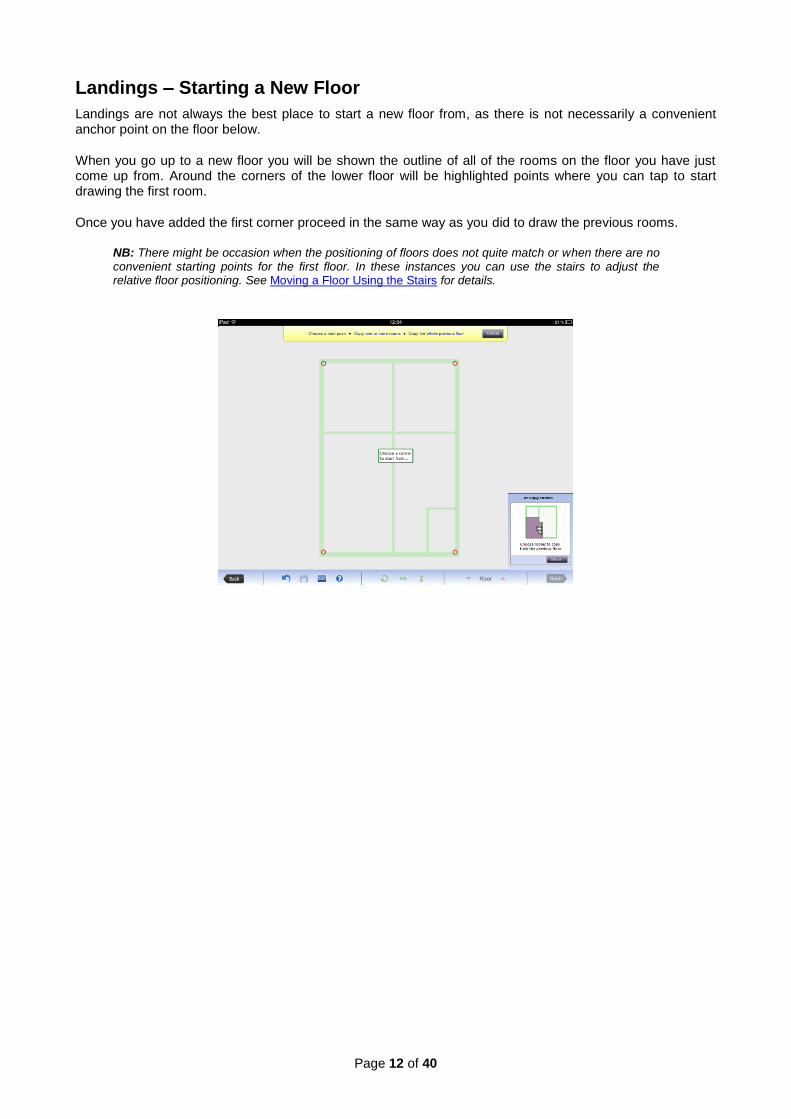
Landings – Starting a New Floor
Landings are not always the best place to start a new floor from, as there is not necessarily a convenient anchor point on the floor below.
When you go up to a new floor you will be shown the outline of all of the rooms on the floor you have just come up from. Around the corners of the lower floor will be highlighted points where you can tap to start drawing the first room.
Once you have added the first corner proceed in the same way as you did to draw the previous rooms.
NB: There might be occasion when the positioning of floors does not quite match or when there are no convenient starting points for the first floor. In these instances you can use the stairs to adjust the relative floor positioning. See Moving a Floor Using the Stairs for details.

Page 13 of 40
Using EPC Functionality
If you are using the DEA version of the software (determined when you create your account – it is the same download) it is possible to record elements of EPC data at various stages of drawing the plan.
Everything listed below recorded for the EPC in PlanUp will be totalled/used for calculations as appropriate in a report which will be downloadable after finishing the plan.
EPC Symbols
Items such as programmers, loft hatches, boiler flues and so on can be added to the plans. A specific menu for EPC only symbols is available on the top tool bar. These items are detailed in full in Appendix 1: Top Toolbar Reference.
These symbols will only show on the EPC plans and not on the marketing plans used by estate agents.
Item Specific Data
Certain standard items can have EPC information recorded about them – windows, doors, fireplaces, radiators, showers, and baths.
Windows
All windows have the option to record:
The glazing type.
The height.
The draft proofing.
To do this:
Tap on the window to bring up the popup menu.
The main menu for windows contains the glazing options – select as appropriate.
To access the height/draft proofing menu tap on Height/Proofing...
You will see some standard heights available with the option to add different ones as may be required.

Page 14 of 40
The width of the window will be used as it is drawn together with the height to calculate the window area and make adjustments to alternative walls as appropriate.
Please note that glazing areas for non-separated conservatories are treated differently. Please see Non-Separated Conservatories for more details.
Doors
Any doors (except garage doors) have an option to record:
The glazing type.
The height.
The draft proofing.
The number of openings.
To do this, tap on the door to bring up the popup menu. You will see on the menu options for:
Glazing/Frame.
Height/Proofing.
Openings.
The menu will update accordingly giving you the options to record what you wish. Below in order: main menu, glazing, height/proofing, and openings menus.
The width of the door will be used as it is drawn together with the height to calculate the window area and make adjustments to alternative walls as appropriate.
Radiators and other heaters
Radiators, storage heaters, etc will be counted (each counted separately) and the totals available in the EPC report. The number of radiators with TRVs is also counted. TRVs can be marked by tapping on the radiator and marking the option in the popup menu.
It is also possible to mark the radiators for use on the estate agent plan or not.

Page 15 of 40
The radiator and other heater options available are:
Single/double radiator.
Storage heater.
Warm air vent.
Heated Towel Rail.
Electric Heater.
Water/oiled filled radiator.
Fireplaces
Once a fireplace has been added you can choose the type of fire/heater it is from the popup menu:
Baths and Showers
For baths and showers it is possible to record mixers. To do this simply select the bath/shower once it has been added to show the popup menu and there will be options visible to record mixer.
Page 16 of 40
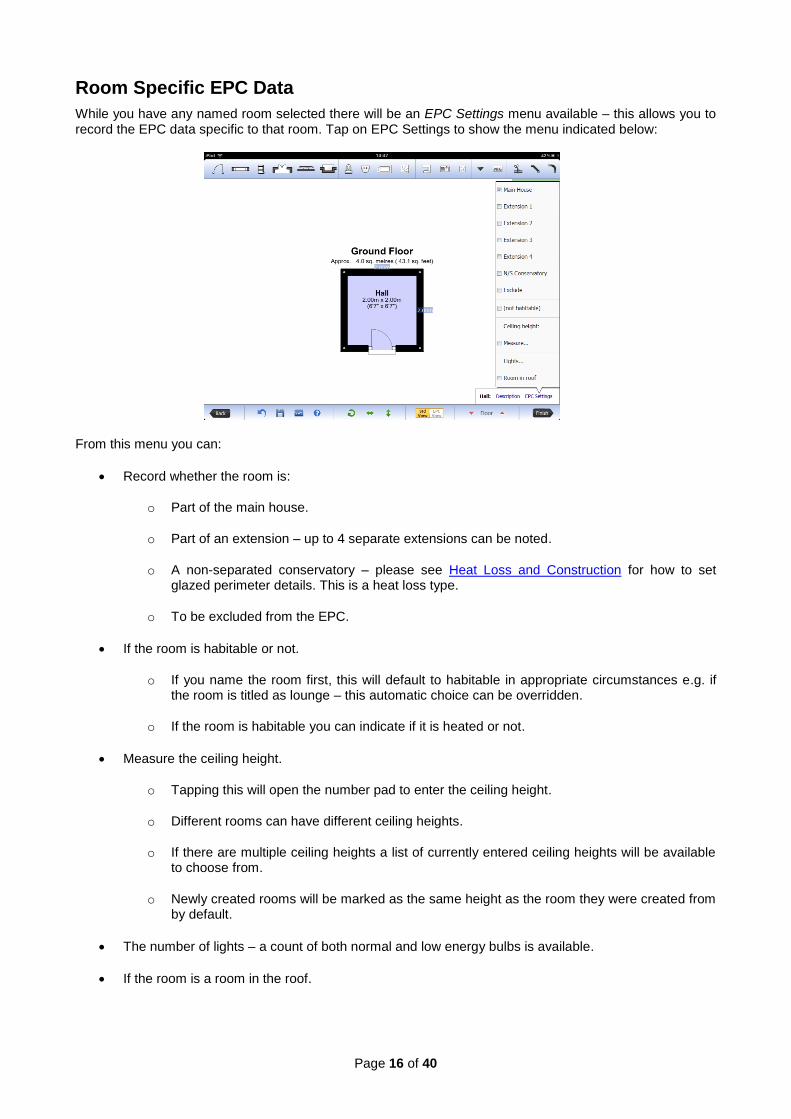
Room Specific EPC Data
While you have any named room selected there will be an EPC Settings menu available – this allows you to record the EPC data specific to that room. Tap on EPC Settings to show the menu indicated below:
From this menu you can:
Record whether the room is:
o Part of the main house.
o Part of an extension – up to 4 separate extensions can be noted.
o A non-separated conservatory – please see Heat Loss and Construction for how to set glazed perimeter details. This is a heat loss type.
o To be excluded from the EPC.
If the room is habitable or not.
o If you name the room first, this will default to habitable in appropriate circumstances e.g. if the room is titled as lounge – this automatic choice can be overridden.
o If the room is habitable you can indicate if it is heated or not.
Measure the ceiling height.
o Tapping this will open the number pad to enter the ceiling height.
o Different rooms can have different ceiling heights.
o If there are multiple ceiling heights a list of currently entered ceiling heights will be available to choose from.
o Newly created rooms will be marked as the same height as the room they were created from by default.
The number of lights – a count of both normal and low energy bulbs is available.
If the room is a room in the roof.

Page 17 of 40
Heat Loss and Construction Details
The best way to record these details is using the EPC view of the plan. You get to the EPC view by tapping on this button in the bottom toolbar:
When in EPC view the button colours will swap the other way around to those shown above and the plan view will change to look something like this:
Heat Loss
The default heat loss type is for HLP. To record other heat loss types:
Tap on the wall measurement in the red box.
This will give you option to choose from a selection of different heat loss types.
The heat loss type will automatically run along the length of the wall unless part of this wall is part of an extension.
NB: Different heat loss types will be displayed in different colours.
Page 18 of 40
Can I Split a Wall Into Two Heat Loss Types?
Yes. Whilst in the EPC view:
Tap on the wall measurement that has two heat loss types.
At the bottom of the popup menu there is an option to Split – tap on this.
The wall has now split into two equal parts.
You can now tap on one of these measurements to change where the split is as required.
Tapping on the measurements will also allow you to choose a different heat loss type for that section only.
Heat loss can also be recorded by tapping on an external wall whilst editing the plan normally and tapping on Heat loss.
NB: You cannot split the heat loss types unless you use the method in the EPC view.
Non-Separated Conservatories – Glazed Perimeter
If a room is marked as a non-separated conservatory you can select the heat loss type as glazed perimeter – this is only available for non-separated conservatories.
Alternative Walls
Any walls that are marked as alternative will have a wall area calculated. These areas will exclude any doors and windows added to the alternative walls. Please ensure the heights of these items have been added correctly to ensure correct calculations. Please see Item Specific Data for details.
IMPORTANT: You must have a ceiling height recorded for the alternative wall area to be calculated. See Room Specific EPC Data for more information on ceiling heights.
If you select the heat loss type as alternative you can record a different construction for the alternative wall types.
Calculations for alternative wall areas are shown on the final EPC report.
Construction and Insulation
You are able to record one construction type for part of the plan – main, and extensions 1-4. To do this:
From the EPC view tap on the options at the bottom of the screen for Main, Ext1, etc.
This will display the floor area for that part of the plan with the ceiling height and heat loss total.
At the right hand end of this it will say Construction – tap on this.
You can now choose from the different types of construction and insulation available.
Tap on OK when done.
You can also record the construction from the normal view by tapping on an external wall and selecting Construction from the popup menu.
EPC Report
This can be saved from any image email you request to be sent or from the Direct Save options as detailed in Saving Final Images.
Page 19 of 40
Saving Final Images
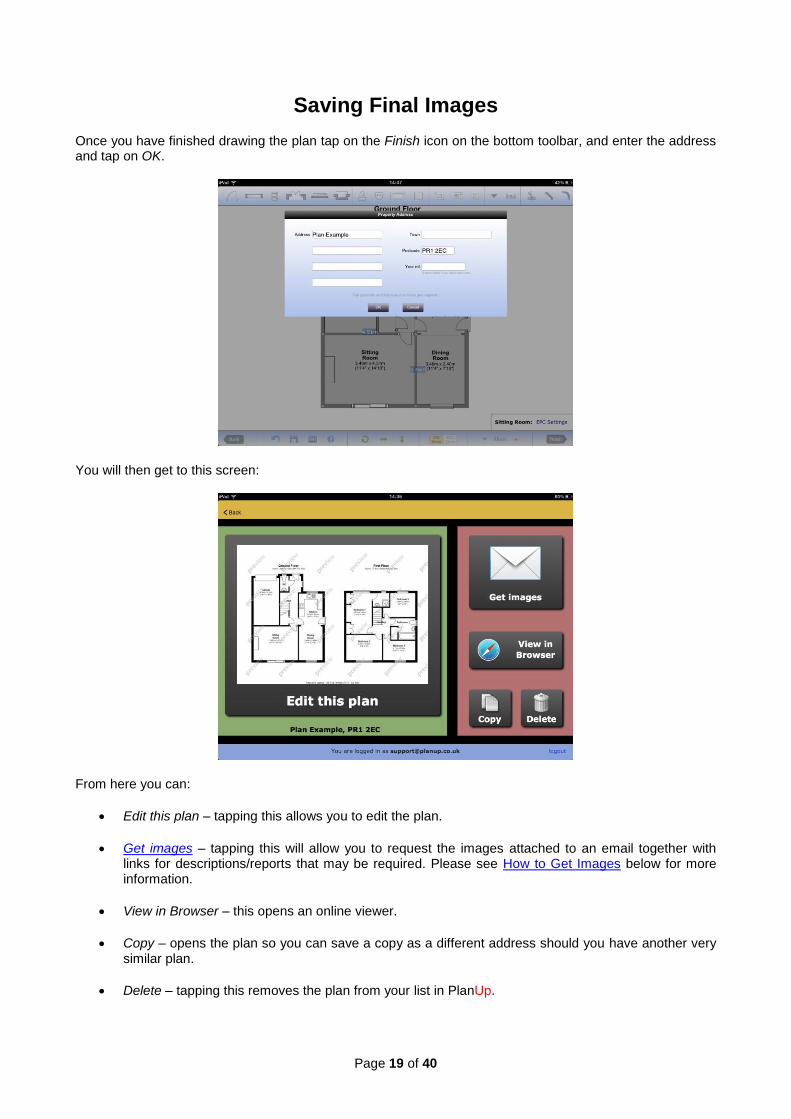
Once you have finished drawing the plan tap on the Finish icon on the bottom toolbar, and enter the address and tap on OK.
You will then get to this screen:
From here you can:
Edit this plan – tapping this allows you to edit the plan.
Get images – tapping this will allow you to request the images attached to an email together with links for descriptions/reports that may be required. Please see How to Get Images below for more information.
View in Browser – this opens an online viewer.
Copy – opens the plan so you can save a copy as a different address should you have another very similar plan.
Delete – tapping this removes the plan from your list in PlanUp.
Page 20 of 40
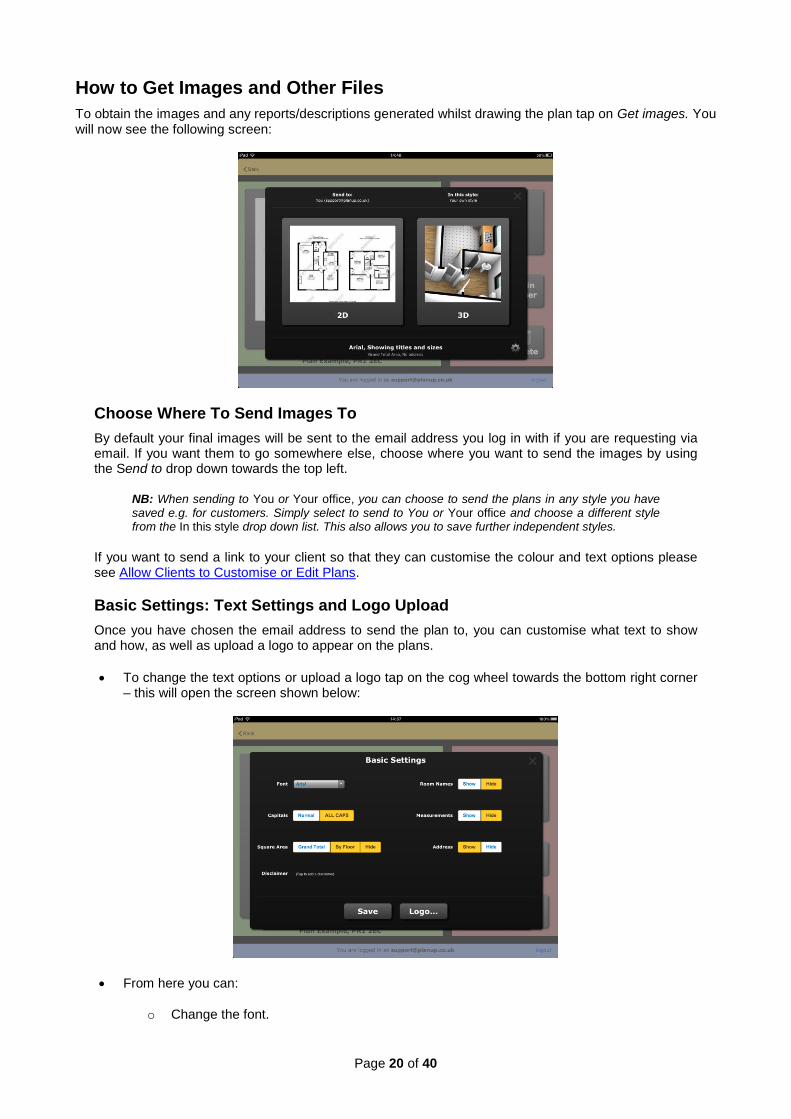
How to Get Images and Other Files
To obtain the images and any reports/descriptions generated whilst drawing the plan tap on Get images. You will now see the following screen:
Choose Where To Send Images To
By default your final images will be sent to the email address you log in with if you are requesting via email. If you want them to go somewhere else, choose where you want to send the images by using the Send to drop down towards the top left.
NB: When sending to You or Your office, you can choose to send the plans in any style you have saved e.g. for customers. Simply select to send to You or Your office and choose a different style from the In this style drop down list. This also allows you to save further independent styles.
If you want to send a link to your client so that they can customise the colour and text options please see Allow Clients to Customise or Edit Plans.
Basic Settings: Text Settings and Logo Upload
Once you have chosen the email address to send the plan to, you can customise what text to show and how, as well as upload a logo to appear on the plans.
To change the text options or upload a logo tap on the cog wheel towards the bottom right corner – this will open the screen shown below:
From here you can:
o Change the font.

Page 21 of 40
o Choose whether text is to be all capitals.
o Choose whether you want the square are to be showing.
o Show or hide the room names.
o Show or hide the room measurements.
o Show or hide the address.
o Add a disclaimer.
Simply tap where it says tap to add a disclaimer.
Enter required text. This will then appear on the bottom of the image.
o Upload a logo (2D only) – uploading a logo can only be done on a Windows device. To upload a logo, tap Logo... and then:
Then tap Upload your logo.
Use the Windows Explorer window to select the logo you want to upload.
Tap on Open.
The logo will then upload and the screen will update to look something like this:

Page 22 of 40
Settings for the logo are changed at a later date as per the message you will see at the bottom of the logo preview.
Select the options/upload as required and tap Save to return to the previous screen.
Now choose if you want 2D or 3D plans by tapping on the relevant button.
2D Plans
Tap on the 2D button to get to the following screen:
NB: Some screens will have slightly different options from iPad (above left) to Windows devices (above right). The screens will also differ slightly according to the version of iOS or Windows you are using.
Change Image Size and Format, and Logo Settings
The image size to be requested is detailed underneath the preview of the plan.
If you wish to change the selected image size/type:
Tap on the cog wheel to the right hand side.
As in the screen shot above from here you can change:
o The format of the image - JPG, PNG, or PDF.
NB: if you require WMF images a link will be available in the email sent or on the direct save screen.
o The number of images – a single image or an image per floor.
o The quality- print or web.
o The orientation – Portrait, landscape, square.

Page 23 of 40
o The size – from a number of preset suggestions or a custom size.
o The settings for use on the logo:
Off (not appearing), Solid, Translucent.
Appearing across each floor or the whole image.
Under the walls or over walls.
Size of the logo as a percentage of the smallest floor of the plan.
Once selected as required tap on Save to return to the previous screen.
Customisations
A brief description of the customisations (colours etc) as shown in the preview can be seen on the lower right hand side. If you want to change the customisations:
Tap on the button where it says change style...
You will have some quick options to choose from and a Custom... button. Tapping this will allow you to:
o Change the floor colour (Fill colour).
o Change the wall fill and outline colour.
o Change the item colour i.e. change the colour of items such as toilets, sinks etc.
o Add a bevelling effect to the walls – the line and fill colours need to be different.
o Add shadows to walls, items, and/or text.
o Select a transparent PNG option – PNG must already be the selected file type.
o Select options as required tap on Save to return to the previous screen.
The preview will update to show the style you have selected.

Page 24 of 40
Should you wish to check the image size being requested again tap on the cross at the right hand side of the style buttons.
When you are happy with the selections made tap on Get images now.
You will see a preparing email screen which will be replaced with a message saying the email has been sent. When you tap on OK you will be taken back to the plan home screen.
You will soon receive an email with the requested image(s) attached as well as further output available in the body of the email.
Remove watermark / Subscribe to PlanUp
To remove the preview watermark, click on the Remove watermark button. You will now need to either:
Subscribe to the use of PlanUp; or,
Accept the single use PAYG fee.
To remove the watermark:
Tap on the button.
If you do not already have an agreement for the use of PlanUp you will be given a choice of subscription levels to sign up to.
Select the subscription level as appropriate.
Follow the prompts onscreen to complete the sign up
Save Directly From PlanUp
If you want to save the images directly from PlanUp this option will be available once the watermark has been removed (Windows devices only).
The remove watermark button will be replaced with a direct save button. Tapping this will give you links on screen to download the various files similar to the below:

Page 25 of 40
As well as images and descriptions you will find the option to save:
WMF images as required for some older back office systems.
A TMA file – this is sometimes required by some older back office systems to import the image and description files.
EPC report and plans (only if you use the DEA version).
There is also a unique plan reference number which some back office systems can use to request information directly from our server to save you needing to save the files yourself.
All customisations are still performed in the same manner as before.
3D Plans
Tap the 3D button.
You will now be given the choice of selecting a wooden or carpeted finish for the floors – select as appropriate.
You will need to generate a 3D image before you can choose the size to be saved. Tap on Prepare Now to generate the 3D image.
You will now see a progress bar with the option to request an email to be sent when the image is ready instead of waiting. If you do wait the screen will refresh when the 3D image is ready.
Once the 3D image has been generated the screen will look very similar to the screen for saving 2D Plans.

Page 26 of 40
Change Image Size and Format
The image size and format to be requested is detailed underneath the 3D preview. Changing the size of the 3D plans works in the same way as you Change Image Size and Format for 2D.
NB: 3D images are only available in jpg and pdf formats.
Remove Watermark / Subscribe to PlanUp
This will allow the preview watermark to be removed the same as the option to Remove watermark / Subscribe to PlanUp when removing the watermark from the 2D plans.
NB: You will only need to remove the watermark once regardless of whether you are requesting the 2D, 3D, or both.
Changing Floor Type
If you want to change the flooring type from what was originally selected, tap on the grey box that says Carpet/Wood, change flooring... at the bottom right corner – this will return you to the screen where you make the choice and will need to generate the 3D image again.
Once you have selected the image size and format tap on Get images now.
You will see a preparing email screen which will explain the email will be sent when the 3D image(s) has been generated. When you tap on OK you will be taken back to the plan home screen.
You will soon receive an email with the requested image(s) attached as well as further output available in the body of the email.
Saving Style Settings To Use Again
If you do plans for more than one person you may want to use different style settings for each person. Different styles can be saved for quick access.
To do this:
First either:
o Enter an email address in the Send to field (as shown in Choose Where To Send Images To); or,
o If sending to yourself or your office tap on the Your style on the right hand side of the screen and select Add a style.
Then proceed to set all text and style settings as described above.
When you next draw a plan simply choose the email address to send to or the style you saved as to automatically choose those settings.

Page 27 of 40
NB: If you save the style using the send to option, that style will be available for you to send to yourself without setting up a separate style. When sending to yourself/your office simply choose the style name that matches the account name for the email address.
Image Emails and Further Output Types
When you receive the email after requesting the images you will see a series of links in the body of the email. These links are for:
Creating interactive photo plans using the add photos link.
Viewing the floorplan in your web browser.
Saving the descriptions as either a word, html, text, or xml file.
Saving EPC plans (only if you use the DEA version).
Viewing the report of EPC data in a web browser (only if you use the DEA version).
Saving WMF images.
Saving a TMA file (needed for import into some older back office systems).
There is also a plan reference number – this can be used by some back office systems to import information directly from our server.
Interactive Photo Plans
To add photo hotspots you first need to tap ‘Add Photos’ – this will open a new window with the online viewer displayed and a panel on the right hand side of the window for adding the hotspots as shown below:
NB: If you are using a Windows PC/laptop you can get to the Add photos screen using the Add photos button below the Remove watermark / Direct save button when requesting 2D plans.
Select the hotspot you want to use and drag across onto the plan. This will then open the box shown below:

Page 28 of 40
Tap on ‘Add files’ which will allow you to navigate to the photos that you want to upload – please note only jpegs can be uploaded.
You can upload as many files at a time as you want to – a hotspot will be added to the right hand side of the image for you to drag into place when the images have been uploaded.
Once you have selected the file to upload tap ‘Start’ and the photos will upload showing you the progress.
Hotspots can be moved anywhere on plan by tapping and dragging on the hotspot.
If you need to replace any hotspot markers, select the replacement hotspot and drag and drop onto the marker you want to replace.
Should you need to delete a hotspot, tap and drag the hotspot to the bin which will appear in the top right hand corner of the plan window when hovering over / tapping on the hotspot as highlighted below:
All changes made are saved as you work on the hotspots – you will see ‘Saving…’ displayed as red text in a red box as illustrated below:
When you are finished the link to use on your website can be found at the bottom of the hotspot panel or by tapping on the view in browser link in the image email or in PlanUp.

Page 29 of 40
Allow Clients to Customise or Edit Plans
It is possible to send a Style and Save link to customers so that they can do their own customisations i.e. change colours, fonts, add logos etc or even to transfer the plan from your account onto another PlanUp account.
NB: Transferring the plan from your account to another means the account the plan is transferred to will pay for the plan – this means that they must have an active subscription with PlanUp.
Send Style and Save Link to Client
This will allow your clients to customise the floor plans i.e. change colours, image size, add a logo etc.
NB: Your clients will not be able to amend any text or font sizes using this link
To send a Style and Save link do this:
Draw the plan as normal and tap finish to save the plan.
Tap on Get Images.
Change where you want to send the images to as described in Choose Where To Send Images To.
The screen will now change to show the additional options as indicated below:
Tap on the top link – Send a ‘style and save’ link...
The following message will appear:

Page 30 of 40
To send the Style and Save link you can either:
o Tap Send an automated email to confirm and send the email to the email address you entered. Your client will then receive an email similar to the following:
Or;
o Tap Send you own email. You will now be shown the link (similar to below) which you can copy and send in an email of your own devising.
Your client then clicks on the link in the email they receive – they do not need to log in. From the page that opens they can customise the plan in the same way that you can after clicking finish.
Images and other outputs are also saved in the same way i.e. requesting images to be sent via email or saving directly.
A user guide for recipients of this link can be found here:
http://forums.themobileagent.co.uk/forum/default.aspx?g=posts&m=750&#post750
Transfer Plan to Client Account
If your client wants to be able to edit the plan i.e. change text, font sizes, move/add items etc then you will need to transfer the plan to the client account.
IMPORTANT: Transferring the plan will mean the client pays for the plan instead of you. Your client must have an active PlanUp subscription to be able to transfer the plans.

Page 31 of 40
To transfer a plan:
Draw the plan as normal and tap finish to save the plan.
Tap on Get Images.
Change where you want to send the images to as described in Choose Where To Send Images To.
The screen will now change to show the additional options as indicated above in Send Style and Save Link to Client.
Tap on the second link – Transfer this plan to Client Email’s account...
The following message will appear:
Tap Yes to confirm and send the email requesting the plan transfer to the email address you entered.
Your client will then receive an email similar to the following:
Once the client has tapped on the Accept the transfer link the plan will be removed from your account and placed onto theirs. They can now access the plan when they next open PlanUp.

Page 32 of 40
Appendices
Appendix 1: Top Toolbar Reference
Estate Agent Edition:
DEA Edition:
Main Toolbar Sub Menu
Icon Item / Tool Icon Item
(shortcut keys – Windows devices only)
Door
Single (D)
Double (D, B)
Patio (D, P)
Sliding (D, S)
Opening/Archway (D, O)
Folding (D, F)
Garage (D, G)
In Arrow (D, A)
Window
Standard (W)
Bay (W, A)
Bow (W, O)
Box (W, B)
Velux/Skylight (W, V)

Page 33 of 40
Stairs
Stairs have a second submenu for each stair
type (except spiral stairs) for the direction the stairs
lead in. Example of second sub menu (straight stairs):
.
Cupboard
Single Door (C)
Double Door (C, D)
Folding Door (C, F)
Opening/Archway (C, O)
Sliding Door (C, L)
W text label (C, W)
CPD text label (C, T)
Radiator (text naming
each symbol is visible on the
menu)
Single (R)
Double (R, D)
Storage Heater (R, S)
Air Vent (R, A)
Heated Towel Rail (R, H)
Electric Heater (R, E)
Water / Oil Filled Radiator (R, W)
Fireplace
Fireplace Hearth (F)
Fireplace with Hearth (F, C)
Fireplace no Hearth (F, N)
FP text label (F, T)
Toilet
Toilet (T)
Toilet – simple (T,2)
Bidet (T, B)

Page 34 of 40
Basin
(small versions available)
Standard (B), small (B, 1)
Square (B, S), small (B, 2)
Oval (B, O), small (B, 3)
Corner (B, C), small (B, 4)
Bath
Standard bath (A)
Double end bath (A, D)
Oval bath (A, O)
Corner bath (A, C)
P-shaped bath (A, P)
Shower
Standard shower (S)
Corner shower (S, C)
Worktop
Worktop (O)
Space (O, S)
Sink
Sink (K)
Double sink (K, D)
Sink with ½ bowl (K, R)
Double sink with ½ bowls (K, N)
Butler sink (K, B)
Double Butler sink (K, U)
Hob
Hob – simple (H)
Five ring hob - simple (H, F)
Hob (H, 4)
Five ring hob (H, 5)
Aga (H, A)
5 oven Aga (H, O)
Page 35 of 40
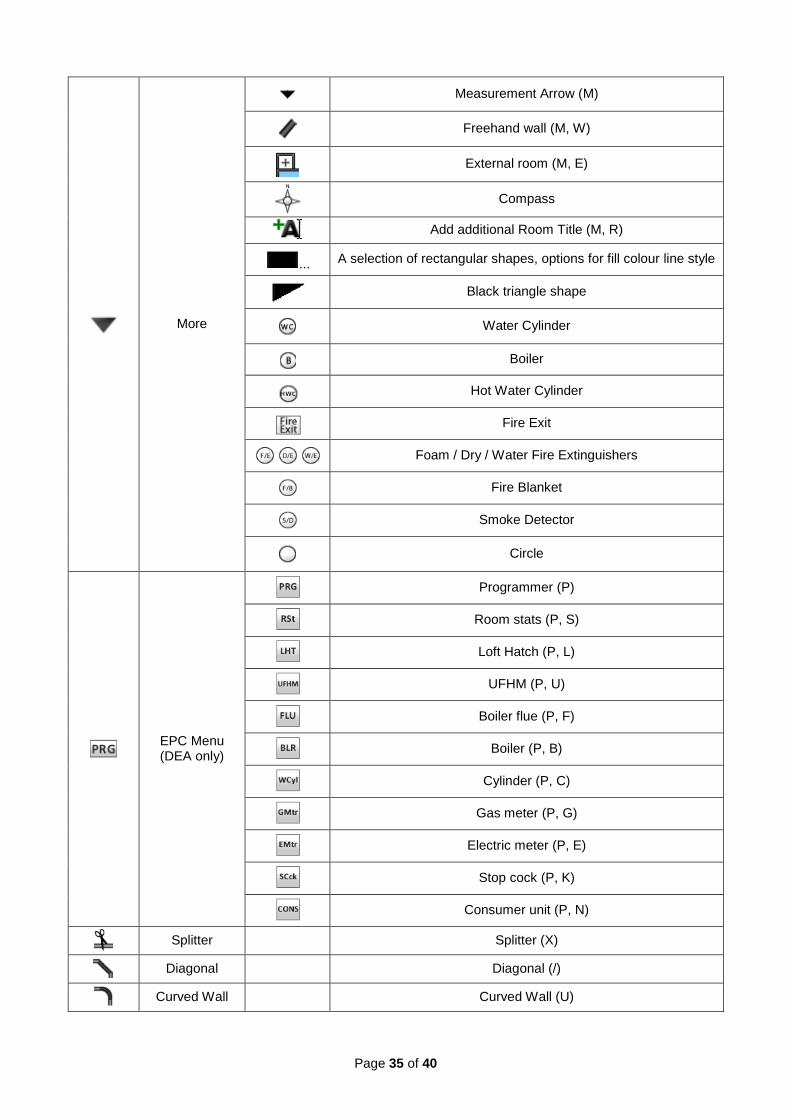
More
Measurement Arrow (M)
Freehand wall (M, W)
External room (M, E)
Compass
Add additional Room Title (M, R)
... A selection of rectangular shapes, options for fill colour line style
Black triangle shape
Water Cylinder
Boiler
Hot Water Cylinder
Fire Exit
Foam / Dry / Water Fire Extinguishers
Fire Blanket
Smoke Detector
Circle
EPC Menu (DEA only)
Programmer (P)
Room stats (P, S)
Loft Hatch (P, L)
UFHM (P, U)
Boiler flue (P, F)
Boiler (P, B)
Cylinder (P, C)
Gas meter (P, G)
Electric meter (P, E)
Stop cock (P, K)
Consumer unit (P, N)
Splitter Splitter (X)
Diagonal Diagonal (/)
Curved Wall Curved Wall (U)
Page 36 of 40
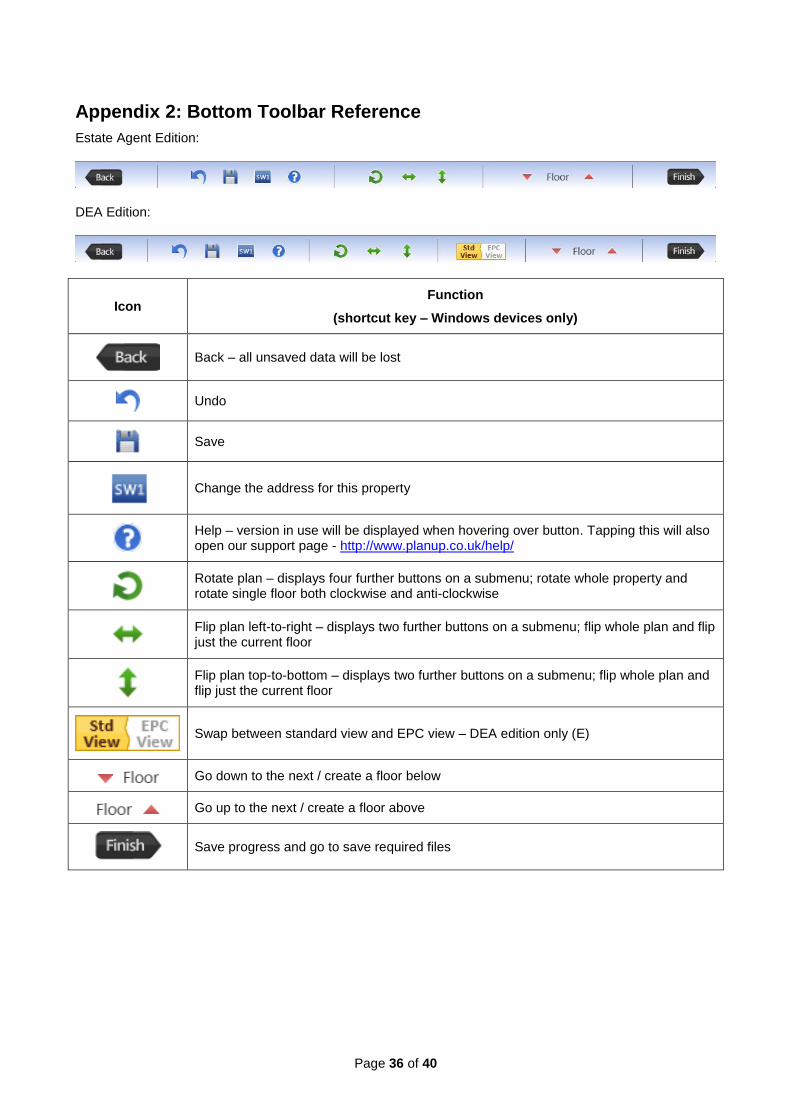
Appendix 2: Bottom Toolbar Reference
Estate Agent Edition:
DEA Edition:
Icon Function
(shortcut key – Windows devices only)
Back – all unsaved data will be lost
Undo
Save
Change the address for this property
Help – version in use will be displayed when hovering over button. Tapping this will also open our support page - http://www.planup.co.uk/help/
Rotate plan – displays four further buttons on a submenu; rotate whole property and rotate single floor both clockwise and anti-clockwise
Flip plan left-to-right – displays two further buttons on a submenu; flip whole plan and flip just the current floor
Flip plan top-to-bottom – displays two further buttons on a submenu; flip whole plan and flip just the current floor
Swap between standard view and EPC view – DEA edition only (E)
Go down to the next / create a floor below
Go up to the next / create a floor above
Save progress and go to save required files

Page 37 of 40
Appendix 3: Room Toolbar
Icon Function
Edit title
(Title) Hide / Show room title
Delete Room
Check measurements
(Sizes) Hide / Show room title
Size settings
Make font larger
Make font smaller
Further Help and Information
If you require any further help or information please see our support page:
http://www.planup.co.uk/help
Here you will find some further FAQs and links to our User Forum - http://forums.themobileagent.co.uk/forum - and details of how to contact us.

Page 38 of 40
FAQs
How do I use stairs?
Adding Stairs
To add stairs:
Tap on stairs icon to open the stairs sub menu.
Choose the appropriate stair shape.
Choose the starting direction of the stairs.
Tap on the plan to add the stairs.
Once added you can tap on the stair to move them.
There are also a number of square handles available to alter the shape of the stairs:
o A handle to move the starting point of the stairs.
o A handle to move the end of the stairs, a handle will be available for each section of stairs in multi section stairs.
o A handle to change the width of the stairs.
o A handle to alter the stair break i.e. change how much of the stairs show on the final plan (white section).
o There will also be a circular handle which will appear to one side which can be used to rotate the stairs.
Moving a Floor Using the Stairs
Stairs can be used to adjust the position of the upper floor relative to the lower floor. To do this:
Go to the floor that the stairs go up to.
Tap on the stairs.
Drag the stairs to move the floor as required e.g. to move the floor to the right relative to the lower floor drag the stairs to the left where they are required to be.
This is often useful if for instance the first floor does not have any useful anchor points relative to the downstairs.
Editing the 3D Stairwell
PlanUp will try to work out what the stairwell should look like on 3D plans. However, this can be adjusted.
When you tap the stairs on the upper level you will in the popup menu an option to Edit 3D Stairwell. Tick this box. You will now see a blue dashed line with 3 square handles – this is the outline showing where the stairwell will be on the 3D image when produced.

Page 39 of 40
If you need to change the stairwell you can use the handles to adjust where the blue dashed lines/3D stairwell go to.
Once you have finished changing the stairwell remove the tick from ‘Edit 3D Stairwell’ to return to the normal stair handles.
The screen shots below show an example of the change in 3D stairwell
Can I change the measurements shown on the plan?
In irregular shaped rooms you may wish to display different measurements to those displayed automatically when choosing to show measurements.
The measurements can be changed using the measurement arrows available using the room toolbar.
To do this:
Tap on the room to bring up the room toolbar.
Tap on the icon, this will display arrows indicating the measurements currently being displayed.
Tap on one of the arrowheads and drag to the measurement you want to be shown.
Page 40 of 40
You can also tap on the three dots under the measurements to choose an additional description to appear next to the measurement e.g. ‘maximum’ or ‘minimum’.
Tap done.
You will be returned to the normal screen to continue working.
IMPORTANT: The measurements shown on the final image are not used for any calculations of the square area. Please be sure the wall measurements are correct as these are the measurements used to calculate the square area.
Can I change a floor title?
There will likely be occasions when you want to change the floor title(s) on a plan e.g. if the plan is a flat you may wish it to say the floor the flat is on if it is not the Ground Floor.
To change the floor title:
Tap on the floor title.
Select Change Title....
You can now select from the preset list or type what you want to use where it says Enter your own.
Tap on Ok.
The floor title will update to show what has been chosen.
Can I add a disclaimer?
Disclaimers can be added in the text settings for a plan. Please see Basic Settings in How to Get Images for more information.
Can I remove the square area?
The square area can be removed in the text settings for a plan. Please see Basic Settings in How to Get Images for more information.
Can I hide all measurements by default?
All room measurements can be hidden using the text settings for a plan. Please see Basic Settings in How to Get Images for more information.
How can I change the type and size of an image to be saved?
The size and format of an image is chosen at the point of requesting the image. Please see Change Image Size and Format for more information.
Can I customise the look of the plan e.g. colours, shadows etc?
Customisations can be altered at the point of requesting the images. Please see Customisations for more information.
Other FAQs
Please see http://www.planup.co.uk/help/contents.aspx for further FAQs.