The Basics of Shoe Design - Autodesk SketchBook Pro Basics of Shoe Design An Autodesk Sketchbook...
22
The Basics of Shoe Design An Autodesk Sketchbook Tutorial by Hudson Rio
Transcript of The Basics of Shoe Design - Autodesk SketchBook Pro Basics of Shoe Design An Autodesk Sketchbook...
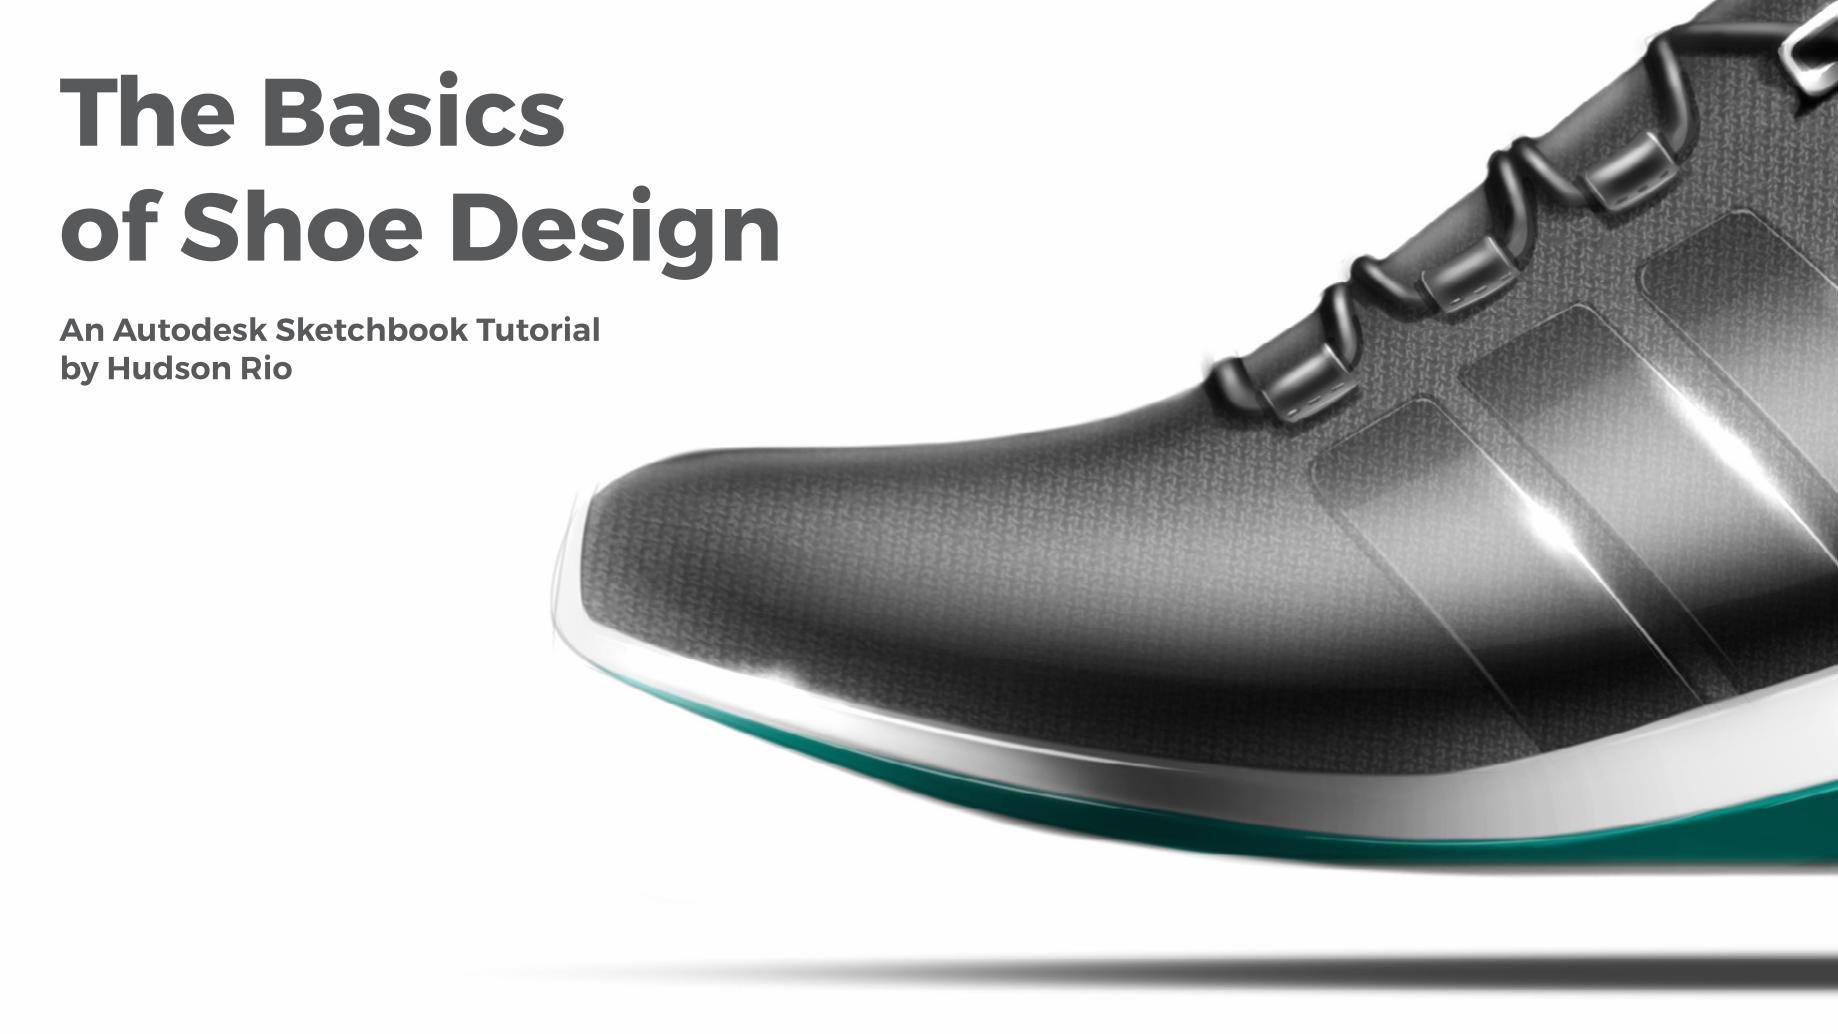
The Basics of Shoe DesignAn Autodesk Sketchbook Tutorial by Hudson Rio
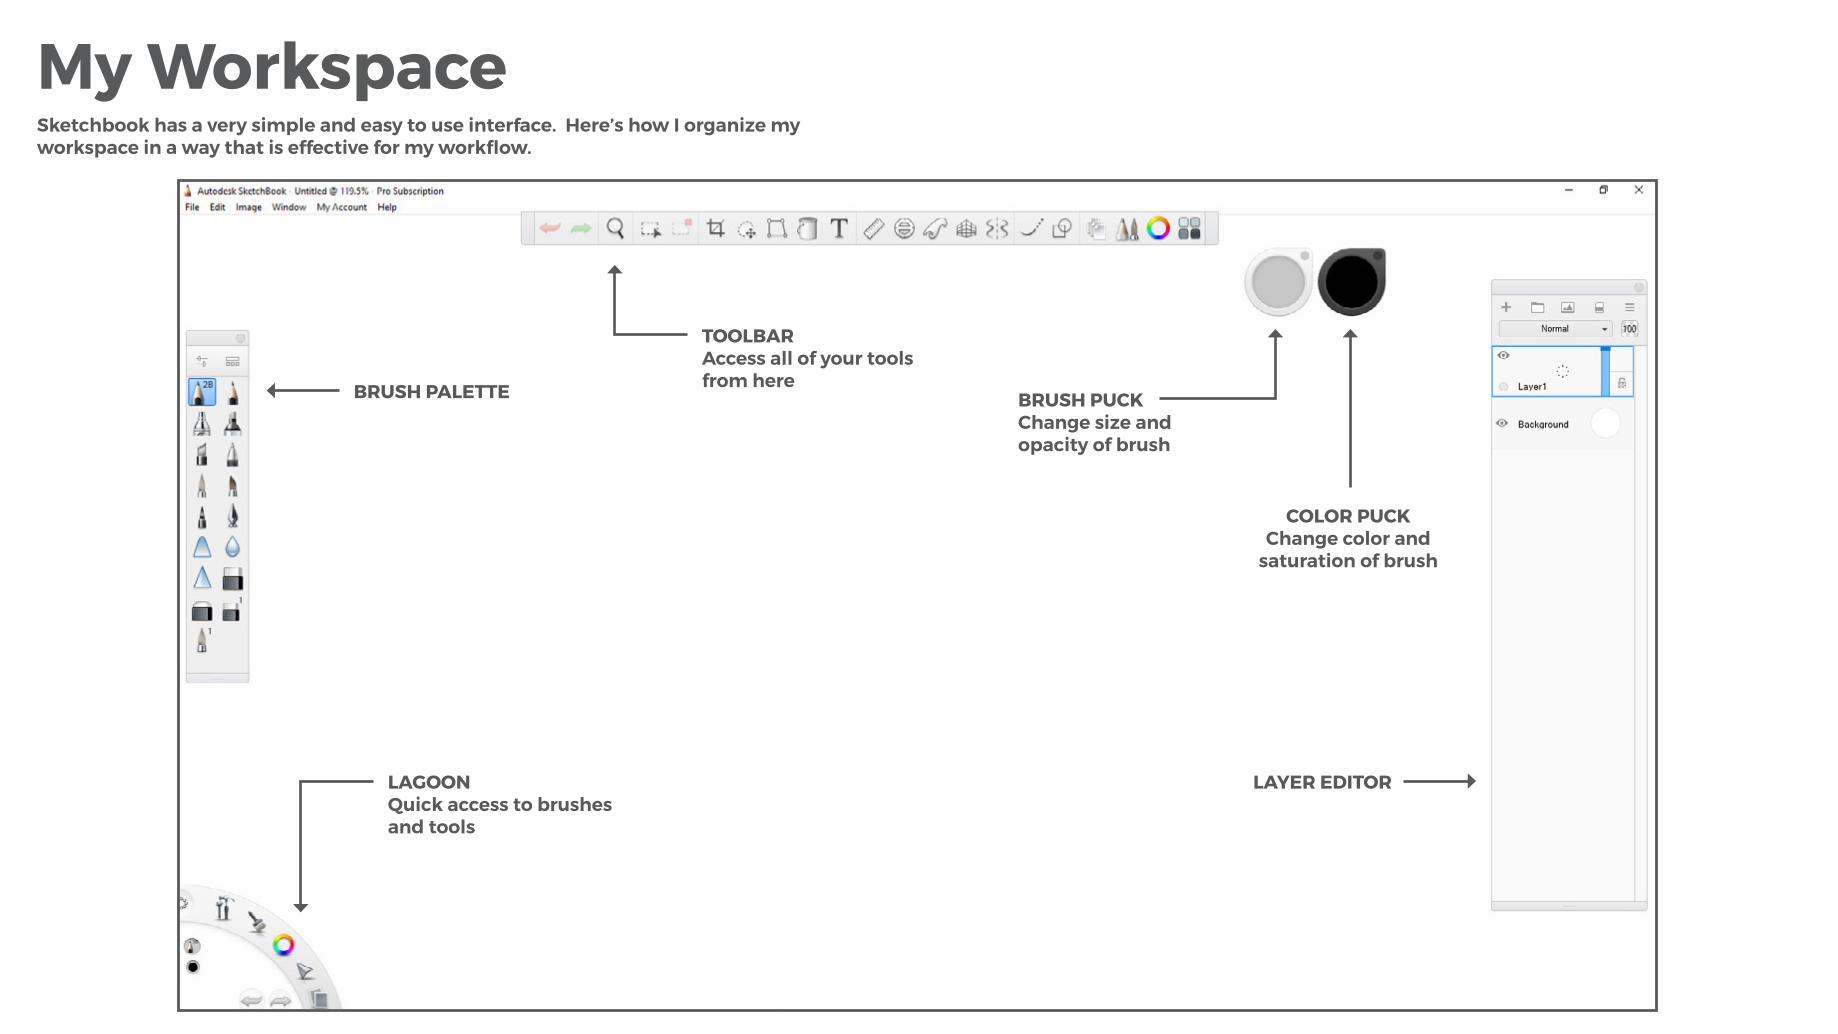
My WorkspaceSketchbook has a very simple and easy to use interface. Here’s how I organize my workspace in a way that is effective for my workflow.
BRUSH PALETTE
LAYER EDITORLAGOONQuick access to brushes and tools
TOOLBAR Access all of your tools from here
COLOR PUCKChange color and
saturation of brush
BRUSH PUCKChange size and opacity of brush
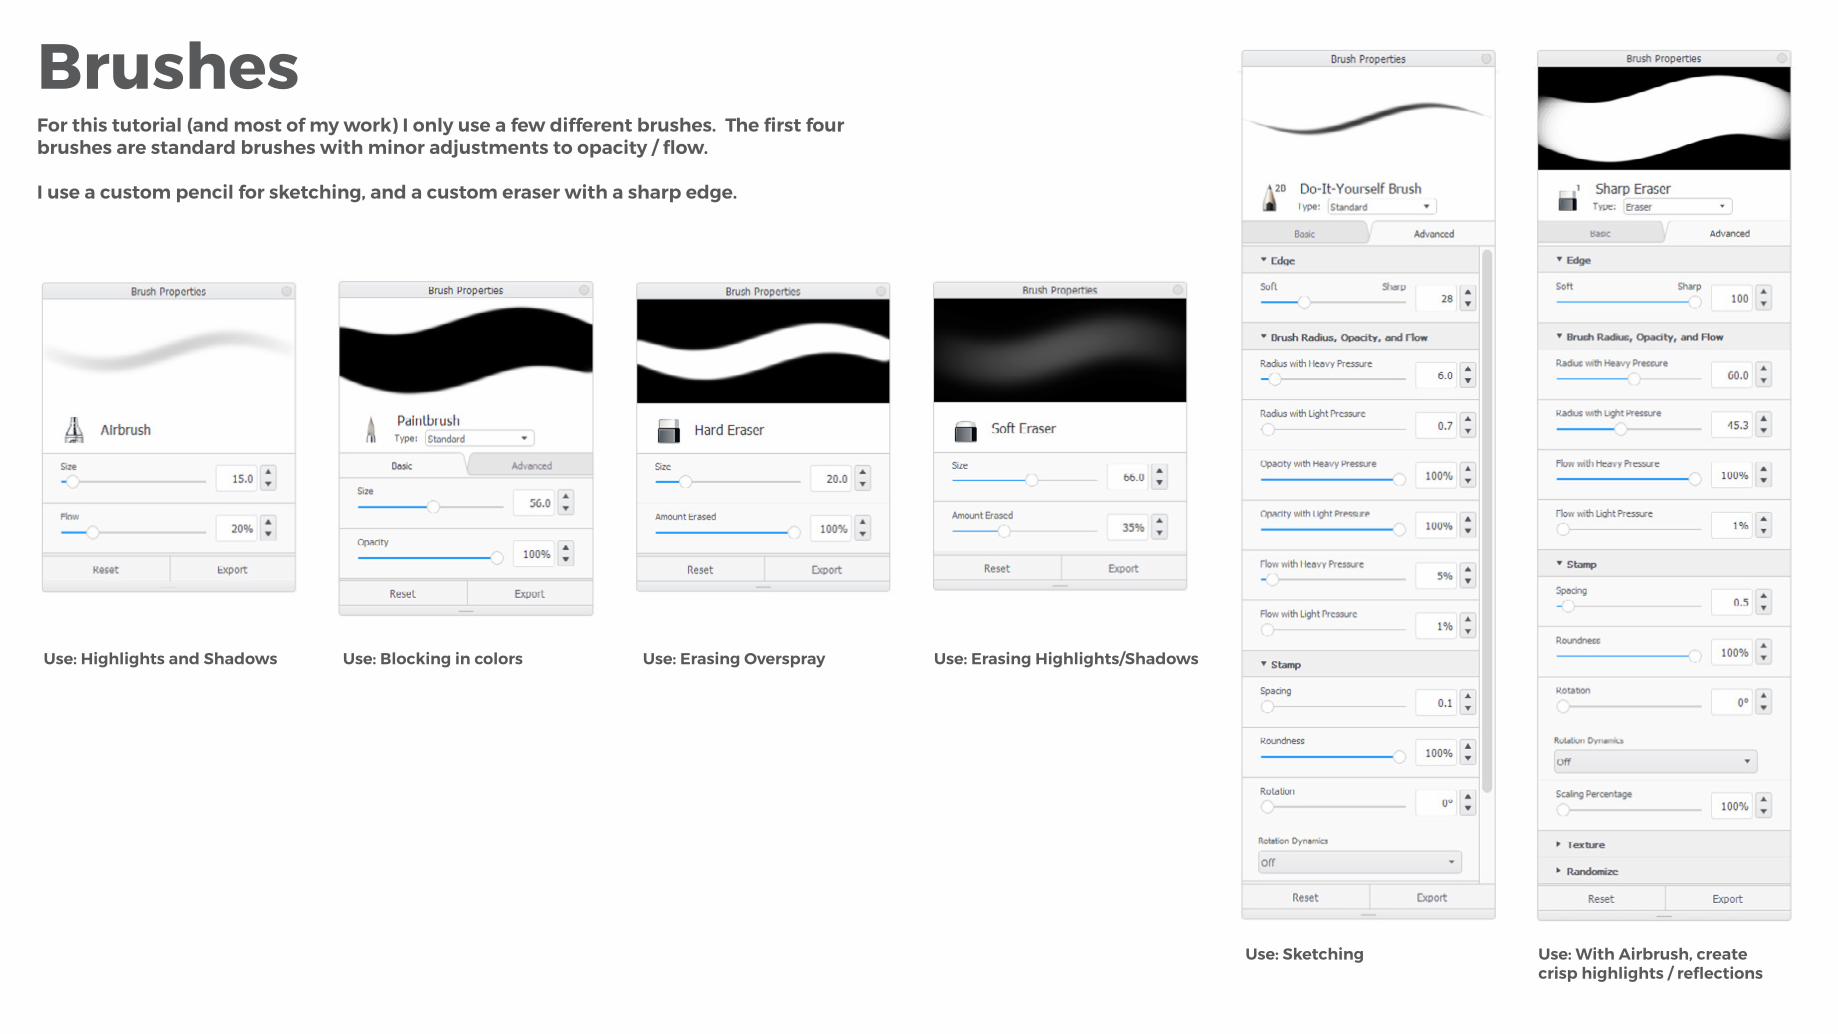
Use: Highlights and Shadows Use: Blocking in colors Use: Erasing Overspray Use: Erasing Highlights/Shadows
Use: Sketching Use: With Airbrush, createcrisp highlights / reflections
BrushesFor this tutorial (and most of my work) I only use a few different brushes. The first four brushes are standard brushes with minor adjustments to opacity / flow.
I use a custom pencil for sketching, and a custom eraser with a sharp edge.
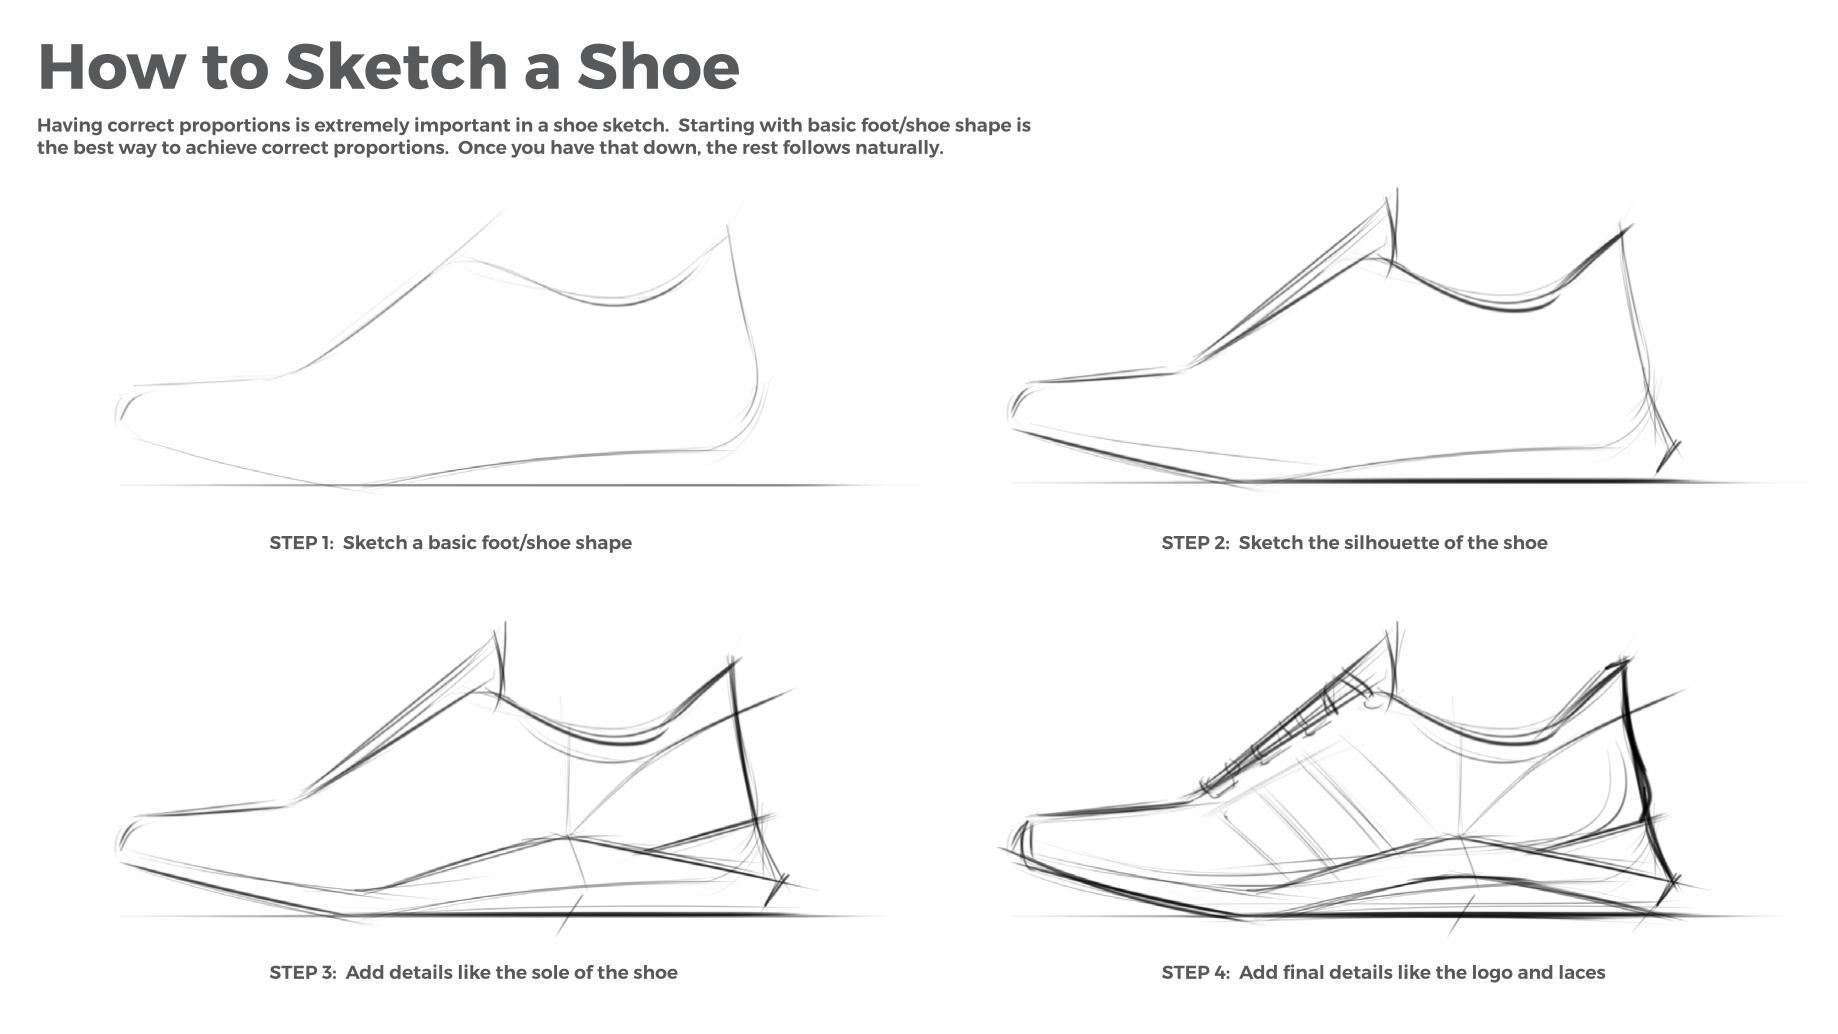
STEP 1: Sketch a basic foot/shoe shape STEP 2: Sketch the silhouette of the shoe
STEP 3: Add details like the sole of the shoe STEP 4: Add final details like the logo and laces
How to Sketch a ShoeHaving correct proportions is extremely important in a shoe sketch. Starting with basic foot/shoe shape is the best way to achieve correct proportions. Once you have that down, the rest follows naturally.
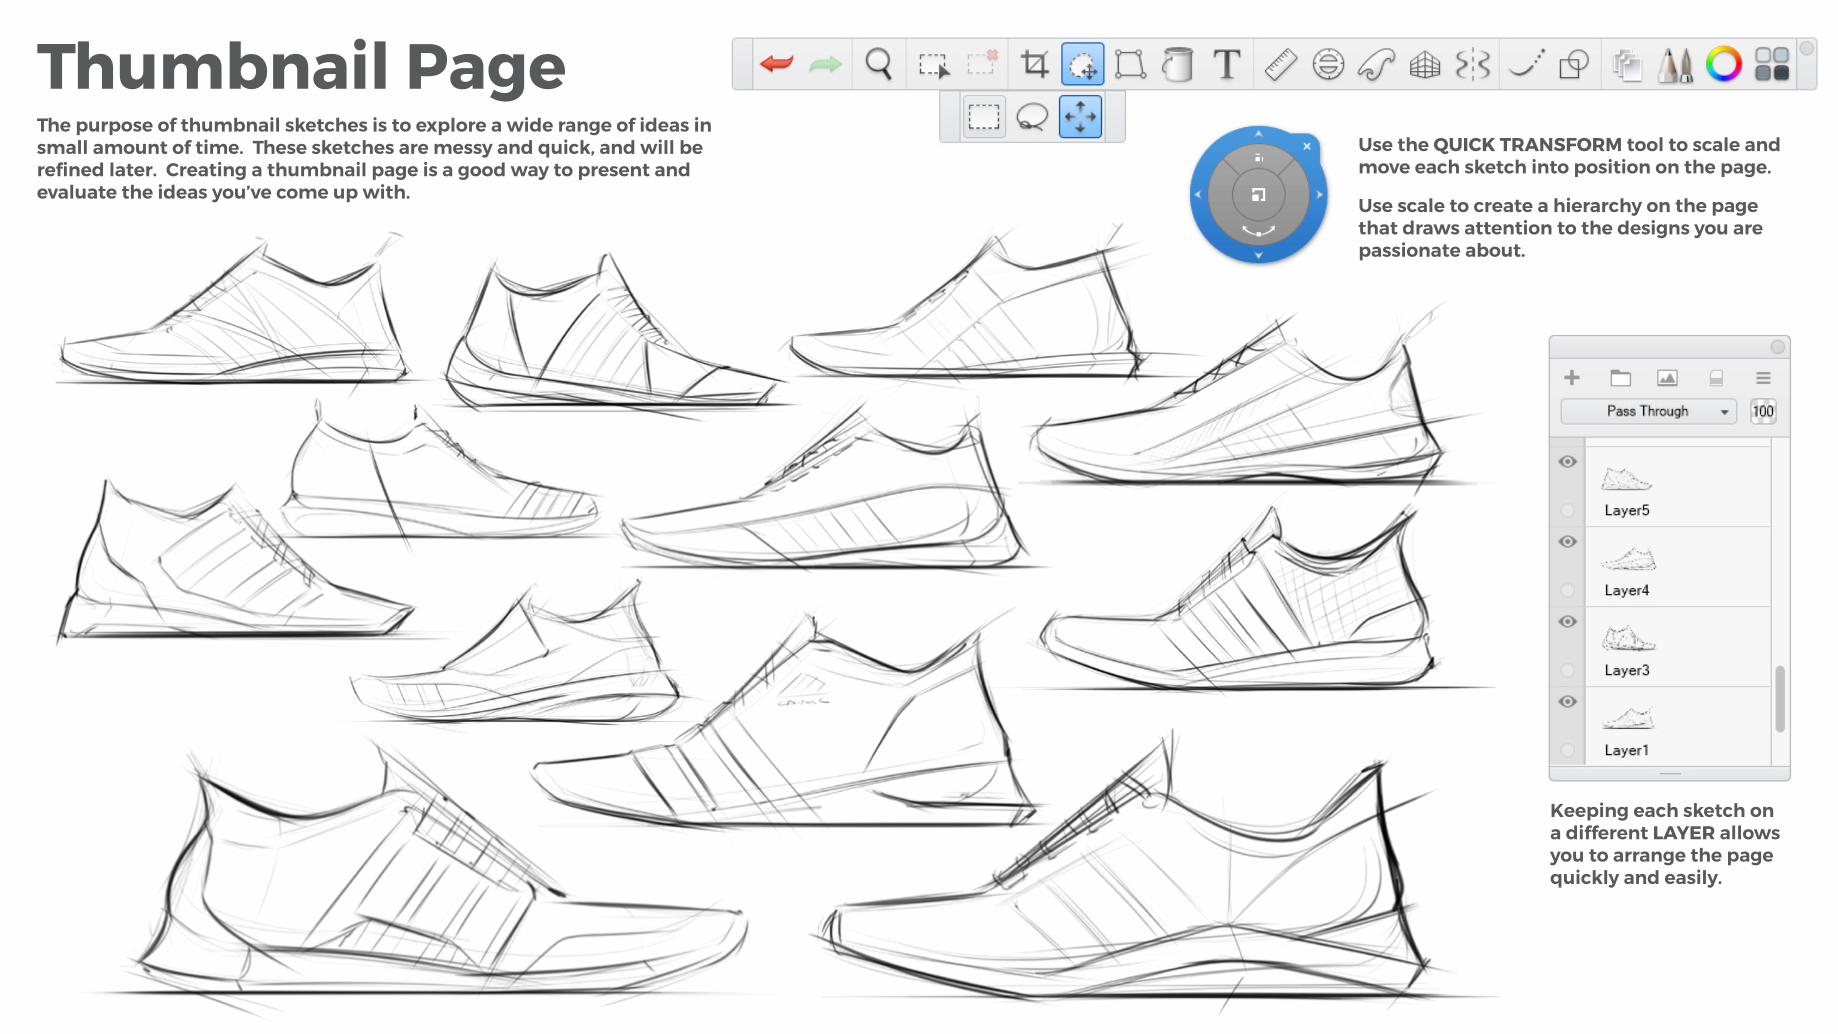
Thumbnail PageThe purpose of thumbnail sketches is to explore a wide range of ideas in small amount of time. These sketches are messy and quick, and will be refined later. Creating a thumbnail page is a good way to present and evaluate the ideas you’ve come up with.
Use the QUICK TRANSFORM tool to scale and move each sketch into position on the page.
Use scale to create a hierarchy on the page that draws attention to the designs you are passionate about.
Keeping each sketch on a different LAYER allows you to arrange the page quickly and easily.
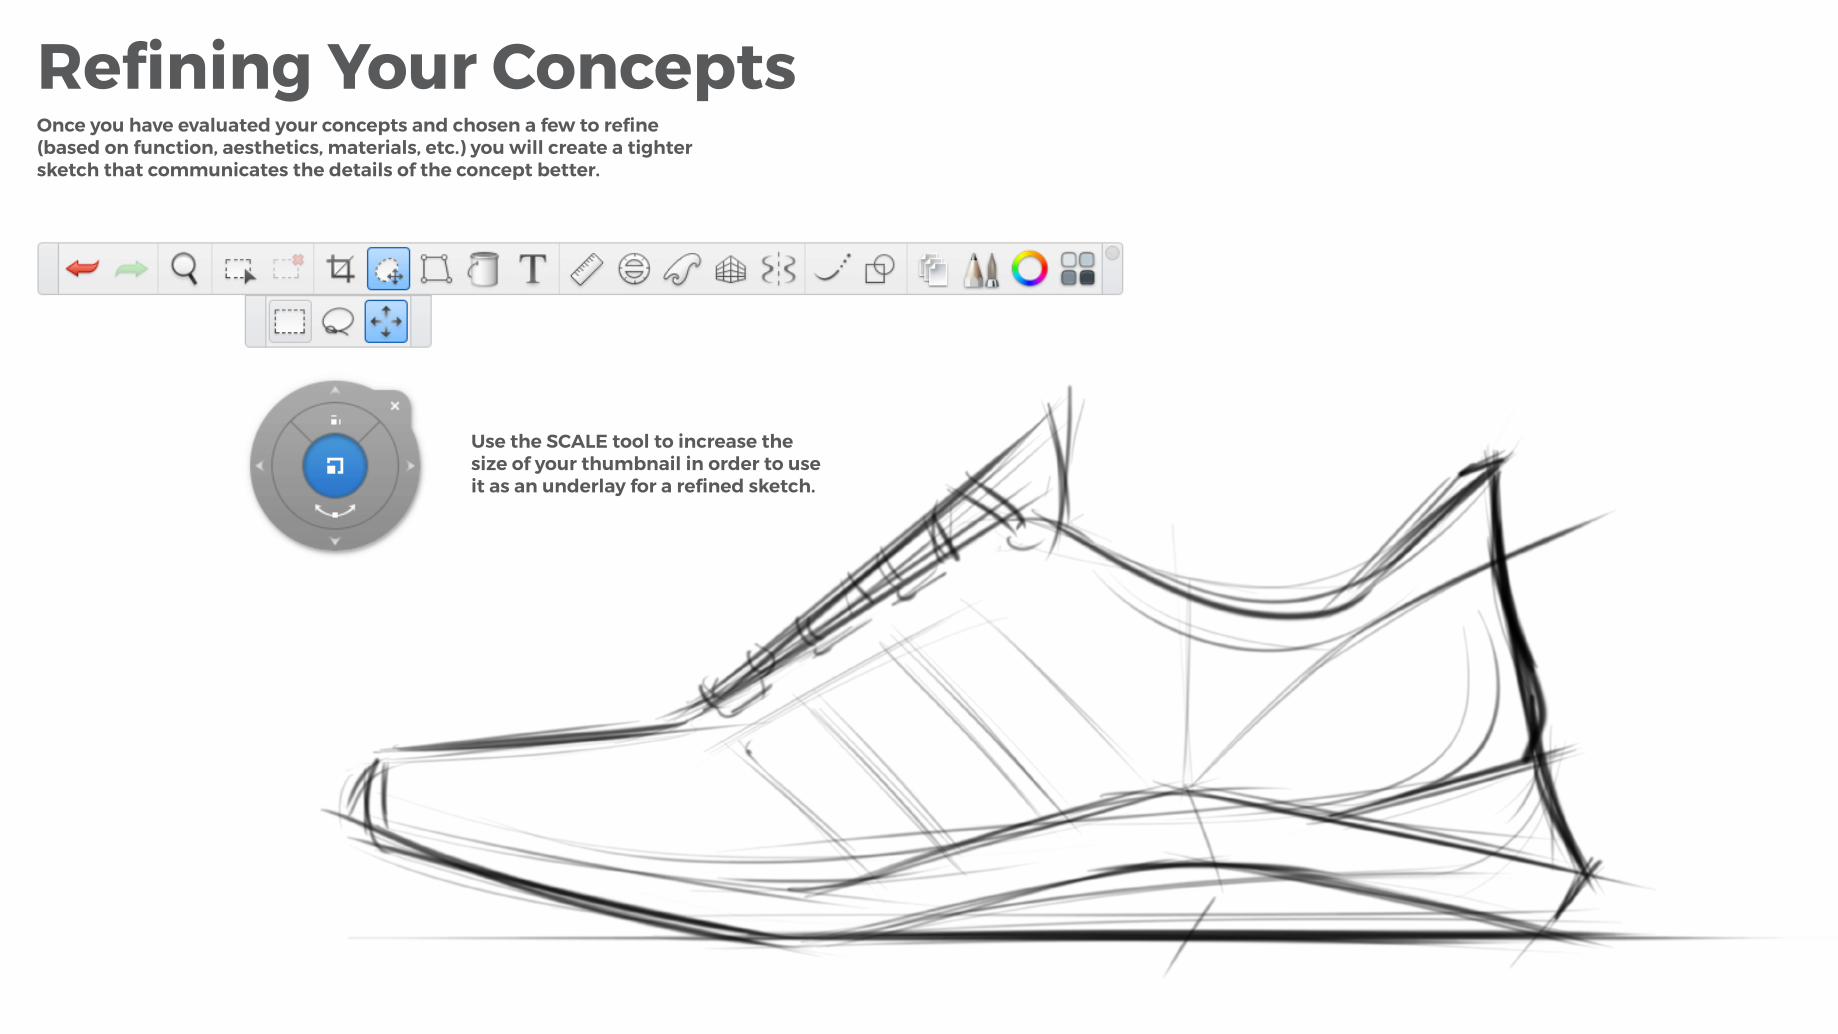
Refining Your ConceptsOnce you have evaluated your concepts and chosen a few to refine (based on function, aesthetics, materials, etc.) you will create a tighter sketch that communicates the details of the concept better.
Use the SCALE tool to increase the size of your thumbnail in order to use it as an underlay for a refined sketch.
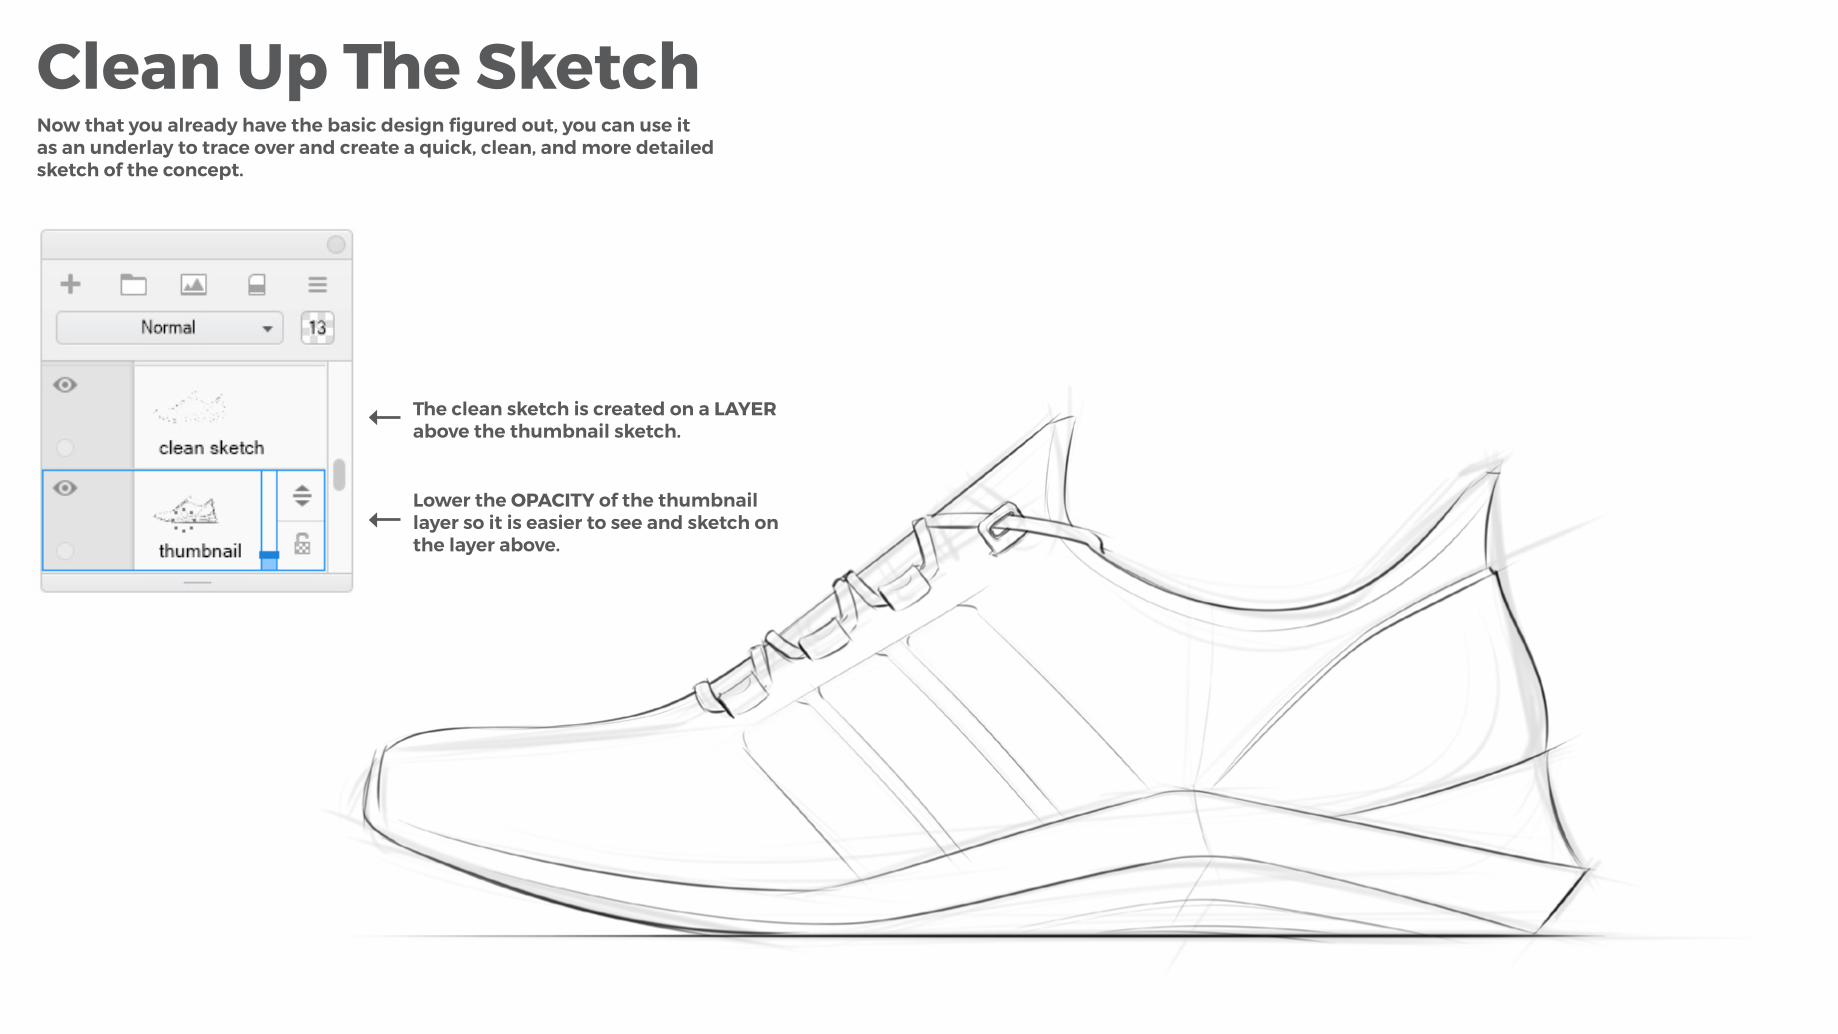
Clean Up The SketchNow that you already have the basic design figured out, you can use it as an underlay to trace over and create a quick, clean, and more detailed sketch of the concept.
The clean sketch is created on a LAYER above the thumbnail sketch.
Lower the OPACITY of the thumbnail layer so it is easier to see and sketch on the layer above.
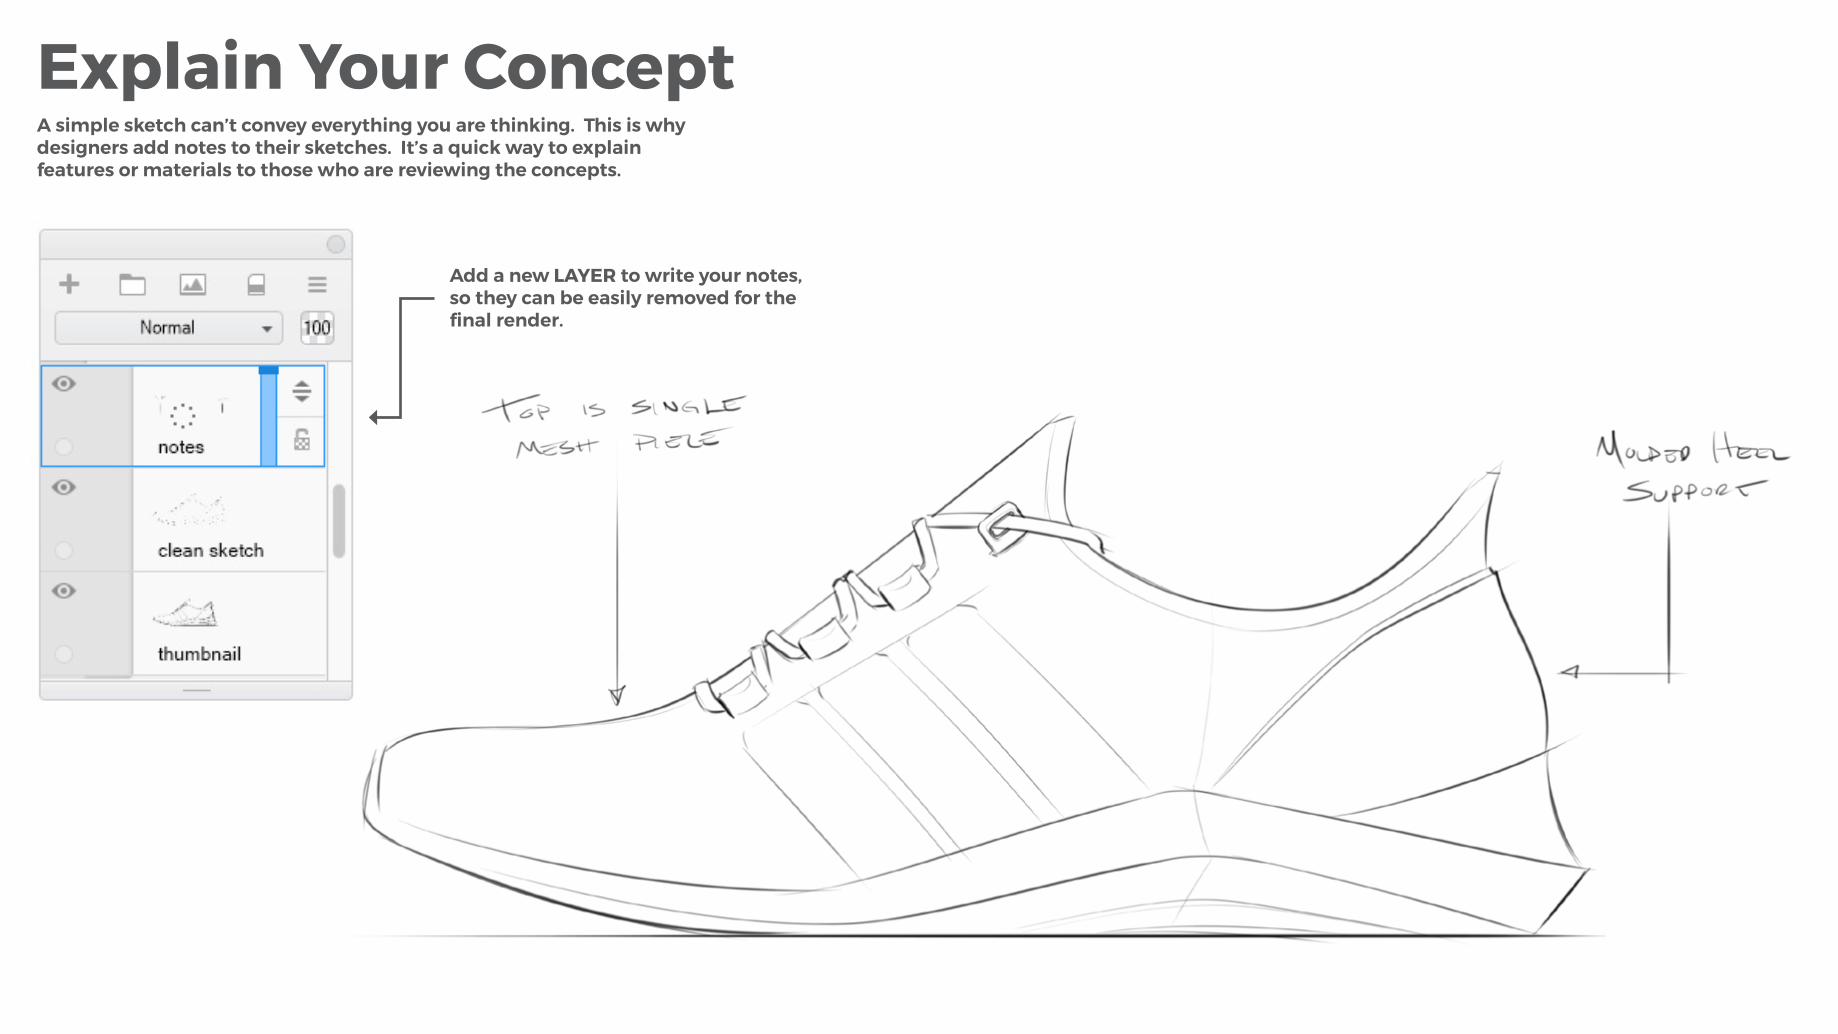
Add a new LAYER to write your notes, so they can be easily removed for the final render.
Explain Your ConceptA simple sketch can’t convey everything you are thinking. This is why designers add notes to their sketches. It’s a quick way to explain features or materials to those who are reviewing the concepts.
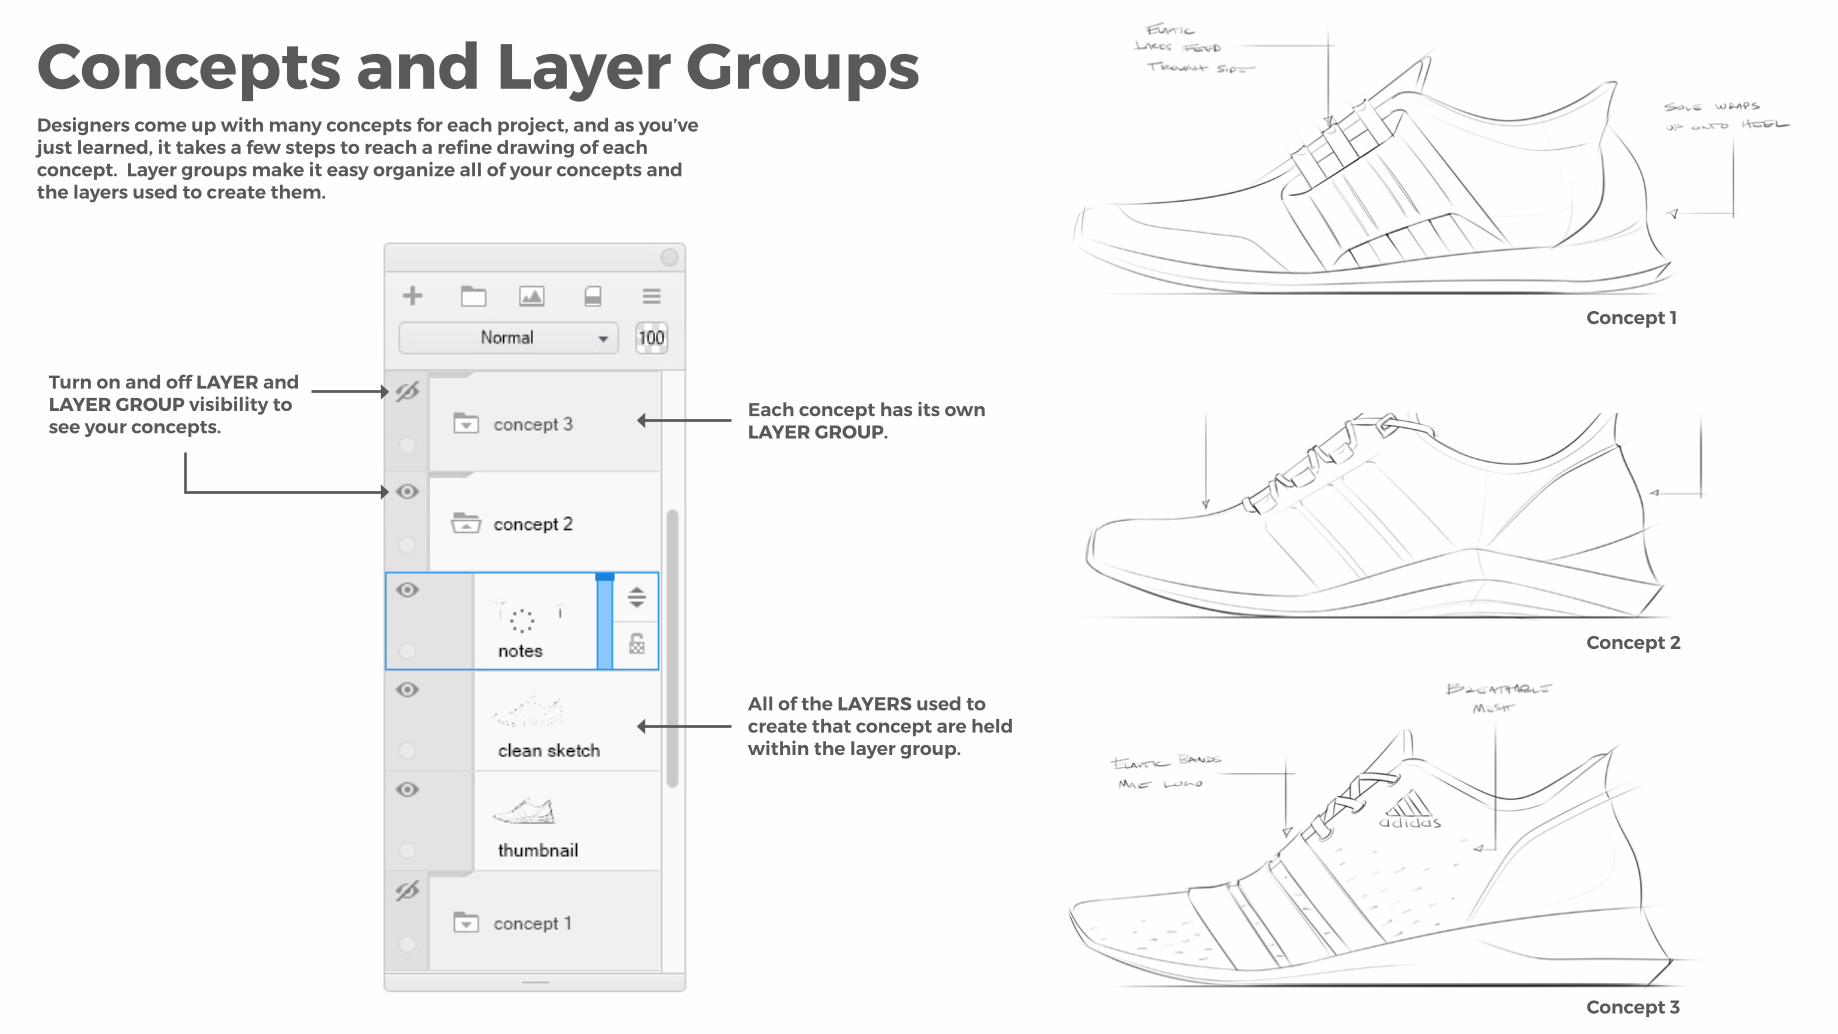
Concepts and Layer GroupsDesigners come up with many concepts for each project, and as you’ve just learned, it takes a few steps to reach a refine drawing of each concept. Layer groups make it easy organize all of your concepts and the layers used to create them.
Turn on and off LAYER and LAYER GROUP visibility to see your concepts.
Each concept has its own LAYER GROUP.
All of the LAYERS used to create that concept are held within the layer group.
Concept 1
Concept 2
Concept 3
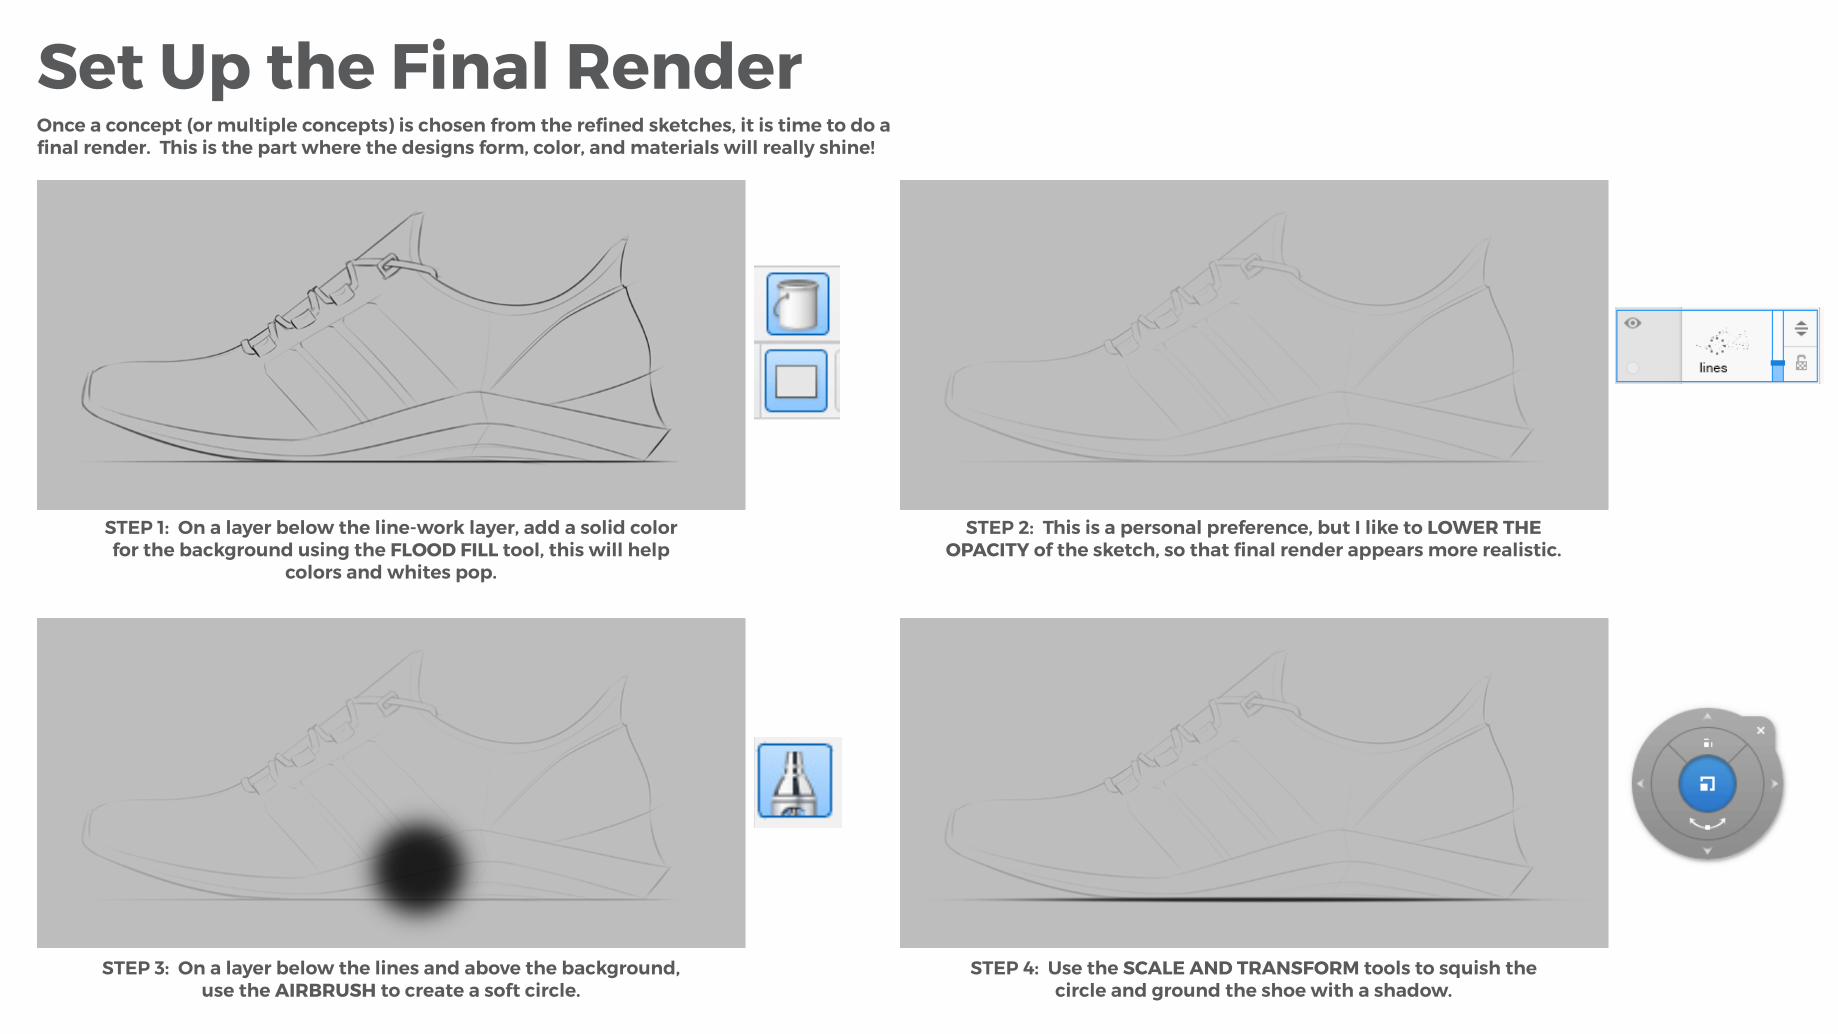
Set Up the Final RenderOnce a concept (or multiple concepts) is chosen from the refined sketches, it is time to do a final render. This is the part where the designs form, color, and materials will really shine!
STEP 1: On a layer below the line-work layer, add a solid color for the background using the FLOOD FILL tool, this will help
colors and whites pop.
STEP 3: On a layer below the lines and above the background, use the AIRBRUSH to create a soft circle.
STEP 2: This is a personal preference, but I like to LOWER THE OPACITY of the sketch, so that final render appears more realistic.
STEP 4: Use the SCALE AND TRANSFORM tools to squish the circle and ground the shoe with a shadow.
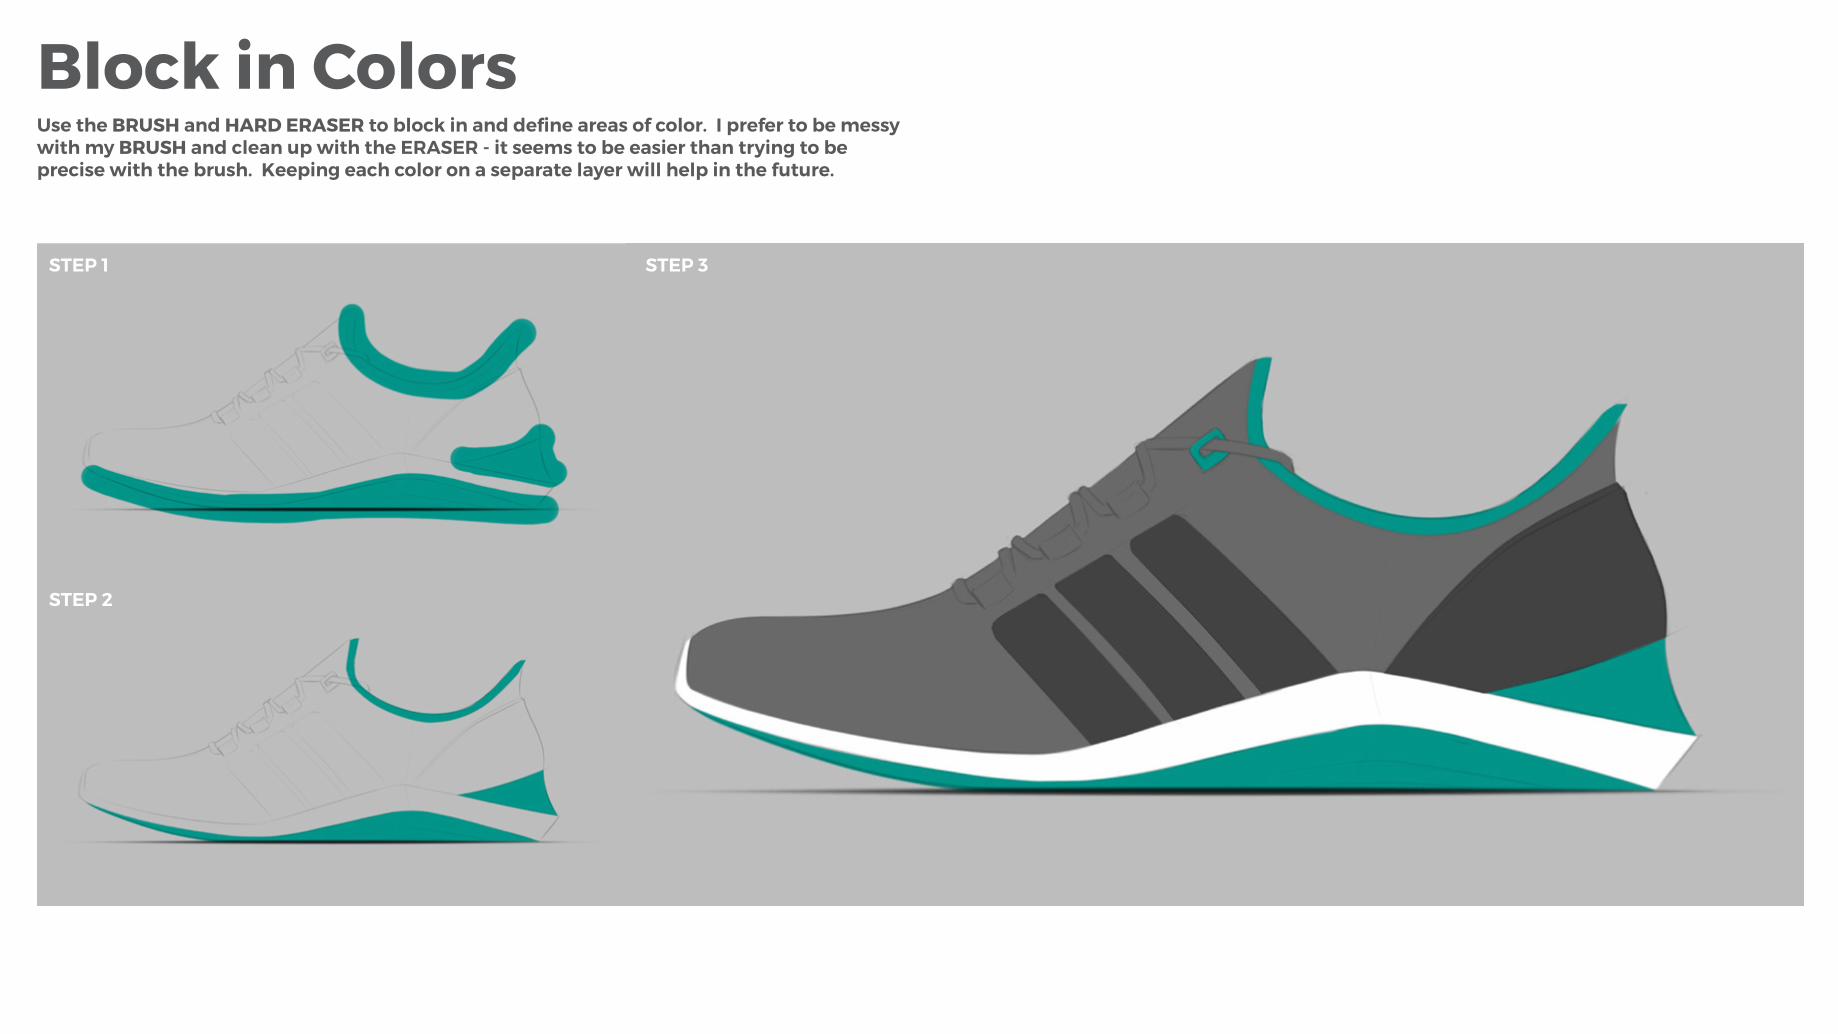
Block in ColorsUse the BRUSH and HARD ERASER to block in and define areas of color. I prefer to be messy with my BRUSH and clean up with the ERASER - it seems to be easier than trying to be precise with the brush. Keeping each color on a separate layer will help in the future.
STEP 1
STEP 2
STEP 3
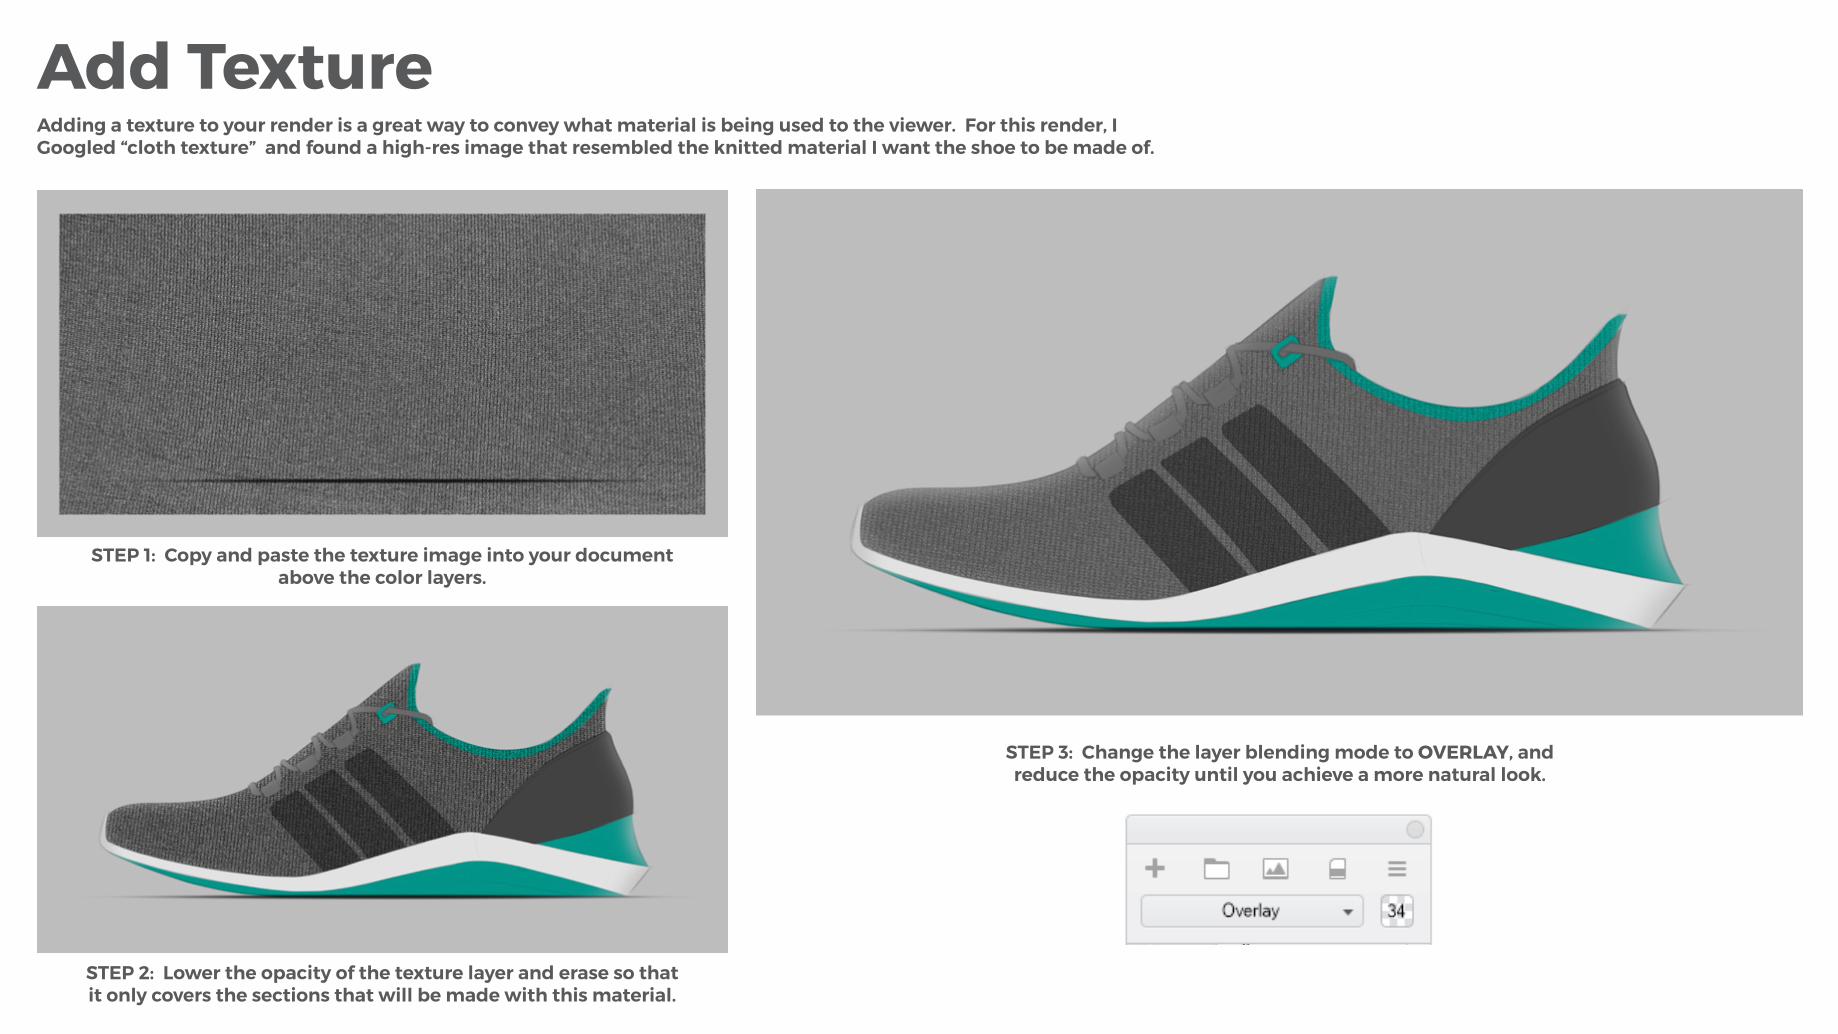
Add TextureAdding a texture to your render is a great way to convey what material is being used to the viewer. For this render, I Googled “cloth texture” and found a high-res image that resembled the knitted material I want the shoe to be made of.
STEP 1: Copy and paste the texture image into your document above the color layers.
STEP 2: Lower the opacity of the texture layer and erase so that it only covers the sections that will be made with this material.
STEP 3: Change the layer blending mode to OVERLAY, and reduce the opacity until you achieve a more natural look.
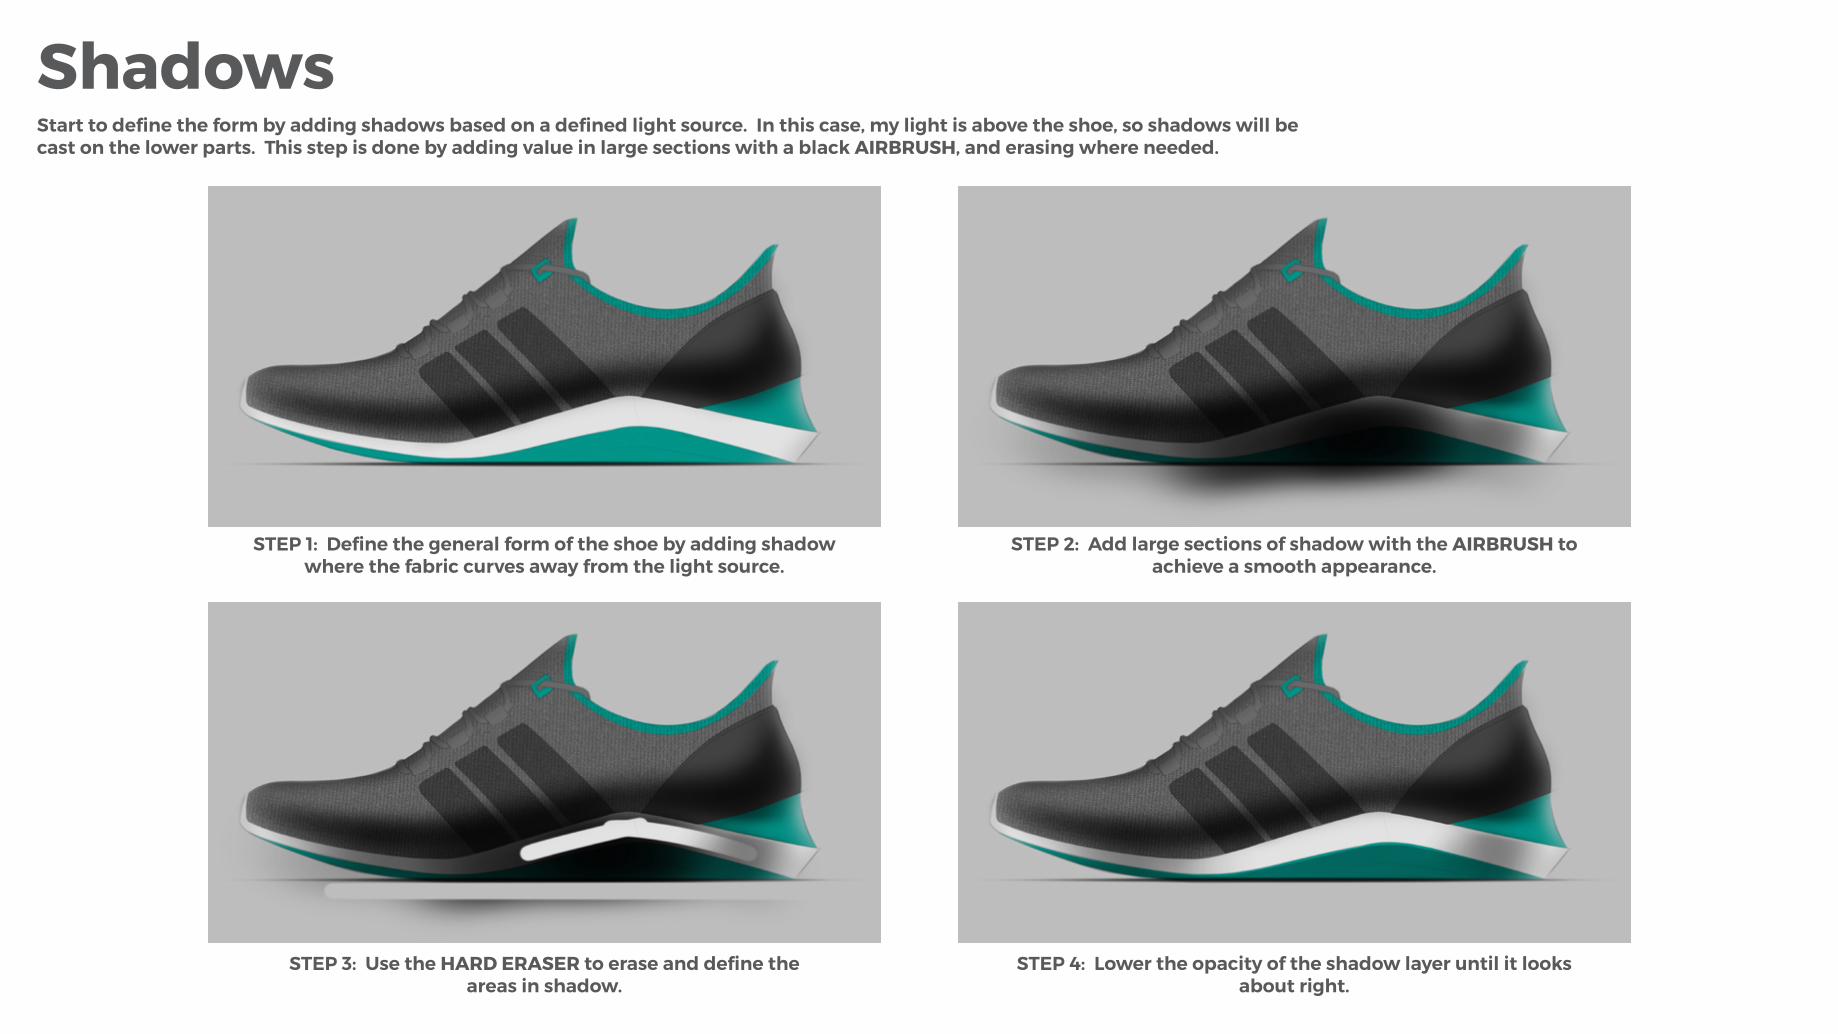
ShadowsStart to define the form by adding shadows based on a defined light source. In this case, my light is above the shoe, so shadows will be cast on the lower parts. This step is done by adding value in large sections with a black AIRBRUSH, and erasing where needed.
STEP 1: Define the general form of the shoe by adding shadow where the fabric curves away from the light source.
STEP 3: Use the HARD ERASER to erase and define the areas in shadow.
STEP 4: Lower the opacity of the shadow layer until it looks about right.
STEP 2: Add large sections of shadow with the AIRBRUSH to achieve a smooth appearance.
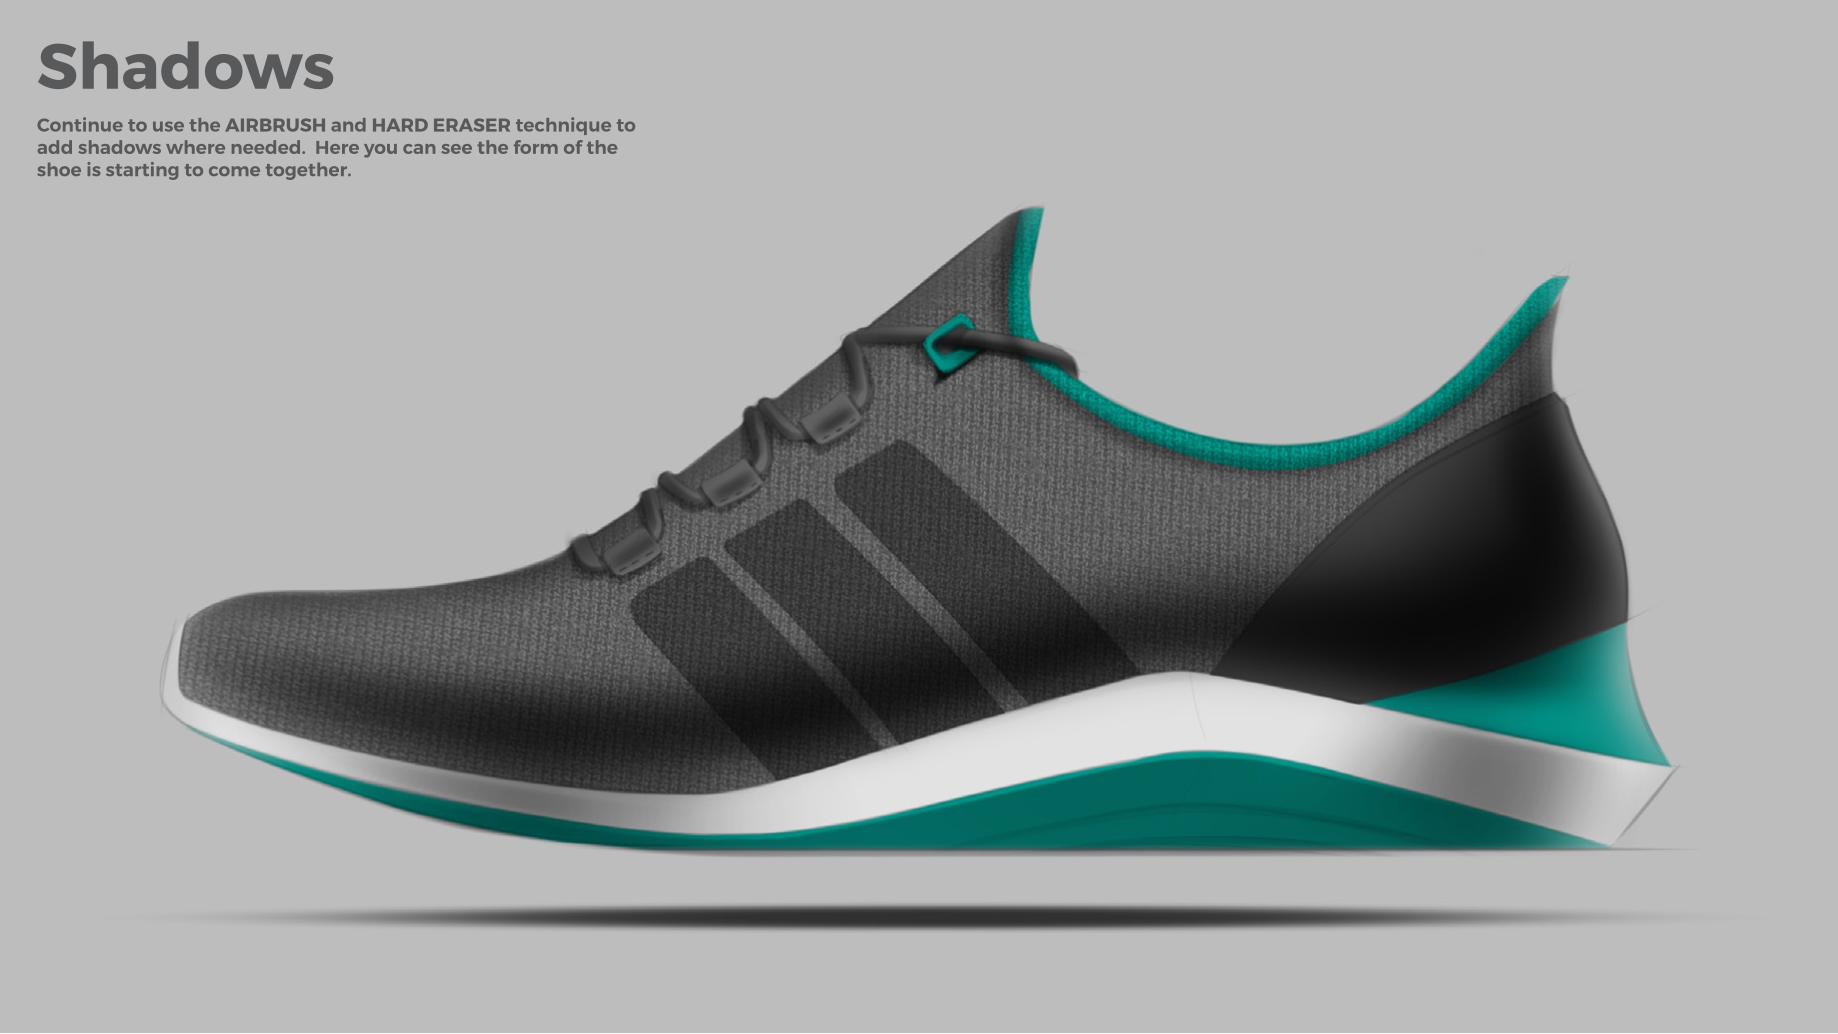
ShadowsContinue to use the AIRBRUSH and HARD ERASER technique to add shadows where needed. Here you can see the form of the shoe is starting to come together.

HighlightsDoing the same as you have done with the shadows, create highlights above the linework layer using a white AIRBRUSH and HARD ERASER. Use the HARD ERASER within the form to create the appearance of glossy materials.
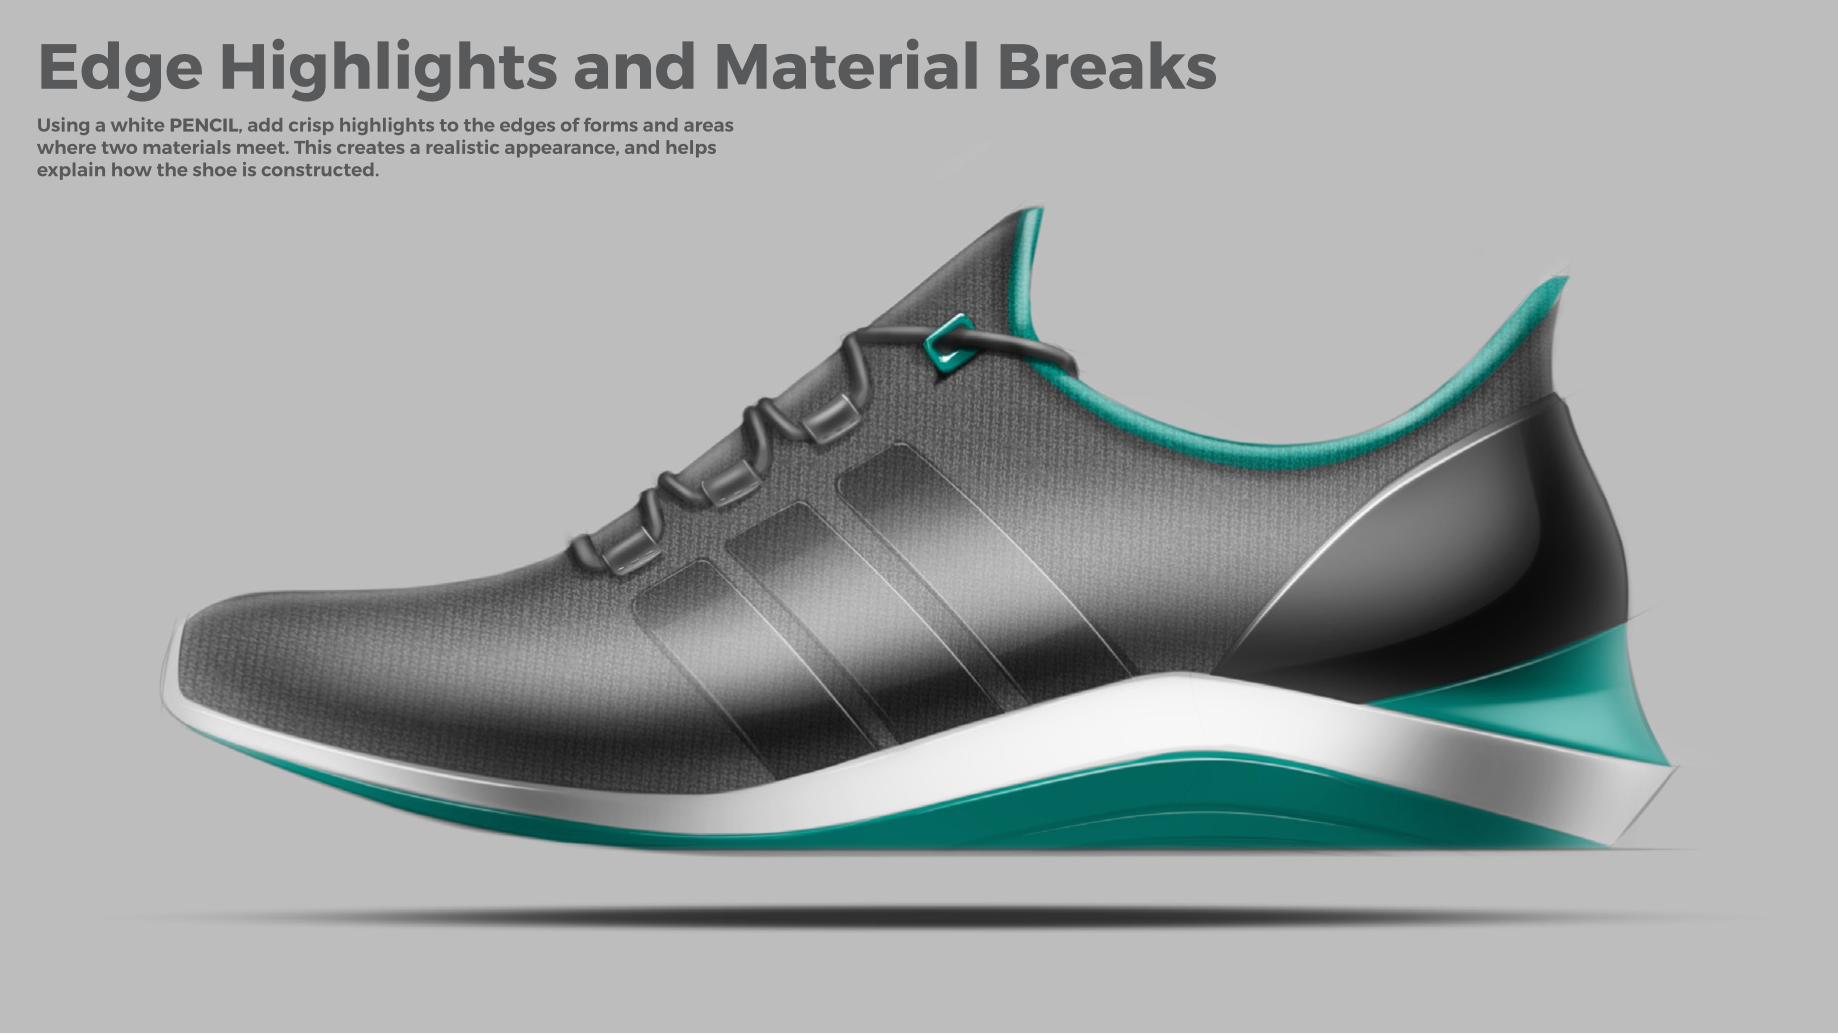
Edge Highlights and Material BreaksUsing a white PENCIL, add crisp highlights to the edges of forms and areas where two materials meet. This creates a realistic appearance, and helps explain how the shoe is constructed.
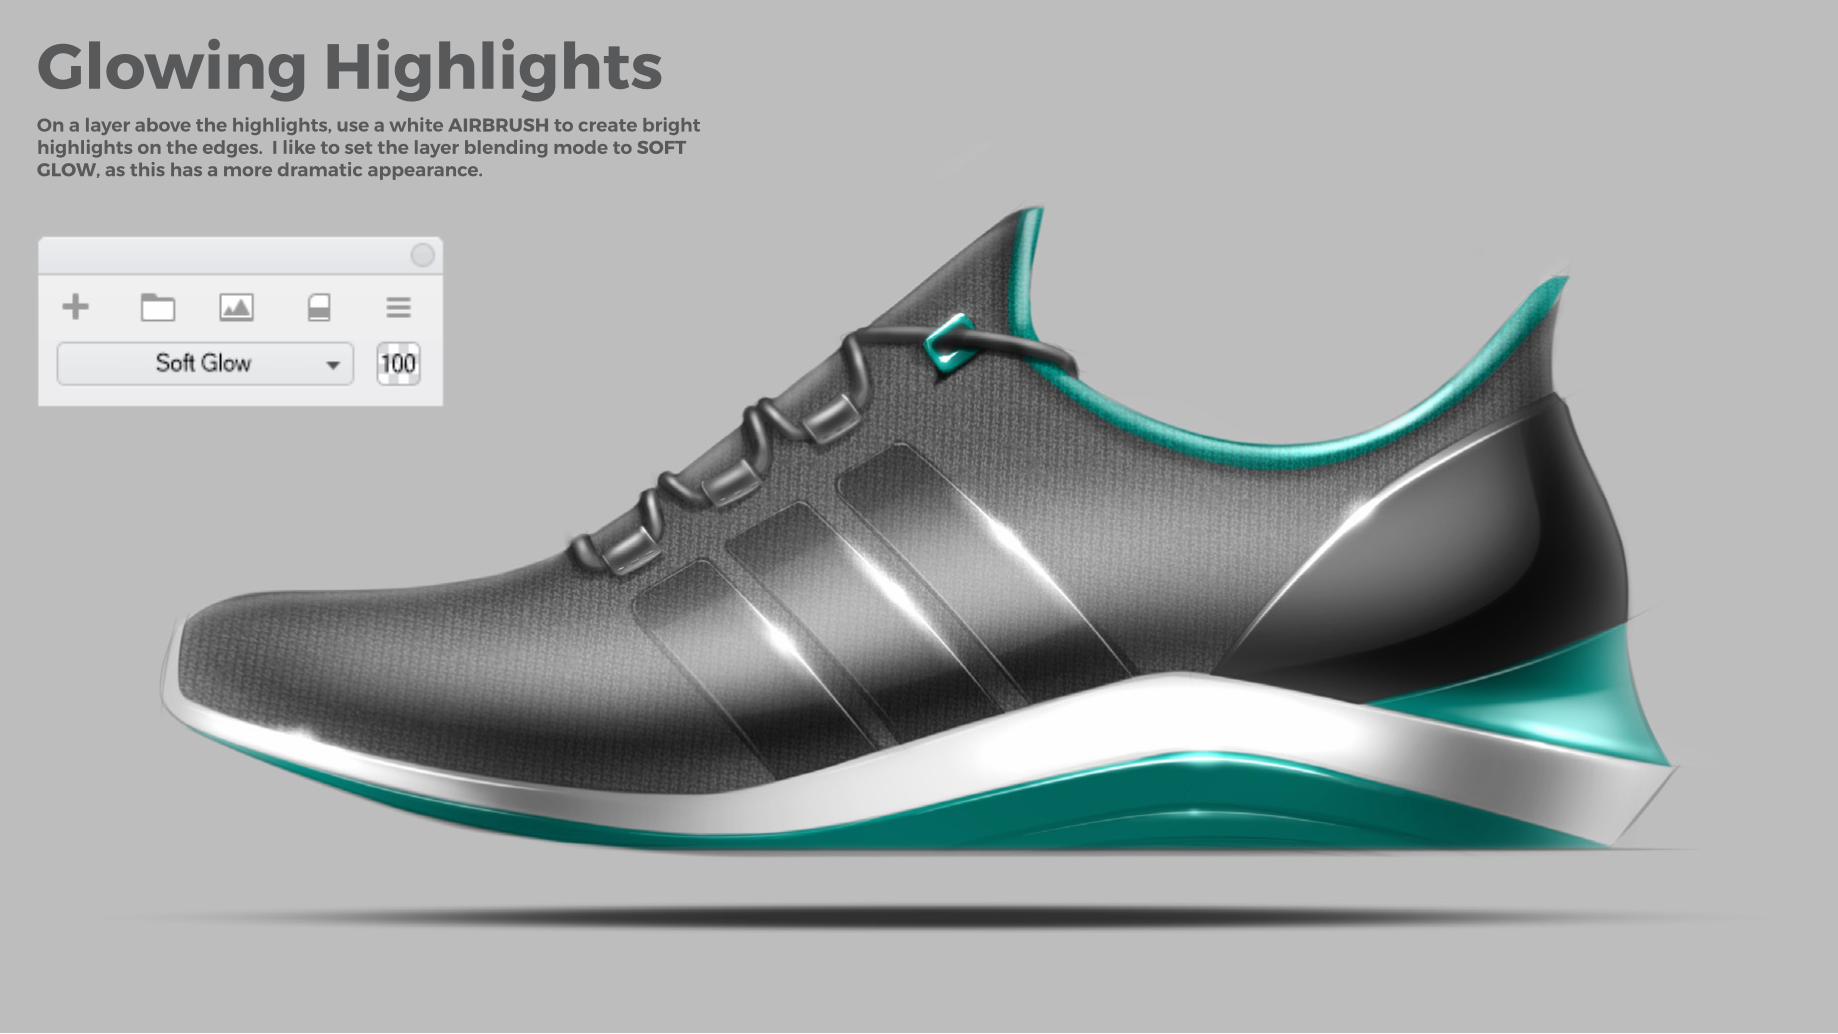
Glowing HighlightsOn a layer above the highlights, use a white AIRBRUSH to create bright highlights on the edges. I like to set the layer blending mode to SOFT GLOW, as this has a more dramatic appearance.
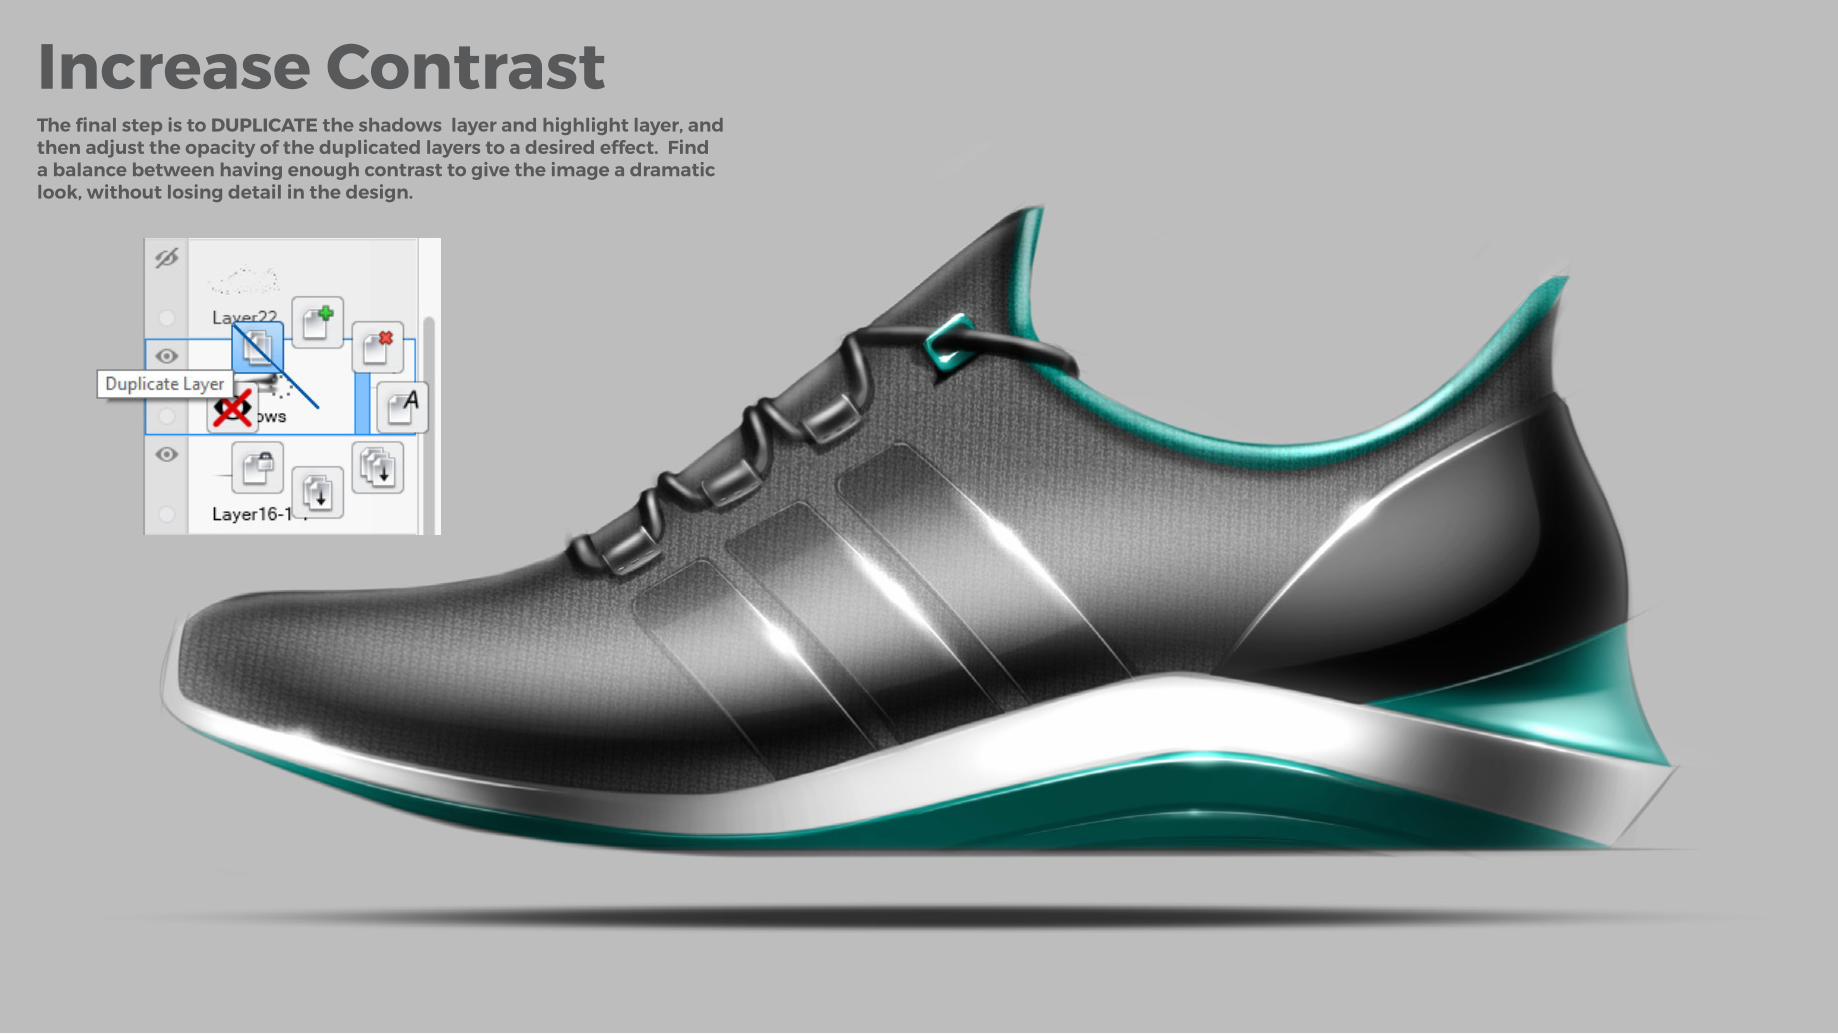
Increase ContrastThe final step is to DUPLICATE the shadows layer and highlight layer, and then adjust the opacity of the duplicated layers to a desired effect. Find a balance between having enough contrast to give the image a dramatic look, without losing detail in the design.
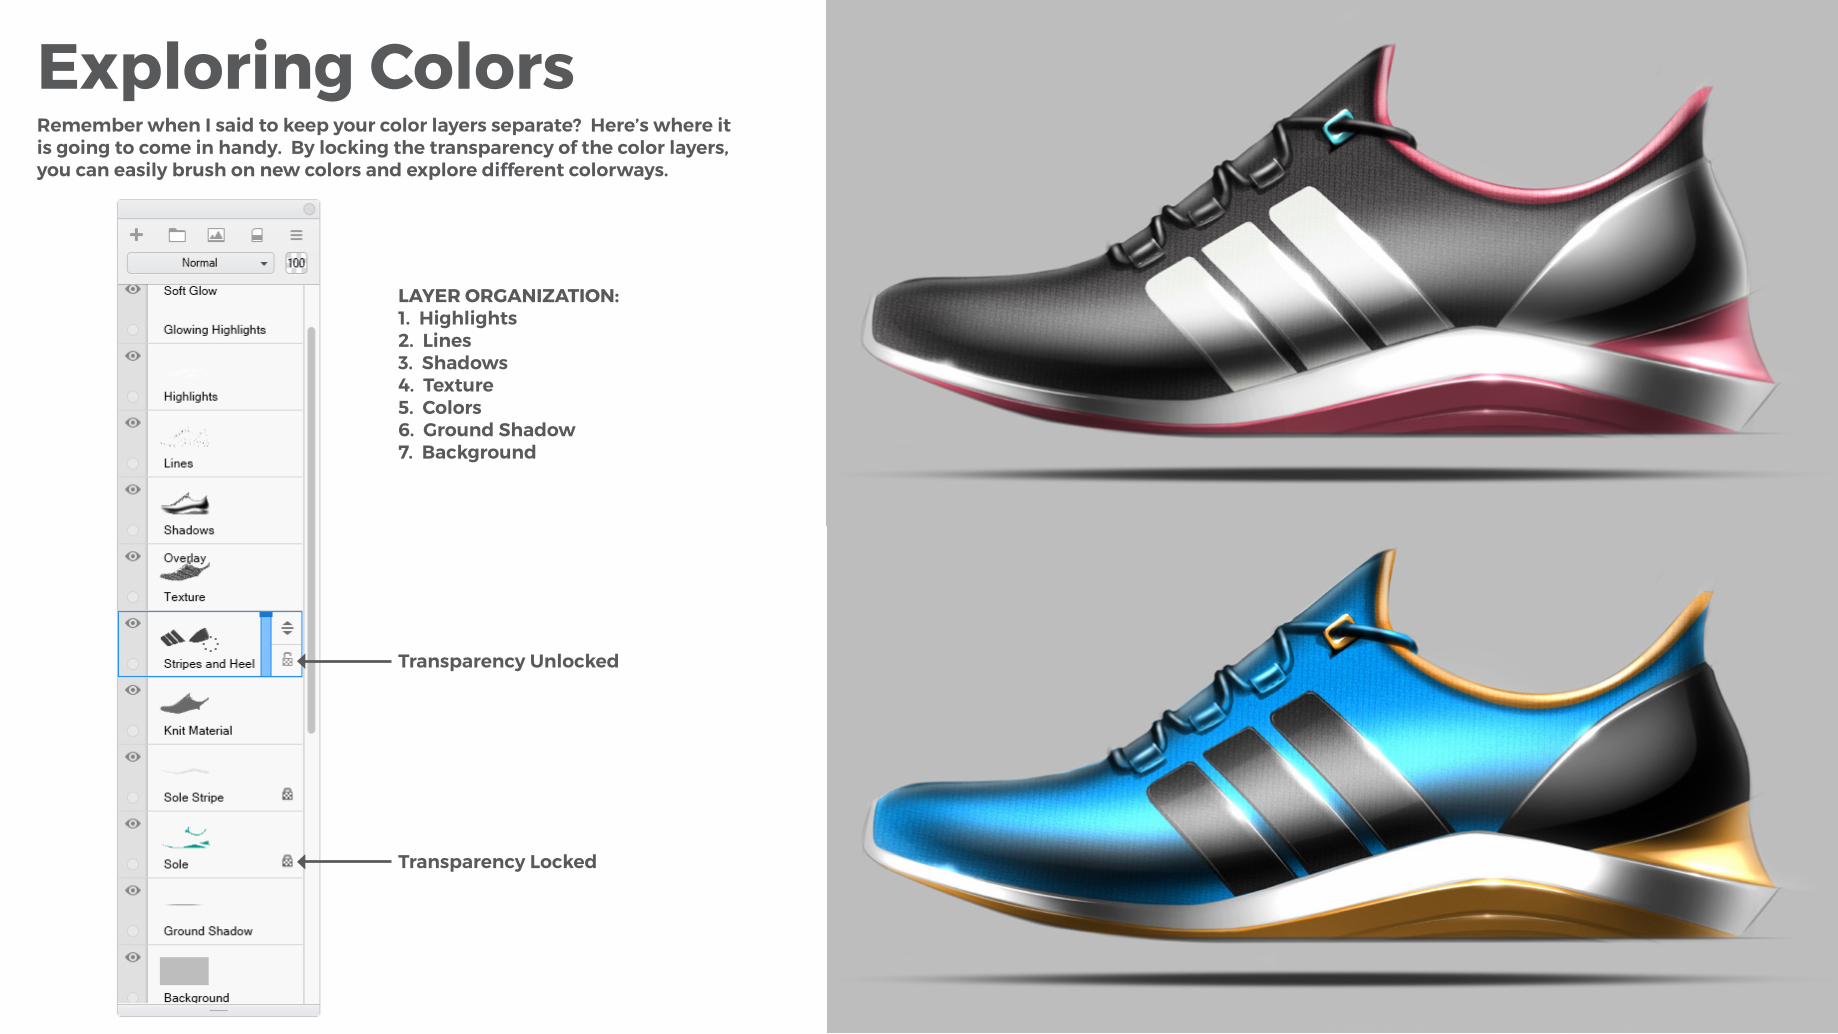
Exploring ColorsRemember when I said to keep your color layers separate? Here’s where it is going to come in handy. By locking the transparency of the color layers, you can easily brush on new colors and explore different colorways.
LAYER ORGANIZATION:1. Highlights2. Lines3. Shadows4. Texture5. Colors6. Ground Shadow7. Background
Transparency Unlocked
Transparency Locked

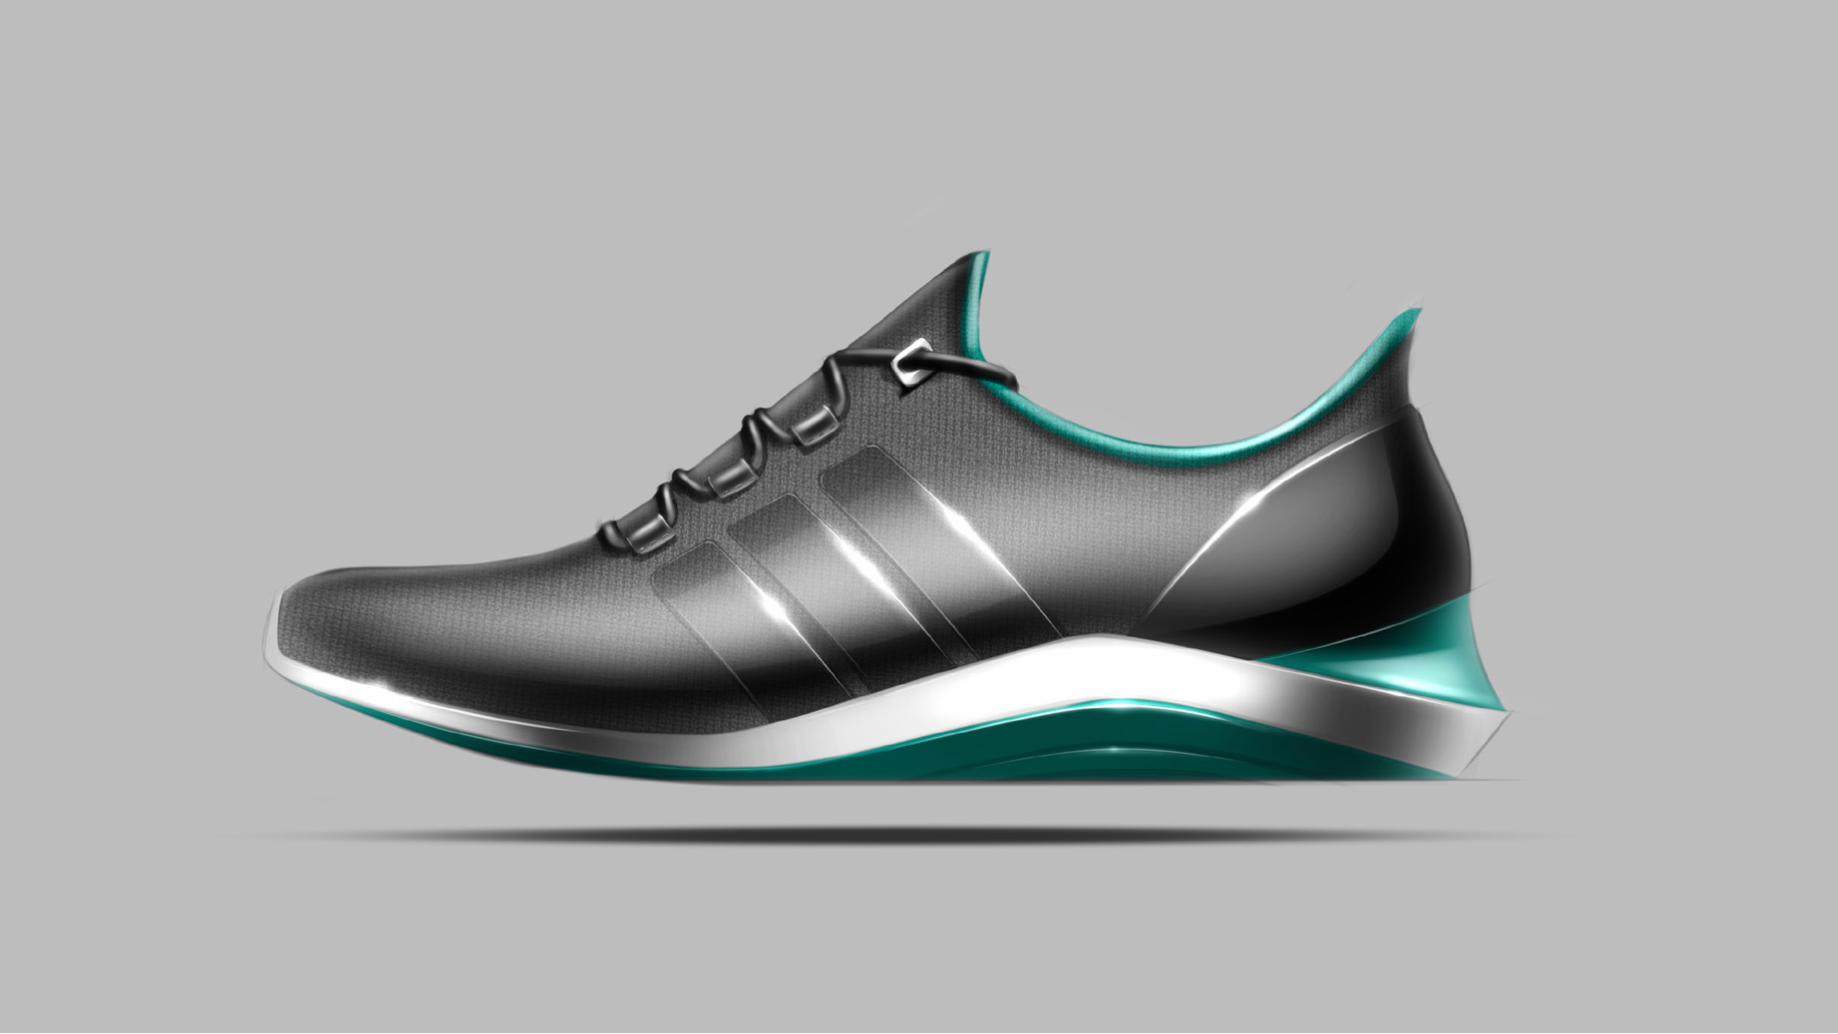
A Quick SummaryNow that we’ve finished the final render, let’s review how we got here!
STEP 1: Quick thumbnail sketch STEP 2: Clean sketch, refining details STEP 3: Realistic render, showing form, color, and materials

Now try it yourself!