Thank you for becoming part of the Reynolds family! - … · Thank you for becoming part of the...
14
Transcript of Thank you for becoming part of the Reynolds family! - … · Thank you for becoming part of the...


ReynoldsCycling.com
Thank you for becoming part of the Reynolds family!
By choosing Reynolds, you have purchased one of the best wheelsets in the world for quality, performance, and overall value. This manual is an essential part of the product, carefully read and follow instructions provided herein. Please keep this manual in a safe place for future reference.
CONTENTS
1. TECHNICAL SPECIFICATIONS | 02
2. TECHNICAL WHEEL SPECIFICATIONS | 03
3. CLINCHER TIRES | 03–04
4. TUBULAR TIRES | 04–07
5. CASSETTE INSTALLATION | 07–08
6. USING THE QUICK RELEASE | 08–09
7. BRAKES | 10
8. PERIODIC WHEEL AND BRAKE PAD MAINTENANCE | 10-11
9. OPERATING PRESSURES | 12
ReynoldsCycling.com 1
MECHANIC QUALIFICATIONPlease be advised that many bicycle service and repair tasks require specialized knowledge, tools and experience. General mechanical aptitude may not be sufficient to properly service or repair your bicycle and/or Reynolds wheels. If you have any doubt regarding your service or repair ability, please take your bicycle to a qualified mechanic or an authorized Reynolds dealer/distributor.
INTENDED USE
• Useofroadwheels: For road racing or general cycling on smooth, dry road surfaces only. Not intended for use on motorized vehicles or for use on vehicles carrying more than one operator/rider.
• Useofmountainwheels: Only use on open, and approved, trails and public lands. Not intended for use on motorized vehicles or for use on vehicles carrying more than one operator/rider. Any such use constitutes misuse which will void the Reynolds warranty and may result in an accident, serious personal injury, death or property damage.
COMPONENT WEAR INSPECTION REQUIREMENTThe longevity of your Reynolds wheels depends on many factors. Factors that will determining their longevity are: rider size and riding style, environmental conditions, tire specifications and air pressure, terrain and geography, cleanliness and maintenance, brake pad composition, and impacts or falls. Improper or harsh use may also compromise the structural integrity and significantly reduce the lifespan of your wheels. Some components of the wheels are subject to wear over time and are not covered under warranty because this is not due to defect. These items not covered under warranty due to normal wear and tear include: bearings, brake pads and rim braking surface. Use only Reynolds recommended brake pads. Perform routine maintenance and cleaning on brake pads and braking surface of rim.
Forcareandusagerecommendations,seeSection8ofthismanualorrefertotheReynoldswebsiteatwww.reynoldscycling.com/maintenance.
Have your wheels regularly inspected by a qualified mechanic for impact and stress marks, cracks, deformations, and signs of fatigue or wear. If the inspection reveals any damage, no matter how slight, immediately replace the component. Components that have experienced excessive wear also need immediate replacement. Frequency of inspection depends on many factors; see Section 8 of this manual for further assistance. Contact your authorized Reynolds dealer/distributor for suggested inspection/maintenance schedule that is best fit for your use, riding style and conditions. If you weigh 82kg/180 lbs or more, you must be especially vigilant and have your bicycle and components inspected more frequently.
Before using Reynolds wheels please recognize that there are risks inherent in bicycle riding. A bicycle component can fail while riding resulting in an accident, injury or possibly death. By your purchase and use of Reynolds wheels you expressly, voluntarily and knowingly accept and assume these risks including, but not limited to: the risk of passive or active negligence of Reynolds or hidden, latent or obvious defect in the product. Furthermore, you agree to hold Reynolds harmless to the fullest extent permitted by law against any resulting damages.
WARNING: Failure to follow any of the instructions in this manual could result in failure of the product, resulting in an accident, personal injury or death.
Ifyouhaveanyquestionspleasecontactanauthorizeddealer/distributororReynoldscustomerserviceat866-798-3040;[email protected].

ReynoldsCycling.com 2
1. TECHNICAL SPECIFICATIONS
PRE-RIDE SAFETY CHECK• Always wear a helmet when riding a bicycle. See the owners manual that came with your bicycle
for additional safety recommendations and mechanical warnings.
• Check to see that all quick release levers, nuts and bolts are properly adjusted. See the “Quick Release” instructions in Section 6 of this manual. While bouncing the bike on the ground, look and listen for anything that may be loose.
• Be sure that your tires are properly inflated to the correct pressure and that there is no damage to the tread or sidewall.
• Be sure that none of the spokes are damaged, loose or missing. Make sure there also is no deformation, cracks or sign of fatigue or stress on the rims.
• Be sure that the wheels are exactly centered in both frame and fork. Spin wheels to be sure that they do not wobble up and down or side to side, and that there is no contact with brake pads during rotation.
• Check your brake pads and cables to be sure that they are in good condition and free of debris.
• Test your brakes prior to your ride to ensure that they are operating properly.
• Check reflectors and lights to ensure that they are clean, straight, securely mounted and operating properly where require by law. Reynolds wheels do not include reflectors. Proper reflectors meeting the Consumer Product Safety Commission (CPSC) regulation should be installed if bicycle will be used on public roads.
• Learn and follow the local bicycle laws and regulations, and obey all traffic signals, signs and laws while you ride.
WARNING: Do not ride your bicycle if it does not pass the pre-ride safety check listed above. Correct any deficient condition(s) before you ride.
GENERAL SAFETY RECOMMENDATIONS
• Always wear a properly fitted and fastened bicycle helmet that has been approved by ANSI or SNELL.
• Be sure that the periodic maintenance is strictly followed (see Section 8 of this manual).
• Always use original Reynolds, or Reynolds-approved replacement parts.
• DONOT make modifications to Reynolds wheels. Modification, improper service, alteration or use of aftermarket parts voids the warranty and could cause wheel malfunction resulting in an accident, injury or death.
• Components that are bent, cracked or otherwise damaged in an accident or as a result of impact must not be straightened. They must be replaced immediately with original Reynolds parts.
• Wear clothing that will make you visible to traffic such as neon, fluorescent or other bright colors.
• Avoid bicycle riding at night. It’s harder to see obstructions on the ground as well as be seen by traffic once it becomes dusk. If you do ride at night, you should equip your bicycle with headlights, taillights and reflectors, as required by law.
• When riding in wet conditions, the stopping power of your brakes is greatly reduced and the adherence your tires have to the ground is considerably reduced. Your braking power may also vary sharply, due to the progressive drying of the braking surface during brake use. This will make it harder to predict performance and control of your bicycle, making it harder to stop. When riding your bicycle in wet conditions, use extra caution to avoid an accident.
• Please get in touch with your local dealer/distributor, or contact Reynolds directly with any questions, comments or concerns.
ReynoldsCycling.com 3
2. TECHNICAL WHEEL SPECIFICATIONS
WHEEL SPECIFICATIONS• E.T.R.T.O. (European Tire and Rim Technical Organization) WHEEL RIM DIAMETER INFORMATION
— 700c Carbon road tubular 633 x 20.5c — 700c Carbon road clincher 622 x 15c — 700c Alloy road clincher 622 x 15c — Mountain tubular 571 x 25 — Mountain clincher 559 x 17c
• Inflation pressures: See “Operating Pressures” Table in Section 9 of this manual
• Hub Specifications/Axle spacing — Front axle = 100mm +/- 0.5mm — Road cassette = 130mm +/- 0.5mm — Mountain cassette = 135mm +/- 0.5mm — Track rear axle = 120mm +/- 0.5mm
3. CLINCHER TIRES
WARNING: CLINCHER RIM/TIRE COMPATIBILITY All Reynolds rims are built in strict accordance with E.T.R.T.O. specifications, and are very dimensionally precise. If a clincher tire is too easy to install on a Reynolds rim, that tire is probably too big and will not seat properly on the rim, which constitutes a significant safety concern. Use only high quality clincher tires that require use of tire levers and reasonable installation effort. Using a tire that fits loosely on the rim can cause unexpected tire failure resulting in an accident, injury or death.
• The clincher wheel you have purchased is designed to use clincher tires only.
• Before installing the tires, cover the exposed spoke holes in the tire bed using Reynolds supplied rim strips.
• Ensure that the tire and wheel are compatible in accordance with E.T.R.T.O. standards before installing the wheel. Check that the diameter indicated on the tire is 622 and that the cross section is between 23mm and 25mm, mountain tire diameter indicated should be 559 and the cross section is between 32mm and 60mm (1.25˝–2.35˝).
• Use inner tubes with a long valve stem (at least 43mm), or Reynolds supplied valve extenders.
WARNING: Failure to properly install the tire can cause sudden and unexpected loss of tire pressure, resulting in an accident, injury or death.
INSTALLING CLINCHER TIRESBe sure that you do not damage, scratch, crush or otherwise distort any portion of the rim when installing the tire. Use only plastic or nylon tire levers when installing.
• Before installing tires onto new Reynolds wheels, take note of the serial numbers located in the tire bed opposite the valve stem hole. These serial numbers are required to register your Reynolds Cycling warranty or RAP.
• Confirm installation of Reynolds supplied rim strip onto tire bed.
• Install one side of the clincher tire into the tire seat provided on the rim (Fig.1).
• Slightly inflate the inner tube to facilitate assembly.
• Toinflatethetire: remove the valve cap, unscrew the presta-valve and inflate tire using a compressor or pump with a pressure gauge to obtain the required pressure. Tighten the valve and replace the cap.
• Insert the valve stem through the hole in the rim, and position the remainder of the partially inflated inner tube inside of the tire, between the tire and rim seat (tire bed).
• Install the second side of the tire into the rim seat.

ReynoldsCycling.com 4
• To properly set the tube and tire onto the rim, inflate the inner tube to between 2-3 atmospheres. Next, manually set the tube and tire on the rim, ensuring that the tire bead is evenly positioned around the outside circumference of the rim. Make sure that the tube is correctly positioned within the tire and that the tire is correctly positioned onto the rim. Lastly, inflate the tube fully to the correct pressure. Please inflate the tube slowly, making sure that you maintain the correct positioning of the valve stem, tube and tire on the rim.
• Todeflatethetire: remove the valve cap, unscrew the presta-valve, press and hold down the valve core to obtain required pressure. Tighten the presta-valve and replace the cap.
WARNING: Check that the clincher rim shows no sign of significant wear, contamination, damage or deformation along the sidewall or brake track. This could cause the rim to unexpectedly break resulting in an accident, injury, or death.
WARNING: Never exceed the maximum inflation pressure recommended by the tire manufacturer for the cross section of the clincher tire that you are using. See the “Opearting Pressures” table in Section 9 of this manual. Excess tire pressure reduces the tire’s grip on the road and increases the risk of the tire unexpectedly bursting. Inflation pressure that is too low reduces tire performance and increases the probability of sudden and unexpected loss of tire pressure. In addition, premature wear and damage to the rim may occur. Incorrect tire pressure could cause tire failure or loss of control of the bicycle resulting in an accident, injury or death.
WARNING: Replace the wheel when the distance between the shoulders/hook beads of a road rim is greater than 15mm mountain rim greater than 17mm (Fig. 2). A deformed rim may cause the clincher to suddenly fail resulting in an accident, personal injury or death.
4. TUBULAR TIRES
WARNING: TUBULAR RIM/TUBULAR TIRE COMPATIBILITYAll Reynolds rims are built in strict accordance with E.T.R.T.O. specifications, and are very dimensionally precise. Use only high quality tubular tires, tubular tire glue and follow manufacturer’s recommended installation procedure. Take your time and use extra care to ensure correct installation of the tire and glue onto the rim. Tires that lack sufficient glue bond, fit loosely on the rims, have defective base tape, are improperly installed or ridden before glue has sufficiently dried, can cause unexpected tire failure or separation from wheel resulting in an accident, injury or death.
• Before gluing and mounting tires to your new Reynolds wheels, take note of the serial numbers located in the tire bed opposite the valve stem hole. These serial numbers are required to register your Reynolds Cycling warranty.
• The tubular wheel you have purchased is designed to use 28˝ X 22mm diameter tubular tires.
• Before fitting the tires, check that the diameter indicated on the tire is 633/28˝ and that the cross section is approximately 22mm to ensure that the tire and wheel are compatible in accordance with

ReynoldsCycling.com 5
E.T.R.T.O. standards. Before installing tubular tires, carefully read and fully understand tire gluing instructions provided in this manual.
• Use tubular tires with a long valve stem (at least 43mm) or Reynolds valve extenders.
WARNING: TUBULAR TIRE INSTALLATIONFailure to properly install tubular tires can cause sudden and unexpected loss of tire pressure or separation of the tubular tire from the wheel resulting in an accident, injury or death.
• Gluing tubular tires is multi-day procedure requiring specific mechanical skills and an attention to detail. Closely follow the instructions provided in this manual for gluing tubular tires to your Reynolds wheels. Follow tire manufacturer’s instructions to prepare tire prior to gluing.
• Carefully follow the steps in specific order to properly glue tires.
Ifyouhavecomments,questionsorconcernsaboutyourabilitytoproperlyandsafelygluetubulartirestoyourwheelset,pleasecontactyourauthorizeddealer/distributororReynoldsdirectlyforassistanceat866-798-3040oremailinfo@reynoldscycling.com.
REQUIRED TOOLS• Truing or similar stand to hold wheel during glue application. Use rags to protect stand from
glue drips
• Acid brush or similar
• Acetone and clean cotton rags (it is safe to use acetone on Reynolds carbon rims)
• Floor pump
• Latex gloves
• 120 grit sandpaper or emery cloth
• Tubular glue/rim cement. We recommend using Vittoria, Continental, or Challenge tubular cement.
Carefully read the instructions on the label for drying times and other useful tips.
PREPARATION• Begin the day before you plan to use your wheels for the first time (24 HOURS). Place your new
tubular tires on the set of corresponding tubular wheels.
• Inflate the tires to within 10-20 psi of their max pressure. This will help stretch the tire, making it easier to install once glue has been applied.
• To inflate the tire: remove the valve cap, unscrew the presta-valve and inflate the tire using a compressor or pump with a pressure gauge to obtain the required pressure, tighten the presta-valve and replace the cap.
• After stretching the tires for a day you are ready to begin gluing. Be sure to have all of your tools set out and easy to access. Work in a well ventilated area. Keep glue, acetone and sharp objects out of the reach of small children.
• Remove the tires from the rims and place them aside. It is recommended that you wear latex gloves during the gluing process.
• Abrade the tubular tire bed using 120 grit sandpaper/emery cloth; starting at the valve hole, sand around the circumference of the rim. Lightly sand the entire tire bed. This procedure creates a tactile surface for glue adhesion and aids in removing any mold release left on the carbon rim during production or contamination from handling.
• Apply a light amount of acetone to a clean cotton rag. Starting again at the valve hole, wipe the entire rim’s tire bed until no carbon residue is visible on the cloth.

ReynoldsCycling.com 6
GLUING RIMS AND TIRES• Prior to installing tubular tires onto wheels, you will apply two thin coats of glue to both the rims
and tires.
• Place the front wheel in the truing stand. Begin at the valve hole by applying a small amount of glue from the brush onto the rim’s tire bed. Brush the glue until complete coverage is achieved across the width of tire bed. Continue around the circumference of the wheel applying a thin layer of glue (Fig. 7).
• Allow glue to dry. Repeat this gluing step on the front wheel a total of two times; applying thin layers of glue with complete coverage across tire bed surface. Follow same gluing steps for the rear wheel. Set both wheels aside to allow glue to completely dry and move to gluing the tires.
• Inflate tire until inverted; the base tape will roll over to the outside, becoming exposed and facilitating gluing.
• Starting at the valve stem and working 360 degrees around the tire, apply a thin layer of glue to the base tape until complete surface coverage is achieved—similar to the technique used to apply glue to the rims.
• Allow first layer of glue to dry and repeat, adding a second layer to the base tape. Repeat gluing process on the other tire.
• Do not start mounting new tires until the glue has fully dried. See glue manufacturer’s suggested drying times, which usually ranges from a few hours or overnight.
INSTALLING TUBULAR TIRES• Apply one final layer of glue to the rim’s tire bed surface on both front and rear wheels.
This final layer of glue will facilitate tire installation and “true up” of tire to the wheel.
• Place the front wheel at your feet on a clean, dry surface (like a linoleum floor). With the valve-hole facing up, use the same technique used during the preparation process, referring to the illustration (Fig 8). Deflate the tire and slip the valve into the rim. Grab the outside of the tire to the right and left of the valve hole and slide the tire onto the rim bed in a smooth, downward motion, stretching the tire as you go (Fig. 9). Continue working the tire onto the wheel in the slowly downward direction until there are only a few inches of tire remaining unseated. Pick up the wheel up and work the remaining tire onto the rim using your thumbs (Fig. 10).
• Now it’s time to center the tire on the wheel, you must work fast to avoid the glue drying too quickly. Place the wheel in a truing stand and rotate slowly. While the wheel rotates, inspect the base tape on the side of the tire near the outer diameter of the rim. The amount of base tape exposed at the outer edge of the rim should be equal on both sides of the tire. True up the tire by twisting it side-to-side on the rim. Check that the valve stem is centered and straight in the valve hole.
• Inflate the tire close to its recommended pressure. Check the base tape again to make sure it is centered and equal in height on both sides of the tire. Also check the tire’s “true” by inspecting the center of the tread pattern for smooth and symmetrical appearance as the tire rotates.
• Check to make sure that there are no glue deposits on the braking surface or sidewall of wheel. Use acetone and a clean rag to remove residual glue.
• Set the freshly glued wheel aside for roughly 24 hours to fully cure.
• Repeat this final step in its entirety on the rear wheel and tire.

ReynoldsCycling.com 7
BEFORE YOU RIDE• Wait 24 hours before riding freshly glued tubular tires.
• With tires inflated, inspect both front and rear wheels for safe glue bond and proper tire adhesion. Take the front wheel in both hands. Applying pressure sideways to the tire with both thumbs, try to roll the tire off the rim using a moderate amount of force. Continue testing adhesion around the circumference of the wheel. Repeat process on rear wheel. If tires hold securely to wheels, verify tire pressure, install onto bicycle and ride safely.
• If tire adhesion is insufficient, do not ride. Repeat gluing process from beginning or contact your mechanic, authorized dealer/distributor or Reynolds directly for direction and recommendations.
• Be sure that you do not damage, scratch, crush or otherwise distort any portion of the rim when installing the tire.
WARNING: Check that the side of the tubular rim shows no sign of significant wear, contamination, damage or deformation on the sidewall or brake track. This could cause the rim to unexpectedly break resulting in an accident, injury or death.
WARNING: Never exceed the maximum inflation pressure recommended by the tire manufacturer for the cross section of the clincher tire that you are using. See the “Opearting Pressures” table in Section 9 of this manual. Excess tire pressure reduces the tire’s grip on the road and increases the risk of the tire unexpectedly bursting. Inflation pressure that is too low reduces tire performance and increases the probability of sudden and unexpected loss of tire pressure. In addition, premature wear and damage to the rim may occur. Incorrect tire pressure could cause tire failure or loss of control of the bicycle resulting in an accident, injury or death.
5. CASSETTE INSTALLATION
WARNING: Always wear protective gloves and glasses when working on cassette and cogs. Always tighten cassette lock ring to manufacturer’s recommended specification.
• Shimano 10 speed cassette systems require a single 1mm spacer installed behind the largest cassette cog on all Shimano 9/10 speed hubs (Fig. 3).
• Install individual or preassembled spacers and cassette cogs onto cassette body of the hub by aligning the spline patterns.
—InstallationofSRAM/Shimanocassette: locate the widest spline on cassette cog and match it with the widest groove on the cassette body. The profile of the cassette body ensures automatic cassette cog alignment since there is only one installation option (Fig. 4).
—InstallationofCampagnolocassette: locate the narrowest spline on cassette cog and match it with the narrowest groove on the cassette body. The profile of the cassette body ensures automatic cassette cog alignment since there is only one installation option (Fig. 5).
• Apply grease/lubricant to lock ring threads located inside outer edge of cassette body.
ReynoldsCycling.com 8
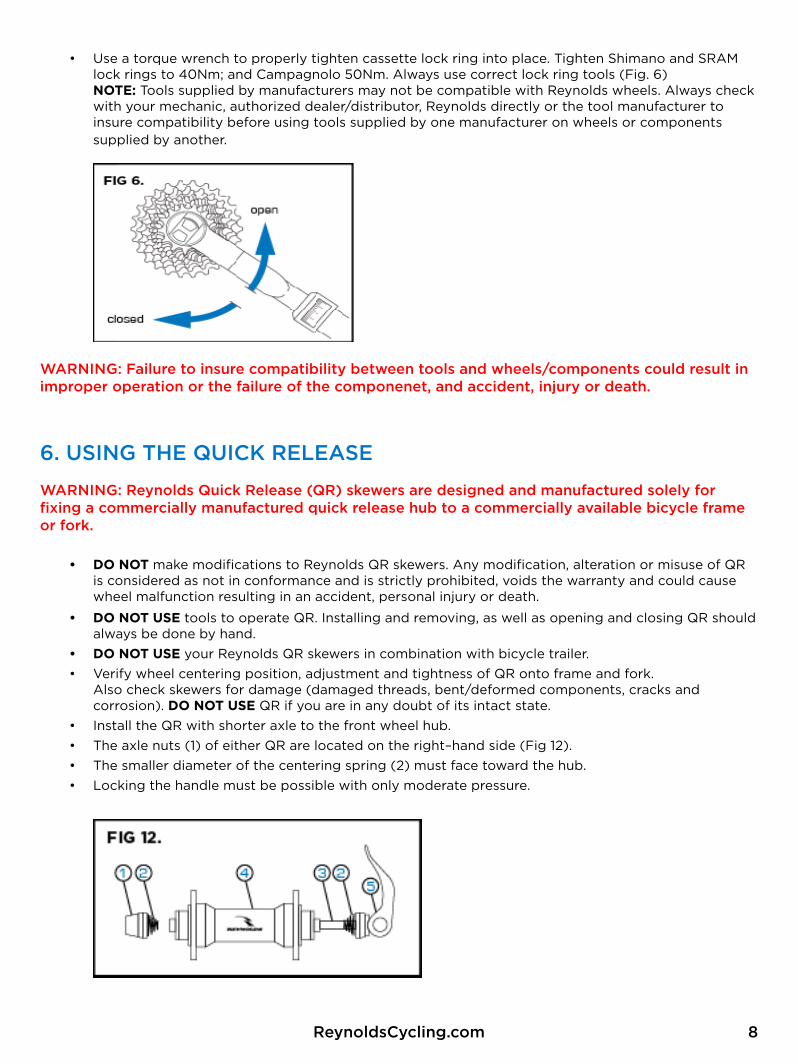
• Use a torque wrench to properly tighten cassette lock ring into place. Tighten Shimano and SRAM lock rings to 40Nm; and Campagnolo 50Nm. Always use correct lock ring tools (Fig. 6) NOTE: Tools supplied by manufacturers may not be compatible with Reynolds wheels. Always check with your mechanic, authorized dealer/distributor, Reynolds directly or the tool manufacturer to insure compatibility before using tools supplied by one manufacturer on wheels or components supplied by another.
WARNING: Failure to insure compatibility between tools and wheels/components could result in improper operation or the failure of the componenet, and accident, injury or death.
6. USING THE QUICK RELEASE
WARNING: Reynolds Quick Release (QR) skewers are designed and manufactured solely for fixing a commercially manufactured quick release hub to a commercially available bicycle frame or fork.
• DONOT make modifications to Reynolds QR skewers. Any modification, alteration or misuse of QR is considered as not in conformance and is strictly prohibited, voids the warranty and could cause wheel malfunction resulting in an accident, personal injury or death.
• DONOTUSE tools to operate QR. Installing and removing, as well as opening and closing QR should always be done by hand.
• DONOTUSE your Reynolds QR skewers in combination with bicycle trailer.
• Verify wheel centering position, adjustment and tightness of QR onto frame and fork. Also check skewers for damage (damaged threads, bent/deformed components, cracks and corrosion). DONOTUSE QR if you are in any doubt of its intact state.
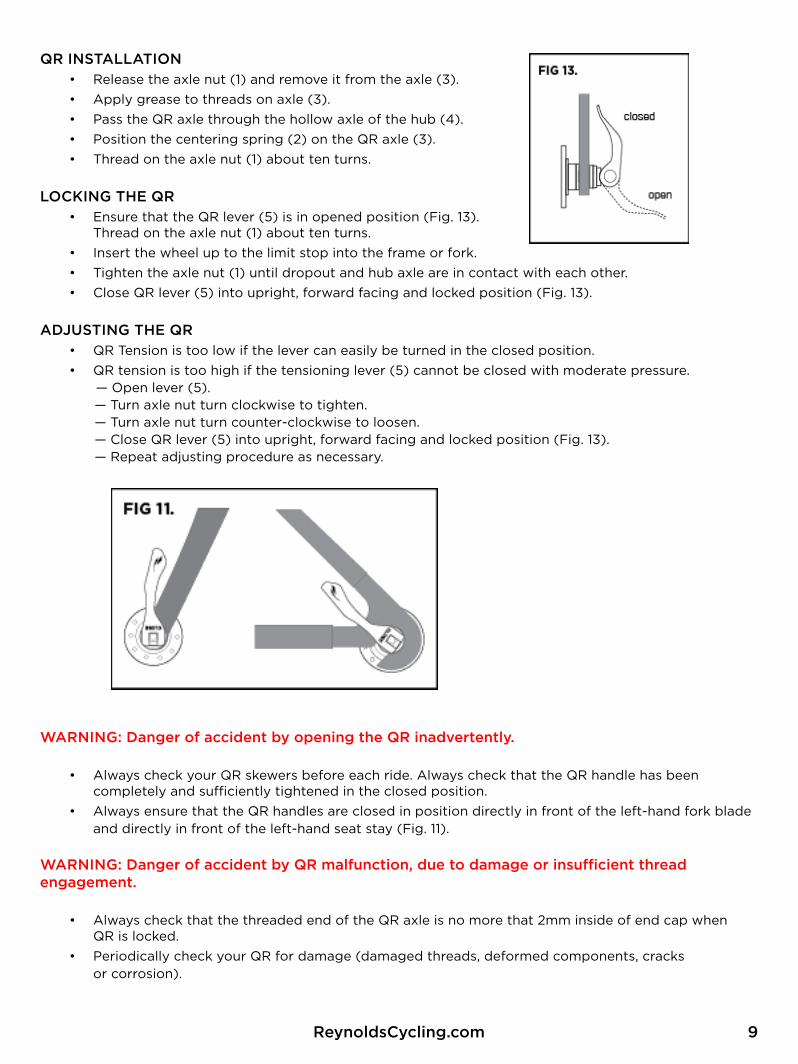
• Install the QR with shorter axle to the front wheel hub.
• The axle nuts (1) of either QR are located on the right–hand side (Fig 12).
• The smaller diameter of the centering spring (2) must face toward the hub.
• Locking the handle must be possible with only moderate pressure.
ReynoldsCycling.com 9
QR INSTALLATION• Release the axle nut (1) and remove it from the axle (3).
• Apply grease to threads on axle (3).
• Pass the QR axle through the hollow axle of the hub (4).
• Position the centering spring (2) on the QR axle (3).
• Thread on the axle nut (1) about ten turns.
LOCKING THE QR• Ensure that the QR lever (5) is in opened position (Fig. 13).
Thread on the axle nut (1) about ten turns.
• Insert the wheel up to the limit stop into the frame or fork.
• Tighten the axle nut (1) until dropout and hub axle are in contact with each other.
• Close QR lever (5) into upright, forward facing and locked position (Fig. 13).
ADJUSTING THE QR• QR Tension is too low if the lever can easily be turned in the closed position.
• QR tension is too high if the tensioning lever (5) cannot be closed with moderate pressure. — Open lever (5). — Turn axle nut turn clockwise to tighten. — Turn axle nut turn counter-clockwise to loosen. — Close QR lever (5) into upright, forward facing and locked position (Fig. 13). — Repeat adjusting procedure as necessary.
WARNING: Danger of accident by opening the QR inadvertently.
• Always check your QR skewers before each ride. Always check that the QR handle has been completely and sufficiently tightened in the closed position.
• Always ensure that the QR handles are closed in position directly in front of the left-hand fork blade and directly in front of the left-hand seat stay (Fig. 11).
WARNING: Danger of accident by QR malfunction, due to damage or insufficient thread engagement.
• Always check that the threaded end of the QR axle is no more that 2mm inside of end cap when QR is locked.
• Periodically check your QR for damage (damaged threads, deformed components, cracks or corrosion).

ReynoldsCycling.com 10
7. BRAKES
WARNING: Failure to use recommended brake pads will void the warranty on your carbon wheels, and may also cause wheel component failure, resulting in an accident, injury or death.
• DONOTUSECORKBRAKEPADS on Reynolds carbon wheels. This will void your warranty. Use only Reynolds supplied or recommended brake pads on your carbon wheels for best performance. Reynolds brake pads are less subject to overheating and dissipate heat better that stock brake pads.
• CAUTION: Using the same set of brake pads for both carbon and alloy wheels will increase the opportunity for excess wear, rim damage and heat deformation on the carbon wheel.
Please consult the instruction sheet supplied by manufacturer.
8. PERIODIC WHEEL AND BRAKE PAD MAINTENANCE
After using the wheelset for the first time, check each wheel for trueness and circularity.
MAINTENANCE AND WHEEL CLEANINGYour Reynolds carbon wheels possess some of the best components and materials available in the cycling industry. Your rims have a specially engineered composite layer at the brake track area to help dissipate heat, increase durability and extent longevity. For best results, keep brake pads and rims clean from debris and glazing on a regular basis.
• Debris can come from many sources. It is commonly generated any time you apply brake pads to the rim, whether you are riding aluminum or carbon wheels. Both surfaces naturally wear on each other and remove minute amounts of surface material at the point of contact. Debris is also picked up from the road and environment as you ride. It is not uncommon to see small stones, metal or other road debris embedded in bicycle brake pads. Wet and adverse climate riding conditions also increase debris build-up on pads, contaminant build-up on the rim surface and increased abrasion between pads and rims.
• Brake pad glazing most often occurs from overheating the brake pad and rim surfaces. Carbon and aluminum rims react differently to heat. Carbon rims tend to build up heat more rapidly under hard and prolonged braking conditions. Brake pads may glaze-over or surface-harden easily, especially if you are new to riding carbon wheels and in hilly or mountainous areas. Riding and braking style is also a contributor to pad glazing. For most riders, a simple change to their frequency and force of braking may reduce brake pad glazing and heat build-up. The biggest difference in riding wheels with aluminum or carbon braking surfaces is the impact of prolonged braking on rim longevity. Try not to “drag” or “grab a handful of brakes” when slowing your bike with carbon wheels—especially on long descents.
• Use your brakes with lighter modulation. Try to “feather” the brakes rather than to “ride or drag” the brakes continuously against the rim. More frequent, short, quick, light applications of your brakes will offer the best results while still providing adequate stopping power; much like an ABS system does for your car. Prolonged application of the rear brake combined with shorter, faster, lighter application of the front brake may also provide less glazing, increase brake pad life and benefit safety in bike handling.
FOR BEST RESULTS, PRACTICE THE FOLLOWING SIMPLE CLEANING TIPS• Wheel cleaning may require you to remove the tires to easily access the entire braking surface.
Routine rim and brake pad cleaning should be performed at least every 3–4 months. Contact your mechanic, or an authorized dealer/distributor for recommended maintenance schedule.
• Suspend your bicycle in a rack and drop the wheelset out of the frame.
• Inspect the brake pad surfaces, front and rear, for embedded debris. Remove any embedded small particles in the pads with a fine point tool.
• Abrade/scuff/sand the brake pads vertically—opposite the direction of rotation from the wheel. Do

ReynoldsCycling.com 11
this until the pad surface is flat/non-shiny. Use an abrasive tool such as a clean metal file or 80–100-grit sandpaper to abrade the brake pad surfaces.
• Run your fingers along the entire circumference of the wheel’s brake surface feeling for changes in roughness. Inspect the braking surface for visible contamination or brake pad build up.
• Use a clean red scotch-brite pad and acetone to best clean the braking surface on your wheels. We recommend that you wear latex gloves whenever using Acetone. DONOTUSE ACETONENEAROPENFLAME. Acetone is highly flammable. Use only in well ventilated area.
• CAUTION:the red abrasive pad will scratch and damage decals. DONOTUSE red abrasive pad on sidewall fabric of DV3K wheels. Wash Reynolds DV3K fabric wheels by wiping them down with water and neutral soap, or specific products designed for cleaning bicycles.
• Clean the brake track only. Lightly abrade the brake track, the top 13mm along the outer edge of the rim circumference. Remove all discoloration, smears and “tacky-feeling” areas. Focus on the rough feeling areas and those with obvious discoloration. Beginning at the valve hole, very lightly scuff the entire brake track with the abrasive pad. Clean only in the direction of wheel rotation, along the circumference of the rim.
• CAUTION:Do not to use excessive pressure when cleaning your wheels as it is easy to remove more than surface contamination and damage the braking layer molded into rim.
• You will detect dark grey/brown dust accumulating on your abrasive pad. Rotate the pad to a clean section and continue cleaning. Clean brake track on both sides of both wheels.
• Wipe down the rim surface with a small amount of acetone on a clean cotton rag. You may need to wipe down the rim several times until you no longer see dark grey/brown deposits on your cleaning rag.
• You may wipe down the entire rim surface with Acetone; it will remove most-all road grime and oil Deposits from your hands, but should not damage decals.
WARNING: Using wheels that have not been centered properly or have broken or damaged spokes may result in an accident, injury or death.
• After every ride check the condition of the tires and inflation pressure.
• Periodically take your bicycle to a qualified mechanic to lubricate the hubs, check spoke tension, and inspect rim and brake pads for excessive wear. Check with your mechanic to select a schedule that is best for you (approximately every 2,000–5,000 km or 1,200–3,000 miles).
• Every 10,000–20,000 km (6,000–12,000 mile) you should take your bicycle to a qualified mechanic to lubricate, remove, disassemble and check the hubs.
• Periodically have a qualified mechanic verify the quality of every component that is susceptible to wear including rims, spokes, bearings and brake pads. And, if necessary, replace worn and damaged components with original Reynolds replacement parts.
• At least once a month, please take your bicycle to a qualified mechanic to check the tension of the spokes, wheel centering, wheel dish and correct as necessary.
• Periods and riding distances are purely indicative and may be significantly different in relation to conditions of use and the intensity of your activity (for example: racing, rain, salted winter roads, rider weight, terrain, etc.). Check with your mechanic to select a maintenance schedule that is best for you.
NOTE: Never spray your bicycle with water under pressure. Pressurized water can pass bearing seals and enter into components of your Reynolds wheels causing damage beyond repair. Wash your bicycle and Reynolds wheels by wiping them down with water and neutral soap or specific products designed for cleaning bicycles. Routine scheduled cleaning of your wheelset and brake pads will improve modulation and braking in all conditions.
TRANSPORT AND STORAGEWhen transporting your Reynolds wheels separately from the bicycle or if the wheels will not be used for a long period of time, store them in a wheel bag to protect against impact and damage.

ReynoldsCycling.com 12
9. OPERATING PRESSURES
Never inflate a tire beyond the maximum pressure marked on the tire’s sidewall. Exceeding the recommended maximum pressure may blow the tire off the rim, which could cause damage to thebike and injury to the rider and bystanders.
Ifyouhavemorequestionspleasecontactyourmechanic,authorizeddealer/distributororReynoldsdirectlyat866-798-3040oremailatinfo@reynoldscycling.com.