Ter mite and Other Structural Pest Control · Ter mite and Other Structural Pest Control....
59
AG1155 Termite and Other Structural Pest Control Classification 1 Training Manual University of Arkansas, U.S. Department of Agriculture, and County Governments Cooperating
Transcript of Ter mite and Other Structural Pest Control · Ter mite and Other Structural Pest Control....

AG1155
Termite and Other Structural Pest Control
Classification 1
Training Manual
University of Arkansas, U.S. Department of Agriculture, and County Governments Cooperating

Edited by:
DR. JOHN D. HOPKINS, Associate Professor and Extension Entomologist, University of
Arkansas Division of Agriculture.
-2-

Preface This manual provides information for the Arkansas commercial pesticide applicator wishing to become certified
in Classification 1 - Termite and Other Structural Pest Control. To become a certified applicator in this category, a candidate must pass both a general standards exam and pass an examination based primarily on the material presented in this manual and (Circular 6) Arkansas Pest Control Law (Act 488 of 1975, as amended). Information covered in the general standards examination is contained in “A Guide for Private and Commercial Applicators: Applying Pesticides Correctly.” Refer to (Circular 6) Arkansas Pest Control Law (Act 488 of 1975, as amended) for specific requirements and minimum standards for termite work. The examinations are administered by the Arkansas State Plant Board. Up-to-date study materials can be obtained from the Arkansas State Plant Board, #1 Natural Resources Drive (P.O. Box 1069), Little Rock, AR 72203-1069, phone (501) 225-1598. Additional study information may be obtained from the University of Arkansas Cooperative Extension Service – the pesticide label, current publications on the subject, pesticide distributors and manufacturers.
Acknowledgments Information accumulates from direct observations, scientific literature and anecdotes from others. Information
from these sources blurs together quickly, and consequently, unique ideas are rare in society. Credit for sources of information on urban pest control and management must go to:
Land Grant University Extension and research workers, most entomologists, who pioneered this work, those who kept training and research alive during the period when the success of synthetic organic pesticides preempted nearly all but control evaluations from the 1940s to the 1960s, and those who persist today; Pest Control Industry workers who held training sessions nationally, regionally and locally where information was disseminated among the experienced and provided to the inexperienced; Environmental Protection Agency personnel who molded modern training and influenced the need for national uniformity in training requirements; State regulatory personnel who cooperated with Universities and Industry and who strongly emphasized the importance of training; and the few textbook authors in the United States and England who compiled the reference data in the understandable and usable form that allows urban pest management practitioners to be professionals.
This manual has been adapted from commercial applicator certification training manuals for termite and other structural pests developed by the Oklahoma Cooperative Extension Service, Division of Agricultural Sciences and Natural Resources, Oklahoma State University; Texas Agricultural Extension Service, the Texas A&M University System; and University of Nebraska Cooperative Extension, University of Nebraska-Lincoln. Also, special thanks go to Dr. Jim T. Criswell, Pesticide Coordinator, Oklahoma State University, Oklahoma Cooperative Extensive Service, Dr. Roger E. Gold, professor and Extension entomologist; Harry Howell, assistant research scientist; Dr. Don L. Renchie, Extension assistant professor; Grady J. Glenn, research assistant; all of the Texas A&M University System; and Murray Walton, staff inspector, Texas Structural Pest Control Board, and Dr. Clyde L. Ogg, Extension Educator and Larry C. Schulze, eds. Pesticide Education Specialist, University of Nebraska Cooperative Extension for their kind permission to adapt their respective manuals.
Specific acknowledgments should go to biological illustrators who graphically render pest and beneficial animals where photographs fail; A.D. Cushman, Dean of USDA illustrators, A. B. Wright, and Joseph Papp provided many illustrations for this manual as did many anonymous illustrators whose work was stripped of identification through the decades of public use.
– 3 –

Table of Contents
Page No. Introduction . . . . . . . . . . . . . . . . . . . . . . . . . . . . . . .5
Termites . . . . . . . . . . . . . . . . . . . . . . . . . . . . . . . . .5 Subterranean Termites . . . . . . . . . . . . . . . . . . . . .6 Drywood Termites . . . . . . . . . . . . . . . . . . . . . . .10 Dampwood Termites . . . . . . . . . . . . . . . . . . . . . .12 Formosan Termites . . . . . . . . . . . . . . . . . . . . . . .12
Pesticides for Termite Control . . . . . . . . . . . . .13 Pyrethroids . . . . . . . . . . . . . . . . . . . . . . . . . . . . .13 Borates . . . . . . . . . . . . . . . . . . . . . . . . . . . . . . . .13 Organophosphates and Carbamates . . . . . . . . . .13 Nicotinoids . . . . . . . . . . . . . . . . . . . . . . . . . . . . .14 Pyrrols . . . . . . . . . . . . . . . . . . . . . . . . . . . . . . . .14 Fiproles (or Phenylpyrazoles) . . . . . . . . . . . . . . .14 Insect Growth Regulators . . . . . . . . . . . . . . . . . .14 Biological Agents . . . . . . . . . . . . . . . . . . . . . . . .14
Bait Technology and Application . . . . . . . . . . .15 Commercial Bating Products . . . . . . . . . . . . . . .15
Preventing Termite Damage . . . . . . . . . . . . . . .17 Construction Practices . . . . . . . . . . . . . . . .17
Building Site . . . . . . . . . . . . . . . . . . . . . . . .17 Wall and Pier (Crawl-Space) Foundations . .17 Raised Porches and Terraces of Concrete
or Masonry . . . . . . . . . . . . . . . . . . . . . . . .18 Clearance Between Wood and Soil . . . . . . .18 Metal Termite Shields . . . . . . . . . . . . . . . . .18 Ventilation Beneath Buildings . . . . . . . . . . .19 Exterior Woodwork . . . . . . . . . . . . . . . . . . .19 Wood Used in Basements . . . . . . . . . . . . . .19 Girders, Sills and Joists . . . . . . . . . . . . . . . .20 Water Pipes and Conduits . . . . . . . . . . . . . .20 Concrete Slab-on-Ground Construction . . .20 Chemically Treated Woods . . . . . . . . . . . . .21
Termiticide Applications . . . . . . . . . . . . . . . . . . .22 Termite Treatment During Construction .22
Factors Affecting Termiticide Application . .22 Methods of Application . . . . . . . . . . . . . . . .22 Slab-on-Ground Buildings . . . . . . . . . . . . . .23 Horizontal Barriers . . . . . . . . . . . . . . . . . . . .24 Vertical Barriers . . . . . . . . . . . . . . . . . . . . . .24 Hollow Block Foundation/Voids in
Masonry . . . . . . . . . . . . . . . . . . . . . . . . . .24 Crawl Space Houses . . . . . . . . . . . . . . . . . .24 Mechanical Alterations . . . . . . . . . . . . . . . .24 Soil Treatments . . . . . . . . . . . . . . . . . . . . . .24
Page No. Treatment of Existing Termite Infestations . .26
Inspection . . . . . . . . . . . . . . . . . . . . . . . . . . . . . .26 Slab-on-Ground Houses . . . . . . . . . . . . . . . . . . .27 Structures With Ducts in the Slab . . . . . . . . . . .28 Raised Cement Porches, Terraces, Entrance
Slabs, Sidewalks and Driveways . . . . . . . . . .28 Crawl Space Houses . . . . . . . . . . . . . . . . . . . . . .29 Basement Houses . . . . . . . . . . . . . . . . . . . . . . . .29 Foundations With Holes, Cracks, Voids or
of Stone or Rubble . . . . . . . . . . . . . . . . . . . . .29 Multiple Brick, Concrete Blocks,
Hollow Tile, Etc. . . . . . . . . . . . . . . . . . . . . . .30 Houses With Wells, Cisterns, Springs, High
Water Table or Near Ponds, Lakes or Streams . . . . . . . . . . . . . . . . . . . . . . . . . . . .30
Treatment Odors . . . . . . . . . . . . . . . . . . . . . . . . .31
Application Equipment and Calibration . . . . .32 Termite Application Equipment . . . . . . . . .32
Components of Sprayers . . . . . . . . . . . . . . .32 Foaming Agents . . . . . . . . . . . . . . . . . . . . . .34
Calibration . . . . . . . . . . . . . . . . . . . . . . . . . . . .34 Sample Calibration Problems . . . . . . . . . . .35
Wood-Boring Beetles and Wasps . . . . . . . . . .39 Lyctid Powderpost Beetles . . . . . . . . . . . . . . . . .40 Anobiid Beetles . . . . . . . . . . . . . . . . . . . . . . . . .40 Bostrichid Powderpost Beetles . . . . . . . . . . . . . .41 Other Wood-Inhabiting Insects . . . . . . . . . . . . . .41
Other Wood-Destroying Insects . . . . . . . . . . . .43 Carpenter Ants . . . . . . . . . . . . . . . . . . . . . . . . . .43 Carpenter Bees . . . . . . . . . . . . . . . . . . . . . . . . . .44
Wood-Inhabiting Fungi . . . . . . . . . . . . . . . . . . . .45 Surface Fungi . . . . . . . . . . . . . . . . . . . . . . . . . . .45 Staining Fungi . . . . . . . . . . . . . . . . . . . . . . . . . . .45 Decay Fungi . . . . . . . . . . . . . . . . . . . . . . . . . . . .45 Other Plant Growth Affecting Wood . . . . . . . . .46 Control . . . . . . . . . . . . . . . . . . . . . . . . . . . . . . . .46
Selected References and Study Material . . . .48
Glossary . . . . . . . . . . . . . . . . . . . . . . . . . . . . . . . .49
– 4 –

Introduction Wood is a biological material. If protected from moisture and insect attack, it can last for centuries. When
wood is not properly protected, however, it will succumb to biological processes that decompose wood: insects that eat the wood or fungi that cause rot and decay. The most damaging insects that attack structural wood are termites. Their activity results in damage and control costs that exceed $1.5 billion per year nationally. Beetles are the next important group of insects that attack wood, while bees, wasps and ants are third in importance, depending on geographical location. Wood-inhabiting fungi are another group of organisms that occasionally cause problems in Arkansas.
Termites Termite control represents a major portion of pest-
control work. No other type of pest control involves as many variables that affect the work to be done or the results obtained. Technicians involved in termite control must have a thorough understanding of the biology and unique habits of the termites, including their food, moisture and temperature requirements. Technicians must also have knowledge of building construction as well as the equipment, chemicals and safety precautions involved in termite control.
Termites are primitive insects belonging to an order of insects known as Isoptera, which means equal wings. This refers to the fact that both pairs of wings on the winged forms (called alates or swarmers) are of equal size and shape. Termites are thought by some to be closely related to cockroaches, but they are different from almost all other insects because they can convert the cellulose of wood into starches and sugar and use it for nutrition. They can do this because of a mutually beneficial association with microorganisms in their digestive tracts that convert cellulose into simple substances that termites can digest. In nature, termites help convert dead wood and other materials containing cellulose into humus.
Entomologists have described about 2,200 species of termites for the entire world; however, only 70 of these species infest structures and require control. There are 13 species of termites in the continental United States that require man’s attention to a greater or lesser extent.
Termites occur in every state of the United States and parts of Canada. To date, they have not been reported in Alaska (Figure 1). They cause varying
Figure 1. Termite activity in the U.S.
degrees of trouble, depending upon the geographical location. The presence and abundance of termites in an area is determined by several factors including temperature, humidity, soil moisture and soil type. Because subterranean termites rely on soil moisture, they’re affected by soil types. In clay soils, moisture is not as readily available because it is tightly bound to the soil particles. Sandy soils have more available moisture. Consequently, subterranean termites are generally more prevalent and more able to survive in sandy soils. Fungi in wood are another source of moisture.
Subterranean termites are the predominant species in Arkansas. Drywood and Dampwood termites have been found in localized areas, however they do not naturally occur in Arkansas. They have been shipped into the state in infested construction materials or furniture from southern and western states. Use of infested materials in construction can establish these pests in structures but it is doubtful if they can survive under Arkansas climatic conditions.
– 5 –

Subterranean Termites
Subterranean termites are native, soil-inhabiting insects that feed on wood, paper and similar cellulose containing materials. The economic importance of subterranean termite attacks on buildings is related to the fact that wood members of a building closest to the soil, such as sills, joists, studs, girders and other important load bearing elements of construction are most likely to be severely damaged by termites. Failure to stop termite attacks can cause loss of support. Other forms of building deterioration, such as sagging walls, leaking surfaces and wood decay can follow. Heated buildings where wood is in direct contact with or in close proximity to the soil offer termites the ideal environment, a favorable year round climate and an abundant sheltered food source.
Subterranean termites are social insects that live in colonies. Three castes can be found there – reproductives, workers and soldiers. The winged primary reproductive adult
Figure 2. “Swarmer” Termite. (swarmer, alate, flying termite) is the
form most often seen. These swarmer termites (Figure 2) are dark colored with bodies about 3/8 of an inch long. They have two pairs of “gauzy” (semitransparent) wings of identical size and shape that extend beyond the body to twice its length. The antennae or “feelers,” like those of all termites, resemble a string of little globular beads.
Large numbers of winged individuals emerge on warm sunny days (usually when temperatures are at least 64°F) after a rain as early as March or April but usually in late April
Figure 3. Queen and Kingto early May. After Reproductive Termites.
taking flight and finding a mate, the termites lose their wings, search
out a place to start a nest, mate and begin rearing the first group of workers. The mated female becomes the “queen” and the male the “king” (Figure 3).
In very large colonies, a secondary reproductive (Figure 4) caste may also be seen. These supplemental or secondary reproductives mate and reproduce within the existing colony. These termites are light colored and usually
Figure 4. Secondaryhave two pairs of short wing Reproductive. pads. Usually, they exist in addition to the regular mature queen (Figure 5) but may become the most important source of eggs in the colony. They are formed as needed and can also take the place of the queen if she is injured or dies. Thus strong colonies have multiple queens. These additional reproductives also give the colony a chance to spread through the process of “budding,” where a number of workers or secondary reproductives can be cut off from the main colony and form a new, self-sufficient colony.
Figure 5. Mature Termite Queen.
The worker (Figure 6) caste makes up the bulk of the colony and is directly responsible for damage to wood. Workers are about 1/4-inch long, whitish colored and soft-bodied. Recent studies of living colonies suggest there may not be a true worker caste in common North American species. They may actually be late instar nymphs. Termite workers are sterile and dedicate their lives to the upkeep, feeding and sanitation work of the colony. Their need for moist, Figure 6. Worker
Termite. humid environments requires workers to live within the ground or in mud tubes that are
– 6 –
constructed up into the wood they are attacking. Workers are rarely seen unless infested wood is examined or the mud tubes are broken open. Because of their thin skin, workers will dry up and die within three to six hours if exposed to the drying conditions outside the nests. The nymphs and adult workers both have thin, bead-like antennae and differ only in size.
The soldier (Figure 7) caste is another form found in colonies. Their primary function is defense of the colony. Soldiers are easily recognized by their large, brownish, well-developed heads and jaws/mandibles. Their responsibility is defending the colony from attack by ants or other termites. The sterile soldiers are far less numerous than the workers. They hide within the mud tubes and in the nest, and will not be seen unless the wood or mud tubes are disturbed.
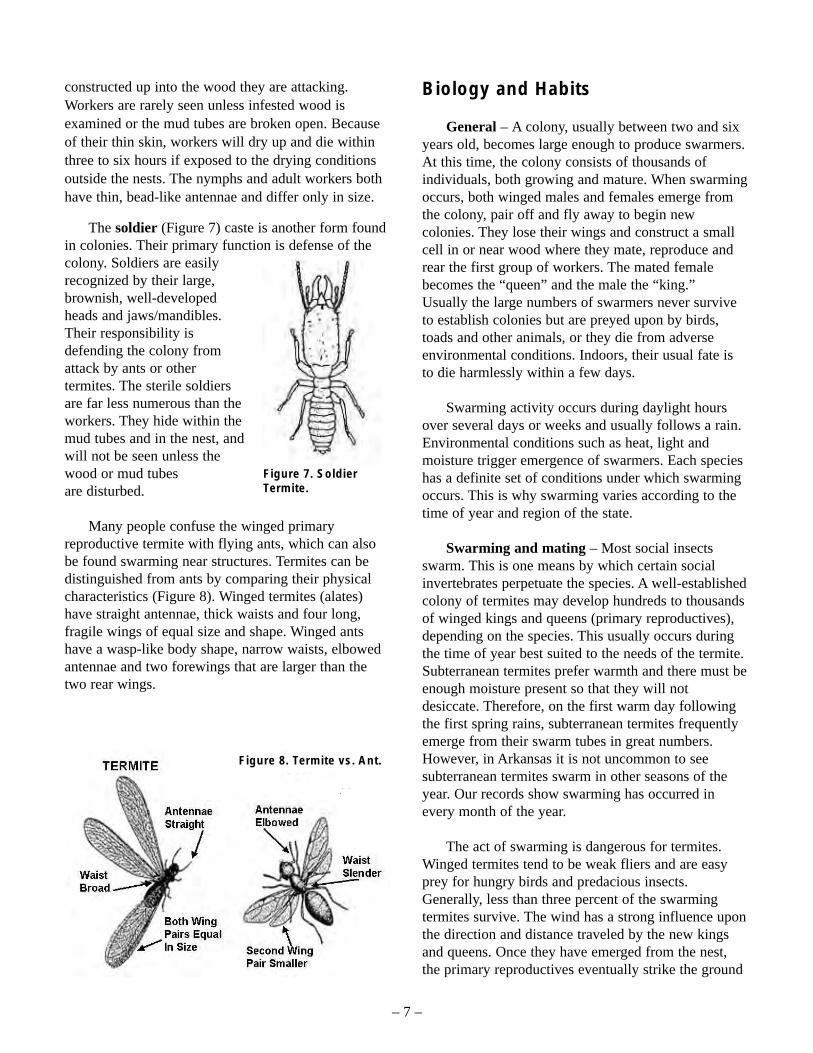
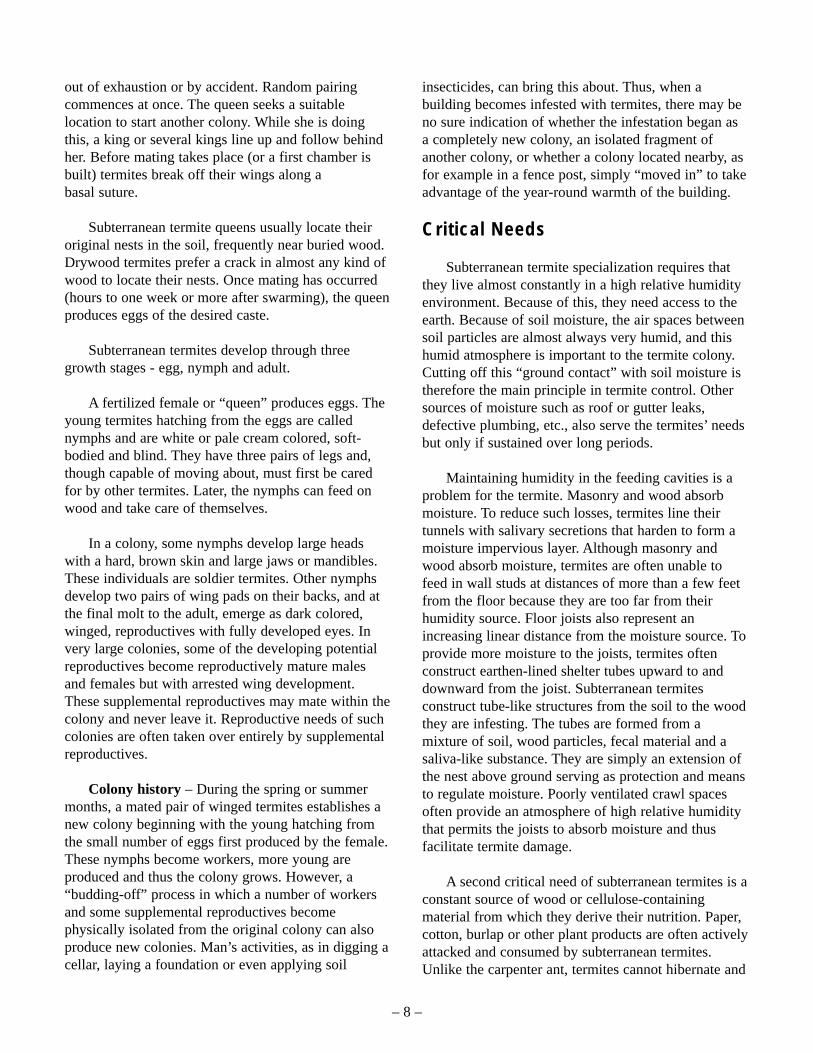
Many people confuse the winged primary reproductive termite with flying ants, which can also be found swarming near structures. Termites can be distinguished from ants by comparing their physical characteristics (Figure 8). Winged termites (alates) have straight antennae, thick waists and four long, fragile wings of equal size and shape. Winged ants have a wasp-like body shape, narrow waists, elbowed antennae and two forewings that are larger than the two rear wings.
Figure 8. Termite vs. Ant.
Figure 7. Soldier Termite.
Biology and Habits
General – A colony, usually between two and six years old, becomes large enough to produce swarmers. At this time, the colony consists of thousands of individuals, both growing and mature. When swarming occurs, both winged males and females emerge from the colony, pair off and fly away to begin new colonies. They lose their wings and construct a small cell in or near wood where they mate, reproduce and rear the first group of workers. The mated female becomes the “queen” and the male the “king.” Usually the large numbers of swarmers never survive to establish colonies but are preyed upon by birds, toads and other animals, or they die from adverse environmental conditions. Indoors, their usual fate is to die harmlessly within a few days.
Swarming activity occurs during daylight hours over several days or weeks and usually follows a rain. Environmental conditions such as heat, light and moisture trigger emergence of swarmers. Each species has a definite set of conditions under which swarming occurs. This is why swarming varies according to the time of year and region of the state.
Swarming and mating – Most social insects swarm. This is one means by which certain social invertebrates perpetuate the species. A well-established colony of termites may develop hundreds to thousands of winged kings and queens (primary reproductives), depending on the species. This usually occurs during the time of year best suited to the needs of the termite. Subterranean termites prefer warmth and there must be enough moisture present so that they will not desiccate. Therefore, on the first warm day following the first spring rains, subterranean termites frequently emerge from their swarm tubes in great numbers. However, in Arkansas it is not uncommon to see subterranean termites swarm in other seasons of the year. Our records show swarming has occurred in every month of the year.
The act of swarming is dangerous for termites. Winged termites tend to be weak fliers and are easy prey for hungry birds and predacious insects. Generally, less than three percent of the swarming termites survive. The wind has a strong influence upon the direction and distance traveled by the new kings and queens. Once they have emerged from the nest, the primary reproductives eventually strike the ground
– 7 –
out of exhaustion or by accident. Random pairing commences at once. The queen seeks a suitable location to start another colony. While she is doing this, a king or several kings line up and follow behind her. Before mating takes place (or a first chamber is built) termites break off their wings along a basal suture.
Subterranean termite queens usually locate their original nests in the soil, frequently near buried wood. Drywood termites prefer a crack in almost any kind of wood to locate their nests. Once mating has occurred (hours to one week or more after swarming), the queen produces eggs of the desired caste.
Subterranean termites develop through three growth stages - egg, nymph and adult.
A fertilized female or “queen” produces eggs. The young termites hatching from the eggs are called nymphs and are white or pale cream colored, soft-bodied and blind. They have three pairs of legs and, though capable of moving about, must first be cared for by other termites. Later, the nymphs can feed on wood and take care of themselves.
In a colony, some nymphs develop large heads with a hard, brown skin and large jaws or mandibles. These individuals are soldier termites. Other nymphs develop two pairs of wing pads on their backs, and at the final molt to the adult, emerge as dark colored, winged, reproductives with fully developed eyes. In very large colonies, some of the developing potential reproductives become reproductively mature males and females but with arrested wing development. These supplemental reproductives may mate within the colony and never leave it. Reproductive needs of such colonies are often taken over entirely by supplemental reproductives.
Colony history – During the spring or summer months, a mated pair of winged termites establishes a new colony beginning with the young hatching from the small number of eggs first produced by the female. These nymphs become workers, more young are produced and thus the colony grows. However, a “budding-off” process in which a number of workers and some supplemental reproductives become physically isolated from the original colony can also produce new colonies. Man’s activities, as in digging a cellar, laying a foundation or even applying soil
insecticides, can bring this about. Thus, when a building becomes infested with termites, there may be no sure indication of whether the infestation began as a completely new colony, an isolated fragment of another colony, or whether a colony located nearby, as for example in a fence post, simply “moved in” to take advantage of the year-round warmth of the building.
Critical Needs
Subterranean termite specialization requires that they live almost constantly in a high relative humidity environment. Because of this, they need access to the earth. Because of soil moisture, the air spaces between soil particles are almost always very humid, and this humid atmosphere is important to the termite colony. Cutting off this “ground contact” with soil moisture is therefore the main principle in termite control. Other sources of moisture such as roof or gutter leaks, defective plumbing, etc., also serve the termites’ needs but only if sustained over long periods.
Maintaining humidity in the feeding cavities is a problem for the termite. Masonry and wood absorb moisture. To reduce such losses, termites line their tunnels with salivary secretions that harden to form a moisture impervious layer. Although masonry and wood absorb moisture, termites are often unable to feed in wall studs at distances of more than a few feet from the floor because they are too far from their humidity source. Floor joists also represent an increasing linear distance from the moisture source. To provide more moisture to the joists, termites often construct earthen-lined shelter tubes upward to and downward from the joist. Subterranean termites construct tube-like structures from the soil to the wood they are infesting. The tubes are formed from a mixture of soil, wood particles, fecal material and a saliva-like substance. They are simply an extension of the nest above ground serving as protection and means to regulate moisture. Poorly ventilated crawl spaces often provide an atmosphere of high relative humidity that permits the joists to absorb moisture and thus facilitate termite damage.
A second critical need of subterranean termites is a constant source of wood or cellulose-containing material from which they derive their nutrition. Paper, cotton, burlap or other plant products are often actively attacked and consumed by subterranean termites. Unlike the carpenter ant, termites cannot hibernate and
– 8 –

must continue to feed and be active throughout the winter. Severe winter cold prevents termites in the woodland from feeding in stumps above ground during much of the winter. However, wood in close contact with heated soil, common in house design beginning in the 1920s provides a favorable habitat during winter.
Wood is made up of three dominant ingredients, those being cellulose, lignocellulose and lignin. All plants have varying amounts or proportions of each of these organic substances. The more cellulose in a plant or plant product, the more attractive it is to a termite. Some woods have chemical substances that confer variable susceptibility to termite attack. There are also woods that are somewhat immune to termite attack especially their heartwood (e.g., cypress, redwood and cedar). Wood products such as paper are favorite foods since they are nearly pure wood pulp and cotton fiber. The lignin, a substance avoided by these pests, is removed during the paper manufacturing process.
Subterranean termites cannot digest cellulose themselves, and are among the species dependent on large numbers of one-celled microorganisms (protozoa) that exist in the termite gut. These protozoa break down the cellulose, a complex sugar, to simpler compounds that termites can further digest as food. Worker termites and older nymphs consume wood and share their nourishment with the developing young, other workers, soldiers and reproductives.
Certain types of fungi play an important role in a termite’s life. Termites are highly attracted to odors produced by wood decaying fungi that, through the decaying process, make the wood easier to penetrate. In some instances, the fungus provides a source of nitrogen in the termite diet.
Termite colonies are remarkably non-combative. It is entirely possible for ants and termites to infest the same building, each producing its winged adults at the appropriate time. There is interaction only if the ant colony finds it expedient to feed upon individuals of the termite colony.
Signs of Infestation
Generally the first readily noticeable sign of infestation is the presence of swarming reproductives on windowsills or near indoor lights. If swarmers are found inside, it is usually an indication that an active infestation exists somewhere within the structure.
Presence of swarmers outdoors is a naturally occurring phenomenon but should be a warning that termites are in the vicinity and are possibly attacking a nearby building.
Another indication is the presence of wings, discarded by the swarmers as a normal part of their behavior, found near emergence sites, on window sills, in cobwebs or inside ‘in floor’ heat/air ducts.
Also, any sub slab ductwork, for venting a heating unit or cook-top range ventilator, can develop cracks that allow termites to enter below grade. If any of these conditions exist, they should be carefully inspected and, if possible, corrected.
Damaged wood often is not noticed unless the exterior surface is removed. However, galleries can be detected by tapping the wood every few inches with a screwdriver. Damaged wood will sound hollow and the screwdriver may even break through into the galleries. Subterranean termite feeding follows the grain of the wood and usually only the soft springwood is eaten. The galleries will contain soil and fecal particles. Subterranean termites do not push wood particles or pellets (fecal material) outside the galleries, as do other wood-boring insects, but rather use them in the construction of their tunnels.
Termites can detect vibrations through their legs. They are unable to hear noises near their nests, but are immediately alerted when their nest is tapped. When alarmed, the soldier termites butt their heads against the gallery walls to initiate the vibrations that will warn the colony. Under certain circumstances it is possible to hear this “ticking” sound.
Other signs of infestation are the presence of flattened, earthen shelter tubes that the termites build over the surface of the foundation to reach the wood (Figure 9). These tubes are usually 1/4-1/2-inch wide. Termites perish rapidly under dry conditions, so they Figure 9. Termite shelter tube. build these mud tubes
– 9 –

to maintain correct humidity throughout the colony. Buildings should be inspected at least once a year for evidence of tubes. In concrete slab construction, closely examine the expansion joints and cracks where pipes and ducts go through the slab. Particular attention must be given to bath plumbing traps and exposed soil beneath heating and air conditioning systems.
When looking for signs of termite activity, the inspector must also be alert for those conditions that favor termite infestations. The most critical condition is wood-to-soil contact. The U.S. Forest Service has identified 15 conditions that frequently lead to termite infestations:
1. Cracks in concrete foundations and open voids in concrete foundations are hidden avenues of entry.
2. Any wooden posts or supports set in concrete may be in contact with the soil underneath.
3. Concrete porches with earth fill may provide wood-to-soil contact.
4. Form boards left in place contribute to the termite food supply.
5. Leaking pipes and dripping faucets in the crawl space keep the soil under the structure moist.
6. Blocking crawl space vents with shrubbery will cause the air under the structure to remain damp and warm.
7. Construction debris in the backfill beside the structure will contribute to the termites’ food supply.
8. Low foundation walls and footings will provide wood-to-soil contact.
9. Stucco or brick veneer carried down over the concrete foundation allows for hidden access to the structure.
10. Soil-filled planters built up against the side of the structure allow direct access into foundation cracks.
11. Forms left in slabs, where plumbing drains enter the structure, provide access.
12. Wooden porch steps in contact with the soil are entry points.
13. Heating units in crawl spaces maintain warm soil temperatures for termite colonies year-round.
14. Paper is a wood product. Paper collars around pipes and ducts also provide access to the structure.
15. Wooden fences, trellises and other wooden adornments up against the side of the structure may provide access.
Estimates of damage caused by subterranean termites have been calculated by Dr. Mike Haverty, 1976 Southern Forest Experiment Station - USDA, Gulfport, MS, and are indicated below:
Estimates of wood consumption are by a theoretical colony of eastern subterranean termites:
1) Wood consumption rate (mg wood/gram of termite/day) = 33.2
2) Weight of worker (mg) = 2.5 3) Wood consumption/termite/day (mg) = 0.083 4) Estimated number of workers/colony = 60,000 5) Wood consumption/colony/day (gm [grams]) =
4.98 6) Days to consume one board foot of pine (where
pine weighs an average of 0.5 gm/cc with 2359.7 cc/board foot or 1179.9 gm/board foot) = 236 days
In other words, an average, mature colony of eastern subterranean termites would contain about 60,000 workers. Under ideal conditions, such a colony would consume about 5 grams of wood each day. This is less than 1/5 of an ounce of wood. At this rate it would take this colony about 157 days to totally consume a one-foot length of a pine 2x4.
Drywood Termites
This termite is not commonly found in Arkansas however, a brief discussion is provided for reference.
Drywood termites live and feed in dry, sound wood and can cause structural damage. Usually significant damage requires a longer period (as compared to subterranean termites) to occur since drywood termite colonies develop at a slower rate. Also, since these termites live and feed inside sound
– 10 –

wood, external damage signs may go undetected for years. Infestations may be found in structural timber and woodwork in buildings, furniture, telephone poles, lumber stacked in lumberyards, paper, cloth, fiber insulation boards and in other products containing cellulose.
Identification
Drywood and subterranean termites are similar in general shape and conformation but differ slightly in size and colorations. They are found in colonies consisting of three castes – reproductives, workers and soldiers. Drywood winged reproductives (primary reproductives, swarmers or alates) generally are larger than subterranean termites with dark brown, smoky gray or almost clear wings. The body color may vary from dark brown to light yellowish-tan. The drywood termite worker and soldier castes closely resemble those of subterranean termites. In most drywood termite species, there is no true worker caste as this function is taken over by nymphs.
Biology and Habits
Nymphs hatch from the eggs within several weeks and are cared for by the new king and queen. After two molts nymphs assume the role of workers and begin to feed and care for the original pair. Eggs are not deposited continuously; in fact, very few are deposited during the first year. In subsequent years, the young queen matures and begins to lay more eggs. Eventually, the colony stabilizes when the queen reaches maximum egg production. At that point the colony contains eggs, nymphs, workers, soldiers and reproductives. If the queen dies, secondary reproductives take over the queen’s duties. Maximum size of a colony depends on several factors such as location, food availability and environmental conditions. Some colonies remain small, but adjacent, multiple colonies may contain up to ten thousand individuals. The colony grows through the queen’s increased egg production and the accumulation of long-lived individuals.
Colony history – After a drywood termite colony has matured, usually requiring several years, swarmers are produced. The swarming activity occurs at dusk or in the evening, and the swarmers fly towards areas of greatest light intensity, gathering around lights or
illuminated windows. Emergence is not often associated with a definite season of the year; most drywood termites emerge during the summer. Certain environmental conditions, such as heat, light and moisture trigger the emergence of swarmers, and each species has a definite set of conditions under which swarming occurs. The number of swarmers is in proportion to the age and size of the colony while environmental conditions regulate the numbers coming forth from the colony.
Critical Needs
Drywood termites derive their nutrition from wood and other material containing cellulose. In fact, the greater the cellulose content of a plant or plant product, the more attractive it is to drywood termites. Drywood termites often actively consume paper, cotton, burlap or other plant products. These termites are dependent on large numbers of one-celled microorganisms (protozoa) that exist in the termite gut for cellulose digestion. The protozoa serve to break down wood particles to simpler compounds that termites can absorb as food. Functional older nymphs consume wood and share their nourishment with the developing young, soldiers and reproductives.
Moisture is not as important to drywood termites as it is to the existence of subterranean termites. They require no contact with the soil or with any source of moisture. Drywood termites extract water from the wood on which they feed and from water formed internally by digestive processes. They require as little as 2 1/2 to 3 percent moisture, but prefer wood with 10 percent moisture content.
Signs of Infestation
Generally the first sign of infestation is the presence of swarming reproductives found on windowsills or near lights. Swarmers found inside are usually a clear indication of an active infestation somewhere within the structure if doors and windows have been closed. Another indication is the presence of discarded wings found near the emergence sites, on windowsills or in cobwebs.
Probably the best evidence of a drywood termite infestation is the presence of fecal pellets. Drywood termites construct “kick holes” in infested wood
– 11 –
through which the pellets are eliminated from galleries or tunnels. These pellets accumulate in small piles below the kick holes or are scattered if the distance between the kick hole and surface below is too great. Fecal pellets also may be found caught in spider webs.
Fecal pellets are distinctive and are used for identification. Drywood fecal pellets are hard, elongated, less than 1/25-inch long, with rounded ends and six flattened or concaved depressed sides with ridges at angles between the six surfaces. The characteristic shape results when the termite exerts pressure on the fecal material in the hindgut to extract and conserve moisture.
The wood interior of drywood termite-damaged wood contains chamber-like structures connected by galleries or tunnels that cut across the wood grain including both soft spring wood and harder summer growth. Galleries have almost sandpaper smooth surfaces containing few or no fecal pellets.
Dampwood Termites
Dampwood termites are not native to Arkansas and are of minor importance from a world standpoint, but they make up a distinct habitat group. Dampwood termites locate their colonies in damp, often decaying wood; but once established, they can extend their activities into sound and even relatively dry wood. They enter wood directly at the time of swarming and always confine their work to wood. They are occasionally responsible for serious damage to wooden structures, usually in conjunction with fungus attack, since the moisture requirements of both are similar.
Flights (swarming) of the dampwood termites usually occur at dusk. Some flights occur throughout the entire year; however, peak annual swarming takes place in late summer and fall.
The winged reproductive of dampwood termites may be an inch or more long, including the wings; the wings are from 7/8 to an inch long. The body is light cinnamon-brown; the wings are light to dark brown, heavily veined, and leathery in appearance. The soldiers are 3/8- to 3/4-inch long, depending upon the instar in which they assumed their typical soldier characteristics. This varies with the age of the colony, which is somewhat true of many species of termites. As with other members of this family, there is no worker class. The nymphs are about 1/2-inch long.
Formosan Termites
There are no records of formosan termites in Arkansas. However, as with dampwood and drywood termites, a brief discussion is provided for reference. This is an important species that is classified as a subterranean termite. Its habits are similar to our native species. The most obvious characteristics that distinguish the formosan termite from native subterranean termites are their larger size, pale yellow body color, oval shape of the head of the soldier in comparison with the oblong head of native subterranean species and hairy wings. The formosan termite also establishes larger colonies, is more aggressive and can do damage much more rapidly. Formosan termites make nests of hardened paper-like materials in wood in or on the ground, in hollows they have excavated from the tree stumps, or in hollow spaces in walls, floors or attics of building. Like the native subterranean termites, the formosan termite builds earthen shelter tubes over objects it cannot penetrate. To date the only areas close to Arkansas reporting established infestations of formosan termites are regions of Louisiana and Texas. However, this species is occasionally transported in wood to other areas of the country and is gradually moving inland from these areas.
– 12 –
Pesticides for Termite Control
Pyrethroids The pyrethroids are a large family of modern
synthetic insecticides similar to the naturally derived botanical pyrethrins. They are highly repellant to termites, which may contribute to the effectiveness of the termiticide barrier. They have been modified to increase their stability in the natural environment. They are widely used in agriculture, homes and gardens. Some examples include: bifenthrin, cyfluthrin, cypermethrin, deltamethrin and permethrin.
They may be applied alone or in combination with other insecticides. Pyrethroids are formulated as ECs, WPs, Gs and aerosols.
Although certain pyrethroids exhibit striking neurotoxicity in laboratory animals when administered by intravenous injection, and some are toxic by the oral route, systemic toxicity by inhalation and dermal absorption is low. There have been very few systemic poisonings of humans by pyrethroids. Although limited absorption may account for the low toxicity of some pyrethroids, rapid biodegradation by mammalian liver enzymes (ester hydrolysis and oxidation) is probably the major factor responsible. Most pyrethroid metabolites are promptly excreted, at least in part, by the kidney.
In response to dermal exposure, some persons may experience a skin sensitivity called paresthesia. The symptoms are similar to “sunburn” sensation of the face and especially the eyelids. Sweating, exposure to sun or heat and application of water aggravate the disagreeable sensations. This is a temporary effect that dissipates within 24 hours. For first aid, wash with soap and water to remove as much residue as possible, and then apply a Vitamin E oil preparation or cream to the affected area.
Paresthesia is caused more by pyrethroids whose chemical makeup includes cyano groups: fenvalerate, cypermethrin and fluvalinate. In addition to protecting themselves from future exposure, persons who have experienced paresthesia should choose a pyrethroid with a different active ingredient, as well as a wettable powder or microencapsulated formulation.
Borates Borate is a generic term for compounds containing
the elements boron and oxygen. Boron never occurs alone naturally, but as calcium and sodium borate ores in several places in the world.
Borax and other sodium borates are used in numerous products such as laundry additives, eye drops, fertilizers and insecticides. While its toxic mechanisms are not fully understood, boron is very toxic to insects and decay fungi that commonly damage wood in structures. However, at low levels boron is only minimally toxic, and perhaps beneficial, to humans, other mammals and growing plants. Use of borate-treated wood for construction of homes and their wood-based contents appears to offer many advantages to today’s environmentally sensitive world.
Unlike most other wood preservatives and organic insecticides that penetrate best in dry wood, borates are diffusible chemicals (they penetrate unseasoned wood by diffusion, a natural process). Wood moisture content and method and length of storage are the primary factors affecting penetration by diffusion.
Properly done, diffusion treatments permit deep penetration of large timbers and refractory (difficultto-treat) wood species that cannot be treated well by pressure. The diffusible property of borates can be manipulated in many ways; suitable application methods range from complex automated industrial processes to simple brush or injection treatments. Application methods include momentary immersion by bulk dipping; pressure or combination pressure/ diffusion treatment; treatment of composite boards and laminated products by treatment of the “wood finish,” hot and cold dip treatments and long soaking periods; spray or brush-on treatments with borate slurries or pastes; and placement of fused borate rods in holes drilled in wood already in use.
Organophosphates and Carbamates
These are two very large families of insecticides. Indeed, they have been the primary insecticides for the past 25 to 30 years. They range in toxicity from slightly to highly toxic. They are formulated in all kinds of ways from highly concentrated ECs to very dilute G formulations.
These insecticide families are similar in their modes of action. They are all nervous system poisons. Insects and all other animals, including humans, have nervous systems that are susceptible. Both insecticide
– 13 –

families are efficiently absorbed by inhalation, ingestion and skin penetration. To a degree, the extent of poisoning depends on the rate at which the pesticide is absorbed. Organophosphates break down chiefly by hydrolysis in the liver; rates of hydrolysis vary widely from one compound to another. With certain organophosphates whose breakdown is relatively slow, significant amounts may be temporarily stored in body fat.
The organophosphates and carbamates replaced the chlorinated hydrocarbons (e.g., chlordane, aldrin and heptachlor) for all uses, including termite control. Examples of organophosphates are chlorpyrifos for termite control and diazinon for other household pests. An example of a carbamate is Carbaryl (Sevin®), also used for household and lawn pests. The pyrethroids are gaining significantly in some aspects of termite control.
Nicotinoids
Nicotinoids are similar to and modeled after the natural nicotine. Imidacloprid is an example of this type of chemistry that is used as a termiticide. Imidacloprid was introduced in Europe and Japan in 1990 and first registered in the U.S. in 1992. Imidacloprid acts on the central nervous system of termites, causing irreversible blockage of postsynaptic nicotinergic acetylcholine receptors. Imidacloprid is registered for use as a termiticide under the name Premise®. It is non-repellent to termites and has contact activity as well as activity as a stomach poison.
Pyrroles
Chlorfenapyr is the only termiticide from the pyrrole family of chemistry and is active primarily as a stomach poison with some contact activity. It is also non-repellent to termites. Chlorfenapyr is registered as a termiticide under the tradename Phantom®. Chlorfenapyr acts on the mitochondria of cells and uncouples or inhibits oxidative phosphorylation, preventing the formation of the crucial energy molecule adenosine triphosphate (ATP). As a result, energy production in the cells shuts down resulting in cellular and ultimately, termite death.
Fiproles (or Phenylpyrazoles)
Fipronil is the only insecticide in this new class, introduced in 1990 and registered in the U.S. in 1996. It is marketed as a termiticide under the tradename Termidor®. This termiticide is a non-repellent material with contact and stomach activity. Fipronil works by blocking the gamma-aminobutyric acid- (GABA) regulated chloride channel in neurons, thus disrupting the activity of the insect’s central nervous system.
Insect Growth Regulators
An insect growth regulator (IGR) is a synthetic chemical that mimics insect hormones. Hormones regulate a wide array of body and growth (physiological) functions. Some examples include interfering with molting, interfering with pupal emergence and interfering with body wall formation.
IGRs are often specific for an insect species or group of very closely related species. They often have delayed effects because they are taken into the insect and “stored” until the insect reaches the right growth stage. This may range from days to weeks or even months. For example, if the IGR stops the insect from molting, and a given insect is exposed just after a molt, it would continue to function normally until the next molt before dying.
In the case of termite control, the slow action of the IGR allows the chemical to be widely spread throughout the colony as the termite workers feed and groom each other.
The IGRs are, in general, environmentally safe and have very low mammalian toxicity. Some examples include noviflumuron, hexaflumuron, pyriproxyfen and methoprene.
Biological Agents
Biological control agents such as disease causing fungi and bacteria and parasitic nematodes are being studied as possible termite control or termite reduction options. In some cases these agents are released into the soil and in other cases they are injected into the aboveground termite galleries. As with all new methods of control, more research is needed to determine the advantages and limitations of such organisms. Bacillus thuringiensis or Bt is an example of a commonly used biological control agent.
– 14 –

Bait Technology and Application There are several termite baits on the market that
add to the arsenal of tools available for managing termite populations and protecting structures. Baits work on the principle that foraging termites will feed on a treated cellulose material, which eventually kills the termites and possibly the colony. The toxic material in the bait must kill slowly enough to allow foraging termites to return to the colony and spread the bait through food sharing (trophallaxis). Because dead termites repel other termites, the toxic material also must kill slowly enough so that dead termites do not accumulate near the bait.
Baits control a colony locally; either eliminating it or suppressing it to the point that it no longer damages a structure. To be successful, the products must be nonrepellent, slow acting and readily consumed by termites. There are three main types of bait products available:
1. Ingested toxicants or stomach poisons 2. Biotermiticides or microbes 3. Insect growth regulators (IGRs)
Each type has unique features and is used differently in termite control programs. Ingested toxicants have the quickest effect. However, dose dependency and learned avoidance may limit this type of product to termite reduction in localized areas.
Biotermiticide, which is derived from fungi, bacteria or nematodes, is injected into active gallery sites. It then develops on the infected foraging termites and spreads among the colony. Suitable temperature and moisture, early detection and avoidance are factors that determine this treatment’s success. It may provide localized area control or, with optimum conditions, may suppress a colony.
Among the insect growth regulators are juvenile hormone analogs (JHA), juvenile hormone mimics (JHM), and chitin synthesis inhibitors (CSI). These products disrupt the termites by causing a specific response or behavior within the colony or by blocking the molting process. Remember that all insects, including termites, have an exoskeleton made primarily of chitin. In order to grow, they must periodically shed their chitinous exoskeletons and form new ones. This process is called molting. A chitin
synthesis inhibitor slowly builds up in the termite and, the next time a molt should occur, prevents proper formation of the cuticle. IGRs are the slowest of the bait types but have greater impact on the colony,
Some of the major baits available to the pest control industry are discussed below. Note their use for either colony elimination or for colony suppression.
Commercial Bating Products
Sentricon™ System
Sentricon™ System, developed by Dow AgroSciences for professional use, combines monitoring with the use of permanent stations. Stations are installed in areas where termites exist and around the perimeter of a structure and in the yard. Each station contains a wood stake and must be periodically monitored for termite activity. After termites attack, the wood is removed and replaced with a bait tube. Termites from the wood must be transferred to the bait tube, which is left in the station until termite activity ceases. Then the bait tubes are replaced with new wood stakes and monitoring for new infestations resumes. Thus, the Sentricon™ System protects property through an integrated program of monitoring, baiting when termites are present, and resuming monitoring when termites are no longer present. The active ingredient in the Sentricon™ System is hexaflumuron, a chitin synthesis inhibitor. The philosophy behind the Sentricon™ System is that foraging pseudergates will feed on the bait, return to the colony and pass the bait to other colony members through trophallaxis. Dow AgroSciences claims that with the Sentricon™‘ System, colony elimination is possible.
FirstLine™ Termite Bait Stations
FMC Corporation manufactures bait stations for suppression of subterranean termite colonies. The FirstLine™ aboveground termite bait station is applied directly to active termite infestations. It is placed above ground, inside or outside, at the leading edge of active termite mud tubes. Another product, the FirstLine™ GT in-ground bait station, is placed in the ground in areas conducive to termite attack and acts as
– 15 –

a first line of defense against termite invasion of a structure. There are two types of these in-ground bait stations. One type has wood stakes for monitoring the presence of termites. The other type has cardboard treated with sulfluramid. Bait stations are placed in areas where termites are present or very close to monitoring stations that have been attacked by termites.
The active ingredient in FirstLine™ termite bait stations is sulfluramid, a slow-acting stomach poison. The philosophy behind the FirstLine™ products is that many termites will feed on the bait and over time will die. Research with these bait stations demonstrates that reduction of the termite population is possible, but not elimination.
FMC Corporation also markets Interceptor™, an on-the-wall application. This product is placed over a termite tube. The tube is broken open to allow termites to have access to the bait. The active ingredient is sulfluramid.
Exterra® Termite Interception and Baiting System
Ensystex Incorporated manufactures a termite baiting system called Exterra® Termite Interception and Baiting System. The in-ground stations are designed to permit visual inspection without removing or disturbing the stations. The chitin synthesis inhibitor diflubenzuron (Labyrinth®) is the active ingredient in the bait matrix, a shredded paper towel material.
Subterfuge® Termite Bait
BASF manufactures Subterfuge® termite bait with hydramethylnon as the active ingredient mixed into bait matrix. This baiting system places the active ingredient in the ground at the same time the station is placed in the ground. Hydramethylnon is a member of the amidinohydrazone family of chemistry and is primarily active as a stomach poison. It is also non-repellent to termites. It works on the mitochondria of
cells and ultimately shuts down energy production resulting in death in a mannar similar to chlorfenapyr.
BioBlast™
An example of a biotermiticide is BioBlast™, manufactured by EcoScience. BioBlast™ is an EPA registered wettable powder containing live spores of the insect killing fungus Metarhizium anisopliae. This product is injected into the termite galleries. The spores germinate, penetrate the cuticles of termites and kill them. Spores are carried throughout the colony in a manner known as “horizontal transfer.” BioBlast™ controls termites in localized areas if conditions are right for the fungus to grow.
Bait Technology Summary
When deciding whether or not to use baits, it is important to remember that this is a relatively new technology. Baits are still being evaluated and their long-term success is unproven. However, the concept of controlling termites with baits is promising. You, the termite control professional, must determine which approach, colony elimination or suppression, will succeed in each situation.
Baits may require from a few weeks to several months to control termites, depending on such factors as the product selected, application timing, the time to discovery by the termites, the amount of feeding the colony does, colony size and other control measures used.
Baits fit well in an integrated pest management (IPM) control program, along with eliminating conditions conducive to termite infestation, judicious use of liquid soil products as a spot or limited barrier application and use of wood treatment products. An IPM program will require more frequent visits to the site for monitoring and to provide ongoing service. Applicators are strongly encouraged to familiarize themselves with bait technology and future products.
– 16 –

Preventing Termite Damage
Construction Practices
Conditions under which termite colonies thrive are rather rigid. Because of this, certain steps taken during planning and construction of a building greatly reduce or prevent future termite damage. Improper design and construction of buildings, resulting perhaps from a lack of knowledge of or an indifference to the termite problem, can leave structures vulnerable to infestation. It is important to stress the value of good building practices and chemical treatment of soil during construction. The objective of the preventive procedures is to prevent termite access to wood and moisture.
Building Site
The most important rule in avoiding termite problems is to prevent direct contact between soil and untreated wood. Whenever possible, roots, stumps and other wood debris should be removed from the building site before construction work is started. Spreader sticks and grade stakes should be removed before the concrete sets. Form boards and scraps of lumber should also be removed before filling or backfilling around the completed foundation. Wood should not be buried beneath porches and steps (Figure 10). No scraps of lumber should be left on the soil surface beneath or around the building following construction. Removal of all these materials reduces the likelihood of future termite infestation.
Figure 10. Termite colonies can develop in wood debris or soil and gain entrance into a building, particularly at the concrete entrance slabs of porches.
To prevent unfavorable moisture build-up in the soil beneath a building, the soil surface should be graded so that surface water will drain away from the building. Connection of eaves gutters and downspouts to a storm-sewer system helps. On flat sites or around buildings with basements, the use of drainage tile around the outside of the building is also helpful.
Wall and Pier (Crawl Space) Foundations
All foundations should be made as impenetrable to termites as possible to prevent hidden access to woodwork above. This is one of the most important protective measures that can be taken. Foundations may be rated in decreasing order of resistance to termite penetration as follows:
1. Poured concrete foundations, properly reinforced, prevent large shrinkage or Figure 11. Poured concrete wall and settlement pier foundation. cracks (Figure 11). Termite can enter through cracks as small as 1/64 of an inch in width.
2. Hollow-block or brick foundations and piers:
• Capped with a minimum of 4 inches of reinforced poured concrete (Figure 12).
• Capped with precast solid-concrete blocks, all joints completely
Figure 12. A reinforced poured filled with concrete cap on masonry wallscement mortar or pier.
or poured lean grout.
– 17 –

• Top course of blocks and all joints completely filled with concrete. Where hollow blocks are left open, no protection is provided, and this type of construction cannot be treated without serious odor problems.
3. Wooden piers, or posts used for foundations or piers, pressure treated with an approved preservative by a standard pressure process, properly set on concrete bases with top surface above grade.
Raised Porches and Terraces of Concrete or Masonry
Dirt-filled porches and terraces account for a large proportion of termite infestations in buildings. Therefore, do not fill spaces beneath concrete porches, entrance platforms and similar raised units with soil. If possible, leave such spaces open for inspection and provide access doors for that purpose. If this cannot be done, or if the spaces beneath raised units must be filled, leave 6 inches of clearance between the soil and wood and thoroughly treat the soil with an insecticide (see section on soil treatment).
Clearance Between Wood and Soil
The outside finished grade should always be at or below the level of soil in a crawl space underneath the structure (Figures 11, 12, 13) so that:
• Water is not trapped underneath the house, and
• The foundation wall is exposed and can be inspected. The exterior siding
Figure 13. Adequate clearance shouldshould be at be provided between wood and soilleast 6 both outside and inside the building. inches above the outside grade and should not extend down more than 2 inches below the top of the
foundation walls, piers and concrete caps. This will force termites into the open where their tunnels can be seen before they reach the wood.
In crawl spaces, the minimum clearance between the ground and the bottoms of floor joists should be 18 inches. Clearances for girders should be at least 12 inches.
Metal Termite Shields
Another method of preventing hidden entry is by means of termite shields (Figure 14), which are sometimes used instead of the concrete cap or other methods of sealing unit
Figure 14. Termite shield over masonry uncapped masonry wall, showingfoundations. minimum clearance from ground on Properly both inside and outside of foundation.
designed, constructed, installed and maintained metal shields will force termites into the open, revealing any tunnels constructed around the edge and over the upper surface of the shields. However, experience has shown that good shield construction and installation is rare. Also, no termite shield has yet been developed that is absolutely effective in preventing the passage of termites.
Termites can construct tubes on the lower surface of a shield. Occasionally one of these tubes will extend around the edge and up over the upper surface. Frequent inspection for the presence of such tubes, therefore, is essential.
Shields are used primarily for protecting portions of buildings above ground. They are suited for unit masonry piers. They are not effective in safeguarding finished rooms in basements. Termites can enter these rooms through expansion joints, crevices in foundation wall, or cracks in the floor. Shields should not be installed in the slab-on-ground type of construction.
– 18 –
Termites tunneling over the shields, the need for frequent inspections and improper construction and installation of shields are common problems. Therefore, termite shields are not presently recommended for detection and prevention of termite infestations.
Ventilation Beneath Buildings
In buildings with crawl spaces, ventilation openings in foundation walls should be large enough and placed properly to prevent dead-air pockets from forming. Such pockets help create humid conditions that favor termite activity and wood decay. Openings placed within three feet of the comers of buildings usually give the best cross-ventilation. The size and number of openings depend on soil moisture, atmospheric humidity and air movement. In general, the total area of ventilation openings should be equivalent to 1/150 of the ground area beneath dwellings. Shrubbery should be kept far enough from the openings to permit free circulation of air and far enough from the foundation to allow inspection of wall surfaces for termite tubes.
Where there is a tendency for moisture to accumulate in crawl spaces or where adequate ventilation is difficult, a vapor barrier over the soil surface is advisable. Polyethylene sheeting, 4 to 6 ml in thickness, is acceptable.
Exterior Woodwork
Certain exterior woodwork is susceptible to decay, and so pressure-treated wood should be used.
Door Frames
Doorframes or jambs should not extend into or through concrete floors. This is particularly true for exposed outside doors. Door thresholds should not cover open block or gaps in the footings.
Wooden Porches and Steps
Porch supports, such as piers, adjacent to a building should be separated from the building proper by two inches to prevent hidden access by termites
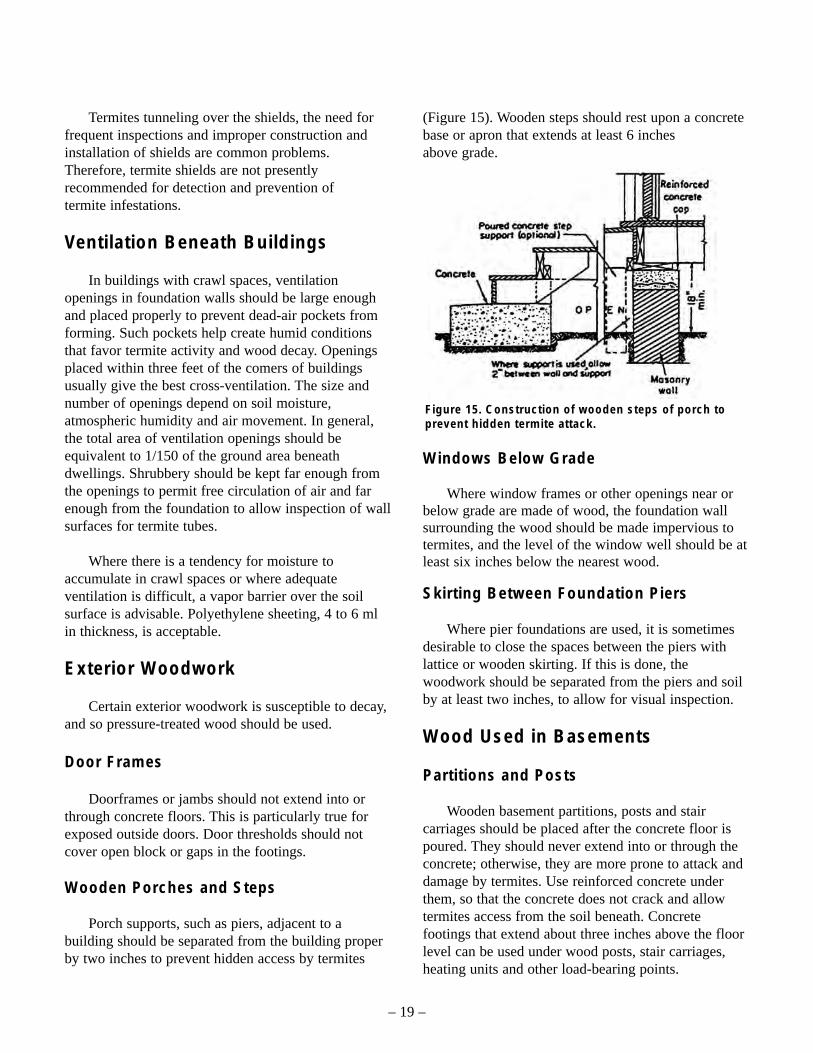
(Figure 15). Wooden steps should rest upon a concrete base or apron that extends at least 6 inches above grade.
Figure 15. Construction of wooden steps of porch to prevent hidden termite attack.
Windows Below Grade
Where window frames or other openings near or below grade are made of wood, the foundation wall surrounding the wood should be made impervious to termites, and the level of the window well should be at least six inches below the nearest wood.
Skirting Between Foundation Piers
Where pier foundations are used, it is sometimes desirable to close the spaces between the piers with lattice or wooden skirting. If this is done, the woodwork should be separated from the piers and soil by at least two inches, to allow for visual inspection.
Wood Used in Basements
Partitions and Posts
Wooden basement partitions, posts and stair carriages should be placed after the concrete floor is poured. They should never extend into or through the concrete; otherwise, they are more prone to attack and damage by termites. Use reinforced concrete under them, so that the concrete does not crack and allow termites access from the soil beneath. Concrete footings that extend about three inches above the floor level can be used under wood posts, stair carriages, heating units and other load-bearing points.
– 19 –

Basement Rooms
Termite infestations in basement rooms are very difficult to detect and control. Such situations commonly exist in recreation rooms and finished basements where untreated wood floors and furring strips are used. The best way to prevent these infestations is to treat the soil below the basement floor, along the outside of the foundation, and in any voids that may exist in the wall. Because of the danger of decay, wood screens, subflooring and furring strips should be made from wood that has been pressure treated with a wood preservative.
Girders, Sills and Joists
A building practice that causes concern is the placement of wooden girders, sills and joists in or on foundation walls in basements below the outside grade level. Termites may find hidden access to this wood; furthermore, the wood may be more subject to decay. Floor joists and girders, boxed in masonry concrete walls, should have an air space of at least one inch around the sides and ends. It is a good practice to use lumber impregnated with a preservative because it is difficult to remove these timbers once they are structurally damaged by termites.
Water Pipes and Conduits
Keep all plumbing and electrical conduits clear of the ground in crawl spaces. Suspend them from girders and joists where possible. Do not support them by wooden blocks or stakes connecting the ground, for termites can tunnel through these supports or construct tubes over them to the sills, floors and joists above. Chemically treat the soil around plumbing that extends from the ground to the wood above.
Where pipes or steel columns penetrate concrete ground slabs or foundation walls, fill the spaces around them with dense cement mortar, roofing grade coal-tar pitch or rubberoid bituminous sealers after the soil around the pipe or column has been treated chemically.
Concrete Slab-on-Ground Construction
One of the most susceptible types of construction, and one that often gives a false sense of security, is the
concrete slab-on-ground. Termites can gain access to the building over the edge of the slab or through expansion joints, openings around plumbing and cracks in the slab. Infestations in buildings with this type of construction are most difficult to control.
Because slab-on-ground construction is so susceptible to termite attack and infestations are very difficult to control in areas of termite activity, pretreat the soil with termiticides before pouring the concrete. Such a treatment, properly applied, will protect a building for many years and is much less expensive than remedial treatments at a later date. Foundations with subslab ductwork should be treated with extra care by an experienced technician.
Do not leave untreated wood such as forms, scraps, grade stakes or wood plugs in or beneath the slab. Reinforce the slab at all points where it is likely to crack.
Slabs vary in their susceptibility to penetration by termites. In order of degree of protection against termites, they are:
1. Monolithic Slab. A monolithic slab (Figure 16) provides the best protection against termites. The floor and footing are poured in one continuous operation, so that there are no joints or other structural features that might permit hidden termites entry. The top of the slab should be at least 8 inches above grade. This type of slab is commonly used under sheds and garages.
Figure 16. Monolithic concrete slab-on-ground construction.
– 20 –

2. Supported Slab. With a supported slab (Figure 17) the floor slab extends completely or partly across the top of the foundation. The slab and the foundation are constructed as independent units. A fully extended slab prevents hidden termite attack, even though a vertical crack may develop in the wall. Termites still must tunnel over an exposed part of the concrete slab. The top of the slab should be at least 8 inches above grade and its lower edge open to view.
3. Floating Slab. The floating slab (Figure 18) is in contact with the ground and is independent of the foundation. This is the most hazardous of the three types of slabs. It comes in contact with the foundation walls where there are expansion joints, through which termites may gain access to the woodwork above.
To reduce penetration through expansion joints and openings made for plumbing and conduits, fill
them with roofing grade coal-tar pitch or rubberoid bituminous sealers. This is not foolproof. The soil should be treated with a long-lasting termiticide before the concrete is poured.
Chemically Treated Woods
Chemically treated wood resists attack by both termites and decay. The degree of protection depends on the kind of preservative, the penetration achieved and the retention of the chemical in the wood. Termites are usually able to build shelter tubes over any small barrier. This is often the case when they encounter naturally resistant wood or chemically treated wood. The termites construct tubes over the undesirable wood to attack the desirable. Only where drywood termites and decay are major concerns should chemically treated wood be used throughout a structure.
Figure 17. Supported concrete slab-on-ground Figure 18. Floating concrete slab-on-groundconstruction. construction.
– 21 –

Termiticide Applications
Termite Treatment During Construction
Chemical treatment of the soil around or under the foundation of buildings serves as one of the most important means of isolating a building from termites; it provides protection from termite attack for many years. Treatment is most effective when done before and during construction of the foundation and should be used in conjunction with good construction, not as a substitute for it. It is particularly important when using concrete slab-on-ground construction. To meet FHA termite-proofing requirements, follow the latest edition of the Housing and Urban Development (HUD) Minimum Property Standards.
Factors Affecting Termiticide Application
The soil type and its moisture content affect the penetration of pesticides. A soil fill accepts treatment best when it is damp, but not excessively wet or dry. If the soil is excessively wet, there is a chance of runoff, and the chemical will not penetrate the soil. In frozen or excessively dry soil, pesticide emulsions are repelled and puddling occurs, resulting in poor penetration and distribution of the termiticide. Check the label, most termiticide labels prohibit applications to be made into saturated or frozen soil.
Mechanical disturbance of treated soil breaks the continuity of the insecticide barrier and increases the possibility of termite penetration. The treatment of fill under slabs extends probably less than 2 inches deep, with the majority of the insecticide being in the top 3/4 of an inch. Therefore, very little disturbance to the treated soil can be tolerated. A freshly treated slab-foundation site should be protected with a polyethylene sheet or other waterproof material, unless the concrete is to be poured the day of the treatment. This protects the treatment from rain and evaporation. The final treatment on the outside of foundation walls should be done after all grading and other soil disturbances have been completed.
A termiticide is stable once it dries in the soil. Because the most commonly used termiticides are quite insoluble in water, leaching is not a problem.
However, there is a slight risk of contaminating a well or other water supply if insecticides are applied to nearby soil that either contains layers of gravel or tends to crack severely during periods of drought. In these situations, the soil should not be treated with chemicals.
Methods of Application
The objective of applying a termiticide to soil is to provide an unbroken chemical barrier between the wood in the structure and termite colonies in the soil. Thus, the insecticide must be applied thoroughly and uniformly to block all routes of termite entry. Treatment is required around all pipes, utility conduits, foundations and footings that contact the soil. Application procedures will depend on the soil type, grading, water table and presence of drainage tile and well location. The design of the structure, location of the colony, severity of infestations in the area and the termite species and its behavior must also be considered. The overall principle in termite control is to make it impossible for termites to move between their nests in the ground and the wood in the structure. If a portion of a structure remains unprotected, termites may still gain entrance to the building.
The rate at which the insecticide will be applied will depend greatly on the results of your site inspection. The site inspection will give you facts about the structure needed to make an application plan. The plan will consist of where applications will be made and how the treatment will be applied.
Three common methods of applying termiticides to soils are broadcast spraying, trenching and rodding.
Broadcast Spraying
A low-pressure broadcast spray may be used to apply termiticides as a preconstruction treatment only before slabs are poured. There are several other points to remember about broadcast spraying:
a) Use low nozzle pressure of 25 psi or less, b) Do not treat the entire crawl space unless covered
with untreated soil or barrier (see termiticide label), and
c) Do not treat areas intended for use as plenums.
– 22 –

Trenching
Trenching involves digging a narrow trench and then flooding it with a measured amount of insecticide. The trench must be right next to the face of the foundation wall or the masonry-work footing of any supporting posts or piers. The trench may not extend below the top of the footing of the foundation wall. The termiticide may be rodded into the soil at the bottom of the trench in addition to being mixed with the excavated soil as the soil is replaced in the trench.
Trenching varies with soil type and moisture. Some people suggest digging a shallow trench and then rodding the soil below to reach the depth of the footings. The trench should be slightly deeper next to the foundation so that the chemical flows against the foundation instead of away from it. On an incline, the trench is constructed in a stair-step fashion to prevent the termiticide from flowing down the incline. In wet or tightly packed soils it is difficult to obtain the needed penetration with the trenching method. Sandy or loose soils can be treated satisfactorily under normal circumstances.
Apply the prescribed label rate of the termiticide emulsion for each 10 linear feet of trench for each foot of depth from grade to footing along the entire length of the trench. Be sure to treat the soil thoroughly as it is returned to the trench. Break up lumps and clods of soil and treat every few inches of depth as the soil is being replaced.
In general, soil and termiticide are mixed in the following manner: After the soil is removed from the trench, some of the termiticide, but not all, is poured into the trench. Some, but not all, of the soil is then backfilled into the trench and mixed thoroughly with the termiticide. Continue alternately adding termiticide and soil, and mixing thoroughly, until the trench is filled. The objective is to obtain even treatment of all the soil in the trench, so take care to combine termiticide and soil in the proper proportions as you fill the trench. Trenching should be done by two people, one to apply the termiticide and the other to add the soil to the trench and mix it with the termiticide. Both people must be certified applicators.
If you think that a foundation may leak if termiticide is poured into the trench, you may spread the excavated soil onto a tarp and add termiticide
directly to the soil on the tarp. Again, only treat some of the soil at any one time. Mix it thoroughly with the termiticide and backfill it into the trench. Proceed until all the soil has been treated and placed back in the trench.
When the trenching operation is completed, cover the treated soil with approximately 1 inch of untreated soil; this will reduce risk of exposure of residents and pets to the treated soil.
Rodding
Rodding the soil is believed by many to be the simplest method of application. The pesticide is applied through hollow steel tubes inserted vertically or horizontally into the soil. A rod is usually made of a pipe, 1/2 of an inch in diameter and about 4 feet long, with a handle and shutoff valve at one end. The other end is fitted with a perforated tip to disperse the liquid laterally as well as downwards.
Penetration of the ground surface may be aided by wetting down the soil before inserting the rod. After rod penetration has begun, chemical flow can start and will aid in the passage of the rod to 3 or more feet necessary to soak the soil at the footings. Always move the rod slowly, allowing the chemical to spread. Never push down and then bring up the treatment rod. Apply the suggested label rate for each 10 linear feet per foot of depth to the top of the footings.
Spacing of rodding varies with soil conditions. Usually, penetration is made every 12 inches, but can sometimes be as close as every 6 inches in clay and as much as 18 inches in sand. The objective is to place the insertion points close enough together to provide overlapping of the application; this ensures there will be no untreated gaps. Angling the rod slightly toward the foundation directs the flow against it. The rod insertion points should be parallel to the foundation.
Slab-on-Ground Buildings
This type of construction is best treated as a pretreatment. Soon after the gravel or dirt fill has been made and tamped, spray the soil with termiticide before the concrete slab is poured. Use a low-pressure (25 psi), coarse spray to avoid misting and drift.
– 23 –

Horizontal Barriers
Apply the label rate of diluted chemical for each 10 square feet over the entire under-slab area, and also under any attached porches, terraces, carports and garages where the fill consists of soil or unwashed gravel (Figure 19).
Figure 19. Chemical treatment of the fill material prior to pouring a concrete slab protects wood in the building from termite attack.
Apply the recommended amount of diluted chemical for each 10 square feet to those areas where the fill is washed gravel or other coarse absorbent material, such as cinders.
Vertical Barriers
Dig a trench 6 to 8 inches wide along the outside of the foundation, including porches and patio. Where the top of the footing is more than 12 inches deep, large volumes of chemical are required. For proper application, make holes about 12 inches apart in the bottom of the trench to the top of the footing, using a crowbar, metal rod or grouting rod. These holes permit better distribution of the chemical by providing access to the soil at depths below the trench. The holes may need to be closer together in hard-packed day soils than in sandy soils. Apply the label indicated rate of diluted chemical for each 10 linear feet of trench for each foot of depth from grade to footing. Refill the trench with the excavated soil, mixing it with the pesticide as described earlier (Figure 20).
Figure 20. Application of a chemical to soil around the foundation.
Hollow Block Foundation/ Voids in Masonry
The general procedure is to, drill holes in the blocks at least 1 to 2 feet above the footing or as close to outside grade level as possible but not above the top of an interior slab. Chemical should be injected to form a continuous barrier and every void should be treated. Apply the label rate of diluted chemical for each 10 linear feet of wall or foundation so that it reaches the footing.
Crawl Space Houses
Crawl spaces are low, less than 3 feet high, and usually have exposed soil. This type of construction is common in many parts of the country, particularly where basements are common. The exposed soil, short distance to floor joists and sills, and unkempt nature make crawl spaces an ideal portal for termites to find and infest the wood in a structure and for swarmers to escape the nest. The termiticide selected should produce little or no odor; exposed treated soil in a crawl space can become a smelly nuisance.
Mechanical Alterations
Remove any pieces of wood left on top of the soil; contractors will often leave construction debris in crawl spaces. Capping the soil with a layer of concrete will prevent swarmers from emerging. Treat the soil before the cap is poured to form an effective barrier. The crawl space should be vented to help minimize moisture and odor build-ups. It is recommended that the total area of vents be equal to 1/150 of the total area of the crawl space. A crawl space with vents placed on at least two of the outside walls and close to the corners will have few dead-air pockets.
Soil Treatments
Treat the soil adjacent to the foundation walls by digging a trench 6 to 8 inches wide along the inside of the foundation (Figure 21). Apply the correct amount of diluted termiticide for each 10 linear feet of trench for each foot of depth from grade to the footing. Where the top of the footing is more than 12 inches deep and thus large volumes of termiticide must be applied, make holes about 12 inches apart in the bottom of the trench to the top of the footing, using a
– 24 –
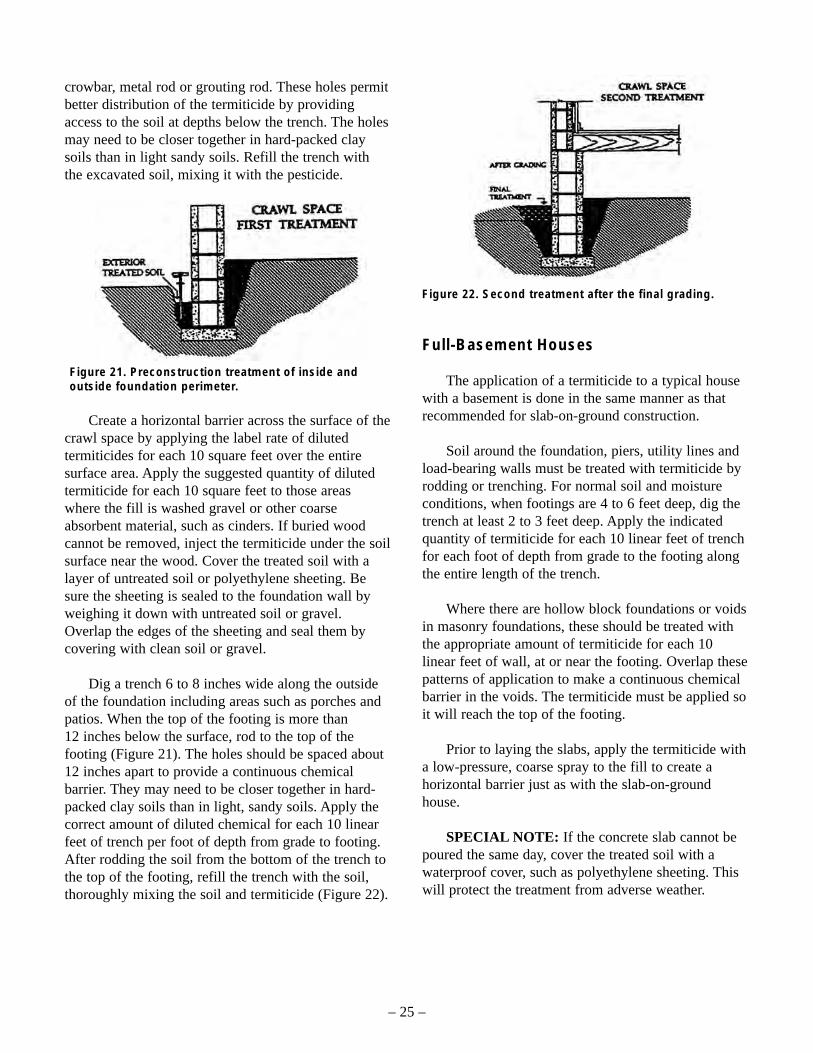
crowbar, metal rod or grouting rod. These holes permit better distribution of the termiticide by providing access to the soil at depths below the trench. The holes may need to be closer together in hard-packed clay soils than in light sandy soils. Refill the trench with the excavated soil, mixing it with the pesticide.
Figure 21. Preconstruction treatment of inside and outside foundation perimeter.
Create a horizontal barrier across the surface of the crawl space by applying the label rate of diluted termiticides for each 10 square feet over the entire surface area. Apply the suggested quantity of diluted termiticide for each 10 square feet to those areas where the fill is washed gravel or other coarse absorbent material, such as cinders. If buried wood cannot be removed, inject the termiticide under the soil surface near the wood. Cover the treated soil with a layer of untreated soil or polyethylene sheeting. Be sure the sheeting is sealed to the foundation wall by weighing it down with untreated soil or gravel. Overlap the edges of the sheeting and seal them by covering with clean soil or gravel.
Dig a trench 6 to 8 inches wide along the outside of the foundation including areas such as porches and patios. When the top of the footing is more than 12 inches below the surface, rod to the top of the footing (Figure 21). The holes should be spaced about 12 inches apart to provide a continuous chemical barrier. They may need to be closer together in hard-packed clay soils than in light, sandy soils. Apply the correct amount of diluted chemical for each 10 linear feet of trench per foot of depth from grade to footing. After rodding the soil from the bottom of the trench to the top of the footing, refill the trench with the soil, thoroughly mixing the soil and termiticide (Figure 22).
Figure 22. Second treatment after the final grading.
Full-Basement Houses
The application of a termiticide to a typical house with a basement is done in the same manner as that recommended for slab-on-ground construction.
Soil around the foundation, piers, utility lines and load-bearing walls must be treated with termiticide by rodding or trenching. For normal soil and moisture conditions, when footings are 4 to 6 feet deep, dig the trench at least 2 to 3 feet deep. Apply the indicated quantity of termiticide for each 10 linear feet of trench for each foot of depth from grade to the footing along the entire length of the trench.
Where there are hollow block foundations or voids in masonry foundations, these should be treated with the appropriate amount of termiticide for each 10 linear feet of wall, at or near the footing. Overlap these patterns of application to make a continuous chemical barrier in the voids. The termiticide must be applied so it will reach the top of the footing.
Prior to laying the slabs, apply the termiticide with a low-pressure, coarse spray to the fill to create a horizontal barrier just as with the slab-on-ground house.
SPECIAL NOTE: If the concrete slab cannot be poured the same day, cover the treated soil with a waterproof cover, such as polyethylene sheeting. This will protect the treatment from adverse weather.
– 25 –
Treatment of Existing Termite Infestations
Ridding existing structures of termite infestations, plus making them resistant to future infestation, is a major goal of termite control. Generally, buildings become infested because, during construction, little or no attention was paid to the preventive measures that would have made the structures resistant to termites. It is in such buildings that termites cause heavy damage each year.
To control termite infestations in existing buildings, observe the same principles that are recommended for the prevention of infestation during the construction of new buildings. That is, eliminate conditions that favor the development of termite colonies in the soil and conditions that permit the passage of termites from the soil to the woodwork of the building. This is important, because termites in the woodwork of a building die if they are prevented from maintaining contact with the soil or other sources of moisture.
Inspection
Each job should start with a thorough inspection. Such an inspection and record keeping will help you avoid legal entanglements, provide proper explanation of the needed work to the owner, help you price the job properly and help you or your employees do the job properly.
For a proper inspection, you need a strong light, a sharp probing tool (e.g., ice pick, leather awl or screwdriver), a tape measure, coveralls, a hard hat, kneepads, graph paper and inspection sheets. A moisture meter may be helpful. Specially trained termite-detection dogs have been useful in locating difficult-to find colonies. A sketch drawn to scale showing the structure’s ground area is very helpful in planning the work and should be kept in your files. It should show all details for treatment and should include the location and spread of the infestation found.
The inspection of both inside and outside walls for termite shelter tubes should be carried out carefully, particularly when the tubes are near soil or in basements or crawl spaces. Check for the presence of swarmers or their shed wings.
Tapping exposed wood by hitting along the grain is also necessary, particularly if foundation walls are of hollow-block construction. Termites frequently enter wood through the voids in the blocks and are very hard to detect. Soundings will tell you where the wood has been damaged or if the wood is easily damaged. If either occurs, probe further for tunnels or the brown, pasty substance, called mastic that termites leave.
Many other pests, including insects and fungi, damage wood. You should be able to distinguish damage caused by termites from that caused by these other wood-destroying pests; this is essential if you are to correctly assess a situation and properly advise your customer.
Walls constructed of stone, concrete, cinder blocks, hollow tile, or brick may develop cracks through which termites can pass to sills and other wood members; carefully inspect such walls. Earth-filled porches and steps account for more cases of termite attack than any other building feature.
Check wood paneling and other wall finishings on basement walls, wood partition walls, and other wood construction in the basement, which extends from masonry to the sills or joists.
Note plumbing and utility fixture entrances and passages through the basement floor and the foundation.
Determine the presence of wells, whether driven or dug, and their distance from the building.
Investigate and make records of springs, sumps, drainage tiles or anything which might be contaminated or transport pesticides away from the treatment area.
Even if an infestation is found, the inspection should be complete and thorough to ensure all points of entry and damage have been found. A light infestation may escape detection even with careful inspection.
Measure inside and outside to make sure that there are no hidden or blind rooms, or double walls.
– 26 –
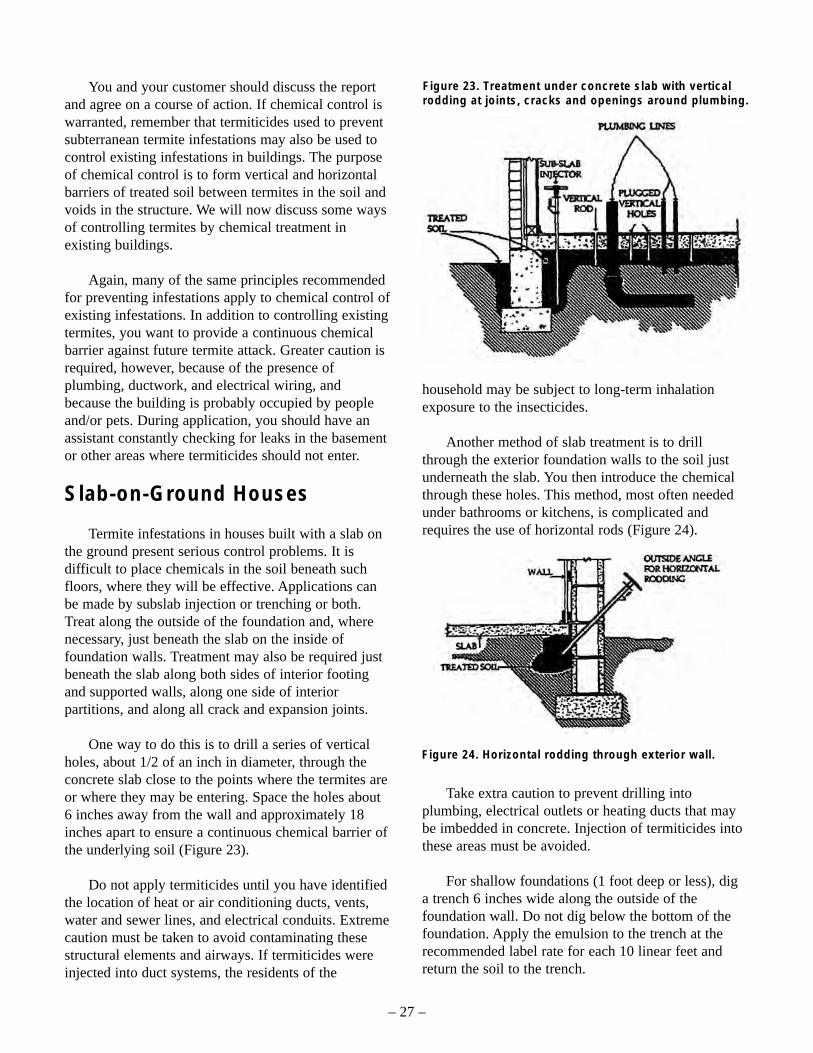
You and your customer should discuss the report and agree on a course of action. If chemical control is warranted, remember that termiticides used to prevent subterranean termite infestations may also be used to control existing infestations in buildings. The purpose of chemical control is to form vertical and horizontal barriers of treated soil between termites in the soil and voids in the structure. We will now discuss some ways of controlling termites by chemical treatment in existing buildings.
Again, many of the same principles recommended for preventing infestations apply to chemical control of existing infestations. In addition to controlling existing termites, you want to provide a continuous chemical barrier against future termite attack. Greater caution is required, however, because of the presence of plumbing, ductwork, and electrical wiring, and because the building is probably occupied by people and/or pets. During application, you should have an assistant constantly checking for leaks in the basement or other areas where termiticides should not enter.
Slab-on-Ground Houses
Termite infestations in houses built with a slab on the ground present serious control problems. It is difficult to place chemicals in the soil beneath such floors, where they will be effective. Applications can be made by subslab injection or trenching or both. Treat along the outside of the foundation and, where necessary, just beneath the slab on the inside of foundation walls. Treatment may also be required just beneath the slab along both sides of interior footing and supported walls, along one side of interior partitions, and along all crack and expansion joints.
One way to do this is to drill a series of vertical holes, about 1/2 of an inch in diameter, through the concrete slab close to the points where the termites are or where they may be entering. Space the holes about 6 inches away from the wall and approximately 18 inches apart to ensure a continuous chemical barrier of the underlying soil (Figure 23).
Do not apply termiticides until you have identified the location of heat or air conditioning ducts, vents, water and sewer lines, and electrical conduits. Extreme caution must be taken to avoid contaminating these structural elements and airways. If termiticides were injected into duct systems, the residents of the
Figure 23. Treatment under concrete slab with vertical rodding at joints, cracks and openings around plumbing.
household may be subject to long-term inhalation exposure to the insecticides.
Another method of slab treatment is to drill through the exterior foundation walls to the soil just underneath the slab. You then introduce the chemical through these holes. This method, most often needed under bathrooms or kitchens, is complicated and requires the use of horizontal rods (Figure 24).
Figure 24. Horizontal rodding through exterior wall.
Take extra caution to prevent drilling into plumbing, electrical outlets or heating ducts that may be imbedded in concrete. Injection of termiticides into these areas must be avoided.
For shallow foundations (1 foot deep or less), dig a trench 6 inches wide along the outside of the foundation wall. Do not dig below the bottom of the foundation. Apply the emulsion to the trench at the recommended label rate for each 10 linear feet and return the soil to the trench.
– 27 –

For foundations deeper than 1 foot, use the rates given for basement houses later in this chapter.
Structures With Ducts in the Slab
Applying a termiticide to an existing structure with intraslab or subslab air circulation ducts must be done with great care. Intraslab ducts are completely encased in the slab (Figure 25). The ducts of a subslab system rest on a vapor barrier, with the concrete poured on top (Figure 26). Take extra precautions when treating a structure with one of these systems; puncturing a duct or allowing termiticide to leak into these ducts results in serious problems. If a mistake is made, there are corrective measures. However, they are expensive and the applicator may never be able to alleviate the customer’s fears.
Figure 25. Intraslab air duct system.
Figure 26. Subslab air duct system.
When inspecting for termites in a structure with air ducts in the slab, you should include some additional procedures. Try to obtain a diagram or blueprint of the duct systems. Determine what the ducts are constructed of, and how tight the joints are. Make measurements of the depth, width and location of the ducts. Inspect the ducts carefully, using a mirror and a flashlight, for soil deposits and evidence of breaks in the ducts. Swarmers coming from the ducts also indicate a break in the integrity of the ductwork.
Discuss evidence of breaks in the ductwork with the homeowner, as this may lead to termiticide leakage.
The termiticide needs to be applied beneath the slab, under or around the ducts. Special tools – subslab injectors – are made for injecting the chemical beneath the slab. They are available with a rubber seal that presses against the sides of the hole drilled in the concrete to avoid leakage up on top of the slab. The holes should be drilled carefully (Figure 27) and must not puncture the ducts. The chemical should be applied at reduced pressure to keep the chemical from being forced into the ducts. Rather than using a subslab injector, you may choose to apply the chemical by gravity feed for an additional margin of safety.
Figure 27. Subslab perimeter heat duct showing the angles needed to rod the termiticide.
During and after treatment, check the ducts for signs of the termiticide. Turn on the heating system and check for odors. If you detect an odor, turn the system off and determine the source of the odor. Leakage in the ducts must be removed. If the odor is from the moist soil, it may persist for several days. The applicator must refer to the termiticide manufacturer for cleanup and odor-deactivation procedures.
Raised Cement Porches, Terraces, Entrance Slabs, Sidewalks and Driveways
All of these that are either filled with soil or on the soil must have the soil adjacent to the foundation treated to control infestations. Treatment may be carried out by drilling through the concrete or tunneling under the concrete next to the foundation wall. No untreated soil should come in contact with
– 28 –

any wooden portion of the structure. Holes should be drilled 12 to 18 inches apart, but in some soils 30 to 36 inches is not uncommon. Thorough treatment of the soil along the foundation is the goal.
Crawl Space Houses
Buildings with crawl spaces usually can be treated easily and effectively. In general, the following procedures can be used:
Dig trenches 6 to 8 inches wide adjacent to and around all piers and along both the inside and outside of all foundation walls. For poured concrete foundations, the trench needs to be only 3 to 4 inches deep. For brick and hollow block masonry foundations, it should be at least 12 inches deep. Where the footing is more than 12 inches deep, make crowbar, pipe or rod holes about 1 foot apart and extend them from the bottom of the trench to the footing. This will prevent termites from gaining hidden entry to the building through voids in these types of foundations. The trench should not be dug below the foundation. Rods shorter than the normal (3- or 4-foot) can be used. Cover treated soil with a layer of untreated soil or another suitable barrier such as polyethylene sheeting.
Piers, chimney bases and utility entrances should also be treated. Treatment at the label rate for each 10 linear feet for each foot of depth will soak the soil for thorough coverage. If the trench is deep, apply the chemical to alternate layers of soil, each about 6 inches thick. Do not make overall broadcast applications in crawl spaces of existing structures.
Basement Houses
Where footings are greater than 1 foot of depth from the grade to the bottom of the foundation, application can be made by trenching or rodding or both at the suggested rate of emulsion for each 10 linear feet per foot of depth. Treat along the outside of foundation walls and, if necessary, beneath the basement floor along the inside of foundation walls as well as along interior load-bearing walls, conduits and piers.
Foundations With Holes, Cracks, Voids or of Stone or Rubble
Stone and rubble foundations, found mainly in older structures, are particularly susceptible to termite attack primarily because of gaps between the stones. The gaps may never have been filled with mortar or the mortar may have deteriorated. Termites can exploit these gaps and tunnel within the wall. A second hazard often associated with these foundations is that the floor joists may be close to the fill, as in the crawl space, or embedded in the foundation. A third condition that an applicator may find is a porch or crawl space without ventilation, which results in damp soil and an ideal hidden location for tubes being built up from the soil to the joists.
Mechanical Alterations
Mechanical alterations may consist of several important repairs. Using mortar to seal gaps between the stones. This sealing operation may go as far as completely facing the wall. Build an access door to inaccessible areas. Install ventilation louvers. Remove soil if it is too close to joists. If there is structural damage, use treated wood when making repairs.
Termiticide Treatments
Interior (soil under the floor) and exterior termiticide application down to the footing is essential. When conducting soil treatments on the exterior, you must be careful that the foundation will not allow seepage into the structure. If you are not confident the foundation will hold the termiticide, do not rod or flood a trench. Trenching, treating the excavated soil and then shoveling the treated backfill into the trench will lower the risk of chemical seepage into critical areas of the structure. Even so, an assistant should be inside looking for leaks during the application. Rodding at the bottom of the trench may be necessary to reach the footing; however, inject the termiticide under low pressure. Treating foundations and wall voids is not recommended as it may lead directly to seepage.
– 29 –

Multiple Brick, Concrete Blocks, Hollow Tile, Etc.
All of these are common and must be horizontally drilled. Holes must be placed in the mortar joints to obtain necessary chemical penetration.
Brick foundations that are at least two bricks thick have headers – bricks laid at right angles periodically – that can stop the flow of a termiticide. Basement construction of multiple-brick foundations should be treated below grade level from the inside and above grade level from the outside. Holes placed every 16 inches at the end of every two stretchers – bricks laid with the 8-inch side out – are adequate. It may be necessary to treat each section of the foundation under conditions such as heavy infestation, moisture problems or construction features.
The voids in hollow-tile walls run horizontally, so a chemical treatment cannot reach below the point where you treat. Do not drill through the tile directly, for it is easily cracked. A thorough grade-level pesticide application to obtain good soil coverage on both sides of the foundation (i.e., where there is a crawl space) is one of the best methods of treatment. This is also true for fieldstone foundations. Little can be done to treat voids, so complete treatment of the soil is of the utmost importance. Fieldstone foundations must be patched and all cracks and voids must be filled before treatment; still, the soil must be removed, treated on a tarp and then backfilled into the trench.
Houses With Wells, Cisterns, Springs, High Water Table or Near Ponds, Lakes or Streams
It is your responsibility to apply the termiticide without contaminating water supplies. Take special precautions if wells, cisterns or springs are located near the treatment area. You should know the restrictions placed on termiticide application by state or local pesticide regulations regarding the minimum acceptable distance between wells and sources of pollution. You must comply with these regulations and label directions for the chemical being used.
The insecticides presently used move very little once they are deposited on the soil and the emulsion
has dried. Movement is usually the result of the emulsion flooding through underground channels, such as those left by old tree roots, through soil that tends to crack severely during periods of drought, or through rock crevices.
Faulty wells are probably the most common cause of contamination. These faults permit surface water to enter the well, usually along the supply pipes that lead into the dwelling. Wells may be constructed in a variety of ways. Casing materials is an important factor to consider. Wells may be cased with steel tubing, stone, concrete or even drainage tiles. Older wells are particularly vulnerable to contamination because the casing may have deteriorated and thus may no longer seal the well from contamination. This is a particular problem with stone-, concrete- and tile-cased wells, which are poorly sealed to begin with. Because it is difficult for the PMP to detect defective well construction or a faulty well, request the well be tested for coliform bacteria by the health department prior to treatment. A positive test indicates that surface runoff is entering the well. This also indicates that the termiticide may also enter the well and the application should not be made.
The well’s location, distance from the structure, depth and location of the supply line must all be recorded during the pretreatment inspection. It is especially important to ask about the location of water wells and cisterns, because the well may be buried and cannot be seen. The inspection should determine runoff patterns, note the slope of the land and the location of paved surfaces. This is especially important if the treatment is to take place uphill of the well, because most shallow groundwater flows in roughly the same direction as the land slopes. The soil type and permeability, seasonal height of water tables and depth of foundation footings need to be known. The permeability of soils and seasonal height of water tables can sometimes be obtained from the U.S. Department of Agriculture’s (USDA) soil surveys for individual counties. If there are no published surveys available for a particular site, representatives of the USDA Soil Conservation Service may have detailed site information from mapping work in progress. Local well drillers, drainage contractors and builders are good sources of information of the depth of the water table. Some important information published in soil surveys includes the permeability of soils to a depth of five feet, the soil texture (amount of gravel, sand, silt and clay typically found in soils) and the percent
– 30 –
organic matter found in soils. Generally, the coarser the soil (that is, the more sand and gravel found in the soil), the more permeable it will be. Conversely, the more organic matter in soil, the more it will hold water.
Treatment Procedures Near the Well and Supply Lines
The soil nearest the well should not be treated by rodding even under reduced pressure. Trench the soil along the foundation and apply the termiticide solution at the recommended rates. Mix the termiticides with the loose soil as you refill the trench.
An alternative method requires removing the soil from the trench and placing it on a waterproof tarp. Apply the termiticide to the soil on the tarp and mix. The treated backfill is then placed back into the trench. You could also line the trench with polyethylene prior to replacing the treated backfill. The polyethylene lining is another method of preventing movement of the termiticide during an application. Cover all treated soil according to label directions.
Extreme care is needed when applying a termiticide around the water supply line. The termiticide may follow the pipe and reach the well. Uncover the supply pipe from the structure out toward the well for a short distance so that seepage along the pipe can be detected. Use the treated back fill or the polyethylene lining application technique to apply the termiticide along the foundation near the supply pipe.
Be especially careful to apply only the amount of chemical needed and apply it slowly enough to let the soil hold it. Do not treat soil that is water-saturated or frozen. Avoid flooding and runoff.
Finally, it may not be possible to solve the customer’s problem safely with a termiticide application. Consider mechanical alterations to the structure to the extent it is economically feasible.
Treatment Odors
The most common complaint about termite treatments is the chemical odor that may linger afterwards. Although the chemicals themselves have little odor, the solvents, emulsifiers, impurities and related compounds in the formulation can create odors that will often disturb the customer. Under various
conditions these odors can be strong, offensive and long lasting, a situation that leads to many problems, complaints, and even lawsuits.
Clients should be informed that there may be some odors associated with the treatment for three or four days. To prevent odor build-up when treating structures, the structure must be ventilated. Windows and doors should be open, and fans can be used to circulate air. Air conditioners should be turned off, and close off upstairs doors when possible.
Seal any uncapped masonry voids before or immediately after treatment. Aerosol foam insulation, strips of roofing material or tarpaper anchored by roofing cement, or solid bricks or caps can be used to seal the voids.
Crawl spaces pose special problems. Install vents if they are not present. If there is excess moisture or dampness, postpone treatments until the soil dries. If a clump of soil squeezed in your hand retains its shape without flaking or falling apart, the soil is probably too wet. Remember, most labels have strong statements about treating wet or frozen soil. The excess moisture causes the odors to linger for several days. Treated soil can be covered with a layer of untreated soil, and vapor barriers can be placed over treated soil. There are also masking or odor reducing products that can be added to the spray tank.
Caulk, fill or seal openings through the floor of a crawl space, such as plumbing, air vents and bath traps. Take special care if there is a furnace or ductwork in the crawl space. All ductwork must be sealed, and some types of systems may not be treatable without major odor problems. If ductwork is accidentally treated with one of the new termiticides, there are ways of decontaminating the site, but they are very expensive. If you have any concern with a potential odor problem, seek additional help before treatment, and explain the problem to the customer.
Operate pumps at pressures between 25 to 50 psi to minimize splashing. Plug all holes after injection, and seal all visible cracks in basement or masonry walls. It is a good practice to have an assistant inside a basement to warn of any seepage problems. Use dehumidifiers in basements to remove moisture and speed drying. For extreme odor problems, activated charcoal filters can be placed on ventilating fare or in the furnace and ducts.
– 31 –
Application Equipment and Calibration The proper selection of application equipment and
its correct operation and maintenance are perhaps as important to effective pest control as the selection of the pesticide itself. The substantial investment in equipment requires that the choice be based on a thorough familiarity with all alternatives, including recent developments in application technology. Many problems of current concern, such as non-uniform coverage and failure of a pesticide to effectively reach the target organism, area at least partially solvable through proper selection and correct operation of application equipment.
When selecting a sprayer, be certain it will operate effectively when subjected to the deteriorating effects of some formulations on hoses, seals, tanks, etc. Other selection considerations should include durability, cost and convenience in filling, operating and cleaning. The function of any sprayer is to deliver the proper rate of chemical and apply it uniformly.
Termite Application Equipment
Termite control requires specialized equipment. The basic piece of equipment for termite control is that used to force chemicals into the soil, foundation voids and areas to be flooded.
In general, your equipment should have enough pump capacity to provide adequate in-line pressure for a hose reaching half way around the structures you normally treat. The longer the hose length used, the greater the drop in pressure. The pump should have adjustable pressure and a bypass valve. Either gasoline-powered engines or electric motors can be used.
Components of Sprayers
For proper maintenance and operation, a thorough knowledge of the various sprayer components is essential. The major components of a sprayer are the supply tank, pump, flow control and nozzles. Other important components include strainers, pressure gauges, hoses and fittings.
Tanks
Because sprayer tanks hold the spray mixture, they must be made of material that is resistant to corrosion from the various pesticide formulations that might be used. Suitable materials include stainless steel, polyethylene plastic and fiberglass. Some pesticides cause corrosion in aluminum, galvanized and steel tanks; therefore, these materials should be avoided.
The filler opening should be large enough to accommodate easy filling and inspection for cleanliness. The cover should form a watertight seal when closed. Some tanks have a screen just under the cover to remove dirt from water during filling. Larger tanks should have some support device to hold the water hose above the filler opening to prevent back siphoning. All tanks should have a shutoff valve located at their lowest point. Tank capacity markings must be accurate to facilitate adding the correct quantity of water or other carrier.
Polyethylene tanks are inexpensive, lightweight and resist corrosion. Although polyethylene tanks are tough and durable, the tank must be replaced if it becomes cracked or broken. And because ultraviolet light causes polyethylene to break down, these tanks should be kept out of the sun when not being used.
Fiberglass tanks are strong and durable but may break or crack when subjected to impact. These tanks are inexpensive and can be used with most chemicals but may be affected by some solvents.
Stainless steel is the highest quality material for pesticide applicator tanks. It is strong, durable and resistant to corrosion by any chemical.
Pumps
The heart of the spraying system is the pump. It must deliver the necessary flow to all nozzles at the desired pressure to ensure uniform distribution. Pump flow capacity should be 20 percent greater than the largest flow rate required by the nozzles and hydraulic agitation to compensate for pump wear.
– 32 –
Other considerations are resistance to corrosive damage from pesticides, initial pump cost, ease of priming and power source available. The materials in the pump housing and seals should be resistant to chemicals, including organic solvents.
Pesticide sprayers commonly use roller, centrifugal, piston, and diaphragm pumps. Each has unique characteristics making it well adapted for a particular situation. Roller, piston and diaphragm pumps are positive-displacement pumps; that is, the volume of output per revolution is always the same, regardless of speed or pressure. In contrast, the output per revolution of centrifugal pumps varies with speed and pressure.
Strainers
Proper filtering of the spray mixture protects the working parts of the spraying system. Three types of strainers commonly used on sprayers are tank-firer, line and nozzle. As the mixture moves through the system, strainer openings should be progressively smaller. Strainer mesh is described by the number of openings per linear inch; a high number indicates a small opening.
A 12- to 20-mesh strainer should be used in the tank filler opening and 40- to 50-mesh is suggested for the line strainer. For positive-displacement pumps (roller, piston and diaphragm), the line strainer should be located between the pump inlet and tank. For centrifugal pumps, it should be located immediately after the pump outlet. Dirt has a smaller impact on centrifugal wear as compared to other pumps.
Nozzle strainers are sometimes installed to ensure that nozzles do not clog. These strainers vary in size but common sizes are 50- and 100-mesh.
Hoses
Use synthetic rubber or plastic hoses that have a burst strength greater than peak operating pressures, resist oil and solvents present in pesticides and are weather-resistant.
Sprayer lines must be properly sized for the system. The suction line, often the cause of pressure problems, must be airtight, non-collapsible, as short as possible, and have an inside diameter as large as the
pump intake. A collapsed suction hose can restrict flow and cause damage to pump seals.
Aminimum of restrictions and fittings should exist between the pressure gauge and nozzle. The proper size line will vary with the size and capacity of the sprayer. A high, but not excessive, fluid velocity should be maintained throughout the system. If lines are too large, the velocity may be so low that the pesticide will settle out and clog the system.
Flow-Control Assembly
The flow-control system directs the flow of the spray mixture and assures that enough flow reaches the nozzles at the desired pressure. The major component is a pressure shutoff valve or a throttling valve.
A pressure gauge must be a part of every sprayer system to correctly indicate the pressure at the nozzle. Pressure directly affects the application rate and spray distribution. Annually check the pressure gauge with a gauge known to be accurate. The total range of a pressure gauge should be two times the maximum expected reading. When selecting a gauge, be sure the internal materials are resistant to the corrosiveness of the spray mixture.
Treating Tools
Various types of implements are used on the end of the hose; a quick-acting valve is highly desirable between the hose and such implements. Generally, three different types of treating tools are used, each tool can be fitted with one of several different tips:
1. Three- to 6-foot pipes are used to force chemicals down into the soil along foundations; these pipes are frequently referred to as rods or soil-rodding devices. Various tips are available for use on these rods.
2. Shorter pipes or rods are used to inject chemicals into wall voids.
3. A subslab injector is used to insert a rod through a concrete slab and inject chemicals into the soil beneath the slab. The injector seals the hole around the injector tube preventing the chemical from spewing out of the hole as a result of backpressure.
– 33 –
Foaming Agents
The use of foaming agents is a developing technology in termite control. The foam is a compact mass of air bubbles separated from each other by a liquid film; air makes up about 85-95 percent of the foam. There are wet and dry foams depending on how much water is used in the mix. After a few minutes to hours after application, the foam breaks down into a liquid as the bubbles collapse.
The foam helps distribute insecticide that is injected in areas that are difficult to treat, such as under slabs and outside steps, around rubble foundations, behind veneers and in voids found in walls, chimneys and masonry. Most of these sites are treated blindly. Foams will disperse around obstructions, rather than being deflected as liquids are, and will better fill a void. As the foam breaks down, it will leave a thin residue on all surfaces it had contacted. This will result in a more complete, uninterrupted treatment barrier.
Be sure the formulation does not contain anti-foaming agents that can complicate the treatment. Some pesticide manufacturers are using special termite formulations to mix better with foaming agents.
Calibration
Application rates may be determined by use of a flow meter (water meter), timer or “slow count” method. In a timer or slow count method, a one-gallon container is filled with water and the delivery rate is determined on a “timed” basis. When using either method, the rate should be periodically checked because delivery rates can change. The rate also should be checked when applying large quantities of solution to make sure that timing or count is accurate. Injecting chemicals into soil results in lower delivery rates per unit of time because of backpressure. Differences in soil composition and compacting also affect delivery rate. In most instances, a flow meter is preferred because it provides the operator a constant and accurate reading of delivery rate. Sample calibration problems are given below.
– 34 –

Sample Calibration Problems
1. Computing solutions as percentage of weight.
% by wt. Desired x gal. Final product x 8.34lbs of pesticide to use = _________________________________________________ % of original product
EXAMPLE: How much wettable powder pesticide containing 40% active ingredient should be added to a 100-gallon tank if recommended treatment is 0.25% concentrate by weight?
0.0025 x 100 gallon x 8.34lbs of pesticide to use = __________________________________ = 5.2 lbs pesticide needed 0.40
2. Computing ppm in solution from mixing wettable powder.
PPM Desired x gal. Final product x 8.34lbs of pesticide to use = ________________________________________________ 1,000,000 x % of original product
EXAMPLE: How much wettable powder pesticide containing 40% active ingredient should be added to a 100-gallon tank if recommended treatment is 1200-ppm a.i.?
1200 x 100 gallon x 8.34lbs of pesticide to use = ___________________________________= 2.5 lbs pesticide needed 1,000,000 x 0.40
3. Compute ppm mixing emulsifiable concentrate.
PPM Desired x gal. Final product x 8.34Gallons of pesticide to use = ________________________________________ 1,000,000 x % of original product
EXAMPLE: How much liquid emulsifiable concentrate containing 0.625 lbs active ingredient (a.i.)/gallon should be added to a 100-gallon tank if recommended treatment is 300 ppm a.i. of a liquid pesticide?
300 x 100 gallon x 8.34Gallons of pesticide to use = __________________________ = 0.4 gallon pesticide needed 1,000,000 x 0.625
– 35 –

4. Compute % of desired concentration when using an Emulsifiable Concentrate. (The gallons of EC needed to mix a spray containing a given percentage of a.i.)
Gallons Desired x % a.i. X 8.34Gallons of pesticide to use = __________________________________ Lbs a.i./gallon x 100
EXAMPLE: How much 25% EC (2 lbs/gal) pesticide is needed to make 50 gallons of a 0.25% finished spray?
50 x 0.25 x 8.34Gallons of pesticide to use = _____________________ = 0.52 lbs pesticide needed 2 x 100
5. Compute percent concentration when ppm is known.
PPM% Concentration = _____________ 10,000
EXAMPLE: What is the percentage of a solution with 1,000 ppm?
1,000% Concentration = _____________= 0.1% 10,000
6. Compute ppm of a solution when the percentage is known.
PPM = % x 10,000
EXAMPLE: How many ppm of a pesticide is there in a 2% solution?
PPM = 2 x 10,000 = 20,000 ppm
7. Compute dilution of a concentration of known percentage to the desired percentage.
Desired amount of final product x concentration of final productAmount of concentrated pesticide to use = __________________________________________________________ Concentration of original product
– 36 –

EXAMPLE: How much 40% dust pesticide is needed to mix 5 lbs of a 25% powder?
5 x 25Amount of pesticide to use = _________ = 3.125 lbs pesticide and 1.875 lbs filler needed 40
8. Dilution to a desired concentration by using Dairyman’s Rectangle.
Unknown amountKnown concentration
Known concentration Unknown amount
EXAMPLE: Make a 70% solution from a 95% solution.
70 parts 95% solution
25 parts water
9. Computing the area to be fogged or space treated. (Cube)
A. Area is a parallelogram.
Cube = length x width x height
Example: 40 foot long 20 foot wide 10 foot high
Cube = 40 x 20 x 10 = 8,000 cubic feet
B. Area with a pitched ceiling.
Pitch height x width x lengthCube = length x width x wall height + ______________________________ 2
– 37 –
Conc.
Desired
(Subtract along dotted lines)
95
0
70

Example: Length = 40 feet Width = 20 feet Wall height = 10 feet Pitch height = 6 feet
6 x 20 x 40Cube = 40 x 20 x 10 + ______________ = 10,400 cubic feet 2
– 38 –
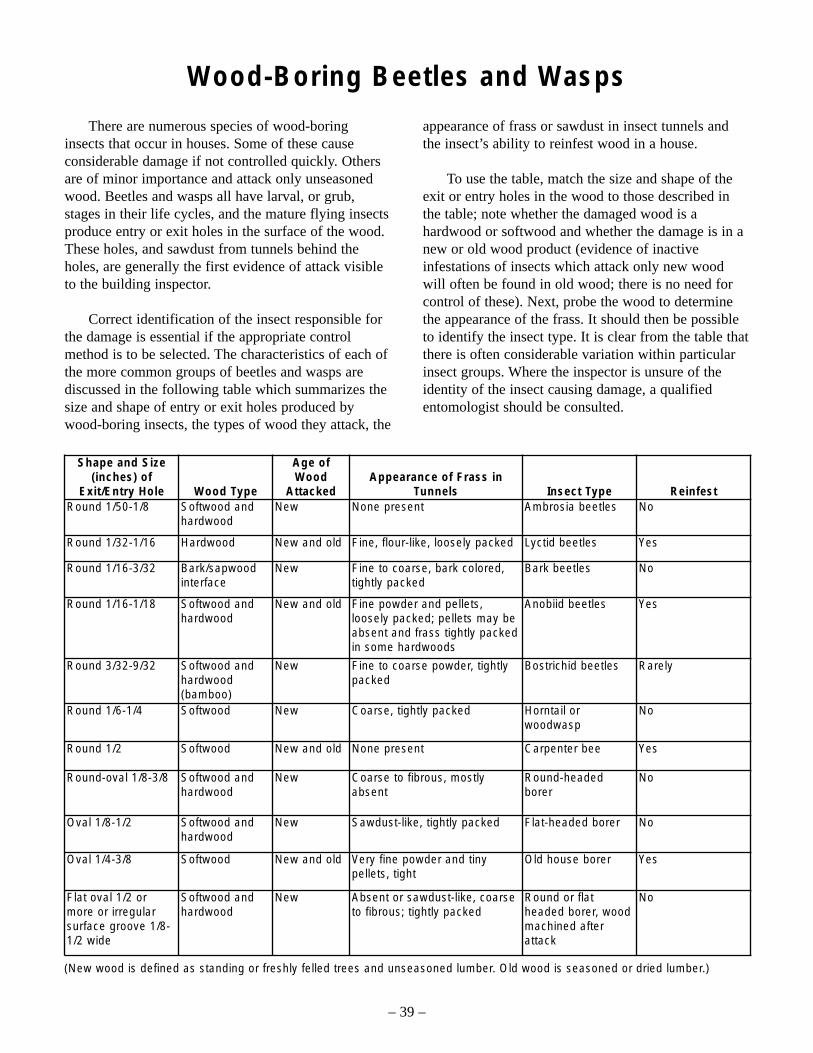
Wood-Boring Beetles and Wasps
There are numerous species of wood-boring insects that occur in houses. Some of these cause considerable damage if not controlled quickly. Others are of minor importance and attack only unseasoned wood. Beetles and wasps all have larval, or grub, stages in their life cycles, and the mature flying insects produce entry or exit holes in the surface of the wood. These holes, and sawdust from tunnels behind the holes, are generally the first evidence of attack visible to the building inspector.
Correct identification of the insect responsible for the damage is essential if the appropriate control method is to be selected. The characteristics of each of the more common groups of beetles and wasps are discussed in the following table which summarizes the size and shape of entry or exit holes produced by wood-boring insects, the types of wood they attack, the
appearance of frass or sawdust in insect tunnels and the insect’s ability to reinfest wood in a house.
To use the table, match the size and shape of the exit or entry holes in the wood to those described in the table; note whether the damaged wood is a hardwood or softwood and whether the damage is in a new or old wood product (evidence of inactive infestations of insects which attack only new wood will often be found in old wood; there is no need for control of these). Next, probe the wood to determine the appearance of the frass. It should then be possible to identify the insect type. It is clear from the table that there is often considerable variation within particular insect groups. Where the inspector is unsure of the identity of the insect causing damage, a qualified entomologist should be consulted.
Shape and Size (inches) of
Exit/Entry Hole Wood Type
Age of Wood
Attacked Appearance of Frass in
Tunnels Insect Type Reinfest Round 1/50-1/8 Softwood and
hardwood New None present Ambrosia beetles No
Round 1/32-1/16 Hardwood New and old Fine, flour-like, loosely packed Lyctid beetles Yes
Round 1/16-3/32 Bark/sapwood interface
New Fine to coarse, bark colored, tightly packed
Bark beetles No
Round 1/16-1/18 Softwood and hardwood
New and old Fine powder and pellets, loosely packed; pellets may be absent and frass tightly packed in some hardwoods
Anobiid beetles Yes
Round 3/32-9/32 Softwood and hardwood (bamboo)
New Fine to coarse powder, tightly packed
Bostrichid beetles Rarely
Round 1/6-1/4 Softwood New Coarse, tightly packed Horntail or woodwasp
No
Round 1/2 Softwood New and old None present Carpenter bee Yes
Round-oval 1/8-3/8 Softwood and hardwood
New Coarse to fibrous, mostly absent
Round-headed borer
No
Oval 1/8-1/2 Softwood and hardwood
New Sawdust-like, tightly packed Flat-headed borer No
Oval 1/4-3/8 Softwood New and old Very fine powder and tiny pellets, tight
Old house borer Yes
Flat oval 1/2 or more or irregular surface groove 1/81/2 wide
Softwood and hardwood
New Absent or sawdust-like, coarse to fibrous; tightly packed
Round or flat headed borer, wood machined after attack
No
(New wood is defined as standing or freshly felled trees and unseasoned lumber. Old wood is seasoned or dried lumber.)
– 39 –

Anobiid Beetles
The most common anobiids attack the sapwood of hardwoods and softwoods. They reinfest seasoned wood if environmental conditions are favorable. Attacks often start in poorly heated or ventilated crawl spaces and spread to other parts of the house. They rarely occur in houses on slab foundations. Anobiids range from 1/8- to 1/4-inch in length and are reddish-brown to nearly black. Adult insects are rarely seen. The most obvious sign of infestation is the accumulation of powdery frass and tiny pellets underneath infested wood or streaming from exit holes. The exit holes are round and vary from 1/16- to 1/8-inch in diameter (Figure 31).
Lyctid Powderpost Beetles
Lyctids attack only the sapwood of hardwoods with large pores: for example, oak, hickory, ash, walnut, pecan and many tropical hardwoods. They reinfest seasoned wood until it disintegrates. Lyctids range from 1/8- to 1/4-inch in length and are reddish-brown to black. The presence of small piles of fine flour-like wood powder (frass) on or under the wood is the most obvious sign of infestation. Even a slight jarring of the wood makes the frass sift from the holes. There are no pellets. The exit holes are round and vary from 1/32- to 1/16-inch in diameter (Figure 29). Most of the tunnels are about 1/16-inch in diameter and loosely packed with fine frass. If damage is severe, the sapwood may be completely converted within a few years to frass held in by a very thin veneer of surface wood with beetle exit holes. The amount of damage depends on the level of starch in the wood.
Figure 28. Lyctid “powderpost” beetle adult and larva.
Figure 29. Typical powderpost beetle damage.
Figure 30. Furniture beetle adult and larva.
Figure 31. Furniture beetle exit holes.
If there are large numbers of holes and the powder is bright and light-colored like freshly sawed wood, the infestation is both old and active. If all the frass is yellowed and partially caked on the surface where it lies, the infestation has been controlled or has dried out naturally. Anobiid tunnels are normally loosely packed with frass and pellets. It is normally 10 or more years before the numbers of beetles infesting wood become large enough for their presence to be noted. Control can be achieved by both chemical and non-chemical methods. For current information on control of anobiids, the inspector should contact the Extension entomologist at his nearest land-grant university, or a reputable pest control company.
Infestations are normally limited to hardwood paneling, trim, furniture and flooring. Replacement or removal and fumigation of infested materials are usually the most economical and effective control methods. For current information on the use of residual insecticides, the inspector should contact the Extension entomologist at his nearest land-grant university or a reputable pest control company.
– 40 –

Bostrichid Powderpost Beetles
Most bostrichids attack hardwoods, but a few species attack softwoods. They rarely attack and reinfest seasoned wood. Bostrichids range from 1/8 to 1/4-inch in length and from reddish-brown to black. The black polycaon is an atypical bostrichid and can be 1/2- to 1- inch in length. The first signs of infestation are circular entry holes for the egg tunnels made by the females. The exit holes made by adults are similar, but are usually filled with frass. The frass is meal-like and contains no pellets. It is tightly packed in the tunnels, and does not sift out of the wood easily. The exit holes are round and vary from 3/32- to 9/32inch in diameter. Bostrichid tunnels are round and range from 1/16- to 3/8-inch in diameter. If damage is extreme, the sapwood may be completely consumed. Bostrichids rarely cause significant damage in framing lumber and primarily affect individual pieces of hardwood flooring or trim. Replacement of structurally weakened members is usually the most economical and effective control method.
Figure 32. False powderpost beetle the adult and larva.
Other Wood-Inhabiting Insects
There are several other species of insects which infest dying or freshly felled trees or unseasoned wood, but which do not reinfest seasoned wood. They may emerge from wood in a finished house, or evidence of their presence may be observed. On rare occasions, control measures may be justified to prevent disfigurement of wood, but control is not needed to prevent structural weakening.
Ambrosia Beetles – These insects attack unseasoned sapwood and heartwood of softwood and hardwood logs, producing circular boreholes 1/50- to 1/8-inch in diameter. Boreholes do not contain frass,
but are frequently stained blue, black or brown. These insects do not infest seasoned wood.
Bark Beetles – These beetles tunnel at the wood/bark interface and etch the surface of wood immediately below the bark. Beetles left under bark edges on lumber may survive for a year or more as the wood dries. Some brown, gritty frass may fall from circular boreholes in the bark, diameter 1/16- to 3/32inch. These insects do not infest wood.
Horntails (wood wasps) – Horntails generally attack unseasoned softwoods and do not reinfest seasoned wood. One species sometimes emerges in houses from hardwood firewood. Horntails occasionally emerge – through paneling, siding or sheetrock in new houses; it may take 4 to 5 years for them to emerge. They attack both sapwood and heartwood, producing a tunnel that is roughly C-shaped in the tree. Exit holes and tunnels are circular in cross section, with diameter 1/6- to 1/4-inch. Tunnels are tightly packed with coarse frass. Frequently, tunnels are exposed on the surface of lumber by milling after development of the insect.
Round-Headed Borers – Several species are included in this group. They attack sapwood of softwoods and hardwoods during storage, but rarely attack seasoned wood. The old house borer is the major round-headed borer that can reinfest seasoned wood (Figure 33). When round-headed borers emerge from wood, they make slightly oval to nearly round exit holes 1/8- to 3/8-inch in diameter (Figure 34). Frass varies from rather fine and meal-like in some species to very coarse fibers like pipe tobacco in others. Frass may be absent from tunnels, particularly where the wood was machined after emergence of the insects.
Figure 33. Old house borer adult and larva.
– 41 –

Figure 34. Old house borer emergence hole.
Flat-Headed Borers – They attack sapwood and heartwood of softwoods and hardwoods. Exit holes are oval, with the long diameter 1/8- to 1/2-inch. Wood damaged by flat-headed borers is generally sawed after damage has occurred, so tunnels are exposed on the
surface of infested wood. Tunnels are packed with sawdust-like borings and pellets, and tunnel walls are covered with fine transverse lines somewhat similar to some round-headed borers. However, the tunnels are much more flattened. The golden buprestid is one species of flat-headed borer that occurs occasionally in the Rocky Mountain and Pacific Coast states. It produces an oval exit hole 3/16- to 1/4-inch across, and may not emerge from wood in houses for 10 or more years after infestation of the wood. It does not reinfest seasoned wood.
If signs of insect or fungus damage other than those already described are observed, the inspector should have the organism responsible identified before recommending corrective measures. Small samples of damaged wood, with any frass and insect specimens (larvae or grubs must be stored in vials filled with alcohol), should be taken to the local Cooperative Extension office for identification.
– 42 –

Other Wood-Destroying Insects
Carpenter Ants
The carpenter ant, Camponotus spp., (Figure 35) occurs widely in the United States and is one of the largest of our common ants. The adults vary in length from 1/4-inch for small workers to 3/4-inch for a queen. The body is dark brown to black in color. In Arkansas, some species are both red and black.
Figure 35. Carpenter ant.
Carpenter ants seek soft, generally moist wood in which to establish their nests; they particularly like wood that has weathered and begun to decay. Although the nest is most often begun in the soft wood, later excavations frequently are made into perfectly sound, dry lumber (Figure 36). Carpenter ants can be found in porch columns and roofs, windowsills, hollow core doors, wood scraps in dirt-filled slab porches and wood in contact with soil.
Figure 36. Carpenter ant damage to wood.
An infestation in a building may be started by a single fertilized female. However, many times it is started by a colony or portion of a colony moving in from another location. This is especially true in wooded areas. The queen sheds her wings when the
new colony is started and remains wingless the rest of her life. The males are winged and die soon after the mating flight is over. Winged forms are usually not produced in a colony until it is at least three years old. A large colony can cause serious structural damage if not controlled.
Carpenter ants do not eat wood (in contrast with termites), but excavate galleries in the wood in which to rear their young. Carpenter ants eject the wood in the form of coarse sawdust. The characteristic sawdust piles aid in nest location. They feed on honeydew excreted by aphids, and upon other insects, animal remains and household food scraps. They are particularly fond of sweets.
The damage of carpenter ants is easily distinguished from that of termites. Their galleries are excavated without regard for the grain and follow the softer portions of the wood. The galleries are kept smooth and clean and have a sandpapered appearance. Termite galleries are not smooth and clean.
When carpenter ants are found within a structure, the colony is either nesting within the building or nesting outside the building and entering to forage for food. Houses near wooded areas are especially subject to invasion.
The key to the control of carpenter ants is locating the nest or nests, which is often difficult. If the nest or nests can be found, there is an excellent chance of controlling this pest. Eliminating nests outside may be just as important as eliminating those in buildings. In some cases, an entire colony may migrate from one nesting site to another (from a tree outdoors to structural timber indoors).
To find nests indoors, examine these locations:
• wood affected by water seepage (porch floors, roofs, porch posts and columns).
• wood in contact with soil. • wood adjacent to dirt-filled slab porches. • firewood piled in garages or next to a house.
Carpenter ants are usually found near moisture. Some signs of carpenter ants to look for when inspecting for a nest indoors are:
– 43 –

• piles of coarse “sawdust” on the floor or foundation.
• ant activity, particularly in kitchens. However, even when the nest is in a building very few ants may be seen. They are usually active at night and often forage outside.
Some of the things to look for outdoors are: • firewood, stumps, logs and trees that might
contain nests. • trees with branches hanging over and touching
the roof of a house. Ants may travel over these branches into the building.
• power and utility lines leading to the house, particularly if they pass through trees and shrubs.
Sanitation measures such as removing and destroying logs and stumps that harbor nests will help eliminate the pest. To protect structures from carpenter ants, destroy the nests in and near the structure.
Apply insecticides to the nest and nest areas. Spraying or dusting the infested area without locating and treating the nest usually does not provide complete control, and is not recommended.
Carpenter Bees
Carpenter bees, Xylocopa spp., are large (3/4- to 1-inch long), heavy-bodied insects (Figure 37). Their blue-black metallic bodies will have some yellow or orange hair. They resemble bumblebees, but can be distinguished by their shiny, black, hairless abdomens. The abdomen of the bumblebee is yellow and hairy. Bumblebees also have large pollen baskets on their hind legs.
Figure 37. Carpenter Bee.
In the spring, carpenter bees become a nuisance as they fly erratically, close to homes and other buildings. Males hover like humming birds, waiting for females to emerge so they can mate. If the males are disturbed,
they may hover or buzz around a person’s head. Only the female stings, and then only if molested. After the mating season, most of the summer is spent loitering around the nest or nearby flowers.
Carpenter bees are a nuisance to have around and they also bore into seasoned woods, especially soft woods such as cedar, redwood, pine and fir. Damage may occur to soft or weathered woods on porches, decks, shed ceilings, railings, overhead trim, porch furniture, dead tree limbs, fence posts, wooden shingles, wood siding, windowsills, wood doors, etc. Female bees bore circular holes, about 1/2-inch wide, into the wood at right angles to the surface for about an inch. Then they turn sharply, boring in the direction of the wood grain for 4 to 6 inches.
Structural damage caused by one or two carpenter bees is slight. However, tunnels may be used again and lengthened by other broods. The activity of numerous bees over a period of years is certain to cause some structural damage.
Carpenter bees over-winter in wood as young adults. The tunnels are made by the females. Those bees that survive the winter mate in the spring (April to June) and then begin preparation for the next brood.
Carpenter bees do not eat the wood they tunnel in, but use these tunnels for rearing the young. The female provides her tunnel-nest with “bee bread” (a mixture of pollen and regurgitated nectar), which serves as food for the larvae when the eggs hatch. She makes a cell for each larva and closes each cell with chewed wood pulp. There may be as many as six to eight cells in the tunnel. The time required to complete development from egg to adult varies from one to three months. Though newly formed adult bees usually emerge in late August, these bees will not mate to start the cycle over again until the following spring.
Painted wood is rarely attacked by carpenter bees, so keep all exposed wood surfaces well painted. Wood stains will not prevent attacks. Wood pressure treated with a preservative should be used if painting is not practical.
Treatment involves applying insecticide into the tunnel entrance. Treat the opening after dark when the bees are less active. Do not plug the holes, but allow the bees to pass freely so they can contact the insecticide. The holes should be filled a day or two later to prevent further use.
– 44 –

Wood-Inhabiting Fungi
Moisture and wood-inhabiting fungi, a group of lower plant forms, are problems occurring occasionally in Arkansas. They can cause severe problems particularly in high moisture or humidity. Wood-inhabiting fungi feed on living or dead wood because they cannot make their own food. Some parts of fungi are so small they can be seen only with a microscope. Other forms such as mushrooms are quite large. These fungi produce spores (similar to seeds) that are distributed by wind and water. Some spores are present wherever wood is being cut, processed or used.
Upon infection by spores, the fungus develops forming microscopic, thread-like structures known as hyphae (singular-hypha) referred to collectively as mycelium. The hyphae may spread through the wood in all directions from the point of infection, more commonly within but also on the surface of wood.
All fungi that grow on wood have certain basic requirements:
• Favorable temperature usually ranging between 50º and 100ºF. The optimum is usually 70º to 85ºF.
• Adequate moisture-fungi usually cannot degrade wood with moisture content below 20 percent. Decay fungi require wood moisture content of about 30 percent for serious damage.
• Adequate oxygen-fungi cannot live in water-saturated wood.
• Food source.
Fungi are often found in structures in association with termites or in the same area as termites. Damage of fungi and termites commonly occurs together because the same environmental conditions favor both.
Since fungi may cause damage or may indicate the presence of termites, it is important to recognize and distinguish common fungi that attack wood. There are basically three types of fungi that attack wood. These include the surface fungi, the staining fungi and the decay fungi.
Some fungi attack wood only in the log stage and cannot damage or continue developing after installation into a structure or building. No control is
necessary for these; however, it is important to recognize them as types that do not require control measures.
Surface Fungi
This group includes molds and mildews. They grow primarily in sapwood of coniferous and deciduous tree species. Wood with surface fungi has a powdery appearance or surface discoloration. These fungi do not cause wood decay. They grow only in storage cells of sapwood and do not reduce the strength (other than impact strength) of the wood. Treatment of wood previously attacked by surface fungi and installed in a structure is not required.
Surface fungi are moisture indicators. Their presence suggests that the wood has absorbed an excessive amount of water and is susceptible to other wood-destroying fungi. They do not attack drywood, but they do increase the ability of the wood to absorb more moisture (permeability) leading to further decay problems.
Staining Fungi
This group of fungi also attacks the surfaces of sapwood of various hardwoods and softwoods, but their hyphae penetrate outer layers of sapwood. These fungi cause a gray to bluish stain that cannot be removed from the wood. They do not cause decay, but they increase the chances that serious decay fungi will enter. They enter wood cells and use the contents as a primary food source. Presence of these fungi also indicates that wood has absorbed an excessive amount of water.
Decay Fungi
These fungi actually utilize the structural portion of the wood (cell walls) to satisfy nutritive requirements. This results in decomposition which makes the wood less suitable for construction purposes or renders it completely unfit if decay is advanced. They attack the sapwood and heartwood. Chemical substances called enzymes, secreted by the fungi, break down cell wall components (cellulose, hemicellulose and lignin) to products that can be
– 45 –

readily assimilated and utilized. Some types of decay fungi include:
Cubical brown rot – This rot causes the wood to break into small cubes with cracks running perpendicular to the grain. This condition is caused by recurring changes in moisture content from wet to dry. The wood becomes brittle and shrinkage occurs as a result of these moisture changes. The wood becomes brown and crumbly and strength decreases rapidly. Cellulose is decomposed and lignin is left which gives a brown appearance. Wood becomes brittle and can be crushed into a powder.
White rot – Fungi that cause white rot attack not only cellulose but also lignin. Destruction of the lignin causes a whitish, bleached appearance. The wood becomes lighter colored and stringy when broken. It has a sponge consistency, and the wood loses its strength gradually. White rot is common in crawl spaces that are consistently wet. Shrinkage is generally not associated as a characteristic of this type of rot.
Soft rot – Soft rot fungi attack the wood from the surface inward and cause cavities to form. They generally are found in situations where the wood is too wet to be attacked by other decay fungi. This type of rot might be expected in cooling towers, pulpwood chips, marine habitats and in wood contacting the soil. This rot is less destructive than white rot.
Dry rot – This is a type of brown rot fungi and is referred to as a water conducting fungus. This fungus has specialized structures called rhizomorphs that conduct water. Rhizomorphs begin to appear as attack by this fungus increases. They are dirty white and become brown or black with age. They may range from 1/4- to 1-inch in diameter. Because of this, the dry rot fungus can attack wood that is resistant to attack by other decay fungi. In some cases this fungus can conduct water up to 25 feet and destroy large areas of wood in 1 to 2 years. Mycelial fans that are papery in texture and whitish-yellow in color may be present.
Other Plant Growth Affecting Wood
Several other fungi attack wood before it reaches the lumber stage. Pecky rot and pock rot are two of these fungi. They may damage the wood, but they
cannot develop inside a building. Bacteria can grow on wood with high moisture content. They are not destructive but can cause sour odors.
Control
All fungi that grow on wood have certain basic requirements that include a food source, favorable temperature and adequate oxygen and moisture. A deficiency in any of these requirements will inhibit the growth of a fungus even though it may be well established in the wood. The most practical method of controlling fungi in structures is to control the moisture content of wood.
Methods of moisture control include:
1. Isolating wood from soil
2. Installing moisture barriers
3. Providing adequate ventilation
4. Improving drainage
5. Applying chemical preservatives
The following check list can be used as a guide in helping avoid problems with decay fungi and/or termites.
Checklist for decay problems:
1. Flowerbeds next to house. Soil should not touch wood siding.
2. Soil grading. Wood should be at least 3 inches above adjacent finish grade for framing members, 6 inches above finish grade for siding.
3. Lawn sprinkler. Persistent wetting of exterior wood creates high decay hazard.
4. Wood junctions. Decay lurks especially where boards or beams are jointed together, end-to-end. Also, the ends of boards or beams absorb water much more rapidly than do the sides. Metal caps help prevent decay.
– 46 –

5. Ends of exposed beams. Cracks that open as wood dries out permit serious rain wetting. Exposed beams should be treated with preservative. When thoroughly dry, ends should be capped with a metal shield.
6. Roof overhang. A wide over-hang moves water runoff away from exterior walls.
7. Roof dormer and chimney. Flashing must be used between roof and dormer.
8. Roof lines. Water should flow away from house. Otherwise, wooden members are wetted continually. Flashing is needed in these areas.
9. Roof edge. If shingles don’t extend enough beyond fascia board, water that curls under the shingle will drain over wood trim at roof edge. Metal edging allows drip line from roof to clear wood trim.
10. Splashing rain. Special hazard: rain from roof falling onto a hard surface like a patio. Install rain gutters with downspouts that direct the drainage away from house.
11. Porch areas. Porch surface must slope away from house to avoid water collection.
12. Wooden posts. Be sure post doesn’t touch the porch surface. Direct flowing water away from posts.
13. Plumbing leaks. Stop spillage behind washing machine, leaks at top of built-in tub, or leaks in shower.
14. Condensation underneath house. Some houses need a vapor barrier between the ground and the house.
15. Water collecting under house. Fill holes and make water drain away from house.
– 47 –
Selected References and Study Material
Anon. 1973. Diagnosis and Treatment of Poisoning by Pesticides. U.S. Environmental Protection Agency, Washington, D.C.
Borrer, Donald J., Dwight M. DeLong and Charles A. Triplehorn. An Introduction to the Study of Insects. 1976. Holt, Rinehart & Winston.
Borror, D.J. and R.E. White. 1970. A Field Guide to the Insects of America North of Mexico. Houghton Mifflin Co., Boston.
Ebeling, Walter. Urban Entomology. 1975. Publications, Division of Agricultural Sciences, University of California, Richmond, California.
How to Avoid Contaminating Drinking Water Systems. 4/23/76. National Pest Control Association, Inc. ESPC 052350.
Mallis, Arnold. Handbook of Pest Control. 1990. Franzak & Foster Co., Cleveland, Ohio.
National Pest Control Association. 1982. Encyclopedia of Structural Pest Control. (7 volumes). Dunn Loring, VA.
National Pest Control Association. Pest Control Publications. Publications Resource Center, 8100 Oak St., Dunn Loring, VA 22027.
Pfadt, Robert E. Fundamentals of Applied Entomology. 1971. MacMillan Publishing Company.
Sweetman, Harvey L. Recognition of Structural Pests and Their Damage. 1965. William C. Brown Company.
Termite Treatment of Existing Structures with Wells or Cisterns. 11/25/87. National Pest Control Association, Inc. ESPC 055055A.
Trade Magazines. Pest Control. P.O. Box 6215, Duluth, MN 55806-9915. Pest Control Technology. P.O. Box 5817, Cleveland, OH 44101-9599. Pest Management. National Pest Control Association, 8100 Oak St., Dunn Loring, VA 22027.
Trade Newsletter for Pest Control Technicians. Techletter. Pinto and Associates, Inc., 914 Hillcrest Dr., Vienna, VA 22180.
Truman, Lee C., Gary W Bennet and William L. Butts. Scientific Guide to Pest Control Operations (Fifth Edition). 1997. Pest Control Magazine.
Wilson, E.O. 1971. The Insect Societies. Harvard University Press. Cambridge, MA.
– 48 –
Glossary
ABSORPTION-The movement of a chemical into plants, animals (including humans), microorganisms.
ACARICIDE -A pesticide used to control mites and ticks. A miticide is an acaricide.
ACTIVE INGREDIENT -The chemical or chemicals in a pesticide responsible for killing, poisoning or repelling the pest. Listed separately in the ingredient statement.
ACUTE TOXICITY -The capacity of a pesticide to cause injury within 24 hours following exposure. LD50 and LC50 are common indicators of the degree of acute toxicity. (See also Chronic Toxicity)
ADJUVANT -A substance added to a pesticide to improve its effectiveness or safety. Same as additive. Examples: Penetrants, spreader-stickers and wetting agents.
ADSORPTION-The process by which chemicals are held or bound to a surface by physical or chemical attraction. Clay and high organic soils tend to adsorb pesticides.
AEROSOL-A material stored in a container under pressure. Fine droplets are produced when the material dissolved in a liquid carrier is released into the air from the pressurized container.
ALGAE -Relatively simple plants that contain chlorophyll and are photosynthetic.
ALGAECIDE-A pesticide used to kill or inhibit algae.
ANTI-SIPHONING DEVICE -A device attached to the filling hose that prevents backflow or back siphoning from a spray tank into a water source.
ANTICOAGULANT -A chemical that prevents normal blood clotting. The active ingredient in some rodenticides.
ANTIDOTE-A treatment used to counteract the effects of pesticide poisoning or some other poison in the body.
ARACHNID -A wingless arthropod with two body regions and four pairs of jointed legs. Spiders, ticks and mites are in the class Arachnida.
ARTHROPOD -An invertebrate animal characterized by a jointed body and limbs and usually a hard body covering that is molted at intervals. For example, insects, mites and crayfish are in the phylum Arthropoda.
ATTRACTANT-A substance or device that will lure pests to a trap or poison bait.
AVICIDE -A pesticide used to kill or repel birds. Birds are in the class Aves.
BACTERIA -Microscopic organisms, some of which are capable of producing diseases in plants and animals. Others are beneficial.
BACTERICIDE -Chemical used to control bacteria.
BAIT-A food or other substance used to attract a pest to a pesticide or to a trap.
BAND APPLICATION -Application of a pesticide in a strip alongside or around a structure, a portion of a structure or any object.
– 49 –

BARRIER APPLICATION -see band application.
BENEFICIAL INSECT -An insect that is useful or helpful to humans. Usually insect parasites, predators, pollinators, etc.
BIOLOGICAL CONTROL-Control of pests using predators, parasites and disease-causing organisms. May be naturally occurring or introduced.
BIOMAGNIFICATION -The process where one organism accumulates chemical residues in higher concentrations from organisms they consume.
BOTANICAL PESTICIDE -A pesticide produced from chemicals found in plants. Examples are nicotine, pyrethrins and strychnine.
BRAND NAME -The name, or designation of a specific pesticide product or device made by a manufacturer or formulator. A marketing name.
CALIBRATE, CALIBRATION OF EQUIPMENT OR APPLICATION METHOD -The measurement of dispersal or output and adjustments made to control the rate of dispersal of pesticides.
CARBAMATES -(N-Methyl Carbamates) A group of pesticides containing nitrogen, formulated as insecticides, fungicides and herbicides. The N-methyl carbamates are insecticides and inhibit cholinesterase in animals.
CARCINOGENIC -The ability of a substance or agent to induce malignant tumors (cancer).
CARRIER-An inert liquid, solid or gas added to an active ingredient to make a pesticide dispense effectively. A carrier is also the material, usually water or oil, used to dilute the formulated product for application.
CERTIFIED APPLICATORS -Individuals who are certified to use or supervise the use of any restricted use pesticide covered by their certification.
CHEMICAL NAME-The scientific name of the active ingredients found in the formulated product. This complex name is derived from the chemical structure of the active ingredient.
CHEMICAL CONTROL-Pesticide application to kill pests.
CHEMOSTERILANT-A chemical compound capable of preventing animal reproduction.
CHEMTREC-The Chemical Transportation Emergency Center has a toll-free number that provides 24-hour information for chemical emergencies such as a spill, leak, fire or accident. 800-424-9300.
CHLORINATED HYDROCARBON-A pesticide containing chlorine, carbon and hydrogen. Many are persistent in the environment. Examples: Chlordane, DDT, methoxychlor. Few are used in urban pest management operations today.
CHOLINESTERASE, ACETYL CHOLINESTERASE -An enzyme in animals that helps to regulate nerve impulses. This enzyme is depressed by N-methyl carbamate and organophosphate pesticides.
CHRONIC TOXICITY -The ability of a material to cause injury or illness (beyond 24 hours following exposure) from repeated, prolonged exposure to small amounts. (See also Acute Toxicity)
– 50 –

COMMERCIAL APPLICATOR-A certified applicator that for compensation uses or supervises the use of any pesticide classified for restricted use for any purpose or on any property other than that producing an agricultural commodity.
COMMON NAME-A name given to a pesticide’s active ingredient by a recognized committee on pesticide nomenclature. Many pesticides are known by a number of trade or brand names but the active ingredient(s) has only one recognized common name.
COMMUNITY-The different populations of animal species (or plants) that exist together in an ecosystem (See also Population and Ecosystem).
COMPETENT-Individuals properly qualified to perform functions associated with pesticide application. The degree of competency (capability) required is directly related to the nature of the activity and the associated responsibility.
CONCENTRATION -Refers to the amount of active ingredient in a given volume or weight of formulated product.
CONTACT PESTICIDE-A compound that causes death or injury to insects when it contacts them. It does not have to be ingested. Often used in reference to a spray applied directly on a pest.
CONTAMINATION -The presence of an unwanted substance (sometimes pesticides) in or on a plant, animal, soil, water, air or structure.
CULTURAL CONTROL -A pest control method that includes changing human habits, e.g., sanitation, changing work practices, changing cleaning and garbage pick-up schedules, etc.
DECONTAMINATE-To remove or break down a pesticidal chemical from a surface or substance.
DEGRADATION -The process by which a chemical compound or pesticide is reduced to simpler compounds by the action of microorganisms, water, air, sunlight or other agents. Degradation products are usually, but not always less toxic than the original compound.
DEPOSIT-The amount of pesticide on treated surface after application.
DERMAL TOXICITY -The ability of a pesticide to cause acute illness or injury to a human or animal when absorbed through the skin (see Exposure Route).
DESICCANT -A type of pesticide that draws moisture or fluids from a pest causing it to die. Certain desiccant dusts destroy the waxy outer coating that holds moisture within an insect’s body.
DETOXIFY -To render a pesticide’s active ingredient or other poisonous chemical harmless.
DIAGNOSIS-The positive identification of a problem and its cause.
DILUENT -Any liquid gas or solid material used to dilute or weakened a concentrated pesticide.
DISINFECTANT -A chemical or other agent that kills or inactivates disease-producing microorganisms. Chemicals used to clean or surface-sterilize inanimate objects.
DOSE, DOSAGE-Quantity, amount or rate of pesticide applied to a given area or target.
– 51 –
DRIFT -The airborne movement of a pesticide spray or dust beyond the intended target area.
DUST-A finely ground, dry pesticide formulation containing a small amount of active ingredient and a large amount of inert carrier or diluent such as clay or talc.
ECOSYSTEM-The pest management unit. It includes a community (of populations) with the necessary physical (harborage, moisture, temperature), and biotic (food, hosts) supporting factors that allow an infestation of pests to persist.
EMULSIFIABLE CONCENTRATE -A pesticide formulation produced by mixing or suspending the active ingredient (the concentrate) and an emulsifying agent in a suitable carrier. When added to water, a milky emulsion is formed.
EMULSIFYING AGENT (EMULSIFIER)-A chemical that aids in the suspension of one liquid in another that normally would not mix together.
EMULSION-A mixture of two liquids that are not soluble in one another. One is suspended as very small droplets in the other with the aid of an emulsifying agent.
ENCAPSULATED FORMULATION -A pesticide formulation with the active ingredient enclosed in capsules of polyvinyl or other materials; principally used for slow release. The enclosed active ingredient moves out to the capsule surface as pesticide on the surface is removed (volatilizes, rubs off, etc.).
ENDANGERED SPECIES-Individual plants or animals with a population that has been reduced to the extent that it is near extinction and that has been designated to be endangered by a federal agency.
ENTRY INTERVAL -See Re-entry Interval.
ENVIRONMENT-Air, land, water, all plants, man and other animals, and the interrelationships that exist among them.
ENVIRONMENTAL PROTECTION AGENCY OR EPA -The federal agency responsible for ensuring the protection of man and the environment from potentially adverse effects of pesticides.
EPA ESTABLISHMENT NUMBER -A number assigned to each pesticide production plant by the EPA. The number indicates the plant at which the pesticide product was produced and must appear on all labels of that product.
EPA REGISTRATION NUMBER -An identification number assigned to a pesticide product when the product is registered by the EPA for use. The number must appear on all labels for a particular product.
ERADICATION -The complete elimination of a (pest) population from a designated area.
EXPOSURE ROUTE OR COMMON EXPOSURE ROUTE-The manner (dermal, oral or inhalation/respiratory) in which a pesticide may enter an organism.
FIFRA-The Federal Insecticide, Fungicide and Rodenticide Act; a federal law and its amendments that control pesticide registration and use.
FLOWABLE-A pesticide formulation in which a very finely ground solid particle is suspended (not dissolved) in a liquid carrier.
– 52 –
FOG TREATMENT -A fine mist of pesticide in aerosol-sized droplets (under 40 microns). Not a mist or gas. After propulsion, fog droplets fall to horizontal surfaces.
FORMULATION-The pesticide product as purchased, containing a mixture of one or more active ingredients, carriers (inert ingredients), with other additives making it easy to store, dilute and apply.
FUMIGANT-A pesticide formulation that volatilizes, forming a toxic vapor or gas that kills in the gaseous state. Usually, it penetrates voids to kill pests.
FUNGICIDE -A chemical used to control fungi.
FUNGUS (Plural, Fungi)-A group of small, often microscopic, organisms in the plant kingdom that cause rot, mold and disease. Fungi need moisture or a damp environment (wood rots require at least 19 percent moisture). Fungi are extremely important in the diet of many insects.
GENERAL USE (UNCLASSIFIED) PESTICIDE -A pesticide that can be purchased and used by the general public. (See also Restricted Use Pesticide)
GRANULE -A dry pesticide formulation. The active ingredient is either mixed with or coated onto an inert carrier to form a small, ready-to-use, low-concentrate particle that normally does not present a drift hazard. Pellets differ from granules only in their precise uniformity, larger size and shape.
GROUNDWATER-Water sources located beneath the soil surface from which springs, well water, etc., is obtained (see also Surface Water).
HAZARD-see Risk.
HERBICIDE -A pesticide used to kill or inhibit plant growth.
HOST-Any animal or plant on or in which another lives for nourishment, development or protection.
IGR, INSECT GROWTH REGULATOR JUVENOID -A pesticide constructed to mimic insect hormones that control molting and the development of some insect systems affecting the change from immature to adult. (See Juvenile Hormone)
INERT INGREDIENT -In a pesticide formulation, an inactive material without pesticidal activity.
INGREDIENT STATEMENT -The portion of the label on a pesticide container that gives the name and amount of each active ingredient and the total amount of inert ingredients in the formulation.
INHALATION -Taking a substance in through the lungs; breathing in. (See Exposure Route)
INSECT GROWTH REGULATOR -see IGR.
INSECTICIDE -A pesticide used to manage or prevent damage caused by insects. Sometimes generalized to be synonymous with pesticide.
INSECTS, INSECTA-A class in the phylum Arthropoda characterized by a body composed of three segments and three pairs of legs.
INSPECTION -To examine for pests, pest damage, other pest evidence, etc. (See Monitoring)
– 53 –

INTEGRATED PEST MANAGEMENT -see IPM.
IPM-Integrated Pest Management. A planned pest control program in which methods are integrated and used to keep pests from causing economic, health-related, or aesthetic injury. IPM includes reducing pests to a tolerable level. Pesticide application is not the primary control method, but is an element of IPM, as are cultural and structural alterations. IPM programs stress communication, monitoring, inspection and evaluation (keeping and using records).
JUVENILE HORMONE-A hormone produced by an insect that inhibits change or molting. As long as juvenile hormone is present, the insect does not develop into an adult but remains immature.
LABEL-All printed material attached to or on a pesticide container.
LABELING-The pesticide product label and other accompanying materials that contain directions that pesticide users are legally required to follow.
LARVA (plural Larvae)-The developmental stage of insects with complete metamorphosis that hatches from the egg. A mature larva becomes a pupa (some other invertebrates have larvae but they do not involve urban pests).
LC50-Lethal concentration. The concentration of a pesticide, usually in air or water that kills 50 percent of a test population of animals. LC50is usually expressed in parts per million (ppm). The lower the LC50 value, the more acutely toxic the chemical.
LD50-Lethal dose. The dose or amount of a pesticide that can kill 50 percent of the test animals when eaten or absorbed through the skin. LD50 is expressed in milligrams of chemical per kilogram of body weight of the test animal (mg/kg). The lower the LD50, the more acutely toxic the pesticide.
LEACHING-The movement of a substance with water downward through soil.
METAMORPHOSIS-A change in the shape or form of an animal. Usually used when referring to insect development.
MICROBIAL DEGRADATION -Breakdown of a chemical by microorganisms.
MICROBIAL PESTICIDE -Bacteria, viruses, fungi, and other microorganisms used to control pests. Also called biorationals.
MICROORGANISM -An organism so small it can be seen only with the aid of a microscope.
MITICIDE -A pesticide used to control mites. (See Acaricide)
MODE OF ACTION-The way in which a pesticide exerts a toxic effect on the target plant or animal.
MOLLUSCICIDE -A chemical used to control snails and slugs.
MONITORING-Ongoing surveillance. Monitoring includes inspection and record keeping. Monitoring records allows technicians to evaluate pest population suppression, identify infested or non-infested sites and manage the progress of the management or control program.
– 54 –

NECROSIS-Death of plant or animal tissues which results in the formation of discolored, sunken or necrotic (dead) areas.
NONTARGET ORGANISM-Any plant or animal other than the intended target(s) of a pesticide application.
NYMPH -The developmental stage of insects with gradual metamorphosis that hatches from the egg. Nymphs become adults.
ORAL TOXICITY -The ability of a pesticide to cause injury or acute illness when taken by mouth. One of the common exposure routes.
ORGANOPHOSPHATES-A large group of pesticides that contain the element phosphorus and inhibit cholinesterase in animals.
PARASITE -A plant, animal or microorganism living in, on, or with another living organism for the purpose of obtaining all or part of its food.
PATHOGEN -A disease causing organism.
PERSONAL PROTECTIVE EQUIPMENT -Devices and clothing intended to protect a person from exposure to pesticides. Includes such items as long-sleeved shirts, long trousers, coveralls, suitable hats, gloves, shoes, respirators and other safety items as needed.
PEST MANAGEMENT-see IPM
PEST-An undesirable organism: (1) any insect, rodent, nematode, fungus, weed or (2) any other form of terrestrial or aquatic plant or animal life or virus, bacteria, or other microorganism (except viruses, bacteria or other microorganisms on, or in living man or other living animals) which the Administrator declares to be a pest under FIFRA, Section 25(c)(1).
PESTICIDE -A chemical or other agent used to kill, repel or otherwise control pests or to protect from a pest.
pH-A measure of the acidity/alkalinity of a liquid: acid below pH 7, basic or alkaline above pH 7 (up to 14).
PHEROMONE-A substance emitted by an animal to influence the behavior of other animals of the same species. Some are synthetically produced for use in insect traps.
PHOTODEGRADATION-Breakdown of chemicals by the action of light.
PHYSICAL CONTROL-Habitat alteration or changing the infested physical structure; e.g., caulking holes, cracks, tightening around doors, windows, moisture reduction, ventilation, etc.
PHYTOTOXICITY-Injury to plants caused by a chemical or other agent.
POINT OF RUNOFF-The point at which a spray starts to run or drip from the surface to which it is applied.
POISON CONTROL CENTER-A local agency, generally a hospital, which has current information as to the proper first aid techniques and antidotes for poisoning emergencies. Centers are listed in telephone directories.
POPULATION-Individuals of the same species. The populations in an area make up a community. (See Ecosystem)
– 55 –
PRECIPITATE-A solid substance that forms in a liquid and settles to the bottom of a container. A material that no longer remains in suspension.
PREDATOR-An animal that attacks, kills and feeds on other animals. Examples of predaceous animals are hawks, owls, snakes, many insects, etc.
PROFESSIONAL-One who is able to make judgments based on training, experience and an available database.
PROPELLANT-The inert ingredient in pressurized products, which forces the active ingredient from the container.
PUPA (plural Pupae)-The developmental stage of insects with complete metamorphosis where major changes from the larval to the adult form occurs.
RATE OF APPLICATION-The amount of pesticide applied to a plant, animal, unit area or surface; usually measured as per acre, per 1,000 square feet, per linear feet or per cubic feet.
RE-ENTRY INTERVAL -The length of time following an application of a pesticide when entry into the treated area is restricted. (See Entry Interval)
REGISTERED PESTICIDES-Pesticide products that have been registered by the Environmental Protection Agency for the uses listed on the label.
REPELLENT-A compound that keeps insects, rodents, birds or other pests away from plants, domestic animals, buildings or other treated areas.
RESIDUAL PESTICIDE -A pesticide that continues to remain effective on a treated surface or area for an extended period following application.
RESIDUE-The pesticide active ingredient or its breakdown product(s) that remain in or on the target after treatment.
RESTRICTED USE PESTICIDE-A pesticide that can be purchased and used only by certified applicators or persons under their direct supervision. A pesticide classified for restricted use under FIFRA, Section 3(d)(1)(C).
RISK-A probability that a given pesticide will have an adverse effect on man or the environment in a given situation.
RODENTICIDE -A pesticide used to control rodents.
RUNOFF-The movement of water and associated materials on the soil surface. Runoff usually proceeds to bodies of surface water.
SIGNAL WORDS-Required word(s) that appear on every pesticide label to denote the relative toxicity of the product. Signal words are DANGER-POISON, DANGER, WARNING or CAUTION.
SITE-Areas of actual pest infestation. Each site should be treated specifically or individually.
SOIL INJECTION-The placement of a pesticide below the surface of the soil. Common application method for termiticides.
– 56 –
SOIL DRENCH -To soak or wet the ground surface with a pesticide. Large volumes of the pesticide mixture are usually needed to saturate the soil to any depth.
SOIL INCORPORATION -The mechanical mixing of a pesticide product with soil.
SOLUTION-A mixture of one or more substances in another substance (usually a liquid) in which all the ingredients are completely dissolved. Example: Sugar in water.
SOLVENT-A liquid that will dissolve another substance (solid, liquid or gas) to form a solution.
SPACE SPRAY-A pesticide that is applied as a fine spray or mist to a confined area.
STOMACH POISON-A pesticide that must be eaten by an animal in order to be effective; it will not kill on contact.
SURFACE WATER-Water on the earth’s surface: rivers, lakes, ponds, streams, etc. (See Groundwater)
SUSPENSION-A pesticide mixture consisting of fine particles dispersed or floating in a liquid, usually water or oil. Example: Wettable powders in water.
TARGET-The plants, animals, structures, areas or pests at which the pesticide or other control method is directed.
TECHNICAL MATERIAL -The pesticide active ingredient in pure form, as it is manufactured by a chemical company. It is combined with inert ingredients or additives in formulations such as wettable powders, dusts, emulsifiable concentrates or granules.
TOXIC-Poisonous to living organisms.
THRESHOLD-A level of pest density. The number of pests observed, trapped, counted, etc., that can be tolerated without an economic loss or aesthetic injury. Pest thresholds in urban pest management may be site specific, for example, different numbers of cockroaches may be tolerated at different sites (e.g., hospitals and garbage rooms). A threshold may be set at zero (e.g., termites in a wooden structure, flies in a hospital operating room).
TOLERABLE LEVELS OF PESTS -The presence of pests at certain levels is tolerable in many situations. Totally eliminating pests in certain areas is sometimes not achievable without major structural alterations, excessive control measures, unacceptable disruption, unacceptable cost, etc. Pest levels that depend on pest observations vary. The tolerable level in some situations will be zero (e.g., termites). Urban pest management programs usually have lower tolerable levels of pests than agricultural programs.
TOXICANT-A poisonous substance such as the active ingredient in a pesticide formulation.
TOXICITY-The ability of a pesticide to cause harmful, acute, delayed or allergic effects. The degree or extent that a chemical or substance is poisonous.
TOXIN-A naturally occurring poison produced by plants, animals or microorganisms. Examples: The poison produced by the black widow spider, the venom produced by snakes, the botulism toxin.
UNCLASSIFIED PESTICIDE -See General Use Pesticide.
URBAN-A Standard Metropolitan Area (SMA) or a town of 2,500(+) occupants.
– 57 –
URBAN PEST MANAGEMENT -Management of pest infestations that are normally problems in urban areas. Urban pest management involves reducing pest populations to tolerable numbers in and around homes, in structures and those pests that cause health related problems. Urban pest management may or may not focus on reducing economic injury but it always deals with health or aesthetic injuries. Pest control workers certified in Categories 3, 7 and 8 usually work in urban pest management or urban pest control.
USE-The performance of pesticide related activities requiring certification include: application, mixing, loading, transport, storage or handling after the manufacturing seal is broken; care and maintenance of application and handling equipment; and disposal of pesticides and their containers in accordance with label requirements. Uses not needing certification are: long distance transport, long-term storage and ultimate disposal.
VAPOR PRESSURE-The property that causes a chemical to evaporate. The higher the vapor pressure, the more volatile the chemical or the easier it will evaporate.
VECTOR-A carrier, an animal (e.g., insect, nematode, mite) that can carry and transmit a pathogen from one host to another.
VERTEBRATE -Animal characterized by a segmented backbone or spinal column.
VIRUS-Ultramicroscopic parasites composed of nucleic acids and proteins. Viruses can only multiply in living tissues and cause many animal and plant diseases.
VOLATILITY-The degree to which a substance changes from a liquid or solid state to a gas at ordinary temperatures when exposed to air.
WATER TABLE-The upper level of the water saturated zone in the ground.
WETTABLE POWDER -A dry pesticide formulation in powder form that forms a suspension when added to water.
ZONE-The management unit, an area of potential pest infestation made up of infested sites. Zones will contain pest food, water and harborage. A kitchen-bathroom arrangement in adjoining apartments might make up a zone; a kitchen, storeroom, waiters station, loading dock at a restaurant may make up another. Zones may also be established by eliminating areas with little likelihood of infestation and treating the remainder as a zone. A zone will be an ecosystem.
– 58 –

The information given herein is supplied with the understanding that no discrimination is intended and no endorsement by the University of Arkansas Cooperative Extension Service is implied. The agrichemical recommendations herein are consistent with
current federal and state pesticide labeling as of the date of publication. Revisions in labels can occur at any time. For your safety
before using any recommended pesticide, always read the product label.
University of Arkansas, United States Department of Agriculture, and County Governments Cooperating Issued
in furtherance of Cooperative Extension work, Acts of May 8 and June 30, 1914, in cooperation with the U.S.
Department of Agriculture, Director, Cooperative Extension Service, University of Arkansas. The Arkansas
Cooperative Extension Service offers its programs to all eligible persons regardless of race, color, national
origin, religion, gender, age, disability, marital or veteran status, or any other legally protected status, and is an
Affirmative Action/Equal Opportunity Employer.
AG1155-2-13RV