TELEFONO BCA DOMO SINGLE LINE DOMO TELEPHONE · Il telefono Domo è in grado di memorizzare fino ad...
24
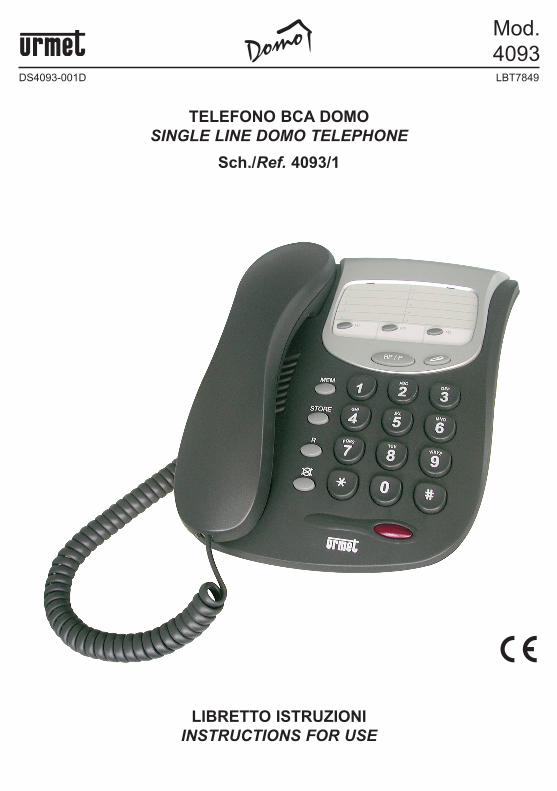
DS4093-001D LBT7849 Mod. 4093 TELEFONO BCA DOMO SINGLE LINE DOMO TELEPHONE Sch./Ref. 4093/1 LIBRETTO ISTRUZIONI INSTRUCTIONS FOR USE
Transcript of TELEFONO BCA DOMO SINGLE LINE DOMO TELEPHONE · Il telefono Domo è in grado di memorizzare fino ad...
DS4093-001D LBT7849
Mod.4093
TELEFONO BCA DOMOSINGLE LINE DOMO TELEPHONE
Sch./Ref. 4093/1
LIBRETTO ISTRUZIONIINSTRUCTIONS FOR USE
2 DS4093-001D
NOTE INFORMATIvE
Uso per cui il dispositivo è destinatoQuesto dispositivo è stato progettato e costruito per essere utilizzato come derivato di un centralinotelefonico (PABX) Urmet. Pertanto la sua installazione all’interno dell’impianto PABX, nonché la suaprogrammazione – laddove necessaria – deve essere eseguita da personale qualificato.
ImballoVerificare che l’imballo ed il contenuto non presentino danni visibili. Se alcune parti non sono presenti orisultano danneggiate, contattare immediatamente il rivenditore. In questi casi non tentare di utilizzare ildispositivo. In caso il prodotto debba essere rimandato al fornitore, assicurarsi di spedirlo con il suo imballooriginale.
Consigli per la collocazione del telefonoÈ preferibile utilizzare il telefono in ambienti protetti con un campo di temperatura compreso tra 5 e 40°Ced una umidità relativa compresa tra 20 e 75%.Evitare di esporre il telefono direttamente ai raggi solari o a fonti di calore.È sconsigliato collocare il telefono in ambienti particolarmente soggetti a polvere, in quanto l’accumularsidi depositi può compromettere il regolare funzionamento dei particolari soggetti a movimento.
Pulizia del telefonoPer la pulizia del telefono utilizzare esclusivamente un panno umido o antistatico. Non usare liquidi volatilicome benzina, alcool, solventi ecc. o panni trattati chimicamente in quanto ciò può rovinare la finitura dellesuperfici.Normalmente i piedini del telefono non segnano la superficie di appoggio ma, in considerazione dellavarietà di materiali disponibili sul campo, si consiglia di pulire regolarmente i punti di appoggio.
Contenuto della confezione• n.1 corpo apparecchio• n.1 microtelefono• n.1 cordone spiralato per microtelefono• n.1 cordone di linea rettilineo con terminazioni plug-in• n.1 spina tripolare con innesto plug-in• n.1 cartellino porta numeri con funzioni citofoniche• n.1 elenco “DIRITTI DEI CONSUMATORI”• n.1 elenco “CENTRI ASSISTENZA TECNICA”• n.1 libretto istruzioni.
Urmet si riserva il diritto di modificare senza preavviso le specifiche e le prestazioni del prodotto.
3LBT7849
INDICE
NOTE INFORMATIVE . . . . . . . . . . . . . . . . . . . . . . . . . . . . . . . . . . . . . . . . . . . . . . . . . . . . . . . . . . . . . . . . . . 2Uso per cui l’apparecchio è destinato . . . . . . . . . . . . . . . . . . . . . . . . . . . . . . . . . . . . . . . . . . . . . . . . . . . . . 2Imballo . . . . . . . . . . . . . . . . . . . . . . . . . . . . . . . . . . . . . . . . . . . . . . . . . . . . . . . . . . . . . . . . . . . . . . . . . . . . . 2Consigli per la collocazione del telefono . . . . . . . . . . . . . . . . . . . . . . . . . . . . . . . . . . . . . . . . . . . . . . . . . . . 2Consigli per l’installazione del telefono . . . . . . . . . . . . . . . . . . . . . . . . . . . . . . . . . . . . . . . . . . . . . . . . . . . . 2Pulizia del dispositivo . . . . . . . . . . . . . . . . . . . . . . . . . . . . . . . . . . . . . . . . . . . . . . . . . . . . . . . . . . . . . . . . . . 2Contenuto della confezione . . . . . . . . . . . . . . . . . . . . . . . . . . . . . . . . . . . . . . . . . . . . . . . . . . . . . . . . . . . . . 2
1. CARATTERISTIChE . . . . . . . . . . . . . . . . . . . . . . . . . . . . . . . . . . . . . . . . . . . . . . . . . . . . . . . . . . . . . . . . . 41.1 Caratteristiche generali . . . . . . . . . . . . . . . . . . . . . . . . . . . . . . . . . . . . . . . . . . . . . . . . . . . . . . . . . . . . . 41.2 Dimensioni . . . . . . . . . . . . . . . . . . . . . . . . . . . . . . . . . . . . . . . . . . . . . . . . . . . . . . . . . . . . . . . . . . . . . . . 5
2. INSTALLAZIONE . . . . . . . . . . . . . . . . . . . . . . . . . . . . . . . . . . . . . . . . . . . . . . . . . . . . . . . . . . . . . . . . . . . . 62.1 Collegamento del microtelefono . . . . . . . . . . . . . . . . . . . . . . . . . . . . . . . . . . . . . . . . . . . . . . . . . . . . . . 62.2 Collegamento del cavo di linea . . . . . . . . . . . . . . . . . . . . . . . . . . . . . . . . . . . . . . . . . . . . . . . . . . . . . . . 62.3 Regolazione del volume della soneria . . . . . . . . . . . . . . . . . . . . . . . . . . . . . . . . . . . . . . . . . . . . . . . . . . 62.4 Installazione a parete . . . . . . . . . . . . . . . . . . . . . . . . . . . . . . . . . . . . . . . . . . . . . . . . . . . . . . . . . . . . . . 7
2.4.1 Appoggio temporaneo del microtelefono . . . . . . . . . . . . . . . . . . . . . . . . . . . . . . . . . . . . . . . . . . . . . 7
3. USO DEL TELEFONO . . . . . . . . . . . . . . . . . . . . . . . . . . . . . . . . . . . . . . . . . . . . . . . . . . . . . . . . . . . . . . . . 83.1 Effettuare una chiamata . . . . . . . . . . . . . . . . . . . . . . . . . . . . . . . . . . . . . . . . . . . . . . . . . . . . . . . . . . . . . 83.2 Rispondere ad una chiamata . . . . . . . . . . . . . . . . . . . . . . . . . . . . . . . . . . . . . . . . . . . . . . . . . . . . . . . . . 83.3 Funzione REDIAL (tasto ) . . . . . . . . . . . . . . . . . . . . . . . . . . . . . . . . . . . . . . . . . . . . . . . . . . . . . . 83.4 Funzione NOTES (tasto ) . . . . . . . . . . . . . . . . . . . . . . . . . . . . . . . . . . . . . . . . . . . . . . . . . . . . . . . 83.5 Funzione FLASh (tasto ) . . . . . . . . . . . . . . . . . . . . . . . . . . . . . . . . . . . . . . . . . . . . . . . . . . . . . . . . 93.6 Funzione MUTE (tasto ) . . . . . . . . . . . . . . . . . . . . . . . . . . . . . . . . . . . . . . . . . . . . . . . . . . . . . . . . 9
4. USO DELLE MEMORIE . . . . . . . . . . . . . . . . . . . . . . . . . . . . . . . . . . . . . . . . . . . . . . . . . . . . . . . . . . . . . . . 94.1 Programmazione delle memorie a richiamo diretto . . . . . . . . . . . . . . . . . . . . . . . . . . . . . . . . . . . . . . . 104.2 Programmazione delle memorie a richiamo indiretto . . . . . . . . . . . . . . . . . . . . . . . . . . . . . . . . . . . . . 104.3 Richiamo delle memorie . . . . . . . . . . . . . . . . . . . . . . . . . . . . . . . . . . . . . . . . . . . . . . . . . . . . . . . . . . . 104.4 Programmazione delle funzioni citofoniche . . . . . . . . . . . . . . . . . . . . . . . . . . . . . . . . . . . . . . . . . . . . . 114.5 Cartellini porta numeri . . . . . . . . . . . . . . . . . . . . . . . . . . . . . . . . . . . . . . . . . . . . . . . . . . . . . . . . . . . . . 12
5. INDIVIDUAZIONE ANOMALIE E gUASTI . . . . . . . . . . . . . . . . . . . . . . . . . . . . . . . . . . . . . . . . . . . . . . . . 12
4 DS4093-001D
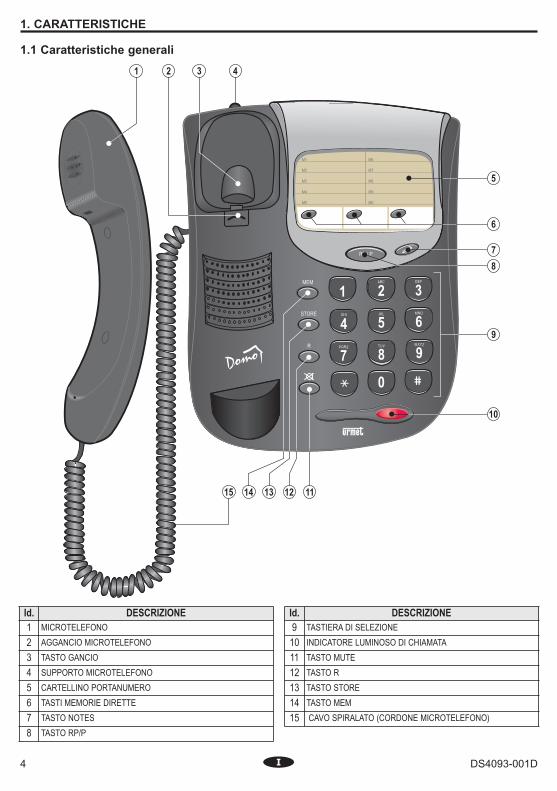
1. CARATTERISTICHE
1.1 Caratteristiche generali
Id. DESCRIZIONE1 MICROTELEFONO2 AGGANCIO MICROTELEFONO3 TASTO GANCIO4 SUPPORTO MICROTELEFONO5 CARTELLINO PORTANUMERO6 TASTI MEMORIE DIRETTE7 TASTO NOTES8 TASTO RP/P
Id. DESCRIZIONE9 TASTIERA DI SELEZIONE10 INDICATORE LUMINOSO DI CHIAMATA11 TASTO MUTE12 TASTO R13 TASTO STORE14 TASTO MEM15 CAVO SPIRALATO (CORDONE MICROTELEFONO)
5LBT7849
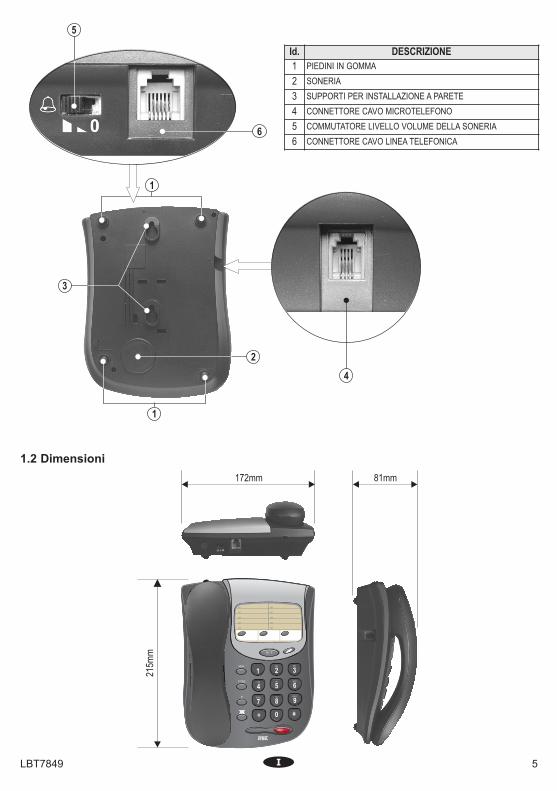
Id. DESCRIZIONE1 PIEDINI IN GOMMA2 SONERIA3 SUPPORTI PER INSTALLAZIONE A PARETE4 CONNETTORE CAVO MICROTELEFONO5 COMMUTATORE LIVELLO VOLUME DELLA SONERIA6 CONNETTORE CAVO LINEA TELEFONICA
1.2 Dimensioni
6 DS4093-001D
PRESA TRIPOLARE
PROVENIENTE DAL PABX
PRESA RJ
PROVENIENTE DAL PABX
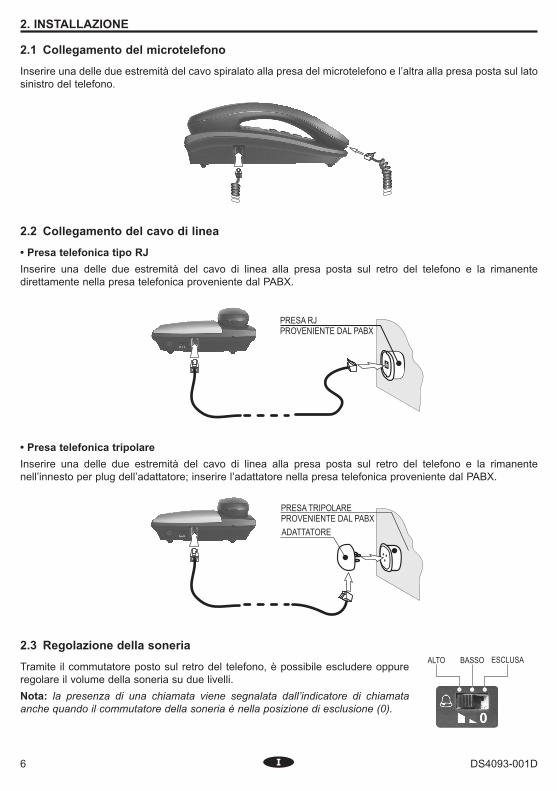
2.2 Collegamento del cavo di linea
• Presa telefonica tipo RJInserire una delle due estremità del cavo di linea alla presa posta sul retro del telefono e la rimanentedirettamente nella presa telefonica proveniente dal PABX.
• Presa telefonica tripolareInserire una delle due estremità del cavo di linea alla presa posta sul retro del telefono e la rimanentenell’innesto per plug dell’adattatore; inserire l’adattatore nella presa telefonica proveniente dal PABX.
2. INSTALLAZIONE
2.1 Collegamento del microtelefono
Inserire una delle due estremità del cavo spiralato alla presa del microtelefono e l’altra alla presa posta sul latosinistro del telefono.
2.3 Regolazione della soneria
Tramite il commutatore posto sul retro del telefono, è possibile escludere oppureregolare il volume della soneria su due livelli.Nota: la presenza di una chiamata viene segnalata dall’indicatore di chiamataanche quando il commutatore della soneria è nella posizione di esclusione (0).

7LBT7849
2.4 Installazione a parete
Il telefono può essere installato a parete mediante due tasselli (non a corredo) che dovranno essere fissati incorrispondenza delle apposite asole ricavate sulla base del telefono.Per forare la parete, si consiglia di utilizzare la dima riportata nell’ultima pagina del presente libretto istruzionie, dopo aver praticato i fori ed inserito i tasselli, avvitare le viti fino ad una distanza dalla parete di circa 5mm.
Far aderire l’apparecchio alla parete in modo che le teste delle viti si inseriscano nel foro largo delle asole ebloccare il telefono con un movimento verticale verso il basso.Rimuovere l’aggancio del microtelefono e reinserirlo dalla parte opposta (ruotarlo di 180°) in maniera tale chefunzioni da fermo.
Effettuare i collegamenti e le regolazioni come descritto nei paragrafi precedenti.
2.4.1 Appoggio temporaneo del microtelefono
Con il telefono fissato a parete, è possibile lasciare in attesa l’interlocutore agganciando il microtelefono sulsupporto posto sulla parte superiore del telefono.
Supporto microtelefono
Sede del supporto
8 DS4093-001D
3.2 Rispondere ad una chiamataPROCEDURAAll’attivazione dei dispositivi di segnalazione di chiamata (soneria espia), sollevate il microtelefono.Al termine della conversazione riagganciate il microtelefono.
3.3 Funzione REDIAL (tasto )DESCRIZIONELa funzione REDIAL consente di richiamare l’ultimo numero selezionato premendo semplicemente un tasto.Il limite della memoria associata alla funzione è di 32 digit, pause comprese.PROCEDURA• Sollevate il microtelefono• attendete il tono di linea• premete il tasto • a fine conversazione riagganciate il microtelefono.
3.4 Funzione NOTES (tasto )DESCRIZIONELa funzione NOTES consente di richiamare un numero telefonico precedentemente memorizzato.Può capitare, ad esempio, di trovare il numero occupato. Premendo il tasto prima di riagganciare ilmicrotelefono, il numero viene memorizzato. Questo potrà essere richiamato anche se intervallato da una opiù telefonate. Il limite della memoria associata alla funzione è di 32 digit, pause comprese.PROCEDURA CON IMPEGNO IMMEDIATO DELLA LINEA DAL PABX• Sollevate il microtelefono• attendete il tono di linea• selezionate il numero desiderato• al tono di occupato oppure a fine conversazione, premete
il tasto • riagganciate il microtelefono.
3. USO DEL TELEFONO
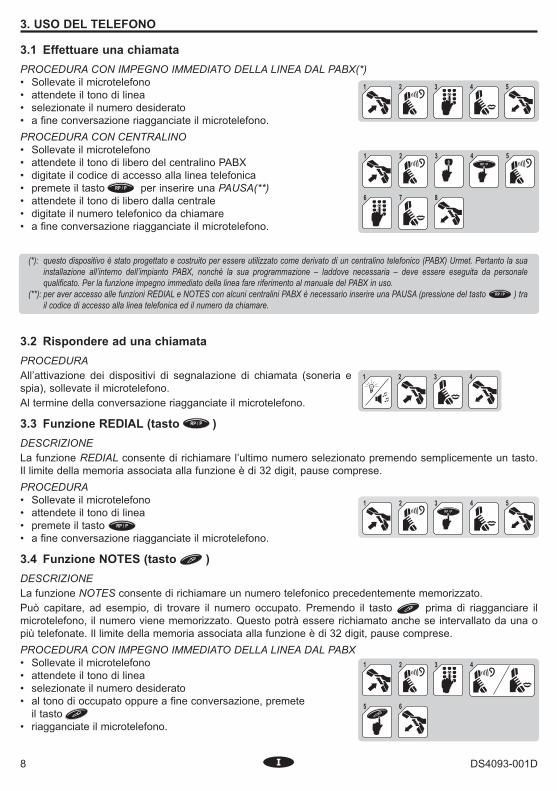
3.1 Effettuare una chiamataPROCEDURA CON IMPEGNO IMMEDIATO DELLA LINEA DAL PABX(*)• Sollevate il microtelefono• attendete il tono di linea• selezionate il numero desiderato• a fine conversazione riagganciate il microtelefono.PROCEDURA CON CENTRALINO• Sollevate il microtelefono• attendete il tono di libero del centralino PABX• digitate il codice di accesso alla linea telefonica• premete il tasto per inserire una PAUSA(**)• attendete il tono di libero dalla centrale• digitate il numero telefonico da chiamare• a fine conversazione riagganciate il microtelefono.
(*): questo dispositivo è stato progettato e costruito per essere utilizzato come derivato di un centralino telefonico (PABX) Urmet. Pertanto la suainstallazione all’interno dell’impianto PABX, nonché la sua programmazione – laddove necessaria – deve essere eseguita da personalequalificato. Per la funzione impegno immediato della linea fare riferimento al manuale del PABX in uso.
(**): per aver accesso alle funzioni REDIAL e NOTES con alcuni centralini PABX è necessario inserire una PAUSA (pressione del tasto ) trail codice di accesso alla linea telefonica ed il numero da chiamare.
9LBT7849
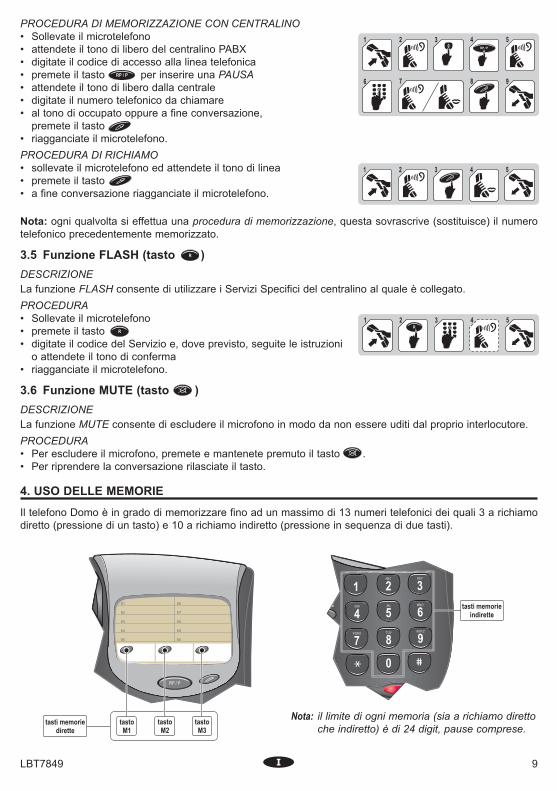
PROCEDURA DI MEMORIZZAZIONE CON CENTRALINO• Sollevate il microtelefono• attendete il tono di libero del centralino PABX• digitate il codice di accesso alla linea telefonica• premete il tasto per inserire una PAUSA• attendete il tono di libero dalla centrale• digitate il numero telefonico da chiamare• al tono di occupato oppure a fine conversazione,
premete il tasto • riagganciate il microtelefono.PROCEDURA DI RICHIAMO• sollevate il microtelefono ed attendete il tono di linea• premete il tasto • a fine conversazione riagganciate il microtelefono.
Nota: ogni qualvolta si effettua una procedura di memorizzazione, questa sovrascrive (sostituisce) il numerotelefonico precedentemente memorizzato.
3.5 Funzione FLASH (tasto )DESCRIZIONELa funzione FLASH consente di utilizzare i Servizi Specifici del centralino al quale è collegato.PROCEDURA• Sollevate il microtelefono• premete il tasto• digitate il codice del Servizio e, dove previsto, seguite le istruzioni
o attendete il tono di conferma• riagganciate il microtelefono.
3.6 Funzione MUTE (tasto )DESCRIZIONELa funzione MUTE consente di escludere il microfono in modo da non essere uditi dal proprio interlocutore.PROCEDURA• Per escludere il microfono, premete e mantenete premuto il tasto .• Per riprendere la conversazione rilasciate il tasto.
4. USO DELLE MEMORIE
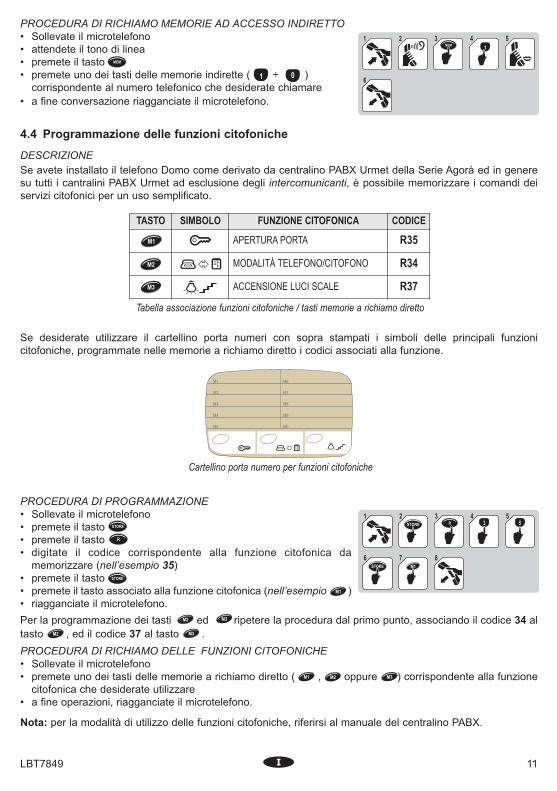
Il telefono Domo è in grado di memorizzare fino ad un massimo di 13 numeri telefonici dei quali 3 a richiamodiretto (pressione di un tasto) e 10 a richiamo indiretto (pressione in sequenza di due tasti).
Nota: il limite di ogni memoria (sia a richiamo direttoche indiretto) è di 24 digit, pause comprese.

10 DS4093-001D
4.1 Programmazione delle memorie a richiamo diretto
PROCEDURA CON IMPEGNO IMMEDIATO DELLA LINEA DAL PABX• Sollevate il microtelefono• premete il tasto• digitate il numero telefonico da memorizzare• premete il tasto• premete uno dei tasti , oppure• riagganciate il microtelefono.
Nota: ogni qualvolta si effettua una procedura di memorizzazione, questa sovrascrive (sostituisce) il numerotelefonico precedentemente memorizzato.
PROCEDURA DI PROGRAMMAZIONE CON CENTRALINO• Sollevate il microtelefono• premete il tasto• digitate il codice di accesso alla linea telefonica• premete il tasto per inserire una PAUSA• digitate il numero telefonico da memorizzare• premete il tasto• premete uno dei tasti , oppure• riagganciate il microtelefono.
4.2 Programmazione delle memorie a richiamo indiretto
PROCEDURA CON IMPEGNO IMMEDIATO DELLA LINEA DAL PABX• Sollevate il microtelefono• premete il tasto• digitate il numero telefonico da memorizzare• premete il tasto• premete uno dei tasti della tastiera ( ÷ )• riagganciate il microtelefono.
PROCEDURA DI PROGRAMMAZIONE CON CENTRALINO• Sollevate il microtelefono• premete il tasto• digitate il codice di accesso alla linea telefonica• premete il tasto per inserire una PAUSA• digitate il numero telefonico da memorizzare• premete il tasto• premete uno dei tasti della tastiera ( ÷ )• riagganciate il microtelefono.
4.3 Richiamo delle memorie
PROCEDURA DI RICHIAMO MEMORIE AD ACCESSO DIRETTO• Sollevate il microtelefono• attendete il tono di linea• premete uno dei tasti delle memorie dirette ( , oppure )
corrispondente al numero telefonico che desiderate chiamare• a fine conversazione riagganciate il microtelefono.
MEM
MEM
11LBT7849
PROCEDURA DI RICHIAMO MEMORIE AD ACCESSO INDIRETTO• Sollevate il microtelefono• attendete il tono di linea• premete il tasto • premete uno dei tasti delle memorie indirette ( ÷ )
corrispondente al numero telefonico che desiderate chiamare• a fine conversazione riagganciate il microtelefono.
4.4 Programmazione delle funzioni citofoniche
DESCRIZIONESe avete installato il telefono Domo come derivato da centralino PABX Urmet della Serie Agorà ed in generesu tutti i cantralini PABX Urmet ad esclusione degli intercomunicanti, è possibile memorizzare i comandi deiservizi citofonici per un uso semplificato.
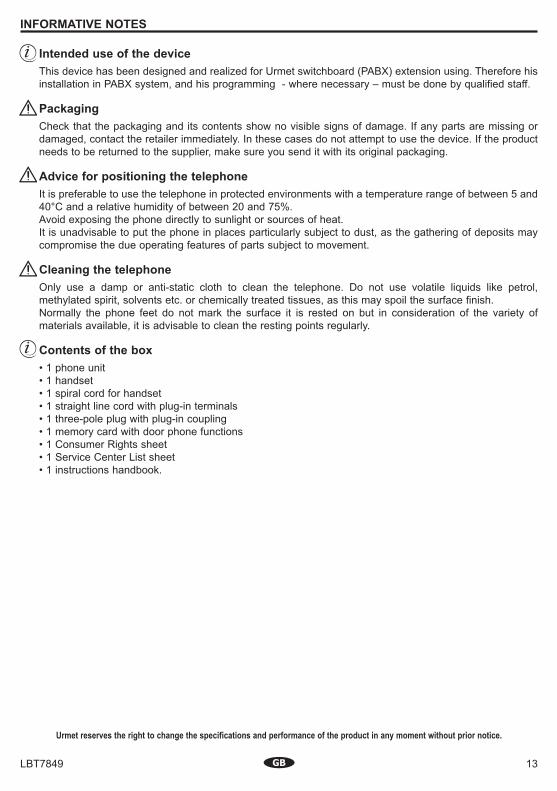
PROCEDURA DI PROGRAMMAZIONE• Sollevate il microtelefono• premete il tasto• premete il tasto• digitate il codice corrispondente alla funzione citofonica da
memorizzare (nell’esempio 35)• premete il tasto• premete il tasto associato alla funzione citofonica (nell’esempio )• riagganciate il microtelefono.Per la programmazione dei tasti ed ripetere la procedura dal primo punto, associando il codice 34 altasto , ed il codice 37 al tasto . PROCEDURA DI RICHIAMO DELLE FUNZIONI CITOFONICHE• Sollevate il microtelefono• premete uno dei tasti delle memorie a richiamo diretto ( , oppure ) corrispondente alla funzione
citofonica che desiderate utilizzare• a fine operazioni, riagganciate il microtelefono.
Nota: per la modalità di utilizzo delle funzioni citofoniche, riferirsi al manuale del centralino PABX.
Cartellino porta numero per funzioni citofoniche
Tabella associazione funzioni citofoniche / tasti memorie a richiamo diretto
TASTO SIMBOLO FUNZIONE CITOFONICA CODICE
APERTURA PORTA R35
MODALITÀ TELEFONO/CITOFONO R34
ACCENSIONE LUCI SCALE R37
Se desiderate utilizzare il cartellino porta numeri con sopra stampati i simboli delle principali funzionicitofoniche, programmate nelle memorie a richiamo diretto i codici associati alla funzione.

12 DS4093-001D
4.5 Cartellini porta numeri
Il telefono Domo è provvisto di cartellini porta numeri (uno standard presente sul telefono ed unopersonalizzato(*) a corredo del prodotto) sui quali è possibile annotare i nominativi dei numeri telefonicimemorizzati. Per compilare (e/o sostituire) il cartellino è necessario rimuovere la protezione. Su di essa èprevista un’asola: fate leva con una punta sottile per sollevarla di qualche millimetro e, successivamente,disimpegnate le linguette dalle sedi.
Punto dove fare leva perrimuovere la protezione
(*): in caso di persistenza, contattare il servizio di assistenza tecnica
(*): vedi §4.4
ANOMALIA PROBABILE CAUSA RIMEDIO(*)Non si sente il segnale di suoneria. Suoneria esclusa. Verificare predisposizione suoneria (vedi §2.3).Con il telefono collegato a centra-lino PABX, non è possibile utilizzarele funzioni REDIAL, NOTES ed inumeri della RUBRICA.
Mancato inserimento dellaPAUSA durante ladigitazione del numerotelefonico.
Inserire la PAUSA tra il codice di accesso alla linea telefonica ed ilnumero da chiamare (vedi capitolo 3).
Telefono muto. Collegamenti apparecchiodifettosi.
Verificare i collegamenti della linea telefonica e del microtelefono(vedi §2.1 e §2.2). Se l’inconveniente persiste, provare a collegarealla stessa borchia un telefono sicuramente funzionante. Se anchequest’ultimo risulterà non funzionante, l’inconveniente sarà daattribuire alla linea telefonica.
5. GUIDA ALLA SOLUZIONE DEI PROBLEMI
13LBT7849
INFORMATIvE NOTES
Intended use of the deviceThis device has been designed and realized for Urmet switchboard (PABX) extension using. Therefore hisinstallation in PABX system, and his programming - where necessary – must be done by qualified staff.
PackagingCheck that the packaging and its contents show no visible signs of damage. If any parts are missing ordamaged, contact the retailer immediately. In these cases do not attempt to use the device. If the productneeds to be returned to the supplier, make sure you send it with its original packaging.
Advice for positioning the telephoneIt is preferable to use the telephone in protected environments with a temperature range of between 5 and40°C and a relative humidity of between 20 and 75%.Avoid exposing the phone directly to sunlight or sources of heat.It is unadvisable to put the phone in places particularly subject to dust, as the gathering of deposits maycompromise the due operating features of parts subject to movement.
Cleaning the telephoneOnly use a damp or anti-static cloth to clean the telephone. Do not use volatile liquids like petrol,methylated spirit, solvents etc. or chemically treated tissues, as this may spoil the surface finish.Normally the phone feet do not mark the surface it is rested on but in consideration of the variety ofmaterials available, it is advisable to clean the resting points regularly.
Contents of the box• 1 phone unit• 1 handset• 1 spiral cord for handset• 1 straight line cord with plug-in terminals• 1 three-pole plug with plug-in coupling• 1 memory card with door phone functions• 1 Consumer Rights sheet• 1 Service Center List sheet• 1 instructions handbook.
Urmet reserves the right to change the specifications and performance of the product in any moment without prior notice.
14 DS4093-001D
TABLE OF CONTENTS
INFORMATIVE NOTES . . . . . . . . . . . . . . . . . . . . . . . . . . . . . . . . . . . . . . . . . . . . . . . . . . . . . . . . . . . . . . . . 13Intended use of the device . . . . . . . . . . . . . . . . . . . . . . . . . . . . . . . . . . . . . . . . . . . . . . . . . . . . . . . . . . . 13Packaging . . . . . . . . . . . . . . . . . . . . . . . . . . . . . . . . . . . . . . . . . . . . . . . . . . . . . . . . . . . . . . . . . . . . . . . . 13Advice for positioning the telephone . . . . . . . . . . . . . . . . . . . . . . . . . . . . . . . . . . . . . . . . . . . . . . . . . . . 13Advice for installing the telephone . . . . . . . . . . . . . . . . . . . . . . . . . . . . . . . . . . . . . . . . . . . . . . . . . . . . . 13Cleaning the telephone . . . . . . . . . . . . . . . . . . . . . . . . . . . . . . . . . . . . . . . . . . . . . . . . . . . . . . . . . . . . . . 13Contents of the box . . . . . . . . . . . . . . . . . . . . . . . . . . . . . . . . . . . . . . . . . . . . . . . . . . . . . . . . . . . . . . . . . 13
1. ChARACTERISTICS . . . . . . . . . . . . . . . . . . . . . . . . . . . . . . . . . . . . . . . . . . . . . . . . . . . . . . . . . . . . . . . . 151.1 general characteristics . . . . . . . . . . . . . . . . . . . . . . . . . . . . . . . . . . . . . . . . . . . . . . . . . . . . . . . . . . . 151.2 Dimensions . . . . . . . . . . . . . . . . . . . . . . . . . . . . . . . . . . . . . . . . . . . . . . . . . . . . . . . . . . . . . . . . . . . . 16
2. INSTALLATION . . . . . . . . . . . . . . . . . . . . . . . . . . . . . . . . . . . . . . . . . . . . . . . . . . . . . . . . . . . . . . . . . . . . 172.1 handset connection . . . . . . . . . . . . . . . . . . . . . . . . . . . . . . . . . . . . . . . . . . . . . . . . . . . . . . . . . . . . . 172.2 Line cord connection . . . . . . . . . . . . . . . . . . . . . . . . . . . . . . . . . . . . . . . . . . . . . . . . . . . . . . . . . . . . . 172.3 Adjusting ringer volume . . . . . . . . . . . . . . . . . . . . . . . . . . . . . . . . . . . . . . . . . . . . . . . . . . . . . . . . . . . 172.4 Wall mounting . . . . . . . . . . . . . . . . . . . . . . . . . . . . . . . . . . . . . . . . . . . . . . . . . . . . . . . . . . . . . . . . . . . 18
2.4.1 Temporary handset resting . . . . . . . . . . . . . . . . . . . . . . . . . . . . . . . . . . . . . . . . . . . . . . . . . . . . . . . 18
3. USINg ThE TELEPhONE. . . . . . . . . . . . . . . . . . . . . . . . . . . . . . . . . . . . . . . . . . . . . . . . . . . . . . . . . . . . 193.1 Making a call . . . . . . . . . . . . . . . . . . . . . . . . . . . . . . . . . . . . . . . . . . . . . . . . . . . . . . . . . . . . . . . . . . . . .193.2 Answering a call . . . . . . . . . . . . . . . . . . . . . . . . . . . . . . . . . . . . . . . . . . . . . . . . . . . . . . . . . . . . . . . . . 193.3 REDIAL function (button ) . . . . . . . . . . . . . . . . . . . . . . . . . . . . . . . . . . . . . . . . . . . . . . . . . . . . . 193.4 NOTES function (button ) . . . . . . . . . . . . . . . . . . . . . . . . . . . . . . . . . . . . . . . . . . . . . . . . . . . . . 193.5 FLASh function (button ) . . . . . . . . . . . . . . . . . . . . . . . . . . . . . . . . . . . . . . . . . . . . . . . . . . . . . . 203.6 MUTE function (button ) . . . . . . . . . . . . . . . . . . . . . . . . . . . . . . . . . . . . . . . . . . . . . . . . . . . . . . 20
4. RECALLINg STORED NUMBERS . . . . . . . . . . . . . . . . . . . . . . . . . . . . . . . . . . . . . . . . . . . . . . . . . . . . . . 204.1 Programming one-touch dial numbers . . . . . . . . . . . . . . . . . . . . . . . . . . . . . . . . . . . . . . . . . . . . . . . . 214.2 Programming two-touch dial numbers . . . . . . . . . . . . . . . . . . . . . . . . . . . . . . . . . . . . . . . . . . . . . . . . . 214.3 Recalling stored numbers . . . . . . . . . . . . . . . . . . . . . . . . . . . . . . . . . . . . . . . . . . . . . . . . . . . . . . . . . . 214.4 Programming door phone functions . . . . . . . . . . . . . . . . . . . . . . . . . . . . . . . . . . . . . . . . . . . . . . . . . . 224.5 Memory cards . . . . . . . . . . . . . . . . . . . . . . . . . . . . . . . . . . . . . . . . . . . . . . . . . . . . . . . . . . . . . . . . . . . 23
5. TROUBLEShOOTINg . . . . . . . . . . . . . . . . . . . . . . . . . . . . . . . . . . . . . . . . . . . . . . . . . . . . . . . . . . . . . . . 23
15LBT7849
1. CHARACTERISTICS
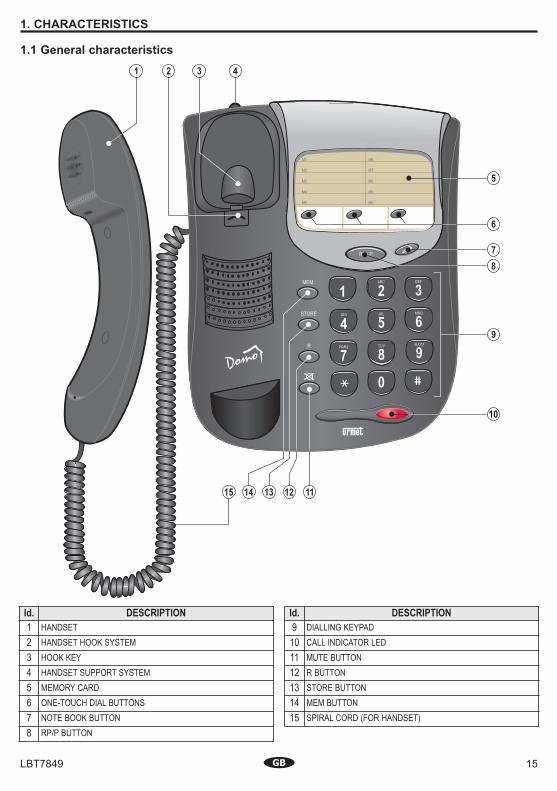
1.1 General characteristics
Id. DESCRIPTION1 HANDSET2 HANDSET HOOK SYSTEM3 HOOK KEY4 HANDSET SUPPORT SYSTEM5 MEMORY CARD6 ONE-TOUCH DIAL BUTTONS7 NOTE BOOK BUTTON8 RP/P BUTTON
Id. DESCRIPTION9 DIALLING KEYPAD10 CALL INDICATOR LED11 MUTE BUTTON12 R BUTTON13 STORE BUTTON14 MEM BUTTON15 SPIRAL CORD (FOR HANDSET)

16 DS4093-001D
Id. DESCRIPTION1 RUBBER FEET2 RINGER3 SUPPORTS FOR WALL MOUNTING4 HANDSET LEAD CONNECTOR5 RINGER VOLUME LEVEL SWITCH6 TELEPHONE LINE LEAD CONNECTOR
1.2 Dimensions
17LBT7849
FROM PABX
RJ SOCKET
FROM PABX
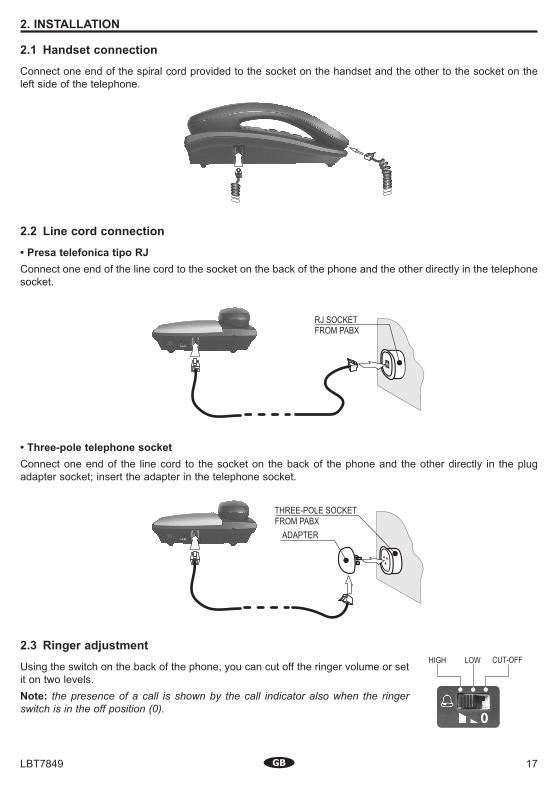
2.2 Line cord connection
• Presa telefonica tipo RJConnect one end of the line cord to the socket on the back of the phone and the other directly in the telephonesocket.
• Three-pole telephone socketConnect one end of the line cord to the socket on the back of the phone and the other directly in the plugadapter socket; insert the adapter in the telephone socket.
2. INSTALLATION
2.1 Handset connection
Connect one end of the spiral cord provided to the socket on the handset and the other to the socket on theleft side of the telephone.
2.3 Ringer adjustment
Using the switch on the back of the phone, you can cut off the ringer volume or setit on two levels.Note: the presence of a call is shown by the call indicator also when the ringerswitch is in the off position (0).
18 DS4093-001D
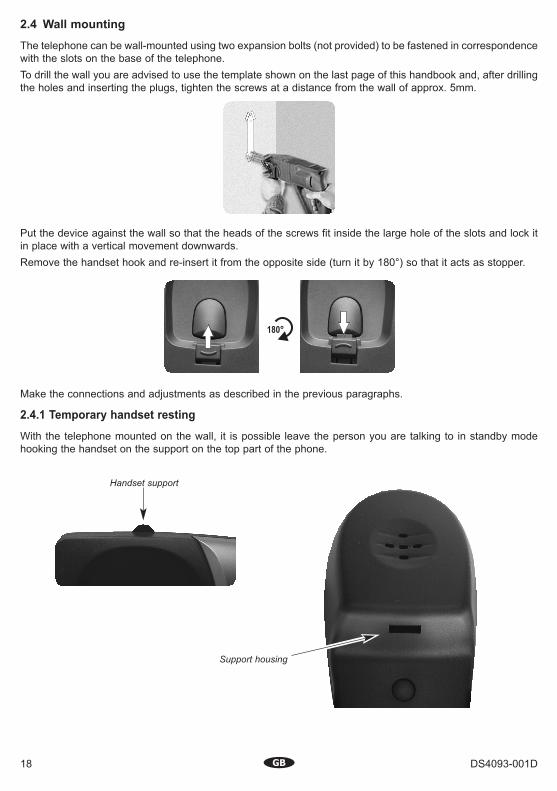
2.4 Wall mounting
The telephone can be wall-mounted using two expansion bolts (not provided) to be fastened in correspondencewith the slots on the base of the telephone.To drill the wall you are advised to use the template shown on the last page of this handbook and, after drillingthe holes and inserting the plugs, tighten the screws at a distance from the wall of approx. 5mm.
Put the device against the wall so that the heads of the screws fit inside the large hole of the slots and lock itin place with a vertical movement downwards.Remove the handset hook and re-insert it from the opposite side (turn it by 180°) so that it acts as stopper.
Make the connections and adjustments as described in the previous paragraphs.
2.4.1 Temporary handset resting
With the telephone mounted on the wall, it is possible leave the person you are talking to in standby modehooking the handset on the support on the top part of the phone.
Handset support
Support housing
19LBT7849
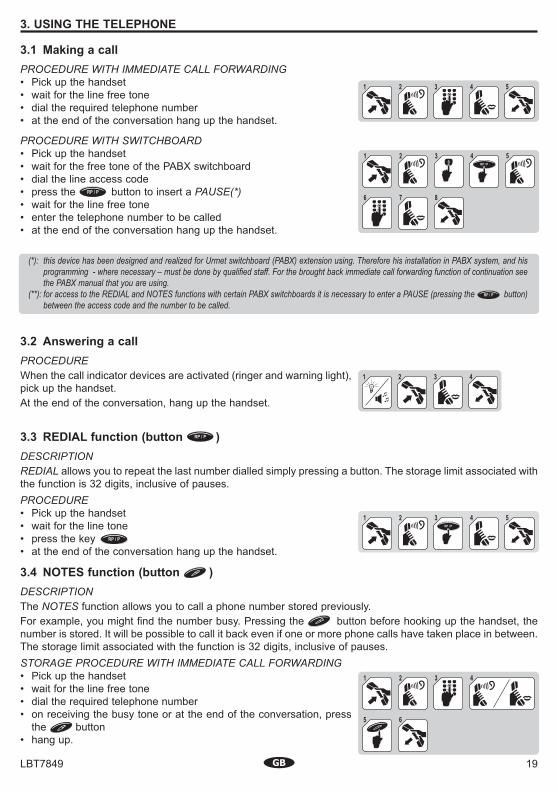
3.2 Answering a callPROCEDUREWhen the call indicator devices are activated (ringer and warning light),pick up the handset.At the end of the conversation, hang up the handset.
3.3 REDIAL function (button )DESCRIPTIONREDIAL allows you to repeat the last number dialled simply pressing a button. The storage limit associated withthe function is 32 digits, inclusive of pauses.PROCEDURE• Pick up the handset• wait for the line tone• press the key • at the end of the conversation hang up the handset.
3.4 NOTES function (button )DESCRIPTIONThe NOTES function allows you to call a phone number stored previously.For example, you might find the number busy. Pressing the button before hooking up the handset, thenumber is stored. It will be possible to call it back even if one or more phone calls have taken place in between.The storage limit associated with the function is 32 digits, inclusive of pauses.STORAGE PROCEDURE WITH IMMEDIATE CALL FORWARDING• Pick up the handset• wait for the line free tone• dial the required telephone number• on receiving the busy tone or at the end of the conversation, press
the button• hang up.
3. USING THE TELEPHONE
3.1 Making a callPROCEDURE WITH IMMEDIATE CALL FORWARDING• Pick up the handset• wait for the line free tone• dial the required telephone number• at the end of the conversation hang up the handset.
PROCEDURE WITH SWITCHBOARD• Pick up the handset• wait for the free tone of the PABX switchboard• dial the line access code• press the button to insert a PAUSE(*)• wait for the line free tone• enter the telephone number to be called• at the end of the conversation hang up the handset.
(*): this device has been designed and realized for Urmet switchboard (PABX) extension using. Therefore his installation in PABX system, and hisprogramming - where necessary – must be done by qualified staff. For the brought back immediate call forwarding function of continuation seethe PABX manual that you are using.
(**): for access to the REDIAL and NOTES functions with certain PABX switchboards it is necessary to enter a PAUSE (pressing the button)between the access code and the number to be called.
20 DS4093-001D
Note: the storage limit associated with each function (bothone and two-touch) is 24 digits, inclusive of pauses.
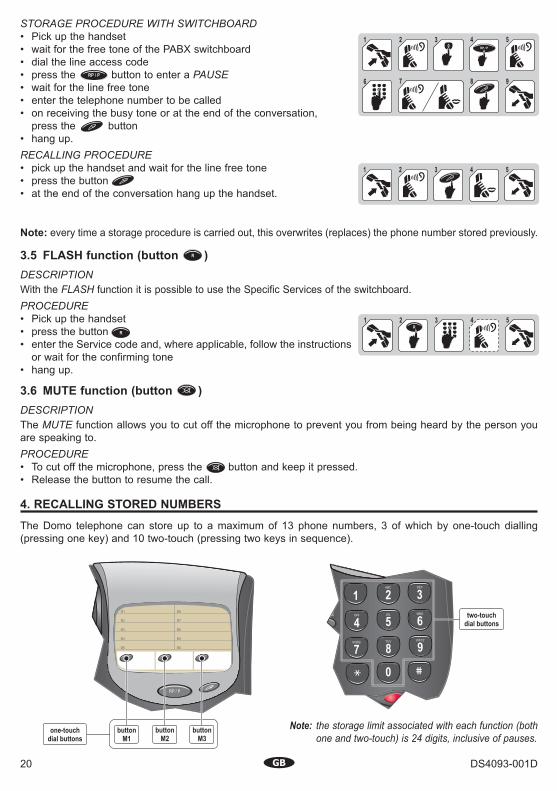
STORAGE PROCEDURE WITH SWITCHBOARD• Pick up the handset• wait for the free tone of the PABX switchboard• dial the line access code• press the button to enter a PAUSE• wait for the line free tone• enter the telephone number to be called• on receiving the busy tone or at the end of the conversation,
press the button • hang up.RECALLING PROCEDURE• pick up the handset and wait for the line free tone• press the button • at the end of the conversation hang up the handset.
Note: every time a storage procedure is carried out, this overwrites (replaces) the phone number stored previously.
3.5 FLASH function (button )DESCRIPTIONWith the FLASH function it is possible to use the Specific Services of the switchboard.PROCEDURE• Pick up the handset• press the button• enter the Service code and, where applicable, follow the instructions
or wait for the confirming tone• hang up.
3.6 MUTE function (button )DESCRIPTIONThe MUTE function allows you to cut off the microphone to prevent you from being heard by the person youare speaking to.PROCEDURE• To cut off the microphone, press the button and keep it pressed.• Release the button to resume the call.
4. RECALLING STORED NUMBERS
The Domo telephone can store up to a maximum of 13 phone numbers, 3 of which by one-touch dialling(pressing one key) and 10 two-touch (pressing two keys in sequence).
21LBT7849
4.1 Programming one-touch dial numbers
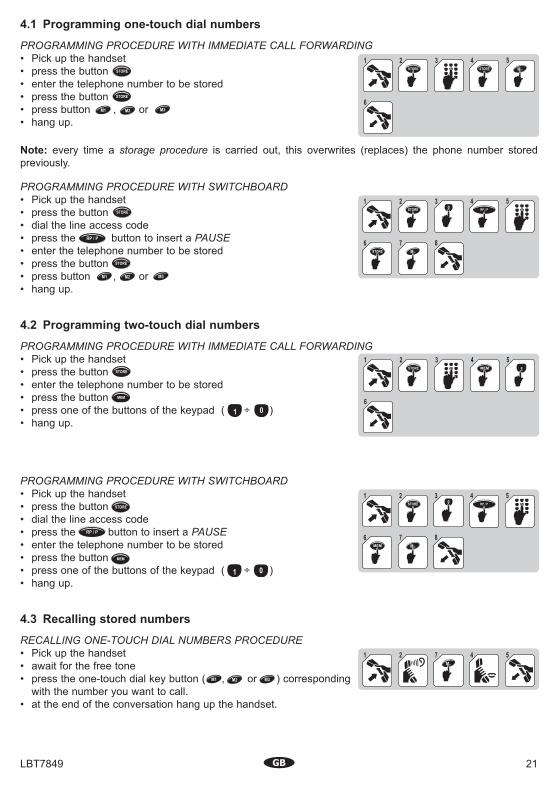
PROGRAMMING PROCEDURE WITH IMMEDIATE CALL FORWARDING• Pick up the handset• press the button• enter the telephone number to be stored• press the button• press button , or• hang up.
Note: every time a storage procedure is carried out, this overwrites (replaces) the phone number storedpreviously.
PROGRAMMING PROCEDURE WITH SWITCHBOARD• Pick up the handset• press the button• dial the line access code• press the button to insert a PAUSE• enter the telephone number to be stored• press the button• press button , or• hang up.
4.2 Programming two-touch dial numbers
PROGRAMMING PROCEDURE WITH IMMEDIATE CALL FORWARDING• Pick up the handset• press the button• enter the telephone number to be stored• press the button• press one of the buttons of the keypad ( ÷ )• hang up.
PROGRAMMING PROCEDURE WITH SWITCHBOARD• Pick up the handset• press the button• dial the line access code• press the button to insert a PAUSE• enter the telephone number to be stored• press the button• press one of the buttons of the keypad ( ÷ )• hang up.
4.3 Recalling stored numbers
RECALLING ONE-TOUCH DIAL NUMBERS PROCEDURE• Pick up the handset• await for the free tone• press the one-touch dial key button ( , or ) corresponding
with the number you want to call.• at the end of the conversation hang up the handset.
MEM
MEM
22 DS4093-001D
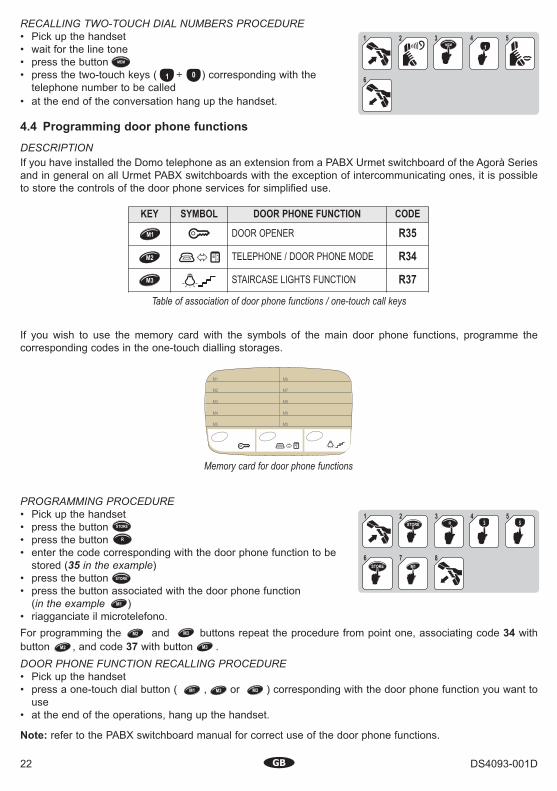
RECALLING TWO-TOUCH DIAL NUMBERS PROCEDURE• Pick up the handset• wait for the line tone• press the button • press the two-touch keys ( ÷ ) corresponding with the
telephone number to be called• at the end of the conversation hang up the handset.
4.4 Programming door phone functions
DESCRIPTIONIf you have installed the Domo telephone as an extension from a PABX Urmet switchboard of the Agorà Seriesand in general on all Urmet PABX switchboards with the exception of intercommunicating ones, it is possibleto store the controls of the door phone services for simplified use.
PROGRAMMING PROCEDURE• Pick up the handset• press the button• press the button• enter the code corresponding with the door phone function to be
stored (35 in the example)• press the button• press the button associated with the door phone function
(in the example )• riagganciate il microtelefono.For programming the and buttons repeat the procedure from point one, associating code 34 withbutton , and code 37 with button . DOOR PHONE FUNCTION RECALLING PROCEDURE• Pick up the handset• press a one-touch dial button ( , or ) corresponding with the door phone function you want to
use• at the end of the operations, hang up the handset.
Note: refer to the PABX switchboard manual for correct use of the door phone functions.
Memory card for door phone functions
Table of association of door phone functions / one-touch call keys
KEY SYMBOL DOOR PHONE FUNCTION CODE
DOOR OPENER R35
TELEPHONE / DOOR PHONE MODE R34
STAIRCASE LIGHTS FUNCTION R37
If you wish to use the memory card with the symbols of the main door phone functions, programme thecorresponding codes in the one-touch dialling storages.
23LBT7849
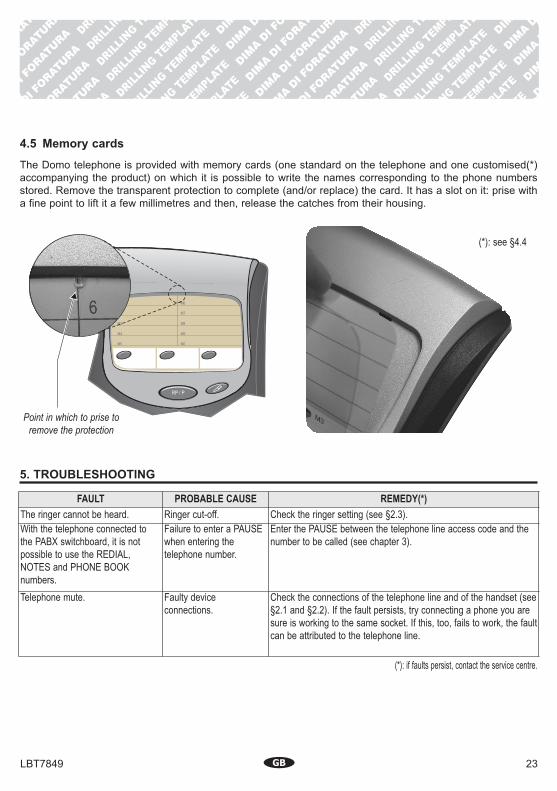
4.5 Memory cards
The Domo telephone is provided with memory cards (one standard on the telephone and one customised(*)accompanying the product) on which it is possible to write the names corresponding to the phone numbersstored. Remove the transparent protection to complete (and/or replace) the card. It has a slot on it: prise witha fine point to lift it a few millimetres and then, release the catches from their housing.
Point in which to prise toremove the protection
(*): if faults persist, contact the service centre.
(*): see §4.4
FAULT PROBABLE CAUSE REMEDY(*)The ringer cannot be heard. Ringer cut-off. Check the ringer setting (see §2.3).With the telephone connected tothe PABX switchboard, it is notpossible to use the REDIAL,NOTES and PHONE BOOKnumbers.
Failure to enter a PAUSEwhen entering thetelephone number.
Enter the PAUSE between the telephone line access code and thenumber to be called (see chapter 3).
Telephone mute. Faulty deviceconnections.
Check the connections of the telephone line and of the handset (see§2.1 and §2.2). If the fault persists, try connecting a phone you aresure is working to the same socket. If this, too, fails to work, the faultcan be attributed to the telephone line.
5. TROUBLESHOOTING