DS4093-002B LBT7864 - domuswire.com · 3.1 DISPLAY Il telefono Domo Plus è dotato di un display a...
32
DS4093-002B LBT7864 Mod. 4093 TELEFONO BCA DOMO PLUS SINGLE LINE DOMO PLUS TELEPHONE Sch./Ref. 4093/15 LIBRETTO ISTRUZIONI INSTRUCTIONS FOR USE
-
Upload
doannguyet -
Category
Documents
-
view
212 -
download
0
Transcript of DS4093-002B LBT7864 - domuswire.com · 3.1 DISPLAY Il telefono Domo Plus è dotato di un display a...

DS4093-002B LBT7864
Mod.4093
TELEFONO BCA DOMO PLUSSINGLE LINE DOMO PLUS TELEPHONE
Sch./Ref. 4093/15
LIBRETTO ISTRUZIONIINSTRUCTIONS FOR USE

2 DS4093-002BI
ITALIANONOTE INFORMATIVEDICHIARAZIONE DI CONFORMITÀ La società Urmet Domus S.p.A. con sede in via Bologna n° 188/C – 10154 Torino (TO) I, dichiara che il presente dispositivo è conforme alle seguenti norme:• EN55022, EN55024 – Compatibilità elettromagnetica• EN41003, EN60950 – Sicurezza elettricae soddisfa i requisiti della Direttiva 1999/5/CE del parlamento Europeo e del Consiglio del 9 marzo 1999 riguardante le apparecchiature radio, le apparecchiature terminali di telecomunicazioni e il reciproco riconoscimento della loro conformità.La conformità a questi requisiti viene espressa mediante la marcatura .
USO PER CUI IL DISPOSITIVO È DESTINATO Questo dispositivo è stato progettato e costruito per essere utilizzato come derivato di un centralino
telefonico (PABX) Urmet Domus. Pertanto la sua installazione all’interno dell’impianto PABX, nonché la sua programmazione – laddove necessaria – deve essere eseguita da personale qualifi cato.
IMBALLO Verifi care che l’imballo ed il contenuto non presentino danni visibili. Se alcune parti non sono presenti o
risultano danneggiate, contattare immediatamente il rivenditore. In questi casi non tentare di utilizzare il dispositivo. In caso il prodotto debba essere rimandato al fornitore, assicurarsi di spedirlo con il suo imballo originale.
CONSIGLI PER LA COLLOCAZIONE DEL TELEFONO È preferibile utilizzare il telefono in ambienti protetti con un campo di temperatura compreso tra 5 e
40°C ed una umidità relativa compresa tra 20 e 75%. Evitare di esporre il telefono direttamente ai raggi solari o a fonti di calore. È sconsigliato collocare il telefono in ambienti particolarmente soggetti a polvere, in quanto l’accumularsi
di depositi può compromettere il regolare funzionamento dei particolari soggetti a movimento.
CONSIGLI PER L’INSTALLAZIONE DEL TELEFONO Il telefono Domo Plus è stato progettato per funzionare senza batterie pertanto se la linea telefonica
viene scollegata per alcune ore, il contenuto delle memorie viene perso.
PULIZIA DEL TELEFONO Per la pulizia del telefono utilizzare esclusivamente un panno umido o antistatico. Non usare liquidi
volatili come benzina, alcool, solventi ecc. o panni trattati chimicamente in quanto ciò può rovinare la fi nitura delle superfi ci.
Normalmente i piedini del telefono non segnano la superfi cie di appoggio ma, in considerazione della varietà di materiali disponibili sul campo, si consiglia di pulire regolarmente i punti di appoggio.
CONTENUTO DELLA CONFEZIONE • n. 1 corpo apparecchio • n. 1 supporto apparecchio • n. 1 microtelefono • n. 1 cordone spiralato per microtelefono • n. 1 cordone di linea rettilineo con terminazioni plug-in • n. 1 spina tripolare con innesto plug-in • n. 1 cartellino porta numeri con funzioni citofoniche • n. 1 libretto istruzioni.
Urmet Domus si riserva il diritto di modifi care senza preavviso le specifi che e le prestazioni del prodotto.

3DS4093-002B I
INDICE
NOTE INFORMATIVE .................................................................................................................................... 2 Dichiarazione di conformità ...................................................................................................................... 2 Uso per cui l’apparecchio è destinato ...................................................................................................... 2 Imballo ...................................................................................................................................................... 2 Consigli per la collocazione del telefono .................................................................................................. 2 Consigli per l’installazione del telefono .................................................................................................... 2 Pulizia del dispositivo ............................................................................................................................... 2 Contenuto della confezione ...................................................................................................................... 2
1. CARATTERISTICHE ............................................................................................................................... 4 1.1 Caratteristiche generali ...................................................................................................................... 4 1.2 Dimensioni ......................................................................................................................................... 5
2. INSTALLAZIONE .................................................................................................................................... 6 2.1 Installazione del supporto .................................................................................................................. 6 2.1.1 Installazione del supporto in confi gurazione “da tavolo” ........................................................... 6 2.1.2 Installazione del supporto in confi gurazione “da parete” ......................................................... .6 2.2 Collegamento del microtelefono ........................................................................................................ 7 2.3 Collegamento del cavo di linea .......................................................................................................... 7 2.4 Regolazione del volume della soneria ............................................................................................... 7 2.5 Regolazione del volume del VivaVoce .............................................................................................. 8 2.6 Programmazione data/ora ................................................................................................................. 8 2.7 Installazione a parete ......................................................................................................................... 9 2.7.1 Appoggio temporaneo del microtelefono .................................................................................. 9
3. USO DEL TELEFONO ............................................................................................................................. 9 3.1 Display ............................................................................................................................................. 10 3.2 Funzione VivaVoce / Mani libere ..................................................................................................... 11 3.3 Effettuare una chiamata ................................................................................................................... 11 3.4 Rispondere ad una chiamata ........................................................................................................... 11 3.5 Funzione REDIAL (tasto ) ..................................................................................................... 11 3.6 Funzione NOTES (tasto )........................................................................................................ 12 3.7 Funzione FLASH (tasto ) .......................................................................................................... 12 3.8 Funzione MUTE (tasto ) ........................................................................................................... 12 3.9 Funzione ATTESA MUSICALE (tasto ) .................................................................................... 13
4. USO DELLE MEMORIE ........................................................................................................................ 13 4.1 Programmazione delle memorie a richiamo diretto ......................................................................... 13 4.2 Programmazione delle memorie a richiamo indiretto ...................................................................... 14 4.3 Richiamo delle memorie .................................................................................................................. 14 4.4 Programmazione delle funzioni citofoniche ..................................................................................... 15 4.5 Cartellini porta numeri ...................................................................................................................... 16
5. GUIDA ALLA SOLUZIONE DEI PROBLEMI ........................................................................................ 16

4 DS4093-002BI
1. CARATTERISTICHE1.1 CARATTERISTICHE GENERALI
2 3 4 7 85 61
9
10
1211
13
14
20 18 1519 17 16
1 MICROTELEFONO2 AGGANCIO MICROTELEFONO3 TASTO GANCIO4 SUPPORTO MICROTELEFONO5 TASTO REGOLAZIONE ORA E DATA6 TASTI MEMORIE A RICHIAMO DIRETTO7 DISPLAY LCD8 TASTO INFORMAZIONI9 CARTELLINO PORTANUMERI10 INDICATORE LUMINOSO DI CHIAMATA11 TASTO NOTES12 TASTO RP/P
13 TASTIERA DI SELEZIONE14 TASTO VIVA VOCE CON INDICATORE
LUMINOSO15 TASTO DI ATTESA MUSICALE CON
INDICATORE LUMINOSO16 TASTO MUTE17 TASTO R18 TASTO STORE19 TASTO MEMORIE A RICHIAMO INDIRETTO20 CAVO SPIRALATO (CORDONE
MICROTELEFONO)

5DS4093-002B I
1 PIEDINI IN GOMMA2 SONERIA3 SUPPORTI PER INSTALLAZIONE A PARETE4 REGOLAZIONE LIVELLO VOLUME DEL VIVA
VOCE5 REGOLAZIONE LIVELLO VOLUME DELLA
SONERIA6 CONNETTORE CAVO LINEA TELEFONICA7 CONNETTORE CAVO MICROTELEFONO8 SUPPORTO APPOGGIO TAVOLO / PARETE
172 mm 81 mm 100 mm
215
mm
Solo telefono Telefono+
Supporto
1.2 DIMENSIONI
7
6
2
3
4
8
5
1
1

6 DS4093-002BI
2. INSTALLAZIONE2.1 INSTALLAZIONE DEL SUPPORTOSe necessita variare l’angolo di lettura del display, installare sotto il telefono il supporto fornito in dotazione.Montare il supporto in riferimento alla tipologia di installazione che si vuole utilizzare:
2.1.1 INSTALLAZIONE DEL SUPPORTO IN CONFIGURAZIONE “DA TAVOLO”
2.1.2 INSTALLAZIONE DEL SUPPORTO IN CONFIGURAZIONE “DA PARETE”
Configurazione da tavolo Configurazione da parete

7DS4093-002B I
2.2 COLLEGAMENTO DEL MICROTELEFONOInserire una delle due estremità del cavo spiralato alla presa sul microtelefono e l’altra alla presa posta sul lato sinistro del telefono (contrassegnata sul fondo del telefono con il simbolo ).
2.3 COLLEGAMENTO DEL CAVO DI LINEA PROVENIENTE DAL PABX• Presa telefonica tipo RJ Inserire una delle due estremità del cavo di linea alla presa posta sul retro del telefono (contrassegnata sul
fondo del telefono con il simbolo ) e la rimanente direttamente nella presa telefonica.
• Presa telefonica tripolare Inserire una delle due estremità del cavo di linea alla presa posta sul retro del telefono (contrassegnata
sul fondo del telefono con il simbolo ) e la rimanente nell’innesto per plug dell’adattatore; inserire l’adattatore nella presa telefonica.
2.4 REGOLAZIONE DELLA SONERIATramite il commutatore posto sul retro del telefono, è possibile escludere oppure regolare il volume della soneria su due livelli.
La presenza di una chiamata viene segnalata dall’indicatore di chiamata anche quando il commutatore della soneria è nella posizione di esclusione (0).
ALTOBASSO
ESCLUSA

8 DS4093-002BI
2.5 REGOLAZIONE DEL VOLUME DEL VIVAVOCETramite il potenziometro posto sul fi anco del telefono, è possibile regolare il volume del VivaVoce. Si consiglia inizialmente di posizionarlo sul valore MEDIO. Durante l’utilizzo sarà possibile regolarlo a proprio piacimento.
2.6 PROGRAMMAZIONE DATA/ORAPer programmare la data/ora è necessario sganciare il microtelefono (*) e premere il tasto .
Durante l’installazione attendere all’incirca una decina di secondi dal collegamento della linea telefonica.
Le prime due cifre del datario indicanti il mese lampeggeranno.Premere più volte il tasto per impostare il mese.Premere il tasto per confermare e proseguire.
Le successive due cifre del datario indicanti il giorno lampeggeranno.Premere più volte il tasto per impostare il giorno.Premere il tasto per confermare e proseguire.
Le prime due cifre dell’orologio indicanti l’ora lampeggeranno.Premere più volte il tasto per impostare l’ora.Premere il tasto per confermare e proseguire.
Le successive due cifre dell’orologio indicanti i minuti lampeggeranno.Premere più volte il tasto per impostare i minuti.Premere il tasto per confermare.
Premere il tasto per uscire dalla procedura di programmazione e riagganciare il microtelefono (*).Dopo circa 6 secondi, sul display compariranno la data e l’ora aggiornate.
La pressione del tasto durante la procedura di programmazione ne causa l’uscita.
(*): oppure premere il tasto .
MINIMO MEDIO MASSIMO

9DS4093-002B I
2.7 INSTALLAZIONE A PARETEIl telefono può essere installato a parete mediante due tasselli (non a corredo) che dovranno essere fi ssati in corrispondenza delle apposite asole ricavate sulla base del telefono e sul supporto (quando utilizzato).Per forare la parete, si consiglia di utilizzare la dima riportata nell’ultima pagina del presente libretto istruzioni e, dopo aver praticato i fori ed inserito i tasselli, avvitare le viti fi no ad una distanza dalla parete di circa 5mm.
Far aderire l’apparecchio alla parete in modo che le teste delle viti si inseriscano nel foro largo delle asole e bloccare il telefono con un movimento verticale verso il basso.Rimuovere l’aggancio del microtelefono e reinserirlo dalla parte opposta (ruotarlo di 180°) in maniera tale che funzioni da fermo.
Effettuare i collegamenti, le regolazioni e la programmazione come descritto nei paragrafi precedenti.
2.7.1 APPOGGIO TEMPORANEO DEL MICROTELEFONOCon il telefono fi ssato a parete, è possibile lasciare in attesa l’interlocutore agganciando il microtelefono sulsupporto posto sulla parte superiore del telefono.
Supporto microtelefono
Sede del supporto

10 DS4093-002BI
3. USO DEL TELEFONOQuesto dispositivo è stato progettato e costruito per essere utilizzato come derivato di un centralino telefonico (PABX) Urmet Domus. Pertanto la sua installazione all’interno dell’impianto PABX, nonché la sua programmazione – laddove necessaria – deve essere eseguita da personale qualifi cato.Per la funzione impegno immediato della linea di seguito riportata fare riferimento al manuale del PABX in uso.
3.1 DISPLAYIl telefono Domo Plus è dotato di un display a 16 digit. In condizioni di riposo visualizza la data e l’ora (vedi programmazione al § 2.6) mentre, durante l’utilizzo, supporta l’utente visualizzando le cifre di selezione ed alcune funzionalità:
Allo sgancio del microtelefono (oppure alla pressione del tasto ), l’orologio viene sostituito da un timer (azzerabile tramite la pressione del tasto INFO ) che misura la durata della conversazione. La visualizzazione data / timer rimane disponibile per 8 secondi circa dal riaggancio del microtelefono (oppure dalla ripressione del tasto ). Durante la selezione, il display visualizza le cifre digitate e, trascorsi 10 secondi circa dalla fi ne della selezione, ripropone le informazioni data/timer.
TASTO
FUNZIONI
DISPLAY
CIFRE DI SELEZIONE
STORE
OPERAZIONE / STATO VISUALIZZAZIONE SUL DISPLAY
Per conoscere l’ultimo numero selezionato, sganciare ilmicrotelefono e premere il tasto INFO. Il numero telefonicorimane visualizzato per circa 6 secondi.
TELEFONO A RIPOSO.
SGANCIO DEL MICROTELEFONO (avvio del timer).
INZIO SELEZIONE (nell’esempio: cifra di accesso allalinea telefonica, inserimento di una pausa e prima partedel numero telefonico).
FINE SELEZIONE (nel caso di numeri telefonici la cuilunghezza sia superiore alle 16 cifre, il display visualizzaesclusivamente le ultime 16).
Dopo circa 10 secondi dalla digitazione dell’ultima cifradi selezione.
Per ottenere il tempo effettivo di conversazione, premereil tasto INFO alla risposta dell’interlocutore.
RIAGGANCIO DEL MICROTELEFONO (per circa 10secondi rimane visualizzata la durata della chiamata).

11DS4093-002B I
3.2 FUNZIONE VIVAVOCE / MANI LIBERE (TASTO )DESCRIZIONELa funzione VivaVoce consente di utilizzare telefono Domo Plus senza l’ausilio del microtelefono. Premendo il tasto la relativa spia si illumina ad indicare l’attivazione della funzione. Ripremendolo la funzione viene rilasciata con il conseguente spegnimento della spia. Lo stesso effetto si ottiene sganciando il microtelefono.È possibile passare da una conversazione in VivaVoce (mani libere) a privata (microtelefono) e viceversa alternando lo sgancio del microtelefono con la pressione del tasto .
Per facilitare la lettura del manuale, nei successivi paragrafi non si fa’ più cenno alla possibilità di utilizzare a propria scelta il microtelefono oppure la funzione VivaVoce. Fare riferimento alle icone riportate alla destra delle relative procedure.
3.3 EFFETTUARE UNA CHIAMATAPROCEDURA CON IMPEGNO IMMEDIATO DELLA LINEA DAL PABX• Sollevate il microtelefono.• Attendete il tono di libero dalla centrale.• Selezionate il numero desiderato.• A fi ne conversazione riagganciate il microtelefono.
PROCEDURA CON CENTRALINO• Sollevate il microtelefono.• Attendete il tono di libero del centralino PABX.• Digitate il codice di accesso alla linea telefonica.• Premete il tasto per inserire una PAUSA (*). Il display visualizza dopo il codice di accesso la lettera P.• Attendete il tono di libero dalla centrale.• Digitate il numero telefonico da chiamare.• A fi ne conversazione riagganciate il microtelefono.
(*): per aver accesso alle funzioni REDIAL e NOTES con alcuni centralini PABX è necessario inserire una PAUSA (pressione del tasto ) tra il codice di accesso alla linea telefonica ed il numero da chiamare.
3.4 RISPONDERE AD UNA CHIAMATAPROCEDURAAll’attivazione dei dispositivi di segnalazione di chiamata (soneria e spia), sollevate il microtelefono.A fi ne conversazione riagganciate il microtelefono.
3.5 FUNZIONE REDIAL (TASTO )DESCRIZIONELa funzione REDIAL consente di richiamare l’ultimo numero selezionato premendo semplicemente un tasto.Il limite della memoria associata alla funzione è di 32 digit, pause comprese.
PROCEDURA• Sollevate il microtelefono.• Attendete il tono di linea.• Premete il tasto .• A fi ne conversazione riagganciate il microtelefono.
3.6 FUNZIONE NOTES (TASTO )
1 2 3 54
1 2 3
6 7 8
54
1 2 3 4
1 2 3 54

12 DS4093-002BI
DESCRIZIONELa funzione NOTES consente di richiamare un numero telefonico precedentemente memorizzato.Può capitare, ad esempio, di trovare il numero occupato. Premendo il tasto prima di riagganciare il microtelefono, il numero viene memorizzato. Questo potrà essere richiamato anche se intervallato da una o più telefonate. Il limite della memoria associata alla funzione è di 32 digit, pause comprese.
PROCEDURA CON IMPEGNO IMMEDIATO DELLA LINEA DAL PABX• Sollevate il microtelefono.• Attendete il tono di linea.• Selezionate il numero desiderato.• Al tono di occupato oppure a fi ne conversazione,
premete il tasto .• Riagganciate il microtelefono.
PROCEDURA DI MEMORIZZAZIONE CON CENTRALINO• Sollevate il microtelefono.• Attendete il tono di libero del centralino PABX.• Digitate il codice di accesso alla linea telefonica.• Premete il tasto per inserire una PAUSA.• Attendete il tono di linea.• Digitate il numero telefonico da chiamare.• Al tono di occupato oppure a fi ne conversazione,
premete il tasto .• Riagganciate il microtelefono.
PROCEDURA DI RICHIAMO• Sollevate il microtelefono ed attendete il tono di linea.• Premete il tasto .• A fi ne conversazione riagganciate il microtelefono.
Ogni qualvolta si effettua una procedura di memorizzazione, questa sovrascrive (sostituisce) il numero telefonico precedentemente memorizzato.
3.7 FUNZIONE FLASH (TASTO )DESCRIZIONELa funzione FLASH consente di utilizzare i Servizi Specifi ci del centralino al quale è collegato (es: TRASFERIMENTO DI CHIAMATA).
PROCEDURA• Sollevate il microtelefono.• Premete il tasto .• Digitate il codice del Servizio e, dove previsto,
seguite le istruzioni o attendete il tono di conferma.• Riagganciate il microtelefono.
3.8 FUNZIONE MUTE (TASTO )DESCRIZIONELa funzione MUTE consente di escludere il microfono in modo da non essere uditi dal proprio interlocutore.
PROCEDURA• Per escludere il microfono, premete il tasto .• Per riprendere la conversazione premete il tasto .
1 2 3
5 6
4
1 2 3
6 7
4 5
8 9
1 2 3 4 5
1 2 3 4 5

13DS4093-002B I
3.9 FUNZIONE ATTESA MUSICALE (TASTO )DESCRIZIONEDurante una conversazione è possibile porre il Vostro interlocutore in attesa con ascolto di una melodiamusicale.
PROCEDURA• Per porre l’interlocutore in attesa musicale, premete
il tasto e riponete il microtelefono nella sede.L’accensione della spia e la presenza della melodia musicale confermano l’attivazione del servizio.
Per riprendere la conversazione sganciate il microtelefono o, nel caso non abbiate riposto il microtelefono nella sede, ripremete il tasto .
• A fi ne conversazione riagganciate il microtelefono.
4. USO DELLE MEMORIEIl telefono Domo è in grado di memorizzare fi no ad un massimo di 20 numeri telefonici, 10 a richiamo diretto (pressione di un tasto) e 10 a richiamo indiretto (pressione in sequenza di due tasti).
Il limite di ogni memoria (sia a richiamo diretto che indiretto) è di 24 digit, pause comprese. Ogni qualvolta si effettua una procedura di memorizzazione, questa sostituisce il numero telefonico
precedentemente memorizzato.
4.1 PROGRAMMAZIONE DELLE MEMORIE A RICHIAMO DIRETTOPROCEDURA DI PROGRAMMAZIONE CON IMPEGNO IMMEDIATO DELLA LINEA DAL PABX• Sollevate il microtelefono.• Premete il tasto . Sul display appare: E.• Digitate il numero telefonico da memorizzare.• Premete il tasto .• Premete uno dei tasti delle memorie (M1 ÷ M0). Sul display,
dopo lo scorrimento verso sinistra del numero telefonico, viene visualizzato Enn (dove nn rappresenta il numero della memoria utilizzata).
• Riagganciate il microtelefono.
1 2
6 7
3 4 5
M1/M11M2/M12M3/M13M4/M14M5/M15
M6/M16M7/M17M8/M18M9/M19M0/M20
1 2 3
6
54

14 DS4093-002BI
PROCEDURA DI PROGRAMMAZIONE CON CENTRALINO• Sollevate il microtelefono.• Premete il tasto . Sul display: E .3. Digitate il codice di accesso alla linea telefonica.• Premete il tasto per inserire una PAUSA.• Digitate il numero telefonico da memorizzare.• Premete il tasto .• Premete uno dei tasti delle memorie (M1 ÷ M0). Sul display,
dopo lo scorrimento verso sinistra del numero telefonico, viene visualizzato Enn (dove nn rappresenta il numero della memoria utilizzata).
• Riagganciate il microtelefono.
4.2 PROGRAMMAZIONE DELLE MEMORIE A RICHIAMO INDIRETTOPROCEDURA DI PROGRAMMAZIONE CON IMPEGNO IMMEDIATO DELLA LINEA DAL PABX• Sollevate il microtelefono.• Premete il tasto . Sul display: E.• Digitate il numero telefonico da memorizzare.• Premete il tasto .• Premete il tasto .• Premete uno dei tasti delle memorie (M1 ÷ M0). Sul display,
dopo lo scorrimento verso sinistra del numero telefonico, viene visualizzato Enn (dove nn rappresenta il numero della memoria utilizzata).
• Riagganciate il microtelefono.
PROCEDURA DI PROGRAMMAZIONE CON CENTRALINO• Sollevate il microtelefono.• Premete il tasto . Sul display: E.• Digitate il codice di accesso alla linea telefonica.• Premete il tasto per inserire una PAUSA.• Digitate il numero telefonico da memorizzare.• Premete il tasto .• Premete il tasto .• Premete uno dei tasti delle memorie (M11 ÷ M20). Sul display, dopo lo scorrimento verso sinistra del numero
telefonico, viene visualizzato Enn (dove nn rappresenta il numero della memoria utilizzata).
• Riagganciate il microtelefono.
4.3 RICHIAMO DELLE MEMORIEPROCEDURA DI RICHIAMO MEMORIE AD ACCESSO DIRETTO• Sollevate il microtelefono.• Attendete il tono di linea.• Premete uno dei tasti delle memorie dirette (M1 ÷ M0)
corrispondente al numero telefonico che desiderate chiamare.
• A fi ne conversazione riagganciate il microtelefono.
1 2 3
6 7 8
54
1 2 3
6 7
54
1 2 3
6 7
54
8 9
1 2 3 54

15DS4093-002B I
PROCEDURA DI RICHIAMO MEMORIE AD ACCESSO INDIRETTO• Sollevate il microtelefono.• Attendete il tono di linea.• Premete il tasto .• Premete uno dei tasti delle memorie indirette (M11 ÷
M20) corrispondente al numero telefonico che desiderate chiamare.
• A fi ne conversazione riagganciate il microtelefono.
4.4 PROGRAMMAZIONE DELLE FUNZIONI CITOFONICHEDESCRIZIONESe avete installato il telefono Domo Plus come derivato da centralino PABX Urmet Domus della Serie Agorà ed in genere su tutti i centralini PABX Urmet Domus ad esclusione degli intercomunicanti, è possibile memorizzare i comandi dei servizi citofonici per un uso semplifi cato.Se desiderate utilizzare il cartellino porta numeri con sopra stampati i simboli delle principali funzioni citofoniche, programmate nelle memorie a richiamo diretto i relativi codici.
PROCEDURA DI PROGRAMMAZIONE• Sollevate il microtelefono• Premete il tasto .• Premete il tasto .• Digitate il codice corrispondente alla funzione citofonica
da memorizzare (per esempio 35).• Premete il tasto .• Premete il tasto associato alla funzione citofonica
(nell’esempio M1) .• Riagganciate il microtelefono.
Per la programmazione dei tasti M2 ed M3 ripetere la procedura dal primo punto, associando il codice 34 al tasto M2, ed il codice 37 al tasto M3.
PROCEDURA DI RICHIAMO DELLE FUNZIONI CITOFONICHE• Sollevate il microtelefono.• Premete uno dei tasti delle memorie a richiamo diretto (M1, M2 oppure M3) corrispondente alla funzione
citofonica che desiderate utilizzare.• A fi ne operazioni, riagganciate il microtelefono.
Per la modalità di utilizzo delle funzioni citofoniche, riferirsi al manuale del centralino PABX.
1 2 3
6
54
SIMBOLO CODICE
M1 APERTURA PORTA R35
M2 MODO TELEFONO /MODO CITOFONO
R34
M3 ACCENSIONE LUCI SCALE R37
Cartellino porta numero per funzioni citofoniche
Tabella associazione funzioni citofoniche /Tasti memorie a richiamo diretto
TASTO FUNZIONE CITOFONICA
1 2 3
6
54
16 DS4093-002BI
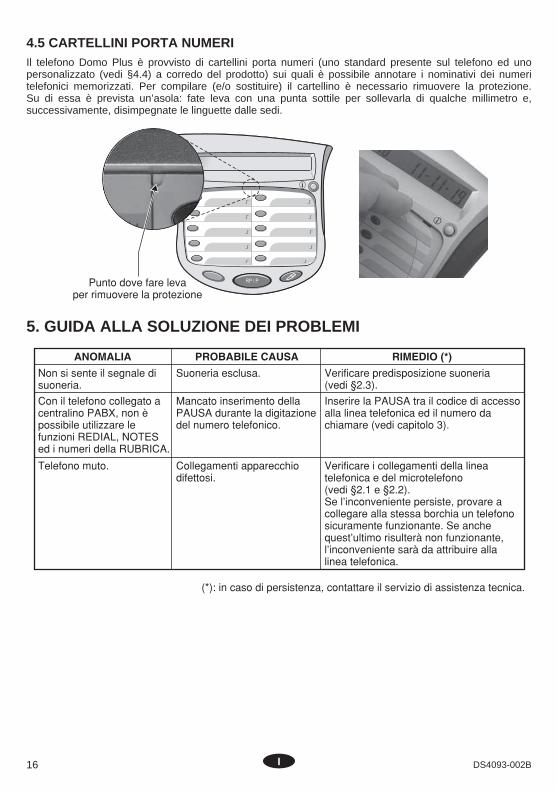
4.5 CARTELLINI PORTA NUMERIIl telefono Domo Plus è provvisto di cartellini porta numeri (uno standard presente sul telefono ed uno personalizzato (vedi §4.4) a corredo del prodotto) sui quali è possibile annotare i nominativi dei numeri telefonici memorizzati. Per compilare (e/o sostituire) il cartellino è necessario rimuovere la protezione. Su di essa è prevista un’asola: fate leva con una punta sottile per sollevarla di qualche millimetro e, successivamente, disimpegnate le linguette dalle sedi.
5. GUIDA ALLA SOLUZIONE DEI PROBLEMI
Verificare i collegamenti della lineatelefonica e del microtelefono(vedi §2.1 e §2.2).Se l’inconveniente persiste, provare acollegare alla stessa borchia un telefonosicuramente funzionante. Se anchequest’ultimo risulterà non funzionante,l’inconveniente sarà da attribuire allalinea telefonica.
ANOMALIA PROBABILE CAUSA RIMEDIO (*)
Non si sente il segnale disuoneria.
Suoneria esclusa. Verificare predisposizione suoneria(vedi §2.3).
Con il telefono collegato acentralino PABX, non èpossibile utilizzare lefunzioni REDIAL, NOTESed i numeri della RUBRICA.
Mancato inserimento dellaPAUSA durante la digitazionedel numero telefonico.
Inserire la PAUSA tra il codice di accessoalla linea telefonica ed il numero dachiamare (vedi capitolo 3).
Telefono muto. Collegamenti apparecchiodifettosi.
(*): in caso di persistenza, contattare il servizio di assistenza tecnica.
Punto dove fare levaper rimuovere la protezione

17DS4093-002B GB
INFORMATIVE NOTESDECLARATION OF CONFORMITY The manufacturer, Urmet Domus S.p.A. whose legal offi ces are in via Bologna 188/C - 10154 Torino (TO), Italy, hereby declares that this device complies with the following standards:• EN55022, EN55024 – Electromagnetic compatibility• EN41003, EN60950 – Electrical safety.Moreover, the device meets the specifi cations of Directive 1999/5/EC by the European Parliament and Council dated 9 March 1999 for radio devices, telecommunication terminals and reciprocal compliance acknowledgement.Conformity to the requirements above is expressed by means of the following marking: .
INTENDED USE OF THE DEVICE This device has been designed and realized for Urmet Domus switchboard (PABX) extension using.
Therefore his installation in PABX system, and his programming - where necessary – must be done by qualifi ed staff.
PACKAGING Check that the packaging and its contents show no visible signs of damage. If any parts are missing
or damaged, contact the retailer immediately. In these cases do not attempt to use the device. If the product needs to be returned to the supplier, make sure you send it with its original packaging.
ADVICE FOR POSITIONING THE TELEPHONE It is preferable to use the telephone in protected environments with a temperature range of between 5
and 40°C and a relative humidity of between 20 and 75%. Avoid exposing the phone directly to sunlight or sources of heat. It is unadvisable to put the phone in places particularly subject to dust, as the gathering of deposits may
compromise the due operating features of parts subject to movement.
ADVICE FOR INSTALLING THE TELEPHONE The Domo Plus telephone has been designed to work without batteries, therefore if the telephone line
is disconnected for a few hours, the contents in storage will be lost.
CLEANING THE TELEPHONE Only use a damp or anti-static cloth to clean the telephone. Do not use volatile liquids like petrol,
methylated spirit, solvents etc. or chemically treated tissues, as this may spoil the surface fi nish. Normally the phone feet do not mark the surface it is rested on but in consideration of the variety of
materials available, it is advisable to clean the resting points regularly.
CONTENTS OF THE BOX • n. 1 phone unit • n. 1 telephone mount • n. 1 handset • n. 1 spiral cord for handset • n. 1 straight line cord with plug-in terminals • n. 1 three-pole plug with plug-in coupling • n. 1 memory card with door phone functions • n. 1 instructions handbook
Urmet Domus reserves the right to change the specifi cations and performance of the product in any moment without prior notice.
ENGLISH

18 DS4093-002BGB
TABLE OF CONTENTS
INFORMATIVE NOTES ............................................................................................................................... 17 Declaration of Conformity ....................................................................................................................... 17 Intended use of the device ..................................................................................................................... 17 Packaging .............................................................................................................................................. 17 Advice for positioning the telephone ...................................................................................................... 17 Advice for installing the telephone ......................................................................................................... 17 Cleaning the telephone .......................................................................................................................... 17 Contents of the box ................................................................................................................................ 17
1. CHARACTERISTICS ............................................................................................................................. 19 1.1 General characteristics .................................................................................................................... 19 1.2 Dimensions ...................................................................................................................................... 20
2. INSTALLATION ..................................................................................................................................... 21 2.1 Installing the mount .......................................................................................................................... 21 2.1.1 “Table-top” confi guration mount installation ............................................................................ 21 2.1.2 “Wall” confi guration mount installation ................................................................................... .21 2.2 Handset connection ......................................................................................................................... 22 2.3 Line cord connection ........................................................................................................................ 22 2.4 Ringer adjustment ............................................................................................................................ 22 2.5 Free-hands speaker volume adjustment .......................................................................................... 23 2.6 Date and time programming procedure ........................................................................................... 23 2.7 Wall mounting .................................................................................................................................. 24 2.7.1 Temporary handset resting ..................................................................................................... 24
3. USING THE TELEPHONE ..................................................................................................................... 25 3.1 Display ............................................................................................................................................. 25 3.2 Free-hands speaker function ........................................................................................................... 26 3.3 Making a call .................................................................................................................................... 26 3.4 Answering a call ............................................................................................................................... 26 3.5 REDIAL function (button ) ..................................................................................................... 26 3.6 NOTES function (button )........................................................................................................ 27 3.7 FLASH function (button ) .......................................................................................................... 27 3.8 MUTE function (button ) ........................................................................................................... 27 3.9 ON-HOLD MUSIC function (button ) ........................................................................................ 28
4. USING PRE-SET NUMBERS ................................................................................................................ 28 4.1 Programming one-touch dial numbers ............................................................................................. 28 4.2 Programming two-touch dial numbers ............................................................................................. 29 4.3 Recalling stored numbers ................................................................................................................ 29 4.4 Programming door phone functions ................................................................................................. 30 4.5 Memory cards .................................................................................................................................. 31
5. TROUBLESHOOTING ........................................................................................................................... 31

19DS4093-002B GB
1. CHARACTERISTICS1.1 GENERAL CHARACTERISTICS
2 3 4 7 85 61
9
10
1211
13
14
20 18 1519 17 16
1 HANDSET2 HANDSET HOOK SYSTEM3 HOOK KEY4 HANDSET SUPPORT SYSTEM5 TIME AND DATE BUTTON6 ONE TOUCHE DIAL BUTTON7 DISPLAY LCD8 INFO BUTTON9 MEMORY CARD10 CALL INDICATOR LED
11 NOTE BOOK BUTTON12 RP/P BUTTON13 DIALLING KEYPAD14 FREE-HANDS SPEAKER BUTTON WITH LED15 ON-HOLD MUSIC BUTTON WITH LED16 MUTE BUTTON17 R BUTTON18 STORE BUTTON19 TWO TOUCHE DIAL BUTTON20 SPIRAL CORD (FOR HANDSET)

20 DS4093-002BGB
172 mm 81 mm 100 mm
215
mm
Telephone only Telephone+
mount
7
6
2
3
4
8
5
1
1
1.2 DIMENSIONS
1 RUBBER FEET2 RINGER3 SUPPORTS FOR WALL MOUNTING4 FREE-HANDS SPEAKER VOLUME5 RINGER VOLUME 6 TELEPHONE LINE LEAD CONNECTOR7 HANDSET LEAD CONNECTOR8 TABLE-TOP/WALL MOUNT

21DS4093-002B GB
2. INSTALLATION2.1 INSTALLING THE MOUNTInstall the mount provided under the telephone to change the reading angle of the display, if needed.Fit the mount in reference to the type of installation required:
2.1.1 “TABLE-TOP” CONFIGURATION MOUNT INSTALLATION
2.1.2 “WALL” CONFIGURATION MOUNT INSTALLATION
Table-top configuration Wall configuration

22 DS4093-002BGB
2.2 HANDSET CONNECTIONConnect one end of the spiral cord provided to the socket on the handset and the other to the socket on the left side of the telephone ( symbol on the bottom of the telephone).
2.3 LINE CORD CONNECTION FROM PABX• Socket RJ Connect one end of the line cord to the socket on the back of the phone ( symbol on the bottom of the
telephone) and the other directly in the telephone socket.
• Three-pole telephone socket Connect one end of the line cord to the socket on the back of the phone ( symbol on the bottom of the
telephone) and the other directly in the plug adapter socket; insert the adapter in the telephone socket.
2.4 RINGER ADJUSTMENTUsing the switch on the back of the phone, you can cut off the ringer volume or set it on two levels.
The presence of a call is shown by the call indicator also when the ringer switch is in the off position (0).
HIGHLOW
CUT-OFF

23DS4093-002B GB
2.5 FREE-HANDS SPEAKER VOLUME ADJUSTMENTUse the trimmer on the side of the telephone to adjust the free-hands speaker volume. It is advisable to set it to MEDIUM to start. You can then adjust the volume as required during use.
2.6 DATE AND TIME PROGRAMMING PROCEDUREPick up the handset (*) and press to program the date/time.
During installation, wait for approximately ten seconds after connecting to the telephone line.
The fi rst two digits of the date indicating the month will blink.Press repeatedly to set the month.Press to confi rm and continue.
The next two digits of the date indicating the day will blink.Press repeatedly to set the day.Press to confi rm and continue.
The fi rst two digits of the clock indicating the hour will blink.Press repeatedly to set the hour.Press to confi rm and continue.
The next two digits of the clock indicating the minutes will blink.Press repeatedly to set the minutes.Press to confi rm.
Press to quit programming and hang up the handset (*).The current date and time will appear on the display after approximately 6 seconds.
Press during the procedure to quit the programming procedure.
(*): or press .
MIN. MED. MAX.

24 DS4093-002BGB
2.7 WALL MOUNTINGThe telephone can be installed on the wall using two bolts (not included) in correspondence with the specifi c slots on the back of the telephone and mount (when used).To drill the wall you are advised to use the template shown on the last page of this handbook and, after drilling the holes and inserting the plugs, tighten the screws at a distance from the wall of approx. 5mm.
Put the device against the wall so that the heads of the screws fi t inside the large hole of the slots and lock it in place with a vertical movement downwards.Remove the handset hook and re-insert it from the opposite side (turn it by 180°) so that it acts as stopper.
Make the connections and adjustments as described in the previous paragraphs.
2.7.1 TEMPORARY HANDSET RESTINGWith the telephone mounted on the wall, it is possible leave the person you are talking to in standby mode hooking the handset on the support on the top part of the phone.
Handset support
Support housing

25DS4093-002B GB
3. USING THE TELEPHONEThis device has been designed and realized for Urmet Domus switchboard (PABX) extension using. Therefore his installation in PABX system, and his programming - where necessary – must be done by qualifi ed staff.For the brought back immediate call forwarding function of continuation see the PABX manual that you are using.
3.1 DISPLAYThe Domo Plus telephone is equipped with a 16 digit alphanumeric display. The date and time will appear (see programming procedure in § 2.6) in stand-by conditions. During use, the dialled numbers and other useful functions:
A conversation timer will appear when the handset is picked up (or is pressed). Press INFO to reset the timer, if required. The date/timer will appear for 8 more seconds after the handset is hang up (or is pressed again). The dialled numbers will appear while dialling. The date/timer information will reappear after approximately 10 seconds.
BUTTON
FUNCTIONS
DISPLAY
DIALLED NUMBERS
STORE
OPERATION / STATE INFORMATION ON DISPLAY
Hang up and press INFO to display the last dialled number.The number will be shown for approximately 6 seconds.
STAND-BY.
OFF-HOOK (timer starts).
START DIALLING (in this example, telephone line accessdigit, pause and first part of the telephone number).
END DIALLING (the display will show only the last16 digits if the telephone number is longer).
After approximately 10 seconds from dialling the last digit.
Press INFO when the called number picks up to displaythe actual conversation time.
HANG UP(the call time appears for approximately 10 seconds).

26 DS4093-002BGB
3.2 FREE-HANDS SPEAKER FUNCTION (BUTTON )DESCRIPTIONThe Domo Plus telephone can be used without the handset with the free-hands speaker function. Press : the respective LED will light up to indicate that the function is on. Press again. The function is ended and the LED will go out. Picking up the handset will have the same effect. You can switch from free-hands (speaker) to private (handset) and vice versa by either picking up the handset or pressing the button.
The possibility of using either the handset or the free-hands speaker function is not specifi ed in the following paragraphs of this manual to simplify instructions. Refer to the icons on the right of the various procedures.
3.3 MAKING A CALLPROCEDURE WITH IMMEDIATE CALL FORWARDING• Pick up the handset.• Wait for the line free tone.• Dial the required telephone number.• At the end of the conversation hang up the handset.
PROCEDURE WITH SWITCHBOARD• Pick up the handset.• Wait for the free tone of the PABX switchboard.• Dial the line access code.• Press the button to insert a PAUSE (*). Letter P will appear on the display after the access code.• Wait for the line free tone.• Enter the telephone number to be called.• At the end of the conversation hang up the handset.
(*): for access to the REDIAL and NOTES functions with certain PABX switchboards it is necessary to enter a PAUSE (pressing the button ) between the access code and the number to be called.
3.4 ANSWERING A CALLPROCEDUREWhen the call indicator devices are activated (ringer and warning light), pick up the handset.At the end of the conversation, hang up the handset.
3.5 REDIAL FUNCTION (BUTTON )DESCRIPTIONREDIAL allows you to repeat the last number dialled simply pressing a button. The storage limit associated with the function is 32 digits, inclusive of pauses.
PROCEDURE• Pick up the handset.• Wait for the free tone.• Press the button .• At the end of the conversation hang up the handset.
1 2 3 54
1 2 3
6 7 8
54
1 2 3 4
1 2 3 54

27DS4093-002B GB
3.6 NOTES FUNCTION (BUTTON )DESCRIPTIONThe NOTES function allows you to call a phone number stored previously.For example, you might fi nd the number busy. Pressing the button before hooking up the handset, the number is stored. It will be possible to call it back even if one or more phone calls have taken place in between.The storage limit associated with the function is 32 digits, inclusive of pauses.
STORAGE PROCEDURE WITH IMMEDIATE CALL FORWARDING• Pick up the handset.• Wait for the line tone.• Dial the required telephone number.• On receiving the busy tone or at the end of the conversation,
press the button .• Hang up.
STORAGE PROCEDURE WITH SWITCHBOARD• Pick up the handset.• Wait for the free tone of the PABX switchboard.• Dial the line access code.• Press the button to enter a PAUSE.• Wait for the line tone.• Enter the telephone number to be called.• On receiving the busy tone or at the end of the conversation,
press the button .• Hang up.
RECALLING PROCEDURE• Pick up the handset and wait for the line free tone.• Press the button .• At the end of the conversation hang up the handset.
Every time a storage procedure is carried out, this overwrites (replaces) the phone number stored previously.
3.7 FLASH FUNCTION (BUTTON )DESCRIPTIONWith the FLASH function it is possible to use the Specifi c Services of the switchboard.
PROCEDURE• Pick up the handset.• Press the button .• Enter the Service code and, where applicable, follow the
instructions or wait for the confi rming tone.• Hang up.
3.8 MUTE FUNCTION (BUTTON )DESCRIPTIONThe MUTE function allows you to cut off the microphone to prevent you from being heard by the person you are speaking to.
1 2 3
5 6
4
1 2 3
6 7
4 5
8 9
1 2 3 4 5
1 2 3 4 5

28 DS4093-002BGB
PROCEDURE• To cut off the microphone, press the button .• Press the button to resume the call.
3.9 ON-HOLD MUSIC FUNCTION (BUTTON )DESCRIPTIONYou can put the call on hold and play music during a conversation.
PROCEDURE• Press and hang up the handset to put the call on
hold. The warning light will come on and the music will be
heard to confi rm that the function is on. To resume the conversation, pick up the handset or press if you did not hang up the handset.
• Hang up the handset at the end of the call.
4. USING PRE-SET NUMBERSThe Domo telephone can store up to 20 pre-set numbers (10 speed dial numbers and 10 numbers that you can dial by pressing two buttons in sequence).
The storage limit associated with each function (both one and two-touch) is 24 digits, inclusive of pauses.
Whenever you perform a storage procedure, this will replace the previously stored telephone number.
4.1 PROGRAMMING ONE-TOUCH DIAL NUMBERSPROGRAMMING PROCEDURE WITH IMMEDIATE CALL FORWARDING• Pick up the handset.• Press the button . On display: E .• Enter the telephone number to be stored.• Press the button .• Press one of the pre-set number buttons (M1 - M0).
Enn (where nn is the pre-set memory position) will appear on the display by scrolling the telephone number to the left.
• Hang up.
1 2
6 7
3 4 5
M1/M11M2/M12M3/M13M4/M14M5/M15
M6/M16M7/M17M8/M18M9/M19M0/M20
1 2 3
6
54

29DS4093-002B GB
PROGRAMMING PROCEDURE WITH SWITCHBOARD• Pick up the handset.• Press the button . On display: E .• Dial the line access code.• Press the button to enter a PAUSE.• Enter the telephone number to be stored.• Press the button .• Press one of the pre-set number buttons (M1 - M0).
Enn (where nn is the pre-set memory position) will appear on the display by scrolling the telephone number to the left.
• Hang up.
4.2 PROGRAMMING TWO-TOUCH DIAL NUMBERSPROGRAMMING PROCEDURE WITH IMMEDIATE CALL FORWARDING• Pick up the handset.• Press the button . On display: E .• Enter the telephone number to be stored.• Press the button .• Press the button .• Press one of the pre-set number buttons (M1 - M0).
Enn (where nn is the pre-set memory position) will appear on the display by scrolling the telephone number to the left.
• Hang up.
PROGRAMMING PROCEDURE WITH SWITCHBOARD• Pick up the handset.• Press the button . On display: E .• Dial the line access code.• Press the button to enter a PAUSE.• Enter the telephone number to be stored.• Press the button .• Press the button .• Press one of the pre-set number buttons (M11 - M20).
Enn (where nn is the pre-set memory position) will appear on the display by scrolling the telephone number to the left.
• Hang up.
4.3 RECALLING STORED NUMBERSRECALLING ONE-TOUCH DIAL NUMBERS PROCEDURE• Pick up the handset.• Wait for the line tone.• Press the speed dial button (M1 - M0) corresponding to the
telephone number to be called.• At the end of the conversation hang up the handset.
1 2 3
6 7 8
54
1 2 3
6 7
54
1 2 3
6 7
54
8 9
1 2 3 54

30 DS4093-002BGB
RECALLING TWO-TOUCH DIAL NUMBERS PROCEDURE• Pick up the handset.• Wait for the free tone of the PABX switchboard.• Press the button .• Press the speed dial button (M11 - M20) corresponding to
the telephone number to be called.• At the end of the conversation hang up the handset.
4.4 PROGRAMMING DOOR PHONE FUNCTIONSDESCRIPTIONIf you have installed the Domo Plus telephone as an extension from a PABX Urmet Domus switchboard of the Agorà Series and in general on all Urmet Domus PABX switchboards with the exception of intercommunicating ones, it is possible to store the controls of the door phone services for simplifi ed use.Program the respective codes under the speed dial buttons if you want to use the number card with the main door phone symbols printed on it.
PROGRAMMING PROCEDURE
• Pick up the handset• Press the button .• Press the button .• Enter the code corresponding with the door phone function
to be stored (35 in the example).• Press the button .• press the button associated with the door phone function
(in the example) .• Hang up.
For programming the and buttons repeat the procedure from point one, associating code 34 with button M2, and code 37 with button M3.
DOOR PHONE FUNCTION RECALLING PROCEDURE• Pick up the handset.• Press a one-touch dial button (M1, M2 or M3) corresponding with the door phone function you want to
use.• At the end of the operations, hang up the handset.
Refer to the PABX switchboard manual for correct use of the door phone functions.
1 2 3
6
54
SYMBOL CODE
M1 DOOR OPENER R35
M2 TELEPHONE MODE /DOOR PHONE MODE
R34
M3 STAIRCASE LIGHTSFUNCTION
R37
Memory card for door phone functionsTable of association of door phone functions /
one-touch call keys
KEY DOOR PHONE FUNCTION
1 2 3
6
54

31DS4093-002B GB
4.5 MEMORY CARDSThe Domo Plus telephone is provided with memory cards (one standard on the telephone and one customised(*) accompanying the product) on which it is possible to write the names corresponding to the phone numbers stored. Remove the transparent protection to complete (and/or replace) the card. It has a slot on it: prise with a fi ne point to lift it a few millimetres and then, release the catches from their housing.(*): see §4.4
5. TROUBLESHOOTING
Check the connections of the telephoneline and of the handset (see §2.1 and§2.2). If the fault persists, try connecting aphone you are sure is working to thesame socket. If this, too, fails to work,the fault can be attributed to thetelephone line.
FAULT PROBABLE CAUSE REMEDY (*)
The ringer cannot be heard. Ringer cut-off. Check the ringer setting (see §2.3).
With the telephoneconnected to the PABXswitchboard, it is notpossible to use theREDIAL, NOTES andPHONE BOOK numbers.
Failure to enter a PAUSEwhen entering the telephonenumber.
Enter the PAUSE between the telephoneline access code and thenumber to be called (see chapter 3).
Telephone mute. Faulty device connections.
(*): if faults persist, contact the service centre.
Point in which to prise toremove the protection

DS4093-002B LBT7864
http://www.urmetdomus.come-mail:[email protected]
FILIALI20151 MILANO - V.Gallarate 218 Tel. 02.380.111.75 - Fax 02.380.111.8000043 CIAMPINO (ROMA) V.L. Einaudi 17/19A Tel. 06.791.07.30 - Fax 06.791.48.97 80013 CASALNUOVO (NA) V.Nazionale delle Puglie 3 Tel. 081.193.661.20 - Fax 081.193.661.0430030 VIGONOVO (VE) - V.del Lavoro 71 Tel. 049.738.63.00 r.a. - Fax 049.738.63.1166020 S.GIOVANNI TEATINO (CH) - V.Nenni 17 Loc. Sambuceto Tel. 085.44.64.851 Tel. 085.44.64.033 - Fax 085.44.61.862
STABILIMENTOURMET DOMUS S.p.A.10154 TORINO (ITALY)VIA BOLOGNA 188/CTelef. 011.24.00.000 (RIC. AUT.)Fax 011.24.00.300 - 323Call Center 011.23.39.810