Technicolor UCW4026MCS Integrator’s Manual
15
© 2019 Technicolor. All Rights reserved Technicolor UCW4026MCS Integrator’s Manual
Transcript of Technicolor UCW4026MCS Integrator’s Manual
© 2019 Technicolor. All Rights reserved
Technicolor UCW4026MCS Integrator’s Manual

Page 2
REVISION RECORD
Revision Date Revision Editor Revision Description
1.0 6-6-19 Angelo Peruch Release Version 1.0
Page 3
Contents 1. Introduction ............................................................................................................................. 4
1 COM51 Setup for Use with UCW4026MCS .......................................................................... 5
1.1 Verify all COM system software is current. .................................................................... 5
1.2 Configuring the QAM for the UCW4026MCS ................................................................ 5
1.3 Set Pro:Idiom Mobile Site Key ........................................................................................ 6
1.4 GUIDE.XML.................................................................................................................... 7
1.5 Set up CONFIG.XML ...................................................................................................... 8
1.6 Add Wi-Fi Configuration to the Config.xml .................................................................... 9
2 Software Updates ................................................................................................................... 10
2.1 File Upload ..................................................................................................................... 10
2.2 Using the Upgrade Feature ............................................................................................. 11
2.3 Manual method (alternate method) ................................................................................ 11
2.4 Software Update via USB Flash Drive .......................................................................... 12
3 Admin Settings ...................................................................................................................... 14
Page 4
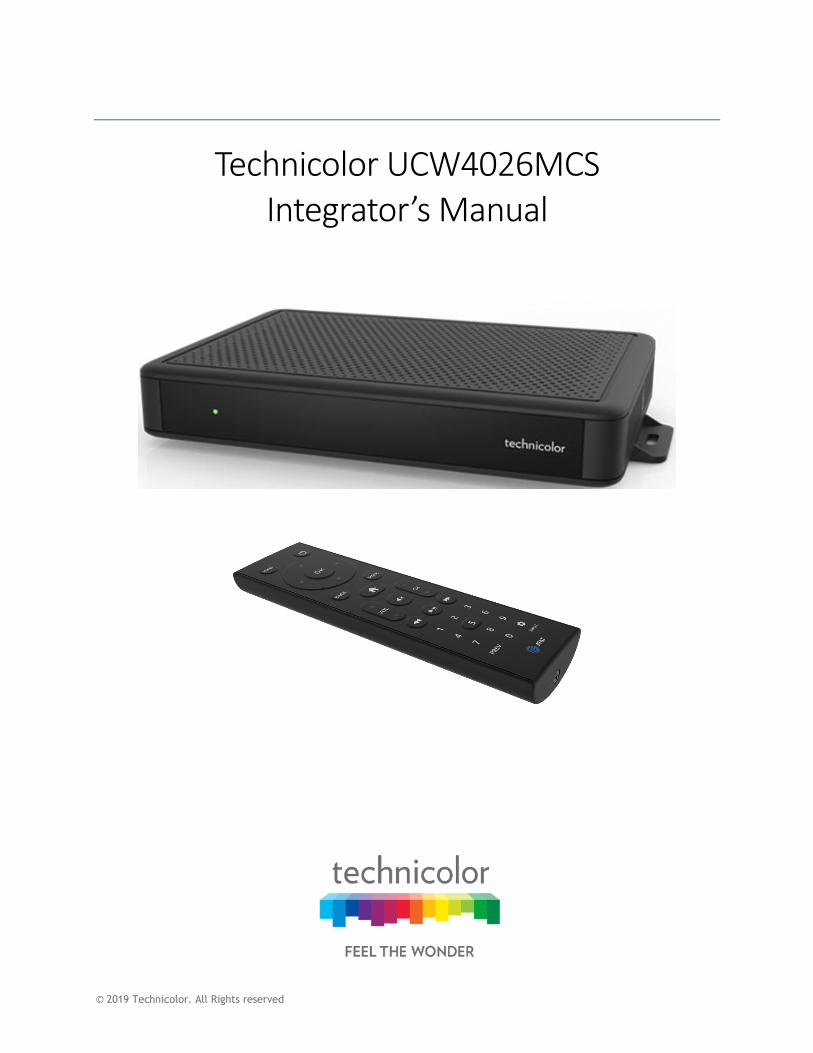
1. Introduction
The UCW4026MCS is a setback tuner box intended for use with the DIRECTV Advanced
Entertainment Platform (AEP) by AT&T.
It will tune both RF signal (QAM) and multicast IPTV streams.
In addition to the STB the unit ships with a remote control, power supply, and HDMI cable.
The UCW4026MCS ships with a basic set of applications or APK’s. AT&T provides automated
product updates, additional APK’s, customization, monitoring, and control using the AT&T
Advanced Entertainment Platform cloud services. To access these services, the UCW4026MCS
must be associated with a registered COM51 on the property. Please work with your distributor
in order to register your COM51 to the AT&T AEP cloud prior to UCW4026MCS installation.
Upon installation on a COM System with a properly registered and configured COM51, the
UCW4026MCS will automatically connect to the AEP cloud via its network connection and will
be automatically associated with the property.
Page 5
1 COM51 Setup for Use with UCW4026MCS
1.1 Verify all COM system software is current.
Visit https://www.technicolor.com/distribute/home-experience/mcs-document-library for the
latest available software, and refer to the COM3000 Integrator’s Manual for instructions to
update these components.
1.2 Configuring the QAM for the UCW4026MCS
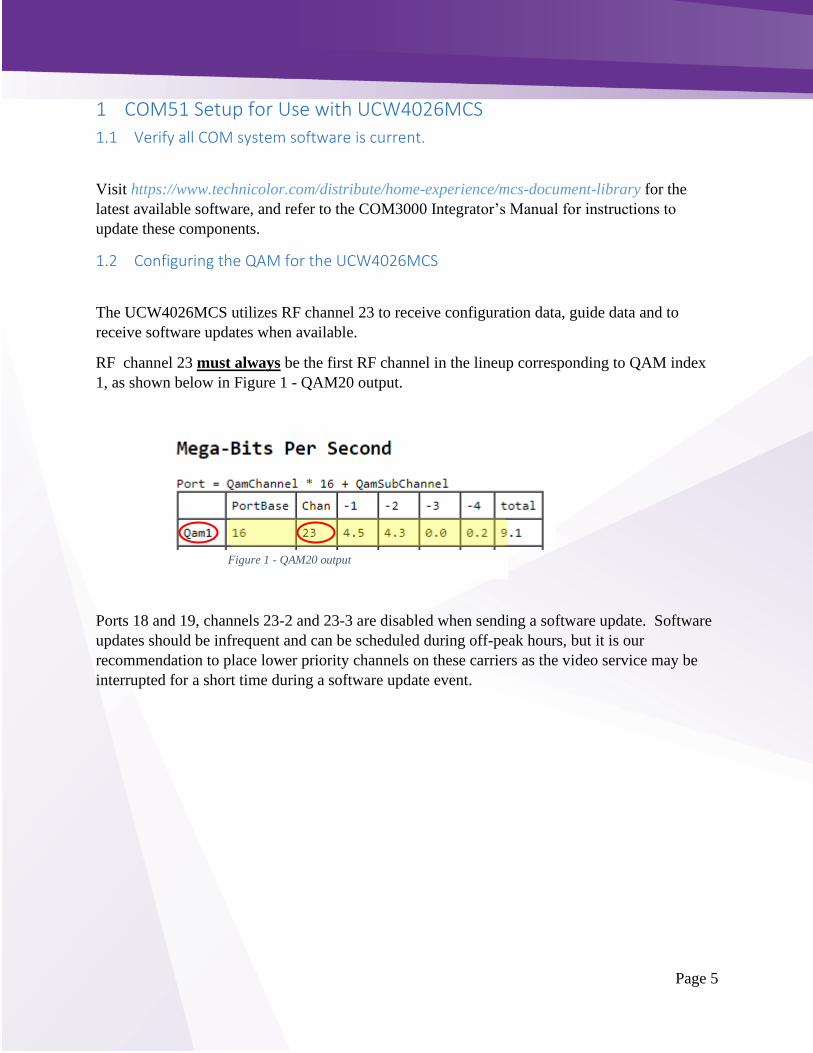
The UCW4026MCS utilizes RF channel 23 to receive configuration data, guide data and to
receive software updates when available.
RF channel 23 must always be the first RF channel in the lineup corresponding to QAM index
1, as shown below in Figure 1 - QAM20 output.
Ports 18 and 19, channels 23-2 and 23-3 are disabled when sending a software update. Software
updates should be infrequent and can be scheduled during off-peak hours, but it is our
recommendation to place lower priority channels on these carriers as the video service may be
interrupted for a short time during a software update event.
Figure 1 - QAM20 output

Page 6
1.3 Set Pro:Idiom Mobile Site Key
The UCW4026MCS uses Pro:Idiom Mobile (PIM) encryption. Each site will require a unique
PIM key be entered in all COM 46/51 cards.
The key must consist of 64 hexadecimal characters:
Numbers 0-9 and/or Letters a-f
Example Key (do not use this on your system):
0123456789abcdef9876543210fedcba0123456789abcdef9876543210fedcba
Technicolor recommends using a site like:
https://www.browserling.com/tools/random-hex
to generate the 64 hexadecimal key. Save the key to a file for future reference.
To enter the Pro:Idiom Mobile (PIM) key navigate to: Discover Page > Click Channel#>
Advanced Edit >Misc Get/Set as shown below in Figure 2- COM51 Misc Get Set.
Enter Name: siteKey (case sensitive)
Enter the PIM Key in the Value field of the Get/Set section
Click Submit
All Pro:Idiom Encrypted streams will include Pro:Idiom Mobile keys using the specified PIM
key.
Repeat this process for every COM51 or COM46 in the system.
Figure 2- COM51 Misc Get Set
Page 7
1.4 GUIDE.XML
The UCW4026MCS will require a GUIDE.XML and a CONFIG.XML file from a COM51 in
order to properly operate in any capacity in either a QAM or IP installation.
Both the GUIDE.XML and the CONFIG.XML should be generated using the same COM51 card
in the system. Generally, it is good practice to select the card in slot 1 for this responsibility, but
it is not a requirement. Whichever card is selected to originate the GUIDE.XML and
CONFIG.XML will also be used to send any software updates to the UCW4026MCS devices.
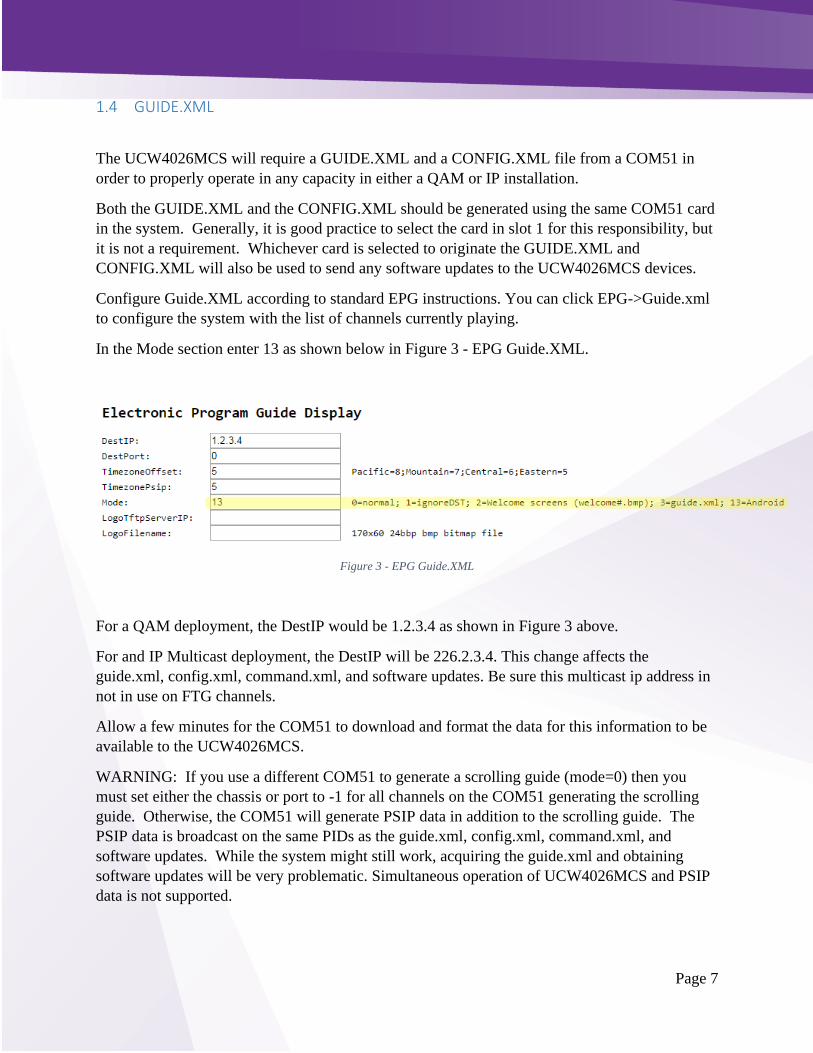
Configure Guide.XML according to standard EPG instructions. You can click EPG->Guide.xml
to configure the system with the list of channels currently playing.
In the Mode section enter 13 as shown below in Figure 3 - EPG Guide.XML.
Figure 3 - EPG Guide.XML
For a QAM deployment, the DestIP would be 1.2.3.4 as shown in Figure 3 above.
For and IP Multicast deployment, the DestIP will be 226.2.3.4. This change affects the
guide.xml, config.xml, command.xml, and software updates. Be sure this multicast ip address in
not in use on FTG channels.
Allow a few minutes for the COM51 to download and format the data for this information to be
available to the UCW4026MCS.
WARNING: If you use a different COM51 to generate a scrolling guide (mode=0) then you
must set either the chassis or port to -1 for all channels on the COM51 generating the scrolling
guide. Otherwise, the COM51 will generate PSIP data in addition to the scrolling guide. The
PSIP data is broadcast on the same PIDs as the guide.xml, config.xml, command.xml, and
software updates. While the system might still work, acquiring the guide.xml and obtaining
software updates will be very problematic. Simultaneous operation of UCW4026MCS and PSIP
data is not supported.

Page 8
1.5 Set up CONFIG.XML The CONFIG.XML file is used to send global information to a wide set of devices that are
connected to the COM51. This includes network configuration data, device settings and
software updates. The CONFIG.XML file also transmits the PIM key from the COM51 to the
devices so that each device can playback video content. Without a CONFIG.XML file, PIM
encrypted content is not viewable.
Navigate to the Android tab on the COM51 interface as shown in below in Figure 4 - Android
Config.
Figure 4 - Android Config
To set up a basic CONFIG.XML on the system, enter the text below in the config.xml as shown
in Figure 5 - Android Config.xml.
<?xml version="1.0" encoding="UTF-8"?> <configuration> <system> </system> </configuration>
Press Submit
Figure 5 - Android Config.xml
Page 9
1.6 Add Wi-Fi Configuration to the Config.xml
The UCW4026MCS can be configured to connect to the property Wi-Fi network.
The COM51 can send a Wi-Fi config file with SSID and Password information.
The SSID must be visible in the Wi-Fi network.
If there are multiple SSIDs for use by UCW4026MCS devices at the property, each
UCW4026MCS will need to be manually programmed for network connection using the set top
user interface. COM51 cannot be used to send Wi-Fi SSID and Password information in the case
of multiple SSIDs.
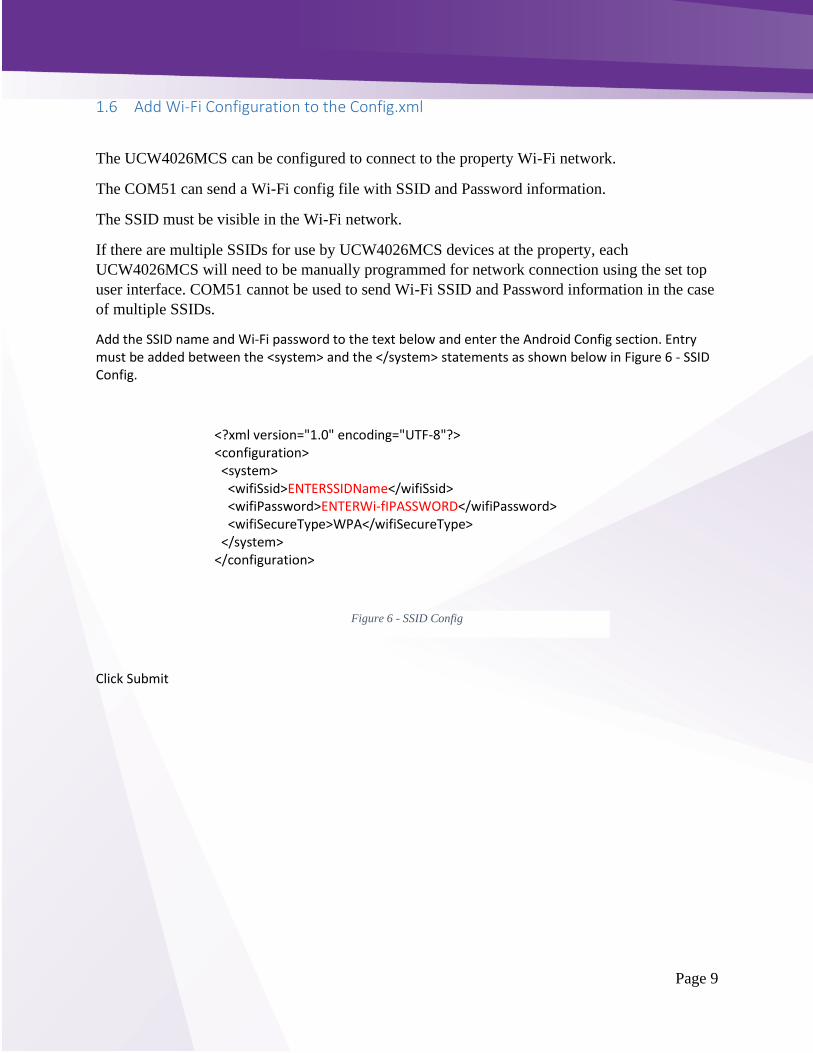
Add the SSID name and Wi-Fi password to the text below and enter the Android Config section. Entry must be added between the <system> and the </system> statements as shown below in Figure 6 - SSID Config. Click Submit
<?xml version="1.0" encoding="UTF-8"?> <configuration> <system> <wifiSsid>ENTERSSIDName</wifiSsid> <wifiPassword>ENTERWi-fIPASSWORD</wifiPassword> <wifiSecureType>WPA</wifiSecureType> </system> </configuration>
Figure 6 - SSID Config

Page 10
2 Software Updates
Technicolor and AT&T are developing processes that will automate software updates, so that all
deployed UCW4026MCS devices that are connected to a monitored COM51 will receive and
install updates without any user intervention. You may refer to the below instructions should a
manual update be necessary.
NOTE: For QAM deployments, the UCW4026MCS will receive software updates from the
COM51 on RF channel 23. Video service on the sub-channels (23-2 & 23-3) will be affected
during the software update.
2.1 File Upload Step One: Upload Software
UCW4026MCS software is in a compressed .zip file. The filename must not be changed.
Using the Browser Upload function available in the PairingInfo page, upload the file to the
COM51 card generating the GUIDE.XML and CONFIG.XML files as shown below in Figure 7 -
Software Upload.
Figure 7 - Software Upload

Page 11
2.2 Using the Upgrade Feature
After Step 1 above a user may simply click on the Upgrade button. An alternative manual
process is described below.
2.3 Manual method (alternate method)
Step Two: Modify the Config.xml
Navigate to the Android tab of the COM51 and click on the config option.
Add the software file name and enter the following text in the Config.xml.
For Update over QAM <?xml version="1.0" encoding="UTF-8"?> <configuration> <system> <systemSoftwareUpdate>QAM='23' FileName='enter_software_file_name'</systemSoftwareUpdate> </system> </configuration> Click For Update over IP <?xml version="1.0" encoding="UTF-8"?> <configuration> <system> <systemSoftwareUpdate>IP='226.100.0.203:6003' FileName='enter_software_file_name'</systemSoftwareUpdate> </system> </configuration> Click
Step Three: Send a COMMAND.XML
While information that a software update is available for the UCW4026MCS is sent via the
CONFIG.XML, the devices do not constantly check the CONFIG.XML. In order to “refresh”
the CONFIG.XML, you can send a COMMAND.XML file.

Page 12
Navigate to the COMMAND tab and simply press SUBMIT. A general command is
automatically generated and sent to all the UCW4026MCS to refresh the CONFIG.XML file.
Once the COMMAND is sent, the UCW4026MCS is ready to receive the update file. For a
QAM system, the unit will go to a black screen with the display “Software System Update”. For
an IP system, video will continue to play without interruption.
Step Four: Stream the Update
Click on “Stream” in the Android tab on the COM51. This will initiate the file transfer of the
software file currently in the Browser Upload from the COM51 to the UCW4026MCS. For a
QAM installation, you can verify progress on the display as the file is being received. Video will
continue to be available for an IP deployment. When completed, the UCW4026MCS will
reboot.
All the UCW4026MCS devices that received the update will ignore any CONFIG.XML message
to update to a new image, yet some devices may not have adequate time or completely received
the update file. Any device that did not update yet continues to see the update file available in
the CONFIG.XML may display the “System Software Update” message if in a QAM
deployment. You can choose to continue streaming the update, or you may remove the
systemSoftwareUpdate text from the CONFIG.XML.
2.4 Software Update via USB Flash Drive
To update the UCW4026MCS via a USB flash stick, copy the software image to the USB flash
stick.
Insert the USB flash stick into the UCW4026MCS. Remove power from the UCW4026MCS,
then using a paper clip, press and hold the reset button as shown below in Figure 8 - Reset
Button, while re-apply power. Continue to hold the reset button for 10 seconds.
Figure 8 - Reset Button

Page 13
A menu will then appear that will permit you to upgrade the software and select a file from the
USB stick. Choose “Apply update from USB” as shown below in Figure 9 - Android Recover
Screen and then select the filename.
Figure 9 - Android Recover Screen
After updating the code, it is also advisable to select “Wipe data/factory reset”.
Next remove the USB stick and select “Reboot system now”.
Page 14
3 Admin Settings
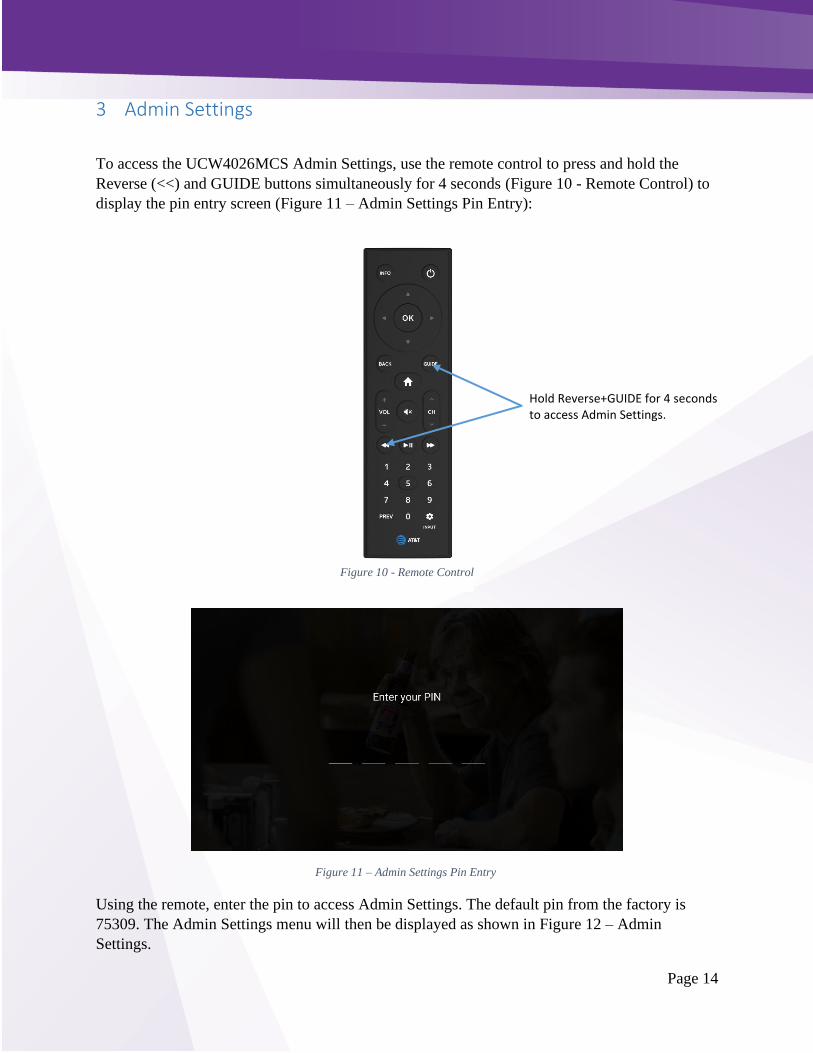
To access the UCW4026MCS Admin Settings, use the remote control to press and hold the
Reverse (<<) and GUIDE buttons simultaneously for 4 seconds (Figure 10 - Remote Control) to
display the pin entry screen (Figure 11 – Admin Settings Pin Entry):
Using the remote, enter the pin to access Admin Settings. The default pin from the factory is
75309. The Admin Settings menu will then be displayed as shown in Figure 12 – Admin
Settings.
Figure 10 - Remote Control
Hold Reverse+GUIDE for 4 seconds to access Admin Settings.
Figure 11 – Admin Settings Pin Entry

Page 15
Figure 12 – Admin Settings