Table of Contents - VMwaredocs.hol.vmware.com/HOL-2016/hol-sdc-1608-springrelease_pdf_en.pdf ·...
195
Table of Contents Lab Overview - What's New with Virtual SAN 6.2 ? ........................................................... 2 Lab Guidance .......................................................................................................... 3 Module 1 - All Flash VSAN 6.2 Cluster (30 Minutes) .......................................................... 6 All Flash VSAN Cluster ............................................................................................. 7 Module 2 - Enabling Performance Service (30 Minutes) .................................................. 38 Configure Virtual SAN (Optional) ........................................................................... 39 Enabling Performance Service .............................................................................. 52 Module 3 - Storage Based Policy Management (30 Minutes) .......................................... 60 Configure Virtual SAN (Optional) ........................................................................... 61 Storage Based Policy Management ....................................................................... 74 Module 4 - Sparse VM Swap Object (30 Minutes) .......................................................... 116 Configure Virtual SAN (Optional) ......................................................................... 117 New Sparse VM Swap Object .............................................................................. 130 Module 5 - Virtual SAN Stretched Cluster (ROBO) (30 Minutes) .................................... 137 Configure Virtual SAN (Optional) ......................................................................... 138 Virtual SAN Stretched Cluster ( ROBO ) ............................................................... 151 HOL-SDC-1608-SpringRelease Page 1 HOL-SDC-1608-SpringRelease
Transcript of Table of Contents - VMwaredocs.hol.vmware.com/HOL-2016/hol-sdc-1608-springrelease_pdf_en.pdf ·...
Table of ContentsLab Overview - What's New with Virtual SAN 6.2 ? ........................................................... 2
Lab Guidance .......................................................................................................... 3Module 1 - All Flash VSAN 6.2 Cluster (30 Minutes) .......................................................... 6
All Flash VSAN Cluster............................................................................................. 7Module 2 - Enabling Performance Service (30 Minutes) .................................................. 38
Configure Virtual SAN (Optional) ........................................................................... 39Enabling Performance Service .............................................................................. 52
Module 3 - Storage Based Policy Management (30 Minutes) ..........................................60Configure Virtual SAN (Optional) ........................................................................... 61Storage Based Policy Management ....................................................................... 74
Module 4 - Sparse VM Swap Object (30 Minutes).......................................................... 116Configure Virtual SAN (Optional) ......................................................................... 117New Sparse VM Swap Object .............................................................................. 130
Module 5 - Virtual SAN Stretched Cluster (ROBO) (30 Minutes) ....................................137Configure Virtual SAN (Optional) ......................................................................... 138Virtual SAN Stretched Cluster ( ROBO )............................................................... 151
HOL-SDC-1608-SpringRelease
Page 1HOL-SDC-1608-SpringRelease
Lab Overview - What'sNew with Virtual SAN 6.2
?
HOL-SDC-1608-SpringRelease
Page 2HOL-SDC-1608-SpringRelease
Lab GuidanceThis lab covers the new features in Virtual SAN 6.2
There are 5 modules in the training:
1. All Flash VSAN Cluster : Virtual SAN clusters contain two or more physical hoststhat contain either a combination of magnetic disks and flash devices ( hybridconfiguration ) or all flash devices ( all-flash configuration ) that contribute cache andcapacity to the Virtual SAN distributed datastore. Virtual SAN uses deduplication andcompression to eliminate duplicate data. These techniques reduce the total storagerequired to meet your needs.
2. Enabling Performance Service : When you create a new Virtual SAN cluster, theperformance service is disabled. Turn on Virtual SAN performance service to monitor theperformance of Virtual SAN clusters, hosts, disks, and VMs. When you turn on theperformance service, Virtual SAN places a Stats database object in the datastore tocollect statistical data. The Stats database is a namespace object that resides in thecluster's Virtual SAN datastore. In this task you will enable the performance service.
3. Storage Based Policy Management : Virtual SAN 6.2 introduces space efficiencytechnologies optimized for all-flash configurations to minimize storage capacityconsumption while ensuring performance and availability. These new features includeRAID5/6 erasure coding to reduce capacity consumption while ensuring the same levelsof availability and performance for a lower total cost of ownership. Another SPBMfeature is Object Checksum. This will ensure that you have data integrity in your VSANCluster. Checksum is available on both hybrid and all-flash configurations of VSAN.
4. Sparse VM Swap Object : This new feature can provide a considerable space-saving on capacity space consumed by deploying VM swap as thin. This will rely on howmany VMs you have deployed, and how large the VM swap space is (essentially the sizeof unreserved memory assigned to the VM).
5. Virtual SAN Stretched Cluster : Features such as Fault Domains, 2-node VSAN andVSAN stretched cluster now have new wizards to make the whole setup process verystraight-forward. The goal of keeping VSAN “radically simple” is still at the heart ofVSAN development.
Lab Captains: John Browne, Ken Osborn, Tony Okwechime, Jitender Rohilla
Activation Prompt or Watermark
When you first start your lab, you may notice a watermark on the desktop indicatingthat Windows is not activated.
HOL-SDC-1608-SpringRelease
Page 3HOL-SDC-1608-SpringRelease
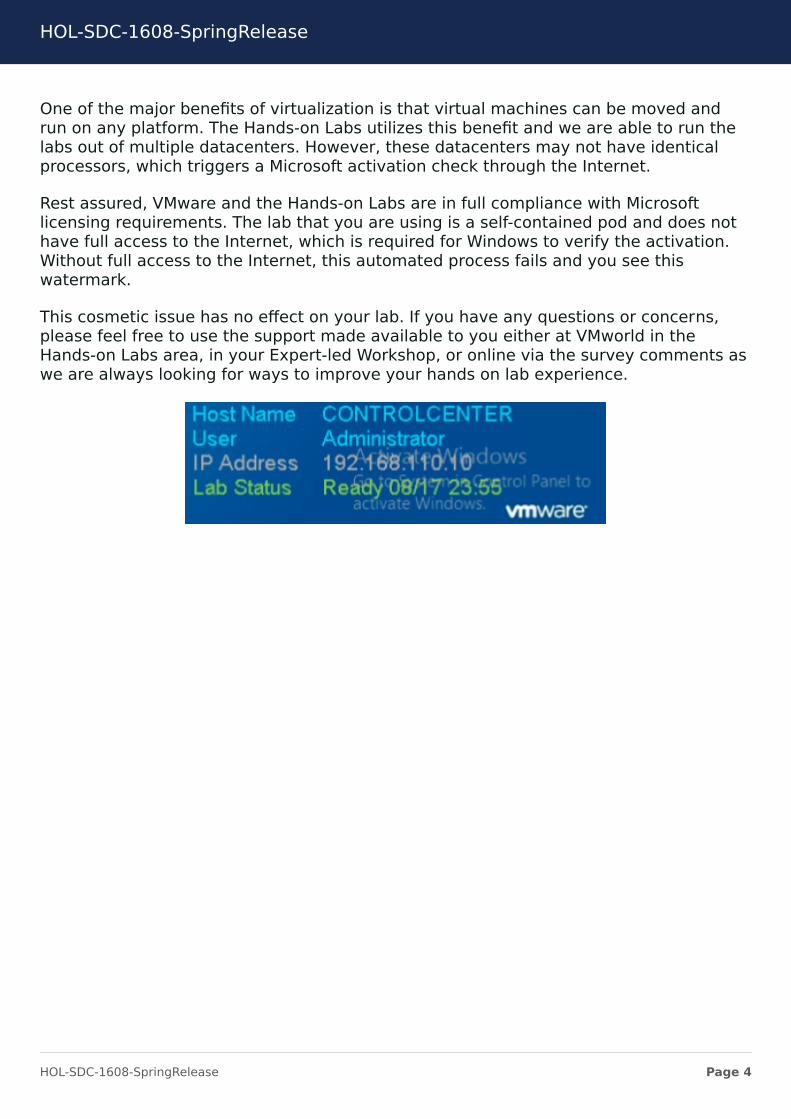
One of the major benefits of virtualization is that virtual machines can be moved andrun on any platform. The Hands-on Labs utilizes this benefit and we are able to run thelabs out of multiple datacenters. However, these datacenters may not have identicalprocessors, which triggers a Microsoft activation check through the Internet.
Rest assured, VMware and the Hands-on Labs are in full compliance with Microsoftlicensing requirements. The lab that you are using is a self-contained pod and does nothave full access to the Internet, which is required for Windows to verify the activation.Without full access to the Internet, this automated process fails and you see thiswatermark.
This cosmetic issue has no effect on your lab. If you have any questions or concerns,please feel free to use the support made available to you either at VMworld in theHands-on Labs area, in your Expert-led Workshop, or online via the survey comments aswe are always looking for ways to improve your hands on lab experience.
HOL-SDC-1608-SpringRelease
Page 4HOL-SDC-1608-SpringRelease

A note on the keyboard
Note : If you are not using a US keyboard be aware that the “ and @ symbols may bereversed or in different locations, depending on how you connect.
You can click on the Keyboard icon on the System Tray of the ControlCenter VM topop up an onscreen keyboard.
HOL-SDC-1608-SpringRelease
Page 5HOL-SDC-1608-SpringRelease
Module 1 - All Flash VSAN6.2 Cluster (30 Minutes)
HOL-SDC-1608-SpringRelease
Page 6HOL-SDC-1608-SpringRelease
All Flash VSAN ClusterVirtual SAN can be configured with all-flash or hybrid storage. Typically in earlierversions of VSAN there is just one flash disk (SSD) per disk group, for read and writecaching. All the other disks in the disk group are used for capacity, and are regularmagnetic SAS or SATA hard disks. This is known as hybrid VSAN configuration.
Creating an All Flash Virtual SAN means that flash disks ( SSDs ) can be used for bothcaching and for capacity tiers.
An All Flash VSAN datastore can be configured using just the vSphere Web Client.
Log in to vSphere Web Client
To start the vSphere Web Client, launch Mozilla Firefox from the icon on your desktop.
Allow Adobe Flash
If you receive a message that 'Firefox has prevented the outdated plugin "Adobe Flash"from running on vcsa-01a.corp,local", click the Allow button.
HOL-SDC-1608-SpringRelease
Page 7HOL-SDC-1608-SpringRelease
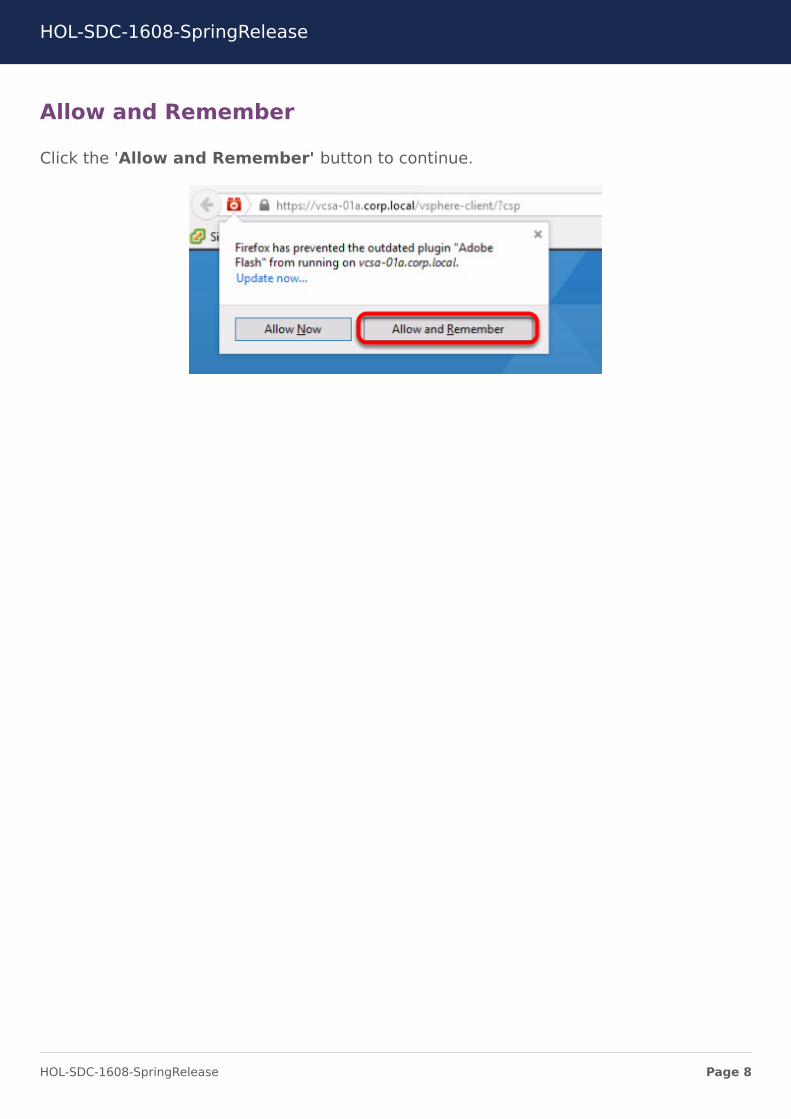
Allow and Remember
Click the 'Allow and Remember' button to continue.
HOL-SDC-1608-SpringRelease
Page 8HOL-SDC-1608-SpringRelease

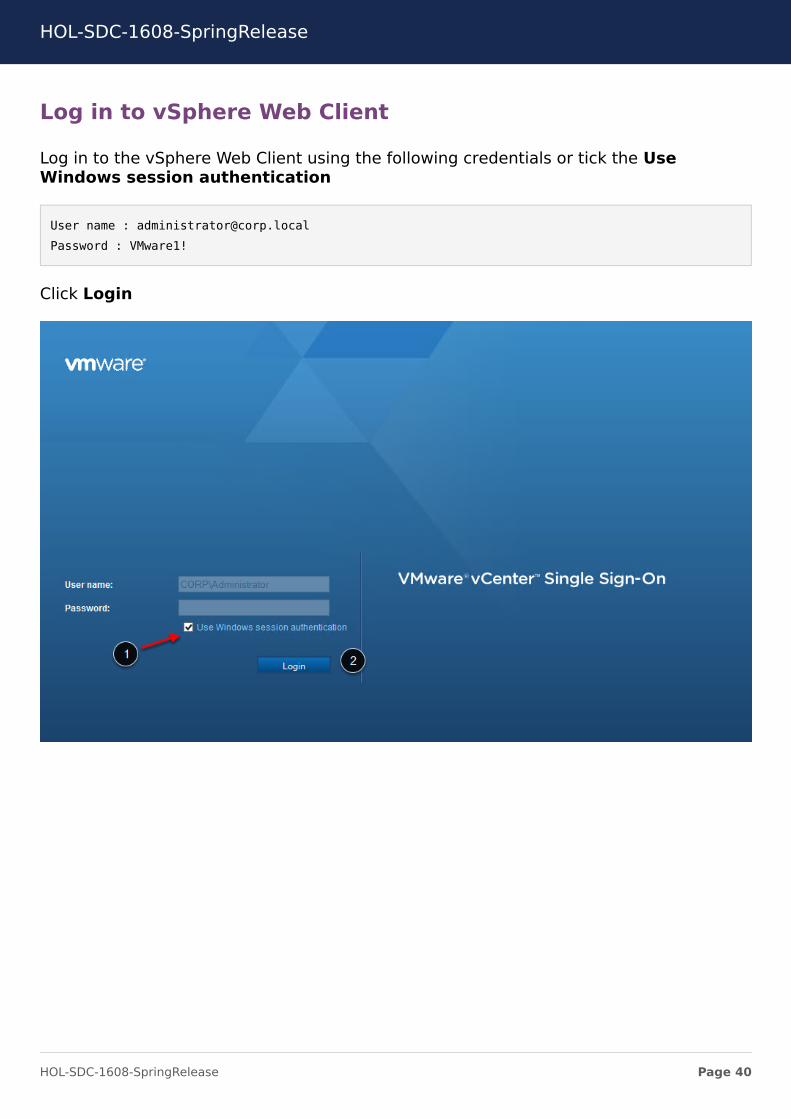
Log in to vSphere Web Client
Log in to the vSphere Web Client using the following credentials or tick the UseWindows session authentication
User name : [email protected] : VMware1!
Click Login
HOL-SDC-1608-SpringRelease
Page 9HOL-SDC-1608-SpringRelease
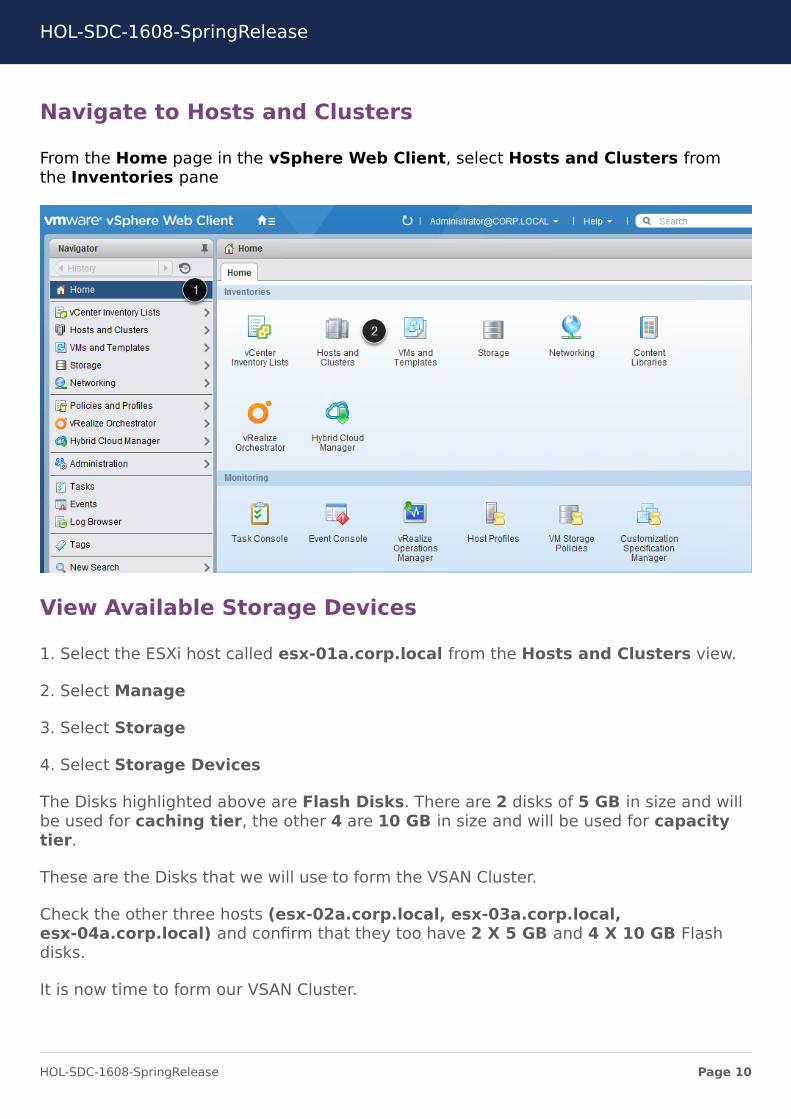
Navigate to Hosts and Clusters
From the Home page in the vSphere Web Client, select Hosts and Clusters fromthe Inventories pane
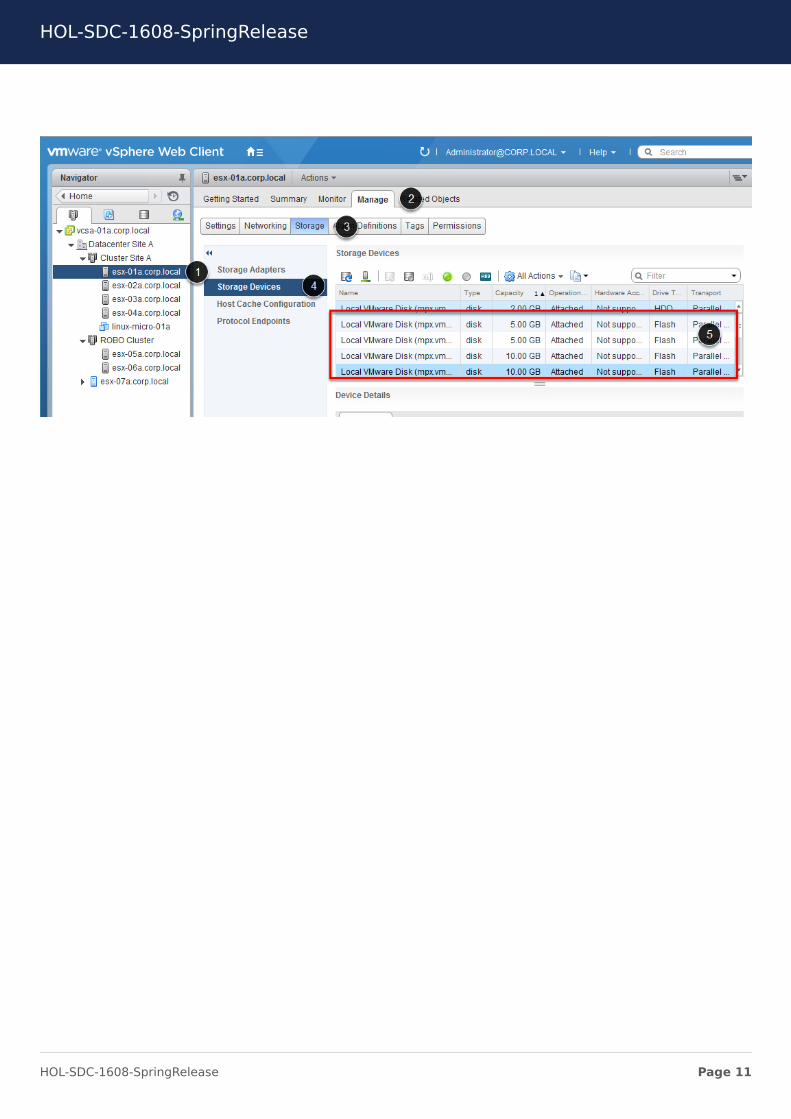
View Available Storage Devices
1. Select the ESXi host called esx-01a.corp.local from the Hosts and Clusters view.
2. Select Manage
3. Select Storage
4. Select Storage Devices
The Disks highlighted above are Flash Disks. There are 2 disks of 5 GB in size and willbe used for caching tier, the other 4 are 10 GB in size and will be used for capacitytier.
These are the Disks that we will use to form the VSAN Cluster.
Check the other three hosts (esx-02a.corp.local, esx-03a.corp.local,esx-04a.corp.local) and confirm that they too have 2 X 5 GB and 4 X 10 GB Flashdisks.
It is now time to form our VSAN Cluster.
HOL-SDC-1608-SpringRelease
Page 10HOL-SDC-1608-SpringRelease
HOL-SDC-1608-SpringRelease
Page 11HOL-SDC-1608-SpringRelease
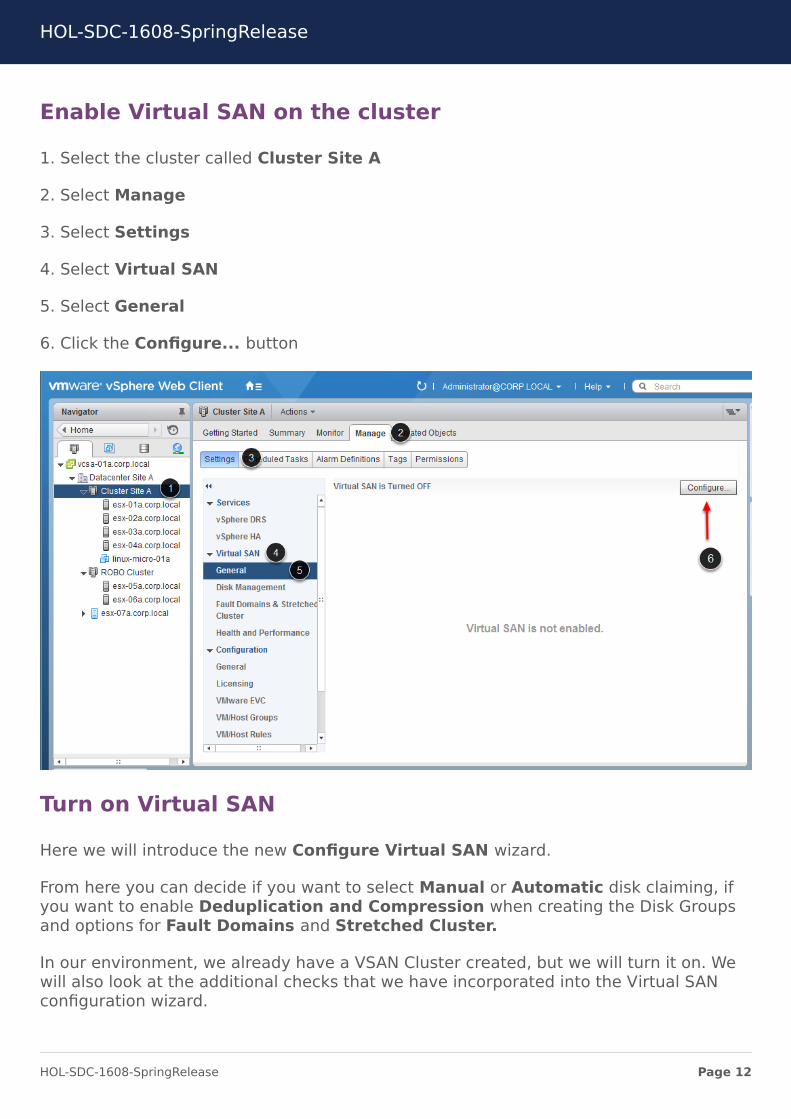
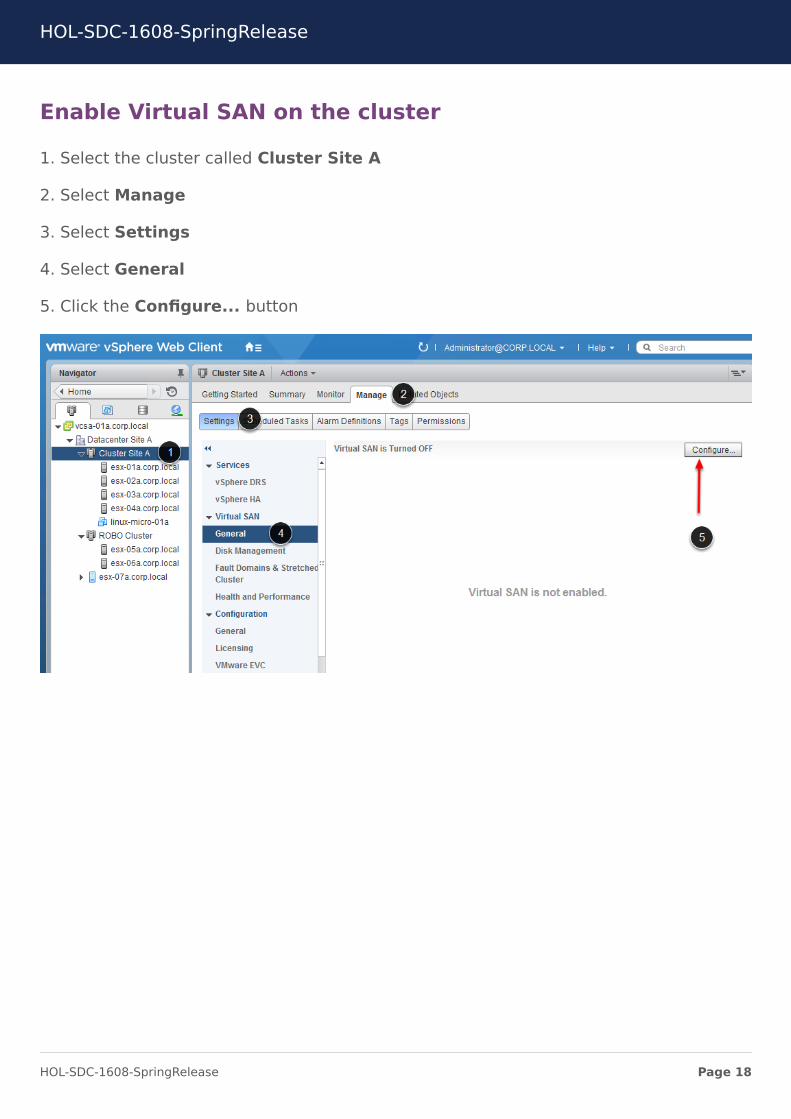
Enable Virtual SAN on the cluster
1. Select the cluster called Cluster Site A
2. Select Manage
3. Select Settings
4. Select Virtual SAN
5. Select General
6. Click the Configure... button
Turn on Virtual SAN
Here we will introduce the new Configure Virtual SAN wizard.
From here you can decide if you want to select Manual or Automatic disk claiming, ifyou want to enable Deduplication and Compression when creating the Disk Groupsand options for Fault Domains and Stretched Cluster.
In our environment, we already have a VSAN Cluster created, but we will turn it on. Wewill also look at the additional checks that we have incorporated into the Virtual SANconfiguration wizard.
HOL-SDC-1608-SpringRelease
Page 12HOL-SDC-1608-SpringRelease
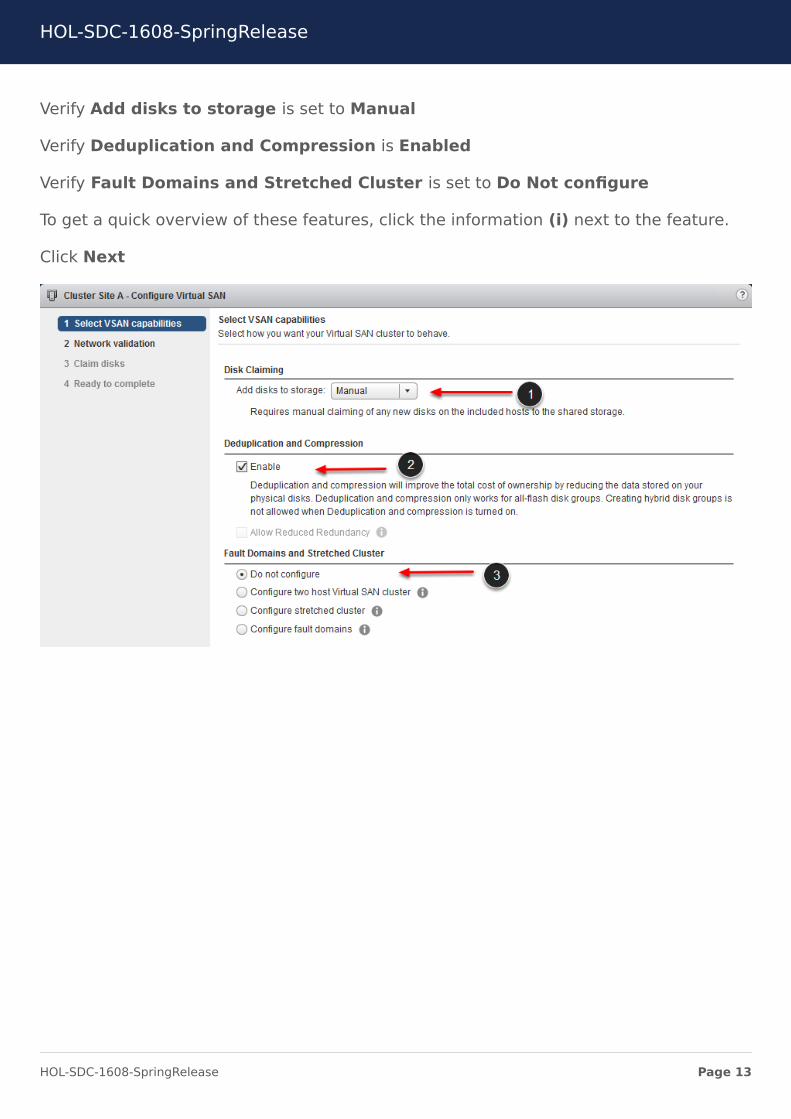
Verify Add disks to storage is set to Manual
Verify Deduplication and Compression is Enabled
Verify Fault Domains and Stretched Cluster is set to Do Not configure
To get a quick overview of these features, click the information (i) next to the feature.
Click Next
HOL-SDC-1608-SpringRelease
Page 13HOL-SDC-1608-SpringRelease
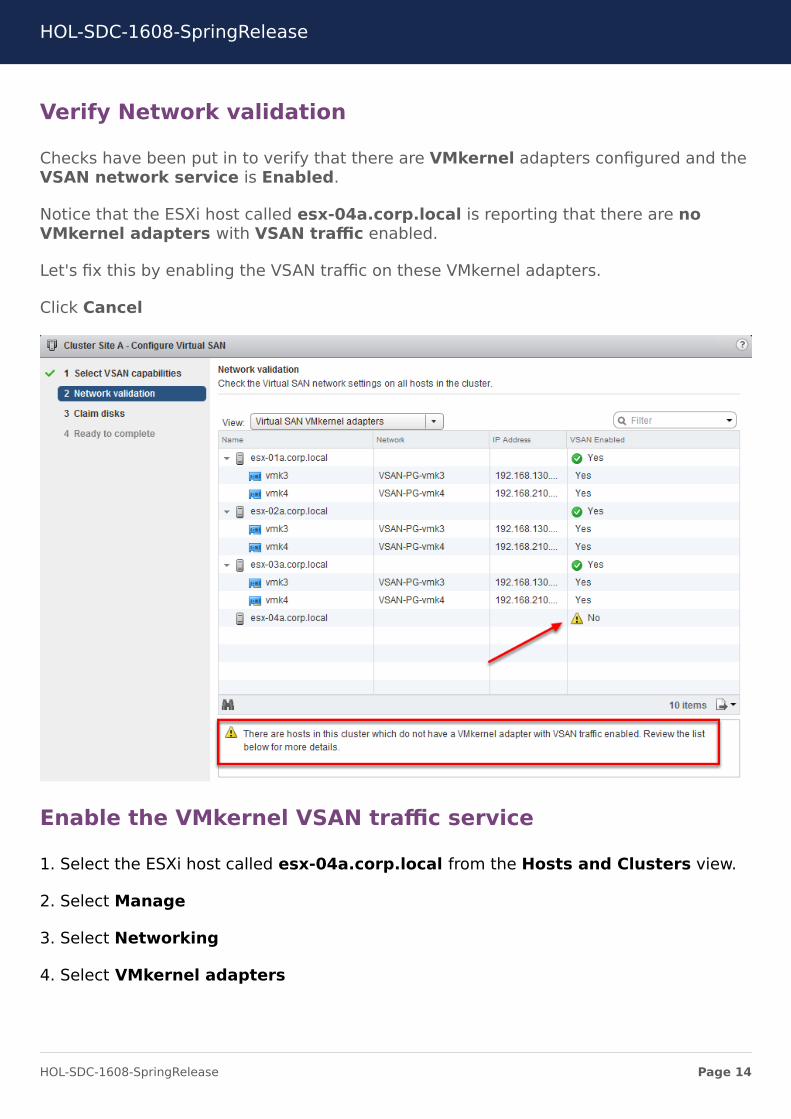
Verify Network validation
Checks have been put in to verify that there are VMkernel adapters configured and theVSAN network service is Enabled.
Notice that the ESXi host called esx-04a.corp.local is reporting that there are noVMkernel adapters with VSAN traffic enabled.
Let's fix this by enabling the VSAN traffic on these VMkernel adapters.
Click Cancel
Enable the VMkernel VSAN traffic service
1. Select the ESXi host called esx-04a.corp.local from the Hosts and Clusters view.
2. Select Manage
3. Select Networking
4. Select VMkernel adapters
HOL-SDC-1608-SpringRelease
Page 14HOL-SDC-1608-SpringRelease
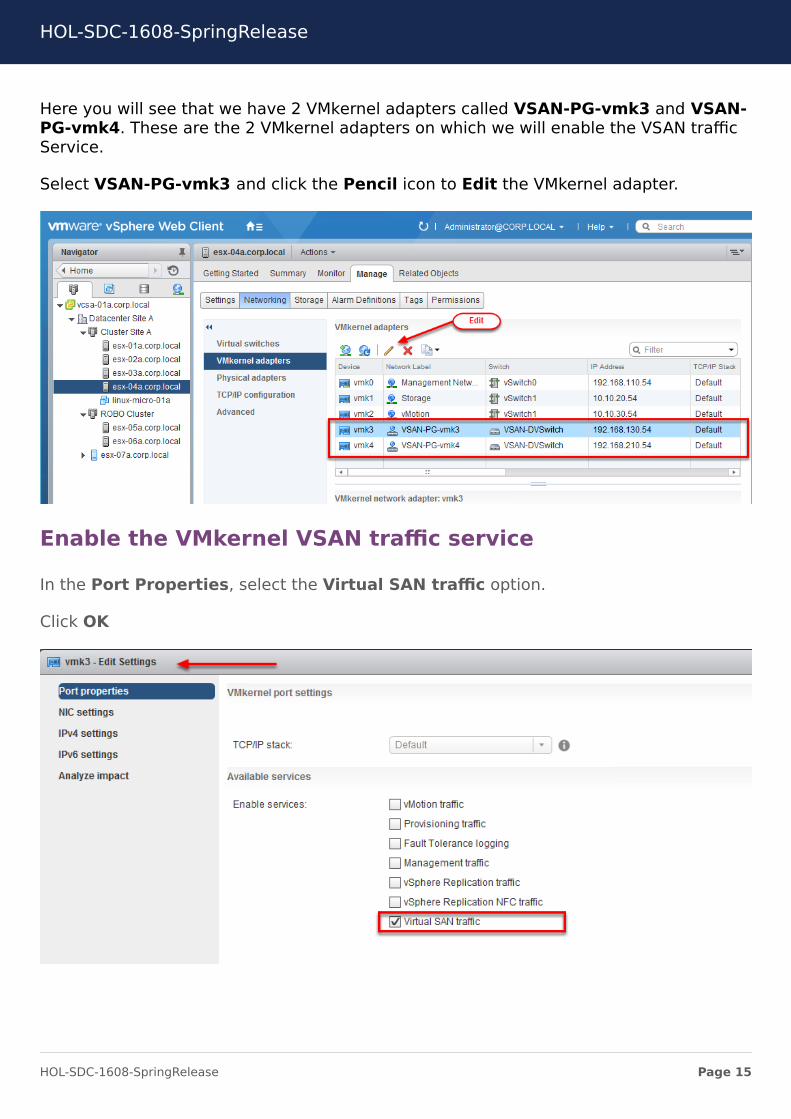
Here you will see that we have 2 VMkernel adapters called VSAN-PG-vmk3 and VSAN-PG-vmk4. These are the 2 VMkernel adapters on which we will enable the VSAN trafficService.
Select VSAN-PG-vmk3 and click the Pencil icon to Edit the VMkernel adapter.
Enable the VMkernel VSAN traffic service
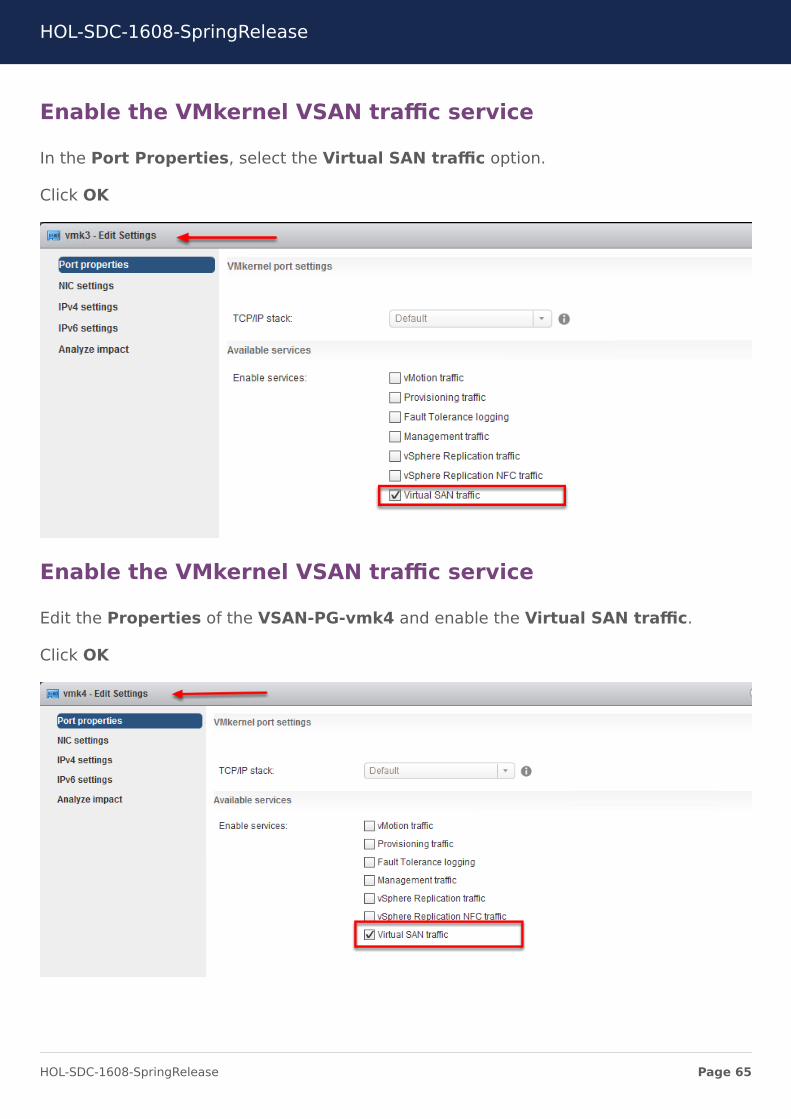
In the Port Properties, select the Virtual SAN traffic option.
Click OK
HOL-SDC-1608-SpringRelease
Page 15HOL-SDC-1608-SpringRelease
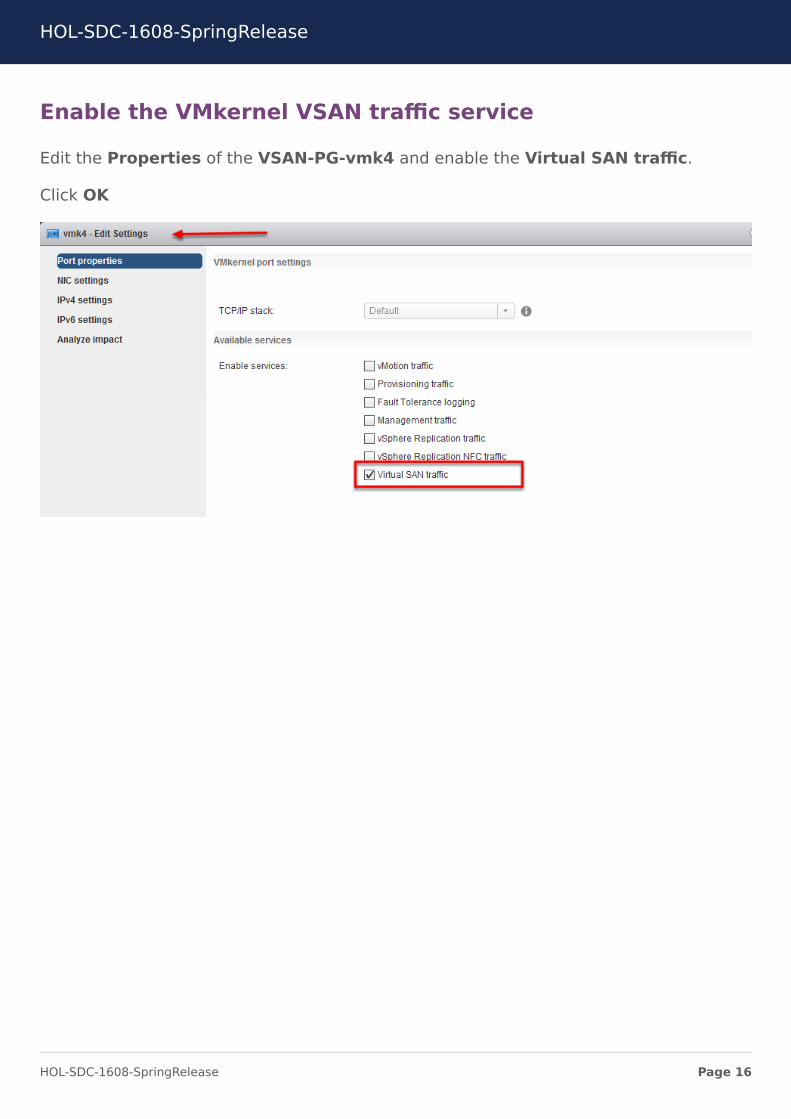
Enable the VMkernel VSAN traffic service
Edit the Properties of the VSAN-PG-vmk4 and enable the Virtual SAN traffic.
Click OK
HOL-SDC-1608-SpringRelease
Page 16HOL-SDC-1608-SpringRelease
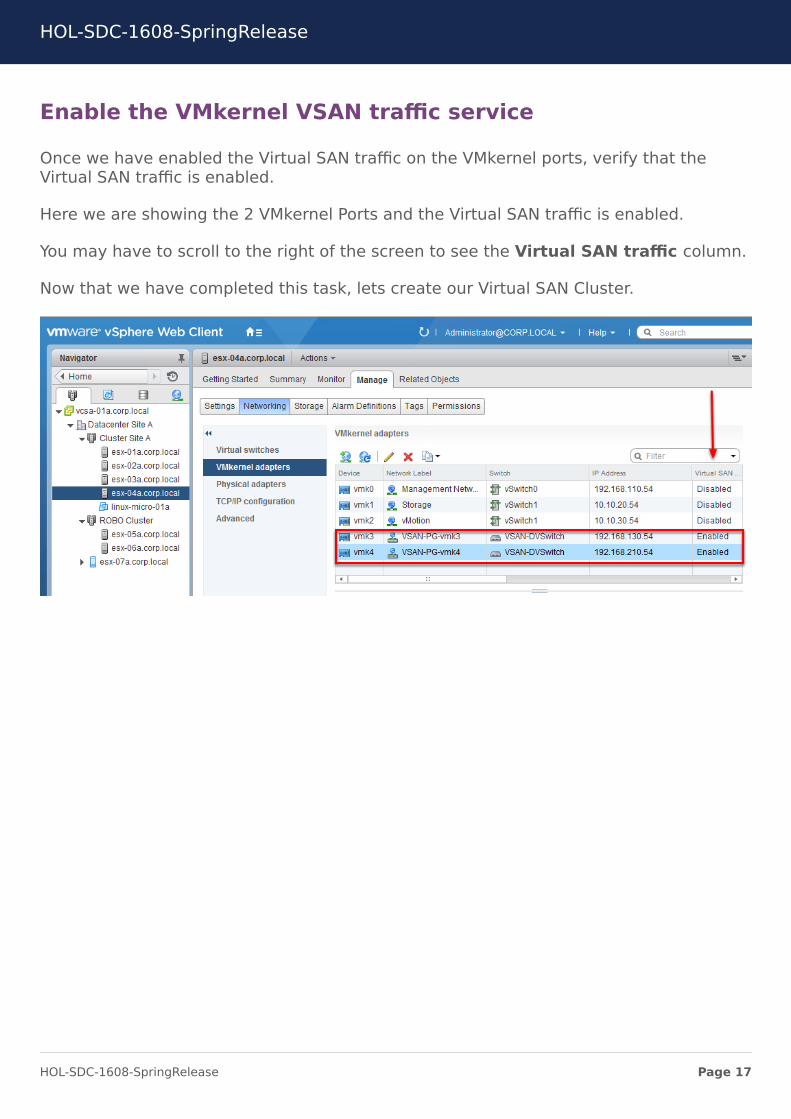
Enable the VMkernel VSAN traffic service
Once we have enabled the Virtual SAN traffic on the VMkernel ports, verify that theVirtual SAN traffic is enabled.
Here we are showing the 2 VMkernel Ports and the Virtual SAN traffic is enabled.
You may have to scroll to the right of the screen to see the Virtual SAN traffic column.
Now that we have completed this task, lets create our Virtual SAN Cluster.
HOL-SDC-1608-SpringRelease
Page 17HOL-SDC-1608-SpringRelease
Enable Virtual SAN on the cluster
1. Select the cluster called Cluster Site A
2. Select Manage
3. Select Settings
4. Select General
5. Click the Configure... button
HOL-SDC-1608-SpringRelease
Page 18HOL-SDC-1608-SpringRelease
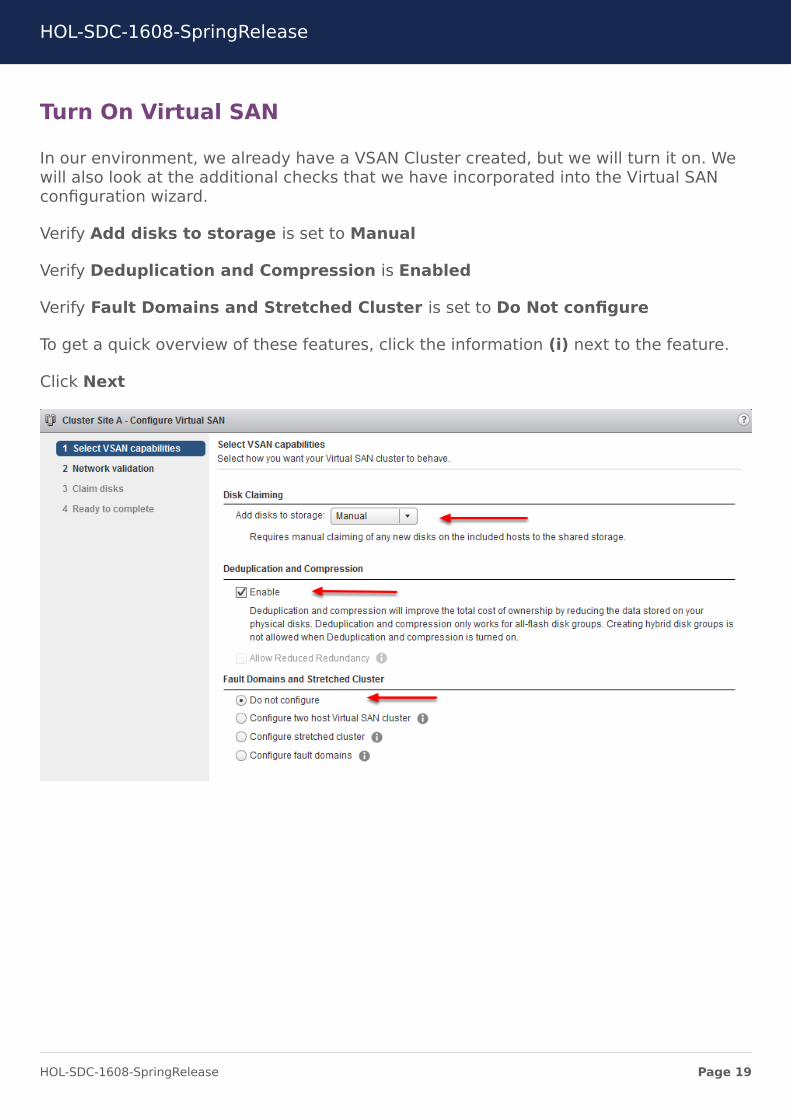
Turn On Virtual SAN
In our environment, we already have a VSAN Cluster created, but we will turn it on. Wewill also look at the additional checks that we have incorporated into the Virtual SANconfiguration wizard.
Verify Add disks to storage is set to Manual
Verify Deduplication and Compression is Enabled
Verify Fault Domains and Stretched Cluster is set to Do Not configure
To get a quick overview of these features, click the information (i) next to the feature.
Click Next
HOL-SDC-1608-SpringRelease
Page 19HOL-SDC-1608-SpringRelease
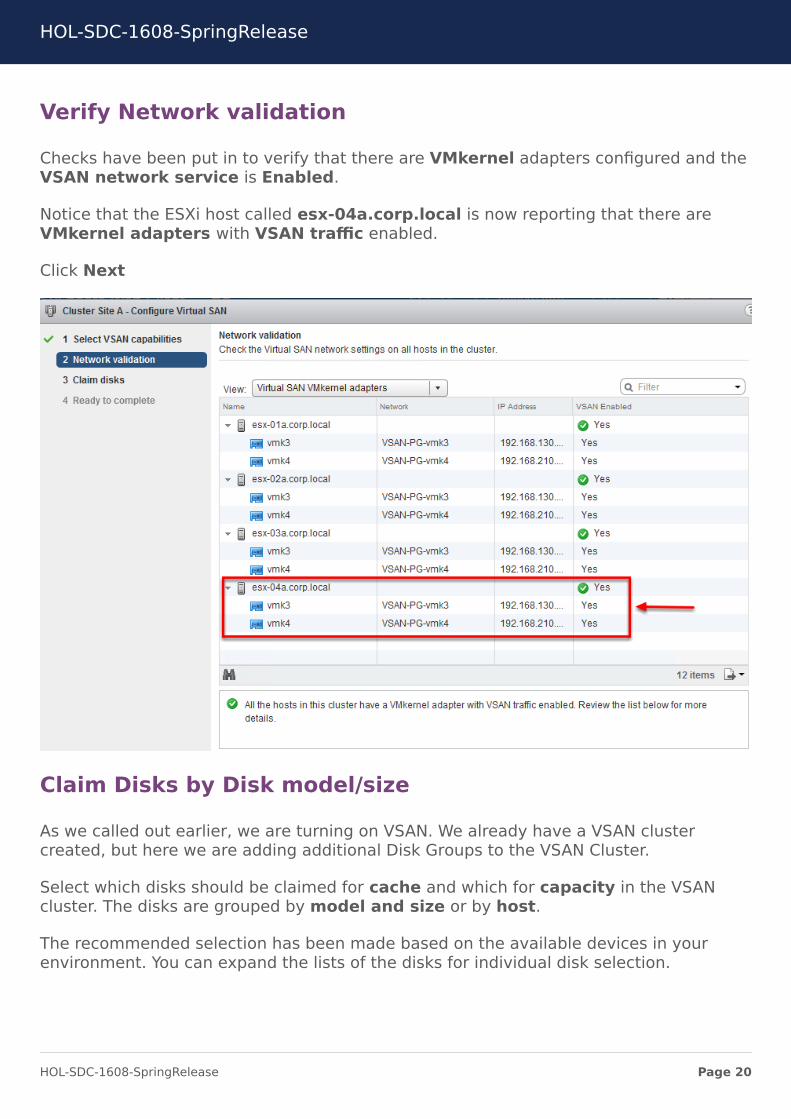
Verify Network validation
Checks have been put in to verify that there are VMkernel adapters configured and theVSAN network service is Enabled.
Notice that the ESXi host called esx-04a.corp.local is now reporting that there areVMkernel adapters with VSAN traffic enabled.
Click Next
Claim Disks by Disk model/size
As we called out earlier, we are turning on VSAN. We already have a VSAN clustercreated, but here we are adding additional Disk Groups to the VSAN Cluster.
Select which disks should be claimed for cache and which for capacity in the VSANcluster. The disks are grouped by model and size or by host.
The recommended selection has been made based on the available devices in yourenvironment. You can expand the lists of the disks for individual disk selection.
HOL-SDC-1608-SpringRelease
Page 20HOL-SDC-1608-SpringRelease

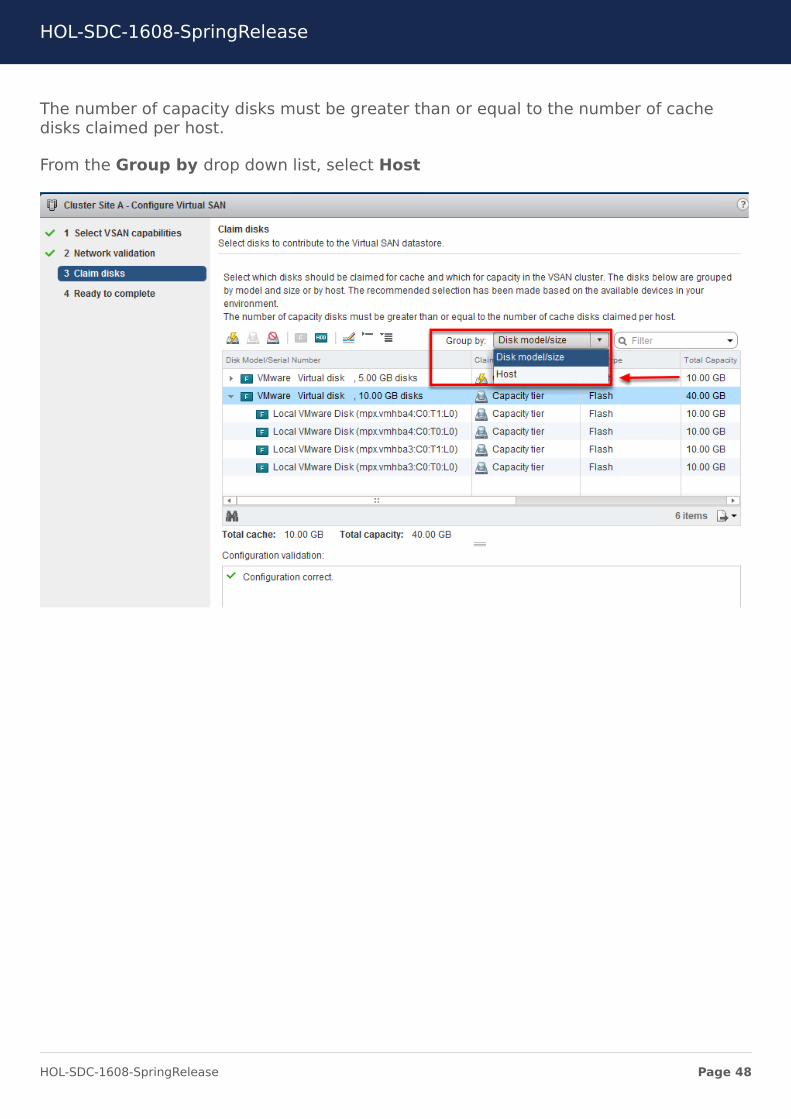
The number of capacity disks must be greater than or equal to the number of cachedisks claimed per host.
From the Group by drop down list, select Host
HOL-SDC-1608-SpringRelease
Page 21HOL-SDC-1608-SpringRelease
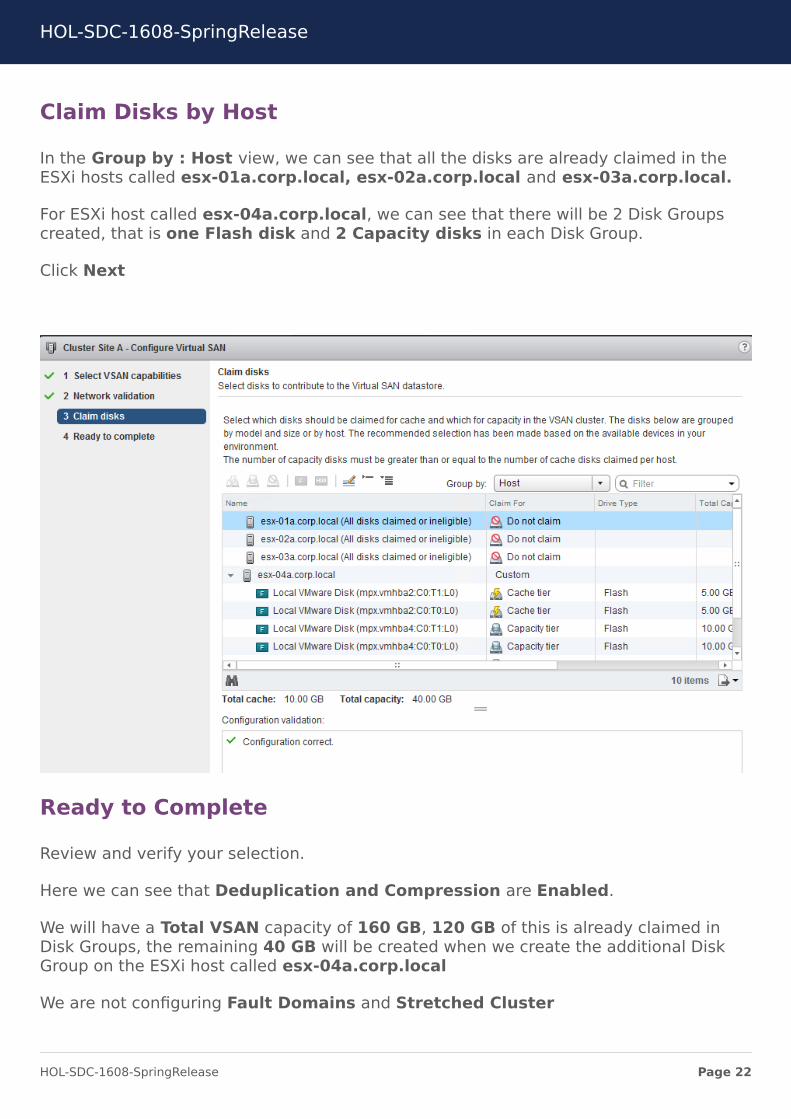
Claim Disks by Host
In the Group by : Host view, we can see that all the disks are already claimed in theESXi hosts called esx-01a.corp.local, esx-02a.corp.local and esx-03a.corp.local.
For ESXi host called esx-04a.corp.local, we can see that there will be 2 Disk Groupscreated, that is one Flash disk and 2 Capacity disks in each Disk Group.
Click Next
Ready to Complete
Review and verify your selection.
Here we can see that Deduplication and Compression are Enabled.
We will have a Total VSAN capacity of 160 GB, 120 GB of this is already claimed inDisk Groups, the remaining 40 GB will be created when we create the additional DiskGroup on the ESXi host called esx-04a.corp.local
We are not configuring Fault Domains and Stretched Cluster
HOL-SDC-1608-SpringRelease
Page 22HOL-SDC-1608-SpringRelease

Click Finish
Wait for cluster reconfiguration to complete
You can monitor the tasks by clicking on the My Tasks at the bottom left of the vSphereWeb Client.
Wait for the Reconfigure Virtual SAN configuration tasks to complete.
HOL-SDC-1608-SpringRelease
Page 23HOL-SDC-1608-SpringRelease
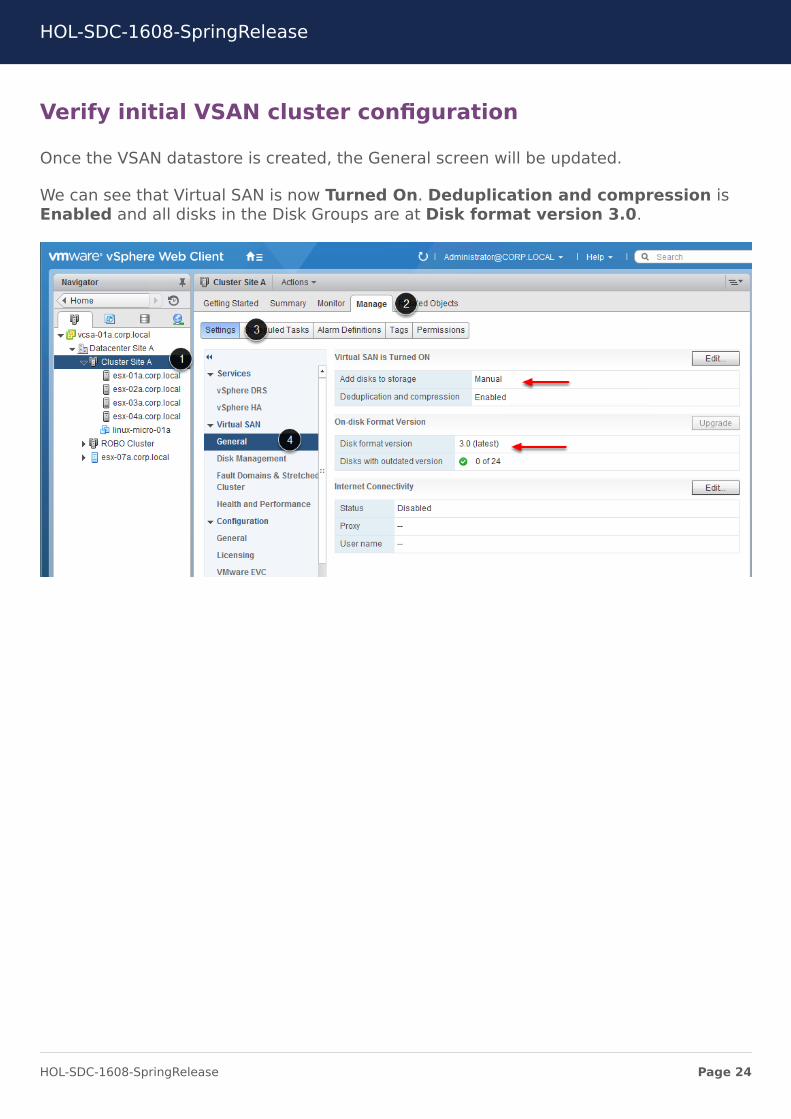
Verify initial VSAN cluster configuration
Once the VSAN datastore is created, the General screen will be updated.
We can see that Virtual SAN is now Turned On. Deduplication and compression isEnabled and all disks in the Disk Groups are at Disk format version 3.0.
HOL-SDC-1608-SpringRelease
Page 24HOL-SDC-1608-SpringRelease
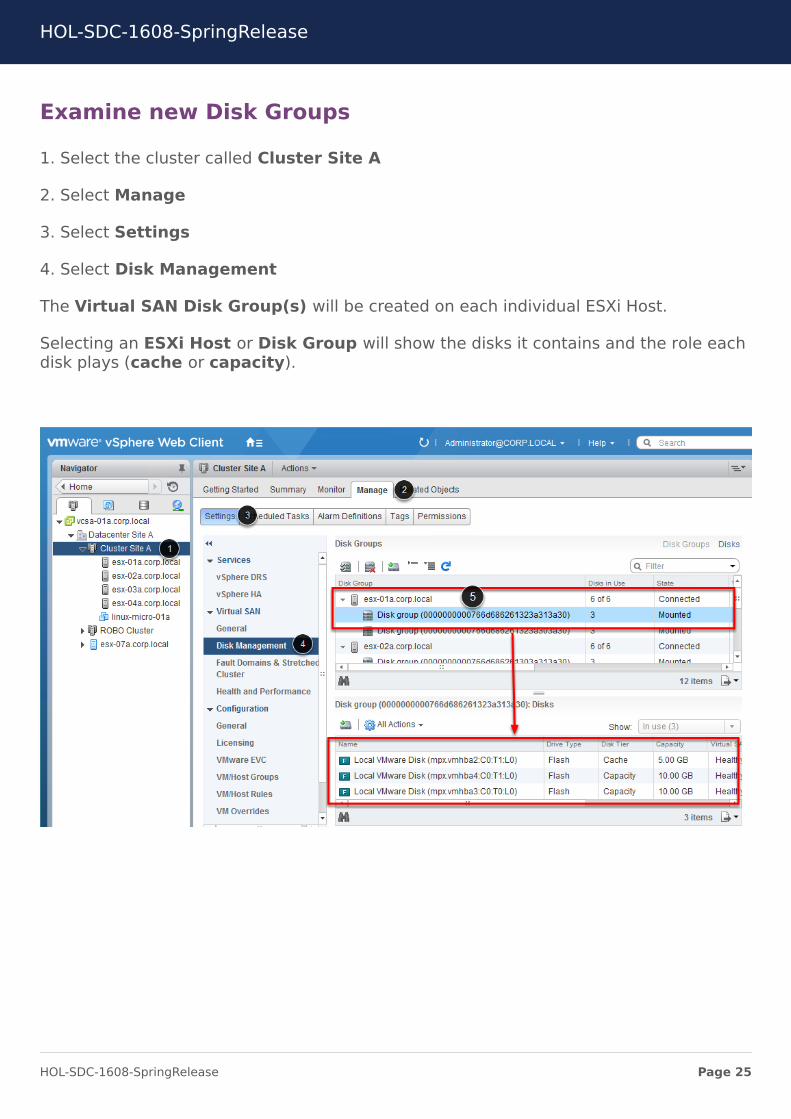
Examine new Disk Groups
1. Select the cluster called Cluster Site A
2. Select Manage
3. Select Settings
4. Select Disk Management
The Virtual SAN Disk Group(s) will be created on each individual ESXi Host.
Selecting an ESXi Host or Disk Group will show the disks it contains and the role eachdisk plays (cache or capacity).
HOL-SDC-1608-SpringRelease
Page 25HOL-SDC-1608-SpringRelease
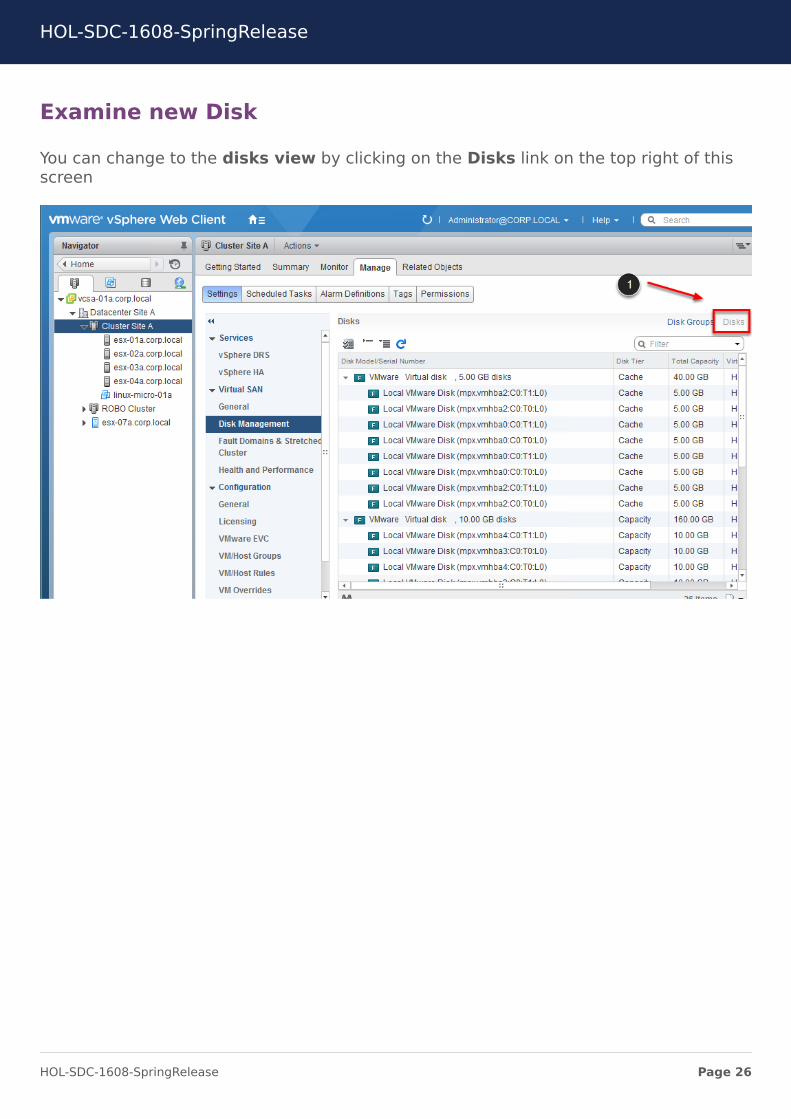
Examine new Disk
You can change to the disks view by clicking on the Disks link on the top right of thisscreen
HOL-SDC-1608-SpringRelease
Page 26HOL-SDC-1608-SpringRelease
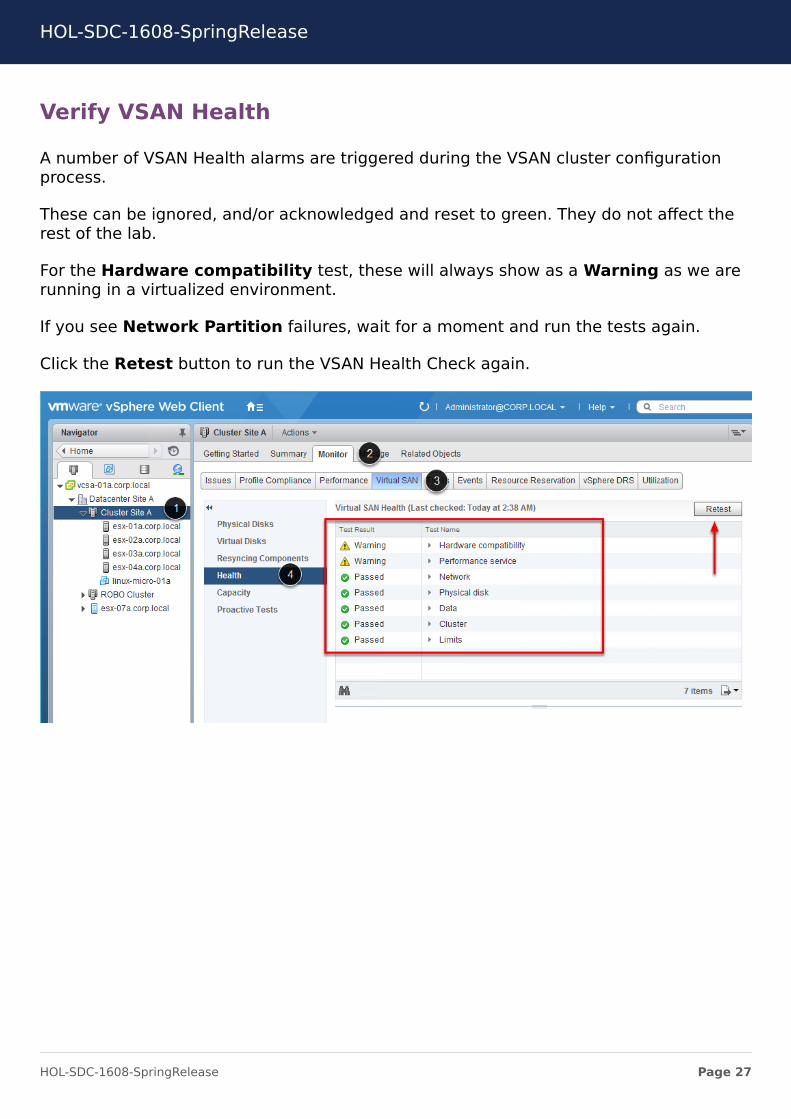
Verify VSAN Health
A number of VSAN Health alarms are triggered during the VSAN cluster configurationprocess.
These can be ignored, and/or acknowledged and reset to green. They do not affect therest of the lab.
For the Hardware compatibility test, these will always show as a Warning as we arerunning in a virtualized environment.
If you see Network Partition failures, wait for a moment and run the tests again.
Click the Retest button to run the VSAN Health Check again.
HOL-SDC-1608-SpringRelease
Page 27HOL-SDC-1608-SpringRelease
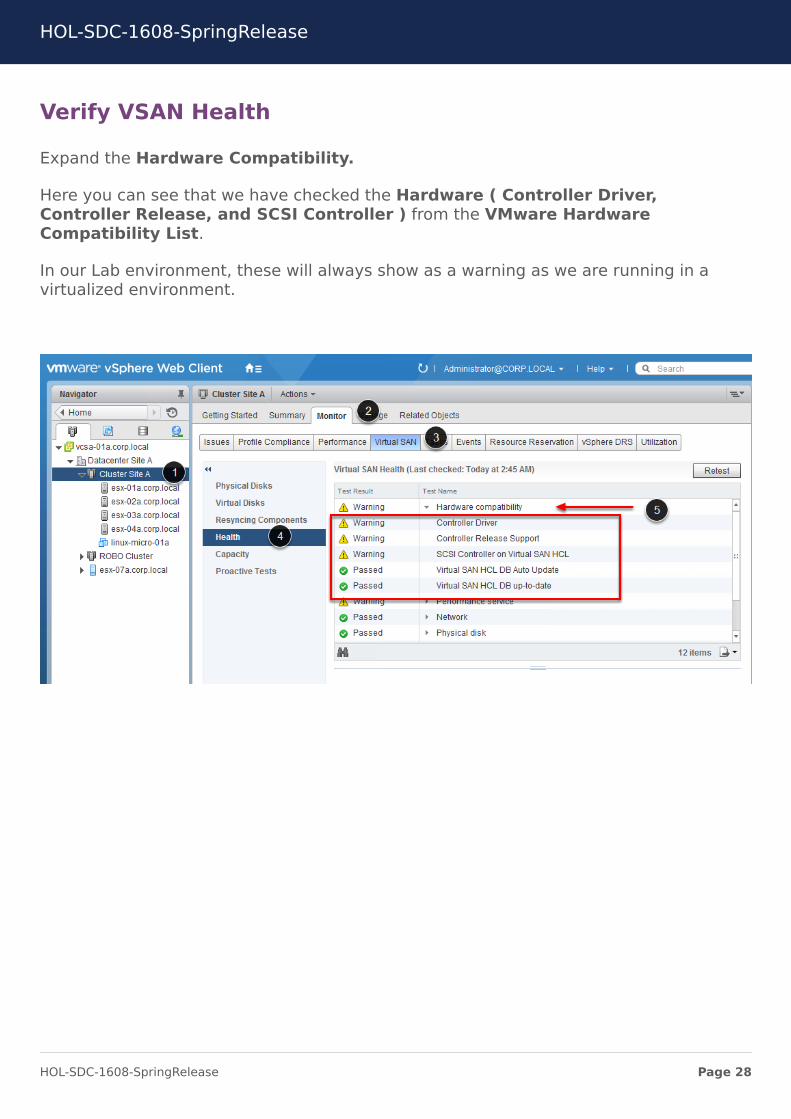
Verify VSAN Health
Expand the Hardware Compatibility.
Here you can see that we have checked the Hardware ( Controller Driver,Controller Release, and SCSI Controller ) from the VMware HardwareCompatibility List.
In our Lab environment, these will always show as a warning as we are running in avirtualized environment.
HOL-SDC-1608-SpringRelease
Page 28HOL-SDC-1608-SpringRelease
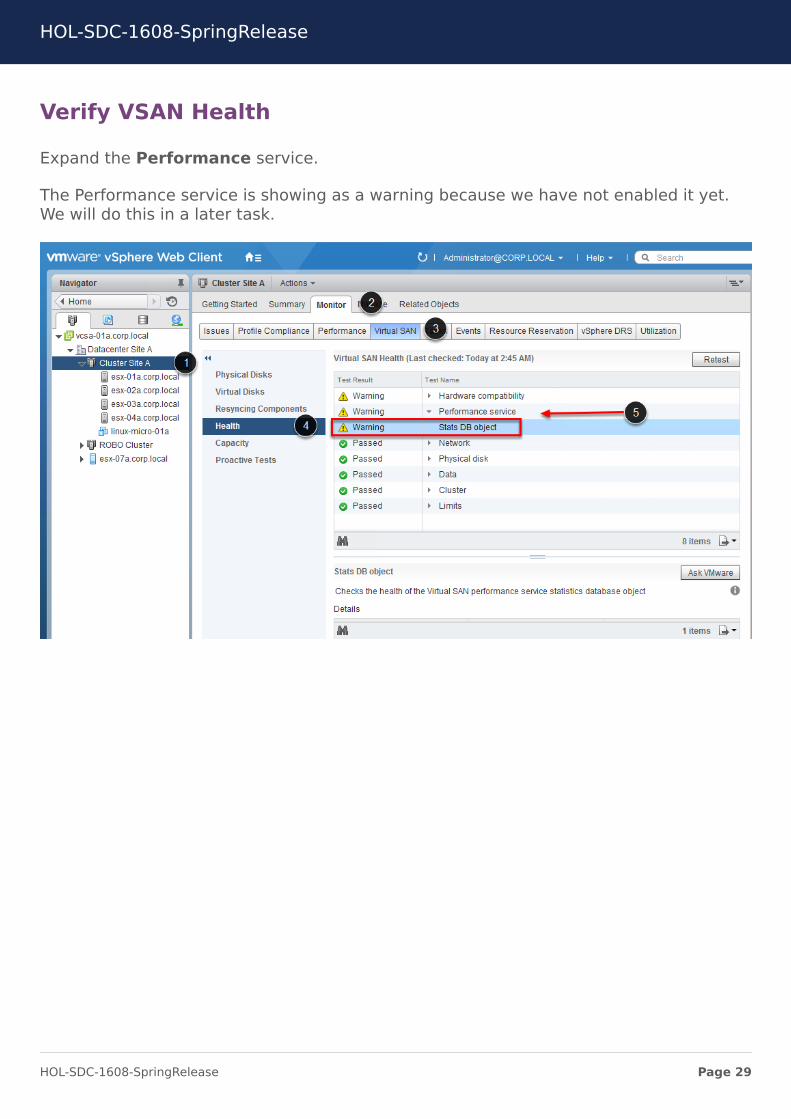
Verify VSAN Health
Expand the Performance service.
The Performance service is showing as a warning because we have not enabled it yet.We will do this in a later task.
HOL-SDC-1608-SpringRelease
Page 29HOL-SDC-1608-SpringRelease
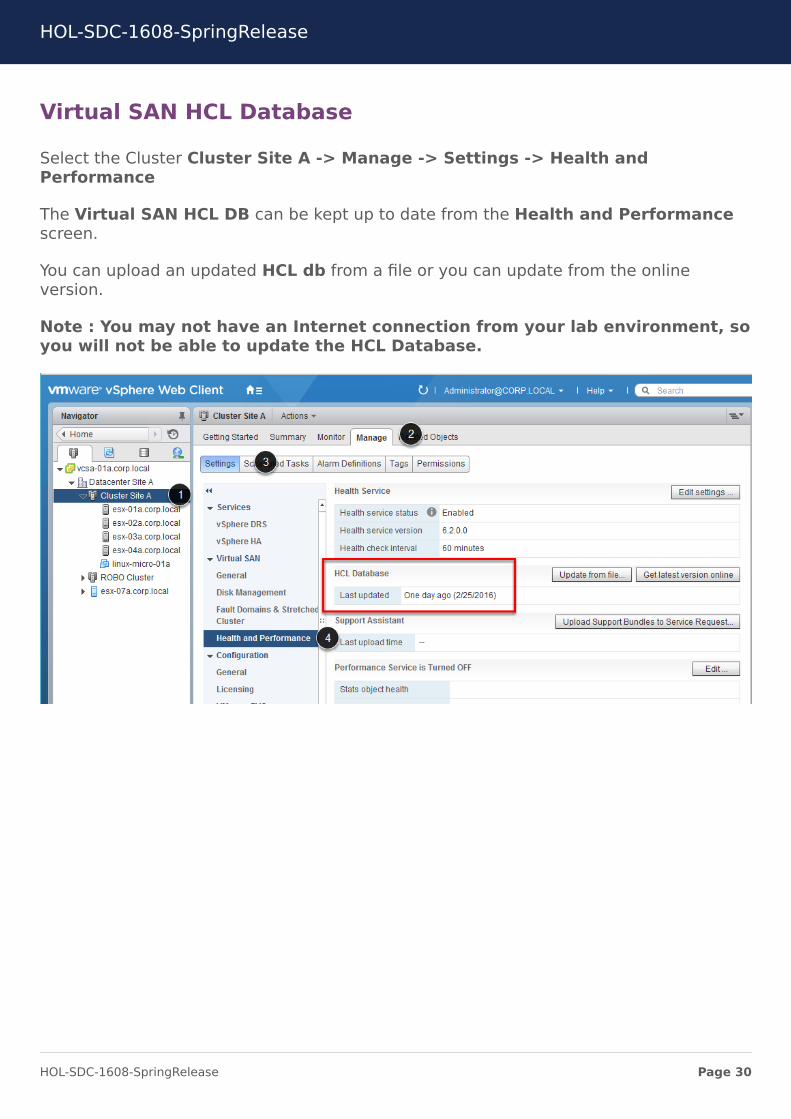
Virtual SAN HCL Database
Select the Cluster Cluster Site A -> Manage -> Settings -> Health andPerformance
The Virtual SAN HCL DB can be kept up to date from the Health and Performancescreen.
You can upload an updated HCL db from a file or you can update from the onlineversion.
Note : You may not have an Internet connection from your lab environment, soyou will not be able to update the HCL Database.
HOL-SDC-1608-SpringRelease
Page 30HOL-SDC-1608-SpringRelease

Examine the new VSAN datastore
1. Switch to the Datastores view.
2. Select the new VSAN datastore (vsanDatastore)
3. Review the basic details in the Summary tab.
We have now successfully created an All Flash VSAN Cluster.
HOL-SDC-1608-SpringRelease
Page 31HOL-SDC-1608-SpringRelease
Get VSAN information from the command line ( esxcli vsan)
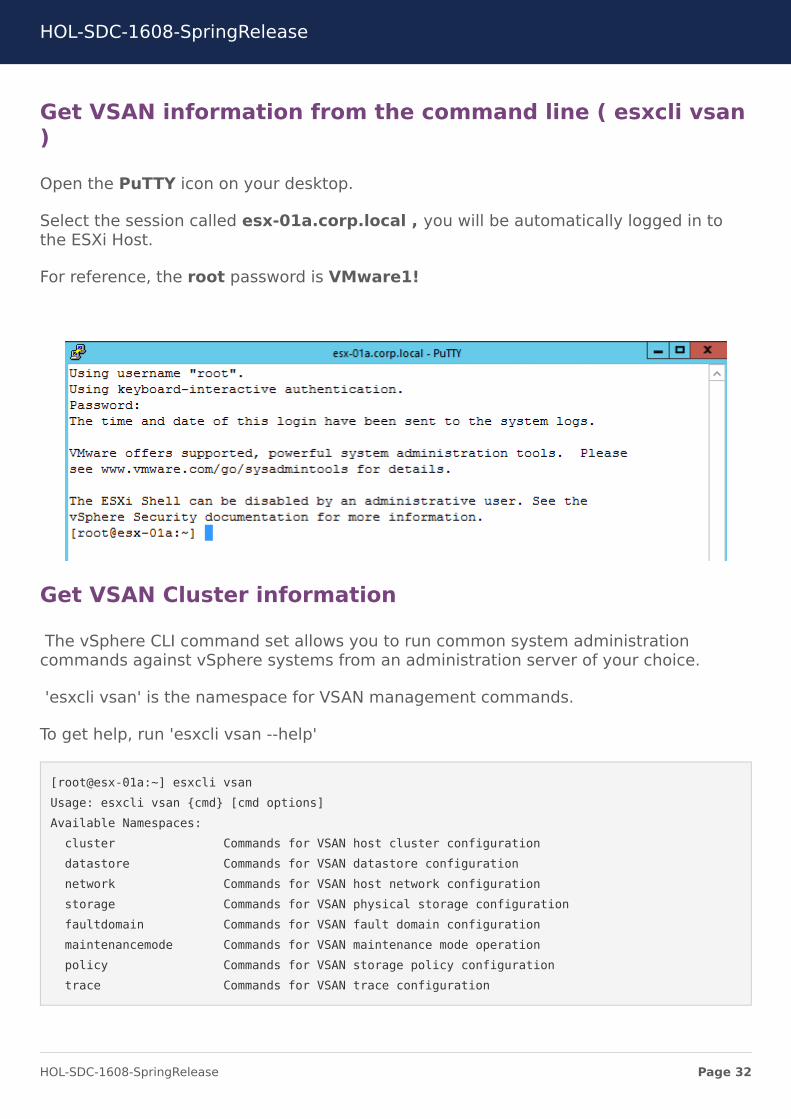
Open the PuTTY icon on your desktop.
Select the session called esx-01a.corp.local , you will be automatically logged in tothe ESXi Host.
For reference, the root password is VMware1!
Get VSAN Cluster information
The vSphere CLI command set allows you to run common system administrationcommands against vSphere systems from an administration server of your choice.
'esxcli vsan' is the namespace for VSAN management commands.
To get help, run 'esxcli vsan --help'
[root@esx-01a:~] esxcli vsanUsage: esxcli vsan {cmd} [cmd options]Available Namespaces:
cluster Commands for VSAN host cluster configurationdatastore Commands for VSAN datastore configurationnetwork Commands for VSAN host network configurationstorage Commands for VSAN physical storage configurationfaultdomain Commands for VSAN fault domain configurationmaintenancemode Commands for VSAN maintenance mode operationpolicy Commands for VSAN storage policy configurationtrace Commands for VSAN trace configuration
HOL-SDC-1608-SpringRelease
Page 32HOL-SDC-1608-SpringRelease
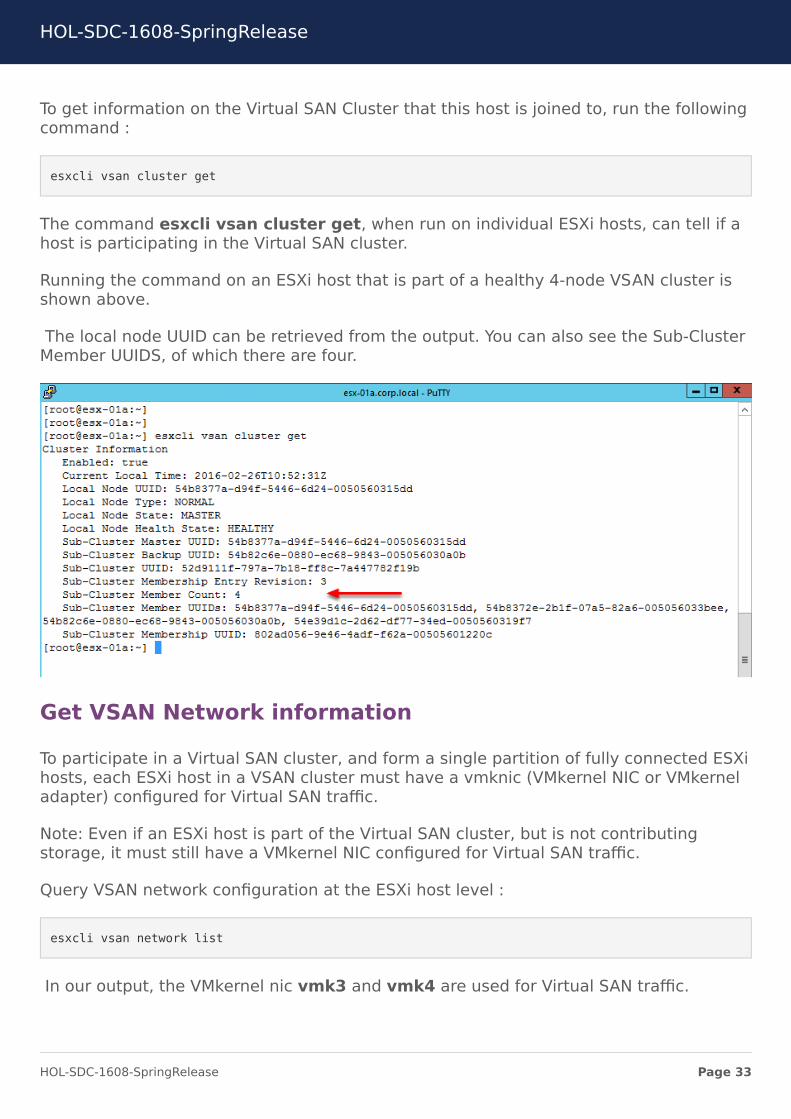
To get information on the Virtual SAN Cluster that this host is joined to, run the followingcommand :
esxcli vsan cluster get
The command esxcli vsan cluster get, when run on individual ESXi hosts, can tell if ahost is participating in the Virtual SAN cluster.
Running the command on an ESXi host that is part of a healthy 4-node VSAN cluster isshown above.
The local node UUID can be retrieved from the output. You can also see the Sub-ClusterMember UUIDS, of which there are four.
Get VSAN Network information
To participate in a Virtual SAN cluster, and form a single partition of fully connected ESXihosts, each ESXi host in a VSAN cluster must have a vmknic (VMkernel NIC or VMkerneladapter) configured for Virtual SAN traffic.
Note: Even if an ESXi host is part of the Virtual SAN cluster, but is not contributingstorage, it must still have a VMkernel NIC configured for Virtual SAN traffic.
Query VSAN network configuration at the ESXi host level :
esxcli vsan network list
In our output, the VMkernel nic vmk3 and vmk4 are used for Virtual SAN traffic.
HOL-SDC-1608-SpringRelease
Page 33HOL-SDC-1608-SpringRelease
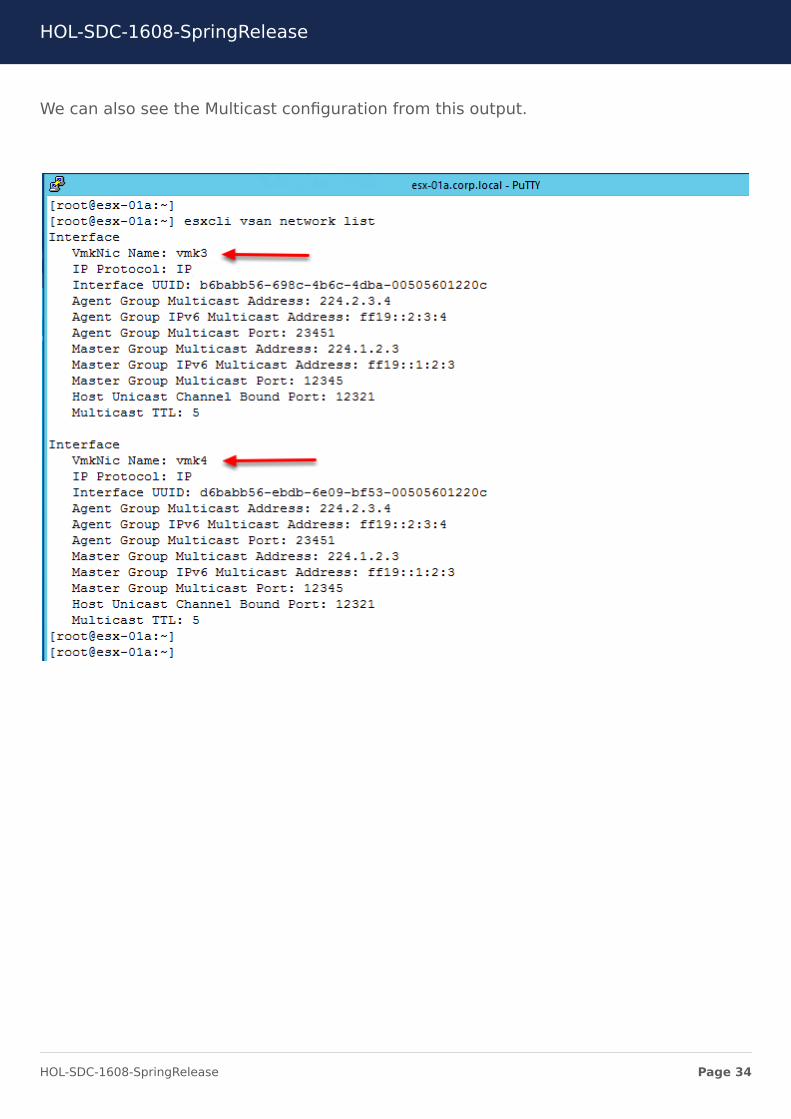
We can also see the Multicast configuration from this output.
HOL-SDC-1608-SpringRelease
Page 34HOL-SDC-1608-SpringRelease
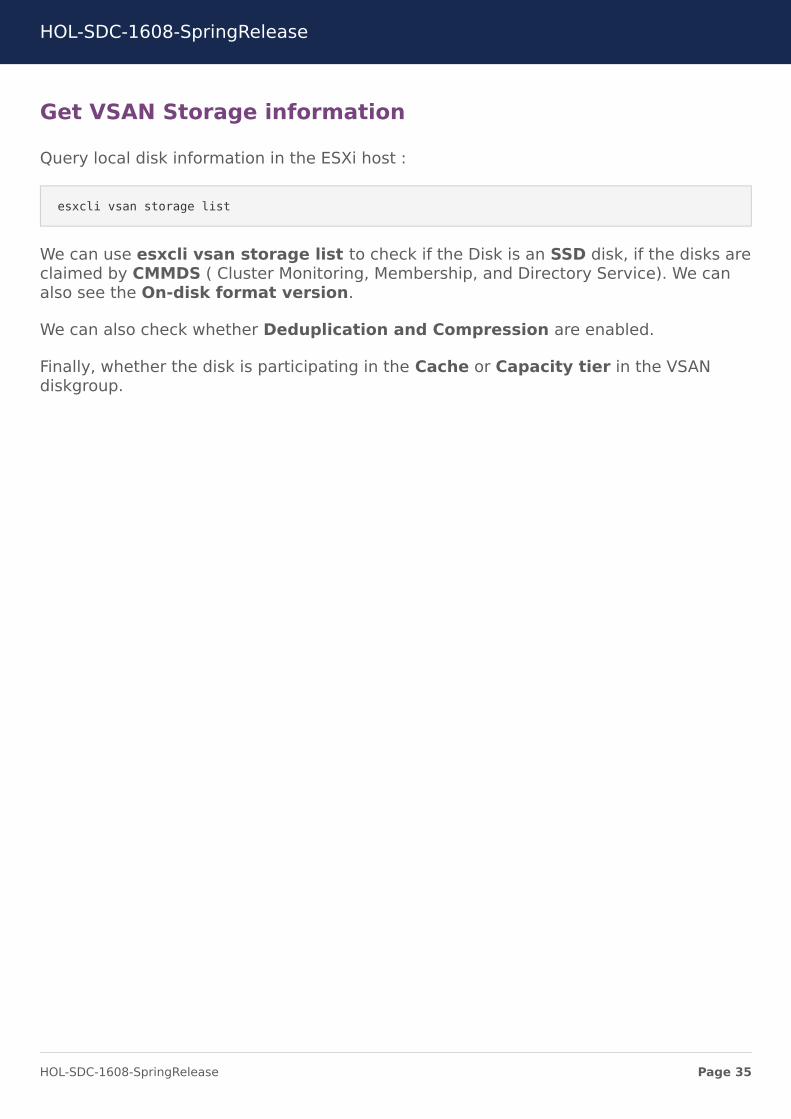
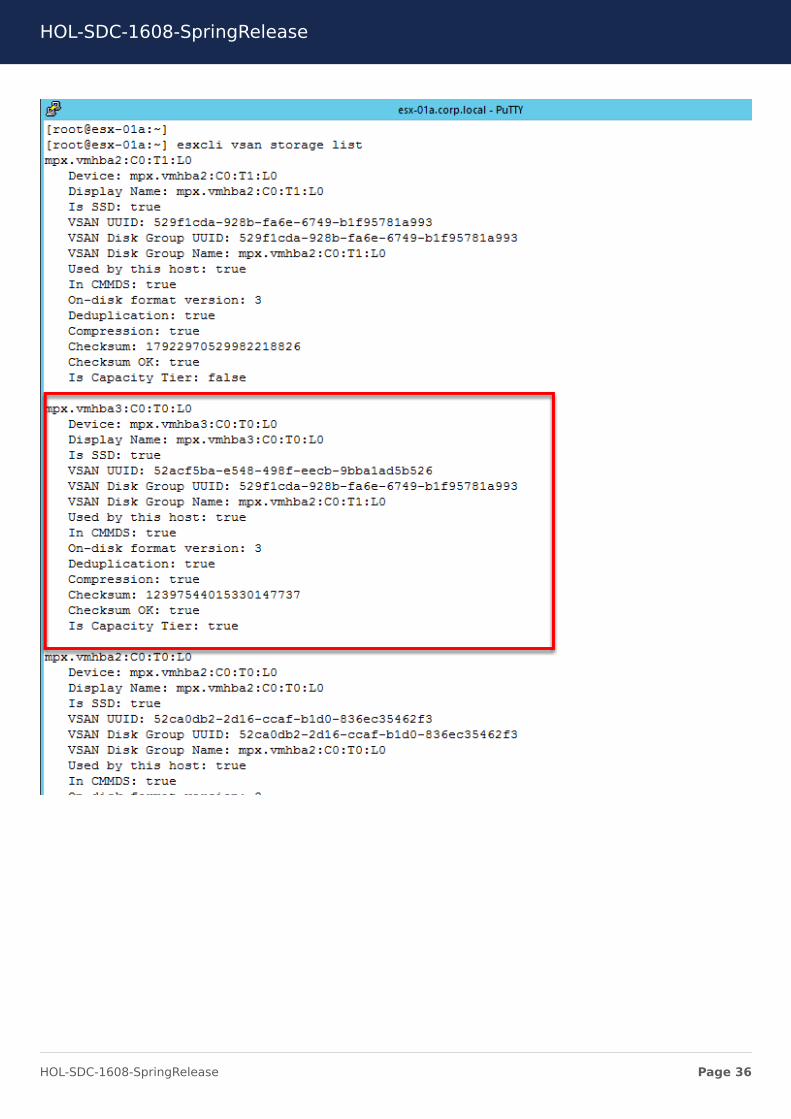
Get VSAN Storage information
Query local disk information in the ESXi host :
esxcli vsan storage list
We can use esxcli vsan storage list to check if the Disk is an SSD disk, if the disks areclaimed by CMMDS ( Cluster Monitoring, Membership, and Directory Service). We canalso see the On-disk format version.
We can also check whether Deduplication and Compression are enabled.
Finally, whether the disk is participating in the Cache or Capacity tier in the VSANdiskgroup.
HOL-SDC-1608-SpringRelease
Page 35HOL-SDC-1608-SpringRelease
HOL-SDC-1608-SpringRelease
Page 36HOL-SDC-1608-SpringRelease
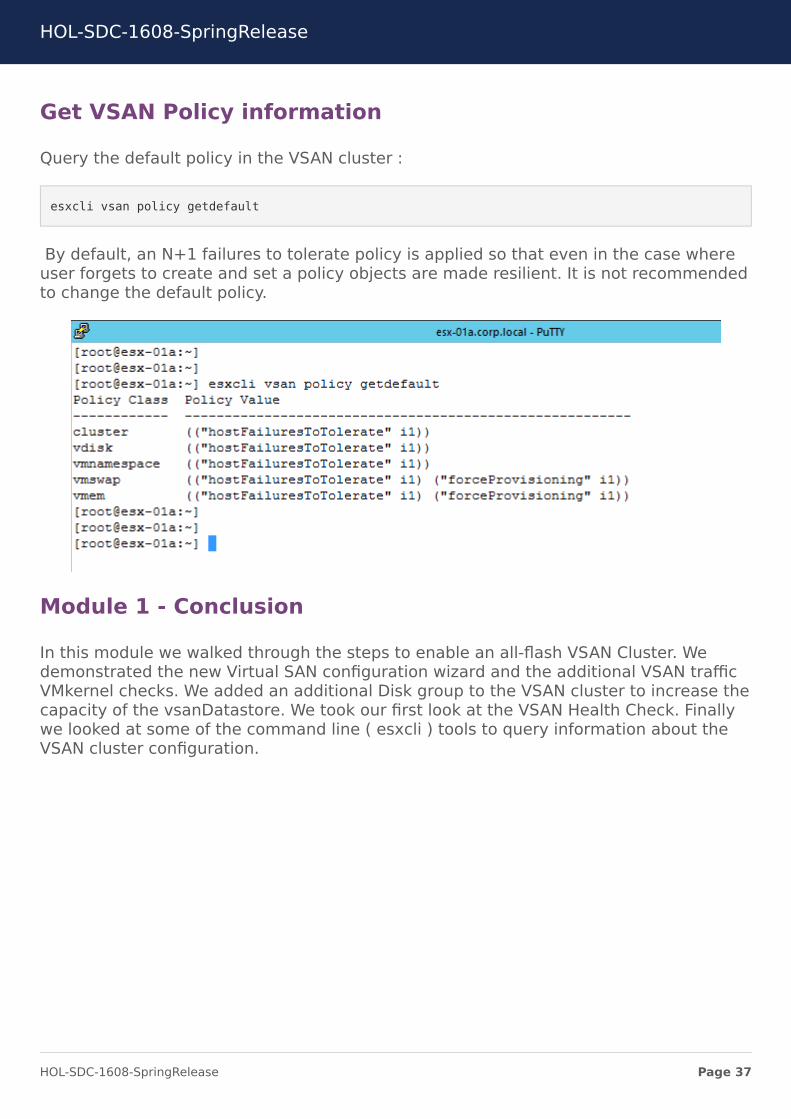
Get VSAN Policy information
Query the default policy in the VSAN cluster :
esxcli vsan policy getdefault
By default, an N+1 failures to tolerate policy is applied so that even in the case whereuser forgets to create and set a policy objects are made resilient. It is not recommendedto change the default policy.
Module 1 - Conclusion
In this module we walked through the steps to enable an all-flash VSAN Cluster. Wedemonstrated the new Virtual SAN configuration wizard and the additional VSAN trafficVMkernel checks. We added an additional Disk group to the VSAN cluster to increase thecapacity of the vsanDatastore. We took our first look at the VSAN Health Check. Finallywe looked at some of the command line ( esxcli ) tools to query information about theVSAN cluster configuration.
HOL-SDC-1608-SpringRelease
Page 37HOL-SDC-1608-SpringRelease
Module 2 - EnablingPerformance Service (30
Minutes)
HOL-SDC-1608-SpringRelease
Page 38HOL-SDC-1608-SpringRelease

Configure Virtual SAN (Optional)If you skipped Module 1, you will need to configure Virtual SAN prior to starting thismodule. If you have completed Module 1, click here to skip ahead!
Log in to vSphere Web Client
To start the vSphere Web Client, launch Mozilla Firefox from the icon on your desktop.
Allow Adobe Flash
If you receive a message that 'Firefox has prevented the outdated plugin "Adobe Flash"from running on vcsa-01a.corp,local", click the Allow button.
Allow and Remember
Click the 'Allow and Remember' button to continue.
HOL-SDC-1608-SpringRelease
Page 39HOL-SDC-1608-SpringRelease
Log in to vSphere Web Client
Log in to the vSphere Web Client using the following credentials or tick the UseWindows session authentication
User name : [email protected] : VMware1!
Click Login
HOL-SDC-1608-SpringRelease
Page 40HOL-SDC-1608-SpringRelease

Navigate to Hosts and Clusters
From the Home page in the vSphere Web Client, select Hosts and Clusters fromthe Inventories pane
HOL-SDC-1608-SpringRelease
Page 41HOL-SDC-1608-SpringRelease

Enable the VMkernel VSAN traffic service
1. Select the ESXi host called esx-04a.corp.local from the Hosts and Clusters view.
2. Select Manage
3. Select Networking
4. Select VMkernel adapters
Here you will see that we have 2 VMkernel adapters called VSAN-PG-vmk3 and VSAN-PG-vmk4. These are the 2 VMkernel adapters on which we will enable the VSAN trafficService.
Select VSAN-PG-vmk3 and click the Pencil icon to Edit the VMkernel adapter.
HOL-SDC-1608-SpringRelease
Page 42HOL-SDC-1608-SpringRelease

Enable the VMkernel VSAN traffic service
In the Port Properties, select the Virtual SAN traffic option.
Click OK
Enable the VMkernel VSAN traffic service
Edit the Properties of the VSAN-PG-vmk4 and enable the Virtual SAN traffic.
Click OK
HOL-SDC-1608-SpringRelease
Page 43HOL-SDC-1608-SpringRelease

Enable the VMkernel VSAN traffic service
Once we have enabled the Virtual SAN traffic on the VMkernel ports, verify that theVirtual SAN traffic is enabled.
Here we are showing the 2 VMkernel Ports and the Virtual SAN traffic is enabled.
You may have to scroll to the right of the screen to see the Virtual SAN traffic column.
Now that we have completed this task, lets create our Virtual SAN Cluster.
HOL-SDC-1608-SpringRelease
Page 44HOL-SDC-1608-SpringRelease

Enable Virtual SAN on the cluster
1. Select the cluster called Cluster Site A
2. Select Manage
3. Select Settings
4. Select General
5. Click the Configure... button
HOL-SDC-1608-SpringRelease
Page 45HOL-SDC-1608-SpringRelease

Turn On Virtual SAN
In our environment, we already have a VSAN Cluster created, but we will turn it on. Wewill also look at the additional checks that we have incorporated into the Virtual SANconfiguration wizard.
Verify Add disks to storage is set to Manual
Verify Deduplication and Compression is Enabled
Verify Fault Domains and Stretched Cluster is set to Do Not configure
To get a quick overview of these features, click the information (i) next to the feature.
Click Next
HOL-SDC-1608-SpringRelease
Page 46HOL-SDC-1608-SpringRelease

Verify Network validation
Checks have been put in to verify that there are VMkernel adapters configured and theVSAN network service is Enabled.
Notice that the ESXi host called esx-04a.corp.local is now reporting that there areVMkernel adapters with VSAN traffic enabled.
Click Next
Claim Disks by Disk model/size
As we called out earlier, we are turning on VSAN. We already have a VSAN clustercreated, but here we are adding additional Disk Groups to the VSAN Cluster.
Select which disks should be claimed for cache and which for capacity in the VSANcluster. The disks are grouped by model and size or by host.
The recommended selection has been made based on the available devices in yourenvironment. You can expand the lists of the disks for individual disk selection.
HOL-SDC-1608-SpringRelease
Page 47HOL-SDC-1608-SpringRelease
The number of capacity disks must be greater than or equal to the number of cachedisks claimed per host.
From the Group by drop down list, select Host
HOL-SDC-1608-SpringRelease
Page 48HOL-SDC-1608-SpringRelease

Claim Disks by Host
In the Group by : Host view, we can see that all the disks are already claimed in theESXi hosts called esx-01a.corp.local, esx-02a.corp.local and esx-03a.corp.local.
For ESXi host called esx-04a.corp.local, we can see that there will be 2 Disk Groupscreated, that is one Flash disk and 2 Capacity disks in each Disk Group.
Click Next
Ready to Complete
Review and verify your selection.
Here we can see that Deduplication and Compression are Enabled.
We will have a Total VSAN capacity of 160 GB, 120 GB of this is already claimed inDisk Groups, the remaining 40 GB will be created when we create the additional DiskGroup on the ESXi host called esx-04a.corp.local
We are not configuring Fault Domains and Stretched Cluster
HOL-SDC-1608-SpringRelease
Page 49HOL-SDC-1608-SpringRelease

Click Finish
Wait for cluster reconfiguration to complete
You can monitor the tasks by clicking on the My Tasks at the bottom left of the vSphereWeb Client.
Wait for the Reconfigure Virtual SAN configuration tasks to complete.
HOL-SDC-1608-SpringRelease
Page 50HOL-SDC-1608-SpringRelease

Verify initial VSAN cluster configuration
Once the VSAN datastore is created, the General screen will be updated.
We can see that Virtual SAN is now Turned On. Deduplication and compression isEnabled and all disks in the Disk Groups are at Disk format version 3.0.
HOL-SDC-1608-SpringRelease
Page 51HOL-SDC-1608-SpringRelease
Enabling Performance ServiceWhen you create a new Virtual SAN cluster, the performance service is disabled. Turnon Virtual SAN performance service to monitor the performance of Virtual SAN clusters,hosts, disks, and VMs.
When you turn on the performance service, Virtual SAN places a Stats databaseobject in the datastore to collect statistical data. The Stats database is a namespaceobject that resides in the cluster's Virtual SAN datastore.
Before you enable the Virtual SAN performance service, make sure the cluster isproperly configured and has no outstanding health issues.
With the release of the Virtual SAN 6.2 Performance Service, VMware is providing basicVirtual SAN performance reporting from the vSphere Web Client. The goals are tohave this feature “always on”, fully integrated with the vSphere Web Client UI, easy toaccess and consume, and maintain historic data of VSAN performance.
A Virtual SAN namespace object is used to store a statistics database (stats DB). Theobject is a regular object (stats object), and has a policy associated with it. The policy ischosen when the administrator enables the performance service. If no specific policy ischosen, the default VSAN datastore policy is used. The default policyhasNumberOfFailuresToTolerate set to 1, which implies that if there is a failure inthe VSAN cluster, the performance service is not impacted and will continue to run.Therefore the performance service has no single point of failure.
On each ESXi host in the VSAN cluster, the performance service runs a daemon tocollect performance metrics. The metrics are calculated as an average over 5 minuteintervals. The stats collection is always on. These statistics are stored in the stats DB inthe stats object. This implies that the vCenter server is not required for any aspect ofthe stats infrastructure, such as setup, collection, storage, and query.
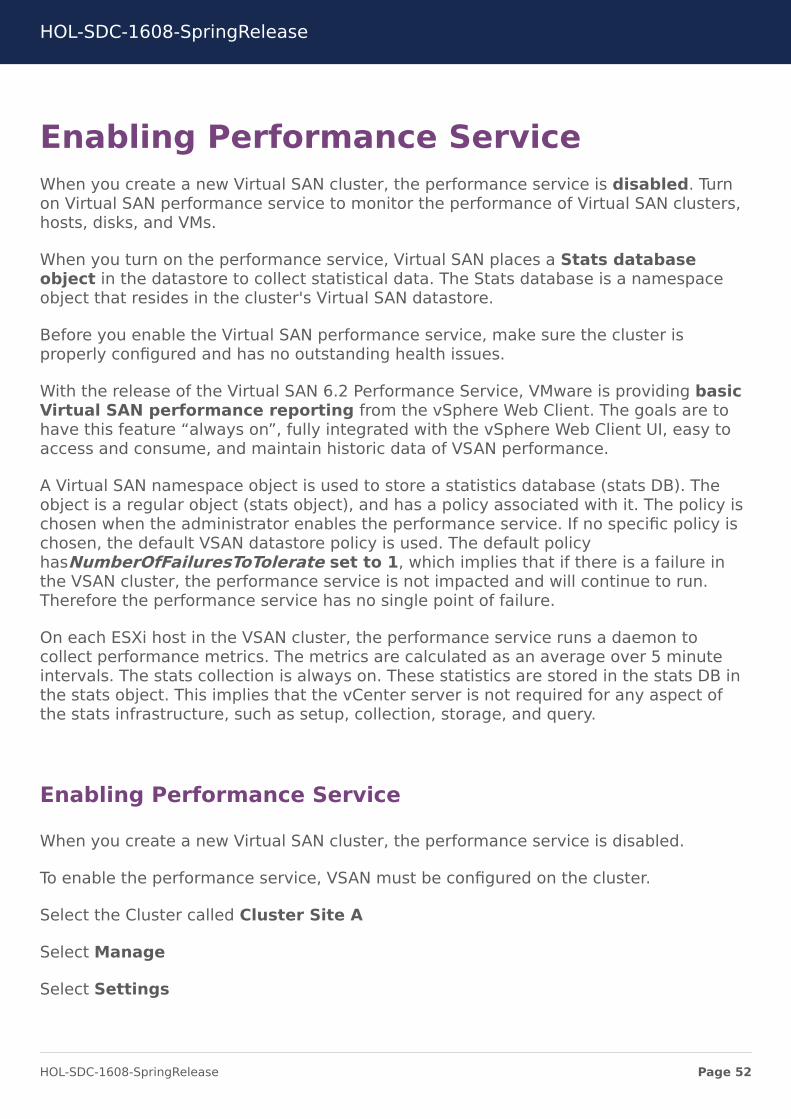
Enabling Performance Service
When you create a new Virtual SAN cluster, the performance service is disabled.
To enable the performance service, VSAN must be configured on the cluster.
Select the Cluster called Cluster Site A
Select Manage
Select Settings
HOL-SDC-1608-SpringRelease
Page 52HOL-SDC-1608-SpringRelease
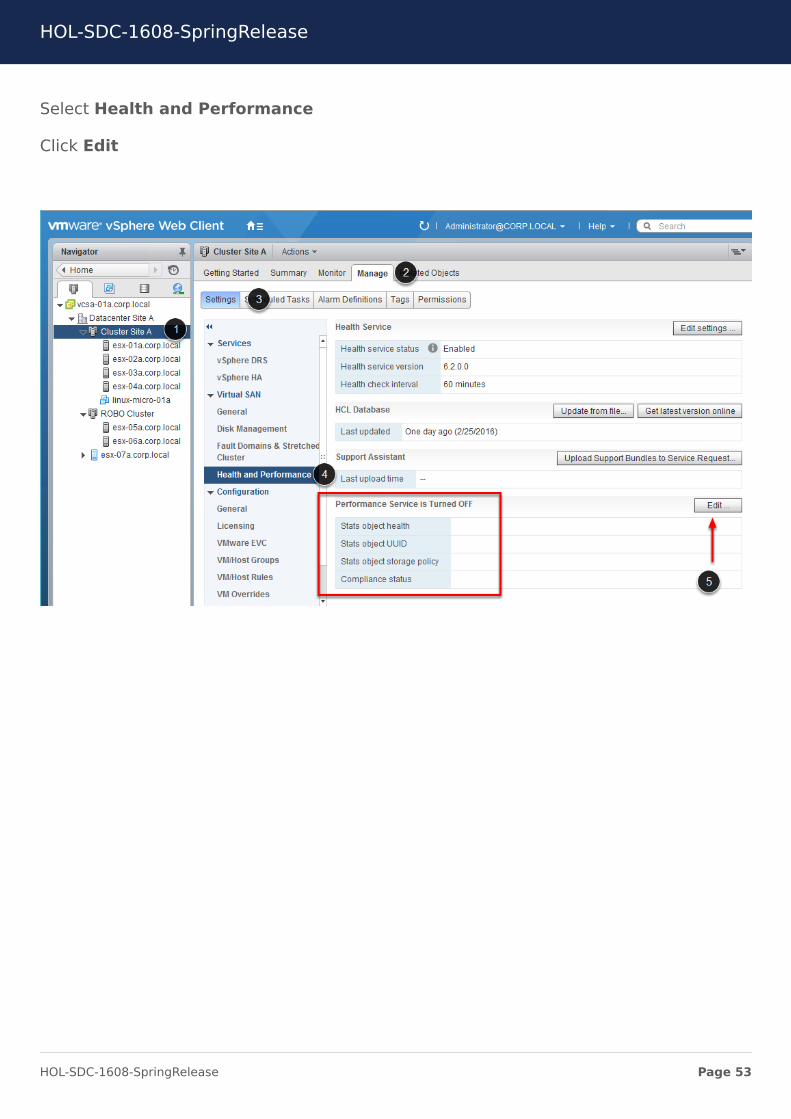
Select Health and Performance
Click Edit
HOL-SDC-1608-SpringRelease
Page 53HOL-SDC-1608-SpringRelease
Enabling Performance Service
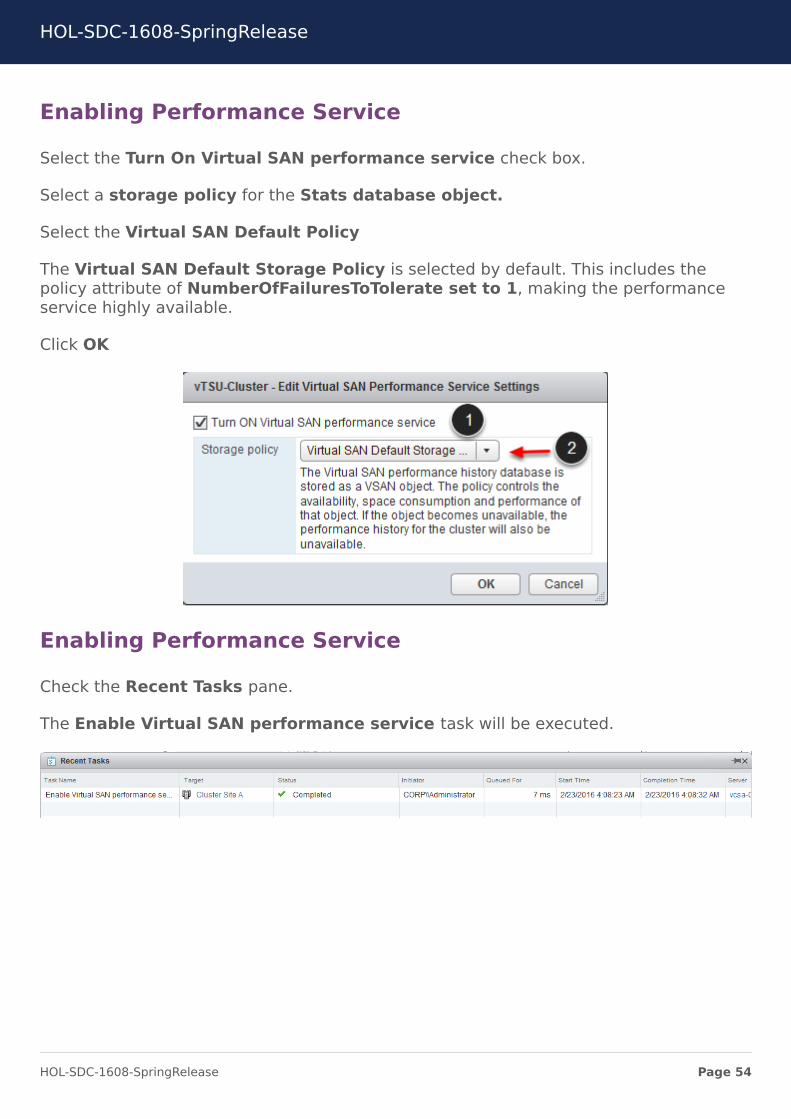
Select the Turn On Virtual SAN performance service check box.
Select a storage policy for the Stats database object.
Select the Virtual SAN Default Policy
The Virtual SAN Default Storage Policy is selected by default. This includes thepolicy attribute of NumberOfFailuresToTolerate set to 1, making the performanceservice highly available.
Click OK
Enabling Performance Service
Check the Recent Tasks pane.
The Enable Virtual SAN performance service task will be executed.
HOL-SDC-1608-SpringRelease
Page 54HOL-SDC-1608-SpringRelease
Enabling Performance Service
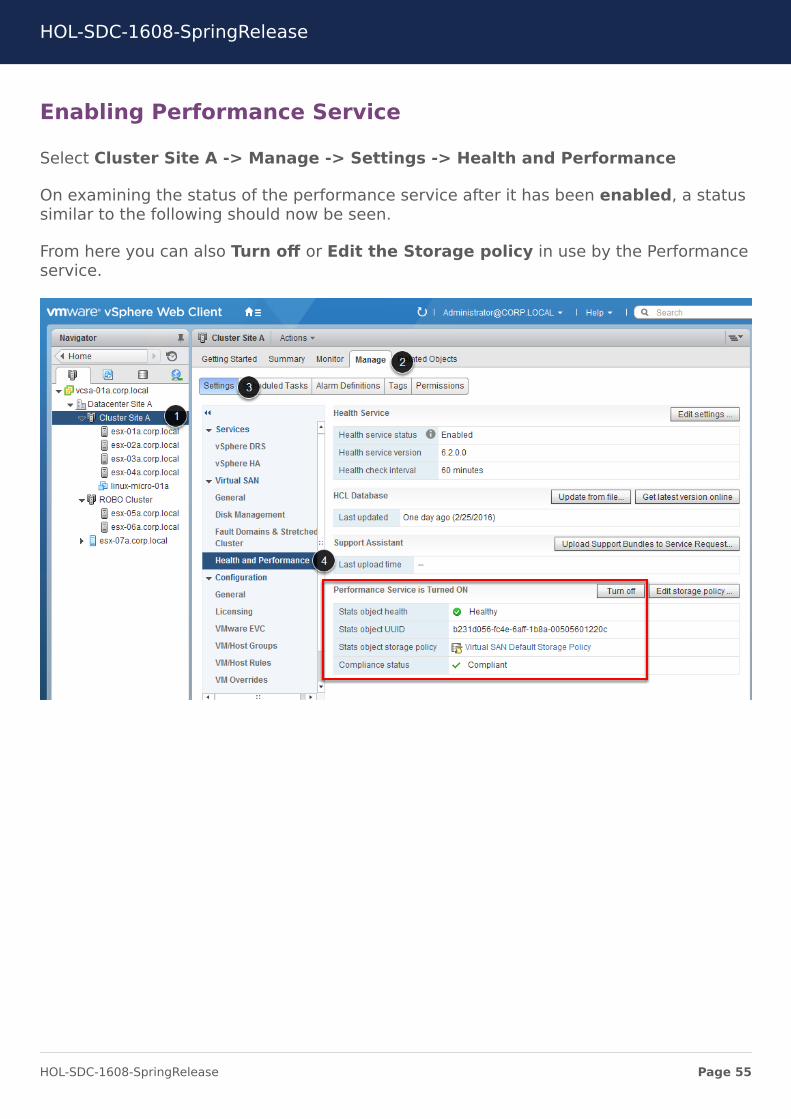
Select Cluster Site A -> Manage -> Settings -> Health and Performance
On examining the status of the performance service after it has been enabled, a statussimilar to the following should now be seen.
From here you can also Turn off or Edit the Storage policy in use by the Performanceservice.
HOL-SDC-1608-SpringRelease
Page 55HOL-SDC-1608-SpringRelease
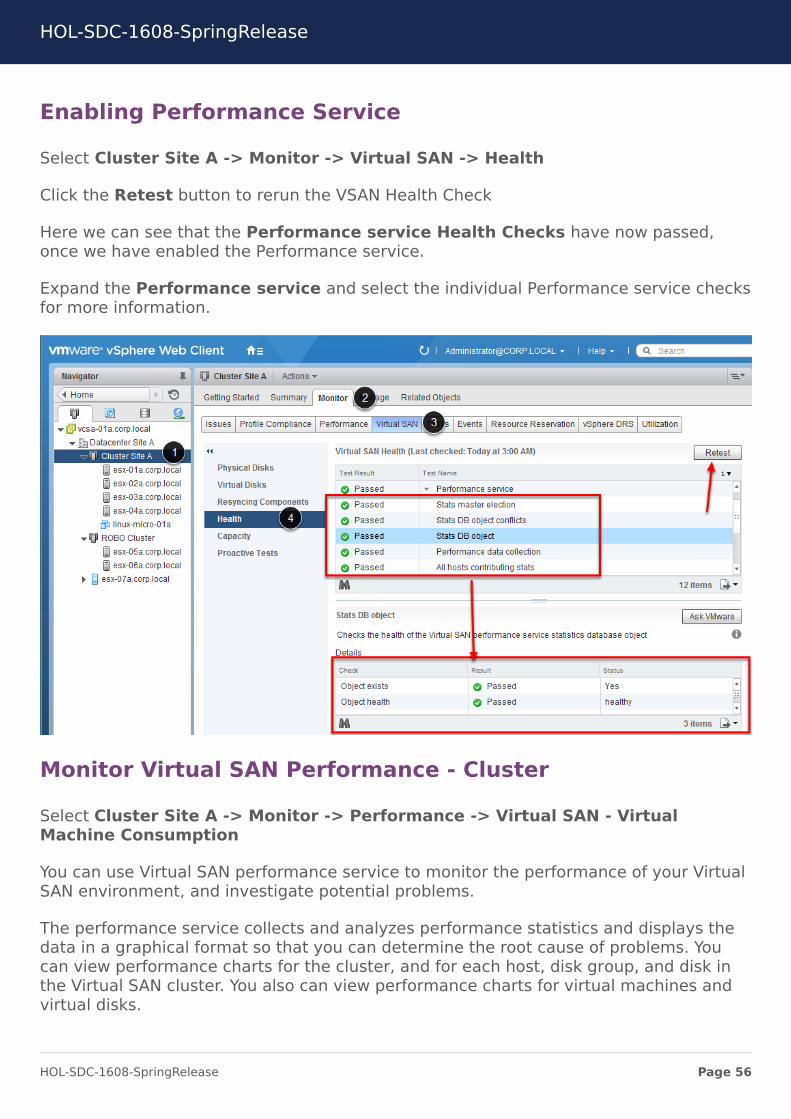
Enabling Performance Service
Select Cluster Site A -> Monitor -> Virtual SAN -> Health
Click the Retest button to rerun the VSAN Health Check
Here we can see that the Performance service Health Checks have now passed,once we have enabled the Performance service.
Expand the Performance service and select the individual Performance service checksfor more information.
Monitor Virtual SAN Performance - Cluster
Select Cluster Site A -> Monitor -> Performance -> Virtual SAN - VirtualMachine Consumption
You can use Virtual SAN performance service to monitor the performance of your VirtualSAN environment, and investigate potential problems.
The performance service collects and analyzes performance statistics and displays thedata in a graphical format so that you can determine the root cause of problems. Youcan view performance charts for the cluster, and for each host, disk group, and disk inthe Virtual SAN cluster. You also can view performance charts for virtual machines andvirtual disks.
HOL-SDC-1608-SpringRelease
Page 56HOL-SDC-1608-SpringRelease
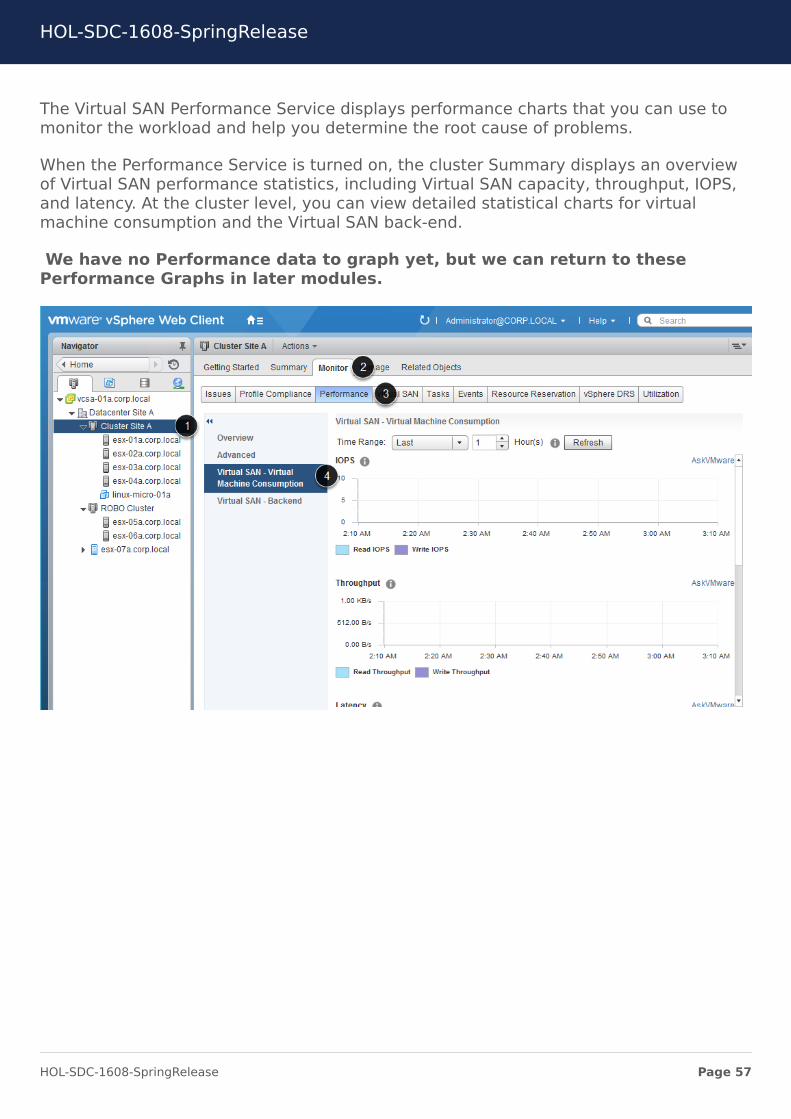
The Virtual SAN Performance Service displays performance charts that you can use tomonitor the workload and help you determine the root cause of problems.
When the Performance Service is turned on, the cluster Summary displays an overviewof Virtual SAN performance statistics, including Virtual SAN capacity, throughput, IOPS,and latency. At the cluster level, you can view detailed statistical charts for virtualmachine consumption and the Virtual SAN back-end.
We have no Performance data to graph yet, but we can return to thesePerformance Graphs in later modules.
HOL-SDC-1608-SpringRelease
Page 57HOL-SDC-1608-SpringRelease
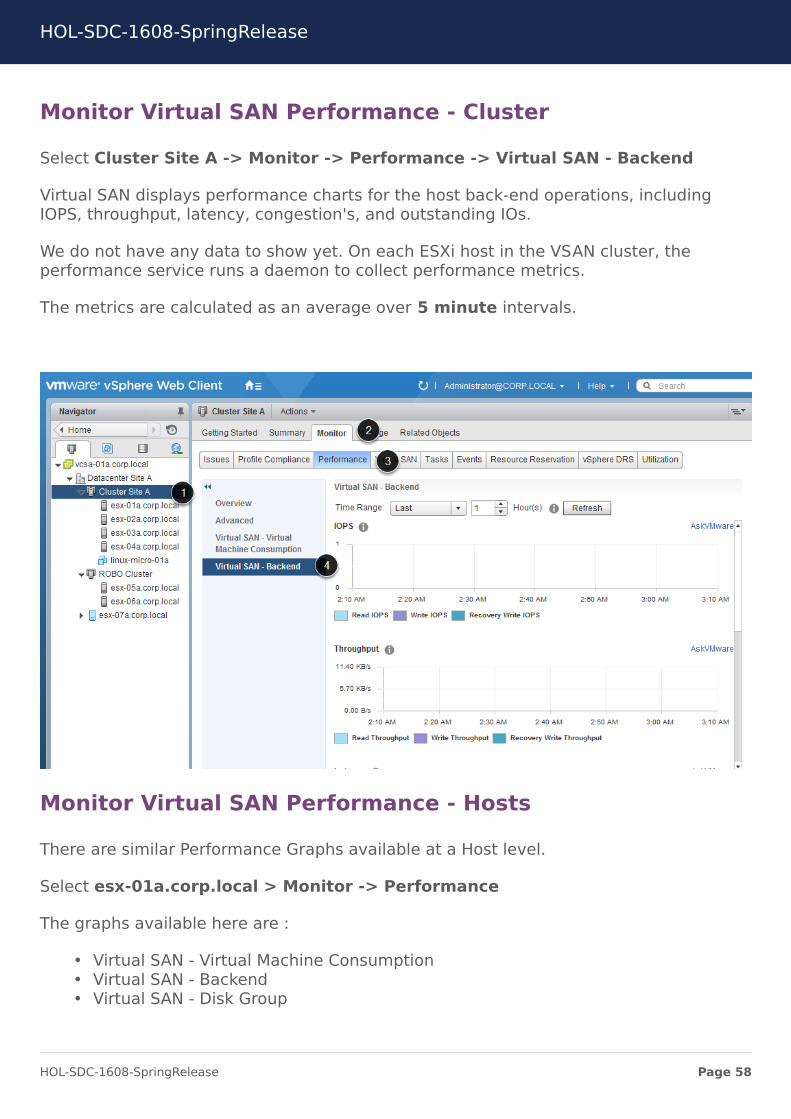
Monitor Virtual SAN Performance - Cluster
Select Cluster Site A -> Monitor -> Performance -> Virtual SAN - Backend
Virtual SAN displays performance charts for the host back-end operations, includingIOPS, throughput, latency, congestion's, and outstanding IOs.
We do not have any data to show yet. On each ESXi host in the VSAN cluster, theperformance service runs a daemon to collect performance metrics.
The metrics are calculated as an average over 5 minute intervals.
Monitor Virtual SAN Performance - Hosts
There are similar Performance Graphs available at a Host level.
Select esx-01a.corp.local > Monitor -> Performance
The graphs available here are :
• Virtual SAN - Virtual Machine Consumption• Virtual SAN - Backend• Virtual SAN - Disk Group
HOL-SDC-1608-SpringRelease
Page 58HOL-SDC-1608-SpringRelease
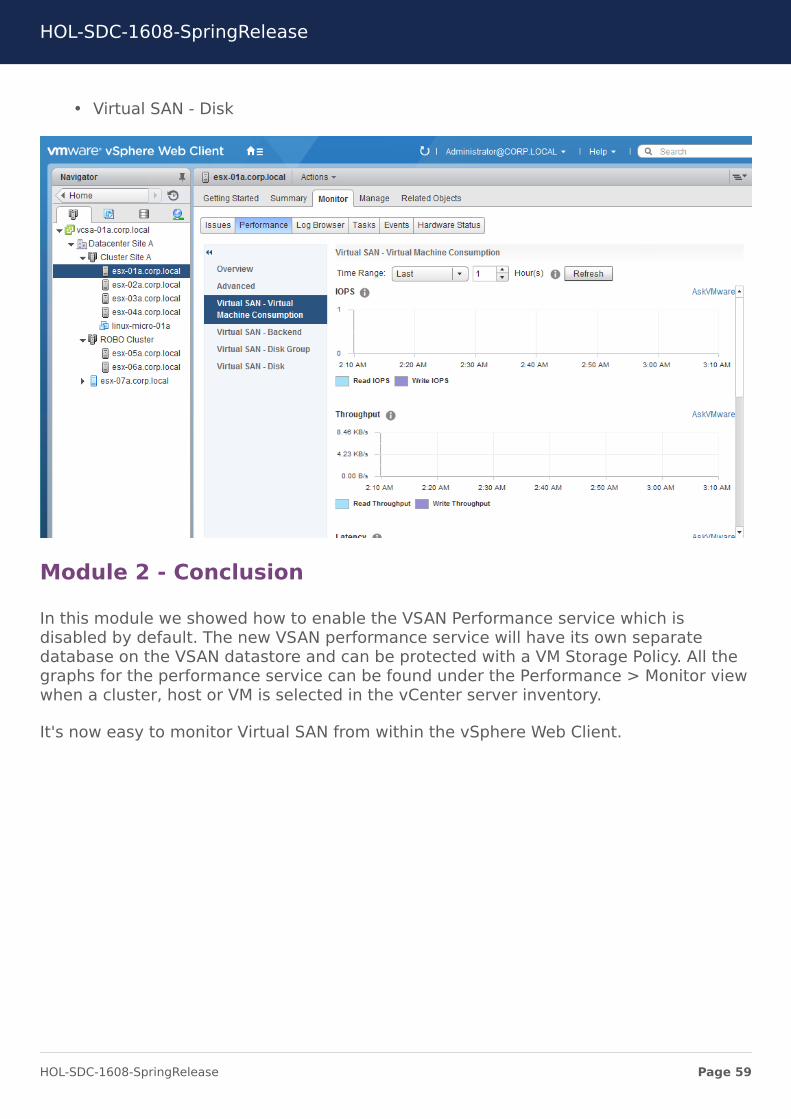
• Virtual SAN - Disk
Module 2 - Conclusion
In this module we showed how to enable the VSAN Performance service which isdisabled by default. The new VSAN performance service will have its own separatedatabase on the VSAN datastore and can be protected with a VM Storage Policy. All thegraphs for the performance service can be found under the Performance > Monitor viewwhen a cluster, host or VM is selected in the vCenter server inventory.
It's now easy to monitor Virtual SAN from within the vSphere Web Client.
HOL-SDC-1608-SpringRelease
Page 59HOL-SDC-1608-SpringRelease

Module 3 - Storage BasedPolicy Management (30
Minutes)
HOL-SDC-1608-SpringRelease
Page 60HOL-SDC-1608-SpringRelease

Configure Virtual SAN (Optional)If you skipped Module 1, you will need to configure Virtual SAN prior to starting thismodule. If you have completed Module 1, click here to skip ahead!
Log in to vSphere Web Client
To start the vSphere Web Client, launch Mozilla Firefox from the icon on your desktop.
Allow Adobe Flash
If you receive a message that 'Firefox has prevented the outdated plugin "Adobe Flash"from running on vcsa-01a.corp,local", click the Allow button.
Allow and Remember
Click the 'Allow and Remember' button to continue.
HOL-SDC-1608-SpringRelease
Page 61HOL-SDC-1608-SpringRelease

Log in to vSphere Web Client
Log in to the vSphere Web Client using the following credentials or tick the UseWindows session authentication
User name : [email protected] : VMware1!
Click Login
HOL-SDC-1608-SpringRelease
Page 62HOL-SDC-1608-SpringRelease

Navigate to Hosts and Clusters
From the Home page in the vSphere Web Client, select Hosts and Clusters fromthe Inventories pane
HOL-SDC-1608-SpringRelease
Page 63HOL-SDC-1608-SpringRelease

Enable the VMkernel VSAN traffic service
1. Select the ESXi host called esx-04a.corp.local from the Hosts and Clusters view.
2. Select Manage
3. Select Networking
4. Select VMkernel adapters
Here you will see that we have 2 VMkernel adapters called VSAN-PG-vmk3 and VSAN-PG-vmk4. These are the 2 VMkernel adapters on which we will enable the VSAN trafficService.
Select VSAN-PG-vmk3 and click the Pencil icon to Edit the VMkernel adapter.
HOL-SDC-1608-SpringRelease
Page 64HOL-SDC-1608-SpringRelease
Enable the VMkernel VSAN traffic service
In the Port Properties, select the Virtual SAN traffic option.
Click OK
Enable the VMkernel VSAN traffic service
Edit the Properties of the VSAN-PG-vmk4 and enable the Virtual SAN traffic.
Click OK
HOL-SDC-1608-SpringRelease
Page 65HOL-SDC-1608-SpringRelease

Enable the VMkernel VSAN traffic service
Once we have enabled the Virtual SAN traffic on the VMkernel ports, verify that theVirtual SAN traffic is enabled.
Here we are showing the 2 VMkernel Ports and the Virtual SAN traffic is enabled.
You may have to scroll to the right of the screen to see the Virtual SAN traffic column.
Now that we have completed this task, lets create our Virtual SAN Cluster.
HOL-SDC-1608-SpringRelease
Page 66HOL-SDC-1608-SpringRelease

Enable Virtual SAN on the cluster
1. Select the cluster called Cluster Site A
2. Select Manage
3. Select Settings
4. Select General
5. Click the Configure... button
HOL-SDC-1608-SpringRelease
Page 67HOL-SDC-1608-SpringRelease

Turn On Virtual SAN
In our environment, we already have a VSAN Cluster created, but we will turn it on. Wewill also look at the additional checks that we have incorporated into the Virtual SANconfiguration wizard.
Verify Add disks to storage is set to Manual
Verify Deduplication and Compression is Enabled
Verify Fault Domains and Stretched Cluster is set to Do Not configure
To get a quick overview of these features, click the information (i) next to the feature.
Click Next
HOL-SDC-1608-SpringRelease
Page 68HOL-SDC-1608-SpringRelease

Verify Network validation
Checks have been put in to verify that there are VMkernel adapters configured and theVSAN network service is Enabled.
Notice that the ESXi host called esx-04a.corp.local is now reporting that there areVMkernel adapters with VSAN traffic enabled.
Click Next
Claim Disks by Disk model/size
As we called out earlier, we are turning on VSAN. We already have a VSAN clustercreated, but here we are adding additional Disk Groups to the VSAN Cluster.
Select which disks should be claimed for cache and which for capacity in the VSANcluster. The disks are grouped by model and size or by host.
The recommended selection has been made based on the available devices in yourenvironment. You can expand the lists of the disks for individual disk selection.
HOL-SDC-1608-SpringRelease
Page 69HOL-SDC-1608-SpringRelease

The number of capacity disks must be greater than or equal to the number of cachedisks claimed per host.
From the Group by drop down list, select Host
HOL-SDC-1608-SpringRelease
Page 70HOL-SDC-1608-SpringRelease

Claim Disks by Host
In the Group by : Host view, we can see that all the disks are already claimed in theESXi hosts called esx-01a.corp.local, esx-02a.corp.local and esx-03a.corp.local.
For ESXi host called esx-04a.corp.local, we can see that there will be 2 Disk Groupscreated, that is one Flash disk and 2 Capacity disks in each Disk Group.
Click Next
Ready to Complete
Review and verify your selection.
Here we can see that Deduplication and Compression are Enabled.
We will have a Total VSAN capacity of 160 GB, 120 GB of this is already claimed inDisk Groups, the remaining 40 GB will be created when we create the additional DiskGroup on the ESXi host called esx-04a.corp.local
We are not configuring Fault Domains and Stretched Cluster
HOL-SDC-1608-SpringRelease
Page 71HOL-SDC-1608-SpringRelease

Click Finish
Wait for cluster reconfiguration to complete
You can monitor the tasks by clicking on the My Tasks at the bottom left of the vSphereWeb Client.
Wait for the Reconfigure Virtual SAN configuration tasks to complete.
HOL-SDC-1608-SpringRelease
Page 72HOL-SDC-1608-SpringRelease

Verify initial VSAN cluster configuration
Once the VSAN datastore is created, the General screen will be updated.
We can see that Virtual SAN is now Turned On. Deduplication and compression isEnabled and all disks in the Disk Groups are at Disk format version 3.0.
HOL-SDC-1608-SpringRelease
Page 73HOL-SDC-1608-SpringRelease
Storage Based Policy ManagementWhen you use Virtual SAN, you can define virtual machine storage requirements, suchas performance and availability, in the form of a policy. Virtual SAN ensures that thevirtual machines deployed to Virtual SAN datastores are assigned at least one virtualmachine storage policy.
Once assigned, the storage policy requirements are then pushed down to the VirtualSAN layer when a virtual machine is being created. The virtual device is distributedacross the Virtual SAN datastore to meet the performance and availability requirements.
When you know the storage requirements of your virtual machines, you can create astorage policy referencing capabilities that the datastore advertises.
You can create several policies to capture different types or classes of requirements.
Storage based Policy Management
Virtual SAN 6.2 adds a number of new Storage Policies, namely Disable objectchecksum, Failure tolerance method and IOPs limit for object.
We are giving a brief description of each of the Storage Policies here.
Number of disk stripes per object - The number of capacity devices across whicheach replica of a virtual machine object is striped. A value higher than 1 might result inbetter performance, but also results in higher use of system resources.
Flash read cache reservation - Flash capacity reserved as read cache for the virtualmachine object. Specified as a percentage of the logical size of the virtual machine disk(vmdk) object. Reserved flash capacity cannot be used by other objects. Unreservedflash is shared fairly among all objects. This option should be used only to addressspecific performance issues.
Number of failures to tolerate - Defines the number of host and device failures avirtual machine object can tolerate. For n failures tolerated, n+1 copies of the virtualmachine object are created and 2*n+1 hosts contributing storage are required.
Force provisioning - If the option is set to Yes, the object will be provisioned even ifthe policy specified in the storage policy is not satisfiable by the datastore. Use thisparameter in bootstrapping scenarios and during an outage when standard provisioningis no longer possible.
Object space reservation - Percentage of the logical size of the virtual machine disk(vmdk) object that should be reserved, or thick provisioned when deploying virtualmachines.
HOL-SDC-1608-SpringRelease
Page 74HOL-SDC-1608-SpringRelease
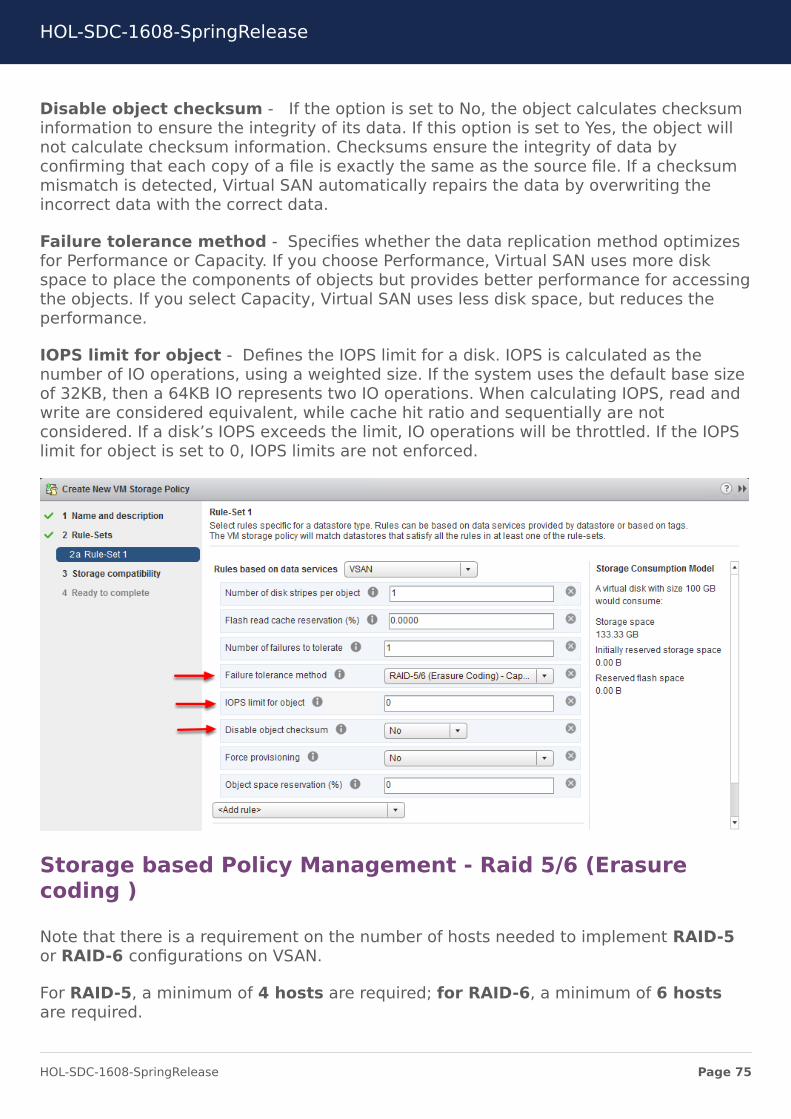
Disable object checksum - If the option is set to No, the object calculates checksuminformation to ensure the integrity of its data. If this option is set to Yes, the object willnot calculate checksum information. Checksums ensure the integrity of data byconfirming that each copy of a file is exactly the same as the source file. If a checksummismatch is detected, Virtual SAN automatically repairs the data by overwriting theincorrect data with the correct data.
Failure tolerance method - Specifies whether the data replication method optimizesfor Performance or Capacity. If you choose Performance, Virtual SAN uses more diskspace to place the components of objects but provides better performance for accessingthe objects. If you select Capacity, Virtual SAN uses less disk space, but reduces theperformance.
IOPS limit for object - Defines the IOPS limit for a disk. IOPS is calculated as thenumber of IO operations, using a weighted size. If the system uses the default base sizeof 32KB, then a 64KB IO represents two IO operations. When calculating IOPS, read andwrite are considered equivalent, while cache hit ratio and sequentially are notconsidered. If a disk’s IOPS exceeds the limit, IO operations will be throttled. If the IOPSlimit for object is set to 0, IOPS limits are not enforced.
Storage based Policy Management - Raid 5/6 (Erasurecoding )
Note that there is a requirement on the number of hosts needed to implement RAID-5or RAID-6 configurations on VSAN.
For RAID-5, a minimum of 4 hosts are required; for RAID-6, a minimum of 6 hostsare required.
HOL-SDC-1608-SpringRelease
Page 75HOL-SDC-1608-SpringRelease
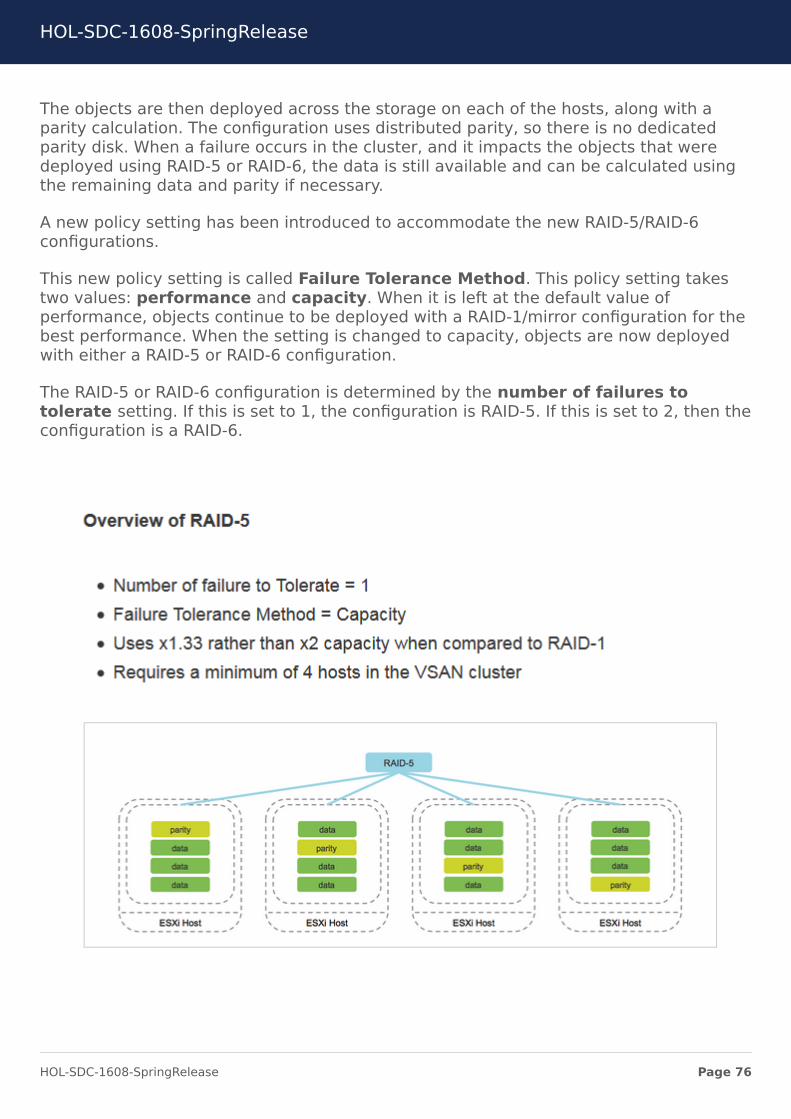
The objects are then deployed across the storage on each of the hosts, along with aparity calculation. The configuration uses distributed parity, so there is no dedicatedparity disk. When a failure occurs in the cluster, and it impacts the objects that weredeployed using RAID-5 or RAID-6, the data is still available and can be calculated usingthe remaining data and parity if necessary.
A new policy setting has been introduced to accommodate the new RAID-5/RAID-6configurations.
This new policy setting is called Failure Tolerance Method. This policy setting takestwo values: performance and capacity. When it is left at the default value ofperformance, objects continue to be deployed with a RAID-1/mirror configuration for thebest performance. When the setting is changed to capacity, objects are now deployedwith either a RAID-5 or RAID-6 configuration.
The RAID-5 or RAID-6 configuration is determined by the number of failures totolerate setting. If this is set to 1, the configuration is RAID-5. If this is set to 2, then theconfiguration is a RAID-6.
HOL-SDC-1608-SpringRelease
Page 76HOL-SDC-1608-SpringRelease
Storage based Policy Management - Raid 5/6 (Erasurecoding )
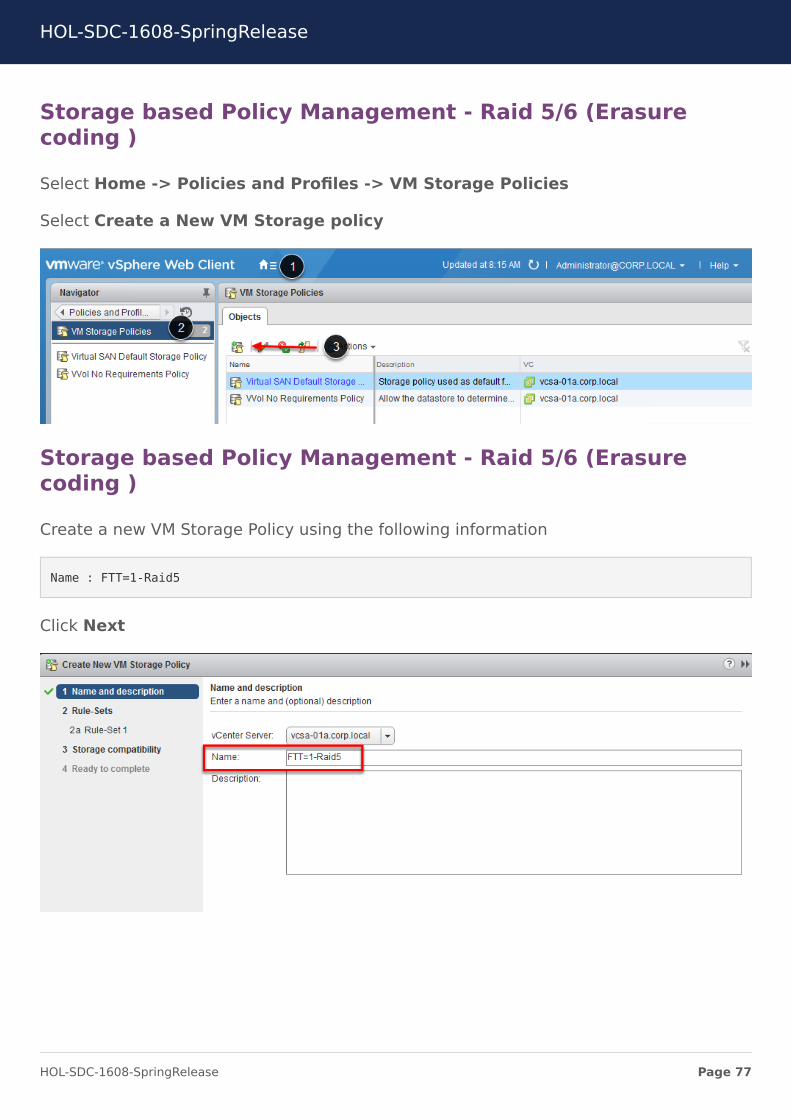
Select Home -> Policies and Profiles -> VM Storage Policies
Select Create a New VM Storage policy
Storage based Policy Management - Raid 5/6 (Erasurecoding )
Create a new VM Storage Policy using the following information
Name : FTT=1-Raid5
Click Next
HOL-SDC-1608-SpringRelease
Page 77HOL-SDC-1608-SpringRelease
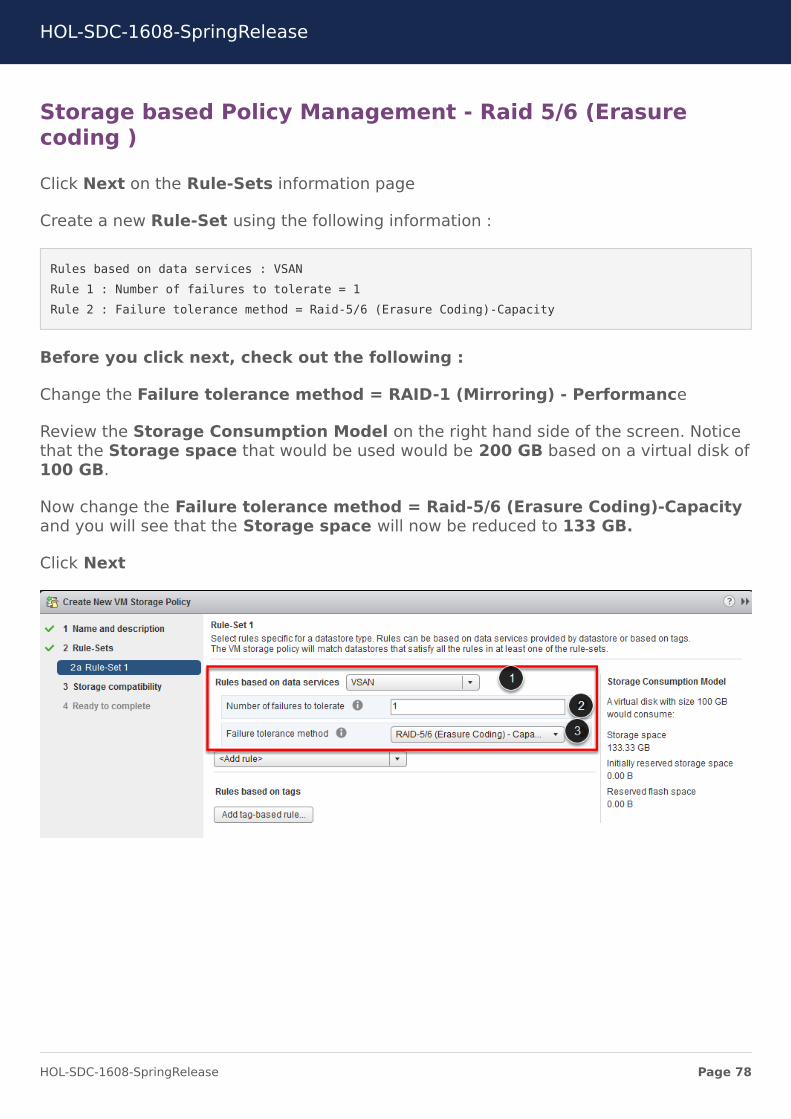
Storage based Policy Management - Raid 5/6 (Erasurecoding )
Click Next on the Rule-Sets information page
Create a new Rule-Set using the following information :
Rules based on data services : VSANRule 1 : Number of failures to tolerate = 1Rule 2 : Failure tolerance method = Raid-5/6 (Erasure Coding)-Capacity
Before you click next, check out the following :
Change the Failure tolerance method = RAID-1 (Mirroring) - Performance
Review the Storage Consumption Model on the right hand side of the screen. Noticethat the Storage space that would be used would be 200 GB based on a virtual disk of100 GB.
Now change the Failure tolerance method = Raid-5/6 (Erasure Coding)-Capacityand you will see that the Storage space will now be reduced to 133 GB.
Click Next
HOL-SDC-1608-SpringRelease
Page 78HOL-SDC-1608-SpringRelease

Storage based Policy Management
The Storage compatibility will be determined based on the VM Storage Policy.
Here we can see that the vsanDatastore is compatible with the VM Storage Policythat we are about to create.
Click Next
Storage based Policy Management - Raid 5/6 (Erasurecoding )
Review the VM Storage Policy Settings
Click Finish
HOL-SDC-1608-SpringRelease
Page 79HOL-SDC-1608-SpringRelease
Storage based Policy Management - Raid 5/6 (Erasurecoding )
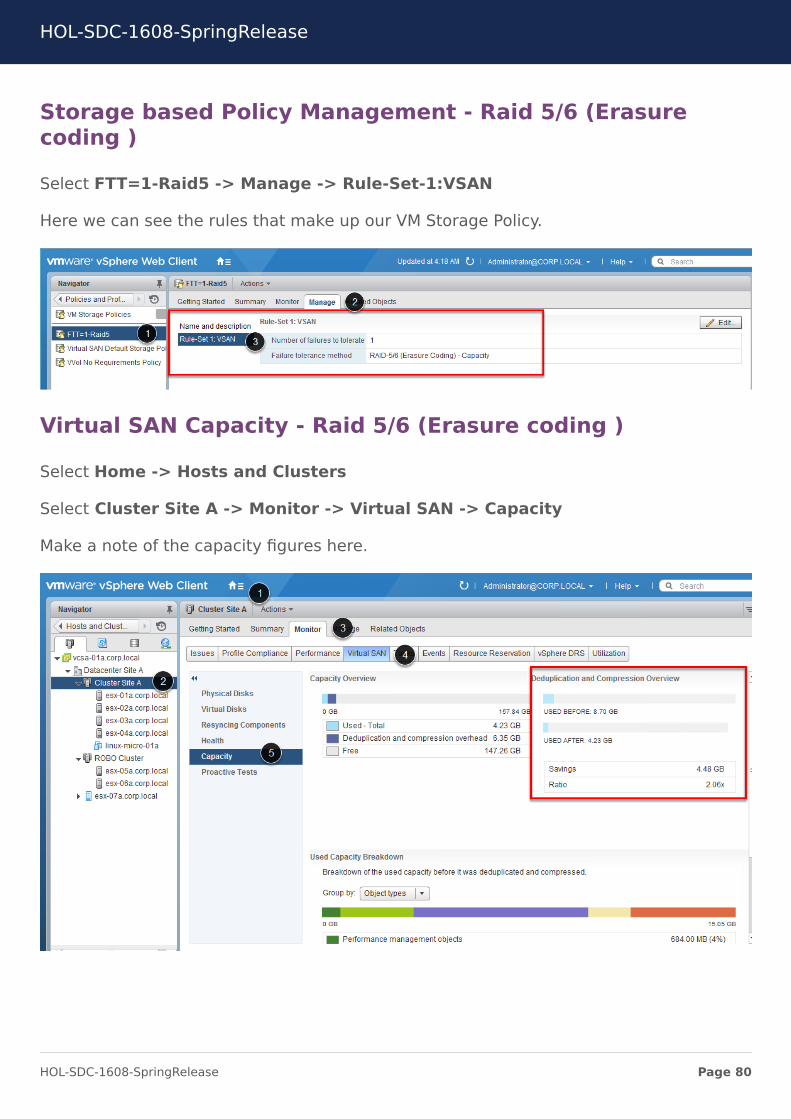
Select FTT=1-Raid5 -> Manage -> Rule-Set-1:VSAN
Here we can see the rules that make up our VM Storage Policy.
Virtual SAN Capacity - Raid 5/6 (Erasure coding )
Select Home -> Hosts and Clusters
Select Cluster Site A -> Monitor -> Virtual SAN -> Capacity
Make a note of the capacity figures here.
HOL-SDC-1608-SpringRelease
Page 80HOL-SDC-1608-SpringRelease
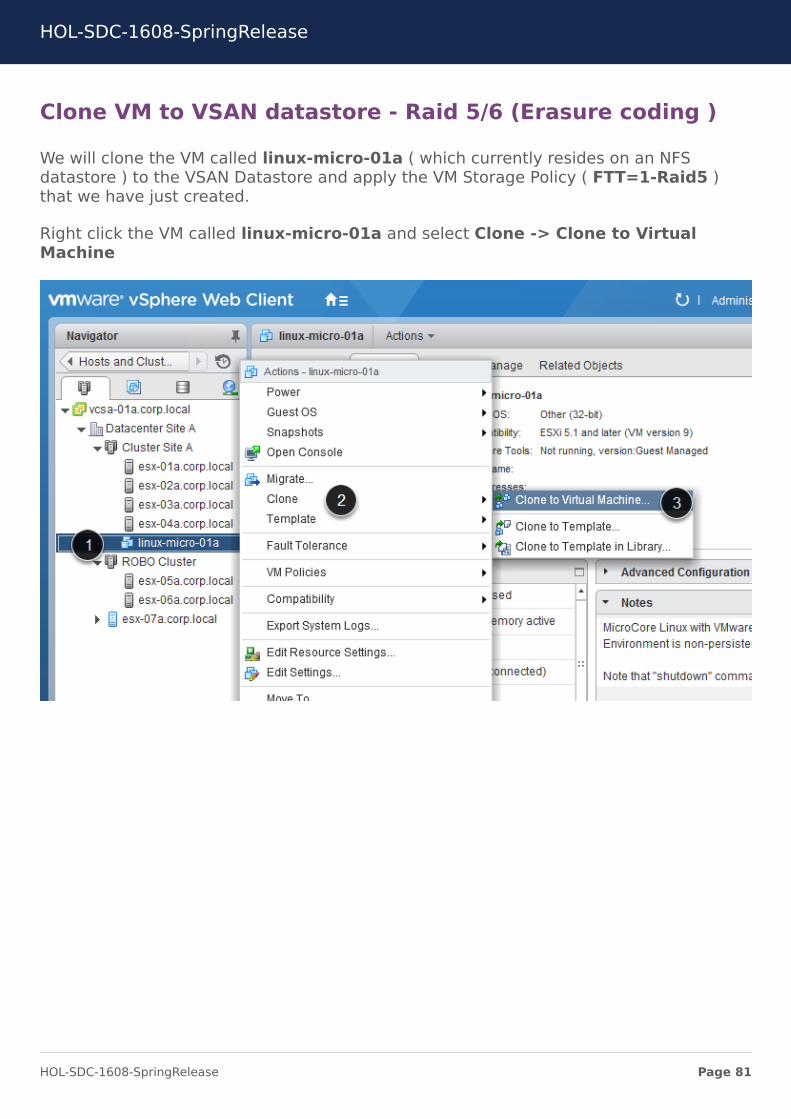
Clone VM to VSAN datastore - Raid 5/6 (Erasure coding )
We will clone the VM called linux-micro-01a ( which currently resides on an NFSdatastore ) to the VSAN Datastore and apply the VM Storage Policy ( FTT=1-Raid5 )that we have just created.
Right click the VM called linux-micro-01a and select Clone -> Clone to VirtualMachine
HOL-SDC-1608-SpringRelease
Page 81HOL-SDC-1608-SpringRelease
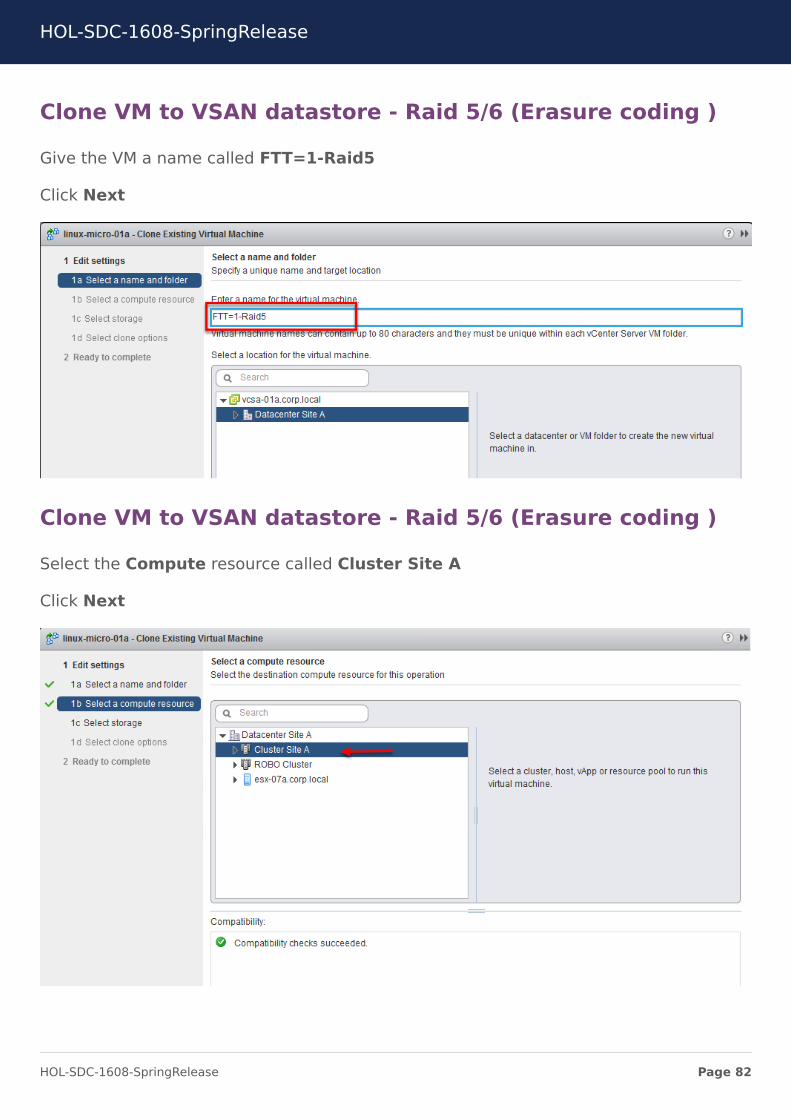
Clone VM to VSAN datastore - Raid 5/6 (Erasure coding )
Give the VM a name called FTT=1-Raid5
Click Next
Clone VM to VSAN datastore - Raid 5/6 (Erasure coding )
Select the Compute resource called Cluster Site A
Click Next
HOL-SDC-1608-SpringRelease
Page 82HOL-SDC-1608-SpringRelease
Clone VM to VSAN datastore - Raid 5/6 (Erasure coding )
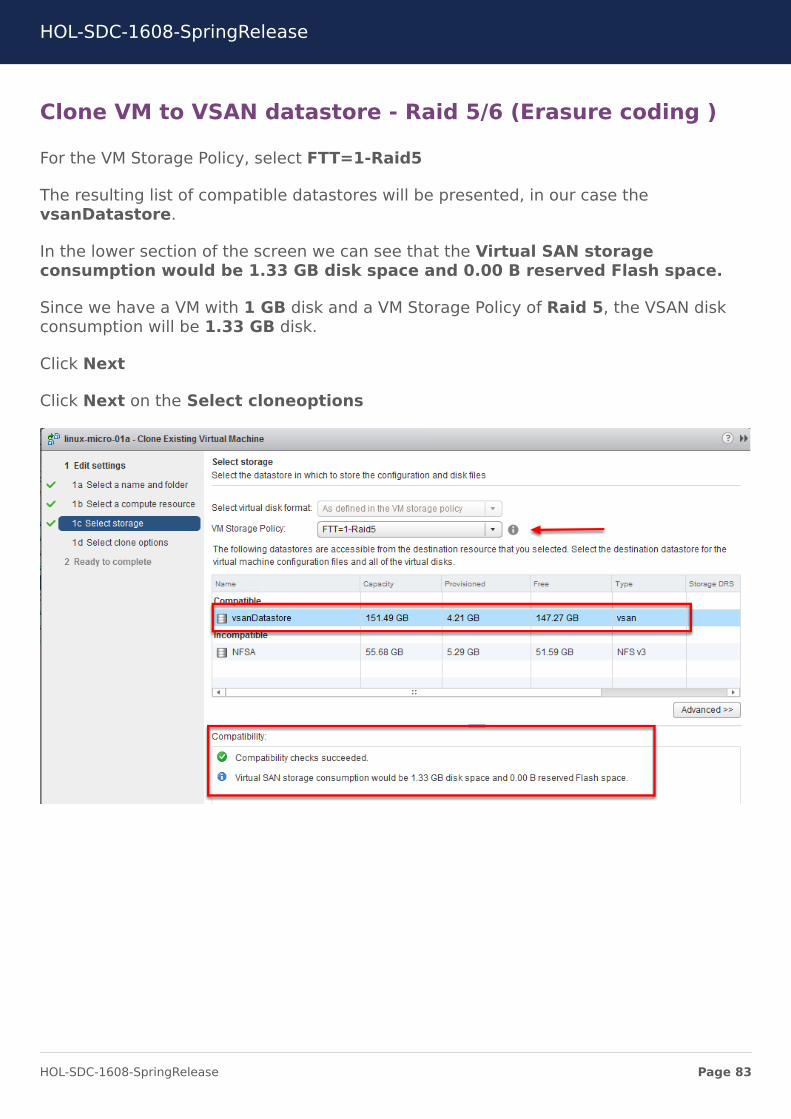
For the VM Storage Policy, select FTT=1-Raid5
The resulting list of compatible datastores will be presented, in our case thevsanDatastore.
In the lower section of the screen we can see that the Virtual SAN storageconsumption would be 1.33 GB disk space and 0.00 B reserved Flash space.
Since we have a VM with 1 GB disk and a VM Storage Policy of Raid 5, the VSAN diskconsumption will be 1.33 GB disk.
Click Next
Click Next on the Select cloneoptions
HOL-SDC-1608-SpringRelease
Page 83HOL-SDC-1608-SpringRelease
Clone VM to VSAN datastore - Raid 5/6 (Erasure coding )
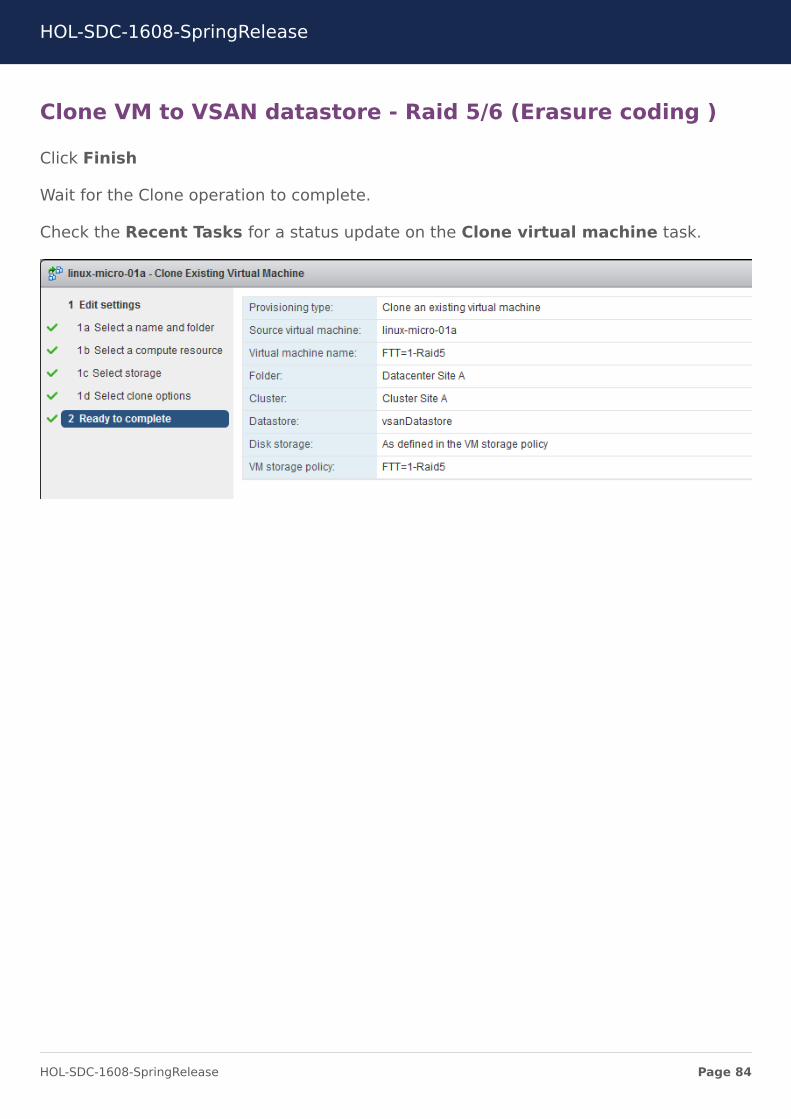
Click Finish
Wait for the Clone operation to complete.
Check the Recent Tasks for a status update on the Clone virtual machine task.
HOL-SDC-1608-SpringRelease
Page 84HOL-SDC-1608-SpringRelease
Clone VM to VSAN datastore - Raid 5/6 (Erasure coding )
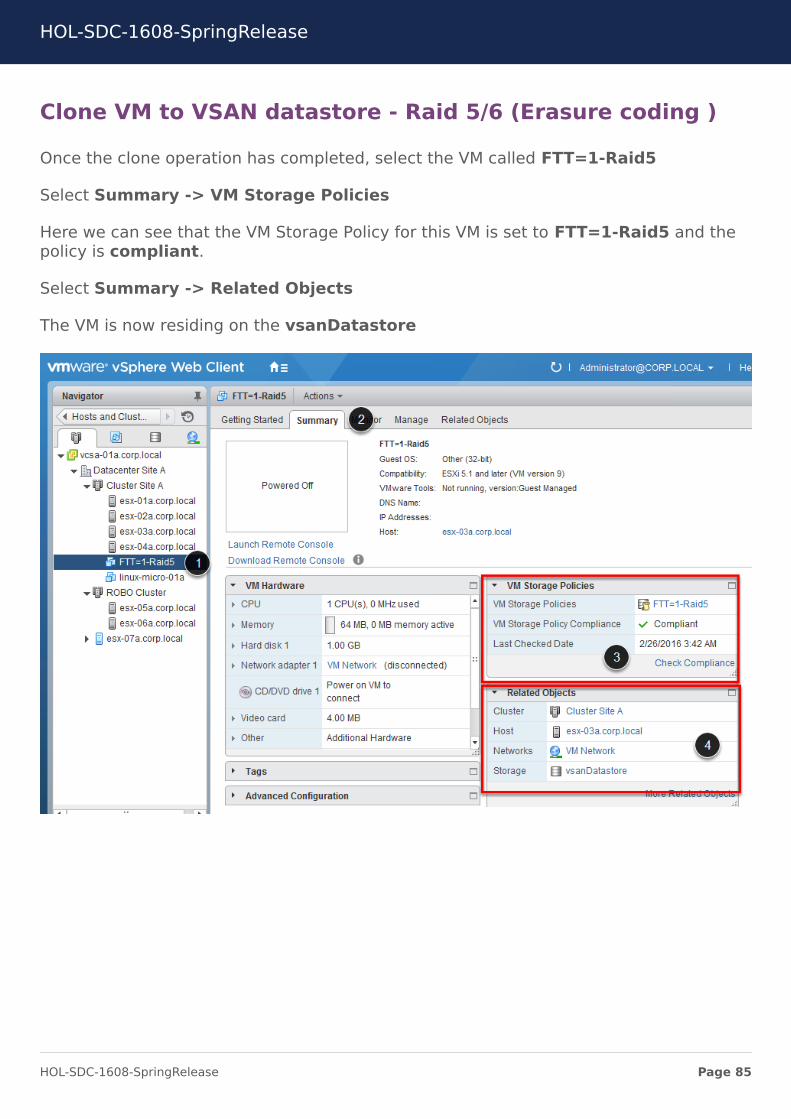
Once the clone operation has completed, select the VM called FTT=1-Raid5
Select Summary -> VM Storage Policies
Here we can see that the VM Storage Policy for this VM is set to FTT=1-Raid5 and thepolicy is compliant.
Select Summary -> Related Objects
The VM is now residing on the vsanDatastore
HOL-SDC-1608-SpringRelease
Page 85HOL-SDC-1608-SpringRelease
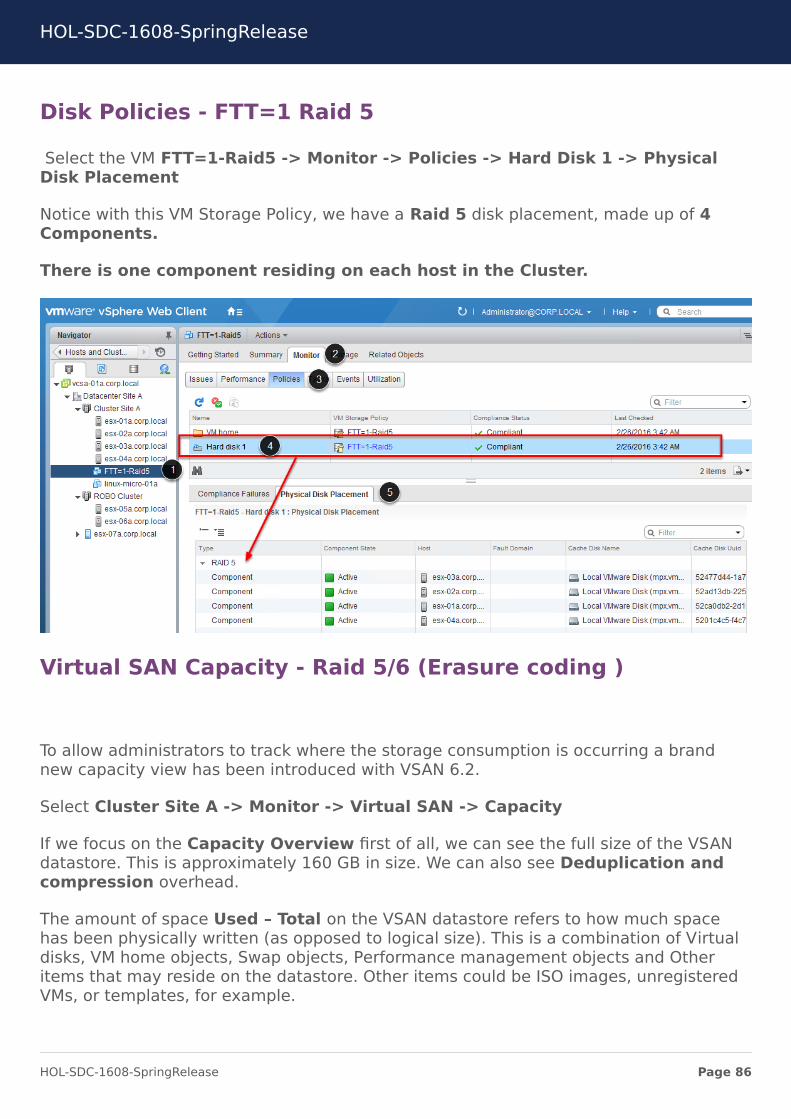
Disk Policies - FTT=1 Raid 5
Select the VM FTT=1-Raid5 -> Monitor -> Policies -> Hard Disk 1 -> PhysicalDisk Placement
Notice with this VM Storage Policy, we have a Raid 5 disk placement, made up of 4Components.
There is one component residing on each host in the Cluster.
Virtual SAN Capacity - Raid 5/6 (Erasure coding )
To allow administrators to track where the storage consumption is occurring a brandnew capacity view has been introduced with VSAN 6.2.
Select Cluster Site A -> Monitor -> Virtual SAN -> Capacity
If we focus on the Capacity Overview first of all, we can see the full size of the VSANdatastore. This is approximately 160 GB in size. We can also see Deduplication andcompression overhead.
The amount of space Used – Total on the VSAN datastore refers to how much spacehas been physically written (as opposed to logical size). This is a combination of Virtualdisks, VM home objects, Swap objects, Performance management objects and Otheritems that may reside on the datastore. Other items could be ISO images, unregisteredVMs, or templates, for example.
HOL-SDC-1608-SpringRelease
Page 86HOL-SDC-1608-SpringRelease
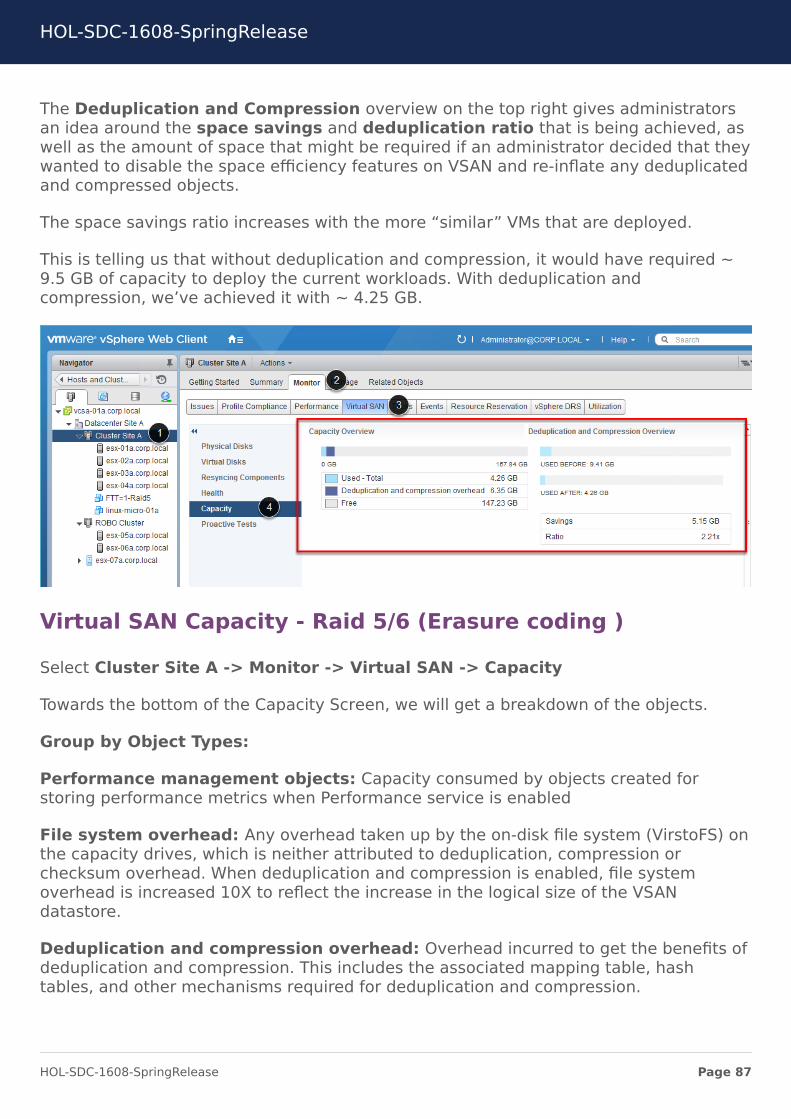
The Deduplication and Compression overview on the top right gives administratorsan idea around the space savings and deduplication ratio that is being achieved, aswell as the amount of space that might be required if an administrator decided that theywanted to disable the space efficiency features on VSAN and re-inflate any deduplicatedand compressed objects.
The space savings ratio increases with the more “similar” VMs that are deployed.
This is telling us that without deduplication and compression, it would have required ~9.5 GB of capacity to deploy the current workloads. With deduplication andcompression, we’ve achieved it with ~ 4.25 GB.
Virtual SAN Capacity - Raid 5/6 (Erasure coding )
Select Cluster Site A -> Monitor -> Virtual SAN -> Capacity
Towards the bottom of the Capacity Screen, we will get a breakdown of the objects.
Group by Object Types:
Performance management objects: Capacity consumed by objects created forstoring performance metrics when Performance service is enabled
File system overhead: Any overhead taken up by the on-disk file system (VirstoFS) onthe capacity drives, which is neither attributed to deduplication, compression orchecksum overhead. When deduplication and compression is enabled, file systemoverhead is increased 10X to reflect the increase in the logical size of the VSANdatastore.
Deduplication and compression overhead: Overhead incurred to get the benefits ofdeduplication and compression. This includes the associated mapping table, hashtables, and other mechanisms required for deduplication and compression.
HOL-SDC-1608-SpringRelease
Page 87HOL-SDC-1608-SpringRelease
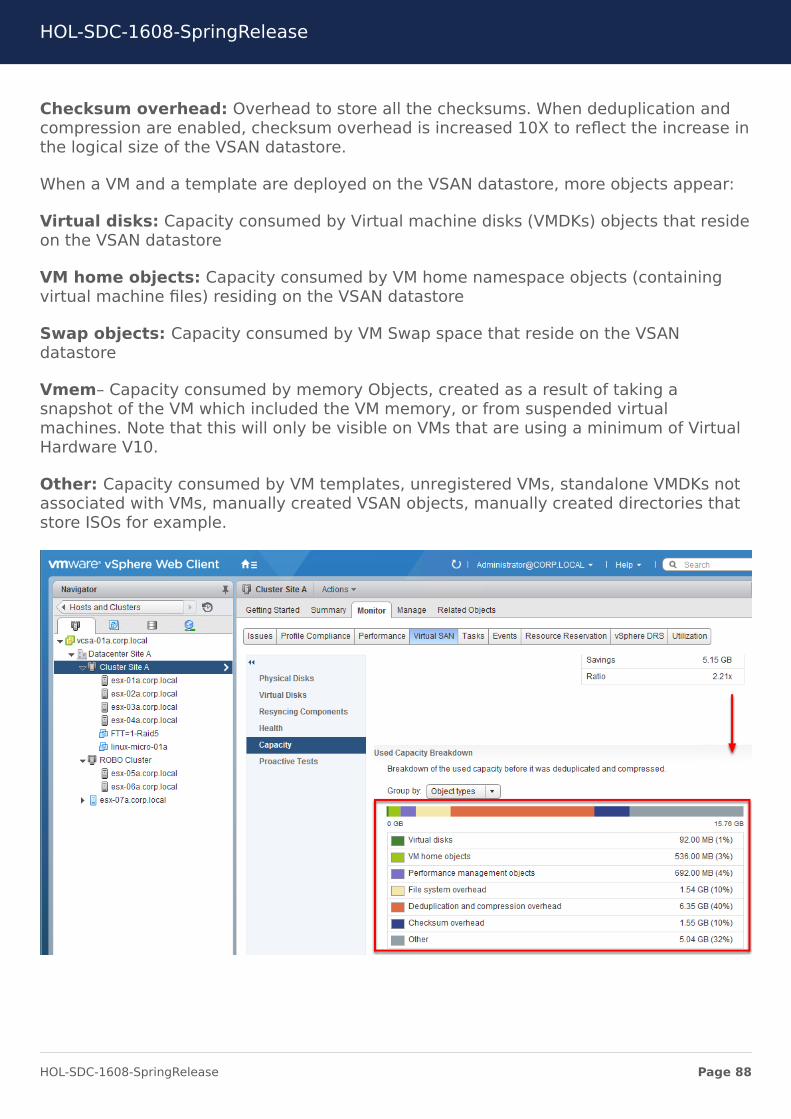
Checksum overhead: Overhead to store all the checksums. When deduplication andcompression are enabled, checksum overhead is increased 10X to reflect the increase inthe logical size of the VSAN datastore.
When a VM and a template are deployed on the VSAN datastore, more objects appear:
Virtual disks: Capacity consumed by Virtual machine disks (VMDKs) objects that resideon the VSAN datastore
VM home objects: Capacity consumed by VM home namespace objects (containingvirtual machine files) residing on the VSAN datastore
Swap objects: Capacity consumed by VM Swap space that reside on the VSANdatastore
Vmem– Capacity consumed by memory Objects, created as a result of taking asnapshot of the VM which included the VM memory, or from suspended virtualmachines. Note that this will only be visible on VMs that are using a minimum of VirtualHardware V10.
Other: Capacity consumed by VM templates, unregistered VMs, standalone VMDKs notassociated with VMs, manually created VSAN objects, manually created directories thatstore ISOs for example.
HOL-SDC-1608-SpringRelease
Page 88HOL-SDC-1608-SpringRelease
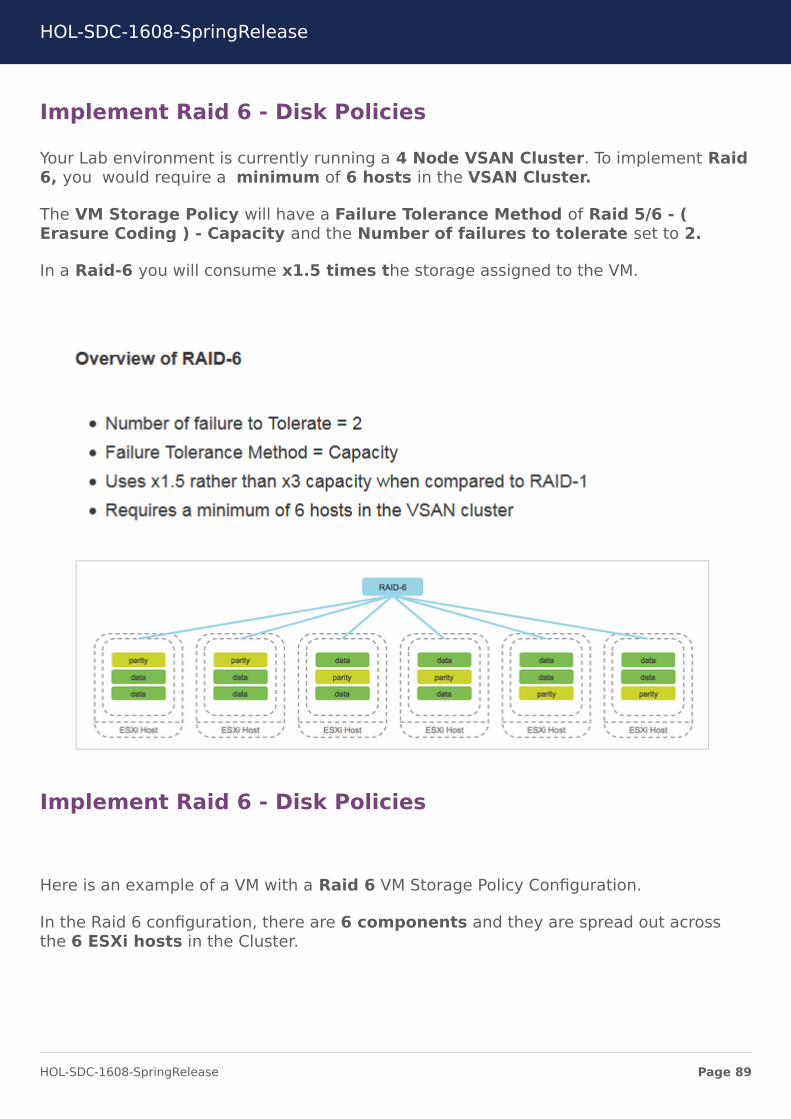
Implement Raid 6 - Disk Policies
Your Lab environment is currently running a 4 Node VSAN Cluster. To implement Raid6, you would require a minimum of 6 hosts in the VSAN Cluster.
The VM Storage Policy will have a Failure Tolerance Method of Raid 5/6 - (Erasure Coding ) - Capacity and the Number of failures to tolerate set to 2.
In a Raid-6 you will consume x1.5 times the storage assigned to the VM.
Implement Raid 6 - Disk Policies
Here is an example of a VM with a Raid 6 VM Storage Policy Configuration.
In the Raid 6 configuration, there are 6 components and they are spread out acrossthe 6 ESXi hosts in the Cluster.
HOL-SDC-1608-SpringRelease
Page 89HOL-SDC-1608-SpringRelease
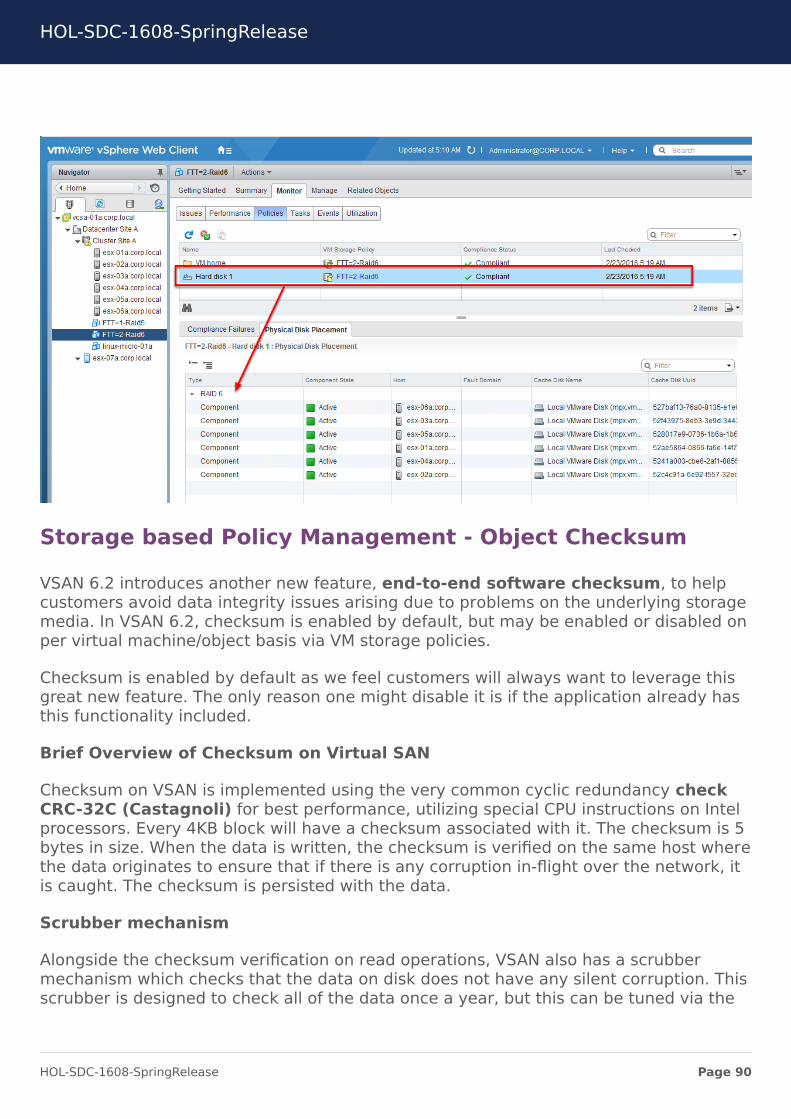
Storage based Policy Management - Object Checksum
VSAN 6.2 introduces another new feature, end-to-end software checksum, to helpcustomers avoid data integrity issues arising due to problems on the underlying storagemedia. In VSAN 6.2, checksum is enabled by default, but may be enabled or disabled onper virtual machine/object basis via VM storage policies.
Checksum is enabled by default as we feel customers will always want to leverage thisgreat new feature. The only reason one might disable it is if the application already hasthis functionality included.
Brief Overview of Checksum on Virtual SAN
Checksum on VSAN is implemented using the very common cyclic redundancy checkCRC-32C (Castagnoli) for best performance, utilizing special CPU instructions on Intelprocessors. Every 4KB block will have a checksum associated with it. The checksum is 5bytes in size. When the data is written, the checksum is verified on the same host wherethe data originates to ensure that if there is any corruption in-flight over the network, itis caught. The checksum is persisted with the data.
Scrubber mechanism
Alongside the checksum verification on read operations, VSAN also has a scrubbermechanism which checks that the data on disk does not have any silent corruption. Thisscrubber is designed to check all of the data once a year, but this can be tuned via the
HOL-SDC-1608-SpringRelease
Page 90HOL-SDC-1608-SpringRelease
advanced setting VSAN.ObjectScrubsPerYear to run more often. For instance, if youwant this to check all of the data once a week, set this to 52, but be aware that therewill be some performance overhead when this operation runs.
Create VM Storage Policy with Object Checksum disabled
In this lab we are going to simulate the new VM Storage Policy rule called ObjectChecksum. We will create 2 VM Storage Policies, one with Object Checksum enabledand one with Object Checksum disabled.
We will attach 2 disks to a VM and write a recognizable pattern to the 2 Disks. We willthen verify this pattern. We will run another tool to inject a bad pattern on a component.We will then read the data to verify the bad pattern.
With Object Checksum disabled, the bad pattern is not fixed and can be seen in theGuest OS.
With Object Checksum enabled, the bad pattern will be fixed. We will see this fromthe ESXi VMkernel Logs.
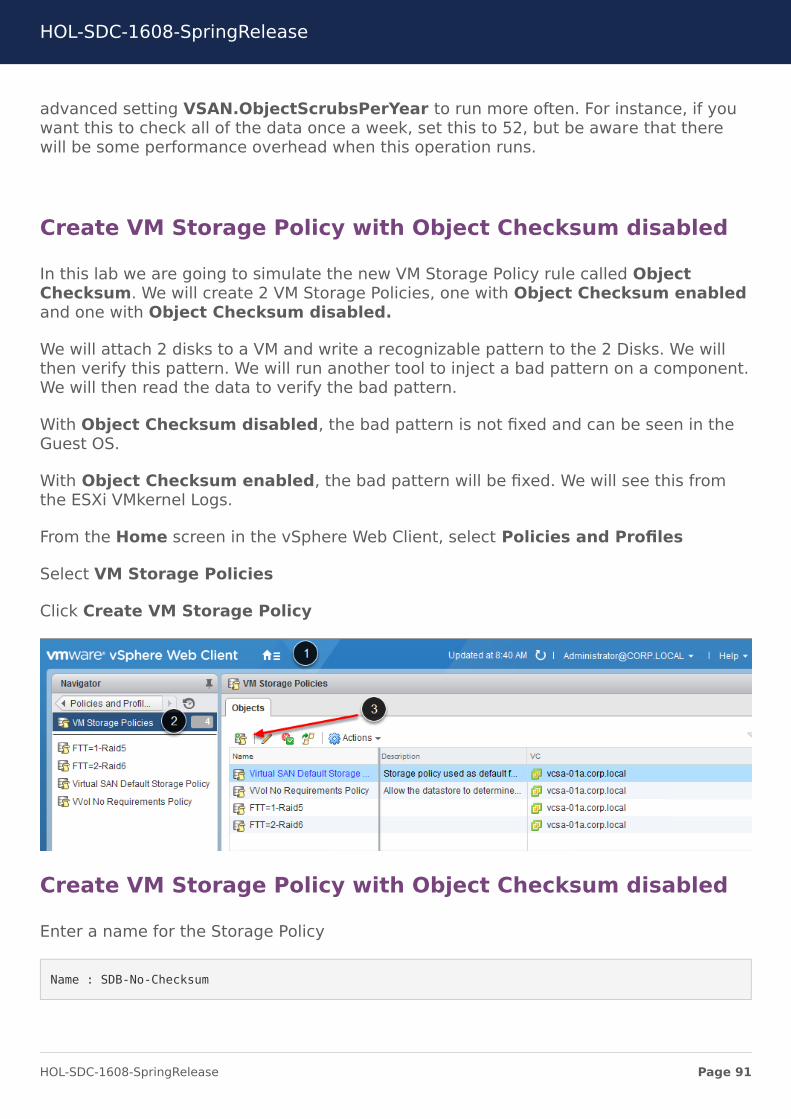
From the Home screen in the vSphere Web Client, select Policies and Profiles
Select VM Storage Policies
Click Create VM Storage Policy
Create VM Storage Policy with Object Checksum disabled
Enter a name for the Storage Policy
Name : SDB-No-Checksum
HOL-SDC-1608-SpringRelease
Page 91HOL-SDC-1608-SpringRelease

Click Next
Create VM Storage Policy with Object Checksum disabled
Click Next on the Rule-Sets
Select VSAN for the Rules based on data services
Add the following rules
Number of failures to tolerate : 1Disable object checksum : Yes
Click Next
HOL-SDC-1608-SpringRelease
Page 92HOL-SDC-1608-SpringRelease
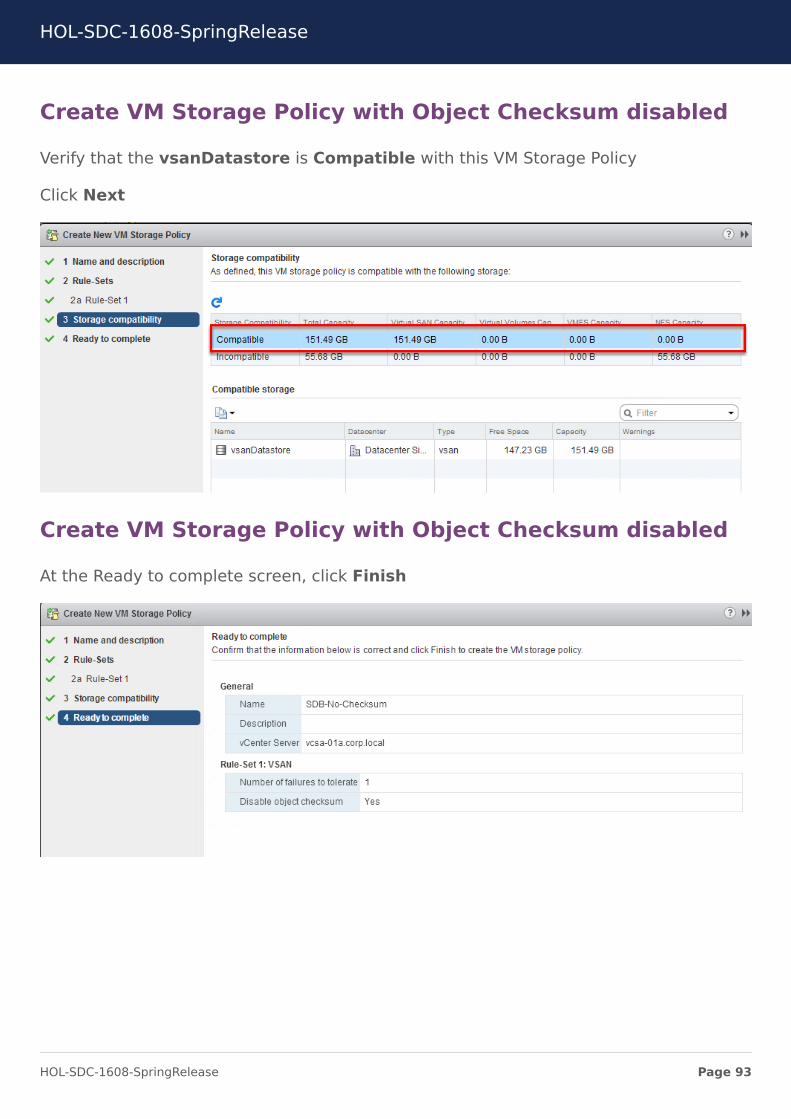
Create VM Storage Policy with Object Checksum disabled
Verify that the vsanDatastore is Compatible with this VM Storage Policy
Click Next
Create VM Storage Policy with Object Checksum disabled
At the Ready to complete screen, click Finish
HOL-SDC-1608-SpringRelease
Page 93HOL-SDC-1608-SpringRelease
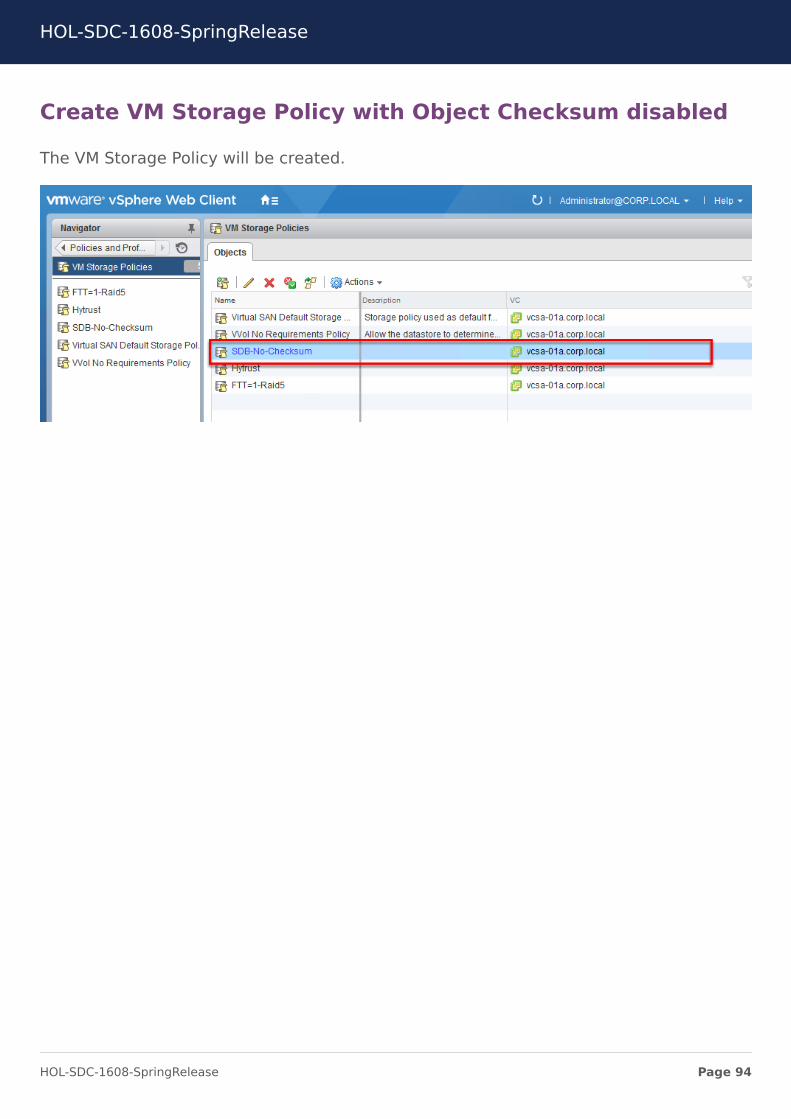
Create VM Storage Policy with Object Checksum disabled
The VM Storage Policy will be created.
HOL-SDC-1608-SpringRelease
Page 94HOL-SDC-1608-SpringRelease
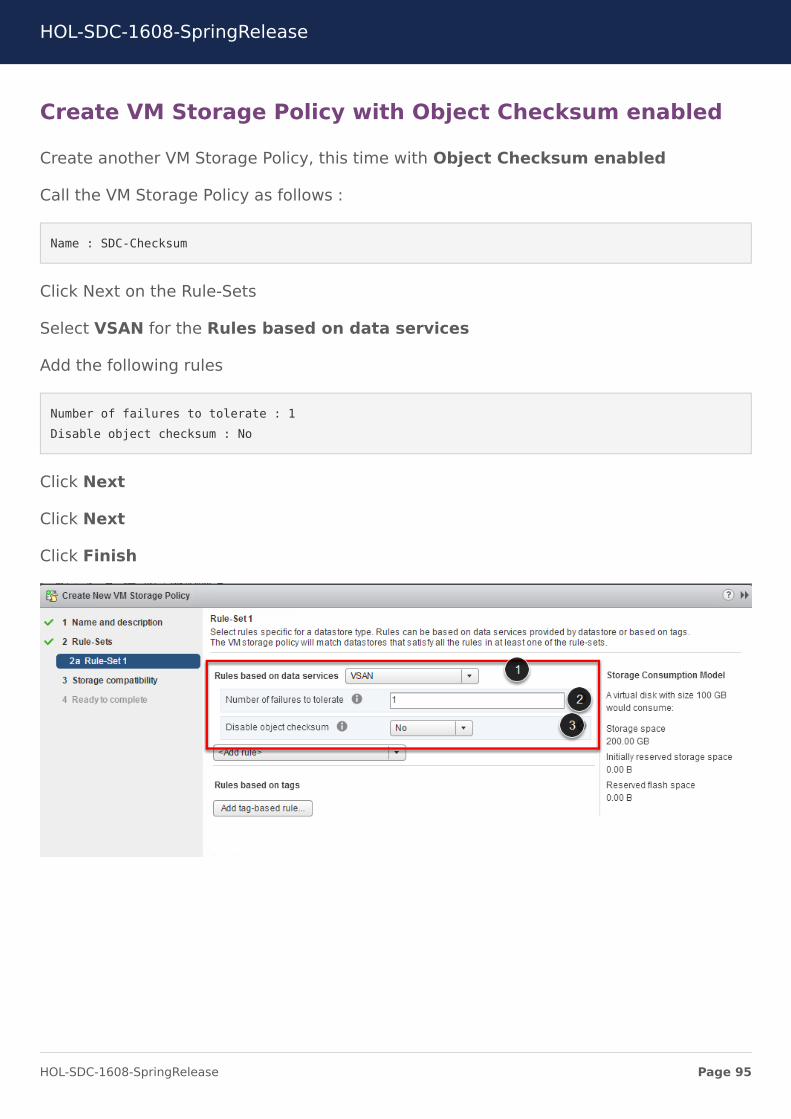
Create VM Storage Policy with Object Checksum enabled
Create another VM Storage Policy, this time with Object Checksum enabled
Call the VM Storage Policy as follows :
Name : SDC-Checksum
Click Next on the Rule-Sets
Select VSAN for the Rules based on data services
Add the following rules
Number of failures to tolerate : 1Disable object checksum : No
Click Next
Click Next
Click Finish
HOL-SDC-1608-SpringRelease
Page 95HOL-SDC-1608-SpringRelease
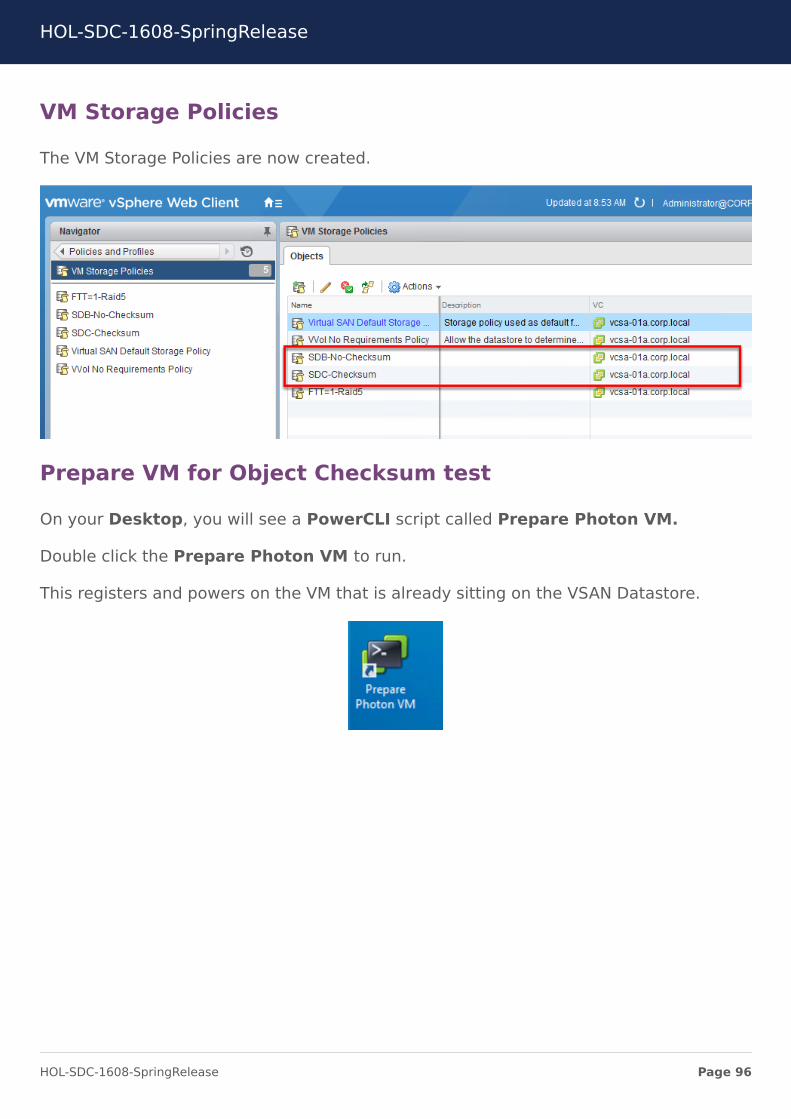
VM Storage Policies
The VM Storage Policies are now created.
Prepare VM for Object Checksum test
On your Desktop, you will see a PowerCLI script called Prepare Photon VM.
Double click the Prepare Photon VM to run.
This registers and powers on the VM that is already sitting on the VSAN Datastore.
HOL-SDC-1608-SpringRelease
Page 96HOL-SDC-1608-SpringRelease
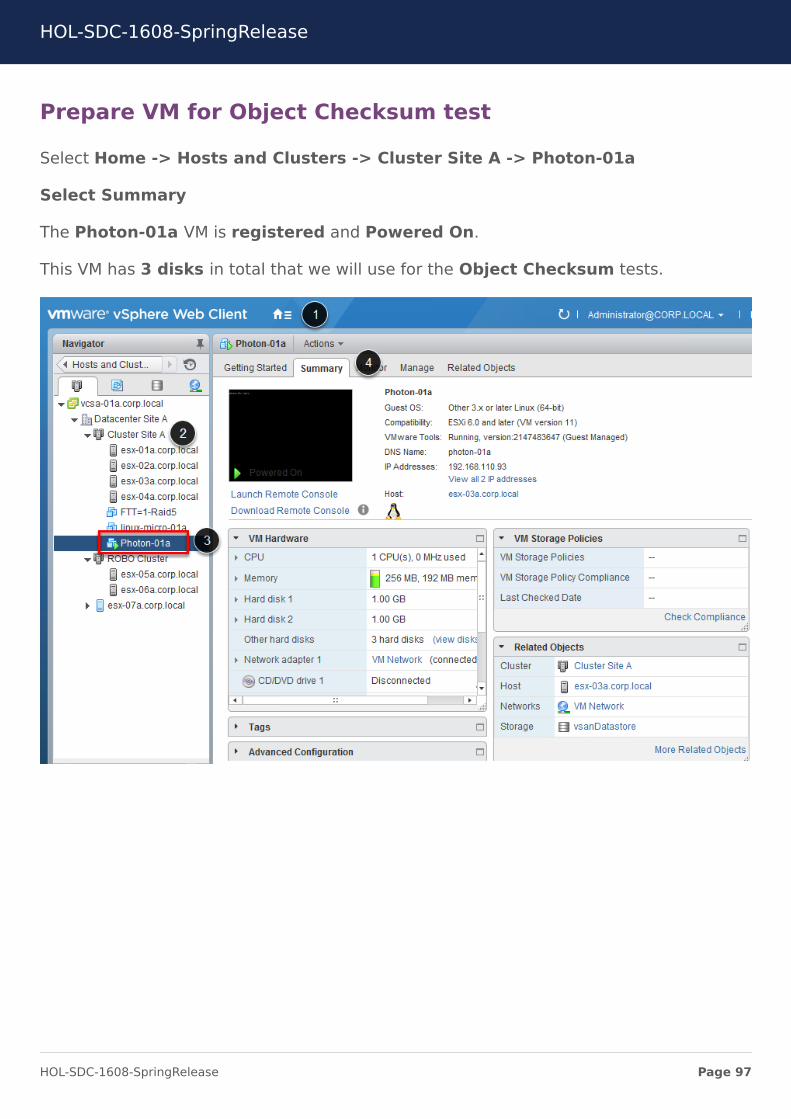
Prepare VM for Object Checksum test
Select Home -> Hosts and Clusters -> Cluster Site A -> Photon-01a
Select Summary
The Photon-01a VM is registered and Powered On.
This VM has 3 disks in total that we will use for the Object Checksum tests.
HOL-SDC-1608-SpringRelease
Page 97HOL-SDC-1608-SpringRelease
Prepare VM for the Object Checksum Test
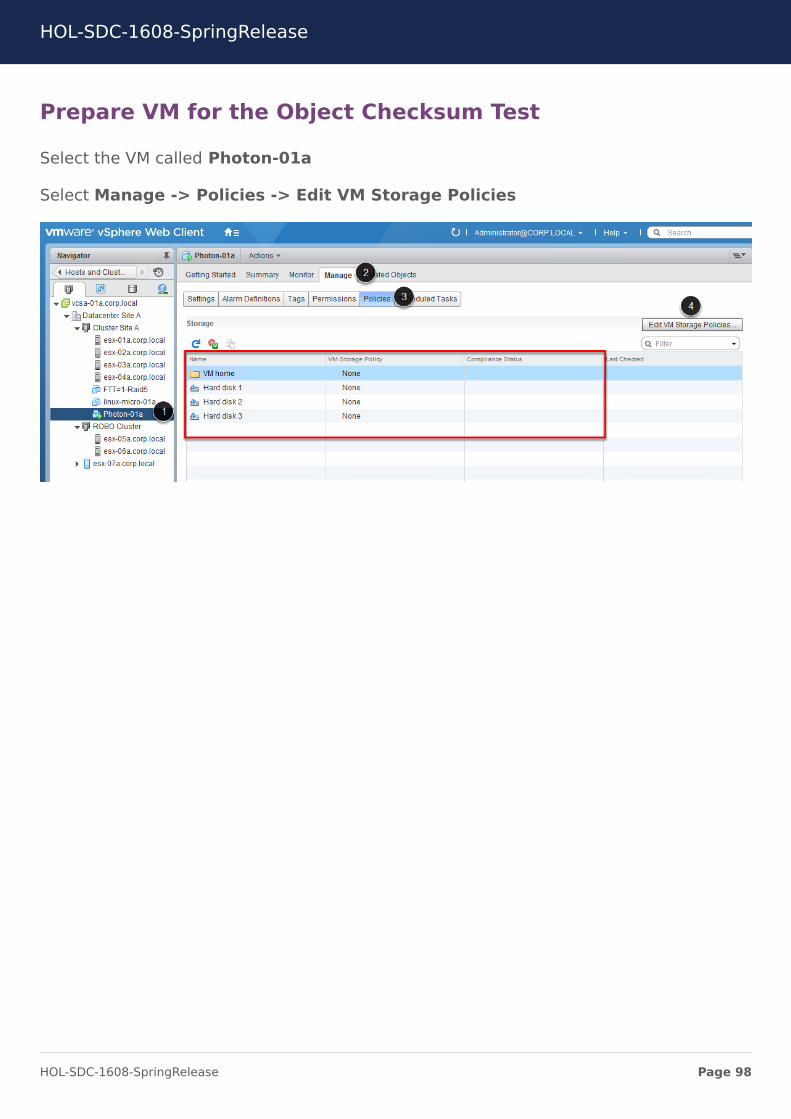
Select the VM called Photon-01a
Select Manage -> Policies -> Edit VM Storage Policies
HOL-SDC-1608-SpringRelease
Page 98HOL-SDC-1608-SpringRelease
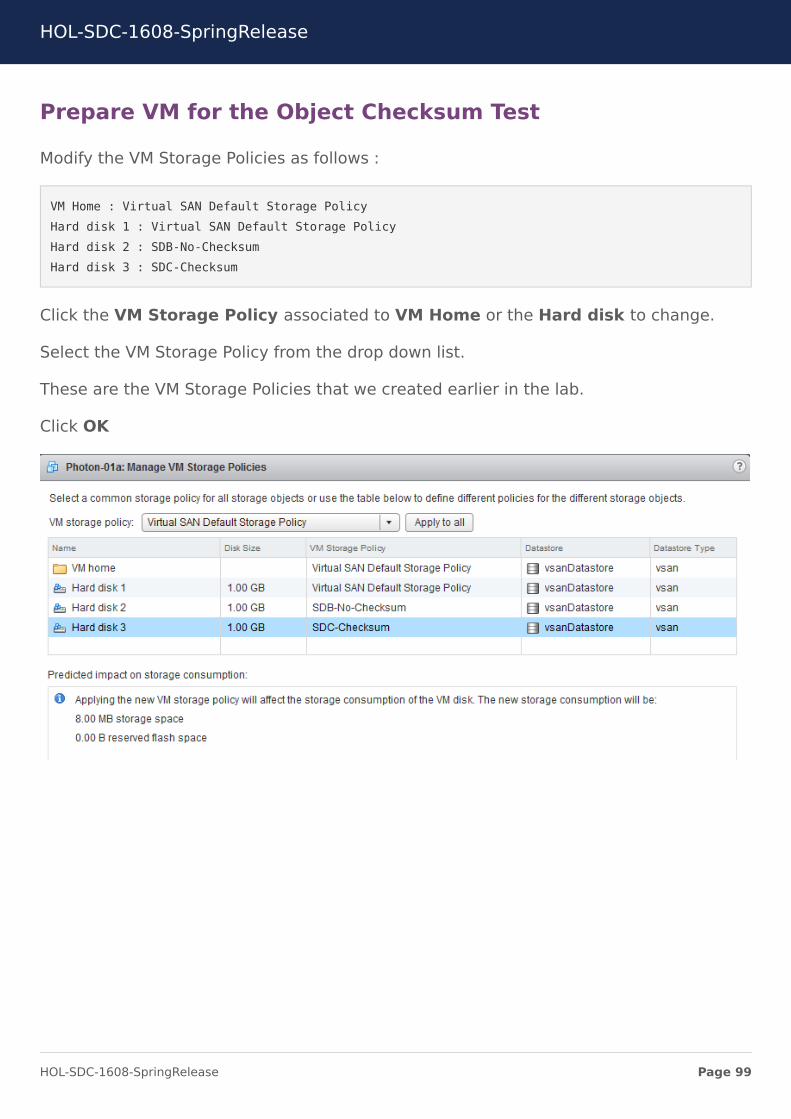
Prepare VM for the Object Checksum Test
Modify the VM Storage Policies as follows :
VM Home : Virtual SAN Default Storage PolicyHard disk 1 : Virtual SAN Default Storage PolicyHard disk 2 : SDB-No-ChecksumHard disk 3 : SDC-Checksum
Click the VM Storage Policy associated to VM Home or the Hard disk to change.
Select the VM Storage Policy from the drop down list.
These are the VM Storage Policies that we created earlier in the lab.
Click OK
HOL-SDC-1608-SpringRelease
Page 99HOL-SDC-1608-SpringRelease
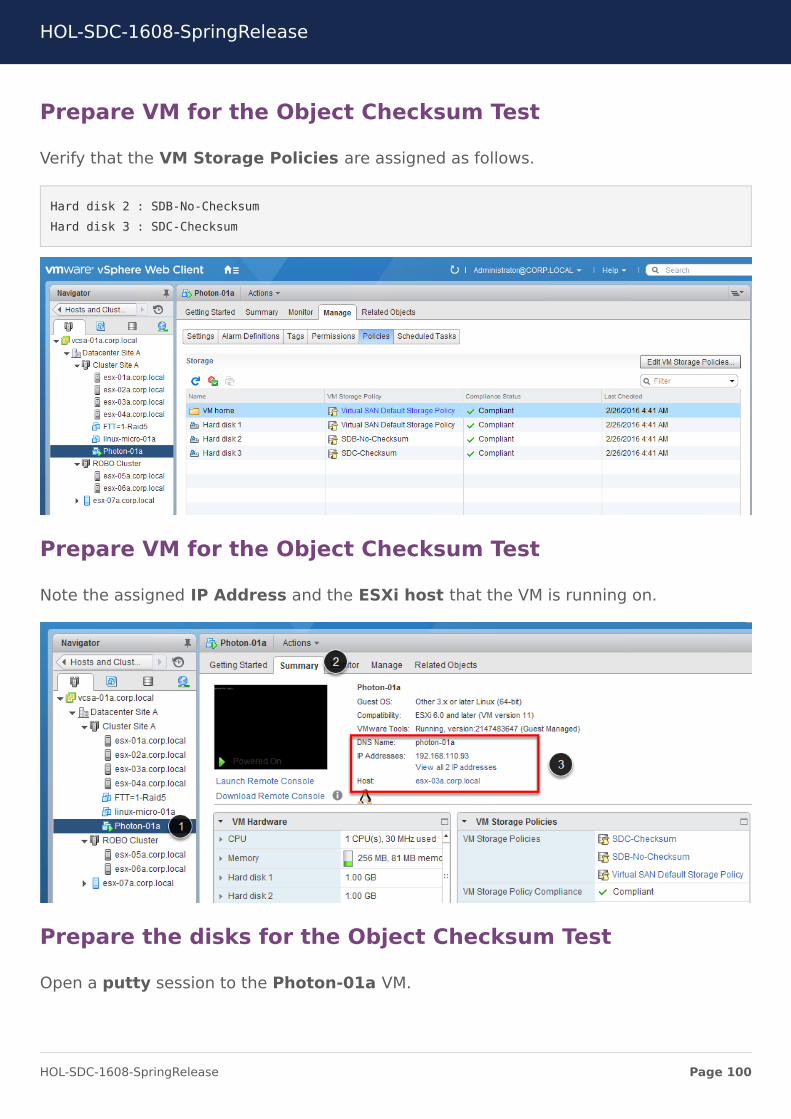
Prepare VM for the Object Checksum Test
Verify that the VM Storage Policies are assigned as follows.
Hard disk 2 : SDB-No-ChecksumHard disk 3 : SDC-Checksum
Prepare VM for the Object Checksum Test
Note the assigned IP Address and the ESXi host that the VM is running on.
Prepare the disks for the Object Checksum Test
Open a putty session to the Photon-01a VM.
HOL-SDC-1608-SpringRelease
Page 100HOL-SDC-1608-SpringRelease
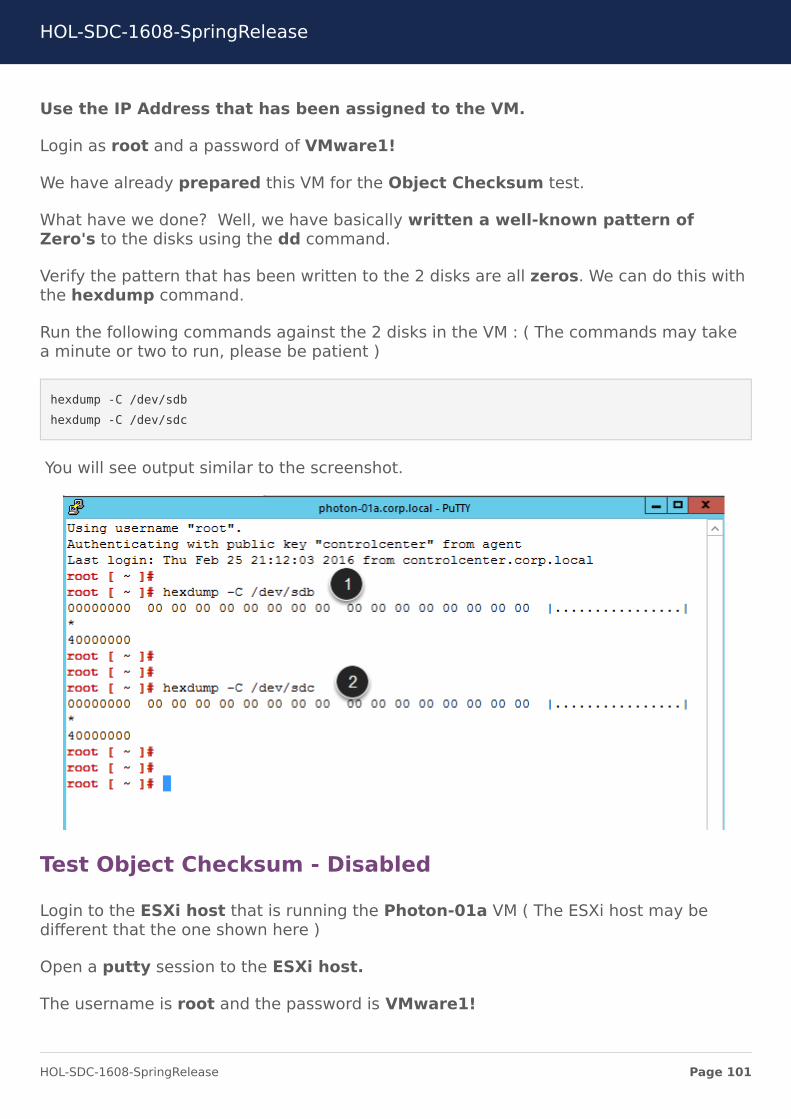
Use the IP Address that has been assigned to the VM.
Login as root and a password of VMware1!
We have already prepared this VM for the Object Checksum test.
What have we done? Well, we have basically written a well-known pattern ofZero's to the disks using the dd command.
Verify the pattern that has been written to the 2 disks are all zeros. We can do this withthe hexdump command.
Run the following commands against the 2 disks in the VM : ( The commands may takea minute or two to run, please be patient )
hexdump -C /dev/sdbhexdump -C /dev/sdc
You will see output similar to the screenshot.
Test Object Checksum - Disabled
Login to the ESXi host that is running the Photon-01a VM ( The ESXi host may bedifferent that the one shown here )
Open a putty session to the ESXi host.
The username is root and the password is VMware1!
HOL-SDC-1608-SpringRelease
Page 101HOL-SDC-1608-SpringRelease
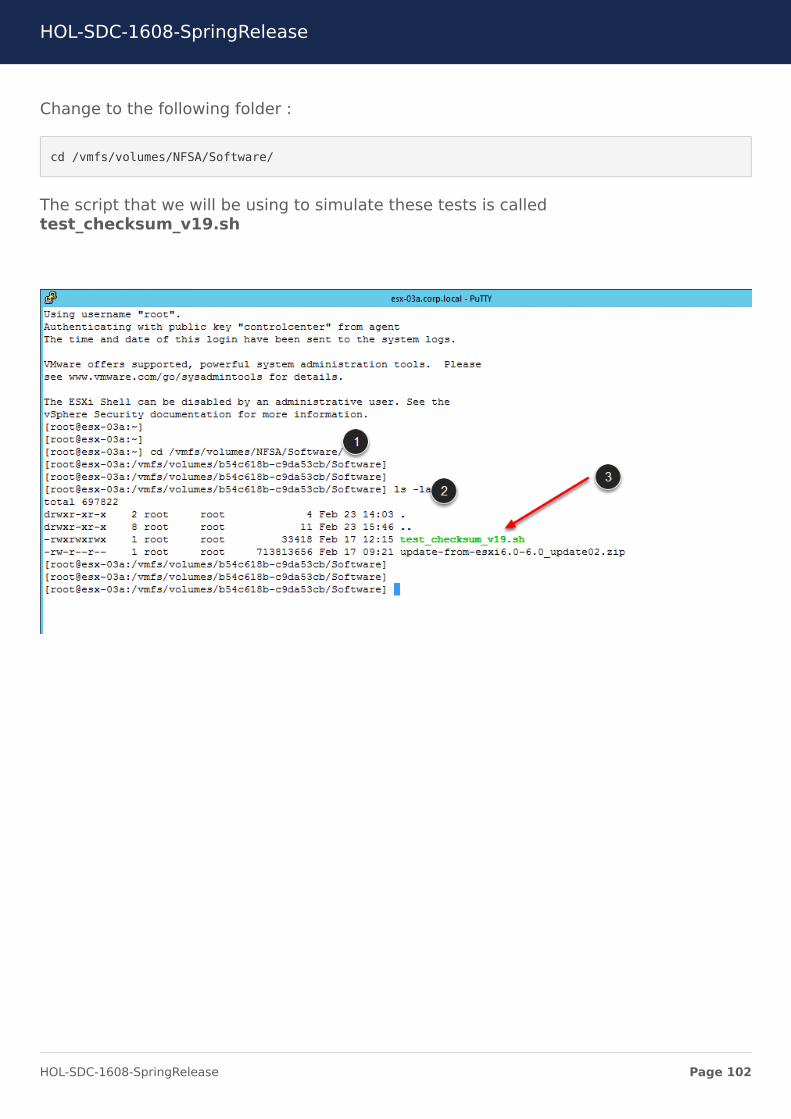
Change to the following folder :
cd /vmfs/volumes/NFSA/Software/
The script that we will be using to simulate these tests is calledtest_checksum_v19.sh
HOL-SDC-1608-SpringRelease
Page 102HOL-SDC-1608-SpringRelease

Test Object Checksum - Disabled
PLEASE NOTE : THIS TOOL is UNSUPORTED by VMware. It is used here tosimulate a VSAN 6.2 feature.
To run the script, execute the following command : ( Pay close attention to theprompts )
./test_checksum_v19.sh
Answer the following prompts :
Do you acknowledge that this tool is unsupported? [y/n] y
HOL-SDC-1608-SpringRelease
Page 103HOL-SDC-1608-SpringRelease
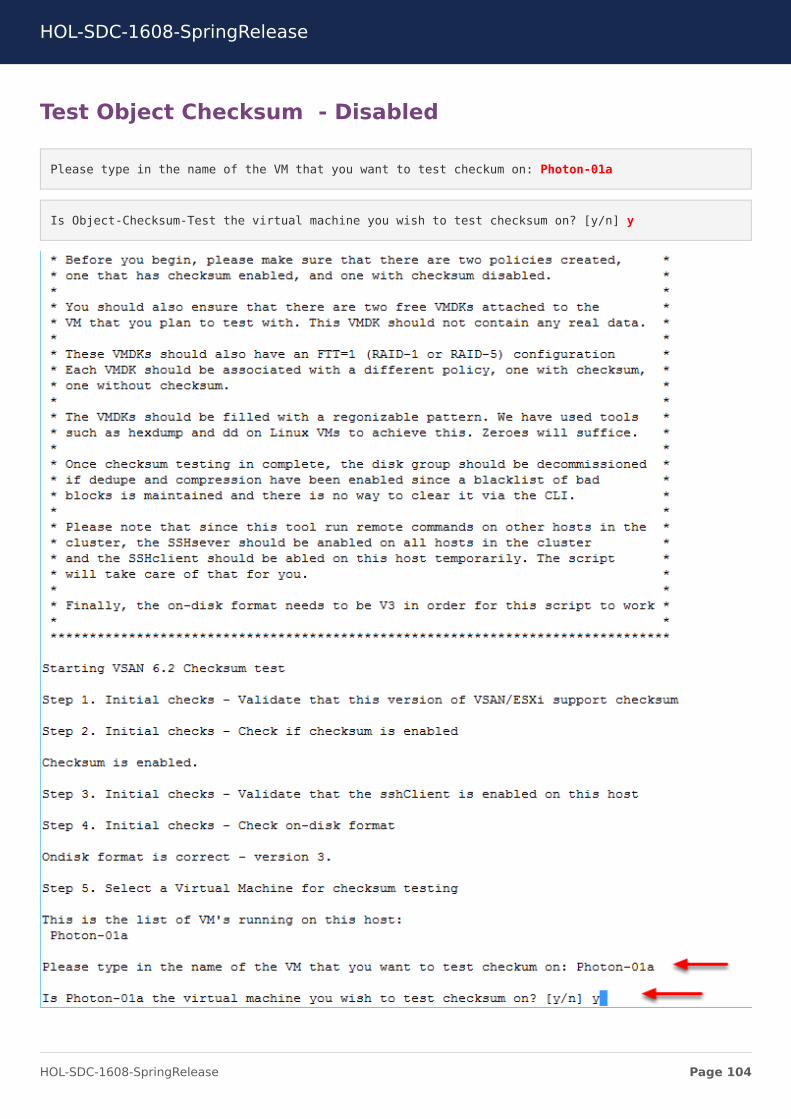
Test Object Checksum - Disabled
Please type in the name of the VM that you want to test checkum on: Photon-01a
Is Object-Checksum-Test the virtual machine you wish to test checksum on? [y/n] y
HOL-SDC-1608-SpringRelease
Page 104HOL-SDC-1608-SpringRelease
Test Object Checksum - Disabled
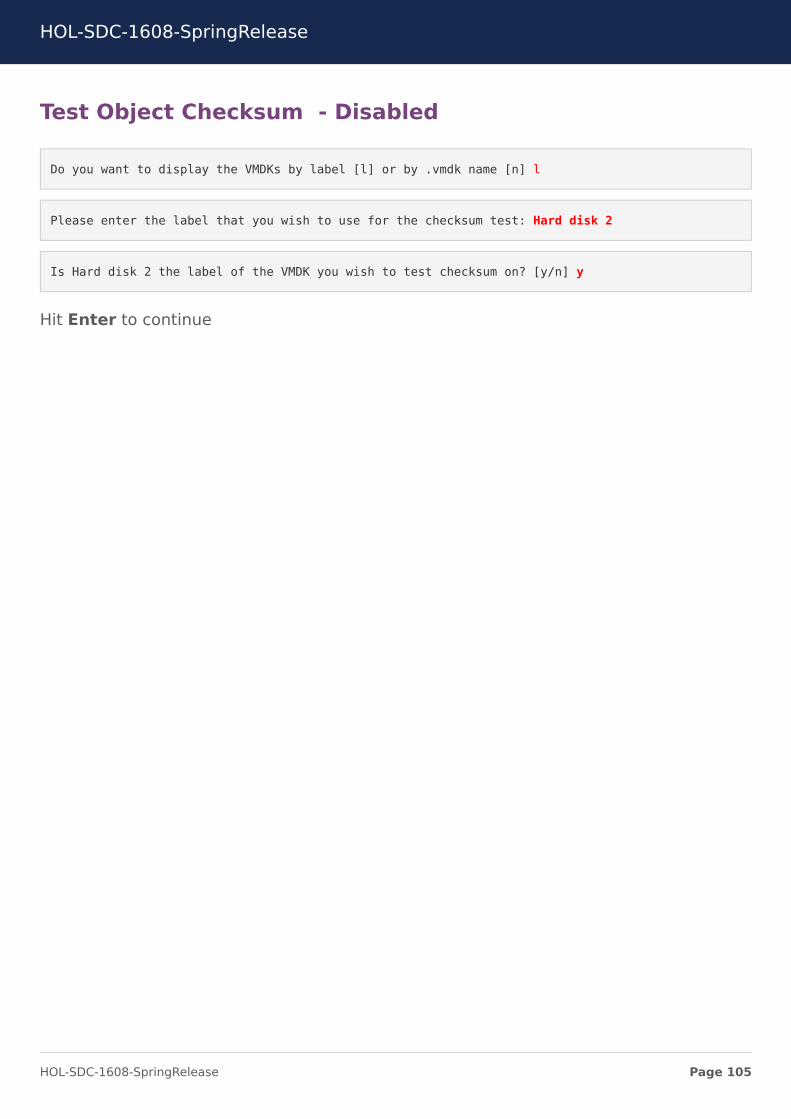
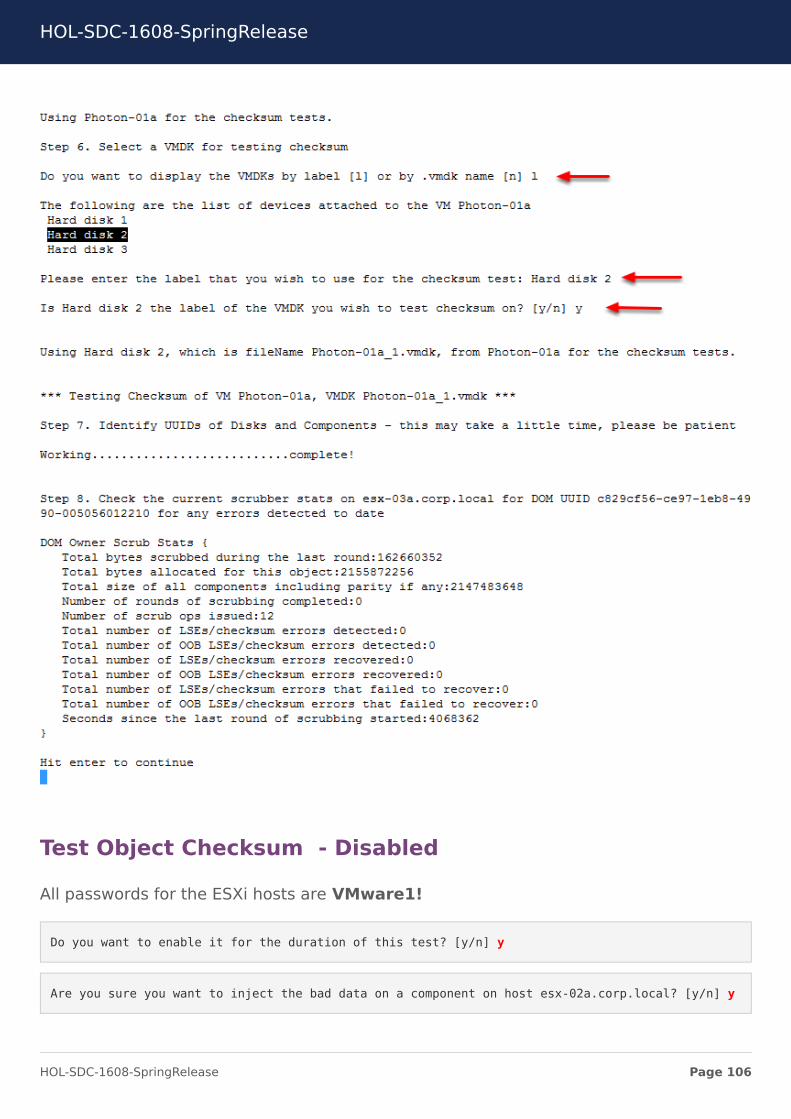
Do you want to display the VMDKs by label [l] or by .vmdk name [n] l
Please enter the label that you wish to use for the checksum test: Hard disk 2
Is Hard disk 2 the label of the VMDK you wish to test checksum on? [y/n] y
Hit Enter to continue
HOL-SDC-1608-SpringRelease
Page 105HOL-SDC-1608-SpringRelease
Test Object Checksum - Disabled
All passwords for the ESXi hosts are VMware1!
Do you want to enable it for the duration of this test? [y/n] y
Are you sure you want to inject the bad data on a component on host esx-02a.corp.local? [y/n] y
HOL-SDC-1608-SpringRelease
Page 106HOL-SDC-1608-SpringRelease
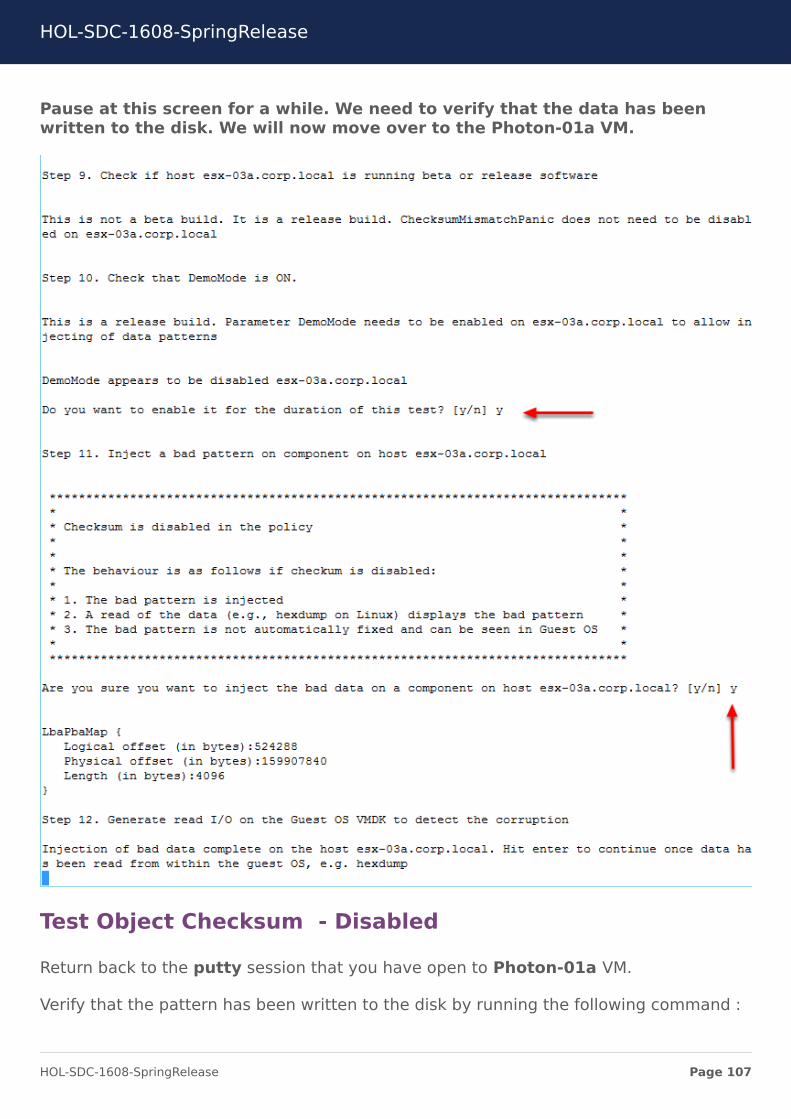
Pause at this screen for a while. We need to verify that the data has beenwritten to the disk. We will now move over to the Photon-01a VM.
Test Object Checksum - Disabled
Return back to the putty session that you have open to Photon-01a VM.
Verify that the pattern has been written to the disk by running the following command :
HOL-SDC-1608-SpringRelease
Page 107HOL-SDC-1608-SpringRelease
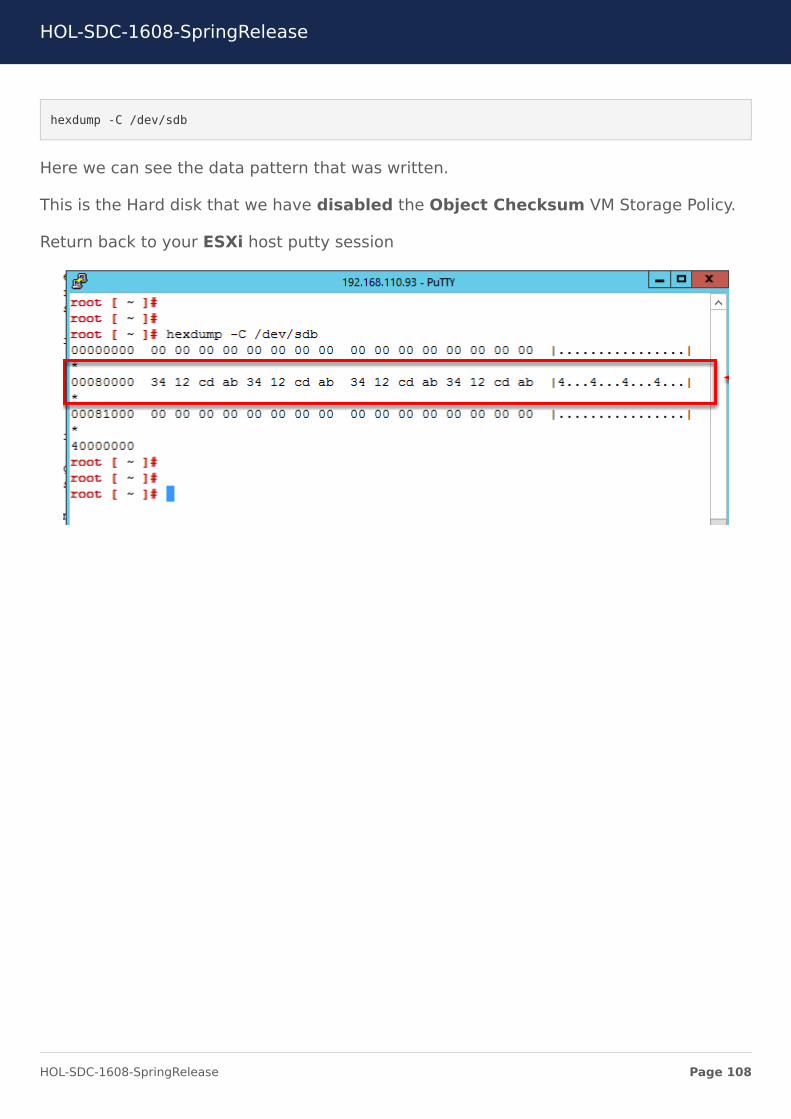
hexdump -C /dev/sdb
Here we can see the data pattern that was written.
This is the Hard disk that we have disabled the Object Checksum VM Storage Policy.
Return back to your ESXi host putty session
HOL-SDC-1608-SpringRelease
Page 108HOL-SDC-1608-SpringRelease
Test Object Checksum - Disabled
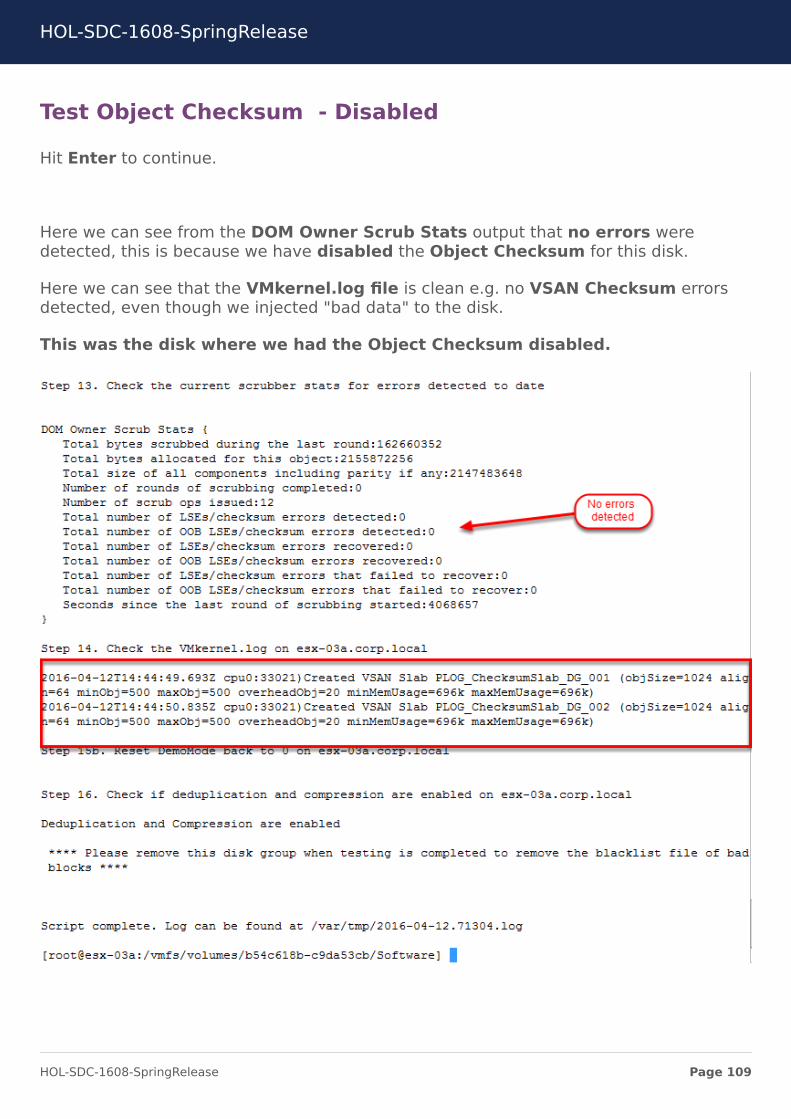
Hit Enter to continue.
Here we can see from the DOM Owner Scrub Stats output that no errors weredetected, this is because we have disabled the Object Checksum for this disk.
Here we can see that the VMkernel.log file is clean e.g. no VSAN Checksum errorsdetected, even though we injected "bad data" to the disk.
This was the disk where we had the Object Checksum disabled.
HOL-SDC-1608-SpringRelease
Page 109HOL-SDC-1608-SpringRelease

Test Object Checksum - Enabled
Lets run the script again but against the disk that has the Object Checksum VMStorage Policy enabled.
Execute the following command : ( Pay close attention to the prompts )
./test_checksum_v19.sh
Answer the following prompts :
Do you acknowledge that this tool is unsupported? [y/n] y
Please type in the name of the VM that you want to test checkum on: Photon-01a
Is Photon-01a the virtual machine you wish to test checksum on? [y/n] y
Test Object Checksum - Enabled
Do you want to display the VMDKs by label [l] or by .vmdk name [n] l
Please enter the label that you wish to use for the checksum test: Hard disk 3
HOL-SDC-1608-SpringRelease
Page 110HOL-SDC-1608-SpringRelease
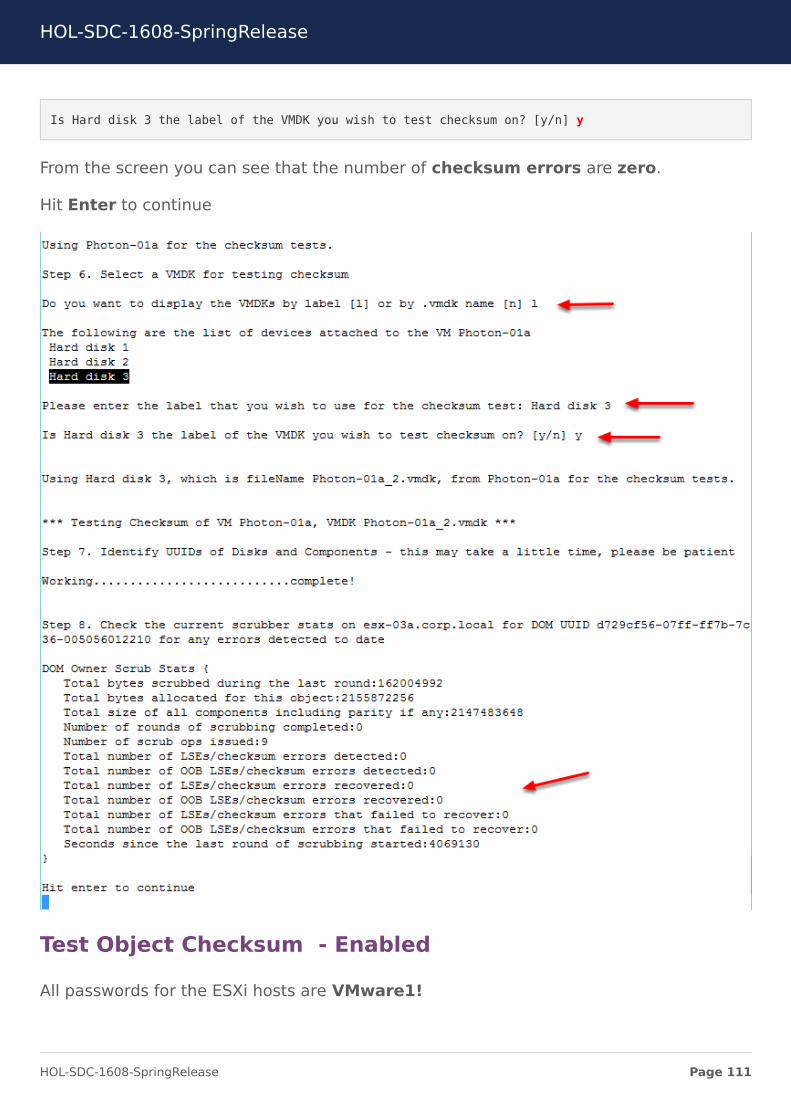
Is Hard disk 3 the label of the VMDK you wish to test checksum on? [y/n] y
From the screen you can see that the number of checksum errors are zero.
Hit Enter to continue
Test Object Checksum - Enabled
All passwords for the ESXi hosts are VMware1!
HOL-SDC-1608-SpringRelease
Page 111HOL-SDC-1608-SpringRelease
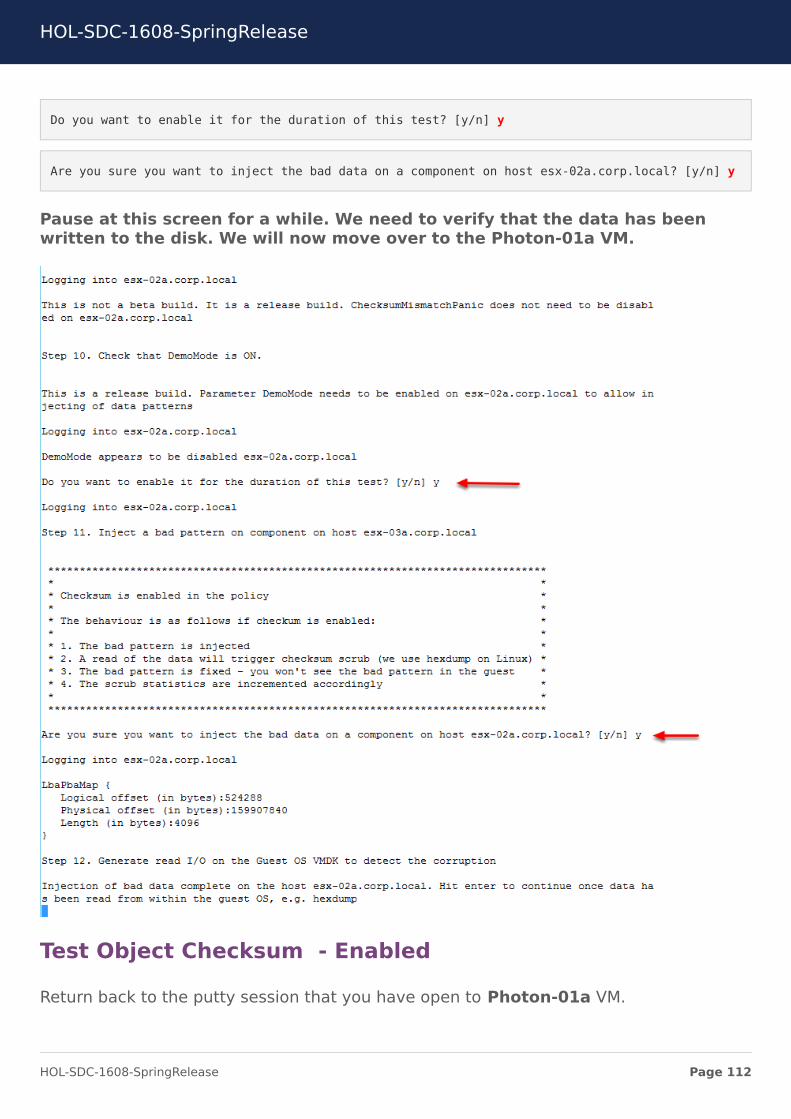
Do you want to enable it for the duration of this test? [y/n] y
Are you sure you want to inject the bad data on a component on host esx-02a.corp.local? [y/n] y
Pause at this screen for a while. We need to verify that the data has beenwritten to the disk. We will now move over to the Photon-01a VM.
Test Object Checksum - Enabled
Return back to the putty session that you have open to Photon-01a VM.
HOL-SDC-1608-SpringRelease
Page 112HOL-SDC-1608-SpringRelease
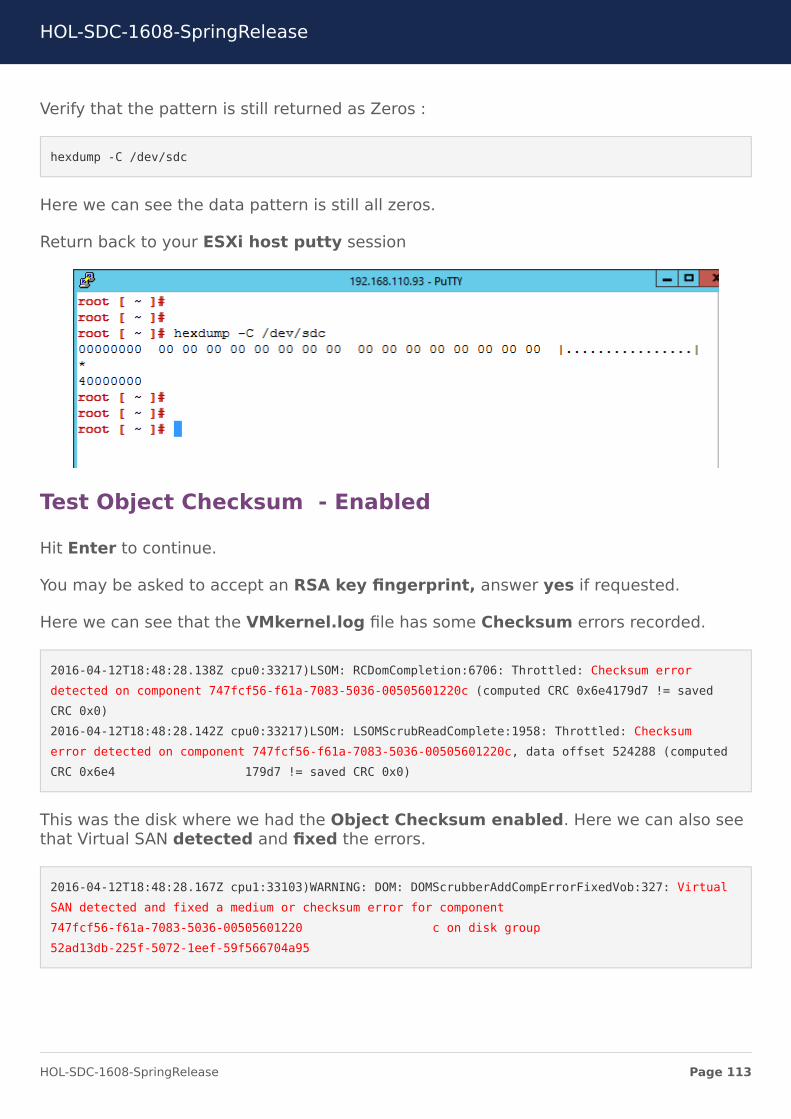
Verify that the pattern is still returned as Zeros :
hexdump -C /dev/sdc
Here we can see the data pattern is still all zeros.
Return back to your ESXi host putty session
Test Object Checksum - Enabled
Hit Enter to continue.
You may be asked to accept an RSA key fingerprint, answer yes if requested.
Here we can see that the VMkernel.log file has some Checksum errors recorded.
2016-04-12T18:48:28.138Z cpu0:33217)LSOM: RCDomCompletion:6706: Throttled: Checksum errordetected on component 747fcf56-f61a-7083-5036-00505601220c (computed CRC 0x6e4179d7 != savedCRC 0x0)2016-04-12T18:48:28.142Z cpu0:33217)LSOM: LSOMScrubReadComplete:1958: Throttled: Checksumerror detected on component 747fcf56-f61a-7083-5036-00505601220c, data offset 524288 (computedCRC 0x6e4 179d7 != saved CRC 0x0)
This was the disk where we had the Object Checksum enabled. Here we can also seethat Virtual SAN detected and fixed the errors.
2016-04-12T18:48:28.167Z cpu1:33103)WARNING: DOM: DOMScrubberAddCompErrorFixedVob:327: VirtualSAN detected and fixed a medium or checksum error for component747fcf56-f61a-7083-5036-00505601220 c on disk group52ad13db-225f-5072-1eef-59f566704a95
HOL-SDC-1608-SpringRelease
Page 113HOL-SDC-1608-SpringRelease
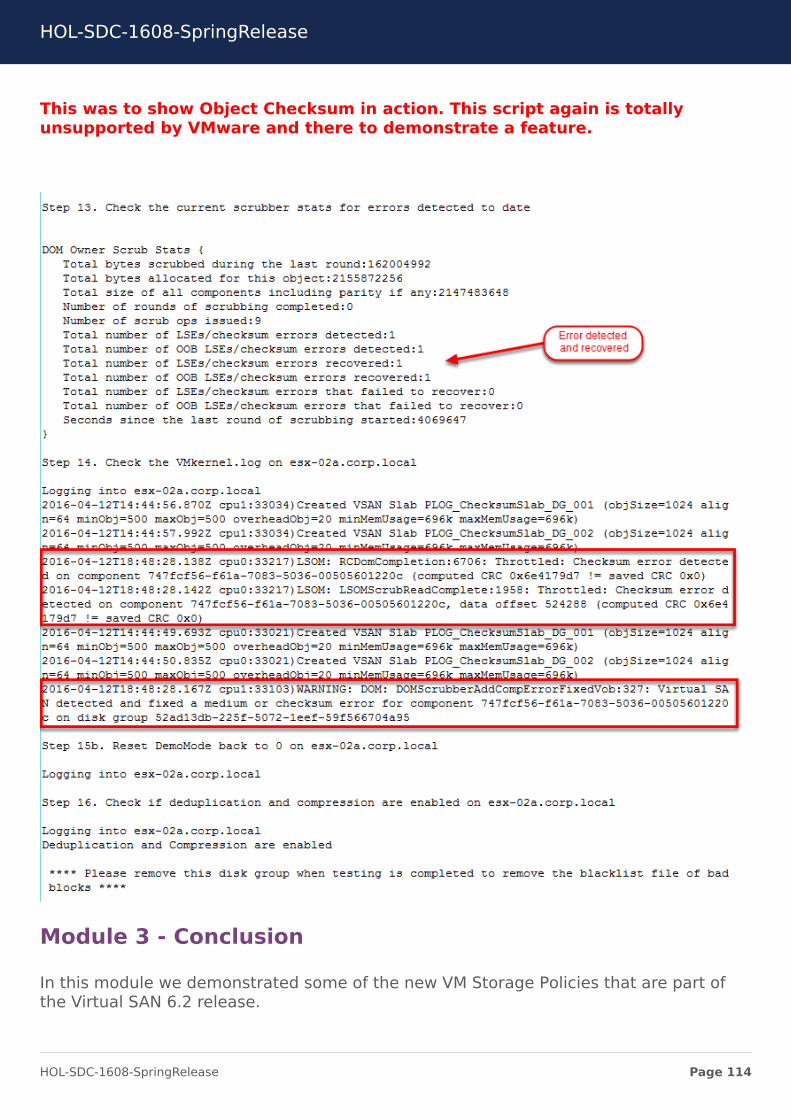
This was to show Object Checksum in action. This script again is totallyunsupported by VMware and there to demonstrate a feature.
Module 3 - Conclusion
In this module we demonstrated some of the new VM Storage Policies that are part ofthe Virtual SAN 6.2 release.
HOL-SDC-1608-SpringRelease
Page 114HOL-SDC-1608-SpringRelease
We started by showing the Failure tolerance method where we could specify whetherthe data replication method optimizes for Performance or Capacity. If you choosePerformance, Virtual SAN uses more disk space to place the components of objects butprovides better performance for accessing the objects. If you select Capacity, VirtualSAN uses less disk space, but reduces the performance.
Object Checksum is fully supported with all of the new features, such as RAID-5/RAID-6, deduplication and compression and configurations such as VSAN stretchedcluster. As mentioned, it is on by default so customers simply get the benefit withouthaving to configure it. And if you find you don’t want it, for some reason or other, simplydisable it in your VM Storage Policy as shown above. This feature will enable VSANcustomers to detect data corruption, due to “latent sector errors” which are typicallydue to physical drive problems, or other silent data corruption.
HOL-SDC-1608-SpringRelease
Page 115HOL-SDC-1608-SpringRelease
Module 4 - Sparse VMSwap Object (30 Minutes)
HOL-SDC-1608-SpringRelease
Page 116HOL-SDC-1608-SpringRelease

Configure Virtual SAN (Optional)If you skipped Module 1, you will need to configure Virtual SAN prior to starting thismodule. If you have completed Module 1, click here to skip ahead!
Log in to vSphere Web Client
To start the vSphere Web Client, launch Mozilla Firefox from the icon on your desktop.
Allow Adobe Flash
If you receive a message that 'Firefox has prevented the outdated plugin "Adobe Flash"from running on vcsa-01a.corp,local", click the Allow button.
Allow and Remember
Click the 'Allow and Remember' button to continue.
HOL-SDC-1608-SpringRelease
Page 117HOL-SDC-1608-SpringRelease

Log in to vSphere Web Client
Log in to the vSphere Web Client using the following credentials or tick the UseWindows session authentication
User name : [email protected] : VMware1!
Click Login
HOL-SDC-1608-SpringRelease
Page 118HOL-SDC-1608-SpringRelease

Navigate to Hosts and Clusters
From the Home page in the vSphere Web Client, select Hosts and Clusters fromthe Inventories pane
HOL-SDC-1608-SpringRelease
Page 119HOL-SDC-1608-SpringRelease

Enable the VMkernel VSAN traffic service
1. Select the ESXi host called esx-04a.corp.local from the Hosts and Clusters view.
2. Select Manage
3. Select Networking
4. Select VMkernel adapters
Here you will see that we have 2 VMkernel adapters called VSAN-PG-vmk3 and VSAN-PG-vmk4. These are the 2 VMkernel adapters on which we will enable the VSAN trafficService.
Select VSAN-PG-vmk3 and click the Pencil icon to Edit the VMkernel adapter.
HOL-SDC-1608-SpringRelease
Page 120HOL-SDC-1608-SpringRelease

Enable the VMkernel VSAN traffic service
In the Port Properties, select the Virtual SAN traffic option.
Click OK
Enable the VMkernel VSAN traffic service
Edit the Properties of the VSAN-PG-vmk4 and enable the Virtual SAN traffic.
Click OK
HOL-SDC-1608-SpringRelease
Page 121HOL-SDC-1608-SpringRelease

Enable the VMkernel VSAN traffic service
Once we have enabled the Virtual SAN traffic on the VMkernel ports, verify that theVirtual SAN traffic is enabled.
Here we are showing the 2 VMkernel Ports and the Virtual SAN traffic is enabled.
You may have to scroll to the right of the screen to see the Virtual SAN traffic column.
Now that we have completed this task, lets create our Virtual SAN Cluster.
HOL-SDC-1608-SpringRelease
Page 122HOL-SDC-1608-SpringRelease

Enable Virtual SAN on the cluster
1. Select the cluster called Cluster Site A
2. Select Manage
3. Select Settings
4. Select General
5. Click the Configure... button
HOL-SDC-1608-SpringRelease
Page 123HOL-SDC-1608-SpringRelease

Turn On Virtual SAN
In our environment, we already have a VSAN Cluster created, but we will turn it on. Wewill also look at the additional checks that we have incorporated into the Virtual SANconfiguration wizard.
Verify Add disks to storage is set to Manual
Verify Deduplication and Compression is Enabled
Verify Fault Domains and Stretched Cluster is set to Do Not configure
To get a quick overview of these features, click the information (i) next to the feature.
Click Next
HOL-SDC-1608-SpringRelease
Page 124HOL-SDC-1608-SpringRelease

Verify Network validation
Checks have been put in to verify that there are VMkernel adapters configured and theVSAN network service is Enabled.
Notice that the ESXi host called esx-04a.corp.local is now reporting that there areVMkernel adapters with VSAN traffic enabled.
Click Next
Claim Disks by Disk model/size
As we called out earlier, we are turning on VSAN. We already have a VSAN clustercreated, but here we are adding additional Disk Groups to the VSAN Cluster.
Select which disks should be claimed for cache and which for capacity in the VSANcluster. The disks are grouped by model and size or by host.
The recommended selection has been made based on the available devices in yourenvironment. You can expand the lists of the disks for individual disk selection.
HOL-SDC-1608-SpringRelease
Page 125HOL-SDC-1608-SpringRelease

The number of capacity disks must be greater than or equal to the number of cachedisks claimed per host.
From the Group by drop down list, select Host
HOL-SDC-1608-SpringRelease
Page 126HOL-SDC-1608-SpringRelease

Claim Disks by Host
In the Group by : Host view, we can see that all the disks are already claimed in theESXi hosts called esx-01a.corp.local, esx-02a.corp.local and esx-03a.corp.local.
For ESXi host called esx-04a.corp.local, we can see that there will be 2 Disk Groupscreated, that is one Flash disk and 2 Capacity disks in each Disk Group.
Click Next
Ready to Complete
Review and verify your selection.
Here we can see that Deduplication and Compression are Enabled.
We will have a Total VSAN capacity of 160 GB, 120 GB of this is already claimed inDisk Groups, the remaining 40 GB will be created when we create the additional DiskGroup on the ESXi host called esx-04a.corp.local
We are not configuring Fault Domains and Stretched Cluster
HOL-SDC-1608-SpringRelease
Page 127HOL-SDC-1608-SpringRelease

Click Finish
Wait for cluster reconfiguration to complete
You can monitor the tasks by clicking on the My Tasks at the bottom left of the vSphereWeb Client.
Wait for the Reconfigure Virtual SAN configuration tasks to complete.
HOL-SDC-1608-SpringRelease
Page 128HOL-SDC-1608-SpringRelease

Verify initial VSAN cluster configuration
Once the VSAN datastore is created, the General screen will be updated.
We can see that Virtual SAN is now Turned On. Deduplication and compression isEnabled and all disks in the Disk Groups are at Disk format version 3.0.
HOL-SDC-1608-SpringRelease
Page 129HOL-SDC-1608-SpringRelease
New Sparse VM Swap ObjectThose of you who have a good understanding of VSAN at this stage will know that avirtual machine deployed on the VSAN datastore is deployed as a set of objects, andnot a set of files, which is how a VM is deployed on traditional datastores. Those objectsinclude the VM Home Namespace, VMDKs and of course VM Swap.
VM Swap is interesting, in that it only exists when the VM is powered on, but on VSAN ithas always been provisioned with 100% Object Space Reservation in the past.
This has some drawbacks, since it tended to consume a lot of capacity. For example, if Ideployed 100 VMs, each with 8 GB of memory, then there is 800 GB of diskprovisioned for the VM swap.
This is reserved space that I may never even use if the VM never experiences resourceissues.
New Sparse VM Swap Object
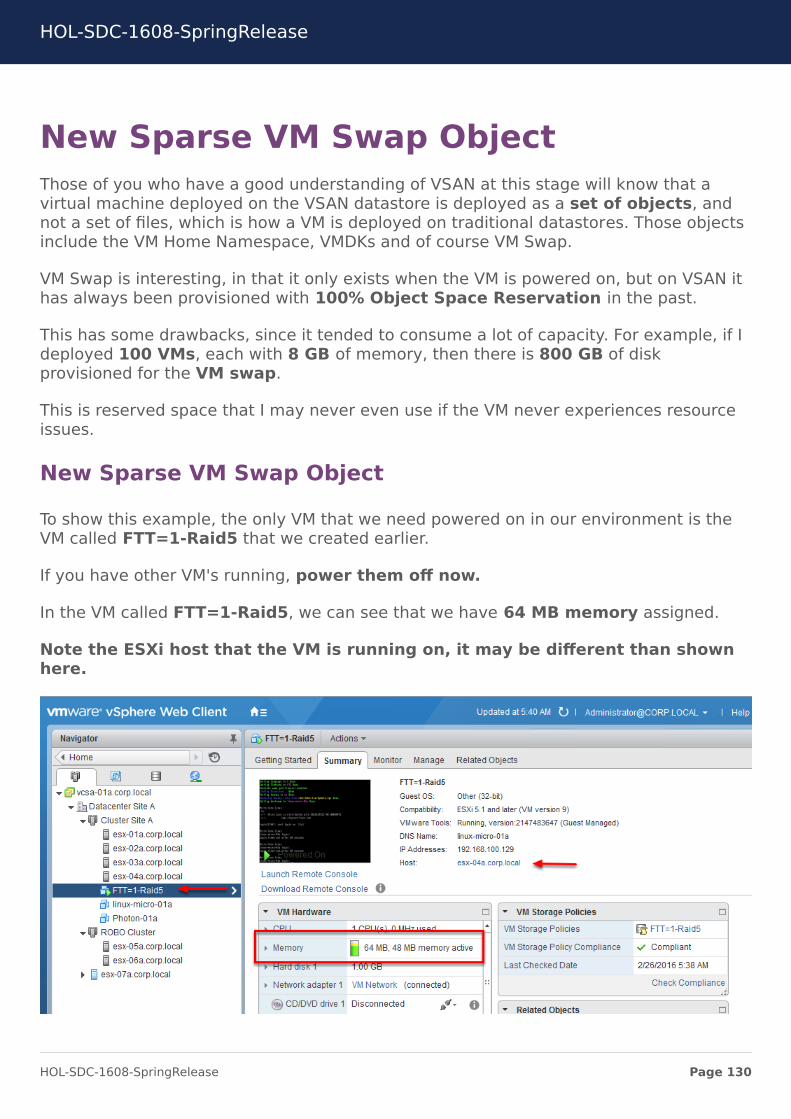
To show this example, the only VM that we need powered on in our environment is theVM called FTT=1-Raid5 that we created earlier.
If you have other VM's running, power them off now.
In the VM called FTT=1-Raid5, we can see that we have 64 MB memory assigned.
Note the ESXi host that the VM is running on, it may be different than shownhere.
HOL-SDC-1608-SpringRelease
Page 130HOL-SDC-1608-SpringRelease
New Sparse VM Swap Object
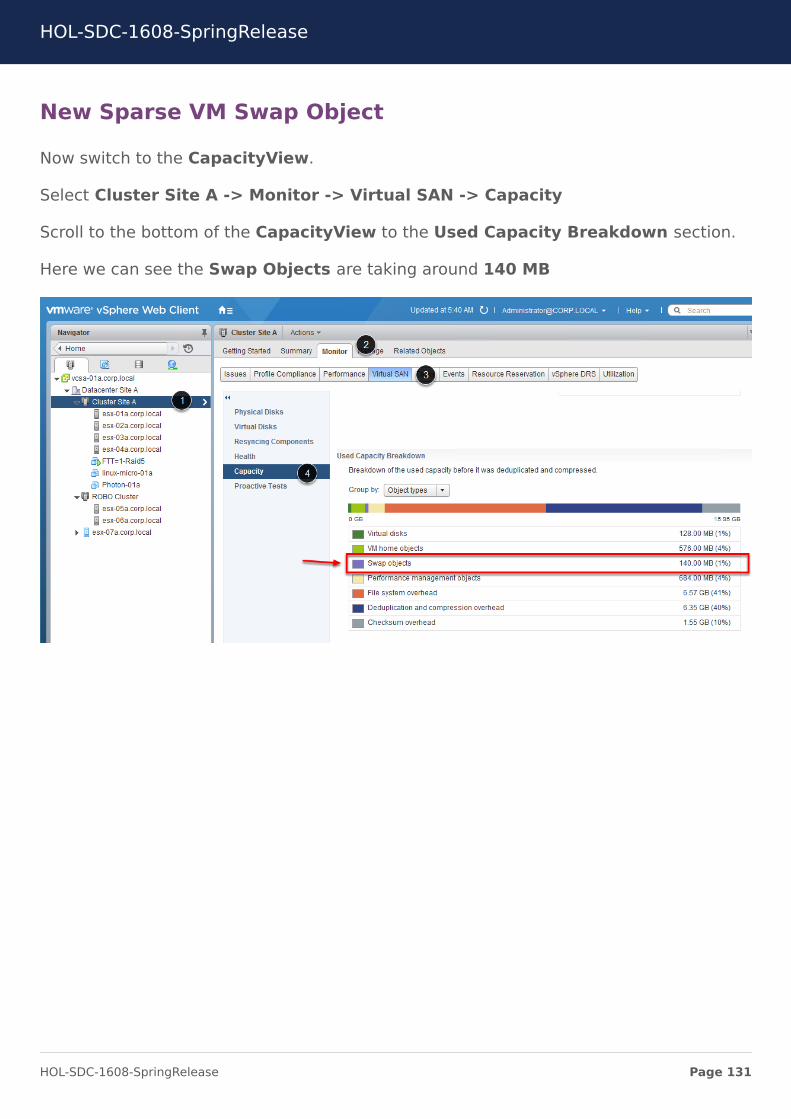
Now switch to the CapacityView.
Select Cluster Site A -> Monitor -> Virtual SAN -> Capacity
Scroll to the bottom of the CapacityView to the Used Capacity Breakdown section.
Here we can see the Swap Objects are taking around 140 MB
HOL-SDC-1608-SpringRelease
Page 131HOL-SDC-1608-SpringRelease
New Sparse VM Swap Object
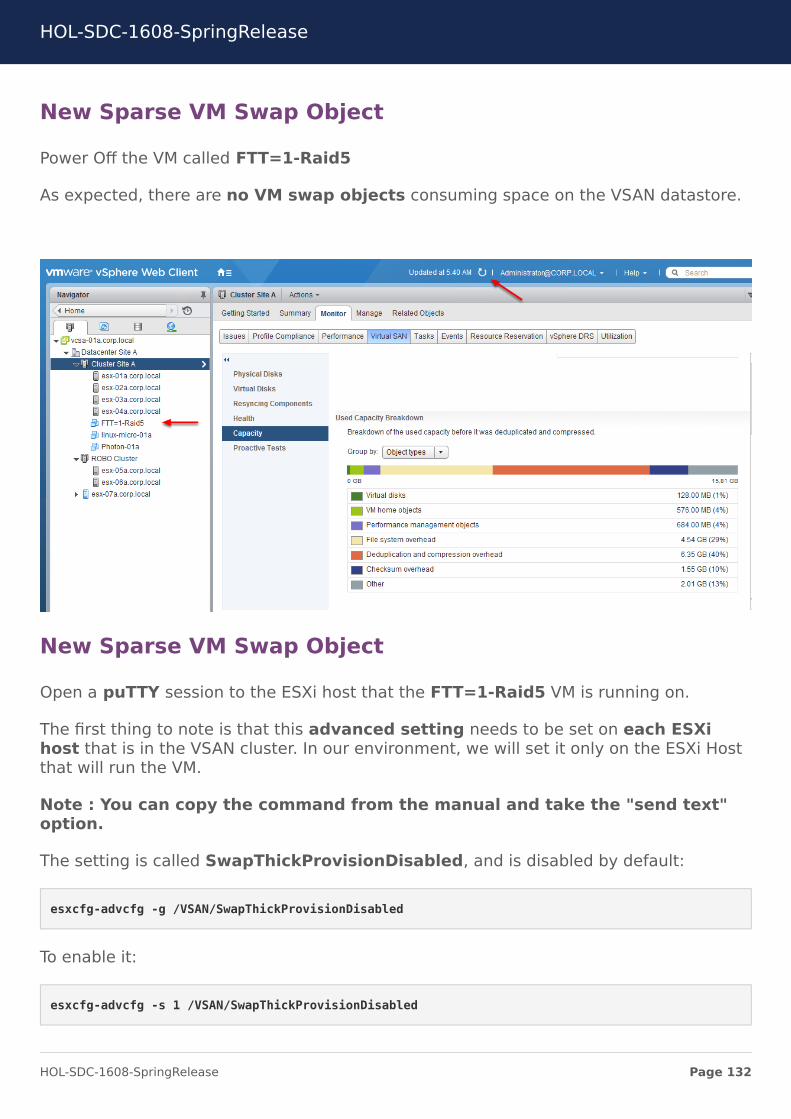
Power Off the VM called FTT=1-Raid5
As expected, there are no VM swap objects consuming space on the VSAN datastore.
New Sparse VM Swap Object
Open a puTTY session to the ESXi host that the FTT=1-Raid5 VM is running on.
The first thing to note is that this advanced setting needs to be set on each ESXihost that is in the VSAN cluster. In our environment, we will set it only on the ESXi Hostthat will run the VM.
Note : You can copy the command from the manual and take the "send text"option.
The setting is called SwapThickProvisionDisabled, and is disabled by default:
esxcfg-advcfg -g /VSAN/SwapThickProvisionDisabled
To enable it:
esxcfg-advcfg -s 1 /VSAN/SwapThickProvisionDisabled
HOL-SDC-1608-SpringRelease
Page 132HOL-SDC-1608-SpringRelease
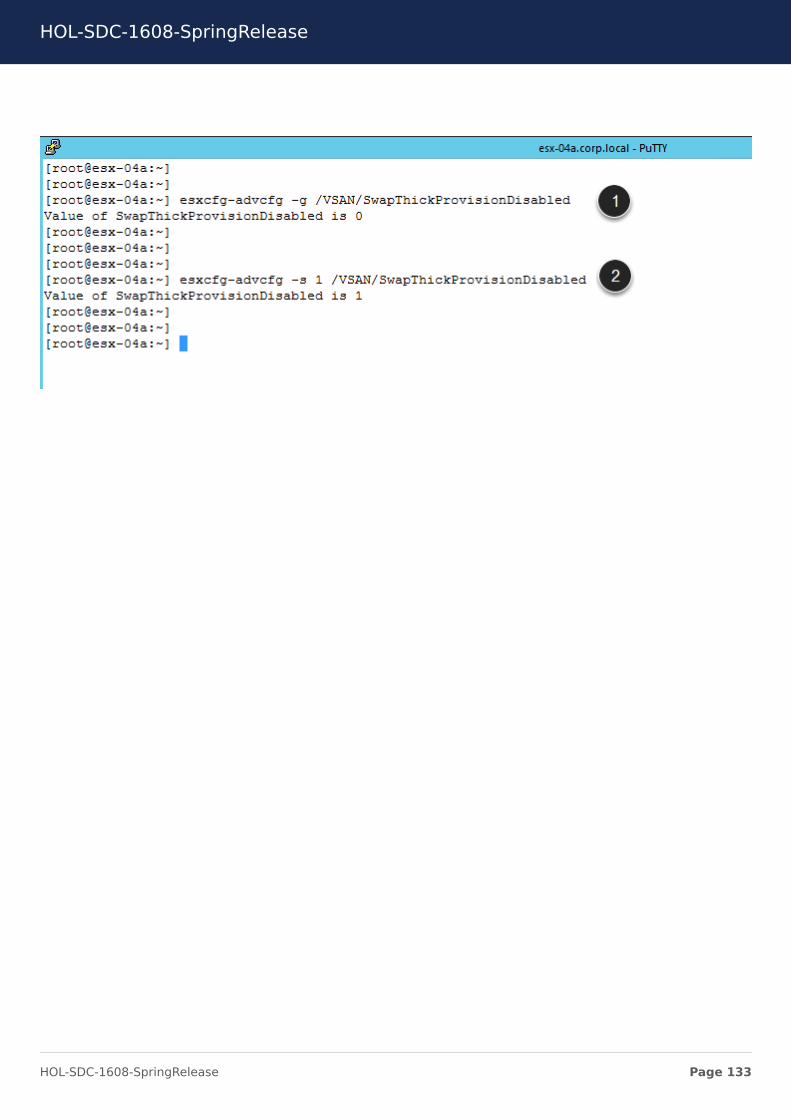
HOL-SDC-1608-SpringRelease
Page 133HOL-SDC-1608-SpringRelease
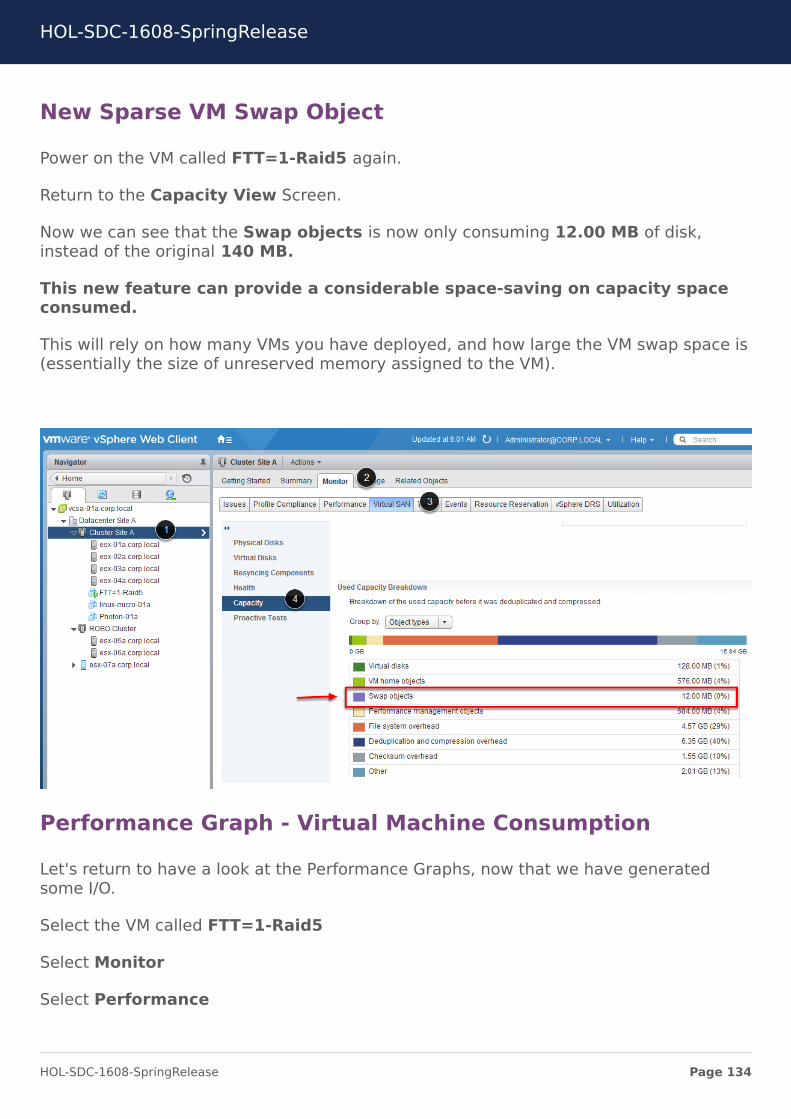
New Sparse VM Swap Object
Power on the VM called FTT=1-Raid5 again.
Return to the Capacity View Screen.
Now we can see that the Swap objects is now only consuming 12.00 MB of disk,instead of the original 140 MB.
This new feature can provide a considerable space-saving on capacity spaceconsumed.
This will rely on how many VMs you have deployed, and how large the VM swap space is(essentially the size of unreserved memory assigned to the VM).
Performance Graph - Virtual Machine Consumption
Let's return to have a look at the Performance Graphs, now that we have generatedsome I/O.
Select the VM called FTT=1-Raid5
Select Monitor
Select Performance
HOL-SDC-1608-SpringRelease
Page 134HOL-SDC-1608-SpringRelease
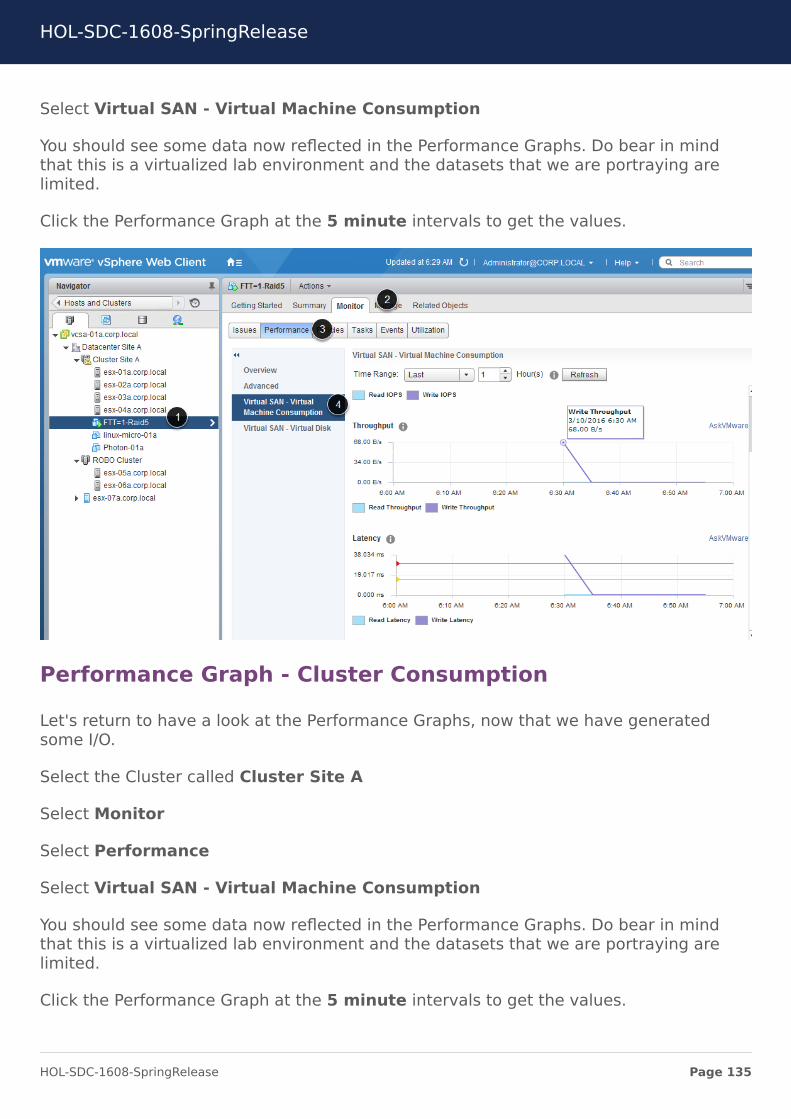
Select Virtual SAN - Virtual Machine Consumption
You should see some data now reflected in the Performance Graphs. Do bear in mindthat this is a virtualized lab environment and the datasets that we are portraying arelimited.
Click the Performance Graph at the 5 minute intervals to get the values.
Performance Graph - Cluster Consumption
Let's return to have a look at the Performance Graphs, now that we have generatedsome I/O.
Select the Cluster called Cluster Site A
Select Monitor
Select Performance
Select Virtual SAN - Virtual Machine Consumption
You should see some data now reflected in the Performance Graphs. Do bear in mindthat this is a virtualized lab environment and the datasets that we are portraying arelimited.
Click the Performance Graph at the 5 minute intervals to get the values.
HOL-SDC-1608-SpringRelease
Page 135HOL-SDC-1608-SpringRelease
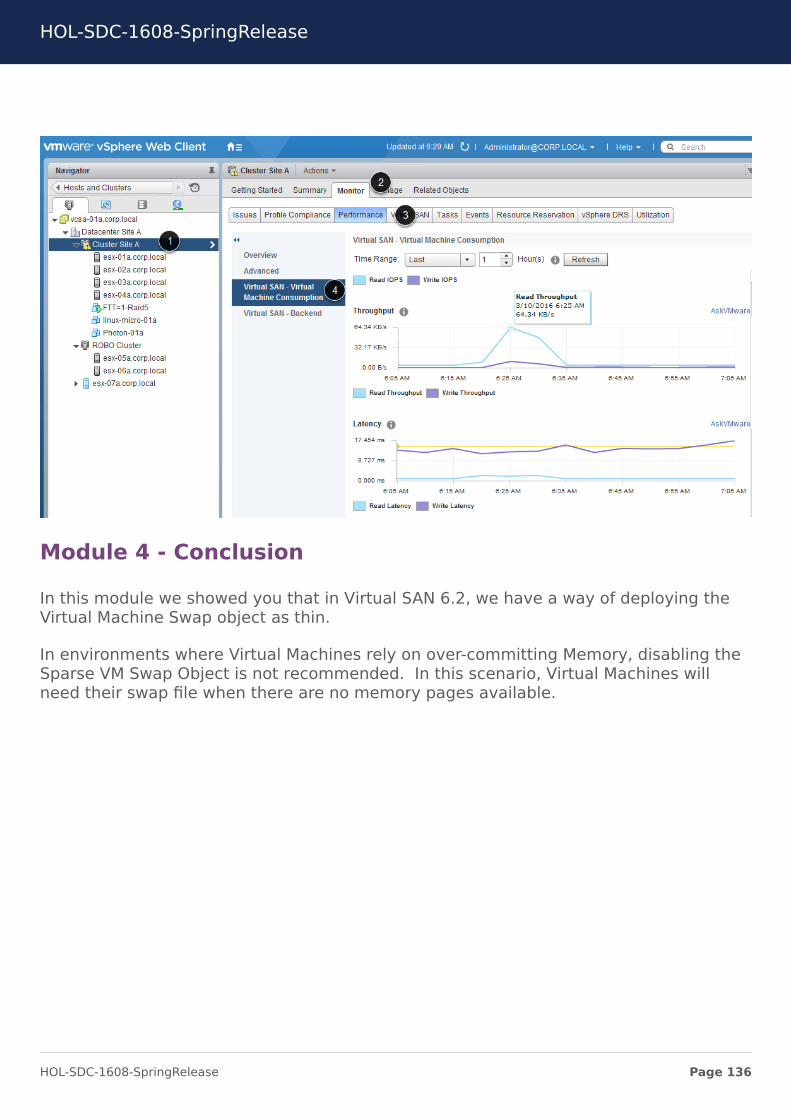
Module 4 - Conclusion
In this module we showed you that in Virtual SAN 6.2, we have a way of deploying theVirtual Machine Swap object as thin.
In environments where Virtual Machines rely on over-committing Memory, disabling theSparse VM Swap Object is not recommended. In this scenario, Virtual Machines willneed their swap file when there are no memory pages available.
HOL-SDC-1608-SpringRelease
Page 136HOL-SDC-1608-SpringRelease
Module 5 - Virtual SANStretched Cluster (ROBO)
(30 Minutes)
HOL-SDC-1608-SpringRelease
Page 137HOL-SDC-1608-SpringRelease
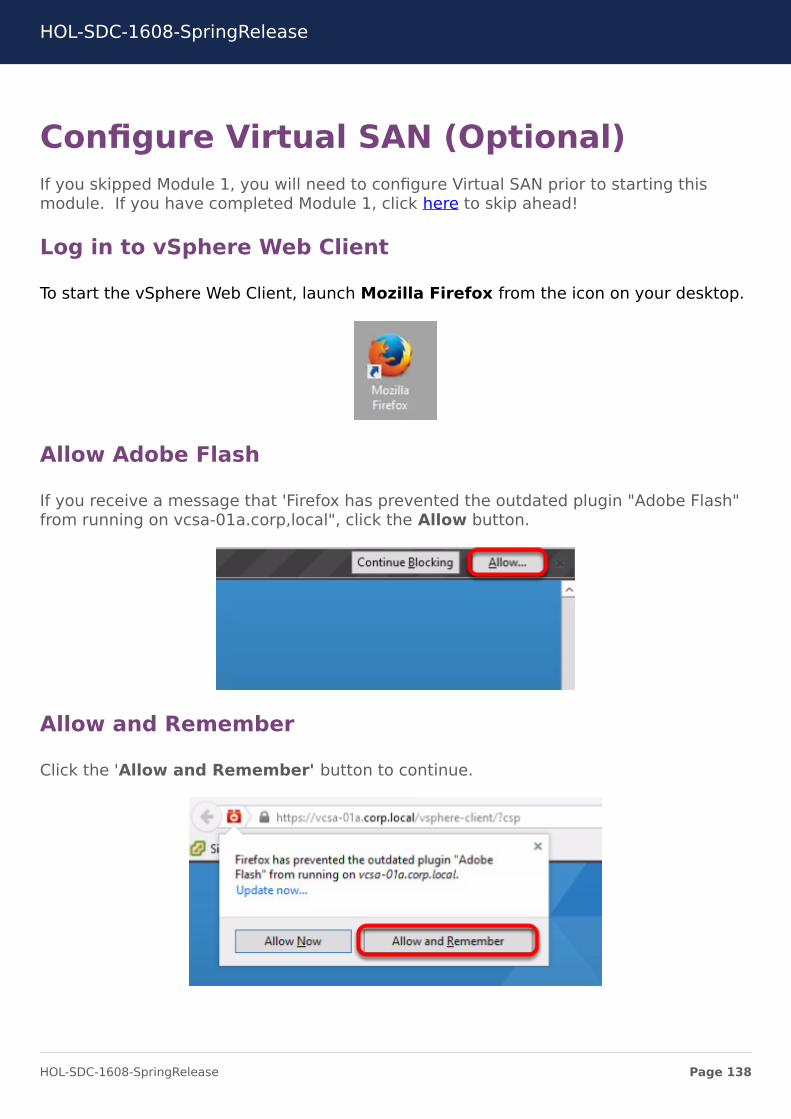
Configure Virtual SAN (Optional)If you skipped Module 1, you will need to configure Virtual SAN prior to starting thismodule. If you have completed Module 1, click here to skip ahead!
Log in to vSphere Web Client
To start the vSphere Web Client, launch Mozilla Firefox from the icon on your desktop.
Allow Adobe Flash
If you receive a message that 'Firefox has prevented the outdated plugin "Adobe Flash"from running on vcsa-01a.corp,local", click the Allow button.
Allow and Remember
Click the 'Allow and Remember' button to continue.
HOL-SDC-1608-SpringRelease
Page 138HOL-SDC-1608-SpringRelease

Log in to vSphere Web Client
Log in to the vSphere Web Client using the following credentials or tick the UseWindows session authentication
User name : [email protected] : VMware1!
Click Login
HOL-SDC-1608-SpringRelease
Page 139HOL-SDC-1608-SpringRelease
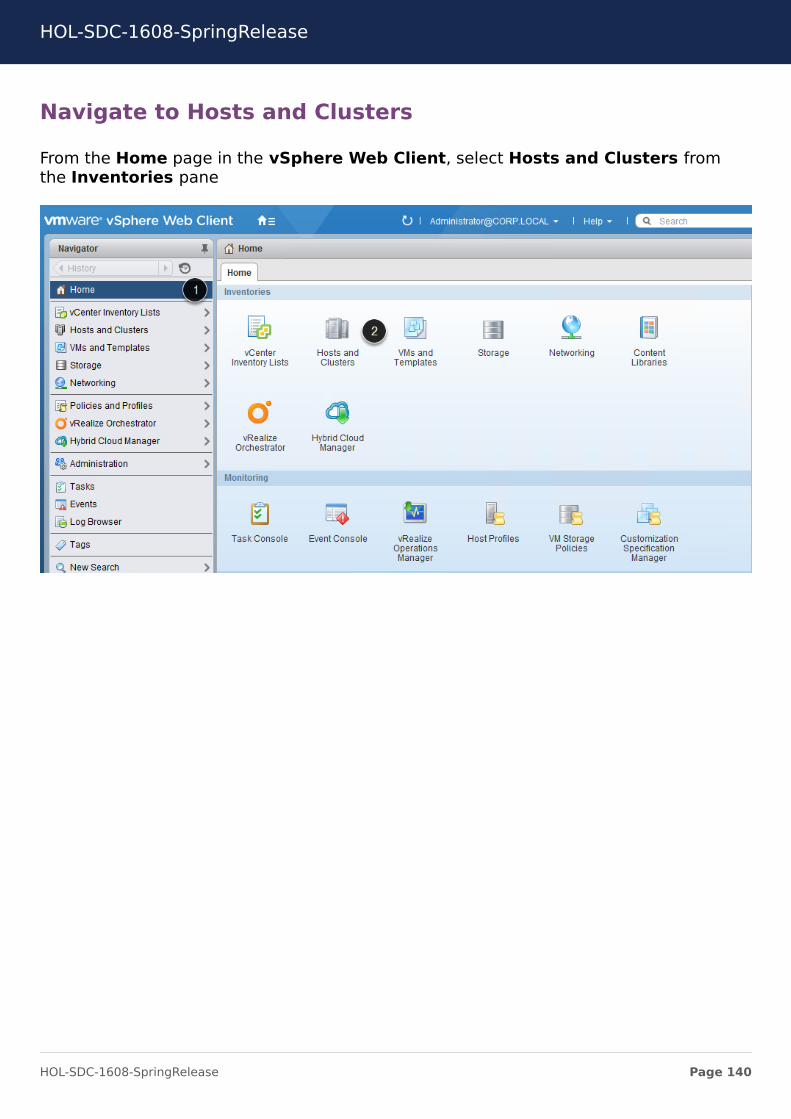
Navigate to Hosts and Clusters
From the Home page in the vSphere Web Client, select Hosts and Clusters fromthe Inventories pane
HOL-SDC-1608-SpringRelease
Page 140HOL-SDC-1608-SpringRelease
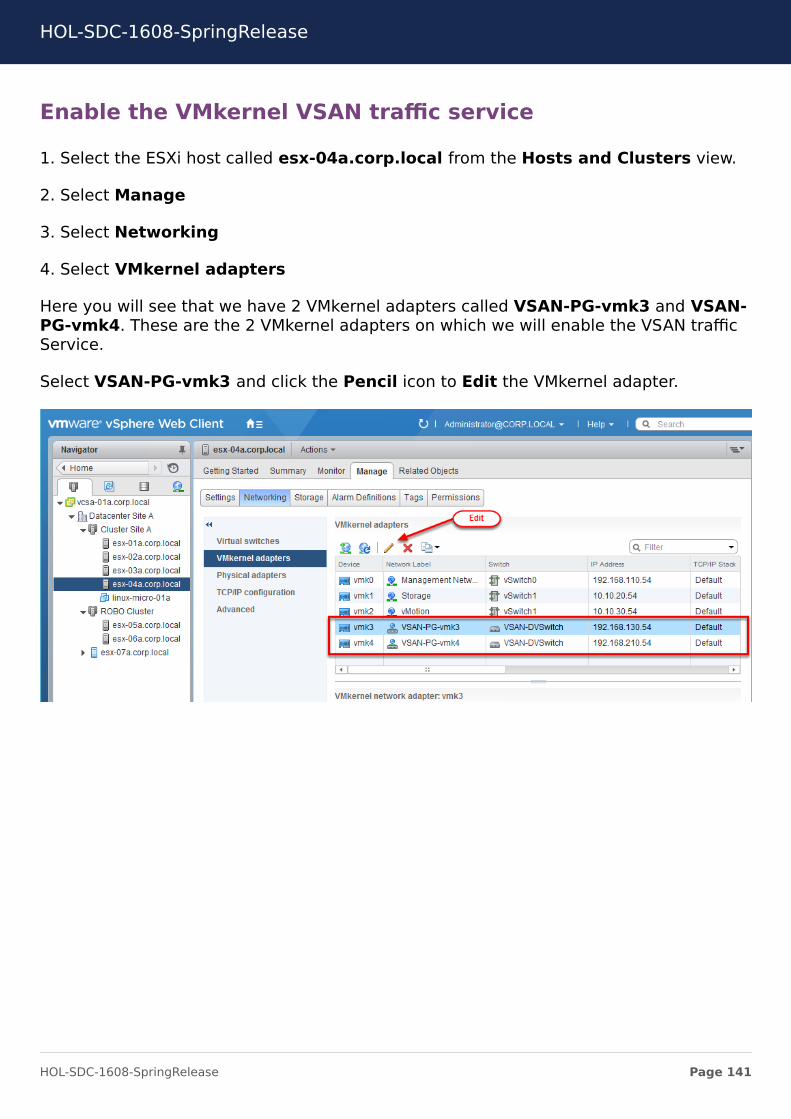
Enable the VMkernel VSAN traffic service
1. Select the ESXi host called esx-04a.corp.local from the Hosts and Clusters view.
2. Select Manage
3. Select Networking
4. Select VMkernel adapters
Here you will see that we have 2 VMkernel adapters called VSAN-PG-vmk3 and VSAN-PG-vmk4. These are the 2 VMkernel adapters on which we will enable the VSAN trafficService.
Select VSAN-PG-vmk3 and click the Pencil icon to Edit the VMkernel adapter.
HOL-SDC-1608-SpringRelease
Page 141HOL-SDC-1608-SpringRelease

Enable the VMkernel VSAN traffic service
In the Port Properties, select the Virtual SAN traffic option.
Click OK
Enable the VMkernel VSAN traffic service
Edit the Properties of the VSAN-PG-vmk4 and enable the Virtual SAN traffic.
Click OK
HOL-SDC-1608-SpringRelease
Page 142HOL-SDC-1608-SpringRelease

Enable the VMkernel VSAN traffic service
Once we have enabled the Virtual SAN traffic on the VMkernel ports, verify that theVirtual SAN traffic is enabled.
Here we are showing the 2 VMkernel Ports and the Virtual SAN traffic is enabled.
You may have to scroll to the right of the screen to see the Virtual SAN traffic column.
Now that we have completed this task, lets create our Virtual SAN Cluster.
HOL-SDC-1608-SpringRelease
Page 143HOL-SDC-1608-SpringRelease

Enable Virtual SAN on the cluster
1. Select the cluster called Cluster Site A
2. Select Manage
3. Select Settings
4. Select General
5. Click the Configure... button
HOL-SDC-1608-SpringRelease
Page 144HOL-SDC-1608-SpringRelease

Turn On Virtual SAN
In our environment, we already have a VSAN Cluster created, but we will turn it on. Wewill also look at the additional checks that we have incorporated into the Virtual SANconfiguration wizard.
Verify Add disks to storage is set to Manual
Verify Deduplication and Compression is Enabled
Verify Fault Domains and Stretched Cluster is set to Do Not configure
To get a quick overview of these features, click the information (i) next to the feature.
Click Next
HOL-SDC-1608-SpringRelease
Page 145HOL-SDC-1608-SpringRelease

Verify Network validation
Checks have been put in to verify that there are VMkernel adapters configured and theVSAN network service is Enabled.
Notice that the ESXi host called esx-04a.corp.local is now reporting that there areVMkernel adapters with VSAN traffic enabled.
Click Next
Claim Disks by Disk model/size
As we called out earlier, we are turning on VSAN. We already have a VSAN clustercreated, but here we are adding additional Disk Groups to the VSAN Cluster.
Select which disks should be claimed for cache and which for capacity in the VSANcluster. The disks are grouped by model and size or by host.
The recommended selection has been made based on the available devices in yourenvironment. You can expand the lists of the disks for individual disk selection.
HOL-SDC-1608-SpringRelease
Page 146HOL-SDC-1608-SpringRelease

The number of capacity disks must be greater than or equal to the number of cachedisks claimed per host.
From the Group by drop down list, select Host
HOL-SDC-1608-SpringRelease
Page 147HOL-SDC-1608-SpringRelease

Claim Disks by Host
In the Group by : Host view, we can see that all the disks are already claimed in theESXi hosts called esx-01a.corp.local, esx-02a.corp.local and esx-03a.corp.local.
For ESXi host called esx-04a.corp.local, we can see that there will be 2 Disk Groupscreated, that is one Flash disk and 2 Capacity disks in each Disk Group.
Click Next
Ready to Complete
Review and verify your selection.
Here we can see that Deduplication and Compression are Enabled.
We will have a Total VSAN capacity of 160 GB, 120 GB of this is already claimed inDisk Groups, the remaining 40 GB will be created when we create the additional DiskGroup on the ESXi host called esx-04a.corp.local
We are not configuring Fault Domains and Stretched Cluster
HOL-SDC-1608-SpringRelease
Page 148HOL-SDC-1608-SpringRelease
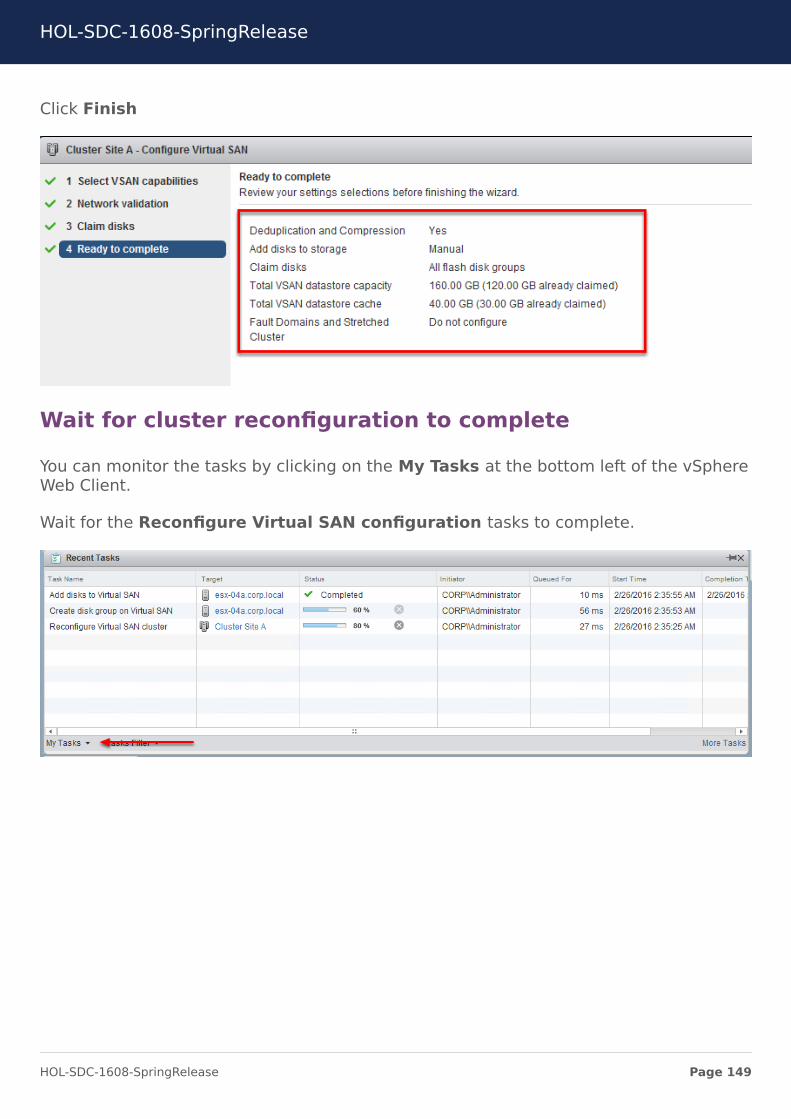
Click Finish
Wait for cluster reconfiguration to complete
You can monitor the tasks by clicking on the My Tasks at the bottom left of the vSphereWeb Client.
Wait for the Reconfigure Virtual SAN configuration tasks to complete.
HOL-SDC-1608-SpringRelease
Page 149HOL-SDC-1608-SpringRelease

Verify initial VSAN cluster configuration
Once the VSAN datastore is created, the General screen will be updated.
We can see that Virtual SAN is now Turned On. Deduplication and compression isEnabled and all disks in the Disk Groups are at Disk format version 3.0.
HOL-SDC-1608-SpringRelease
Page 150HOL-SDC-1608-SpringRelease
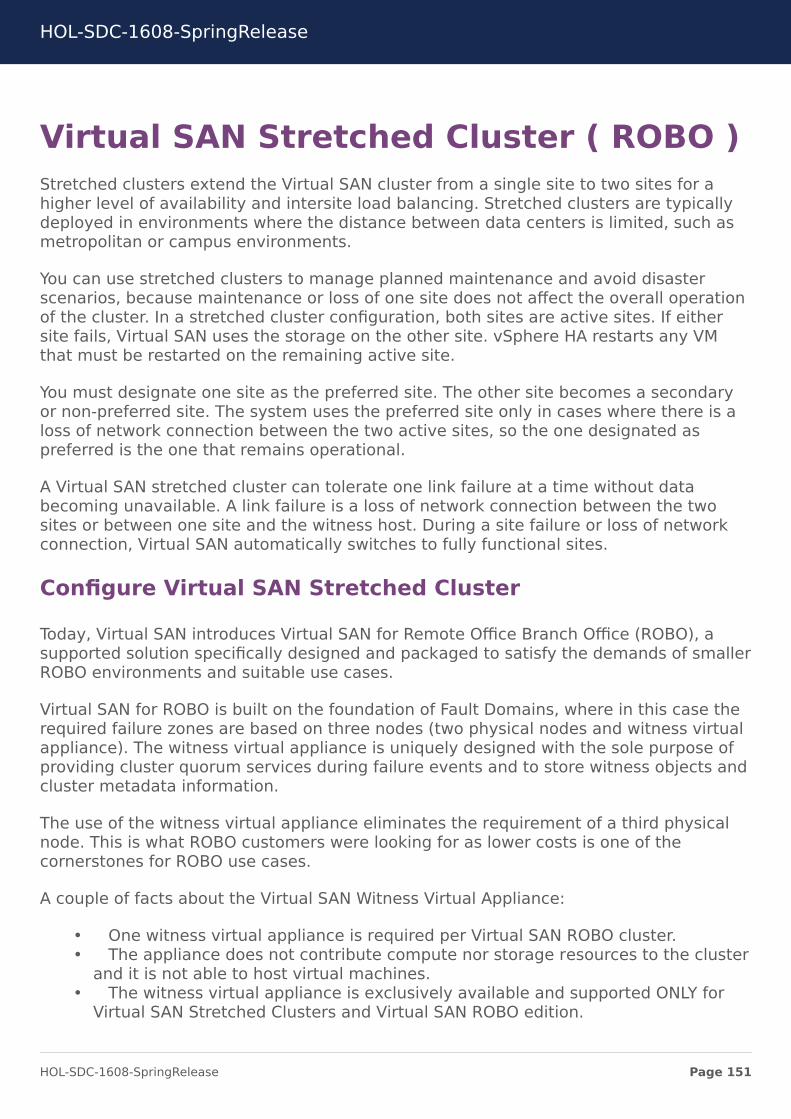
Virtual SAN Stretched Cluster ( ROBO )Stretched clusters extend the Virtual SAN cluster from a single site to two sites for ahigher level of availability and intersite load balancing. Stretched clusters are typicallydeployed in environments where the distance between data centers is limited, such asmetropolitan or campus environments.
You can use stretched clusters to manage planned maintenance and avoid disasterscenarios, because maintenance or loss of one site does not affect the overall operationof the cluster. In a stretched cluster configuration, both sites are active sites. If eithersite fails, Virtual SAN uses the storage on the other site. vSphere HA restarts any VMthat must be restarted on the remaining active site.
You must designate one site as the preferred site. The other site becomes a secondaryor non-preferred site. The system uses the preferred site only in cases where there is aloss of network connection between the two active sites, so the one designated aspreferred is the one that remains operational.
A Virtual SAN stretched cluster can tolerate one link failure at a time without databecoming unavailable. A link failure is a loss of network connection between the twosites or between one site and the witness host. During a site failure or loss of networkconnection, Virtual SAN automatically switches to fully functional sites.
Configure Virtual SAN Stretched Cluster
Today, Virtual SAN introduces Virtual SAN for Remote Office Branch Office (ROBO), asupported solution specifically designed and packaged to satisfy the demands of smallerROBO environments and suitable use cases.
Virtual SAN for ROBO is built on the foundation of Fault Domains, where in this case therequired failure zones are based on three nodes (two physical nodes and witness virtualappliance). The witness virtual appliance is uniquely designed with the sole purpose ofproviding cluster quorum services during failure events and to store witness objects andcluster metadata information.
The use of the witness virtual appliance eliminates the requirement of a third physicalnode. This is what ROBO customers were looking for as lower costs is one of thecornerstones for ROBO use cases.
A couple of facts about the Virtual SAN Witness Virtual Appliance:
• One witness virtual appliance is required per Virtual SAN ROBO cluster.• The appliance does not contribute compute nor storage resources to the cluster
and it is not able to host virtual machines.• The witness virtual appliance is exclusively available and supported ONLY for
Virtual SAN Stretched Clusters and Virtual SAN ROBO edition.
HOL-SDC-1608-SpringRelease
Page 151HOL-SDC-1608-SpringRelease
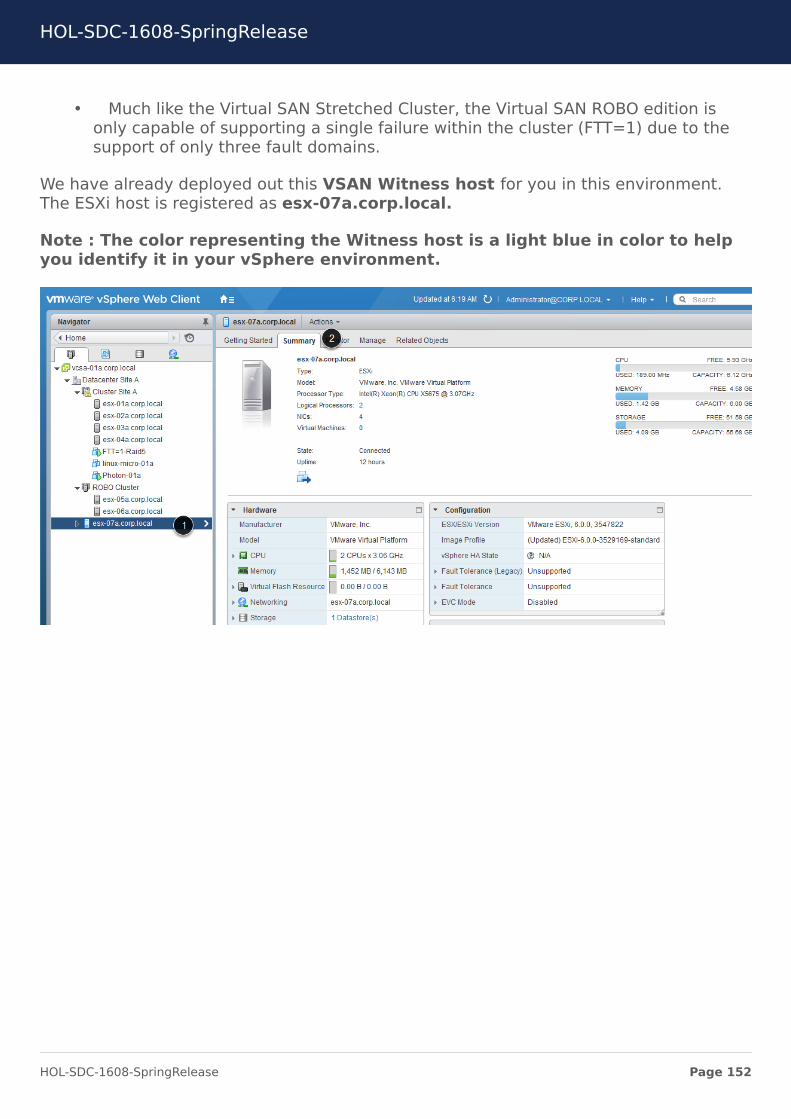
• Much like the Virtual SAN Stretched Cluster, the Virtual SAN ROBO edition isonly capable of supporting a single failure within the cluster (FTT=1) due to thesupport of only three fault domains.
We have already deployed out this VSAN Witness host for you in this environment.The ESXi host is registered as esx-07a.corp.local.
Note : The color representing the Witness host is a light blue in color to helpyou identify it in your vSphere environment.
HOL-SDC-1608-SpringRelease
Page 152HOL-SDC-1608-SpringRelease
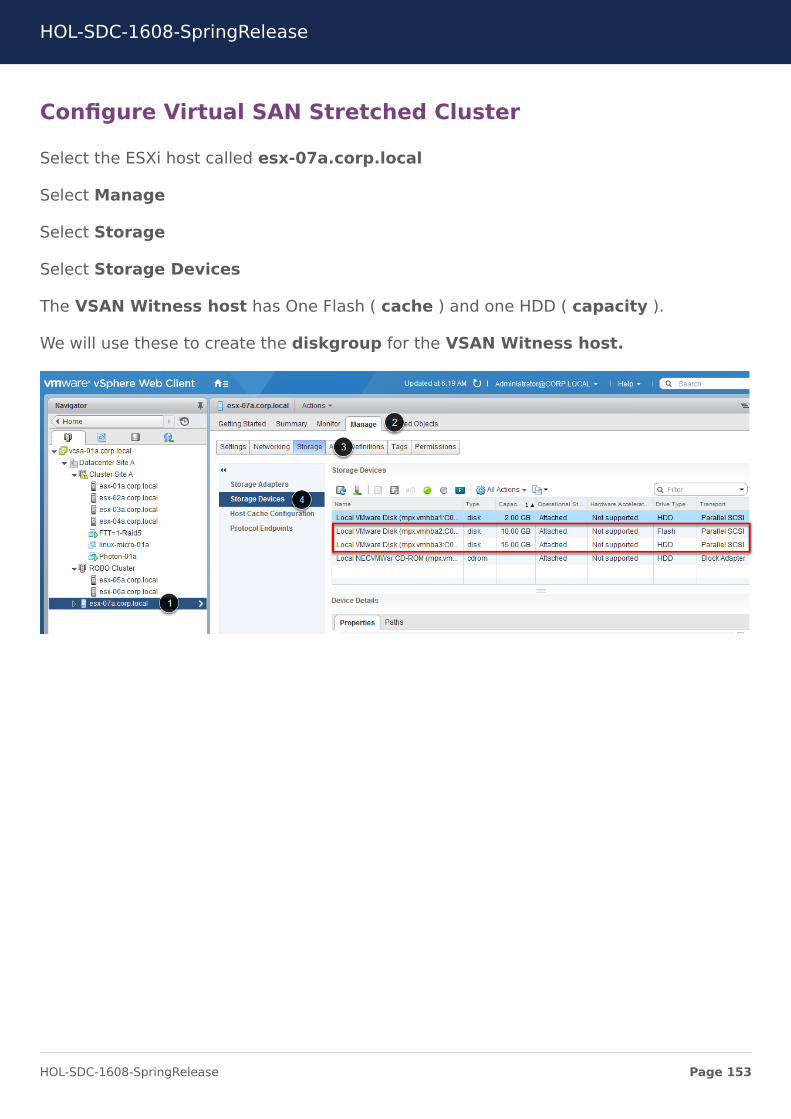
Configure Virtual SAN Stretched Cluster
Select the ESXi host called esx-07a.corp.local
Select Manage
Select Storage
Select Storage Devices
The VSAN Witness host has One Flash ( cache ) and one HDD ( capacity ).
We will use these to create the diskgroup for the VSAN Witness host.
HOL-SDC-1608-SpringRelease
Page 153HOL-SDC-1608-SpringRelease
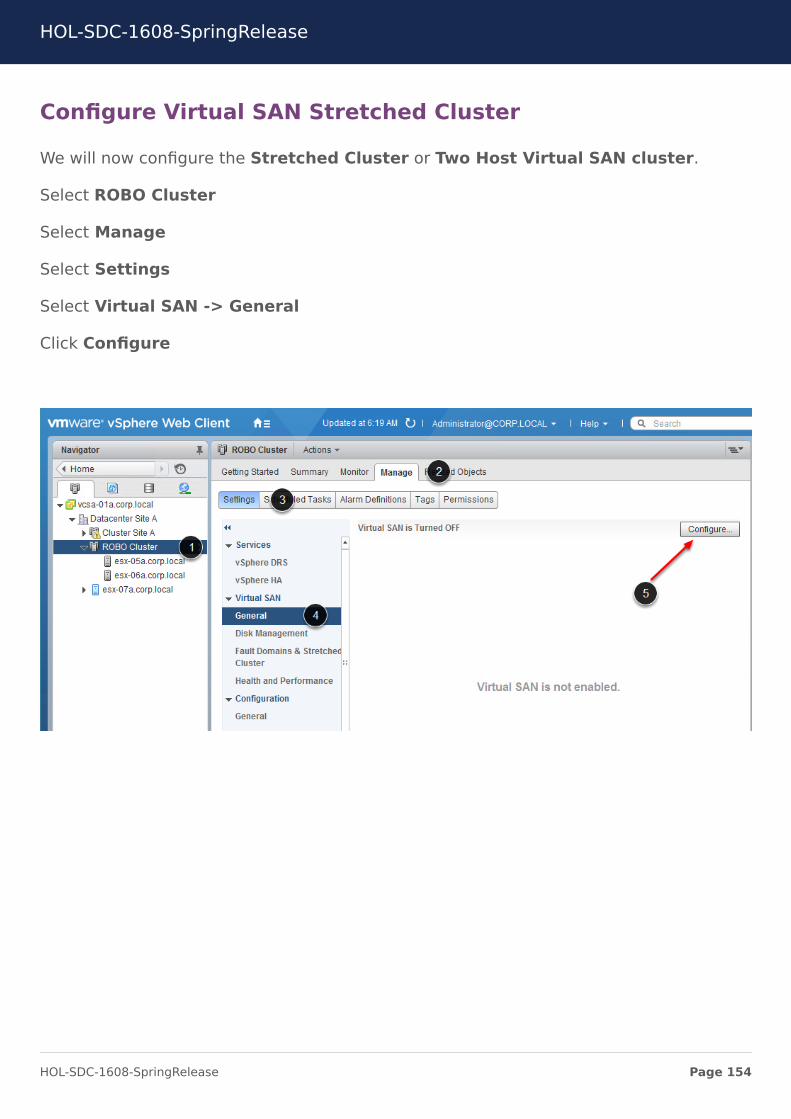
Configure Virtual SAN Stretched Cluster
We will now configure the Stretched Cluster or Two Host Virtual SAN cluster.
Select ROBO Cluster
Select Manage
Select Settings
Select Virtual SAN -> General
Click Configure
HOL-SDC-1608-SpringRelease
Page 154HOL-SDC-1608-SpringRelease
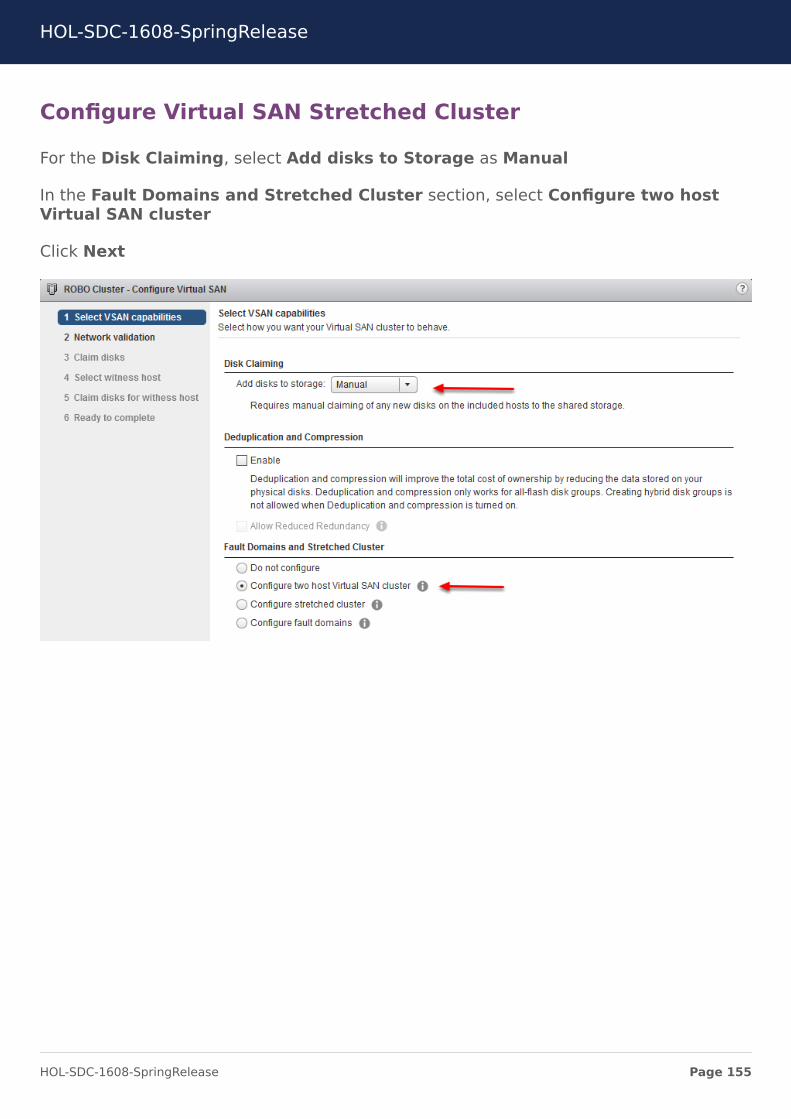
Configure Virtual SAN Stretched Cluster
For the Disk Claiming, select Add disks to Storage as Manual
In the Fault Domains and Stretched Cluster section, select Configure two hostVirtual SAN cluster
Click Next
HOL-SDC-1608-SpringRelease
Page 155HOL-SDC-1608-SpringRelease
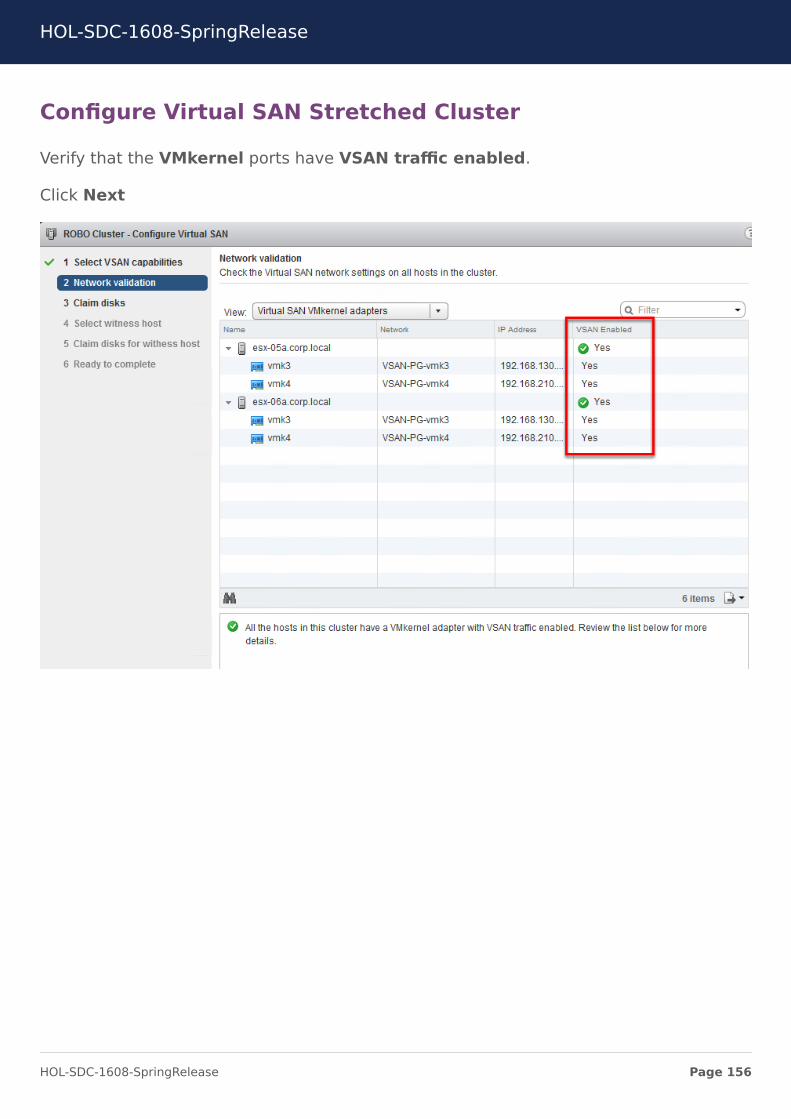
Configure Virtual SAN Stretched Cluster
Verify that the VMkernel ports have VSAN traffic enabled.
Click Next
HOL-SDC-1608-SpringRelease
Page 156HOL-SDC-1608-SpringRelease
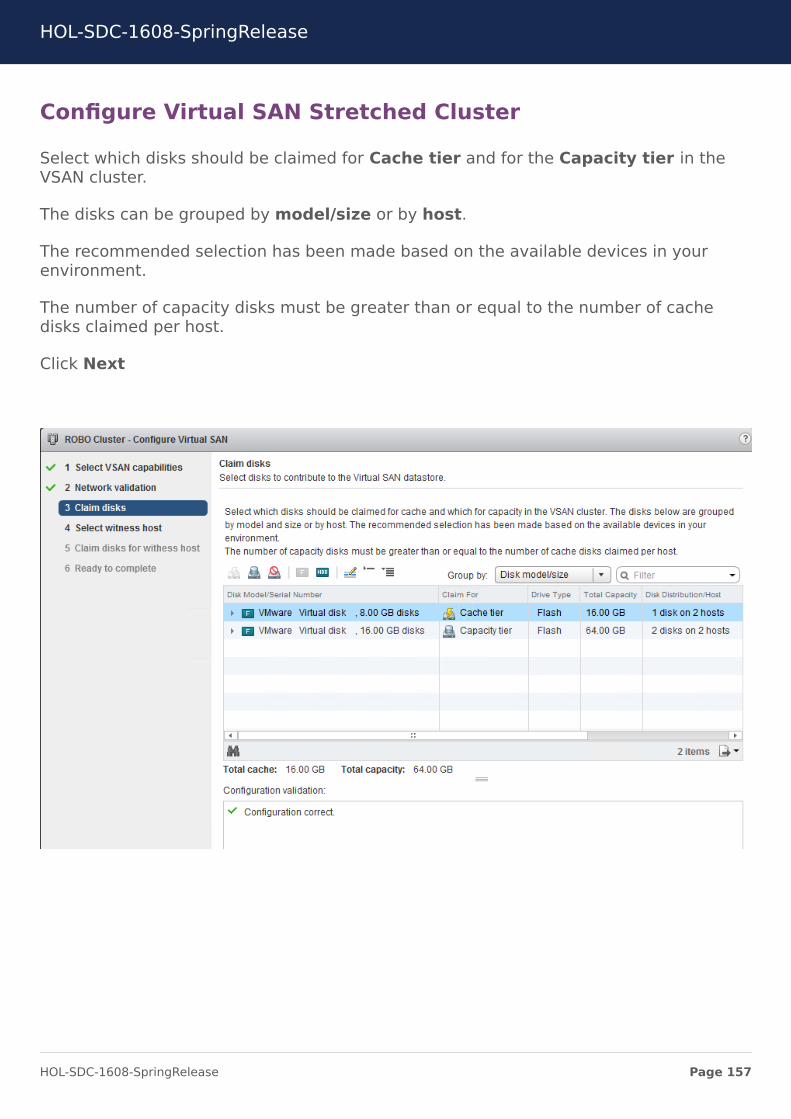
Configure Virtual SAN Stretched Cluster
Select which disks should be claimed for Cache tier and for the Capacity tier in theVSAN cluster.
The disks can be grouped by model/size or by host.
The recommended selection has been made based on the available devices in yourenvironment.
The number of capacity disks must be greater than or equal to the number of cachedisks claimed per host.
Click Next
HOL-SDC-1608-SpringRelease
Page 157HOL-SDC-1608-SpringRelease
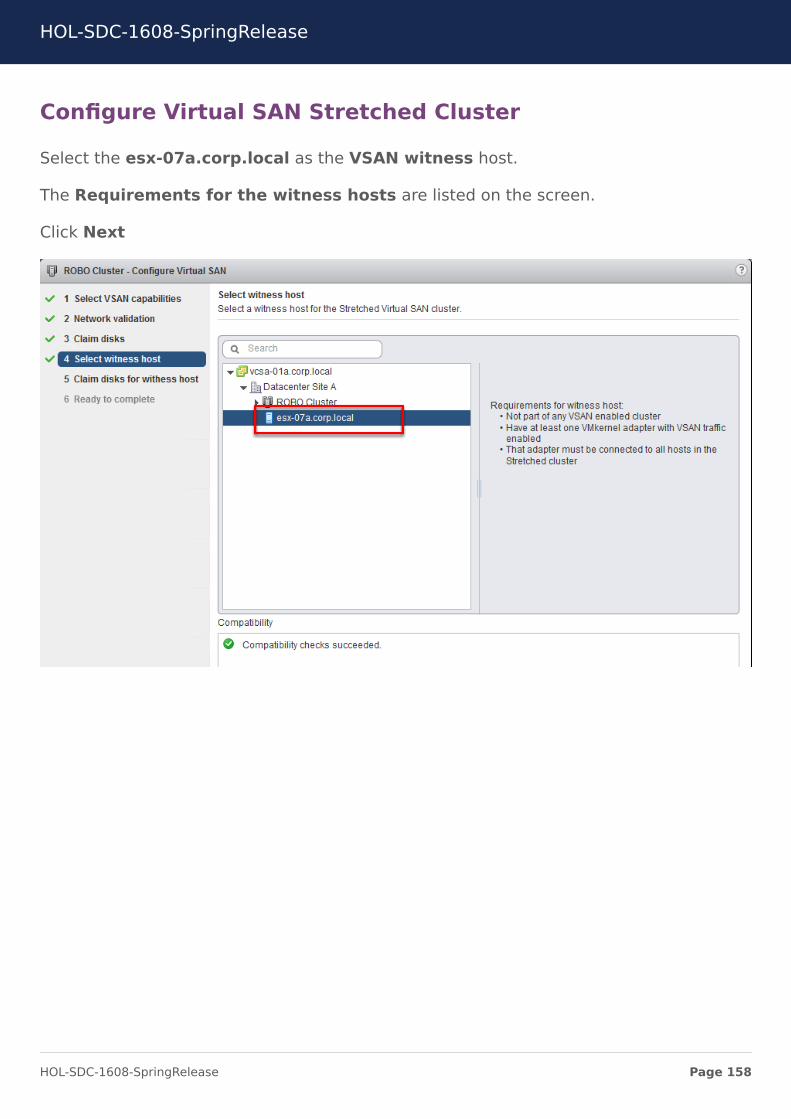
Configure Virtual SAN Stretched Cluster
Select the esx-07a.corp.local as the VSAN witness host.
The Requirements for the witness hosts are listed on the screen.
Click Next
HOL-SDC-1608-SpringRelease
Page 158HOL-SDC-1608-SpringRelease
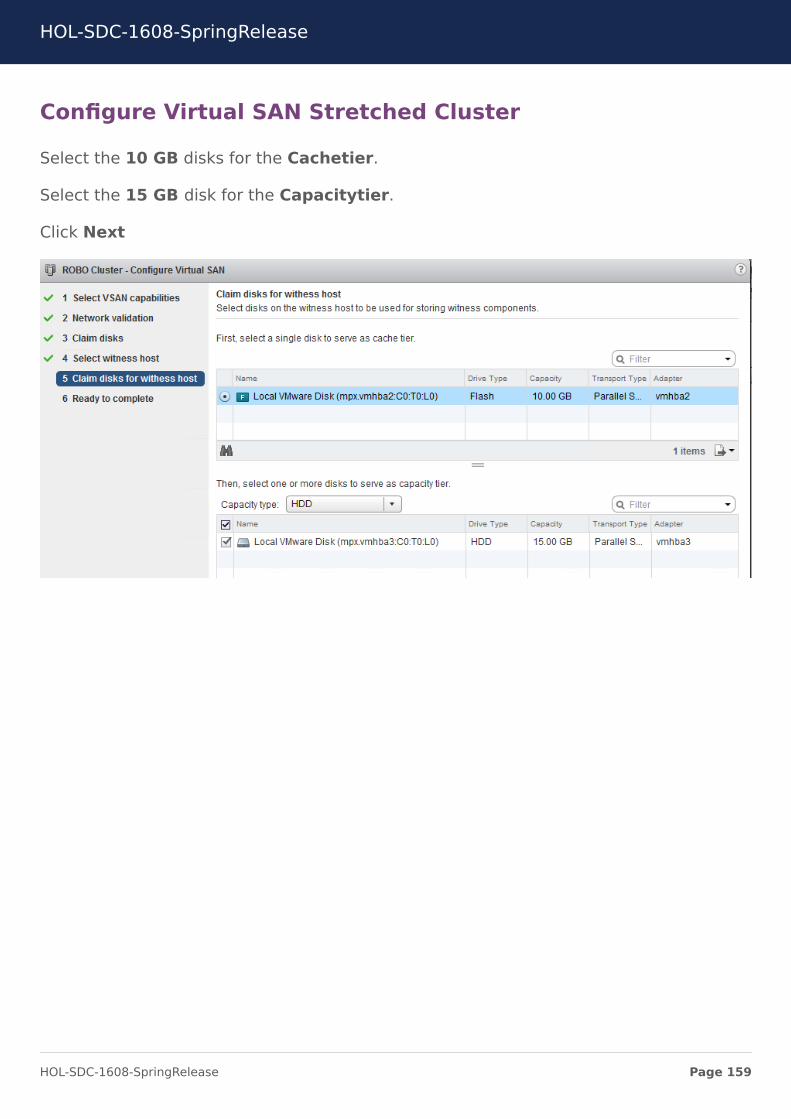
Configure Virtual SAN Stretched Cluster
Select the 10 GB disks for the Cachetier.
Select the 15 GB disk for the Capacitytier.
Click Next
HOL-SDC-1608-SpringRelease
Page 159HOL-SDC-1608-SpringRelease
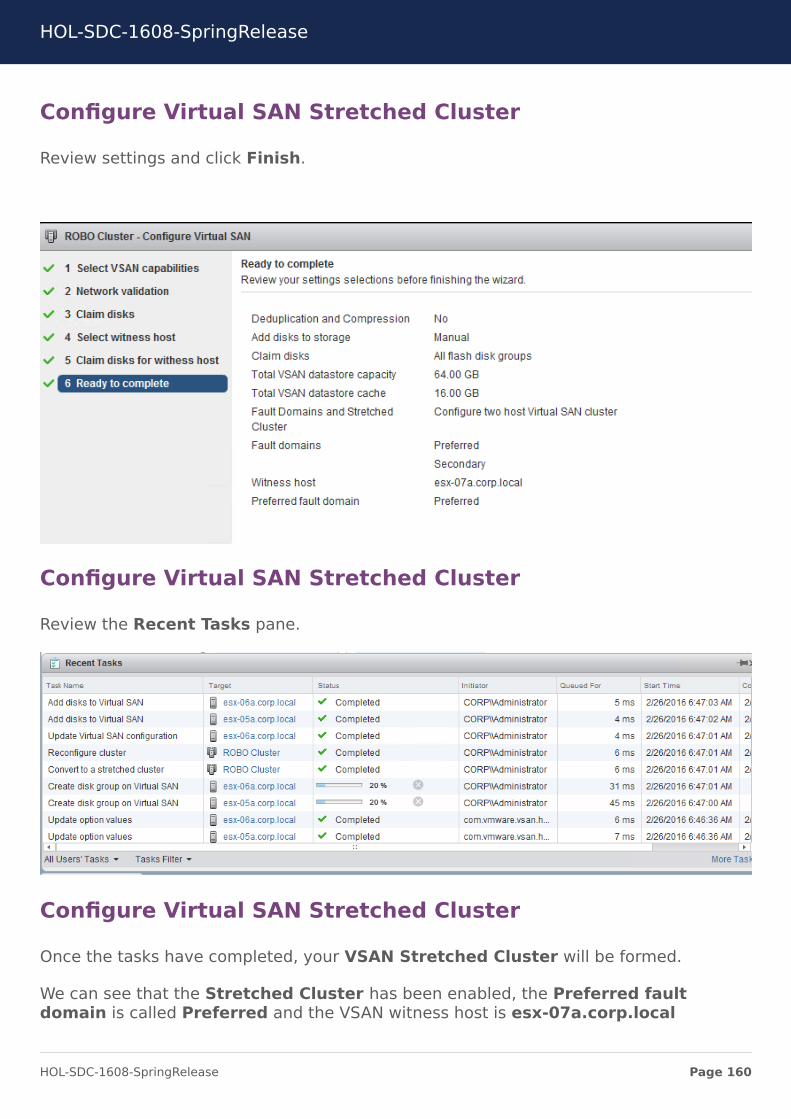
Configure Virtual SAN Stretched Cluster
Review settings and click Finish.
Configure Virtual SAN Stretched Cluster
Review the Recent Tasks pane.
Configure Virtual SAN Stretched Cluster
Once the tasks have completed, your VSAN Stretched Cluster will be formed.
We can see that the Stretched Cluster has been enabled, the Preferred faultdomain is called Preferred and the VSAN witness host is esx-07a.corp.local
HOL-SDC-1608-SpringRelease
Page 160HOL-SDC-1608-SpringRelease
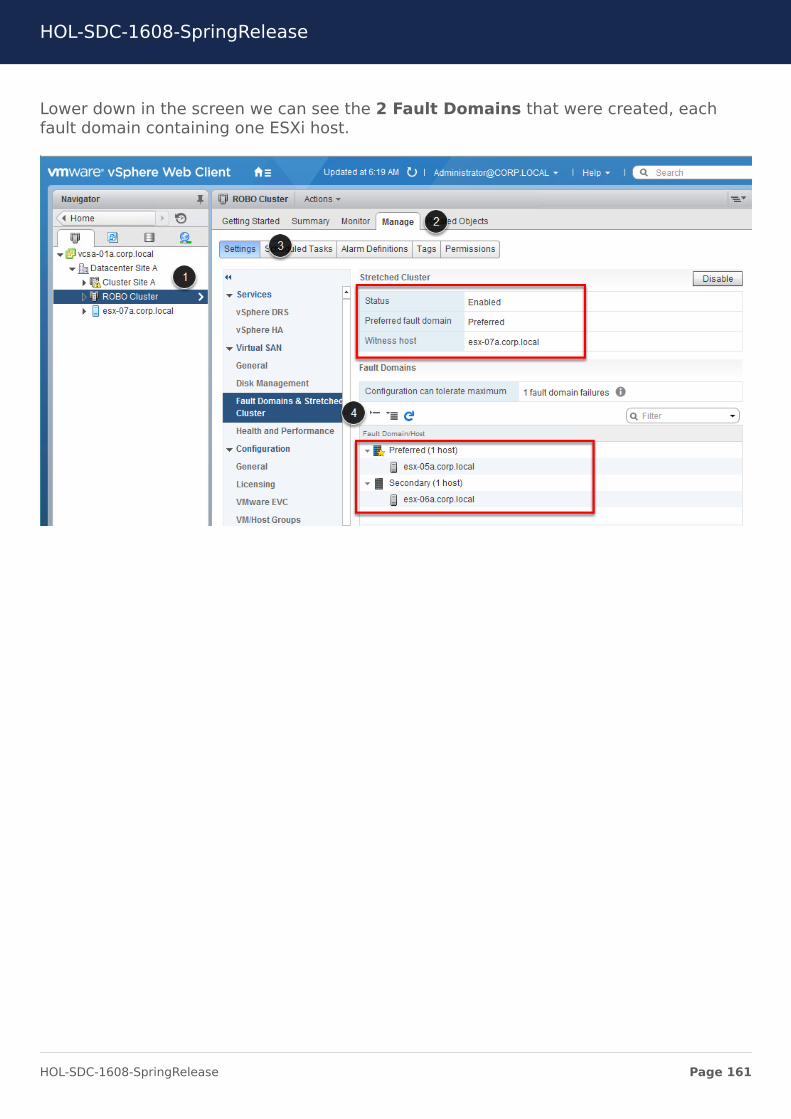
Lower down in the screen we can see the 2 Fault Domains that were created, eachfault domain containing one ESXi host.
HOL-SDC-1608-SpringRelease
Page 161HOL-SDC-1608-SpringRelease
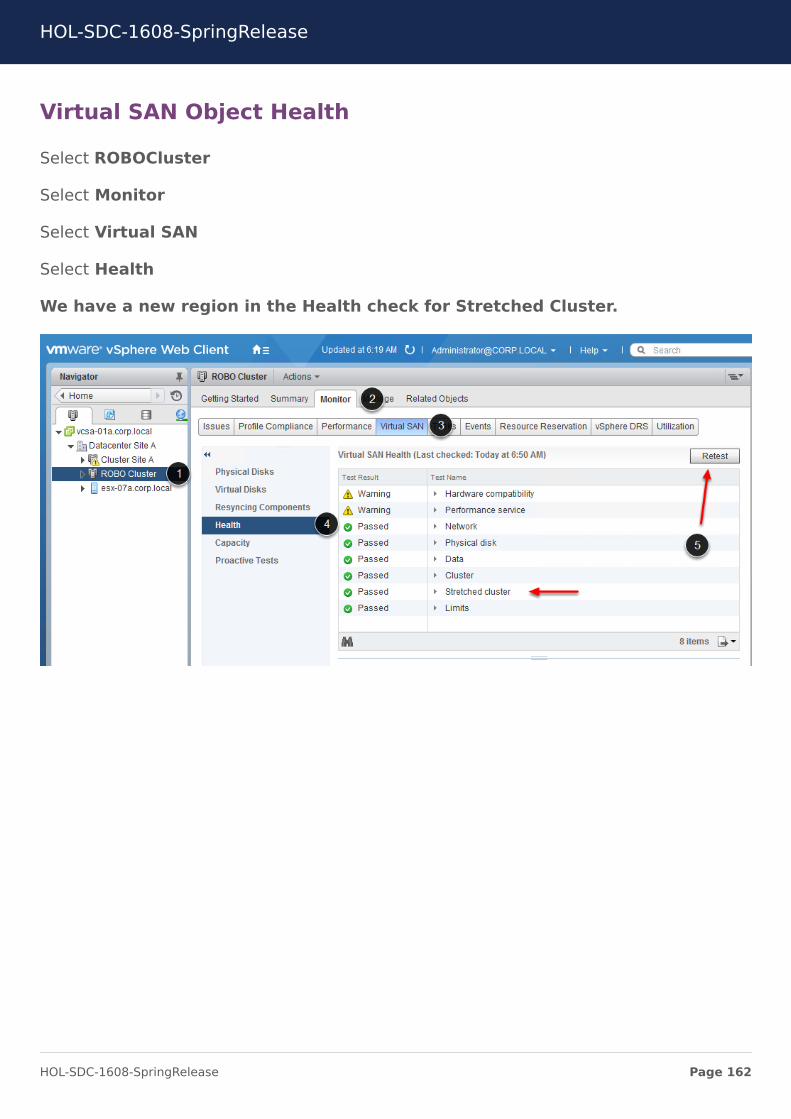
Virtual SAN Object Health
Select ROBOCluster
Select Monitor
Select Virtual SAN
Select Health
We have a new region in the Health check for Stretched Cluster.
HOL-SDC-1608-SpringRelease
Page 162HOL-SDC-1608-SpringRelease
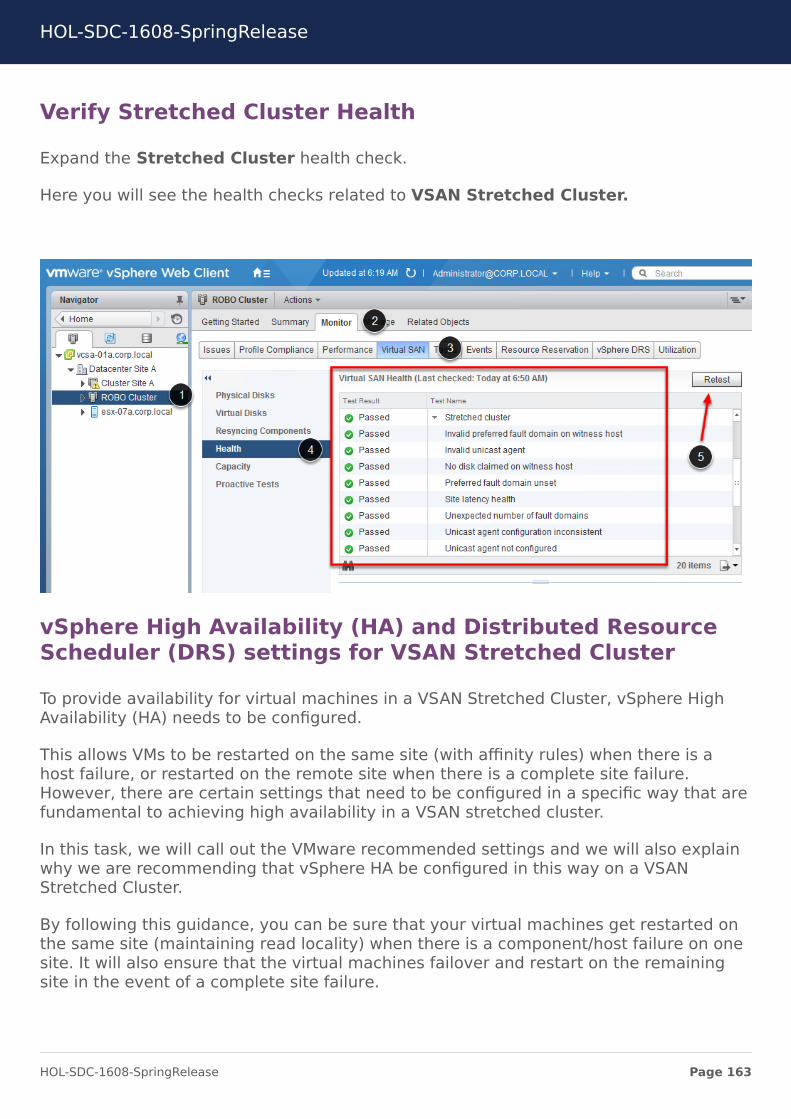
Verify Stretched Cluster Health
Expand the Stretched Cluster health check.
Here you will see the health checks related to VSAN Stretched Cluster.
vSphere High Availability (HA) and Distributed ResourceScheduler (DRS) settings for VSAN Stretched Cluster
To provide availability for virtual machines in a VSAN Stretched Cluster, vSphere HighAvailability (HA) needs to be configured.
This allows VMs to be restarted on the same site (with affinity rules) when there is ahost failure, or restarted on the remote site when there is a complete site failure.However, there are certain settings that need to be configured in a specific way that arefundamental to achieving high availability in a VSAN stretched cluster.
In this task, we will call out the VMware recommended settings and we will also explainwhy we are recommending that vSphere HA be configured in this way on a VSANStretched Cluster.
By following this guidance, you can be sure that your virtual machines get restarted onthe same site (maintaining read locality) when there is a component/host failure on onesite. It will also ensure that the virtual machines failover and restart on the remainingsite in the event of a complete site failure.
HOL-SDC-1608-SpringRelease
Page 163HOL-SDC-1608-SpringRelease
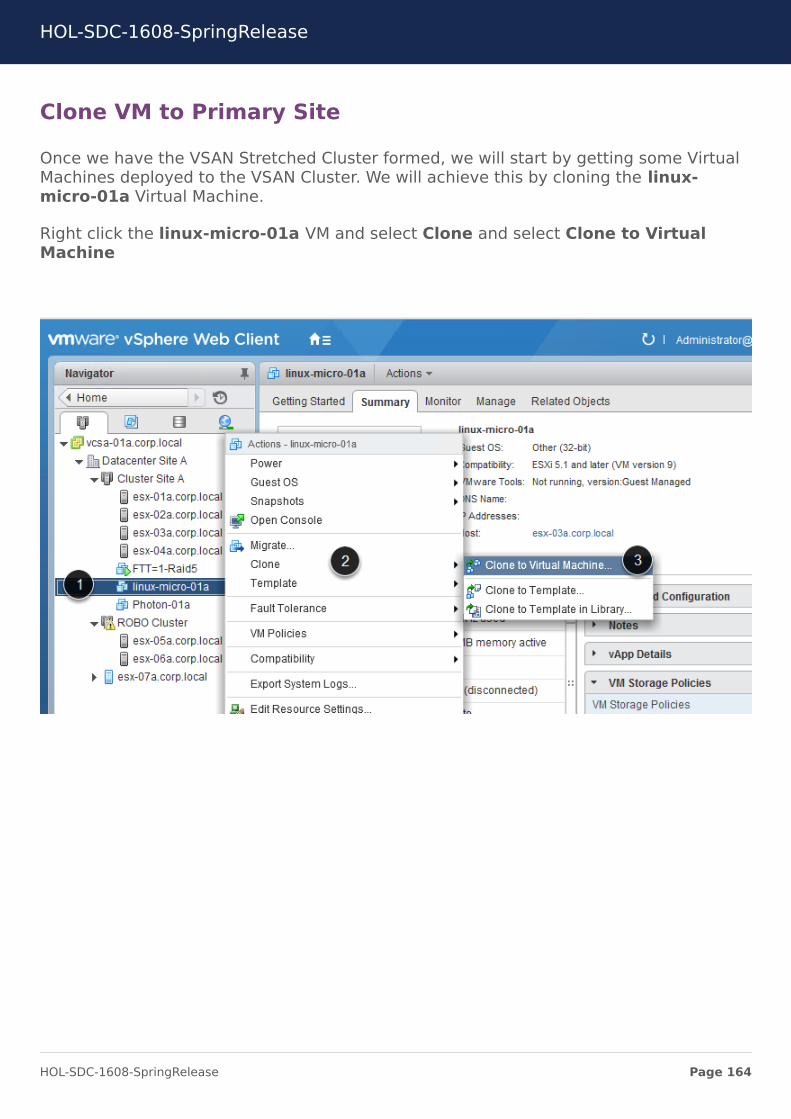
Clone VM to Primary Site
Once we have the VSAN Stretched Cluster formed, we will start by getting some VirtualMachines deployed to the VSAN Cluster. We will achieve this by cloning the linux-micro-01a Virtual Machine.
Right click the linux-micro-01a VM and select Clone and select Clone to VirtualMachine
HOL-SDC-1608-SpringRelease
Page 164HOL-SDC-1608-SpringRelease
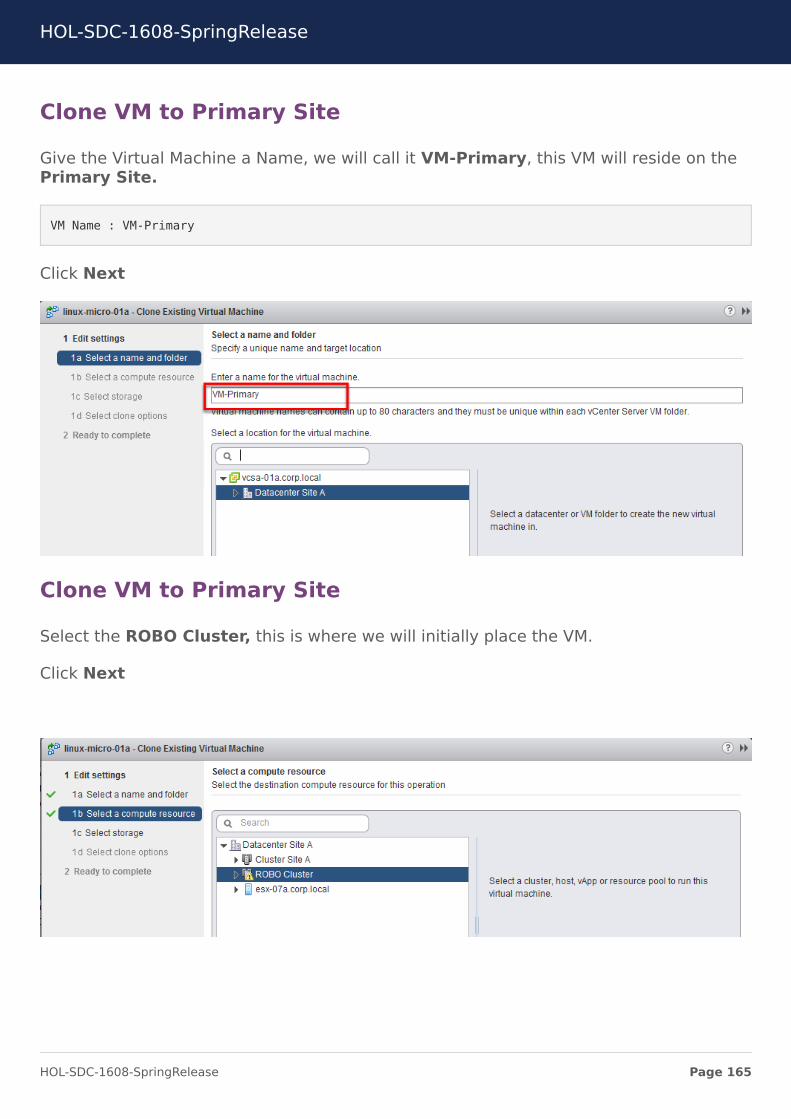
Clone VM to Primary Site
Give the Virtual Machine a Name, we will call it VM-Primary, this VM will reside on thePrimary Site.
VM Name : VM-Primary
Click Next
Clone VM to Primary Site
Select the ROBO Cluster, this is where we will initially place the VM.
Click Next
HOL-SDC-1608-SpringRelease
Page 165HOL-SDC-1608-SpringRelease
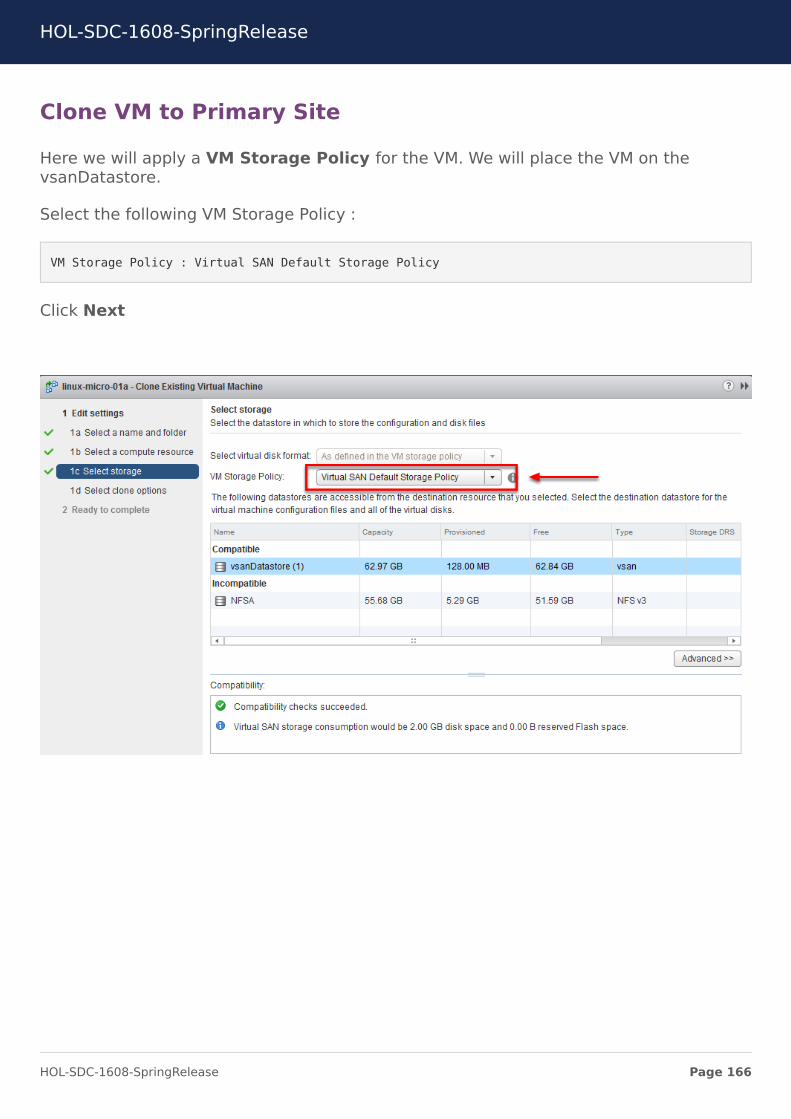
Clone VM to Primary Site
Here we will apply a VM Storage Policy for the VM. We will place the VM on thevsanDatastore.
Select the following VM Storage Policy :
VM Storage Policy : Virtual SAN Default Storage Policy
Click Next
HOL-SDC-1608-SpringRelease
Page 166HOL-SDC-1608-SpringRelease

Clone VM to Primary Site
Click Next on the Select Clone options
Clone VM to Primary Site
Review your settings and click Finish
HOL-SDC-1608-SpringRelease
Page 167HOL-SDC-1608-SpringRelease
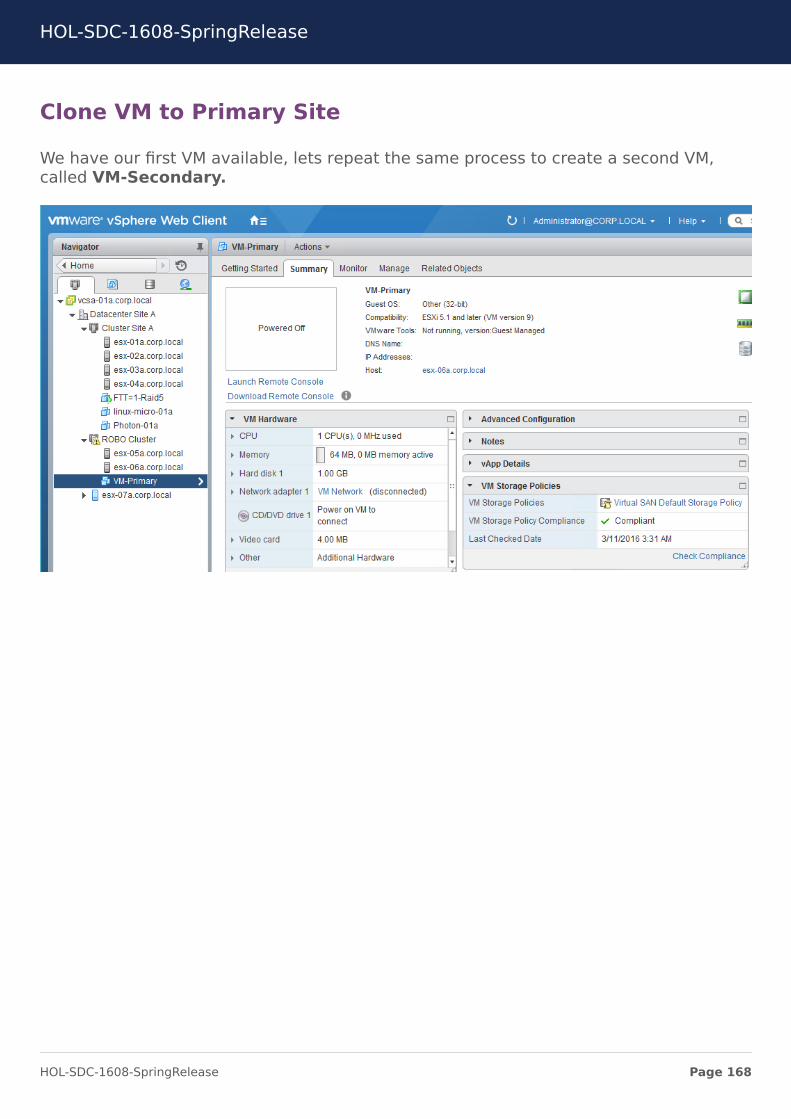
Clone VM to Primary Site
We have our first VM available, lets repeat the same process to create a second VM,called VM-Secondary.
HOL-SDC-1608-SpringRelease
Page 168HOL-SDC-1608-SpringRelease
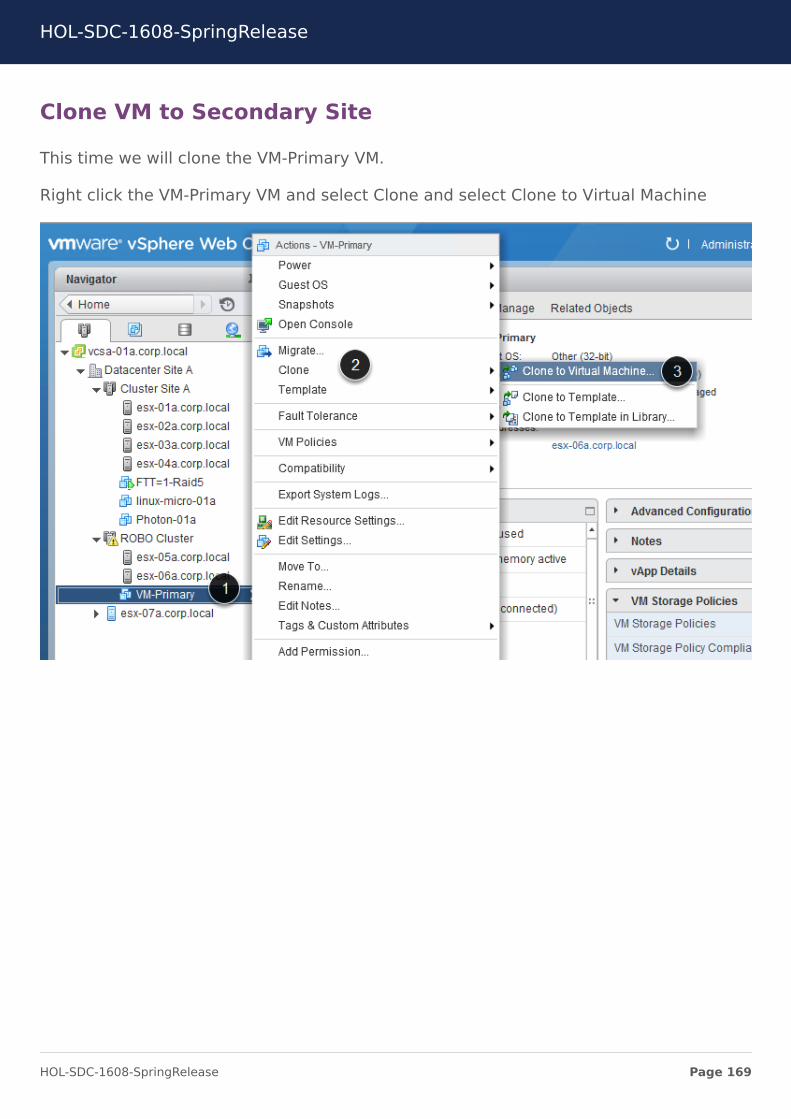
Clone VM to Secondary Site
This time we will clone the VM-Primary VM.
Right click the VM-Primary VM and select Clone and select Clone to Virtual Machine
HOL-SDC-1608-SpringRelease
Page 169HOL-SDC-1608-SpringRelease
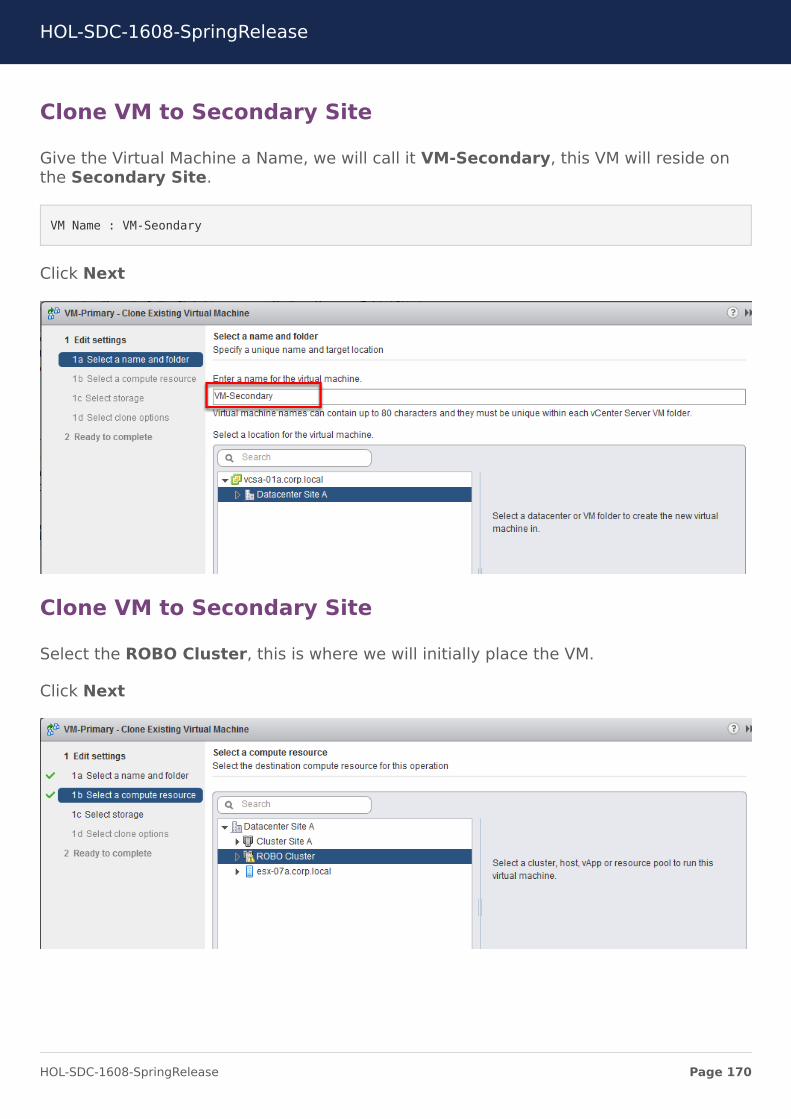
Clone VM to Secondary Site
Give the Virtual Machine a Name, we will call it VM-Secondary, this VM will reside onthe Secondary Site.
VM Name : VM-Seondary
Click Next
Clone VM to Secondary Site
Select the ROBO Cluster, this is where we will initially place the VM.
Click Next
HOL-SDC-1608-SpringRelease
Page 170HOL-SDC-1608-SpringRelease
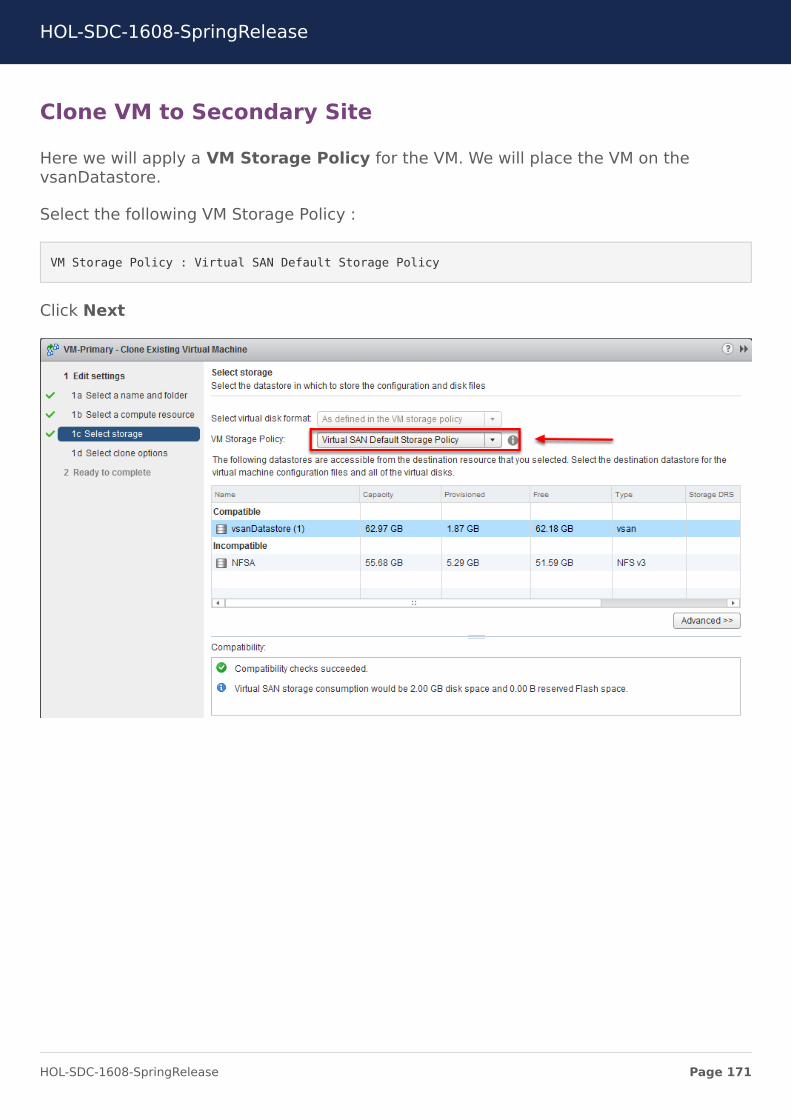
Clone VM to Secondary Site
Here we will apply a VM Storage Policy for the VM. We will place the VM on thevsanDatastore.
Select the following VM Storage Policy :
VM Storage Policy : Virtual SAN Default Storage Policy
Click Next
HOL-SDC-1608-SpringRelease
Page 171HOL-SDC-1608-SpringRelease
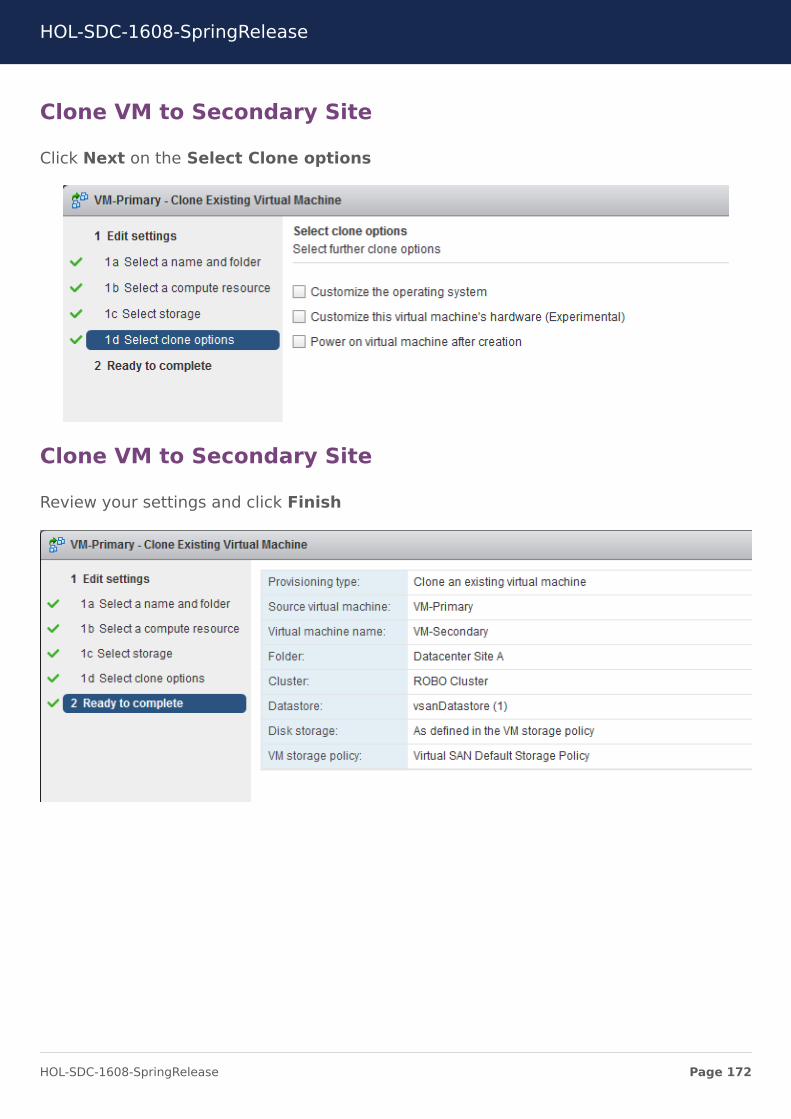
Clone VM to Secondary Site
Click Next on the Select Clone options
Clone VM to Secondary Site
Review your settings and click Finish
HOL-SDC-1608-SpringRelease
Page 172HOL-SDC-1608-SpringRelease

vSphere HA and DRS settings for VSAN Stretched Cluster
We now have our 2 Virtual Machines deployed in our environment.
vSphere DRS Settings
We have already configured most of the HA and DRS settings required for a VSANStretched Cluster, but we will call them out here just to show you what needs to beconfigured.
DRS can be setup in fully automated or partially automated mode.
For more information on setting up VSAN Cluster refer to the following link : -http://www.vmware.com/files/pdf/products/vsan/VMware-Virtual-SAN-6.2-Stretched-Cluster-Guide.pdf
Select ROBO Cluster
Select Manage
Select Settings
Select vSphere DRS
HOL-SDC-1608-SpringRelease
Page 173HOL-SDC-1608-SpringRelease
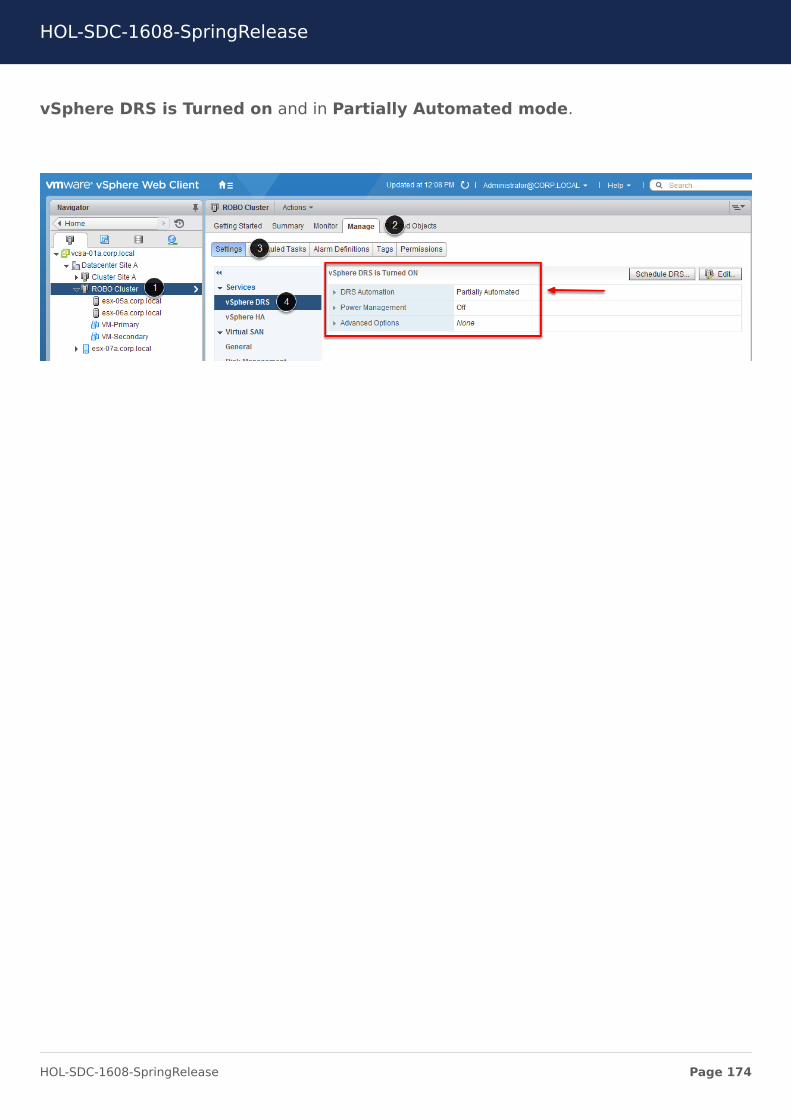
vSphere DRS is Turned on and in Partially Automated mode.
HOL-SDC-1608-SpringRelease
Page 174HOL-SDC-1608-SpringRelease
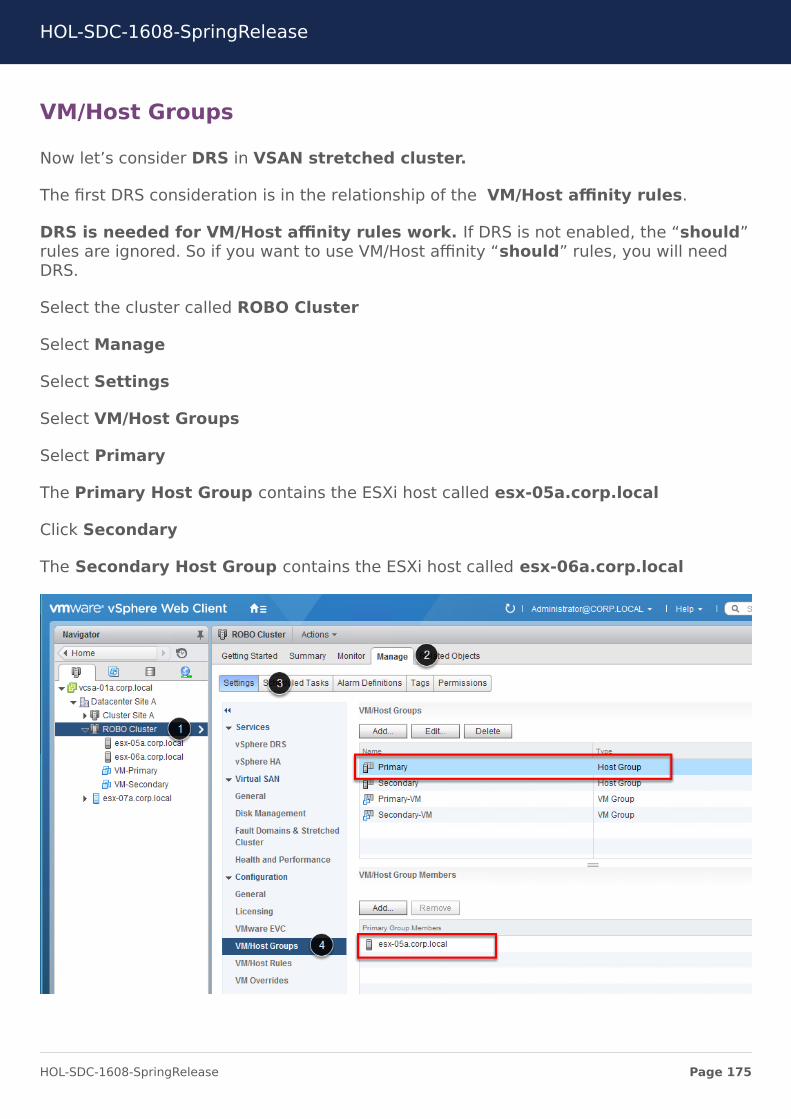
VM/Host Groups
Now let’s consider DRS in VSAN stretched cluster.
The first DRS consideration is in the relationship of the VM/Host affinity rules.
DRS is needed for VM/Host affinity rules work. If DRS is not enabled, the “should”rules are ignored. So if you want to use VM/Host affinity “should” rules, you will needDRS.
Select the cluster called ROBO Cluster
Select Manage
Select Settings
Select VM/Host Groups
Select Primary
The Primary Host Group contains the ESXi host called esx-05a.corp.local
Click Secondary
The Secondary Host Group contains the ESXi host called esx-06a.corp.local
HOL-SDC-1608-SpringRelease
Page 175HOL-SDC-1608-SpringRelease
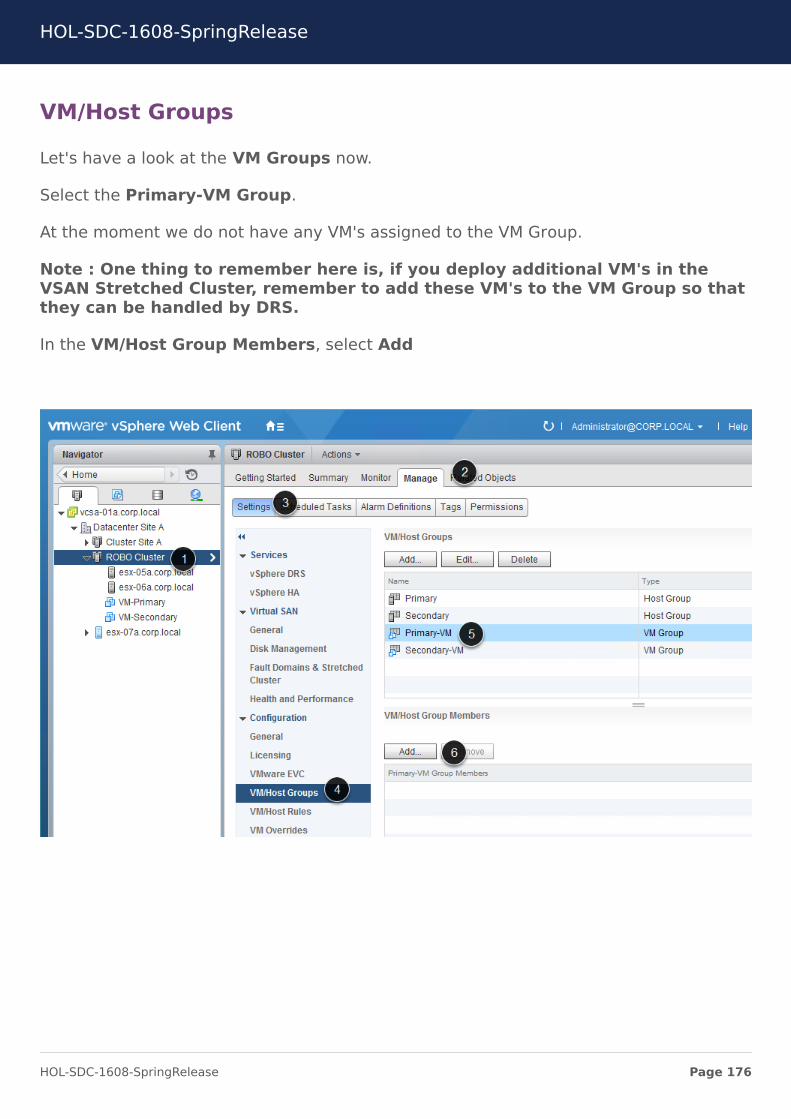
VM/Host Groups
Let's have a look at the VM Groups now.
Select the Primary-VM Group.
At the moment we do not have any VM's assigned to the VM Group.
Note : One thing to remember here is, if you deploy additional VM's in theVSAN Stretched Cluster, remember to add these VM's to the VM Group so thatthey can be handled by DRS.
In the VM/Host Group Members, select Add
HOL-SDC-1608-SpringRelease
Page 176HOL-SDC-1608-SpringRelease
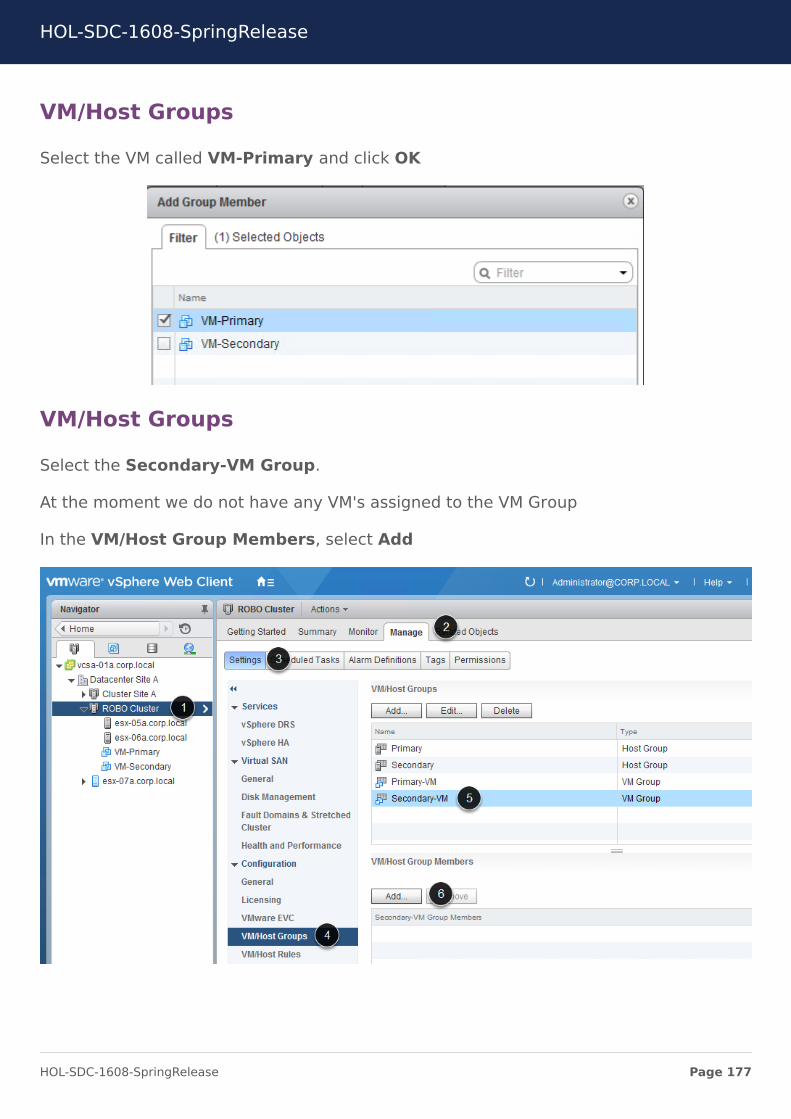
VM/Host Groups
Select the VM called VM-Primary and click OK
VM/Host Groups
Select the Secondary-VM Group.
At the moment we do not have any VM's assigned to the VM Group
In the VM/Host Group Members, select Add
HOL-SDC-1608-SpringRelease
Page 177HOL-SDC-1608-SpringRelease
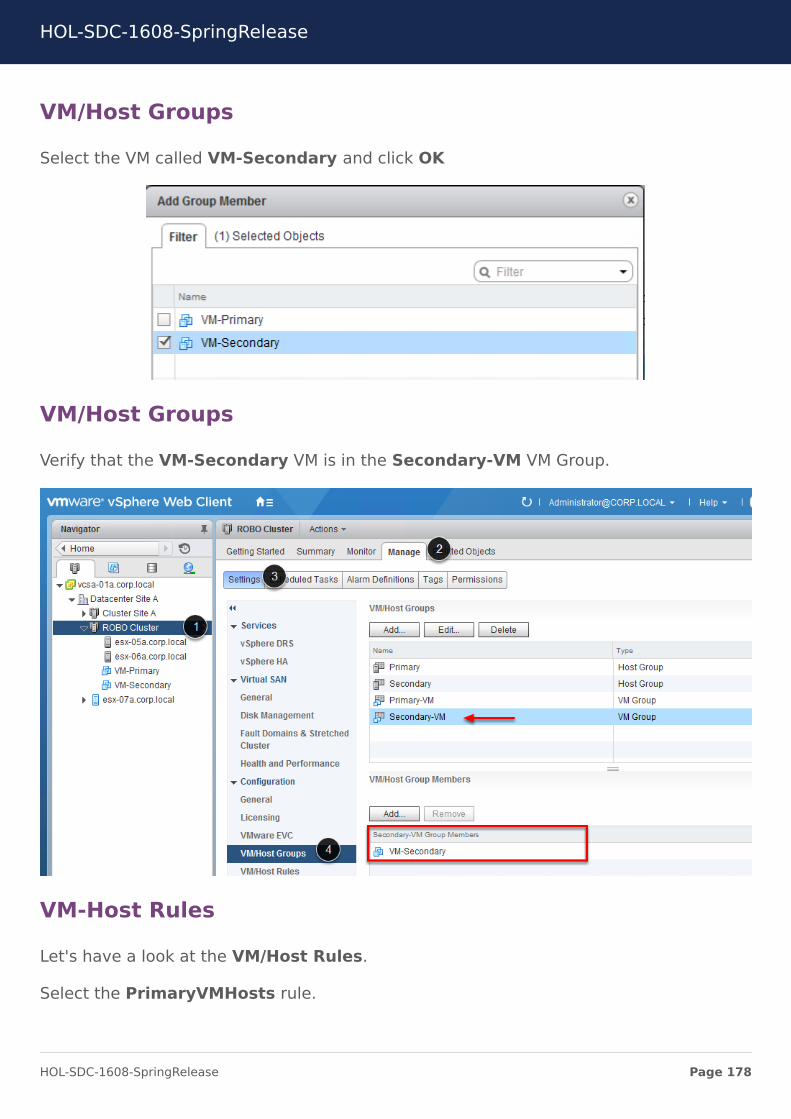
VM/Host Groups
Select the VM called VM-Secondary and click OK
VM/Host Groups
Verify that the VM-Secondary VM is in the Secondary-VM VM Group.
VM-Host Rules
Let's have a look at the VM/Host Rules.
Select the PrimaryVMHosts rule.
HOL-SDC-1608-SpringRelease
Page 178HOL-SDC-1608-SpringRelease
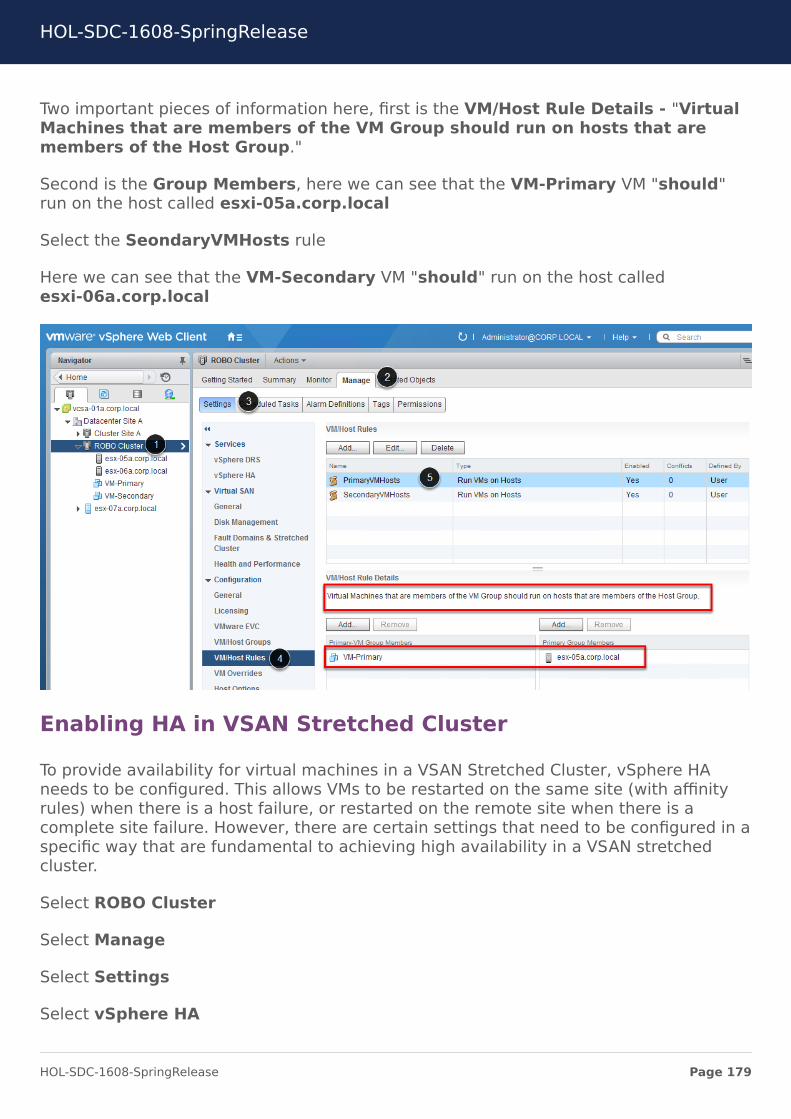
Two important pieces of information here, first is the VM/Host Rule Details - "VirtualMachines that are members of the VM Group should run on hosts that aremembers of the Host Group."
Second is the Group Members, here we can see that the VM-Primary VM "should"run on the host called esxi-05a.corp.local
Select the SeondaryVMHosts rule
Here we can see that the VM-Secondary VM "should" run on the host calledesxi-06a.corp.local
Enabling HA in VSAN Stretched Cluster
To provide availability for virtual machines in a VSAN Stretched Cluster, vSphere HAneeds to be configured. This allows VMs to be restarted on the same site (with affinityrules) when there is a host failure, or restarted on the remote site when there is acomplete site failure. However, there are certain settings that need to be configured in aspecific way that are fundamental to achieving high availability in a VSAN stretchedcluster.
Select ROBO Cluster
Select Manage
Select Settings
Select vSphere HA
HOL-SDC-1608-SpringRelease
Page 179HOL-SDC-1608-SpringRelease
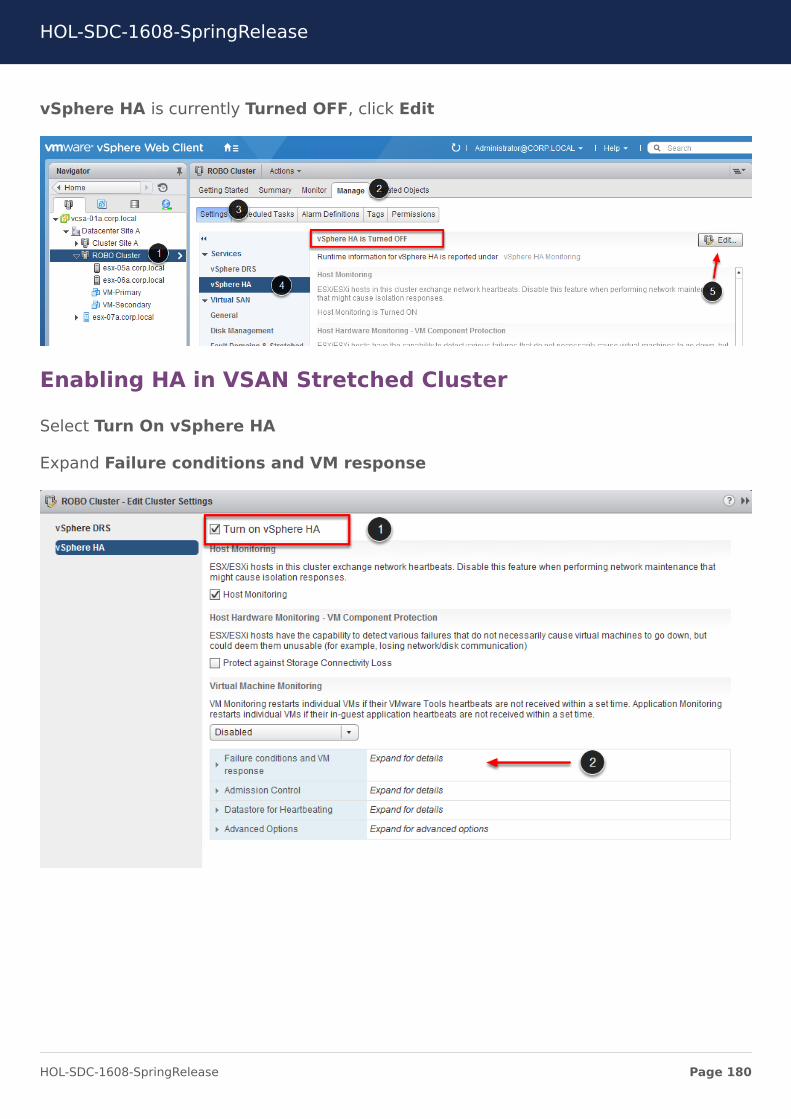
vSphere HA is currently Turned OFF, click Edit
Enabling HA in VSAN Stretched Cluster
Select Turn On vSphere HA
Expand Failure conditions and VM response
HOL-SDC-1608-SpringRelease
Page 180HOL-SDC-1608-SpringRelease
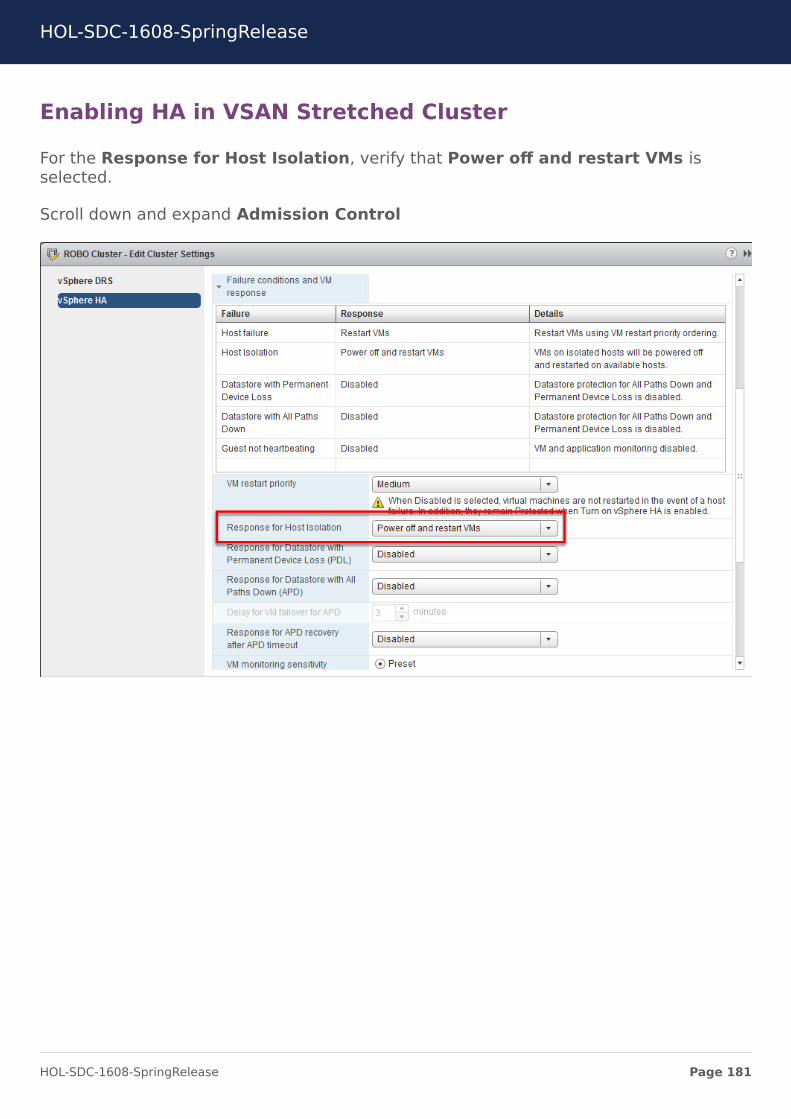
Enabling HA in VSAN Stretched Cluster
For the Response for Host Isolation, verify that Power off and restart VMs isselected.
Scroll down and expand Admission Control
HOL-SDC-1608-SpringRelease
Page 181HOL-SDC-1608-SpringRelease
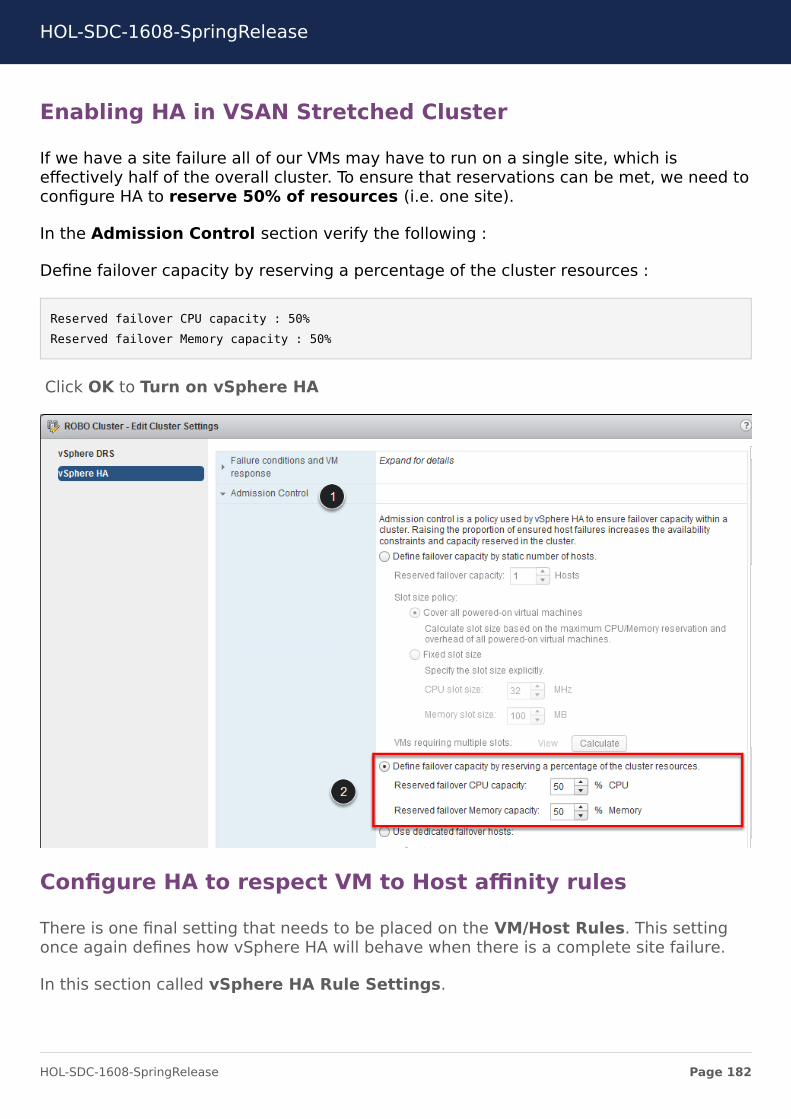
Enabling HA in VSAN Stretched Cluster
If we have a site failure all of our VMs may have to run on a single site, which iseffectively half of the overall cluster. To ensure that reservations can be met, we need toconfigure HA to reserve 50% of resources (i.e. one site).
In the Admission Control section verify the following :
Define failover capacity by reserving a percentage of the cluster resources :
Reserved failover CPU capacity : 50%Reserved failover Memory capacity : 50%
Click OK to Turn on vSphere HA
Configure HA to respect VM to Host affinity rules
There is one final setting that needs to be placed on the VM/Host Rules. This settingonce again defines how vSphere HA will behave when there is a complete site failure.
In this section called vSphere HA Rule Settings.
HOL-SDC-1608-SpringRelease
Page 182HOL-SDC-1608-SpringRelease
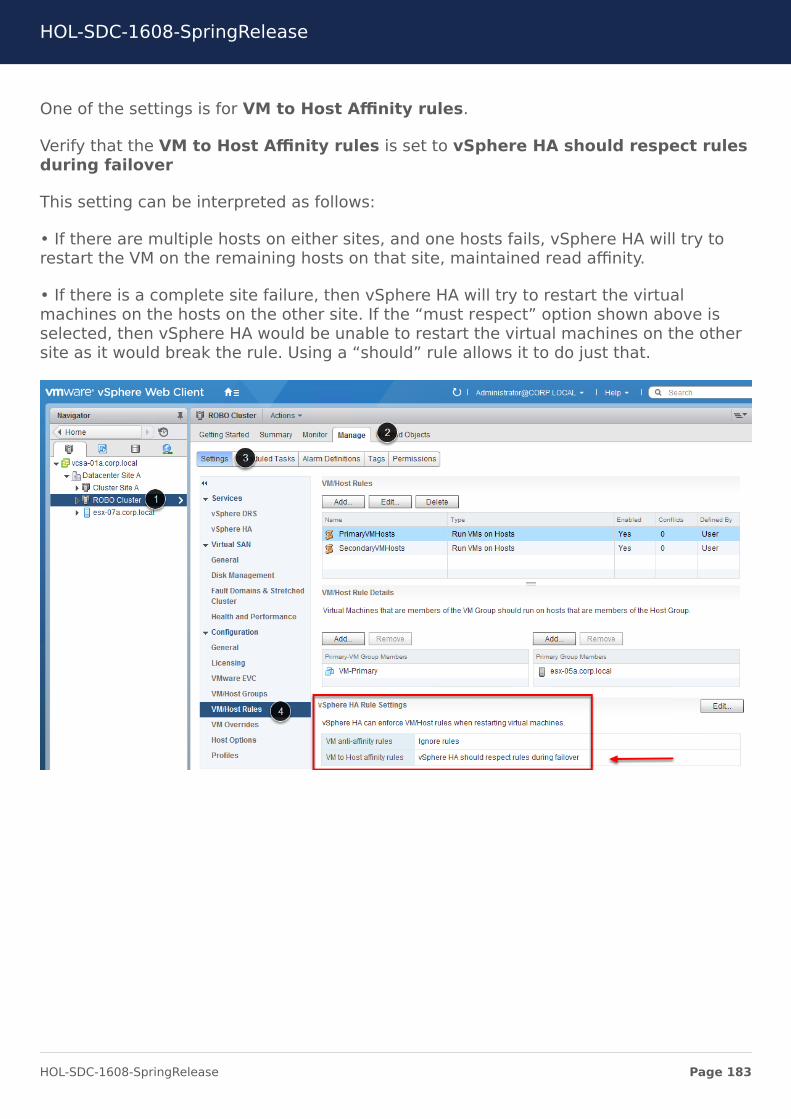
One of the settings is for VM to Host Affinity rules.
Verify that the VM to Host Affinity rules is set to vSphere HA should respect rulesduring failover
This setting can be interpreted as follows:
• If there are multiple hosts on either sites, and one hosts fails, vSphere HA will try torestart the VM on the remaining hosts on that site, maintained read affinity.
• If there is a complete site failure, then vSphere HA will try to restart the virtualmachines on the hosts on the other site. If the “must respect” option shown above isselected, then vSphere HA would be unable to restart the virtual machines on the othersite as it would break the rule. Using a “should” rule allows it to do just that.
HOL-SDC-1608-SpringRelease
Page 183HOL-SDC-1608-SpringRelease
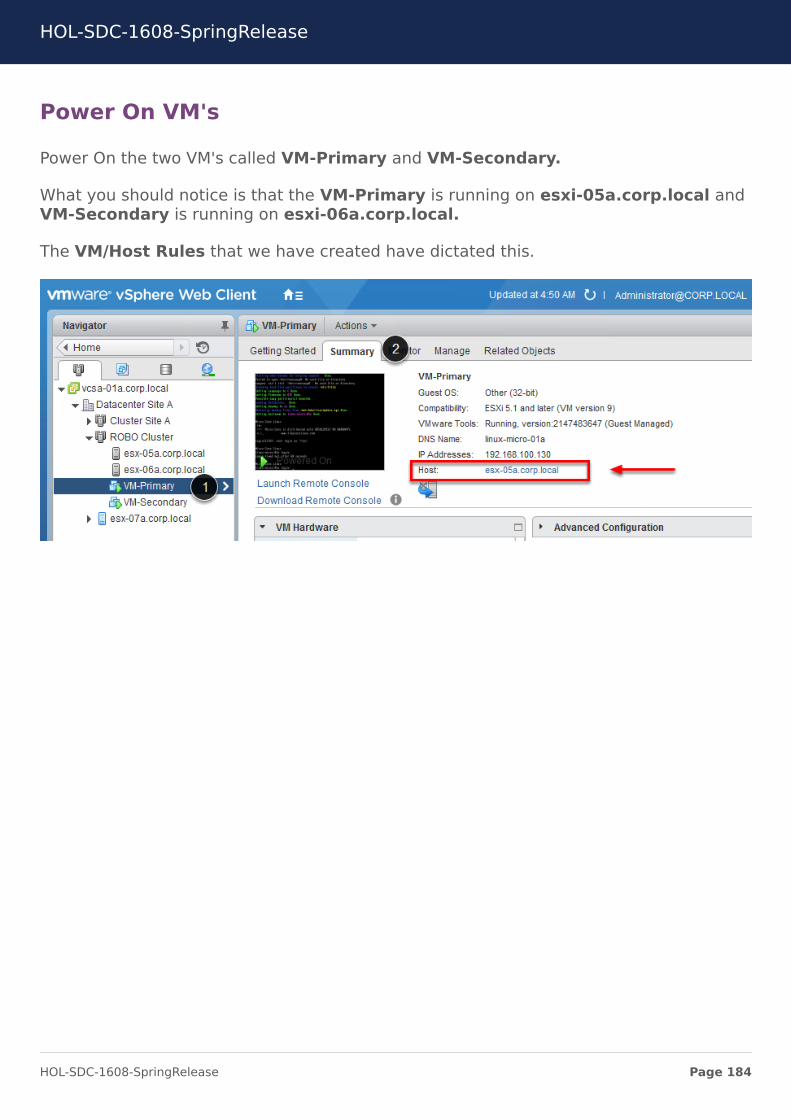
Power On VM's
Power On the two VM's called VM-Primary and VM-Secondary.
What you should notice is that the VM-Primary is running on esxi-05a.corp.local andVM-Secondary is running on esxi-06a.corp.local.
The VM/Host Rules that we have created have dictated this.
HOL-SDC-1608-SpringRelease
Page 184HOL-SDC-1608-SpringRelease
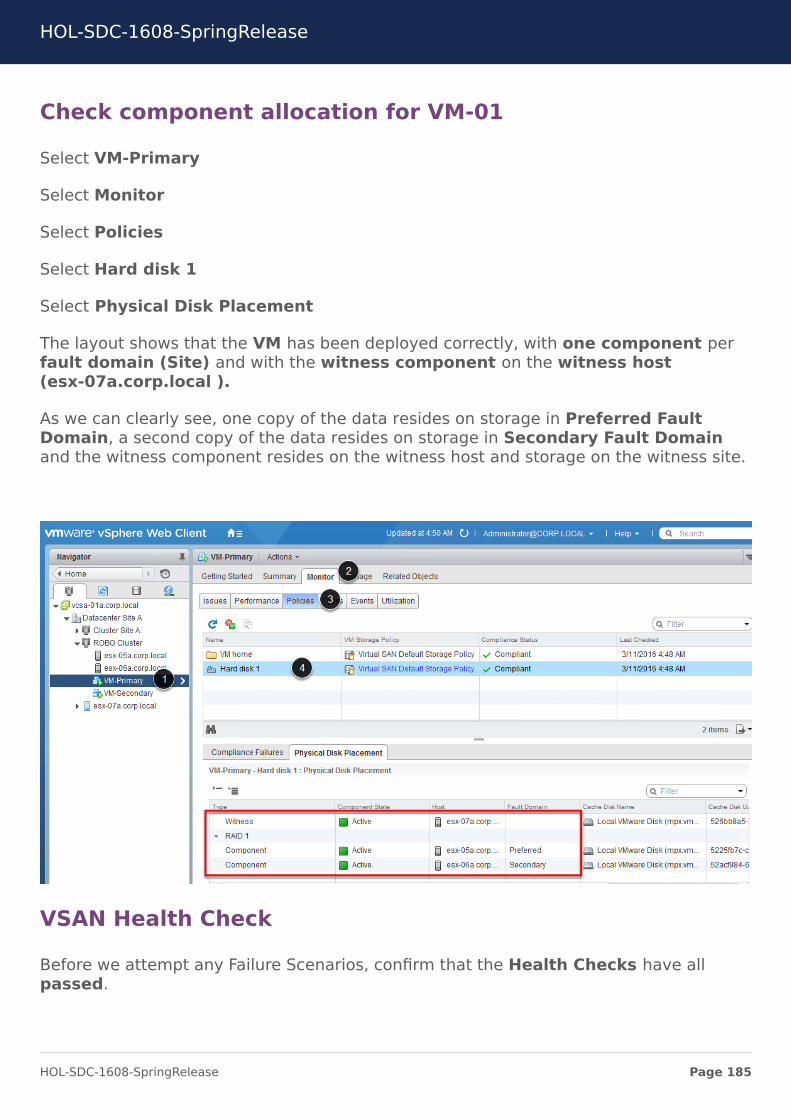
Check component allocation for VM-01
Select VM-Primary
Select Monitor
Select Policies
Select Hard disk 1
Select Physical Disk Placement
The layout shows that the VM has been deployed correctly, with one component perfault domain (Site) and with the witness component on the witness host(esx-07a.corp.local ).
As we can clearly see, one copy of the data resides on storage in Preferred FaultDomain, a second copy of the data resides on storage in Secondary Fault Domainand the witness component resides on the witness host and storage on the witness site.
VSAN Health Check
Before we attempt any Failure Scenarios, confirm that the Health Checks have allpassed.
HOL-SDC-1608-SpringRelease
Page 185HOL-SDC-1608-SpringRelease
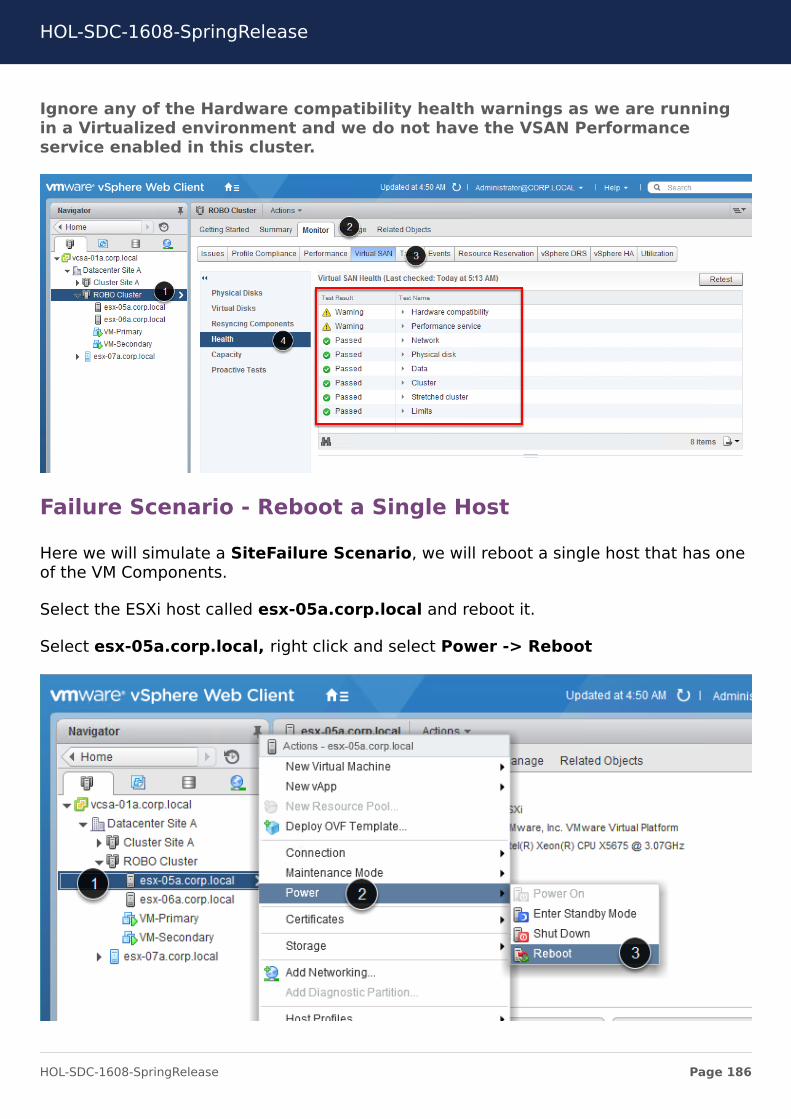
Ignore any of the Hardware compatibility health warnings as we are runningin a Virtualized environment and we do not have the VSAN Performanceservice enabled in this cluster.
Failure Scenario - Reboot a Single Host
Here we will simulate a SiteFailure Scenario, we will reboot a single host that has oneof the VM Components.
Select the ESXi host called esx-05a.corp.local and reboot it.
Select esx-05a.corp.local, right click and select Power -> Reboot
HOL-SDC-1608-SpringRelease
Page 186HOL-SDC-1608-SpringRelease
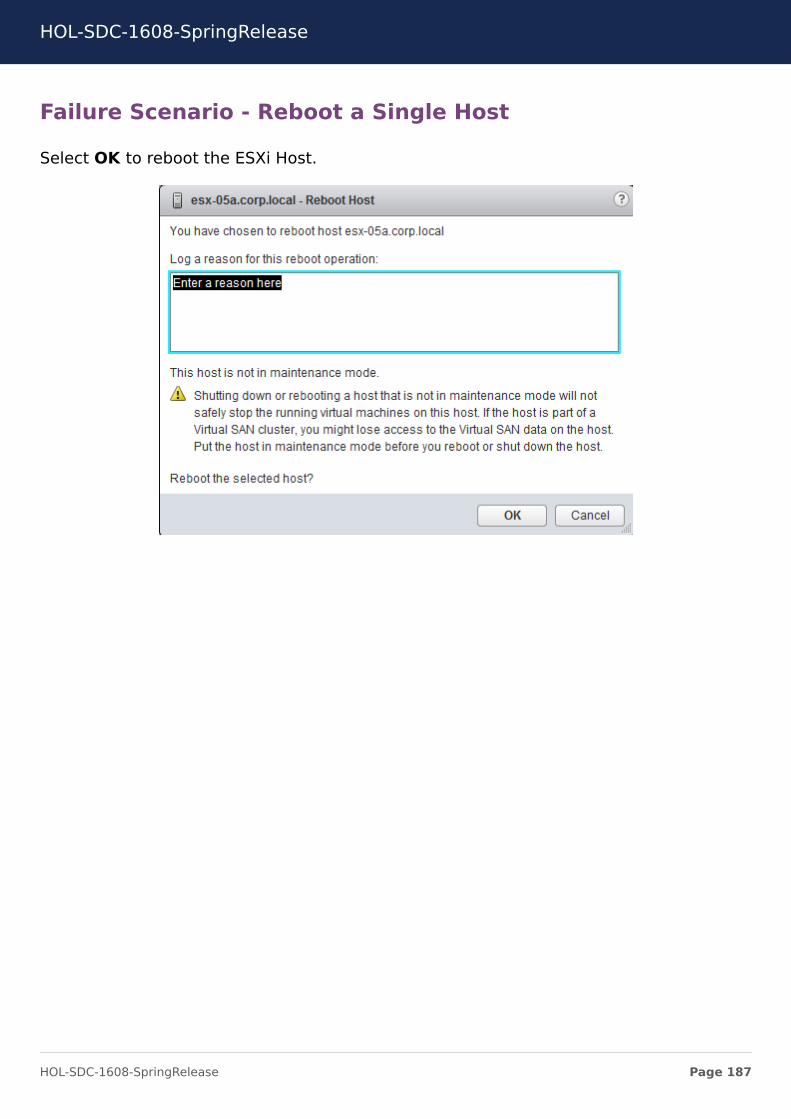
Failure Scenario - Reboot a Single Host
Select OK to reboot the ESXi Host.
HOL-SDC-1608-SpringRelease
Page 187HOL-SDC-1608-SpringRelease
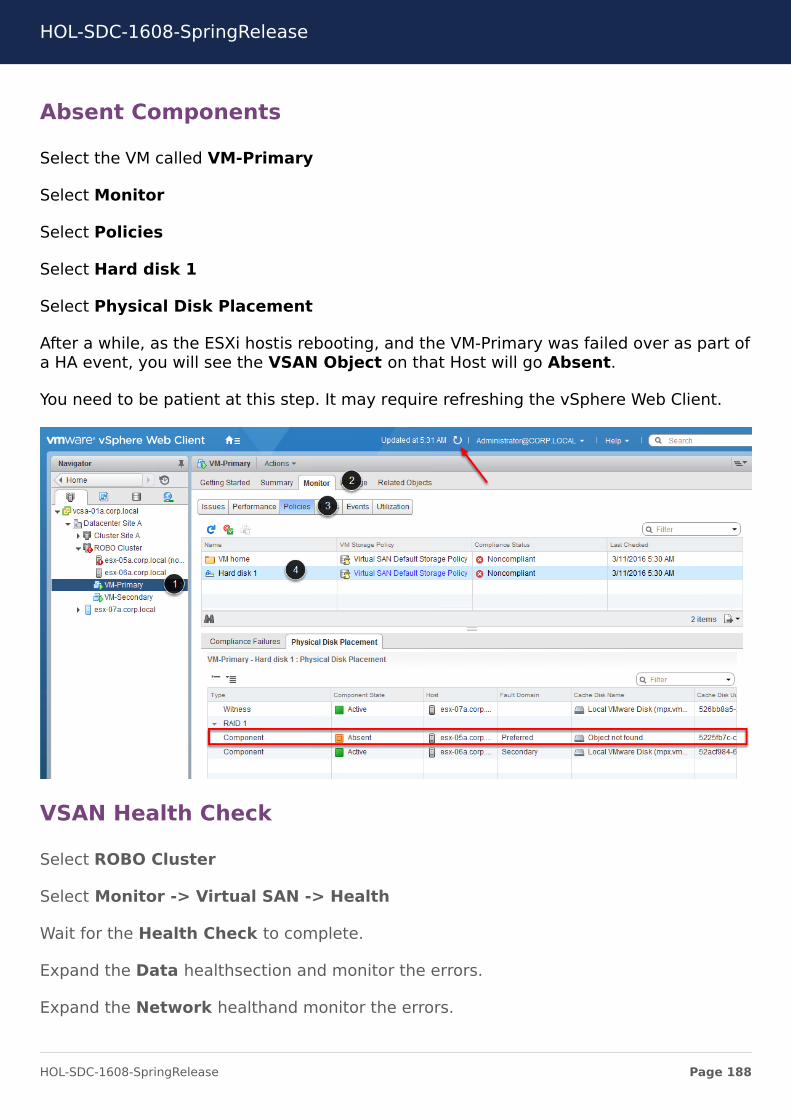
Absent Components
Select the VM called VM-Primary
Select Monitor
Select Policies
Select Hard disk 1
Select Physical Disk Placement
After a while, as the ESXi hostis rebooting, and the VM-Primary was failed over as part ofa HA event, you will see the VSAN Object on that Host will go Absent.
You need to be patient at this step. It may require refreshing the vSphere Web Client.
VSAN Health Check
Select ROBO Cluster
Select Monitor -> Virtual SAN -> Health
Wait for the Health Check to complete.
Expand the Data healthsection and monitor the errors.
Expand the Network healthand monitor the errors.
HOL-SDC-1608-SpringRelease
Page 188HOL-SDC-1608-SpringRelease
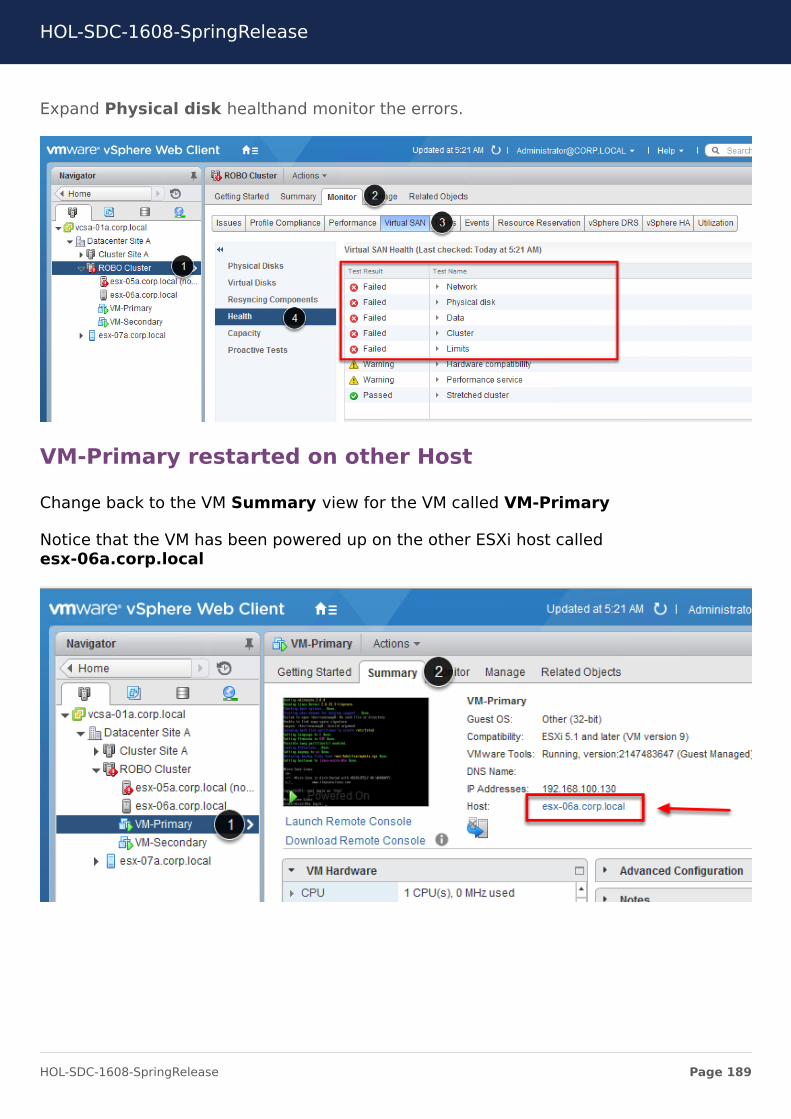
Expand Physical disk healthand monitor the errors.
VM-Primary restarted on other Host
Change back to the VM Summary view for the VM called VM-Primary
Notice that the VM has been powered up on the other ESXi host calledesx-06a.corp.local
HOL-SDC-1608-SpringRelease
Page 189HOL-SDC-1608-SpringRelease
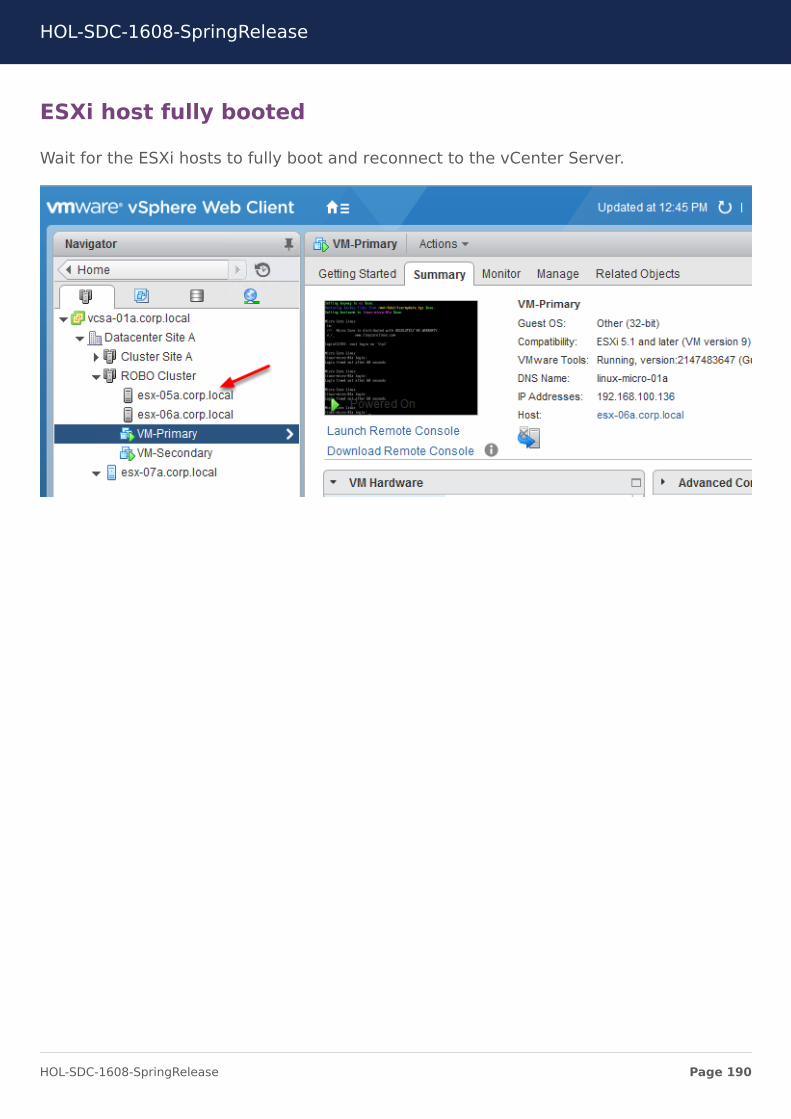
ESXi host fully booted
Wait for the ESXi hosts to fully boot and reconnect to the vCenter Server.
HOL-SDC-1608-SpringRelease
Page 190HOL-SDC-1608-SpringRelease
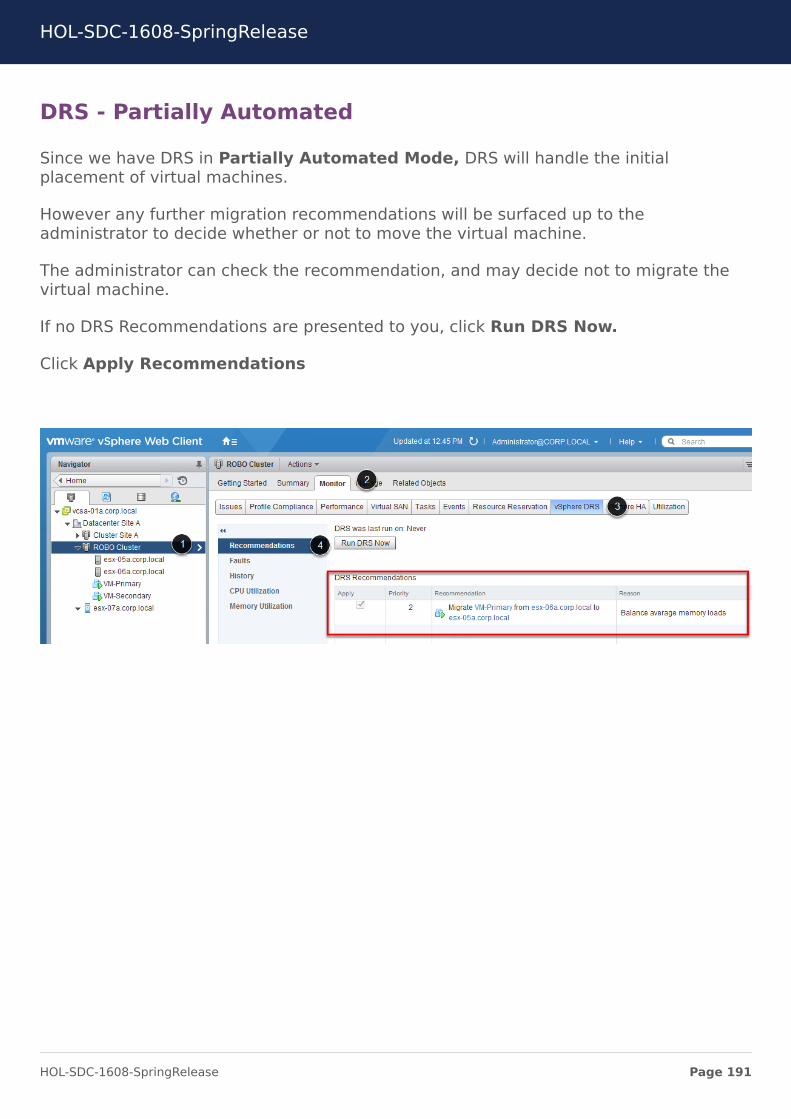
DRS - Partially Automated
Since we have DRS in Partially Automated Mode, DRS will handle the initialplacement of virtual machines.
However any further migration recommendations will be surfaced up to theadministrator to decide whether or not to move the virtual machine.
The administrator can check the recommendation, and may decide not to migrate thevirtual machine.
If no DRS Recommendations are presented to you, click Run DRS Now.
Click Apply Recommendations
HOL-SDC-1608-SpringRelease
Page 191HOL-SDC-1608-SpringRelease
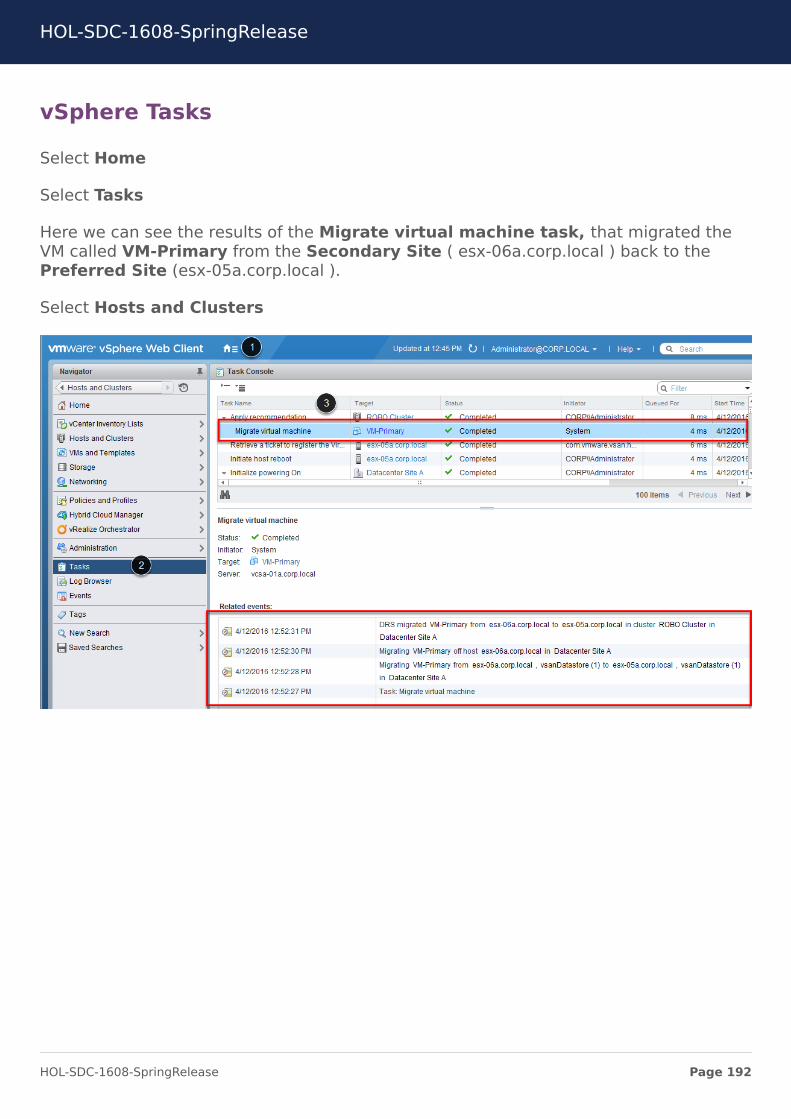
vSphere Tasks
Select Home
Select Tasks
Here we can see the results of the Migrate virtual machine task, that migrated theVM called VM-Primary from the Secondary Site ( esx-06a.corp.local ) back to thePreferred Site (esx-05a.corp.local ).
Select Hosts and Clusters
HOL-SDC-1608-SpringRelease
Page 192HOL-SDC-1608-SpringRelease
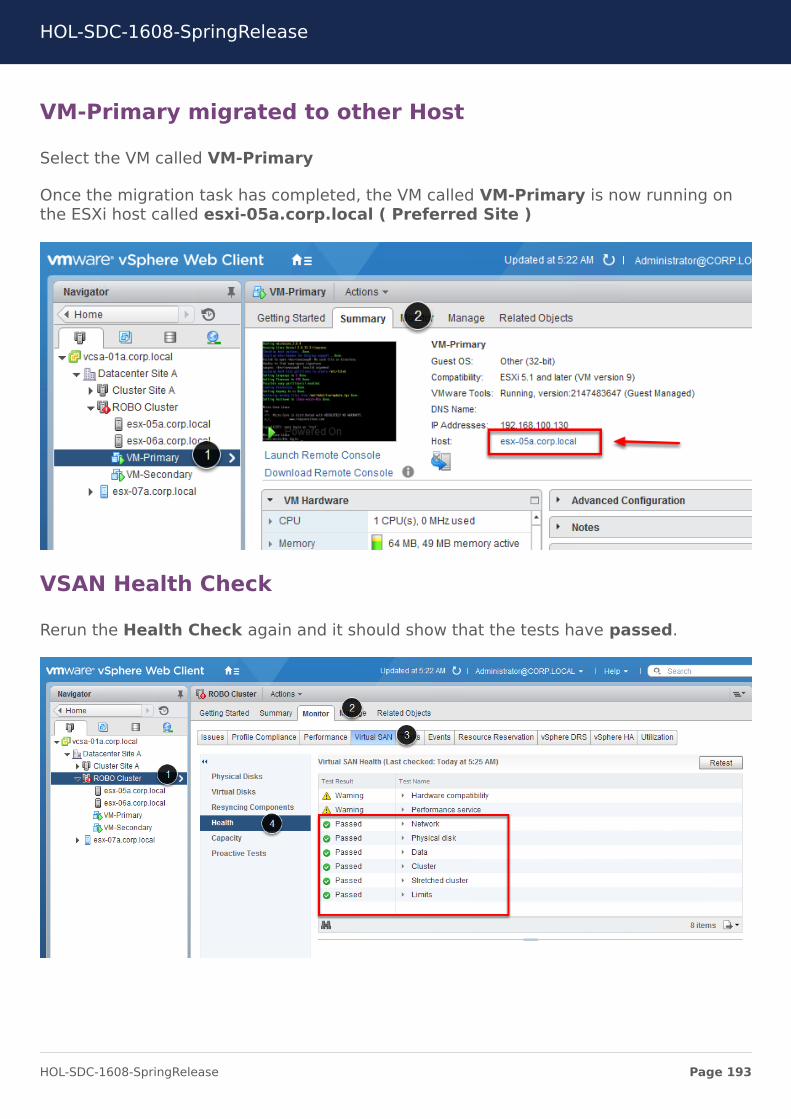
VM-Primary migrated to other Host
Select the VM called VM-Primary
Once the migration task has completed, the VM called VM-Primary is now running onthe ESXi host called esxi-05a.corp.local ( Preferred Site )
VSAN Health Check
Rerun the Health Check again and it should show that the tests have passed.
HOL-SDC-1608-SpringRelease
Page 193HOL-SDC-1608-SpringRelease
Module 5 - Conclusion
In this module we showed you how to create a two node VSAN Stretched Cluster withthe VSAN Witness Host. The Witness host gave us the quorum to create this 3 nodeVSAN Cluster.
We covered the vSphere High Availability (HA) and Distributed Resource Scheduler(DRS) configuration required for VSAN Stretched Cluster and finally we simulated a nodefailure in the VSAN Stretched Cluster and we saw the VM restart on the other node inthe cluster. Once the original node was back on-line again, we saw that we had tomigrate the VM back to the Preferred Site. This was because of the VMwarerecommendation of having DRS in Partially Automated mode.
HOL-SDC-1608-SpringRelease
Page 194HOL-SDC-1608-SpringRelease
ConclusionThank you for participating in the VMware Hands-on Labs. Be sure to visithttp://hol.vmware.com/ to continue your lab experience online.
Lab SKU: HOL-SDC-1608-SpringRelease
Version: 20160711-053226
HOL-SDC-1608-SpringRelease
Page 195HOL-SDC-1608-SpringRelease