Table of Contents - VMwaredocs.hol.vmware.com/HOL-2017/hol-1757-mbl-6_pdf_en.pdf · Table of...
62
Table of Contents Lab Overview - HOL-1757-MBL-6 - VMware AirWatch: Technology Partner Integration ..... 2 Lab Guidance .......................................................................................................... 3 Module 1 - F5 Integration with AirWatch (30 min) ............................................................. 8 Getting Started ...................................................................................................... 9 F5 BigIP Configuration .......................................................................................... 11 Login to the AirWatch Console .............................................................................. 28 AirWatch Console Configuration ........................................................................... 34 iOS Device Enrollment .......................................................................................... 38 Testing Per App VPN ............................................................................................. 51 Un-enrolling Your Device ....................................................................................... 56 HOL-1757-MBL-6 Page 1 HOL-1757-MBL-6
Transcript of Table of Contents - VMwaredocs.hol.vmware.com/HOL-2017/hol-1757-mbl-6_pdf_en.pdf · Table of...

Table of ContentsLab Overview - HOL-1757-MBL-6 - VMware AirWatch: Technology Partner Integration .....2
Lab Guidance .......................................................................................................... 3Module 1 - F5 Integration with AirWatch (30 min)............................................................. 8
Getting Started ...................................................................................................... 9F5 BigIP Configuration .......................................................................................... 11Login to the AirWatch Console .............................................................................. 28AirWatch Console Configuration ........................................................................... 34iOS Device Enrollment .......................................................................................... 38Testing Per App VPN ............................................................................................. 51Un-enrolling Your Device ....................................................................................... 56
HOL-1757-MBL-6
Page 1HOL-1757-MBL-6

Lab Overview -HOL-1757-MBL-6 -VMware AirWatch:Technology Partner
Integration
HOL-1757-MBL-6
Page 2HOL-1757-MBL-6

Lab GuidanceNote: It will take more than 90 minutes to complete this lab. You shouldexpect to only finish 2-3 of the modules during your time. The modules areindependent of each other so you can start at the beginning of any moduleand proceed from there. You can use the Table of Contents to access anymodule of your choosing.
The Table of Contents can be accessed in the upper right-hand corner of theLab Manual.
AirWatch has native integration with many other technology vendors. This labintroduces you to a few of the different partner integrations available in AirWatch. Visitthe AirWatch Marketplace to learn about all of the available integrations!
Each Module can be taken independently or you can start at the beginning and workyour way through each module in sequence. In most cases, a unique "sandbox" instanceof AirWatch will be created just for you when you begin a Module. When the Module hasended, this sandbox will be deleted and the device that you are enrolling in the lab willbe returned to the state that it was in prior to the lab. The approximate time it will taketo go through all the modules is around 2.5 hours.
Lab Module List:
• Module 1 - AirWatch/F5 Integration (30 minutes) (Advanced) This lab isdesigned to introduce you to the integration of AirWatch and F5.
• Module 2 - AirWatch/Cisco ISE Integration(45 minutes) (Advanced)Introduction to management capabilities offered by AirWatch for Apple Mac OSXplatform.
• Module 3 - AirWatch/Forcepoint Integration(30 minutes) (Advanced) This labis designed to introduce you to the integration of AirWatch and Forcepoint(formerly WebSense).
Lab Captains:
• All modules: Roger Deane, Jeff Harris, Shardul Navare
This lab manual can be downloaded from the Hands-on Labs Document site found here:
http://docs.hol.vmware.com
This lab may be available in other languages. To set your language preference and havea localized manual deployed with your lab, you may utilize this document to help guideyou through the process:
http://docs.hol.vmware.com/announcements/nee-default-language.pdf
HOL-1757-MBL-6
Page 3HOL-1757-MBL-6
Location of the Main Console
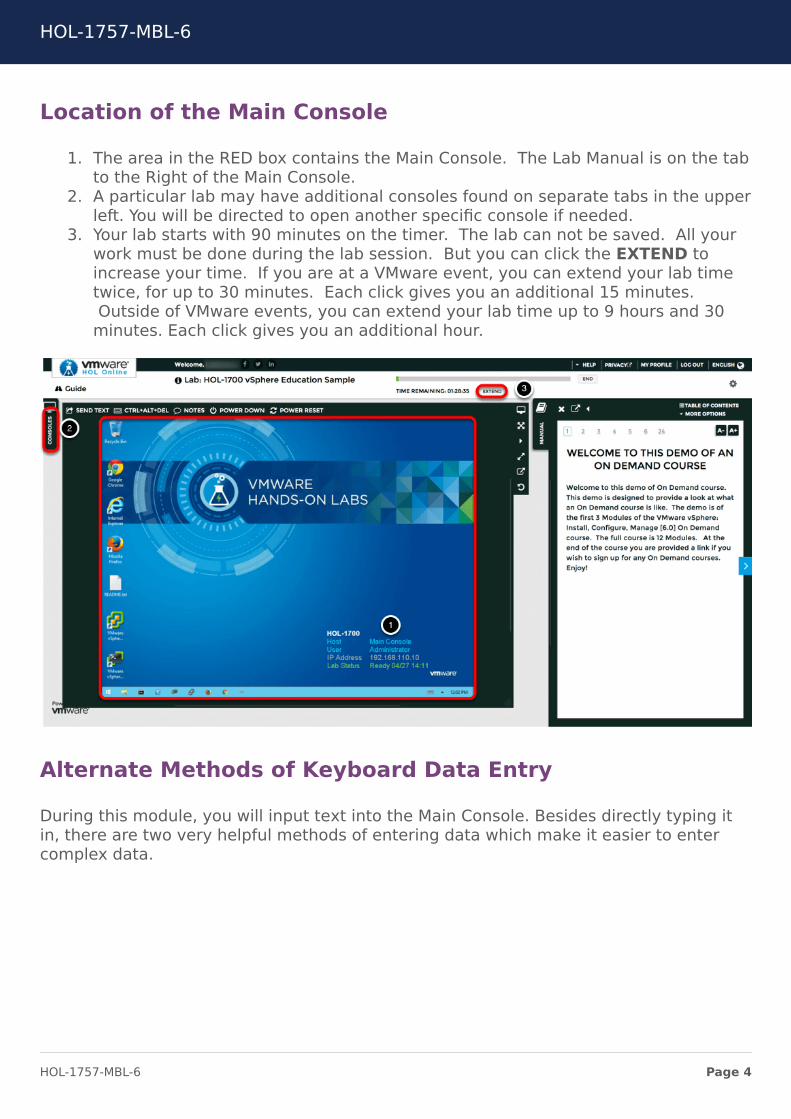
1. The area in the RED box contains the Main Console. The Lab Manual is on the tabto the Right of the Main Console.
2. A particular lab may have additional consoles found on separate tabs in the upperleft. You will be directed to open another specific console if needed.
3. Your lab starts with 90 minutes on the timer. The lab can not be saved. All yourwork must be done during the lab session. But you can click the EXTEND toincrease your time. If you are at a VMware event, you can extend your lab timetwice, for up to 30 minutes. Each click gives you an additional 15 minutes.Outside of VMware events, you can extend your lab time up to 9 hours and 30
minutes. Each click gives you an additional hour.
Alternate Methods of Keyboard Data Entry
During this module, you will input text into the Main Console. Besides directly typing itin, there are two very helpful methods of entering data which make it easier to entercomplex data.
HOL-1757-MBL-6
Page 4HOL-1757-MBL-6
Click and Drag Lab Manual Content Into Console ActiveWindow
You can also click and drag text and Command Line Interface (CLI) commands directlyfrom the Lab Manual into the active window in the Main Console.
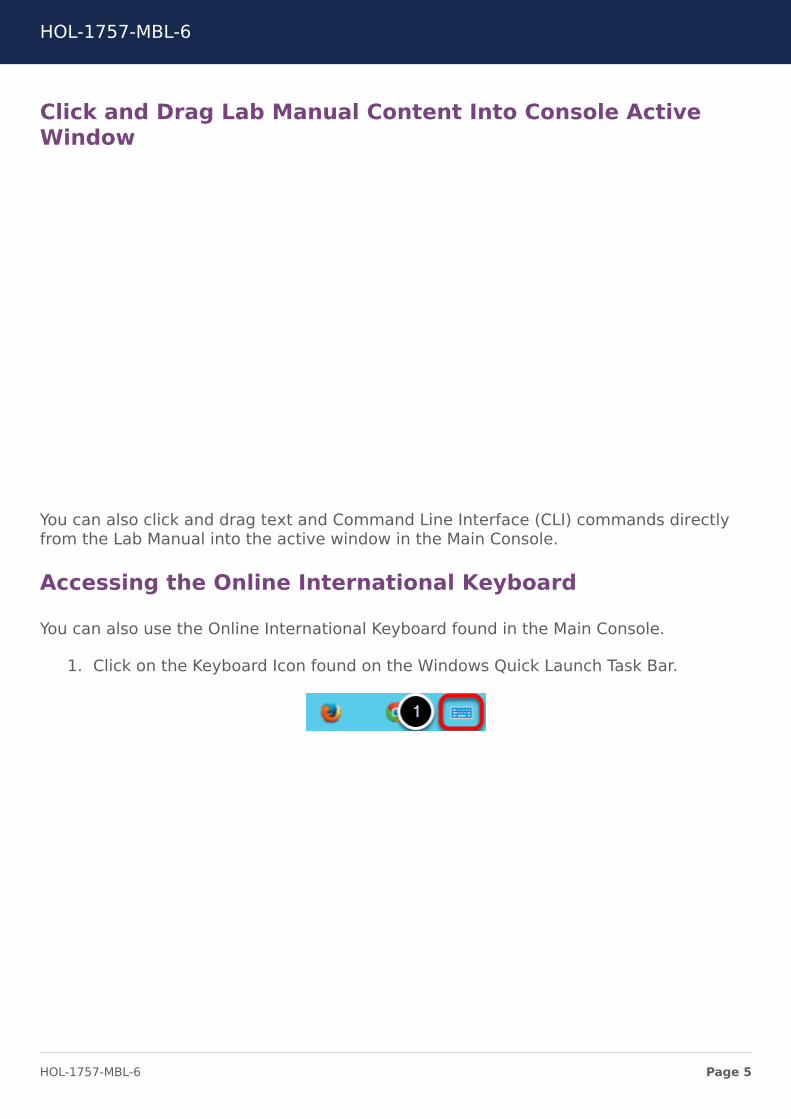
Accessing the Online International Keyboard
You can also use the Online International Keyboard found in the Main Console.
1. Click on the Keyboard Icon found on the Windows Quick Launch Task Bar.
<div class="player-unavailable"><h1 class="message">An error occurred.</h1><div class="submessage"><ahref="http://www.youtube.com/watch?v=xS07n6GzGuo" target="_blank">Try watching this video on www.youtube.com</a>, or enableJavaScript if it is disabled in your browser.</div></div>
HOL-1757-MBL-6
Page 5HOL-1757-MBL-6

Click once in active console window
In this example, you will use the Online Keyboard to enter the "@" sign used in emailaddresses. The "@" sign is Shift-2 on US keyboard layouts.
1. Click once in the active console window.2. Click on the Shift key.
Click on the @ key
1. Click on the "@" key.
Notice the @ sign entered in the active console window.
Activation Prompt or Watermark
When you first start your lab, you may notice a watermark on the desktop indicatingthat Windows is not activated.
HOL-1757-MBL-6
Page 6HOL-1757-MBL-6

One of the major benefits of virtualization is that virtual machines can be moved andrun on any platform. The Hands-on Labs utilizes this benefit and we are able to run thelabs out of multiple datacenters. However, these datacenters may not have identicalprocessors, which triggers a Microsoft activation check through the Internet.
Rest assured, VMware and the Hands-on Labs are in full compliance with Microsoftlicensing requirements. The lab that you are using is a self-contained pod and does nothave full access to the Internet, which is required for Windows to verify the activation.Without full access to the Internet, this automated process fails and you see this
watermark.
This cosmetic issue has no effect on your lab.
Look at the lower right portion of the screen
Please check to see that your lab is finished all the startup routines and is ready for youto start. If you see anything other than "Ready", please wait a few minutes. If after 5minutes you lab has not changed to "Ready", please ask for assistance.
HOL-1757-MBL-6
Page 7HOL-1757-MBL-6

Module 1 - F5 Integrationwith AirWatch (30 min)
HOL-1757-MBL-6
Page 8HOL-1757-MBL-6

Getting StartedWith F5 BIG-IP APM, you may provide AirWatch mobile users unmatched secure remoteaccess, performance, and availability. This module guides you through the configurationdetails required to integrate F5 BIG-IP APM with AirWatch mobile device management(MDM). The steps are a series of recommended practices to follow in order to build anintegrated solution. As with any system deployment, the steps are examples and thedeployed environment may not exactly match these examples.
What to Expect
After completing this guide, you will be able to:
• Use the F5 BIG-IP APM as an AirWatch access gateway.• Use the iOS BIG-IP Edge Client for Per-App VPN access with iOS 7 or later.• Authenticate AirWatch MDM users via the BIG-IP APM.• Initiate on-demand VPN tunnels by domain query.• Use BIG-IP APM as a Microsoft Active Sync Proxy for Android and iOS email
synchronization.• Manage AirWatch MDM devices through the BIG-IP APM access gateway.
Requirements
This section covers various requirements for implementing in your own environment.These include prerequisites, product licensing, software, and/or hardware requirements.All prerequisites will be provided for use during this module.
Prerequisites:
This solution utilizes the following ancillary infrastructure:
• An authentication server• An email server• An application server• An NTP time server• Globally Routable IP addresses• Mobile device(s) with network access (iOS and Android devices only)• Internet access• Administrator login credentials• SSL Certificate and Key (please reference F5 solution article SOL14499 for how to
create a certificate authority and client certificates)
AirWatch
• AirWatch service subscription required.
HOL-1757-MBL-6
Page 9HOL-1757-MBL-6

F5 BIG-IP
• Either a physical or a virtual instance of BIG-IP is required.• This guide is based on BIG-IP software release 11.5.0.• This solution relies on F5 Access Policy Manager (APM) and requires an APM
software license.
HOL-1757-MBL-6
Page 10HOL-1757-MBL-6

F5 BigIP ConfigurationThis section covers the steps required to be performed within the BigIP webconfiguration utility. The BigIP you will be accessing for this lab has been pre-configuredfor the lab environment.
HOL-1757-MBL-6
Page 11HOL-1757-MBL-6

Open a Browser and the F5 Web Admin Console
1. Launch Chrome from the ControlCenter desktop.2. Select the "BIG-IP" shortcut from the bookmarks bar or navigate to
"https://bigip-01.corp.local".3. Enter "admin" for the Username field.4. Enter "VMware1!" for the Password field.5. Click Login.
NOTE: You may use Firefox if you prefer but it does not use the Windows certificatestore and does not trust the internal SSL certificate presented by the F5 so you will needto accept the security warning in order to establish that trust.
Create A Network Access Policy
This step will use the BIG-IP configuration utility wizard to assist you in creating aremote access configuration using Access Policy Manager (APM).
HOL-1757-MBL-6
Page 12HOL-1757-MBL-6
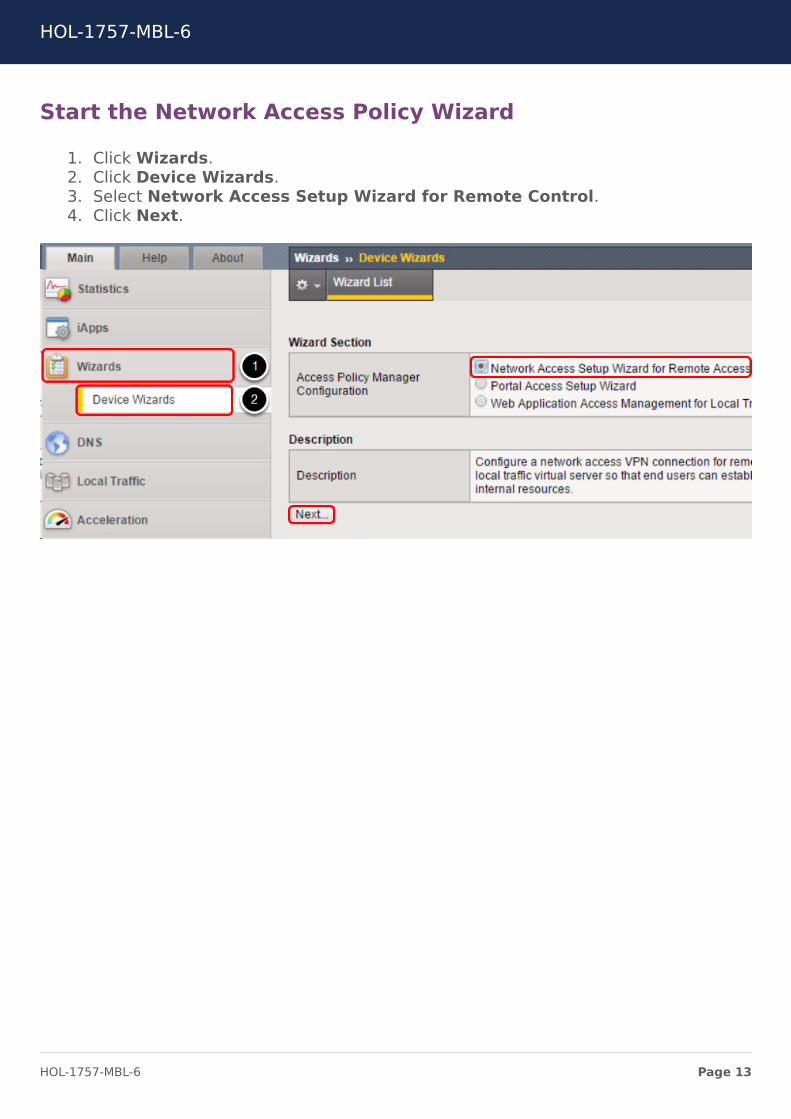
Start the Network Access Policy Wizard
1. Click Wizards.2. Click Device Wizards.3. Select Network Access Setup Wizard for Remote Control.4. Click Next.
HOL-1757-MBL-6
Page 13HOL-1757-MBL-6

Set the Basic Properties
1. Enter "f5_airwatch_policy" for the Policy Name field.2. Enter "f5_airwatch_policy" for the Caption field.3. Uncheck Enable Antivirus Check in Access Policy.4. Enter "192.168.120.1" for the IPv4 Gateway Address field.5. Click "Next".
HOL-1757-MBL-6
Page 14HOL-1757-MBL-6
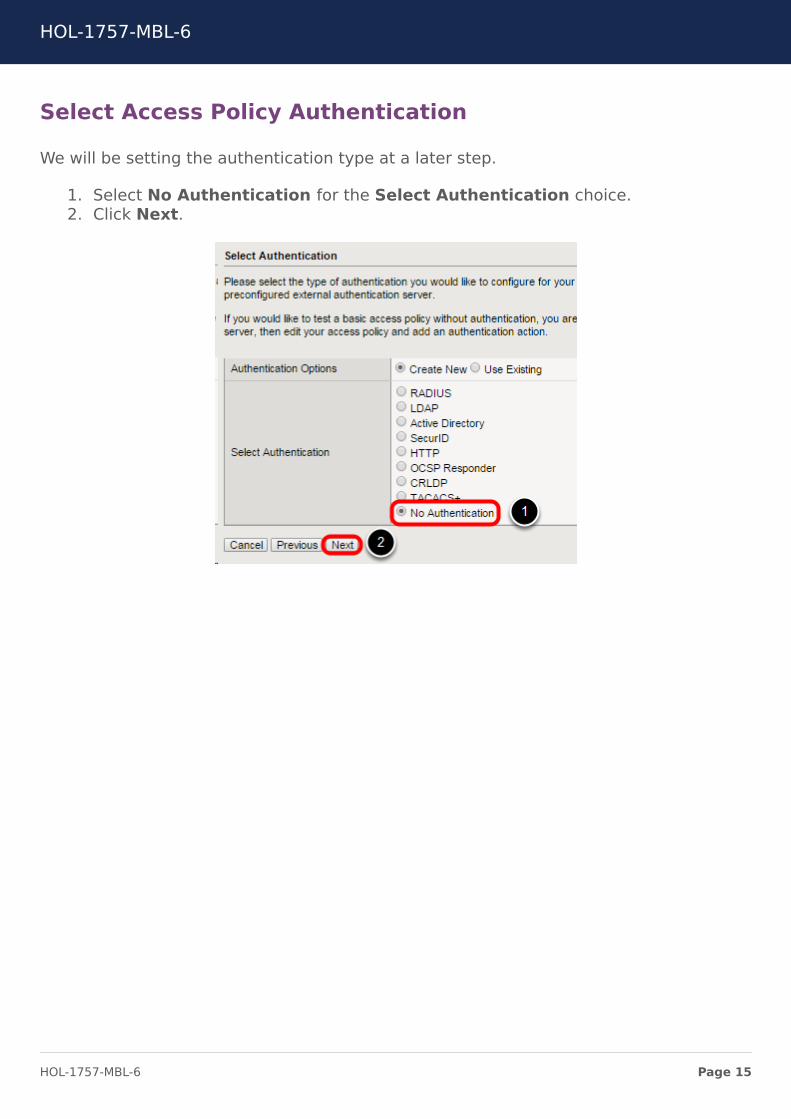
Select Access Policy Authentication
We will be setting the authentication type at a later step.
1. Select No Authentication for the Select Authentication choice.2. Click Next.
HOL-1757-MBL-6
Page 15HOL-1757-MBL-6

Set the Lease Pool Range
A lease pool is a pool of available IP addresses that BIG-IP will assign to remote clientsfor network access. The size of this pool needs to be large enough to provide enoughaddress space for the total concurrent connections licensed by APM.
1. Enter "192.168.2.100" for the Start IP Address field.2. Enter "192.168.2.199" for the End IP Address field.3. Click Add.4. Click Next.
HOL-1757-MBL-6
Page 16HOL-1757-MBL-6

Configure Network Access Settings
The client settings should be set according to the deployment scenario requirements. Inthis example, all traffic will be forced through the SSL VPN tunnel.
1. Click Next.
HOL-1757-MBL-6
Page 17HOL-1757-MBL-6

Configure DNS Hosts
1. Enter "192.168.110.10" for the first Primary Name Server field.2. Enter "corp.local" for the DNS Default Domain Suffix field.3. Click Next.
Enter the Virtual Server IP Address
Finally, the Virtual Server IP Address needs to be defined.
1. Enter "192.168.5.11" for the Virtual Server IP Address field.2. Uncheck the Redirect Server checkbox.3. Click Next.
HOL-1757-MBL-6
Page 18HOL-1757-MBL-6

Review & Confirm Configuration
Review your settings, scroll down and select "Next".
HOL-1757-MBL-6
Page 19HOL-1757-MBL-6

Review Summary of F5 Network Access Configuration
Review your configuration again and select "Finished".
HOL-1757-MBL-6
Page 20HOL-1757-MBL-6
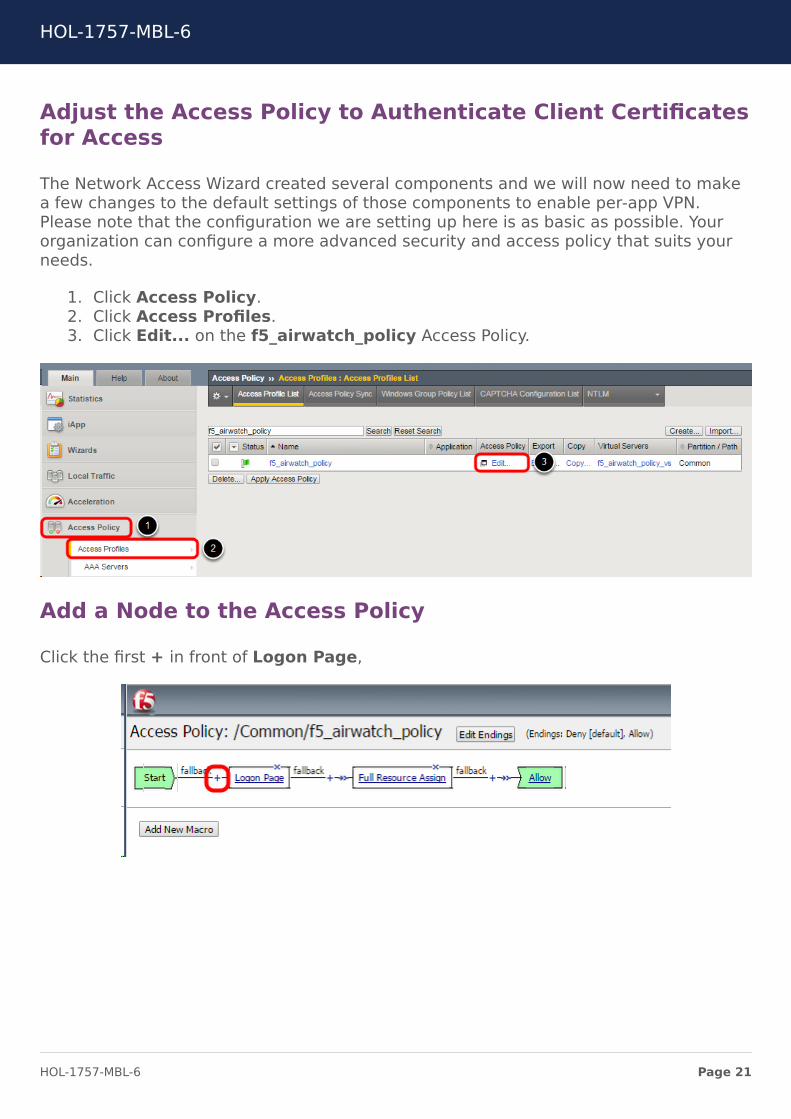
Adjust the Access Policy to Authenticate Client Certificatesfor Access
The Network Access Wizard created several components and we will now need to makea few changes to the default settings of those components to enable per-app VPN.Please note that the configuration we are setting up here is as basic as possible. Yourorganization can configure a more advanced security and access policy that suits yourneeds.
1. Click Access Policy.2. Click Access Profiles.3. Click Edit... on the f5_airwatch_policy Access Policy.
Add a Node to the Access Policy
Click the first + in front of Logon Page,
HOL-1757-MBL-6
Page 21HOL-1757-MBL-6

Enable Client Certificate Authentication
1. Click Authentication.2. Select On-Demand Cert Auth.3. Click Add Item.
HOL-1757-MBL-6
Page 22HOL-1757-MBL-6

Set Cert Auth Mode to Require
1. Set Auth Mode to Require.2. Click Save.
Apply the Access Policy Updates
1. Click Apply Access Policy.2. Close the Access Policy Editor tab in the browser to return the F5 Admin
Console.
HOL-1757-MBL-6
Page 23HOL-1757-MBL-6

Configure Advanced Settings of the Virtual Server
1. Click Local Traffic.2. Click Virtual Servers.3. Click f5_airwatch_policy_vs.
HOL-1757-MBL-6
Page 24HOL-1757-MBL-6

Change the Service Port
Enter "5010" for the Service Port field.
HOL-1757-MBL-6
Page 25HOL-1757-MBL-6

Edit the Virtual Server Settings
We will need to change the SSL Profile on the F5 Virtual Server to accept ClientCertificates from our Enterprise PKI and enable a few options that are required for Per-App VPN.
1. Scroll down to find the SSL Profile (Client) section.2. Select clientssl in the Selected list under SSL Profile (Client).3. Click the >> button to remove clientssl from the Selected list.4. Select clientssl_holcertreq in the Available list under Client Profile (Client).5. Click the << button to move clientssl_holcertreq to the Selected list.6. Select Auto Map for the Source Address Translation dropdown.
HOL-1757-MBL-6
Page 26HOL-1757-MBL-6
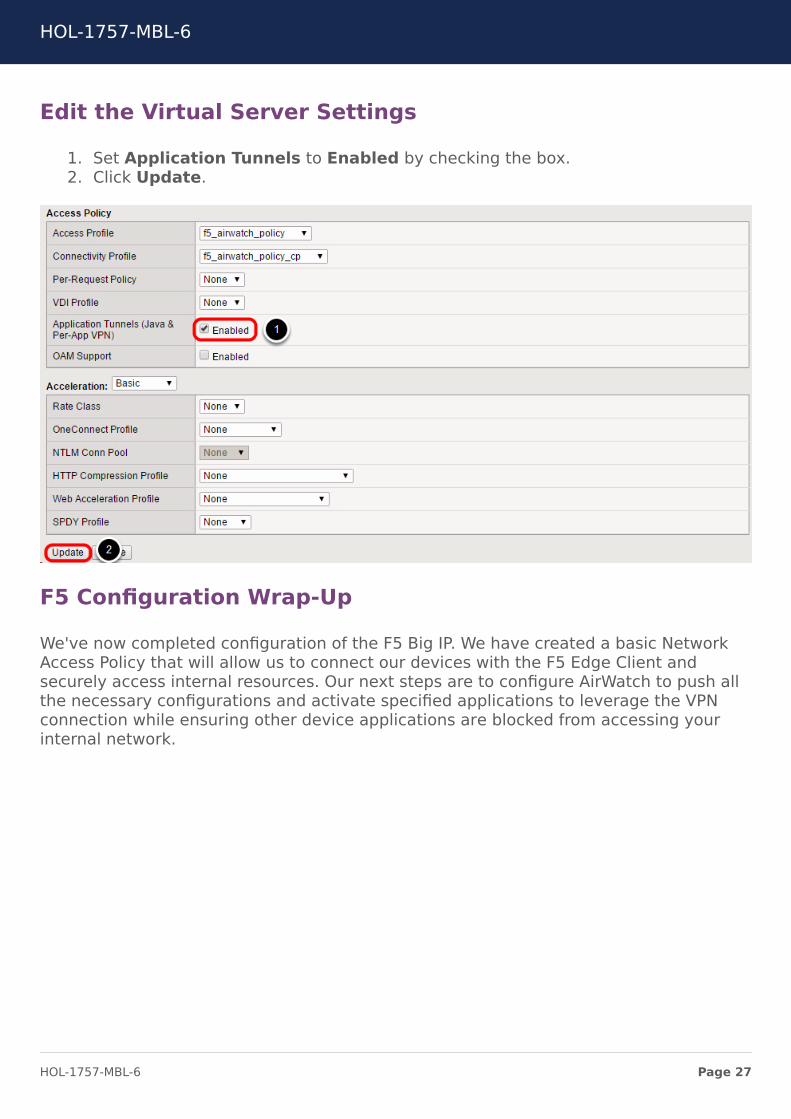
Edit the Virtual Server Settings
1. Set Application Tunnels to Enabled by checking the box.2. Click Update.
F5 Configuration Wrap-Up
We've now completed configuration of the F5 Big IP. We have created a basic NetworkAccess Policy that will allow us to connect our devices with the F5 Edge Client andsecurely access internal resources. Our next steps are to configure AirWatch to push allthe necessary configurations and activate specified applications to leverage the VPNconnection while ensuring other device applications are blocked from accessing yourinternal network.
HOL-1757-MBL-6
Page 27HOL-1757-MBL-6
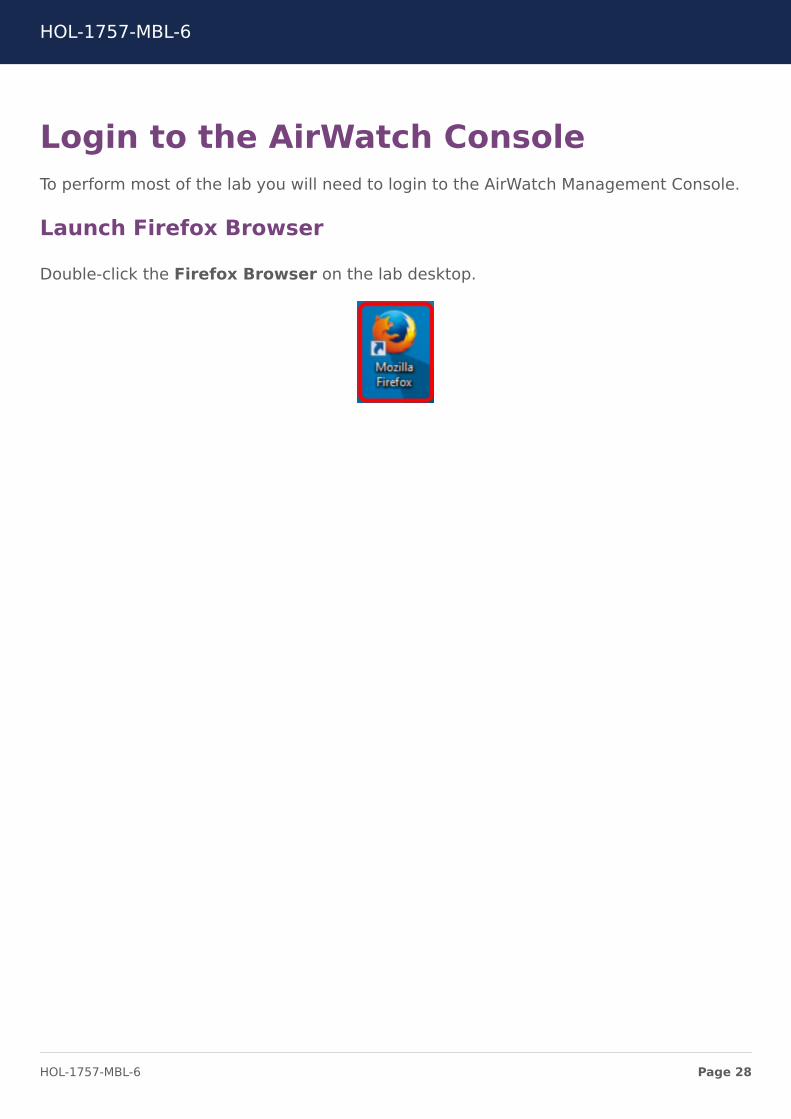
Login to the AirWatch ConsoleTo perform most of the lab you will need to login to the AirWatch Management Console.
Launch Firefox Browser
Double-click the Firefox Browser on the lab desktop.
HOL-1757-MBL-6
Page 28HOL-1757-MBL-6

Authenticate to the AirWatch Administration Console
The default home page for the browser is https://hol.awmdm.com. Enter yourAirWatch Admin Account information and click the Login button.
NOTE - If you see a Captcha, please be aware that it is case sensitive!
1. Enter your Username. This is you email address that you have associated withyour VMware Learning Platform (VLP) account.
2. Enter "VMware1!" for the Password field.3. Click the Login button.
NOTE - Due to lab restrictions, you may need to wait here for a minute or sowhile the Hands On Lab contacts the AirWatch Hands On Labs server.
HOL-1757-MBL-6
Page 29HOL-1757-MBL-6

Accept the End User License Agreement
NOTE - The following steps of logging into the Administration Console will onlyneed to be done during the initial login to the console.
You will be presented with the AirWatch Terms of Use. Click the Accept button.
HOL-1757-MBL-6
Page 30HOL-1757-MBL-6

Address the Initial Security Settings
After accepting the Terms of Use, you will be presented with a Security Settings pop-up. The Password Recovery Question is in case you forget your admin password andthe Security PIN is to protect certain administrative functionality in the console.
1. You may need to scroll down to see the Password Recovery Questions andSecurity PIN sections.
2. Select a question from the Password Recovery Question drop-down (defaultselected question is ok here).
3. Enter "VMware1!" in the Password Recovery Answer field.4. Enter "VMware1!" in the ConfirmPassword Recovery Answer field.5. Enter "1234" in the Security PIN field.6. Enter "1234" in the Confirm Security PIN field.7. Click the Save button when finished.
HOL-1757-MBL-6
Page 31HOL-1757-MBL-6

HOL-1757-MBL-6
Page 32HOL-1757-MBL-6
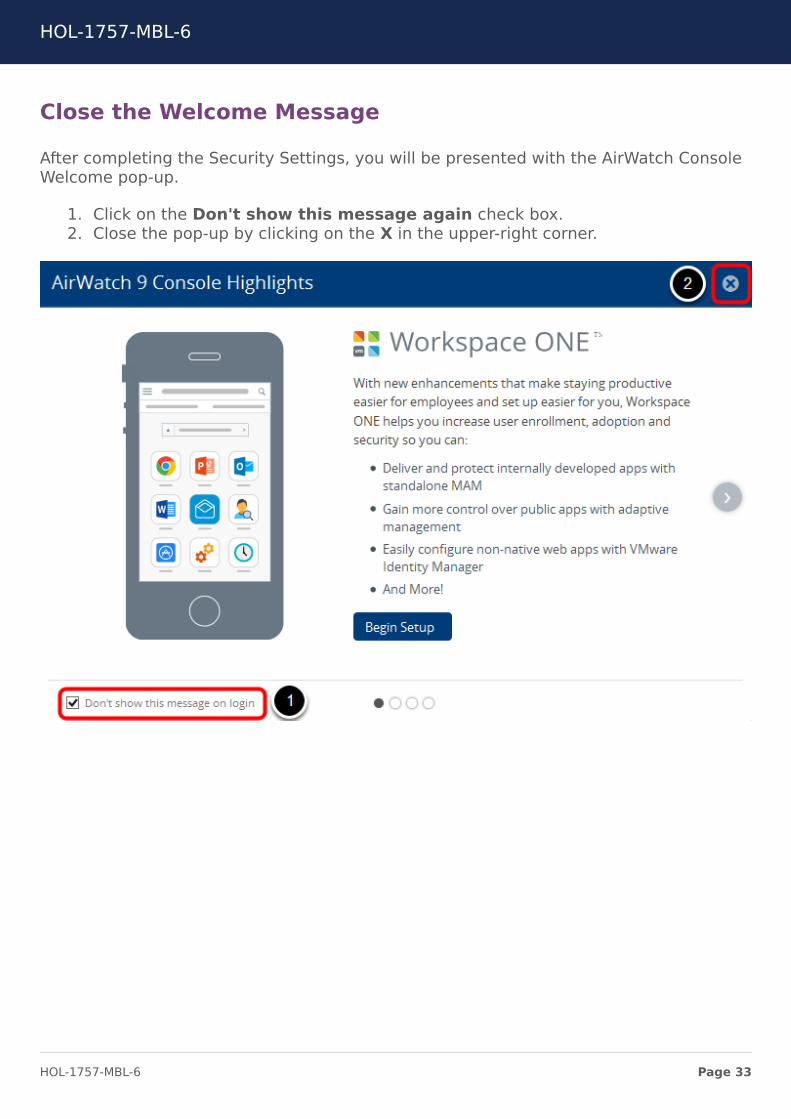
Close the Welcome Message
After completing the Security Settings, you will be presented with the AirWatch ConsoleWelcome pop-up.
1. Click on the Don't show this message again check box.2. Close the pop-up by clicking on the X in the upper-right corner.
HOL-1757-MBL-6
Page 33HOL-1757-MBL-6
AirWatch Console ConfigurationIn this chapter you create a Per-App VPN profile and deploy an Application configured touse the F5 Edge Client on iOS.
Create an iOS VPN Profile
In this step you will configure the iOS profile that will be delivered to the device toconfigure the F5 Edge Client on the device to allow only designated applications toaccess content on internal servers.
Add a New Profile
1. Click Add.2. Click Profile.
Select the OS the profile will be used for.
1. Click Apple iOS.
Configure the General Properties of the Profile
1. Select General.2. You may need to scroll down to view the Name and Assigned Groups fields.3. Enter "F5 Per-App VPN" as the Name.4. Click the Assigned Groups field.5. Select "All Devices @ [email protected]" as the Assigned Smart Group.
Add a Credentials Payload
1. Click Credentials from the Payload menu.2. Click Configure to go to the Credential configuration menu.
Configure the Credentials Payload
For the purposes of this lab, a Certificate Authority has already been configured for youto use. We have connected this Microsoft CA to AirWatch to allow AirWatch to issue andmanage client certificates for use with the F5 SSL VPN. This allows users to seamlesslyconnect to the VPN and authenticate without the need for entering username andpassword. As soon as the designated application is opened on the device, the VPNconnection will be established.
HOL-1757-MBL-6
Page 34HOL-1757-MBL-6

1. Select Defined Certificate Authority for the Credential Source field.2. Select HOL.AIRWLAB.COM HOL CA for the Certificate Authority field.3. Select HOL 2017 Mobile User for the Certificate Template field.
Add a VPN Payload
1. Click VPN from the Payload menu.2. Click Configure to access the VPN payload settings.
Configure the VPN Payload
1. Select F5 SSL from the Connection Type dropdown.2. Enter "f5hol.airwlab.com:5010" in the Server field.3. Check the Per-app VPN checkbox.4. Check Connect Automatically checkbox, which should auto-enable after
enabling the Per-App VPN Rules checkbox.
Configure the VPN Payload
1. Scroll down to find the Authentication section.2. Select Certificate for the User Authentication dropdown.3. Select Certificate #1 for the Identity Certificate dropdown.4. Click Save & Publish.
Publish the VPN Profile
1. Click Publish.
Add the F5 BIG-IP Edge Client as a Public Application
In order to apply the VPN profile, the F5 Edge Client needs to be installed on yourdevice. We can leverage AirWatch to deploy the F5 BIG-IP Edge Client to the devicethrough MDM. This step will walk you through the process of adding an application fromthe Public App store.
Add a New Public Application
1. Click Add.2. Click Public Application.
Search for the Application to Add
1. Select Apple iOS from the Platform dropdown.
HOL-1757-MBL-6
Page 35HOL-1757-MBL-6
2. Ensure Search App Store is set for the Source option.3. Enter "F5 Edge Client" in the Name field.4. Select Next.
Select the F5 BIG-IP Edge Client from the Search Results
1. Click Select on the F5 BIG-IP Edge Client application.
Assign the Application to a Smart Group
The Info tab is configured already so we will continue to the next settings tab.
1. Click the Assignment tab.2. Click the Selected Assignment Groups field.3. Select "All Devices @ [email protected]" as the Assigned Smart Group.
Set the Deployment Options for the Application
1. Scroll down to find the Deployment section.2. Select "Automatic: system push".3. Click Save & Publish.
Publish the Application
1. Click Publish.
Add the Dolphin Browser as a Public Application
In order to associate the VPN profile to specific apps, you need to add the applicationthrough MDM. This step will walk you through the process of adding an application fromthe Public App store that will be associated to the VPN profile you created.
Add a New Public Application
1. Click Add.2. Click Public Application.
Search for the Application to Add
1. Select Apple iOS from the Platform dropdown.2. Ensure Search App Store is set for the Source option.3. Enter "Dolphin Browser" in the Name field.4. Select Next.
HOL-1757-MBL-6
Page 36HOL-1757-MBL-6
Select Dolphin Browser from the Search Results
Click "Select" on the Dolphin Browser application that best suits the iOS device you areusing with the lab.
Assign the Application to a Smart Group
The Info tab is configured already so we will continue to the next settings tab.
1. Click the Assignment tab.2. Click the Selected Assignment Groups field.3. Select "All Devices @ [email protected]" as the Assigned Smart Group.
Set the Deployment Options for the Application
1. Scroll down to find the Deployment section.2. Select "Automatic: system push".
Set the App Tunneling Options for the Application
1. Scroll down until you see the App Tunneling option under Policies.2. Set the App Tunneling option to Enabled.3. Select the F5 Per-App VPN profile from the Per-App VPN Profile dropdown.
Publish the Application
Click Publish.
HOL-1757-MBL-6
Page 37HOL-1757-MBL-6
iOS Device EnrollmentEnroll Your iOS Device
You are now going to enroll your iOS device for use with this module.
HOL-1757-MBL-6
Page 38HOL-1757-MBL-6
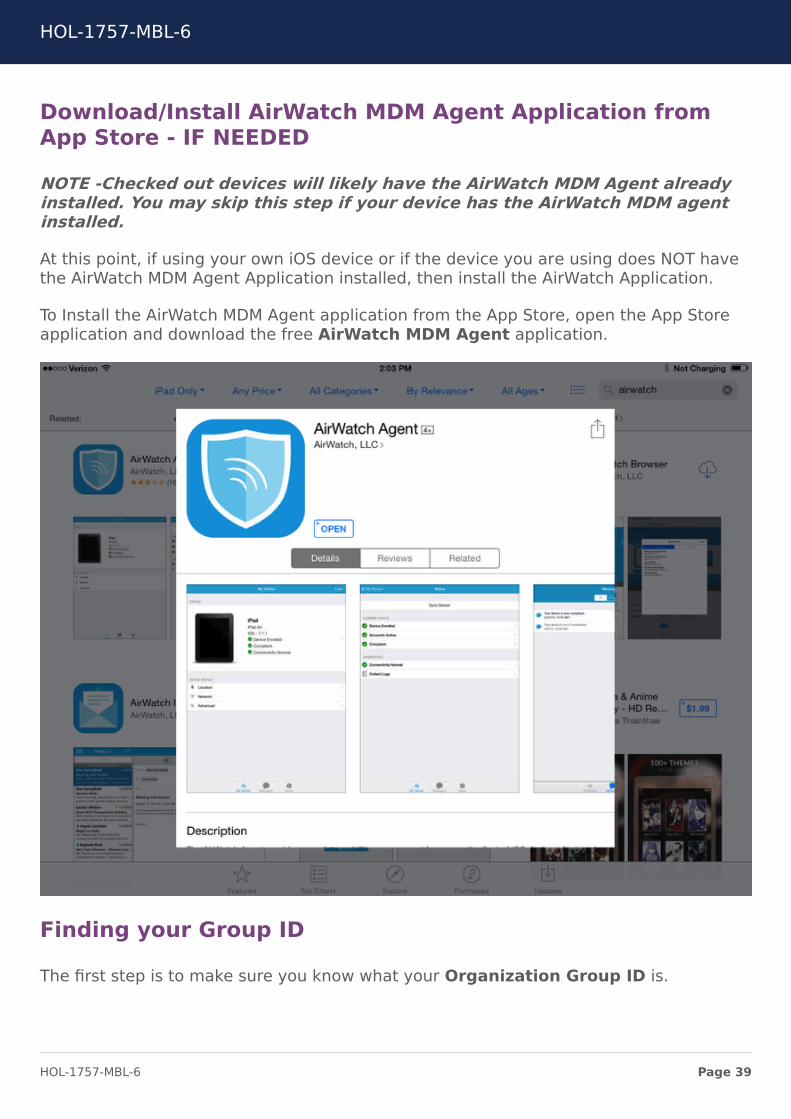
Download/Install AirWatch MDM Agent Application fromApp Store - IF NEEDED
NOTE -Checked out devices will likely have the AirWatch MDM Agent alreadyinstalled. You may skip this step if your device has the AirWatch MDM agentinstalled.
At this point, if using your own iOS device or if the device you are using does NOT havethe AirWatch MDM Agent Application installed, then install the AirWatch Application.
To Install the AirWatch MDM Agent application from the App Store, open the App Storeapplication and download the free AirWatch MDM Agent application.
Finding your Group ID
The first step is to make sure you know what your Organization Group ID is.
HOL-1757-MBL-6
Page 39HOL-1757-MBL-6

1. To find the Group ID, hover your mouse over the Organization Group tab at thetop of the screen. Look for the email address you used to log in to the lab portal.
2. Your Group ID is displayed at the bottom of the Organization Group pop up. TheGroup ID is required when enrolling your device in the following steps.
Launching the AirWatch MDM Agent
Launch the AirWatch Agent app on the device.
NOTE - If you have your own iOS device and would like to test you will need todownload the agent first.
HOL-1757-MBL-6
Page 40HOL-1757-MBL-6

Choose the Enrollment Method
Click on the Server Details button.
Attach the AirWatch MDM Agent to the HOL Sandbox
Once the Agent has launched you can enroll the device. To do so, follow the belowsteps.
1. Enter "hol.awmdm.com" for the Server field.2. Enter your Group ID for your Organization Group for the Group ID field. Your
Group ID was noted previously in the Finding your Group ID step.3. Tap the Go button.
HOL-1757-MBL-6
Page 41HOL-1757-MBL-6

NOTE - If on an iPhone, you may have to close the keyboard by clicking Donein order to click the Continue button.
HOL-1757-MBL-6
Page 42HOL-1757-MBL-6

Authenticate the AirWatch MDM Agent
On this screen, enter the Username and Password for the basic user account.
1. Enter "testuser" in the Username field.2. Enter "VMware1!" in the Password field.3. Tap the Go button.
HOL-1757-MBL-6
Page 43HOL-1757-MBL-6

Redirect to Safari and Enable MDM Enrollment in Settings
The AirWatch Agent will now redirect you to Safari and start the process of enablingMDM in the device settings.
Tap on Redirect & Enable at the bottom of the screen.
HOL-1757-MBL-6
Page 44HOL-1757-MBL-6

Install the MDM Profile
Tap Install in the upper right corner of the Install Profile dialog box.
HOL-1757-MBL-6
Page 45HOL-1757-MBL-6

Install and Verify the AirWatch MDM Profile
Tap Install when prompted at the Install Profile dialog.
NOTE -If a PIN is requested, it is the current device PIN. Provided VMwaredevices should not have a PIN.
HOL-1757-MBL-6
Page 46HOL-1757-MBL-6
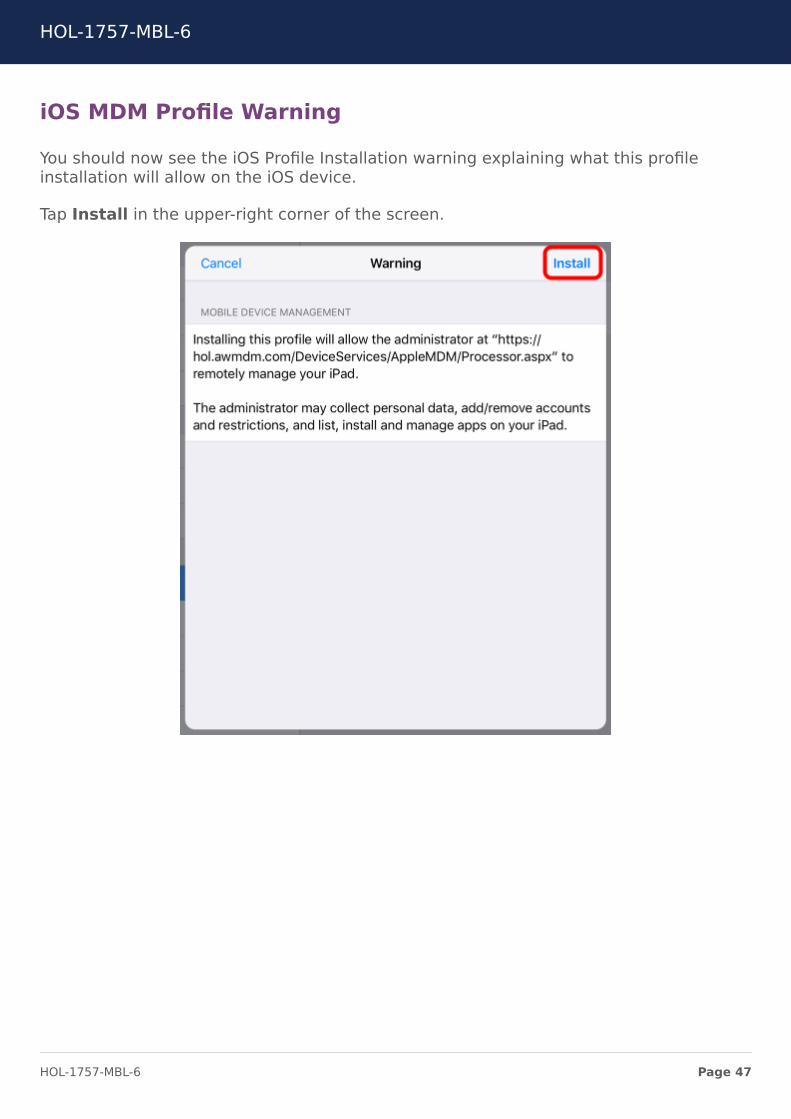
iOS MDM Profile Warning
You should now see the iOS Profile Installation warning explaining what this profileinstallation will allow on the iOS device.
Tap Install in the upper-right corner of the screen.
HOL-1757-MBL-6
Page 47HOL-1757-MBL-6

Trust the Remote Management Profile.
You should now see the iOS request to trust the source of the MDM profile.
Tap Trust when prompted at the Remote Management dialog.
HOL-1757-MBL-6
Page 48HOL-1757-MBL-6

iOS Profile Installation Complete
You should now see the iOS Profile successfully installed.
Tap Done in the upper right corner of the prompt.
HOL-1757-MBL-6
Page 49HOL-1757-MBL-6

AirWatch Enrollment Success
Your enrollment is now completed. Tap Open to navigate to the AirWatch Agent.
Accept the App Installation (IF NEEDED)
You may be prompted to install a series of applications depending on which Module youare taking. If prompted, tap Install to accept the application installation.
HOL-1757-MBL-6
Page 50HOL-1757-MBL-6
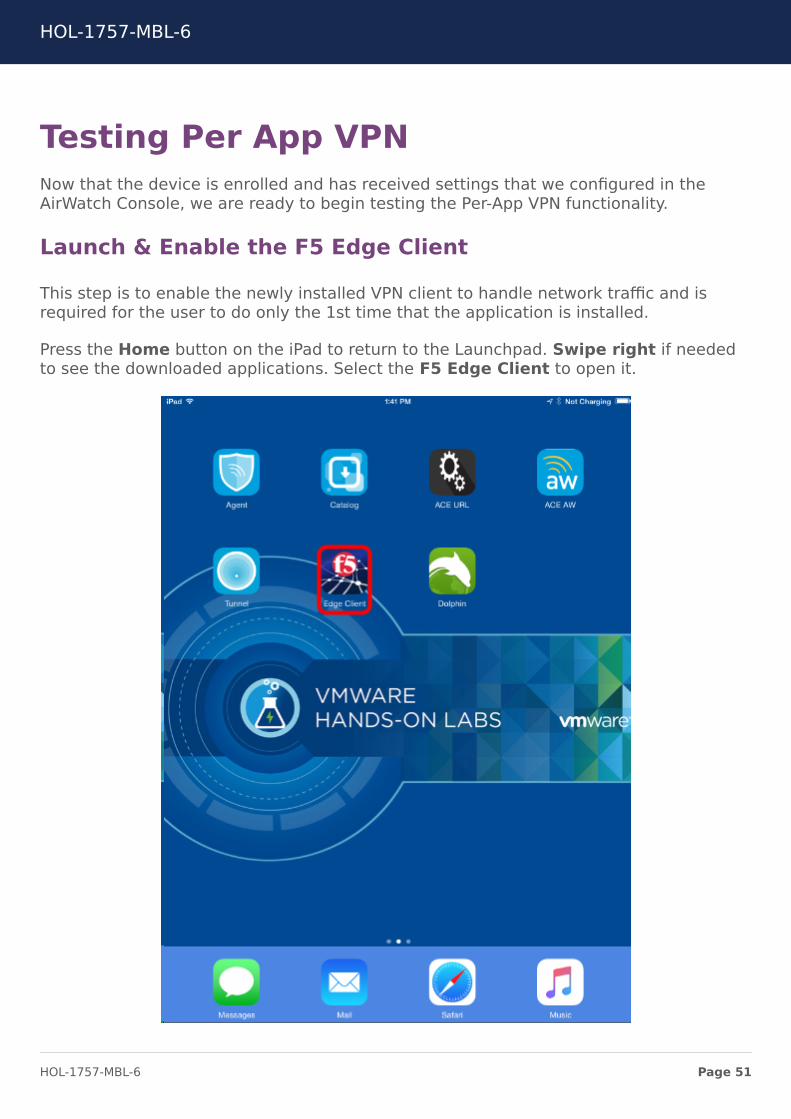
Testing Per App VPNNow that the device is enrolled and has received settings that we configured in theAirWatch Console, we are ready to begin testing the Per-App VPN functionality.
Launch & Enable the F5 Edge Client
This step is to enable the newly installed VPN client to handle network traffic and isrequired for the user to do only the 1st time that the application is installed.
Press the Home button on the iPad to return to the Launchpad. Swipe right if neededto see the downloaded applications. Select the F5 Edge Client to open it.
HOL-1757-MBL-6
Page 51HOL-1757-MBL-6

Accept the VPN Security Warning
Select Enable at the User Agreement prompt.
HOL-1757-MBL-6
Page 52HOL-1757-MBL-6
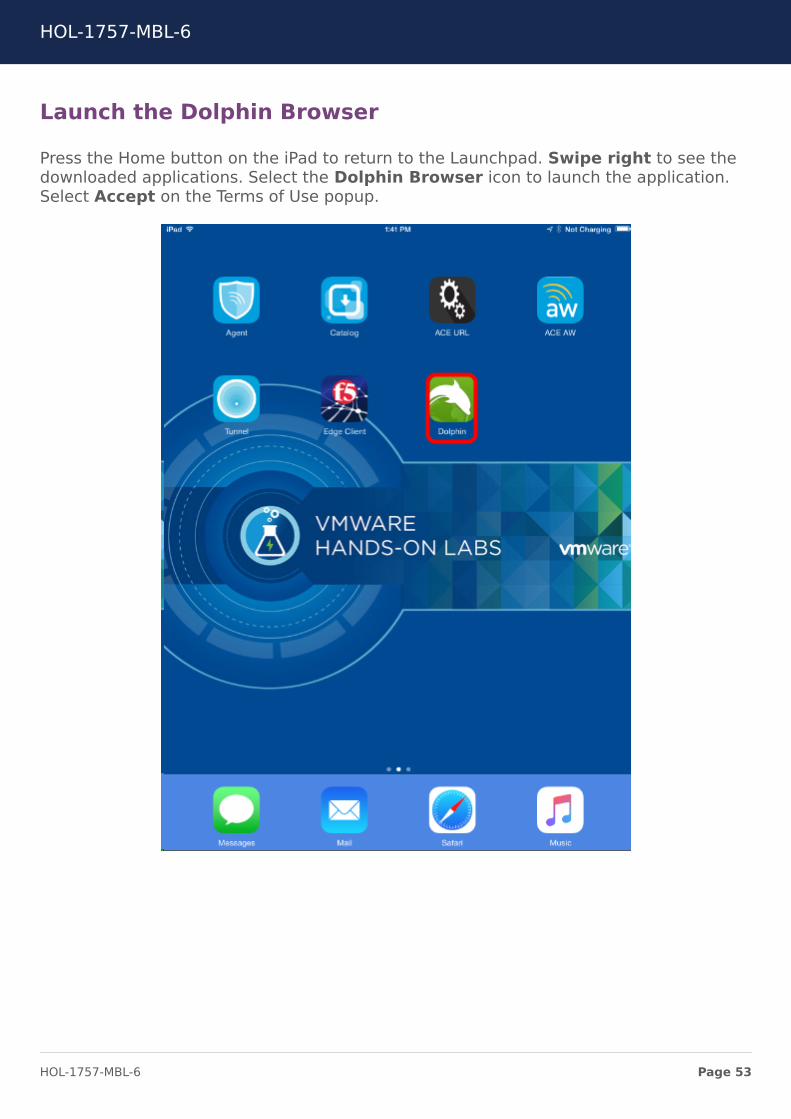
Launch the Dolphin Browser
Press the Home button on the iPad to return to the Launchpad. Swipe right to see thedownloaded applications. Select the Dolphin Browser icon to launch the application.Select Accept on the Terms of Use popup.
HOL-1757-MBL-6
Page 53HOL-1757-MBL-6

Access the Internal Website with Dolphin Browser.
1. The application will launch and you will see the VPN icon appear indicating theconnection is active.
2. Enter the URL "internal.hol.airwlab.com" in the URL bar.3. The website will load and you'll see the Welcome message.
Attempt to Access the Website From Safari
We will now show that although the VPN connection is active, other applications on thedevice will not be able to access the internal network resources.
Open Safari
Return to the launchpad by pressing the Home button on the iPad. Open Safari byselecting the icon form the Launcher.
Attempt to Navigate to the Internal Resource From Safari
1. Open a new tab by selecting the + sign on the navigation bar.
HOL-1757-MBL-6
Page 54HOL-1757-MBL-6
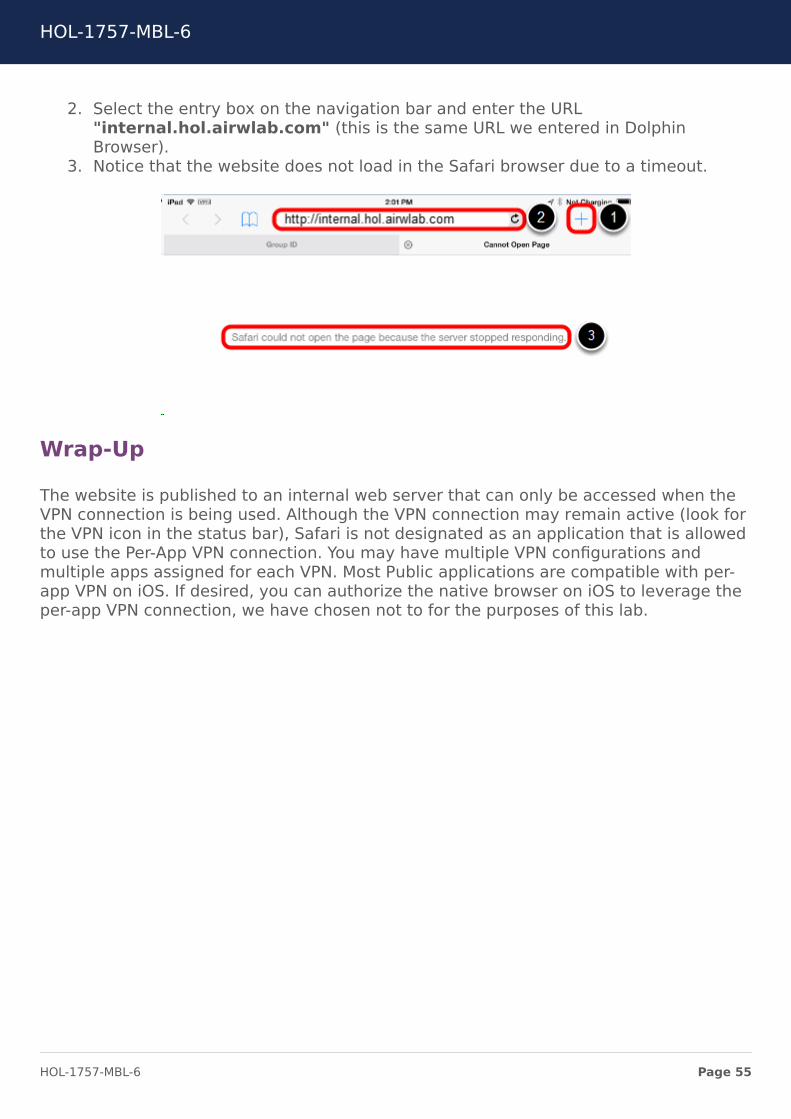
2. Select the entry box on the navigation bar and enter the URL"internal.hol.airwlab.com" (this is the same URL we entered in DolphinBrowser).
3. Notice that the website does not load in the Safari browser due to a timeout.
Wrap-Up
The website is published to an internal web server that can only be accessed when theVPN connection is being used. Although the VPN connection may remain active (look forthe VPN icon in the status bar), Safari is not designated as an application that is allowedto use the Per-App VPN connection. You may have multiple VPN configurations andmultiple apps assigned for each VPN. Most Public applications are compatible with per-app VPN on iOS. If desired, you can authorize the native browser on iOS to leverage theper-app VPN connection, we have chosen not to for the purposes of this lab.
HOL-1757-MBL-6
Page 55HOL-1757-MBL-6

Un-enrolling Your DeviceYou are now going to un-enroll the iOS device from AirWatch.
NOTE: The term "Enterprise Wipe" does not mean reset or completely wipe yourdevice. This only removes the MDM Profiles, Policies, and content which the AirWatchMDM Agent controls.
It will NOT remove the AirWatch MDM Agent application from the device as this wasdownloaded manually before AirWatch had control of the device.
Enterprise Wipe (un-enroll) your iOS device
Enterprise Wipe will remove all the settings and content that were pushed to the devicewhen it was enrolled. It will not affect anything that was on the device prior toenrollment.
To Enterprise Wipe your device you will first bring up the AirWatch Console in a webbrowser. You may need to re-authenticate with your credentials (VLP registered emailaddress and "VMware1!" as the password).
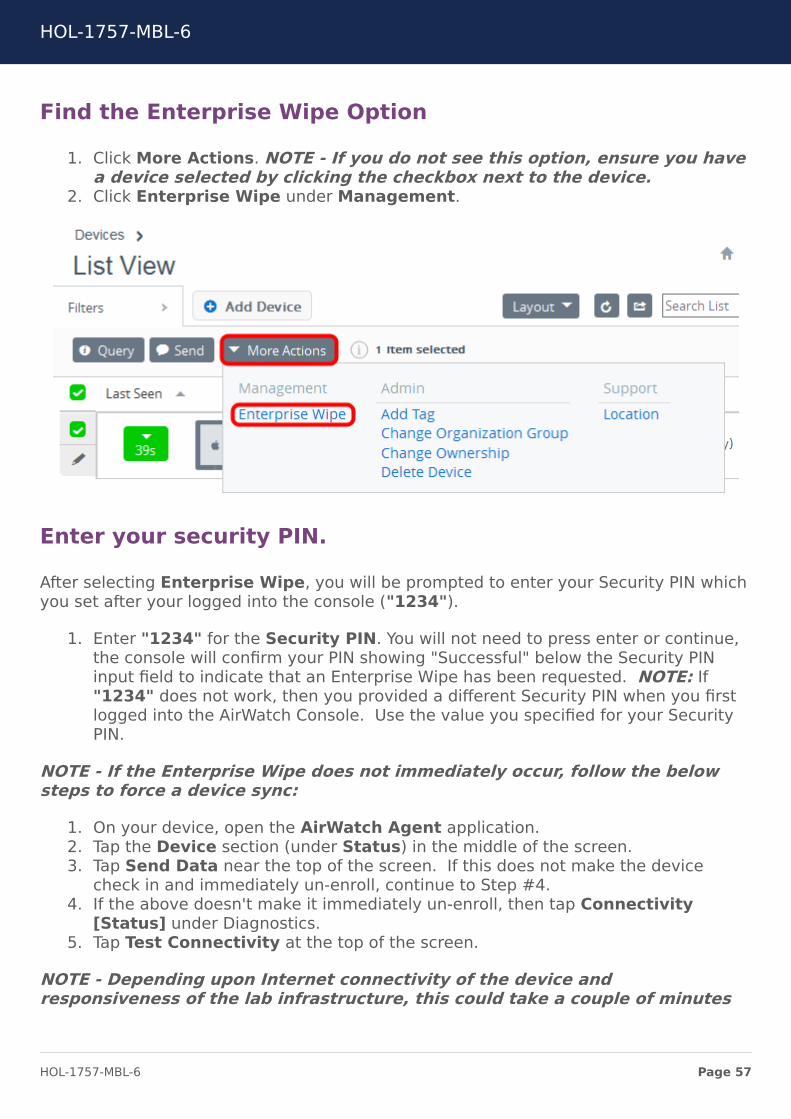
1. Click Devices on the left column.2. Click List View.3. Click the checkbox next to the device you want to Enterprise Wipe.
NOTE - Your Device Friendly Name will very likely be different than what isshown. It will, however, be in the same location as shown on image in thisstep.
HOL-1757-MBL-6
Page 56HOL-1757-MBL-6
Find the Enterprise Wipe Option
1. Click More Actions. NOTE - If you do not see this option, ensure you havea device selected by clicking the checkbox next to the device.
2. Click Enterprise Wipe under Management.
Enter your security PIN.
After selecting Enterprise Wipe, you will be prompted to enter your Security PIN whichyou set after your logged into the console ("1234").
1. Enter "1234" for the Security PIN. You will not need to press enter or continue,the console will confirm your PIN showing "Successful" below the Security PINinput field to indicate that an Enterprise Wipe has been requested. NOTE: If"1234" does not work, then you provided a different Security PIN when you firstlogged into the AirWatch Console. Use the value you specified for your SecurityPIN.
NOTE - If the Enterprise Wipe does not immediately occur, follow the belowsteps to force a device sync:
1. On your device, open the AirWatch Agent application.2. Tap the Device section (under Status) in the middle of the screen.3. Tap Send Data near the top of the screen. If this does not make the device
check in and immediately un-enroll, continue to Step #4.4. If the above doesn't make it immediately un-enroll, then tap Connectivity
[Status] under Diagnostics.5. Tap Test Connectivity at the top of the screen.
NOTE - Depending upon Internet connectivity of the device andresponsiveness of the lab infrastructure, this could take a couple of minutes
HOL-1757-MBL-6
Page 57HOL-1757-MBL-6

or more if there is excessive traffic occurring within the Hands On Labenvironment.
Feel free to continue to the "Force the Wipe" step to manually uninstall the AirWatchservices from the device if network connectivity is failing.
Verify the Un-Enrollment
Press the Home button on the device to go back to the home screen. The applicationspushed through AirWatch should have been removed from the device.
NOTE - The applications and settings pushed through AirWatch managementshould have been removed. The Agent will still be on the device because thatwas downloaded manually from the App Store. Due to lab environmentsettings, it may take some time for the signal to traverse through the various
HOL-1757-MBL-6
Page 58HOL-1757-MBL-6

networks out and back to your device. Continue on to the next step to forcethe wipe if the needed.
HOL-1757-MBL-6
Page 59HOL-1757-MBL-6
Force the Wipe - IF NECESSARY
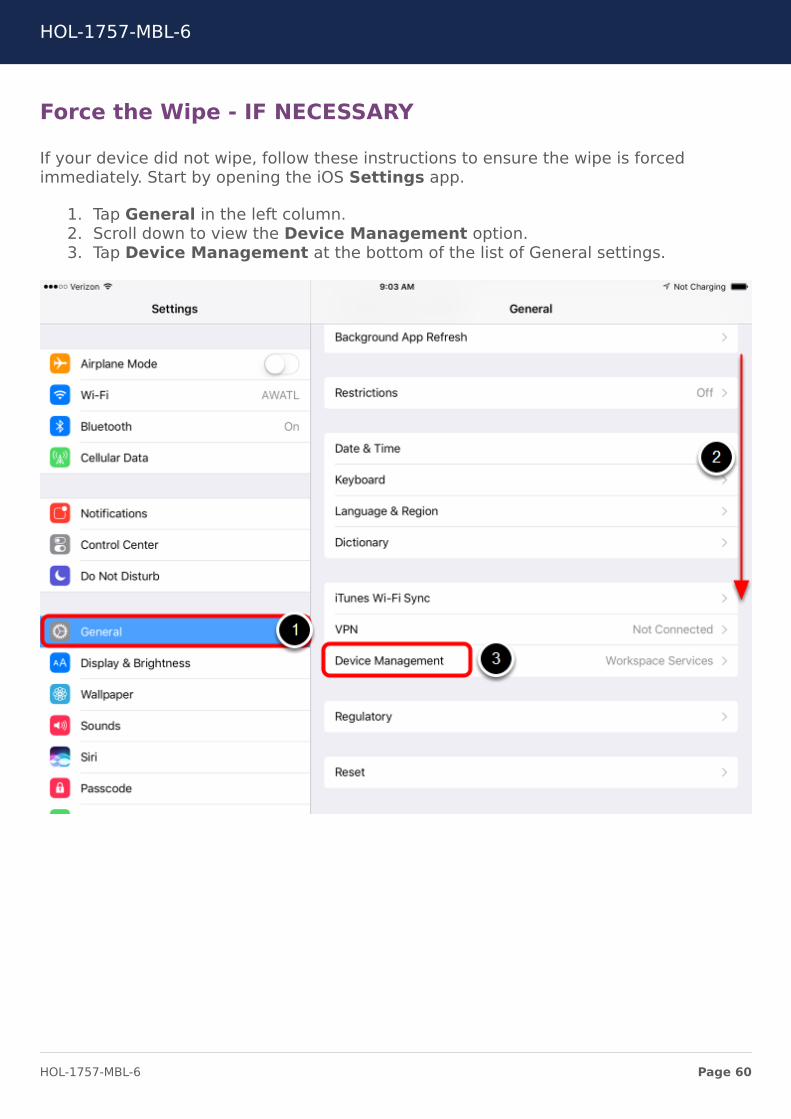
If your device did not wipe, follow these instructions to ensure the wipe is forcedimmediately. Start by opening the iOS Settings app.
1. Tap General in the left column.2. Scroll down to view the Device Management option.3. Tap Device Management at the bottom of the list of General settings.
HOL-1757-MBL-6
Page 60HOL-1757-MBL-6

Force the Wipe - IF NECESSARY
Tap the Workspace Services profile that was pushed to the device.
Force the Wipe - IF NECESSARY
1. Tap Remove Management on the Workspace Services profile. NOTE: Ifprompted for a device PIN, enter it to continue. VMware provisioned devicesshould not have a device PIN enabled.
2. Tap Remove on the Remove Management prompt.
After removing the Workspace Services profile, the device will be un-enrolled. Feel freeto return to the "Verify the Un-Enrollment" step to confirm the successful un-enrollment of the device.
HOL-1757-MBL-6
Page 61HOL-1757-MBL-6

ConclusionThank you for participating in the VMware Hands-on Labs. Be sure to visithttp://hol.vmware.com/ to continue your lab experience online.
Lab SKU: HOL-1757-MBL-6
Version: 20170502-055108
HOL-1757-MBL-6
Page 62HOL-1757-MBL-6