Supplier Network Collaboration - L Brands · Allocation Reports through SAP Portal ... PGI Open...
68
Order Fulfillment and Reporting Supplier Network Collaboration
Transcript of Supplier Network Collaboration - L Brands · Allocation Reports through SAP Portal ... PGI Open...

Order Fulfillment and Reporting
Supplier Network Collaboration

i SNC OrderFulfill and Reporting.Update.doc
CONFIDENTIAL INFORMATION
This manual contains confidential, proprietary and trade secret information of Limited Brands, and its affiliated companies (“Limited Brands”) which is commercially valuable. This information cannot be used, duplicated, disclosed, distributed, modified or discussed in whole or in part for any purpose other than the legitimate business purposes of Limited Brands. Associates and vendors who have access to confidential information must use their best efforts to prevent disclosure to anyone other than expressly required in the performance of their duties to Limited Brands.
Upon request or upon your separation from Limited Brands, you will be required to return these materials or otherwise account for them.
Limited Brands, Inc 2012. All Rights Reserved.
This manual contains material protected by copyright, trade secrets, business process, novel ideas and/or inventions which are proprietary and confidential. You may not copy, modify, publish, transmit, display, create derivative works, sell, transfer, reveal, discuss or in any way use the content of this manual for any purpose other than Limited Brands’ legitimate business purposes.
Title
Subtitle

ii SNC OrderFulfill and Reporting.Update.doc
Table of Contents Table of Contents .......................................................................................................... ii Introduction ................................................................................................................... 4
Overview ...................................................................................................................................... 4 Standard Icons Defined ............................................................................................................... 4
Change Vendor Assignment ........................................................................................ 5 Multiple Vendor Numbers ............................................................................................................ 5
SNC Inbound POs and STOs ........................................................................................ 6 Inbound Purchase Order Report .................................................................................................. 6
SNC Inventory Overview Report ................................................................................ 10 Inventory Overview .................................................................................................................... 10
Post Goods Receipt .................................................................................................... 13 Goods Receipt for Purchase Order ........................................................................................... 13
Post Goods Receipt through Portal For Finished Good Production ...................................... 13 Post Goods Receipt through Portal for Components ............................................................. 15
Invoices ........................................................................................................................ 18 Saving Search Criteria as a Variant ........................................................................................... 18
Creating a Variant (One Time Set Up) ................................................................................... 18 Modify Display of Invoice Overview Screen ............................................................................... 20 Create Invoice from List ............................................................................................................. 22
Select from List of Purchase Orders ...................................................................................... 22 Create Invoice by Entering Purchase Order Directly ................................................................. 26
Enter PO Number and Line Item ............................................................................................ 26 Create Invoice Using the “New” Function .................................................................................. 29
“New” Function ....................................................................................................................... 29 Review Invoice Overview ........................................................................................................... 30
Review Details and Status ..................................................................................................... 30 Search for Invoice Using Invoice Number ................................................................................. 32
Search for Individual Invoice .................................................................................................. 32 Exporting Invoice........................................................................................................................ 33
Export to Excel ....................................................................................................................... 33 Marking Purchase Orders as Fully Invoiced .............................................................................. 34
Maintenance Activity .............................................................................................................. 34 SNC Allocation Report ................................................................................................ 36
Allocation Reports – STOs with Open PGI ................................................................................ 36 Allocation Reports through SAP Portal .................................................................................. 36 Document Creation Date – Date STO Created ...................................................................... 37 Document Delivery Date – By Delivery Date Requested on STO ......................................... 39
SNC Post Goods Issue/PGI ........................................................................................ 40 PGI Open Stock Transport Orders............................................................................................. 40
Post Goods Issue through SAP Portal ................................................................................... 40 Search Outbound Deliveries and PGI ........................................................................ 44
Post Goods Issue of Delivery Doc ............................................................................................. 44 Post Goods Issue of Delivery Doc through Portal .................................................................. 44
Appendix ...................................................................................................................... 51 SNC Display Forecast ................................................................................................................ 51
Allocation Reports through SAP Portal .................................................................................. 51 Display Bill Of Materials (BOM) ................................................................................................. 54 SNC Outbound Delivery on Demand ......................................................................................... 56
Process ................................................................................................................................... 56 Create Outbound Delivery ...................................................................................................... 56
Inventory Movement Report ....................................................................................................... 61 MBOL Report using MB51 ..................................................................................................... 61

iii SNC OrderFulfill and Reporting.Update.doc
Stock Requirements List ............................................................................................................ 65 Stock Requirements through SAP Portal ............................................................................... 65

4 SNC OrderFulfill and Reporting.Update.doc
Introduction
Overview
This manual is designed to assist with the Order Fulfillment and Reporting Tabs of the Supplier Network Collaboration (SNC) tool.
Standard Icons Defined
The following icons may appear throughout the course:
Icon Description
Critical/Warning: Indicates critical information that, if ignored, can result in process or transaction failure.
Note: Provides helpful or advisory information.
Process: Provides business process information.
Reference: Indicates a reference to additional information.
Step by Step: Indicates a system procedure.
Best Practice: Use to identify best practices used throughout the enterprise.
5 SNC OrderFulfill and Reporting.Update.doc
Change Vendor Assignment
Multiple Vendor Numbers
If your company has multiple vendor numbers with Mast Global, you will need to change your vendor assignment via the following process, in order to view the respective data for another vendor number.
Step By Step: Change Vendor Assignment
1. Log in to the SNC site with the provided user ID and password.
2. Select the SNC Supplier tab.
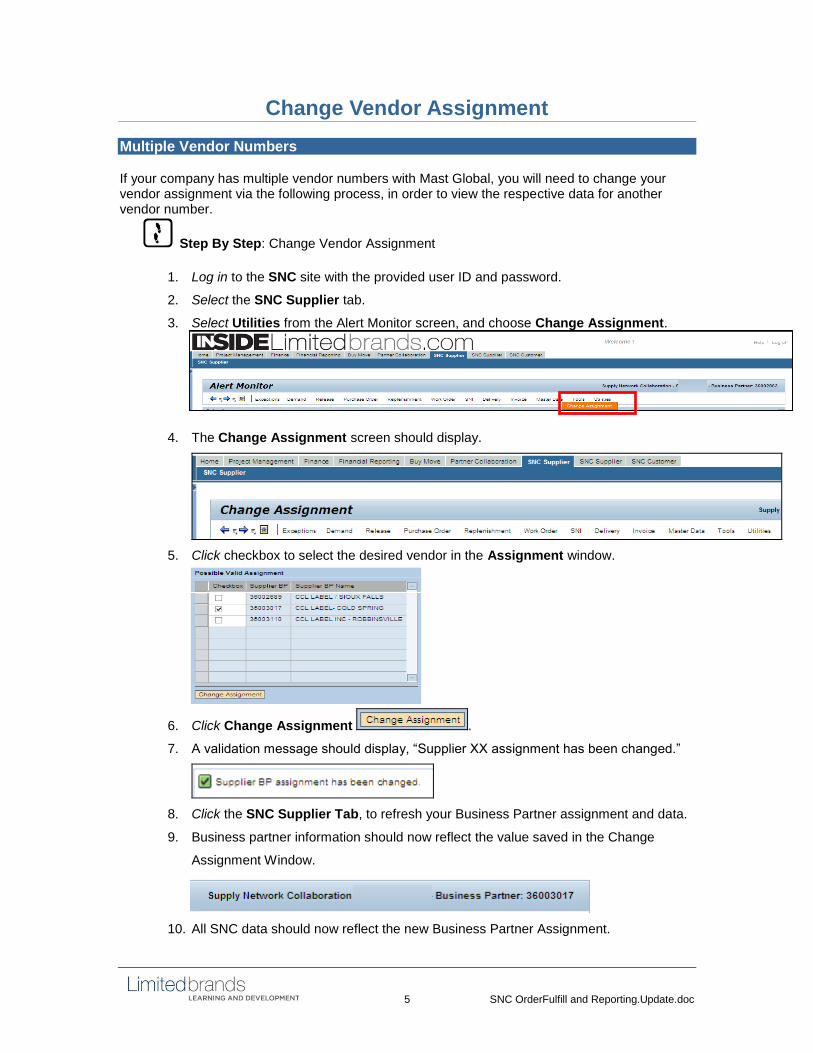
3. Select Utilities from the Alert Monitor screen, and choose Change Assignment.
4. The Change Assignment screen should display.
5. Click checkbox to select the desired vendor in the Assignment window.
6. Click Change Assignment .
7. A validation message should display, “Supplier XX assignment has been changed.”
8. Click the SNC Supplier Tab, to refresh your Business Partner assignment and data.
9. Business partner information should now reflect the value saved in the Change
Assignment Window.
10. All SNC data should now reflect the new Business Partner Assignment.

6 SNC OrderFulfill and Reporting.Update.doc
SNC Inbound POs and STOs
Inbound Purchase Order Report
The Inbound PO Report pulls all open inbound PO's the supplier is receiving and includes ASN information. Allocation Reports through SAP Portal
Step by Step:
11. Open the Limitedbrands Portal.
12. Enter User ID and Password.
13. Click Log on .
14. Click SNC Supplier tab.
15. Select Reporting.
16. Within the Detailed Navigation list, select Inbound POs and STOs.

7 SNC OrderFulfill and Reporting.Update.doc
17. The Inbound PO and STO report screen should display.
18. In the Vendor field, select desired vendor from drop down.
19. In the Receiving Site field, select the desired C site from the drop down.
20. In the Document Type section, click to highlight the box to the left of the NB
Standard Purchase Order.
21. Click Search .
Note: the Open Orders box will always be defaulted as checked. Therefore the search will only pull up open orders.
Additional search criteria (article, date, PO number) may be filtered within the screen search options. Example: To view data for a specific PO, enter the PO number in the Purchase Doc field and then click Search.

8 SNC OrderFulfill and Reporting.Update.doc
22. The Report should display.
23. Use the scroll bar at the bottom of the screen to view more of the report on the
screen.
24. Click Export to Excel to download the report.
25. The PO Details Report box should display. Click PO Details.xls to open.
26. The File Download box should display.
27. Click Open .
28. The report should open in Excel.
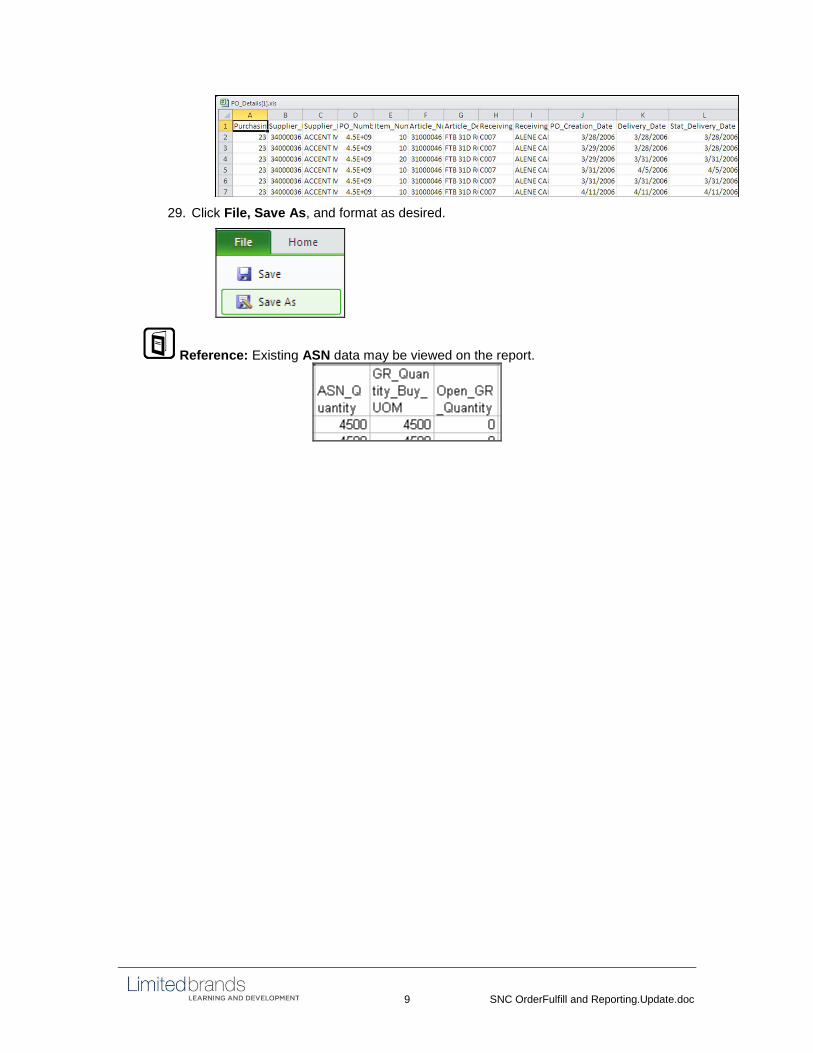
9 SNC OrderFulfill and Reporting.Update.doc
29. Click File, Save As, and format as desired.
Reference: Existing ASN data may be viewed on the report.
10 SNC OrderFulfill and Reporting.Update.doc
SNC Inventory Overview Report
Inventory Overview
Use the Inventory Overview Report to display the Stock levels and status at one or more sites. Inventory Overview Report through SAP Portal
Step by Step:
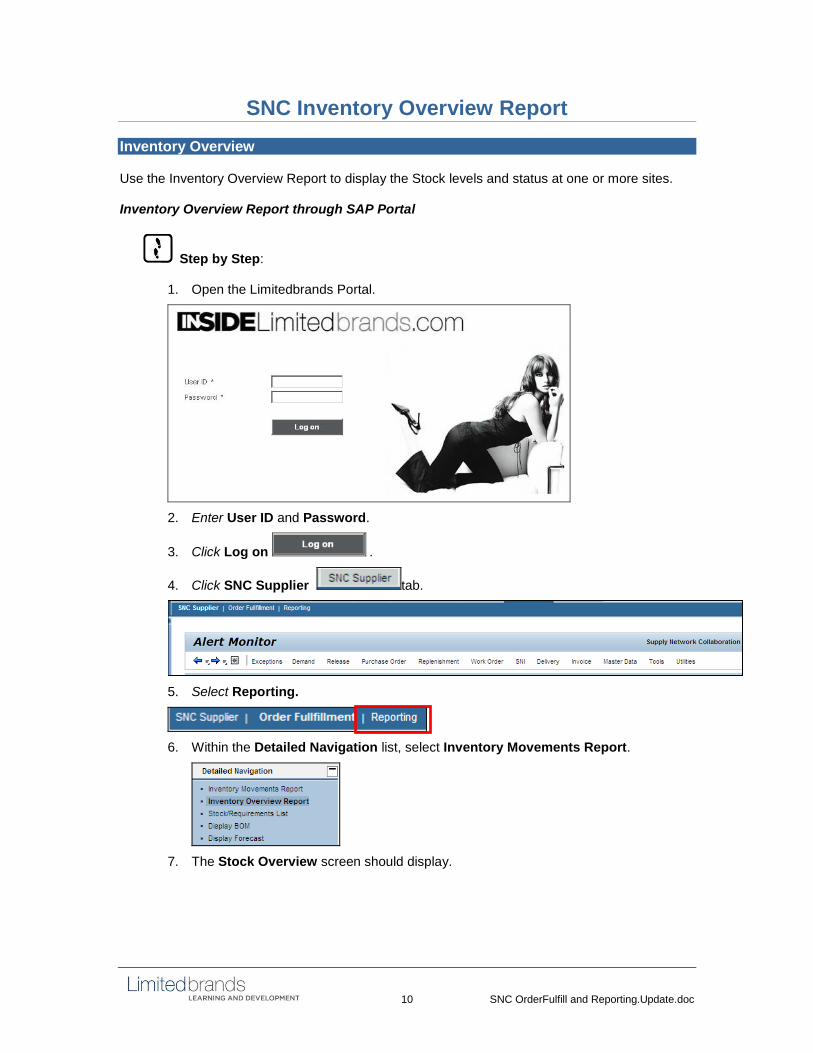
1. Open the Limitedbrands Portal.
2. Enter User ID and Password.
3. Click Log on .
4. Click SNC Supplier tab.
5. Select Reporting.
6. Within the Detailed Navigation list, select Inventory Movements Report.
7. The Stock Overview screen should display.

11 SNC OrderFulfill and Reporting.Update.doc
8. In the Site field line, click Multiple Selection to enter multiple sites.
9. The Multiple Selection for Site box should display.
10. In the Site fields, enter the C and T sites, as appropriate.
11. Click Copy .
12. The Site fields on the initial Stock Overview screen should populate. The Multiple
Selection arrow should now display a green bar , indicating that Multiple
Selection is active.

12 SNC OrderFulfill and Reporting.Update.doc
13. Click Execute .
14. The Stock Overview screen should return. Review Stock Status.
Stock Provided to Vendor: Stock that can only be consumed by the vendor to produce a Finished Good.
0001 Active Status: Stock that can be consumed by another site via a Stock Transport Order (STO).

13 SNC OrderFulfill and Reporting.Update.doc
Post Goods Receipt
Goods Receipt for Purchase Order
For a merchandise vendor to display and post goods receipt on a specific Purchase Order, follow the steps outlined below to access and navigate through the SAP Portal.
Post Goods Receipt through Portal For Finished Good Production
Step by Step:
1. Open the Limitedbrands Portal.
2. Enter User ID and Password.
3. Click Log on .
4. Click SNC Supplier tab.
5. Select Order Fulfillment.
6. Click Production Goods Receipt in the Detailed Navigation list.
7. Custom transaction for MB01 Receiving should display.

14 SNC OrderFulfill and Reporting.Update.doc
8. In the Purchasing Doc field, enter the Purchase Order number.
9. Press the Enter key.
10. The Purchase Order Line details should display.
11. In the Receiving Quantity column, enter the quantity for each line.
Note: The total Ordered/Open Quantity for each article aggregates on a single line. (if 1 SKU multiple times on the Order, one line should display. If 4 different SKUs, 4 lines should display.)
12. In the Batch column, enter the Batch # for each line. (Batch Managed articles only)
Reference: If an article is Batch Managed, the Batch field should display white. The field is greyed out if the article is not Batch Managed.
13. Click Post.

15 SNC OrderFulfill and Reporting.Update.doc
Post Goods Receipt through Portal for Components
Step by Step
1. Click SNC Supplier Tab
2. Select Order Fulfillment.
3. Click Component / STO Goods Receipt in the Detailed Navigation list.
4. The Goods Receipt for Purchase Order: Initial Screen should display.
5. Enter the required data into the following fields:
Movement Type – 101
Purchase Order – Purchase Order number for the order to receive

16 SNC OrderFulfill and Reporting.Update.doc
6. Press the Enter key to process.
7. The Goods Receipt for PO:Selection Screen 0001/0002 should display.
8. For each line item to receive:
Check the box in front of each line item to receive
Change the quantity if different from quantity receiving
9. Only 5 open Purchase Order lines will display. To view additional PO lines, click
Tools and make the appropriate selection.
17 SNC OrderFulfill and Reporting.Update.doc
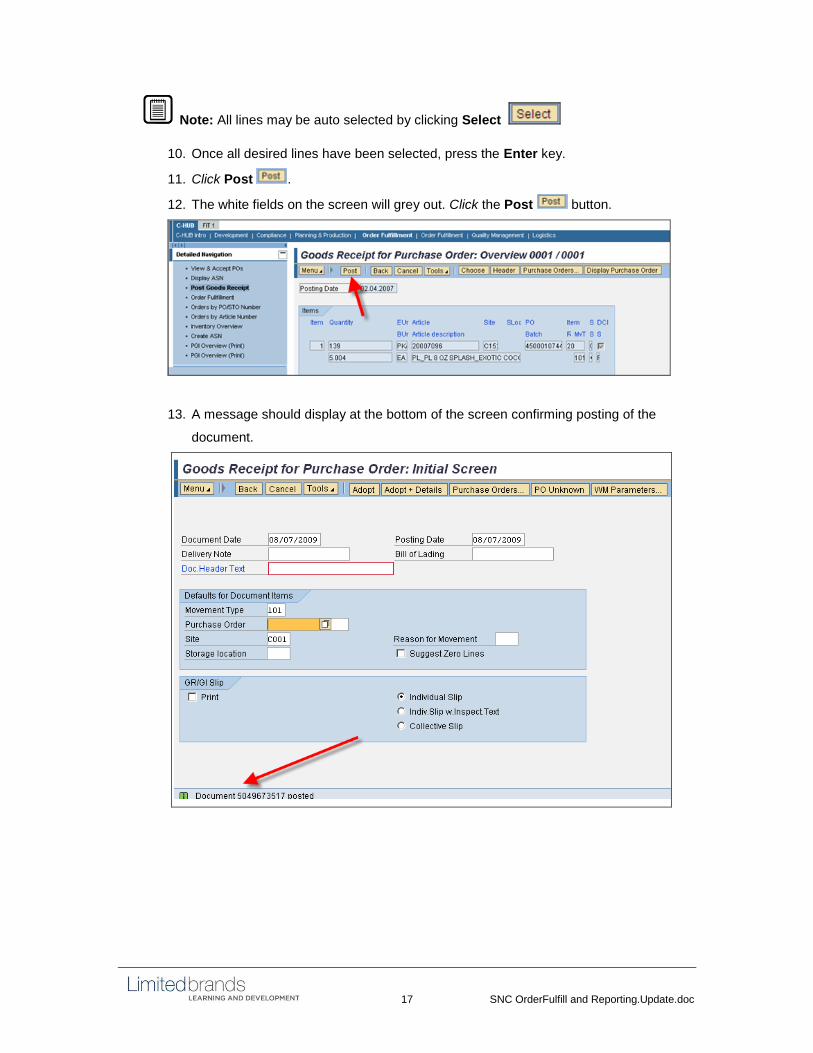
Note: All lines may be auto selected by clicking Select
10. Once all desired lines have been selected, press the Enter key.
11. Click Post .
12. The white fields on the screen will grey out. Click the Post button.
13. A message should display at the bottom of the screen confirming posting of the
document.

18 SNC OrderFulfill and Reporting.Update.doc
Invoices Saving Search Criteria as a Variant
Functionality exists within the SNC Create Invoice screen to create variants to consistently populate frequently used search criteria.
Creating a Variant (One Time Set Up)
Step by Step: Search for Documents Requiring Invoices (Select from List)
1. On the Alert Monitor screen, click Invoice from the header menu.
2. Select Documents Requiring Invoices from the drop down menu.
3. Documents Requiring Invoices should display.
4. Enter the Customer number (example: 1117) into the Customer field.
5. In the Fully Invoiced field, select Not Fully Invoiced from the drop down.
6. In the Reference doc field, select Purchase Order from the drop down.
7. Click the down arrow on Reset to Name and Save As variant to User
Specific.
Best Practice: Creating a variant will populate the same search criteria in the Documents Requiring Invoices screen.

19 SNC OrderFulfill and Reporting.Update.doc
8. The newly created Variant should now display in the Selection Area at the top of the
screen.
9. The saved Variant may be selected at the start of the Create Invoice activity to
populate the desired fields.

20 SNC OrderFulfill and Reporting.Update.doc
Modify Display of Invoice Overview Screen
SNC allows the manipulation of the screen display to customize the overview screen layout.
Step by Step: Change Settings in Screen Layout Display
1. Click Settings (far right side of Invoice Overview screen).
2. Review the Settings screen with Hidden and Displayed Columns.
3. Highlight the desired columns to move and use the Add and Remove
buttons.
Suggested Column Layout: Invoice No. Item Doc. Date Net Crcy Status PaytAdvDte Paid Net Amount Inv. Type Item Type Product Pur. Doc. PurDocItem Quantity UoM
4. To use the changed layout during the current login session, click OK .

21 SNC OrderFulfill and Reporting.Update.doc
5. To create a permanent personalized view of the column layout, click Save As
.
6. Name the view in the Description field.
7. Click the Initial View checkbox to create a default layout.
8. Click OK .
9. Click Apply to transfer the settings.
10. Click OK to save the transfer.
11. The newly saved layout should now display in the View drop down.

22 SNC OrderFulfill and Reporting.Update.doc
Create Invoice from List
Invoices may be created by selecting from a list of Purchase Orders.
Select from List of Purchase Orders
Step by Step: Search for Documents Requiring Invoices (Select from List)
1. On the Alert Monitor screen, click Invoice from the header menu.
2. Select Documents Requiring Invoices from the drop down menu.
3. Documents Requiring Invoices should display.
4. Enter the Customer number (example: 1117) into the Customer field.
5. In the Fully Invoiced field, select Not Fully Invoiced from the drop down.
6. In the Reference doc field, select Purchase Order from the drop down.
7. Click the down arrow on Reset to Save As variant to User Specific.
Best Practice: Creating a variant will populate the same search criteria in the Documents Requiring Invoices screen.
8. Select Variant created in one time set up doc. (example: INVOICE)
9. Click Go to save.
10. Scroll down to view the Open Invoices.

23 SNC OrderFulfill and Reporting.Update.doc
11. Any orders requiring Invoices should display.
12. The columns may be sorted in ascending or descending order using the Sort
functionality. ( Icon to the right of the column name)
13. Click the gray box to the left of the Purchase Order to highlight and select desired
Order Number.
14. Click Create Invoice .
15. Scroll up to view the Create Invoice screen.
Note: Required fields are designated with a red star.
16. Enter the Invoice Number into the Invoice No. field.
Process: The Invoice Number field has a 16 character Max limit. The same 16 character invoice number may not be used more than once. 17. The Document Date should equal the Invoice Date from Supplier’s system.
18. Scroll down to view Invoice Items.

24 SNC OrderFulfill and Reporting.Update.doc
19. The Invoice Items screen should display.
20. Update Quantity and Price fields as appropriate.
Best Practice: For applicable Price Change, best practice is to communicate with Mast Global purchasing partners during the PO Confirmation process.
21. Scroll to the right of the screen and populate Tax Code with “I0” (Alphanumeric letter
I and number 0)
Note: Price Unit (Pr. Unit) and Price Unit of Measure (Pr. UoM) should not be
changed.
Reference: Unchecking or rechecking the OK checkbox will recalculate your total invoice cost based on any changes to quantities or prices.
22. Scroll up to top of page.
23. Select Check to validate invoice completion.
24. Messages may display. Correct any red errors and click Check to continue.
Best Practice: Scroll to right and down to ensure view of all messages. If there are no red error messages, continue to Publish.
25. Review Validation messages.
26. Click Publish .
25 SNC OrderFulfill and Reporting.Update.doc
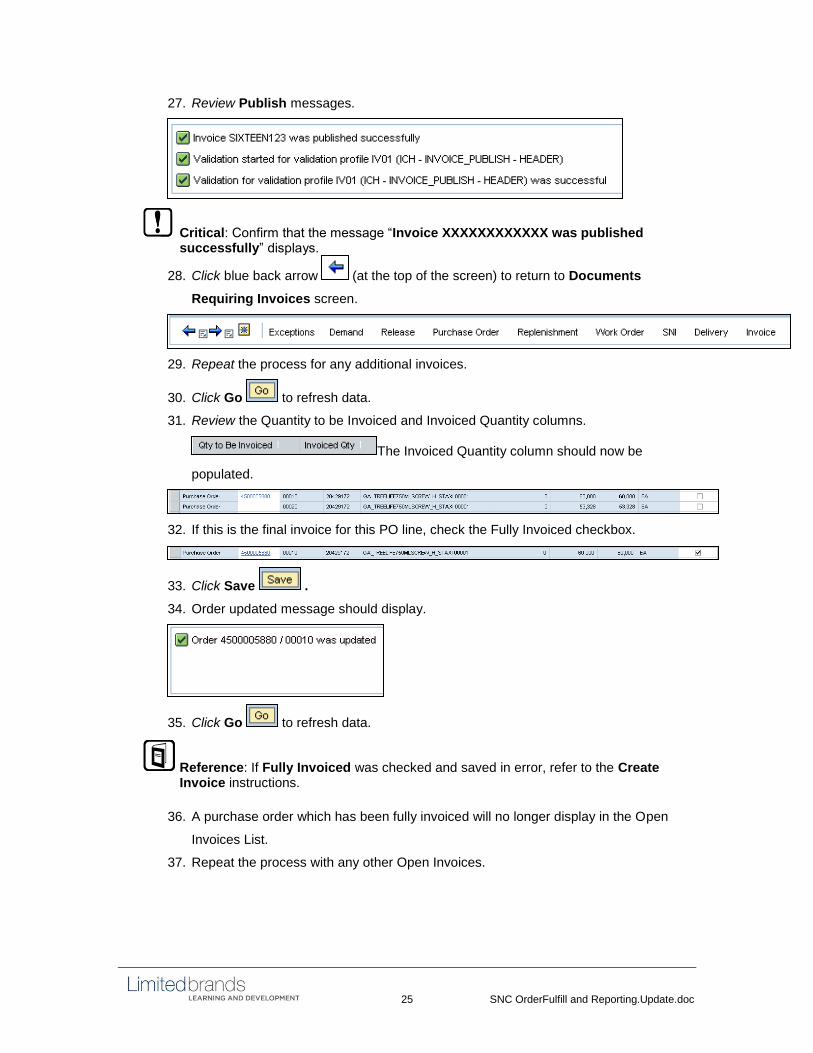
27. Review Publish messages.
Critical: Confirm that the message “Invoice XXXXXXXXXXXX was published successfully” displays.
28. Click blue back arrow (at the top of the screen) to return to Documents
Requiring Invoices screen.
29. Repeat the process for any additional invoices.
30. Click Go to refresh data.
31. Review the Quantity to be Invoiced and Invoiced Quantity columns.
The Invoiced Quantity column should now be
populated.
32. If this is the final invoice for this PO line, check the Fully Invoiced checkbox.
33. Click Save .
34. Order updated message should display.
35. Click Go to refresh data.
Reference: If Fully Invoiced was checked and saved in error, refer to the Create Invoice instructions.
36. A purchase order which has been fully invoiced will no longer display in the Open
Invoices List.
37. Repeat the process with any other Open Invoices.

26 SNC OrderFulfill and Reporting.Update.doc
Create Invoice by Entering Purchase Order Directly
Rather than selecting from a list of PO numbers, an Invoice may be created by entering a PO number and Line Item directly.
Enter PO Number and Line Item
Step by Step: Create Invoice by entering PO Number and Line Item directly
1. On the Alert Monitor screen, click Invoice from the header menu.
2. Select Create Invoice.
3. The Create Invoice screen should display.
4. In the first header drop down select from the following:
Invoice: Creation of any Standard merchandise invoice.
Subsequent Debit: Any price adjustments to increase cost after merchandise invoice already published.
Subsequent Credit: Any price adjustments to decrease cost after merchandise invoice already published.
5. In the next header drop down, select Purchase Order .

27 SNC OrderFulfill and Reporting.Update.doc
6. Enter PO Number invoice is to be created
for.
7. Enter Line Item Number .
8. Enter Customer Number .
9. Click Add .
Note: Required fields are designated with a red star.
10. Enter the Invoice Number into the Invoice No. field.
Process: The Invoice Number field has a 16 character Max limit. The same 16 character invoice number may not be used more than once.
11. The Document Date should equal the Invoice Date from Supplier’s system.
12. Scroll down to view Invoice Items.
13. Update Quantity and Price fields as appropriate.
Best Practice: For applicable Price Change, best practice is to communicate with Mast Global purchasing partners during the PO Confirmation process.
14. Scroll to the right of the screen and populate Tax Code with “I0” (Alphanumeric letter
I and number 0)

28 SNC OrderFulfill and Reporting.Update.doc
Note: Price Unit (Pr. Unit) and Price Unit of Measure (Pr. UoM) should not be
changed.
Reference: Unchecking or rechecking the OK checkbox will recalculate your total invoice cost based on any changes to quantities or prices.
15. Scroll up to top of page.
16. Select Check to validate invoice completion.
17. Messages may display. Correct any red errors and click Check to continue.
Best Practice: Scroll to right and down to ensure view of all messages. If there are no red error messages, continue to Publish.
18. Review Validation messages.
19. Click Publish .
20. Review Publish messages.
Critical: Confirm that the message “Invoice XXXXXXXXXXXX was published successfully” displays.

29 SNC OrderFulfill and Reporting.Update.doc
Create Invoice Using the “New” Function
When processing a series of Invoices, it may be useful to utilize the “New” functionality.
“New” Function
Step by Step: Create Invoices Using “New” without returning to Alert Monitor screen
1. After processing through Publish and Save in the final steps of creating an Invoice,
to begin to create a new invoice, click New on the Create Invoice screen.
2. A confirmation box should display.
3. Click Yes to confirm.
4. Enter new PO Number .
5. Enter new Line Item Number .
6. Enter Customer Number .
7. Click Add .
8. To continue creating the invoice, click Check to validate invoice completion
and review messages.
30 SNC OrderFulfill and Reporting.Update.doc
Review Invoice Overview
The Invoice Overview may be accessed to review details and status of Invoices.
Review Details and Status
Step by Step: Invoice Overview
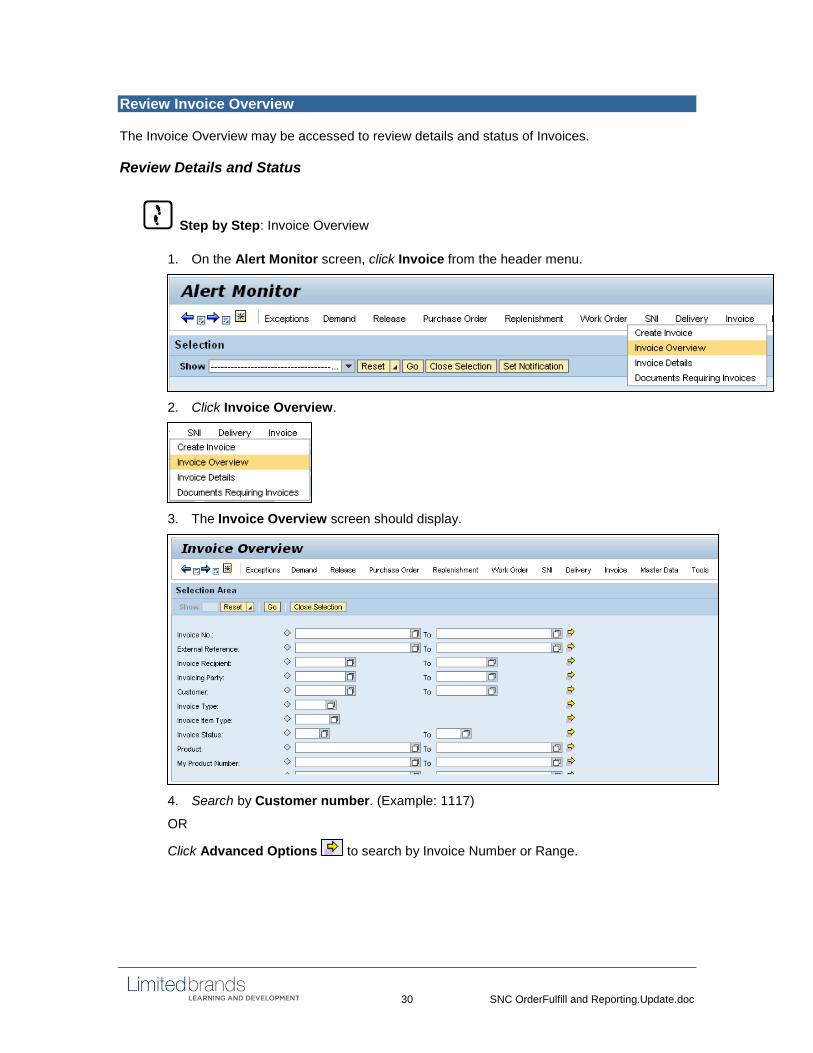
1. On the Alert Monitor screen, click Invoice from the header menu.
2. Click Invoice Overview.
3. The Invoice Overview screen should display.
4. Search by Customer number. (Example: 1117)
OR
Click Advanced Options to search by Invoice Number or Range.

31 SNC OrderFulfill and Reporting.Update.doc
Input desired Multiple Selection criteria and click OK to process.
Best Practice: Click Reset in the Selection Area of the Invoice Overview screen to save specific Search Criteria as a go forward Variant.
5. Review Invoices.
6. Click the desired Invoice number in the Invoice No. column to view details of an
individual invoice.
7. Review columns:
Status o Paid: Customer has remitted payment o Published: Successfully published the invoice out of SNC. Invoice has not yet
been paid by customer.
PaytAdvDte: Refers to customer payment processing date
32 SNC OrderFulfill and Reporting.Update.doc
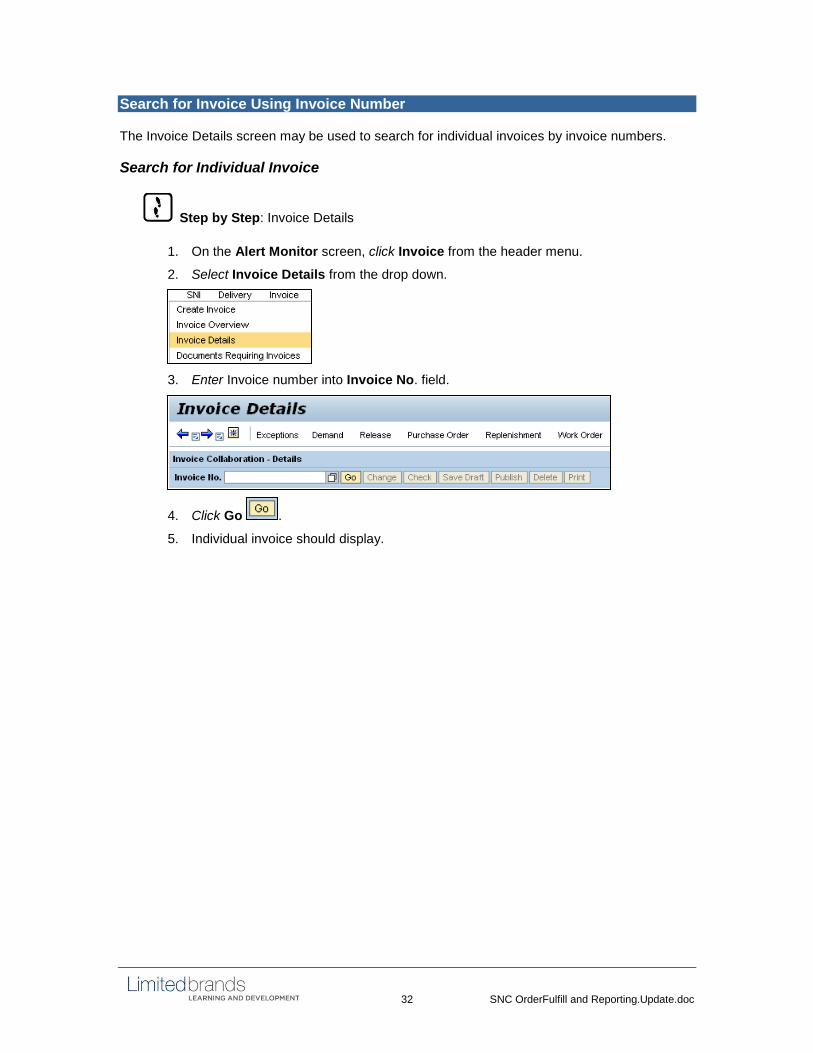
Search for Invoice Using Invoice Number
The Invoice Details screen may be used to search for individual invoices by invoice numbers.
Search for Individual Invoice
Step by Step: Invoice Details
1. On the Alert Monitor screen, click Invoice from the header menu.
2. Select Invoice Details from the drop down.
3. Enter Invoice number into Invoice No. field.
4. Click Go .
5. Individual invoice should display.

33 SNC OrderFulfill and Reporting.Update.doc
Exporting Invoice
The Invoice Items screen may be exported to Microsoft Excel using the Export functionality.
Export to Excel
Step by Step: Export Invoice Items
1. Review the Invoice Items section of the Create Invoice screen
2. Click Export .
3. Click Export to Microsoft Excel .
4. Click Open or Save on the export.xls box.

34 SNC OrderFulfill and Reporting.Update.doc
Marking Purchase Orders as Fully Invoiced
The below steps should be followed as a periodic maintenance activity.
Maintenance Activity
Step by Step
1. On the Alert Monitor screen, click Invoice from the header menu.
2. Select Documents Requiring Invoices from the drop down menu.
3. Documents Requiring Invoices should display.
4. Enter the Customer number (example: 1117) into the Customer field.
5. In the Fully Invoiced field, select Not Fully Invoiced from the drop down.
6. In the Reference doc field, select Purchase Order from the drop down.
7. Scroll down to the lower portion of the screen..
8. Review the Quantity to be Invoiced and Invoiced Quantity columns in the Open
Invoices section.
9. The Invoiced Quantity column should now be populated.
10. If this is the final invoice for this PO line, check the Fully Invoiced checkbox.
11. Click Save .
35 SNC OrderFulfill and Reporting.Update.doc
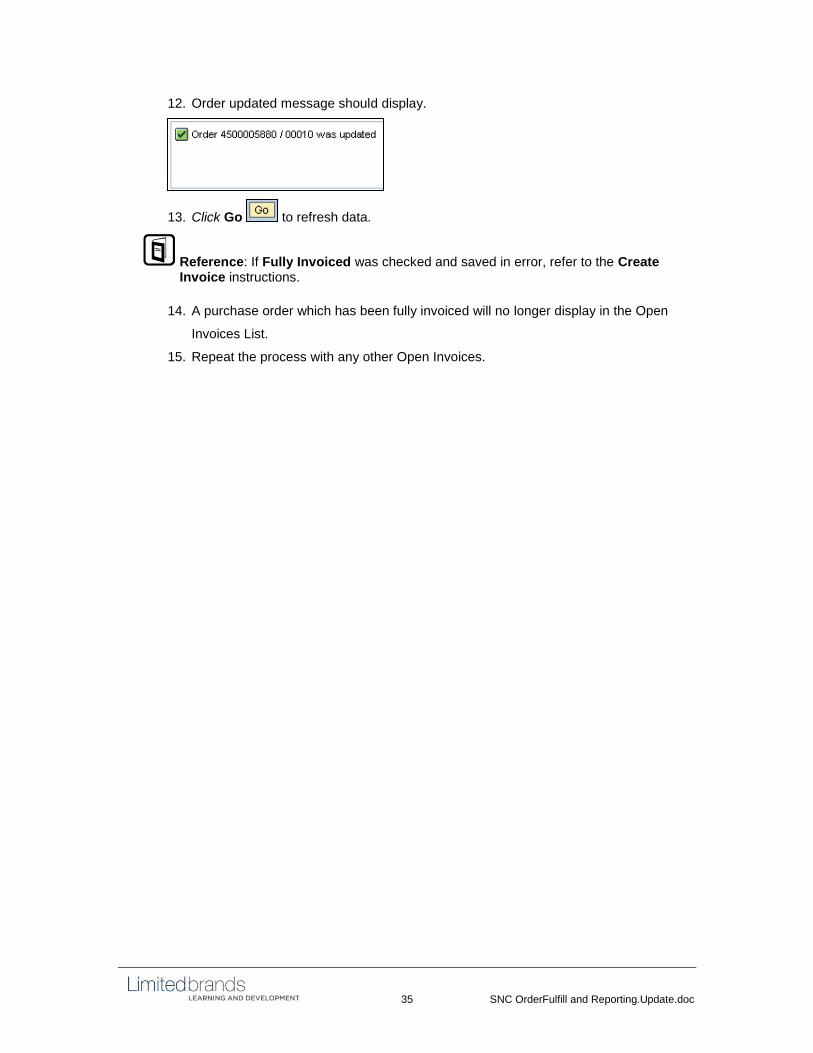
12. Order updated message should display.
13. Click Go to refresh data.
Reference: If Fully Invoiced was checked and saved in error, refer to the Create Invoice instructions.
14. A purchase order which has been fully invoiced will no longer display in the Open
Invoices List.
15. Repeat the process with any other Open Invoices.
36 SNC OrderFulfill and Reporting.Update.doc
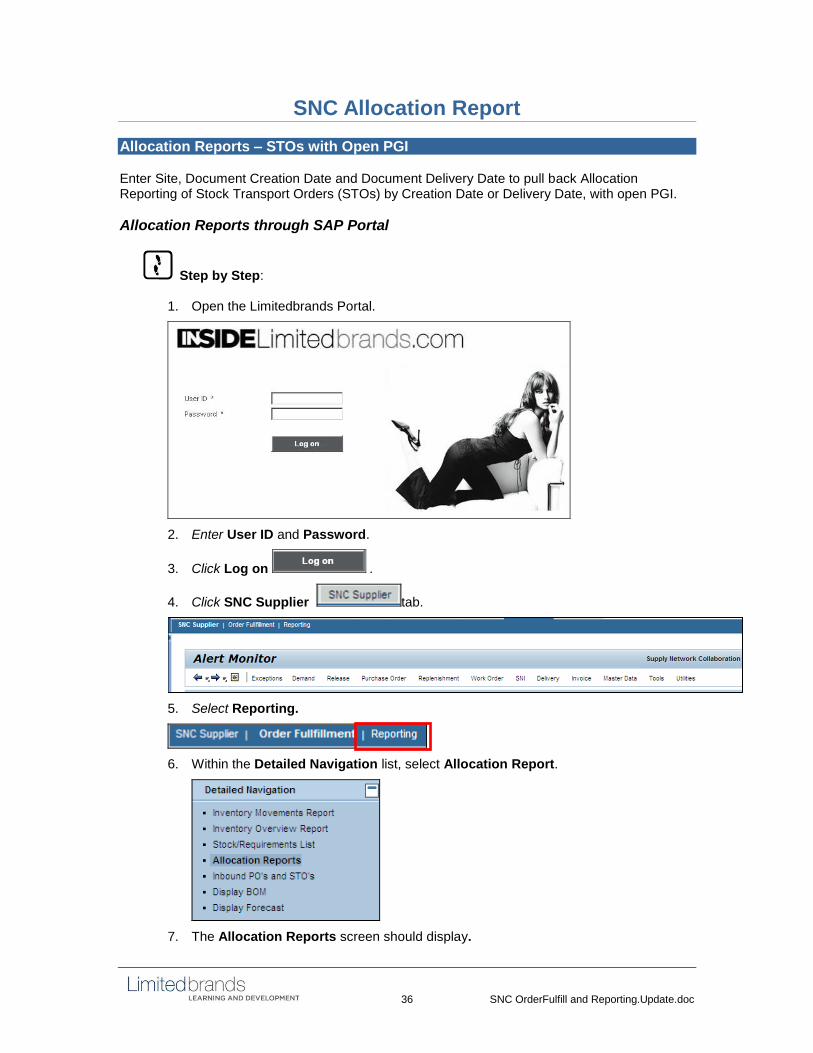
SNC Allocation Report
Allocation Reports – STOs with Open PGI
Enter Site, Document Creation Date and Document Delivery Date to pull back Allocation Reporting of Stock Transport Orders (STOs) by Creation Date or Delivery Date, with open PGI.
Allocation Reports through SAP Portal
Step by Step:
1. Open the Limitedbrands Portal.
2. Enter User ID and Password.
3. Click Log on .
4. Click SNC Supplier tab.
5. Select Reporting.
6. Within the Detailed Navigation list, select Allocation Report.
7. The Allocation Reports screen should display.
37 SNC OrderFulfill and Reporting.Update.doc
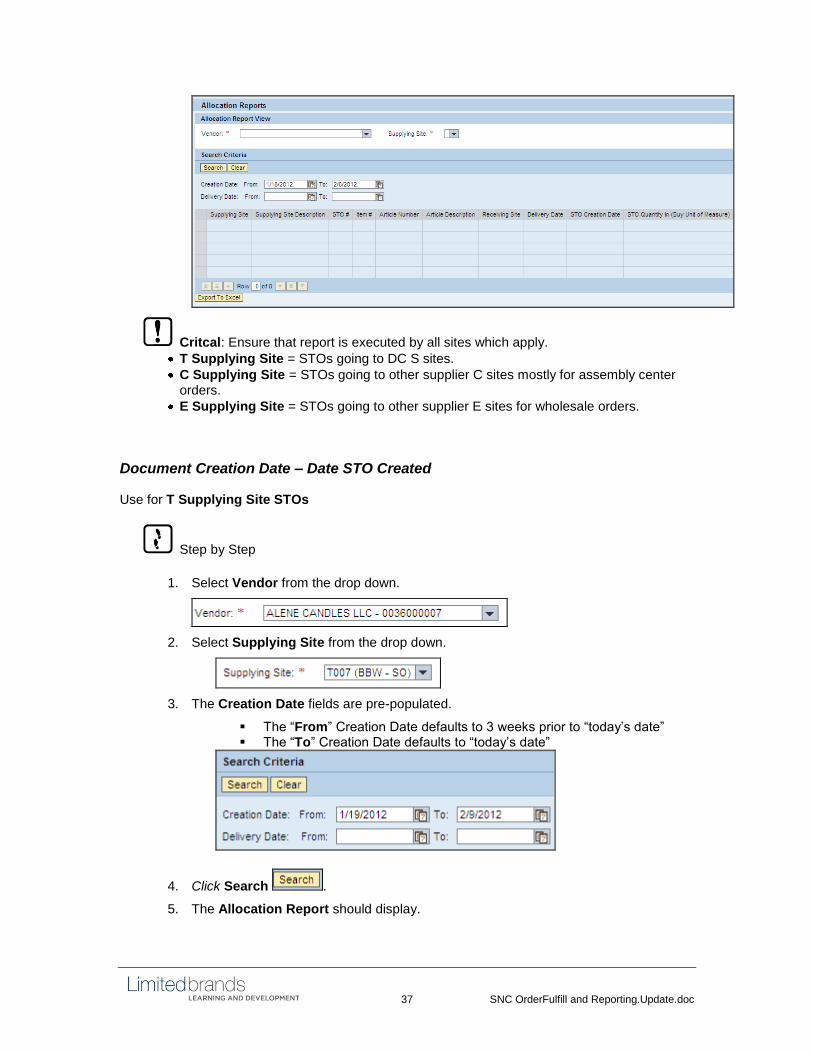
Critcal: Ensure that report is executed by all sites which apply.
T Supplying Site = STOs going to DC S sites.
C Supplying Site = STOs going to other supplier C sites mostly for assembly center orders.
E Supplying Site = STOs going to other supplier E sites for wholesale orders.
Document Creation Date – Date STO Created Use for T Supplying Site STOs
Step by Step
1. Select Vendor from the drop down.
2. Select Supplying Site from the drop down.
3. The Creation Date fields are pre-populated.
The “From” Creation Date defaults to 3 weeks prior to “today’s date” The “To” Creation Date defaults to “today’s date”
4. Click Search .
5. The Allocation Report should display.

38 SNC OrderFulfill and Reporting.Update.doc
6. Click Export to Excel .
7. Allocation Report box should open, Click Allocation Report xls.
8. The File Download box should display.
9. Click Open .
10. The Report should export to Excel.
11. Click File, Save As to save the report to the appropriate folder location.
39 SNC OrderFulfill and Reporting.Update.doc
Best Practice: Upon Export, the report may be formatted as desired. (For example, wrap header text, increase column width, etc.)
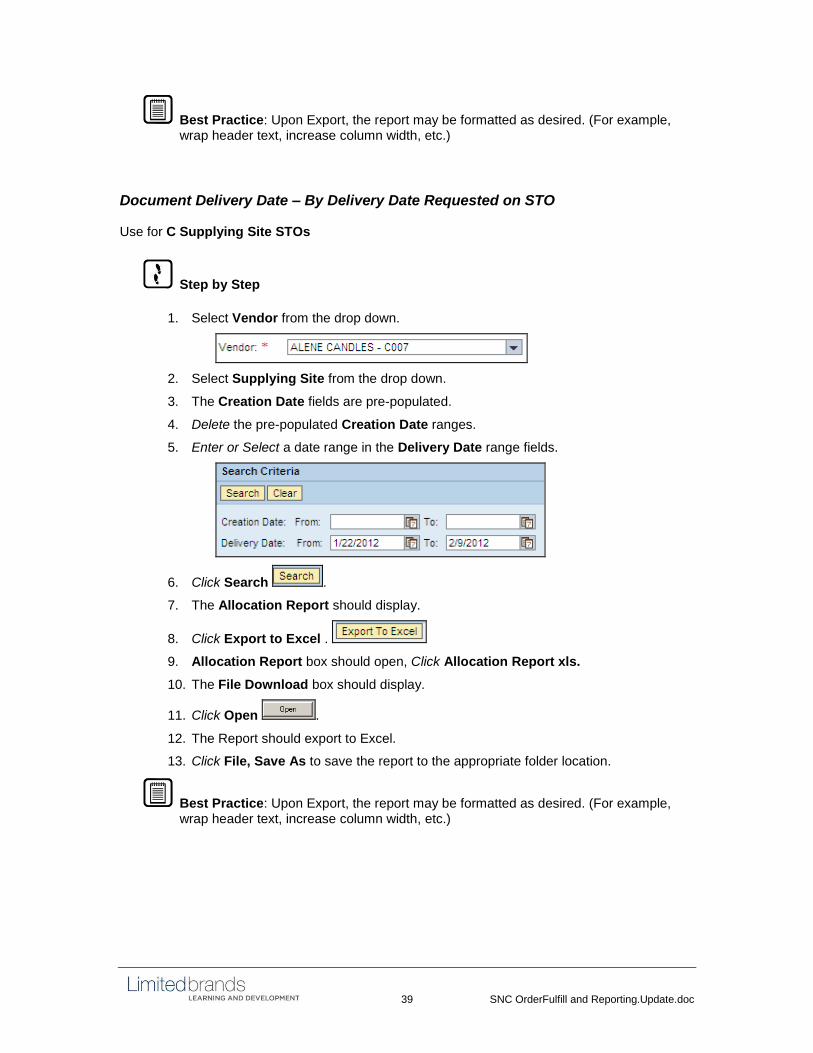
Document Delivery Date – By Delivery Date Requested on STO Use for C Supplying Site STOs
Step by Step
1. Select Vendor from the drop down.
2. Select Supplying Site from the drop down.
3. The Creation Date fields are pre-populated.
4. Delete the pre-populated Creation Date ranges.
5. Enter or Select a date range in the Delivery Date range fields.
6. Click Search .
7. The Allocation Report should display.
8. Click Export to Excel .
9. Allocation Report box should open, Click Allocation Report xls.
10. The File Download box should display.
11. Click Open .
12. The Report should export to Excel.
13. Click File, Save As to save the report to the appropriate folder location.
Best Practice: Upon Export, the report may be formatted as desired. (For example, wrap header text, increase column width, etc.)

40 SNC OrderFulfill and Reporting.Update.doc
SNC Post Goods Issue/PGI PGI Open Stock Transport Orders
Use the SNC Transfer Posting screen to PGI open Stock Transport Orders using the Master Bill of Lading (MBOL) and MBOL number.
Post Goods Issue through SAP Portal
Step by Step:
1. Open the Limitedbrands Portal.
2. Enter User ID and Password.
3. Click Log on .
4. Click SNC Supplier tab.
5. Select Order Fulfillment.
6. Within the Detailed Navigation list, select Outbound Delivery on Demand.
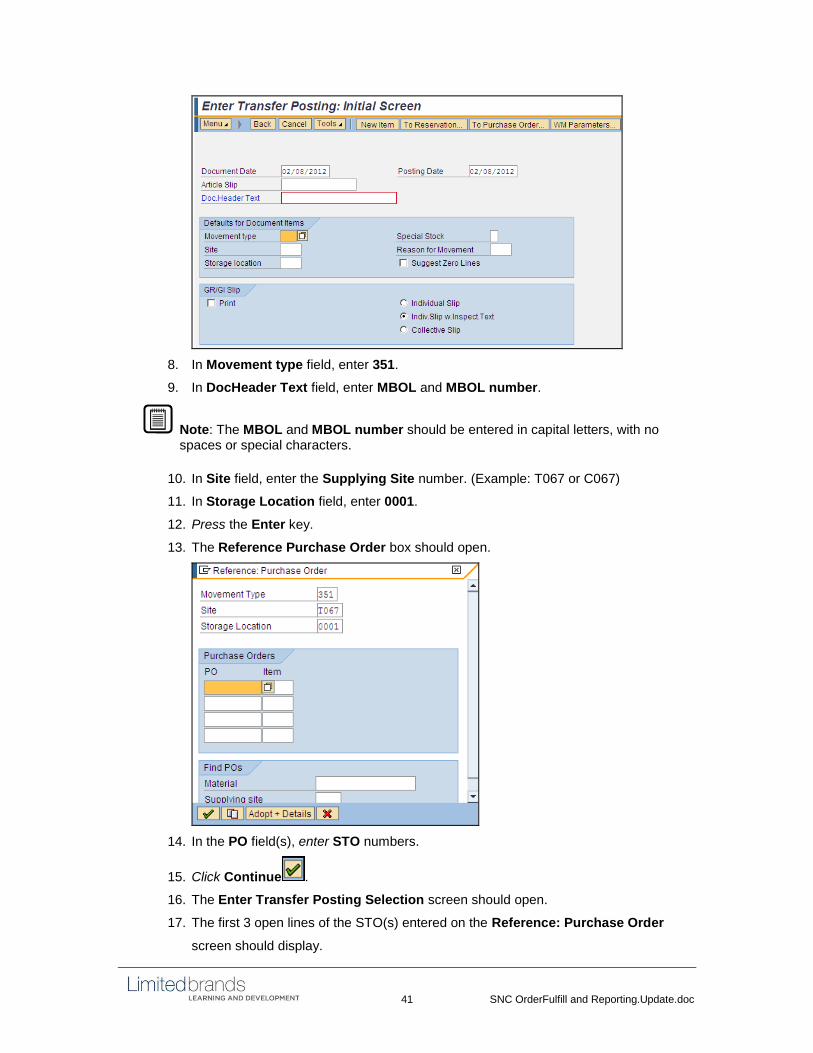
7. The Enter Transfer Posting screen should display.
41 SNC OrderFulfill and Reporting.Update.doc
8. In Movement type field, enter 351.
9. In DocHeader Text field, enter MBOL and MBOL number.
Note: The MBOL and MBOL number should be entered in capital letters, with no spaces or special characters.
10. In Site field, enter the Supplying Site number. (Example: T067 or C067)
11. In Storage Location field, enter 0001.
12. Press the Enter key.
13. The Reference Purchase Order box should open.
14. In the PO field(s), enter STO numbers.
15. Click Continue .
16. The Enter Transfer Posting Selection screen should open.
17. The first 3 open lines of the STO(s) entered on the Reference: Purchase Order
screen should display.

42 SNC OrderFulfill and Reporting.Update.doc
18. Check the boxes of the lines to PGI. The open quantity should display.
19. In the bottom right corner of the screen, “Entry 1 of X” (Example: “1 of 7”) indicates
how many lines should display for the STO(s) entered.
20. In the Quantity field, enter the quantity to PGI.
21. To move to the next page, select Tools, then select Next Page.
22. The next page should display, with the next open STO line to PGI.
23. Review the Entry X of X in the lower right corner to determine reaching the last STO
to PGI.

43 SNC OrderFulfill and Reporting.Update.doc
Reference: Postings may be checked using Tools, Previous Page or First Page to page through the entries.
24. To PGI, click Post .
25. A confirmation message should display in the bottom left corner when PGI is
complete and Document number assigned.
26. To PGI additional STOs to the same MBOL number in the Doc Header Text and
continue.
44 SNC OrderFulfill and Reporting.Update.doc
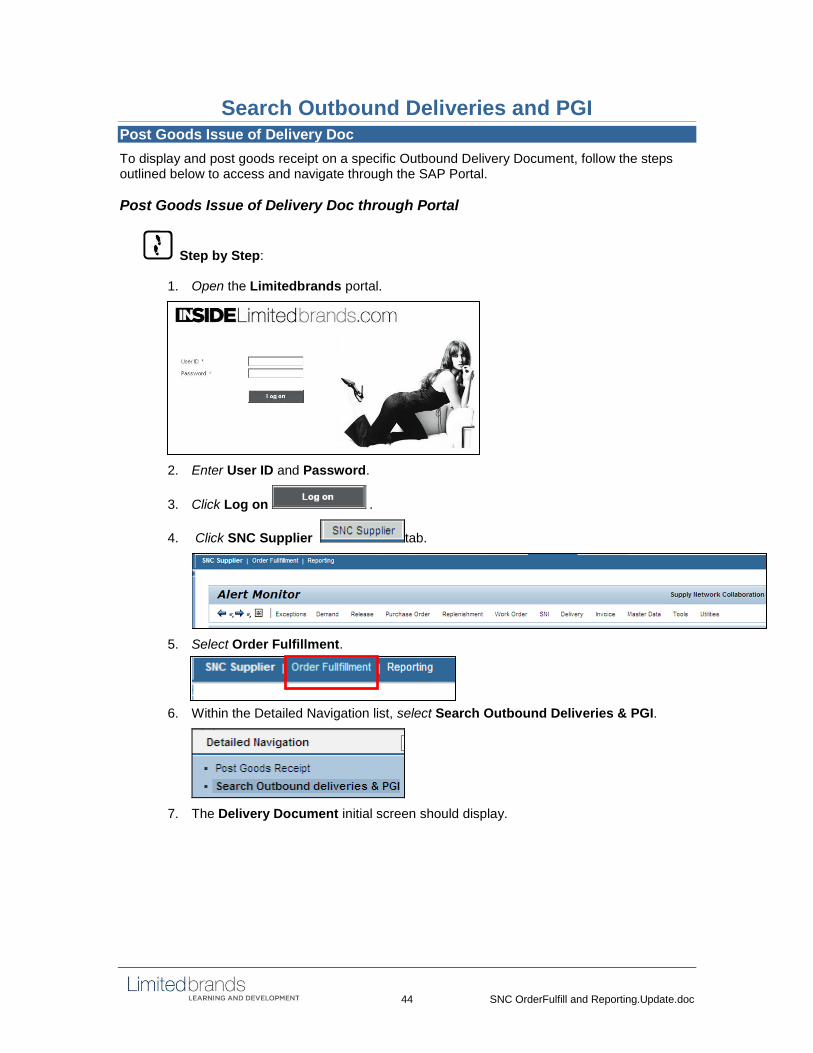
Search Outbound Deliveries and PGI Post Goods Issue of Delivery Doc
To display and post goods receipt on a specific Outbound Delivery Document, follow the steps outlined below to access and navigate through the SAP Portal.
Post Goods Issue of Delivery Doc through Portal
Step by Step:
1. Open the Limitedbrands portal.
2. Enter User ID and Password.
3. Click Log on .
4. Click SNC Supplier tab.
5. Select Order Fulfillment.
6. Within the Detailed Navigation list, select Search Outbound Deliveries & PGI.
7. The Delivery Document initial screen should display.
45 SNC OrderFulfill and Reporting.Update.doc
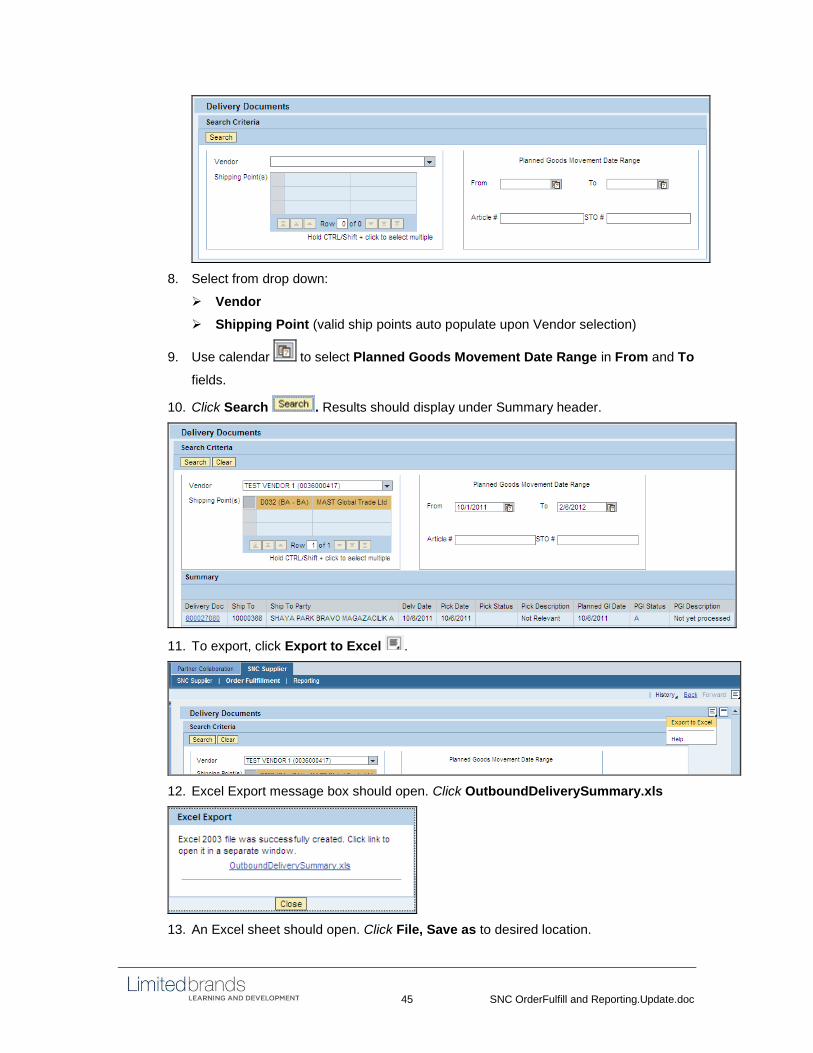
8. Select from drop down:
Vendor
Shipping Point (valid ship points auto populate upon Vendor selection)
9. Use calendar to select Planned Goods Movement Date Range in From and To
fields.
10. Click Search . Results should display under Summary header.
11. To export, click Export to Excel .
12. Excel Export message box should open. Click OutboundDeliverySummary.xls
13. An Excel sheet should open. Click File, Save as to desired location.

46 SNC OrderFulfill and Reporting.Update.doc
14. To PGI a delivery doc, select the Delivery Doc to be processed from the Summary.
15. The Delivery Doc should open with all lines displayed. Click Post Goods Issue
.
16. A Security message box should display. Click Yes.

47 SNC OrderFulfill and Reporting.Update.doc
17. The Change Outbound Delivery Doc screen should display. Press the Enter key.
18. Delivery Doc Item Overview should display.
Process: You must delete the lines on the delivery doc which will not be PGI’d. To
delete, highlight the line and click Delete .

48 SNC OrderFulfill and Reporting.Update.doc
19. Click Yes on the Delete Items message box.
20. To PGI, select the Picking tab.
21. The Delivery quantity and the Pick quantity should match.
If the quantities are identical, continue to step 20
If the Pick quantity is less than the Delivery quantity, proceed to step 22
Process: If you PGI less than the delivery qty, you must change the delivery qty to be the same as the picking qty.
22. To pick all lines, click More and select Post Goods Issue.
23. The Change Outbound Delivery screen will display. Delivery has been saved
message should display at the bottom of the screen, indicating that PGI is complete.

49 SNC OrderFulfill and Reporting.Update.doc
24. On the Picking Tab, key the actual quantity to be picked in the Pick Quantity field.
25. From the Menu dropdown, select Edit.
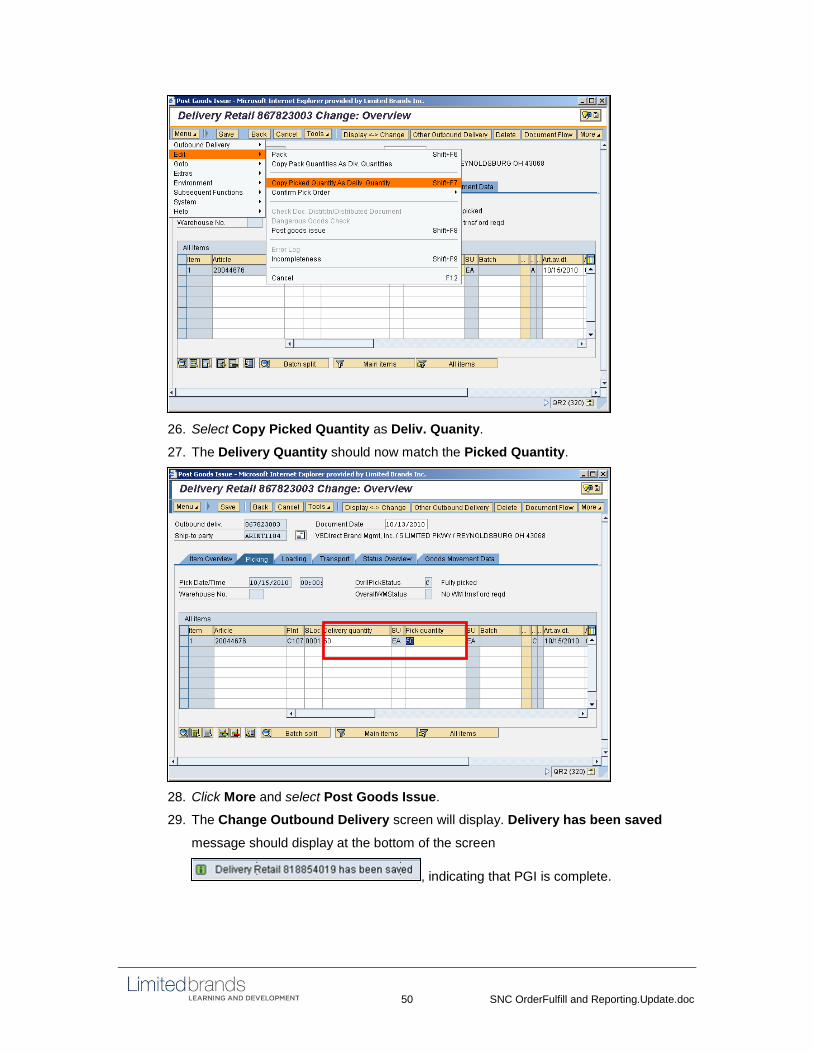
50 SNC OrderFulfill and Reporting.Update.doc
26. Select Copy Picked Quantity as Deliv. Quanity.
27. The Delivery Quantity should now match the Picked Quantity.
28. Click More and select Post Goods Issue.
29. The Change Outbound Delivery screen will display. Delivery has been saved
message should display at the bottom of the screen
, indicating that PGI is complete.

51 SNC OrderFulfill and Reporting.Update.doc
Appendix
The Appendix contains step by steps for exception based activities.
SNC Display Forecast
Use the SNC Reporting functionality to display Forecast.
Allocation Reports through SAP Portal
Step by Step:
1. Open the Limitedbrands Portal.
2. Enter User ID and Password.
3. Click Log on .
4. Click SNC Supplier tab.
5. Select Reporting.
6. Within the Detailed Navigation list, select Display Forecast.

52 SNC OrderFulfill and Reporting.Update.doc
7. The Display Requisitions report screen should display.
8. From the Supplying Vendor ID drop down, select Vendor number then complete
the other fields as needed to filter the search criteria.
Note: The report may be run without filters to view all existing requisitions.
9. After completing search criteria, click Search .
10. The report should display.
11. Click Export to Excel.
12. The PR Report Details box should display. Click PR Report.xls.
13. Click Open on File Download box.
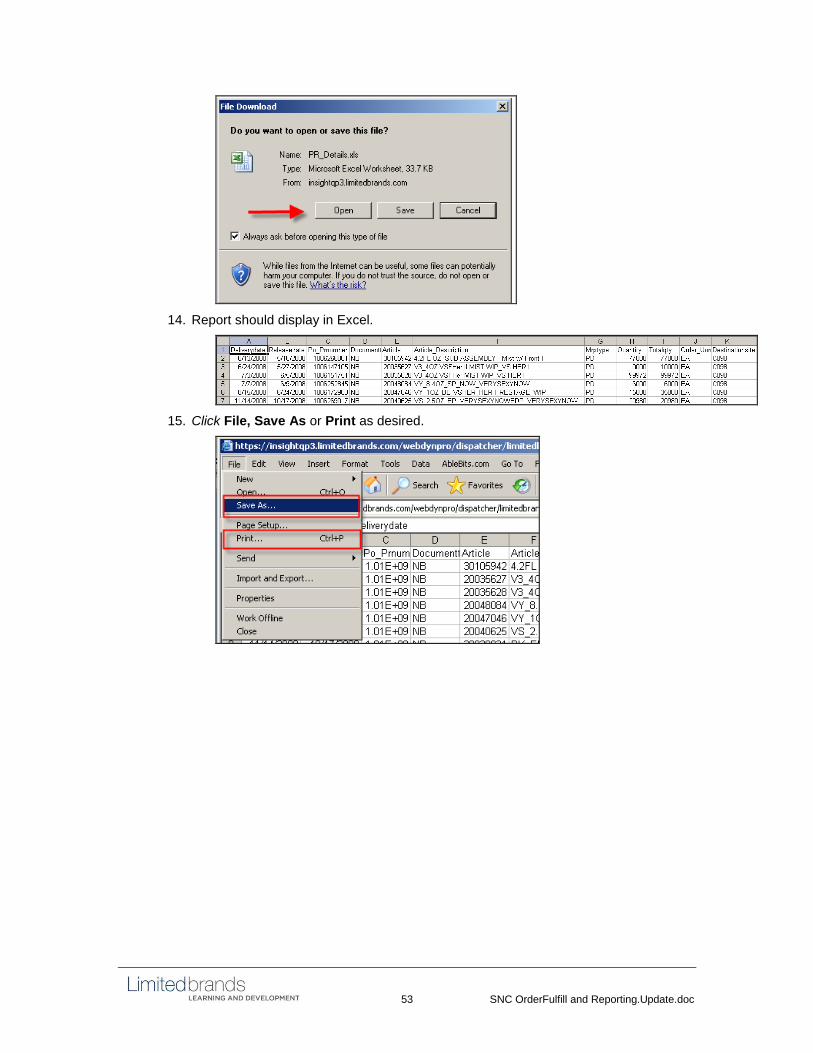
53 SNC OrderFulfill and Reporting.Update.doc
14. Report should display in Excel.
15. Click File, Save As or Print as desired.

54 SNC OrderFulfill and Reporting.Update.doc
Display Bill Of Materials (BOM)
Use the SNC Reporting functionality to display Bill of Materials.
Step by Step:
1. Open the Limitedbrands Portal.
2. Enter User ID and Password.
3. Click Log on .
4. Click SNC Supplier tab.
5. Select Reporting.
6. Within the Detailed Navigation list, select Display BOM.
7. The Display Bill of Materials report screen should display.

55 SNC OrderFulfill and Reporting.Update.doc
8. Select Vendor from the Vendor drop down.
9. In the Article field, enter Article number.
10. Select C Site in the Site drop down.
11. Click blue button to the right of Alternative BOM to select values in the drop
down.
12. Choose the highest alternate BOM number for most recent version of BOM
13. Click Search .
14. Report should display.

56 SNC OrderFulfill and Reporting.Update.doc
SNC Outbound Delivery on Demand
Some Stock Transport Document types utilize an outbound delivery. This process is normally utilized when a warehouse management system is involved in the distribution process. Additionally, an outbound delivery is used when the shipping point and receiving point belong to two different company codes – as the outbound delivery will facilitate intercompany billing and ownership transfer of the inventory.
Process After the filler/vendor posts production, the vendor will obtain the STO they need to ship against, from the STO allocation report available to fillers in the SAP Portal. This is an existing vendor process. When performing goods issue off the STO from the E site, to IEG, the filler should create an outbound delivery. The STO document type used for intercompany is an NB. This document type requires an outbound delivery and uses this delivery to facilitate intercompany billing. Step 1 Obtain STO from portal allocation report on the Reporting tab. Step 2 Delivery Processing
Go to SAP transaction VL10B (Create Outbound Delivery) Delivery Creation Profile 0102 will be assigned to each e-site vendor
NOTE: This delivery creation profile should have no impact to the Sales Order based deliveries created automatically via another process
Create Outbound Delivery
Step by Step:
1. Open the Limitedbrands Portal.
2. Enter User ID and Password.
3. Click Log on .
4. Click SNC Supplier tab.

57 SNC OrderFulfill and Reporting.Update.doc
5. Select Order Fulfillment.
6. Within the Detailed Navigation list, select Outbound Delivery on Demand.
7. The Purchase Order Items screen should display.
8. Click the User Role tab.
9. Delivery Creation Profile 0102 will be assigned to each e-site vendor.
Reference: This creation profile should have no impact to the Sales Order based deliveries created automatically via another process.
Example of List Profiles selections.
10. Click the Purchase Order tab.

58 SNC OrderFulfill and Reporting.Update.doc
11. Enter the STO number in the Purchasing Document field.
12. Click Execute .
13. The Delivery Creation display should generate.
14. The Open STO qty should display.
15. The Cumulated STO delivery qty (CumQty) should display.
Process: System automatically proposes the Open Quantity.
Reference: The vendor may override the Cumulated Quantity with the quantity they can ship per line item.
16. Click the checkboxes to select the line items intended to be fulfilled.

59 SNC OrderFulfill and Reporting.Update.doc
17. Click Background .
18. Deliveries should create.
19. Review the updated Open Qty values.
20. On the Outbound Display overview screen, click the Picking tab.

60 SNC OrderFulfill and Reporting.Update.doc
21. The OverllPickStatus field should display Not Relevant for picking.
22. Delivery will Post Goods Issue automatically via batch job.
61 SNC OrderFulfill and Reporting.Update.doc
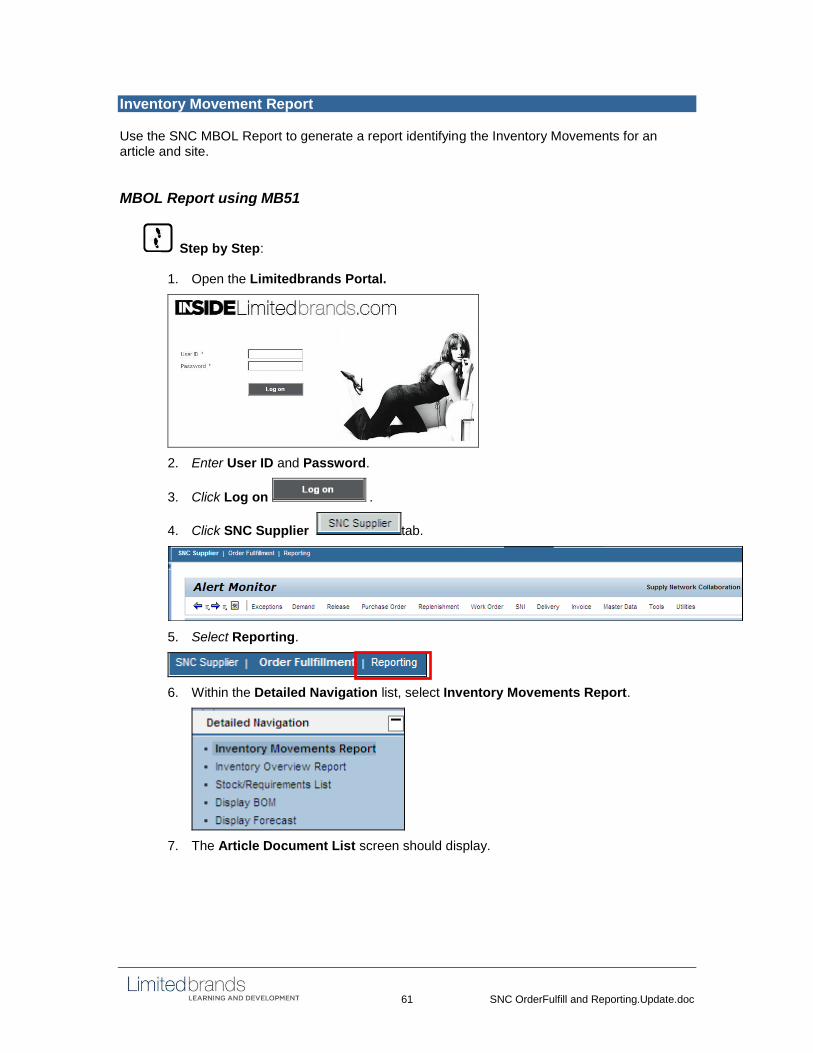
Inventory Movement Report
Use the SNC MBOL Report to generate a report identifying the Inventory Movements for an article and site.
MBOL Report using MB51
Step by Step:
1. Open the Limitedbrands Portal.
2. Enter User ID and Password.
3. Click Log on .
4. Click SNC Supplier tab.
5. Select Reporting.
6. Within the Detailed Navigation list, select Inventory Movements Report.
7. The Article Document List screen should display.

62 SNC OrderFulfill and Reporting.Update.doc
8. Select Get Variant .
9. In the Find Variant box, delete the name in the Created By field.
Reference: The Created By field defaults to the user ID signed in. Deleting the defaulted name allows a search of all Variants, not just ones created by the signed in user ID.
10. Click Execute .
11. The Variant Directory should display.

63 SNC OrderFulfill and Reporting.Update.doc
12. Double click (or click to highlight and then click Choose ) the /1A_MBOL
Variant.
13. The MBOL should pre-populate in the Document Header Text field.
14. Enter Article (Optional).
15. Enter Site (Optional).
16. Enter MBOL number.
Process: Remove the * and type in number, all capital letters, no spaces or special characters.
17. Click Execute .
18. The Article Document List should display.
Note: If the correct MBOL doesn’t display, enter the article and site and execute with MBOL* or blank this field out and execute.
Posting Date range can also be modified to capture a wider range of postings or executed with the Posting Data fields blanked out. Report will display all PGI’s by article.
19. Click More .
20. Select Detail List.

64 SNC OrderFulfill and Reporting.Update.doc
21. Report should display in Detail List format.
22. Click Menu, then select Settings, Layout, Choose.
23. Choose Layout box should display.
24. Scroll to select /1A MBOL. Double click line to select (or click to highlight and then
click Choose ).
25. MBOL Report should display. Print and attach to packing slip.

65 SNC OrderFulfill and Reporting.Update.doc
Stock Requirements List
Use the Stock Requirements List to display the Stock levels of one article at one site.
Stock Requirements through SAP Portal
Step by Step:
1. Open the Limitedbrands Portal.
2. Enter User ID and Password.
3. Click Log on .
4. Click SNC Supplier tab.
5. Select Reporting.
6. Within the Detailed Navigation list, select Stock/Requirements List.
7. The Stock Requirements List: Intitial Screen should display.
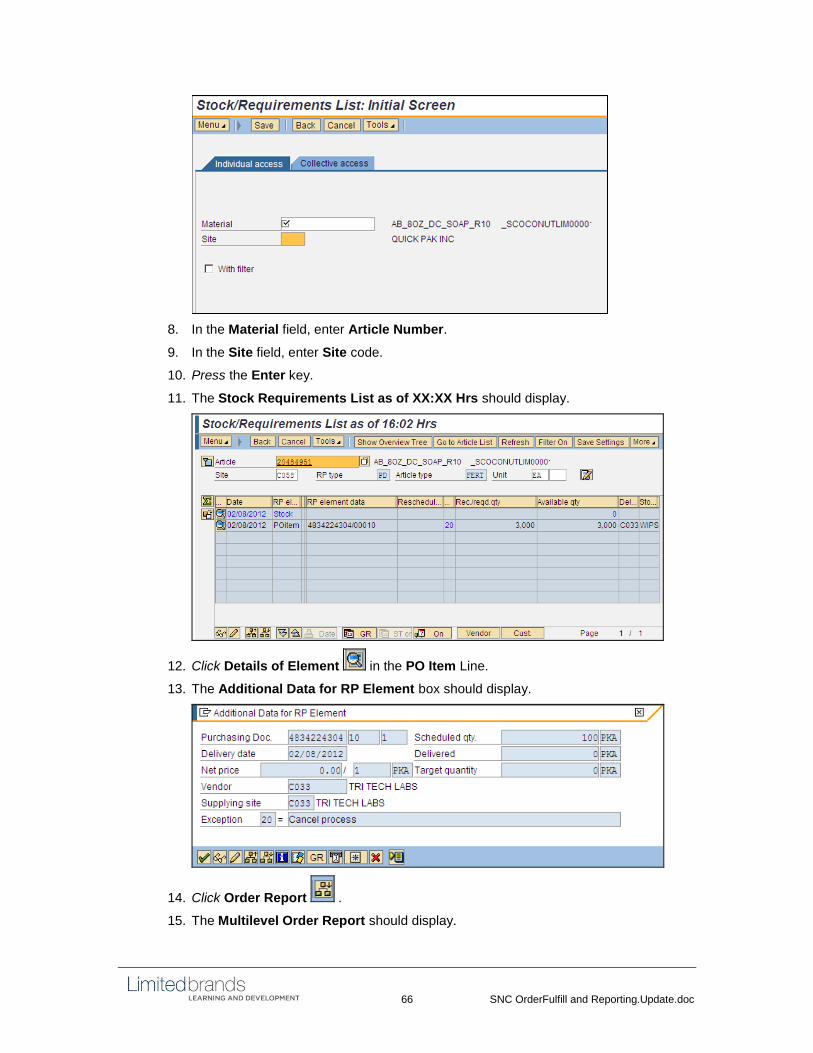
66 SNC OrderFulfill and Reporting.Update.doc
8. In the Material field, enter Article Number.
9. In the Site field, enter Site code.
10. Press the Enter key.
11. The Stock Requirements List as of XX:XX Hrs should display.
12. Click Details of Element in the PO Item Line.
13. The Additional Data for RP Element box should display.
14. Click Order Report .
15. The Multilevel Order Report should display.
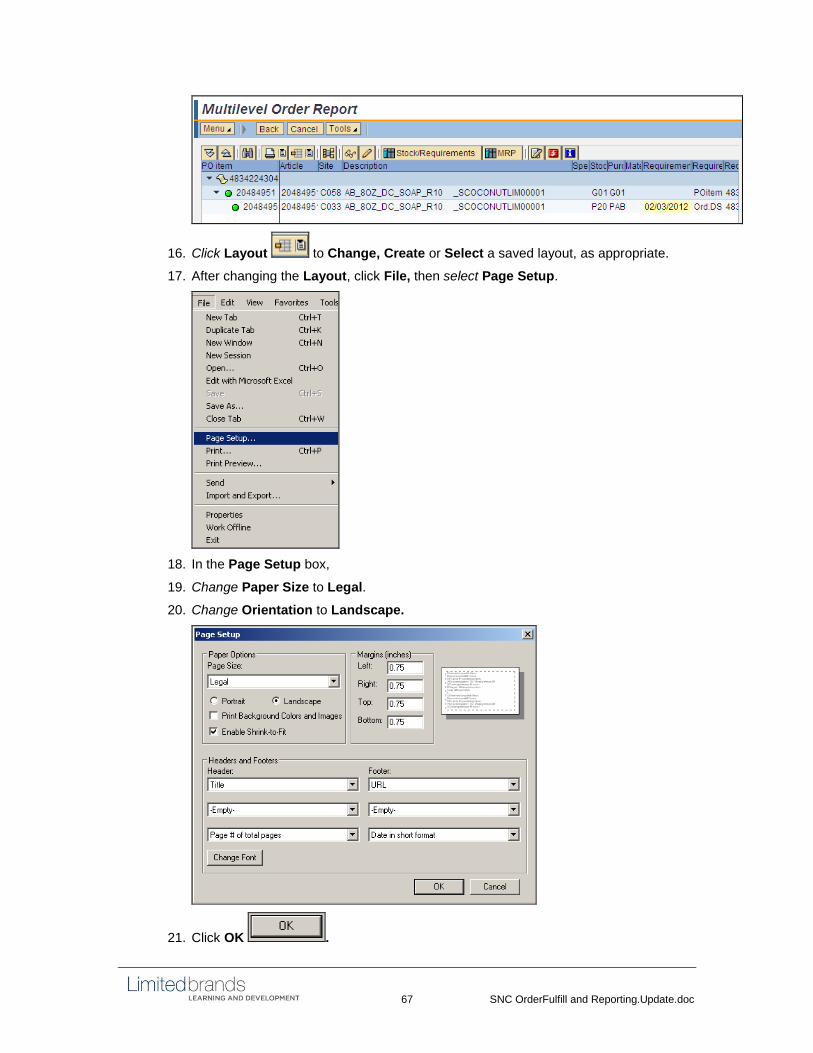
67 SNC OrderFulfill and Reporting.Update.doc
16. Click Layout to Change, Create or Select a saved layout, as appropriate.
17. After changing the Layout, click File, then select Page Setup.
18. In the Page Setup box,
19. Change Paper Size to Legal.
20. Change Orientation to Landscape.
21. Click OK .