SunScreen 3.2 Administration...
400
SunScreen 3.2 Administration Guide Sun Microsystems, Inc. 901 San Antonio Road Palo Alto, CA 94303-4900 U.S.A. Part No: 806–6346–10 December, 2001
Transcript of SunScreen 3.2 Administration...

SunScreen 3.2 AdministrationGuide
Sun Microsystems, Inc.901 San Antonio RoadPalo Alto, CA 94303-4900U.S.A.
Part No: 806–6346–10December, 2001

Copyright 2000 Sun Microsystems, Inc. 901 San Antonio Road Palo Alto, CA 94303-4900 U.S.A. All rights reserved.
This product or document is protected by copyright and distributed under licenses restricting its use, copying, distribution, and decompilation. Nopart of this product or document may be reproduced in any form by any means without prior written authorization of Sun and its licensors, if any.Third-party software, including font technology, is copyrighted and licensed from Sun suppliers.
Parts of the product may be derived from Berkeley BSD systems, licensed from the University of California. UNIX is a registered trademark in the U.S.and other countries, exclusively licensed through X/Open Company, Ltd.
Sun, Sun Microsystems, the Sun logo, docs.sun.com, AnswerBook, AnswerBook2, and Solaris are trademarks, registered trademarks, or service marksof Sun Microsystems, Inc. in the U.S. and other countries. All SPARC trademarks are used under license and are trademarks or registered trademarksof SPARC International, Inc. in the U.S. and other countries. Products bearing SPARC trademarks are based upon an architecture developed by SunMicrosystems, Inc.
The OPEN LOOK and Sun™ Graphical User Interface was developed by Sun Microsystems, Inc. for its users and licensees. Sun acknowledges thepioneering efforts of Xerox in researching and developing the concept of visual or graphical user interfaces for the computer industry. Sun holds anon-exclusive license from Xerox to the Xerox Graphical User Interface, which license also covers Sun’s licensees who implement OPEN LOOK GUIsand otherwise comply with Sun’s written license agreements.
Federal Acquisitions: Commercial Software–Government Users Subject to Standard License Terms and Conditions.
DOCUMENTATION IS PROVIDED “AS IS” AND ALL EXPRESS OR IMPLIED CONDITIONS, REPRESENTATIONS AND WARRANTIES,INCLUDING ANY IMPLIED WARRANTY OF MERCHANTABILITY, FITNESS FOR A PARTICULAR PURPOSE OR NON-INFRINGEMENT, AREDISCLAIMED, EXCEPT TO THE EXTENT THAT SUCH DISCLAIMERS ARE HELD TO BE LEGALLY INVALID.
Copyright 2000 Sun Microsystems, Inc. 901 San Antonio Road Palo Alto, CA 94303-4900 U.S.A. Tous droits réservés
Ce produit ou document est protégé par un copyright et distribué avec des licences qui en restreignent l’utilisation, la copie, la distribution, et ladécompilation. Aucune partie de ce produit ou document ne peut être reproduite sous aucune forme, par quelque moyen que ce soit, sansl’autorisation préalable et écrite de Sun et de ses bailleurs de licence, s’il y en a. Le logiciel détenu par des tiers, et qui comprend la technologie relativeaux polices de caractères, est protégé par un copyright et licencié par des fournisseurs de Sun.
Des parties de ce produit pourront être dérivées du système Berkeley BSD licenciés par l’Université de Californie. UNIX est une marque déposée auxEtats-Unis et dans d’autres pays et licenciée exclusivement par X/Open Company, Ltd.
Sun, Sun Microsystems, le logo Sun, docs.sun.com, AnswerBook, AnswerBook2, et Solaris sont des marques de fabrique ou des marques déposées, oumarques de service, de Sun Microsystems, Inc. aux Etats-Unis et dans d’autres pays. Toutes les marques SPARC sont utilisées sous licence et sont desmarques de fabrique ou des marques déposées de SPARC International, Inc. aux Etats-Unis et dans d’autres pays. Les produits portant les marquesSPARC sont basés sur une architecture développée par Sun Microsystems, Inc.
L’interface d’utilisation graphique OPEN LOOK et Sun™ a été développée par Sun Microsystems, Inc. pour ses utilisateurs et licenciés. Sun reconnaîtles efforts de pionniers de Xerox pour la recherche et le développement du concept des interfaces d’utilisation visuelle ou graphique pour l’industriede l’informatique. Sun détient une licence non exclusive de Xerox sur l’interface d’utilisation graphique Xerox, cette licence couvrant également leslicenciés de Sun qui mettent en place l’interface d’utilisation graphique OPEN LOOK et qui en outre se conforment aux licences écrites de Sun.
CETTE PUBLICATION EST FOURNIE “EN L’ETAT” ET AUCUNE GARANTIE, EXPRESSE OU IMPLICITE, N’EST ACCORDEE, Y COMPRIS DESGARANTIES CONCERNANT LA VALEUR MARCHANDE, L’APTITUDE DE LA PUBLICATION A REPONDRE A UNE UTILISATIONPARTICULIERE, OU LE FAIT QU’ELLE NE SOIT PAS CONTREFAISANTE DE PRODUIT DE TIERS. CE DENI DE GARANTIE NES’APPLIQUERAIT PAS, DANS LA MESURE OU IL SERAIT TENU JURIDIQUEMENT NUL ET NON AVENU.
011129@2870

Contents
Preface 15
1 Starting the Administration GUI and Logging In 21
Terms Used in This Book 21
Administration GUI Browser Requirements 22
Accessing Local System Resources 23
� To Install the Java Plug-In on the Screen 23
� To Install on the Remote Administration Station. 24
� To Save the identitydb.obj File 24
� To Use the HotJava 1.1 Browser 25
Using the Administration GUI 26
� To Start the Administration GUI for Browsers Without the Java Plug-In 26
� To Start the Administration GUI for Browsers With the Java Plug-In 26
� To Log In to the Administration GUI 26
Administration GUI Navigation Bar and Buttons 29
Changing the Admin User Password 30
� To Change the Admin User Password 30
2 Working With Common Objects 35
Using the Policy Rules Page 37
� To Modify the Policies Associated with a Common Object 37
Policies List Page 39
Policies List Panel 40
Types of Policies 40
Policies List Page Action Buttons 41
3

Using Common Objects 43
The Screen Field and Common Objects 45
� To Add a Common Object 46
� To Search for a Common Object 46
� To Edit a Common Object 47
� To Edit a Common Object From the Policy Rules Table 49
� To Delete a Common Object 50
� To Rename a Common Object 51
Service and Service Group Objects 53
� To Add a Service 53
� To Add a Service Group 57
Address Objects 59
� To Add a Host Address 60
� To Add a Group of Addresses 62
� To Add a Range of Addresses 64
Certificate Objects 67
� To Generate an IKE Certificate 67
� To Export an IKE Certificate 69
� To Import an IKE Certificate 71
� To Associate an IKE Certificate 73
� To Generate SKIP UDHs Certificates 74
� To Load a SKIP Issued Public or Private Certificate 77
� To Associate SKIP Certificate 80
Certificate Groups 82
� To Add a Certificate Group 82
� To Work with IKE Certificate Groups 85
IPsec Key 87
� To Add an IPsec Key 87
Screen Objects 89
Screen Object Tabs 89
Miscellaneous Tab 89
SNMP Tab 91
Primary/Secondary Tab 94
Mail Proxy Tab 96
Adding a Screen Object 97
� To Add a Screen 97
SNMP Alert Receivers 98
4 SunScreen 3.2 Administration Guide • December, 2001

� To Add an SNMP Alert Receiver 99
� To Delete an SNMP Alert Receiver 100
Interface Objects 102
� To Add or Edit Interfaces 104
� To Remove an Interface 106
� To Set up a Routing Interface 106
� To Set up a Stealth Interface 108
� To Change an Admin Interface From the Local Console 111
� To Change an Admin Interface From a Remote Console 114
Adding Jar Signatures and Jar Hashes 116
� To Add a Jar Signature 117
� To Add a Jar Hash 119
Proxy Users 120
Authentication 120
� To Add an Authorized User 122
Time Objects 124
� To Create Time Objects 124
3 Creating and Managing Rules 127
Packet Filtering Rules 128
� To Modify Rules 128
� To View and Edit the Details of an Object 131
� To Edit a Rule 131
� To Add a New Rule 133
� To Move a Rule 134
� To Delete a Rule 135
Administrative Access Rules 136
� To Add or Change an Administrative Access Rule for Local Administration136
� To Add or Change an Administrative Access Rule for Remote Administration139
� To Specify a SKIP/IPsec/IKE Action on a Remote Access Rule 144
Network Address Translation (NAT) Rules 149
NAT Mapping Overview 149
NAT Administration Page 150
Your NAT Scenario 151
� To Manually Add an ARP Entry 152
Contents 5

� To Define NAT Rules 152
� To Edit the NAT Rules 154
Example: Static NAT of a Host to a Host 156
Example: Reverse Rule 156
Example: Dynamic Translation of a Range Of Addresses to One Host 157
Virtual Private Network (VPN) Rules 158
Before You Begin 159
Configuring a VPN 159
� To Add a VPN Gateway Definition 160
� To Create Packet Filtering Rules for a VPN 164
4 Creating and Managing Policies 169
Working With Policies 170
� To Work with Policies 171
Editing Policies 172
� To Edit a Policy 172
� To Add a New Policy 173
� To Copy a Policy 174
� To Rename a Policy 175
� To Delete a Policy 176
� To Verify a Policy 177
� To Back Up All Policies 179
� To Restore All Policies 181
Working With Policy Locks 183
� To Leave an Administration Session 183
� To Unlock a Policy 183
� To Forcibly Clear the Lock 184
Activating Policies 184
� To Save Changes 184
� To Cancel Policy Changes 186
� To Activate a Policy 186
5 Using High Availability 187
Setting Up High Availability 188
HA Policy 189
Preparing to Install High Availability 189
6 SunScreen 3.2 Administration Guide • December, 2001

Using the /etc/hosts File for Name Resolution 190
Defining HA 190
Modifying the HA Service Group 191
Using NAT With HA in Routing Mode 191
Installing High Availability 192
� To Edit the Policy 192
� To Install the SunScreen software in an HA Configuration 193
� To Install HA on the Secondary HA Screen 194
� To Define the HA Interface 199
� To Define the Screen Object for the HA Primary Screen 201
� To Initialize HA on the Primary HA Screen 203
� To Add the Secondary HA Screen to the Primary HA Screen 203
� To Allow Non-Administrative Traffic on an HA Network 205
Configuring Policies for an HA Cluster 208
Removing HA 209
HA Logging 210
6 Setting Up and Using Proxies 211
Matching Proxy Rules 212
Preparing to Use Proxies 212
Defining Proxy Data 213
Setting Up Proxy Users 213
� To Set up Basic Proxy Users 214
� To Add a Single Proxy User 215
� To Add a Proxy User Group 217
� To Add Spam Domains 218
� To Delete Spam Domains 221
Writing and Editing Policy Rules for Proxies 223
� Basic Steps for Writing Policy Rules for Proxies 224
� To Write Policy Rules for the Proxies 227
� To Define PROXY_FTP 228
� To Define PROXY_HTTP 230
� To Define PROXY_SMTP 231
� To Define PROXY_Telnet 232
Using the FTP Proxy 233
� To Use the FTP Proxy 233
Using the TELNET Proxy 235
Contents 7

� To Use the Telnet Proxy 235
Using the SMTP Proxy 236
� To Use the SMTP Proxy 236
Using the HTTP Proxy 236
� To Configure the Browser to Use the HTTP Proxy 237
Proxy Logging 238
7 Configuring Centralized Management Groups 241
CMG Overview 242
CMG Requirements 242
CMG Configuration Tasks 243
� Basic Centralized Management Procedure 243
� To Generate an IKE or SKIP Certificate on the Primary Screen 245
� To Associate the IKE or SKIP Primary Screen’s Certificate with the PrimaryScreen Object 247
� To Put the IKE or SKIP Primary Screen’s Certificate on the Secondary Screen249
� To Add the IKE or SKIP Primary Screen Object to the Secondary Screen 251
� To Generate an IKE or SKIP Certificate for the Secondary Screen 252
� To Modify the IKE or SKIP Secondary Screen Object 253
� To Configure the Secondary Screen for Management by the Primary Screen255
� To Add the Secondary Screen’s Certificate ID to the Primary Screen 259
� To Add a Secondary Screen Object to the Primary Screen 260
� To Add a New Address Group to the Primary Screen 261
� To Define the Secondary Screen’s Interfaces on the Primary Screen 263
� To Configure the Primary Screen to Manage the Secondary Screens 264
8 Adding Remote Administration Stations After Installation 267
Adding a Remote Administration Station 267
� To Set Up the Screen to Use the New Remote Administration Station 268
� To Inform the Screen About the New Remote Administration Station 268
� To Set Up the Access Control List on the New Remote Administration Station273
9 Getting Status and Managing Logs 275
The Information Page 275
8 SunScreen 3.2 Administration Guide • December, 2001

Status Information 276
� To View Status Information 276
Log Page 278
� To View the Log Page 278
280
Setting a Log Viewing Filter 281
The Information Tab 284
Action Buttons 285
Statistics Page 286
� To View the Statistics Page 286
Viewing Statistics 289
� To See the SKIP Statistics 289
Viewing Logs 290
� To Set the Retrieval Mode 290
� To Set a Log Viewing Filter 292
Saving and Clearing the Log 293
� To Save the Log 294
� To Clear the Log 295
� To Save and Clear the Log 296
Changing the Size of the Log File 297
� To Change the Log File Size for a Specific Screen 298
Virus Scanning 299
10 Using the Command Line Interface 301
Command Summary 301
UNIX (shell) Commands 302
ssadm Command 302
� To Execute an ssadm Command on a Local Screen 303
� To Execute an ssadm -r Command on a Remote Administration Station303
Logging In to and Out of SunScreen Remotely 304
� To Log In to and Out of SunScreen Remotely 304
ssadm Subcommand Summary 304
ssadm configure Command 306
Configuration Editor Subcommands 306
Using the Configuration Editor 308
� To Edit a Policy 308
Contents 9

Working With Policies 308
� To Create a New Policy 308
� To Copy a Policy 309
� To Rename a Policy 309
� To Delete a Policy 309
� To Verify a Policy 309
� To Activate a Policy 310
� To Back Up Your SunScreen Configuration 310
� To Restore Your SunScreen Configuration 310
Working With Services and Service Groups 310
� To Add a New Single Service 311
� To Add a New Service Group 311
� To Modify Service Groups 311
� To Rename a Service or Service Group 312
� To Rename References to a Service 312
� To Delete a Service or Service Group 312
� To Check References to a Service or Service Group 312
Addresses, Address Ranges, and Address Groups 313
� To Add a New Host Address 313
� To Add a Range of Addresses 313
� To Add an Address Group 314
� To Add an Address Range in CIDR Format 314
� To Delete an Address, Address Range, or Address List 314
� To Check References to a Deleted Address, Address Range, or Address List315
� To Rename an Address, Address Range, or Address Group 315
Working With Certificates 315
� To Add Private Screen Certificates From a Diskette 316
� To Add Private Screen Certificates From a Directory 317
� To Add Screen Local Identities 317
� To Add Self-Generated Screen Certificates for Local Administration 318
� To Add Self-Generated Screen Certificates Using Remote Administration 319
� To Add Public Certificates from a Diskette or a File 321
Using Certificate Groups 322
� To Add Certificate Groups 322
� To Add a New Member to a Certificate Group 322
� To Remove a Member From a Certificate Group 322
� To Rename a Certificate or Certificate Group 323
10 SunScreen 3.2 Administration Guide • December, 2001

� To Delete a Certificate or Certificate Group 323
� To Check References to a Deleted Certificate 323
� To Check References to a Deleted Certificate Group 323
IKE Policy Rule Syntax 324
� To Add Rules Using Keys Added on Both Screens 325
� To Work with IKE Rules with Pre-Shared Key 325
� To Work with IKE Rules with Self-Signed Certificates 326
� To Work with IKE Rules with Issued Certificates 328
Working With Screen Objects 329
� To Add a Screen 329
� To List the Screens 330
� To Add an SNMP Receiver to a Screen 330
� To Add Multiple SNMP Receivers to a Screen 330
� To Add a Time Status Indicator to a Screen 330
� To Remove SNMP Receivers From a Screen 330
� To Set a Screen to Stealth Mode 331
Interfaces 331
Overlapping Interfaces 331
� To Add Interfaces (in Routing Mode) 331
� To Add Interfaces (in Routing Mode) with a Detailed Log 331
� To Remove an Interface 332
Adding or Modifying an Authorized User 332
Configuration Editor authuser Subcommands 332
� To Add An Authorized User with Password Authentication 333
� To Add An Authorized User and SecurID Name 333
� To Display Authorized Users 334
� To Modify Authorized Users 334
� To Delete an Authorized User 334
Working With Policy Rules 335
� To Create a Packet Filtering Rule 335
� To Reorder the Rules 336
� To Delete a Rule 336
� To Edit Any Part of a Rule 337
Modifying Access Rules for GUI Local Administration 338
� To Add an Access Rule for GUI Local Administration 338
� To Edit an Access Rule for GUI Local Administration 338
� To Delete an Access Rule for GUI Local Administration 338
Contents 11

Modifying Access Rules for Remote Administration 339
� To Add an Access Rule for Remote Administration 339
� To Edit an Access Rule for Remote Administration 339
� To Delete an Access Rule for Remote Administration 340
Network Address Translation (NAT) 340
� To Add ARP Manually 340
� To Define NAT Mappings 340
� To Delete NAT Mappings 341
� To List the NAT Mappings 341
Virtual Private Network (VPN) 342
� To Add a VPN Gateway 342
� To Replace a VPN Gateway 342
� To Remove a VPN Gateway 343
Information, Statistics, and Logs 343
� To View the Information 343
� To View the Statistics 343
� To Set Logsize on a Screen 344
� To Set Up Packet Logging 344
� To Examine Packets 344
� To Display Packets in the Log File 344
� To View the Log 345
� To Save the Log 345
� To Clear the Log 345
� To Save and Clear the Log 345
Setting Up High Availability (HA) 346
� To Allow Non-Administrative Traffic on an HA Network 347
� To Remove an HA Screen 347
� To View HA Information 348
Centralized Management Groups (CMG) 348
� To Change a Screen Object to Put It in a Cluster 349
� To Remove a Screen from a Cluster 349
Getting Support for SunScreen Products 349
Gathering Data From the Screen 351
� To use the ssadm lib/statetables Command 351
� To Use the ssadm lib/screeninfo Command 351
� To Use the ssadm lib/nattables Command 351
� To Use the ssadm lib/support Command 351
12 SunScreen 3.2 Administration Guide • December, 2001

� To Use the ssadm lib/support help Option 352
Troubleshooting 352
� To Use the ssadm debug_level Command 352
Installing and Configuring the Netscape Browser from the Command Line 353
� To Install and Configure the Netscape Browser 353
� To Save the identitydb.obj File 354
A Quick Start Procedures 355
Telnet Proxy Service Without Proxy User Authentication 355
� To Set Up the SunScreen Environment 356
� To Configure the Telnet Proxy Service 356
Telnet Proxy Service With Proxy User Authentication 357
� To Set Up the SunScreen Environment 358
� To Configure the Telnet Proxy Service 358
FTP Proxy Service Without Proxy User Authentication 360
� To Set Up the SunScreen Environment 361
� To Configure the FTP Proxy Service 361
� To Test the FTP Proxy Service 362
FTP Proxy Service With Proxy User Authentication 363
� To Set Up the SunScreen Environment 364
� To Configure the FTP Proxy Service 364
HTTP Proxy Service 366
� To Set Up the SunScreen Environment 367
� To Configure the HTTP Proxy Service 367
SMTP Proxy Service 368
� To Set Up the SunScreen Environment 368
� To Test Relay Blocking 370
Configuring RADIUS Authentication 372
� To Configure RADIUS Authentication 372
Telnet Proxy Service With RADIUS User Authentication 373
� To Configure the Telnet Proxy Service With RADIUS User Authentication 373
FTP Proxy Service With RADIUS User Authentication 374
� To Configure the FTP Proxy Service With RADIUS User Authentication 374
SecurID Clients Supported by SunScreen 375
� To Configure SecurID Authentication 376
Telnet Proxy Service With SecurID User Authentication 376
� To Set Up the Telnet Proxy Service With SecurID User Authentication 376
Contents 13

FTP Proxy Service With SecurID User Authentication 377
� To Set Up the FTP Proxy Service With SecurID User Authentication 377
Glossary 379
Index 391
14 SunScreen 3.2 Administration Guide • December, 2001

Preface
SunScreen™ 3.2 for the Solaris™ operating environment is part of the family ofSunScreen products that provide solutions for security authentication and privacyrequirements. SunScreen enables companies to establish secure department networksthat are connected to a public internetwork.
This SunScreen 3.2 Administration Guide provides all the information necessary toconfigure and administer SunScreen on your network. Other manuals in theSunScreen documentation set include:
� SunScreen Installation Guide� SunScreen 3.2 Administrator’s Overview� SunScreen 3.2 Configuration Examples� SunScreen SKIP User’s Guide, Release 1.5.1
Who Should Use This BookThe SunScreen 3.2 Administration Guide is intended for SunScreen systemadministrators who are responsible for the operation, support, and maintenance ofnetwork security. In this guide, it is assumed that you are familiar with UNIX® systemadministration and TCP/IP networking concepts as well as with your networktopology.
15

How This Guide Is OrganizedThe SunScreen 3.2 Administration Guide contains the following chapters andappendixes:
� Chapter 1 covers the basic concepts as well as the procedures for starting andconfiguring the Java™-based browser and logging in to the administrationgraphical user interface (GUI). It also shows how to define access levels foradministrative users.
� Chapter 2 contains the procedures for using the administration GUI to add, delete,and rename common objects.
� Chapter 3 shows how to use packet filtering, administrative access rules, NetworkAddress Translation (NAT), and virtual private networks (VPN).
� Chapter 4 explains how to create a policy file, which specifies how your SunScreenfirewall will function. This chapter also contains many policy managementprocedures.
� Chapter 5 describes how to set up and manage a High Availability (HA) SunScreenconfiguration.
� Chapter 6 tells you how to use proxies to provide content filtering and userauthentication.
� Chapter 7 describes how to set up multiple Screens to be managed from onelocation.
� Chapter 8 shows how to add additional remote Administration Stations to yournetwork.
� Chapter 9 describes the information page in the administration GUI, how to viewstatistics and logs, and how to set the retrieval mode.
� Chapter 10 contains procedures for using the UNIX command line interface (CLI)to manage a SunScreen firewall.
� Appendix A contains detailed information about proxy services and SecurID andRADIUS authentication.
Related Books and PublicationsYou may want to refer to the following sources for background information oncryptography, network security, and SunScreen 3.2 SKIP.
16 SunScreen 3.2 Administration Guide • December, 2001

� Schneier, Bruce, Applied Cryptography: Protocols, Algorithms, and Source Code in C,2nd Edition, John Wiley & Sons, 1996, ISBN: 0471128457
� Chapman, D. Brent and Elizabeth D. Zwicky, Building Internet Firewalls, O’Reilly &Associates, 1995, ASIN: 1565921240
� Walker, Kathryn M. and Linda Croswhite Cavanaugh, Computer Security Policiesand SunScreen Firewalls, Sun Microsystems Press, Prentice Hall, 1998, ISBN0130960150
� Cheswick, William R. and Steve Bellovin, Firewalls and Internet Security: Repellingthe Wily Hacker, 1st edition, Addison-Wesley, 1994, ISBN 201633574
� Black, Uyless D., Internet Security Protocols: Protecting IP Traffic, 1st Edition, PrenticeHall, 2000, ISBN: 0130142492
� Comer, Douglas E., Internetworking with TCP/IP, 3rd Edition, Volume 1, PrenticeHall, 1995, ISBN 0132169878
� Doraswamy, Naganand and Dan Harkins, Ipsec: The New Security Standard for theInternet, Intranets, and Virtual Private Networks, 1st Edition, Prentice Hall, 1999,ISBN: 0130118982
� Stallings, William, Network and Internetwork Security: Principles and Practice, InstElect, 1994, Product#: 0780311078
� Kaufman, Charlie and Radia Perlman, Mike Speciner, Network Security: PrivateCommunication in a Public World, 1st Edition, Prentice Hall, 1995, ISBN: 0130614661
� Garfinkel, Simson and Gene Spafford, Practical Unix and Internet Security, 2ndEdition, O’Reilly & Associates, 1996, ISBN: 1565921488
� Farrow, Rik, UNIX System Security: How to Protect Your Data and Prevent Intruders,Addison-Wesley, 1990, ISBN: 0201570300
Sun Software and Networking Security http://www.sun.com/security/
Ordering Sun DocumentsFatbrain.com, an Internet professional bookstore, stocks select product documentationfrom Sun Microsystems, Inc.
For a list of documents and how to order them, visit the Sun Documentation Center onFatbrain.com at http://www1.fatbrain.com/documentation/sun.
Preface 17

Accessing Sun Documentation OnlineThe docs.sun.comSM Web site enables you to access Sun technical documentationonline. You can browse the docs.sun.com archive or search for a specific book title orsubject. The URL is http://docs.sun.com.
Getting Support for SunScreen ProductsIf you require technical support, contact your Sun sales representative or Sunauthorized reseller. See http://www.sun.com/service/contacting/index.html forinformation on contacting Sun andhttp://www.sun.com/service/support/index.html for information on Sun’s supportservices.
Typographic ConventionsThe following table describes the typographic changes used in this book.
TABLE P–1 Typographic Conventions
Typeface or Symbol Meaning Example
AaBbCc123 The names of commands, files, anddirectories; on-screen computer output
Edit your .login file.
Use ls -a to list all files.
machine_name% you havemail.
AaBbCc123 What you type, contrasted withon-screen computer output
machine_name% su
Password:
AaBbCc123 Command-line placeholder: replace witha real name or value
To delete a file, type rmfilename.
18 SunScreen 3.2 Administration Guide • December, 2001

TABLE P–1 Typographic Conventions (Continued)Typeface or Symbol Meaning Example
AaBbCc123 Book titles, new words, or terms, orwords to be emphasized.
Read Chapter 6 in User’s Guide.
These are called class options.
You must be root to do this.
Shell Prompts in Command ExamplesThe following table shows the default system prompt and superuser prompt for the Cshell, Bourne shell, and Korn shell.
TABLE P–2 Shell Prompts
Shell Prompt
C shell prompt machine_name%
C shell superuser prompt machine_name#
Bourne shell and Korn shell prompt $
Bourne shell and Korn shell superuser prompt #
Preface 19

20 SunScreen 3.2 Administration Guide • December, 2001

CHAPTER 1
Starting the Administration GUI andLogging In
This manual provides the information and instructions for configuration andmanagement of the SunScreen firewall. The main part of the manual relies on theadministrative graphical user interface (GUI). Chapter 10 describes how to configureand manage the firewall using the command line interface (CLI). The various featuresand theory behind SunScreen are discussed in the SunScreen 3.2 Administrator’sOverview.
This chapter provides basic information you will use throughout the book. It assumesthat you have already installed the Administration Station and Screen software usingthe information in the SunScreen Installation Guide.
After a brief discussion of SunScreen terminology, this chapter reviews basic browserrequirements and shows how to use the administration GUI to perform basic tasks.
Terms Used in This BookTo manage the SunScreen firewall effectively, you need to understand certain terms, afew of which are defined below. Other terms are defined when they are first used. Allterms can be looked up in the Glossary at the back of this manual.
The system running the firewall software is called a Screen. An Administration Station isa system used to configure and administer the Screen. An Administration Station canbe located:
� At the local Screen� At a remote location on your network� At a remote location across the Internet
21

Use common objects to model your network configuration and topology. Commonobjects are the smallest units that you can define on a Screen. The addresses ofnetworks and individual hosts, different services (network protocols), and the usernames of people authorized to administer the Screen are examples of common objects.
Policy rules are the individual rules that implement a security policy. Policy rulesdescribe the relationships between the common objects (for example, hosts that cancommunicate with each other). There are four types of policy rules:
� Packet Filtering rules describe network traffic flow policy.
� Administrative Access rules describe who can access the Screen and what they can doonce they access it.
� Network Address Translation (NAT) rules describe network address translations.
� Virtual Private Network (VPN) rules describe the Screens that participate in a VPNand the hosts for which they provide the VPN.
A policy is a named set of policy rules. When you install SunScreen, an initial policy iscreated for you, based on the information you supply. The name of this policy isInitial.
New installations can be performed at three levels for routing mode (see “Deciding onYour Initial Security Level” in SunScreen Installation Guide). After a new “permissive”installation, the default policy rules leave everything “open”; in other words, there isno packet filtering or any other type of firewall activity until you specify it. New“secure” and ”restricting” installations begin with different default levels of filtering inplace.
For stealth mode, the installation comes up without any rules.
Administration GUI BrowserRequirementsUsing the Administration GUI, you can configure, administer, edit, and manage theScreen. You can use any browser that supports the Java™ platform and is compliantwith JDK™ 1.1.3. You can use Netscape Navigator™, the HotJava™ browser, orInternet Explorer as long as the browser has the required Java support. The onlyrestriction applies to accessing local system resources.
22 SunScreen 3.2 Administration Guide • December, 2001

Note – The Netscape Java Plug-In provided with the Solaris 8 software is notcompatible with the Administartion GUI applet. To save log files and load certificatesusing a Netscape browser, you must install the required version of the Netscape JavaPlug-In, as documented in the following sections.
Accessing Local System ResourcesBecause Netscape Navigator and Internet Explorer do not support the Javamechanism for applet signing, browser security mechanisms prevent theadministration GUI from accessing your system’s local resources.
The operations that require access to your local system resources are:
� Exporting and importing IKE certificates� Loading certificates from a diskette� Backing up all policies� Restoring all policies� Saving log files� Loading Jar signatures
If you do not need to perform any of these operations, you can go to “To Log In to theAdministration GUI” on page 26. If you need to access local system resources, youshould read the following sections.
To work around local access limitations, you can use the Java Plug-In or the HotJavabrowser version. You can find versions of the Netscape and HotJava browsers, as wellas the required Java Plug-In, on the SunScreen CD-ROM.
Note – The SunScreen Administration GUI requires a Java plugin that supports Java1.1 features. This dependency creates interaction problems when the Java plugin 1.2(or later) is already present on the system. The fix for this problem is to remove theJava 1.2 plugin from the system.
� To Install the Java Plug-In on the ScreenThe documentation for the Java Plugin is on the Sun Website athttp://java.sun.com/products/plugin/1.1.3/readme.html.
1. Issue the following command to remove the Java 1.2 Plugin:
pkgrm SUNWj2pi
2. Make sure the SunScreen CD-ROM is still in the CD-ROM drive.
Starting the Administration GUI and Logging In 23

3. Become root, if you are not already root.
4. Install the Java Plug-In for use by a single screen, type the following:
# volcheck
$ cp /cdrom/cdrom0/javaplugins/* /usr/lib/sunscreen/admin/htdocs/plugin/plugins/.
If you plan on sharing the Java plugin with Administration Stations, use the followinginstructions:
5. Save the file identitydb.obj on a diskette (see below) and distribute it to allAdministration Stations.
� To Install on the Remote Administration Station.1. Open a Web browser window on the remote Administration Station.
2. Download the plugin from the Screen using one of the following links.
� Java plugin for SPARC system fromhttp://localhost:3852//plugin/plugins/plugin-112i-solsparc.sh.
� Java plugin for Windows system fromhttp://localhost:3852//plugin/plugins/plugin-112i-win32.exe.
3. On the remote administration station, execute the shell script.
a. If your system is a Solaris operating environment, type the following commandat the shell prompt:
# chmod a+x file_name.sh
# ./file_name.sh
b. If your system is a Windows system, make sure that you have permission toexecute the program and then execute the program.
� To Save the identitydb.obj FileAfter you install the Java Plug-In, next you install the identitydb.obj file.
1. If administration is done from a Solaris operating environment (local or remote),place the/usr/lib/sunscreen/admin/htdocs/plugin/plugins/identitydb.obj filein the $HOME directory of the user on the machine they are using foradministration.
2. If administration is done from a Windows system, Use the following procedure:
a. Obtain a DOS formatted diskette
24 SunScreen 3.2 Administration Guide • December, 2001

b. Insert the DOS formatted diskette in the floppy drive on the Screen.
c. On the Screen, copy the file identitydb.obj to the diskette:
% volcheck
% cp /usr/lib/sunscreen/admin/htdocs/plugin/plugins/identitydb.obj /floppy/floppy0
d. Use the diskette you just created to copy the identitydb.obj file to theappropriate location:
� C:\WINDOWS directory for Windows 95/98/2000 users
� C:\WINDOWS\PROFILES\username for multiuser Windows 95/98/2000systems
� C:\WINNT\PROFILES\username for Windows NT systems
e. If the file identitydb.obj already exists in these locations, add SunScreen asone of the accepted signers to the file identitydb.obj.
Note – The SunScreen GUI can use a signed Java applet to provide access tofunctions that are normally restricted by a web browser. These functions includesaving or loading SunScreen configurations and certificates to files on the localcomputer.
To verify the Java applet’s signature, the web browser needs a copy of thecertificate that was used to sign the applet. A copy of this certificate is installedwith the SunScreen administration software in/usr/lib/sunscreen/etc/SunScreenEFS.x509. This is a file that you copyto your workstation or PC where the web browser will be run and add to yourbrowser’s list of trusted signers. Refer to your browser’s documentation fordetailed instructions on Java applet security.
� To Use the HotJava 1.1 BrowserYou can add the HotJava 1.1 browser from the SunScreen CD. The package name isSUNWdthj. If you use the HotJava 1.1 browser and want to access local systemresources, the browser’s preferences must allow medium security for unsignedapplets. To set this level of security:
1. Go to the browser’s Edit menu.
2. Choose Preferences.
3. Choose Applet Security.
4. Choose the Medium Security radio button from the Unsigned Applets column.
5. Choose Apply.
Starting the Administration GUI and Logging In 25

Using the Administration GUI
� To Start the Administration GUI for BrowsersWithout the Java Plug-In
1. To connect to a Screen with local administration, type:
http://localhost:3852
2. To connect to a Screen with remote administration, type:
http://Screen_Name:3852
where Screen_Name is the name of the machine running the SunScreen software.
� To Start the Administration GUI for Browsers Withthe Java Plug-In
1. To connect to a Screen with local administration, type:
http://localhost:3852/plugin
2. To connect to a Screen with remote administration, type:
http://Screen_Name:3852/plugin
where Screen_Name is the name of the machine running the SunScreen software.
Note – HA Configurations Only: Use the name of the interface dedicated to highavailability (HA) or to a dedicated Admin interface for all HA administration;otherwise, you will connect to the currently active HA host instead of the primary HAhost.
� To Log In to the Administration GUIYou must log in with a user name and password every time you start theadministration GUI. The initial user name and password are both admin.
26 SunScreen 3.2 Administration Guide • December, 2001

1. Type your Sunscreen Admin User name in the Admin User field.
The initial user name is admin. To change the Admin User, you can add anotherAuthorized User and use that Authorized User name when you log into Sunscreen(see “To Add an Authorized User” on page 122).
2. Type your Sunscreen Admin User password in the Password field.
The default user password is admin. Change the password for the default loginaccount as soon as possible to prevent unauthorized access to the Screen’s policies. Fora description on how to change passwords, see “Changing the Admin User Password”on page 30.
3. Select the locale.
The default is en_US [English USA]. This also means that the libraries used togenerate messages are in US English.
4. Select the initial task.
There are two choices for the initial task:
� View Information
Starting the Administration GUI and Logging In 27

The information page shows the current status of the Screen, enables you to viewand manage the logs, and shows interface statistics.
� Manage Policies
The policies page enables you to create, edit, and manage SunScreen policies,policy rules, and common objects, including the Admin User IDs.
Once logged in, you can move between the Information and Policies pages byselecting the appropriate task from the administration GUI navigation buttons.
28 SunScreen 3.2 Administration Guide • December, 2001

5. Click the Login button to log in.
Opens the page that you chose for the Select Task field after successful authentication.
6. (Optional) Click the Documentation button to display online documentation.
Click one of the links to open the appropriate documentation. You do not have to login to look at the online documentation.
Administration GUI Navigation Bar and ButtonsThe administration GUI navigation bar and navigation buttons, shown below, appearat the top of administration GUI pages. You should use these button for movingamong the pages of the administration GUI.
If these buttons are missing from a page of the administration GUI, it means that youhave unsaved changes from your editing session. Once you have saved your changesthe buttons reappear.
The following table describes the administration GUI navigation buttons.
TABLE 1–1 Administration GUI Navigation Buttons
Control Description
Logout Logs out of the administration session, which clears any lock you may beholding.
Policies Displays the Policies List page, where you add new policies. You can editthe policies for SunScreen on the Policy Rules page.
Information Displays the Information page, where you can view the logs, productinformation, status of SunScreen, and the SKIP and IKE statistics.
Documentation Displays the Documentation page, which contains links to the onlineSunScreen documentation.
Starting the Administration GUI and Logging In 29

Changing the Admin User PasswordThe security of the network relies on restricting the ability to change SunScreen rulesto authorized people only, so changing the password for the admin user is extremelyimportant.
� To Change the Admin User Password1. Log in to the Screen using the default admin user name and password if you have
not already done so.
2. Select Manage Policies as the initial task.
If you are already logged in, select Policies from the navigation buttons across the topof the page.
3. Select the policy named Initial from the Policies List panel of the Policies List page.
Note – Do not select the policy named Currently Active.
The Policy List page appears. The buttons below the policy list become active, and theEdit button changes from View to Edit.
30 SunScreen 3.2 Administration Guide • December, 2001

4. Click the Edit Button.
A Please wait while the configuration loads... warning window appears while the PolicyRules page is loading.
5. In the Common Objects panel, set the following variables:
a. Select Authorized User for Type, and leave the action setting at Add New.
b. Type admin in the Search String field.
c. Select * for Screen.
d. Leave Subtype setting at All.
Starting the Administration GUI and Logging In 31

6. Click the Search button.
At the far right of the Results area, the text string 1 found appears.
7. Select admin in the Results area.
Note – You might have to scroll to see the admin setting in the Results area.
The Detail field displays the details of the admin, including the encrypted password.
8. Click the Edit button at the bottom part of the Common Objects panel.
The User dialog box appears.
32 SunScreen 3.2 Administration Guide • December, 2001

9. Deselect the User Enabled and Password Enabled check boxes, and type the newpassword twice.
If you do not deselect the check boxes, you will not be able to edit the password.
10. When you have finished typing and retyping the password, select the User Enabledand Password Enabled check boxes again, then click the OK button.
If you do not select User Enabled and Password Enabled at this point, the admin userwill not be active on the policies.
11. Click Yes when asked to Activate the policy.
Starting the Administration GUI and Logging In 33

34 SunScreen 3.2 Administration Guide • December, 2001

CHAPTER 2
Working With Common Objects
Common objects are the smallest building blocks you work with when managing yourSunScreen. Common objects are used by (“common” to) all existing policies; anymodification to these objects affects the operation of all policies.
This chapter describes:
� Using the Policy Rules page� Adding, editing, deleting, renaming, and searching for common objects� Viewing and editing details of a common object� Adding services and service groups� Adding host addresses, ranges, and groups of addresses� Adding and deleting SNMP alert receivers� Adding, generating, and loading SKIP UDHs� Generating, importing, exporting and associating IKE certificates� Adding a Screen� Adding and editing interfaces� Adding a time object
This chapter describes how to use the administration GUI to manipulate commonobjects. To perform the same tasks from the command line interface, refer toChapter 10.
The following table provides a list of the procedures that are in this chapter.
35

TABLE 2–1 Common Object Procedures
Object Procedure
Common Objects “To Add a Common Object” on page 46
“To Search for a Common Object” on page 46
“To Edit a Common Object” on page 47
“To Edit a Common Object From the Policy Rules Table” on page 49
“To Delete a Common Object” on page 50
“To Rename a Common Object” on page 51
Service Objects “To Add a Service ” on page 53
“To Add a Service Group” on page 57
Address Objects “To Add a Host Address ” on page 60
“To Add a Group of Addresses” on page 62
“To Add a Range of Addresses” on page 64
Certificate Objects “To Generate an IKE Certificate” on page 67
“To Export an IKE Certificate” on page 69
“To Import an IKE Certificate” on page 71
“To Associate an IKE Certificate” on page 73
“To Generate SKIP UDHs Certificates” on page 74
“To Load a SKIP Issued Public or Private Certificate” on page 77
“To Associate SKIP Certificate” on page 80
Certificate Group “To Add a Certificate Group” on page 82
“To Work with IKE Certificate Groups” on page 85
IPsec Key Object “To Add an IPsec Key” on page 87
Screen Objects “To Add a Screen” on page 97
“To Add an SNMP Alert Receiver” on page 99
“To Delete an SNMP Alert Receiver” on page 100
36 SunScreen 3.2 Administration Guide • December, 2001

TABLE 2–1 Common Object Procedures (Continued)Object Procedure
Interface Objects “To Add or Edit Interfaces” on page 104
“To Remove an Interface” on page 106
“To Set up a Routing Interface” on page 106
“To Set up a Stealth Interface” on page 108
“To Change an Admin Interface From the Local Console” on page 111
“To Change an Admin Interface From a Remote Console” on page 114
Jar Objects “To Add a Jar Signature” on page 117
“To Add a Jar Hash” on page 119
Authentication “To Add an Authorized User” on page 122
Time Objects “To Create Time Objects” on page 124
Using the Policy Rules PageTo add and modify the common objects, use the Policy Rules page of theadministration GUI.
� To Modify the Policies Associated with a CommonObject
1. Choose a policy in the Policies List page.
Working With Common Objects 37

2. Click the Edit button.
The Policy Rules page appears.
38 SunScreen 3.2 Administration Guide • December, 2001

Policies List PageYou reach the Policies List page by choosing Manage Policies for the Select Task fieldon the Login Page before you click the login button or by clicking the Policies buttonon the administration GUI’s navigation bar.
You can move to the SunScreen Information page, display the online documentation,or log out by clicking the appropriate button on the administration navigation bar
The Policies List page allows you to add a new policy or to edit, copy, rename, delete,and backup a particular policy to a local file; to restore a policy from a local file; and toinitialize HA.
The Policies List page identifies the policies that have been stored for a Screen. TheList Policies page has two instructions under the top or navigation bar: “To edit a
Working With Common Objects 39

policy select one from the table and click the ‘Edit’ button,” and “For other tasks selectfrom the top panel buttons.”
Policies List PanelBelow the Policies List banner is a panel consisting of three columns that show:
1. The name – You must click a name of a policy that you want to edit in this column.The term “-Currently Active-” appears in this column for the active policy and thename and the version of the active policy appears in the version column.
2. The version (if present) – The version lists the versions of policies for your system.
3. The active policy information (if present).
The Policies List panel lists the policies that have been set up for a particular Screen.The active policy is the first policy in the list of policies and is automaticallyhighlighted when you first come to this page. You can edit inactive Screen policies byclicking the name of an entry in the Policies List panel to highlight it, then click one ofthe controls at the bottom of the Policies List page.
Types of PoliciesThe types of policies are:
� Regular Policies – Policies that share common objects with other regular policies.
40 SunScreen 3.2 Administration Guide • December, 2001

� Versioned Policies – A policy with a version number is displayed by clicking thebutton next to the regular policy name in the first column of Policies List Panel ofthe Policies List Page. Clicking the reverse arrow hides the versions of a policy. Apolicy with a version number contains a snapshot of the common objects that areembedded in the saved policy. The name of the policy contains a dot followed byan incremental number. The higher the number, the later the version. Versionedpolicies cannot be modified, but their rules can be extracted to a new policy.
� Currently Active Policy – This policy is extracted from the active policy. Thecurrently active policy cannot be modified. If you click the currently active policyand highlight it, the edit button retains the (RO) designation to show that it is readonly. A Save As button appears on the Policy Name line on the Packet Filtering tabof the Policy Rules panel. You can save any modifications to the currently activepolicy as a new policy. A Save As button appears on the Common Objects panel.You can save the common objects of this policy to replace the current commonobjects associates with regular policies.
This allows you to make the common objects embedded in this version of the policythe current common objects, overwriting the existing set of common objects.
This approach allows you to save only the rules part of the versioned policy so that:
� These rules become the current rules for this policy, for example the rules for policyInitial.10 can be made the rules for the current version of Initial.
� You can copy the rule to a new name.
Note – The rules created in this way are used with the current set of commonobjects. On verifying this policy, you may have to fix any inconsistencies.
The difference in behavior between Save As and Edit(RO) is that Save As affects thecurrent policy only and Edit(RO) affects a policy version. With Edit(RO), you have theadditional choice of making the rules the current rules for the policy.
Policies List Page Action ButtonsThe following table describes the action buttons for the Policies List page.
TABLE 2–2 Action Buttons on the Policies List Page
Control Description
Add New button Opens a dialog box that prompts you for the name of the policy that youwant to add. The name for this new policy appears on the policies listpanel. You add the rules for the new policy on the Policy Rules page.
Working With Common Objects 41

TABLE 2–2 Action Buttons on the Policies List Page (Continued)Control Description
Edit button Opens the Policy Rules page for the policy that you have highlightedand allows you to change the parameters. If the Edit button displays(RO), it means that the policy that you highlighted is read-only. Theread-only mode applies only to the active policy and the policy versionsin the version column:� You cannot modify an active policy.� You must click the name (the first column of the policies list panel) to
highlight the policy that you want to edit.
Copy button Opens a dialog box that prompts you for the new name of the policy towhich you want to copy the information from the policy that youhighlighted on the Policies List panel.
Rename button Opens a dialog box asking for the new name you want to assign to theselected policy on the Policies List panel.
Delete button Opens a dialog box asking you to confirm you want to delete theselected policy on the Policies List panel.
Activate button Activates the selected policy on the Policies List panel for the Screen.After you click the Activate button, the version and active policyinformation are updated in the highlighted row.
Backup All button Opens the Backup All dialog box, which enables copying the policies toa file or diskette. You cannot use the Backup All button if you are using abrowser whose security restrictions do not allow access to the file systemfrom applets. Most browsers have plug-in modules that permit you toback up your policies to a local file or diskette.
The backup medium contains copies of the local identities (theencryption keys and certificates) and must be stored securely anddisposed of securely to avoid compromising your security.
Restore All button Opens the Restore All dialog box, which enables restoring the policiesfrom a file or diskette. The restore operation causes the information fromthe backup file to overwrite all current policy information. You cannotuse the Restore All button if you are using a browser whose securityrestrictions do not allow access to the file system from applets.
Initialize HA button Opens the Initialize HA dialog box. This dialog box contains thestatements that you need to be connected to the HA primary to performthis operation and that you must select the interface you would like tobe the HA interface for the primary. This dialog box presents a choice listof all the interfaces available.
Help button Opens the online help.
42 SunScreen 3.2 Administration Guide • December, 2001

Using Common ObjectsUse the Common Objects area of the Policy Rules page to add common objects andconstruct policy rules. The changes you make to the common objects do not affect thecurrently active policy until you activate them.
The following table describes the information, controls, and the buttons in theCommon Objects Panel.
TABLE 2–3 Common Object Information, Controls, and Buttons
Information Control Description
Version The version of the registry of common objects that is being usedin a policy. The latest version of the registry is used by all policies.If you edit the common objects (registry) the word “modified”appears after the number until you either cancel the changes orsave the changes.
Type CommonObject ChoiceList
Displays the list of common objects available. You choose thecommon object that you want from this list.
Subtype ChoiceList for Addinga NewCommonObject ofChosen Type
Displays the choice list of subtypes available for the commonobject that you selected. Each common object has it own set ofsubtypes and each subtype requires that you provide differentinformation in a dialog box for that subtype for that commonobject.
Working With Common Objects 43

TABLE 2–3 Common Object Information, Controls, and Buttons (Continued)Information Control Description
Search Search String Enter the string for a particular subtype for a common object inthis editable text field. When you click the Search button, allmatching subtypes appear in the Results choice list. Leaving thisfield blank returns all entries defined for the selected subtype orlocal to the selected Screen. Selecting All in Search on Screens andSearch Subtype Choice with the Search String field empty returnsall entries defined.
Search onScreen
Displays a choice list of the Screens that the AdministrationStation manages. Selecting a Screen from this list limits the searchto common objects exclusive to that Screen.
SearchSubtypes
Display a choice list of the subtypes available for the selectedcommon object.
Search Button Starts the search according to the criteria set.
Results Displays a choice list of available entries that match the criteria.
Found Show the number of entries in the search that match the criteria.
Detail Displays the description for the item chosen from the Resultschoice list.
Edit Button Displays the dialog box for the common object selected. Editing acommon object is similar to adding a new one. The difference isthat after you have chosen the common object that you want toedit and have clicked the Edit button, the dialog box for thatcommon object contains all the information and you only need tomodify the requisite information.
Delete Button Displays the Delete dialog box.
Rename Button Displays the Rename dialog box.
Help Button Displays online help.
The following table lists the common objects used in SunScreen.
TABLE 2–4 Common Object Descriptions
Common Object Use
Address Defines the network elements that make up the policy
Authorized User Describes an administrator for your Screen administration
Certificate Defines the certificates used for SKIP and IKE connections
Interface Defines the Screen’s network interface ports.
44 SunScreen 3.2 Administration Guide • December, 2001

TABLE 2–4 Common Object Descriptions (Continued)Common Object Use
Jar Hash The Java archive hash for HTTP proxy dialog filtering
Jar Signature The Java archive signature for HTTP proxy dialog filtering
IPsec Key For IPsec manual keys
Proxy User Defines the proxy user name for an authorized user
Screen Defines values and objects to a specific Screen
Service Defines network protocols
Time Defines time intervals for time-dependent rules
Some of these objects are saved automatically every time they are edited or newobjects are added. Although the changes apply immediately and cannot be cancelled,they do not take effect until the policy is activated. The automatically saved objectsare:
� Authorized user� Jar hash� Jar signature� Proxy user
The Screen Field and Common ObjectsThe Screen field provides a way to define an object or rule for a specific screen in ascenario that utilizes multiple Screens, specifically when you use CentralizedManagement Groups. It has no effect on standalone Screen administration.
SunScreen allows you to use the same name for different common objects if you selectdifferent Screen objects for them. You may also define different parameters for thesecommon objects; the Screens to which they refer then interpret them locally.
An object with “*” selected applies to all Screens. This is the default, and isrecommended for all objects unless there is a need to use a single name more thanonce.
Rules whose Screen field is blank apply to all Screens. Rules with a specific Screenobject selected apply only to that Screen.
Working With Common Objects 45
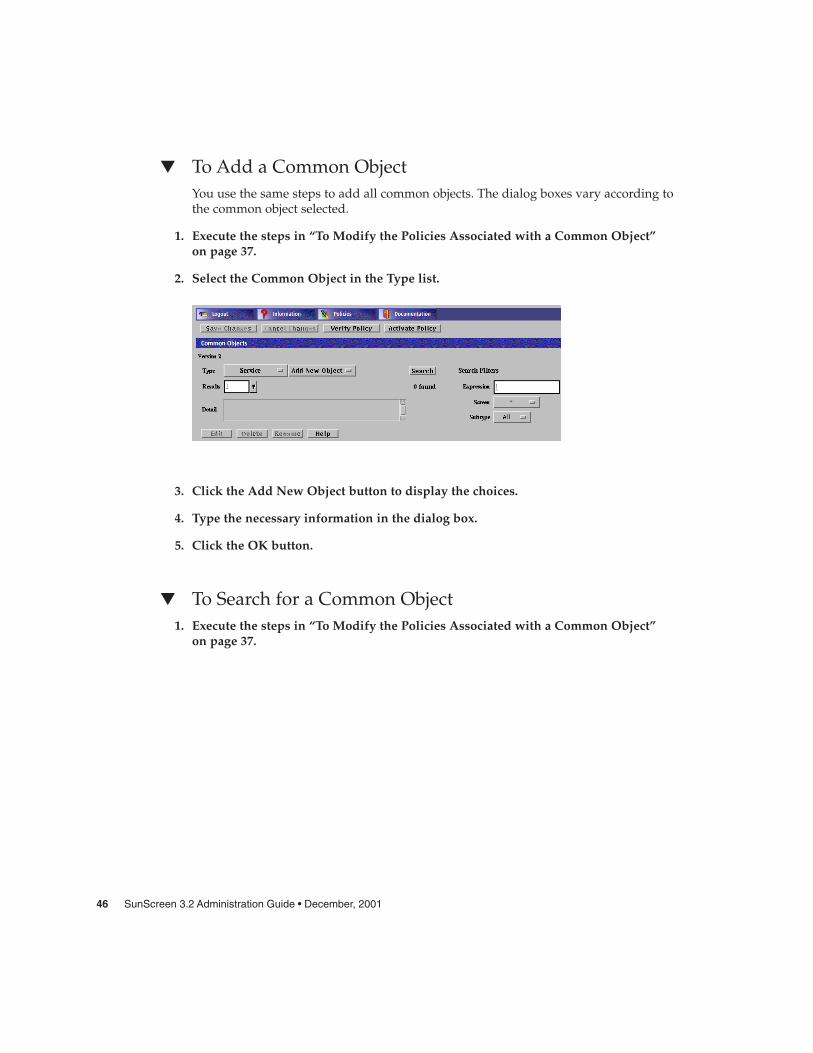
� To Add a Common ObjectYou use the same steps to add all common objects. The dialog boxes vary according tothe common object selected.
1. Execute the steps in “To Modify the Policies Associated with a Common Object”on page 37.
2. Select the Common Object in the Type list.
3. Click the Add New Object button to display the choices.
4. Type the necessary information in the dialog box.
5. Click the OK button.
� To Search for a Common Object1. Execute the steps in “To Modify the Policies Associated with a Common Object”
on page 37.
46 SunScreen 3.2 Administration Guide • December, 2001
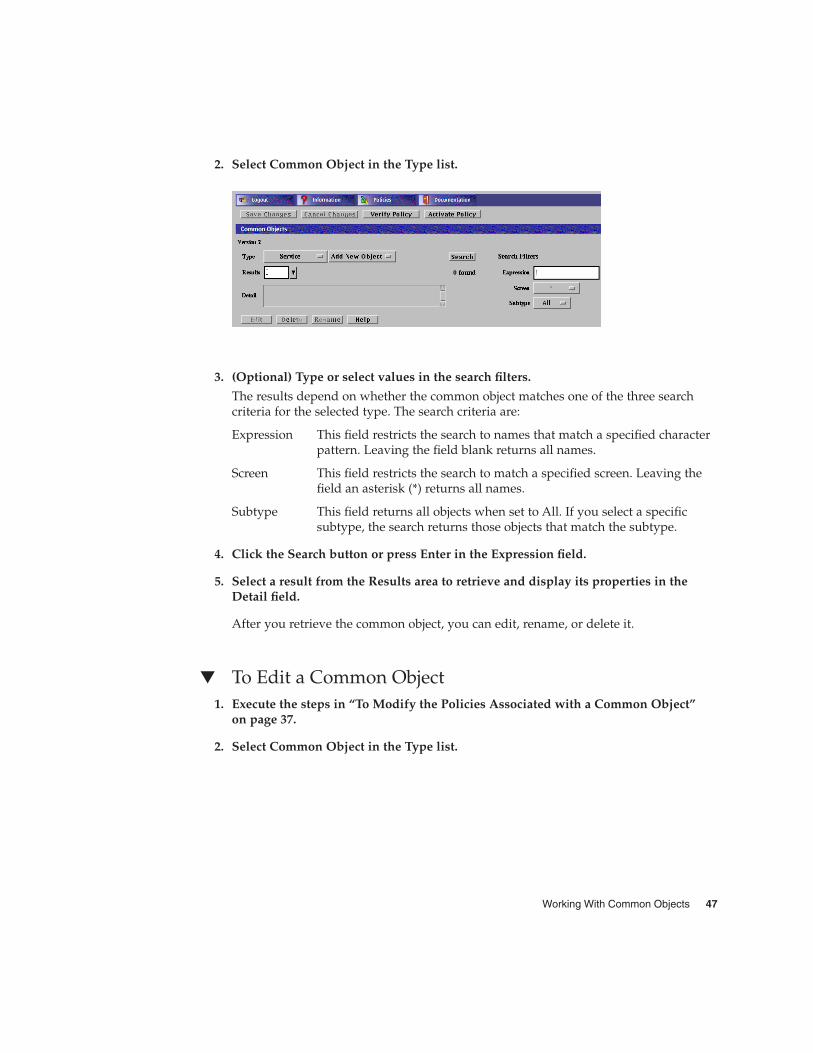
2. Select Common Object in the Type list.
3. (Optional) Type or select values in the search filters.
The results depend on whether the common object matches one of the three searchcriteria for the selected type. The search criteria are:
Expression This field restricts the search to names that match a specified characterpattern. Leaving the field blank returns all names.
Screen This field restricts the search to match a specified screen. Leaving thefield an asterisk (*) returns all names.
Subtype This field returns all objects when set to All. If you select a specificsubtype, the search returns those objects that match the subtype.
4. Click the Search button or press Enter in the Expression field.
5. Select a result from the Results area to retrieve and display its properties in theDetail field.
After you retrieve the common object, you can edit, rename, or delete it.
� To Edit a Common Object1. Execute the steps in “To Modify the Policies Associated with a Common Object”
on page 37.
2. Select Common Object in the Type list.
Working With Common Objects 47

3. (Optional) Select the search criteria.
4. Click the Search button.
5. In the Results area, select the name of the common object to edit.
The details for the selected common object are displayed.
6. Click the Edit button.
The dialog box for the object appears.
48 SunScreen 3.2 Administration Guide • December, 2001

7. Make your changes in the dialog box.
8. Click the OK button.
� To Edit a Common Object From the Policy Rules Table1. Execute the steps in “To Modify the Policies Associated with a Common Object”
on page 37.
2. Click once on the cell in the Policy Rules Table that contains the object to be viewedor edited.
The dialog box for the chosen object appears.
Working With Common Objects 49

Note – If more than one common object uses a particular name, you may not be ableto display the details for the object by clicking on the table cell. In such cases, youmust search for desired object and select it.
3. Edit the object if necessary.
4. Click the OK button.
� To Delete a Common ObjectIf you delete a named common object (such as address, service, or certificate) that isbeing used in a policy object, SunScreen displays a warning message before it deletesthe object.
1. Execute the steps in “To Modify the Policies Associated with a Common Object”on page 37.
2. Select Common Object in the Type list.
3. Select the search criteria.
4. Click the Search button.
5. From the Results area, select the name of the common object to delete.
50 SunScreen 3.2 Administration Guide • December, 2001

6. Click the Delete button.
7. Click Yes in the Delete Rule dialog box.
Note – Be careful not to remove your Administration Station’s address from itsinterface address group. If you do, you will be unable to administer your Screen afteryou activate the next policy.
� To Rename a Common ObjectWhen you rename a common object with no Screen object, you also rename allreferences to the object in the current policy.
1. Execute the steps in “To Modify the Policies Associated with a Common Object”on page 37.
2. Select Common Object in the Type list.
Working With Common Objects 51

3. Click the Search button.
4. From the Results area, select the name of the common object to be renamed.
5. Click the Rename button.
The Rename dialog box appears.
6. Type the new name in the Please Enter the New Name field.
7. Click the OK button.
52 SunScreen 3.2 Administration Guide • December, 2001

Service and Service Group ObjectsWhen setting up your network security policy, you need to decide which networkservices to make available to hosts on your internal network and which services tomake available to hosts on the external network. Most sites need to determine policyrules that govern basic services.
SunScreen provides many predefined network services and service groups, such as www,http, ftp, telnet, and dns. You can change the default values of a service or add anew service as needed. (See “Services and State Engines” in SunScreen 3.2Administrator’s Overview for a list of services and service groups.)
You can define both single services and service groups (clusters of single services thatyou want to use together.) The services that are available for use in the policies areinstalled as part of the SunScreen software.
In addition to the basic services, every TCP/IP implementation provides services suchas echo, discard, daytime, chargen, and time. For services such as ftp, you maywant to allow anyone in the internal corporate network to send outbound traffic, butonly allow inbound traffic in this protocol to go to the FTP server. This requires tworules: one for the outbound traffic and one for the inbound traffic going to the publicserver.
Each service uses a state engine, a sort of protocol checker. For example, the FTP stateengine checks port numbers when the ftp service is being used. For more informationon state engines, see “Services and State Engines” in SunScreen 3.2 Administrator’sOverview.
� To Add a Service
Note – Although you can change the default values for a service, the preferred methodis to add a new service with the new values. This makes troubleshooting easier.
1. Execute the steps in “To Modify the Policies Associated with a Common Object”on page 37.
2. Select Service in the Type list.
Working With Common Objects 53

3. Click New Single from the Add New Object list.
The Service dialog box appears.
The following table describes the controls in the Service dialog box for a single service.
TABLE 2–5 Controls for Service Dialog Box for Single Service
Control Description
Name Specifies the name of the service object.
Description (Optional) Provides a brief description about the service object.
Screen (Optional) Restricts the service so that it applies to the selected Screen only. Thedefault (All) means that all Screens recognize this object unless an object existsthat has been specifically defined for a particular Screen and has the samename as the Screen for which it is defined.
Filter Table Information
54 SunScreen 3.2 Administration Guide • December, 2001

TABLE 2–5 Controls for Service Dialog Box for Single Service (Continued)Control Description
Filter Table Display the parameters for the single services.1. The Add Filter button Adds a row to the filter table so that you can define
additional forward filters for the service.2. The Add Port button adds ports for use by the forward filter. This field
becomes active when you click the port field of the filter table.3. The Delete button the highlighted row in the table. You click a row in the
table to highlight it.
Filter Identifies the state engine.
Port Identifies the port number, program number, or type used by the forward filter.
Broadcast Determines whether the rules in which the service is used allowscommunication to broadcast or multicast addresses. If you want the service towork for nonbroadcast addresses, you must enter a separate table entries forbroadcast and nonbroadcast entries
Parameters Overrides the default values the selected packet-filter state engine. Each stateengine has a set of parameters; refer to “Services and State Engines” inSunScreen 3.2 Administrator’s Overview for default parameters values and theirmeaning.
Reverse Determines whether the filter applies to packets originating from the host inthe To address of a rule and going to the From address of a rule.
OK Button Stores the new or changed information and makes the Save Changes commandbutton active.
Cancel Button Cancels any new or changed information.
Help Button Displays the page of online help for this common object.
4. Type the name for this new service in the Name field.
For example: ftp-34
5. (Optional) Type a description for this service in the Description field.
For example: Use ftp-34 instead of the supplied ftp service.
The description appears in the Service Details field that displays when you choose aservice or service group for a rule.
6. (Optional) Select a Screen from the Screen list.
7. Click the Add Filter button.
This adds an entry to the filter list.
8. Select a filter from the list.
You can use the Add Filter button as necessary to select the filters that you need for aparticular service.
Working With Common Objects 55

9. (Optional) If you have too many filters:
a. Select the Parameters field to highlight the line that contains the unwanted filter.
b. Click the Delete button to delete the filter.
c. Repeat these steps until all unwanted filters are deleted.
10. Click the select box in the Filter field to display the list of service filter engines.
For each filter desired:
a. Click the Select box under Filter.
b. Choose a filtering engine from the list displayed.
c. Click the Reverse box, if the service operates in the reverse direction.
Reverse is a seldom-used option for specifying asymmetric inbound traffic, such astraceroute and router discovery services.
11. Type the port number for the new service in the Port field.
You can use the Add Port button as necessary to add an additional set or sets of portsthat you need for a particular filter. As a rule, you need to use the Add Port buttononly when you must specify a discontinuous set of port numbers, such as"1024–1028" + "1030–1048". If you have too many ports, follow the steps belowto delete them:
a. Click the Add Port button to add the necessary ports.
b. Select the parameters field to highlight the line that contains the unwanted port.
56 SunScreen 3.2 Administration Guide • December, 2001

c. Click the Delete button to delete the unwanted port.
12. (Optional) To override the default values for the filter that you have selected,change the default values by typing the values that you want to use.
13. Click the Broadcast button if the service sends IP broadcast packets.
If the service sends both broadcast and non-broadcast packets (for example, thestandard rip service), you will need two ports: one with the broadcast box checkedand one with the broadcast box unchecked.
14. (Optional) If you want to override the default parameters for the filter that you haveselected, type the required number of parameters, separated by spaces.
You need to type in parameters only if you do not want to use the default values. Forinformation about the default values for these fields, see “Services and State Engines”in SunScreen 3.2 Administrator’s Overview.
15. Click the OK button to place this service definition in the policy file.
The service ftp-34 now appears in the list of services.
16. Repeat the above steps until you have added all the services necessary for yourpolicy.
� To Add a Service Group
Note – Although you can modify the default services in service groups, the preferredmethod is to add a new service group that contains the services that you want. Thismakes troubleshooting easier.
1. Execute the steps in “To Modify the Policies Associated with a Common Object”on page 37.
2. Select Service in the Type list.
3. Select New Group from the Add New Object list.
Working With Common Objects 57

The Service dialog box is displayed.
The following table describes the controls in the Service dialog box for service group.
TABLE 2–6 Controls for Service Group Service Dialog Box
Control Description
Name Specifies the name of the service object.
Description (Optional) Provides a brief description about the service object.
Screen (Optional) Restricts this service group applies to the selected Screen only.The default (All) means that all Screens recognize this object unless an objectexists that has been specifically defined for a particular Screen and has thesame name as the Screen for which it is defined.
Services List Identifies the services that do not belong to the service group. Refer to“Services and State Engines” in SunScreen 3.2 Administrator’s Overview for adescription of services.
Members List Identifies the services that belong to the service group.
Add Button Moves the service selected in the Services list to the Members list, makingthe service a member of the specified service group.
58 SunScreen 3.2 Administration Guide • December, 2001

TABLE 2–6 Controls for Service Group Service Dialog Box (Continued)Control Description
Remove Button Moves the service selected in the Members list to the Services list, removingthe service from the specified service group.
OK Button Stores the new or changed information and makes the Save Changescommand button active.
Cancel Button Cancels any new or changed information.
Help Button Calls up the page of online help for this common object.
4. Type the name for the new service group in the Name field in the Service dialogbox.
5. (Optional) Type a description for this new service group in the Description field.
The description appears in the Service Details field that displays when you choose aservice or service group for a rule.
6. (Optional) Choose a Screen from the Screen list.
7. Select the service or service group that you want to include in this new servicegroup.
8. Click the Add button to move the chosen service or service group to the Memberslist.
9. Click the OK button.
10. Repeat the above steps until you have added all the service groups required.
Address ObjectsSunScreen identifies network elements—networks, subnetworks, and individualhosts—by mapping a named address object to one or more IP addresses. Addressobjects are used:
� To define the network elements that make up the policy� To define the network interfaces� As the source and destination addresses for policy rules and for NAT
Each rule must have a source address and a destination address.
An address object can represent a single computer or a whole network. You can gatheraddress objects that represent individual and network addresses to form address
Working With Common Objects 59

groups. You may define address objects that specifically include or exclude otheraddress objects (single IP hosts, ranges of contiguous IP addresses, or groups ofdiscontiguous IP addresses). Some addresses are already defined.
An individual host is identified by linking its unique IP address to an address object.The address object can use the name or IP address of the host.
Caution – If you change the Admin address, the admin certificate, the local certificate,or the admin-group certificate, you risk losing connectivity from the AdministrationStation to the Screen. Reestablishing connectivity is difficult and requires you to loginto the Screen directly or to use an Administration Station that is still working. It alsorequires exchanging encryption information.
� To Add a Host Address1. Execute the steps in “To Modify the Policies Associated with a Common Object”
on page 37.
2. Select Address in the Type list.
3. Select New Host from the Add New Object list.
60 SunScreen 3.2 Administration Guide • December, 2001

The Host Address dialog box appears.
The following table describes the controls in the Address dialog box for a new host.
TABLE 2–7 Controls for New Host Address Dialog Box
Control Description
Name Specifies the name for the address object.
DescriptionField
(Optional) Provides a brief descriptive note about the address object.
Screen (Optional) Restricts this address so that it applies to the selected Screen only.The default (All) means that all Screens recognize this object unless an objectexists that has been specifically defined for a particular Screen and has thesame name as the Screen for which it is defined.
IPAddress/HostName
Specifies the IP address you want to associate with the address objectidentified in the Name list.
Lookup IPAddress Button
If SunScreen has access to DNS or NIS, lets you look up host addresses byhost name.
OK Button Stores the new or changed information and makes the Save Changescommand button active.
Cancel Button Cancels any new or changed information.
Help Button Calls up the page of online help for this common object.
4. Type the name for this new address in the Name field.
For example: NewAddr
5. (Optional) Type a description in the Description field.
The description appears in the Address Details field that is displayed when you usethe Rule Definition dialog box to choose an address or address group for a rule.
Working With Common Objects 61
6. (Optional) Select a Screen from the Screen list.
7. Type the IP address in the IP Address/Host Name field.
For example: 100.100.20.10
8. Click the OK button.
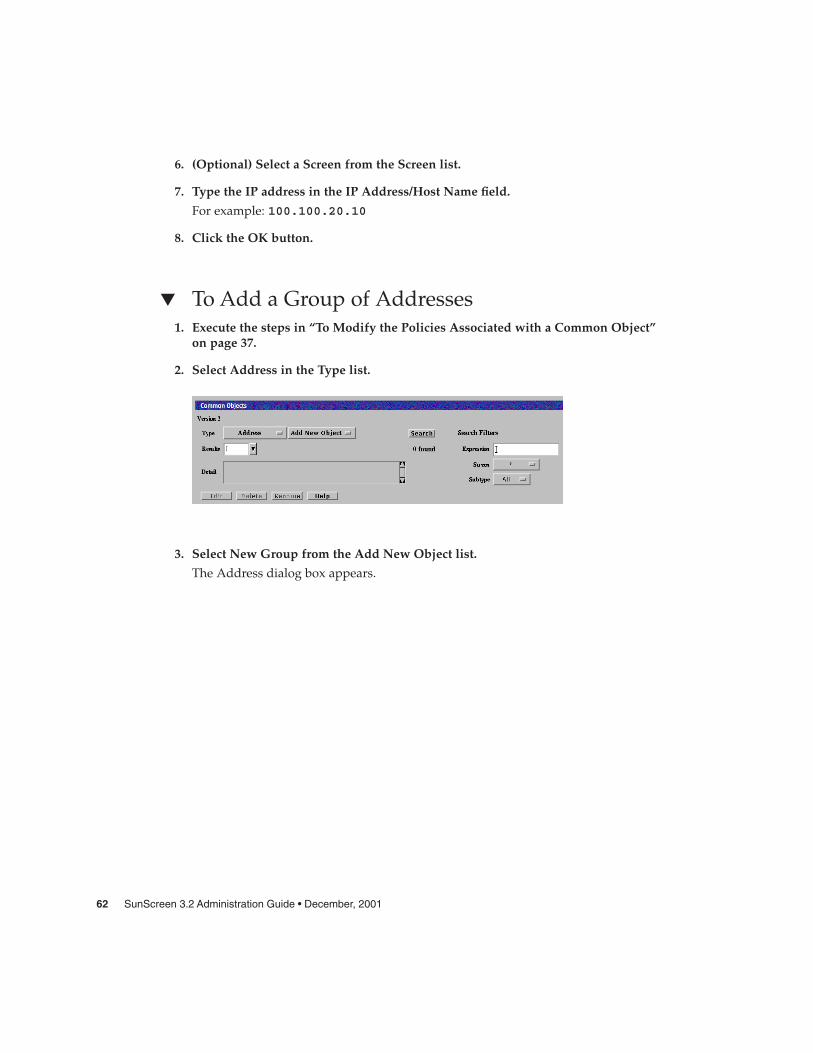
� To Add a Group of Addresses1. Execute the steps in “To Modify the Policies Associated with a Common Object”
on page 37.
2. Select Address in the Type list.
3. Select New Group from the Add New Object list.
The Address dialog box appears.
62 SunScreen 3.2 Administration Guide • December, 2001

The following table describes the controls for the Address dialog box for new group.
TABLE 2–8 Controls for the New Group Address Dialog Box
Control Description
Name Specifies the name for the address object.
Description (Optional) Provides a brief description about the address object.
Screen (Optional) Restricts this address group so that it applies to the selectedScreen only. The default (All) means that all Screens recognize this objectunless an object exists that has been specifically defined for a particularScreen and has the same name as the Screen for which it is defined.
Addresses Displays the addresses objects that can to be used to create the addressgroup.
Include List Specifies the address objects that are currently included in the addressgroup. Use the Add or Remove buttons to modify the list.
Exclude List Specifies the address objects that are excluded from the address group. Forexample, you can create an address group that includes all addresses exceptas specified in the Exclude List. Use the Add or Remove buttons to modifythe list.
Working With Common Objects 63

TABLE 2–8 Controls for the New Group Address Dialog Box (Continued)Control Description
OK Button Stores the new or changed information and makes the Save Changescommand button active.
Cancel Button Cancels any new or changed information.
Help Button Calls up the page of online help for this common object.
4. Type the name for this new address group in the Name field.
For example: GroupName
5. (Optional) Type a description in the Description field.
The description appears in the Address Details field that is displayed when youchoose an address or address group for a rule using the Rule Definition dialog box.
6. (Optional) Select a Screen from the Screen list.
7. Select an address from the Addresses list.
8. Use the Add button to move the address to the Include list or to the Exclude list.
Use the corresponding Remove button to remove addresses from the lists.
9. Continue to build the intended address group by adding to the Include lists.
10. Click the OK button.
� To Add a Range of AddressesAn address range is a set of numerically contiguous IP addresses, identified by thestarting and ending addresses or using the CIDR notation. Networks and subnetworksare typically identified by an IP address range name. You can set up an address object torepresent an address range.
1. Execute the steps in “To Modify the Policies Associated with a Common Object”on page 37.
2. Select Address in the Type list.
64 SunScreen 3.2 Administration Guide • December, 2001

3. Select New Range in the Add New Object list.
The Address dialog box appears.
The following table describes the controls for the Address dialog box for new range.
TABLE 2–9 Controls for New Range Address Dialog Box
Control Description
Name Specifies the name for the address object.
Description (Optional) Provides a brief description about the address object.
Screen (Optional) Restricts this range of addresses so that it applies to theselected Screen only. The default (All) means that all Screensrecognize this object unless an object exists that has beenspecifically defined for a particular Screen and has the same nameas the Screen for which it is defined.
Starting IP Address Specifies the starting IP address in the range.
Ending IP Address Specifies the ending IP address in the range.
Working With Common Objects 65

TABLE 2–9 Controls for New Range Address Dialog Box (Continued)Control Description
OK Button Stores the new or changed information and makes the SaveChanges command button active.
Cancel Button Cancels any new or changed information.
Help Button Calls up the page of online help for this common object.
4. Type the name for this new address range in the Name field.
For example: AddrRange
5. (Optional) Type a description in the Description field.
The description appears in the Address Details field that is displayed when youchoose an address or address group for a rule using the Rule Definition dialog box.
6. (Optional) Select All from the Screen list.
7. If you are using the Range Syntax, type the Starting IP address in the Starting IPAddress field.
For example: 100.100.20.10
8. If you are using the Range Syntax, type the Ending IP address in Ending IP Addressfield.
For example: 100.100.20.90
9. Clicking the CIDR Syntax tab to use the CIDR Syntax for defining a Range ofAddresses.
The CIDR Address dialog box appears
10. If you are using the CIDR Syntax tab, type the network address (for example,
66 SunScreen 3.2 Administration Guide • December, 2001

10.100.20.0)and the network mask (for example, 255.255.255.0, or 24).
11. Click the OK button.
Certificate ObjectsIf you are using remote administration, the certificate for the Screen and the certificatefor the remote Administration Station were created, and the hashes exchanged, duringthe installation procedure.
You can combine certificates into groups for ease of use and convenience.
Note – Store the diskette that contains the certificate safely and securely. It containssensitive information that is not encrypted.
� To Generate an IKE CertificateUnlike SKIP, installing a remote administration station does not automatically createan IKE certificate. Perform the following steps on the primary Screen to generate anew certificate:
1. Execute the steps in “To Modify the Policies Associated with a Common Object”on page 37.
2. Select Certificate from the Type list.
3. Select Generate IKE Certificate from the Add New list.
Working With Common Objects 67

The certificate dialog box appears with options for the type of key to generate. Thedefault value for the Encryption Type is rsa-sha1. The default Key Size is the lowestavailable.
4. Select if you want to use a self-generated certificate or a certificate request for acertificate authority to sign.
5. Type a name in the Name field.
6. (Optional) Type a description in the Description field.
7. (Optional) Select the Screen from the Screen list.
8. Select the Screen the certificate is installed on from the Installed On list.
9. Type an X.509 distinguished name for the certificate subject in the DistinguishedName field. The distinguished name typically has the form of C=Country,O=Organization, OU=Organizational_Unit, and CN=Common_Name.
10. Select the Encryption Type. You can select rsa-sha1, rsa-md5, or dsa.
11. Select the Key Size. The default is the lowest available.
12. Click the Generate button.
13. Click the OK button.
68 SunScreen 3.2 Administration Guide • December, 2001

� To Export an IKE Certificate1. Execute the steps in “To Modify the Policies Associated with a Common Object”
on page 37.
2. Select Certificate from the Type list.
3. Click Search.
4. Select the certificate you want to export from the list in the Results area.
5. Click the Edit button.
The export certificate panel appears
6. Click the Export Certificate button.
The Export Certificate panel appears
Working With Common Objects 69

7. If you do not have the Java plugin loaded, you can Copy and Paste the informationby selecting the certificate information in the Export Certificate panel and copyingand pasting the information into another file.
8. If you have the Java plugin loaded, you can click the Save button.
70 SunScreen 3.2 Administration Guide • December, 2001

The Save CA request to a file panel appears. Type the file name for where to save theexported certificate.
� To Import an IKE CertificateWhen you import an IKE certificate, the process explicitly creates an object andassociates that object with imported certificate. You do not need to manually do anassociate for the imported IKE certificate. The procedure “To Associate an IKECertificate” on page 73 is typically used when you have added an IKE certificatefrom the command line.
1. Execute the steps in “To Modify the Policies Associated with a Common Object”on page 37.
Working With Common Objects 71

2. Select Certificate from the Type list.
3. Select Import IKE Certificate from the Add New Object selection list.
4. The IKE Certificate panel appears.
5. Type a name in the Name field.
6. (Optional) Type a description in the Description field.
7. Select the Screen from the Screen list.
8. Select the machine where the certificate will be installed from the Installed on list.
9. If you have the Java plugin loaded, click the Browse button beside the PEM Base64or BER ASN.1 File field to bring up a panel that you can use to navigate to the filethat contains the certificate.
10. If you do not have the Java plugin loaded, click the radio button beside the Paste inPEM Base64 Text: which enables the area where you can paste in the certificate
72 SunScreen 3.2 Administration Guide • December, 2001

information that you have copied from another file.
11. Click the Install Certificate button to import and install the certificate.
12. Go to “To Work with IKE Certificate Groups” on page 85 to add the IKE certificateto either an IKE root CA certificate group or to an IKE manually verified certificategroup.
� To Associate an IKE CertificateThis procedure is typically used when you have added an IKE certificate using thecommand line interface.
1. Execute the steps in “To Modify the Policies Associated with a Common Object”on page 37.
2. Select Certificate from the Type list.
3. Select Associate IKE Certificate from the Add New Object selection list.
The associate IKE certificate panel opens.
Working With Common Objects 73

4. Type a name in the Name field.
5. (Optional) Type a description in the Description field.
6. Select the Screen from the Screen list.
7. Select the machine where the IKE certificate will be installed from the Installed onlist.
8. Type an X.509 distinguished name for the certificate subject in the DistinguishedName field. The distinguished name typically has the form of C=Country,O=Organization, OU=Organizational_Unit, and CN=Common_Name.
9. Go to “To Work with IKE Certificate Groups” on page 85 to add the IKE certificateto either an IKE root CA certificate group or to an IKE manually verified certificategroup.
� To Generate SKIP UDHs Certificates
Note – Use the Installed On field in the Certificate dialog box to choose the Screenwhere you want to add the certificate to the SKIP database. The default choice is theScreen to which users are connected. This is the choice you should use if you are usingcentralized management groups.
Self-generated private keys use the SKIP NSID 8, signifying that the public value forthat key has not been signed. To validate the public value, the hash of the public valueassociated with that private key is used as the certificate ID. When the certificate is
74 SunScreen 3.2 Administration Guide • December, 2001

added either manually or through Certificate Discovery Protocol (CDP), you cancertify the public value by comparing the hash of the public value in the certificate tothe certificate ID. Unsigned Diffie-Hellman certificates are described in theSunScreen 3.2 Administrator’s Overview.
1. Execute the steps in “To Modify the Policies Associated with a Common Object”on page 37.
2. Select Certificate in the Type list.
3. Select Generate SKIP UDH in the Add New Object list.
Working With Common Objects 75

The Certificate dialog box is displayed.
The following table describes the controls for the Certificate dialog box for generateScreen certificate.
TABLE 2–10 Controls for the Certificate Dialog Box for Generate Screen Certificate
Control Description
Name Specifies a name for the certificate.
Description (Optional) Provides a brief description about the certificate object.
Screen Specifies the Screen that recognizes the certificate object. The default isAll.
Installed On (Optional) Specifies the Screen on which the certificate is generated.
Radio buttons Specifies the strength of encryption that the Screen uses.
Generate NewCertificate
Generates the certificate. The Certificate ID field displays the certificate’scertificate ID.
OK Button Stores the new or changed information and makes the Save Changescommand button active.
Cancel Button Cancels any new or changed information.
76 SunScreen 3.2 Administration Guide • December, 2001

TABLE 2–10 Controls for the Certificate Dialog Box for Generate Screen Certificate(Continued)Control Description
Help Button Calls up the page of online help for this common object.
4. Type a name in the Name field.
5. (Optional) Type a description in the Description field.
6. (Optional) Select the Screen from the Screen list.
7. (Optional) Select the name of the Screen on which the Certificate is installed in theInstalled On field.
8. Specify the level of encryption the Screen uses.
Available levels are:
� Highest available� U.S. and Canada (4096)� U.S. and Canada (3072)� U.S. and Canada (2048)� Global (1024)� Global (512)
9. Click the Generate New Certificate button.
The Certificate ID field displays the Certificate ID.
10. Click the OK button.
� To Load a SKIP Issued Public or Private Certificate
Note – Because Netscape Navigator and Internet Explorer do not support the Javamechanism for applet signing, the administration GUI cannot access your system’slocal resources. (Browser security mechanisms prevent this type of access to localsystem resources.) See “Accessing Local System Resources” on page 23.
You can add new key pairs and local identities by using a SunScreen Key andCertificate diskette. This type of key and certificate is known as an issued certificate.Certificates are described in “Certificate Object” in SunScreen 3.2 Administrator’sOverview. You also can add new private keys from a directory that contains only oneset of private key and certificate files.
1. Execute the steps in “To Modify the Policies Associated with a Common Object”
Working With Common Objects 77

on page 37.
2. Select Certificate in the Type list.
3. Select Load SKIP Issued Private key or Load SKIP Issued Public key from the AddNew Object list.
The Certificate dialog box appears.
The following table describes the controls for the Certificate dialog box for generateScreen certificate.
78 SunScreen 3.2 Administration Guide • December, 2001

TABLE 2–11 Controls for the Certificate Dialog Box for Generate Screen Certificate
Control Description
Name Specifies a name for the certificate.
Description (Optional) Provides a brief description about the certificate object.
Screen Specifies the Screen that recognizes the certificate object. The default is All.
Installed On (Optional) Specifies the Screen on which the certificate is generated.
Load Certificate Brings up a selection panel where you can identify the location of the filethat contains the certificate.
OK Button Stores the new or changed information and makes the Save Changescommand button active.
Cancel Button Cancels any new or changed information.
Help Button Calls up the page of online help for this common object.
4. Type a name in the Name field.
5. (Optional) Type a description in the Description field.
6. (Optional) Select the Screen from the Screen list.
7. (Optional) Select the Screen the certificate is installed on from the Installed On list.
8. Click the Load Certificate button.
9. In the File dialog box:
Working With Common Objects 79

a. Select the directory of the floppy that contains the certificate files.
b. Select a file with a .crt extension from the Files list.
c. Click the OK button.
The Certificate ID field contains the value.
10. Click the OK button.
� To Associate SKIP CertificateBy associating a certificate, you can assign a name to a certificate that exists on anotherScreen. Associate a certificate ID when you want to encrypt communication betweentwo Screens or between a Screen and an Administration Station.
Note – Self-generated certificates are validated by a telephone call between two peoplewho know each other and recognize each other’s voice.
1. Execute the steps in “To Modify the Policies Associated with a Common Object”on page 37.
2. Select Certificate in the Type list.
80 SunScreen 3.2 Administration Guide • December, 2001

3. Select Associate SKIP Certificate from the Add New Object list.
The Certificate dialog box appears.
The following table describes the controls for the Certificate dialog box for associateSKIP certificate.
TABLE 2–12 Controls for Associate SKIP Certificate Dialog Box
Control Description
Name Specifies the name for the certificate ID object.
Description (Optional) Provides a brief description about the MKID or certificate IDobject.
Working With Common Objects 81

TABLE 2–12 Controls for Associate SKIP Certificate Dialog Box (Continued)Control Description
Screen Specifies which Screen recognizes the certificate ID object. The default is All.Specifying a Screen allows you to define packet-filtering rules that encrypttraffic between any two machines, not just between an AdministrationStation and a Screen. Specify the Screen only if you are using CentralizedManagement. A common object or policy rule applies to all Screens unlessyou choose a specific Screen.
Installed On (Optional) Used only if you later remove this certificate object from thecommon objects. At that time, the SKIP identity that is installed on theScreen will be removed from the parameter.
Certificate ID Specifies the certificate ID (hash value) for the certificate that you generatedon the other system.
OK Button Stores the new or changed information and makes the Save Changescommand button active.
Cancel Button Cancels any new or changed information.
Help Button Calls up the page of online help for this common object.
4. Type a name in the Name field.
5. (Optional) Type a description in the Description field.
6. (Optional) Select the Screen from the Screen list.
7. Select the Screen the certificate is installed on from the Installed On list.
8. Select the type of certificate from the Certificate Type list.
9. Type the Certificate ID (MKID) for the certificate.
10. Click the OK button.
Certificate Groups
� To Add a Certificate GroupAfter you have named certificate, you can group them into logical groups, so that youcan use a group instead of single names in a policy rule..
82 SunScreen 3.2 Administration Guide • December, 2001

There are two special predefined IKE certificate groups. See “To Work with IKECertificate Groups” on page 85 for the steps you need to follow to set up IKEcertificate groups.
1. Execute the steps in “To Modify the Policies Associated with a Common Object”on page 37.
2. Select Certificate in the Type list.
3. Select New Group from the Add New Object list.
The Certificate dialog box appears.
The following table describes the controls in the Certificate dialog box for certificategroup.
Working With Common Objects 83

TABLE 2–13 Controls for Certificate Group Dialog Box
Control Description
Name Specifies the name of the certificate object.
Description (Optional) Provides a brief description about the certificate object.
Screen Specifies which Screen recognizes the certificate object.
AvailableCertificate List
Identifies the certificates that do not belong to the certificate group. Refer to“Services and State Engines” in SunScreen 3.2 Administrator’s Overview for adescription of services.
Include List Identifies the certificates that are to be included in the certificate group.
Exclude List Identifies certificates that are to be excluded from the certificate group.
Add Button Moves the certificate selected in the Available Certificates List to the Includeor Exclude list, making the certificate a member of the specified servicegroup.
Remove Button Moves the certificate selected in the Group Members list to the Include orExclude list, removing the certificate from the specified certificate group.
OK Button Stores the new or changed information and makes the Save Changescommand button active.
Cancel Button Cancels any new or changed information.
Help Button Calls up the page of online help for this common object.
4. Type a name in the Name field.
5. (Optional) Type a description in the Description field.
6. (Optional) Select a Screen from the Screen list.
7. Select an certificate from the Available Certificates list.
8. Use the Add button to move the certificate to the Include list or the Exclude list.
Use the corresponding Remove button to remove certificates from the lists.
9. (Optional) Continue to build the intended certificate group by adding to the Includelists.
10. Click the OK button.
84 SunScreen 3.2 Administration Guide • December, 2001

� To Work with IKE Certificate GroupsThere are two special predefined IKE certificate groups:
IKE manually verified certificates that hold trusted certificates used by IKEIKE root CA certificates that hold root CA certificates used by IKE
1. Execute the steps in “To Modify the Policies Associated with a Common Object”on page 37.
2. Select Certificate in the Type list.
3. Click the Search button.
4. Select either the IKE root CA certificate or the IKE manually verified certificate fromthe results field.
5. Click the Edit button.
6. (For IKE root CA certificate) The IKE root CA certificate panel appears.
Working With Common Objects 85

7. (For IKE root CA certificate) Select the IKE root CA certificate from the AvailableCertificates and click the ADD button to add it to the Include List
8. (For IKE manually verified certificate) The IKE manually verified certificate panelappears.
86 SunScreen 3.2 Administration Guide • December, 2001

9. (For IKE manually verified certificate) Individually select the certificates that havebeen manually verified and click the Add button for each to add them to theInclude List
IPsec KeyThe IPsec Key (also referenced as manual keying) dialog allows you to generate anIPsec key by either manually typing the key value or to use a random numbergenerator to generate the key. The key that is generated by the random numbergenerator is determined by the algorithm used.
Note – IPsec Key cannot be used for remote administration or VPN.
� To Add an IPsec Key1. Execute the steps in “To Modify the Policies Associated with a Common Object”
on page 37.
Working With Common Objects 87

2. Select IPsec Key from the Type list.
3. Select NEW from the Add New Object list.
The IPsec Key dialog appears.
4. Type the name for the IPsec key in the Name field.
5. (Optional) Type a brief description for the IPsec key.
6. Select which Screen recognizes the IPsec key. The default is all.
Note – Typing a Screen name allows you to define packet filter rules that encrypttraffic between any two machines, not just between an Administration Station and aScreen.
7. Select the Key size. The Hex string values you can select are:
DES-CBC 16
3DES-CBC 48
88 SunScreen 3.2 Administration Guide • December, 2001

MD5 32
SHA1 40
8. Manually type a key value to be used for the IPsec key. You should use the abovehex values for proper security. If you type additional hex characters, they arediscarded and the maximum value listed above is used.
9. Alternatively, click the Generate New Key to use the random generator to create theIPsec key.
10. Click the OK button
Screen ObjectsIf you are configuring high availability (HA) or centralized management groups(CMG), you need to add a Screen. For the standalone configuration, you may edit theScreen for adding SNMP or modifying miscellaneous properties.
If you are running in stealth mode or mixed mode (a mix of routing and stealthinterfaces), you must modify the Screen object in order to define the stealth networkand netmask for the network the Screen is subdividing.
Screen Object TabsMost of the work with Screen Objects is done using the 4 tabs on the Screen dialogbox.
Miscellaneous Tab
Working With Common Objects 89

The following table describes the controls for the Miscellaneous tab of the Screendialog box.
TABLE 2–14 Controls for the Miscellaneous Tab of the Screen Dialog Box
Control Description
Name Specifies a name for the screen object.
Description (Optional) Provides a brief description of the screen object.
Log Size Sets the size of the log in megabytes.
Stealth NetworkAddress
Specifies the network address for interfaces that are used as stealthinterfaces. Set this parameter if you have used the interface object todesignate any Screen interfaces as stealth interfaces.
Stealth Netmask Specifies the netmask for interfaces that are used as stealth interfaces. Setthis parameter if you have used the interface object to designate any Screeninterfaces as stealth interfaces.
Allow RoutingTraffic
Specifies whether the Screen sends or receives updates to the routing tableusing the RIP protocol.
Name Service Specifies the name service (DNS, NIS, Both, or None) that the Screen willuse.
90 SunScreen 3.2 Administration Guide • December, 2001

TABLE 2–14 Controls for the Miscellaneous Tab of the Screen Dialog Box (Continued)Control Description
CertificateDiscovery
Specifies whether the Screen uses Certificate Discovery.
OK Button Stores the new or changed information and makes the Save Changescommand button active.
Cancel Button Cancels any new or changed information.
Help Button Calls up the page of online help for this common object.
SNMP TabThe SNMP tab specifies the interval for SNMP timed status indicator traps and youcan add, edit, or delete SNMP trap receivers.
Working With Common Objects 91

Note – Use the Action field of the packet-filtering Rule Definition dialog box to specifyactions that generate SNMP alerts. The machine that receives SNMP trap alerts mustnot be a remote Administration Station.
The following shows the SNMP tab of the Screen dialog box.
The following table describes the controls for the SNMP tab on the Screen dialog box.
TABLE 2–15 Controls for the SNMP Tab of the Screen Dialog Box
Control Description
Name Specifies a name for the Screen object.
Description (Optional) Provides a brief description of the Screen object.
SNMP timerinterval (inminutes)
Specifies in minutes when an SNMP trap is emitted. Specifying a time hereturns on the timed status indicator. Specify the time in 1-minute increments.If you do not set the interval as part of the screen object’s SNMP_TIMER,these traps are not sent. You cannot configure this trap.
SNMP Receivers Displays the list of SNMP receivers. You are limited to five receivers.
92 SunScreen 3.2 Administration Guide • December, 2001

TABLE 2–15 Controls for the SNMP Tab of the Screen Dialog Box (Continued)Control Description
Add/Delete(Name/IPaddress)
1. Specifies the name or the IP address of the SNMP receiver that you wantto add to list when you click the Add button.
2. Specifies the name or the IP address of the SNMP receiver that you wantto delete when you click the Delete button.
Add Adds the SNMP receiver specified in the Add/Delete (Name/IP address)field to the list of SNMP receivers shown in the SNMP Receivers field.
Delete 1. Deletes the SNMP receiver specified in the Add/Delete (Name/IPaddress) field from the list of SNMP receivers shown in the SNMPReceivers field.
2. Deletes the SNMP receiver highlighted in the SNMP Receivers field.
OK Button Stores the new or changed information and makes the Save Changescommand button active.
Cancel Button Cancels any new or changed information
Help Button Calls up the page of online help for this common object.
The following SNMP traps are supported:
� As an action on a packet that matches a particular rule� As a default drop action on an interface� Time status indicator traps
The first two types include the following data:
� interface – The SunScreen network interface number on which the packet wasreceived.
� interfaceName – The SunScreen network interface name on which the packetwas received.
� errorReason – The reason the alert was generated. (See the sunscreen.mib filefor a complete list of reasons.)
� packetLength – The actual length of the packet in bytes.
� lengthLogged – The length of the data logged in bytes.
� packetData – The packet data.
The SNMP timed status indicator trap uses the same receivers database as other typesof SNMP traps. There is only one database with a maximum of five receivers. Thesereceivers are specified as variable to the screen object.
To activate the timed status indicator traps, set the SNMP timer interval.
The following data are in the SNMP timed status indicator. These data cannot bemodified and new data cannot be added:
Working With Common Objects 93

� cpuUsage – Average percentile CPU usage
� memoryAvail – Current swap space available, in kilobytes
� swapIn – Current swap ins
� swapOut – Current swap outs
� scanRate – Current scan rate
� tcpUsage – Current number TCP connections in the SunScreen state table
� ipUsage – Current number IP connections in the SunScreen state table
� udpUsage – Current number UDP connections in the SunScreen state table
� rootUsage – Disk usage of the root partition, /
� varUsage – Disk usage of the var partition, /var
� etcUsage – Disk usage of the etc partition, /etc
� tmpUsage – Disk usage at the tmp partition, /tmp
Only these SNMP traps are supported. No get or set operations are supported.
Primary/Secondary TabThe Primary/Secondary tab associates a certificate object with a Screen that is part ofan HA cluster or a CMG. The High Availability choice (No, Primary, or Secondary)and the Primary Name choice determine the role a Screen has within an HA clusterand centralized management group (CMG). The settings you choose determine whichother controls on the Primary/Secondary tab are active.
The following table describes the controls for the Primary/Secondary tab.
94 SunScreen 3.2 Administration Guide • December, 2001

TABLE 2–16 Controls for the Primary/Secondary Tab of the Screen Dialog Box
Control Description
Name Specifies a name for the Screen object.1. The entry in the Name field must be the same as the entry that exists in
the nameservice lookup or in the /etc/hosts file. The IP addressassociated with this name must match the IP address of theadministrative interface.
2. The type of interfaces must be the same on all the machines in the HAcluster. This interface must be dedicated on each machine in the HAcluster with a dedicated network connection. For reasons of security, theHA network should not be connected to any other network. The HAprimary Screen is always the Screen you administer whether it is theactive or passive Screen.
Description (Optional) Provides a brief description of the Screen object.
HighAvailability
Specifies whether the Screen is used for HA. If you are using it for HA, youcan specify whether the Screen is a primary HA Screen or a secondary HAScreen.
Primary Name Specifies the name of the primary Screen. This is the primary of this Screenif this Screen is an HA secondary, or the primary of a centralizedmanagement group if you want this Screen to be a CMG secondary.
AdministrativeIP
IP address of the Screen that is used for administration. This is the IPaddress or an address group that contains all interface addresses of theScreen.
AdministrationCertificate
Specifies the name of the Screen’s Administration certificate (SKIP/IKE).
HighAvailability IPAddress
Specifies the IP address of the HA interface.
EthernetAddress
Generated by the system.
SKIP Parameters � Specifies SKIP Key, Data, and MAC algorithms.
IKE Parameters � Specifies IPSEC, AH, and ESP algorithms along with IKE options andalgorithyms.
OK Button Stores the new or changed information and makes the Save Changescommand button active.
Cancel Button Cancels any new or changed information.
Help Button Calls up the page of online help for this common object.
Working With Common Objects 95

Mail Proxy TabThe Mail Proxy tab allows adding, editing, or deleting domains known to distributeunsolicited electronic mail (spam). You can define spam domains if you use an SMTPproxy.
The following table describes the controls for the Mail Proxy tab of the Screen dialogbox.
TABLE 2–17 Controls for the Mail Proxy Tab of the Screen Dialog Box
Control Description
Name Specifies a name for the Screen object.
Description (Optional) Provides a brief description of the Screen object.
Spam Domains Lists the domains that are distributing unsolicited electronic mail.
Add/DeleteHost
1. Specify the domain that you want to add to the Spam Domains list whenyou click the Add button.
2. Specify the domain that you want to delete from the Spam Domains listwhen you click the Delete button.
96 SunScreen 3.2 Administration Guide • December, 2001

TABLE 2–17 Controls for the Mail Proxy Tab of the Screen Dialog Box (Continued)Control Description
Add Adds the domain specified in the Add/Delete Host field to the list of spamdomains shown in the Spam Domains field.
Delete 1. Deletes the domain specified in the Add/Delete Host field from the listof domains shown in the Spam Domains field.
2. Deletes the domain highlighted in the Spam Domains field.
OK Button Stores the new or changed information and makes the Save Changescommand button active.
Cancel Button Cancels any new or changed information.
Help Button Calls up the page of online help for this common object.
Adding a Screen Object
� To Add a Screen1. Execute the steps in “To Modify the Policies Associated with a Common Object”
on page 37.
2. Select Screen in the Type list.
3. Select New from the Add New Object list.
The Miscellaneous area in the Screen dialog box appears.
4. In the Name field, type the name of the Screen as it appears in the naming serviceor the host file.
5. Type a number in the Log Size (MB) field, to set the total size for log files (thedefault is 100 Mbytes).
6. The Stealth Network Address and Stealth Netmask (of the network the Screen
Working With Common Objects 97

partitions) fields apply only if the Screen has stealth interfaces.
7. Click the Yes or No radio button to allow or deny Destination Address Checking.Destination Address Checking is used for anti-spoofing protection.
8. Click the Yes or No radio button to allow or deny routing traffic (RIP).
9. Click a Name Service radio button to choose the name service that the Screen willrely on to define the host address.
You can also use both DNS and NIS or no name service at all.
10. Click the Yes or No radio button for Certificate Discovery (SKIP only).
This determines whether the Screen itself is to participate in a certificate discoveryexchange. Selecting Yes, however, does not allow CDP traffic to go through the Screen.
11. Click the OK button.
SNMP Alert ReceiversYou set actions that generate SNMP alerts as part of a security policy. Use the SNMPtab in the Screen dialog box to:
� Add an SNMP trap receiver� Delete an SNMP trap receiver� Set the timer for the timed status indicator
A management information base (MIB) that describes the SNMP trap is included withthe SunScreen CD-ROM, as part of the SUNWsfwau package. It is installed as:/usr/lib/sunscreen/Admin/etc/sunscreen.mib. Load this MIB into yourSNMP manager to enable it to use the SNMP trap generated by the Screen.
Caution – The machine that you want to receive SNMP trap alerts must not be aremote Administration Station. SNMP alert packets are sent in the clear, and thecommunication between the remote Administration Station and Screen is encrypted;any packets sent in the clear are dropped.
The recipients of SNMP messages are controlled on a Screen-by-Screen basis. TheScreen object has a place for an optional list of IP addresses, which are the hosts towhich it sends the SNMP packets.
There are two ways to send SNMP packets:
� Set SNMP in a Packet Filtering rule’s Action� Specify it in the default Reject Action of an interface object
98 SunScreen 3.2 Administration Guide • December, 2001

SNMP alerts are described in “Screen Object” in SunScreen 3.2 Administrator’sOverview.
The following information describes using the administration GUI. For the commandline interface, see Chapter 10.
� To Add an SNMP Alert Receiver1. Execute the steps in “To Modify the Policies Associated with a Common Object”
on page 37.
2. Select Screen in the Type list.
3. Select New from the Add New Object list.
4. Click the SNMP tab in the Screen dialog box.
The SNMP area is displayed.
Working With Common Objects 99

5. Type the name or IP address of the recipient of the SNMP trap in the Name field.
6. Click the Add button.
A list of SNMP alert receivers appears. You can define up to five receivers. SunScreensends each generated alert to all receivers.
7. Click the OK button when you are finished.
Note – You use the SNMP Timer Interval field in the SNMP tab to specify the timeinterval, in minutes, between the health-update packets that are emitted by the Screen.If you do not specify any Alert receivers, no health-update packets are issued.
If you set the SNMP Timer Interval field to zero (or leave it empty) and there are Alertreceivers, no health-update packets are issued, although other SNMP alerts are sent tothe Alert receivers.
� To Delete an SNMP Alert Receiver1. Execute the steps in “To Modify the Policies Associated with a Common Object”
on page 37.
100 SunScreen 3.2 Administration Guide • December, 2001
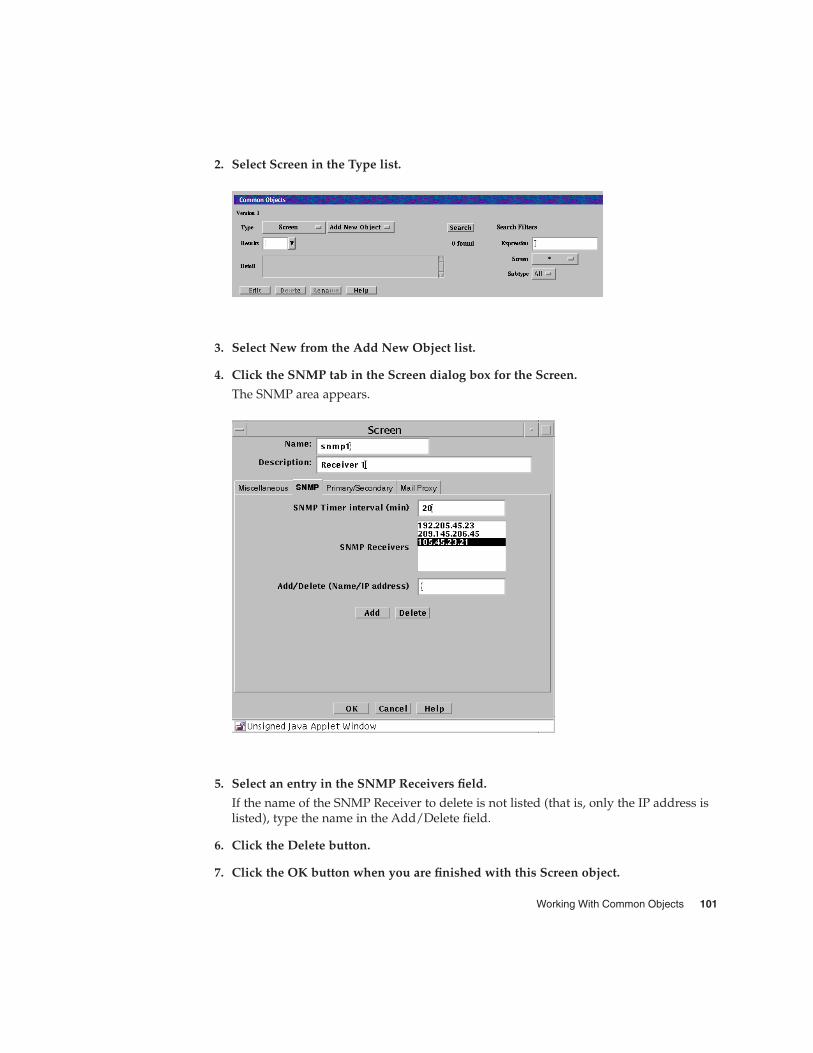
2. Select Screen in the Type list.
3. Select New from the Add New Object list.
4. Click the SNMP tab in the Screen dialog box for the Screen.
The SNMP area appears.
5. Select an entry in the SNMP Receivers field.
If the name of the SNMP Receiver to delete is not listed (that is, only the IP address islisted), type the name in the Add/Delete field.
6. Click the Delete button.
7. Click the OK button when you are finished with this Screen object.
Working With Common Objects 101

Interface ObjectsAn Interface Object represents a network interface that makes one or more IPaddresses accessible to a Screen. Empty address groups for all available networkinterfaces are defined during installation in routing mode. After you complete theinstallation, you can add and remove interfaces, redefine the addressees for thenetwork interfaces, and set up high availability. For an interface to be able to reach adesired set of addresses, you must define one or more address groups and specifywhich address group each interface will use.
Note – If the user wants to use spoof detection, they will need to associate accurateaddress groups with each interface.
For Routing interfaces, there are two types of spoof detection : Complete andIncomplete. On the Interface Definition panel (see “To Add or Edit Interfaces”on page 104), you can set the spoof detection by clicking on the "Spoof Protection"pulldown and making the selection (see “Interface Object” in SunScreen 3.2Administrator’s Overview for information on Complete and Incomplete spoofdetection).
For Stealth interfaces, the type of spoof detection is always set to Complete and is notmodifiable.
The maximum number of stealth interfaces per Screen is 15; however, the number ofrouting interfaces is virtually limitless.
The following table describes the controls for the Interface Definition dialog box.
TABLE 2–18 Controls for the Interface Definition Dialog Box
Control Description
Interface Specifies the interface.
Type Specifies the type of interface. The options are:� ROUTING� ADMIN� DISABLED� HA� STEALTH
Screen Specifies the Screen on which this interface physically resides. If you areusing centralized management, you must complete this field.
Valid Address Specifies the source IP addresses for this interface.
102 SunScreen 3.2 Administration Guide • December, 2001

TABLE 2–18 Controls for the Interface Definition Dialog Box (Continued)Control Description
Spool Protection Specified the level of spoof protection. For Routing interfaces, there are twotypes of spoof detection : Complete and Incomplete (see “Interface Object”in SunScreen 3.2 Administrator’s Overview for information on Complete andIncomplete spoof detection).
Logging Identifies the disposition of a packet, when a packet received on theinterface does not match any rule. The options are:� NONE – Do not log packets.� SUMMARY – Record the first 40 bytes of the packet in the log.� DETAIL – Record the complete packet in the log.
If a packet matches a rule, it is disposed of according to the action for therule it matches.
SNMP Alerts Specifies whether the Screen should issue an SNMP alert message when apacket received on an interface does not match a rule. The options are:� SNMP_NONE – Do not send an SNMP alert message. (This is the
default.)� SNMP – Send an SNMP alert message when a packet received on this
interface is rejected.
If a packet matches a rule, it is disposed of according to the action for therule it matches.
ICMP Action Identifies the ICMP rejection message that is issued if a packet received onthe interface is rejected. In most cases, the Screen rejects packets by sendingan ICMP Destination Unreachable packet with the reject code set asspecified in the ICMP action on the interface.
The one exception is the PORT_UNREACHABLE ICMP action. In this case,the Screen rejects TCP packets by sending a TCP RESET packet and otherpackets by sending an ICMP Destination Unreachable (Port Unreachable)message.
The options for the actions are:� NONE� NET_UNREACHABLE� HOST_UNREACHABLE� PORT_UNREACHABLE� NET_FORBIDDEN� HOST_FORBBIDEN.
If a packet matches a rule, it is disposed of according to the action for therule it matches.
Comment (Optional) Provides a descriptive note about the Interface object.
Working With Common Objects 103

TABLE 2–18 Controls for the Interface Definition Dialog Box (Continued)Control Description
Router IPAddress
(Optional) Specifies the router’s IP address when the type of interface isSTEALTH. This allows packets that have had their destination addresschanged, for example NAT or tunnelling, to be sent to a router. You canspecify as many as five router IP addresses. If you have stealth interfaces,define the router that does the routing for the subnet for at least one ofthem.
OK Button Stores the new or changed information and makes the Save Changescommand button active.
Cancel Button Cancels any new or changed information.
Help Button Calls up the page of online help for this common object.
� To Add or Edit InterfacesBefore adding a new interface, you must define the address group that the interfacewill use in the policy.
Note – Any added interfaces, or edits to interfaces, take effect only when you activatethe policy rule that includes those interfaces.
1. Execute the steps in “To Modify the Policies Associated with a Common Object”on page 37.
2. Select Interface in the Type list.
3. Select New from the Add New Object list beside the Interfaces area.
The Interface Definition dialog box appears.
104 SunScreen 3.2 Administration Guide • December, 2001

4. Type the name of the interface, such as hme0 or qfe1.
Note – Virtual interfaces are not configured in SunScreen. On the physical interface(qe1) needs to be defined, and all associated virtual (logical) interfaces will beprotected.
5. Select the type of interface you want to add, such as ROUTING, ADMIN,DISABLED, HA, or STEALTH, from the Type list.
6. (Optional) Select the name of the Screen you want to add from the Screen list.
7. Select the name of the valid addresses you want to add from the Valid Addresseslist.
8. (Optional) Select the type of logging you want to use from the Logging list.
9. (Optional) Select which SNMP alert to use, if any, from the SNMP Alert list.
10. (Optional) Select the name of the Reject Action you want to use from the ICMPAction list.
11. Click the OK button to save your interface definition.
12. (Optional) Repeat the steps above until you have added all the interfaces yourequire.
Working With Common Objects 105

� To Remove an Interface1. Execute the steps in “To Modify the Policies Associated with a Common Object”
on page 37.
2. Select Interface in the Type list.
3. Select the name of the interface you want to delete from the Type list.
The Detail text area displays information about the interface.
4. Select the name of the Screen from which you want to remove the interface.
5. Click the Delete button.
Note – Any interfaces that you remove with this procedure remain active until youactivate the policy rule that formerly included them. Routing interfaces must beremoved from the operating system, otherwise they will be unprotected on thenetwork.
� To Set up a Routing Interface
Note – In Routing Mode only, before you can configure a new routing interface, youmust first configure it on your system. (Use the documentation for your operatingsystem.) Do not try to do this for stealth interfaces.
1. Execute the steps in “To Modify the Policies Associated with a Common Object”on page 37.
2. Select Interface in the Type list.
106 SunScreen 3.2 Administration Guide • December, 2001

3. Select New in the Add New Object list.
The Interface Definition dialog box appears.
4. Type the name for the interface in the Interface field.
5. (Optional) Type a brief description for the interface.
6. Select ROUTING in the Type field list.
The Interface Definition dialog box changes and the Routing IP Address fields aredisabled and the Address Overlap field is enabled.
Working With Common Objects 107

7. Type the remainder of the information in the fields.
8. (Optional) Select the name of the Screen you want to add from the Screen list.
9. Select the name of the valid addresses you want to add from the Valid Addresseslist.
10. (Optional) Select the type of logging you want to use from the Logging list.
11. (Optional) Select which SNMP alert to use, if any, from the SNMP Alert list.
12. (Optional) Select the name of the reject action you want to use from the ICMPAction list.
13. Click the OK button when finished.
14. Click Save Changes.
� To Set up a Stealth InterfaceThe stealth interfaces have optional router entries. Use these entries to define allaccessible routers on your subnet that can be reached from this interface. These routersare required if your policy uses NAT or tunneling, and recommended otherwise.
108 SunScreen 3.2 Administration Guide • December, 2001

You need to create address groups that accurately reflect all the hosts available fromeach stealth interface, and you must associate these address groups with stealthinterfaces when you define them.
For additional information, see “Routing and Stealth Mode Interfaces” in SunScreen 3.2Administrator’s Overview.
Note – Do not configure any interfaces at the operating system for use as stealthinterfaces with the following exception. Configure one interface for use as an AdminInterface for Remote Administration.
1. Execute the steps in “To Modify the Policies Associated with a Common Object”on page 37.
2. Select Interface in the Type list.
3. Select New in the Add New Object list.
The Interface Definition dialog box appears.
Working With Common Objects 109

4. Type the name for the interface in the Interface field.
5. (Optional) Type a brief description for the interface.
6. Select STEALTH in the Type field list.
The Interface Definition dialog box changes and the Address Overlap field is disabled.
110 SunScreen 3.2 Administration Guide • December, 2001

7. Select the name of the Screen you want to add from the Screen list.
8. Select the name of the valid addresses you want to add from the Valid Addresseslist.
9. Select the type of logging you want to use from the Logging list.
10. Select which SNMP alert to use, if any, from the SNMP Alert list.
11. Select the name of the reject action you want to use from the ICMP Action list.
12. Type the Router IP Addresses
13. Click the OK button when finished.
14. Click Save Changes.
� To Change an Admin Interface From the LocalConsoleIf you want to upgrade an existing admin interface or if an existing admin interface isdefective, you can change the admin interface on the local console as follows:
1. Execute the steps in “To Modify the Policies Associated with a Common Object”
Working With Common Objects 111

on page 37.
2. Select Interface in the Type list.
3. Select New from the Add New Object list
The Interface Definition dialog box appears.
4. Fill in the information making sure to select Admin in the Type field.
5. Click OK.
6. Select Screen from the Type List
7. Click Search to see the list of screens
8. Select the screen and click Edit.
112 SunScreen 3.2 Administration Guide • December, 2001

The screen dialog box appears.
9. Select Primary/Secondary.
10. In the Administration IP Address field, either select “*” or the name of the address
Working With Common Objects 113

object. The address object is set by selecting Address in the Type list and thenselecting New Host and filling in the IP address for the address object.
11. Save and activate the changes.
12. Thoroughly test the new admin interface.
13. Follow the steps in “To Remove an Interface” on page 106 to remove the old admininterface once you are satisfied with the new admin interface.
14. Save and activate the changes.
� To Change an Admin Interface From a RemoteConsole
1. Execute the steps in “To Modify the Policies Associated with a Common Object”on page 37.
2. Select Interface in the Type list.
3. Select New from the Add New Object list
The Interface Definition dialog box appears.
114 SunScreen 3.2 Administration Guide • December, 2001

4. Save and activate the changes.
5. Select Screen in the Type list.
The Screen panel appears.
6. Click Search and then select the screen for which you are changing the admininterface
7. Click Edit
8. Select Primary/Secondary in the Screen dialog box.
The Primary/secondary panel appears.
Working With Common Objects 115

9. Select “*” for the Administration IP Address to allow for testing.
10. Save and activate the changes.
11. Thoroughly test the new admin interface.
12. Reselect Screen from the Type list
13. Select Primary/Secondary in the Screen dialog box.
14. Fill in the fields making sure to select the address object for the new admininterface. The address object is set by selecting Address in the Type list and thenselecting New Host and filling in the IP address for the address object.
15. Save and activate the changes.
16. Thoroughly test the new admin interface.
17. After you are satisfied that the new admin interface is working correctly, follow thesteps in “To Remove an Interface” on page 106 to remove the old admin interface.
Adding Jar Signatures and Jar HashesYou administer the Screen through any browser that supports the Java platform and iscompliant with Java Developers Kit (JDK) 1.1. Because Netscape Navigator andInternet Explorer do not support the Java mechanism for applet signing, the
116 SunScreen 3.2 Administration Guide • December, 2001

administration GUI cannot access your system’s local resources. (Browser securitymechanisms prevent this type of access to local system resources.) See“Administration GUI Browser Requirements” on page 22 for more information.
Jar Signatures and Jar hashes are described in the SunScreen 3.2 Administrator’sOverview.
� To Add a Jar Signature1. Execute the steps in “To Modify the Policies Associated with a Common Object”
on page 37.
2. Select Jar Signature from the Type list.
3. Select New from the Add New list.
The Jar Signature dialog box appears.
The following table describes the controls for the JAR signature dialog box.
Working With Common Objects 117

TABLE 2–19 Controls for the Jar Signature Dialog Box
Control Description
Name Identifies the name of the certificate.
Master Key ID Identifies the certificate ID.
Load JarCertificateButton
Loads the certificate used to authenticate the Java archive. This procedurerequires that your browser can allow local access to files.
OK Button Stores the new or changed information.
Cancel Button Cancels any new or changed information.
Help Button Calls up the page of online help for this common object.
4. Type a name in the Name field.
5. Click the Load Jar Certificate button.
A dialog box appears. Navigate through the paths to find the certificate used to signthe Java archive.
6. Select on the Certificate file.
7. Click the OK button.
118 SunScreen 3.2 Administration Guide • December, 2001

� To Add a Jar HashYou can set up the HTTP proxy to filter Java applets based on the hash value of the Jarfile. The Jar hash object is automatically saved when it is edited or when a new Jarhash object is added. Changes apply immediately and cannot be cancelled.
1. Execute the steps in “To Modify the Policies Associated with a Common Object”on page 37.
2. Select Jar Hash from the Type list.
3. Select New from the Add New button.
The Jar Hash dialog box appears.
The following table describes the controls for the Jar hash dialog box.
TABLE 2–20 Controls for the Jar Hash Dialog Box
Control Description
Name Identifies the name of the certificate.
Master Key ID Identifies the certificate ID.
OK Button Stores the new or changed information.
Working With Common Objects 119

TABLE 2–20 Controls for the Jar Hash Dialog Box (Continued)Control Description
Cancel Button Cancels any new or changed information.
Help Button Calls up the page of online help for this common object.
4. Type the name for this certificate in the Name field.
5. Type the MD5 hash of the Jar archive in the Master Key ID field.
6. Click the OK button.
Proxy UsersProxy users are discussed in Chapter 6.
AuthenticationAuthorized User is a Common Object that provides a way for you to specify whichusers are allowed to use the Telnet, HTTP, and FTP proxy.
The proxy users database depends on information in the authorized users database. Totake full advantage of the user authentication feature of the FTP, HTTP, and Telnetproxies, you must create entries for both authorized users and proxy users. Define auser in the Authorized User area in the Policy Rules page before defining that user asa proxy user. See “Authentication” in SunScreen 3.2 Administrator’s Overview forinformation on the proxy database and the authorized user database.
Also see SunScreen 3.2 Configuration Examples for an example that uses AuthorizedUser and Proxy User.
120 SunScreen 3.2 Administration Guide • December, 2001
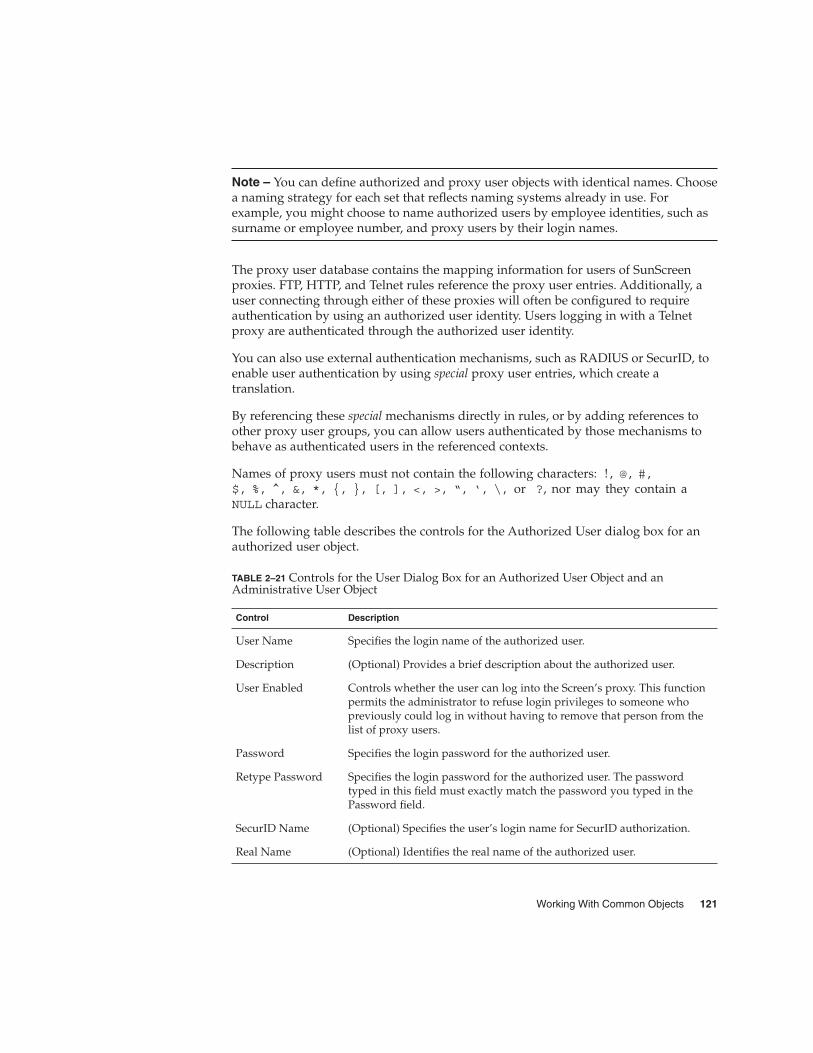
Note – You can define authorized and proxy user objects with identical names. Choosea naming strategy for each set that reflects naming systems already in use. Forexample, you might choose to name authorized users by employee identities, such assurname or employee number, and proxy users by their login names.
The proxy user database contains the mapping information for users of SunScreenproxies. FTP, HTTP, and Telnet rules reference the proxy user entries. Additionally, auser connecting through either of these proxies will often be configured to requireauthentication by using an authorized user identity. Users logging in with a Telnetproxy are authenticated through the authorized user identity.
You can also use external authentication mechanisms, such as RADIUS or SecurID, toenable user authentication by using special proxy user entries, which create atranslation.
By referencing these special mechanisms directly in rules, or by adding references toother proxy user groups, you can allow users authenticated by those mechanisms tobehave as authenticated users in the referenced contexts.
Names of proxy users must not contain the following characters: !, @, #,$, %, ^, &, *, {, }, [, ], <, >, “, ‘, \, or ?, nor may they contain aNULL character.
The following table describes the controls for the Authorized User dialog box for anauthorized user object.
TABLE 2–21 Controls for the User Dialog Box for an Authorized User Object and anAdministrative User Object
Control Description
User Name Specifies the login name of the authorized user.
Description (Optional) Provides a brief description about the authorized user.
User Enabled Controls whether the user can log into the Screen’s proxy. This functionpermits the administrator to refuse login privileges to someone whopreviously could log in without having to remove that person from thelist of proxy users.
Password Specifies the login password for the authorized user.
Retype Password Specifies the login password for the authorized user. The passwordtyped in this field must exactly match the password you typed in thePassword field.
SecurID Name (Optional) Specifies the user’s login name for SecurID authorization.
Real Name (Optional) Identifies the real name of the authorized user.
Working With Common Objects 121

TABLE 2–21 Controls for the User Dialog Box for an Authorized User Object and anAdministrative User Object (Continued)Control Description
Contact Information (Optional) Displays information on how to contact the specified user.
OK Button Stores the new or changed information.
Cancel Button Cancels any new or changed information.
Help Button Calls up the page of online help for this common object.
� To Add an Authorized User1. Execute the steps in “To Modify the Policies Associated with a Common Object”
on page 37.
2. Select Authorized User from the Type list.
3. Select New from the Add New button.
The User dialog box appears.
122 SunScreen 3.2 Administration Guide • December, 2001

4. Type the user name in the User Name field.
5. (Optional) Type a description in the Description field.
6. Click the User Enabled button.
7. Define the authorization method by either assigning a password or choosing aSecureID name.
a. (Assign Password) Type a password in the Password field.
If you do this step, you also need to retype the password to confirm it.
b. (SecureID name) Type a SecureID name in the SecurID field.
8. Select the Enabled check box.
9. (Optional) Type a name in the Real Name field.
10. (Optional) Type an email address in the Contact Information field.
11. Repeat these steps until you have added all the authorized users.
12. Click the OK button.
All changes apply immediately.
Working With Common Objects 123

Time ObjectsYou can control the time of day when rules are in effect by defining time objects forthem.
For instance,the following graphic shows use of the time object in a rule that allows all“www” service traffic during the “day” time (where “day” has been defined in theTime dialog box in“To Create Time Objects” on page 124). This rule is applicable onlyfor the time defined, in this case the time specified in a predefined time object.
� To Create Time Objects1. Execute the steps in “To Modify the Policies Associated with a Common Object”
on page 37.
2. Select Time in the Type list.
124 SunScreen 3.2 Administration Guide • December, 2001

3. Select New from the Add New Object list.
The Time dialog box appears.
The following table describes the controls in the Time dialog box.
TABLE 2–22 Controls for the Time Dialog Box
Control Description
Name Specifies a name for the time object.
Description (Optional) Adds a descriptive note about the time object.
Screen Specifies the Screen that recognizes the time object.
Working With Common Objects 125

TABLE 2–22 Controls for the Time Dialog Box (Continued)Control Description
Table for theTime Parameters
Sets the time of day and the day of the week for this time object. Use theAdd button to add a row to the table and the Delete button to remove a rowto the table1. Day column contains a choice list of the days of the week plus
EVERYDAY and *.2. Start Time column contains a choice list of the hours in a day using the
24–hour clock with midnight denoted as 00.3. Time Start column contains a choice list of the minutes in an hour in
5–minute increments.4. End Time column contains a choice list of the hours in a day using the
24–hour clock with midnight denoted as 00.5. End Time column contains a choice list of the minutes in an hour in
5–minute increments.
Add RowButton
Adds a row to the table so that you can set time parameters for this timeobject. To cover more than one day, but less than everyday, add a row foreach day and choose the day that you want for each row
Delete Button Deletes a highlighted entry in the table.
OK Button Stores the new or changed information and makes the Save Changescommand button active.
Cancel Button Cancels any new or changed information.
Help Button Calls up the page of online help for this common object.
4. Type a name in the Name field.
For example: day
5. (Optional) Type a description in the Description field.
For example: Business hours
6. (Optional) Select a Screen from the Screen list.
7. Click Add Row.
8. Set the following:
� Day of the week� Start Time (hr, min)� End Time (hr, min)
9. Click the OK button.
126 SunScreen 3.2 Administration Guide • December, 2001

CHAPTER 3
Creating and Managing Rules
This chapter describes:
� Packet filtering rules
� Viewing and editing the details of an object in the packet filtering table
� Adding, editing, deleting, and reordering rules
� Administrative access rules
� Network Address Translation (NAT)
� Virtual private networks (VPN)
� Verifying a policy
The following information describes the administration GUI. Chapter 10 containsinformation about the command line interface.
The following table list the procedures in this chapter.
TABLE 3–1 Procedures for Managing Rules
Rule Procedure
Packet Filter Rules “To View and Edit the Details of an Object” on page 131
“To Edit a Rule” on page 131
“To Add a New Rule” on page 133
“To Move a Rule” on page 134
“To Delete a Rule” on page 135
127

TABLE 3–1 Procedures for Managing Rules (Continued)Rule Procedure
Administrative AccessRules
“To Add or Change an Administrative Access Rule for LocalAdministration” on page 136
“To Add or Change an Administrative Access Rule for RemoteAdministration” on page 139
“To Specify a SKIP/IPsec/IKE Action on a Remote Access Rule”on page 144
NAT Rules “To Manually Add an ARP Entry” on page 152
“To Define NAT Rules” on page 152
“To Edit the NAT Rules” on page 154
VPN Rules “To Add a VPN Gateway Definition” on page 160
“To Create Packet Filtering Rules for a VPN” on page 164
Packet Filtering Rules
� To Modify Rules1. Choose a policy in the Policies List page.
128 SunScreen 3.2 Administration Guide • December, 2001

2. Click the Edit button.
The Policy Rules page appears.
Creating and Managing Rules 129

To display the controls on a tab, click the tab header. The following table describes thetabs that are available from the Policy Rules panel.
TABLE 3–2 Policy Rules Panel Tabs
Tab Description
Packet Filtering Shows the packet filtering rule or rules.
Administration Access Defines access rules for local administration and remoteAdministration Stations through the administration GUI or thecommand line (see Chapter 10).
NAT (NetworkAddress Translation)
Maps private network addresses to public network addresses.
VPN (Virtual PrivateNetwork)
Maps name, address, certificate, issued certificate (key) algorithm,data algorithm, MAC algorithm, tunnel address, and description.
130 SunScreen 3.2 Administration Guide • December, 2001

� To View and Edit the Details of an Object1. Execute the steps in “To Modify Rules” on page 128.
2. In the packet filtering table, click on the cell that contains the object you want toview or edit.
The dialog box for the chosen object appears.
Note – The packet filtering table does not allow you to click and get a popup menu;you get a pulldpwn where you can select another value.
� To Edit a Rule1. Execute the steps in “To Modify Rules” on page 128.
2. Click the Packet Filtering tab in the Policy Rules area.
3. Select the rule to edit.
4. Click the Edit button.
The Rule Definition dialog box for the selected policy appears.
Creating and Managing Rules 131

5. Edit each field by clicking the down arrow to display the list.
You can add a new address, range of addresses, or list of addresses for both the Sourceand Destination addresses.
Rule Index Assigns a number to a rule. When editing or adding a new rule, bydefault, this field displays a number one greater than the last rule(indicating this rule will be placed at the bottom of the list). If you typea lower number, the new rule is inserted into the specified position inthe list, and the rules currently in the configuration are renumbered.
Screen (Optional) Specifies the Screen for which you want the rule to apply.Select a specific Screen name in this field if you use centralizedmanagement and want a rule to apply to a specific Screen.
Service Identifies the network service or service group to which this ruleapplies.
Source The value to which the source address of a packet is compared. If anasterisk (*) appears, any source address meets the criteria of the rule.
Destination The value to which the destination address of a packet is compared todetermine whether the rule should apply. If an asterisk (*) appears,any destination address meets the criteria of the rule.
Action Displays the action for the rule and permits setting the loggingbehavior. The options are ALLOW, DENY, ENCRYPT, and VPN.
Time Specifies the time object which restricts the applicability of the rule. Ifan asterisk (*) appears, the rule applies at all times.
132 SunScreen 3.2 Administration Guide • December, 2001

Description (Optional) Provides a brief description of the Administrative Accessrule.
6. Click the OK button in the Rule Definition dialog box when you have finishedediting the rule.
7. (Optional) Click the Verify Policy button at the top of the Policy Rules page toensure that you have created a valid policy.
8. Click the Save Changes button to be sure the changes are saved.
Note – Each Save creates a version.
Note – If a filtering rule fails to detect any issued certificate (key) encryptionalgorithms, it may display the following error message:
An error occurred in detecting the Encryption algorithms.
Please check if skipd process is running.
If this occurs, restart the SKIP daemon process with the skipd_restart command.See the “Configuration Editor Reference” in SunScreen 3.2 Administrator’s Overview formore information on the skipd_restart command.
� To Add a New Rule1. Execute the steps in “To Modify Rules” on page 128.
2. Click the Add New Rule button in the Policy Rules area.
The Rule Definition dialog box for the selected policy appears.
Creating and Managing Rules 133

3. Edit each field by clicking the down arrow to display the list.
4. Click the OK button in the Rule Definition dialog box when you have finishedediting the rule.
5. (Optional) Click the Verify Policy button at the top of the Policy Rules page toensure that you have created a valid policy.
� To Move a Rule1. Execute the steps in “To Modify Rules” on page 128.
2. Select the policy rule to be moved.
3. Click the Move button.
134 SunScreen 3.2 Administration Guide • December, 2001

The Move Rule dialog box appears.
4. Type the number of the rule that you want to move in the From Rule Index field.
5. Type the number of the position to which you want to move the rule in the To RuleIndex field.
6. Click the OK button.
The rules reorder themselves to reflect the change you made. You must move each rulewhose position you want to change.
7. (Optional) Click the Verify Policy button at the top of the Policy Rules page toensure that you have created a valid policy.
Note – Edits do not affect the behavior of the Screen, nor of established connectionswith state entries, until you activate the policy.
� To Delete a Rule
Note – Do not delete all the packet filtering rules or you may lose complete access tothe Screen.
1. Execute the steps in “To Modify Rules” on page 128.
2. Select the rule you want to delete from the table in the Packet Filtering area.
3. Click the Delete button.
The Delete Rule dialog box appears.
Creating and Managing Rules 135

4. Click the Yes button.
Administrative Access RulesYou use administrative access rules to:
� Provide access to the Screen from additional remote Administration Stations
� Provide access for local administration from the administration GUI.
You can add new users that you have created, re-add users for whom new passwordshave been defined, or change SecurID assigned names on the Administrative Accesspage. You can also add an access rule for users and change the encryption parameters.
You must activate a new policy for any changes to take effect.
The fields of the Administrative access rules tab are described in the SunScreen 3.2Administrator’s Overview.
The following information describes using the administration GUI. Chapter 10contains information about the command line interface.
� To Add or Change an Administrative Access Rulefor Local Administration
1. Execute the steps in “To Modify Rules” on page 128.
2. Click the Administrative Access tab to display the Administrative Access area.
136 SunScreen 3.2 Administration Guide • December, 2001

3. Click the Add New Rule button, or Edit button, below the Access Rules for GUILocal Administration area.
Creating and Managing Rules 137

The Local Access Rules dialog box appears.
The following table describes the controls for the Local Access Rules dialog box.
TABLE 3–3 Controls for the Local Access Rules Dialog Box
Control Description
Rule Index Assigns a number to a rule. By default, this field displays a number onegreater than the last rule (indicating this rule will be placed bottom of thelist). If you type a lower number, the new rule is inserted into the specifiedposition in the list, and the rules currently in the configuration arerenumbered.
Description (Optional) Provides a brief description of the Administrative Access rule.
Screen (Optional) Specifies the Screen for which you want the rule to apply. Type aspecific Screen name in this field if you use centralized management andwant a rule to apply to a specific Screen. The default All applies to allScreens.
138 SunScreen 3.2 Administration Guide • December, 2001

TABLE 3–3 Controls for the Local Access Rules Dialog Box (Continued)Control Description
User Lists the user names of SunScreen administrators. Use the names that youdefined for the Administrative User object.
Access Level Specifies what actions the designated user can perform.1. ALL – Allows the administrator to display and modify all setting for the
Screen.2. WRITE – The administrator can perform all operations except modifying
the Administration Access rules for any Policy.3. READ – The administrator can view both the Information and Policy.
This level also allows the user to save and clear logs on the informationpage. With this access level users cannot modify any Policy data.
4. STATUS – The administrator can display status information (logs,statistics, status information) but cannot display or modify managementsettings.
5. NONE – The administrator no longer has any access. This switchprevents an administrator who had access from logging in withouthaving to remove that administrator from the database.
� To Add or Change an Administrative Access Rulefor Remote AdministrationIf you are adding an additional remote Administration Station, you must add a rulefor it.
Note – If you change the encryption parameters, make a note of them; they have tomatch the encryption parameters on the remote Administration Station.
1. Execute the steps in “To Modify Rules” on page 128.
2. Click the Administrative Access tab in the Policy Rules area.
Creating and Managing Rules 139
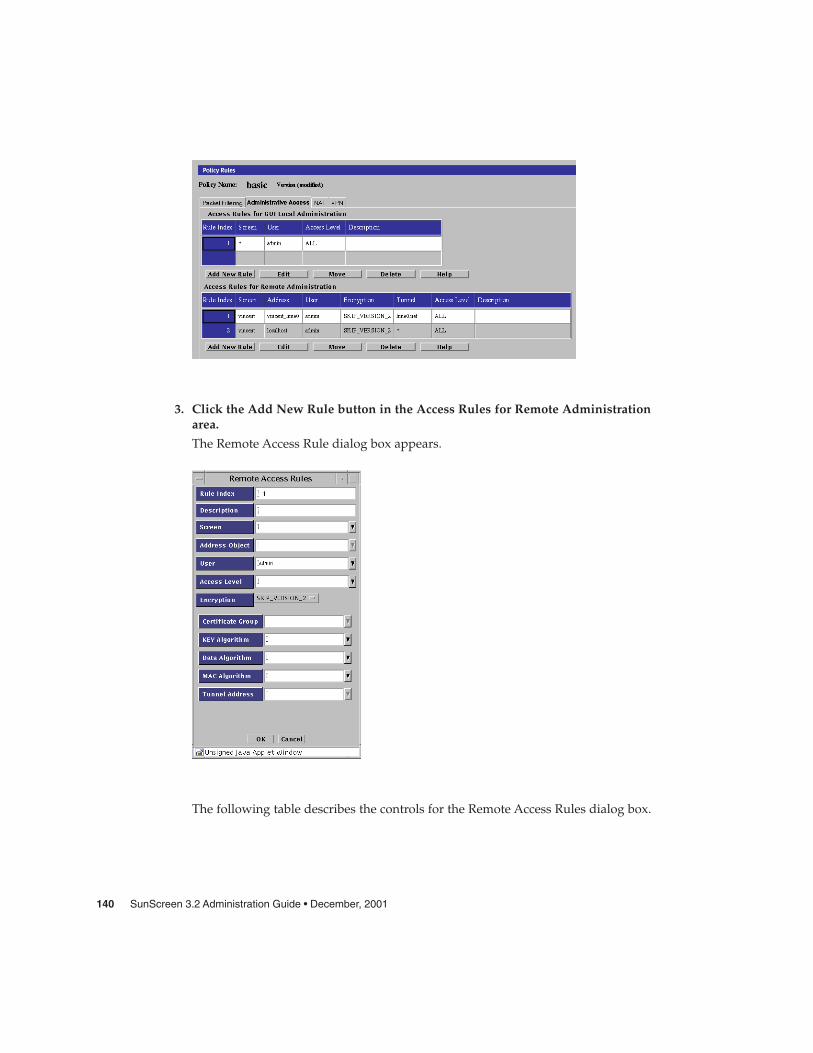
3. Click the Add New Rule button in the Access Rules for Remote Administrationarea.
The Remote Access Rule dialog box appears.
The following table describes the controls for the Remote Access Rules dialog box.
140 SunScreen 3.2 Administration Guide • December, 2001

TABLE 3–4 Controls for the Remote Access Rules Dialog Box
Control Description
Rule Index (Optional) Assigns a number to a rule. By default, this field displays anumber one greater than the last rule (indicating this rule will be placedbottom of the list). If you type a lower number, the new rule is inserted intothe specified position in the list, and the rules currently in the configurationare renumbered.
Description (Optional) Provides a brief description of the remote administrative accessrule.
Screen (Optional) Specifies the Screen for which you want the rule to apply. Type aspecific Screen name in this field if you use centralized management andwant a rule to apply to a specific Screen. The default All applies to allScreens.
Address Object Restricts addresses(es) from which users may initiate a connection..
User Lists the user names of SunScreen administrators. Use the names that youdefined for the Administrative User object.
Access Level Specifies what actions the designated user can perform:1. ALL – The administrator can display and modify all settings for the
Screen.2. WRITE – The administrator can perform all operations except modifying
the Administration Access rules for any Policy.3. READ – The administrator can view both the Information and Policy.
This level also allows the user to save and clear logs on the informationpage. With this access level users cannot modify any Policy data.
4. STATUS – The administrator can display status information (logs,statistics, status) but cannot display or modify management settings.
5. NONE – The administrator does not have access.
Encryption Specifies the type and version of encryption (SKIP or IKE) being used toencrypt traffic between the Screen and the Administration Station.
CertificateGroup
(SKIP only) Specifies the name of the certificate group, which cancorrespond to a single certificate or a certificate group, allowed over thisinterface.
Key Algorithm (SKIP only) Identifies the algorithm used to encrypt traffic-encrypting keys.The algorithms available depend on the strength of encryption (128 bit, or 56bit) that you are using with SunScreen.
Data Algorithm (SKIP only) Identifies the algorithm used to encrypt message traffic betweenthe Screen and the Administration Station. The algorithms available dependon the strength of encryption (128 bit or 56 bit) that you are using withSunScreen.
MAC Algorithm (SKIP only) Identifies the algorithm used to authenticate traffic.
Creating and Managing Rules 141

TABLE 3–4 Controls for the Remote Access Rules Dialog Box (Continued)Control Description
Tunnel Identifies the tunnel address used for the communication between theremote Administration Station and the Screen.
Move button Enables you to assign a new rule index number for the rule that youhighlighted in the Access Rules for Remote Administration panel of theAdministrative Access tab.
Delete button Deletes the access rule that you highlighted in the Access Rules for RemoteAdministration panel of the Administrative Access tab.
Help button Displays the online help.
4. Select the user or group of administration users to which this access rule applies.
5. To associate this entry with a specific Screen, choose a Screen from the Screen list.
Note – If you are using the CMG (centralized management group) feature, and thisfield is left blank or contains an asterisk (“*”), the access rule being defined will, bydefault, allow access to all Screens in the cluster.
6. Select the address you want to use from the Address Object list.
7. Select the type of encryption you want to use from the Encryption list.
To use IPsec IKE, see “To Specify a SKIP/IPsec/IKE Action on a Remote Access Rule”on page 144.
To use SKIP (Simple Key-Management for Internet Protocol), follow these substeps:
a. Select the version of SKIP you want to use from the Encryption list.
Use SKIP_VERSION_1 for communicating with an SPF-100. For later versions,choose SKIP_VERSION_2.
The required fields for SKIP_VERSION_1 are:
� Certificate Group� Key Algorithm� Data Algorithm
The required fields for SKIP_VERSION_2 are:
� MAC Algorithm� Certificate Group� Key Algorithm� Data Algorithm
b. Select the certificate group that you want to use from the Certificate Group list.
142 SunScreen 3.2 Administration Guide • December, 2001
Specify the Screen’s certificate or certificate group (in this case, the certificate orcertificate group that includes the remote Administration Station’s certificate) andadministration IP address in the Screen’s Administration Certificate field.
c. Select the key algorithm that you want to use from the Key Algorithm list.
d. Select the data algorithm you want to use from the Data Algorithm list.
e. (For SKIP_VERSION_2 only) Select the MAC algorithm that you want to usefrom the list of MAC algorithms.
f. (Optional) Select the tunnel address of the remote Administration Station fromthe Tunnel list.
8. Type a description in the Description field.
9. Select the level of access you wish to authorize for this user from the Access Levellist.
There are five access levels for remote administrators:
ALL —The administrator can display and modify all settings for the Screen.
STATUS — The administrator can display status information (logs, statistics,status) but cannot display or modify management settings
READ — The administrator can view both the Information and Policy. This levelalso allows the user to save and clear logs on the information page. With this accesslevel users cannot modify any Policy data
WRITE —The administrator can perform all operations except modifying theAdministration Access rules for any Policy.
NONE (Default) — The administrator does not have access.
10. Click the OK button.
11. Repeat the previous steps until you have added all the access rules for remoteadministration.
12. Click the Save Changes button.
13. Add the Screen’s certificate MKID in the SKIP database of the remoteAdministration Station, and configure it to use SKIP to communicate with theScreen.
Creating and Managing Rules 143

� To Specify a SKIP/IPsec/IKE Action on a RemoteAccess Rule
1. Execute the steps in “To Modify Rules” on page 128.
2. Select the Administration Access tab in the Policy Rules area.
The Administration Access panel appears.
3. Click Add New Rule under the Access Rules for Remote Administration
The Remote Access Rules panel appears.
144 SunScreen 3.2 Administration Guide • December, 2001

4. Select IPSEC IKE from the Encryption pulldown.
The Remote Access Rules panel for IPsec/IKE appears.
Creating and Managing Rules 145

5. (Optional) Type a brief description for this rule.
6. Select the user or group of administration users to which this access rule applies.
7. To associate this entry with a specific Screen, choose a Screen from the Screen list.
Note – If you are using the CMG (centralized management group) feature, and thisfield is left blank or contains an asterisk (“*”), the access rule being defined will, bydefault, allow access to all Screens in the cluster.
8. Select the address you want to use from the Address Object list,
9. Select the level of access you wish to authorize for this user from the Access Levellist.
There are five access levels for remote administrators:
146 SunScreen 3.2 Administration Guide • December, 2001

ALL. Master administrators, who have the access level ALL, grant the variousaccess levels to the other administrators.
STATUS. Status administrators, who have the access level STATUS, can monitorSunScreens, but cannot view the policies.
READ. Local administrators, who have the access level READ, are usersresponsible for reviewing their individual Screen’s policy. Local Administrators areallowed to read policies, but cannot change them; to do so they must make arequest for changes to executive or master administrators.
WRITE. Executive administrators, who have the access level WRITE, can defineand change policies.
NONE (Default—obviously not for remote administrators)
10. If you are using IPsec, follow Step 11 through Step 17. If you are using IKE, followStep 18 through Step 23.
Note – You must complete Step 11 through Step 17 plus Step 18 through Step 23 toperform remote administration for IKE.
11. (IPsec) To define the ESP, click the Edit button.
The ESP Header panel appears.
12. (IPsec) Select the Encryption Algorithm to be used. The options are none, Null,DES, 3DES, BLOWFISH, and AES.
13. (IPsec) Select the Authentication Algorithm to be used. The options are none, MD5,and SHA1.
14. (IPsec) Click the OK button
15. (IPsec) To define the authentication header (AH), click the Edit button.
The AH header appears.
Creating and Managing Rules 147

16. (IPsec) Select the Authentication Algorithm to be used. The options are none, MD5,and SHA1.
17. (IPsec) Click the OK button
18. (IKE) Select the Encryption Algorithm to be used. The options are none, Null, DES,3DES, BLOWFISH, and AES.
19. (IKE) Select the Hash Algorithm to be used. The options are none, MD5, and SHA1.
20. (IKE) Select the Oakley Group. The options are 1, 2, and 5.
21. (IKE) Select the Authentication Method to be used. The options are:
RSA-SIGNATURESRSA-ENCRYPTIONDSS-SIGNATURES
22. (IKE) Select the name of the Source Certificate. You can click on the arrow to see alist of certificates that are defined.
23. (IKE) Click the OK button.
148 SunScreen 3.2 Administration Guide • December, 2001

Network Address Translation (NAT)Rules
Note – You can use NAT with encryption to provide communication in an encryptedtunnel (secure virtual private network). Encryption at the source tunnel address takesplace after the NAT mapping; decryption at the destination tunnel address must takeplace before the NAT translation.
NAT Mapping OverviewYou use the NAT tab to set up mapping rules that translate IP addresses according tospecific rules. These rules interpret the source and destination addresses of incomingIP packets, then translate either the apparent source or the intended destination andsend the packets on. You can map hosts, lists of addresses, ranges of addresses, orspecific groups, depending on what you have configured in your SunScreeninstallation.
The map used during the translation of a packet consists of rules. In general, youwould translate addresses to:
� Ensure that internal addresses appear as registered addresses on the Internet
� Send traffic for a specific destination to a different, predetermined destination
When defining NAT rules, the first rule (lowest number) that matches a packetapplies, and no other rules can apply. Therefore, you might define specific rules first,then broader cases later.
You can define the mappings of internal addresses to external addresses. Use the NATtab in the Policy Rules area of the Policy Rules page to specify the address that is to betranslated to a particular address and to specify static mapping or dynamic mapping.For additional information on NAT, see “Network Address Translation” inSunScreen 3.2 Administrator’s Overview.
All network address translations take place before a packet is tested against any of thescreening rules. In this way, you can define all screening rules using only internaladdresses.
Creating and Managing Rules 149

NAT Administration PageThe meanings and uses of the specific fields in the NAT page are described in thefollowing table.
TABLE 3–5 NAT Page Field Explanations
Field Use
Rule Index Use this field to assign a number to a rule. By default, this field displays anumber that is one greater than the last rule, which indicates the rule isplaced at the end of the list. If you type a specific number, the new rule isinserted into that position in the list, and the rules in the policy areconsequently renumbered.
Screen Use this field to specify the Screen for which you want the rule to apply.Type a specific Screen name in this field if you use Centralized Managementand want a rule to apply to a specific Screen. If a Screen isn’t specified, therule applies for all Screens that are defined.
If Centralized Management is in place, each NAT rule must be associatedexplicitly with the Screen to which it applies.
Mapping � StaticSpecify static mapping to set up a one-to-one relationship between twoaddresses. You can use static mapping to set new apparent IP addressesfor hosts on your network without having to reconfigure each host.
� DynamicSpecify dynamic mapping to map source addresses to other addresses ina many-to-one relationship. You can use dynamic mapping to ensurethat all traffic leaving the firewall appears to come from a specificaddress or group of addresses, or to send traffic intended for severaldifferent hosts to the same actual IP access.
Source Specify the source address to map from an untranslated packet. Sourceaddresses are the actual addresses contained in the packet entering thefirewall.
Destination Specify the destination address for the untranslated packet. Destinationaddresses are the actual addresses contained in the packet entering thefirewall.
TranslatedSource
Specify the translated source address for a packet. The address from whichthe packet appears to originate is the translated source.
TranslatedDestination
Specify the translated destination address for a packet. The translateddestination is the actual address where the packet goes after it leaves thefirewall.
You cannot translate both source and destination addresses; that is, youcannot make packets appear to come from a different IP address andsimultaneously direct the packets to a different destination.
150 SunScreen 3.2 Administration Guide • December, 2001
TABLE 3–5 NAT Page Field Explanations (Continued)Field Use
Description Use this field to provide a description of the rule.
All static NAT rules are unidirectional. They work precisely as defined and are notinterpreted as also applying in the reverse direction. Thus, if you map an internalsource address to an external source address and you want the mapping to apply inthe reverse direction, you must use a second rule to map the external destinationaddress to the internal destination address explicitly.
Dynamic NAT requires only one rule.
Your NAT ScenarioWhen building security policies using NAT, define the security policy rules in terms ofinternal addresses. All packets that are destined for external addresses used in NATmust be routed to the Screen.
Note – If you use static NAT to map a machine’s address, a machine on any othernetwork can initiate traffic to that machine, given a properly defined reverse rule.
In routing mode (unlike stealth mode), the Screen does not automatically answer ARPrequests for destination address. Consequently, the Screen must either route to aseparate network that has a destination address, or a proxy ARP entry must beconfigured manually.
Static NAT is a one-to-one mapping of the internal address to an external address.Dynamic NAT is many-to-one or many-to-few mapping of internal addresses to anexternal address.
For more information on NAT and the possible set up, see “Network AddressTranslation” in SunScreen 3.2 Administrator’s Overview. For an example that uses NAT,see SunScreen 3.2 Configuration Examples manual.
Creating and Managing Rules 151

Note – In cases where NAT will occur between the Administration station and theScreen, do not include the address of a remote Administration Station in any of yourNAT rules.
If Centralized Management is in place, each NAT rule must be associated explicitlywith the Screen to which it applies.
� To Manually Add an ARP Entry� For networks that attach to the Screen on the inside and have NAT mappings
applied, use the following command.
This is recommended for any network on which there are addresses to which youwant to allow public access.
# arp -s IP_Address ether_address pub
You must add this entry each time you reboot the Screen, so you may want to modifya startup script to do this automatically when you reboot.
Note – This entry is not necessary in stealth mode.
The following information describes how to use the administration GUI. Chapter 10contains information about the command line interface.
� To Define NAT RulesWhen you design a static NAT mapping, be sure that the ranges and groups used inthe Source and Translated Source fields and the ranges and groups used in theDestination and Translated Destination fields are exactly the same size.
1. Execute the steps in “To Modify Rules” on page 128.
2. Select the NAT tab in the Policy Rules area.
The Network Address Translation area is displayed.
152 SunScreen 3.2 Administration Guide • December, 2001

3. Click Add New Rule below the Network Address Translation area.
The NAT Definition dialog box is displayed.
4. Select the Screen that should use NAT mapping.
The default is NAT applied to the policies of all Screens.
5. Select all four addresses in the NAT Definition dialog box.
6. Click the OK button.
Creating and Managing Rules 153

7. Repeat the previous steps until you have configured all the rules as required.
8. Click the Save Changes button to save the edited mappings.
You must click the Activate button for the changes take effect.
In most cases, when you define a static mapping, the internal address and externaladdress are both single addresses.
� To Edit the NAT Rules1. Execute the steps in “To Modify Rules” on page 128.
2. Select the NAT tab in the Policy Rules area.
The Network Translation area appears.
3. In the Mapping field, select the mapping on the table that you want to edit.
4. Click the Edit button below the Network Address Translation area.
The NAT Definition dialog box for that mapping appears.
154 SunScreen 3.2 Administration Guide • December, 2001
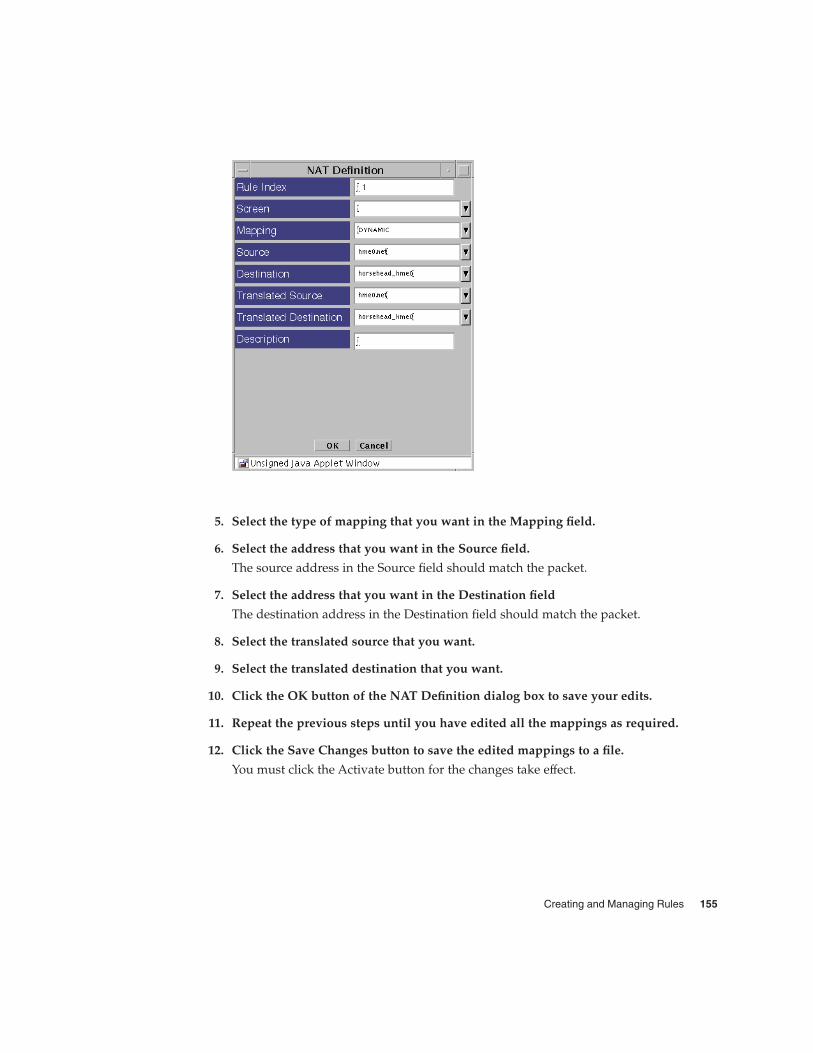
5. Select the type of mapping that you want in the Mapping field.
6. Select the address that you want in the Source field.
The source address in the Source field should match the packet.
7. Select the address that you want in the Destination field
The destination address in the Destination field should match the packet.
8. Select the translated source that you want.
9. Select the translated destination that you want.
10. Click the OK button of the NAT Definition dialog box to save your edits.
11. Repeat the previous steps until you have edited all the mappings as required.
12. Click the Save Changes button to save the edited mappings to a file.
You must click the Activate button for the changes take effect.
Creating and Managing Rules 155

Example: Static NAT of a Host to a HostThe following example translates the address of laguna to nathost for alldestination addresses for all outgoing traffic.
Example: Reverse RuleThe following example translates the address nathost to laguna for all sourceaddresses for all incoming traffic.
Note – Although one-way communication is allowed, and one of these rules may beused without the other, it is more common to use both together.
156 SunScreen 3.2 Administration Guide • December, 2001

Example: Dynamic Translation of a Range OfAddresses to One HostIn the following example, the translation occurs only when the destinations matchwhat is in the internet address group. If the address is not in this group, the sourceaddress cannot be translated.
Creating and Managing Rules 157

Virtual Private Network (VPN) RulesTypically, companies use a virtual private network (VPN) when they have offices withnetworks in more than one location. Usually, those companies want to use anencrypted tunnel through public networks for a secure connection between their ownlocations or to connect securely with partners. This strategy avoids the need fordedicated lines or any changes to user applications.
You can use a Screen as a VPN gateway on behalf of systems or networks that residebehind the firewall. The Screen then encrypts and encapsulates all packets before theyare sent over the Internet. The content of each packet remains private until it arrives atthe remote location. Anyone capturing packets between locations will only seeencrypted, unreadable packets.
A VPN also enables a site to conceal the details of its own network topology byencrypting the original packets (including their IP headers) and creating new IPheaders using addresses specified by the VPN gateway (called tunnel addresses).When these packets arrive at the remote location, the new IP headers are removed.Then, once decryption takes place, the original headers are restored so the packets canreach their intended destination.
VPN Rules are a convenience that allows you to easily define and reference a largenumber of systems or networks using a single VPN name. First, you create VPN ruleswhich define your VPN endpoints and give the definition for a VPN name. Then, youuse the VPN name as part of a Packet Filtering rule with the VPN action. This methodis particularly convenient where you are referencing groups of networks as opposed togroups of systems. Then, if the topographical details of a network changes, you onlyhave to modify the related VPN rules and not the Packet Filtering rules. Since youonly need one certificate for each VPN rule, certificate management is much easier.
Note – SunScreen provides another option for creating a VPN gateway: Use theENCRYPT action on Packet Filtering rules. In this scenario, you define the encryptedVPN endpoints as part of a regular Packet Filtering rule. The VPN endpoints typicallyare single systems although you can define multiple endpoints using Address rangesand groups. This method provides an easy way to accommodate requests forencrypted access between a few systems
See the SunScreen 3.2 Configuration Examples manual for detailed examples of usingVPN rules.
158 SunScreen 3.2 Administration Guide • December, 2001

Before You BeginBefore you configure a VPN, you must complete several preliminary tasks:
� Install the SunScreen software on all Screens involved in the VPN.
For detailed information on Screen installation, refer to the SunScreen InstallationGuide.
Note – Each Screen must have its own local certificate.
If you install a Screen with remote administration, this certificate is generatedautomatically. If not, refer to “To Generate SKIP UDHs Certificates” on page 74 fordetails on how to create this certificate if you are using SKIP or to “To Generate anIKE Certificate” on page 67 if you are using IKE.
� Add a certificate object to each Screen for every other Screen in the VPN.
For more information on adding certificates, refer to “To Associate SKIPCertificate” on page 80 if you are using SKIP or to.“To Associate an IKE Certificate”on page 73 if you are using IKE.
� Create Address objects (host, group, or range) on each Screen for any address inthe VPN, including an Address object for each Screen as well.
Refer to “Address Objects” on page 59 for more information.
Once you successfully complete these tasks, set up the VPN by defining VPNgateways and creating packet filtering rules as described in the following sections.
Configuring a VPNTo define the systems that are taking part in a particular VPN, you need to create aVPN gateway for each Screen involved in the VPN. You create these gatewaydefinitions by using the VPN tab in the Policy Rules area of the Policy Rules page.
Each VPN gateway definition associates a particular certificate with a set of hosts thatare protected by that gateway. The protected hosts will have traffic protected by thatcertificate and its private key.
Creating and Managing Rules 159
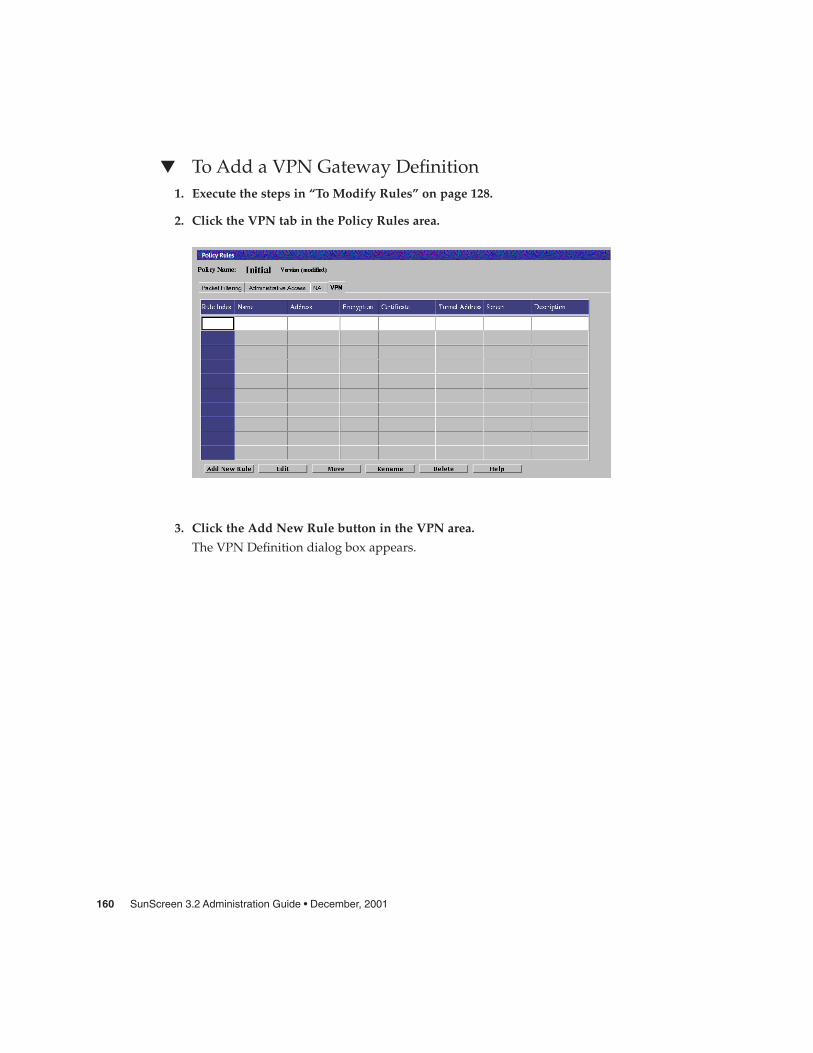
� To Add a VPN Gateway Definition1. Execute the steps in “To Modify Rules” on page 128.
2. Click the VPN tab in the Policy Rules area.
3. Click the Add New Rule button in the VPN area.
The VPN Definition dialog box appears.
160 SunScreen 3.2 Administration Guide • December, 2001

The following table describes the controls in the VPN Definition dialog box fordefining VPN gateways.
TABLE 3–6 Controls in the VPN Definition Dialog Box
Control Descriptions
Rule Index (Optional) Assigns a number to a rule. By default, this field displays anumber one greater than the last rule (indicating this rule will be placed theend of the list). Typing a lower number inserts the new rule into thespecified position in the list and renumbers the rules currently in theconfiguration. Rules take effect in order.
Name Specifies the Name of the VPN to which this gateway belongs. Type thesame name in the Name field for each gateway that is in the VPN.
Description (Optional) Provides a short description of the VPN gateway.
Address Specifies the addresses to be protected by this VPN gateway.
Encryption Specifies the type of encryption. Select either SKIP or IPsec IKE.
Certificate Specifies the name of the certificate for this VPN gateway.
Key Algorithm (SKIP only) Specifies the secret (key) algorithm the VPN uses. All gatewaysin the same VPN must use the same (key) algorithm.
Creating and Managing Rules 161

TABLE 3–6 Controls in the VPN Definition Dialog Box (Continued)Control Descriptions
Data Algorithm (SKIP only) Specifies the data algorithm the VPN uses. All gateways in thesame VPN must use the same data algorithm.
MAC Algorithm (SKIP only) Specifies the MAC algorithm the VPN uses. All gateways in thesame VPN must use the same MAC algorithm.
Tunnel Address (SKIP only) Specifies the destination address on the outer (unencrypted) IPpacket to which tunnel packets are sent.
4. In the Name field, type the name of the VPN to which the gateway belongs.
Type the same name for each gateway to be included in the VPN.
5. (Optional) Type a description of the VPN gateway in the Description field.
6. In the Address field, select the addresses to be protected by this VPN gateway.
7. Select the encryption type. If you select IPSEC IKE, the following panel appears.Go to Step 13 below for the IPsec IKE definitions
8. In the Certificate field, select the gateway’s Certificate ID.
9. In the Key Algorithm field, select the key algorithm (or “none”) to be used by theVPN.
All gateways in the same VPN must use the same key algorithm.
10. In the Data Algorithm field, select the data algorithm (or “none”) to be used by theVPN.
All gateways in the same VPN must use the same data algorithm.
11. In the MAC Algorithm field, select the MAC algorithm (or “none”) to be used bythe VPN.
All gateways in the same VPN must use the same MAC algorithm.
12. In the Tunnel Address field, select the tunnel address to be used by the VPN.
13. If you selected IPSEC IKE for encryption, you can select the algorithms to be usedas follows:
162 SunScreen 3.2 Administration Guide • December, 2001

a. Click the ESP Edit button to define the ESP header encryption andauthentication algorithms.
b. Click the AH Edit button to define authentication headers.
Creating and Managing Rules 163

c. Select the Encryption Algorithm for IKE. The options are none, null, DES, 3DES,BLOWFISH, or AES.
d. Select the Hash Algorithm. The options are MD5 or SHA1.
e. Select the Oakley Group. The options are 1, 2, or 5.
f. Select the Authentication Method. The options are RSA-SIGNATURES, orDSS-SIGNATURES.
g. Select the Source Certificate. Click the arrow to see a list of available IKEcertificated.
14. Click the OK button.
Note – Repeat Step 3 through Step 14 to define a VPN gateway for each Screen in theVPN. To make sure they are all included in this particular VPN, be sure to give all ofthem the same VPN name.
� To Create Packet Filtering Rules for a VPNTo use the VPN you have defined by creating VPN gateways, perform the followingsteps to add packet filtering rules:
1. Execute the steps in “To Modify Rules” on page 128.
2. Click the Packet Filtering tab of the Policy Rules area.
164 SunScreen 3.2 Administration Guide • December, 2001

3. Click the Add New Rule button at the bottom of the rules.
Creating and Managing Rules 165

The Rule Definition dialog box appears.
4. Type the information into the fields as desired.
You may use the asterisk, or wildcard, character (“*”) in the source and destinationfields. Using a wild card will check all traffic to see if it is part of the specified VPN.
Select VPN in the action field. When the Action Details dialog box requires a VPN,select the name of the VPN used when defining the VPN gateways.
166 SunScreen 3.2 Administration Guide • December, 2001

The one VPN-based rule will then generate all the VPN gateway pair-wise rules sothat the hosts at each site can communicate with each other securely. Any host thatcannot be secured (for example, if it is not protected by a VPN gateway) will not beallowed to communicate by the VPN-based rule. You can create a rule that allows thatparticular host to communicate, but you must set that up separately and explicitly.
5. Click the OK button for both the Action Details and the Add Rule dialog boxes.
Note – If you did not use “*” for source, destination, and service, repeat steps 2through 4 for any additional rules. You must add VPN rules for each Screen that ispart of the VPN.
Creating and Managing Rules 167

168 SunScreen 3.2 Administration Guide • December, 2001

CHAPTER 4
Creating and Managing Policies
This chapter describes:
� Viewing the Policies List page� Working with policies� Adding, copying, renaming, and verifying a policy� Deleting a policy� Backing up all policies� Restoring all policies� Leaving an administration session� Unlocking a policy� Saving policy changes� Canceling policy changes� Activating a policy
The following table list the procedures in this chapter.
TABLE 4–1 Working With Policies
Policy Action “To Work with Policies” on page 171
“To Edit a Policy” on page 172
“To Add a New Policy” on page 173
“To Copy a Policy” on page 174
“To Rename a Policy” on page 175
“To Delete a Policy” on page 176
“To Verify a Policy” on page 177
“To Back Up All Policies” on page 179
“To Restore All Policies” on page 181
169

TABLE 4–1 Working With Policies (Continued)Policy Locks “To Leave an Administration Session” on page 183
“To Unlock a Policy” on page 183
“To Forcibly Clear the Lock” on page 184
Activating Policies “To Save Changes” on page 184
“To Cancel Policy Changes” on page 186
“To Activate a Policy” on page 186
Working With PoliciesTo reach the Policies List page, you can either choose Manage Policies for the SelectTask field on the Login page before you click the Login button, or click the Policiesbutton on the administration GUI’s navigation bar.
170 SunScreen 3.2 Administration Guide • December, 2001

� To Work with Policies1. Select a policy in the Policies List page.
2. Click the Edit button.
The Policy Rules page appears.
Creating and Managing Policies 171

Editing Policies
� To Edit a PolicyYou can edit any policy to which you have WRITE access except the currently activepolicy. This policy is a READ ONLY copy of a policy that lets you view the rulescurrently in use by the firewall. The actual editable version of the currently activepolicy is available through the list of policies on this page.
When you installed SunScreen, a policy named Initial was created, containingenough information for you to start administering the Screen. You can work with thispolicy or create another policy and set it to be the currently active policy.
172 SunScreen 3.2 Administration Guide • December, 2001

Note – Logging in as a user with an access level of ALL or WRITE puts you into asession. If you make changes to a policy, you cannot log out of the session until youeither save or cancel those changes.
� Select a policy in the Policies List page.
Note – The View button appears if the policy you chose can only be read in read-onlymode (for example, the Currently Active policy in the first row, and the policyversions in the Version column). See the SunScreen 3.2 Administrator’s Overview formore information on policy types.
� To Add a New Policy1. Select a policy in the Policies List page.
Creating and Managing Policies 173
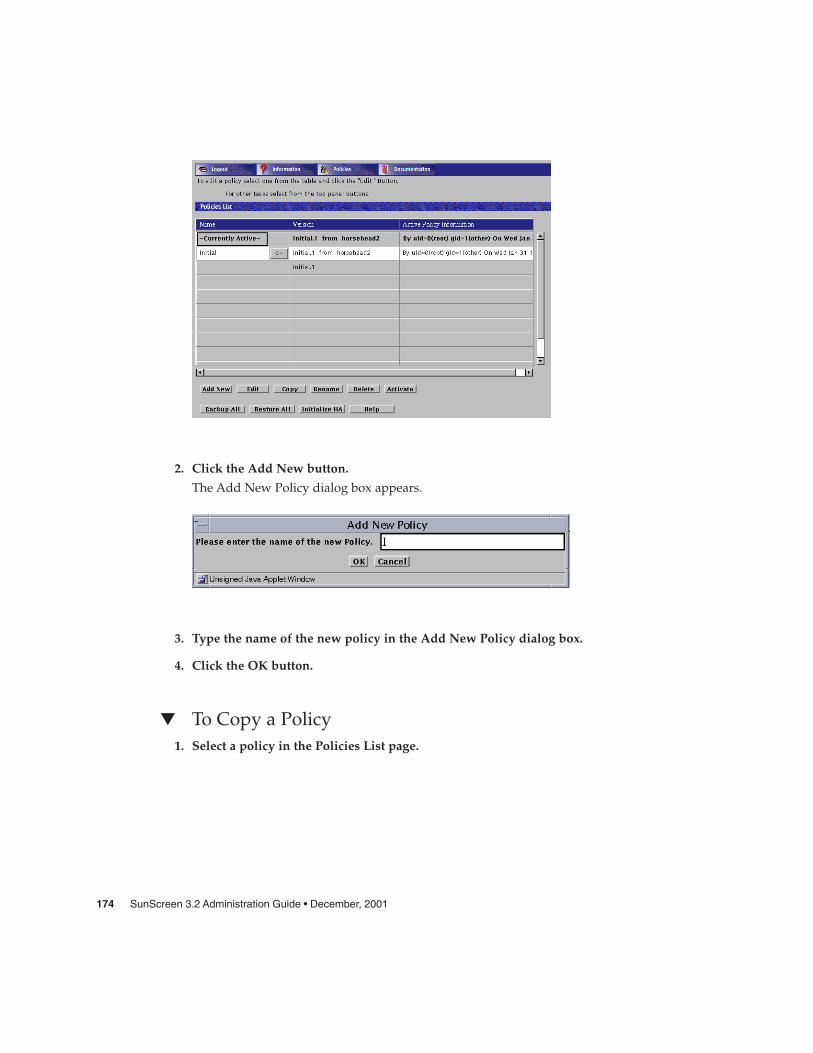
2. Click the Add New button.
The Add New Policy dialog box appears.
3. Type the name of the new policy in the Add New Policy dialog box.
4. Click the OK button.
� To Copy a Policy1. Select a policy in the Policies List page.
174 SunScreen 3.2 Administration Guide • December, 2001

2. Select the policy you want to copy.
3. Click the Copy button.
The Copy dialog box appears.
4. Type the name of the new policy in the Copy dialog box.
5. Click the OK button.
� To Rename a Policy1. Select a policy in the Policies List page.
Creating and Managing Policies 175

2. Select the policy you want to rename.
3. Click the Rename button.
The Rename dialog box appears.
4. Type the name of the new policy in the Rename dialog box.
5. Click the OK button.
� To Delete a Policy1. Select a policy in the Policies List page.
176 SunScreen 3.2 Administration Guide • December, 2001

2. Select the policy you want to delete.
3. Click the Delete button.
The Delete Policy dialog box appears.
4. Click the Yes button in the Delete Policy dialog box to delete the policy.
� To Verify a PolicyTo verify that any changes you have made are stable:
1. Select a policy in the Policies List page.
Creating and Managing Policies 177

2. Select the Policy you want to verify.
3. Click the Edit button.
The Policy page for the selected policy appears.
178 SunScreen 3.2 Administration Guide • December, 2001

4. Click the Verify Policy button above the Common Objects area.
Clicking the Verify Policy button verifies that all the rules are valid and shouldcompile successfully when you activate this policy. The rules in the chosen policy fileare checked for errors, but the policy is not activated. Verifying a policy allows you todebug it without activating it.
You can activate the policy when verification has succeeded.
� To Back Up All PoliciesBacking up your policies is always good practice, especially if anything happens to thedisk. You also should back up the original policy after you install SunScreen. Thismakes it easier to restore earlier policies, if necessary. Backing up from theadministration GUI backs up only the current versions of all the policies.
Creating and Managing Policies 179

Caution – The backup medium contains copies of the local identities (the encryptionkeys and certificates) and must be stored securely and disposed of properly to avoidcompromising your security.
Note – This procedure requires a browser that can be used to access Local files. Youcan use the HotJava Browser, Netscape, or Internet Explorer with Sun’s Java Plug-Inand the identitydb.obj file (copied to the correct location). See “To Install the JavaPlug-In on the Screen” on page 23 for informationon how to install the plug-in.
1. Select a policy in the Policies List page.
2. Click the Backup All button to back up the current version of the policies.
The Select a backup file dialog box appears.
180 SunScreen 3.2 Administration Guide • December, 2001

3. Type the path name of the directory in the Filter field and type the name of thebackup file in the Selection field.
� To Restore All Policies
Note – This procedure requires a browser that can be used to access Local files. Youcan use the HotJava Browser, Netscape, or Internet Explorer with Sun’s Java Plug-Inand the identitydb.obj file (copied to the correct location). See “To Install the JavaPlug-In on the Screen” on page 23 for information on installing the plug-in.
The Restore operation causes all current policy information, including commonobjects, to be overwritten by the new information from the backup file.
1. Select a policy in the Policies List page.
Creating and Managing Policies 181

2. Click the Restore All button.
The Select a backup file dialog box appears.
3. Type the path name of the directory in the Filter field and the file name for thebackup file in the Selection field.
182 SunScreen 3.2 Administration Guide • December, 2001

4. Click the OK button.
Caution – Before you change the administration address (such as le0, qe0, orhme0), the administration certificate, the local certificate, or the administration-groupcertificate, be sure that you understand how each one affects your ability to connect tothe SunScreen. If you change these items, you risk losing connectivity from theAdministration Station to the Screen. Reestablishing connectivity is difficult andrequires that you log into the Screen directly or use an Administration Station that isstill working. It also requires an exchange of encryption information.
Working With Policy Locks
� To Leave an Administration Session� Logging in as a user with an access level of ALL or WRITE puts you into a session.
If you make changes to a policy, you cannot log out of the session until you eithersave or cancel those changes.
� To Unlock a PolicyA lock is automatically acquired and held by the first person to change a policy. Thelock is held on a per system basis; if someone acquires the lock, you cannot makechanges to a policy.
The lock does not affect the buttons in the SunScreen banner. Anyone can request asearch at any time and view the Documentation and Information pages.
If the Could not acquire the lock message appears (to indicate that someonehas made changes to the policy):
� On the command line, type:
edit> QUIT
Or
� In the administration GUI:
1. Click the Cancel Changes button.
2. Click the Policies button in the SunScreen banner.
Creating and Managing Policies 183

You can try to edit the policy later.
Note – When you click the Save Changes button or log out, you give up the lock andothers can work on the Screen.
� To Forcibly Clear the Lock� To clear the lock forcibly, type the following at the command line:
# ssadm lock -c policy_name
Activating Policies
� To Save ChangesTo save your changes:
1. Select a policy in the Policies List page.
184 SunScreen 3.2 Administration Guide • December, 2001

2. Make required changes to the policy and rules.
3. Click the Save Changes button to save all changes made for all objects and rules inthe policy.
An Activate Policy dialog box appears.
4. Select Yes if you wish to activate the policy.
Creating and Managing Policies 185

� To Cancel Policy ChangesIf you want to return to the previous saved version of a rule:
1. Make changes to either the policies or the rules
2. Click the Cancel Changes button.
Changes made before you click the Cancel Changes button are not saved.
� To Activate a PolicyUse Activate when you want the rules you see to be the ones the Screen uses tofilter traffic.
1. Select the name of the policy in the Policies List page.
2. Click the Activate button to activate the policy.
The Verifying/Activating window with the activation status appears.
186 SunScreen 3.2 Administration Guide • December, 2001

CHAPTER 5
Using High Availability
“High Availability”(HA) is a SunScreen configuration that consists of a primary Screenand a secondary Screen or Screens that mirror the operations on the primary Screen. Inthis way, the HA configuration behaves as a single system. Should anything cause theprimary Screen to fail, the secondary Screen immediately takes over, providinguninterrupted operation. This chapter describes how to set up high availabilityScreens. You can also find a detailed example of a high availability configuration in“Stealth Mode With HA” in SunScreen 3.2 Configuration Examples.
Note – You can upgrade SunScreen EFS 2.0, 3.0, and 3.1 HA clusters to SunScreen 3.2.There is an upgrade script to aid the transition for 3.0 and 3.1 HA clusters toSunScreen 3.2. The Upgrade from EFS 2.0 is a more manual process. See the SunScreenInstallation Guide for upgrade information.
The following table list the procedures in this chapter.
TABLE 5–1 Procedures for Using High Availability
HA “To Edit the Policy” on page 192
“To Install the SunScreen software in an HA Configuration” on page 193
“To Install HA on the Secondary HA Screen” on page 194
“To Define the HA Interface” on page 199
“To Define the Screen Object for the HA Primary Screen” on page 201
“To Initialize HA on the Primary HA Screen” on page 203
“To Add the Secondary HA Screen to the Primary HA Screen” on page 203
“To Allow Non-Administrative Traffic on an HA Network” on page 205
187

Setting Up High AvailabilityTo use high availability, (you must install SunScreen as an HA system, as described inthe SunScreen Installation Guide. High availability, its limitations, topology, set up, andcapability are described in detail in “High Availability” in SunScreen 3.2 Administrator’sOverview. For examples of HA configuration, see SunScreen 3.2 Configuration Examplesmanual.
Note – The network used for HA traffic must be kept physically secure because allsecret keys and configurations are transmitted in the clear over the HA interface.
HA lets you deploy multiple Screens in situations where the connection between aprotected inside network and an unprotected outside network is critical. One memberof the HA cluster, the active HA Screen, performs packet filtering, network addresstranslation, logging, and encryption/decryption of packets travelling between theinside and outside networks. The other members of the HA cluster, which can be asmany as 31 passive HA Screens, receive the same packets, perform the samecalculations, and mirror the configuration of the active HA Screen, but they do notforward traffic between the inside network and the outside network. If the active HAScreen fails, one of the passive HA Screens takes over (failover) as the active HAScreen and begins routing and filtering network traffic within seconds. Because thepassive HA Screens mirror the active HA Screen, few connections are lost if a failoveroccurs.
The routing interfaces of all the systems in the HA cluster have the same interfacenames with the same IP addresses. When a firewall becomes a secondary Screen, theMAC address of each routing interface is changed so that it is the same as the MACaddress of the same interface on the primary Screen. Each HA Screen, therefore,receives the same traffic, ensuring that passive Screens can duplicate the state of thepacket filter engine should the active Screen fail. The secondary firewalls have thesame rules and process the packets in the same way.
188 SunScreen 3.2 Administration Guide • December, 2001
Note – Both Screens mirror configuration. They attempt to mirror state byindependently building the same state table, since they see the same traffic. They donot exchange information about what is in each others’ state tables, however. Thatmeans that if one Screen is rebooted, it will have the same rules, configuration, MACaddresses, etc., but will not have the same state in memory. This Screen will neverlearn old information from the other Screen; it will only be able to learn newinformation from listening on the wire. The internal state as far as memory and statetables are concerned will be out of sync for some undetermined amount of time, untilall the old state entries time out or are closed from the other Screen.
HA PolicyWhen you set up an HA cluster, you designate one Screen as the primary HA Screen,and you configure it with the common objects and policy rules that the HA cluster willuse. When you activate the policy, it is copied from the primary HA Screen to the othermembers of the HA cluster. The Solaris system and network configuration are notcopied from the primary HA Screen; they must be identical on all the Screens in theHA cluster.
Caution – Be sure to keep the HA network physically secure. The HA clustertransmits secret keys and policies in the clear over the dedicated HA network.
The interfaces for network connections must be the same for each HA cluster member.For example, if one HA host uses the le0 interface as its dedicated internal networkconnection, all HA hosts must use the le0 network interface as their dedicatedinternal network connections. Similarly, all Screens in the HA cluster must use thesame IP address on their non-dedicated interfaces.
Preparing to Install High AvailabilityHA is designed to maintain the great majority of network connections. During areboot (an orderly shutdown), the active Screen being rebooted notifies the passiveScreens, and the appropriate passive Screen takes over as the active Screen withoutloss of connections. Because the passive Screens do not forward, reject, or log packets,the load on passive Screens is less than the load on the active Screen. Consequently,load-induced faults that affect the active Screen are unlikely to have affected thepassive Screens. Once the previously-passive secondary Screen becomes active, ofcourse, it is subject to the same load that caused the failure.
Using High Availability 189

The machines that are used as the HA Screen should all be of equivalent power, sothat the passive HA Screen can keep up with nearly all the processing of the active HAScreen.
No traffic is allowed out of the passive HA Screens with the exception ofadministration traffic, such as normal GUI administration, HA administration, and HAheartbeat (the communication signal on the dedicated network that assures that thenetwork is working). This means, for example, that you cannot use telnet to connectto the passive HA hosts. You can, however, use telnet to connect to active HA hosts.
Using the /etc/hosts File for Name ResolutionWhen you configure the hostname resolution in the /etc/nsswitch.conf file forHA hosts, the key word files must appear first in the “hosts line” because:
� Using the /etc/hosts file for hostname resolution is more reliable than usingDNS or NIS or both.
� An HA Screen in the passive mode cannot send packets over the network;therefore, remote hostname resolution, such as DNS or NIS, will fail for passiveHA Screens.
Defining HAThe primary HA Screen manages secondary HA Screens in an HA cluster. A passive HAScreen within an HA cluster mirrors the state of the active Screen, which can be theprimary or a secondary HA Screen. When the active Screen fails, the passive Screenthat has been running the longest takes over as the active Screen. Primary means thesystem is the HA administration host for the HA configuration. It does not necessarilymean that the system is the active host
You must use the unique HA interface address for administration. If you use one ofthe shared addresses, then that address will always resolve to the HA Screen that iscurrently active. Because the active host is not necessarily the primary administrationhost, you must use the unique HA interface address to ensure that you arecommunicating with the correct host.
If you do not use the unique HA interface address, then the connection will be lost andthe administration GUI will hang immediately if the remotely administered primaryHA Screen is shut down. You will still be able to administer the active HA Screen fromthe command line, using the command ssadm, but you will be unaware that you areadministering a secondary HA Screen. This will not propagate the configuration toany other HA Screen; instead, the configuration will be overwritten when the primaryHA Screen comes up again and a policy is activated.
190 SunScreen 3.2 Administration Guide • December, 2001

Modifying the HA Service GroupYou cannot connect directly to a passive HA Screen, nor can you connect from one HAScreen to another, except with remote administration to the HA interface. You canallow:
� Services and service groups other than the standard HA services
� Remote administration
� Router discover
� Heartbeat (the communication between or among HA Screens to assure that thededicated HA network is working)
Adding additional services or service groups may be useful; for example, if you needto copy Solaris system files between the HA hosts or to be able to log into the activeHA Screen remotely and then connect to the primary administration HA host withtelnet. Adding a service to the HA service group circumvents the passive HA modeand allows the traffic that the added service permits through the SunScreen filters.
You can add any services to the HA service group by selecting Service in the Type liston the Edit Policy page, saving the change, and reactivating the configuration.
Note – The services or service groups that you add to the HA service group areallowed only between the HA hosts.
Using NAT With HA in Routing ModeDepending on the configuration you use for NAT, you must add an ARP (AddressResolution Protocol) entry for static NAT mappings on all Screens in routing mode,active and passive, so that NAT can continue to work after a failover. You mustreplicate all non-SunScreen configurations, including static ARP entries, on all HAScreens. Because you must do this every time an HA Screen fails over or every timeyou reboot a Screen, you may want to automate this in one of your start-up scripts.For more information on configuring NAT, see “Network Address Translation” inSunScreen 3.2 Administrator’s Overview. For more information on ARP, see the manpage for arp(1M).
Using High Availability 191

Installing High Availability
� To Edit the Policy1. Choose a policy in the Policies List page.
2. Click the Edit button.
The Policy Rules page appears.
192 SunScreen 3.2 Administration Guide • December, 2001

� To Install the SunScreen software in an HAConfiguration
1. Configure identical interfaces on all HA machines, by editing the/etc/hostname.interface-name file or running the ifconfig command.
2. Dedicate one interface on each machine to HA.
� You must have a dedicated network between the HA hosts that, for reasons ofsecurity, is not connected to any other network.
� All the HA machines must be configured with the same interface names and beconnected to the network and to each other in the same way.
� The dedicated HA interface must have a unique address name and IP address (sothat the configurations, including interface configurations, can be synchronizedlater).
3. Connect the HA interfaces of the HA machines one at a time after installing the
Using High Availability 193

operating system (if necessary) and configuring the routing on these machines.
Since the HA hosts have the same names and IP addresses, you must connect thenon-HA interfaces of only one of the HA machines (for example, HA1, as shown by thesolid line in Figure 5–1). This machine will become the primary and active HA Screen.This approach prevents confusion from arising in the routing and ARP tables on theactive HA Screen. After the HA configuration is complete, the HA software keeps therouting and ARP tables orderly.
4. Connect the secondary Screen, for example, HA2 (as shown by the broken line inFigure 5–1) to the hubs.
You do not have to install any special software for HA other than SunScreen. The HAsoftware is automatically installed as part of SunScreen.
Note – Do not perform this step until you have installed, configured, and tested theboth the primary (active) and secondary HA Screens.
Inside OutsideHA heartbeat network
Connected
Not yet connected
HA1
hub hub
HA2
FIGURE 5–1 Wiring Before and During HA Configuration
� To Install HA on the Secondary HA Screen1. Start the full SunScreen install on the secondary HA Screen.
2. Select the “Custom” option on the Select Type of Install panel and click the Nextbutton.
194 SunScreen 3.2 Administration Guide • December, 2001

3. Select which Sunscreen function you want to install
Using High Availability 195

4. Click Next
The Component Selection Dialog appears.
5. Select the components to be installed and click Next.
The Secondary HA Designation dialog appears.
196 SunScreen 3.2 Administration Guide • December, 2001

6. Select Yes and click the Next button.
The secondary HA data dialog box appears.
7. In the secondary HA Data dialog box:
Using High Availability 197

a. Fill in the HA Interface field.
b. Fill in the secondary HA IP Address field.
8. Click the Next button.
9. Reboot the secondary HA Screen when the final panel appears.
198 SunScreen 3.2 Administration Guide • December, 2001
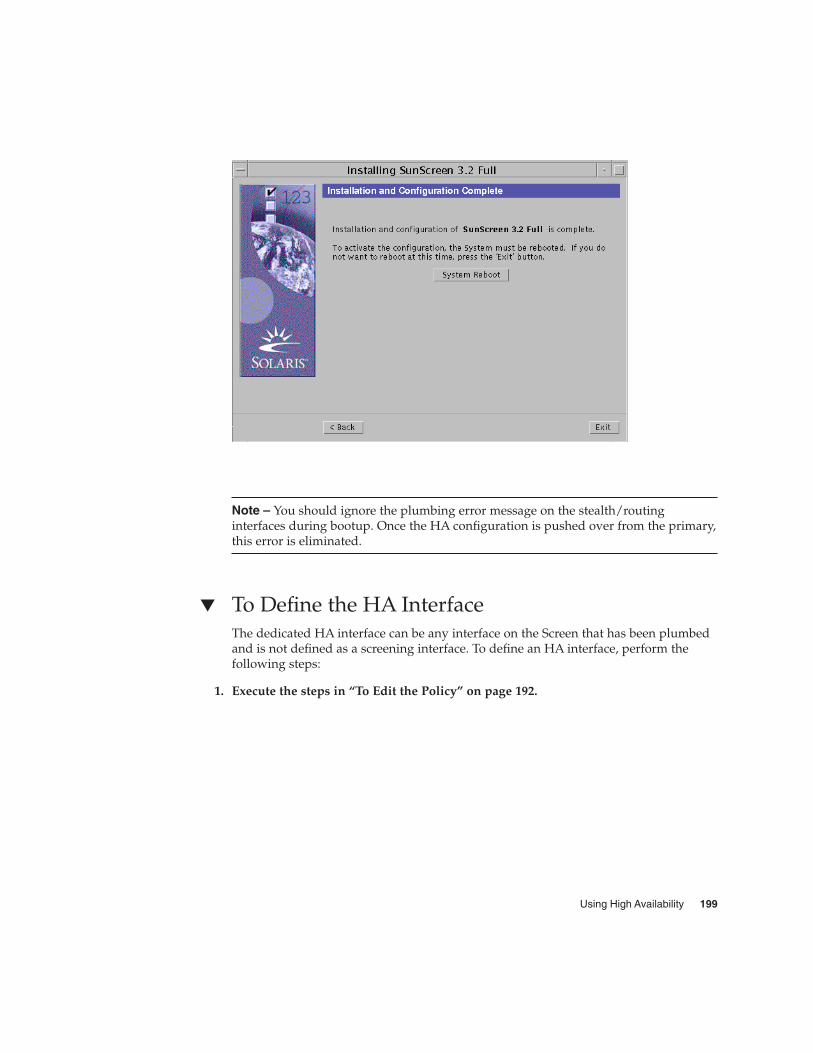
Note – You should ignore the plumbing error message on the stealth/routinginterfaces during bootup. Once the HA configuration is pushed over from the primary,this error is eliminated.
� To Define the HA InterfaceThe dedicated HA interface can be any interface on the Screen that has been plumbedand is not defined as a screening interface. To define an HA interface, perform thefollowing steps:
1. Execute the steps in “To Edit the Policy” on page 192.
Using High Availability 199

2. Select Interface from the Type list.
3. Click the Search button.
4. Select the interface name that you want to dedicate to HA and click Edit.
If the interface does not appear, select New from the Add New list.
5. Define the interface, selecting HA as the Type.
200 SunScreen 3.2 Administration Guide • December, 2001

6. Click the OK button.
� To Define the Screen Object for the HA PrimaryScreen
1. Execute the steps in “To Edit the Policy” on page 192.
2. Select Screen in the Type list.
3. Click the Search button.
4. Select the name of the Screen that you want to use as the primary HA Screen, thenclick the Edit button.
Using High Availability 201

If the Screen object is not yet defined for the primary Screen, select New from the AddNew list and type the name of the primary Screen in the Name field.
5. Click the Primary/Secondary tab.
6. Select Primary in the High Availability field.
7. Type the IP address of the primary Screen’s dedicated HA interface in the HighAvailability IP Address field.
8. Type the Ethernet address of the interface on the primary Screen in the EthernetAddress field.
9. Click the OK button.
202 SunScreen 3.2 Administration Guide • December, 2001

� To Initialize HA on the Primary HA Screen1. Execute the steps in “To Edit the Policy” on page 192.
2. In the Policies List page, click on Initialize HA.
The Initialize HA dialog box appears.
3. Select the interface to be the HA interface from the Interface list.
Note – The HA interface on the primary HA Screen and secondary HA Screen must bethe same.
4. Click the OK button
The Policies List page appears.
� To Add the Secondary HA Screen to the PrimaryHA Screen
1. Execute the steps in “To Edit the Policy” on page 192.
2. Select Screen from the Type list.
3. Select New from the Add New Object list.
Using High Availability 203

The Screen dialog box appears.
4. Type the name of the secondary HA Screen in the Name field.
5. Click the Primary/Secondary tab in the Screen dialog box.
6. Set the following values in the Primary/Secondary area of the Screen dialog box:
High Availability Secondary
Primary Name Name of primary Screen
Administrative IP Address Leave blank
High Availability IP Address Secondary Screen IP address
7. Click the OK button.
8. Click the Save Changes button on the Policies List page.
The Activate Policy dialog box appears.
9. Click Yes.
204 SunScreen 3.2 Administration Guide • December, 2001

10. Fully connect the secondary HA Screen to the network.
After adding an HA secondary Screen and activating your policy, the new secondaryScreen may become active. If it does, you must direct the secondary Screen to becomepassive before you can perform additional administration on the primary Screen.
Note – Make sure all wires and cables are connected properly.
11. Configure the service and policy rules on the primary HA Screen.
All changes made on the primary HA Screen are automatically copied to all secondaryHA Screens.
12. Save and activate the policy.
� To Allow Non-Administrative Traffic on an HANetwork
1. Execute the steps in “To Edit the Policy” on page 192.
2. Select Interface from the type list.
3. Click the Search button.
4. Select the interface name.
Using High Availability 205

5. Click the Edit button.
206 SunScreen 3.2 Administration Guide • December, 2001

6. Note the name in the Valid Address field for later use as the Destination Addressfor the new rule to be defined.
7. Click the Cancel button to close the Interface Definition panel.
8. Click the Add New Rule button.
9. Fill in the fields. Make sure you set the Destination Address to the same name thatwas in the Valid Address field in Step 6above.
Using High Availability 207

10. Click OK.
11. Click Save Changes.
The Activate Policy dialog box appears.
12. Click Yes to activate the policy.
Configuring Policies for an HA ClusterYou configure the HA cluster just as you configure a single Screen. Policy rules forpassive HA Screens are configured when they connect to the primary HA Screen. Youshould write a rule for connecting to the unique address of each host in the HA servicegroup.
208 SunScreen 3.2 Administration Guide • December, 2001

Updates to the primary HA Screen are automatically relayed to all the other HAScreens. This synchronization takes place during activation. When a configuration isactivated, the primary HA Screen transfers the configuration—including certificates,local keys, addresses, and policy rules—to all other secondary HA Screens.
When an HA host is in the passive mode, you cannot connect to that host directly,except with remote administration to the HA interface. This also applies toconnections from one HA host to another on the HA interface.
You can allow services other than the standard HA service or remote administrationand heartbeat. These services will only be allowed between the HA hosts. Add them tothe HA service group by selecting Service in the Type list on the Edit Policy page, andadd the services you want to include.
Removing HARemoving HA involves removing both software and hardware. Simply disabling theHA configuration is insufficient and is only one part of the process. Because there ismore than one Screen that has the same IP address on the network, simply disablingHA would leave two or more HA Screens on the network that are trying to route thesame traffic, which would disrupt the network traffic through the Screens.
Remove the HA hosts one at a time to reduce the chances of disrupting the network.Remove the passive HA host or hosts first to avoid losing connections.
If you must remove the active HA host, use the following command on both the activeHA host that you want to remove and on the passive HA host that will become theactive HA host. This will help you to find out whether any connections will be lost.
� For local administration:
# ssadm lib/statetables� For remote administration:
# ssadm -r Screen_Name lib/statetables
If the state tables are in an acceptable level of synchronization, you can proceed toremove the active HA host.
Using High Availability 209

HA LoggingInformation about the HA Screen is not shown as such in the Log Browser.
If you want to see the changes in state, be sure that /etc/syslog.conf contains thefollowing lines:
*.err;kern.notice;auth.notice;user.none;daemon.info /dev/console
*.err;kern.debug;daemon.info;mail.crit;user.none /var/adm/messages
Note – Some HA messages are now sent to syslog and some sent to regular log.
210 SunScreen 3.2 Administration Guide • December, 2001

CHAPTER 6
Setting Up and Using Proxies
A proxy is a user-level application that runs on the Screen. The main purpose ofproxies is to provide content filtering, as opposed to packet filtering. For example, youcan use proxies to allow or deny access to Java applets through the firewall. Proxiescan also provide user authentication, as in the case of telnet traffic. See SunScreen 3.2Configuration Examples manual for an example using Proxies.
Note – There is no way for SunScreen High Availability systems to share the proxystate. Proxies do not work with SunScreen High Availability.
The following table shows the procedures in this chapter.
TABLE 6–1 Proxy Procedures
Proxy Users “To Add a Single Proxy User” on page 215
“To Add a Proxy User Group” on page 217
“To Add Spam Domains” on page 218
“To Delete Spam Domains” on page 221
Policy Rules “To Write Policy Rules for the Proxies” on page 227
“To Define PROXY_FTP” on page 228
“To Define PROXY_HTTP” on page 230
“To Define PROXY_SMTP” on page 231
“To Define PROXY_Telnet” on page 232
FTP Proxy “To Use the FTP Proxy” on page 233
Telnet Proxy “To Use the Telnet Proxy” on page 235
SMTP Proxy “To Use the SMTP Proxy” on page 236
211

TABLE 6–1 Proxy Procedures (Continued)HTTP proxy “To Configure the Browser to Use the HTTP Proxy” on page 237
Matching Proxy RulesEach proxy is an independent program that reads its own policy file. The file for eachproxy consists of policy rules selected by the compiler. Rules may in turn referencedata in the user database.
Each proxy follows a sequence of tests to determine whether a rule matches:
1. Does the source address of the packet fall within the source-address range in thepolicy rule?
2. Is the destination address of the final connection (the host that the user specifies) inthe destination address in the policy rule?
3. If the policy rule requires user authentication, did the user authenticate correctly?Is that user enabled?
4. Is this (possibly anonymous) authenticated user included in the policy rule, eitherdirectly or by group membership?
Preparing to Use ProxiesSunScreen includes four proxies: FTP, HTTP, SMTP, and TELNET.
Each one is a completely separate user-level application, although they use someshared data and policy files for authentication. Certain proxies provide some contentfiltering or user authentication or both. They allow or deny sessions based on thesource and destination addresses.
The rc proxy script is used to start up the proxies as needed. It is located in/etc/init.d and the symbolic link to /etc/rc2.d/S79proxy. The script verifiesthat:
� The proxy executable is in /usr/lib/sunscreen/proxies.� The corresponding policy file is in /etc/sunscreen/proxies.� The policy file has a size larger than zero.
If these requirements are not met, the proxy will not start.
212 SunScreen 3.2 Administration Guide • December, 2001

The policy rule compiler uses this script to cause each proxy to reread its policy file asneeded.
Note – You must disable the corresponding standard network service (if any) forHTTP proxies to function. If you have installed an HTTP daemon, you must disable itbefore the HTTP proxy will work. Conflicting standard Solaris servers for telnet, FTP,and SMTP are handled automatically during policy activation. See the SunScreen 3.2Administrator’s Overview for further details.
Defining Proxy DataYou define proxy data on the Policy Rules page. The databases for proxies are the Javaarchive (Jar) Signatures, Jar hashes, the Proxy Users, and SMTP Proxy data.
Setting Up Proxy UsersProxy users are used in FTP, HTTP (if desired), and Telnet proxy rules. The proxyusers database depends on information in the authorized users database. To take fulladvantage of the user authentication feature of the FTP, HTTP, and Telnet proxies, youmust create entries for both authorized users and proxy users. Define a user as anAuthorized User before defining that user as a Proxy user. See “Authentication”on page 120 for the procedure for setting up an Authorized user and “Authentication”in SunScreen 3.2 Administrator’s Overview for information on the proxy database andthe authorized user database.
Note – Define all necessary authorized users before attempting to define proxy users.
Note – You can define authorized and proxy user objects with identical names. Choosea naming strategy for each set that reflects naming systems already in use. Forexample, you might choose to name authorized users by employee identities, such assurname or employee number, and proxy users by their login names.
The proxy user database contains the mapping information for users of SunScreenproxies. FTP, HTTP, and Telnet rules reference the proxy user entries. Additionally, a
Setting Up and Using Proxies 213

user connecting through either of these proxies will often be configured to requireauthentication by using an authorized user identity. Users logging in with a Telnetproxy are authenticated through the authorized user identity.
You can also use external authentication mechanisms, such as RADIUS or SecurID, toenable user authentication by using special proxy user entries, which create atranslation.
By referencing these special mechanisms directly in rules, or by adding references toother proxy user groups, you can allow users authenticated by those mechanisms tobehave as authenticated users in the referenced contexts.
Names of proxy users must not contain the following characters: !, @, #,$, %, ^, &, *, {, }, [, ], <, >, “, ‘, \, or ?, nor may they contain aNULL character.
� To Set up Basic Proxy Users1. Choose a policy in the Policies List page.
2. Click the Edit button.
The Policy Rules page appears.
214 SunScreen 3.2 Administration Guide • December, 2001

� To Add a Single Proxy User1. Execute the steps in “To Set up Basic Proxy Users” on page 214.
2. Select Proxy User from the Type list.
Setting Up and Using Proxies 215

3. Select New Single from the Add New button.
The Proxy User dialog box is displayed.
4. Type a name for this Proxy User in the Name field.
5. (Optional) Type a description in the Description field.
6. Select the User Enabled check box. The default is disabled,
If this box is not selected, the proxy user remains inactive and cannot use the proxies.
7. Select the name of the authorized user that you want to place in the AuthorizedUser Name field.
8. (Optional) Select the name or names of the user group or groups with which youwant to associate this proxy user.
9. Type the name that the proxy user should use when connecting to the target server(which is also known as the “backend” server) in the Backend User Name field.
This name will be the identity that the proxy user assumes on any target serverconnected through this proxy user.
216 SunScreen 3.2 Administration Guide • December, 2001
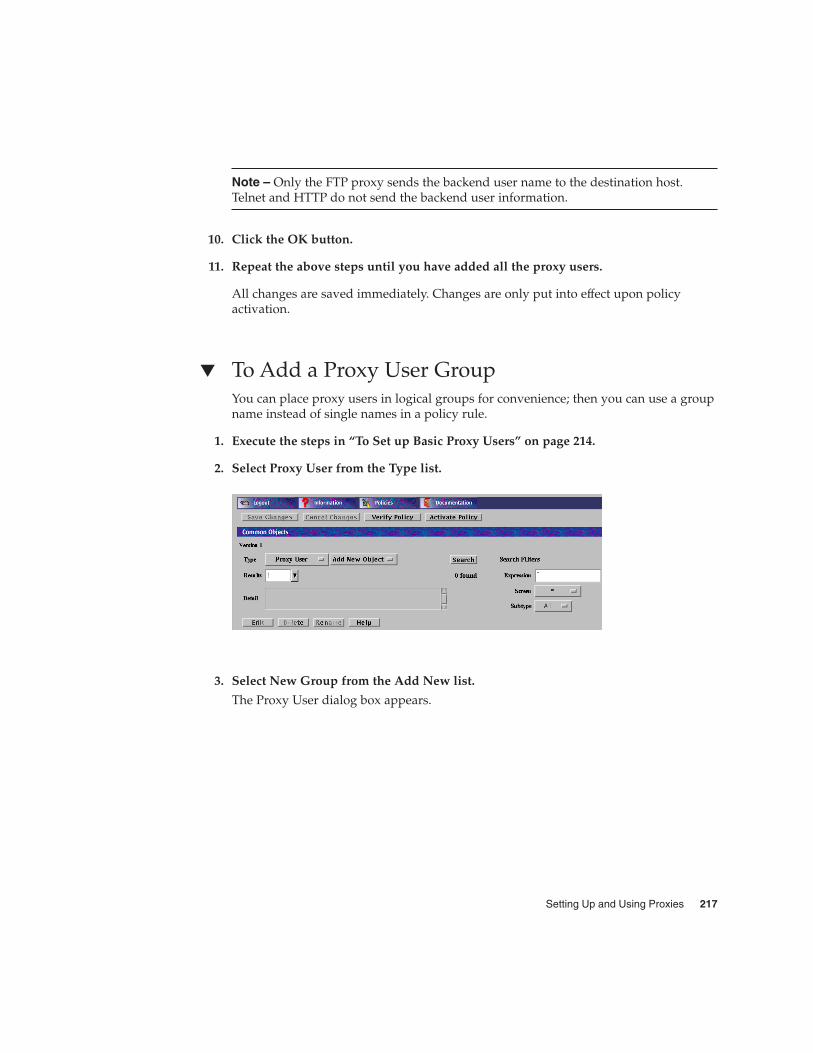
Note – Only the FTP proxy sends the backend user name to the destination host.Telnet and HTTP do not send the backend user information.
10. Click the OK button.
11. Repeat the above steps until you have added all the proxy users.
All changes are saved immediately. Changes are only put into effect upon policyactivation.
� To Add a Proxy User GroupYou can place proxy users in logical groups for convenience; then you can use a groupname instead of single names in a policy rule.
1. Execute the steps in “To Set up Basic Proxy Users” on page 214.
2. Select Proxy User from the Type list.
3. Select New Group from the Add New list.
The Proxy User dialog box appears.
Setting Up and Using Proxies 217

4. Type the name for this group of proxy users in the Name field.
5. (Optional) Type a short description of this definition in the Description field.
6. Select the User Enabled check box to enable the user group.
7. Use the Add or Remove buttons to move selected proxy users or groups of proxyusers into or out of the list of Member Users.
8. Add all the proxy users and groups of proxy users that you wish to include in yourdefinition.
9. Click the OK button.
10. Repeat the above steps until you have defined all the groups of users required.
� To Add Spam DomainsYou can define the domains from which you think that you receive spam mail.
218 SunScreen 3.2 Administration Guide • December, 2001

Note – For more information on spam control, see “SMTP Proxy” in SunScreen 3.2Administrator’s Overview.
1. Execute the steps in “To Set up Basic Proxy Users” on page 214.
2. Select Screen from the Type list.
3. Select New from the Add New list.
The Screen dialog box appears.
4. Type a name in the Name field.
Setting Up and Using Proxies 219

5. (Optional) Type a brief description in the Description field.
6. Click the Mail Proxy tab.
The Spam Domain list appears.
7. Type the name you want to add to the Spam Domain list into the Add/Delete Hostfield.
8. Click the Add button.
9. Click the OK button.
10. Repeat these steps until you have added all the domains from which you receiveSpam mail.
11. Click the Save Changes button
220 SunScreen 3.2 Administration Guide • December, 2001

� To Delete Spam Domains
Note – For more information on spam control, see “SMTP Proxy” in SunScreen 3.2Administrator’s Overview.
1. Execute the steps in “To Set up Basic Proxy Users” on page 214.
2. Select Screen from the Type list.
3. Click the Search button.
4. Select the Spam domain from the Results field.
5. Click the Edit button.
The Screen dialog box appears.
Setting Up and Using Proxies 221

6. Click the Mail Proxy tab.
The Mail Proxy Screen appears
222 SunScreen 3.2 Administration Guide • December, 2001

7. Select the Spam domain to be deleted in the Spam Domains field.
8. Click the Delete button.
9. Click the OK button.
10. Click the Save Changes button.
Writing and Editing Policy Rules forProxiesPolicy Rules are strictly ordered; they take effect in the order in which they are listed.You may either define policy rules in the order in which you want them to take effector rearrange them after they are defined.
Setting Up and Using Proxies 223

� Basic Steps for Writing Policy Rules for Proxies1. Choose the policy Initial in the Policies List page.
2. Click the Edit button.
The Policy Rules page appears.
224 SunScreen 3.2 Administration Guide • December, 2001

3. Select the Packet Filtering tab in the Policy Rules area.
Proxies are defined in the Packet Filtering page.
4. Click the Add New Rule button in the Packet Filtering area.
The Rule Definition dialog box for that policy is displayed.
Setting Up and Using Proxies 225

In the Rule Definition dialog box, the Rule Index field is filled with the next availablerule index.
5. (Optional) If a rule is valid only for a particular Screen, select that Screen only inthe Common Objects area.
The default is for the rule to be valid for all Screens.
6. In the Services box in the panel, select one of the services that is valid for proxies,for example:
� ftp� www� smtp� telnet
7. Select the source and destination address that you want for the Source andDestination Address fields.
Be sure you have defined these addresses on the Policy Rules page.
8. For a proxy rule, select ALLOW or DENY in the Action field.
These are the only valid actions for proxies. The Encrypt or VPN action to not apply toproxies.
� LOG� SNMP� PROXY
226 SunScreen 3.2 Administration Guide • December, 2001

When you select ALLOW, a new dialog box appears:
When you select DENY, a new dialog box appears:
� LOG� SNMP� ICMP Reject� PROXY
� To Write Policy Rules for the Proxies1. Execute the steps in “Basic Steps for Writing Policy Rules for Proxies” on page 224.
2. From the Proxy list, select the information that you want to put into the LOG andSNMP fields.
There are five items in the Proxy list:
� NONE� PROXY_HTTP� PROXY_FTP� PROXY_SMTP� PROXY_Telnet
Setting Up and Using Proxies 227

3. Select the name of the proxy service for which you are writing this policy rule forthe Service field.
If you plan to use proxies, you must select the appropriate proxy service:
TABLE 6–2 Proxies and Services
Choose ThisService
For This Proxy
ftp PROXY_FTP
www PROXY_HTTP
smtp PROXY_SMTP
telnet PROXY_TELNET
Each choice requires slightly different steps, which are listed below under the fourproxy types.
� To Define PROXY_FTP1. Execute the steps in “Basic Steps for Writing Policy Rules for Proxies” on page 224.
2. Select PROXY_FTP as the proxy
228 SunScreen 3.2 Administration Guide • December, 2001

The Rule Definition Dialog Box for PROXY_FTP appears
3. Select PROXY_FTP from the Proxy list and eight fields appear below the Proxy fieldin the dialog box:
� GET� PUT� CHDIR� MKDIR� RENAME� REMOVE� DELETE� Proxy User
4. Select an action for each field (GET, PUT, CHDIR, MKDIR, RENAME, REMOVE,and DELETE) or accept the default values. You can either allow (Allow) or disallow(Deny) use of these FTP commands based on the settings you choose.
5. Select the name of a defined proxy user in the PROXY USERS field.
6. Click the OK button in the dialog box.
7. Click the Save Changes button.
Setting Up and Using Proxies 229

� To Define PROXY_HTTP1. Execute the steps in “Basic Steps for Writing Policy Rules for Proxies” on page 224.
2. Select PROXY_HTTP as the proxy, click that name to put it into the Proxy field.
Five fields then appear below the Proxy field:
� Cookies� ActiveX� Java� SSL� Proxy User
3. Set the action for each item.
a. For Cookies, ActiveX, and SSL, choose an action or accept the default underProxy Details. You can either allow (Allow) or disallow (Deny) the use ofcookies, ActiveX, or SSL based on the settings you choose for each field.
b. For the Java field, choose among the following under Proxy Details:
� Allow all Java
� Block all Java
� Allow Java with signed Jars, with the signature in the Jar Signature database
� Allow Java, with the Jar hash in the Jar Hash database
� Allow both signed Jar signature and Jar Hash
230 SunScreen 3.2 Administration Guide • December, 2001

Note – If you select Jar Signature or Jar Hash, they must be defined in theCommon Objects area of the Policy Rules page.
4. (Optionally) Select a proxy user or group to be allowed through the proxy.
5. Click the OK button in the dialog box.
6. Click the Save Changes button.
� To Define PROXY_SMTP1. Execute the steps in “Basic Steps for Writing Policy Rules for Proxies” on page 224.
2. Select PROXY_SMTP as the proxy.
the Relay field appears below the Proxy field in the dialog box.
Note – For more information on relay control, see “SMTP Proxy” in SunScreen 3.2Administrator’s Overview.
3. Determine whether you want to allow relaying of mail messages through the proxyin the Proxy Details area.
Setting Up and Using Proxies 231

4. If you want to allow all relaying, select the RELAY: ALLOW setting.
5. If you want to restrict the relaying, define the local domain name for the Screen orcreate a list of valid relay (domain) targets as described in the following 2 substepsand select the RELAY: RESTRICT setting.
a. Define the Local Domain Name
Create or edit the /etc/defaultdomain file to contain the domain suffix for theScreen.
Note – For this default domain to become active, you must either shut down andreboot the Screen or run the following command:
# domainname ’cat /etc/defaultdomain’
b. Create a List of Valid Relay Targets
Use the mail_relay feature of the ssadm command to create a list of valid relay(domain) targets (see “SMTP Proxy” in SunScreen 3.2 Administrator’s Overview).
Note – The destination address in this rule should be the address of the SMTPserver or servers that will spool and/or deliver email after it is restricted andfiltered by the screen.
6. Click the OK button in the dialog box.
7. Click the Save Changes button.
� To Define PROXY_Telnet1. Execute the steps in “Basic Steps for Writing Policy Rules for Proxies” on page 224.
2. Select PROXY_Telnet as the proxy.
The Proxy Users field appears below the Proxy field on the right side of the RuleDefinition dialog box.
232 SunScreen 3.2 Administration Guide • December, 2001

3. Select the proxy user or group that is allowed through the proxy.
4. Click the OK button in the dialog box.
5. Click the Save Changes button.
Using the FTP ProxyTo use the proxy and successfully make FTP connections through the Screen, you mustFTP to the proxy on the Screen rather than directly to the end system. The Screen’spolicy rules will only allow FTP connections to and from the proxy.
For information on setting up the ftp proxy, see “To Define PROXY_FTP”on page 228.
� To Use the FTP ProxyThe following example steps show what happens when users wants to connect to thesystem named ftp.sun.com, which has an anonymous FTP account. To get there,they must first ftp to the SunScreen proxy named Screen.
Setting Up and Using Proxies 233

Note – The anonymous proxy user is prefigured during the installation of thesoftware. It is an unauthenticated proxy user, so any string provided before the first @(“at” sign) in the password is ignored. The password after the first@ (here:[email protected]) is the backend user password—in this case, the username, as is the custom for anonymous FTP.
1. Type the command:
% ftp screen
The following text appears:
Connected to screen220-Proxy: SunScreen FTP Proxy Version 3.2
: Username to be given as <proxy-user@<FTP-server-host>: Password to be given as <proxy-password@<FTP-server-password>
220 ReadyName (screen:zzz):[email protected]
The format for the user name is the proxy user name and the destination serverseparated by an “at” sign.
2. Type your authorized user password at the prompt to authenticate you to this proxy:
331- Proxy: Authenticate & connect:331 Password needed to authenticate ´anonymous’.Password:
Note – The password is not echoed. Its format is two passwords separated by an “at”sign. The first password is the authorized user password for the proxy, and the secondis the password for the destination ftp server. In the example,anonymous@[email protected], anonymous is the password for the proxyand [email protected] is the email address that ftp.sun.com requires foranonymous ftp.
The following text appears:
230- Proxy:: Authentication mapped ´anonymous’ to backend user ´anonymous’.: Connecting to ftp.sun.com (192.9.9.73) - done
Server:: 220 ftp.sun.com FTP server (Version 2.0.9) ready: 220-Welcome to Sun Microsystems Corporate FTP Server.: 220-: 220 ftp FTP server (ftpd Wed Oct 30 23:31:06 PST 1996) ready.
Proxy: Login on server as ´anonymou.Server:331 Guest login ok, send your e-mail address as password.Proxy supplying password to server230 Guest login ok, access restrictions apply.ftp>...
234 SunScreen 3.2 Administration Guide • December, 2001

ftp>...ftp>...ftp> bye221- Proxy: Quitting service.221 Server: Goodbye.%
Using the TELNET ProxyThe SunScreen telnet proxy logon process takes place in two stages:
1. First, you must telnet to the Screen and be authenticated by the proxy, whichthen forwards you to the destination host, which prompts you to log in.
2. You can then log in to the target system and be authenticated in the usual manner.
For information on setting up the telnet proxy, see “To Define PROXY_Telnet”on page 232.
� To Use the Telnet ProxyThe following steps illustrate what a user logging into a system through the telnetproxy experiences. In this example, the proxy is running on a Screen named Screen,and the user wants to connect to a system named foo.com:
1. Type the following:
% telnet Screen
The following text appears:
SunScreen Telnet Proxy Version: 3.2
2. Type the user name at the prompt:
Username@Hostname: [email protected]
3. Type your authorized user password to authenticate you to this proxy:
password:
The password is not echoed. If you are successful, you will see the normal telnetconnection information for the system foo.com, for example:
% Trying 172.16.6.74Connected to foo.comEscape character is ‘^]’.
Setting Up and Using Proxies 235

UNIX(r) System V Release 4.0 (foo.com)login:
4. Log in to the system as you normally would, and if required, type a password.
Using the SMTP ProxyThe SMTP proxy provides a relay for email. It can restrict access based on sourceaddress, as well as the domain name of the originating address, and the source anddestination mailbox addresses presented within the SMTP protocol (envelope). Thesource (the sender’s address) is compared to the list of spam domains; if the addressmatches any specific spam domain, the packet gets dropped. The destination (therecipients’s address) is compared with the local domain to see if relaying is beingattempted. If relaying is allowed, the email message gets passed through, if not, theemail message gets dropped.
Be sure you have defined any necessary spam and relay restrictors (see “To Add SpamDomains” on page 218 and “To Delete Spam Domains” on page 221).
� To Use the SMTP Proxy1. Point the MX record for the domain to the proxy for mail to be processed properly.
SMTP connection is then made to the proxy rather than to the actual SMTP server.
2. Point the destination in the rule to the actual SMTP server.
Using the HTTP ProxyThe HTTP proxy provides a relay capability for the World Wide Web supporting theHTTP protocol. As with other proxies, it allows or denies sessions based on the sourceor destination address. It also provides selective filtering of content based on thesource and destination of sessions. The selective filtering options include Java filtering,ActiveX, and cookies.
The HTTP proxy filters Java by reading the signatures encapsulated in Java Archives(Jars) or on a precomputed hash of Java Archive content.
236 SunScreen 3.2 Administration Guide • December, 2001

For user-based authentication, select a proxy user. For more information onconfiguring the HTTP proxy, see “To Define PROXY_HTTP” on page 230.
� To Configure the Browser to Use the HTTP ProxyBasically, you point your browser at the Screen instead of allowing the browser totarget HTTP servers directly. This example procedure is designed for configuring theNetscape browser. Consult the documentation for your browser to determine how toset the HTTP proxy server address and port number.
The server address should be the Screen’s address and the port number must be 80.
1. Select Preferences in the Edit pulldown.
The Preference page is displayed.
2. Select Advanced on the Preferences page.
3. Select Proxies under the Advanced selection.
4. Select Manual proxy configuration.
Setting Up and Using Proxies 237

5. Click the View button beside the Manual proxy configuration.
6. Enter the IP address in the HTTP Proxy field.
7. Type the number 80 as the number of the Port in the Port field for HTTP.
The HTTP proxy is fixed at port 80 in the current version of SunScreen.
You may, as desired, set the values for the FTP Proxy and/or Security Proxy to thesame values just used for the HTTP Proxy. This will cause browser-initiated requestsfor ftp:// and/or SSL references to be handled by the HTTP proxy on the Screen. See“Proxies” in SunScreen 3.2 Administrator’s Overview for details on HTTP Proxy PortRestrictions and HTTP Proxy Access for ftp://.
8. Click the OK button in the View Manual Proxy Configuration dialog box.
9. Click the OK button in the Preferences dialog box.
Proxy LoggingYou control proxy logging by selecting Logging as part of a rule’s action and byconfiguring the log limiter variables.
238 SunScreen 3.2 Administration Guide • December, 2001
When logging is specified in a proxy rule, all (non-debug) events relating to a sessionenabled by that rule are logged for the proxy. Events based on the limiters for a givenproxy are also logged, regardless of rule action.
See SunScreen 3.2 Administrator’s Overview for the specifications of log limiter variables.
Setting Up and Using Proxies 239

240 SunScreen 3.2 Administration Guide • December, 2001

CHAPTER 7
Configuring Centralized ManagementGroups
This chapter describes how to configure centralized management groups (CMG) usingthe administration GUI. Centralized management enables you to administerconfigurations on a group of Screens remotely.
The following information describes how to use the administration GUI. For anexample of a CMG setup, see the SunScreen 3.2 Configuration Examples manual.
The following table lists the procedures in this chapter.
TABLE 7–1 Procedures for Centralized Management
“To Generate an IKE or SKIP Certificate on the Primary Screen” on page 245
“To Associate the IKE or SKIP Primary Screen’s Certificate with the Primary Screen Object”on page 247
“To Put the IKE or SKIP Primary Screen’s Certificate on the Secondary Screen” on page 249
“To Add the IKE or SKIP Primary Screen Object to the Secondary Screen” on page 251
“To Generate an IKE or SKIP Certificate for the Secondary Screen” on page 252
“To Modify the IKE or SKIP Secondary Screen Object” on page 253
“To Configure the Secondary Screen for Management by the Primary Screen” on page 255
“To Add the Secondary Screen’s Certificate ID to the Primary Screen” on page 259
“To Add a Secondary Screen Object to the Primary Screen” on page 260
“To Define the Secondary Screen’s Interfaces on the Primary Screen” on page 263
“To Add a New Address Group to the Primary Screen” on page 261
“To Configure the Primary Screen to Manage the Secondary Screens” on page 264
241

CMG OverviewA centralized management group is comprised of a primary Screen and a number ofsecondary Screens. The primary Screen, where all configuration objects reside,manages both itself and the centralized management group’s secondary Screens. Theprimary Screen’s function is to push policy configurations to the secondary Screens inthe CMG. This capability enables you to manage many Screens effectively from onelocation.
To configure a centralized management group, you have to exchange certificateinformation between the CMG primary and secondary Screens, then add thesecertificates, along with the Admin IP address information and encryption algorithmsfor the respective Screens, to the Screen objects.
On the CMG primary Screen, you need to specify each interface present on anysecondary Screen. These interface definitions should include the related Screen objectto make them Screen-specific.
Finally, you must add packet filtering rules to both the primary and secondary Screensso the primary Screen can push its policy to the secondary Screens.
CMG RequirementsMany configurations require cluster members to pass through a firewall in order tocommunicate with the primary Screen. In these configurations, any firewall beingtraversed must contain packet filtering rules that allow certain traffic from the primaryScreen to pass through its interfaces to the secondary Screen or Screens. These rulesmust include the following services:
� SKIP� Certificate Discovery Protocol� IPsec/IKE
242 SunScreen 3.2 Administration Guide • December, 2001

Note – Although SKIP and IPsec are different protocols and cannot interoperate (SKIPcan communicate with any release of SKIP, but not with IPsec.) , you can have SKIPrules and IPsec rules on both machines as long as there is no host overlap. That is, youmay set the secondary Screen up to use SKIP to encrypt all traffic between A and B andIPsec to encrypt all traffic between A and C. For this type of setup, the CMG primaryScreen should have as its ADMIN_CERTIFICATE a certificate group containing oneSKIP and one IKE certificate. Each secondary Screen will have as itsADMIN_CERTIFICATE either a SKIP or an IKE certificate and the appropriateencryption parameters.
CMG Configuration TasksThe following steps outline the workflow in setting up a centralized managementgroup (CMG). Detailed steps for each task are provided in the following sections.
1. Generate a certificate for the primary Screen (if needed.)
2. On the primary Screen, associate this Certificate with the primary Screen object.
3. Add the primary Screen certificate to the secondary Screen.
4. Add a Screen object for the primary Screen to the secondary Screen.
5. Generate a certificate for the secondary Screen (if needed.)
6. On the secondary Screen, modify the secondary Screen object.
7. Add new rules on the secondary Screen allowing it to be managed by the primaryScreen, and activate the policy.
8. Add the secondary Screen certificate to the primary Screen.
9. Add a Screen object for the secondary Screen to the primary Screen.
10. Add a new address group on the primary Screen.
11. Define the secondary Screen’s interfaces on the primary Screen.
12. Add new rules on the primary Screen allowing it to manage the secondary Screen.
13. On the primary Screen, activate the policy for the CMG.
� Basic Centralized Management Procedure1. Choose a policy in the Policies List page.
Configuring Centralized Management Groups 243

2. Click the Edit button.
The Policy Rules page appears.
244 SunScreen 3.2 Administration Guide • December, 2001

� To Generate an IKE or SKIP Certificate on thePrimary ScreenIf you selected remote administration during SunScreen installation, a certificate wasautomatically generated for the Screen, using the primary Screen’s hostname with a.admin suffix. You can use this certificate to configure centralized management; youdo not need to generate a new certificate.
If you did not select remote administration during SunScreen installation, perform thefollowing steps on the primary Screen to generate a new certificate:
1. Execute the steps in “Basic Centralized Management Procedure” on page 243.
2. Select Certificate from the Type list.
Configuring Centralized Management Groups 245

3. (SKIP only) Select Generate SKIP UDH from the Add New list.
The certificate dialog box appears with options for the type of key to generate. Thedefault value for the type is highest available.
4. (SKIP only) Type the name of the CMG’s primary Screen (with the suffix .admin)in the Name field of the Certificate dialog box.
In this example, boss is the primary CMG Screen’s host name.
5. (SKIP only) Click the Generate New UDH button.
Once generated, the Certificate ID field contains the Certificate Identifier for theCMG’s primary Screen. You use the name of the Certificate Object (as specified in theName field) to configure the secondary Screen.
6. (IKE only) Select Generate IKE Certificate from the Add New list.
246 SunScreen 3.2 Administration Guide • December, 2001

The certificate dialog box appears with options for the type of key to generate. Thedefault value for the type is highest available.
7. (IKE only) Type the name of the CMG’s primary Screen (with the suffix .admin) inthe Name field of the Certificate dialog box.
In this example, boss is the primary CMG Screen’s host name.
8. Fill in the remainder of the fields as called out in “To Generate an IKE Certificate”on page 67.
9. (IKE only) Click the Generate button.
The IKE certificate is generated. You use the name of the Certificate Object (asspecified in the Name field) to configure the secondary Screen.
10. Click the OK button.
� To Associate the IKE or SKIP Primary Screen’sCertificate with the Primary Screen ObjectPerform the following steps on the primary Screen:
1. Execute the steps in “Basic Centralized Management Procedure” on page 243.
Configuring Centralized Management Groups 247

2. Select Screen from the Type list.
3. Click the Search button.
The results area now contains the name of the CMG’s primary Screen.
4. Select the name of the CMG’s primary Screen in the Results area.
Information about the Screen appears in the Details field
5. Click the Edit button.
The Screen dialog box appears.
6. Click the Primary/Secondary tab.
248 SunScreen 3.2 Administration Guide • December, 2001
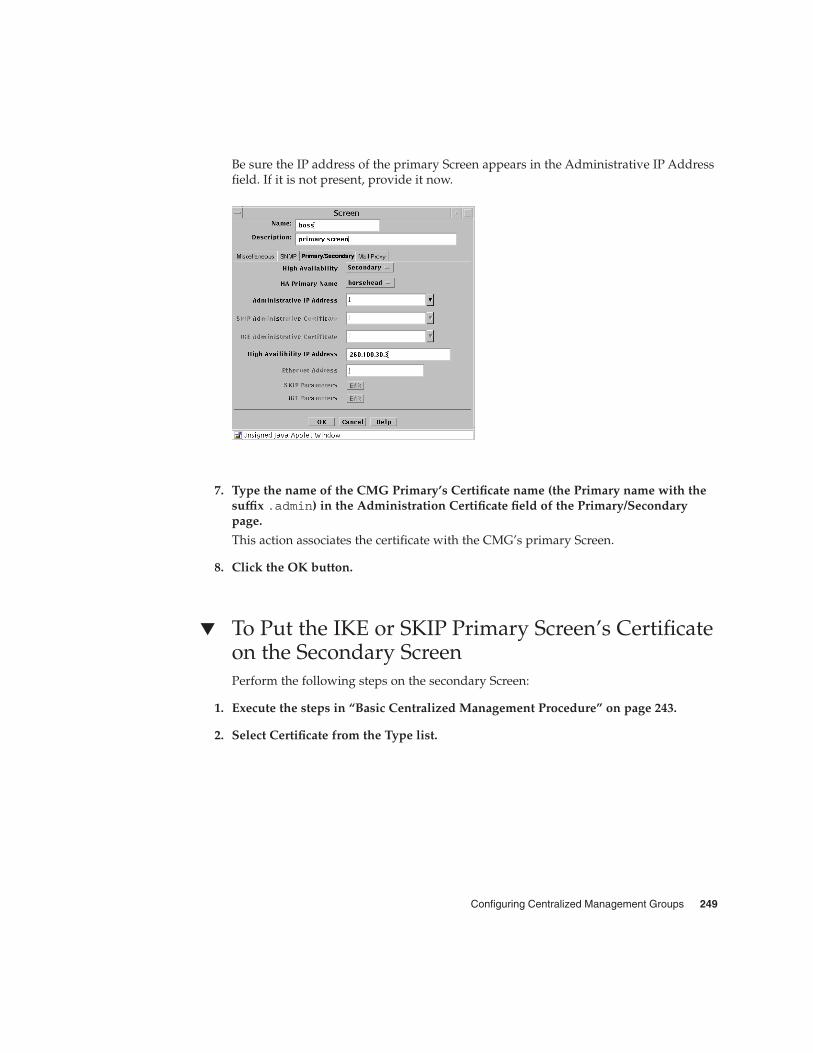
Be sure the IP address of the primary Screen appears in the Administrative IP Addressfield. If it is not present, provide it now.
7. Type the name of the CMG Primary’s Certificate name (the Primary name with thesuffix .admin) in the Administration Certificate field of the Primary/Secondarypage.
This action associates the certificate with the CMG’s primary Screen.
8. Click the OK button.
� To Put the IKE or SKIP Primary Screen’s Certificateon the Secondary ScreenPerform the following steps on the secondary Screen:
1. Execute the steps in “Basic Centralized Management Procedure” on page 243.
2. Select Certificate from the Type list.
Configuring Centralized Management Groups 249

3. (SKIP only) Select Associate SKIP Certificate from the Add New list.
The Certificate dialog box appears.
4. (SKIP only) Type the primary Screen name (with .admin suffix) in the Name field.
5. (SKIP only) In the Certificate ID field, type the Certificate ID of the primary Screen.
6. (IKE only) Select Associate IKE Certificate from the Add New List.
The certificate dialog box appears.
250 SunScreen 3.2 Administration Guide • December, 2001

7. (IKE only) Type the primary Screen name (with .admin suffix) in the Name field.
8. (IKE only) In the Distinguished Name field, type the Distinguished Name of theprimary Screen.
9. Click the OK button.
� To Add the IKE or SKIP Primary Screen Object tothe Secondary ScreenPerform the following steps on the secondary Screen:
1. Execute the steps in “Basic Centralized Management Procedure” on page 243.
2. Select Screen from the Type list.
3. Click the Add New button.
Configuring Centralized Management Groups 251

The Screen dialog box appears with the Miscellaneous tab selected.
4. Type the name of the CMG’s primary Screen in the Name field.
5. Click the Primary/Secondary tab.
Be sure the IP address of the primary Screen appears in the Administrative IP Addressfield. If it is not present, provide it now.
6. Type the name of the CMG Primary’s Certificate name (the Primary name with thesuffix .admin) in the IKE or SKIP Administration Certificate field of thePrimary/Secondary page.
7. Click the OK button.
� To Generate an IKE or SKIP Certificate for theSecondary Screen
Note – If you selected Remote Administration during SunScreen installation, acertificate was automatically generated for the Screen. This certificate has a namecontaining the primary Screen’s hostname with a .admin suffix. You can use thiscertificate to configure Centralized Management; you do not have to generate a newcertificate.
Perform the following steps on the secondary Screen:
252 SunScreen 3.2 Administration Guide • December, 2001

1. (IKE only) Follow the steps in “To Generate an IKE Certificate” on page 67.
2. (SKIP only) Follow the steps in “To Generate SKIP UDHs Certificates” on page 74.
� To Modify the IKE or SKIP Secondary ScreenObjectPerform the following steps on the secondary Screen:
1. Execute the steps in “Basic Centralized Management Procedure” on page 243.
2. Select Screen from the Type list.
3. Click the Search button.
4. Select the name of the CMG’s secondary Screen from the Results area.
5. Click the Edit button.
The Screen dialog box appears.
6. Select the Primary/Secondary tab in the Screen dialog box.
Configuring Centralized Management Groups 253

7. Select Secondary from the High Availability pulldown.
254 SunScreen 3.2 Administration Guide • December, 2001

8. If not present, type the administration IP address of the CMG’s secondary Screen inthe Administration IP Address field.
9. (IKE only) Type the secondary Screen certificate name in the IKE AdministrationCertificate field.
In this example, the name is efs-u5.admin.
10. (SKIP only) Type the secondary Screen certificate name in the SKIP AdministrationCertificate field.
In this example, the name is efs-u5.admin.
11. Click the OK button.
� To Configure the Secondary Screen forManagement by the Primary ScreenPerform the following steps from the CMG secondary Screen.
Configuring Centralized Management Groups 255

Note – The configuration changes in this step allow the primary Screen to download apolicy to the secondary Screen. Once a policy is downloaded, the changes are nolonger in effect. To download additional policies, see “To Configure the PrimaryScreen to Manage the Secondary Screens” on page 264.
1. Execute the steps in “Basic Centralized Management Procedure” on page 243.
2. Click the Packet Filtering tab of the Policy Rules area.
The policy rules that are currently defined for this policy are displayed.
3. Click the Add New button in the Policy Rules area.
The Rule Definition dialog box appears.
4. Type 1 for the Rule Index.
This index will make the rule the first rule that gets enforced. You must place this rulebefore any other rule that could conflict with it. If you do not place it first, the primaryScreen may not be able to manage the secondary Screen.
5. Fill in the following fields with real values for your configuration (values areprovided for this example):
Screen efs-u5
Service certificate discovery (SKIP only)
Source boss
256 SunScreen 3.2 Administration Guide • December, 2001

Destination efs-u5
Action ALLOW
You can leave default values in all the other fields.
6. Click the OK button.
7. (SKIP only) Repeat Steps 2 through 6 using a Service of skip instead of certificatediscovery
8. Verify that the rule definitions are correct.
The packet filtering rules should look like those in the following figure:
9. Create address groups for each interface on the secondary Screen:
a. From the Type list in the Common Objects area, select Address.
b. Select New Group from the Add New list.
c. Type the name of the address group that you wish to use (bos_le0 for example).
d. Add the address objects to the Include and Exclude lists.
Note – If the objects you need to make the appropriate group are not present, youmay press Cancel. Follow the instructions in “To Add a Group of Addresses”on page 62 to create the necessary objects, then return to this section and startagain at Step a.
e. Click the OK button.
10. Define each interface on the secondary Screen as follows:
a. Select Interface from the Type list.
Configuring Centralized Management Groups 257

b. Select New from the Add New list.
The Interface Definition window appears.
c. Fill in the Interface, Type, Address Group, and Screen fields.
d. Click the OK button.
258 SunScreen 3.2 Administration Guide • December, 2001

� To Add the Secondary Screen’s Certificate ID to thePrimary ScreenPerform the following steps on the primary Screen:
1. Execute the steps in “Basic Centralized Management Procedure” on page 243.
2. Select Certificate from the Type list.
3. Select Associate SKIP Certificate from the Add New list.
The Certificate dialog box appears.
4. Type the secondary Screen name (with .admin suffix) in the Name field.
Configuring Centralized Management Groups 259

5. In the Certificate ID field, type the Certificate ID of the CMG’s secondary Screen.
6. Click the OK button.
� To Add a Secondary Screen Object to the PrimaryScreenAlthough SunScreen EFS 3.0 and 3.1 primary Screens can push rules to 3.2 secondaryScreens, they can only do so using the functionality of the primary Screen’s softwarerelease. A SunScreen primary Screen, however, can manage SunScreen EFS Version 3.0and 3.1 secondary Screens effectively. If in doubt, install the latest software release onthe primary Screen.
Perform the following steps on the primary Screen:
1. Execute the steps in “Basic Centralized Management Procedure” on page 243.
2. Select Screen from the Type list.
3. Click the New button.
260 SunScreen 3.2 Administration Guide • December, 2001

The Screen dialog box appears with the Miscellaneous tab selected.
4. Type the name of the CMG’s secondary Screen in the Name field then click thePrimary/Secondary tab.
5. Select the primary Screen object name by selecting it from the Primary Name list.
This action tells the secondary Screen the name of its primary Screen.
6. Be sure the IP address of the secondary Screen appears in the Administrative IPAddress field.
7. Type the CMG secondary certificate name (the Secondary name with the suffix.admin) in the Administration Certificate field of the Primary/Secondary page.
8. To edit either the SKIP or IKE parameters, click the appropriate Edit button.
9. Click the OK button.
� To Add a New Address Group to the PrimaryScreenPerform the following steps on the primary Screen:
1. Execute the steps in “Basic Centralized Management Procedure” on page 243.
Configuring Centralized Management Groups 261

2. Select Address from the Type list.
3. Select New Group from the Add New list.
The Address dialog box appears.
4. Type the name of the Address Group.
In this example, you create the Address Group efs-u5_le0 to be used for theinterface definition on the secondary Screen.
5. Select the name of the secondary Screen from the Screen list.
In this example, the Screen name is efs-u5.
6. Click the OK button.
Select the address objects to include and exclude from this address group. If therequired object is not listed, click the Cancel button and follow the instructions in “ToAdd a Group of Addresses” on page 62. After you create the required objects, return tothis section and start again.
262 SunScreen 3.2 Administration Guide • December, 2001

� To Define the Secondary Screen’s Interfaces on thePrimary ScreenPerform the following steps on the primary Screen:
1. Execute the steps in “Basic Centralized Management Procedure” on page 243.
2. Select Interface from the Type list.
3. Select New from the Add New list.
The Interface Definition dialog box appears.
4. Define the interfaces of the secondary Screen:
Configuring Centralized Management Groups 263
The interface definition for efs-u5_le0 is shown in this figure. You must define eachof the secondary Screen’s interfaces on the primary Screen as follows, and eachdefinition must contain one of the following:
Interface The actual interface name on the secondary Screen
Type STEALTH, ROUTING, or ADMIN
Screen Screen name as defined in the Screen object
Address Group Valid addresses for this interface
The Interface Definition dialog box is now identical on both screens.
5. Click the OK button.
� To Configure the Primary Screen to Manage theSecondary ScreensPerform this task on the CMG primary Screen. It adds policy rules to allow theprimary Screen to pass management traffic through the secondary Screen’s interfaces.
1. Execute the steps in “Basic Centralized Management Procedure” on page 243.
2. Select the Packet Filtering tab of the Policy Rules area.
The policy rules that are currently defined for this policy are displayed.
3. Click the Add New Rule button in the Policy Rules area.
The Rule Definition dialog box appears.
264 SunScreen 3.2 Administration Guide • December, 2001

4. Type 1 for the Rule Index.
Note – This index makes this rule the first rule that gets enforced. You must place thisrule before any other rule that could conflict with it. If you do not place it first, theprimary Screen may not be able to manage the secondary Screen.
5. Fill in the following fields with real values for your configuration (values areprovided for this example):
Screen efs-u5
Service certificate discovery (SKIP only)
Source boss
Destination efs-u5
Action ALLOW
You can leave default values in all the other fields.
6. Click the OK button.
7. (SKIP only) Repeat Steps 1 through 5 using a service of skip instead of certificatediscovery.
8. Verify that the rule definitions are correct.
Configuring Centralized Management Groups 265

The packet filtering rules should look like the following:
9. Create address groups for each interface on the secondary Screen using theinstructions in “To Add a New Address Group to the Primary Screen” on page 261.
10. Define each of the secondary Screens’s interfaces using the instructions in “ToDefine the Secondary Screen’s Interfaces on the Primary Screen” on page 263.
11. From the primary Screen, activate the policy to push it to all the CMG secondaryScreens.
Note – Be sure to activate the policy on the secondary Screen first so it will be able toreceive the pushed policy from the primary Screen.
266 SunScreen 3.2 Administration Guide • December, 2001

CHAPTER 8
Adding Remote AdministrationStations After Installation
This chapter describes how to add a remote Administration Station after you havealready installed SunScreen. There are three basic steps:
1. Install the administration software on the new remote Administration Station.
2. Set up the Screen to use the new Administration Station.
3. Set up the access control list on the new remote Administration Station.
Much of the information you need to perform this task is located in the SunScreenInstallation Guide. Refer to it for detailed information on how to install the SunScreenadministration software and certificates on the additional remote AdministrationStation.
Adding a Remote Administration StationIf you have already set up a remote Administration Station with your Screen (and youwant to add an additional Administration Station), you should have a Screencertificate and admin certificate group, so you can skip most of these steps and godirectly to “To Inform the Screen About the New Remote Administration Station”on page 268.
If this is the first remote Administration Station (Screen installed with localadministration only), you need to create a certificate and admin certificate groupbefore you add the remote Administration Station certificate. The following procedureexplains how to accomplish this task.
267

� To Set Up the Screen to Use the New RemoteAdministration Station
1. Generate a certificate for the Screen (see “To Generate SKIP UDHs Certificates”on page 74 if you are using a SKIP certificate or “To Generate an IKE Certificate”on page 67 if you are using an IKE certificate).
2. (SKIP only) Issue a skipd_restart command.
3. Add the certificate from remote Administration Station to the Screen (see “ToAssociate SKIP Certificate” on page 80 if you are using a SKIP certificate or “ToAssociate an IKE Certificate” on page 73 if you are using an IKE certificate).
4. Add a certificate group named admin with the Administration Station certificate asa member of this group (see “To Add a Certificate Group” on page 82).
5. Add an Administrative Access rule for Remote Administration using the adminuser, admin certificate group, and encryption parameters that match those of theremote Administration Station (see “To Add or Change an Administrative AccessRule for Remote Administration” on page 139).
6. Save and activate the policy.
� To Inform the Screen About the New RemoteAdministration StationAfter installing the SunScreen administration software and certificates, follow thesteps below to inform the Screen about the new remote Administration Station.
1. Choose the policy Initial in the Policies List page.
268 SunScreen 3.2 Administration Guide • December, 2001
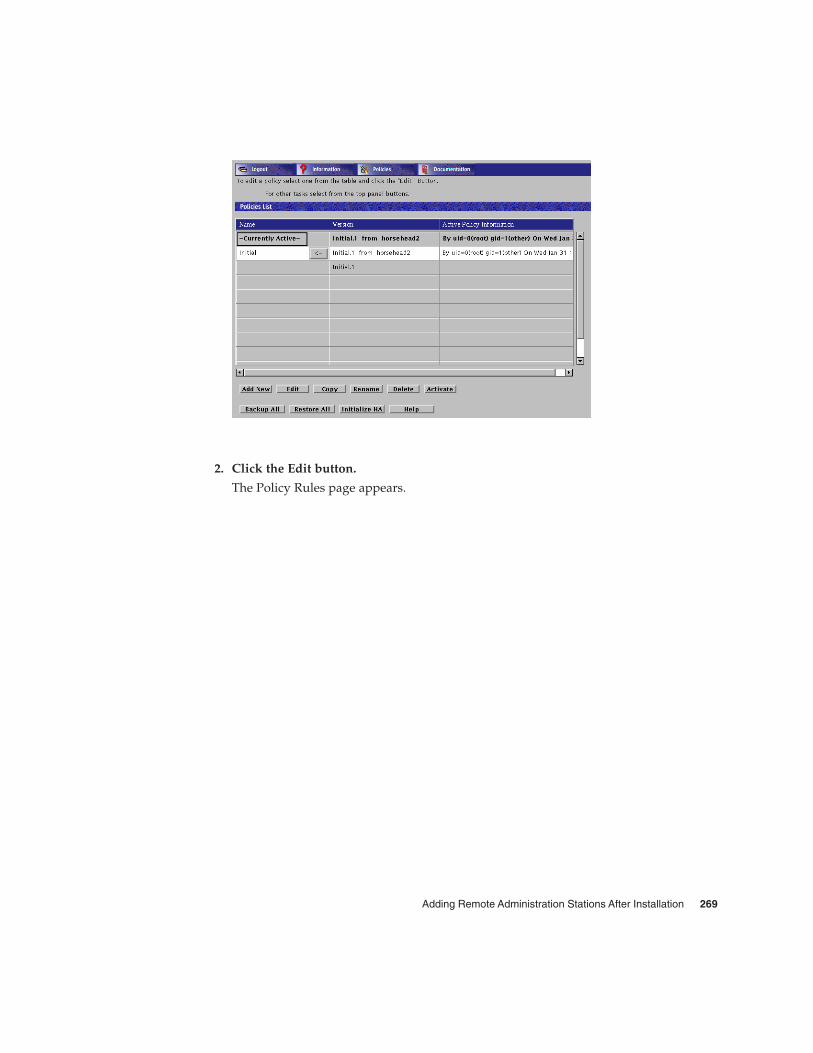
2. Click the Edit button.
The Policy Rules page appears.
Adding Remote Administration Stations After Installation 269

3. Select Certificate in the Type list.
4. Select Associate SKIP Certificate from the Add New list.
The Certificate dialog box appears.
270 SunScreen 3.2 Administration Guide • December, 2001

5. Type a name for the new remote Administration Station in the Name field.
6. Type the certificate number of the new remote Administration Station in theCertificate ID field.
The Certificate ID begins with 0x.
7. Click the OK button.
8. Click the Administrative Access tab in the Policy Rules area.
The Administrative Access area appears.
9. Click the Edit button below the Access Rules for Remote Administration table.
The Remote Access Rules dialog box appears. Note the name in the Certificate Groupfield. In the following steps, you must add the certificate of the new remoteAdministration Station to this group.
Adding Remote Administration Stations After Installation 271

10. Click the Cancel button.
11. Select Certificate in the Type list.
12. Click the Search button.
13. Select the Certificate Group name in the Results area that was displayed in theCertificate Group field of the Remote Access Rules dialog box, in Step 3 throughStep 7.
14. Click the Edit button.
The Certificate dialog box appears.
272 SunScreen 3.2 Administration Guide • December, 2001
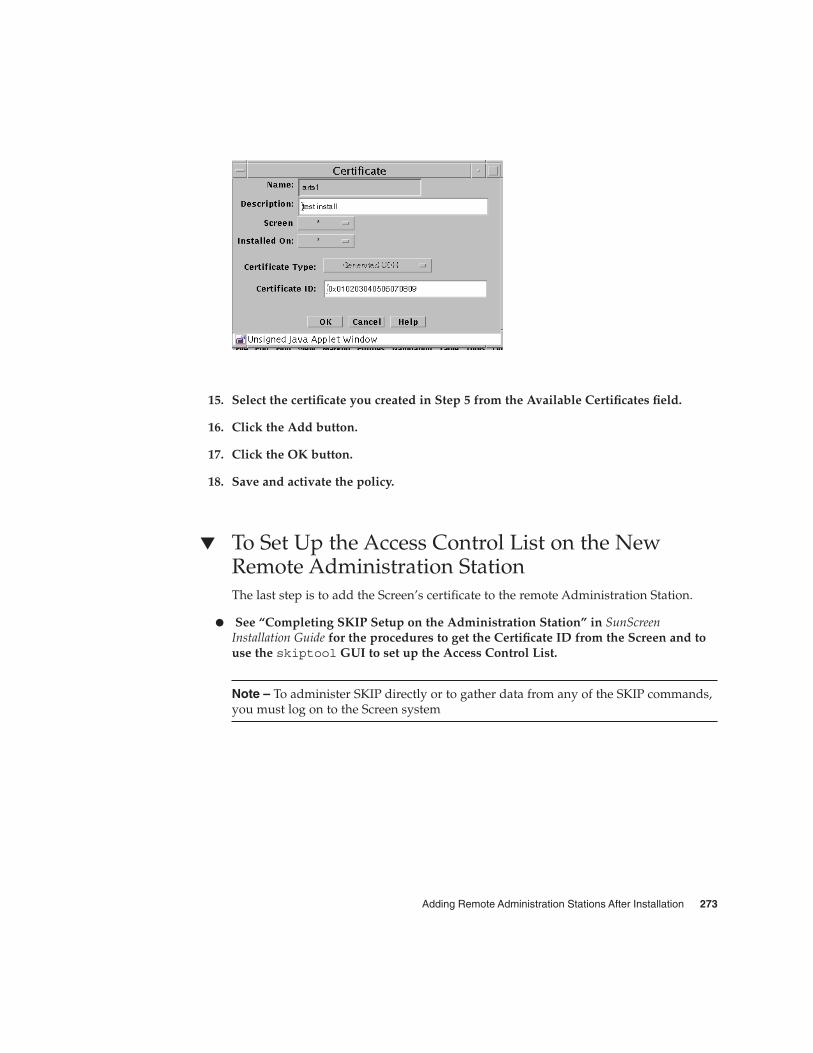
15. Select the certificate you created in Step 5 from the Available Certificates field.
16. Click the Add button.
17. Click the OK button.
18. Save and activate the policy.
� To Set Up the Access Control List on the NewRemote Administration StationThe last step is to add the Screen’s certificate to the remote Administration Station.
� See “Completing SKIP Setup on the Administration Station” in SunScreenInstallation Guide for the procedures to get the Certificate ID from the Screen and touse the skiptool GUI to set up the Access Control List.
Note – To administer SKIP directly or to gather data from any of the SKIP commands,you must log on to the Screen system
Adding Remote Administration Stations After Installation 273

274 SunScreen 3.2 Administration Guide • December, 2001

CHAPTER 9
Getting Status and Managing Logs
This chapter describes the following tasks associated with the Information page in theadministration GUI:
� Viewing status information� Viewing SKIP statistics� Viewing logs� Setting the log retrieval mode� Setting a log viewing filter� Saving and clearing the log� Changing the log file size for a Screen
The Information PageThe Information page provides statistics, logs, and other information, such as systemboot time, SunScreen boot time, version, and information about high availability. Todisplay the Information page, click the Information button in the SunScreen banner.
275

Status Information
� To View Status Information1. Click the Information button in the SunScreen banner.
The Information page displays.
2. Click the Status tab.
The Status page displays.
276 SunScreen 3.2 Administration Guide • December, 2001

The Status page shows SunScreen product information as well as HA configurationinformation.
The following table describes the information presented on this page.
TABLE 9–1 Status Information
Title Description
Product The name of the software product.
System BootTime
Date and time when the system was last restarted.
Getting Status and Managing Logs 277
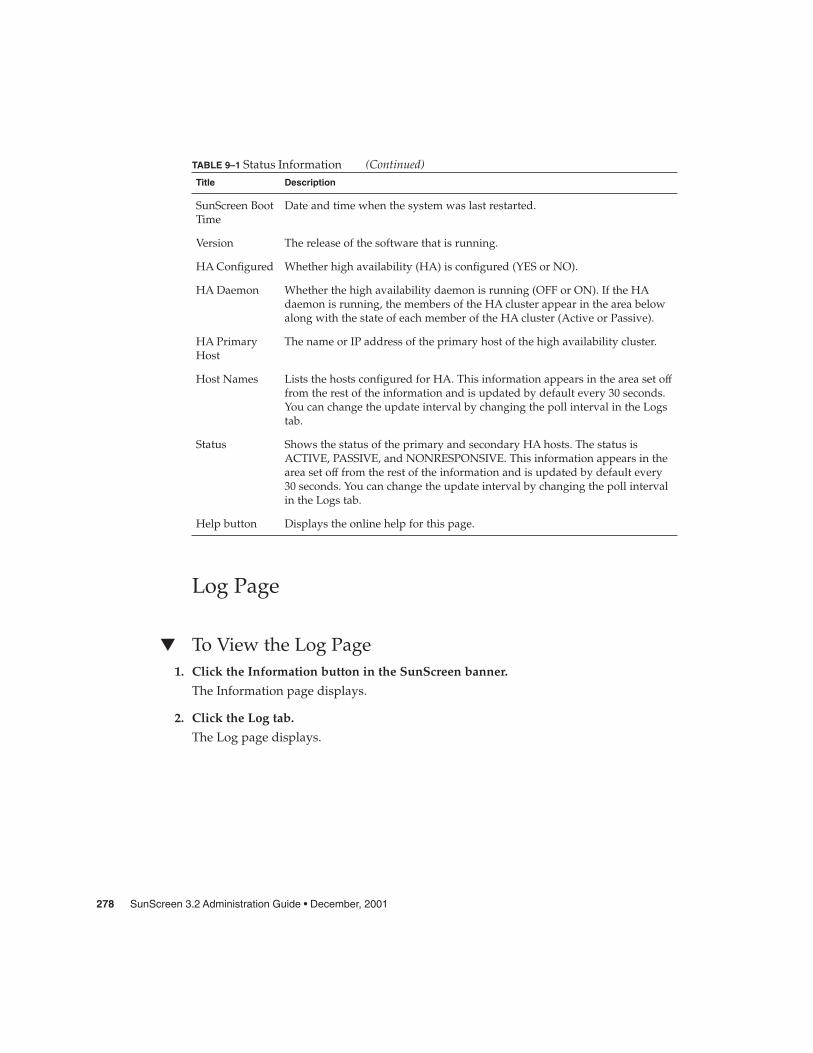
TABLE 9–1 Status Information (Continued)Title Description
SunScreen BootTime
Date and time when the system was last restarted.
Version The release of the software that is running.
HA Configured Whether high availability (HA) is configured (YES or NO).
HA Daemon Whether the high availability daemon is running (OFF or ON). If the HAdaemon is running, the members of the HA cluster appear in the area belowalong with the state of each member of the HA cluster (Active or Passive).
HA PrimaryHost
The name or IP address of the primary host of the high availability cluster.
Host Names Lists the hosts configured for HA. This information appears in the area set offfrom the rest of the information and is updated by default every 30 seconds.You can change the update interval by changing the poll interval in the Logstab.
Status Shows the status of the primary and secondary HA hosts. The status isACTIVE, PASSIVE, and NONRESPONSIVE. This information appears in thearea set off from the rest of the information and is updated by default every30 seconds. You can change the update interval by changing the poll intervalin the Logs tab.
Help button Displays the online help for this page.
Log Page
� To View the Log Page1. Click the Information button in the SunScreen banner.
The Information page displays.
2. Click the Log tab.
The Log page displays.
278 SunScreen 3.2 Administration Guide • December, 2001

The following table describes the column headings for the log panel of the SunScreenInformation page.
TABLE 9–2 Column Headings on the Log Panel of the SunScreen Information Page
Field Description
Time Indicates the time that the packet or event represented by this record waslogged by the Screen. Use this time field to retrieve records in Historicalmode as set in the Log Browser Tab Retrieval Setting.
Level Indicates the type and severity level of the logged event.
Service Indicates the network service or protocol, such as TCP, IP, NFS, Telnet, orHTTP, over which this packet was sent or to which the event is related.
Address(es) Shows the address from which and to which a packet was sent. Arrowsindicate direction. Some events that, by themselves, are not related to IPtraffic will not have an address or addresses, as shown in the example.
Getting Status and Managing Logs 279

TABLE 9–2 Column Headings on the Log Panel of the SunScreen Information Page(Continued)Field Description
Reason/Detail Shows the reason a packet or event was logged or the detail regarding thelogging. This information depends on the requirements of the rules within apolicy.
The logs tab also displays the Retrieval Setting tab and Information tab for the logs.
Logged packets are configured in the packet filtering rules so that a packet or an eventis displayed which meets the requirements of a rule in a policy. The log has tworetrieval modes: Historical and Real Time.
� The Historical mode allows you to examine a particular segment for a particulartime.
� The Real Time mode displays information as the packets pass through the Screenwhile you are looking at the log.
Retrieval Setting Tab
The following table describes the controls on the Retrieval Setting tab.
TABLE 9–3 Controls on the Retrieval Setting Tab
Control Description
Retrieval Mode radiobuttons
Specifies the time frame for which you want log messages:� Historical allows you to examine a particular segment for
particular time and shows the segment of that log the mostclosely matches the time that you see as the first item in the listof logged packets. You must use four digits in specifying theyear, for example, 2000.
� Real Time specifies that the system displays the most recentlylogged records. You can specify how often the Log Browserpage updates the log display in the Real Time Poll Interval field.If you set the log to Real Time Poll Interval, click the applybutton. Depending upon your configured settings, records arelogged faster than the Log Browser polls for new records. Thus,the display falls more and more behind as time goes on. If youwant to see the most recently logged records. Click the Applybutton to force a retrieval. The Poll Interval field also sets thetimes when the information in the Statistics tab is updated.
280 SunScreen 3.2 Administration Guide • December, 2001

TABLE 9–3 Controls on the Retrieval Setting Tab (Continued)Control Description
Fetch More Recordsbutton
Retrieves more log records in the historical mode only. If you checkHistorical Reference Time and click the Apply button afterspecifying a date and time for retrieving records, the display willretrieve log records using the date and time that the log file was lastcleared. Using this button, you can display the next screen of laterrecords.
Filter Keywords field Provide the ability to create many simple filtering expressions fromthe choice lists available. These controls reduce typing effort as wellas serving as reminders of filtering options. For more detail, see thefollowing section, “Setting a Log Viewing Filter” on page 281.
Add to Current Filterbutton
Causes these items chosen in the Filter Keywords fields to be addedto the Filter Keywords text entry box at its current insertion pointer.For more detail, see the following section, “Setting a Log ViewingFilter” on page 281. It adds all text that is currently selected in thefour combo boxes.
Current Filter text box Allows you to enter an expression of the log-browser filteringlanguage. An arbitrary logdump expression can be entered thereand activated using the Apply button. For more detail, see “Settinga Log Viewing Filter” on page 281 below.
Setting a Log Viewing FilterThe Log Browser filters log events to be displayed. The language that it uses isidentical to the filtering options of the logdump command in the command-lineprogram; it is a superset of the language used by the Solaris snoop packet monitortool.
You have full access to this language typing an arbitrary logdump expression in theCurrent Filter text entry box in its Retrieval Settings tab and clicking the Apply buttonto activate it.
In addition, the Filter Keywords controls provide the ability to create many simplefiltering expressions. These controls reduce typing effort as well as serving asreminders of filtering options.
The Filter Keywords controls are used by selecting one or more operations from theirchoice lists or entering a target (operand) in the Text box. After choosing or typingyour entry, click the Add to Current Filter button to add these items to the FilterKeywords text entry box at its current insertion pointer.
The leftmost editable combo box contains the Boolean operators and, or, and not.
The Events box provides filtering terms that are complete and restrict the type of logevent displayed. The following table describes the terms in the Events box.
Getting Status and Managing Logs 281

TABLE 9–4 Filter Terms of the Events Box
Term Description
loglvl pkt Allows displaying network packet-type events
loglvl sess Allows displaying network session-type events
loglvl auth Allows displaying events related to authentication operations
loglvl app Allows displaying events related to screen application (usually proxy)operations
logapp activate Allows displaying events related to policy activation.
logapp auth Allows displaying events from the authentication subsystem
logapp compiler Allows displaying events related to policy compilation
logapp edit Allows displaying events related to registry or policy editing
logapp ftpp Allows displaying events from the FTP proxy
logapp ha Allows displaying events related to HA operation
logapp httpp Allows displaying events from the HTTP proxy
logapp iked Allows displaying events related to the IKE daemon
logapp log Allows displaying events related to the logging facilities themselves
logapp restore Allows displaying events related to policy restoration
logapp scan Allows displaying events related to proxy content scanning andredirection
logapp smtpp Allows displaying events from the SMTP proxy
logapp telnetp Allows displaying events from the Telnet proxy
logsev emerg Allows displaying events of an emergency severity
logsev alert Allows displaying events of an alert severity or above
logsev crit Allows displaying events of a critical severity or above
logsev err Allows displaying events of an erroneous severity or above
logsev warn Allows displaying events of a warning severity or above
logsev note Allows displaying events of a notice severity or above
logsev info Allows displaying events of an informative severity or above (all eventsthat are not of debug severity)
logsev debug Allows displaying events of a debug severity or above (all events)
282 SunScreen 3.2 Administration Guide • December, 2001

TheTerms box provides filtering terms most of which are incomplete and require anoperand value, You type these in the Text box. They are added to the choice list of theText box for reference so that you need not retype the value if you want to use it again.The following table describes the filter terms in the Terms box.
TABLE 9–5 Filter Terms in the Terms Box
Term Description
logwhy reason# Restricts display to packets that have the given logging reason whycode
logiface iface Restricts display to packets that arrived on the interface named iface
host hostname Restricts display to events either from or to hostname
dst hostname Restricts display to events destined for hostname
src hostname Restricts display to events origination from hostname
port hostname Restricts display to events related to the service svcname
dstport hostname Restricts display to events targeted to the service svcname
srcport svcname Restricts display to events originating from the service svcname
net netaddr Restricts display to events either from or to the network whosenumber is netaddr
udp Restricts display to events related to the UDP transport protocol
tcp Restricts display to events related to the TCP transport protocol
icmp Restricts display to packets of the ICMP control protocol
rpc Restricts display to packets of the RPC protocol
The terms in italics are variables for which you must supply a value or values in thewhen you choose this term from the choice list. The values for the variable are asfollow:
� reason # The reason number is shown in “Error Messages” in SunScreen 3.2Administrator’s Overview.
� hostname can be:
� An IP address (dotted-quad a.b.c.d) (for example, 129.9.9.99)
� An IP address range (a.b.c.d..e.f.g.h) (for example,129.9.9.0..129.9.9.254)
� A hostname known to the screen’s naming service (for example, the DNS namehost.your-domain.com)
� svcname can be:
� A numeric TCP or UDP port number (for example, 23 for Telnet)
Getting Status and Managing Logs 283

� A numeric TCP or UDP port number range (for example, 6000. .6023 for Xwindows)
� A service name known to the screen’s naming service (for example, domainfound in /etc/services)
� iface can be:
� The name of an interface (for example hme0)
� netaddr can be:
� The IP network number (for example 199.12.200)
The Information TabThe log-browser Information tab on the Screen Information page and shown in belowprovides the statistics for the current log.
The following table describes the fields on the Information tab. You cannot edit thefields on this page.
TABLE 9–6 Fields on the Information Tab
Control Description
Server Name field Indicates the name of the Screen to which the Log Browser isconnected.
Log current size field(bytes)
Indicates the current size of the log file in bytes on the server.
Log maximum size field(bytes)
Indicates the maximum size of the log file in bytes on the server.
Last Cleared field Indicates the date and time the log file was last cleared.
284 SunScreen 3.2 Administration Guide • December, 2001

TABLE 9–6 Fields on the Information Tab (Continued)Control Description
Cleared By field Identifies the login name of the administrator who last cleared thelog file.
Log loss count (records)field
Indicates the number of log records that have been thrown awaysince the last “clear” operation. Log records are lost if the log growsbeyond its maximum size or if the file system on which the log iswritten fills before that maximum is reached. Packets that cannot belogged because the traffic load exceeds the logger’s ability to storeentries are not counted.
Action ButtonsThe following table describes the action buttons on the SunScreen Information Page.
TABLE 9–7 Action Buttons on the SunScreen Information Page
Button Description
Apply button Applies any changes to the settings for the Log Browser page. Youcan click the Apply button to update the data displayed on the LogBrowser page in the real time mode.
Cancel button Undoes any changes that have not yet been applied.
Defaults button Resets the Log Browser settings to their default values.
Save Log button Saves the log file to a local file. If you are using Netscape Navigatoror Internet Explorer, you must use the Java plug-in to save the logto a local file.
Clear Log button Clears the log file, which clears the log record display area.
Save/Clear Log button Saves and clears the log file. While the file is being saved, the Screendoes not add records to the log. If you are using NetscapeNavigator or Internet Explorer, you must use the Java plug-in tosave the log to a local file.
Help button Displays a browser window with the online help for the SunScreenInformation Page. Two Help buttons appear on this page. Theyboth display the same online help.
Getting Status and Managing Logs 285

Statistics Page
� To View the Statistics Page1. Click the Information button in the SunScreen banner.
The Information page displays.
2. Click the Statistics tab.
The Statistics page displays.
The Traffic Statistics panel displays traffic statistics for each interface on the Screen.The following table describes the fields on the Traffic Statistics panel of the Statisticstab. The values displayed in these fields cannot be modified.
286 SunScreen 3.2 Administration Guide • December, 2001

TABLE 9–8 Controls on the Traffic Statistics Panel of the Statistics Page
Control Description
Interface field Name of the interface.
Address field Address of the interface.
Inputs field Total number of packets seen on that network interface. This numberincludes packets processed by the Screen and intranet traffic. Becausethis counter records more than just the number of packets through theinterface, the number can be much higher than the sum of the numbersin the Passes and Drops fields, which record the number of packetspassed and dropped.
Outputs field Total number of packets passed from other interfaces on the Screen andsent out over this interface.
Passes field Number of packets received from another interface, matched to anALLOW rule exactly, and sent out over the designated interface.
Logs field Number of packets that have been logged by the Screen according to theactions in the active configuration.
Alerts field Number of SNMP alerts generated because of the traffic on this networkinterface.
Drops field Number of packets that have been dropped, either as a result of exactlymatching a DENY rule or as a result of not matching any rule and beingdropped as the default action of the Screen’s interface.
AllocFail field Error counter for packets lost because of the lack of resources.
NoCanPuts field Error counter for packets lost because of the lack of stream flow control.
BadPackets field Error counter for packets lost because of errors.
The SKIP Statistics panel shows the SKIP statistics for the SunScreen. The followingtable describes the fields on the SKIP Statistics panel of the Statistics page. The valuesdisplayed in these fields cannot be modified.
TABLE 9–9 Controls on the SKIP Statistics Panel of the Statistics Tab
Control Description
skip_hdr_bad_versions field Total number of SKIP headers with invalid protocolversions.
skip_hdr_short_ekps field Number of SKIP headers with short encrypted packetfields.
skip_hdr_short_mids field Number of SKIP headers with short MID fields.
Getting Status and Managing Logs 287

TABLE 9–9 Controls on the SKIP Statistics Panel of the Statistics Tab (Continued)Control Description
skip_hdr_bad_kp_algs field Number of SKIP headers with unknowncryptographic algorithms.
V1 skip_hdr_encodes field Number of SKIP V1 headers encoded.
V1 skip_hdr_decodes field Number of SKIP V1 headers decoded.
V1 skip_hdr_runts field Number of SKIP V1 headers with short packets.
V1 skip_hdr_short_nodeids field Number of SKIP V1 headers with short nodeidentifiers.
IPSP skip_ipsp_decodes field Number of SKIP V2 headers decoded.
IPSP skip_ipsp_encodes field Number of SKIP V2 headers encoded.
IPSP skip_hdr_bad_nsid field Number of headers with a bad V2 name spaceidentifier.
IPSP skip_hdr_bad_mac_algs field Number of headers with unknown or badauthentication algorithms.
IPSP skip_hdr_bad_mac_size field The number of headers with an authentication errorin the MAC size.
IPSP skip_hdr_bad_mac_val field The number of headers with an authentication errorin the MAC value.
IPSP skip_hdr_bad_next field Number of headers with a bad Next Protocol field.
IPSP skip_hdr_bad_esp_spi field Number of headers with a bad V2 SPI field.
IPSP skip_hdr_bad_ah_spi field Number of headers with a bad V2 AH SPI field.
IPSP skip_hdr_bad_iv field Number of headers with a bad V2 initializationvector.
IPSP skip_hdr_bad_short_r_mkeyidfield
Number of headers with a short V2 receiver keyidentifier.
IPSP skip_hdr_bad_short_s_mkeyidfield
Number of headers with a short V2 sender keyidentifier.
IPSP skip_hdr_bad_bad_r_mkeyid field Number of headers with a bad V2 receiver keyidentifier.
skip_key_max_idle field Time, in seconds, until an unused key is reclaimed.
skip_key_max_bytes field Maximum number of bytes to encrypt beforediscarding a key.
skip_encrypt_keys_active field Number of encryption keys in the cache.
skip_decrypt_keys_active field Number of decryption keys in the cache.
288 SunScreen 3.2 Administration Guide • December, 2001

TABLE 9–9 Controls on the SKIP Statistics Panel of the Statistics Tab (Continued)Control Description
skip_key_lookups field Total number of key cache lookups.
skip_keymgr_requests field Total number of key cache misses (key not found).
skip_key-reclaims field Total number of key entries reclaimed.
skip_hash_collisions field Total number of table collisions.
Viewing StatisticsThe Statistics area shows SKIP and traffic statistics for each network interface. Fieldsfor the interface, SKIP key management, SKIP key statistics, and SKIP header statisticsare described in “Logging” in SunScreen 3.2 Administrator’s Overview.
� To See the SKIP Statistics1. Click the Information button in the SunScreen banner.
The Information page displays.
2. Click the Statistics tab.
The Statistics page displays.
Getting Status and Managing Logs 289

Viewing LogsUse the Log tab to view logged packets. You can configure policies in the packetfiltering rules so that a packet is logged when it matches, or does not match, aparticular policy rule criterion. For a complete description of logs, filtering, andretrieval settings, see “Logging” in SunScreen 3.2 Administrator’s Overview.
� To Set the Retrieval ModeYou can view packet activity logs in two modes: real time and historical (for a specifiedtime period).
290 SunScreen 3.2 Administration Guide • December, 2001

1. Click the Information button in the SunScreen banner.
2. Click the Log tab in the Information page.
The Log page displays.
3. Click the Retrieval Settings tab at the bottom of the log.
� Real time mode displays the information as the packets pass through the Screen.
� Historical mode enables you to examine a particular segment for specified time.
Getting Status and Managing Logs 291

Note – If you are using historical mode, you must use four digits to specify theyear, for example, 2001.
� To Set a Log Viewing Filter1. Click the Information button in the SunScreen banner.
2. Click the Log tab in the Information page.
3. Select or type a Boolean operator (AND, OR, or NOT) in the Operator FilterKeywords fields.
4. Either type the entire filter directly into the Current Filter field or perform thefollowing steps:
292 SunScreen 3.2 Administration Guide • December, 2001

a. Select or type a filtering term in the Events Filter Keywords field.
b. Select or type a filtering term in the Terms Filter Keywords field.
c. Type the operand value in the Text Filter Keywords field.
d. Click Add to Current Filter to add the items to the Current Filter field at thecursor insertion point.
e. Click Apply to activate the filter.
Note – For listings of the terms and values permitted in the four Filter Keywordsfields, see the SunScreen 3.2 Administrator’s Overview.
For example, you can type host in the Term field and your machine name in the Textfield to only see records that apply to your machine.
Saving and Clearing the LogThe size of your network configuration and the logging rules you specify can causelog files to become extremely large. You should save and clear them periodically toprevent losing information. The default log size is 100MB, but it is configurable. If thelog file fills up, the oldest data in the log is overwritten and information is lost. AllAdmin Users except those with an access level of STATUS can perform Save or Clearoperations on the logs.
Some browsers do not allow you to save log files because save operations involve alocal write operation, which is not allowed by the Java security model. If you useNetscape Navigator or Internet Explorer, you must use the Java Plug-In to enable saveoperations. The HotJava browser will allow you to perform these operations withoutthe Java Plug-In with the medium/low security level set.
Getting Status and Managing Logs 293

Note – Saving a log to a file does not clear the log records from the Log page.
� To Save the Log1. From the Information page, click the Log button.
The Log page appears.
2. Click the Save Log button at the bottom of the Log page.
The Save File dialog box appears.
3. Type the full path (including file name) of the file where you want to store logs.
294 SunScreen 3.2 Administration Guide • December, 2001

4. Click the OK button.
� To Clear the LogThe following steps clear the page of any log records without saving the records or thelog file.
1. From the Information page, click the Log button.
The Log page appears.
Getting Status and Managing Logs 295
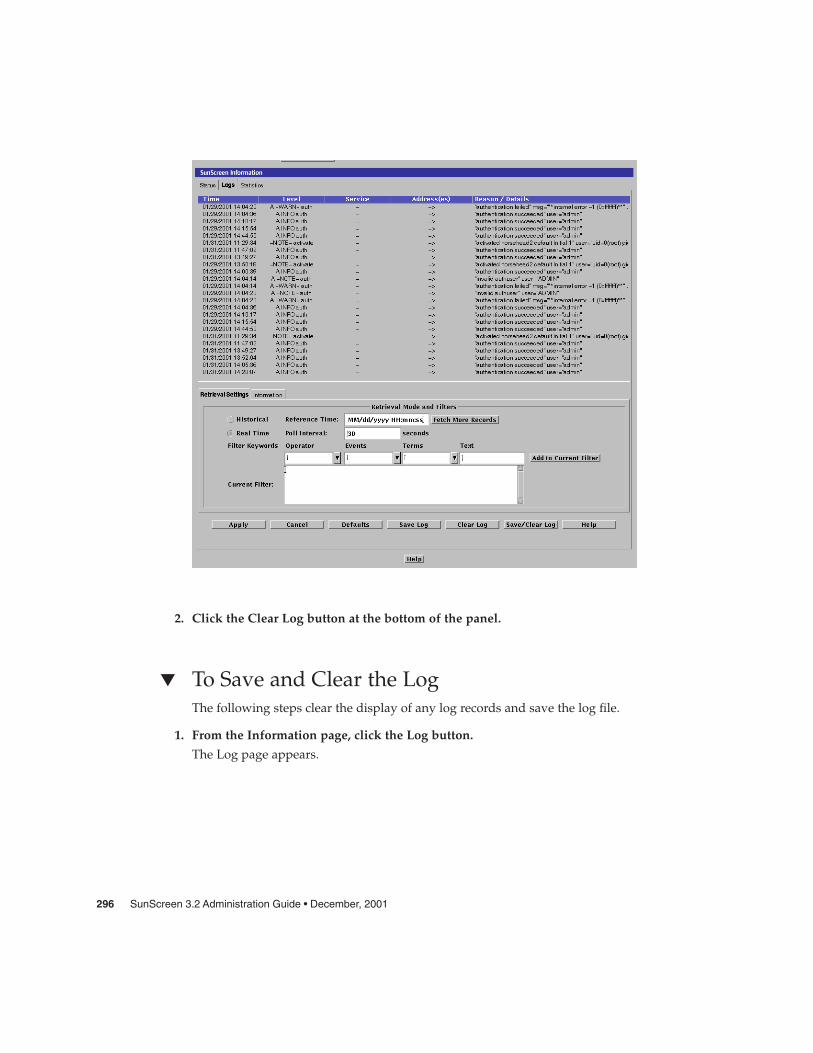
2. Click the Clear Log button at the bottom of the panel.
� To Save and Clear the LogThe following steps clear the display of any log records and save the log file.
1. From the Information page, click the Log button.
The Log page appears.
296 SunScreen 3.2 Administration Guide • December, 2001

2. Click the Save/Clear Log button.
The Save File dialog box appears.
3. Type the full path (including file name) of the file where you want to store logs.
4. Click the Save button.
Changing the Size of the Log FileThe global size of log files is set like other configuration items and controlled by theLogSize variable. You can set this variable with the command-line interface but notwith the administration GUI; however, you can use the administration GUI to set the
Getting Status and Managing Logs 297

size of the log file for a specific Screen. The default log size is 100MB, but it isconfigurable. If the log file fills up, it will overwrite the oldest data and informationcan be lost.
Note – The log file for a Screen is resized only when that Screen is restarted.
� To Change the Log File Size for a Specific Screen1. Select the desired Common Object Type.
2. Click the Search button.
3. Select the entry from the Results area.
4. Click the Edit button.
5. Under the Miscellaneous tab, change the Log Size entry.
298 SunScreen 3.2 Administration Guide • December, 2001
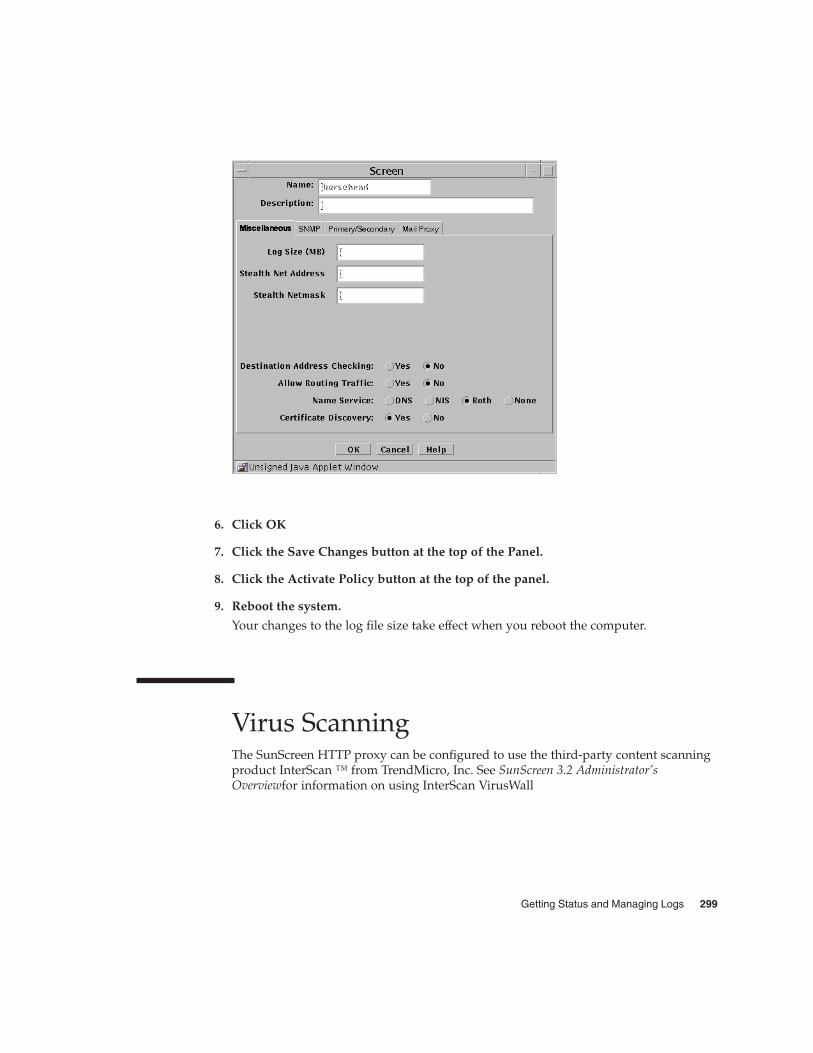
6. Click OK
7. Click the Save Changes button at the top of the Panel.
8. Click the Activate Policy button at the top of the panel.
9. Reboot the system.
Your changes to the log file size take effect when you reboot the computer.
Virus ScanningThe SunScreen HTTP proxy can be configured to use the third-party content scanningproduct InterScan ™ from TrendMicro, Inc. See SunScreen 3.2 Administrator’sOverviewfor information on using InterScan VirusWall
Getting Status and Managing Logs 299

300 SunScreen 3.2 Administration Guide • December, 2001

CHAPTER 10
Using the Command Line Interface
All the SunScreen functionality that is available through the administration GUI is alsoavailable through a command line interface. Administering your Screens through thecommand line can be useful when you want to manage one or more remote Screens orif you use more than one network address.
You can use the command line to access a Screen from its own keyboard when theScreen is being administered locally; this requires that you have superuser (root)access. You can also use the command line to access a Screen from an AdministrationStation when the Screen is being administered remotely; this requires that you useSKIP or IPsec encryption and an admin user name and password.
For more information on the command line, see “Configuration Editor Reference” inSunScreen 3.2 Administrator’s Overview.
Command SummaryThe following commands are available at your shell prompt when /usr/sbin isincluded in your $PATH. The following table lists the SunScreen UNIX (shell)commands and their descriptions. Many of these commands duplicate administrationGUI functions; some provide context for other commands.
TABLE 10–1 SunScreen Command Summary
UNIX Command Description
ssadm Primary command line tool for SunScreen administration. ssadmsubcommands perform various operations, such as editing andactivating a SunScreen configuration and examining the status of aScreen.
301

TABLE 10–1 SunScreen Command Summary (Continued)UNIX Command Description
ss_client Provide communication between a SunScreen AdministrationStation and a Screen that is running an earlier SunScreen firewallproduct release. ss_client is provided only for the purpose ofremotely administering such products using the SunScreen systemas a remote Administration Station.
Note – The commands used for administering SunScreen SKIP are meant to be runonly on a pure Administration Station, not on a Screen. They can be found in “Usingthe Command-Line Interface” in SunScreen SKIP User’s Guide, Release 1.5.1.
UNIX (shell) Commands
ssadm Commandssadm is the primary command line tool for SunScreen administration. ssadm has anumber of subcommands that perform various operations such as editing andactivating a configuration, and examining the status of a Screen.
ssadm runs directly on a locally administered Screen, or indirectly from a remoteAdministration Station that is using SKIP or IPsec to encrypt IP networkcommunications passing between them. See “How SKIP Works” in SunScreen SKIPUser’s Guide, Release 1.5.1 for more information regarding SKIP encryption.
The ssadm command resides in the /usr/sbin directory. Include this directory inyour directory search path to have access to the commands on the local Screen.
Usage:
ssadm [-b] [-n] subcommand [parameters...]
ssadm [-b] [-n] -r remotehost [-F ticketfile] subcommand [parameters...]
Options:
-b Allow binary data (instead of text) in standard inputand output.
-n Do not read any input from standard input.
302 SunScreen 3.2 Administration Guide • December, 2001

-r remotehost Access remote Screen using address or hostnameremotehost.
-F ticketfile Use authorization ticket stored in ticketfile.
The available ssadm subcommands are described in “ssadm Subcommand Summary”on page 304.
The -b option normally is not needed since those subcommands that process binarydata enable the binary mode automatically. For example, ssadm backup, ssadmrestore, ssadm log, ssadm logdump, and ssadm patch handle binary data evenif -b is not specified.
When ssadm is executed locally on the Screen (that is, without the -r option) no loginor authentication is required, but you must be superuser to have any effect.
When ssadm is used with the -r option to access a remote Screen, loginauthentication is required. You must use the ssadm login command to get a ticketthat is used by subsequent invocations of ssadm to allow access to the remote Screen.Normally, the ticket is stored in a ticketfile, the name of which can be specified usingthe -F option, or through the SSADM_TICKET_FILE environment variable. See thessadm login command for information about ticket files and remote administrationusing ssadm.
� To Execute an ssadm Command on a Local Screen� You can configure a local Screen by typing the commands listed in this appendix on
the Screen’s keyboard. For example, to activate a policy called Initial, you wouldtype:
# ssadm activate Initial
where ssadm is the command you want to execute, activate is the name of thessadm subcommand, and Initial is the name of the policy you want to activate.
� To Execute an ssadm -r Command on a RemoteAdministration Station
� To configure a Screen from a remote Administration Station, precede thesubcommands listed in this appendix with ssadm -r and the address or hostnameof the Screen you want to administer. For example, to activate the policy Initial on aremote Screen called SunScreen1, you would type:
# ssadm -r SunScreen1 activate Initial
Using the Command Line Interface 303

Logging In to and Out of SunScreen RemotelyIf you are using remote administration, you must log in before you can perform mostssadm commands.
� To Log In to and Out of SunScreen Remotely1. To log into SunScreen remotely, type the following on the remote Administration
Station:
# SSADM_TICKET_FILE=$HOME/.ssadmticket# export SSADM_TICKET_FILE# touch $SSADM_TICKET_FILE# chmod go= $SSADM_TICKET_FILE# ssadm -r SunScreen1 login username password /WRITE access <E23B344150C702EC>
2. To log out of SunScreen remotely, type the following:
# ssadm -r SunScreen1 logout
ssadm Subcommand SummaryThe following table lists the SunScreen ssadm subcommands and their descriptions.Many ssadm subcommands duplicate administration GUI functions, while othersprovide a context for other subcommands.
TABLE 10–2 SunScreen ssadm Subcommand Summary
ssadm Subcommand Description
activate Activate a Screen policy
active List information about the currently active policy
algorithm List algorithms supported by SKIP
backup Write a SunScreen backup file to standard output
certdb Allows a user to manually administer the two databases of publickey certificates used by SKIP and IKE. These databases store longterm certificates so that they may be accessed by the key manager.
certlocal A utility for managing the two local identity databases on a Screen.ssadm certlocal is the primary tool for administering local IDs.
304 SunScreen 3.2 Administration Guide • December, 2001

TABLE 10–2 SunScreen ssadm Subcommand Summary (Continued)ssadm Subcommand Description
certrldb A utility for managing the certificate revocations lists in the IKEcertificate database. ssadm certrldb can add, delete, extract, andlist IKE certificates based on the command option specified.
configure Create an initial SunScreen configuration. ssadm configure,when combined with pkgadd, is equivalent to using the installationwizard graphical user interface.
debug_level Set or clear the level of debugging output generated by a Screen
edit Run the SunScreen configuration editor (see “Configuration EditorReference” in SunScreen 3.2 Administrator’s Overview)
ha Configure the features of a high availability (HA) Screen
lock Examine or remove the protection lock that the configuration editorplaces on a policy file
log Maintain the Screen log file
logdump Interpret Screen logs and display their contents
login Authenticate a user for administrative access through ssadm to aScreen from a remote Administration Station
logmacro Expands SunScreen logmacro objects
logout Terminate the session created by ssadm login.
logstats Print information about the SunScreen log
patch Install patch, as needed
policy Create, delete, list, rename Screen policies
product Print single line describing the SunScreen product in use
restore Read a backup file from standard input
securid Configure the client layer of the SecurID system
sys_info Print a description of running SunScreen software
traffic_stats Report summary information about the traffic flowing through theSunScreen, classified by interface
You maintain user-controlled data by using the ssadm edit subcommand.
To look at or change a policy in some way, invoke the configuration editor and type aseries of commands that end with save and quit requests.
Using the Command Line Interface 305

ssadm configure Commandssadm configure is a text-based command line utility for creating an initialSunScreen configuration. ssadm configure, combined with pkgadd, is thecommand line equivalent of the installation wizard graphical user interface.
ssadm configure interactively queries you with various options for configuring theSunScreen, creates a configuration, stores it under the policy name Initial, and activatesit. After ssadm configure finishes, you can administer the firewall.
Configuration Editor SubcommandsYou use the ssadm edit subcommands when running the configuration editor,which is responsible for maintaining the SunScreen configuration database.
Note – Be sure to save changes made using commands such as add, del, rename,renamereference, insert, replace, and move, before you quit. Run save onlyonce, just before the quit command to avoid accumulating too many policy versions.
The following table lists the SunScreen configuration editor ssadm editsubcommands and their descriptions. Many subcommands duplicate administrationGUI functions; the remainder provide context for other subcommands.
TABLE 10–3 SunScreen Configuration Editor (ssadm edit) Subcommand Summary
edit Subcommand Description
add Create or redefine an entry
add_member Add a member to a group or list
authuser Manipulates the list of authorized users (see Table 10–4)
del[ete] Delete the specified entry of the given TYPE
del[ete]_member Delete a member from a centralized management group or list
insert Insert a new object of one of the ordered (indexed) types in aspecified position in the corresponding list
jar_hash Manipulates the list of Jar hashes used by the HTTP proxy
jar_sig Manipulates the list of Jar signatures used by the HTTP proxy
list Display all data for all entries or a specific entry of a give TYPE
306 SunScreen 3.2 Administration Guide • December, 2001

TABLE 10–3 SunScreen Configuration Editor (ssadm edit) Subcommand Summary(Continued)edit Subcommand Description
list_name Display the set of unique base names and subtype of all of a givenTYPE
load Load a policy into the configuration editor
lock Lock the policy in anticipation of performing edits
lock_status Return the status of the lock relative to this editor
mail_relay Manipulates the list of mail relays used by the SMTP proxy
mail_spam Manipulates the list of spam domains used by the SMTP proxy
move Move an indexed entry from its current location in the ordered listto the new location
proxyuser Manipulates the list of proxy users
quit Cause the editor to terminate if there are no unsaved changes
QUIT Cause the editor to terminate even if there are unsaved changes
refer Determine if a named-object of a given TYPE is referred to in thecurrent policy
referlist Display a list of all entries in the current policy that refer to aspecified named-object of a given TYPE
reload Discard any and all edits, if made, and reload the data into theeditor from the database
rename Rename a specified named-object of a given TYPE
renamereference Renames all references to a specified named-object of a given TYPE
replace Replace an object at a specified index
save Save all current edits to the policy or common objects
save as Save the policy rules to a different policy name
search Search for objects that match specified criteria
vars The vars command in the configuration editor manipulatesvariables used for RADIUS configuration. See the section onRADIUS configuration in the “RADIUS User AuthenticationDetails” in SunScreen 3.2 Administrator’s Overview for moreinformation
verify Verifies the currently loaded configuration without saving it
Using the Command Line Interface 307

Using the Configuration EditorThe configuration editor lets you edit only one policy at a time. When you are in anediting session, others are unable to edit the same policy, although they can read it. Ifyou modify any of the common objects, other people are unable to modify commonobjects until you save your changes.
� To Edit a PolicyInvoke the configuration editor with the edit command, which is a subcommand ofssadm, and the name of your policy, such as Initial. Once the configuration editor isrunning, the prompt changes to: edit>.
1. For a locally administered Screen, type:
# ssadm edit policy_name
2. For a remotely administered Screen, type:
# ssadm -r Screen_name edit policy_name
Working With Policies
� To Create a New Policy1. Use the ssadm command to add a new policy using local administration by typing:
# ssadm policy -a policy_name
2. Use ssadm -r to add the same policy using remote administration by typing:
# ssadm -r Screen_name policy -a policy_name
308 SunScreen 3.2 Administration Guide • December, 2001

Note – If you create a new policy, it will not have the administrative access rulesnecessary for GUI or remote administration. It may be safer to copy an existing,working policy and modify it than to create a new policy.
� To Copy a Policy1. Using local administration, use the -c option to copy a policy by typing:
# ssadm policy -c policy_name policy_copy_name
2. Using remote administration, use the -c option with the ssadm -r command tocopy a policy by typing:
# ssadm -r Screen-name policy -c policy_name policy_copy_name
� To Rename a Policy1. Using local administration, rename a policy by typing:
# ssadm policy -r old_name new_name
2. Using remote administration, rename a policy by typing:
# ssadm -r Screen_name policy -r old_name new_name
� To Delete a Policy1. Using local administration, delete a policy by typing:
# ssadm policy -d name
2. Using remote administration, delete a policy by typing:
# ssadm -r Screen_name policy -d name
� To Verify a Policy1. Verify the validity of a policy, for example, myconfig, using local administration by
typing:
# ssadm activate -n myconfig
Using the Command Line Interface 309

2. Verify the validity of a policy, for example, myconfig, using remote administration bytyping:
# ssadm -r Screen_name activate -n myconfig
� To Activate a Policy1. Activate a policy using local administration by typing:
# ssadm activate myconfig
2. Activate a policy using remote administration by typing:
# ssadm -r Screen_name activate myconfig
� To Back Up Your SunScreen Configuration1. Using local administration, type the following to back up a policies:
# ssadm backup > filename
2. Using remote administration, type the following to back up a policies:
# ssadm -r Screen_name backup > filename
� To Restore Your SunScreen Configuration1. Restore policies using local administration by typing:
# ssadm restore < filename
2. Restore policies for remote administration by typing:
# ssadm -r Screen_name restore < filename
Working With Services and ServiceGroupsThe tasks in this section describe how to work with single services and service groups.
310 SunScreen 3.2 Administration Guide • December, 2001

� To Add a New Single Service1. Type the following to add the service ftp-34, service engine, discriminator,
parameters, and description (which is optional) within quotation marks.
In the example below, all you need to type is "PARAMETERS 1200 1200 1" if you donot want to use the default values. See “Services and State Engines” in SunScreen 3.2Administrator’s Overview for the default parameters for the state engines
edit> add service ftp-34 SINGLE FORWARD ftp PORT 34 PARAMETERS 1200 1200 1COMMENT "ftp-34 uses port 34 instead of port 21.Use ftp-34 instead of the supplied ftp service."
2. Type the following to see the new service ftp-34:
edit> list service ftp-34"ftp-34" SINGLE FORWARD "ftp" PORT 34 PARAMETERS 1200 1200 1COMMENT "ftp-34 uses port 34 instead of port 21.Use ftp-34 instead of the supplied ftp service."
� To Add a New Service Group
Note – SunScreen lets you change the default services in service groups; however, tomake troubleshooting easier, it is better to add a new service group that contains theservices that you want rather than modify an existing service group.
1. Type the following to add the service group useful services and description(which is optional) within quotation marks:
edit> add service "useful services" GROUP www archie gopherCOMMENT "A new service group that is used instead of common services."
The description will appear in the Service Details field that appears when you choosea service or service group for a policy rule using the Policy Rule Definition dialog box.
2. Type the following to list the new service group, useful services:
edit> list service "useful services""useful services" GROUP "www" "archie" "gopher"COMMENT "A new service group that is used instead of common services."
This procedure needs more information and an accurate example.
� To Modify Service Groups� Add the GROUP again with the modified member list. The new definition
overwrites the old definition.
Using the Command Line Interface 311

� To Rename a Service or Service Group� Type the following to rename a service or service group without modifying
references to it:
edit> rename service "useful services" "dmz services"
The changes take effect when you activate the policy whose rules you have edited.
� To Rename References to a Service
Note – SunScreen lets you rename a single service or a service group. To maketroubleshooting easier, do not rename the single services and service groups that aresupplied with SunScreen.
� Type the following to rename all references to a service or service group:
For example:
edit> renamereference service "useful services" "dmz services"
� To Delete a Service or Service Group
Note – SunScreen lets you delete a single service or a service group. To maketroubleshooting easier, do not delete the single services and service groups that aresupplied with SunScreen.
� Type the following to delete a service or service group.
For example, to delete the service group dmz service type:
edit> del service "dmz services"
This command does not check for references to the single service or service group thatyou are deleting. The changes take effect when you activate the policy whose rulesyou have edited.
� To Check References to a Service or Service GroupTo check references to the single service or service group that you want to delete orhave deleted:
312 SunScreen 3.2 Administration Guide • December, 2001

1. Type the following to find references to the service or service group that you wantto delete or have deleted
For example:
edit> referlist service "dmz services"
This displays a list of all the instances where the service or service group is used.
2. Remove the service or service group if you have not already done so.
3. Edit the rule to remove obsolete references from the rule or rules displayed aftertyping the command in Step 1.
Addresses, Address Ranges, andAddress GroupsThe tasks in this section describe how to work with addresses, address ranges, andaddress groups.
� To Add a New Host Address� Type the following to add the new host address 172.16.1.2 and a description (which
is optional) within quotation marks:
edit> add address ftp-www HOST 172.16.1.2COMMENT "Address of the DMZ host"
The changes take effect when you activate the policy whose rules you have edited.
� To Add a Range of Addresses� Type the following to add an address range from 172.16.3.2 to 172.16.3.255 and a
description (which is optional) within quotation marks:
edit> add address corp RANGE 172.16.3.2 172.16.3.255COMMENT "All hosts in corporate"
The changes take effect when you activate the policy whose rules you have edited.
Using the Command Line Interface 313

� To Add an Address Group� Type the following to add an address group and a description (which is optional)
within quotation marks, for example:
edit> add address Internet GROUP { corp sales ftp-www } {}COMMENT "The ranges corporate and sales and the host ftp-wwwhave access to the Internet"
The changes take effect when you activate the policy whose rules you have edited.
� To Add an Address Range in CIDR Format� Type the following to add a network group and a description (which is optional)
within quotation marks, for example:
edit> add address cidr2 RANGE 10.100.253.0/24COMMENT "The network group consists of an IP addressand a mask."
The changes take effect when you activate the policy whose rules you have edited.
� To Delete an Address, Address Range, or AddressList
Note – To make troubleshooting easier, do not delete the names of the addresses,ranges of addresses, and lists of addresses that were defined when SunScreen wasinstalled.
This command does not check for references to the address, range of addresses, or listof addresses that you are deleting.
� Type the following to delete an address, a range of addresses, or a list of addresses,for example:
edit> del address host0
To have the changes take effect, you must activate the policy.
314 SunScreen 3.2 Administration Guide • December, 2001

� To Check References to a Deleted Address, AddressRange, or Address List
� Type the following to find the reference to an address, a range of addresses, or a listof addresses that you want to delete or have deleted, for example:
edit> referlist address host0
This displays a list of all the instances where the address, range of addresses, or list ofaddresses is used. You can now remove the address, range of addresses, or list ofaddresses from the address list in which it is used and edit the policy rule to remove itfrom the rule or rules in which it is used.
� To Rename an Address, Address Range, or AddressGroup
Note – To make troubleshooting easier, do not delete or rename the names ofaddresses, ranges of addresses, or lists of address that were defined when SunScreenwas installed.
1. Type the following to rename an address, a range of addresses, or a list of addressesand all reference to it, for example:
edit> renamereference address ftp-www DMZ
2. Type the following to rename an address, a range of addresses, or a list of addressesonly, for example:
edit> rename address ftp-www DMZ
The changes take effect when you activate the policy whose rules you have edited.
Working With CertificatesEach SKIP certificate object requires a particular Name Space ID (NSID) and theMaster Key ID (certificate ID) of the certificate. NSIDs and certificate IDs are describedin “Common Objects” in SunScreen 3.2 Administrator’s Overview.
� Certificate IDs that use the IP address use the NSID 0 convention with the IPaddress as the MKID.
Using the Command Line Interface 315

� Certificate IDs use the NSID 1 convention with an MKID of 8 hexadecimal digits(32 bits}.
� Self-generated certificates use the NSID 8 convention with an MKID of 32hexadecimal digits (128 bits).
You can add SKIP X.509 keys and certificates from a diskette or file, or from adirectory that contains only one set of private key and certificate files.
� To Add Private Screen Certificates From a Diskette
Note – You cannot add Screen certificates remotely. To add Screen certificates toScreens that are administrated remotely, go to each Screen in turn and follow the stepsto add Screen certificates from a diskette or a file.
1. Insert the diskette that contains the private certificate into the diskette drive of theAdministration Station.
2. Mount the diskette by typing:
# volcheck
3. Type the following command, including the path to the directory where the privatekey and certificate are stored:
# install_skip_keys -icg /floppy/diskette_name
4. Eject the diskette.
# eject diskette_name
Note – Store the diskette that contains the private key and public certificate safely andsecurely. It contains sensitive information that is not encrypted.
5. Type the following to restart the SKIP key manager to update the certificatedatabase:
# skipd_restart
6. Type the following to name the private key and certificate you have just added, andan optional comment if desired:
edit> add certificate sales-home SINGLE NSID 1 MKID "0xA00050E"COMMENT "Use this cert for tunnelling to home from NY"
where sales-home is the name that you are giving the certificate; 1 is the NSID; A00050Eis the certificate ID.
316 SunScreen 3.2 Administration Guide • December, 2001

� To Add Private Screen Certificates From aDirectory
1. Type the following command, including the path to the directory where the privatekey and certificate are stored:
# install_skip_keys -icg /directory_name
2. Type the following to restart the SKIP key manager to update the certificatedatabase:
# skipd_restart
3. Type the following to name the private key and certificate you have just added, andan optional comment if desired:
edit> add certificate sales-home SINGLE NSID 1 MKID "0xA00050E"COMMENT "Use this cert for tunnelling to home from NY"
where sales-home is the name that you are giving the certificate; 1 is the NSID; A00050Eis the certificate ID.
� To Add Screen Local IdentitiesYou can add Screen local identities only with local administration; therefore, for aremotely administrated Screen, you must gain access to the Screen’s shell prompt, forinstance with the rlogin command.
Note – To use the rlogin command, you must first save the local identity and thesecret key to separate files. For example, you may have extracted the self-generatedcertificate ID keys that you generated on a Screen to a diskette (because it isimpossible to generate the same key later, should you have to reinstall the SunScreensoftware). Once you have swapped certificate IDs with a number of peer systems, itbecomes difficult to fix things in a timely manner. If this seems cumbersome, usetelnet, which is more secure than rlogin.
SunScreen installation programs re-key the Screen being installed, so you have to addyour old keys back into the database before configuring the Screen for virtual privatenetworks (see “Encryption, Tunneling, and Virtual Private Networks” in SunScreen 3.2Administrator’s Overview for more information about VPNs).
1. Type the following to use the skiplocal command to add the Screen’s localidentity.
# skiplocal -a -T soft -t x509 -n 1 -c certificate_filename -s secret_filename
This example shows adding a CA key and certificate. If you are adding aself-generated key and certificate, the value for -t is dhpublic and the value for -n is 8.
Using the Command Line Interface 317

2. Type the following to restart the SKIP key manager to update the certificatedatabase:
# skipd_restart
3. Type the following to name the private key and certificate you have just added, forexample:
edit> add certificate sales-home SINGLE NSID 1 MKID "0xA000050E"COMMENT "certificate for home sales"
where:
� sales-home is the name that you are giving the certificate� 1 is the NSID� A00050E is the MKID
� To Add Self-Generated Screen Certificates for LocalAdministrationThe following example illustrates how to generate a global (512–bit) key.
1. Use the skiplocal command to create a self-generated Screen certificate.
For example:
# skiplocal -k -m 512
Note – If you have installed more than one encryption strength, use the -m flagfollowed by the modulus size, in bits, of the encryption for which you want to create anew certificate. The modulus sizes are:
� Global (1024 bits)� U.S. and Canada Only (2048. 3072, or 4096 bits)
The highest modukus size that works with PC-SKIP in the U.S. and Canada is 2048.
You see the following message on the Screen:
generating local secret with 512 modulus sizeIt would help the quality of the random numbers if you wouldtype 50-100 random keys on the keyboard. Hit return whenyou are done.
2. Type 50 to 100 random keys.
As you type the random keys, the number of keys appears on the screen.
3. Press the Return key.
The continuation of the message appears on the screen:
318 SunScreen 3.2 Administration Guide • December, 2001
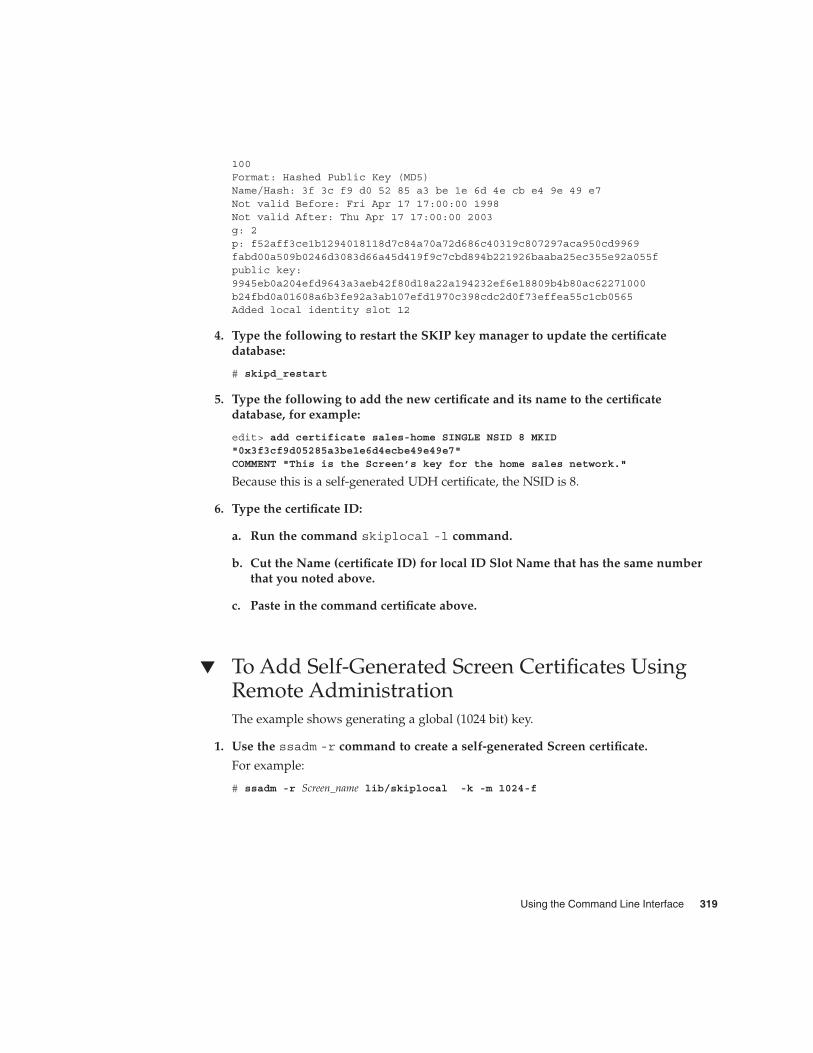
100Format: Hashed Public Key (MD5)Name/Hash: 3f 3c f9 d0 52 85 a3 be 1e 6d 4e cb e4 9e 49 e7Not valid Before: Fri Apr 17 17:00:00 1998Not valid After: Thu Apr 17 17:00:00 2003g: 2p: f52aff3ce1b1294018118d7c84a70a72d686c40319c807297aca950cd9969fabd00a509b0246d3083d66a45d419f9c7cbd894b221926baaba25ec355e92a055fpublic key:9945eb0a204efd9643a3aeb42f80d18a22a194232ef6e18809b4b80ac62271000b24fbd0a01608a6b3fe92a3ab107efd1970c398cdc2d0f73effea55c1cb0565Added local identity slot 12
4. Type the following to restart the SKIP key manager to update the certificatedatabase:
# skipd_restart
5. Type the following to add the new certificate and its name to the certificatedatabase, for example:
edit> add certificate sales-home SINGLE NSID 8 MKID"0x3f3cf9d05285a3be1e6d4ecbe49e49e7"COMMENT "This is the Screen’s key for the home sales network."
Because this is a self-generated UDH certificate, the NSID is 8.
6. Type the certificate ID:
a. Run the command skiplocal -l command.
b. Cut the Name (certificate ID) for local ID Slot Name that has the same numberthat you noted above.
c. Paste in the command certificate above.
� To Add Self-Generated Screen Certificates UsingRemote AdministrationThe example shows generating a global (1024 bit) key.
1. Use the ssadm -r command to create a self-generated Screen certificate.
For example:
# ssadm -r Screen_name lib/skiplocal -k -m 1024-f
Using the Command Line Interface 319

Note – You must use the -f flag with remote administration. This flag suppresses theprompt to type random keys on the keyboard.
If you have installed more than one encryption strength, use the -m flag followed bythe modulus size, in bits, of the encryption for which you want to create a newcertificate. The modulus sizes are:
� Global (1024 bits)� U.S. and Canada Only (2048. 3072, or 4096 bits)
The highest modukus size that works with PC-SKIP in the U.S. and Canada is 2048.
The following message appears on the screen:
generating local secret with 1024 modulus sizeFormat: Hashed Public Key (MD5)Name/Hash: 3f 3c f9 d0 52 85 a3 be 1e 6d 4e cb e4 9e 49 e7Not valid Before: Fri Apr 17 17:00:00 1998Not valid After: Thu Apr 17 17:00:00 2003g: 2p:f52aff3ce1b1294018118d7c84a70a72d686c40319c807297aca950cd9969fabd00a509b0246d3083d66a45d419f9c7cbd894b221926baaba25ec355e92a055fpublic key:9945eb0a204efd9643a3aeb42f80d18a22a194232ef6e18809b4b80ac62271000b24fbd0a01608a6b3fe92a3ab107efd1970c398cdc2d0f73effea55c1cb0565Added local identity slot 12
2. Type the following to restart the SKIP key manager to update the certificatedatabase:
# ssadm -r Screen_name lib/skipd_restart
3. Start the editor on the remote Screen.
4. Type the following to add the new certificate and its name to the certificatedatabase.
For example:
edit> add certificate sales-home NSID 8 MKID"0x3f3cf9d05285a3be1e6d4ecbe49e49e7"COMMENT "This is the Screen’s key for the home sales network."
Because this is a self-generated UDH certificate, the NSID is 8.
5. Type the certificate ID:
a. Run the skiplocal -l command.
b. Cut the Name (certificate ID) for local ID Slot Name that has the same numberthat you noted above and paste in the command certificate above.
320 SunScreen 3.2 Administration Guide • December, 2001

For tunnelling with a remote Administration Station, see the editor commandaccessremote. For tunnelling with encrypted packet filtering, see “Working WithPolicies” on page 308. Tunnelling is also described in “Encryption, Tunneling, andVirtual Private Networks” in SunScreen 3.2 Administrator’s Overview.
� To Add Public Certificates from a Diskette or a FileYou can do this only with local administration; therefore, for a remotely administratedScreen, you must go to the Screen to add Screen certificates from a diskette or a file.
1. Insert the diskette that contains the public certificate, if you are using issuedcertificates, into the diskette drive of the Administration Station.
You also can add new private keys from a directory that contains only one set ofcertificate files. If you are adding private certificate from a directory, you do not needthis step and step 2.
2. Mount the diskette by typing:
# volcheck
3. Type the path to the directory where the public certificates are stored and thefollowing command and the name of the directory to add the public certificate, forexample:
# /floppy/floppy0/install_skip_keys A00050B
This example shows adding a public certificate ID.
4. If you are using issued certificates, type the following in the terminal window toeject the diskette:
# eject floppy0
If you are adding a public certificate from a directory, you do not need this step.
5. Type the following to name the public certificate you have just added, for example:
edit> add certificate NYcert NSID 1 "0xA00050B"COMMENT "NY office public cert"
Where NYcert is the name that you are giving the certificate, 1 is the NSID, andA00050B is the certificate ID. NSIDs and certificate IDs are described in “CommonObjects” in SunScreen 3.2 Administrator’s Overview.
Each SKIP certificate requires a particular Name Space ID (NSID) and the Master KeyID (certificate ID) of the certificate.
� Issued certificates that use the IP address use the NSID 0 convention with the IPaddress as the certificate ID.
� Issued certificates use the NSID 1 convention with a certificate ID of 8 hexadecimaldigits (32 bit).
Using the Command Line Interface 321

� Self-generated certificates use the NSID 8 convention with an certificate ID of 32hexadecimal digits (128 bits).
Note – The tunnel address can be specified as an option in the rule that uses thecertificate or in the remote administration rule.
Using Certificate GroupsThese procedures describe how to create and work with certificate groups. Theexamples in these tasks use a list of U.S. sales offices (sales-list) as the certificategroup and individual sales offices (such as sales-il for the Illinois office).
� To Add Certificate GroupsAfter you have named certificate IDs in the rule, you can group them into logicalgroups so that you can use a group instead of single names in a rule.
� Use the GROUP option to group named certificate IDS.
For example:
edit> add certificate sales-list GROUP{sales-co sales-il sales-tx sales-sca sales-nca} {}COMMENT "list of U.S. sales offices"
� To Add a New Member to a Certificate Group� Use the add_member subcommand to add a new member to a certificate group.
For example:
edit> add_member certificate sales-list sales-wy
� To Remove a Member From a Certificate Group� Use the del_member subcommand to remove a member from a certificate group.
For example:
edit> del_member certificate sales-list sales-wy
322 SunScreen 3.2 Administration Guide • December, 2001

� To Rename a Certificate or Certificate Group
Note – To make troubleshooting easier, do not rename the certificates that werecreated when you installed SunScreen.
� Use the renamerefernce subcommand to rename a certificate or certificate group.
For example:
edit> renamereference certificate sales-ny sales-northeast
When you rename a certificate group using this command, SunScreen checks for allinstances in the certificate policy object for the old name and changes them to the newname. It does not rename references in other places, such as administrative rules andpolicy rules.
� To Delete a Certificate or Certificate Group
Note – To make troubleshooting easier, do not delete the certificates that were createdwhen you installed a remotely administered SunScreen.
This command does not check for references to the certificate or certificate group thatyou are deleting.
� Use the del subcommand to delete a certificate or certificate group.
For example:
edit> del certificate sales-la
� To Check References to a Deleted Certificate� Use the refer subcommand to find the reference to a certificate and certificate
group that you want to delete or have deleted.
For example:
edit> refer certificate sales-la
� To Check References to a Deleted Certificate Group� Use the referlist subcommand to find the reference to a certificate and certificate
group that you want to delete or have deleted, for example:
Using the Command Line Interface 323

edit> referlist certificate sales-west
This displays a list of all the instances in the certificate database where the certificategroup is used. You can remove it from the access entries in which it is used and editany policy rule in which it is used to remove it.
IKE Policy Rule SyntaxFor tunneling mode, pre-shared key usage:
[SCREEN scrn] svc srcaddr dstaddr \IPSEC { AH(authalg1) | ESP(encralg1[, authalg2]) }+ \IKE(encralg2, authalg3, oakleygroup, PRE-SHARED, pskey) \[SOURCE_SCREEN srcscrn] [DESTINATION_SCREEN dstscrn] \[SOURCE_TUNNEL srctunaddr] [DESTINATION_TUNNEL dsttunaddr] \
ALLOW
For tunneling mode, certificate usage:
[SCREEN scrn] svc srcaddr dstaddr \IPSEC { AH(authalg1) | ESP(encralg1[, authalg2]) }+ \IKE(encralg2, authalg3, oakleygroup, authmethod, \srccert, dstcert) \[SOURCE_SCREEN srcscrn] [DESTINATION_SCREEN dstscrn] \[SOURCE_TUNNEL srctunaddr] [DESTINATION_TUNNEL dsttunaddr] \
ALLOW
For tunneling mode, manual key usage:
[SCREEN ] \IPSEC { AH(spi1, authalg, key1) \| ESP(spi2, encralg2, key2 [, spi3, authalg3, key3]) } \[SOURCE_SCREEN srcscrn] [DESTINATION_SCREEN dstscrn] \[SOURCE_TUNNEL srctunaddr] [DESTINATION_TUNNEL dsttunaddr] \
ALLOW
An alternative syntax follows:
[SCREEN scrn] svc srcaddr dstaddr \IPSEC { AH(spi1, authalg, key1) | ESP(spi2, encralg2, \key2 [, add key "key_des" SINGLE "1234567812345678"
edit> add key "key_ah" SINGLE "1234567890abcdef1234567890abcdef"
324 SunScreen 3.2 Administration Guide • December, 2001

� To Add Rules Using Keys Added on Both Screens
Note – See the SunScreen 3.2 Configuration Examples manual for an example of how touse the GUI to perform this same function.
1. On Screen 1:
1 "telnet" "screen1_host" "screen2_host" IPSEC ESP(0x123,"DES", "key_des") AH(0x345, "MD5", "key_ah") SOURCE_SCREEN"screen1" ALLOW 2 "telnet" "screen2_host" "screen1_host"IPSEC ESP(0x123, "DES", "key_des") AH(0x345, "MD5", "key_ah")
DESTINATION_SCREEN "screen1" ALLOW
2. On Screen 2:
1 "telnet" "screen2_host" "screen_host1" IPSEC ESP(0x123,"DES", "key_des") AH(0x345, "MD5", "key_ah") SOURCE_SCREEN"screen2" ALLOW 2 "telnet" "screen1_host" "screen2_host"IPSEC ESP(0x123, "DES", "key_des") AH(0x345, "MD5", "key_ah")
DESTINATION_SCREEN "screen2" ALLOW
Note – The hex values 0x123, 0x345 are SPI values and must be between 0x000 and0xFFF.
3. If you choose different algorithms, like 3DES or SHA1, define manual keys of theproper length.
In hex strings, the lengths are respectively.
� CBC 16� 3DES 48� MD5 32� SHA1 40
4. Save and activate the policy.
� To Work with IKE Rules with Pre-Shared Key
Note – See the SunScreen 3.2 Configuration Examples manual for an example of how touse the GUI to perform this same function.
1. Add the pre-shared secret key on both Screens
edit> add key "shared-secret" SINGLE "shared_secret"
Using the Command Line Interface 325

2. Add rules like the following using keys added on both Screens.
a. On Screen1:
1 "telnet" "screen1_host" "screen2_host" IPSEC ESP("DES")IKE("DES", "MD5", 2, PRE-SHARED, "shared-secret")SOURCE_SCREEN "screen1" ALLOW 2 "telnet" "screen2_host""screen1_host" IPSEC IPSEC ESP("DES") IKE("DES","MD5", 2, PRE-SHARED, "shared-secret") DESTINATION_SCREEN
"screen1" ALLOW
b. On Screen2:
1 "telnet" "screen2_host" "screen1_host" IPSEC ESP("DES")IKE("DES", "MD5", 2, PRE-SHARED, "shared-secret")SOURCE_SCREEN "screen2" ALLOW 2 "telnet" "screen1_host""screen2_host" IPSEC IPSEC ESP("DES") IKE("DES","MD5", 2, PRE-SHARED, "shared-secret") DESTINATION_SCREEN
"screen2" ALLOW
3. Save and activate policy.
� To Work with IKE Rules with Self-Signed Certificates
Note – See the SunScreen 3.2 Configuration Examples manual for an example of how touse the GUI to perform this same function.
1. Generate certificates or private keys on both Screens using ssadm certlocal:
a. On Screen1:
# ssadm certlocal -Iks -m 512 -t rsa-md5 -D "C=US,\
O=YourOrg, CN=screen1_name"
b. On Screen2:
# ssadm certlocal -Iks -m 512 -t rsa-md5 -D "C=US,\
O=YourOrg, CN=screen2_name"
2. Export the certificates to the other Screen.
a. On Screen1:
# ssadm certdb -I -e "SUBJECT=C=US, \
O=YourOrg, CN=screen1_name" > /tmp/cert1
b. On Screen2:
# ssadm certdb -I -e "SUBJECT=C=US, \
O=YourOrg, CN=screen2_name" > /tmp/cert2
326 SunScreen 3.2 Administration Guide • December, 2001

3. Securely transport the file /tmp/cert1 to the Screen1 and /tmp/cert2 to Screen 2.
4. Import the exported certificate to the Screen certificate database.
a. On Screen2:
# ssadm certdb -I -a < /tmp/cert1
b. On Screen1:
# ssadm certdb -I -a < /tmp/cert2
5. Add certificate objects on both systems:
edit> add certificate "screen1_cert" SINGLE IKE "C=US,O=YourOrg,CN=screen1_name"edit> add certificate "screen2_cert" SINGLE IKE "C=US,
O=YourOrg,CN=screen2_name"
6. Mark the certificate you imported in Steps 3 and 4 as trusted on both systems usingssadm edit:
a. On Screen 1:
edit> add member certificate "IKE manually verified
certificates" "screen2_cert"
b. On Screen 2:
edit> >add member certificate "IKE manually verified
certificates" "screen1_cert"
The group name "IKE manually verified certificates" is reserved for a trustedCertificate Group.
7. Add packet filtering rules on both Screens.
a. On Screen1:
1."telnet" "screen1_host" "screen2_host" IPSEC ESP("DES")IKE("DES", "MD5", 2, RSA-SIGNATURES, "screen1_cert","screen2_cert") ALLOW 2 "telnet" "screen2_host" "screen1_host"IPSEC IPSEC ESP("DES") IKE("DES", "MD5", 2, RSA-SIGNATURES,
"screen2_cert", "screen1_cert") ALLOW
b. On Screen2:
1."telnet" "screen2_host" "screen1_host" IPSEC ESP("DES")IKE("DES", "MD5", 2, RSA-SIGNATURES, "screen2_cert","screen1_cert") ALLOW 2 "telnet" "screen1_host" "screen2_host"IPSEC IPSEC ESP("DES") IKE("DES", "MD5", 2, RSA-SIGNATURES,
"screen1_cert", "screen2_cert") ALLOW
8. Refer to the man page of ssadm-certlocal(1M) and ssadm-certdb(1M) formore information.
Using the Command Line Interface 327

9. Save and activate the policy.
� To Work with IKE Rules with Issued Certificates
Note – See the SunScreen 3.2 Configuration Examples manual for an example of how touse the GUI to perform this same function.
1. Generate keys and certificate requests on each Screen.
a. On Screen1:
# ssadm certlocal -Ikc -m 512 -t rsa-md5 -D "C=US, \
O=YourOrg,CN=screen1_issued"
b. On Screen2:
# ssadm certlocal -Ikc -m 512 -t rsa-md5 -D "C=US, \
O=YourOrg,CN=screen2_issued"
2. Bring the requests to a certificate server and have them signed and you should getthree files from the CA:
screen1_issued.cert: screen1’s cert.screen2_issued.cert: screen2 ’s cert
root.cert: the CA’s cert
Further detailed instructions on this step depends on your certificate server.
3. Securely transport the files to each system under /tmp and import them.
4. Import three certificates on each Screen:
# ssadm certdb -I -a < /tmp/screen1_issued.cert# ssadm certdb -I -a < /tmp/screen2_issued.cert
# ssadm certdb -I -a < /tmp/root.cert
In this example, it is assumed you are using a certificate server with CA’s subject
DN = "C=US, O=YourOrg.com, OU=sunscreen, CN=Certificate Manager"
5. Add certificate objects for each Screen and mark the root CA as trusted. On eachScreen:
edit> add certificate root_cert SINGLE IKE "C=US,O=YourOrg.com, OU=sunscreen, CN=Certificate Manager"edit> add certificate screen2_issued_cert SINGLE IKE "C=US,O=YourOrg, CN=screen2_issued"edit> add certificate screen1_issued_cert SINGLE IKE "C=US,O=YourOrg, CN=screen1_issued"
edit> add_member certificate "IKE root CA certificates" root_cert
The group name "IKE root CA certificates" is reserved for a trusted Certificate Group.
328 SunScreen 3.2 Administration Guide • December, 2001

6. Add packet filtering rules on both Screens.
a. On Screen1:
1."telnet" "screen1_host" "screen2_host" IPSEC ESP("DES")IKE("DES", "MD5", 2, RSA-SIGNATURES, "screen1_issued_cert","screen2_issued_cert") ALLOW 2 "telnet" "screen2_host" "screen1_host"IPSEC IPSEC ESP("DES") IKE("DES", "MD5", 2, RSA-SIGNATURES,
"screen2_issued_cert", "screen1_issued_cert") ALLOW
b. On Screen2:
1."telnet" "screen2_host" "screen1_host" IPSEC ESP("DES")IKE("DES", "MD5", 2, RSA-SIGNATURES, "screen1_issued_cert","screen2_issued_cert") ALLOW 2 "telnet" "screen1_host" "screen2_host"IPSEC IPSEC ESP("DES") IKE("DES", "MD5", 2, RSA-SIGNATURES,
"screen2_issued_cert", "screen1_issued_cert") ALLOW
7. Save and activate the policy.
Working With Screen ObjectsA Screen object controls much of the identity of a Screen. It contains information foryour stealth, HA, cluster, and administrative rules. Upon installation, a Screen objectthat you can edit is created. As with other common objects, when you redefine aScreen object, you must specify all the parameters that you want to set; otherwise theparameters are set to default values.
� To Add a Screen� To add a screen object with a previously-created certificate, using DNS and NIS for
Name Service and passing routing information, type the following:
edit> add screen vorticity ADMIN_CERTIFICATE vorticity.admin RIP DNS NISCOMMENT "The screen that protects the sales office"
Using the Command Line Interface 329

Note – Adding a comment is optional.
� To List the Screens� Type the following to list all the Screens:
edit> list screen
� To Add an SNMP Receiver to a Screen� To add an SNMP receiver to the Screen used in the previous procedure:
edit> add screen vorticity ADMIN_CERTIFICATEvorticity.admin RIP DNS NIS SNMP 10.100.253.200
� To Add Multiple SNMP Receivers to a Screen� To add multiple SNMP receivers to the previous Screen object:
edit> add screen vorticity ADMIN_CERTIFICATE vorticity.adminROUTING DNS NIS SNMP 10.100.253.200 10.100.253.254
� To Add a Time Status Indicator to a Screen� To add a Time Status Indicator of 30 minutes to the previous Screen object:
edit> add screen vorticity ADMIN_CERTIFICATE vorticity.adminROUTING DNS NIS SNMP_TIMER 30 SNMP 10.100.253.200 10.100.253.254
� To Remove SNMP Receivers From a Screen� To remove SNMP receivers from the Screen, do not include them in the Screen
object when you set it:
edit> add screen vorticity ADMIN_CERTIFICATE vorticity.admin RIP DNS NIS
330 SunScreen 3.2 Administration Guide • December, 2001

� To Set a Screen to Stealth Mode� At the editor prompt, type:
edit> add screen vorticity ADMIN_CERTIFICATE vorticity.admin RIPSTEALTH_NET 10.100.253.0 255.255.255.0 COMMENT "The screen in Stealth Mode"
InterfacesFor Routing interfaces, there are two types of spoof detection : Complete andIncomplete. On the Interface Definition panel (see “To Add or Edit Interfaces”on page 104), you can set the spoof detection by clicking on the "Spoof Protection"pulldown and making the selection (see “Interface Object” in SunScreen 3.2Administrator’s Overview for information on Complete and Incomplete spoofdetection).
For Stealth interfaces, the type of spoof detection is always set to Complete and is notmodifiable.
Overlapping Interfaces
Note – The maximum number of stealth interfaces per Screen is 15; however, thenumber of routing interfaces is virtually limitless.
� To Add Interfaces (in Routing Mode)Before you add a new interface, you must define the address group that the interfacewill use.
� Type the following to define the interface named qe0 with no logging, no SNMPalerts, and ICMP_PORT_UNREACHABLE:
edit> add interface qe0 ROUTING qe0 ICMP PORT_UNREACHABLE
� To Add Interfaces (in Routing Mode) with a Detailed Log� Type the following to define the interface qe0 with detailed logging and SNMP
alerts:
Using the Command Line Interface 331

edit> add interface qe0 ROUTING qe0 LOG DETAIL SNMP ICMP PORT_UNREACHABLE
� To Remove an Interface1. List the currently active interfaces by typing:
edit> list interface
A list of active interfaces is displayed.
2. Find the interface you want to delete and type the following:
edit> del interface interface_name
Note – Any interfaces that you remove with this procedure remain active until youreactivate a policy.
Adding or Modifying an AuthorizedUserThe authorized user object is used to establish a user identity and provide amechanism to authenticate it by:
� Password� SecurID
Configuration Editor authuser SubcommandsTo manipulate authorized user objects, use the authuser subcommand. authuser isunusual in that it uses its own subcommands, which are listed in the following table.
TABLE 10–4 authuser Subcommands
authuser Subcommand Description
add "name" item... Creates or overwrites an object. This subcommand takes acomplete description of the object, beginning with its name,followed by desired items and subitems.
delete "name" Deletes a named object.
332 SunScreen 3.2 Administration Guide • December, 2001

TABLE 10–4 authuser Subcommands (Continued)authuser Subcommand Description
names [,sortopt] Displays the names of all authorized user objects. The default isasc. The sort options are:asc ascending order by name (case-sensitive)desc descending order by name (case-sensitive).iasc ascending order by name (case-insensitive).idesc descending order by name (case-insensitive).raw order stored in database.
print [,sortopt] ["name"] Displays one or more objects. With no object specified, printdisplays all AUTHUSER objects; specifying a name causes only thatobject’s definition to be displayed.
� To Add An Authorized User with PasswordAuthentication
� Type the following to add an authorized user named Audrey Farber for localadministration:
edit> authuser add admin1 PASSWORD={ "foo" }CONTACT_INFO=bj@bobo REAL_NAME="Audrey Farber"DESCRIPTION="created for remote administration"
Although the password is in plain text when you add a user, it is automaticallyencrypted, and the password will be displayed as empty quotation marks (""). Enabled is the default.
Note – The description field cannot contain single (‘ ‘) or double (" ") quotation marks,as in the description: This user, test_user, is for ‘testing’ only.
All changes apply to the object immediately; however, for the changes to take effect inpolicy and administrative access rules, you must activate the policy.
� To Add An Authorized User and SecurID Name1. Type the following to add an authorized user named Audrey Farber for local
administration:
edit> authuser add admin1 SECURID={ "C2BR" }CONTACT_INFO=bj@boboREAL_NAME="Audrey Farber"DESCRIPTION="created for local administration"
2. Type the following to add an authorized user for remote administration:
Using the Command Line Interface 333

edit> authuser add admin1 SECURID={ "C2BR" }CONTACT_INFO=bj@boboDESCRIPTION="created for remote administration"
Enabled is the default. All changes apply to the object immediately; however, for thechanges to take effect in policy and administrative access rules, you must activate thepolicy.
� To Display Authorized Users� Type the following to display a list of authorized user objects as they appear in the
database:
edit> authuser names,raw
The following list is displayed:
barbara.boboadminmelanie.haberadminaudry.farber
admin
� To Modify Authorized Users� Use the authuser add subcommand to modify the information for a user.
For example, to change the SecurID name from C3BR to C4BR:
edit> authuser add admin1 SECURID={ "C4BR" }CONTACT INFO=bj@bobo REAL_NAME="Audrey Farber"DESCRIPTION="created for remote administration"
The new parameters for the user will overwrite the old parameters. All changes applyimmediately.
Modifications to passwords or SecurID passcodes take place immediately. For otherchanges to take effect in policy and administrative access rules, you must activate thepolicy.
� To Delete an Authorized User� Use the authuser delete subcommand to delete an authorized user, for example:
edit> authuser delete admin1
All changes apply immediately.
334 SunScreen 3.2 Administration Guide • December, 2001

Working With Policy RulesPolicy Rules are ordered, that is, they are executed in the order in which they arelisted. You can define them in the order in which you want them to take effect or youcan reorder your policy rules after you have defined them.
� To Create a Packet Filtering Rule1. Type the following to add a new rule at the end of a policy with the attributes listed
below:
edit> add Rule ping * * ALLOW SKIP_VERSION_2 cert-1 cert-2DES-CBC RC2-40 MD5 NONE LOG SUMMARY
Service ping
Source Address *
Destination Address *
Encryption SKIP Version 2
Encryption Details:
� Siource Certificate is cert-1� Destination Certificate is cert-2� Key algorithm is DES-CBC� Data algorithm is RC2-40� MAC algorithm is MD5� NONE for the compression (This is the only possible value,
at present.)
Action ALLOW
Action Details ALLOW
Compression NONE
Note – All other options assume default values unless specified (for example, SNMP isoff).
2. Type the following to add a new rule at a particular position, for example, 1 to addit at the beginning of the policy:
edit> insert Rule 1 ping * * ALLOW SKIP_VERSION_2 cert-1 cert-2DES-CBC RC2-40 MD5 NONE LOG SUMMARY
Using the Command Line Interface 335

Note – If a filtering rule fails to detect any issued certificate (key) encryptionalgorithms, it may display the following error message:
An error occurred in detecting the Encryption algorithms.Please check if skipd process is running.
If this occurs, restart the skipd process with the skipd_restart command.
� To Reorder the Rules1. Use the list subcommand to produce an ordered list of rules for the policy:
edit> list rule
An ordered list of policy rules is displayed, as shown in this example.
1 "www" "*" "*" ALLOW2 "finger" "*" "*" ALLOW3 "ftp" "*" "localhost" USER "admin"ALLOW LOG DETAIL PROXY_FTPFTP_GET FTP_CHDIR FTP_RENAME FTP_DELETE4 "daytime" "localhost "*" ALLOW5 "telnet" "*" "*" ALLOW6 "echo" "localhost" "*" ALLOW
2. Use the move subcommand to move a policy rule to a new position, for example,from fourth to fifth position:
edit> move rule 4 5
The list of policy rules now shows the change in the order of the rules.
1 "www" "*" "*" ALLOW2 "finger" "*" "*" ALLOW3 "ftp" "*" "localhost" USER "admin"ALLOW LOG DETAIL PROXY_FTPFTP_GET FTP_CHDIR FTP_RENAME FTP_DELETE4 "telnet" "*" "*" ALLOW5 "daytime" "localhost "*" ALLOW6 "echo" "localhost" "*" ALLOW
� To Delete a Rule1. Use the del subcommand to delete policy rule 5:
edit> del rule 5
2. Generate the ordered list of policy rules:
edit> list rule
336 SunScreen 3.2 Administration Guide • December, 2001

The new list of policy rules reflects the deletion of rule 5; the former rule 6 nowoccupies the fifth position.displayed.
1 "www" "*" "*" ALLOW2 "finger" "*" "*" ALLOW3 "ftp" "*" "localhost" USER "admin"ALLOW LOG DETAIL PROXY_FTPFTP_GET FTP_CHDIR FTP_RENAME FTP_DELETE4 "telnet" "*" "*" ALLOW5 "echo" "localhost" "*" ALLOW
� To Edit Any Part of a RuleYou can edit a component or the components of a policy rule by using the followingprocedure. The example shows how to modify the action.
1. List all the rules in the policy:
edit> list rule
An ordered list of policy rules is displayed.
1 "www" "*" "*" ALLOW2 "finger" "*" "*" ALLOW3 "ftp" "*" "localhost" USER "admin"ALLOW LOG DETAIL PROXY_FTP FTP_GET FTP_CHDIR FTP_RENAME FTP_DELETE4 "telnet" "*" "*" ALLOW5 "echo" "localhost" "*" ALLOW
2. Use the replace subcommand to edit the policy. For example, to change the actionof policy rule 4 from ALLOW to DENY, insert a new policy rule with the actionchanged:
edit> replace rule 4 telnet * * DENY LOG DETAIL
3. List the rules for the policy:
edit> list rule
The list of policy rules is displayed, showing the rule with the new values replaces theold rule.
1 "www" "*" "*" ALLOW2 "finger" "*" "*" ALLOW3 "ftp" "*" "localhost" USER "admin"ALLOW LOG DETAIL PROXY_FTPFTP_GET FTP_CHDIR FTP_RENAME FTP_DELETE4 "telnet" "*" "*" DENY LOG DETAIL5 "echo" "localhost" "*" ALLOW
The changes take effect when you activate the policy whose rules you have edited.
Using the Command Line Interface 337

Modifying Access Rules for GUI LocalAdministration
� To Add an Access Rule for GUI Local Administration� Use the add subcommand with the accesslocal argument to add an
administrative access rule for local administration.
For example:
edit> add accesslocal USER admin3 PERMISSION ALL
� To Edit an Access Rule for GUI Local Administration1. List the administrative access rules for local administration:
edit> list AccessLocal
By default, an admin user is created during installation.
The following approximates the output that is displayed:
1 USER "admin" PERMISSION ALL2 USER "admin3" PERMISSION ALL
2. Use the replace subcommand to replace an administrative access rule with a newvalue for a particular user for local administration:
edit> replace AccessLocal 2 USER "admin3" PERMISSION STATUS
� To Delete an Access Rule for GUI Local Administration
Note – Do not delete all the administrative access rules.
� Use the del subcommand to delete the administrative access rule for localadministration.
For example, to delete rule 2, type:
edit> del AccessLocal 2
338 SunScreen 3.2 Administration Guide • December, 2001

Modifying Access Rules for RemoteAdministration
� To Add an Access Rule for Remote Administration� Use the add subcommand with the accessremote argument to add an
administrative access rule for remote administration:
edit> add accessremote USER admin3 * SKIP_VERSION_2 admin-groupDES-CBC DES-CBC MD5 NONE
This administrative access rule allows the access level ALL for the admin 3 user at aremote Administration Station on the Internet to use the GUI and command line toadminister the Screen.
Note – Make a note of the encryption parameters if you change them, because theyhave to match the encryption parameters on the remote Administration Station.
� To Edit an Access Rule for Remote Administration1. List the administrative access rules for remote administration, for example:
edit> list accessremote
The following approximates the output that is displayed:
1 USER "admin" "*" SKIP_VERSION_2 "admin-group" "DES-CBC""DES-CBC" "NONE" "NONE" PERMISSIONALL2 USER "admin3" "*" SKIP_VERSION_2 "admin-group" "DES-CBC""DES-CBC" "NONE" "NONE" PERMISSIONALL
Note – Make a note of the encryption parameters if you change them, because theyhave to match the encryption parameters on the remote Administration Station.
2. Use the replace subcommand to replace an administrative access rule with thevalue or values for a particular user for remote administration with a new value (forexample, STATUS, for the access level):
edit> replace accessremote USER admin3 * SKIP_VERSION_2 admin-groupDES-CBC DES-CBC NONE NONE PERMISSION STATUS
This administrative access rule changes the access level for admin3 at a remoteAdministration Station on the Internet to STATUS.
Using the Command Line Interface 339

� To Delete an Access Rule for Remote Administration
Note – Do not delete all the administrative access rules.
� Use the del subcommand to delete an administrative access rule for remoteadministration:
edit> del accessremote 2
Where 2 is the number, in the ordered rules, that you want to delete.
Network Address Translation (NAT)
Caution – If you are using NAT, the when you define a static mapping, be sure thatthe ranges and groups used in the Source, Destination, Translated Source, andTranslated Destination fields are exactly the same size.
� To Add ARP Manually� Use the arp command with the -s flag if the networks that attach to the Screen on
the inside have internal addresses (including any network on which there areaddresses to which you want to allow external access):
# arp -s IP_Address ether_address pub
Note – You must either add this entry each time you reboot the Screen or write yourown script to automate this function. If you are administering the Screen remotely, youmust either go to the Screen to add this entry or have a rule in your policy that allowsyou to use a command or protocol such as telnet or ssh to access the Screen. Seealso the arp(1M) man page.
� To Define NAT MappingsFor local administration, you can create either a static or a dynamic NAT entry byspecifying either the STATIC or DYNAMIC option.
340 SunScreen 3.2 Administration Guide • December, 2001

1. Use the add subcommand to create a static NAT entry that maps an internal addressto an external address:
edit> add nat STATIC src dest translated_src translated_dest
When you define a static mapping, the internal address and external address are bothsingle addresses, but either can be a range or a list. In most cases, you should add areverse entry for static mapping.
2. To create the equivalent dynamic NAT entry, substitute the DYNAMIC option for theSTATIC option.
edit> add nat DYNAMIC src dest translated_src translated_dest
Note – You can also use a range of addresses or a group of addresses.
3. Activate the policy to have the changes take effect.
� To Delete NAT Mappings� Use the del subcommand to delete a NAT entry that maps an internal address to an
external address, regardless of whether mapping is static or dynamic:
edit> del nat 1
The changes take effect when you activate the policy whose rules you have edited.
� To List the NAT Mappings� Use the list subcommand to list a NAT entry that maps internal address to a
external address, regardless of whether mapping is static or dynamic:
edit> list nat
You will see a listing that shows type of NAT, the internal address, and the externaladdress:
1 STATIC "105-range" "*" "nat-range" "*"
Using the Command Line Interface 341

Virtual Private Network (VPN)
� To Add a VPN GatewaySetting up a VPN requires you to have a certificate per Screen and to define theaddress groups involved. For descriptions and concepts of the virtual private network,see “Encryption, Tunneling, and Virtual Private Networks” in SunScreen 3.2Administrator’s Overview.
1. At the command line prompt, type:
edit> add vpngateway vpn-net addrgrp-a SKIP cert-a KEYDES-CBC DATA RC4-40 MAC MD5 COMPRESSION NONE
Where:
� vpn-net is the name of the VPN� addrgrp-a is an address group that uses the following certificate� SKIP cert-a is the certificate
If you are using a tunnel address, append TUNNEL address_name to the add/replace.
To setup the VPN completely, you should have all the certificates, address groups, andVPN gateways defined on each Screen. In a VPN configuration that has two networksconnected, you would see something like the following:
edit> list vpngateway1 "vpn-net" "addrgrp-a" SKIP "cert-a" KEY "DES-CBC" DATA "RC4-40"MAC "MD5" COMPRESSION "NONE"2 "vpn-net" "addrgrp-b" SKIP "cert-b" KEY "DES-CBC" DATA "RC4-40"MAC "MD5" COMPRESSION "NONE"
2. Create an address group to contain the address groups for both networks, forexample:
edit> add address vpn-grp GROUP { addrgrp-a addrgrp-b } {}
3. Define a rule to specify the VPN gateway:
edit> add rule common vpn-grp vpn-grp ALLOW VPN vpn-net
� To Replace a VPN GatewayVPN gateways are set up in an ordered manner.
� To change values, at the command line prompt, type (for example):
342 SunScreen 3.2 Administration Guide • December, 2001

edit> replace vpngateway 1 vpn-net addrgrp-a SKIP cert-new KEYDES-CBC DATA RC4-40 MAC MD5 COMPRESSION NONE
� To Remove a VPN GatewayTo remove the VPN gateway, you must delete the rules and VPN object.
� At the command line prompt, type (for example):
edit> del vpngateway 1
Information, Statistics, and Logs
� To View the InformationThe ssadm sys_info subcommand provides information such as product, systemboot time, SunScreen boot time, and version.
1. To display information using local administration, type the following:
# ssadm sys_info
2. To display the equivalent information using remote administration, use the -r flagand specify the name of the remote Screen:
# ssadm -r Screen_name sys_info
� To View the StatisticsThe traffic_stats option displays information about the traffic flowing through aScreen.
1. Using local administration, type the following:
# ssadm traffic_stats
2. Using remote administration:
# ssadm -r Screen_name traffic_stats
Using the Command Line Interface 343

� To Set Logsize on a ScreenYou can use LOGSIZE to set the maximum size of your log file. The values areexpressed in Mbytes, where 200 represents 200 Mbytes.
� At the editor prompt, type:
edit> add screen vorticity ADMIN_CERTIFICATE vorticity.admin CDP RIP DNSSNMP 10.100.253.200 LOGSIZE 200
� To Set Up Packet LoggingSunScreen provides flexible logging of packets. A packet can be logged when itmatches a policy rule, when it does not match a policy rule, or when it matches apolicy rule whose action is DENY.
1. Configure SunScreen to log packets that do not match any particular policy rule.
Most frequently, packets are logged because of the DENY action in a rule or becausethey do not match any policy rule.
2. Set the type of logging you want in the details for the ALLOW action in a policyrule.
3. Set the type of ICMP reject in the details for the DENY action in a policy rule.
4. On the Interfaces panel of the Interface page, set logging for packets that aredropped because they do not match any policy rule.
� To Examine Packets� Once a log is retrieved, use the ssadm logdump command to examine it.
Examining logged packets can be useful for troubleshooting problems encounteredwhile you set up security policies. For example, when first creating policies, make thedefault DENY action "log packets." This enables you to review the logs easily. You canalso use logging to capture any attempts to break in.
� To Display Packets in the Log FileYou can examine a saved log file only from the command line.
� Use the ssadm logdump command to display packets in the log file:
# ssadm logdump -i ssadm_log_file
344 SunScreen 3.2 Administration Guide • December, 2001
ssadm_log_file is the name of a log file that has been downloaded from the Screen.
� To View the Log� Type the following to view the current log using local administration:
# ssadm log get | ssadm logdump -i -
Note – See the ssadm-logdump manpage for a list of options.
� To Save the Log1. Using local administration, use ssadm log get to save a log record to a file for local
administration:
# ssadm log get > filename
2. Using remote administration use ssadm with the -r option:
# ssadm -r Screen_name log get > filename
� To Clear the LogThis action clears the log browser’s display of any log records without saving themand clears the SunScreen log file.
1. Using local administration, type the following to clear the log file:
# ssadm log clear
2. Using remote administration, use ssadm with the -r option:
# ssadm -r Screen_name log clear
� To Save and Clear the LogThis action saves a log to a file and clears the display of any log records.
1. Using local administration, type the following to save the log to a file and clear thelog:
# ssadm log get_and_clear > filename
Using the Command Line Interface 345

2. Using remote administration, use the ssadm with the -r option:
# ssadm -r Screen_name log get_and_clear > filename
Setting Up High Availability (HA)See Chapter 5 and “Encryption, Tunneling, and Virtual Private Networks” inSunScreen 3.2 Administrator’s Overview before using the command line to set up HA.
1. To install HA on the Screen designated to be the primary HA Screen, type thefollowing:
# ssadm ha init_primary interface
This step creates a new HA cluster containing one Screen.
2. To install HA on the Screen designated to be the secondary HA Screen type thefollowing:
# ssadm ha init_secondary interface primaryIP
Where:
� interface is the interface to be used for the HA heartbeat and synchronization
� primaryIP is the IP address (on the HA network) of the primary Screen in thecluster
Note – You can receive the following error message after you issue the ssadm hainit_secondary command because the primary screen has not sent the policy to thesecondary screen. This is normal and the error message can be ignored.
Error: No filtering interfaces defined.
3. To add the HA secondary Screen to the existing HA cluster, execute the followingcommand on the primary machine in the cluster:
# ssadm ha add_secondary secondaryIP
Where secondaryIP is the IP address (on the dedicated HA network) of the secondaryScreen to be added.
346 SunScreen 3.2 Administration Guide • December, 2001

Note – After adding an HA secondary Screen and activating your policy, the newsecondary Screen may become active. If you need to perform additionaladministration on the primary Screen, first direct the secondary Screen to becomepassive so that you can communicate with the primary Screen.
� To Allow Non-Administrative Traffic on an HANetworkBy default, only administrative traffic is allowed on the HA interface (ping andSunScreen Administration services). This design keeps the network as secure aspossible. However, sometimes administrators have some need to open up otherservices on this private network.
This can be accomplished by adding filtering rules that include the HA network as thedestination address. For example, suppose that the dedicated HA network is172.16.0.0/24. The following policy would allow telnet traffic to and from any addresson the HA network.
� Add the filtering rule as follows:
edit> list interface qfe0"qfe0" HA "hanetwork" INCOMPLETEedit> list addresshanetwork "hanetwork" RANGE 172.16.0.0/24edit> list rule 1
1 "telnet" "hanetwork" "hanetwork" ALLOW
The destination address must be the same network object that is used in the interfacedefinition. An equivalent object with a different name will not work.
For example, the following change would work, since only the source is a newlydefined object.
edit> add address hanetwork2 RANGE 172.16.0.0/24edit> replace rule 1 telnet hanetwork2 hanetwork ALLOW
However, the below change would not work, since the destination address object isnot the same exact object that is defined in the HA interface definition:
edit> add address hanetwork2 RANGE 172.16.0.0/24edit> replace rule 1 telnet hanetwork hanetwork2 ALLOW
� To Remove an HA ScreenHA setup requires commands that are outside the configuration editor. Removing theHA setup consists of removing the HA_* options from the Screen objects on theappropriate machines. The three steps below assume the following:
Using the Command Line Interface 347

edit> list screen"vorticity" MASTER "barotropic" CDPRIP NIS HA_SECONDARY HA_IP 129.192.1.2"barotropic" ADMIN_CERTIFICATE "barotropic.admin" CDPDNS NIS HA_PRIMARY HA_IP 129.192.1.5 HA_ETHER 8:0:20:9e:e0:66
1. Remove the HA Screen:
edit> del screen vorticity
2. Redefine the primary Scrren to no longer be an HA-PRIMARY::
edit> add screen barotropic ADMIN_CERTIFICATE barotropic.admin CDP DNS NIS
3. Save and activate your configuration.
� To View HA InformationThe next two steps display information such as the current active or passive status ofthe HA machine in question and the current state of the HA daemon.
1. Using local administration, type the following:
# ssadm ha status
2. Using remote administration, use the -r flagssadm with the -r option to displaythe same information:
# ssadm -r Screen_name ha status
3. To view the status of all HA machines in a cluster, type the following from theprimary HA machine:
# ssadm ha status -Z
Centralized Management Groups (CMG)Use the following commands to set up a CMG cluster. Centralized managementgroups are explained in Chapter 7 and in “Centralized Management Group” inSunScreen 3.2 Administrator’s Overview.
348 SunScreen 3.2 Administration Guide • December, 2001

� To Change a Screen Object to Put It in a ClusterThe example below illustrates a two-machine cluster setup.
� Type the following on both machines in the cluster:
edit> add screen sphere ADMIN_CERTIFICATE "sphere.admin"CDP RIP NIS LOGSIZE 100edit> add screen velocity ADMIN_IP 10.100.105.5 ADMIN_CERTIFICATEvorticity.admin KEY"DES" DATA "RC4-40"MAC "MD5" COMPRESSION "NONE" MASTER sphere CDP DNS NIS
� To Remove a Screen from a Cluster� Type the following on the primary Screen ("sphere" in this example):
edit> del screen vorticity
Getting Support for SunScreen ProductsIf you have any support issues, call your authorized service provider. For furtherinformation about support, use the following URL to contact Enterprise Services:http://www.sun.com/service/contacting.
You can collect useful diagnostic information by saving the output of the SunScreensupport commands shown in the following table.
TABLE 10–5 SunScreen Support Commands
Command Description
config Brings over configuration files for the active configuration
date Sets and gets current time/date
disks Checks disk space (df -k)
eeprom Checks EEPROM settings
findcore Checks for a core file
help Provides a list of the available support commands
last Checks boot history
packages Checks pkginfo and patch history
Using the Command Line Interface 349

TABLE 10–5 SunScreen Support Commands (Continued)Command Description
procs Checks processes (ps -elf)
skip Checks contents of /etc/skip/ directory
stats Checks the kernel networking statistics (netstat -k)
streams Checks the STREAMS statistic (netstat -m)
versions Brings over version information on major SunScreen components
These commands, sent from a remote Administration Station, are used for remotediagnostics.
1. Type the following to start any of these support commands:
a. From a local administration station, type:
# ssadm Screen_name lib/support Command_Name
b. From a remote administration station, type:
# ssadm -r Screen_name lib/support Command_Name
2. The following table list additional support commands that are available usinglib/Command_Name instead of lib/support::
TABLE 10–6 Other Support Commands
Command Description
nattables List the contents of internal NAT tables.
screeninfo List all of the information about the SunScreen installation includingpackages installed, patched installed on the system, etc. This commandproduces copious amounts of data.
statetables Displays internal protocol state tables
support help List the support commands available.
3. Type the following to start any of these other support commands:
a. From a local administration station, type:
# ssadm Screen_name lib/Command_Name
b. From a remote administration station, type:
# ssadm -r Screen_name lib/Command_Name
350 SunScreen 3.2 Administration Guide • December, 2001

Gathering Data From the ScreenYou can use several commands to gather system information from the Screen. Thisinformation may be requested by Sun Service, should you encounter problems withyour Screen.
Note – These commands should only be used for debugging in conjunction with asupport call.
� To use the ssadm lib/statetables Command� To see internal statetable information, type:
# ssadm lib/statetables
� To Use the ssadm lib/screeninfo CommandThis command gathers a complete set of data for your Sun Service representative,including:
� State tables� ARP table information� Disk usage� Streams information� SunScreen configuration information and files� Uptime� SKIP information
� At the command line prompt, type:
# ssadm lib/screeninfo > output_filename
� To Use the ssadm lib/nattables Command� To list the contents of the internal NAT tables, type:
# ssadm lib/nattables
� To Use the ssadm lib/support CommandThis command gives you access to the commands in the support directory, all ofwhich are invoked by the screeninfo command. However, if you are seekinglimited data, you may want to run this command alone.
Using the Command Line Interface 351
� At the command line prompt, type:
# ssadm lib/support subcommand [parameters...]
See the following procedure for information on the subcommands or parameters usedwith this CLI.
� To Use the ssadm lib/support help Option� At the command line prompt, type:
# ssadm lib/support help
A list of the subcommnads is displayed.
TroubleshootingYou can use the ssadm debug_level command to control the printing of debugginginformation from the SunScreen kernel.
If you type the command with no arguments, ssadm debug_level displays thecurrent debug-level mask. By default, this mask has a value of 1, which means itreports only significant errors.
If you specify a hexadecimal number as an argument for ssadm debug_level, thecommand sets the kernel debugging mask to that level.
� To Use the ssadm debug_level Command1. To list the debugging bit choices, type the following:
# ssadm debug_level ?
2. Select a ssadm debug_level mask by setting all of the debugging bits in whichyou are interested.
Probably the most useful example of the ssadm debug_level debugging bit isDEFAULT_DROP.
352 SunScreen 3.2 Administration Guide • December, 2001
Installing and Configuring the NetscapeBrowser from the Command LineWhen using the Java Plug-In for Netscape Navigator, follow the instructions in theNetscape release notes. In particular, define the MOZILLA_HOME environment variableand include the Netscape installation directory in your PATH, so you do not have totype the full path name every time you run Netscape.
� To Install and Configure the Netscape Browser1. Set up an environment for installing and running the Java Plug-In.
� For sh or ksh users, type:
# unset CLASSPATH# MOZILLA_HOME=/opt/netscape# PATH=$MOZILLA_HOME:$PATH# export PATH MOZILLA_HOME
� For csh users, type:
% unsetenv CLASSPATH% setenv MOZILLA_HOME /opt/netscape% set path = ( $MOZILLA_HOME $path )
2. Install the Java Plug-In by typing:
# sh Java_Plugin_File_Name.sh
3. Save the identitydb.obj file. See “To Save the identitydb.obj File”on page 354.
4. Access the SunScreen administration GUI in one of two ways:
� Access the SunScreen administration GUI with no access to local files by typing:
# netscape http://screenhost:3852/
� Access the SunScreen administration GUI using the Java Plug-In, with access tolocal files for backup and restore, by typing:
# netscape http://screenhost:3852/plugin/
5. Set the CLASSPATH environment variable only if you need to install special Javafiles in Netscape Communicator.
Communicator uses CLASSPATH to find local .class files. If CLASSPATH is set inyour environment, only the .jar files and directories specified in the CLASSPATH aresearched. If you set your CLASSPATH, you must make sure that each .jar file in
Using the Command Line Interface 353

$MOZILLA_HOME/java/classes is listed individually in your CLASSPATH.
� To Save the identitydb.obj FileAfter installing the Java Plug-In, save the identitydb.obj file to distribute to theAdministration Stations.
1. Save the file identitydb.obj by going to the following URL:
http://localhost:3852/plugin/plugins/
2. In Netscape, press mouse button 3 and choose Save Link As.
If your browser does not support this save operation, access identitydb.obj in the/usr/lib/sunscreen/admin/htdocs/plugin/plugins/ directory.
3. Copy the identitydb.obj file onto a diskette to distribute to all AdministrationStations.
4. If the identitydb.obj file already exists in its proper location, add SunScreen asan accepted signer.
Operating System Proper Location
UNIX $HOME
Single-user Win95 C:\WINDOWS
Multi-user Win95/98 C:\WINDOWS\PROFILES\username
WinNT C:\WINNT\PROFILES\username
Note – If the identitydb.obj file does not exist, copy the file from the diskette toone of the above locations, then perform Step 4.
354 SunScreen 3.2 Administration Guide • December, 2001

APPENDIX A
Quick Start Procedures
This section contains cookbook-style instructions for setting up the following:
� Telnet proxy service with and without proxy user authentication� FTP proxy service with and without proxy user authentication� HTTP proxy service� SMTP proxy service� Configuring RADIUS Authentication� Telnet and FTP proxy service with RADIUS user authentication� SecurID clients supported by SunScreen� Telnet and FTP proxy service with SecurID user authentication
Telnet Proxy Service Without Proxy UserAuthenticationThe following information is used in this example:
Proxy user name pu1
Authorized user name none
Authorized user password none
Backend user name bu1
Backend Telnet server name telnet_server
SunScreen proxy name sunscreen_fw
Client machine name tiny
355

� To Set Up the SunScreen Environment1. Add an entry in the /etc/hosts file if it is accessible, for example:
1.2.3.4 telnet_server
2. Type the following to make sure the backend Telnet server is accessible:
ping -s telnet_server
� To Configure the Telnet Proxy Service
Note – There is no need to create an authorized user.
1. Create the proxy user:
a. In the Common Objects section, select Proxy User from the Type list.
b. Select New Single from the Add New list.
The Proxy User dialog box appears.
c. Type a name for this Proxy User in the Name field, for example:
pu1
d. Select the User Enabled check box.
e. Leave the Authorized User Name field empty.
f. Type a name in the Backend User Name field, for example:
bu1
g. Click the OK button.
2. Create a Policy Rule.
a. Click the Add New button in the Policy Rules area of the Policy Rules page.
The Rule Definition dialog box appears.
b. Select the following values for each field as follows by clicking the down arrowto display the list:
Service telnet
Source Address *
Destination Address *
356 SunScreen 3.2 Administration Guide • December, 2001

Action ALLOW
PROXY list PROXY_TELNET
3. Save the changes:
a. Click the Verify Policy button.
b. Click the Save Changes button.
4. Test the Telnet Proxy Service
From the client machine:
a. Make sure the physical connections are good.
b. Make sure the client machine can access the SunScreen proxy:
ping -s sunscreen_fw
c. Test the Telnet proxy service:
Command issued telnet sunscreen_fw
Username@Hostname pu1@telnet_server
Password Press the Return key
tiny# telnet sunscreen_fwTrying 70.70.70.1...Connected to sunscreen_fw.Escape character is "^]".SunScreen Telnet Proxy Version 3.2
Username@Hostname: pu1@telnet_serverPassword: <press return>Trying telnet_server (1.2.3.4) ...Connected to telnet_server
SunOS 5.6
login: bu1
Password: bu1_pw
Telnet Proxy Service With Proxy UserAuthenticationThe following information is used in this example:
Quick Start Procedures 357

Proxy user name pu1
Authorized user name au1
Authorized user password au1_pw
Backend user name bu1
Backend Telnet server name telnet_server
SunScreen proxy name sunscreen_fw
Client machine name tiny
� To Set Up the SunScreen Environment1. Type the following to make sure the backend Telnet Server is accessible:
# ping -s telnet_server
2. Add an entry in the /etc/hosts file if it is accessible. For example:
1.2.3.4 telnet_server
� To Configure the Telnet Proxy Service1. Create an authorized user:
a. In the Common Objects section, select Authorized User from the Type list.
b. Select New from the Add New list.
The Authorized User dialog box appears.
c. Type a name for this authorized user in the Name field, for example:
au1
d. Select the User Enabled check box.
e. Type the password:
au1_pw
f. Select the Enabled check box after the Password field.
g. Retype the password:
au1_pw
h. Click the OK button.
358 SunScreen 3.2 Administration Guide • December, 2001

2. Create the Proxy User:
a. In the Common Objects section, select Proxy User from the Type list.
b. Select New from the Add New list.
The Proxy User dialog box appears.
c. Type a name for this Proxy User in the Name field, for example:
pu1
d. Select the User Enabled check box.
e. Type the following in the Authorized User Name field:
au1
f. Type a name in the Backend User Name field, for example:
bu1
g. Click the OK button.
3. Create a Policy Rule:
a. Click the Add New button in the Policy Rules area of the Policy Rules page.
The Rule Definition dialog box appears.
b. Select the following values for each field:
Service telnet
Source Address *
Destination Address *
Action ALLOW
PROXY list PROXY_TELNET
c. Click the OK button.
4. Save the changes:
a. Click the Verify Policy button.
b. Click the Save Changes button.
5. Test the Telnet Proxy Service
From the client machine:
a. Make sure the physical connections are good.
b. Make sure the client machine can access the SunScreen proxy:
Quick Start Procedures 359

ping -s sunscreen_fw
c. Test the Telnet proxy service:
Command issued telnet sunscreen_fw
Username pu1@telnet_server
Password au1’s password, for example, au1–pw.(Password is not seen because it is echosuppressed.)
tiny# telnet sunscreen_fwTrying 70.70.70.1...Connected to sunscreen_fw.Escape character is "^]".SunScreen Telnet Proxy Version 3.2
Username@Hostname: pu1@telnet_serverPassword: au1_pwTrying telnet_server (1.2.3.4) ...Connected to telnet_server
SunOS 5.6
login: bu1
Password: au1_pw
FTP Proxy Service Without Proxy UserAuthenticationThe following information is used in this example:
Proxy user name pu1
Authorized user name none
Authorized user password none
Backend user name bu1
Backend user password bu1_pw
Backend FTP server name ftp_server
SunScreen proxy server name sunscreen_fw
360 SunScreen 3.2 Administration Guide • December, 2001

Client machine name tiny
� To Set Up the SunScreen Environment
Note – The ping command must be enabled in the Rules page before you canperform the following procedure.
1. Type the following to make sure the backend FTP Server is accessible:
ping -s ftp_server
2. Add an entry in the /etc/hosts file if it is accessible. For example:
1.2.3.4 ftp_server
� To Configure the FTP Proxy Service
Note – There is no need to create an authorized user.
1. Create the proxy user:
a. In the Common Objects section, select Proxy User from the Type list.
b. Select New Single from the Add New list.
The Proxy User dialog box appears.
c. Type a name for this Proxy User in the Name field, for example:
pu1
d. Select the User Enabled check box.
e. Leave the Authorized User Name field empty.
f. Type a name in the Backend User Name field, for example:
bu1
g. Click the OK button.
2. Create a Policy Rule
a. Click the Add New button in the Policy Rules area of the Policy Rules page.
Quick Start Procedures 361

The Rule Definition dialog box appears.
b. Select the following values for each field:
Service proxy_ftp
Source Address *
Destination Address *
Select Action ALLOW
c. From the PROXY list, select PROXY_FTP.
d. Enable the FTP command options, for example:
GET ALLOW
CHDIR ALLOW
PROXY USERS pu1
e. Click the OK button.
3. Save the changes:
a. Click the Verify Policy button.
b. Click the Save Changes button.
� To Test the FTP Proxy ServiceFrom the client machine:
1. Make sure the physical connections are good.
2. Use the ping command to make sure the client machine can access the SunScreenproxy:
# ping -s sunscreen_fw
Note – The ping command must be enabled in the Rules page before you canperform this procedure.
3. Test the FTP proxy service.
For example, the following values produce the screen output in Example C-1:
Command issued ftp sunscreen_fw
User name pu1@ftp_server
362 SunScreen 3.2 Administration Guide • December, 2001

Password put_anything@bu1_pwOR:<none>@bu1_pwFor example, zzz@bu1_pwPassword is not seen because it is echo suppressed.
EXAMPLE A–1 Screen Output
tiny# ftp sunscreen_fwConnected to sunscreen_fw.220- Proxy: SunScreen FTP Proxy Version 3.2: Username to be given as <proxy-user>’@’<FTP-server-host>: Password to be given as <proxy-password>’@’<FTP-server-password>220 Ready.Name (sunscreen_fw: root): pu1@ftp_server331- Proxy: Authenticate & connect:331 Password needed to authenticate ’pu1’.Password: <zzz@bu1_pw>ORPassword: <@bu1_pw>230- Proxy:: Authentication mapped ’pu1’ to backend user ’bu1’.: Connecting to ftp_server (1.2.3.4) - done.Server: 220 ftp_server FTP server (SunOS 5.6) ready.Proxy: Login on server as ’bu1’.Server: 331 Password required for bu1.Proxy: Supplying password to server.230 Server: User bu1 logged in.
ftp> ls
FTP Proxy Service With Proxy UserAuthenticationThe following information is used in this example:
Proxy user name pu1
Authorized user name au1
Authorized user password au1_pw
Backend user name bu1
Backend user password bu1_pw
Backend FTP server name ftp_server
SunScreen proxy server name sunscreen_fw
Quick Start Procedures 363

Client machine name tiny
� To Set Up the SunScreen Environment1. Use the ping command to make sure the backend FTP Server is accessible:
ping -s ftp_server
2. Add an entry in the /etc/hosts file if it is accessible. For example:
1.2.3.4 ftp_server
� To Configure the FTP Proxy Service1. Create the authorized user:
a. In the Common Objects section, select Authorized User from the Type list.
b. Select New from the Add New list.
The Authorized User dialog box appears.
c. Type a name for this authorized user in the Name field, for example:
au1
d. Select the User Enabled check box.
e. Type the password:
au1_pw
f. Select the Enabled check box after the Password field.
g. Retype the password:
au1_pw
h. Click the OK button.
2. Create a Proxy User:
a. In the Common Objects section, select Proxy User from the Type list.
b. Select New from the Add New list.
The Proxy User dialog box appears.
c. Type a name for this Proxy User in the Name field, for example:
pu1
364 SunScreen 3.2 Administration Guide • December, 2001

d. Select the User Enabled check box.
e. Type a name in the Authorized User Name field:
au1
f. Type a name in the Backend User Name field, for example:
bu1
g. Click the OK button.
3. Create a Policy Rule:
a. Click the Add New button in the Policy Rules area of the Policy Rules page.
The Rule Definition dialog box appears.
b. Select the following values for each field:
Service ftp
Source Address *
Destination Address *
Action ALLOW
PROXY list PROXY_FTP
c. Enable the FTP command options, for example:
GET ALLOW
CHDIR ALLOW
PROXY USERS pu1
4. Click the OK button.
5. Save the changes:
a. Click the Verify Policy button.
b. Click the Save Changes button.
6. Test the FTP Proxy Service
From the client machine:
a. Make sure the physical connections are good.
b. Make sure the client machine can access the SunScreen proxy:
# ping -s sunscreen_fw
c. Test the FTP proxy service:
Quick Start Procedures 365

Command issued ftp sunscreen_fw
Username pu1@ftp_server
Password For example, au1_pw@bu1_pw(Password is not seen because it is echosuppressed.)
EXAMPLE A–2 Screen Output
tiny# ftp sunscreen_fwConnected to sunscreen_fw.220- Proxy: SunScreen FTP Proxy Version 3.2: Username to be given as <proxy-user>’@’<FTP-server-host>: Password to be given as <proxy-password>’@’<FTP-server-password>220 Ready.Name (sunscreen_fw: root): pu1@ftp_server331- Proxy: Authenticate & connect:331 Password needed to authenticate ’pu1’.Password: <au1_pw@bu1_pw>230- Proxy:: Authentication mapped ’pu1’ to backend user ’bu1’.: Connecting to ftp_server (1.2.3.4) - done.Server: 220 ftp_server FTP server (SunOS 5.6) ready.Proxy: Login on server as ’bu1’.Server: 331 Password required for bu1.Proxy: Supplying password to server.230 Server: User bu1 logged in.
ftp> ls
HTTP Proxy Service
Note – User authentication does not apply.
The following information is used in this example:
Backend HTTP Server name gobaby
Backend HTTP Server URL gobaby/Sun.Net
SunScreen proxy name sunscreen_fw
Client machine name tiny
366 SunScreen 3.2 Administration Guide • December, 2001

� To Set Up the SunScreen Environment1. Disable the HTTP daemon (for example, httpd), if it is running.
2. Type the following to make sure the backend HTTP Server is accessible:
ping -s gobaby
3. Add an entry in the /etc/hosts file if it is accessible. For example:
1.2.3.4 gobaby
� To Configure the HTTP Proxy Service1. Create the Proxy User:
a. In the Common Objects section, select Proxy User from the Type list.
b. Select New from the Add New list.
The Proxy User dialog box appears.
c. Type a name for this Proxy User in the Name field, for example:
pu1
d. Leave the Authorized User Name field blank.
e. Leave the Backend User Name blank.
f. Click the OK button.
2. Create a Policy Rule:
a. Click the Add New button in the Policy Rules area of the Policy Rules page.
The Rule Definition dialog box appears.
b. Select the following values for each field:
Service http
Source address *
Destination address *
Action ALLOW
PROXY list PROXY_HTTP
Cookies, ActiveX, Java, and SSL ALLOW/DENY
c. Click the OK button.
Quick Start Procedures 367

3. Save the changes:
a. Click the Verify Policy button.
b. Click the Save Changes button.
4. Test the HTTP Proxy service
From the client machine:
a. Make sure the physical connections are good.
b. Make sure the client machine can access the SunScreen proxy:
ping -s sunscreen_fw
c. Configure the browser to use the HTTP proxy:
HTTP Proxy sunscreen_fw
Port 80
d. Type the following URL:
http://gobaby/Sun.Net
The screen output appears on the web page.
SMTP Proxy Service
Note – User authentication does not apply.
� To Set Up the SunScreen Environment1. Configure addresses and rules for DNS servers and address(es) for SMTP server(s)
as follows:
ssadm edit Initialedit> add Address dns0 HOST 1.2.3.4edit> add Address dns1 HOST 1.2.3.5edit> add Address dns-servers GROUP { dns0 dns1 } { }edit> add Address smtp-server HOST ...edit> add Rule dns localhost dns-servers ALLOW
2. Test spam filtering.
368 SunScreen 3.2 Administration Guide • December, 2001

The rule below allows any address to all inbound mailboxes, no relay checking.
edit> add Rule smtp "*" smtp-server ALLOW PROXY_SMTP RELAYedit> save
3. Type the following to create a basic mail spam list (list of domains and/or addresseswhich won’t be allowed to send mail):
ssadm edit Initial mail_spam add spam.comssadm edit Initial mail_spam add 0.0.0.0..255.255.255.255
Note – For more information on spam control, see “SMTP Proxy” in SunScreen 3.2Administrator’s Overview.
4. Type the following to activate the configuration:
ssadm activate Initial
This refuses mail from any named host in spam.com, any host that has anunregistered address, and any originator name (in MAIL FROM: command) withinspam.com.
Now a connection from an unregistered host, or from a registered host under thedomain spam.com, looks like this:
% telnet efs 25Trying 1.2.3.4...Connected to efsEscape character is "^]".455 Smells like ... bacon ... no, spam!Connection closed by foreign host.
The reverse-translated name (or lack thereof) has determined the originator is aspammer.
A connection from a registered host not under the domain spam.com looks like this:
% telnet efs 25Trying 1.2.3.4...Connected to efsEscape character is "^]".220 efs ESMTP Sendmail 8.7.4/8.7.3;Thu, 11 Mar 1999 19: 34: 40 -0800 (PST)helo me.com250 efs Hello me.com [3.4.5.6],pleased to meet youmail from: [email protected] Smells like ... bacon ... no, spam!Connection closed by foreign host.
The connection is aborted because the originating user was determined to be aspammer. [email protected] is an alternate syntax for the mailbox.
Quick Start Procedures 369

� To Test Relay Blocking1. Type the following to replace the previous rule with a rule that checks relaying:
edit> add Rule smtp "*" smtp-server ALLOW PROXY_SMTP
This allows only configured domains in inbound mailbox names.
2. Type the following to create a basic mail relay list (a list of domains and/or hostswhich will/will not be allowed as recipient):
ssadm edit Initial mail_relay add good.orgssadm edit Initial mail_relay add !too.good.orgssadm edit Initial mail_relay add !too-mailerssadm edit Initial mail_relay add plenty.org
The ! prefix indicates that the domain or host is not to be allowed; if you are usingcsh, remember to escape the !, which is a shell meta-character.
Relay processing first compares the recipient domain(s) to those which are NOTs (thatis, begin with !); if the recipient is found there, the message is refused.
Second, the recipient domain(s) are compared to the list of OK domains (that is,without !); if found, the recipient is allowed.
3. Activate the configuration.
This refuses mail to any mailbox in the subdomain too.good.org or for the hosttoo-mailer, but accepts messages bound for any mailbox in other parts ofgood.org, or any mailbox in plenty.org (from RCPT TO: command).
This example shows mail for allowed recipients, ending in one which will not berelayed-to:
% telnet efs 25Trying 1.2.3.4...Connected to efsEscape character is "^]".220 efs ESMTP Sendmail 8.7.4/8.7.3;Thu, 11 Mar 1999 19: 34: 40 -0800 (PST)helo me.com250 efs Hello me.com [3.4.5.6],pleased to meet youmail from: [email protected] [email protected]... Sender okrcpt to: <[email protected]>250 Recipient okrcpt to: extra@[email protected] Recipient okrcpt to: <[email protected]>250 Recipient okrcpt to: [email protected] Relay refusedConnection closed by foreign host.
The connection was aborted because the recipient would require a forbidden relayoperation.
370 SunScreen 3.2 Administration Guide • December, 2001

Other examples of relay addresses that will not be allowed are:
� bad1@too-mailer
� bad2@[email protected]
� [email protected]@good.org
� @good.org,[email protected]
� @too.good.org,[email protected]
Note – The last two bullet items are examples of older, ARPANET-style pathnaming, and most modern mail transfer agents (MTA), such as sendmail, are notconfigured to accept them, regardless of whether they pass our relay filtering. Also,mailbox names surrounded by <> are treated as if they there are no <>s.
4. Test default relay.
If there is no configured relay list, the domain name of the SunScreen host itself isused as the allowed domain. For example, if the SunScreen name [email protected], the relay checking behaves as if the following command wasconfigured as the entire relay list:
ssadm edit Initial mail_relay domain.com
The following example shows mail which actually gets through:
% telnet efs 25Trying 1.2.3.4...Connected to efsEscape character is "^]".220 efs ESMTP Sendmail 8.7.4/8.7.3; Thu, 11 Mar 1999 19: 34: 40 -0800 (PST)helo me.com250 efs Hello me.com [3.4.5.6], pleased to meet youmail from: [email protected] [email protected]... Sender okrcpt to: [email protected] Recipient okrcpt to: [email protected] Recipient okrcpt to: [email protected] Recipient okrcpt to: [email protected] Recipient okdata354 Enter mail, end with “.” on a line by itselfSubject: I Love Candy
I really, really love good candy ... yummm! Send me some!
.250 UAA01234 Message accepted for deliveryquit221 efs closing connection
Quick Start Procedures 371

Connection closed by foreign host.
After the . (ending the mail session), the proxy and mailer return to the state wherethe mailer expects a next message (starting with a MAIL FROM: command.
Note – Backslash \ and end-of-line denote command line continuation.
Configuring RADIUS AuthenticationA typical RADIUS configuration uses two Screens, each of which protects the site.With multiple sites, a given site may use the RADIUS server of another site as abackup.
� To Configure RADIUS Authentication1. Identify the RADIUS servers:
# ssadm edit Policyedit> vars add prg=auth name=RADIUSServersVALUES={ host=radius_server_name }DESCRIPTION="RADIUS server name(s) or addresses to query"
2. Add the node secret used by the RADIUS protocol to secure traffic between theRADIUS client and server:
# ssadm edit Policyedit> vars add sys=screen_name prg=authname=RADIUSNodeSecret VALUE="xxxxxxxx
Where xxxxxxxx is the RADIUS Node Secret.
3. Add a rule to allow the SunScreen machine to communicate with the RADIUSservers:
# ssadm edit Policyedit> add rule radius EFS_hostname radius_server_name ALLOWedit> save# ssadm activate Policy
372 SunScreen 3.2 Administration Guide • December, 2001

Telnet Proxy Service With RADIUS UserAuthenticationThe following information is used in this example:
Proxy user name pu1
Authorized user name au1
Autherized user password au1_pw
Backend user name bu1
Backend user password bu1_pw
Backend Telnet server name telnet_server
SunScreen proxy server name sunscreen_fw
� To Configure the Telnet Proxy Service WithRADIUS User Authentication
1. Follow the steps in the previous section, “Configuring RADIUS Authentication”on page 372.
2. Add a rule to enable the Telnet Proxy for a pre-defined RADIUS user:
# ssadm edit Policyedit> Add Rule telnet USER radius ALLOW PROXY_Telnetedit> save# ssadm activate Policy
3. Test the Telnet Proxy with RADIUS authentication:
Telnet command issued telnet sunscreen_fw
Username@Hostname /radius/bu1@telnet_server
Password bu1_radpw
# telnet sunscreen_fwUsername @Hostname: /radius/bu1@telnet_serverPassword: bu1_radpw
Quick Start Procedures 373

FTP Proxy Service With RADIUS UserAuthenticationThe following information is used in this example:
Proxy user name pu1
Authorized user name au1
Authorized user password au1_pw
Backend user name bu1
Backend user password bu1_pw
Backedn FTP server name ftp_server
SunScreen proxy server name sunscreen_fw
Radius user name bu1
Radius user password bu1_radpw
� To Configure the FTP Proxy Service With RADIUSUser Authentication
1. Follow the steps in the section above, “Configuring RADIUS Authentication”on page 372.
2. Configure the FTP Proxy Service:
a. Create a Proxy user group, for example, ftp-grp.
b. Add predefined users radius and securid to ftp-grp.
# ssadm edit Policy> proxyuser add ftp-grp GROUP> proxyuser addmember ftp-grp radius> proxyuser addmember ftp-grp securid
c. For each user that will be using the FTP Proxy:
i. Create a record in the Authorized User database.
ii. Create a record in the Proxy User database.
374 SunScreen 3.2 Administration Guide • December, 2001

iii. Add the user as member of ftp-grp:
# ssadm edit Policy> authuser add au1 PASSWORD=\{ au1_pw \}> proxyuser add pu1 auth_user_name=au1 backend_user_name=bu1> proxyuser addmember ftp-grp pu1
This example assumes C shell. The backslash \ before the brackets is the escapekey from special characters { and }. For Bourne shell, the backslash is notnecessary.
Since there are typically many users to administer, this is a good task toautomate with a script.
d. Add a rule to allow the FTP proxy for the proxy user group, ftp-grp.
# ssadm edit Policyedit> Add Rule ftp USER ftp-grp ALLOW PROXY_FTP FTP_GET FTP_CHDIRedit> save# ssadm activate Policy
3. Test the FTP Proxy with RADIUS authentication:
FTP proxy login ftp sunscreen_fw
Username@Hostname bu1@ftp_server
Password bu1_radpw@bu1_pw
# ftp sunscreen_fwUsername@Hostname: radius_user@ftp_serverPassword: radius_user_pw@password_at_ftp_server
SecurID Clients Supported by SunScreenSunScreen supports two mechanisms for SecurID clients:
� Install ACE/Agent 3.3 on each user desktop.
Or:
1. Install SunScreen SecurID stub client on the SunScreen machine.
a. As root, install a copy of sdconf.rec from the ACE server after it has beenconfigured to have SunScreen as the ACE client.
b. Type the following in the directory containing sdconf.rec:
# /usr/lib/sunscreen/lib/securid_stubclient_setup sdconf.rec
Quick Start Procedures 375

The ACE/Agent 3.3 is supported only on the Solaris 2.6 SPARC platform. It replacesthe system login module with an ACE login module. When the Ace/Agent 3.3 isinstalled on each user desktop, ACE accounting will show that the user isauthenticated through the user’s desktop.
Note – Only install the EFS SecurID stub client on the SunScreen EFS firewall. ACEaccounting will show that the users are authenticated through the EFS machine.
� To Configure SecurID Authentication1. Follow ACE documentation to set up the ACE server and configure SecurID users.
2. Install either ACE/Agent 3.3 on each user desktop or the SunScreen SecurID stubclient on the EFS machine.
3. Add a rule to allow the SunScreen machine to communicate with the ACE servers:
# ssadm edit Policyedit> Add Rule securid EFS_hostname secureid_server_name ALLOWedit> save# ssadm activate Policy
Telnet Proxy Service With SecurID UserAuthentication
� To Set Up the Telnet Proxy Service With SecurIDUser AuthenticationThe following information is used in this example:
Proxy user name pu1
Authorized user name au1
Authorized user password au1_pw
Backend user name bu1
Backend user password bu1_pw
376 SunScreen 3.2 Administration Guide • December, 2001

Backend Telnet server name telnet_server
SunScreen proxy server name sunscreen_fw
1. Follow the steps in “To Configure SecurID Authentication” on page 376.
2. Add a rule to allow telnet proxy for predefined SecurID user:
# ssadm edit Policyedit> Add Rule telnet USER securid ALLOW PROXY_Telnetedit> save# ssadm activate Policy
3. Test the Telnet Proxy with SecurID Authentication:
Telnet proxy login command issued telnet sunscreen_fw
Username@Hostname /securid/bu1@telnet_server
Password securid_passcode
# telnet sunscreen_fwUsername@Hostname: /securid/bu1@telnet_serverPassword: securid_passcode
FTP Proxy Service With SecurID UserAuthentication
� To Set Up the FTP Proxy Service With SecurID UserAuthenticationThe following information is used in this example:
Proxy user name pu1
Authorized user name au1
Authorized user password au1_pw
Backend user name bu1
Badkend user password bu1_pw
Backend FTP server name ftp_server
Quick Start Procedures 377
SecurID user name bu1
SecurID user passcode securid_passcode
1. Follow the steps in “To Configure SecurID Authentication” on page 376.
2. Configure the FTP Proxy Service
a. Create a Proxy user group, for example, ftp-grp.
b. Add predefined users radius and securid to ftp-grp:
# ssadm edit Policy> proxyuser add ftp-grp GROUP> proxyuser addmember ftp-grp radius> proxyuser addmember ftp-grp securid
c. For each user that will be using the FTP Proxy:
i. Create a record in the Authorized User database.
ii. Create a record in the Proxy User database.
iii. Add user as member of ftp-grp:
# ssadm edit Policy> authuser add au1 PASSWORD=\{ au1_pw\}> proxyuser add pu1 auth_user_name=au1 backend_user_name=bu1> proxyuser addmember ftp-grp pu1
Since there are typically many users to administer, this can be done through ascript.
d. Add a rule to allow FTP proxy for proxy user group ftp-grp:
# ssadm edit Policyedit> Add Rule ftp USER ftp-grp ALLOW PROXY_FTP FTP_GET FTP_CHDIRedit> save# ssadm activate Policy
3. Test the FTP Proxy with SecurID Authentication:
FTP proxy login ftp sunscreen_fw
Username@Hostname /securid/bu1@ftp_server
Password securid_passcode@bu1_pw
# ftp sunscreen_fwUsername@Hostname: /securid/bu1@ftp_serverPassword: securid_passcode@bu1_pw
378 SunScreen 3.2 Administration Guide • December, 2001

Glossary
active Screen Screen in a high availability cluster that is keeping state and passingtraffic. There is always exactly one active Screen in a correctlyoperating high availability cluster. See primary Screen and passiveScreen.
address In networking, a unique code that identifies a node to the network.SunScreen uses IP addresses.
ADP Algorithm Discovery Protocol. Enables one entity to inform another ofthe capabilities it supports.
AH Authentication Header. A mechanism for providing strong integrityand authentication for IP datagrams.
algorithm Sequence of steps designed to solve a problem or execute a processsuch as drawing a curve from a set of control points, or encrypting ablock of data.
AMI Authentication Management Infrastructure.
API application program interface. Set of calling conventions defining howa service is invoked through a software package. An interface betweenthe operating system and application programs, which includes theway the application programs communicate with the operatingsystem, and the services the operating system makes available to theprograms.
argument Item of information following a command. It may, for example, modifythe command or identify a file to be affected. Sometimes the termparameter is used.
ATM asynchronous transfer mode. Transmits data, voice, video, and framerelay traffic in real time. With ATM, digital information is broken upinto standard-sized packets, each with the address of its finaldestination.
attack Attempted cryptanalysis or an attempt to compromise system security.
379

authentication Property of knowing that the claimed sender is in fact the actualsender.
broadcast Packet delivery system, where a copy of a given packet is distributedto all hosts attached to the network.
CA See certificate authority.
cache Buffer of high-speed memory used to store frequently accessedmemory or values. A cache increases effective memory transfer ratesand processor speed.
CBC Cipher Block Chaining (see also DES). A mode used to chain afeedback mechanism, which essentially means the previous block isused to modify the encryption of the next block.
CDP Certificate Discovery Protocol. Request and response protocol used bytwo parties to transfer certificates.
CentralizedManagement group
Multiple secondary Screens that are managed by the CentralizedManagement group’s primary Screen. Note that a Screen in a centrallymanaged group, whether primary or secondary, can also be part of aHA cluster. See HA cluster.
certificate Data structure that binds the identity of an entity with a public-keyvalue.
certificate authority Trusted network entity that digitally signs a certificate containinginformation identifying the user; such as, user’s name, issuedcertificate, and the certificate’s expiration date.
certificate identifier (ID) Generic naming scheme term used to identify a particularself-generated or issued certificate. It effectively decouples theidentification of a key for purposes of key lookup and access controlfrom issues of network topology, routing, and IP addresses.
CFB Cipher Feedback. Uses a block cipher to implement a stream cipher.
cipher Cryptographic algorithm used for encryption or decryption.
ciphertext Encrypted message.
cluster Screens in an HA cluster connected by a high-speed network that worktogether as if they were one Screen. See high availability.
common objects Data objects that are relevant to all SunScreen policies. They include:address, screen, state engine, service, interface, certificate, time, andVPN gateway groups.
confidentiality Property of communicating such that only the sender and the intendedrecipients know what is being sent, and unintended parties cannotdetermine what is sent.
configuration Union of one policy with the common objects to form a completedescription of the behavior of one or more Screens.
380 SunScreen 3.2 Administration Guide • December, 2001
content filtering Practice of allowing or disallowing traffic based on the content of thedata being sent.
decryption Process of converting ciphertext back to plaintext.
demilitarized zone Small protected inside network or subnetwork that provides limitedpublic access to resources such as web servers, FTP servers, and otherinformation resources.
DES Data encryption standard. A common algorithm for encrypting anddecrypting data.
DMZ See demilitarized zone.
DNS domain naming system. Distributed name and address mechanismused in the Internet.
DST Destination addresses.
dynamic packetscreening
Process to ALLOW or DENY examined traffic.
dynamic translation NAT converts a set of internal private addresses into external publicaddresses. It allows internal hosts to contact external hosts, but cannotbe used to allow external hosts to contact internal hosts.
encapsulation Technique used by layered protocols in which a layer adds headerinformation to the protocol data unit from the layer above. In Internetterminology, for example, a packet would contain a header from thephysical layer, followed by a header from the network layer (IP),followed by a header from the transport layer (TCP), followed by theapplication protocol data. See tunneling.
encryption Process of protecting information from unauthorized use by makingthe information unintelligible. Encryption is based on a code, called akey, which is used to decrypt the information. Contrast withdecryption.
ESP Encapsulating Security Payload. Mechanism for providing integrityand confidentiality to IP datagrams. In some circumstances it can alsoprovide authentication to IP datagrams, depending on whichalgorithm or algorithm mode is used. It does not providenonrepudiation and protection from traffic analysis.
Ethernet LAN that enables real-time communication between machinesconnected directly through cables.
failover Process by which a passive Screen in a high availability group becomesthe active Screen if the active Screen becomes unavailable.
filter Program that reads the standard input, acts on it in some way, andthen prints the results as standard output.
Glossary 381

firewall Computer situated between your internal network and the rest of thenetwork that filters packets as they go by according to user-specifiedcriteria.
fragmentation Process of dividing a packet into multiple smaller packets so that theycan be sent over a communication link that only supports a smallersize.
FTP proxy Can be configured to allow or deny specific FTP commands such asput or get.
gateway A device that connects networks that use different communicationprotocols. It transfers information and converts it to a compatibleformat to the receiving network. See virtual private network.
HA See high availability.
HA cluster High availability-specific groups. Multiple secondary HA clusterScreens are managed by the primary HA cluster Screen. One Screen inan HA cluster (secondary or primary) is the active Screen that isactively filtering. Additional HA cluster Screens remain passive untilone detects the failure of the active HA cluster Screen and takes overthe routing and filtering of the network traffic. See high availability.
heartbeat Periodic message sent between the machines within an HA clusterover a private network to maintain state. If the heartbeat is notdetected after a specified interval and number of retries, a passivemachine in the HA cluster becomes the active machine. See highavailability.
high availability Consists of one active Screen and at least one passive Screen. If theactive Screen fails, a passive Screen takes over the filtering of thenetwork traffic and other functionality of the failed firewall.
host Name of any device on a TCP/IP network that has an IP address. InSunScreen, host is only used when referring to a source or destinationof a packet.
HTTP proxy Can be configured to ALLOW or DENY Java applets, and ActiveXcontrols and cookies.
ICMP Internet Control Message Protocol. IP protocol that handles errors andcontrol messages, to enable routers to inform other routers (or hosts) ofIP routing problems or make suggestions of better routes. See ping.
IKE See Internet Key Exchange.
Initial configuration When installing SunScreen, the user creates, compiles, and activates aconfiguration named Initial, which enables a user to connect to theScreen where the configurations used to implement their securitypolicy are built.
382 SunScreen 3.2 Administration Guide • December, 2001

integrity Property of ensuring that data is transmitted from the source todestination without undetected alteration.
interfaces Describes the physical interface ports of Screen objects.
Internet Key Exchange The Internet Key Exchange (IKE) protocol is a key managementprotocol standard that is used in conjunction with the IPSec standard.
Internet Protocol Suite of protocols within TCP/IP used to link networks worldwide onthe Internet. See IP.
IP Internet Protocol. Network layer protocol for the Internet Protocolsuite.
IPsec An IP security feature that provides robust authentication andencryption of IP packets.
issued certificate Certificate that is issued by a certificate authority. See self-generatedcertificate.
JDK Java Development Kit. Software tools used to write Java applets orapplication programs.
JRE Java Runtime Environment.
key Code for encrypting or decrypting data.
key and certificatediskette
Medium that contains the private key and certificate, and should bekept secure. The identifier for the certificate is on the label.
log browser Facility in SunScreen administration GUI that enables the display andprinting of log messages.
MAC Message Authentication Code. (Also known as media access control,an IEEE standard.) See authentication.
media access control (MAC) The lower sublayer of the OSI Reference Model layer 2, thedata-link layer. It controls access to a transmission medium such TokenRing, CSMA/CD, Ethernet, and the like.
Message AuthenticationCode
Message Authentication Code. (Also known as media access control,an IEEE standard.) See authentication.
message transfer agent The program responsible for delivering email messages from a mailuser agent or other MTA.
MIB Management Information Base. SNMP structure that describes theparticular device being monitored. See SNMP.
MTA See message transfer agentt.
multicast Special form of broadcast where copies of the packet are delivered toonly a subset of all possible destinations.
NAT See network address translation.
Glossary 383

network addresstranslation
Function used when packets passing through a firewall have theiraddresses changed (or translated) to different network addresses.Address translation can be used to translate unregistered addressesinto a smaller set of registered addresses, allowing internal systemswith unregistered addresses to access systems on the Internet.
network layer Third of the seven layers in the ISO model for standardizingcomputer-to-computer communications.
network mask Number used by software to separate the local subnet address fromthe rest of a given IP address.
node Junction at which subsidiary parts originate or center.
nodename Name by which the system is known to a communications network.Every system running Solaris is assigned a nodename. The nodenamecan be displayed using the Solaris uname -n command. Each Screenhas a name that is normally the same as the nodename.
nonrepudiation Property of a receiver being able to prove that the sender of a messagedid in fact send the message, even though the sender might later wantto deny ever having sent it.
NSID Name space identifier. Used to identify a naming scheme for a SKIPkey. See key.
OLTP Online transaction processing. Handles real-time transactions.
OSI Open Systems Interconnection. Suite of protocols and standardssponsored by ISO to communicate data between incompatiblecomputer systems.
OSPF Open shortest path first. A network routing protocol.
packet Group of information in a fixed format that is transmitted as a unitover communications lines.
parameter See argument.
passive Screen Screen in a high availability cluster that is keeping state with the activeScreen but not actually passing traffic. A passive Screen will becomeactive if the cluster’s active Screen fails. See active Screen.
passphrase Collection of characters used in a similar manner to, although longerthan, password. Letters in both uppercase and lowercase can be used,as well as special characters and numbers. See password.
password Unique string of characters that a user types as an identification codeas a security measure to restrict access to computer systems andsensitive files.
peer Any functional unit in the same layer as another entity.
PFS Perfect Forward Secrecy. Captured packets that are decrypted cannotbe used to decrypt other packets.
384 SunScreen 3.2 Administration Guide • December, 2001

ping Packet Internet Groper. Program used to test reachability ofdestinations by sending them an ICMP echo request and waiting for areply. See ICMP.
plaintext Unencrypted message.
plumb To install and configure a network interface.
Point-to-Point Protocol PPP (the successor to SLIP) provides router-to-router andhost-to-network connections over both synchronous and asynchronouscircuits.
TCP/IP connectivity, usually for PCs over a telephone line.
policy Named set of policy data. For example, when the SunScreen softwareis first installed, it configures a default policy named Initial.
PPP See Point-to-Point Protocoll.
primary Screen In a high availability cluster, the Screen that controls the configurationof the cluster. In a centralized management group, the Screen thatcontrols the configuration of the other Screens in the group. Each highavailability cluster or centralized management group has exactly oneprimary Screen. See high availability.
private key Corresponds to a public key and is never disclosed to the public. Seesecret key.
protocol A formal description of messages to be exchanged and rules to befollowed for two or more systems to exchange information.
proxies Proxies are separate user-level applications and provide contentfiltering and user authentication. Proxies are used to control thecontent of various network services. See HTTP proxy, FTP proxy,Telnet proxy, and SMTP proxy.
pseudorandom Pseudorandom numbers appear random but can be generated reliablyon different systems or at different times.
public certificatediskette
Medium that contains only the certificate containing the public key.The identifier for the certificate is on the label
public-key certificate A digitally signed data structure containing a user’s public key, as wellas information about the time and date during which the certificate isvalid.
public-key cryptography Also known as asymmetric key cryptography. In public-keycryptosystems, everyone has two related complementary keys, apublicly revealed key and a secret key (also frequently called a privatekey). Each key unlocks the code that the other key makes. Knowingthe public key does not help you deduce the corresponding secret key.The public key can be published and widely disseminated across a
Glossary 385

communications network. This protocol provides privacy without theneed for the secure channels that a conventional cryptosystemrequires.
real time Event or system that must receive a response to some stimulus withina narrow, predictable time frame, provided that the response is notstrongly dependent on highly variable system-performanceparameters, such as a processor load or interface.
remote System in another location that can be accessed through a network.
router Intermediary device responsible for making decisions about which ofseveral paths network (or Internet) traffic will follow.
routing mode Routing-mode interfaces have IP addresses and perform IP routing.Routing mode requires that you subnet the network.
All proxies are accessed through the transmission control protocol(TCP) and, therefore, can only run on systems with at least oneinterface configured in routing mode.
rules Formulas that define a security policy in terms of the common dataobjects for SunScreen. Policy data include filtering rules, NAT rules,and administration access rules.
Screen-specific objects Data objects relevant to the policies of one Screen. See commonobjectscommon objects.
SDNS Secure Data Network Service.
secondary Screen Screen that receives its configuration from a primary Screen. Normally,no administration is performed on a secondary Screen. A secondaryScreen does, however, maintain its own logs and status, which can beexamined. See high availability.
secret key Corresponds to a public key and is never disclosed to the public. Seeprivate key.
self-generated certificate See self-signed certificate and UDH certificate. Compare with issuedcertificate.
self-signed certificate A digitally signed collection of data, whose content can be checked forauthenticity, and optionally used to check the authenticity of otherdigitally signed collections (issued certificate).
In SKIP, the CA certificates are self-signed. Obtained out-of-band, theyare used as the basis for issued certificate from a CA, no matter howthey are obtained
session key Common cryptographic component to encrypt each individualconversation between two people with a separate key.
SET Secure Electronic Transaction. Protocol that is an emerging standardfor Internet bank card transactions.
386 SunScreen 3.2 Administration Guide • December, 2001

shell Program within which a user communicates with the operatingsystem.
SKIP Simple Key-Management for Internet Protocols. IP-layer encryptionpackage integrated into SunScreen, which provides a system with theability to encrypt any protocol within the TCP/IP suite efficiently.Once installed, systems running SunScreen SKIP can encrypt all trafficto any SKIP-enabled product, including SunScreen products.
SMTP Simple Mail Transfer Protocol. Used on the Internet to route email.
SMTP proxy TCP/IP protocol that sends messages from one computer to anotheron a network and is used on the Internet to route email.
SNMP Simple Network Management Protocol. Network managementprotocol that enables a user to monitor and configure network hostsremotely.
snoop Sun Microsystems, Inc. UNIX utility that captures packets from thenetwork and displays their contents.
source code Uncompiled version of a program written in a language such as C,C++, or Java. The source code must be translated to machine languageby a program (the compiler) before the computer can execute theprogram.
stateful packet filter Packet filter that bases its decision to allow or deny the packet usingboth the data in the packet and information (that is, state) saved fromprevious packets or events. A stateful packet filter has memory of pastevents and packets.
stateless packet filter Packet filter that bases its decision to allow or deny a packet usingonly the data in that packet. A stateless packet filter has no memory ofpast events and packets.
static translation Address translation that provides fixed translation between an externaladdress and a private (possibly unregistered) address. It provides away for external hosts to initiate connections to internal hosts withoutactually using an external address. See network address translation.
stealth mode Stealth-mode interfaces do not have IP addresses. They bridge theMAC layer. Stealth mode interfaces partition an existing singlenetwork and, consequently, do not permit you to subnet the network.If all of your interfaces are in stealth mode, SunScreen offers optionalhardening of the OS, which removes packages and files from theSolaris operating system that are not used by SunScreen.
subnet In the Internet Protocol, a mechanism to subdivide (registered)networks into locally defined pieces. This technique provides betteruse of the IP address space while minimizing routing-table complexity.See subnet mask.
Glossary 387

subnet mask Specifies which bits of the 32-bit IP address represent networkinformation. The subnet mask, like an IP address, is a 32-bit binarynumber: a 1 is entered in each position that will be used for networkinformation and a 0 is entered in each position that will be used asnode number information. See node.
SunScreen Name of the family of security products produced by SunMicrosystems, Inc.
SunScreen SKIP See SKIP.
TCP See Transmission Control Protocol .
TCP/IP Transmission Control Protocol/Internet Protocol. Protocol suiteoriginally developed by the Department for Defense for the Internet. Itis also called the Internet protocol suite. SunOS networks run onTCP/IP by default.
Telnet proxy Enables users of one host to log into a remote host and interact asnormal terminal users of that host.
traffic analysis Analysis of network traffic flow for the purpose of deducinginformation such as frequency of transmission, the identities of theconversing parties, sizes of packets, flow identifiers used, and the like.
Transmission ControlProtocol
The protocol within TCP/IP that governs breaking data messages intopackets that are sent using IP, reassembling these packets into thecomplete message, and verifying the reassembled message as the sameas the original data message.
tunnel address Destination address on the outer (unencrypted) IP packet to whichtunnel packets are sent. Generally used for encrypted gateways wherethe IP address of the host serves as the intermediary for any or allhosts on a network whose topography must remain unknown orhidden from the rest of the world.
tunneling Process of encrypting an entire IP packet, and wrapping it in another(unencrypted) IP packet. The source and destination addresses on theinner and outer packets may be different.
UDH certificate Unsigned Diffie-Hellman certificate. UDH public value can be usedwhen entities are named using the message digest of their DH publicvalue, and these names are securely communicated. This term is nowmostly replaced by self-signed certificate. See certificate identifier (ID).
UDP User Datagram Protocol. All CDP communication uses UDP.
unicast Packet sent to a single destination. Compare broadcast, multicast.
version Manner in which a policy’s historical versions are preserved.
virtual private network A network with the appearance and functionality of a regular network,but which is really like a private network within a public one.
388 SunScreen 3.2 Administration Guide • December, 2001

The use of encryption in the lower protocol layers provides a secureconnection through an otherwise insecure network, typically theInternet. VPNs are generally cheaper than real private networks usingprivate lines but rely on having the same encryption system at bothends. The encryption may be performed by firewall software orpossibly by routers.
VPN See virtual private network.
VPN gateway See virtual private network.
Glossary 389

390 SunScreen 3.2 Administration Guide • December, 2001

Index
Numbers and Symbols3DES
IKE, 148, 164IPsec, 147
Aaccess level
remote access rule, 146accesslocal, 338activate, 51add a screen, 329Add Filter button, 55add multiple SNMP receivers to a screen, 330add_secondary, 346add self-generated certificate, 318add SNMP receivers to a screen, 330adding IKE Rules, 325address, 44
add, 59add a host, 60add range, 64admin, 60, 183defining, 60deleting, 50destination, 59, 149external, 151group, 62individual, 59IP, 60, 64, 98, 100, 102, 149, 189, 283network, 59, 301
address (continued)new host, 60new range, 65pre-defined, 60range, 64remove, 51, 64, 84source, 59, 149tunnel, 162
address group, 51, 62address list, 59
defining, 62deleting, 50
address range, 64defining, 64deleting, 50
admin certificate, 60admin-group certificate, 60, 183administration
HA, 26local, 136, 338remote, 67, 136, 139, 152, 267
administration access rule, 136adding for local administration, 136adding for remote administration, 139encryption, 142
administration GUI, 77, 190, 353defining VPN gateways, 161documentation button, 29instructions, 39navigation bar, 29navigation buttons, 29Policies List page, 39
391

administration GUI (continued)Save As button
Edit(RO) button, 41Administration Station, 60, 183, 301, 354
adding an additional, 139, 267remote, 98, 139, 303
administrative access rule, 22Administrative Access tab, 136, 139, 144, 271AES
IKE, 148, 164IPsec, 147
algorithmData, 143, 162Key, 143, 162MAC, 162
anti-spoofing, 98ARP, 191arp command, 340ARP request, 151, 194associate
IKE certificate, 73authentication, 332authentication algorithm, 148authentication method, 148Authorized User, 44authorized user, 332, 334
add, 120, 213authuser delete subcommandebeas, 334
Bbanner, 275BLOWFISH
IKE, 148, 164IPsec, 147
broadcast, 57Broadcast button, 57browser
configure for HTTP proxy, 237Internet Explorer, 22log, 281Netscape, 22starting, 26
CCentralized Management, 150, 152centralized management
certificate for Screen, 94certificate, 44, 67
adding, 77admin, 60, 183admin group, 60, 183associating, 80associating SKIP Certificate, 81.crt file, 80deleting, 323generate
SKIP UDH, 74renaming, 323screen object, 94SKIP CA private
loading, 77SKIP CA public, 77SKIP UDH, 74Unsigned Diffie-Hellman, 316
certificate authority signed IKE certificate, 68Certificate Discovery Protocol (CDP), 75certificate group, 82, 85, 322, 324Certificate ID, 162Certificate ID field, 271certlocal, 326check references to a deleted certificate
group, 323check references to deleted certifictae, 323CIDR, 66CIDR Syntax tab, 66clear log button, 296command line, 301common object
delete, 50rename, 51
common objectsadding, 46deleting, 50details, viewing and editing, 49editing, 48modifying, 37renaming, 51searching, 47
configurationediting, 337
392 SunScreen 3.2 Administration Guide • December, 2001

configuration editor, 308controls
Policies List page, 41Current Filter, 292
Ddata algorithm, 143date, 275day of the week
time objects, 126DES
IKE, 148, 164IPsec, 147
destination address, 59Destination Address Checking, 98dialog box
screen object Primary/Secondary tab, 94screen object SNMP tab, 92
distinguished name, 74DNS, 190dynamic NAT, 341
EEdit(RO) button, 41editing
screen object, 89editing a Screen object, 91editing a screen object
Miscellaneous tab, 89Primary/Secondary tab, 94
editorconfiguration, 308
encryption, 60, 98, 139, 149, 183, 188, 301choosing, 139, 318, 320modulus size, 318, 320
encryption algorithm, 148end time
time objects, 126/etc/hosts file, 190Events Filter, 293exporting IKE certificate, 69
Ffile
identitydb.obj, 353log, 295Solaris, 191
filteradd, 55Current, 292delete, 56Events, 293Operator, 292parameters, 57Terms, 293Text, 293
filter, log viewing, 292filtering
packet, 22, 188proxy dialog, 45
Ggenerate
IKE Certificate, 67GUI, 77, 139, 190, 353
interoperability with command line, 301locale, 27logging in, 26online documentation, 29password, 27starting, with plugin, 26starting, without plugin, 26viewing information, 28
HHA
and NAT, 191certificate for Screen, 94definition, 189installing, 193, 198remove, 191removing, 209set up, 188viewing current information about, 275
hash, 75
Index 393

HA (continued)Jar, 45
host, 53HA, 26, 190IP, 60
HTTP, 45
Iidentity
local, 77IKE
associate, 73certificate authority signed, 68distinguished name, 74
common name, 68, 74country, 68, 74organization, 68, 74organizational unit, 68, 74
exporting certificate, 69importing certificate, 71issued certificates, 328pre-shared key, 325remote access rule, 144
access level, 146self-generated certificate, 68self-signed certificates, 326
IKE Certificategenerating, 67
IKE Rule Syntax, 324importing IKE certificate, 71Information button, 275Information page, 275init_secondary, 346, 348install_skip_keys command, 316interface, 26, 44, 51, 102, 289
activate, 104define, 59HA, 188HA cluster, 189port, 44statistics, 289
interface objectadd or edit, 104ADMIN, 105DISABLED, 105
interface object (continued)HA, 105removing, 106ROUTING, 105routing, 106STEALTH, 105stealth interface, 108
interface objects, 102interfaces
routing mode, 331Internet Explorer, 77, 285, 293IP address, 59, 64IP host, 60IPsec
remote access rule, 144, 146IPsec key, 87
adding, 87key size, 88manually entering, 87random number generator, 87
issued certificates, 328
JJar
hash, 45, 213, 230signature, 45, 230
Jar hash, 45Jar signature, 117Java
Jar hash, 45Jar signature, 45
Java Plug-in, 293, 353JDK, 116
Kkey, 74
secret, 188SunScreen, 77
Key algorithm, 143
394 SunScreen 3.2 Administration Guide • December, 2001

Llib/screeninfo, 351lib/statetables, 351lib/support, 351lib/support help, 352list a screen, 330loading
SKIP CA private, 78SKIP CA public, 78
local certificate, 60, 183local identity, 77local resources, 23
backing up all policies, 23identitydb.obj, 24installing Java plugin, 23loading certificates from a diskette, 23loading Jar signatures, 23restoring all policies, 23saving log files, 23
logclear, 295save, 294save and clear file, 296
Logset viewing filter, 281
logset viewing filter, 275view, 275
log button, 294log size, changing, 298Log tab, 278, 291log viewing filter, 292logdump command, 344
MMail Proxy tab, 220, 222
spam, 96management information base (MIB), 98master key identity (MKID), 316MIB, See management information baseMiscellaneous tab, 252, 261, 298
editing a screen object, 89mode
historical, 291log retrieval, 275, 290
mode (continued)real time, 291routing, 151stealth, 151
Nname service, 190name space ID (NSID), 316NAT, 22, 59, 149, 191, 340
edit mapping, 154mapping, 153, 191reverse rule, 154
NAT Mappingdynamic, 149
NAT mappingstatic, 149
NAT ruledefine, 149
NAT tab, 149, 152, 154nattables, 350Netscape, 77, 293, 353Netscape Navigator, 285network, 22, 64, 151, 190
internal, 53network address
CIDR address, 66network mask, 67
Network Address Translation, 22, 59, 149network element, 44network interface, 59, 102network protocol, 45NIS, 190
OOperator Filter, 292
Ppacket
broadcast, 57filtering, 22IP, 149
Index 395

packet (continued)non-broadcast, 57SNMP, 98
Packet Filter rules, 128Packet Filtering tab, 131, 164, 225, 256, 264packet logging, setting up, 344password, 27, 301, 332
changing, 30password enabled, 33user enabled, 33
Policies List page, 39controls, 41
policy, 53, 59, 172activate, 51, 104, 106, 332definition, 22
Policy Rules pagepanel tabs, 130
portadd, 56delete, 56interface, 44
pre-shared key, 325Primary/Secondary tab, 202, 204, 248, 252, 261
editing a Screen object, 94protocol, 53
network, 45proxy
databases, 213FTP, 233HTTP, 236set up, 212SMTP, 236TELNET, 235use, 212user, 45user, add, 215
Rrandom keys, entering, 318Registry
addresses, address ranges, addresslists, 313, 315
authorized users, 332, 334certificates, 315, 324services and service groups, 313
Rename button, 52Retrieval Settings tab, 291RIP, See routing trafficrip service, 57rlogin command, 317, 340routing, 194Routing Interface, 106routing traffic, 98rule, 59
activate, 104, 106add new, 133Administrative Access, 22creating and managing, 128deleting, 135, 337modifying, 128moving, 134policy, 22time-dependent, 45view and edit details, 131
SSave As button, 41save/clear log button, 297save log button, 294Screen, 26, 45, 51, 59, 64, 98, 151, 183, 235, 291,
301adding certificate, 67, 77administer, 172certificate for in centralized management
group, 94certificate for in HA cluster, 94HA active, 188HA cluster, 189HA passive, 188primary, 242secondary, 242
screen objectcertificate, 94editing, 89Mail Proxy tab, 96Miscellaneous tab, 89, 91Primary/Secondary tab, 94Primary/Secondary tab dialog box, 94SNMP tab dialog box, 92
screen objects, 89
396 SunScreen 3.2 Administration Guide • December, 2001

screen object (continued)adding, 97log size, 97routing traffic, 98stealth interface, 98
screeninfo, 350Search button, 50SecurID, 332self-generated IKE certificate, 68self-signed certificates, 326service, 45, 191
add, 53checking references to, 312default values, 53new group, 57predefined, 53
service groupadd, 57checking references to, 312deleting, 312modifying, 311predefined, 53renaming, 312
signatureJar, 45
SKIP, 44, 242, 289, 301skip, 350SKIP
and NAT, 149key manager, 318statistics, 289
SKIP statistics, 289SKIP UDH, 74
level of encryption, 77skipd_restart command, 268, 317skiplocal command, 317, 320SNMP
timed status indicator, 91SNMP alert receiver, 98
add, 99, 101add trap receiver, 98delete trap, 98deleting, 100set timer, 98
SNMP receiversadding multiples, 330adding to a screen, 330
SNMP tab, 98editing a screen object, 91
SNMP traps, supported, 93source address, 59Spam, 218, 236
delete, 221spam
Mail Proxy tab, 96ssadm, 302
—f, 320—r, 319activate a policy, local administration, 310activate a policy, remote administration, 310adding a policy, local administration, 308adding a policy, remote administration, 308authuser subcommands
add, 332add an authorized user and SecurID
name, 333add an authorized user with passoerd
authentication, 333delete, 332delete authorized users, 334display authorized users, 334modify authorized users, 334name, 333print, 333
backup configuration, localadministration, 310
backup configuration, remoteadministration, 310
copy a policy, local administration, 309copy a policy, remote administration, 309debug_level, 352delete a policy, local administration, 309delete a policy, remote administration, 309edit subcommands, 306
accesslocal, 338add, 306, 311, 313, 318add a network group, 314add a range of addresses, 313add a screen, 329add access rule, local administration, 338add access rule, remote
administration, 339add an adress group, 314add certificate, 316, 320
Index 397

ssadm, edit subcommands (continued)add certificate groups, 322add host address, 313add interfaces in routing mode, 331add interfaces with detailed log, 331add_member, 306, 322add member to a certificate group, 322add multiple SNMP receivers to a
screen, 330add NAT mapping, dynamic, 341add NAT mapping, static, 340add new service group, 311add new single service, 311add private key, 318add public certificate, 321add self-generated certificate, 318add SNMP receivers to a screen, 330add time status indicators to a
screen, 330add VPN gateway, 342authuser, 306change a screen object to put it in a
cluster, 349check references to a deleted
address, 315check references to a deleted address
list, 315check references to a deleted address
range, 315check references to a deleted certificate
group, 323check references to a service or service
group, 312check references to deleted
certificate, 323create packet filtered rule, 335del, 312, 314, 323del[ete], 306del[ete]_member, 306del_member, 322delete a certifictae or certificate
group, 323delete a service or service group, 312delete access rule, local
administration, 338delete access rule, remote
administration, 340
ssadm, edit subcommands (continued)delete an address, 314delete an address list, 314delete and address range, 314delete NAT mapping, 341delete rule, 336edit access rule, local administration, 338edit access rule, remote
administration, 339insert, 306jar_hash, 306jar_sig, 306list, 306, 311list a screen, 330list_name, 307list NAT mapplig, 341list rule, 337load, 307lock, 307lock_status, 307mail_relay, 307mail_spam, 307move, 307proxyuser, 307QUIT, 307quit, 307refer, 307, 323referlist, 307, 312, 315, 323reload, 307remove a member from a group, 322remove a screen from a cluster, 349remove an HA screen, 347remove an interface, 332remove SNMP receivers from a
screen, 330remove VPN gateway, 343rename, 307, 312rename a address, 315rename a certificate or certificate
group, 323rename a service or service group, 312rename an address group, 315rename an address range, 315rename reference, 315rename references to a service, 312renamereference, 307, 312, 315, 323reorder rules, 336
398 SunScreen 3.2 Administration Guide • December, 2001

ssadm, edit subcommands (continued)replace, 307replace part of rule, 337replace VPN gateway, 342save, 307save as, 307search, 307set a screen to stealth mode, 331set logsize, 344vars, 307verify, 307
ha subcommandsadd_secondary, 346init_secondary, 346redefine primary screen, 348set up high availability, 346status, 348view HA status, 348
lib/screeninfo, 351lib/statetables, 351lib/support, 351lib/support help, 352log subcommands
clear log, 345save and clear log, 345save log, 345
logdump commandexamine packets, 344
logdump subcommandsdisplay packets in log file, 344view log, 345
on local screen, 303on remote station, 303remote log in, 304remote log out, 304rename a policy, local administration, 309rename a policy, remote administration, 309restore policies, local administration, 310restore policies, remote administration, 310subcommand
activate, 304active, 304algorithm, 304backup, 304certdb, 304certlocal, 304configure, 305
ssadm, subcommand (continued)debug, 305edit, 305ha, 305lock, 305log, 305logdump, 305login, 305logmacro, 305logout, 305logstats, 305patch, 305policy, 305product, 305restore, 305securid, 305summary, 304sys_info, 305traffic_stats, 305
verify a policy, local administration, 309verify a policy, remote administration, 310
ssadm options—b, 302—F, 303—n, 302—r, 303
start timetime objects, 126
state engine, 53statetables, 350static mapping
define, 154static NAT, 152, 341statistics, 275
interface, 289Statistics tab, 286, 289Status page, 277Status tab, 276stealth mode, setting, 331subnetwork, 64SunScreen banner, 275SunScreen EFS 3.0
resources, 16SunScreen Key, 77superuser, 301support, 350
Index 399

support commandconfig, 349date, 349disks, 349eeprom, 349findcore, 349last, 349nattables, 350packages, 349procs, 350screeninfo, 350skip, 350statetables, 350stats, 350streams, 350support, 350versions, 350
Syntax, IKE rules, 324sys_info command, 343system information, 343
Ttabs
Administrative Access, 136, 139, 144, 271CIDR Syntax, 66Log, 278, 291Mail Proxy, 220, 222Miscellaneous, 252, 261, 298NAT, 149, 152, 154Packet Filtering, 131, 164, 225, 256, 264Primary/Secondary, 202, 204, 248, 252, 261Retrieve Settings, 291SNMP, 98Statistics, 286, 289Status, 276VPN, 159
Terms Filter, 293Text Filter, 293time, 45, 275time objects
creating, 124day of the week, 126define, 124end time, 126example of time object, 124
time objects (continued)start time, 126
time status indicators, 330timed status indicator, 98
SNMP, 91traffic statistics, 289traffic_stats command, 343trap receiver, 98tunnel, 149
UUnsigned Diffie-Hellman certificate,, See
certificate, Unsigned Diffie-Hellmanuser
admin, 27authorized, 45, 120, 213, 216, 332, 334proxy, 45, 120, 213
Vversion, 275Virtual Private Network, 22, 149virus scanning, 299VPN, 22, 317
add gateway, 158VPN tab, 159vpngateway, 342
400 SunScreen 3.2 Administration Guide • December, 2001