Sunburst Pattern -...
7
Sunburst Pattern Uses the Railroad Crossing Stamps ©2013 Cindy Blackberg
Transcript of Sunburst Pattern -...

Sunburst PatternUses the Railroad Crossing Stamps
©2013 Cindy Blackberg

Materials:
36 - 5” print squares for quarter circles
36 - fat eighths (9”x 22”) print for points &
pieced border
½ yard light beige background for points
1 ¼ yard darker beige background
¾ yard binding
2 ¾ yard backing
Valdani perle cotton #12 (I used green &
gold.)
No slip embroidery hoop
Chenille needles size 24 gold eye for the
embroidery
Graphite pencil to trace embroidery pattern
Wash and Press all fabrics before
beginning.
Stamping Tips:
1. Wash and press all the fabrics for your
stamping project.
2. Pat the stamp gently into the fabric
inkpad, making sure both lines of the image is
inked. Don’t push the stamp into the ink pad
too hard or you will get ink on the center of
the shape.
3. Place the fabric face down on a sandpaper
board (or a rotary cutting mat) and stamp.
4. Let the image dry a few seconds and heat
set if desired.
5. Cut the shape on the exterior line.
6. Clean the stamp with a wet one or baby
wipe. Dry with a paper towel.
Sunburst©2013 Cindy Blackberg
256 E Leatherwood Dr.
Walland, TN 37886
www.cindyblackberg.com

Stamping the Pieces:
For each block, stamp:
4 - quarter circles
4 sets of 5 points (20 total)
20 light background pieces
When stamping, the lengthwise grain is
parallel to the selvage. Position the finger
holds of the stamps to the lengthwise grain.
Cut out the pieces on the exterior line.
Assemble the Blocks:
1. Layout the quarter circles in a pleasing
arrangement.
2. Pick up 2 adjacent circles and place them
right sides together.
3. Place a pin in the corner of the top piece
and find the corner of the bottom piece.
Leave the pin hanging.
4. Place a pin in the ending corner of the top
piece and find the ending corner of the
bottom piece. Leave this pin hanging.
5. Thread a Richard Hemming size 10 sharp
needle with a single strand of matching
quilting thread and knot.
6. Place the needle into the first pin position.
Remove the pin.
7. Stitch along the stamped line.
8. At the ending pin, come up at the corner
where the pin is positioned. Do 2
backstitches. Cut off the thread, leaving a
tail.
9. Do the same thing for the other 2
quarter circles.
DO NOT PRESS!
10. Sew the 2 halves together by placing
them right sides together. Pin to the right
of both seam allowances in the center. (If
you are right handed.)
A
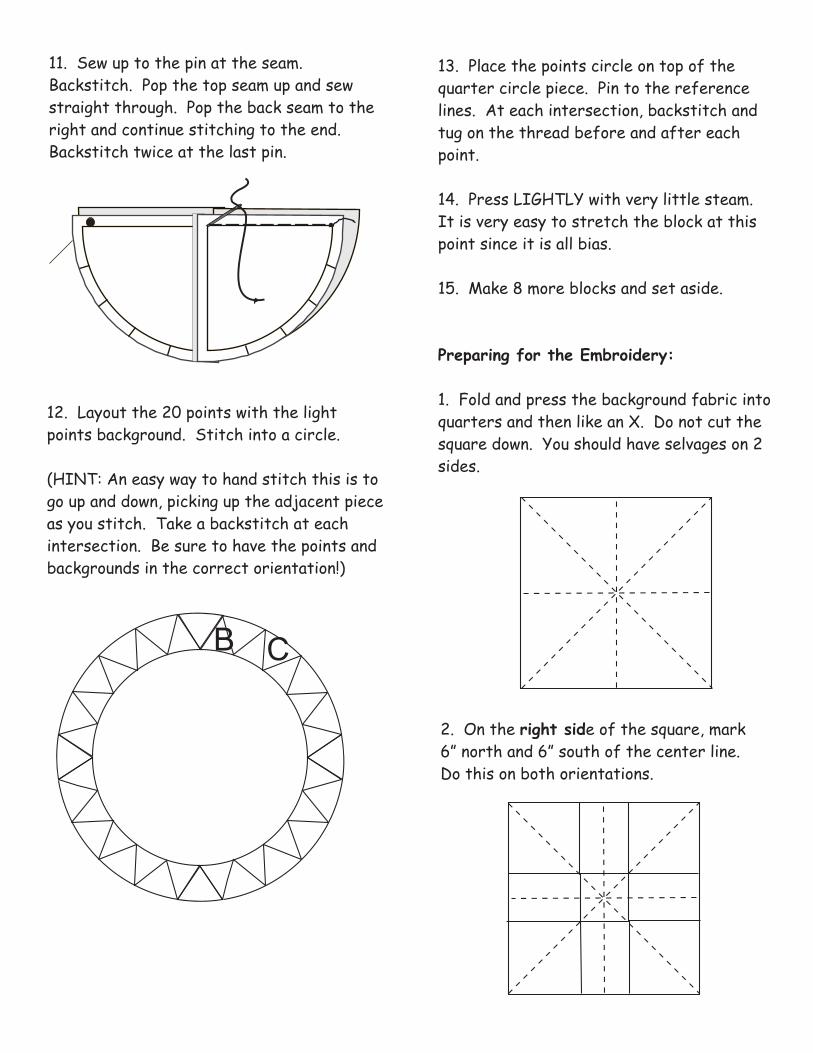
11. Sew up to the pin at the seam.
Backstitch. Pop the top seam up and sew
straight through. Pop the back seam to the
right and continue stitching to the end.
Backstitch twice at the last pin.
12. Layout the 20 points with the light
points background. Stitch into a circle.
(HINT: An easy way to hand stitch this is to
go up and down, picking up the adjacent piece
as you stitch. Take a backstitch at each
intersection. Be sure to have the points and
backgrounds in the correct orientation!)
13. Place the points circle on top of the
quarter circle piece. Pin to the reference
lines. At each intersection, backstitch and
tug on the thread before and after each
point.
14. Press LIGHTLY with very little steam.
It is very easy to stretch the block at this
point since it is all bias.
15. Make 8 more blocks and set aside.
Preparing for the Embroidery:
1. Fold and press the background fabric into
quarters and then like an X. Do not cut the
square down. You should have selvages on 2
sides.
2. On the right side of the square, mark
6” north and 6” south of the center line.
Do this on both orientations.
B C

3. Now mark 12” from the lines you just
marked to get nine blocks.
4. Make a template from the vine pattern.
Center the vine template over the drawn
lines and trace.
Embroider the Vine:
1. Embroider the vine with #8 DMC perle
cotton. Using the stem stitch, embroider
3 rows, green, gold and green to make the
vine look more thicker.
2. Press the top.
Measure
Piece in the Sunburst:
1. On the back of the embroidered
fabric, find the center of each block.
Make a circle template from template
plastic that fits from seamline to
seamline on the sunburst adding
reference marks at each point. A circle
guide is enclosed, just make sure it fits
your measurement.
2. Trace the template pattern on the
back of the embroidered fabric,
centering each circle in the 9
embroidered squares, and tracing the
reference marks. (Make sure there are
reference marks in the north, south, west
and east positions, so your block will be
sewn with the quarter seam lines like an
X.
3. Cut out 1/4” inside the pencil line. Do
this one circle at a time, so the hole will
not stretch.
4. With the sunburst block on TOP, and
the background right sides together, sew
from point to point, using the reference
marks to line up the points.
5. Press the top. Center the design and
cut down to 39 ½” carefully.
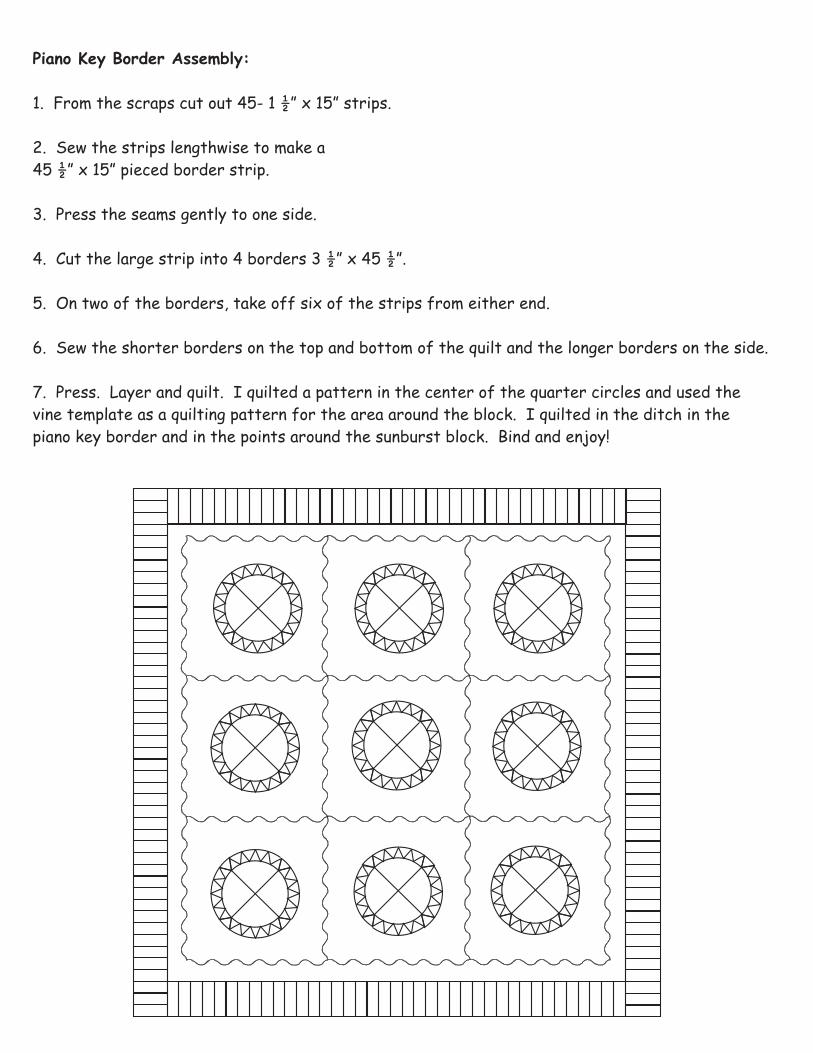
Piano Key Border Assembly:
1. From the scraps cut out 45- 1 ½” x 15” strips.
2. Sew the strips lengthwise to make a
45 ½” x 15” pieced border strip.
3. Press the seams gently to one side.
4. Cut the large strip into 4 borders 3 ½” x 45 ½”.
5. On two of the borders, take off six of the strips from either end.
6. Sew the shorter borders on the top and bottom of the quilt and the longer borders on the side.
7. Press. Layer and quilt. I quilted a pattern in the center of the quarter circles and used the
vine template as a quilting pattern for the area around the block. I quilted in the ditch in the
piano key border and in the points around the sunburst block. Bind and enjoy!

Vine Template with orientation to the pencil line
Circle Guide