Studio Anywhere: A Photographer's Guide to Shooting in...
53
NICK FANCHER STUDIO ANYWHERE A Photographer’s Guide to Shooting in Unconventional Locations
Transcript of Studio Anywhere: A Photographer's Guide to Shooting in...

NICK FANCHER
STUDIO ANYWHEREA Photographer’s Guide to Shooting in Unconventional Locations

NICK FANCHER
STUDIO ANYWHEREA Photographer’s Guide to Shooting in Unconventional Locations
PEACHPIT PRESS

STUDIO ANYWHERE: A PHOTOGRAPHER’S GUIDE TO SHOOTING IN UNCONVENTIONAL LOCATIONSNick Fancher
PEACHPIT PRESSwww.peachpit.com
To report errors, please send a note to [email protected] Press is a division of Pearson Education.
Copyright © 2015 by Shutter-Think Photography, LLC
Acquisitions Editor: Ted WaittProject Editor: Valerie WitteSenior Production Editor: Lisa BraziealDevelopment and Copy Editor: Linda LaflammeProofreader: Patricia J. PaneComposition: WolfsonDesignIndexer: James MinkinCover Image: Nick FancherCover Design: Aren StraigerInterior Design: Mimi Heft
NOTICE OF RIGHTSAll rights reserved. No part of this book may be reproduced or transmitted in any form by any means, electronic, mechanical, photocopying, recording, or otherwise, without the prior written permission of the publisher. For information on getting permission for reprints and excerpts, contact [email protected].
NOTICE OF LIABILITYThe information in this book is distributed on an “As Is” basis, without warranty. While every precaution has been taken in the preparation of the book, neither the author nor Peachpit shall have any liability to any person or entity with respect to any loss, damage, or injury caused or alleged to be caused directly or indirectly by the instructions contained in this book or by the computer software and hardware products described in it.
This book is intended for educational purposes only and is not intended to be, nor should it be construed as, legal advice. The law, particularly copyright law, is notoriously fact specific, and no book, including this one, can substitute for expert guidance from qualified legal counsel. To obtain guidance relevant to your particular circumstances you should speak with a qualified, competent lawyer properly licensed in your jurisdiction. Consult your local bar association for guidance on finding such a lawyer in your area.
The views and opinions expressed in this book are those of the author alone and are not purported to be those of any employer, client, or affiliated entity, past or present.
TRADEMARKSMany of the designations used by manufacturers and sellers to distinguish their products are claimed as trademarks. Where those designations appear in this book, and Peachpit was aware of a trademark claim, the designations appear as requested by the owner of the trademark. All other product names and services identified throughout this book are used in editorial fashion only and for the benefit of such companies with no intention of infringement of the trademark. No such use, or the use of any trade name, is intended to convey endorsement or other affiliation with this book.
ISBN-13: 978-0-134-08417-6ISBN-10: 0-134-08417-9
9 8 7 6 5 4 3 2 1
Printed and bound in the United States of America

This book is dedicated to anyone starting with nothing. Let no one tell you that you can’t
create your own path or that you need to follow a certain formula to achieve success.
Rules are constantly being broken, rewritten, and broken again. Enjoy your journey.
ACKNOWLEDGMENTS
I want to thank the team at Peachpit Press, who made this book a reality. Specifically,
I’d like to thank Ted Waitt for giving me a chance and sticking with me as the idea
of Studio Anywhere evolved. Thank you to Valerie Witte, who seamlessly took over
the project from Ted. Thanks to Linda Laflamme, my patient and thorough editor; to
the fabulous production team of Lisa Brazieal, Mimi Heft, and WolfsonDesign, who
perfectly married the images, diagrams, and text to the page; and to Patricia J. Pane,
my proofreader.
A big thank you to Linda Ringler and Rick Kocks, my high school photography
teachers, who gave me total creative freedom and taught me more about photography
and alternative processes than any of my college professors. You truly are unsung
heroes, and I will never forget the passion and knowledge that you instilled in my
classmates and me.
I’d also like to thank my family and friends who are nothing if not supportive and
encouraging. I am very fortunate.
Finally, I’d like to thank my wife, Beth, for her faith in me and support over the years.
You are a wonderful mother to Jack and Margot and wise beyond your years. You help
keep me humbled without crushing my spirit.

Introduction viii
PART I THE LIVING ROOM STUDIO 1
■■ 1 White Light, White Wall 2Edit for Effect ............................................................................................. 4
Check Your Work ......................................................................................7
Lit Background ......................................................................................... 9
■■ 2 It’s the Mood That Makes It Good 11Aesthetic Decisions............................................................................... 12
Finishing Touches in Post ...................................................................13
Once More, With Feeling ..................................................................... 16
■■ 3 Window Light 20Subject Direction ................................................................................... 21
Rugged Sophistication ......................................................................... 22
■■ 4 Using Existing Environments 25Aesthetic Decisions ............................................................................. 26
Editing .......................................................................................................29
Quiz 1: Deconstruct the Lighting ..................................................... 35
PART II THE BACKYARD STUDIO 37
■■ 5 Head Shots 38Soft Light ..................................................................................................39
Directional Light .................................................................................... 42
CONTENTS
iv STUDIO ANYWHERE: A PHOTOGRAPHER’S GUIDE TO SHOOTING IN UNCONVENTIONAL LOCATIONS

■■ 6 When It’s Good to Be Shallow 44Legendary Pink Dots ............................................................................44
Alley Cat ....................................................................................................48
■■ 7 In the Garage 52Directional Light .................................................................................... 56
■■ 8 Kiddie Pools. Who’d a Thunk It? 57Blackout ....................................................................................................58
Applying the Experiment.................................................................... 61
■■ 9 Shooting Product 64Quiz 2: Deconstruct the Lighting .....................................................69
PART III THE BASEMENT STUDIO 71
■■ 10 Soft Light 72On White ..................................................................................................73
On Gray ..................................................................................................... 77
■■ 11 Moody Light 79The First Rule of Moody Lighting… ................................................79
Black on Black on Black ......................................................................84
Are You Gellin’? ......................................................................................88
■■ 12 Creative Backdrops 92No Paris? No Problem. ......................................................................... 92
Channeling the ’80s ............................................................................ 96
Pegboard Pinlight ................................................................................104
■■ 13 Shooting Product 106Lighting a Product with a Reflective Surface.............................106
Shooting a Product on a Reflective Surface ...............................111
Re-creating Window Light ...............................................................115
Quiz 3: Deconstruct the Lighting ...................................................117
CONTENTS v

PART IV THE OFFICE STUDIO 119
■■ 14 Portraits on White 120Travel Light ............................................................................................120
It’s the Wood That Makes It Good .................................................124
■■ 15 Environmental Portraits 128Getting the Drop on Narrow Spaces .............................................128
Curtain Call ...........................................................................................133
■■ 16 Shooting Product 136Time to Reflect ......................................................................................138
Put ’em on the Glass ..........................................................................142
Quiz 4: Deconstruct the Lighting ...................................................145
PART V THE PARK STUDIO 147
■■ 17 Still Waters Don’t Need to Run Deep 148After the Rain ........................................................................................148
Bridge Over Dappled Waters ...........................................................152
■■ 18 Transform the Weather 160Gettin’ Shifty with It ...........................................................................160
Fake It ’Til You Make It ......................................................................164
■■ 19 Eclipse the Sun 166A Gun at a Knife Fight ........................................................................166
Quiz 5: Deconstruct the Lighting ...................................................171
vi STUDIO ANYWHERE: A PHOTOGRAPHER’S GUIDE TO SHOOTING IN UNCONVENTIONAL LOCATIONS

PART VI THE STREET STUDIO 173
■■ 20 On the Beaten Path 174Dancer in the Dark .............................................................................175
Homage to Street .................................................................................179
■■ 21 Get on Up 182Up on the Roof ......................................................................................182
Welcome to the Thunderdome .......................................................186
■■ 22 Concrete Jungle 191Creating a Story ...................................................................................191
One Wall, Two Looks ..........................................................................195
■■ 23 Parking Garages 202A GQ View ...............................................................................................204
Always the Sun ....................................................................................206
Quiz 6: Deconstruct the Lighting ...................................................210
Epilogue What’s Next? 211Testing New Waters ............................................................................211
Edit Yourself ..........................................................................................213
Building Your SEO ...............................................................................217
Quiz Answer Key .................................................................................226
Index 232
CONTENTS vii

What’s your definition of a photo studio? Is it having a white seamless backdrop
or a cyc wall? Maybe it’s anyplace where you have total control of all light. Perhaps
it’s a place where you can create dynamic product shots. In a perfect world, where
every day is a breezy 72 degrees with partial cloud coverage, we would all have a
5,000-square-foot studio in New York or Los Angeles. We’d also have the entire
catalog of B&H in our equipment lockups. But that isn’t reality.
Reality is that you have an outdated DSLR with two decent lenses (which took you
several years to save up for), and you managed to sneak out of your office job an hour
early to shoot an underpaying client in a public park on a gray, 45-degree rainy day.
Or maybe all you have at your disposal is an unfinished basement. Or a garage. Or
the empty conference room at your office day job. That’s the point of Studio Anywhere:
to show you how to achieve the shot of your dreams while working in some of the
most problematic scenarios imaginable.
NO STUDIO? NO PROBLEM
Over the years, I’ve slowly discovered that a traditional photo studio isn’t necessary
to get studio-like results. If you are shooting a portrait of someone, for example, you
need only a few feet of blank wall (especially if it’s a cropped shot, such as a head
shot). Recently, I was in New York City on a shoot, and I decided to take an extra
day to do a few test shoots with models. Because I didn’t know the city well, nor
did I have a permit to shoot on the street or the budget to rent a studio, I thought
it would be easiest to just meet the models at their homes, shooting both in their
apartments and around their buildings. I liked the element of unpredictability. When
I punched the addresses into my GPS, I didn’t know whether I was walking into a
penthouse suite with an amazing view of the city (it happened) or an unpolished
art living space, occupied by seven artists in Williamsburg (also happened). I knew
that I had the tools to overcome any lighting issues, however, so I welcomed the
challenge and was excited to see what kind of scenarios I’d encounter.
INTRODUCTION1
viii STUDIO ANYWHERE: A PHOTOGRAPHER’S GUIDE TO SHOOTING IN UNCONVENTIONAL LOCATIONS

This book is a diary of sorts, of my experiences in working without the use of a
traditional photography studio. Whether shooting a corporate portrait, a test shoot
with a model, a promo shoot with a band, or a wedding, I always seem to be on
location—even back when I had a studio. Staring at those rent bills each month,
I came to realize the time I did spend in that expensive space was spent sitting in
front of my computer, editing, or meeting with clients, which could just as easily
be done at coffee shops. So, I ditched the traditional studio. Now when I need to
shoot a portrait on a blank backdrop or I need a place to shoot production shots,
I get creative, as you’ll see in the chapters ahead.
My goal in writing this book is not to teach you how to replicate one of my photos.
My goal is to get you to think outside the box, or studio, in our case. This book is a
place where I share the techniques, tips, and shortcuts that I’ve learned along the
way. Remember the end of The Last Crusade, when Indiana Jones tossed the fistful of
dirt across the invisible bridge to make it visible? This book is my fistful of dirt.
The shoot that started it all. I took this shot at one of my first shoots in New York City and realized that I was better off meeting my subject at his place rather than renting a studio.
INTRODUCTION ix

I see this book as a resource where photographers can glean technical info from
behind-the-scenes photos and lighting diagrams from my photo shoots. However,
I don’t stop there. Because picture taking is only half of the process, I also lay out
what my Lightroom and Photoshop workflow looks like. Finally, I let you in on the
aesthetic decisions I made; directing a photo shoot is more than simply knowing
how to wield a camera or process a raw file. This book takes a holistic view of the
photographic process, starting at conceptualization through the execution and
post-production to completion.
TAKE CONTROL: GEAR
Whether you are working with a harsh, sunny day, a gray rainy day, a small hallway
with a white drop ceiling, or a large, dark room with a black ceiling, you must be
able to overcome less-than-ideal scenarios. Once the shoot is over, you need to
know how to take the raw images and polish them, using editing software such
as Lightroom and Photoshop. This means that you need to have the right gear to
accomplish these things, and you need to know how to properly use it. Thankfully,
there’s far less gear required to accomplish this than you may think.
My perspective has always been one of using what you have. If you are just starting
out, you have nothing or next to it. I bought my first DSLR at Best Buy, back in 2005:
a Canon 20D with a kit 18–55 f/3.5–5.6 lens and a 1GB memory card. It’s a joke of a
setup now, but I made it work. I used that setup exclusively for three years, until
I could afford to get a Sigma 70–200 and a 430EX strobe. I still couldn’t afford a
decent wide-angle lens or even triggers for my flash (this was before the market
was saturated with cheap wireless triggers). Still, I used what I had. Occasionally,
I would book a gig where I needed better gear, so I would rent the additional gear
from a fellow photographer, billing the client for the expense.
I often receive an email from someone asking me to recommend what gear a beginner
photographer should purchase. My response is always the same: It depends. What’s
your budget? $500? Save up your money. If you manage to book a paying gig and
need gear for it, use your $500 to rent the gear for the shoot and bill the client for
the expenses. You need at least $1,000 to get a halfway decent startup rig, in my
opinion. Buy a used, full-frame sensor DSLR, if possible, such as a Canon 5D Mark
I, and buy a decent lens, like a Canon 85 1.8. Your next goal should be to purchase
a decent wide-angle lens, such as a Canon 35 1.4L or a nice zoom lens, like a 24–70
x STUDIO ANYWHERE: A PHOTOGRAPHER’S GUIDE TO SHOOTING IN UNCONVENTIONAL LOCATIONS
f/2.8L. After you have a decent body and a couple of reliable lenses, you can start to
consider purchasing a flash setup. That may be odd to hear, since I am a strobe guy,
but honestly, you can accomplish quite a bit with a reflector and some sunlight.
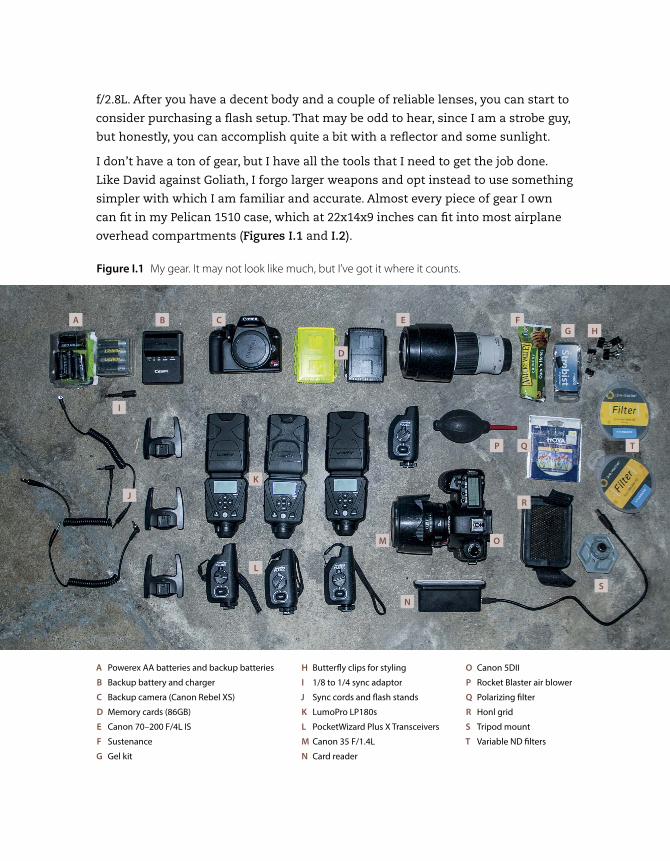
I don’t have a ton of gear, but I have all the tools that I need to get the job done.
Like David against Goliath, I forgo larger weapons and opt instead to use something
simpler with which I am familiar and accurate. Almost every piece of gear I own
can fit in my Pelican 1510 case, which at 22x14x9 inches can fit into most airplane
overhead compartments (Figures I.1 and I.2).
A Powerex AA batteries and backup batteries
B Backup battery and charger
C Backup camera (Canon Rebel XS)
D Memory cards (86GB)
E Canon 70–200 F/4L IS
F Sustenance
G Gel kit
H Butterfly clips for styling
I 1/8 to 1/4 sync adaptor
J Sync cords and flash stands
K LumoPro LP180s
L PocketWizard Plus X Transceivers
M Canon 35 F/1.4L
N Card reader
O Canon 5DII
P Rocket Blaster air blower
Q Polarizing filter
R Honl grid
S Tripod mount
T Variable ND filters
Figure I.1 My gear. It may not look like much, but I’ve got it where it counts.
A
I
B C
D
J
K
L
M O
P Q
R
S
T
N
E FG H

As you can see, I have two good lenses: one wide
prime and one long zoom. I have a full-frame,
DSLR camera body and a cheaper backup
DSLR. For lighting, I have three LumoPro LP180
strobes, which are durable, manual flashes (no
E-TTL). I also have two neutral-density filters
(one for each lens size), a colored gel pack, a strobe grid, a polarizing filter, an air
blower to remove sensor dust, and a ton of AA batteries. Besides what you see in
the case, I also have a couple 15-foot light stands, an umbrella, a 5-in-1 reflector,
and a tripod that I rarely use.
Whether you’re a seasoned pro or just beginning, as a photographer, one of your
main priorities should be to get past the novelty of your gear. Whether you don’t
know how to properly use your gear or you are more focused on getting the image
technically immaculate, you will likely miss out on the whole purpose of the shoot:
to connect with your subject and capture their essence as you perceive it.
To illustrate my point, consider Figures I.3 and I.4, which feature the same subject
photographed with two different camera bodies. For Figure I.3, I used my semi-pro
body: a Canon 5DII. I shot Figure I.4 with a Canon Rebel XSi (which currently goes
for just under $200 on eBay) that I keep in my case as an “Oh, shit” body. The 5D has
a full-frame sensor and 21 megapixels; it’s an all-around badass piece of equipment.
Weighing in at just over 10 megapixels, the Rebel is a starter camera with a cropped
sensor. If I were to pull that out of my case at a commercial shoot, the art director
Tip Although I prefer Powerex rechargeable batteries, I also keep a backup stash of disposable batteries in my case. Better to have them and not need them than the alternative.
Figure I.2 Almost all of my gear fits in my Pelican 1510 case.
xii STUDIO ANYWHERE: A PHOTOGRAPHER’S GUIDE TO SHOOTING IN UNCONVENTIONAL LOCATIONS

would laugh at me. When used to capture good light at a low ISO, and in combination
with a decent lens, however, the camera bodies provide comparable results. Even
when viewing the images at 100%, it’s hard to tell the difference between the two
files, other than the 5D’s larger file size.
Figure I.3 Shot with a Canon 5DII. Take a close look at it, and then compare this image to Figure I.4, which was shot with the Rebel XSi.
Figure I.4 Shot with a Canon Rebel XSi. Although the XSi is a far inferior camera body to the 5DII, you’ll have a hard time telling the results apart when you use a good lens in good light.
INTRODUCTION xiii

DECONSTRUCT THE LIGHTING
When it comes to lighting, a small flash is typically more than sufficient to get the
job done well. The lighting diagrams included in this book will let you in on how
I light a variety of situations with nothing more than small flashes. Unfortunately,
a lighting diagram or behind-the-scenes photo won’t be available for most images
that you come across. For this reason, knowing how to properly deconstruct the
lighting in an image, sometimes referred to as reverse engineering, is an invaluable
skill. If you know how to read the quality of light in a photograph, you’ll be able
to tell quite a bit about how it was created, such as how many lights were used,
whether the light source was soft or hard, and whether it was large or small.
Some photos can be rather easy to deconstruct, especially when you can discern
the light modifier in the catchlight (the specular highlights) in a subject’s eyes or on
the shiny surface of a product. The task gets trickier if multiple light sources are
involved or if the subject is in a scene with mixed lighting—not to mention photos
that are composites, which open a whole other can of pixels. But pay attention to a
few of these constants:
■■ Height and direction of the light source
■■ Hardness or presence of any shadows
■■ Number of apparent light sources
Once you’ve sharpened your skills at reading light, you’ll be able to glance at a photo
and know, for example, that it was lit with an umbrella overhead and a reflector
underneath, or with two softboxes sandwiched together in front of the subject.
Then, if you or your client wants similar results to a photo you see, you have a head
start on ideas, knowing at least where to begin with the lighting.
Consider Figure I.5. This is a one-light portrait with a hard light source: just a bare-
bulb strobe on a light stand. The flash head is zoomed out to 24mm, which allows
for a wider, more even light spread. Note the tiny catchlight, the hard quality to
the light, and the defined shadows on the subject’s face. The similar shadows on
the background mean that the subject is also close to the background, as well. In
Figure I.6, the distance of light to subject and from the subject to the background
as well as strobe output level are all the same, but the zoom is now set to 70mm.
As you can see, the spread is not as wide, leaving the center of the flash hotter, or
brighter, than the edges of the light. This technique of zooming the flash head in can
be useful if you are shooting a subject outside or in a setting without a backdrop,
xiv STUDIO ANYWHERE: A PHOTOGRAPHER’S GUIDE TO SHOOTING IN UNCONVENTIONAL LOCATIONS

where light falloff is not apparent. In other words, it allows you to get the most
out of your flash, because it’s focused into the area where your subject is standing,
rather than off into no-man’s land.
Figure I.5 The subject is standing in front of a white background, while the light source is a bare-bulb flash, zoomed out to 24mm. Note the tiny catchlight, the hard shadows below his jaw, and how defined and close his shadow is to him.
Figure I.6 The subject is standing in front of a white background, while the light source is a bare-bulb flash, zoomed in to 70mm. There are still hard shadows on the subject, and his shadow is still close and defined. The light spread is starting to fall off in the corners of the image, however, leaving a slight hotspot in the middle of the frame.

Figure I.7 shows the flash zoomed to 105mm, while Figure I.8 zooms to 105mm
with a grid added. The quality of light is still hard, but with the focus all the way to
the middle, so there is almost no light spread, and the center of the light is now two
to three stops brighter. Again, this is helpful to keep in mind when you are outside,
trying to overpower the sun and your flash needs all the juice it can get. Not to
mention, if your subject is outside and not against a backdrop, using a wide flash
zoom is just a waste of power. Instead, focus the zoom in and just worry about
properly lighting the subject.
Figure I.7 The subject is standing in front of a white background, while the light source is a bare-bulb flash, zoomed in to 105mm. The light falloff in this image is much more apparent.
xvi STUDIO ANYWHERE: A PHOTOGRAPHER’S GUIDE TO SHOOTING IN UNCONVENTIONAL LOCATIONS

Figure I.8 The subject is standing in front of a white background, while the light source is a flash zoomed in to 105mm with an added grid. The light is now almost like a spotlight.
INTRODUCTION xvii

When it comes to softening your light source, you have several options. Figure I.9 was
lit with a strobe zoomed to 24mm, just like in Figure I.5, but with a white umbrella
added to the light. When deconstructing the photo, look for a circular shape in the
subject’s eyes (the umbrella) and also note the quality of any present shadows. When
the light is diffused by an umbrella or another modifier, the shadows will appear
softer, with the edges feathered rather than defined. Figure I.10 was lit the same as
Figure I.9, except that the subject’s shadow is no longer visible in the background,
which means that he’s no longer standing right in front of the backdrop.
Figure I.10 The subject is 3 feet away from a white background, while the light source is a flash zoomed out to 24mm with an added umbrella. His shadow is no longer visible because of the increased distance between him and the backdrop.
Figure I.9 The subject is standing in front of a white background, while the light source is a flash zoomed out to 24mm with an added umbrella. The catchlight is a bit larger, and the shadows are much softer.

If the catchlight is a square or a narrow rectangle (Figure I.11), you can deduce
that the light source was a softbox or a strip light, respectively. Add a second light
on the other side of the subject, leaving a small gap between them, and you have
a lighting effect similar to the one Martin Schoeller has made famous, as seen in
Figure I.12.
Figure I.12 This setup is similar to the one that Martin Schoeller made famous: two softboxes placed in front of the subject, about 2 feet apart. It’s a soft, flattering light that leaves a cool catchlight in the subject’s eyes.
Figure I.11 The subject is 3 feet away from a white background, while the light source is a flash zoomed out to 24mm and bounced into a 40x60-inch white board to create a large light bank. The catchlight is a bit larger and is shaped like a square.
INTRODUCTION xix

Sometimes there may be two catchlights, one brighter than the other, as is the case
in Figure I.13. The brighter catchlight is the light, and the less vivid shape is just a
reflector. If you move the subject several feet off of a white background, the main
light won’t spill onto it as much, turning the white to a medium gray tone, as seen
in Figure I.14. Also, note the addition of the hair light in the shot, which helps to
separate the subject from the darker background. If I aim the second (hair) light at
the background, powering up the output so that it’s higher than my main light, I now
have a pure white background, as seen in Figure I.15.
Of course, all this deconstructive advice is not to say that you can only achieve
certain results by replicating the lighting or techniques that another photographer
used, or by replicating what you see in the pages of Studio Anywhere. Rather, once
you understand how light works and how to manipulate the light that’s available to
you (be it natural or manufactured), it’s your prerogative to use that information in
fresh and creative ways. Just remember to always check the directional and quality
of the light, and especially the eyes, because the eyes don’t lie. Only Photoshop does.
Figure I.13 The subject is 3 feet away from a white background, while the main light is zoomed out to 24mm and shot into an umbrella, with a fill reflector below the subject’s chin. There are now two catchlights: one circular and bright, and one wider and less vivid.
xx STUDIO ANYWHERE: A PHOTOGRAPHER’S GUIDE TO SHOOTING IN UNCONVENTIONAL LOCATIONS

Figure I.15 Here you see a large main light and an illuminated, white background.
Figure I.14 While similar to the previous setup in Figure I.13, this has an added hair light, which separates the subject from darker backgrounds.
INTRODUCTION xxi


Ohio is not an island. We don’t have access to exotic beaches. Hell, a good number
of Ohioans probably don’t even know what the word exotic means. So when I
want to construct a dreamy water scene for a portrait here, I need to get creative
(Figure 8.1).
For creativity, I can think of no better source of inspiration than the fashion industry.
Although I hardly consider myself a fashion photographer, I regularly study the
photography in fashion magazines, which contain some of the best lighting and
storytelling techniques. I have always found it useful to look at those who are doing
better work than me, so that I may glean from their work and apply it to my own.
A word of warning, however: Studying photographers further along than you can
also be discouraging. When you topple from the heights of inspiration down the
slippery slope of “I’ll never be that good,” catch yourself by comparing your work to
what it was one year prior. As long as you’re growing, you are doing more than okay!
KIDDIE POOLS. WHO’D A THUNK IT?
Figure 8.1 The setup. By blacking out a kiddie pool, you can get the most out of the ripples and colors of reflections.
8
57

Which brings me to this next scenario. Awhile back I came across the dreamy fashion
work of French photographer Bruno Dayan. In particular, he had done a beauty shoot
featuring jewelry on a model partially submerged in water. I had never seen colors
and tones quite like his. They were simultaneously some of the most beautiful and
also the most discouraging images I had ever seen. I was determined to figure out
how he had done it—so that I could do it.
BLACKOUT
Ideally, I would have liked to see a behind-the-scenes photo of the tools and location
that Dayan used. Alas, I could find none. So, I tried to read the light in the photo and
make up the rest as I went along. Clearly, I needed water, so I started there. Lacking
a beach and exotic body of water to experiment with, I turned to the next best thing:
an inflatable kiddie pool. I set up the pool in the shadow of my house, making sure
to keep it out of direct sunlight, because it was a cloudless summer day. I set up my
lights and began shooting a few frames to check the light, before the model even
entered the water. The first issue that I encountered was that no matter how I angled
the light or set the exposure, the water wasn’t appearing black like in the inspiration
pictures. So I added a bunch of black towels and sheets to the bottom of the pool.
Now I was on the right track.
I did this shoot back when I was still using High Speed Sync (HSS) to kill my ambient
outdoor light. Because of the light output that is lost in HSS mode, I had to gang
all four of my Canon 430EX flashes on one light stand to get sufficient output. (I’ve
since converted to using variable neutral-density, or ND, filters instead, as you’ll
learn in Chapter 21.) Using a FourSquare bracket from Lightware Direct, I attached
the four flashes to the pole and set them all to half power, allowing for a decent
output without killing the refresh time. I was shooting through a white umbrella, so
a bit of the output was lost, but I was still at a shutter speed of 1/3200 with an aper-
ture of f/1.4. This exposure allowed me to squash the ambient light and sufficiently
light the model. Figure 8.2 shows the lighting diagram.
58 STUDIO ANYWHERE: A PHOTOGRAPHER’S GUIDE TO SHOOTING IN UNCONVENTIONAL LOCATIONS

I had my exposure, but I needed movement in the water. I’ve since deduced that
Mr. Dayan must have been shooting in a lake or pond, where the water is naturally
dark with naturally occurring ripples and water movement. At the time, however,
I was halfway into the shoot and all the way committed to getting a good shot. I began
kicking the edge of pool, which sent ripples across the surface of the water. Now I was
getting somewhere, as you can see in Figure 8.3. Note that the patches of soft blue
light in the waves are reflections of the sky.
LENS
35 1.4L
FOUR FLASHES
Flashes mounted together using a FourSquare bracket
All zoomed to 24mm, set to 1/2 power
EXIF DATA
1/3200 sec. ƒ/1.4 ISO 50
Figure 8.2 The lighting diagram. For this shot, I used High Speed Sync (HSS) to kill the ambient light. Because of the light output that is lost in HSS mode, I needed to gang four flashes on one stand to get a sufficient output.
Figure 8.3 The raw file. To get ripples in the water, I had to kick the sides of the kiddie pool. The patches of soft blue light in the waves were reflections of the sky.
I made sure to snap several frames with good ripples before I called it a wrap
(which I never say out loud at a shoot). When I imported my files and started to
compare them with Bruno’s (not recommended), I was feeling pretty down that
the experiment had failed. But the truth of the matter was I shouldn’t have been
so hard on myself. The shoot was not only my first attempt at blindly emulating
his work, I was also working solo using a minimal setup in my backyard, while
a whole team of creatives with much better resources had been at his disposal.
After all, it was just a fun experiment, and I still had Lightroom up my sleeve.
Once I began playing with the Levels and Curves controls in Lightroom, the images
really started to come alive. Dayan’s images looked like he had essentially pulled
up the shadows in Tone Curve, which created a nice texture in the water ripples.
8: KIDDIE POOLS. WHO’D A THUNK IT? 59

So, I spent most of the editing time in these areas. I also wanted to push an overall
blue tone on the image, so I added a +64 blue tone in the Split Toning panel and a
+58 warm tone to the highlights, to retain a warmth in the skin tones (Figure 8.4).
Finally, I decided that I liked the image better with a vertical orientation. I cropped,
making sure to retain the original canvas dimensions, and my experiment was
complete (Figure 8.5).
Figure 8.4 The Lightroom settings. I did most of my color grading in the Tone Curve panel, while also imparting an overall cool feel by adding a Split Tone overlay.
60 STUDIO ANYWHERE: A PHOTOGRAPHER’S GUIDE TO SHOOTING IN UNCONVENTIONAL LOCATIONS

APPLYING THE EXPERIMENT
Now that I was more familiar with shooting water and making it appear black,
I decided to apply the skills to my product photography. (These are the types of
things that I do for fun, by the way.)
I was in the middle of a series of experiments for which I shot the same bottle of
cologne in as many ways as I could come up with, in order to sharpen my product
photography skills. This shoot ended up being my third experiment and began much
like the pool shoot, but on a smaller scale. This time, I used a shallow glass dish, one
black towel, and less water. I first tried placing the towel below the glass dish, but the
glass created an awful glare. Moving the towel into the dish helped with the glare,
but changed the water level.
Figure 8.5 The final image. Although it’s a bit different than Dayan’s, I am still happy with the result. Plus, now I have more knowledge about working with lighting and water, so the next time around will be smoother sailing.
8: KIDDIE POOLS. WHO’D A THUNK IT? 61

I wanted just enough to cover the towel and the
bottom portion of the cologne bottle, without
fully submerging it.
I dialed in the lighting (and the water), then
agitated the dish to create water ripples around
the bottle. In the process, I also produced air
bubbles. Tiny, little air bubbles. Like thousands
of them. They were all over the inside the dish,
including inside the cologne bottle lid (Figure 8.6).
I tried removing them, one at a time, using the
Spot Removal tool in Lightroom but gave up after
10 minutes, with another hour or two of work
ahead of me. Now what?
My bubble solution may be the most important
lesson of the shoot: Know when to outsource
your work. We’ve all been there, with several
jobs shot and waiting to be edited, when a
painstaking, time-sucking moment like the
removal of thousands of air bubbles comes along,
and you have to make a decision. Fall behind
on other work or speed up the process by
outsourcing portions of a job?
For the bubbles, I outsourced the cleanup work
to my retoucher friend. I know some photogra-
phers who hand off all of their editing and color
grading to employees, interns, or coworkers,
while they stick to shooting. There isn’t anything
wrong with this, but I prefer to have my hand in
the whole process. I find that my photo shoots are done almost equally in the cam-
era and the editing. I let the mood of the images influence how I color grade them;
I’m not comfortable leaving those decisions up to another person. After I’ve already
put my signature color grading on the image, however, I have no problem send-
ing the file off to a retoucher to have them remove all the air bubbles (Figure 8.7).
Decide how much of your hand needs to be involved and how much you’re com-
fortable handing off to someone else, so you’re not left buried in bubbles.
Figure 8.6 The shot looked good— or would, minus a few (thousand) air bubbles.
Note If you’re curious about the rest of the experimental product shots, my eBook, Run and Gun Lighting Resource (Peachpit), details the entire series.

Figure 8.7 I applied what I learned in the previous water experiment to my product photography. Same principles, just on a smaller scale.
8: KIDDIE POOLS. WHO’D A THUNK IT? 63

79
Moody light is my absolute favorite type of light. It can be so cinematic and theatri-
cal. It’s like placing my subjects on a stage and letting them become a character,
someone else. The term moody light encompasses a number of different techniques
—colored gels, flash grids, blacking out the scene except for the subject—and I’ll
cover all of these scenarios in this chapter.
THE FIRST RULE OF MOODY LIGHTING…
… is you don’t talk about moody lighting. Okay, I’m kidding, but I was seriously
aiming to invoke Tyler Durden from Fight Club in this shoot I did with model Alex
Prange. Although we weren’t re-creating a particular scene from the film, we want-
ed to capture the character’s badass presence. Alex has the body of Brad Pitt in the
movie as well as the swagger, so all I needed to do was get the light nailed down.
As you can see in Figure 11.1, Alex was about 5 feet in front of a white vinyl backdrop.
The nice thing about a vinyl or fabric backdrop as opposed to a paper sweep is that
it has a nice, wavy texture. Although the texture can be played down or outright
eliminated depending on the direction and intensity of light on it, I decided to high-
light the texture in this shot.
MOODY LIGHT 11
Figure 11.1 The setup. Alex is pumped up and ready to get his Fight Club on. It’s kind of fitting that we were shooting in a creepy basement.
80 STUDIO ANYWHERE: A PHOTOGRAPHER’S GUIDE TO SHOOTING IN UNCONVENTIONAL LOCATIONS
I placed my background light low and close to the backdrop, aiming upward (it’s
hidden behind the small, black V-flat). I also made sure that the background light
output matched the output of the main light, in order to retain some detail in the
white backdrop. (Usually, I make the background light 2 to 3 stops brighter than the
main light to blow out the background to pure white.)
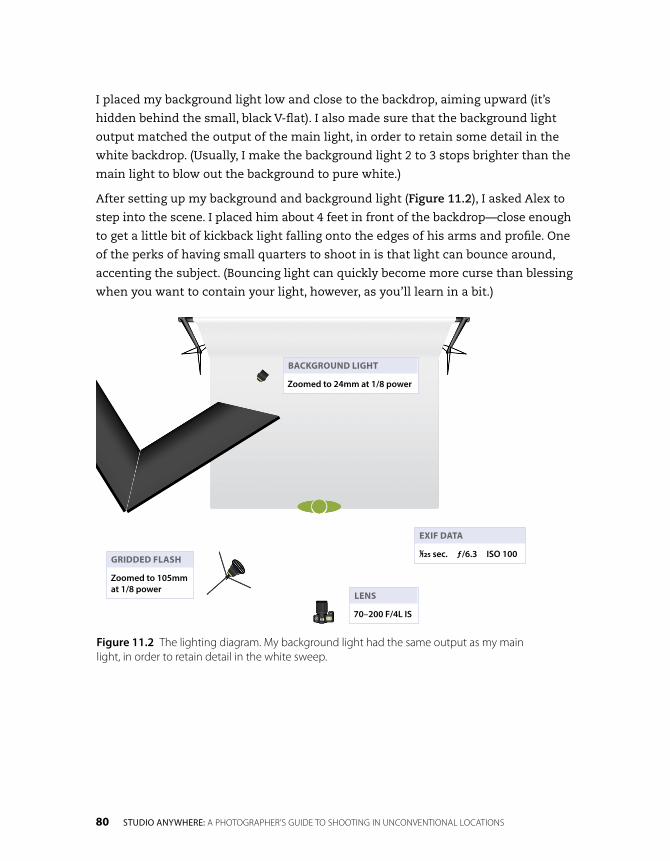
After setting up my background and background light (Figure 11.2), I asked Alex to
step into the scene. I placed him about 4 feet in front of the backdrop—close enough
to get a little bit of kickback light falling onto the edges of his arms and profile. One
of the perks of having small quarters to shoot in is that light can bounce around,
accenting the subject. (Bouncing light can quickly become more curse than blessing
when you want to contain your light, however, as you’ll learn in a bit.)
Figure 11.2 The lighting diagram. My background light had the same output as my main light, in order to retain detail in the white sweep.
GRIDDED FLASH
Zoomed to 105mm at 1/8 power
LENS
70–200 F/4L IS
EXIF DATA
1/125 sec. ƒ/6.3 ISO 100
BACKGROUND LIGHT
Zoomed to 24mm at 1/8 power

11: MOODy LIGHT 81
For my main light, I opted to use my
trusty Honl grid to get contrasty, hard
light. Hard light, which creates hard
shadow and bright highlights, was just
what Alex’s many muscles needed
to really stand out (Figure 11.3). One
thing to keep in mind when lighting a
subject with a grid is that if he moves
much at all, the small area of light will
quickly fall off of him. Sometimes this
can make for cool, unintentional shots
where the subject’s face goes to shadow
while his torso is lit, and so on. But
if you want his face to be lit, as most
portraits require, you need to instruct
the subject to stay within the confined
area of the flash output.
My post work on this image was
pretty similar to my normal color-
grading routine, except for this shot
I wanted to outline the hard lines of
his muscles. To do so, I slid the Clarity
to +63. I also wanted the shot to have
a warmer look, so I desaturated the Blue and Cyan channels (Figure 11.4). After
making a slight crop, the image was finished (Figure 11.5).
Figure 11.3 The raw file. The hard main light helped to define his muscles.

82 STUDIO ANYWHERE: A PHOTOGRAPHER’S GUIDE TO SHOOTING IN UNCONVENTIONAL LOCATIONS
Figure 11.4 The Lightroom settings are much like those for my normal color grading, save for the extra Clarity, which highlights the hard light and muscles of the model.

11: MOODy LIGHT 83
Figure 11.5 I am Jack’s final shot.

84 STUDIO ANYWHERE: A PHOTOGRAPHER’S GUIDE TO SHOOTING IN UNCONVENTIONAL LOCATIONS
BLACK ON BLACK ON BLACK
To paraphrase Samuel L. Jackson in Jackie Brown, “Grids: When you absolutely, posi-
tively got to kill every lumen in the room, accept no substitutes.” Have a room that
you want to make black? You don’t even need a black backdrop or the dark cover of
night. All you need is a flash, a grid, and a room. As long as your subject isn’t stand-
ing within 5 feet of a wall, you will have no problem killing all of the ambient light.
Case in point. I was doing a shoot with Dani, who was in black body paint, wearing
all black above the waist. I wanted the whole scene to be black, save for Dani and
the textures of her outfit. It was a conceptual fashion shoot, this portion being the
Hell portion of a Heaven/Hell-themed shoot. (The as-yet-to-be-shot Heaven scenario
will, fittingly, be all white.)
I met Dani at the makeup artist’s house, about an hour after they got started on
the makeup, to give them a head start with the lengthy application. I knew that the
basement was going to be an optimal shooting space because it was windowless
but wide open and barren (Figure 11.6). I quickly set up the sole flash (Figure 11.7),
and then waited another hour while they put the finishing touches on the makeup
and hair (so much for the head start).
Figure 11.6 The setup. This time we were shooting in the basement of my makeup artist’s home. Even though it lacked a black backdrop, I had no problem creating a black environment with the use of my flash settings.

11: MOODy LIGHT 85
The shoot actually went rather quickly (15 minutes). As you can see in Figure 11.8,
Dani was wearing a crop top. Although her unpainted abdomen and sweatpants are
visible in the shot, this wasn’t a big issue. Because the light falloff was so dramatic
from her bust to her torso, a quick adjustment in Lightroom would have the image
looking right as rain (Figure 11.9).
Figure 11.8 The raw file. Dani’s midriff and sweatpants are visible but can easily be removed in post.
GRIDDED FLASH
Zoomed to 105mm at 1/8 power LENS
70–200 F/4L IS
EXIF DATA
1/80 sec. ƒ/4 ISO 50
Figure 11.7 The diagram. A moderate flash output of 1/8 was enough to knock out the ambient light in the basement. The added grid on the flash contained the light from spilling onto the nearby walls, helping to create a black environment.

86 STUDIO ANYWHERE: A PHOTOGRAPHER’S GUIDE TO SHOOTING IN UNCONVENTIONAL LOCATIONS
Figure 11.9 The Lightroom settings. Because the image was, for all intents and purposes, black and white, I toggled over into Black & White mode to allow for a quicker editing process.

11: MOODy LIGHT 87
When I got the file into Lightroom,
I thought that the editing would
go a certain way (easily), but it
turned out to go a totally differ-
ent route (hard). The hard light
and the too-good camera sensor
captured far more orangey
skin tones than I expected. I was
fortunate that the image was
relatively colorless, so I toggled
over to Black & White mode. The
nice thing about editing a file
as black and white is that the
color channels only control lumi-
nance. This way I could lower the
Orange, Yellow, and Red channels
(her skin color) and control the
way the highlights, shadows,
and midtones appeared. This
method of tweaking specific color
channels is a bit more focused
adjustment than just sliding the
global Highlights or Shadows
sliders. Now I had details in both
the shadows and the highlights,
and Dani was looking perfect in
purgatory (Figure 11.10).
Figure 11.10 The final image. Once I brought down the highlights and brought up the shadows, Dani looked exactly how I had envisioned she would look in a hopeless, black void.

88 STUDIO ANYWHERE: A PHOTOGRAPHER’S GUIDE TO SHOOTING IN UNCONVENTIONAL LOCATIONS
ARE YOU GELLIN’?
Gels and moody lighting go together like a wink and a smile. Even better, flash gels are
one of the cheapest, yet most powerful and valuable items that you’ll put in your
camera case. Nowadays, you can get a pocket-sized pack of over 50 different-colored
gels to accompany your flash for under $20. At 1.5 by 3 inches, these tiny pieces of
nylon sure pack a wallop. That’s because gels can do more than just colorize an accent
light. If used on a main light, they allow you to change the white balance in your
camera, thus allowing you to control your entire scene (more on that in Chapter 20).
The more light you pump through a gel, the more washed out the color will be, so
keep your output lower for a nice rich hue. Figure 11.11 is a fashion shot I did with
Sebastian. I liked his tailored suit and wanted to capture it in a number of different
ways, to see which I preferred. I shot it with direct light on a white background, subtle
lighting on a black background, and as you can see here, with an accent color on a
white background. Figure 11.11 ended up being my favorite take on the subject.
Although the background was lit, I positioned Sebastian about 6 feet away from it,
which was far enough in front of it that his body went into shadow. I lit him with a
red-gelled flash with a grid on it to constrain the light. The red face, paired with a
silhouetted body, gave him a nice ominous mystique.
Gels are also effective at changing silhouetted color. I own a variety of colored
backdrop rolls, but my options are much greater when paired with the use of a gel.
Combine a red gel with a yellow background, for example, and you get a beautiful,
rich tangerine color. Pair a red gel with a blue background and you get purple. A red
gel on a white or gray background can vary from red to pink, depending on how
high the output is on the flash (lower output is more red, higher output is more
pink). Figure 11.12 is a red gel on a white background. The main light was a gridded
flash to the right of the model, which created the spotlight on the model and back-
drop. The red-gelled background light was on the floor to the left of the model,
aimed at the backdrop, with a piece of cardboard next to it to flag the light off of the
model. The crisscrossed lights along with the gel created the trippy double shadow,
giving the image a ’60s vibe, which was the direction for the shoot.
You can also shift a colored backdrop to a totally different color. If you aren’t familiar
with color theory, do a quick Internet search for subtractive color mixing to see what
will happen when you mix one colored gel with a different colored background. In
Figure 11.13, you can see what happens when you use a red-gelled flash on a blue
background: You get a beautiful shade of fuschia. Now go out and get crazy with it!

11: MOODy LIGHT 89
Figure 11.11 Gels are small but extremely effective. For instance, the red gel in this image provides an accent color and adds an ominous mood to the fashion shot.
Figure 11.12 Gels are great for changing your background. The red gel in this shot changed the backdrop to a bright pink color.
Figure 11.13 A red gel on a blue background creates a beautiful fuschia.

90 STUDIO ANYWHERE: A PHOTOGRAPHER’S GUIDE TO SHOOTING IN UNCONVENTIONAL LOCATIONS
I have always wanted to shoot editorial work—assignments for magazines and newspapers. To me, seeing your own work in print is the mark of having “made it” as a photographer. The problem is, how do you get your work in front of the right people to even be considered for an assignment? You’ve no doubt read articles in industry photo magazines about how to make brilliant and eye-catching marketing materials to nab that client you are after. But that doesn’t help you very much if you don’t know which person you should be sending it to, let alone how to get his or her contact info.
Wonder no more. Yodelist.com is a service for photographers who want to buy email and mailing addresses for industry contacts, such as the photo and art directors at your target publications. Once you become a member, which isn’t free, you have access to an enormous directory of industry contacts. In my case, I was interested in magazine and newspaper publishers, specifically on the East Coast, because I live closer to it than to the West Coast. Once you narrow down the list of publications that you want to contact, you can purchase the emails of the contacts at each publication for 10 cents apiece.
Next, go through your list of addresses, and send a short email to each publication; simply introduce yourself and provide a link to your portfolio site. Note I didn’t suggest linking to your Flickr or 500PX page. Get a website, or at least a clean-looking Tumblr blog, that shows a few of your best, most diverse images, rather than a smattering of all the work you’ve ever done. I have several galleries on my portfolio website, with less than 30 images per gallery. Less is more. Save the rest for your blog.
The important thing to keep in mind is whether or not your photography fits well with the style of the publication that you are contacting. I recently read an interview on aPhotoEditor.com (another amazing resource you should check out) with Jodi Peckman, the director of photog-raphy for Rolling Stone magazine. In the interview, she mentioned that she receives hundreds of emails per day and that the vast majority were from food or lifestyle photographers (not the kind of photographer that Rolling Stone needs). Hundreds a day! When you reach out to photo editors, make sure to show them work that fits with their publications.
After you send out your emails, all you can do is wait and understand that you won’t hear back from the vast majority of them. Be patient. If they respond at all, it won’t be immediately. I once personally emailed over 900 people; about a dozen responded. Although I didn’t hear back from most of the magazines, I did see huge spikes in my website analytics on the days that I sent emails, so I knew that people were reading them. I didn’t lose heart, and you shouldn’t either.
About a week after I had sent out the emails, I received an offer from ESPN Magazine: Would I be interested photographing an athlete’s family that lived on the east side of my city? Yes! I was ecstatic. More than that, I was validated. Not only had my emails been reaching the right people, but I now had a photo shoot for a huge client.
PRO-TIP: HOW TO PURSUE EDITORIAL WORK

11: MOODy LIGHT 91
Even though I wasn’t sending out pretty little marketing pieces to these publications, I was still getting my work in front of them. The right people were seeing my images. And convenience is a powerful thing. If you can save these photo editors and directors some time and make their lives easier by being their go-to source in your region, then it’s a win-win for them and for you. Since then I have added The New York Times (Figure 11.14) and Forbes Japan (Figure 11.15) to my client list.
Figure 11.14 I shot the Ohio State Reformatory for an article on the 20th anniversary of The Shawshank Redemption for The New york Times.
Figure 11.15 This shot of the founders of Nottingham Spirk is from a job for Forbes Japan.
INDEX
A
accent lights, 26, 27
Adjustment Brush, 6
aesthetic decisions
existing environments and, 26–28
moody light and, 12–13
alley-based photos, 48–49
ambient light
balancing with flash, 158
hard light balanced with, 207
knocking out, 84, 85, 149, 168
shifting the color of, 161
angular sidelight, 196, 197
aPhotoEditor.com website, 90, 213
art directors (ADs), 66
Auto Mask option, 6
available light. See natural light
Avedon, Richard, 73
B
backdrops
black, 20, 52
colored, 88, 89
creative, 92–105
’80s-themed, 96–103
fabric, 65, 79, 92
gray, 77–79
paper, 92, 180
pegboard, 104–105
scenic prints as, 92–96
skies as, 182, 183, 186
textured, 79, 99, 104
white, 2, 73–76, 124
backgrounds
blacking out, 174, 175–178
extending in post-production, 18–19
shallow depth of field for, 44–49
softening with long lenses, 159
white walls used as, 120–121
backyard studio photos, 37–68
alleys and, 48–49
garage setups and, 52–56
head shots as, 38–43
kiddie pools and, 57–61
product shots as, 61–63
shallow depth of field for, 44–49
ballerina photos, 174, 175–178
bare-bulb strobe
accent lighting with, 26
starting with, 12
basement studio photos, 71–116
creative backdrops for, 92–105
gray backdrops for, 77–78
moody light for, 79–89
product shots as, 106–116
reflective surfaces and, 106–114
setting up the space for, 222–224
soft light for, 72–78
white backdrops for, 73–76
window light re-created for, 115–116
batch editing photos, 29–32
batteries, xii
Bell, Olga, 9
Black & White Mix panel, 54, 188, 189
Black and White mode, 188, 189
black plexiglass, 64, 65
232 STUDIO ANYWHERE: A PHOTOGRAPHER’S GUIDE TO SHOOTING IN UNCONVENTIONAL LOCATIONS

black-and-white image processing
for car rooftop shoot, 188, 189
for garage photo shoot, 54–55
for moody light shoot, 86, 87
blackening the room, 84–87
blacking out the environment, 174, 175–178
lighting setup for, 175–176
post-processing for, 176–177
black V-flats, 20, 52
Blue channel, 54, 169
blue gel, 160
bokeh, 44
Boris band shoot, 200–201
bounce boards, 124, 223
bouncing the flash, 3, 72, 93
brush adjustments, 40, 55, 176, 177, 189
business issues. See photography work
business workplace. See office studio photos
C
Canon 5DII camera, xii–xiii
Canon 430EX strobes, 168
Canon Rebel XSi camera, xii–xiii
car rooftop photos, 182–190
Black and White mode for, 188, 189
lighting setups for, 182, 183, 187
Mad Max theme for, 186–190
post-processing for, 182, 184, 188–189
sky as backdrop in, 182, 183, 186
Cartier-Bresson, Henri, 173
catchlights, xiv, xix, xx, 39, 53
chimping, 21
Clarity slider, 4, 66, 81, 139, 151
clients
building your SEO for, 217–221
portfolio selection for, 213–217
testing new waters for, 211–213
Clone Stamp tool, 99, 182
Cloudy white balance, 160
color cast, 122, 168
color channels, 54, 87
color gels. See gels
color grading images, 30, 34, 163
colored backdrops, 88, 89
commercial photography, 211–213
Content-Aware Fill, 18–19, 163
Contrast slider, 4, 14, 75, 176
creative backdrops, 92–105
’80s-themed, 96–103
lighting setups for, 93, 97, 104
pegboard pinlight, 104–105
post-processing, 94–95, 98–102
scenic prints, 92–96
creek submersion portrait, 152–156
Cunningham, Bill, 173
curtains in office portraits, 133–135
Curve adjustments, 4, 102, 169
cyan gel, 12, 13, 105, 112
D
Dayan, Bruno, 58
deconstructing lighting, xiv–xxi
answer key to quizzes on, 226–231
quiz images to deconstruct, 35, 69, 117, 145, 171, 210
depth of field
shallow, 44–49
softening background, 159, 207
desert photo shoot, 186–190
diCorcia, Philip-Lorca, 173
Dimitrova, Valentina, 191
directional light
INDEX 233

changing a scene using, 198
garage-based photos and, 56
head shots and, 42–43
re-created window light as, 115
disposable batteries, xii
distortion, wide-angle, 9, 39
dramatic lighting, 128, 129
duotones, 151
E
eclipsing sunlight, 166–170
high-speed sync for, 166–167
neutral-density filters for, 167–168
post-processing for, 169
Edit in Photoshop option, 98
editing photos. See post-processing
editorial work, 90–91
Eiffel Tower image, 92–93
’80s-themed backdrops, 96–103
lighting setup using, 97
post-processing photos with, 98
engineering prints, 92
Enns, Jenna, 186
environmental portraits, 128–135
curtains used in, 133–135
lighting setups for, 128–130, 133–134
narrow spaces for, 128–132
post-processing, 130–131
ESPN Magazine, 90
existing environment photos, 25–34
aesthetic decisions for, 26–28
lighting setup for, 26–27
post-processing, 29–34
experimental product shots, 61–63
Exposure slider, 6, 31, 32, 54
F
fabric backdrops, 65, 79, 92
fashion photography
getting inspiration from, 57–58
kiddie pools used for, 58–61
moody black lighting for, 84–87
positioning yourself for, 214
street settings for, 179–181, 195
fill light, 176, 182, 183, 187, 207
filtering star-rated images, 29
filters
graduated, 5
neutral-density, 58, 166, 167–168
flags, 16, 88, 224
flash
ambient light and, 158
bouncing, 3, 72, 93
faking sunlight with, 164–165
fill light from, 176, 187, 207
ganged setup for, 58
gels for, 12, 16, 88
gridded, 9, 26, 27, 28, 81
unmodified, 157
white balance for, 164
zooming, xiv–xvi
Flash white balance, 164
floors
reflections from, 138–141
white boards used as, 11
Fluorescent Light white balance, 161
foam core
as backdrops, 2, 124, 179
shooting through, 108
Forbes Japan, 91
FourSquare bracket, 58
234 STUDIO ANYWHERE: A PHOTOGRAPHER’S GUIDE TO SHOOTING IN UNCONVENTIONAL LOCATIONS

G
garage-based photos (backyard studio), 52–56
directional light in, 56
head shots as, 53
lighting setup for, 53
post-processing, 54–55
See also parking garages
gear, x–xiii
author’s use of, xi–xiii
recommended for beginners, x–xi
gels
colored backdrops used with, 88, 89
moody light and, 12, 16, 88–89, 134
shifting colors using, 161
white balance and, 88, 133–134, 160
Google+ accounts, 221
Google AdWords, 220
Google Maps, 200
Google searches, 217
Google Webmaster Tools, 217
GQ-type photo shoot, 204–255
gradient adjustments, 5
graduated filters, 5
gray backdrops, 77–79
Green channel, 54, 66, 67
green gel, 161
Greenfield-Sanders, Timothy, 73
grid light, 26, 27, 28, 81, 84
Grishanova, Katya, 172
H
hair light, xx, xxi
hair retouching, 169
hard light
balancing without modifiers, 157–159
mood lighting using, 81, 87
portrait photography and, 207
head shots, 38–43
backyard lighting for, 39
directional light for, 42–43
garage-based setups for, 53
office studio portraits as, 121
post-processing, 40–41
soft light for, 39–41
See also portraits
Highlights slider, 6, 46, 54, 87, 176, 209
high-speed sync (HSS), 58, 59, 166–167, 205
Histogram panel, 7
HOMAGE photo shoot, 179–181
Honl grid, 26, 81
HSL panel, 41, 154, 155, 161, 162
Hurrell, George, 26
I
interacting with subjects, 21
iStock images, 93
J
Jackson, Samuel L., 84
JackThreads, 136, 142, 204
K
Kander, Nadav, 213
keywords, 219, 220, 221
kiddie pool photos, 57–61
black background for, 58
lighting setup for, 58–59
post-processing, 59–60
Krug, Neil, 213
INDEX 235

L
Lange, George, 21
Latham, Kristie, 175
lens flare, 122
lenses
long, 20, 39, 53, 159
ND filters for, 167–168
Lichtenstein, Roy, 92
light
accent, 26, 27
ambient, 84, 149, 158
bounced, 80, 93
directional, 42–43, 56
fill, 176, 182, 183, 187, 207
grid, 26, 27, 28, 81, 84
hard, 81, 87, 157–159, 207
natural, 20–24, 65
soft, xviii–xix, 39, 72
window, 20–24
light modifiers
balancing hard light without, 157–159
soft light created with, 72
light spill, 9, 16, 97, 107
lighting deconstruction. See deconstructing lighting
lighting setups
for blacking out the environment, 175–176
for car rooftop photos, 182, 183, 187
for creative backdrops, 93, 97, 104
for environmental portraits, 128–130, 133–134
for existing environments, 26–27
for garage-based shots, 53
for head shots, 39, 53
for kiddie pool shots, 58–59
for moody light, 12–13, 16, 79–81, 84–85
for nighttime street photos, 192, 195–196
for office studio portraits, 121, 125, 133–134
for park studio photos, 149, 153, 161, 164–165, 168
for product shots, 64–66, 106–108, 112, 138–139, 142–143, 149
for shallow depth of field, 44, 45
for small spaces, 2–3, 9
for soft light, 39, 74, 77
for window light, 20
Lightroom adjustments. See post-processing
links, building for websites, 221
living room studio photos, 1–36
existing environments for, 25–34
moody light for, 11–19
small spaces for, 2–10
window light for, 20–24
location scouting, 200–201
long lenses
for portraits, 20, 39, 53
for softening backgrounds, 159
LumoPro LP180 strobes, xii, 168
LumoPro reflector panel kit, 20
M
Mad Max photo theme, 186–190
magazine assignments, 90–91
magenta gel, 97
marketing
building your SEO for, 217–221
portfolio selection for, 213–217
Model Mayhem, 26
modifiers. See light modifiers
moody light photos
aesthetic decisions for, 12
basement studio and, 79–89
creating black rooms for, 84–87
236 STUDIO ANYWHERE: A PHOTOGRAPHER’S GUIDE TO SHOOTING IN UNCONVENTIONAL LOCATIONS

gels used for, 12, 16, 88–89, 134
lighting setups for, 12–13, 16, 79–81, 84–85
living room studio and, 11–19
post-processing, 13–15, 81–82, 86–87
N
Nagel, Patrick, 96
natural light
backyard studio and, 38, 56, 64
product shots using, 64–65
window light as, 20–24
See also sunlight
neutral density (ND) filters, 58, 166, 167–168
New Develop Preset dialog box, 5
New York Times, The, 91
Newman, Andy, 204
newspaper assignments, 90–91
nighttime street photos, 191–199
creating a story with, 191–194
lighting setups for, 192, 195–196
one wall, two looks for, 195–199
post-processing, 192–193, 198
O
office studio photos, 119–144
backgrounds for, 120–121, 124, 133–134
environmental portraits as, 128–135
lighting setups for, 121, 125, 128–130, 133–134
portraits on white as, 120–127
post-processing, 122, 126
product shots as, 136–144
pro-tip on shooting, 50–51
Old Hollywood theme, 25, 26, 33
one-light portrait setup, xiv–xvi
optimizing your website, 217–221
Orange channel, 54, 122, 182
orange gel, 133, 134
outsourcing jobs, 62, 169
P
paper backdrops, 92, 180
park studio photos, 147–170
creek submersion portrait, 152–156
eclipsing the sun in, 166–170
lighting setups for, 149, 153, 161, 164–165, 168
post-processing, 150–151, 154–155, 161–163, 169
product shots as, 148–152
rain puddles used in, 148–152, 160–163
weather transformations for, 160–165
parking garages, 202–209
GQ-type shoot in, 204–255
lighting setups for, 204–205, 206–207
location advantages of, 202–203
post-processing photos from, 208–209
rooftop sunlight in, 206–207
Patch tool, 99, 100
Peckman, Jodi, 90
pegboard pinlight backdrop, 104–105
Pelican 1510 case, xi, xii
Photo District News, 213
photography work, 211–221
building your SEO for, 217–221
portfolio selection for, 213–217
testing new waters for, 211–213
Photoshop adjustments
Content-Aware Fill, 18–19, 163
texture added to images, 99
transferring files for, 98
See also post-processing
plexiglass, 64, 65, 111
INDEX 237

PocketWizard Flex TT5 system, 167
PocketWizard MiniTT1 system, 167
PocketWizard Plus X triggers, 168
portfolio selection, 213–217
portraits
directional light for, 42–43, 56
environmental, 128–135
long lens used for, 20, 39, 53
office studio, 120–135
park studio, 152–156
soft light for, 39
theater troupe, 124–127
white background for, 120–127
See also head shots
post-apocalyptic scene, 189
post-processing
backyard photos, 40–41, 46
basement portraits, 75–76, 78
black-and-white images, 54–55
blacked-out environments, 176–177
car rooftop photos, 182, 184, 188–189
creative backdrop photos, 94–95, 98–102
environmental portraits, 130–131
existing environment photos, 29–34
extending backgrounds in, 18–19
head shots, 39–41
moody light photos, 13–15, 81–82, 86–87
nighttime street photos, 192–193, 198
office studio portraits, 122, 126, 130–131
park studio photos, 150–151, 154–155, 161–163, 169
product shots, 66–67, 109, 112–113, 139–140, 150–151
small room photos, 4–7
weather transformations, 161–163
window light photos, 22–23
Powerex rechargeable batteries, xii
Prange, Alex, 79
Preset panel, 30
presets, 5, 30
prints
engineering, 92
scenic, 92–96
product shots (backyard studio), 64–68
experimental, 61–63
lighting setup for, 64–66
post-processing, 66–67
reflections in, 65, 66
water-based setup for, 61–63
product shots (basement studio), 106–116
lighting setups for, 106–108, 112
post-processing, 109, 112–113
products on reflective surfaces, 111–114
products with reflective surfaces, 106–110
window light recreated for, 115–116
product shots (office studio), 136–144
floor reflections in, 138–141
hallway example of, 136–137
lighting setups for, 138–139, 142–143
post-processing, 139–140
space limitations for, 142–143
product shots (park studio), 148–152
lighting setup for, 148–149
post-processing, 150–151
professional retouchers, 62, 169
ProMaster ND filters, 168
pro-tips
balancing hard light without modifiers, 157–159
extending backgrounds in post, 18–19
how to pursue editorial work, 90–91
making the most of locations, 50–51
scouting locations from computer, 200–201
using what you have, 222–225
238 STUDIO ANYWHERE: A PHOTOGRAPHER’S GUIDE TO SHOOTING IN UNCONVENTIONAL LOCATIONS

Q
Querin, Jeff, 73
quizzes on deconstructing lighting
answer key to, 226–231
images to deconstruct, 35, 69, 117, 145, 171, 210
R
RadioPopper PX system, 167, 168
rain puddles
park portrait using, 160–163
product shot using, 148–152
Rasterbater wall art generator, 92
rechargeable batteries, xii
red gel, 12, 16, 88, 89
reflective surfaces
lighting products with, 65, 66, 106–110
shooting products on, 111–114
reflectors
fill light from, xx, 42, 107
shooting through, 38, 39
white panels used as, 72
window light and, 20
renting gear, x
resources
on commercial photography, 213
on finding editorial work, 90
on search engine optimization, 218
retouchers, 62, 169
rim lighting, 22
roof of car photos. See car rooftop photos
rugged sophistication look, 22–24
Run and Gun Lighting Resource (Fancher), 62
S
scenic prints, 92–96
Schoeller, Martin, xix, 213
scouting locations, 200–201
SEO (search engine optimization), 217–221
SEOquake plug-in, 218–219
Shadows slider, 22, 54, 75, 87, 209
shallow depth of field, 44–49
alley photos using, 48–49
backyard photos using, 44–47
lighting setup for, 44, 45
Show Highlight Clipping Indicator, 7
skies
adjusting in Lightroom, 182
using as backdrop, 182, 183, 186, 189
small room photos, 2–10
lighting setups for, 2–3, 9
post-processing, 4–7
soft light photos
backyard studio and, 39–41
basement studio and, 72–78
bouncing the flash for, 3, 72
creating with modifiers, 72
deconstructing sources of, xviii–xix
lighting diagrams for, 39, 74, 77
outdoor head shots as, 39–41
panel reflectors for, 72
post-processing, 40–41, 75–76, 78
window light recreated for, 115
softboxes, xix, 72, 157
Split Toning panel, 46, 60
Spot Removal tool, 15, 62, 67, 112, 113
spotlight effect, xvii, 26, 195
Squarespace websites, 219
star ratings, 29
storytelling, 191–194
street studio photos, 173–209
INDEX 239
blacking out the environment in, 174, 175–178
car rooftops for shooting, 182–190
creating a story with, 191–194
HOMAGE photo shoot, 179–181
nighttime setting for, 191–199
one wall, two looks for, 195–199
parking garages and, 202–209
strip lights, xix, 227
Strudwick, Destiny, 206
studios
backyard, 37–68
basement, 71–116, 222–224
living room, 1–36
office, 119–144
park, 147–170
street, 173–209
subjects, interacting with, 21
subtractive color mixing, 88
sunlight
faking with flash, 164–165
fill light from, 182, 183
garage studio utilizing, 52
parking garage rooftop and, 206–207
portraits and directional, 42–43
product shots using, 64–65
techniques for eclipsing, 166–170
See also natural light
synchronizing settings, 30–32
T
Targeted Action tool (TAT), 41
test shoots, 212, 215, 224
textures
backdrop, 79, 99, 104
clothing, 12, 13
Photoshop, 98–99
theater troupe studio, 124–127
three-quarter light, 9
Tone Curve panel, 7, 31, 60, 169
Transform tool, 99, 101
Tungsten white balance, 133–134, 160
U
umbrellas, xviii, 72, 77, 157
unpaid photo shoots, 212, 214, 215, 216, 224
urban photography. See street studio photos
V
variable ND filters, 58, 168, 182
variety, importance of, 32
Vasilev, Kristian, 191
V-flats
basement setups and, 224
garage setups and, 52
window light and, 20
vinyl backdrops, 79
Visualize Spots option, 112
W
water-based setups
creek submersion portrait, 152–156
kiddie pools used for, 58–61
product shots using, 61–63, 148–152
rain puddles for, 148–152, 160–163
weather transformations, 160–165
color shifts for, 160–163
lighting setups for, 161
post-processing, 161–163
warming up colors for, 164–165
240 STUDIO ANYWHERE: A PHOTOGRAPHER’S GUIDE TO SHOOTING IN UNCONVENTIONAL LOCATIONS

websites
optimizing with SEO, 217–221
of photography resources, 90, 213
white backdrops
home shoots and, 2
soft light on, 73–76
street photography and, 179, 180
white balance
adjusting in Lightroom, 94
gels for changing, 88, 133–134, 160
strobe flash and, 164
white boards
as bounce boards, 124, 223
as floor over carpet, 11
as reflectors, 38, 72
white curtains, 133–135
white light, white wall photos, 2–10
lighting setups for, 2–3, 9
post-processing, 4–7
wide-angle distortion, 9, 39
window blind backdrop, 97
window light photos, 20–24
lighting setup, 20
post-processing, 22–23
re-creating in basement studio, 115–116
subject direction in, 21–22
windy conditions, 175, 180
Winters, Dan, 213
Wolfe, Chelsea, 1
WordPress websites, 219
work, photography. See photography work
workplace photos. See office studio photos
Y
Yellow channel, 54, 169
Yodelist.com website, 90
Z
zooming the flash head, xiv–xvi
INDEX 241


![VS Anywhere. Visual Studio Industry Partner VS Anywhere NEXT STEPS Contact us at: [contact@vsanywhere.com] Website Blog- Facebook.](https://static.fdocuments.us/doc/165x107/56649e425503460f94b34c12/vs-anywhere-visual-studio-industry-partner-vs-anywhere-next-steps-contact.jpg)