Storage options-ip-camera-manual
8
IP Camera Installation Guide www.storageoptions.com INITIAL INSTALLATION This IP Camera and its software are designed for Windows XP / Vista / 7. Please follow these instructions to install and use your new device. 1 Connect the IP camera to your router via standard RJ45 network cable, and plug it into the mains supply. Your computer should already be connected to the router. 2 Insert the software disk into your computer; the setup wizard should load automatically. If it does not auto run, you will need to view the contents of your DVD (“My Computer” DVD-ROM) and run “Setup.exe” to begin installation. You will be asked to choose your language. Click “OK” to continue. 3 You will be presented with the IP Camera Manager setup wizard. The wizard will guide you through the Storage Options IP Camera software installation process. Click “Next” to continue. Before you can install the software and use your new IP camera, you must accept the licence agreement.
-
Upload
no-company -
Category
Education
-
view
139 -
download
0
Transcript of Storage options-ip-camera-manual

IP Camera Installation Guide
www.storageoptions.com
INITIAL INSTALLATION This IP Camera and its software are designed for Windows XP / Vista / 7. Please follow these instructions to install and use your new device.
1 Connect the IP camera to your router via standard RJ45 network cable, and plug it into the mains supply. Your computer should already be connected to the router.
2 Insert the software disk into your computer; the setup wizard should load automatically. If it does not auto run, you will need to view the contents of your DVD (“My Computer” DVD-ROM) and run “Setup.exe” to begin installation. You will be asked to choose your language. Click “OK” to continue.
3 You will be presented with the IP Camera Manager setup wizard. The wizard will guide you through the Storage Options IP Camera software installation process. Click “Next” to continue. Before you can install the software and use your new IP camera, you must accept the licence agreement.
IP Camera Installation Guide
www.storageoptions.com
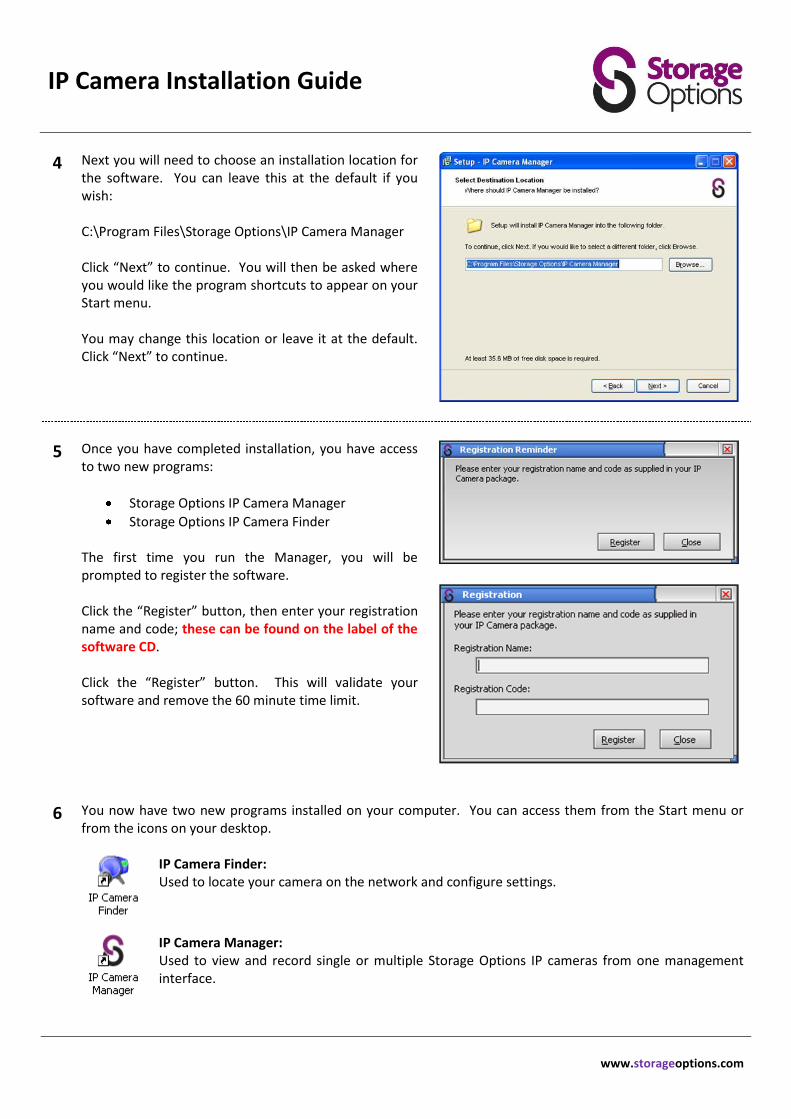
4 Next you will need to choose an installation location for the software. You can leave this at the default if you wish: C:\Program Files\Storage Options\IP Camera Manager Click “Next” to continue. You will then be asked where you would like the program shortcuts to appear on your Start menu. You may change this location or leave it at the default. Click “Next” to continue.
5 Once you have completed installation, you have access to two new programs:
Storage Options IP Camera Manager
Storage Options IP Camera Finder The first time you run the Manager, you will be prompted to register the software. Click the “Register” button, then enter your registration name and code; these can be found on the label of the software CD. Click the “Register” button. This will validate your software and remove the 60 minute time limit.
6 You now have two new programs installed on your computer. You can access them from the Start menu or from the icons on your desktop.
IP Camera Finder: Used to locate your camera on the network and configure settings.
IP Camera Manager: Used to view and record single or multiple Storage Options IP cameras from one management interface.
IP Camera Installation Guide
www.storageoptions.com
IP CAMERA FINDER
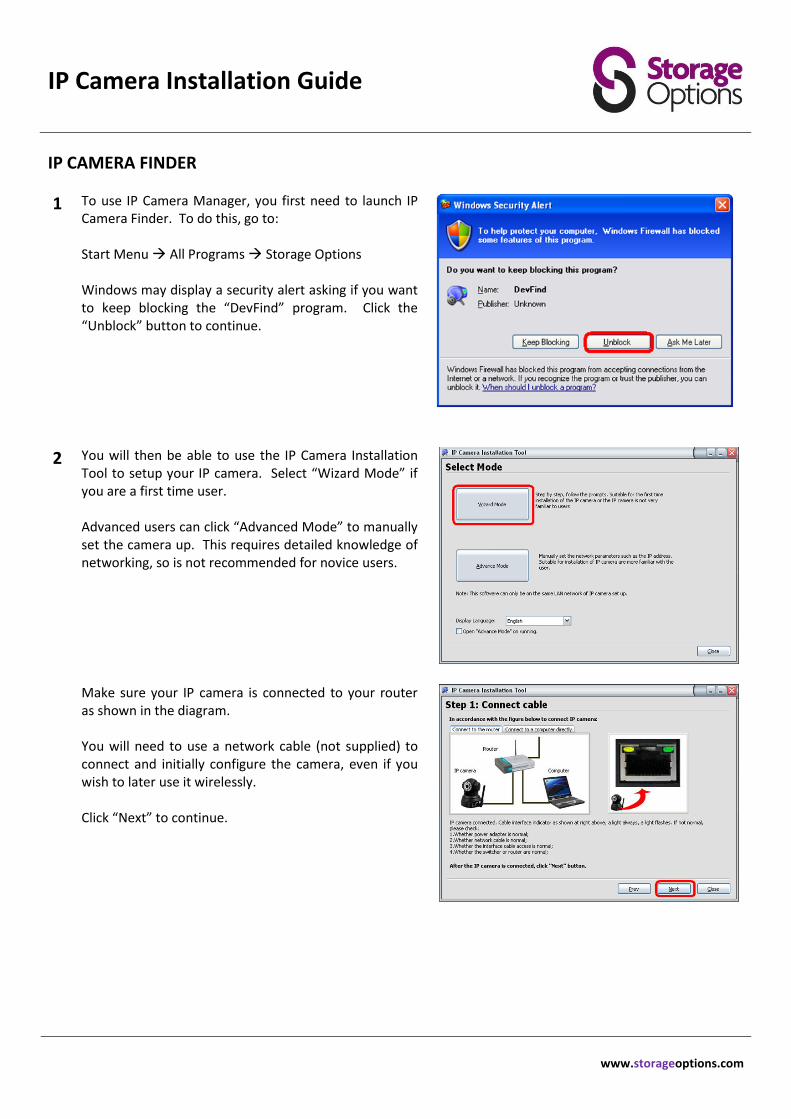
1 To use IP Camera Manager, you first need to launch IP Camera Finder. To do this, go to: Start Menu All Programs Storage Options Windows may display a security alert asking if you want to keep blocking the “DevFind” program. Click the “Unblock” button to continue.
2 You will then be able to use the IP Camera Installation Tool to setup your IP camera. Select “Wizard Mode” if you are a first time user. Advanced users can click “Advanced Mode” to manually set the camera up. This requires detailed knowledge of networking, so is not recommended for novice users.
Make sure your IP camera is connected to your router as shown in the diagram. You will need to use a network cable (not supplied) to connect and initially configure the camera, even if you wish to later use it wirelessly. Click “Next” to continue.
IP Camera Installation Guide
www.storageoptions.com
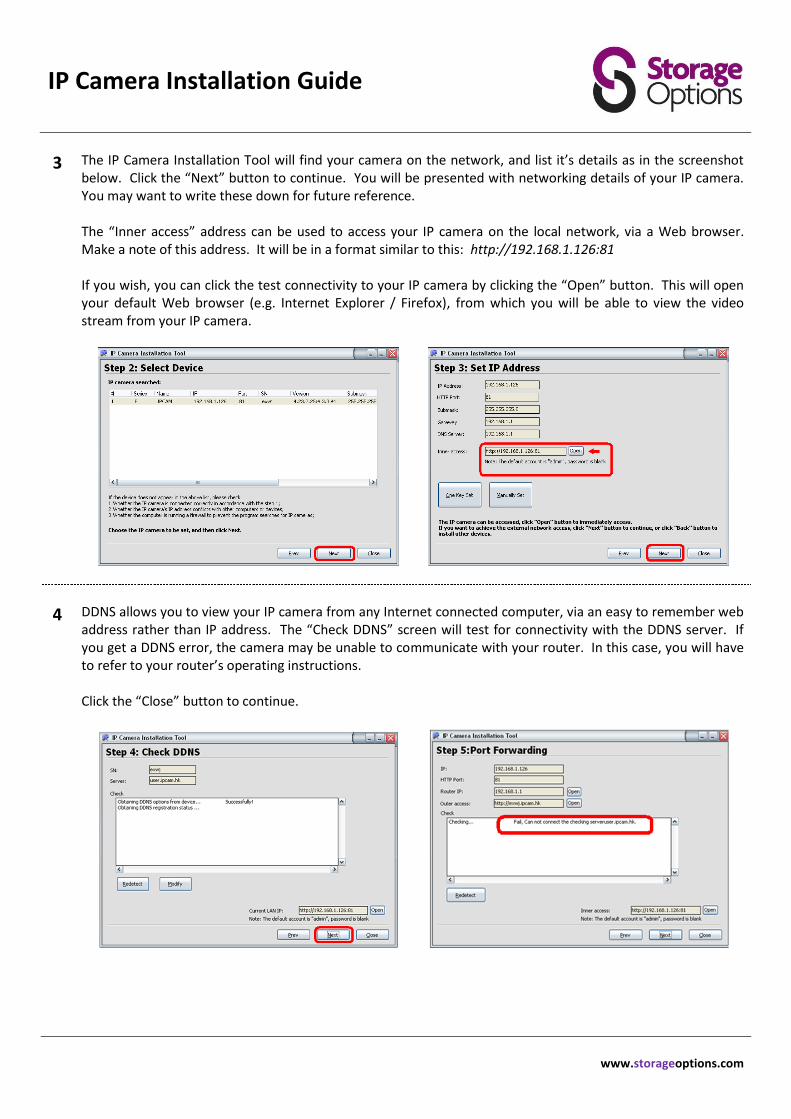
3 The IP Camera Installation Tool will find your camera on the network, and list it’s details as in the screenshot below. Click the “Next” button to continue. You will be presented with networking details of your IP camera. You may want to write these down for future reference. The “Inner access” address can be used to access your IP camera on the local network, via a Web browser. Make a note of this address. It will be in a format similar to this: http://192.168.1.126:81 If you wish, you can click the test connectivity to your IP camera by clicking the “Open” button. This will open your default Web browser (e.g. Internet Explorer / Firefox), from which you will be able to view the video stream from your IP camera.
4 DDNS allows you to view your IP camera from any Internet connected computer, via an easy to remember web address rather than IP address. The “Check DDNS” screen will test for connectivity with the DDNS server. If you get a DDNS error, the camera may be unable to communicate with your router. In this case, you will have to refer to your router’s operating instructions. Click the “Close” button to continue.

IP Camera Installation Guide
www.storageoptions.com
IP CAMERA MANAGER
1 Open the Storage Options IP Camera Manager program, by default located at: Start Menu All Programs Storage Options You will be presented with four blank camera windows and various options. Click the “Search & Add Equipment” button to add your IP camera to the management interface.
2 A new window will open. It will list all available Storage Options IP cameras on the network. Your camera should appear on this list. If not, click the “Refresh” button. Click the checkbox next to your camera to select it, then click the “OK” button to continue.
3 Your camera’s IP address will now appear in the list to the right of the screen. You can either double-click this to view the camera in an available window, or click the “Start All” button. The display options controls just below the camera selection box allow you to change how many cameras are displayed at once and in various configurations. For more advanced options, right-click the camera in the camera selection box, then click “Equipment Options” from the drop-down menu.
IP Camera Installation Guide
www.storageoptions.com
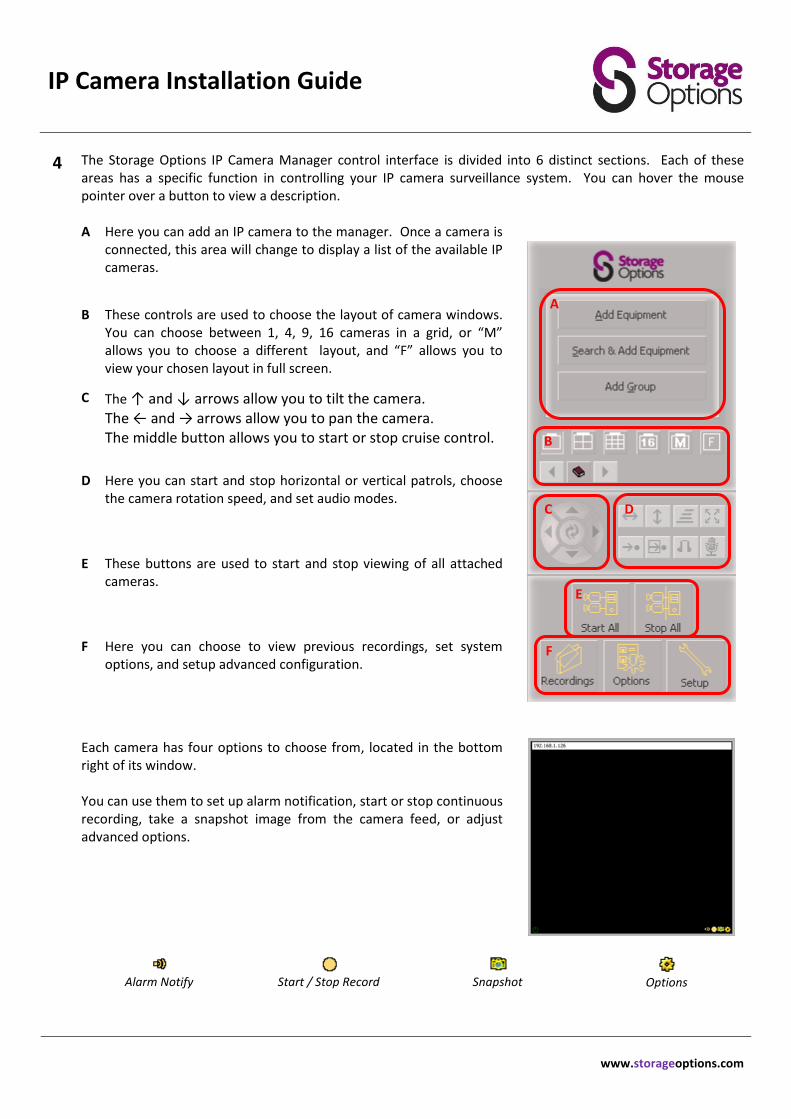
4 The Storage Options IP Camera Manager control interface is divided into 6 distinct sections. Each of these areas has a specific function in controlling your IP camera surveillance system. You can hover the mouse pointer over a button to view a description.
A Here you can add an IP camera to the manager. Once a camera is
connected, this area will change to display a list of the available IP cameras.
B These controls are used to choose the layout of camera windows. You can choose between 1, 4, 9, 16 cameras in a grid, or “M” allows you to choose a different layout, and “F” allows you to view your chosen layout in full screen.
C The ↑ and ↓ arrows allow you to tilt the camera. The ← and → arrows allow you to pan the camera. The middle button allows you to start or stop cruise control.
D Here you can start and stop horizontal or vertical patrols, choose the camera rotation speed, and set audio modes.
E These buttons are used to start and stop viewing of all attached cameras.
F Here you can choose to view previous recordings, set system options, and setup advanced configuration.
Each camera has four options to choose from, located in the bottom
right of its window. You can use them to set up alarm notification, start or stop continuous recording, take a snapshot image from the camera feed, or adjust advanced options.
Alarm Notify
Start / Stop Record
Snapshot
Options
A
B
C D
E
F
IP Camera Installation Guide
www.storageoptions.com
VIEWING FROM A WEB BROWSER
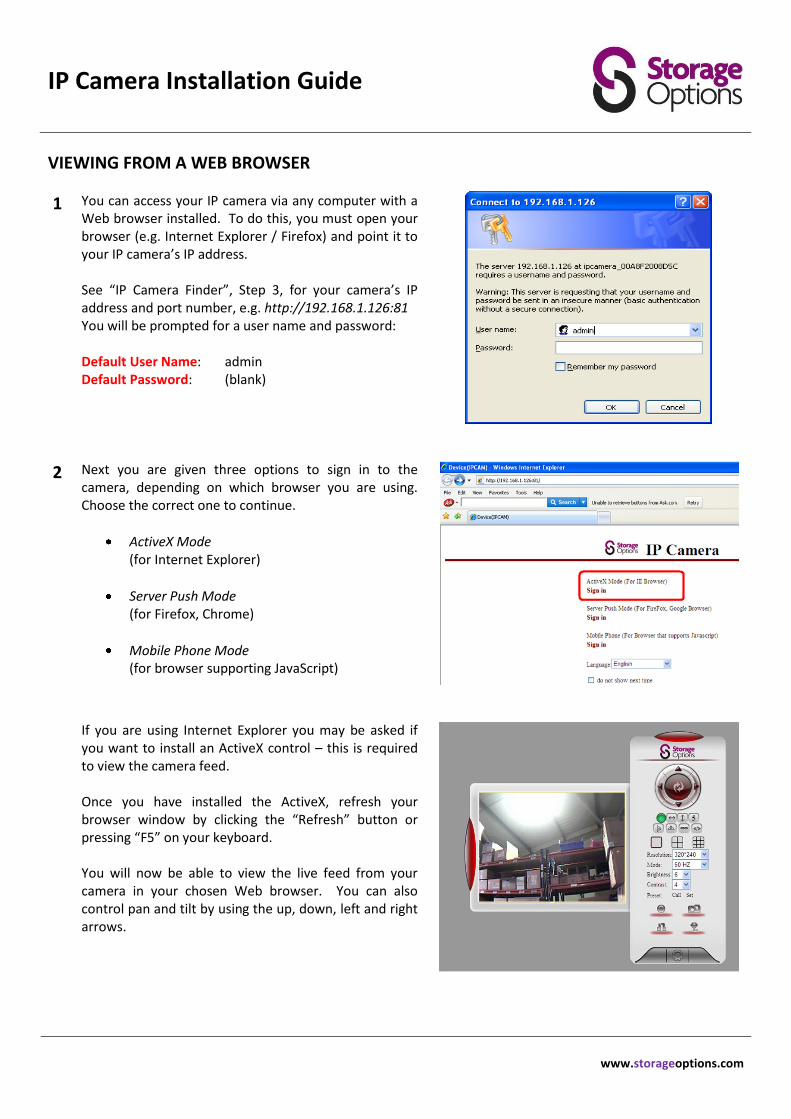
1 You can access your IP camera via any computer with a Web browser installed. To do this, you must open your browser (e.g. Internet Explorer / Firefox) and point it to your IP camera’s IP address. See “IP Camera Finder”, Step 3, for your camera’s IP address and port number, e.g. http://192.168.1.126:81 You will be prompted for a user name and password:
Default User Name: Default Password:
admin (blank)
2 Next you are given three options to sign in to the camera, depending on which browser you are using. Choose the correct one to continue.
ActiveX Mode (for Internet Explorer)
Server Push Mode (for Firefox, Chrome)
Mobile Phone Mode (for browser supporting JavaScript)
If you are using Internet Explorer you may be asked if you want to install an ActiveX control – this is required to view the camera feed. Once you have installed the ActiveX, refresh your browser window by clicking the “Refresh” button or pressing “F5” on your keyboard. You will now be able to view the live feed from your camera in your chosen Web browser. You can also control pan and tilt by using the up, down, left and right arrows.

IP Camera Installation Guide
www.storageoptions.com
WIRELESS CONFIGURATION
1 To set up wireless connectivity between your router and IP camera, you first need to know your wireless network SSID, encryption type and access key. Please refer to your router’s operating instructions for how to find these details. From the IP camera’s Web interface (see the “Viewing From A Web Browser” section), click the “Settings” icon. This will open the configuration pages for your IP camera. Wireless configuration can only be done from here.
2 Select “Wireless LAN Settings” from the main menu on the left of the screen.
Enter your wireless network SSID in the appropriate box.
Make sure network type is set to “Infrastructure”.
Set the encryption type to match your router’s setting.
Enter your network access key in the “Share Key” box.
Once these settings match those of your router, you can disconnect the network cable between the router and
IP camera, and continue to use it wirelessly.
1 YEAR
WARRANTY
Support: United Kingdom
Hotline: 0844 248 7191
E-mail: [email protected]