Wireless IP Camera Operation Guide-L Seriesipcdownload.net/IP-Camera-User-Guide.pdfWireless IP...
13
Wireless IP Camera Operation Guide-L Series L Series- Operation Guide 【Plug & Play Wireless IP Camera】 Feb, 2014, V3.0.1
Transcript of Wireless IP Camera Operation Guide-L Seriesipcdownload.net/IP-Camera-User-Guide.pdfWireless IP...
Wireless IP Camera Operation Guide-L Series
L Series-
Operation Guide
【Plug & Play Wireless IP Camera】
Feb, 2014, V3.0.1
Wireless IP Camera Operation Guide-L Series
2
Statement If the user manual can not help you to solve the problem, please contact your local distributors or our technology center for the solutions. We will update the content for the new functions without notice.
Notice 1. Installation Environment
* Keep away from the places of high-temperature, heat source and direct sunlight. * Keep away from water and when get wet, cut off the power immediately. * Avoid using in damp environment; the reference range for operation humidity is below 85%RH.
* Avoid using in overheating and too cold environment, the reference range for operation temperature is -10 ~ +50 ℃ ℃
* Please install it horizontally or wall mounting, avoid to strenuous vibration place and do not put other equipments onto the item
2. Transport and Handling
* The package is well-designed to ensure the security during the delivery, so please do not change the package at random.
* Do not move the IP cameras from overheated to super cooled condition frequently; otherwise it will frost and shorten the service life.
* Do not move the item when it is power on; otherwise the main board might be damaged.
Notice:
1. Please check the power supply before it is working. 2. Be careful not to bang the camera or subject it to strong impacts or shocks. 3. Do not directly touch the optical components like the image sensor, if necessary, please place a clean and moistened cloth with alcohol and wipe the dirt gently; When not in use, please place the dust cover on to the item to protect the image sensor. 4. Do not aim the camera directly into the sun or at other intense light sources that could affect the image quality (it is not the problem for the IP camera), also shorten the service life for the image sensor. 5. Keep away from laser when it is working, otherwise the image sensor could be damaged. 6. If the equipment is not working properly, please contact the store or the service center, do not disassemble or modify the equipment in any way. (Problems caused by unauthorized modification or repair should be out of warranty.)
Wireless IP Camera Operation Guide-L Series
3
Contents
1. Introduction………………………………………………………………………………………4
1.1 Function Overview……..………………………………………………………………………4
1.2 Package Contents………..……………………………………………………………………4
2. Install the IP Camera……………………………….……………………………………………4
2.1 PC Hardware Requirements…………………………………………………………………4
2.2 Install the IPC………………………………………….………………………………………4
3. Access the IP Camera by iOS/Android…...….………………………………….….…….……5
3.1 iOS…………………………………..…………………………………………...……………5
3.2 Android………………………………….……………………………………………………5
4. Access the IP Camera by PC Client……………….……………………………………………6
4.1 LAN Access…………………………...…………………………………………………………6
4.2 Change Password……………………….……………………………………………………8
4.3 Internet Access……………………………………………………………………………8
5. Other Settings……………………………………………………………………………………10
5.1 WiFi Setting……………………………………………………………………………………10
5.2 Mail & Alarm Setting…………………………………………………………………………11
5.3 Record & Capture Path……………….……………………………………………………....12
5.4 Record Schedule……………………………………………………………………………12
5.5 Reset to Factory Setting.……………………………………………………………………13
6. FAQ………………………...………………...…………………………………………………….13
7. Tech Support......................................................................................................................13

Wireless IP Camera Operation Guide-L Series
4
1. Introduction 1.1. Function Overview This IP Camera adopts Plug & Play technology. Once connected to Internet, user can view crystal live video by the professional software supplied with the camera on Smart phone and PC easily. 1.2. Package Contents
IP Camera Net Cable (optional) Operation Guide Bracket Power adaptor Warranty Card Screws
2. Install the IP Camera
2.1 PC Hardware Requirements: Pentium III 1GHz or above RAM 256M or above Windows XP and later,Internet explorer 6.0 and later (8.0 or later recommended)
2.2 Install the IP Camera The following serves as a typical installation for home use.
Wireless IP Camera Operation Guide-L Series
5
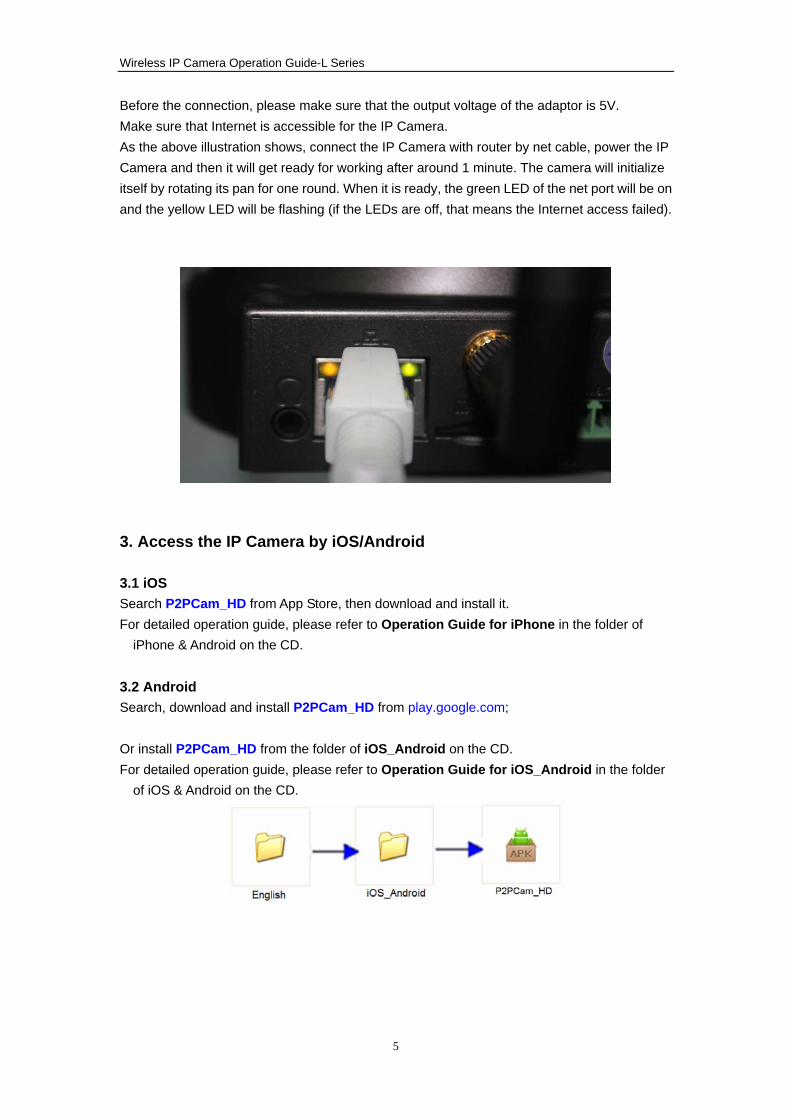
Before the connection, please make sure that the output voltage of the adaptor is 5V. Make sure that Internet is accessible for the IP Camera. As the above illustration shows, connect the IP Camera with router by net cable, power the IP Camera and then it will get ready for working after around 1 minute. The camera will initialize itself by rotating its pan for one round. When it is ready, the green LED of the net port will be on and the yellow LED will be flashing (if the LEDs are off, that means the Internet access failed).
3. Access the IP Camera by iOS/Android 3.1 iOS Search P2PCam_HD from App Store, then download and install it. For detailed operation guide, please refer to Operation Guide for iPhone in the folder of
iPhone & Android on the CD. 3.2 Android Search, download and install P2PCam_HD from play.google.com; Or install P2PCam_HD from the folder of iOS_Android on the CD. For detailed operation guide, please refer to Operation Guide for iOS_Android in the folder
of iOS & Android on the CD.
Wireless IP Camera Operation Guide-L Series
6
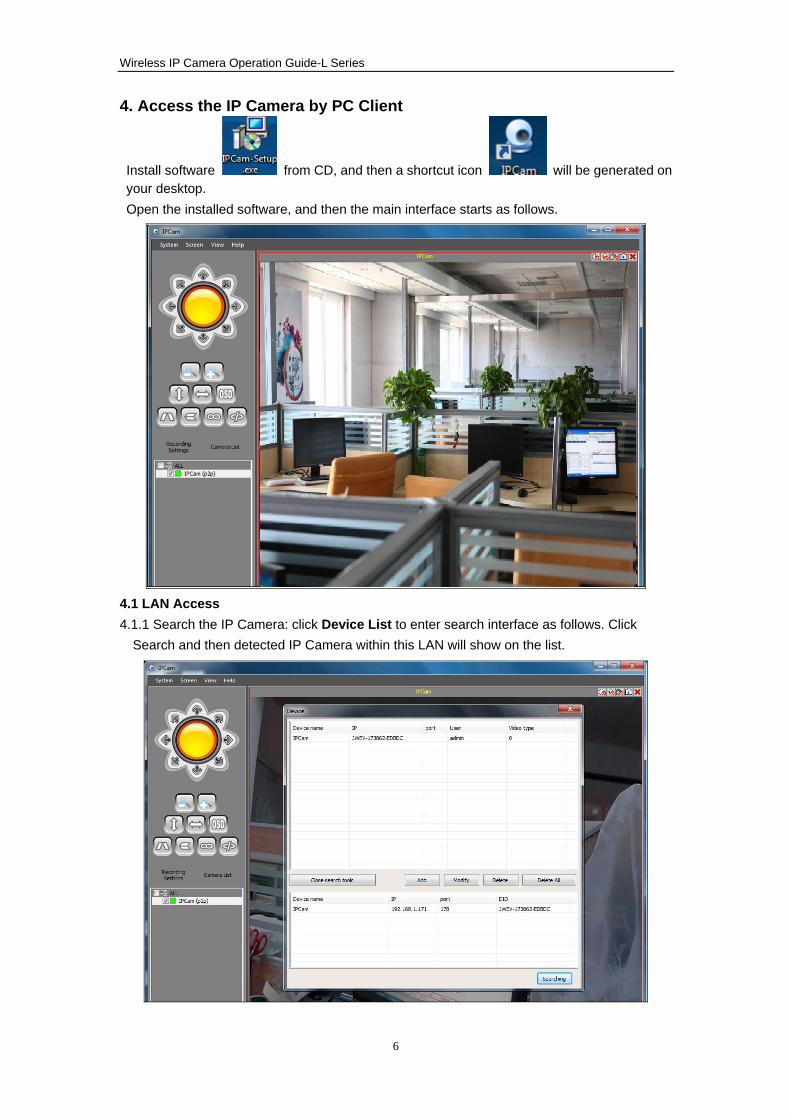
4. Access the IP Camera by PC Client
Install software from CD, and then a shortcut icon will be generated on your desktop.
Open the installed software, and then the main interface starts as follows.
4.1 LAN Access 4.1.1 Search the IP Camera: click Device List to enter search interface as follows. Click
Search and then detected IP Camera within this LAN will show on the list.
Wireless IP Camera Operation Guide-L Series
7
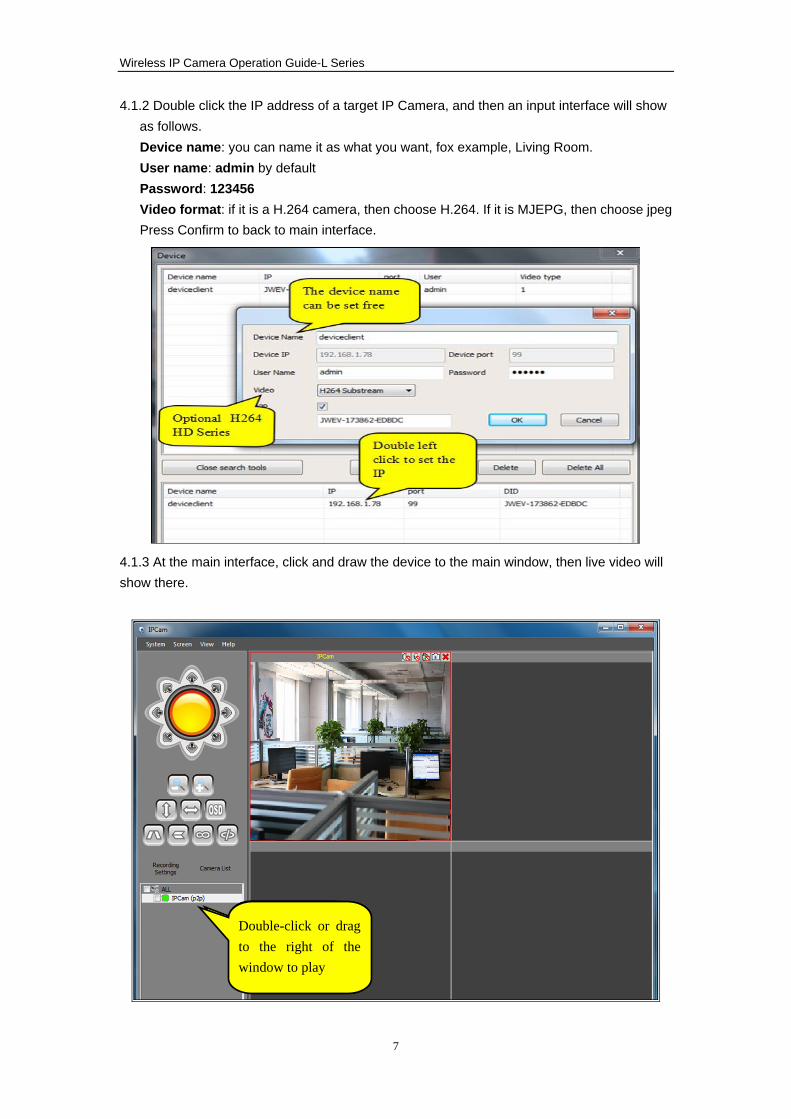
4.1.2 Double click the IP address of a target IP Camera, and then an input interface will show as follows. Device name: you can name it as what you want, fox example, Living Room. User name: admin by default Password: 123456 Video format: if it is a H.264 camera, then choose H.264. If it is MJEPG, then choose jpeg Press Confirm to back to main interface.
4.1.3 At the main interface, click and draw the device to the main window, then live video will show there.
Double-click or drag to the right of the window to play
Wireless IP Camera Operation Guide-L Series
8
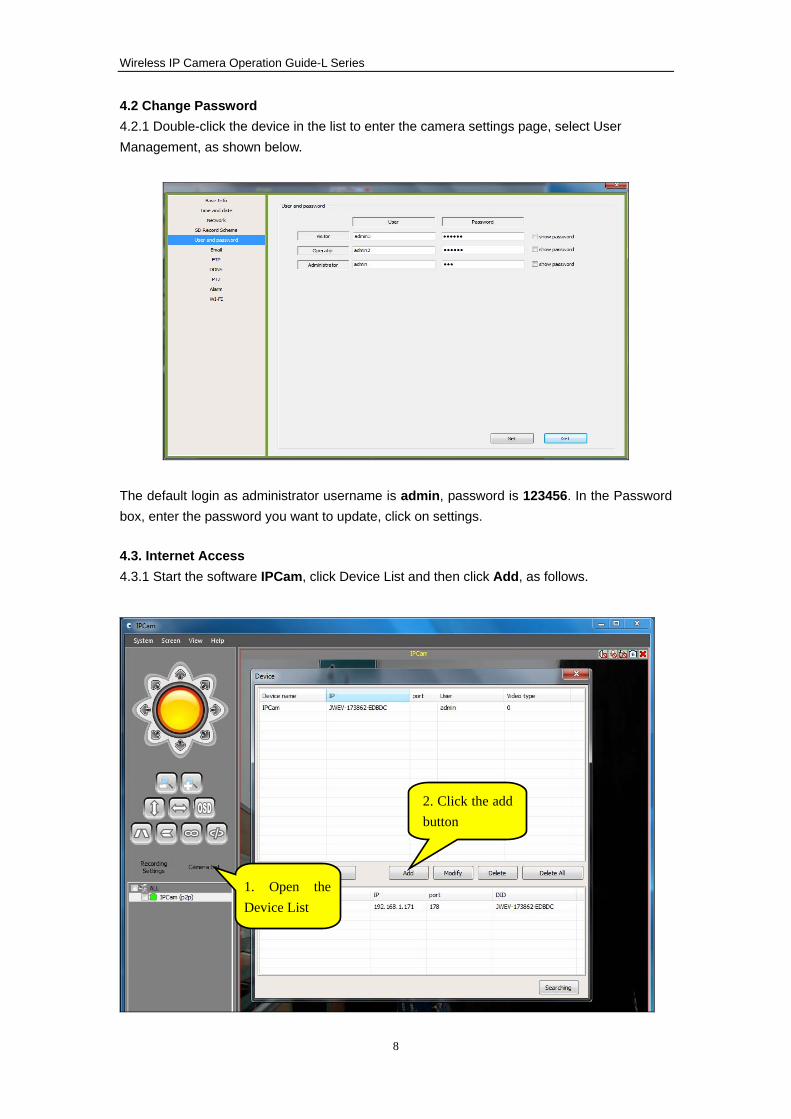
4.2 Change Password 4.2.1 Double-click the device in the list to enter the camera settings page, select User Management, as shown below.
The default login as administrator username is admin, password is 123456. In the Password box, enter the password you want to update, click on settings.
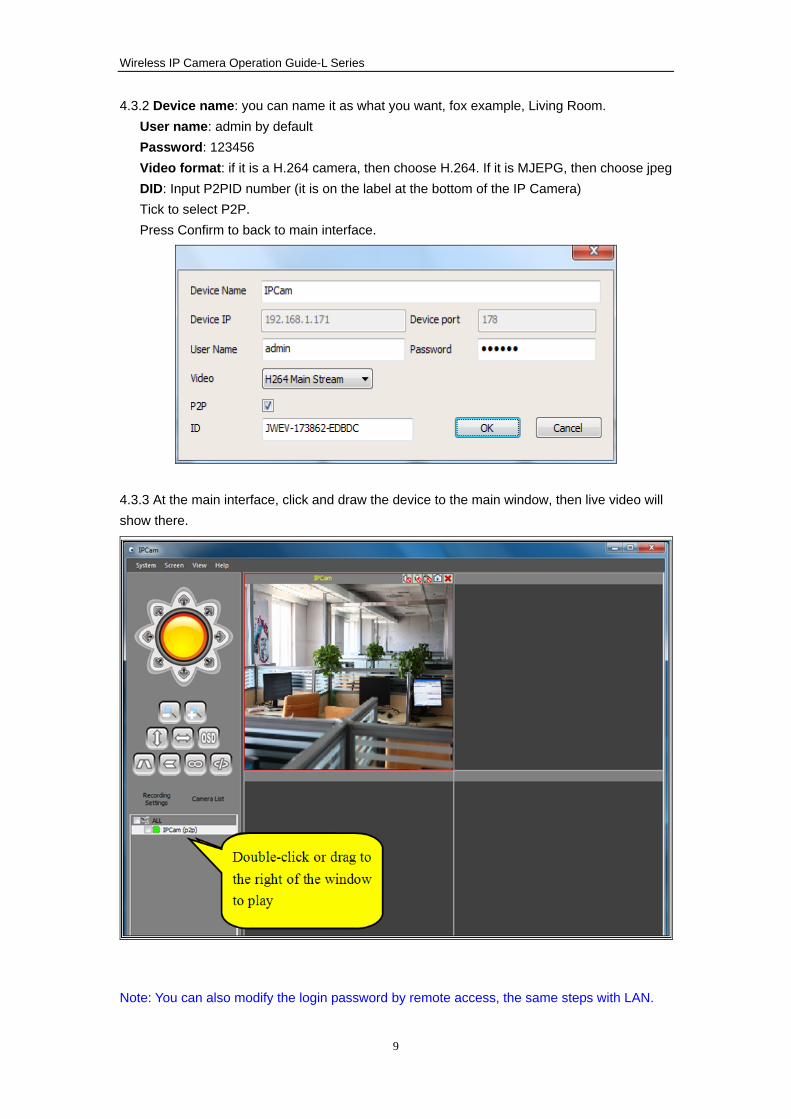
4.3. Internet Access 4.3.1 Start the software IPCam, click Device List and then click Add, as follows.
1. Open the Device List
2. Click the add button
Wireless IP Camera Operation Guide-L Series
9
4.3.2 Device name: you can name it as what you want, fox example, Living Room. User name: admin by default Password: 123456 Video format: if it is a H.264 camera, then choose H.264. If it is MJEPG, then choose jpeg DID: Input P2PID number (it is on the label at the bottom of the IP Camera) Tick to select P2P. Press Confirm to back to main interface.
4.3.3 At the main interface, click and draw the device to the main window, then live video will show there.
Note: You can also modify the login password by remote access, the same steps with LAN.
Wireless IP Camera Operation Guide-L Series
10
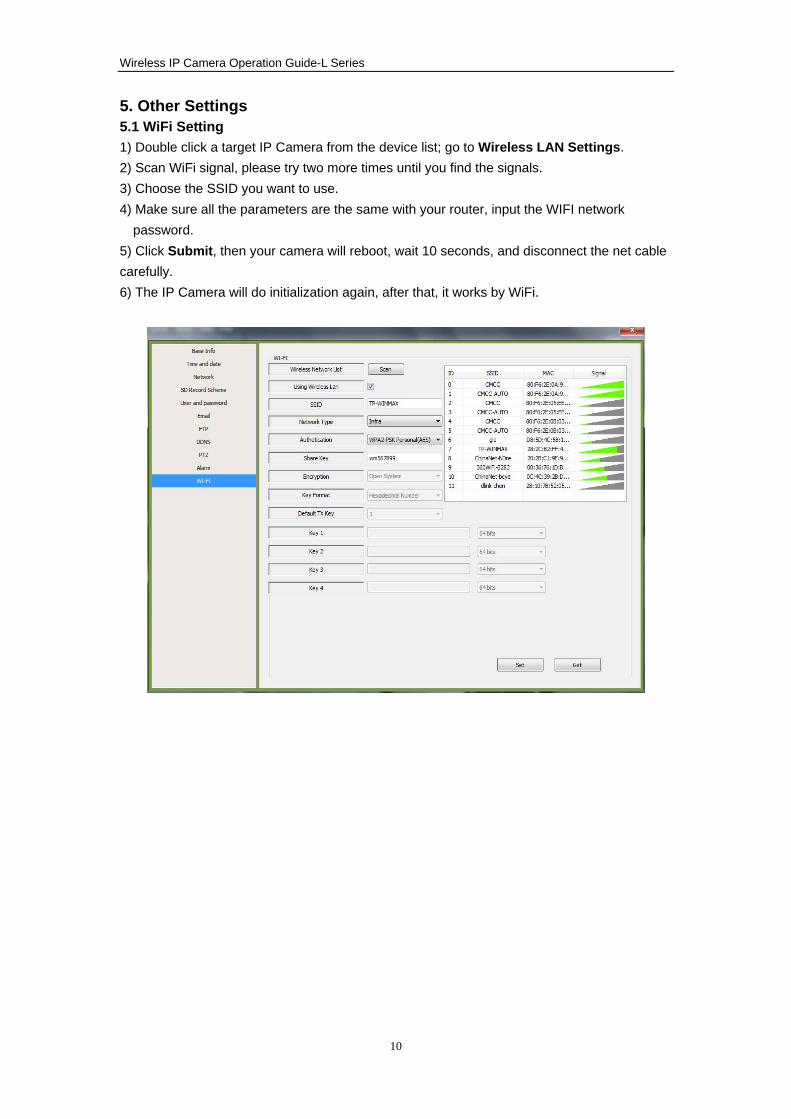
5. Other Settings 5.1 WiFi Setting 1) Double click a target IP Camera from the device list; go to Wireless LAN Settings. 2) Scan WiFi signal, please try two more times until you find the signals. 3) Choose the SSID you want to use. 4) Make sure all the parameters are the same with your router, input the WIFI network
password. 5) Click Submit, then your camera will reboot, wait 10 seconds, and disconnect the net cable carefully. 6) The IP Camera will do initialization again, after that, it works by WiFi.
Wireless IP Camera Operation Guide-L Series
11
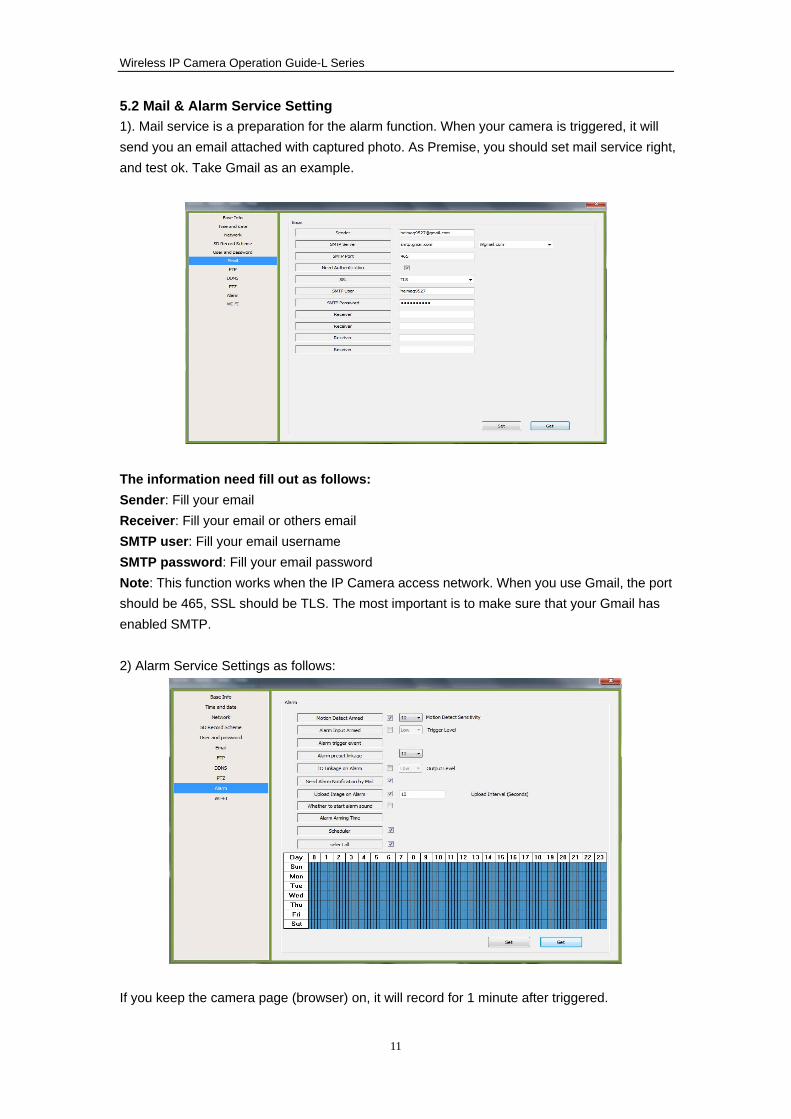
5.2 Mail & Alarm Service Setting 1). Mail service is a preparation for the alarm function. When your camera is triggered, it will send you an email attached with captured photo. As Premise, you should set mail service right, and test ok. Take Gmail as an example.
The information need fill out as follows: Sender: Fill your email Receiver: Fill your email or others email SMTP user: Fill your email username SMTP password: Fill your email password Note: This function works when the IP Camera access network. When you use Gmail, the port should be 465, SSL should be TLS. The most important is to make sure that your Gmail has enabled SMTP. 2) Alarm Service Settings as follows:
If you keep the camera page (browser) on, it will record for 1 minute after triggered.
Wireless IP Camera Operation Guide-L Series
12
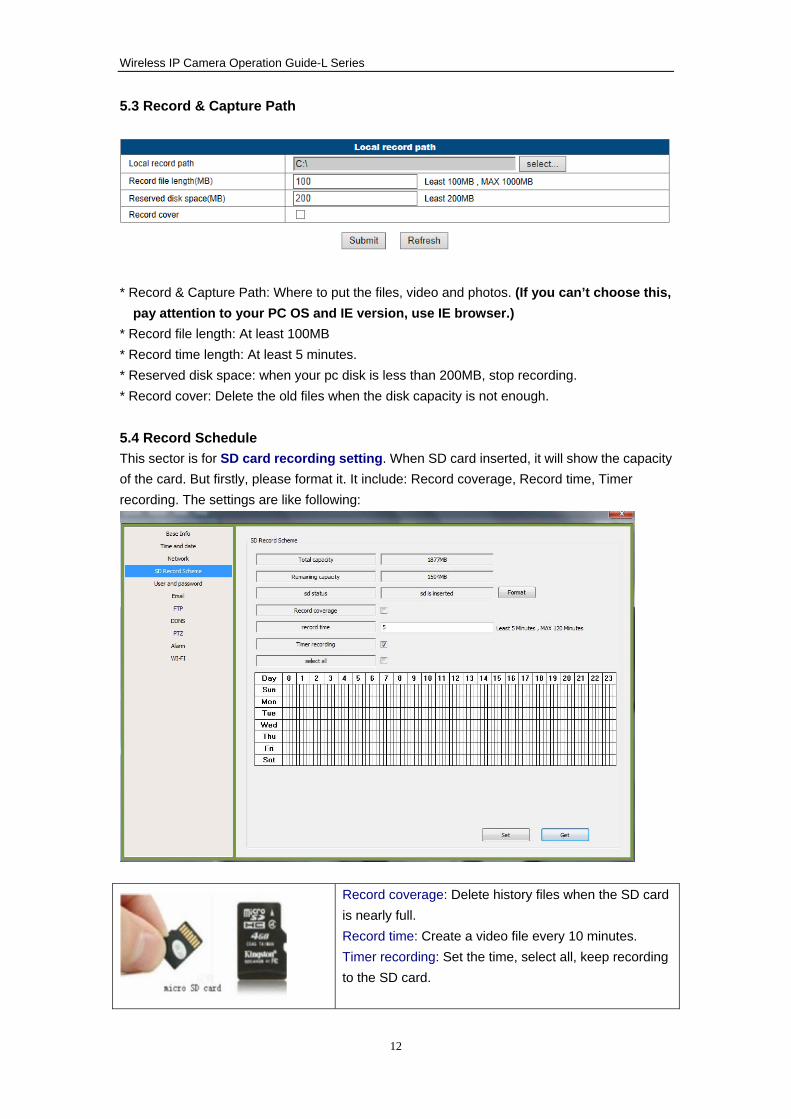
5.3 Record & Capture Path
* Record & Capture Path: Where to put the files, video and photos. (If you can’t choose this,
pay attention to your PC OS and IE version, use IE browser.) * Record file length: At least 100MB * Record time length: At least 5 minutes. * Reserved disk space: when your pc disk is less than 200MB, stop recording. * Record cover: Delete the old files when the disk capacity is not enough. 5.4 Record Schedule This sector is for SD card recording setting. When SD card inserted, it will show the capacity of the card. But firstly, please format it. It include: Record coverage, Record time, Timer recording. The settings are like following:
Record coverage: Delete history files when the SD card is nearly full. Record time: Create a video file every 10 minutes. Timer recording: Set the time, select all, keep recording to the SD card.
Wireless IP Camera Operation Guide-L Series
13
5.5 Restore Factory Default Setup Press the reset button under or on the camera for about 1 minute until the camera reboots. Please make sure the power supply is connected to the camera when you do this. 6. FAQ 1. Why does my computer or security software say the software is dangerous and it is a virus? The wizard will detect device in your network, and it seems like a virus. Please ignore the warning and continue. 2. Why can’t the wizard detect the camera? Please make sure the network cable is connected and turn off firewall and security software on your computer. 3. Why does the camera always ask for username and password or it says Incorrect User? The camera’s default username is admin, password is 123456. If you forget your username or password, you can reset the camera to factory settings to get the default username and password. 4. Why is the image blurry? Remove the protective film on the lens and rotate the lens of the camera to get a clear image. 5. Why doesn’t the camera pan/tilt properly? Maybe the camera is stuck. Please rotate its head manually to fix it. 6. Why does the camera always drop wireless connection? Please tighten the antenna of the camera. Make sure it is not far away from the router and there is no big barrier between the camera and the router. 7. Tech Support For technical issue, please contact the distributor from which you bought the product.