Stencyl Essentials - Sample Chapter
15
Community Experience Distilled Build beautiful, unique, cross-platform games rapidly with the free Stencyl 2D game engine and toolset Stencyl Essentials Richard Sneyd
-
Upload
packt-publishing -
Category
Documents
-
view
36 -
download
2
description
Chapter No. 3 Backgrounds and TilesetsBuild beautiful, unique, cross-platform games rapidly with the free Stencyl 2D game engine and toolset For more information: http://bit.ly/1JJmxWV
Transcript of Stencyl Essentials - Sample Chapter
C o m m u n i t y E x p e r i e n c e D i s t i l l e d
Build beautiful, unique, cross-platform games rapidly with the free Stencyl 2D game engine and toolset
Stencyl EssentialsRichard Sneyd
Stencyl Essentials
With the incredible growth in the global games industry over the past few years, Stencyl makes it possible for anyone to learn how to create amazing, engaging, and polished 2D games in just a fraction of the time.
Whether you are new to game development or an experienced developer looking for a quicker, more intuitive way to prototype, develop, and publish your game ideas, this book will show you how to achieve your game development goals using Stencyl. By following a clear, step-by-step development cycle for our fi rst game prototype, you will rapidly gain a working knowledge of the Stencyl game engine and toolkit. With ample screenshots, you can be certain that you’ll be able to follow along at every stage.
Who this book is written forIf you are a computer game enthusiast who has always wanted to know what it takes to build a playable game, or maybe you would like to expand your programming knowledge so that you can develop great computer games using a solid game engine and toolkit, then this book is for you.
$ 29.99 US£ 19.99 UK
Prices do not include local sales tax or VAT where applicable
Richard SneydVisit www.PacktPub.com for books, eBooks,
code, downloads, and PacktLib.
What you will learn from this book
Discover the key benefi ts of Stencyl, its technical structure, and what makes it so special
Understand and work effectively with the Stencyl interface
Set up scenes and alter their settings at will
Import and utilize graphics
Integrate sound FX and music in your games
Create and confi gure actor types and instances
Implement tilesets and backgrounds by importing them in to your game
Write custom behaviors to control your actors
Stencyl Essentials"CommunityExperienceDistilled"
In this package, you will find: The author biography
A preview chapter from the book, Chapter 3 'Backgrounds and Tilesets'
A synopsis of the book’s content
More information on Stencyl Essentials
About the Author Richard Sneyd (BA Hons.) is the founder and CEO of CyberMyth Games, an indie
game development studio based in Country Cork, Ireland. His role within the company
requires that he wears many hats, including that of a programmer, designer, digital
2D and 3D artist, sound designer, scriptwriter, texture artist, leader, marketer, and
business man.
He is also a fully registered, qualified, and highly experienced lecturer. His specialty
subjects include 3D modeling and animation, computer game programming, 2D image
processing, game design, desktop audio, psychology, consumer behavior, human
resources, and business management. In addition to classroom teaching, he is actively
involved in online education, regularly publishing new courses, and various other
learning materials, such as books and tutorials, in conjunction with CyberMyth Games.
He is enthusiastic about his work, and his students and colleagues think of him as a
very dedicated and accomplished teacher. All of his courses and books are characterized
by a steady, incremental flow of information, and a lucid teaching style that is easy to
understand and follow for all.
He is a husband to his wonderful wife, Jennifer, and father to a wonderful son, Darius.
Stencyl Essentials The world of game development has been in a state of flux for the past few years. New
technology, as well as new development tools and frameworks, has diversified the games
industry and opened up the field to those who may not otherwise have been in a position
to realize and publish their game concepts.
Stencyl is one such innovation. Developed from the ground up by founder Jonathan
Chung, to be as accessible as possible to as many people as possible, yet it still retains the
awesome power necessary for professional-level developers. Stencyl makes it possible
for anyone with a great idea and the right motivation to develop their own games, from
concept to market.
Stencyl Essentials has been written to get you up and running with Stencyl faster than
with any other book, as it has been written in terse, yet lucid prose with a no-nonsense
style, enabling you to get to grips with Stencyl in a fun, yet fast-paced way. This book is
centered around a project, which has been designed to reinforce all of the key learning
objectives. You will be guided through the process of building a game prototype, which
is based on a successful, published game called Mudslide Cowboy (CyberMyth Games).
By the end of this book, you will be competent in the use of all of Stencyl's most
important features, and quite prepared to start working on your own game projects.
What This Book Covers Chapter 1, Exploring the Stencyl Toolset and Game Engine, introduces the
Stencyl toolset and interface, demonstrating how to navigate through all the most
important screens.
Chapter 2, Starting the Game Project, explains the game concept, which we will
be working on in the subsequent chapters, and guides you through the process of
creating your first game project.
Chapter 3, Backgrounds and Tilesets, explains how to import Backgrounds and
Tilesets and how to configure their settings, in preparation for use in our game levels.
Chapter 4, Building Levels Using Scenes, explains how you can learn to utilize
backgrounds, foregrounds, and tiles to sculpt a visually compelling and varied
game level.
Chapter 5, Actor Types and Instances, introduces you to the process of importing,
customizing, and configuring actors, which can then be made interactive through using
actor behaviors.
Chapter 6, Writing Simple Behaviors, teaches you the process of building the game logic
using the signature block-snapping interface of the Behavior Designer in Stencyl.

Chapter 7, Complex Behaviors and Code, digs deep into the incredible power of Stencyl's
visual programming system, showing you how to harness it at a more advanced level.
Chapter 8, Adding Sound Effects and Music, explains how Stencyl handles audio, and
then guides you through the process of importing sound fi les, configuring them, and
playing them in-game.
Chapter 9, Adding HUD Elements, shows how we can use actors in a special way to
create animated elements of our heads-up display.
Chapter 10, Adding Menus and Buttons, guides you through the process of creating a
Start screen and adding functional buttons to it.
Chapter 11, Scoring and Game Rules, helps you implement a game rule, based around
the collection of gold coins, that will aid us in measuring success or failure during
play sessions.
Chapter 12, Publishing and Monetization, gives us a clear overview of the principal
publishing and monetization available to game developers in Stencyl.
[ 25 ]
Backgrounds and TilesetsBackgrounds and tilesets are the two most important asset types in Stencyl when it comes to constructing the ludic (game) and aesthetic aspects of the spaces in our levels. Backgrounds can be used to great effect in providing a fi ctional context and can assist in creating a sense of depth through the use of effects, such as parallax scrolling, and so on. Tilesets can be used to create a vivid and varied, yet memory-effi cient, ludic space within our game levels. In this chapter, we will learn how to:
• Correctly import these two important resource types• Implement them within our games
The term ludic is an adjective that means pertaining to games or play. It is used in the games industry and is very widely used in academia (game studies). It would be advisable for you to take a moment to absorb its meaning, and assimilate it into your game development vocabulary.
Backgrounds and foregroundsWhile the asset type is referred to as a Background in Stencyl, they can be used as either backgrounds or foregrounds within our game levels, which means that we can place them either behind or in front of the active play area of our game. In particular, in the case of platform games, the use of both foregrounds and backgrounds with staggered parallax scrolling speeds can create a real sense of richness and depth in our game worlds.

Backgrounds and Tilesets
[ 26 ]
Adding our fi rst backgroundIf the empty game project, we created at the end of Chapter 2, Starting the Game Project, is not open on your computer, please reopen it now. On the Dashboard, on the left-hand pane with the list of available asset types, click on Backgrounds. You should see the following screenshot:
Click on it, and you will be presented with the following window:
Chapter 3
[ 27 ]
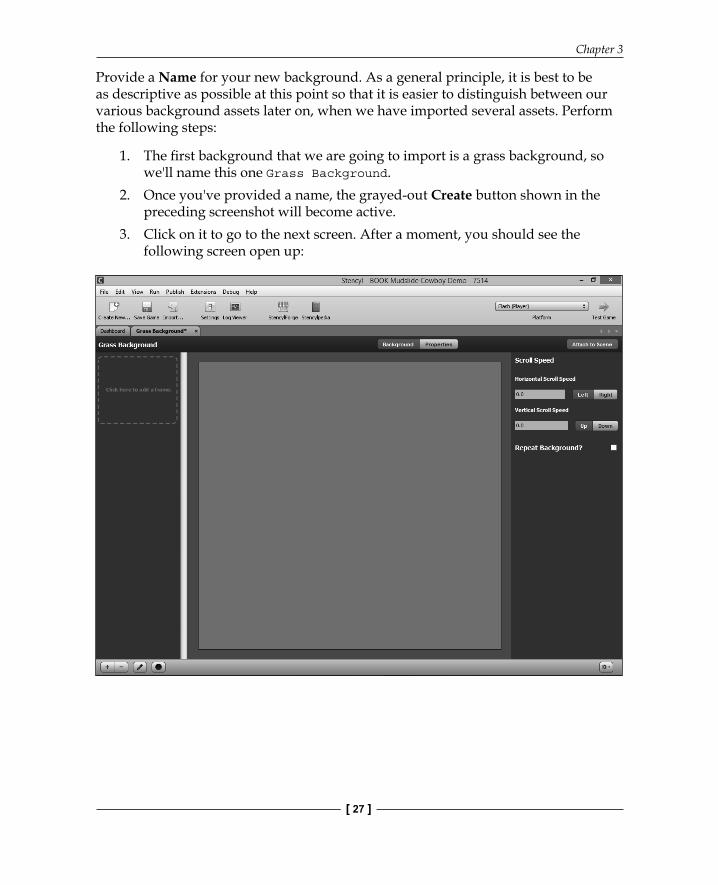
Provide a Name for your new background. As a general principle, it is best to be as descriptive as possible at this point so that it is easier to distinguish between our various background assets later on, when we have imported several assets. Perform the following steps:
1. The fi rst background that we are going to import is a grass background, so we'll name this one Grass Background.
2. Once you've provided a name, the grayed-out Create button shown in the preceding screenshot will become active.
3. Click on it to go to the next screen. After a moment, you should see the following screen open up:
Backgrounds and Tilesets
[ 28 ]
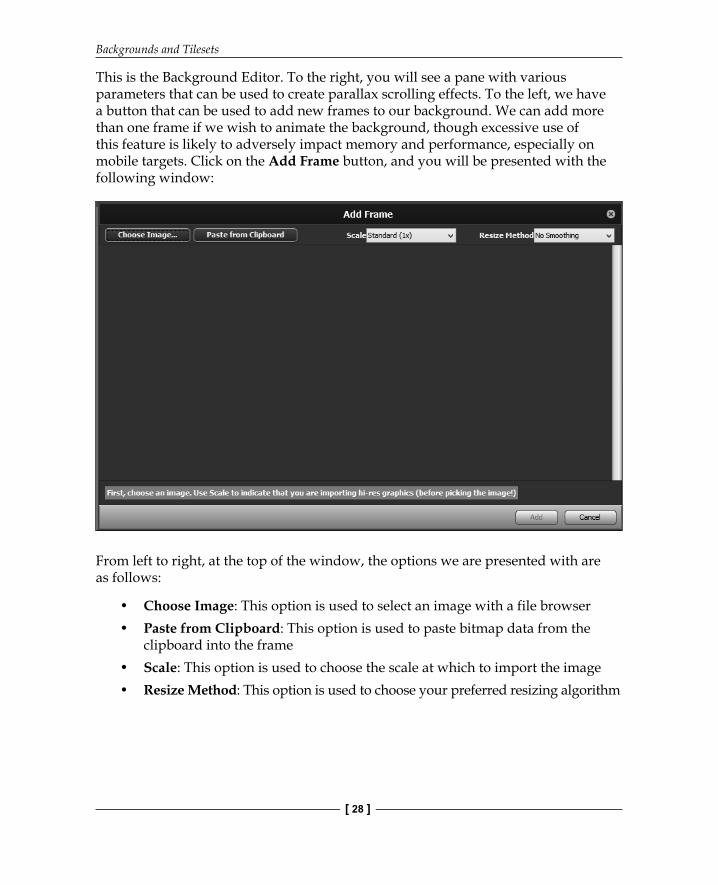
This is the Background Editor. To the right, you will see a pane with various parameters that can be used to create parallax scrolling effects. To the left, we have a button that can be used to add new frames to our background. We can add more than one frame if we wish to animate the background, though excessive use of this feature is likely to adversely impact memory and performance, especially on mobile targets. Click on the Add Frame button, and you will be presented with the following window:
From left to right, at the top of the window, the options we are presented with are as follows:
• Choose Image: This option is used to select an image with a file browser• Paste from Clipboard: This option is used to paste bitmap data from the
clipboard into the frame• Scale: This option is used to choose the scale at which to import the image• Resize Method: This option is used to choose your preferred resizing algorithm
Chapter 3
[ 29 ]
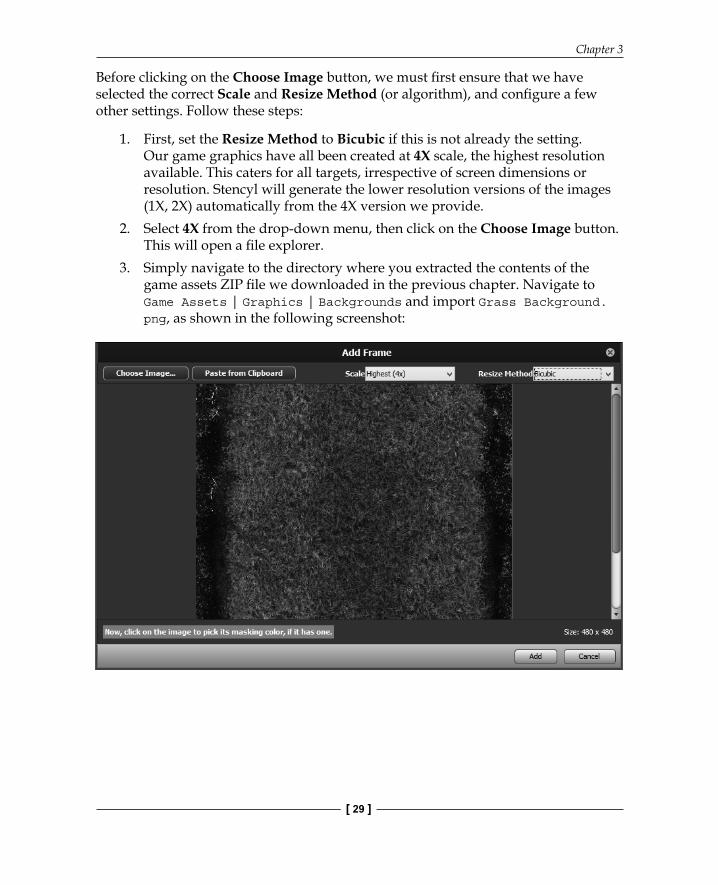
Before clicking on the Choose Image button, we must fi rst ensure that we have selected the correct Scale and Resize Method (or algorithm), and confi gure a few other settings. Follow these steps:
1. First, set the Resize Method to Bicubic if this is not already the setting. Our game graphics have all been created at 4X scale, the highest resolution available. This caters for all targets, irrespective of screen dimensions or resolution. Stencyl will generate the lower resolution versions of the images (1X, 2X) automatically from the 4X version we provide.
2. Select 4X from the drop-down menu, then click on the Choose Image button. This will open a fi le explorer.
3. Simply navigate to the directory where you extracted the contents of the game assets ZIP fi le we downloaded in the previous chapter. Navigate to Game Assets | Graphics | Backgrounds and import Grass Background.png, as shown in the following screenshot:
Backgrounds and Tilesets
[ 30 ]
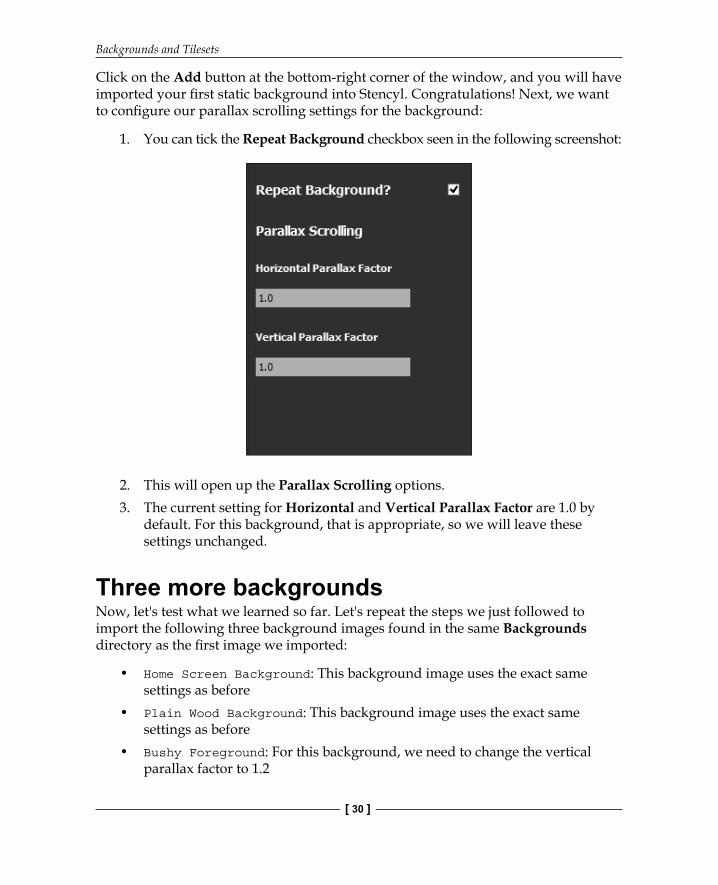
Click on the Add button at the bottom-right corner of the window, and you will have imported your fi rst static background into Stencyl. Congratulations! Next, we want to confi gure our parallax scrolling settings for the background:
1. You can tick the Repeat Background checkbox seen in the following screenshot:
2. This will open up the Parallax Scrolling options.3. The current setting for Horizontal and Vertical Parallax Factor are 1.0 by
default. For this background, that is appropriate, so we will leave these settings unchanged.
Three more backgroundsNow, let's test what we learned so far. Let's repeat the steps we just followed to import the following three background images found in the same Backgrounds directory as the fi rst image we imported:
• Home Screen Background: This background image uses the exact same settings as before
• Plain Wood Background: This background image uses the exact same settings as before
• Bushy Foreground: For this background, we need to change the vertical parallax factor to 1.2
Chapter 3
[ 31 ]
Well done! We have successfully imported and confi gured all of the background images needed to build our prototype game. Now we just need to import our fi rst tileset, and we can start building our own 2D game worlds!
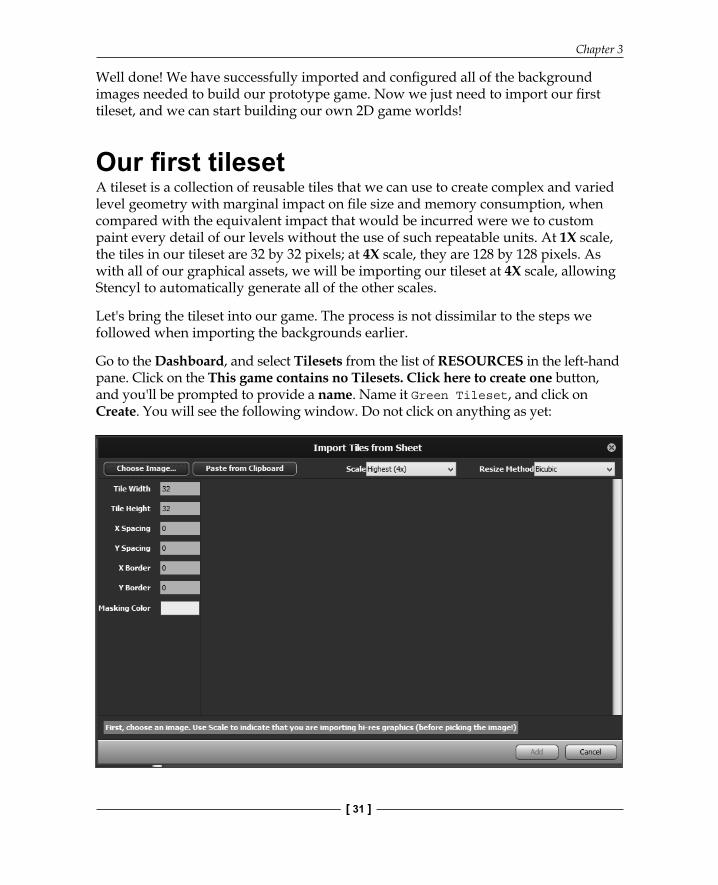
Our fi rst tilesetA tileset is a collection of reusable tiles that we can use to create complex and varied level geometry with marginal impact on fi le size and memory consumption, when compared with the equivalent impact that would be incurred were we to custom paint every detail of our levels without the use of such repeatable units. At 1X scale, the tiles in our tileset are 32 by 32 pixels; at 4X scale, they are 128 by 128 pixels. As with all of our graphical assets, we will be importing our tileset at 4X scale, allowing Stencyl to automatically generate all of the other scales.
Let's bring the tileset into our game. The process is not dissimilar to the steps we followed when importing the backgrounds earlier.
Go to the Dashboard, and select Tilesets from the list of RESOURCES in the left-hand pane. Click on the This game contains no Tilesets. Click here to create one button, and you'll be prompted to provide a name. Name it Green Tileset, and click on Create. You will see the following window. Do not click on anything as yet:

Backgrounds and Tilesets
[ 32 ]
Click on Choose Image, and the fi le browser will open, as it did during the importing process for our backgrounds. Navigate to the game assets folder as before. The tileset can be found in the Game Assets/Graphics/Tilesets/green grass tileset.png directory. If successful, you should see the tileset fi ll the window like the following screenshot:
When working in Stencyl, we always see the 1X scale graphics, as this is the default resolution for desktop targets (Windows, Mac, and Linux). The higher resolution graphics are only used when we test or run the game. Which particular resolution is utilized at runtime depends on the platform and device being targeted, screen dimensions, and so on. Now click on an individual tile to edit its settings. The two most important settings to be confi gured are as follows:
• Collision Bounds: Here, we can set either a box or polygonal collision shape for the various tiles in our tileset by clicking on the required shape, as shown in the panel. If the tile is blank, or if it's a tile that actors should be able to pass through, we must set it to No Collisions, which is the top-left option in the collision bounds shapes window. All the tiles are set to the square collision shape by default and must be altered if this does not fit the particular tile.

Chapter 3
[ 33 ]
• Frames: By default, all the tiles have just one frame—most tiles are static. If you wish to animate a tile (water, lava, and so on), you can import additional frames and set their duration in milliseconds, as shown in the following screenshot:
If you click and drag the tilesheet from one tile location to another, you can make a rectangular selection of multiple tiles. This can be timesaving if you wish to set the same collision shape for multiple tiles. Try it.
Each tile in the set has its own collision bound, highlighted in the Collision Bounds pane to the right. Be sure to match the Collision Bounds pane to the visible part of the tile as closely as possible, using the various shapes available under Collision Bounds to the right of the screen. You can create custom shapes, if you want to be very precise, by clicking on the plus (+) button at the top left of the Collision Bounds window, as shown in the preceding screenshot. When you are satisfi ed, save your progress, and click on the close (x) icon on the Tileset tab, which is to the right of the Dashboard tab toward the top of the screen, to close out the editor for now.
Backgrounds and Tilesets
[ 34 ]
SummaryIn this chapter, we learned the processes involved in importing two of the most signifi cant graphical resource types in Stencyl: Backgrounds and Tilesets, which are used to sculpt the ludic (pertaining to games and play) and aesthetic (pertaining to beauty) space of our games. We confi gured parallax scrolling settings for our backgrounds, and we learned how to cater for all resolutions by importing at 4X scale and allowing Stencyl to generate the lower resolutions using a bicubic algorithm. In the next chapter, we'll learn how to use these newly imported game assets to start building out the space of our game levels!

Where to buy this book You can buy Stencyl Essentials from the Packt Publishing website.
Alternatively, you can buy the book from Amazon, BN.com, Computer Manuals and most internet
book retailers.
Click here for ordering and shipping details.
www.PacktPub.com
Stay Connected:
Get more information Stencyl Essentials