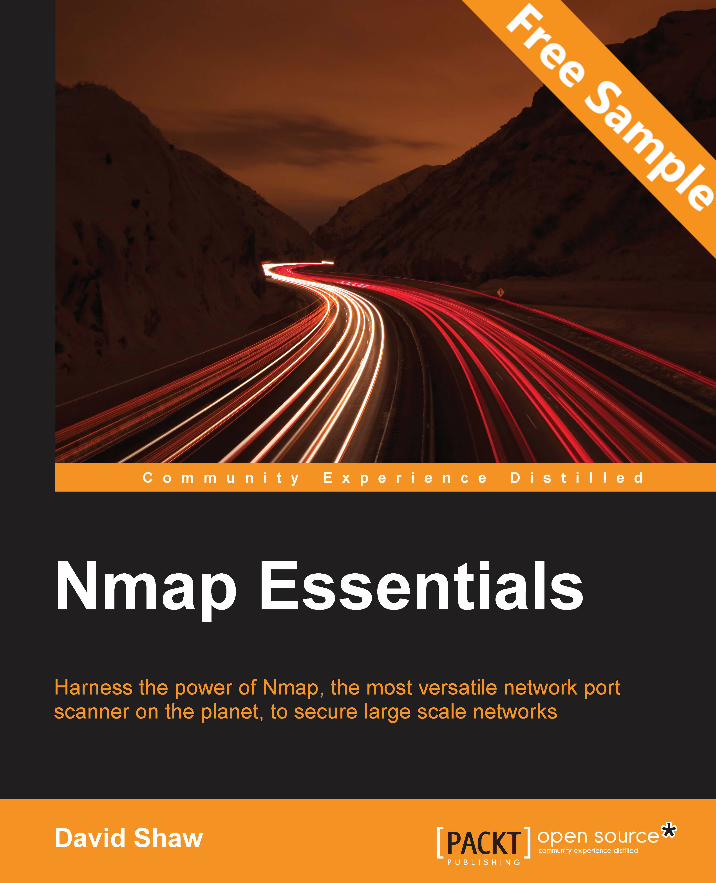
Nmap Essentials - Sample Chapter
13
Free Sample
-
Upload
packt-publishing -
Category
Technology
-
view
116 -
download
0
Transcript of Nmap Essentials - Sample Chapter
Free Sample
In this package, you will find: The author biography
A preview chapter from the book, Chapter 3 'Nmap Basics'
A synopsis of the book’s content
More information on Nmap Essentials
About the Author David Shaw has extensive experience in many areas of information security.
He began working in the trenches of perimeter analysis and conducting external
threat research for large financial institutions. After switching to offensive security,
he joined Redspin to conduct application security assessments and network
penetration tests.
David is currently the Chief Technology Officer and Vice President of Professional
Services at Redspin, specializing in external and application security, and managing
a team of highly skilled engineers. He has particular interests in complex threat
modeling and unconventional attack vectors, and has been a speaker at THOTCON,
NolaCon, ToorCon, LayerOne, DEF CON, BSides Las Vegas, BSides Los Angeles,
and BSides Seattle.
Nmap Essentials This book is designed to teach readers how to run Nmap, one of the most powerful
network security tools ever created. I'm excited to walk you through learning this
tool, as well as the various different elements that come with it—for example, the
Nmap Scripting Engine and other tools like Ncat and Ncrack. Throughout this book,
we'll be walking through techniques, tips, and tricks to help you learn the essentials
of Nmap in a fast and efficient manner!
What This Book Covers Chapter 1, Introduction to Nmap, reviews the history of Nmap, what the tool
does, when it will be used, how the product evolved, and how to install Nmap
on Windows, Linux, and OS X.
Chapter 2, Network Fundamentals, is about how networks work and why a port
scanner is important. It overviews TCP, UDP, port scanning, common ports,
and service banners.
Chapter 3, Nmap Basics, covers how to run basic or normal Nmap scans
without complex flags.
Chapter 4, Advanced Nmap Scans, is about the advanced flags in Nmap
that can designate different types of scans.
Chapter 5, Performance Optimization, is about how to optimize timing,
parallelism, and so on, in Nmap in order to complete scans efficiently.
Chapter 6, Introduction to the Nmap Scripting Engine, is about the Nmap
scripting engine—what it is, how it works, what programming language
it uses, and popular Nmap scripts to use.
Chapter 7, Writing Nmap Scripts, teaches the reader how to create a basic
Nmap script in Lua.
Chapter 8, Additional Nmap Tools, covers the other tools that come with
the Nmap suite—Nrack, Nping, and Ncat.
Chapter 9, Vulnerability Assessments and Tools, explains the relationships
between Nmap and other tools commonly used in professional vulnerability
assessments.
Chapter 10, Penetration Testing with Metasploit, is about the interaction
of Nmap with penetration testing tools such as Metasploit.
[ 15 ]
Nmap BasicsNow that we understand how networks work, it's time to jump into actually using Nmap to scan computers and networks. This chapter aims to cover several topics that will get you up and running in order to actually scan some of these things.
In this chapter, we will cover:
• How to choose a target• How to run a default scan• How to check service versions• How to log scans (and what the different log types mean)• How to specify special scan ranges• How to learn the reasoning for Nmap results
How to choose a targetAlthough it is generally accepted that scanning computers over the Internet is not a crime, it's also not appreciated by system administrators. There are thousands of scans every second, across all areas of the Internet—but that doesn't mean that you won't get an abuse complaint (or worse) if you scan the wrong machine. Make sure that any target you choose is aware of (and consents to) whatever scan you may decide to conduct. There are a few ways that you can make your own targets—which some readers might fi nd easier than using free ones online.
The most simple target, and easiest to set up, is to just use another computer on your local area network. You can use your router (usually located at 192.168.1.1 for home routers), another machine on your network (which we'll talk about fi nding), or even buy a cheap laptop to use as a test lab.
Nmap Basics
[ 16 ]
If you do not have access to another machine to scan or do not feel comfortable (or authorized) to scan another machine, you can create your own by virtualizing a machine. Although you'll need to be somewhat familiar with installing Linux to make this work, there are free software solutions (such as VirtualBox) and commercial software solutions (such as VMWare or Parallels) to virtualize machines for you. If you decide to take this route to scan targets in this book, I recommend you to install Ubuntu or Debian—you can scan from these machines too! In addition to creating your own virtual server, it's possible to buy a Virtual Private Server (VPS) from cloud hosting providers without spending a lot of money. Common providers include Linode, DigitalOcean (which, at the time of writing, has VPSes for only $5 per month), Amazon Web Services (AWS), Rackspace, and so on. The advantage of running one of these cloud-based servers is that you can also get experience in running a fully fl edged Linux server. If you are so inclined, you can even host web, email, FTP, or any other service on this server as well!
Lastly, if you do not want to host your own virtual machine, don't have any other machines on your network, and do not want to pay for a virtual private server; you can either scan your own machine (which isn't quite as exciting), or use a free service provided by the Nmap team at http://scanme.nmap.org/.
This site gives you full permission to scan, so you do not have to worry about being rude or annoying to any network administrators. On the other hand, it's impossible to actually change any of the services listening on this host, so you can never really change the results you're getting. Using your own computer ("localhost" or 127.0.0.1) can sometimes be a better choice, as you'll be able to run services and see different ports detected.
For the purposes of scanning examples in this book, we will use http://scanme.nmap.org/ and various additional virtual machines that were set up for the explicit purpose of being scanned. Remember: do not scan without permission!
Chapter 3
[ 17 ]
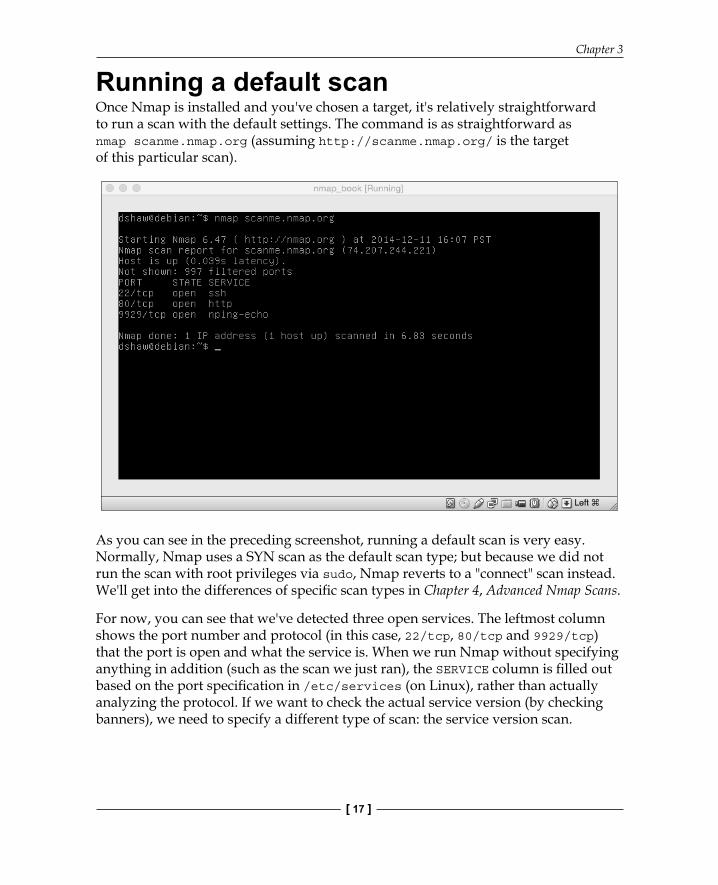
Running a default scanOnce Nmap is installed and you've chosen a target, it's relatively straightforward to run a scan with the default settings. The command is as straightforward as nmap scanme.nmap.org (assuming http://scanme.nmap.org/ is the target of this particular scan).
As you can see in the preceding screenshot, running a default scan is very easy. Normally, Nmap uses a SYN scan as the default scan type; but because we did not run the scan with root privileges via sudo, Nmap reverts to a "connect" scan instead. We'll get into the differences of specifi c scan types in Chapter 4, Advanced Nmap Scans.
For now, you can see that we've detected three open services. The leftmost column shows the port number and protocol (in this case, 22/tcp, 80/tcp and 9929/tcp) that the port is open and what the service is. When we run Nmap without specifying anything in addition (such as the scan we just ran), the SERVICE column is fi lled out based on the port specifi cation in /etc/services (on Linux), rather than actually analyzing the protocol. If we want to check the actual service version (by checking banners), we need to specify a different type of scan: the service version scan.
Nmap Basics
[ 18 ]
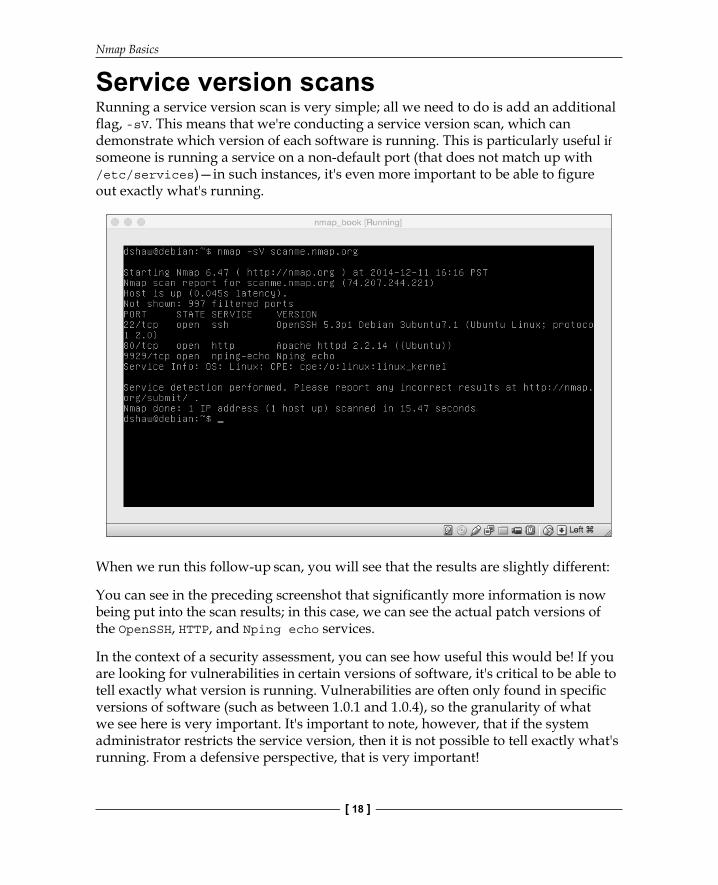
Service version scansRunning a service version scan is very simple; all we need to do is add an additional fl ag, -sV. This means that we're conducting a service version scan, which can demonstrate which version of each software is running. This is particularly useful if someone is running a service on a non-default port (that does not match up with /etc/services)—in such instances, it's even more important to be able to fi gure out exactly what's running.
When we run this follow-up scan, you will see that the results are slightly different:
You can see in the preceding screenshot that signifi cantly more information is now being put into the scan results; in this case, we can see the actual patch versions of the OpenSSH, HTTP, and Nping echo services.
In the context of a security assessment, you can see how useful this would be! If you are looking for vulnerabilities in certain versions of software, it's critical to be able to tell exactly what version is running. Vulnerabilities are often only found in specifi c versions of software (such as between 1.0.1 and 1.0.4), so the granularity of what we see here is very important. It's important to note, however, that if the system administrator restricts the service version, then it is not possible to tell exactly what's running. From a defensive perspective, that is very important!
Chapter 3
[ 19 ]
You might also have noticed that at the top of the scan, before the results, the text Not shown: 997 filtered ports is displayed. Nmap doesn't show all the closed ports in scans, since that would clutter the scan results itself. It's possible to see these (and to see whether they are listed as closed or fi ltered) by increasing the verbosity of the scan—which we'll get to in Chapter 4, Advanced Nmap Scans. However, more importantly, you should remember that there are 65,535 ports that can be opened or closed on every single machine. If we add 997 to the three ports that we already saw were open, we only get 1,000—only a tiny fraction of the total number of ports!
By default, Nmap will only scan the top 1,000 ports that are usually open. This doesn't correspond to the fi rst 1,000 ports, but rather the ones that are most commonly open. You can get the same result by using the --top-ports 1000 fl ag or specifying a different number (such as --top-ports 200, for example).
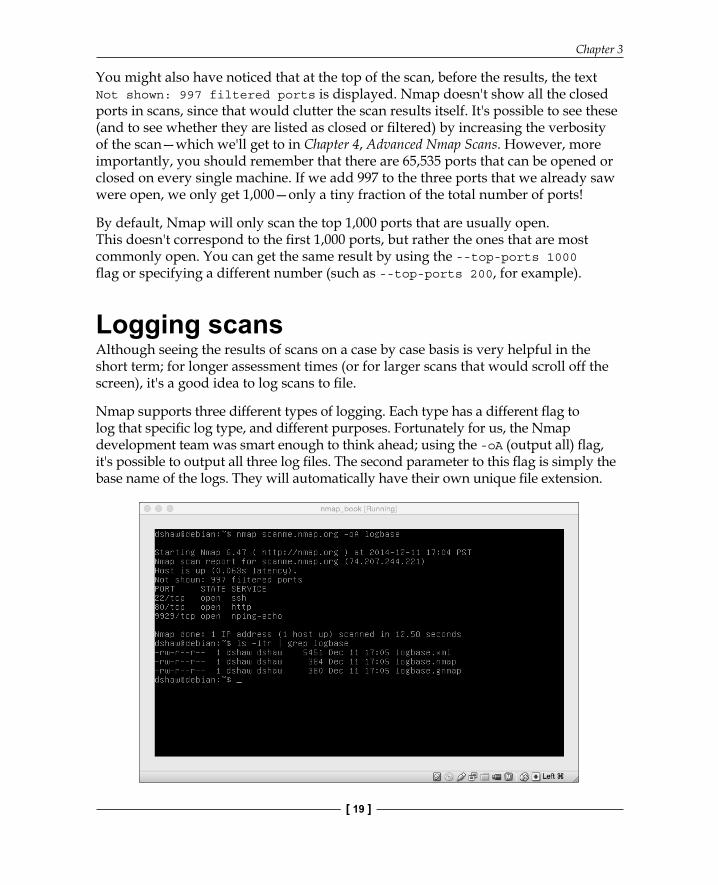
Logging scansAlthough seeing the results of scans on a case by case basis is very helpful in the short term; for longer assessment times (or for larger scans that would scroll off the screen), it's a good idea to log scans to fi le.
Nmap supports three different types of logging. Each type has a different fl ag to log that specifi c log type, and different purposes. Fortunately for us, the Nmap development team was smart enough to think ahead; using the -oA (output all) fl ag, it's possible to output all three log fi les. The second parameter to this fl ag is simply the base name of the logs. They will automatically have their own unique fi le extension.
Nmap Basics
[ 20 ]
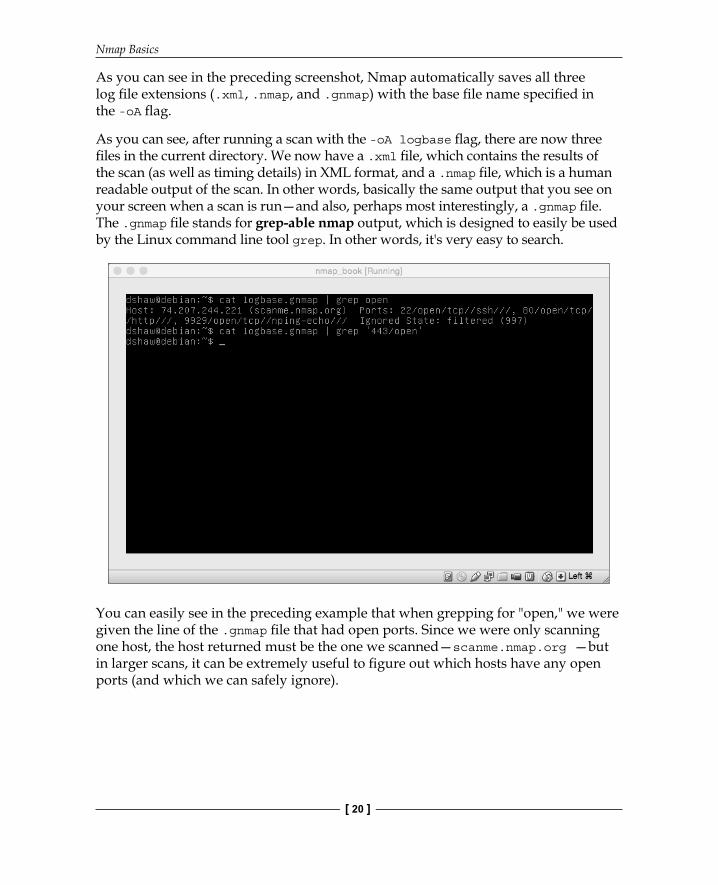
As you can see in the preceding screenshot, Nmap automatically saves all three log fi le extensions (.xml, .nmap, and .gnmap) with the base fi le name specifi ed in the -oA fl ag.
As you can see, after running a scan with the -oA logbase fl ag, there are now three fi les in the current directory. We now have a .xml fi le, which contains the results of the scan (as well as timing details) in XML format, and a .nmap fi le, which is a human readable output of the scan. In other words, basically the same output that you see on your screen when a scan is run—and also, perhaps most interestingly, a .gnmap fi le. The .gnmap fi le stands for grep-able nmap output, which is designed to easily be used by the Linux command line tool grep. In other words, it's very easy to search.
You can easily see in the preceding example that when grepping for "open," we were given the line of the .gnmap fi le that had open ports. Since we were only scanning one host, the host returned must be the one we scanned—scanme.nmap.org —but in larger scans, it can be extremely useful to fi gure out which hosts have any open ports (and which we can safely ignore).
Chapter 3
[ 21 ]
Secondly, we did a grep for 443/open. This grep didn't return anything (since port 443 was not open in this scan), but you can see how using a greppable output like this can quickly and effi ciently determine which hosts had certain ports online. When we talk about active exploitation through Nmap, we'll be able to better understand just how valuable information like this can be.
Specifi ed scan rangesWe learned earlier that by default, Nmap only scans the top 1000 ports. However, services can be put online on any of the 65,535 ports that exist—not just the most common ones. Many system administrators and network engineers run services on very high ports such as 65,001, so that they aren't detected by normal scans. Security through obscurity, though, never really works!
It's possible to specify a specifi c port range by using the -p fl ag. So, if you want to only scan port 80 on scanme.nmap.org, you can type nmap -p 80 scanme.nmap.org. The port specifi cation fl ag works for ranges too—so, in another example, nmap -p1-1024 scanme.nmap.org will scan ports 1 to 1024 (all privileged ports) on the target host.
There's also a useful trick to scan all 65,535 ports on a machine: instead of typing -p1-65535, you can simply use the shortcut -p-. The Nmap developers were kind and insightful enough to realize that typing the number "65,535" a lot gets quite tiring!
Although we're currently only scanning one host, it's worth noting that there are several ways to specify multiple IP addresses or hostnames as well. CIDR notation (192.168.1.0/24), lists of IP addresses (1.2.3.4,1.2.3.5,1.2.3.6), and targets fi les (-iL targets.txt) are all valid ways to specify hosts to scan. They will all be scanned with the same scan type, and the timing involved is optimized by Nmap itself. We'll talk more about optimizing this process in Chapter 5, Performance Optimization.
Understanding the reason fl agSince we've already covered basic networking—including the TCP three-way handshake—in Chapter 2, Network Fundamentals, you already know what it means for a port to be open, and how that can usually be determined. However, in certain edge cases (and especially for the filtered ports), understanding Nmap's logic behind open, closed, and fi ltered ports can be extremely useful to understand.
Nmap Basics
[ 22 ]
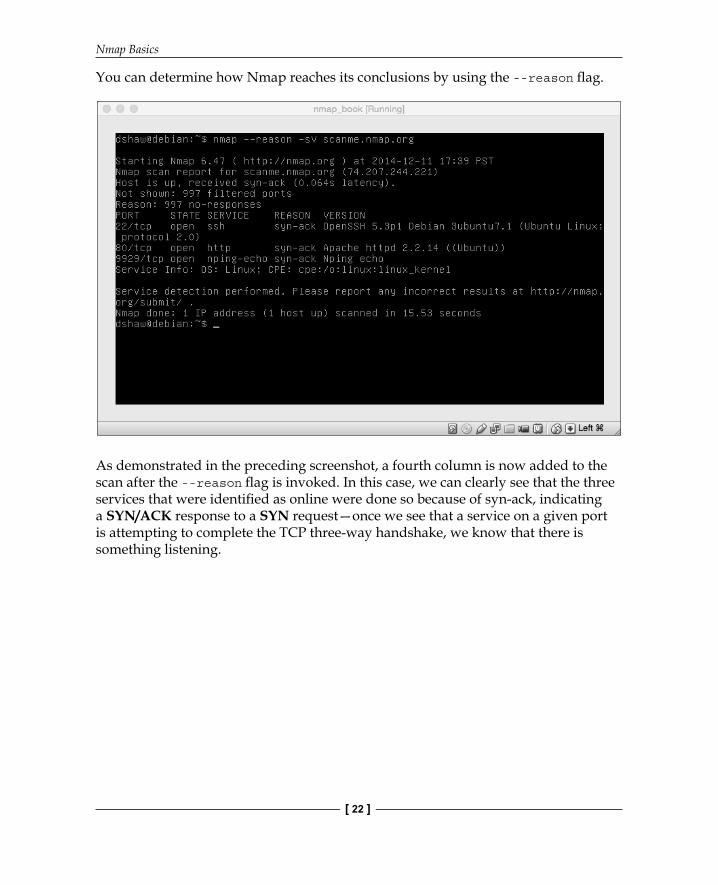
You can determine how Nmap reaches its conclusions by using the --reason fl ag.
As demonstrated in the preceding screenshot, a fourth column is now added to the scan after the --reason fl ag is invoked. In this case, we can clearly see that the three services that were identifi ed as online were done so because of syn-ack, indicating a SYN/ACK response to a SYN request—once we see that a service on a given port is attempting to complete the TCP three-way handshake, we know that there is something listening.

Chapter 3
[ 23 ]
SummaryAfter reading this chapter, you should be able to conduct many different and interesting types of scans. You should also know how to change the ports you're scanning and how to scan multiple hosts at once. You've learned that grabbing service banners can help you see which versions of software are running, and how to output various different types of log fi les. Lastly, you should now be able to understand the network-based reasons for why Nmap is fl agging results in certain ways. There's a long way to go to become a true Nmap master, but you've conquered the basics of getting a scan under way. In the next chapter, we will learn how to conduct advanced Nmap scans in order to get results in more complex situations. This next chapter will allow you to scan in even strange or hostile environments, which security professionals often encounter during the course of an engagement.

Where to buy this book You can buy Nmap Essentials from the Packt Publishing website.
Alternatively, you can buy the book from Amazon, BN.com, Computer Manuals and most internet
book retailers.
Click here for ordering and shipping details.
www.PacktPub.com
Stay Connected:
Get more information Nmap Essentials